> ## Documentation Index
> Fetch the complete documentation index at: https://razorpay-881012b3.mintlify.site/llms.txt
> Use this file to discover all available pages before exploring further.
# POS Partnership
> Become a Razorpay POS Partner. Refer POS to clients via Razorpay Dashboard upload or referral links and track application status.
Available in
🇮🇳 India
[Razorpay POS](https://razorpay.com/pos/) is a point-of-sale payments solution that allows business to accept payments using UPI, credit and debit cards, wallets, contactless, EMI and more with superfast processing and high transaction success rate.
Razorpay POS offers advanced security features, real-time reporting, and the convenience to accept payments anytime, anywhere. Additionally, it provides a range of value-added services to enhance business operations.
## How it Works
1. Sign up or log in to your Dashboard.
* [New to Razorpay](/docs/partners/new-to-razorpay)
* [Existing Razorpay Merchant](/docs/partners/existing-merchant#become-a-razorpay-partner)
2. Refer leads for POS using [Email](#refer-clients-using-email), [Referral links](#refer-clients-using-referral-link) or [Dashboard bulk upload](#refer-clients-using-bulk-upload).
## Partner Eligibility
You would be an ideal partner to refer Razorpay POS if you are a system integrator who primarily serves businesses that operate in the offline sector, such as retail establishments and restaurants. You may offer services like inventory management, billing solutions, delivery management, and integrated payment solutions to streamline operations of your clients.
## Add Agents
You can manage POS onboarding yourself or add agents to your account to assist you. Agents can invite clients, perform client KYC and track activation status. You can create separate logins by creating a distinct role within your Partner Dashboard. An agent can only view the POS section under **Affiliate Accounts**.
To add agents:
1. Log in to the Dashboard.
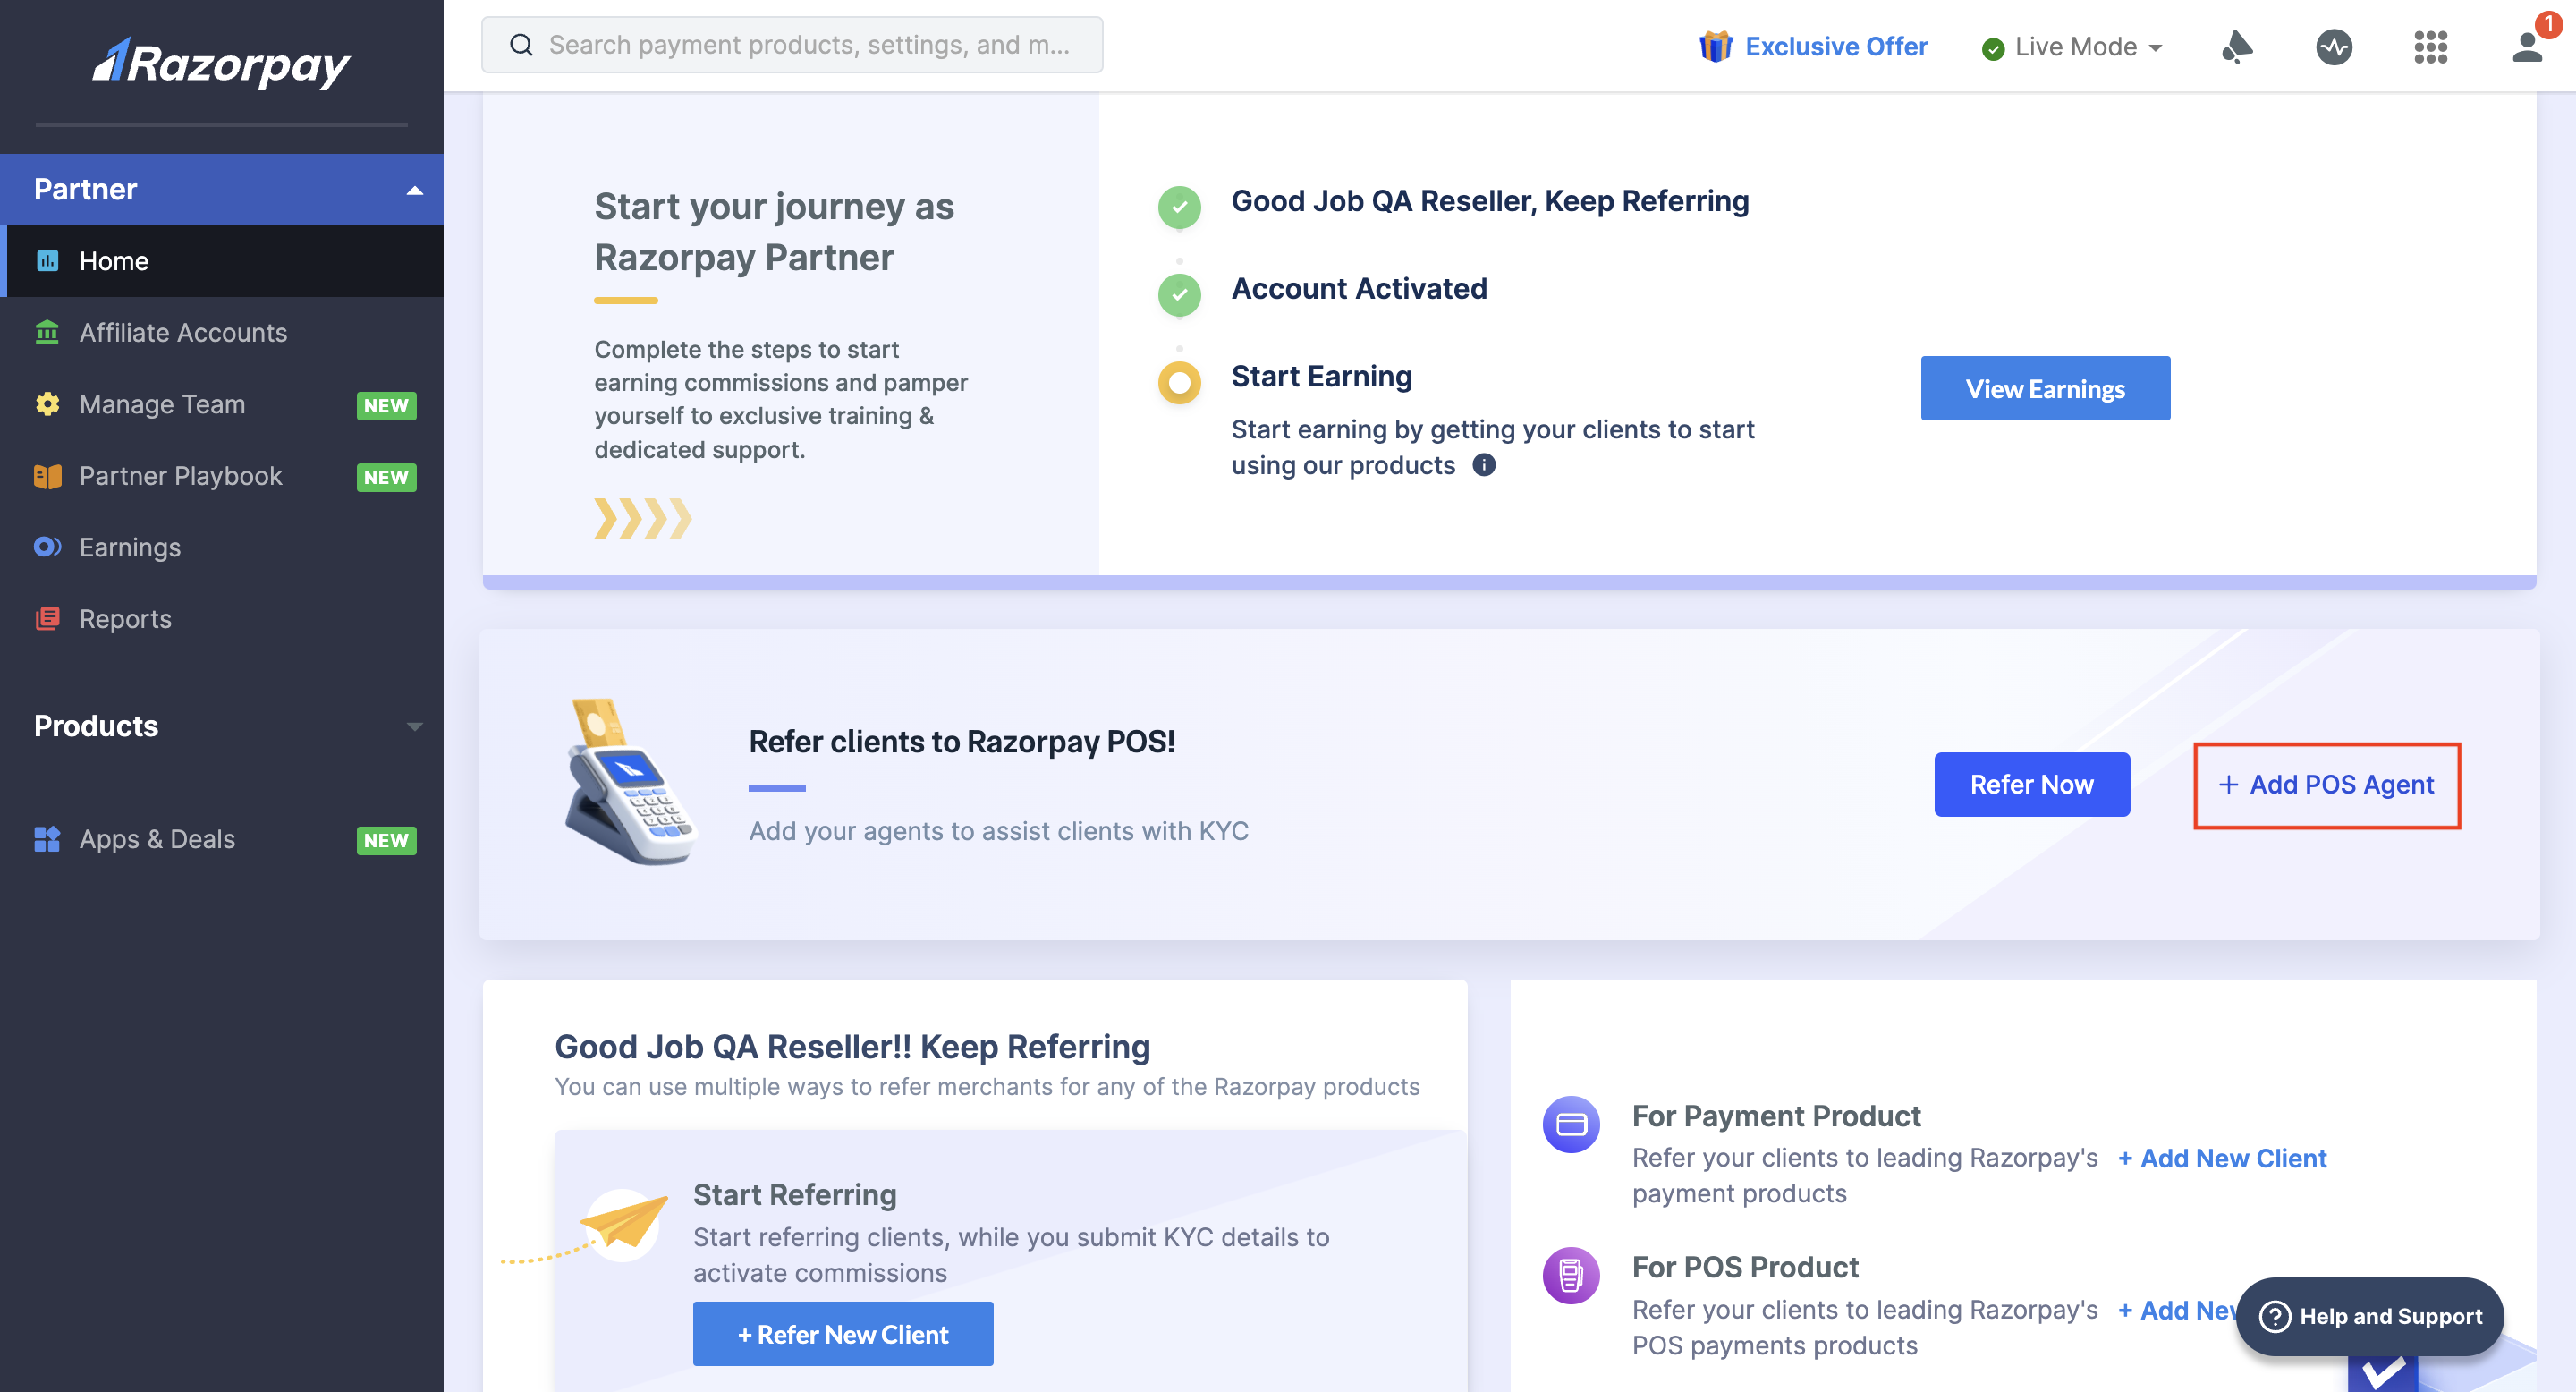
2. Click **+ Add POS Agent** under **Refer clients to Razorpay POS!**.
 3. Enter the email id of the agent and select the **Role** as **POS Partner Agent**.
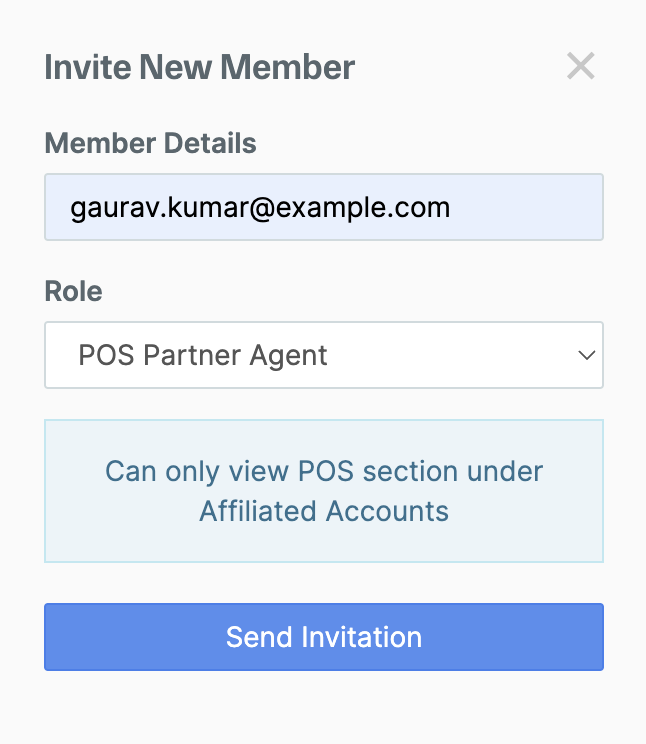 4. Click **Send Invitation**.
## Refer Product to Clients
You can refer your clients for POS in three ways:
* [Using Referral Link](#refer-clients-using-referral-link)
* [Using Email](#refer-clients-using-email)
* [Using Dashboard Upload](#refer-clients-using-bulk-upload)
### Refer Clients Using Referral Link
Refer and invite your customers to apply for Razorpay POS. This option is suitable if you want to broadcast the link on your website or social media channels. Clients can voluntarily sign up for the product using your link.
1. Log in to the Dashboard.
2. In the **Partner** section, navigate to **Affiliate Accounts**.
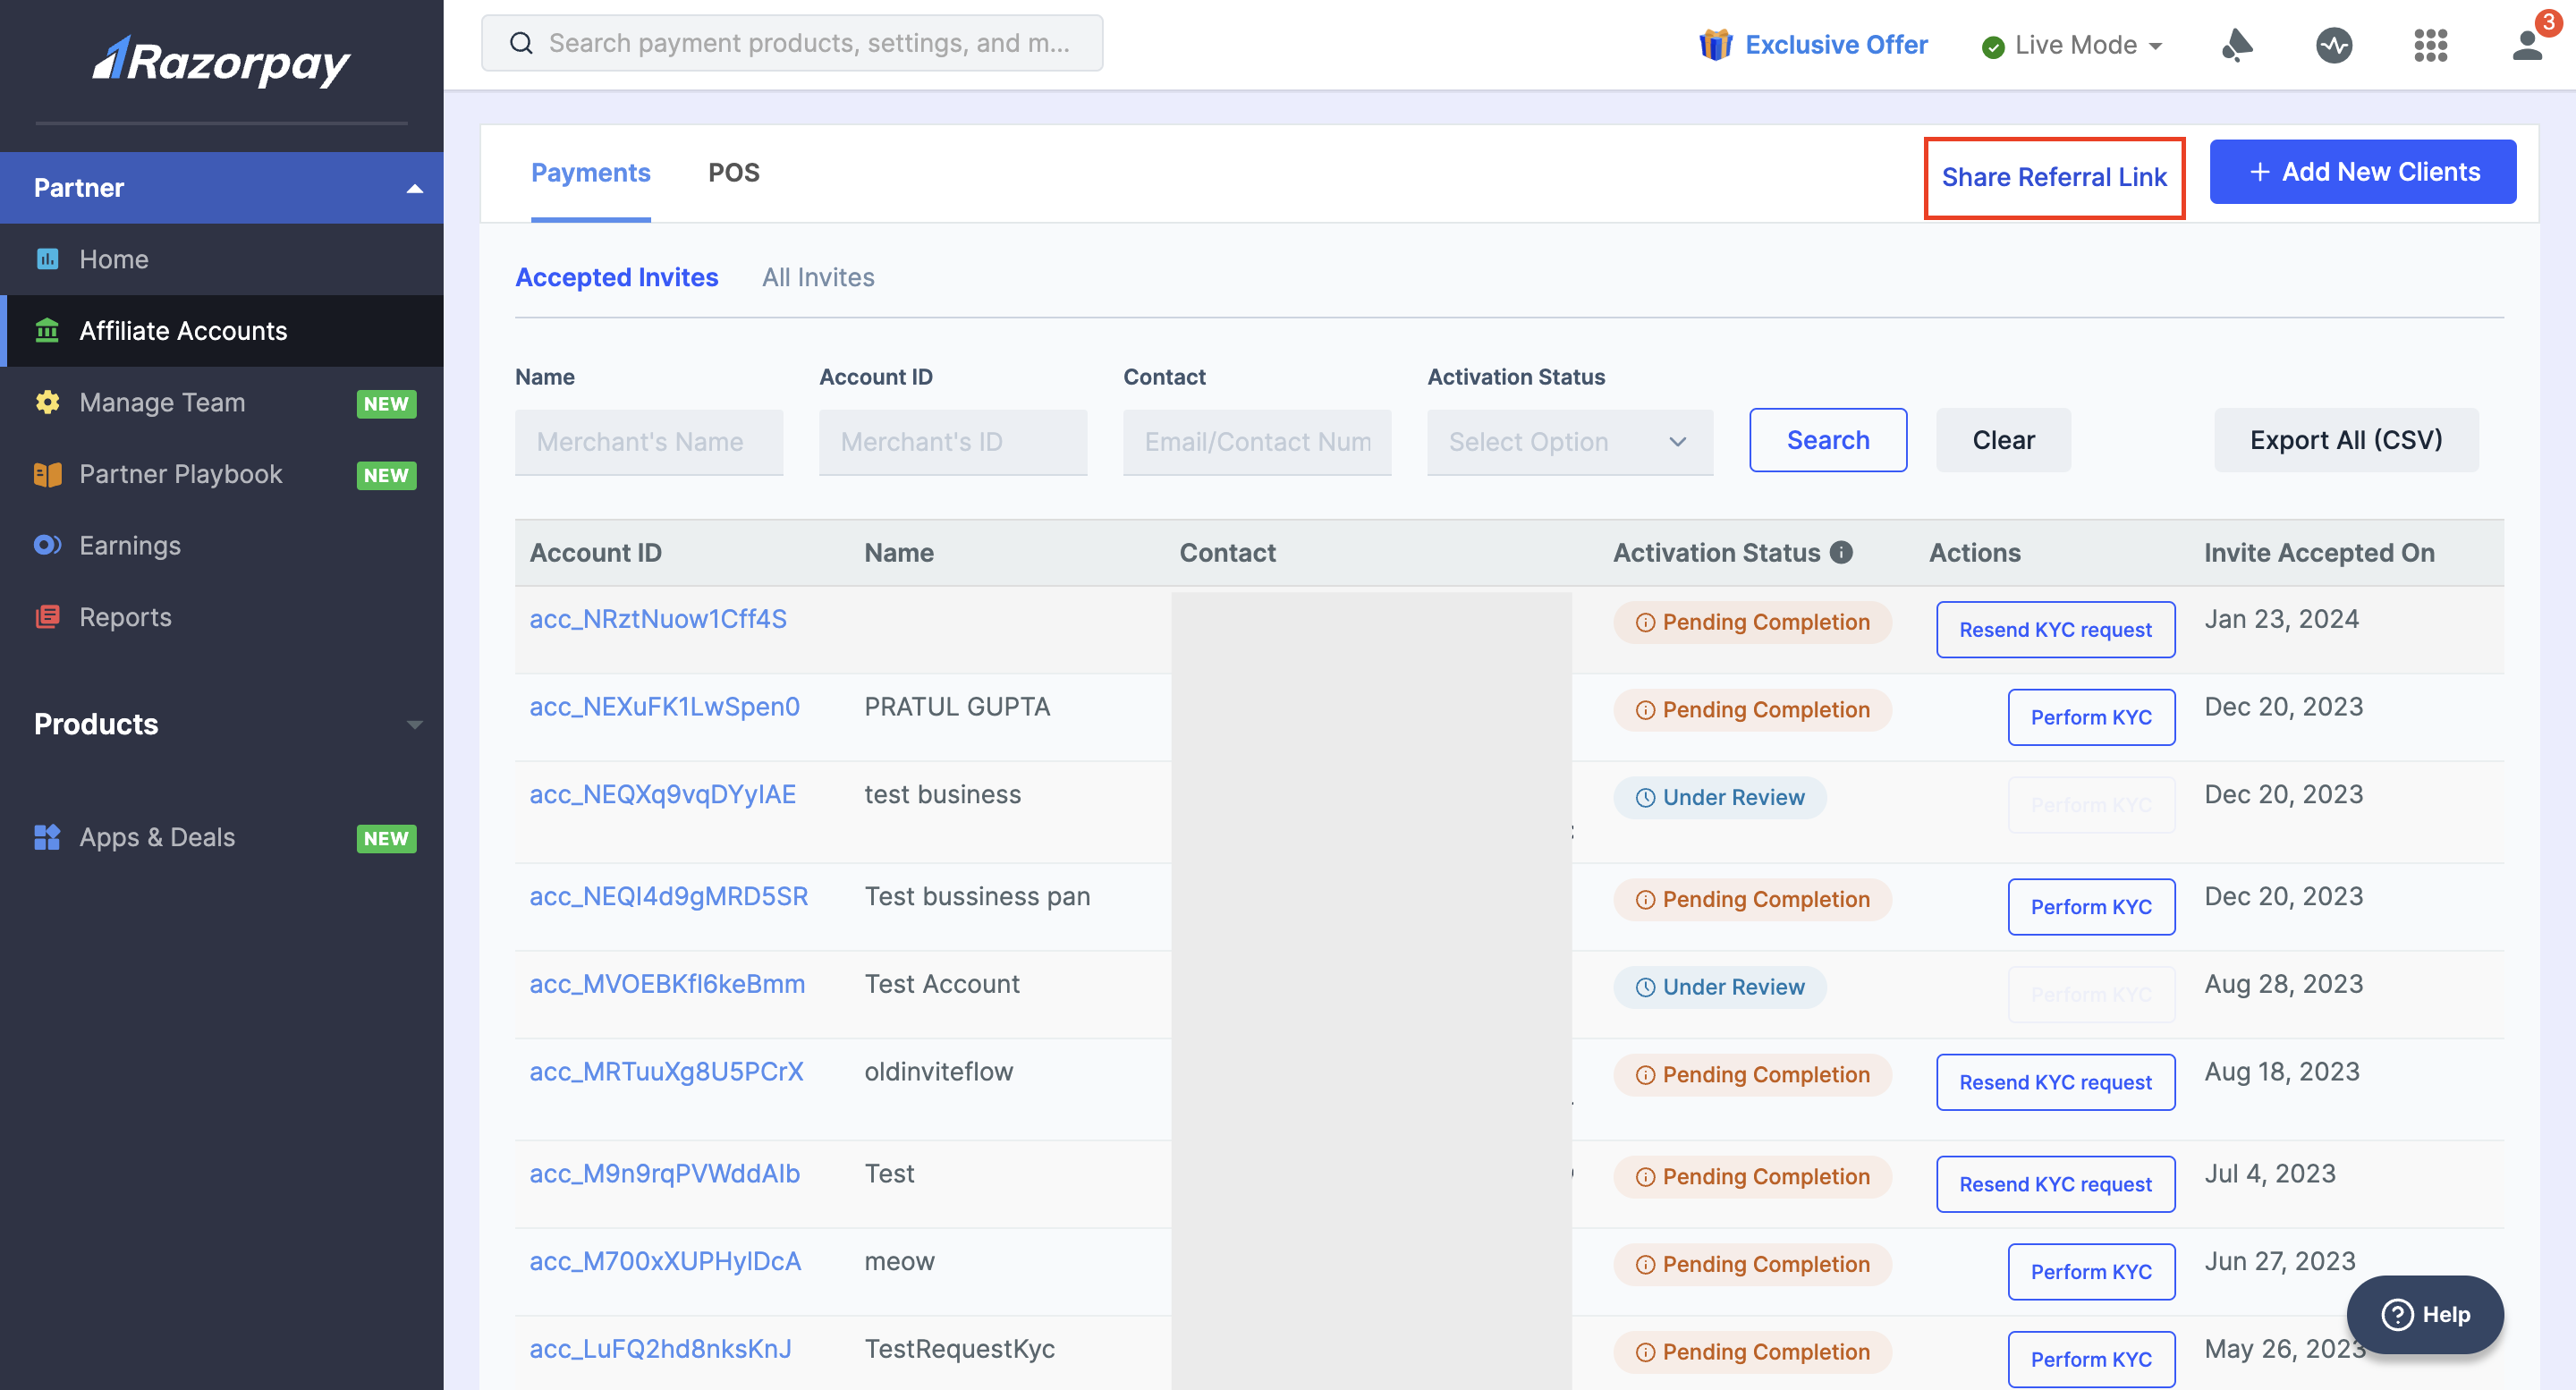
3. Click **Share Referral Link**.
4. Click **Send Invitation**.
## Refer Product to Clients
You can refer your clients for POS in three ways:
* [Using Referral Link](#refer-clients-using-referral-link)
* [Using Email](#refer-clients-using-email)
* [Using Dashboard Upload](#refer-clients-using-bulk-upload)
### Refer Clients Using Referral Link
Refer and invite your customers to apply for Razorpay POS. This option is suitable if you want to broadcast the link on your website or social media channels. Clients can voluntarily sign up for the product using your link.
1. Log in to the Dashboard.
2. In the **Partner** section, navigate to **Affiliate Accounts**.
3. Click **Share Referral Link**.
 4. Select **Razorpay POS**.
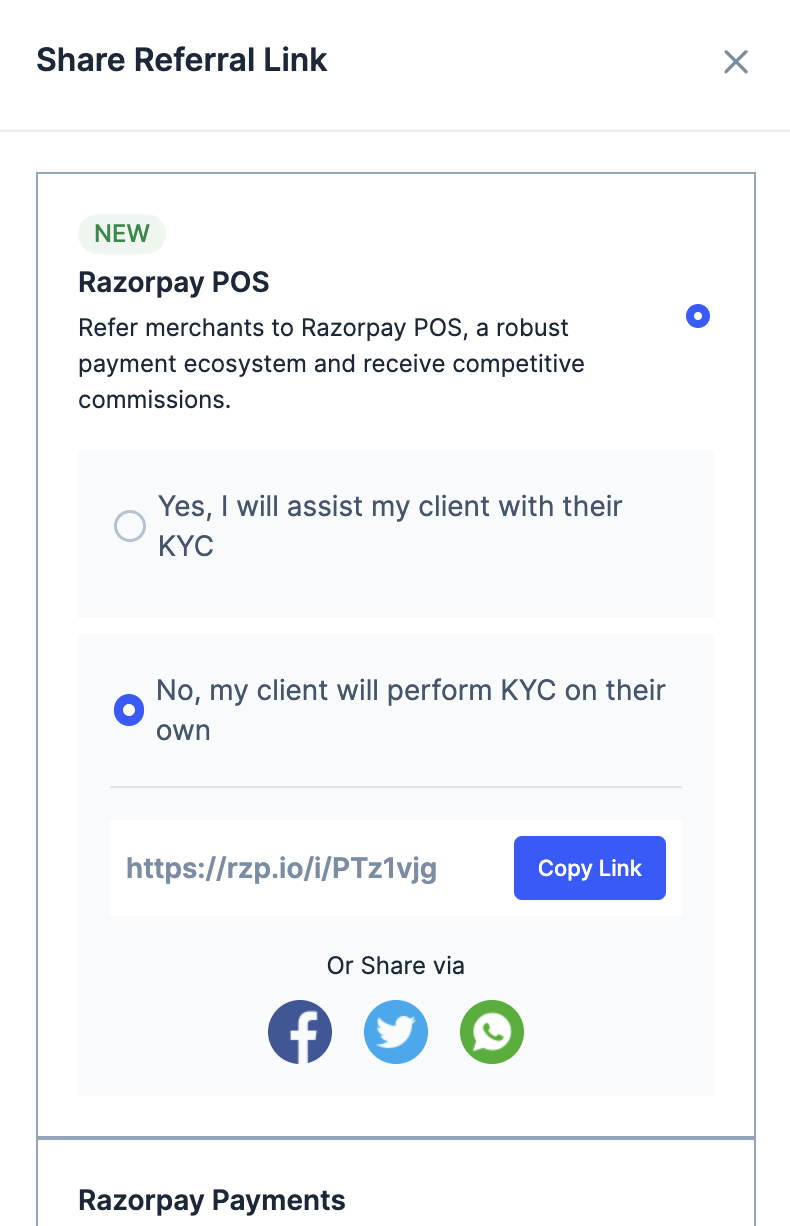
5. If you want to perform KYC for your client, select **Yes, I will assist my client with their KYC**.
4. Select **Razorpay POS**.
5. If you want to perform KYC for your client, select **Yes, I will assist my client with their KYC**.
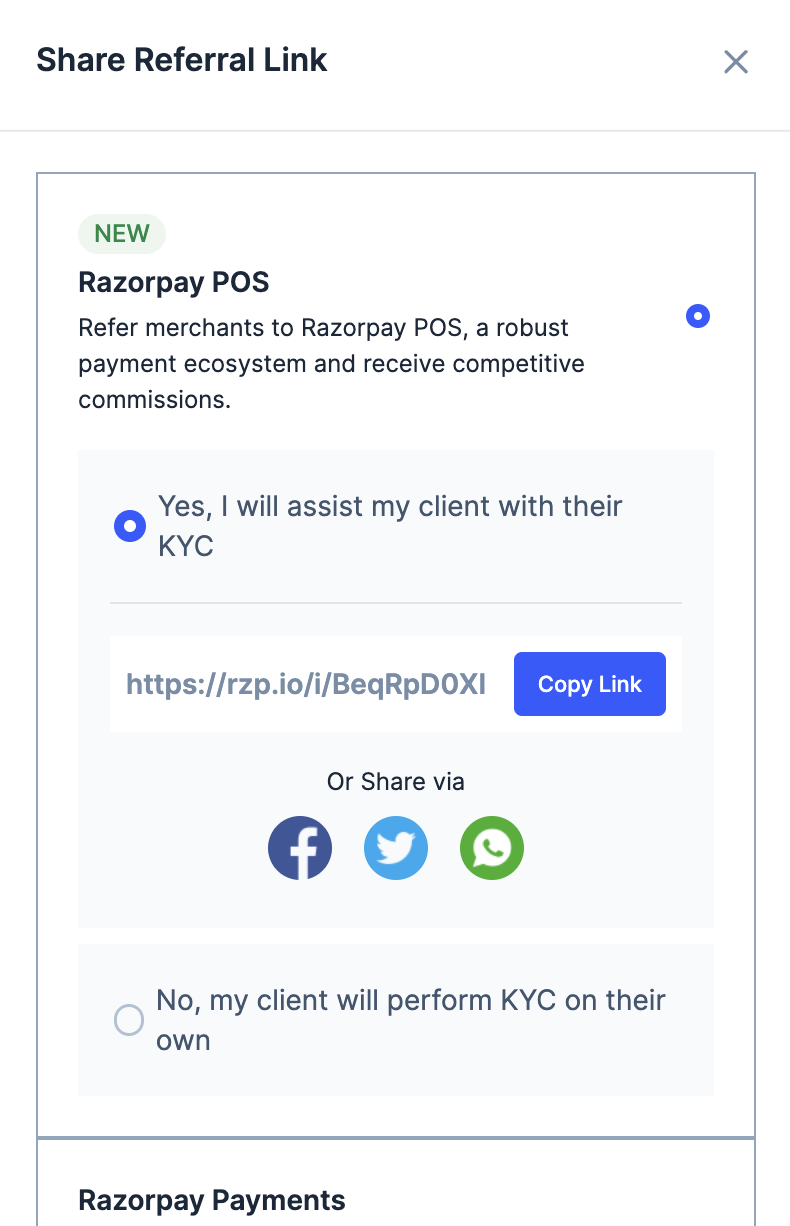 6. You can share the link using:
* Copy button: This copies the referral link. You can copy-paste this link and send it via email or instant messaging apps such as WhatsApp.
* Facebook: Click the Facebook icon to share the referral link as a post on your Facebook account.
* X(Formerly Twitter): Click the X/Twitter icon to send a tweet with the referral link.
* WhatsApp: Click the WhatsApp icon to send a message with the referral link.
7. If you do not want to perform KYC for your clients, select **No, my client will perform KYC on their own**. A **different** referral link will be displayed. You can share this link usinsg the above options.
6. You can share the link using:
* Copy button: This copies the referral link. You can copy-paste this link and send it via email or instant messaging apps such as WhatsApp.
* Facebook: Click the Facebook icon to share the referral link as a post on your Facebook account.
* X(Formerly Twitter): Click the X/Twitter icon to send a tweet with the referral link.
* WhatsApp: Click the WhatsApp icon to send a message with the referral link.
7. If you do not want to perform KYC for your clients, select **No, my client will perform KYC on their own**. A **different** referral link will be displayed. You can share this link usinsg the above options.
 **Handy Tips**
We recommended you to perform KYC for your clients as it decreases onboarding time by 50% and acts as a value-added service. During onboarding, your client will see a consent screen to allow you access to perform KYC. They need to approve it for you to submit the KYC form on their behalf.
**Handy Tips**
We recommended you to perform KYC for your clients as it decreases onboarding time by 50% and acts as a value-added service. During onboarding, your client will see a consent screen to allow you access to perform KYC. They need to approve it for you to submit the KYC form on their behalf.
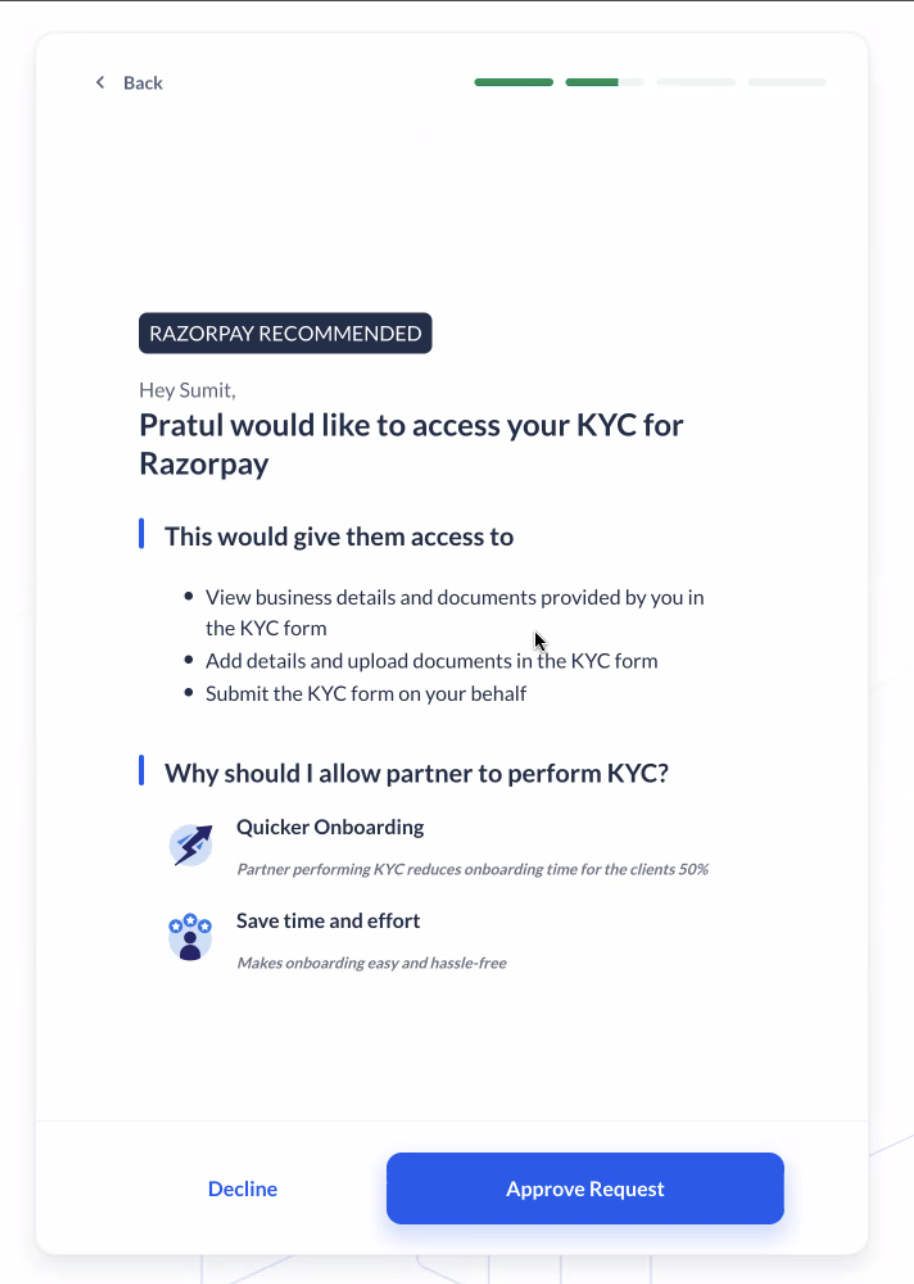 Clients can click on this referral link and sign up as an Affiliate account.
### Refer Clients Using Email
You can invite clients for Razorpay POS using their email id to sign up and register on Razorpay.
1. Log in to the Dashboard.
2. Click **Partner** and navigate to **Affiliate Accounts**.
3. Go to the **POS** tab and click **+ Add New Clients**.
Clients can click on this referral link and sign up as an Affiliate account.
### Refer Clients Using Email
You can invite clients for Razorpay POS using their email id to sign up and register on Razorpay.
1. Log in to the Dashboard.
2. Click **Partner** and navigate to **Affiliate Accounts**.
3. Go to the **POS** tab and click **+ Add New Clients**.
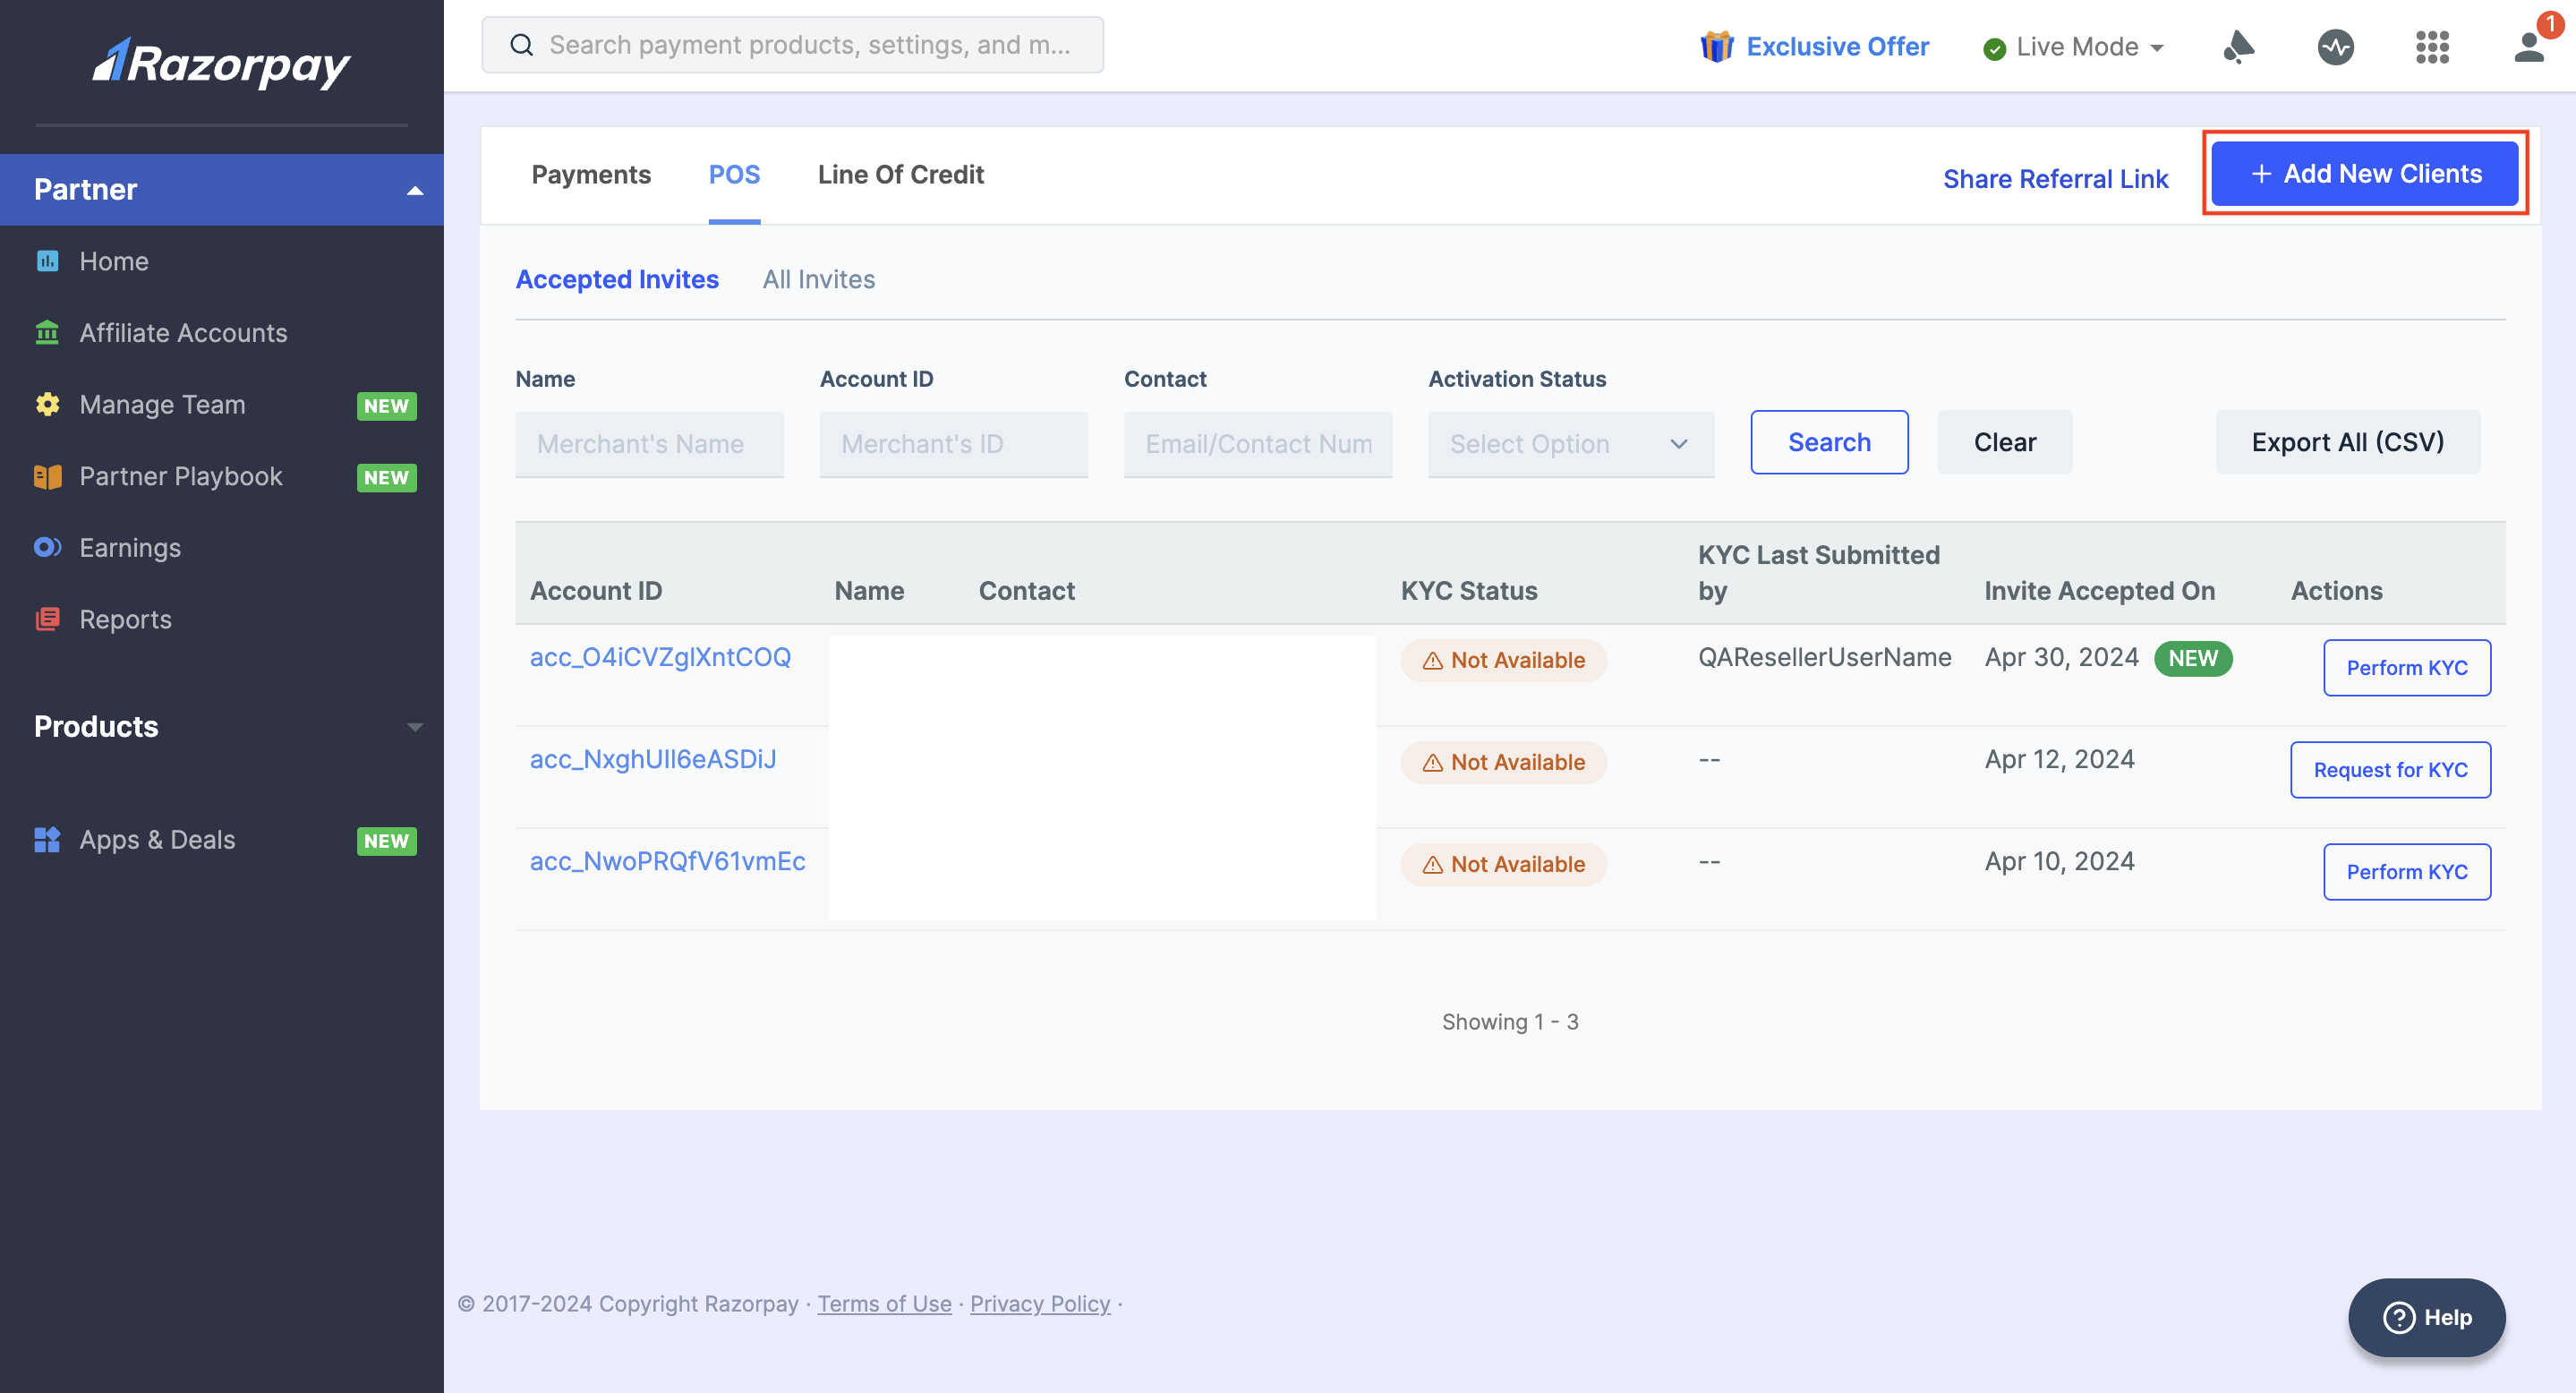 4. Under the **Using Email** tab, enter the **Client Name**, **Email ID** and **Contact number** *(optional)* to which the invite link must be sent. Click **Next**.
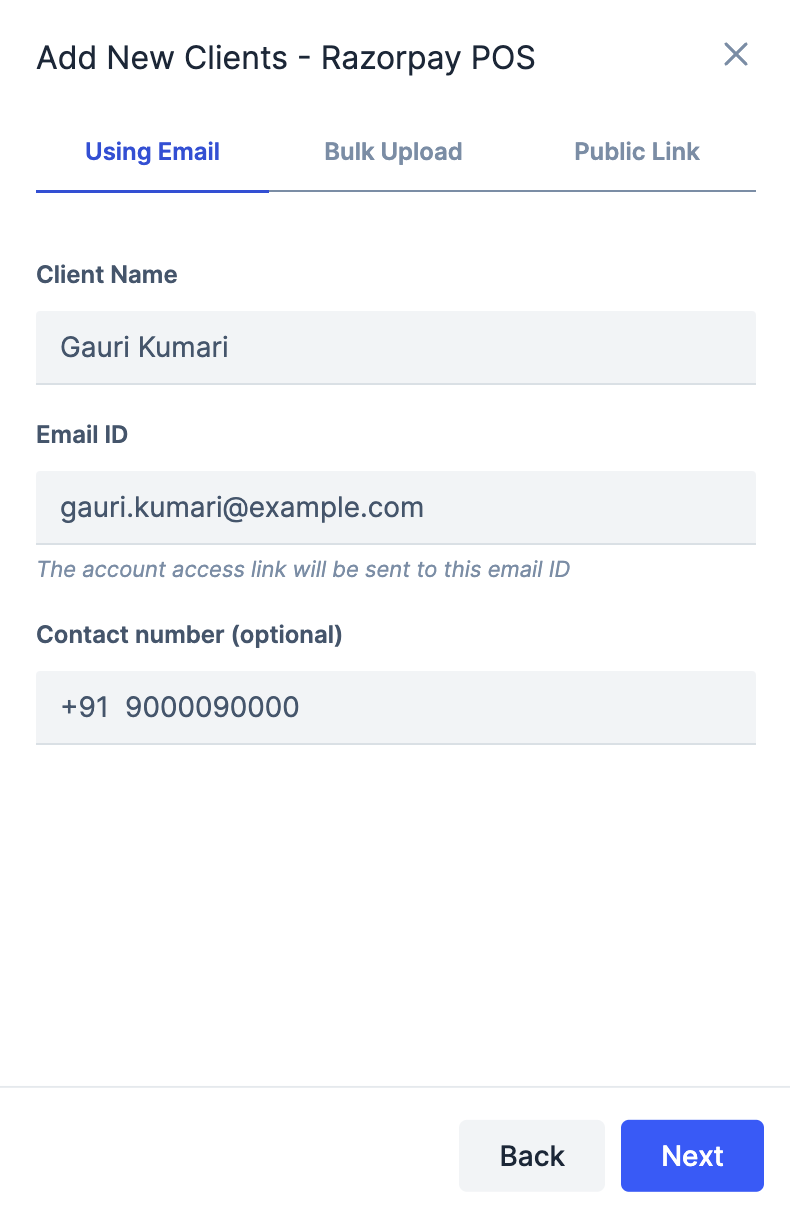 5. If you want to perform KYC for your client, select **Yes, I will assist my client with their KYC**. If not, select **No, my client will perform KYC on their own**. Click **Send Invite**.
 **Handy Tips**
We recommended you to perform KYC for your clients as it decreases onboarding time by 50% and acts as a value-added service. During onboarding, your client will see a consent screen to allow you access to perform KYC. They need to approve it for you to submit the KYC form on their behalf.
### Refer Clients Using Bulk Upload
You can send invites to multiple users using the **Bulk Upload** option. Upload an XLSX or CSV file with the Dashboard's required data. This sends a single sign up invitation link to multiple clients in bulk.
To view and understand the file format requirements, download the [sample template](https://razorpay.com/docs/build/browser/assets/images/sample_invite_submerchant_batch.xlsx). The account creation template contains the following headers.
`name` *mandatory*
: Name of the client's account.
`email` *mandatory*
: The email address of the client.
`contact_mobile` *optional*
: The contact number of the client.
**Watch Out!**
* Do not modify field names/headers (`name`, `email` and `contact_mobile`) in a batch as it might result in an upload failure.
* There should be **only 1** sheet in the file.
* The size of the file can be up to 50 MB. You can add up to 5,000 rows in a particular file. The links will be processed in the same sequence as listed in the file.
1. Log in to the Dashboard.
2. Click **Partner** and navigate to **Affiliate Accounts**.
3. Go to the **POS** tab and click **+ Add New Clients**.
4. Go to the **Bulk Upload** tab.
5. Upload the file. You can drag and drop or **click to upload**.
**Handy Tips**
We recommended you to perform KYC for your clients as it decreases onboarding time by 50% and acts as a value-added service. During onboarding, your client will see a consent screen to allow you access to perform KYC. They need to approve it for you to submit the KYC form on their behalf.
### Refer Clients Using Bulk Upload
You can send invites to multiple users using the **Bulk Upload** option. Upload an XLSX or CSV file with the Dashboard's required data. This sends a single sign up invitation link to multiple clients in bulk.
To view and understand the file format requirements, download the [sample template](https://razorpay.com/docs/build/browser/assets/images/sample_invite_submerchant_batch.xlsx). The account creation template contains the following headers.
`name` *mandatory*
: Name of the client's account.
`email` *mandatory*
: The email address of the client.
`contact_mobile` *optional*
: The contact number of the client.
**Watch Out!**
* Do not modify field names/headers (`name`, `email` and `contact_mobile`) in a batch as it might result in an upload failure.
* There should be **only 1** sheet in the file.
* The size of the file can be up to 50 MB. You can add up to 5,000 rows in a particular file. The links will be processed in the same sequence as listed in the file.
1. Log in to the Dashboard.
2. Click **Partner** and navigate to **Affiliate Accounts**.
3. Go to the **POS** tab and click **+ Add New Clients**.
4. Go to the **Bulk Upload** tab.
5. Upload the file. You can drag and drop or **click to upload**.
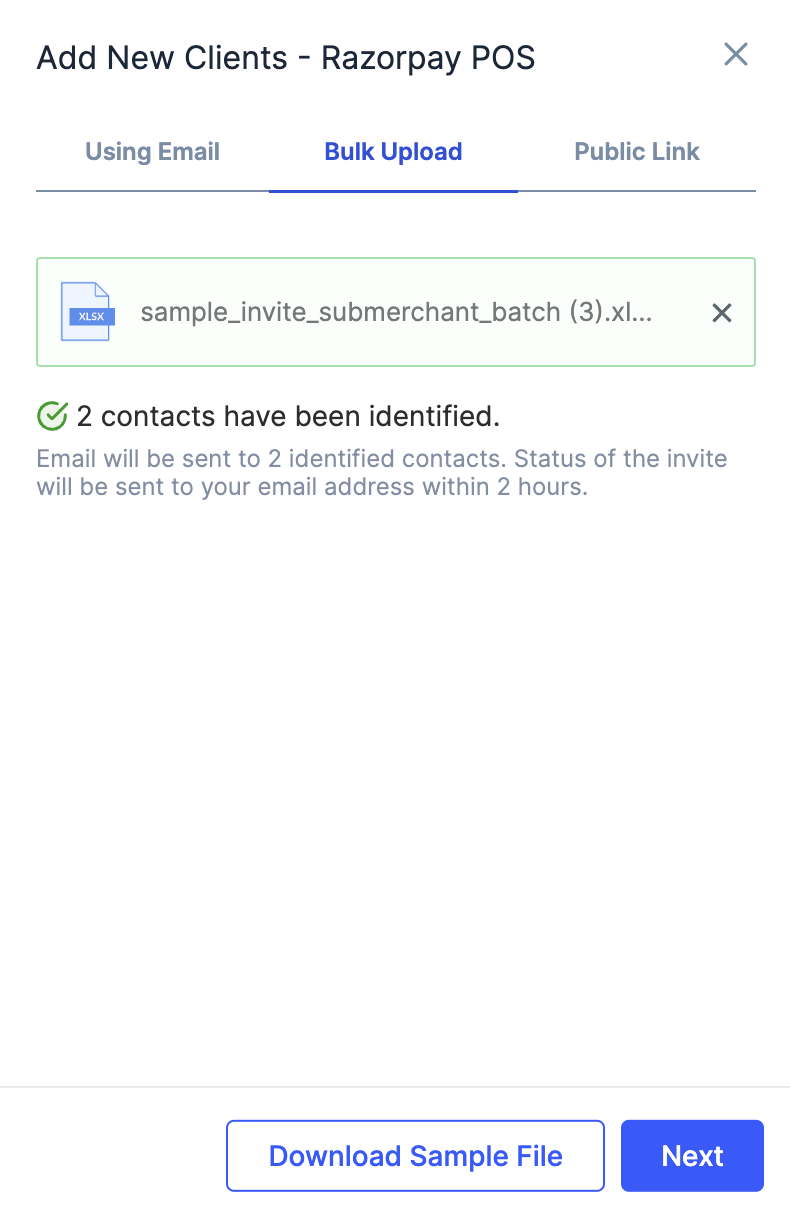
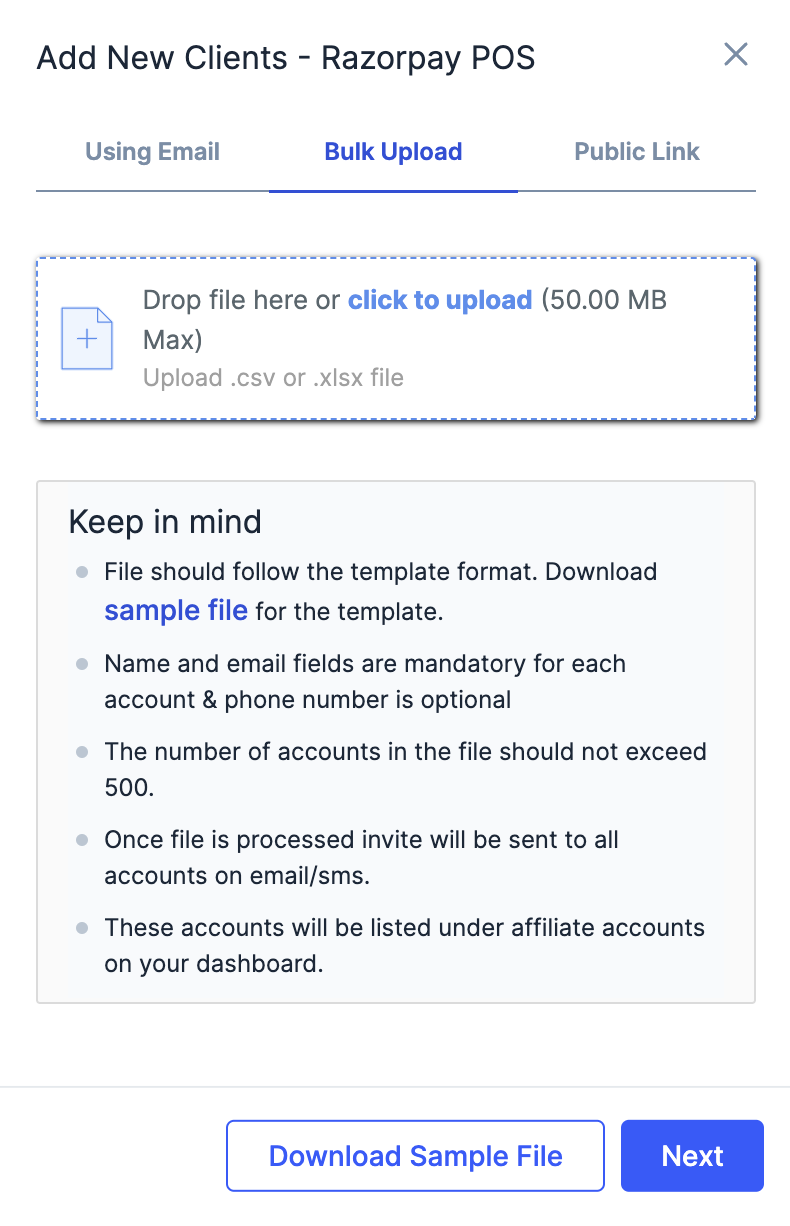 6. The file is validated for any associated errors and uploaded to the Razorpay server. Click **Next**.
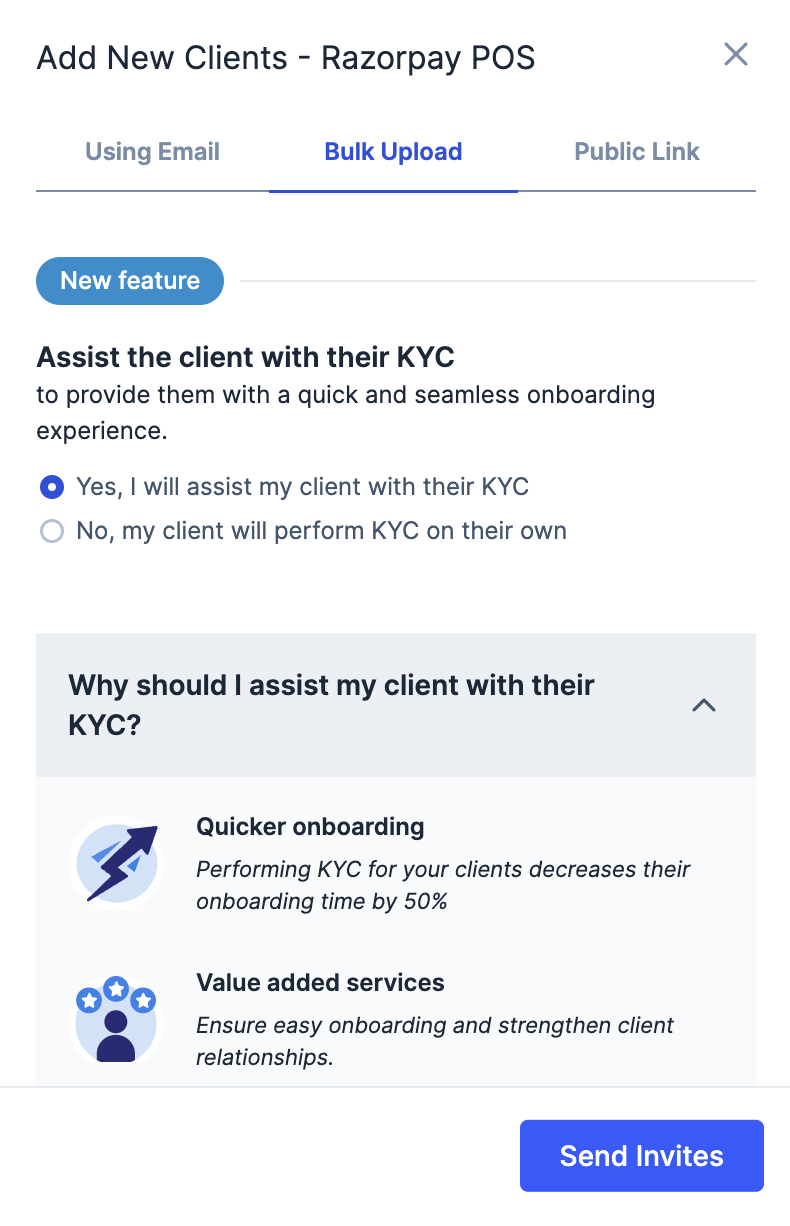
 7. If you want to perform KYC for your client, select **Yes, I will assist my client with their KYC**. If not, select **No, my client will perform KYC on their own**. Click **Send Invites** to send invites to your clients via email.
 **Handy Tips**
We recommended you to perform KYC for your client as it decreases onboarding time by 50% and acts as a value-added service. During onboarding, your client will see a consent screen to allow you access to perform KYC. They need to approve it for you to submit the KYC form on their behalf.
Some leads may be missing from the Dashboard due to failures. Please check for Razorpay's status email in your inbox. This mail contains the details of the failed leads.
## Track Leads Status
As a Partner, you can track the status of the lead's application status under the **POS** tab in your Partner Dashboard. It is displayed under the **KYC Status** column.
| Status | Description |
| ------------------- | --------------------------------------------------------------------------------------------------------------------------------------------------------------------------------------------------------------------------------------------------------------------------------------------------------------------------------------------------------------------------------------------------------------------------------------- |
| Not Submitted | When you invite the client, and your affiliate account is successfully added, the activation status by default is `Not submitted`. This is the default status. |
| Instantly Activated | Your affiliate account sets the Razorpay account password and provides contact details, business details, and account details. Once these details are fully verified, the activation status moves to `Instantly Activated`. The clients can start accepting payments once the account is instantly activated. However, the settlements will not be enabled. |
| Under Review | Your affiliate account submits business documents to Razorpay depending on their business type. Razorpay then starts with the KYC review process. This changes the activation status to `Under Review`. |
| Activated | The account activation status is `Activated` once the KYC documents are successfully verified. The payments made by the affiliate accounts before they submitted the KYC form and documents will be settled to your account.The account activation status is `Activated` once the documents are successfully verified. The payments made by the affiliate accounts before they submitted the documents will be settled to your account. |
## Support
For queries or assistance in any of the steps mentioned above, reach out to your sales POC.
### Related Information
* [Razorpay POS](https://razorpay.com/pos/)
* [About Partners](/docs/partners)
**Handy Tips**
We recommended you to perform KYC for your client as it decreases onboarding time by 50% and acts as a value-added service. During onboarding, your client will see a consent screen to allow you access to perform KYC. They need to approve it for you to submit the KYC form on their behalf.
Some leads may be missing from the Dashboard due to failures. Please check for Razorpay's status email in your inbox. This mail contains the details of the failed leads.
## Track Leads Status
As a Partner, you can track the status of the lead's application status under the **POS** tab in your Partner Dashboard. It is displayed under the **KYC Status** column.
| Status | Description |
| ------------------- | --------------------------------------------------------------------------------------------------------------------------------------------------------------------------------------------------------------------------------------------------------------------------------------------------------------------------------------------------------------------------------------------------------------------------------------- |
| Not Submitted | When you invite the client, and your affiliate account is successfully added, the activation status by default is `Not submitted`. This is the default status. |
| Instantly Activated | Your affiliate account sets the Razorpay account password and provides contact details, business details, and account details. Once these details are fully verified, the activation status moves to `Instantly Activated`. The clients can start accepting payments once the account is instantly activated. However, the settlements will not be enabled. |
| Under Review | Your affiliate account submits business documents to Razorpay depending on their business type. Razorpay then starts with the KYC review process. This changes the activation status to `Under Review`. |
| Activated | The account activation status is `Activated` once the KYC documents are successfully verified. The payments made by the affiliate accounts before they submitted the KYC form and documents will be settled to your account.The account activation status is `Activated` once the documents are successfully verified. The payments made by the affiliate accounts before they submitted the documents will be settled to your account. |
## Support
For queries or assistance in any of the steps mentioned above, reach out to your sales POC.
### Related Information
* [Razorpay POS](https://razorpay.com/pos/)
* [About Partners](/docs/partners)