> ## Documentation Index
> Fetch the complete documentation index at: https://razorpay-881012b3.mintlify.site/llms.txt
> Use this file to discover all available pages before exploring further.
# Custom Onboarding SDK
> Integrate with Custom Onboarding SDK to create client accounts using APIs and prefill KYC details.
Available in🇮🇳 India
With the Custom Onboarding SDK, you can streamline sub-merchant enrollment by handling the process on their behalf — they do not need to create individual accounts or complete KYC verification themselves. Use the APIs and generate access token for your sub-merchants. You can onboard multiple sub-merchants with a single application unless there is a difference of commissions amongst the sub-merchants.
To integrate with Custom Onboarding SDK:
1. [Create an Application](#1-create-an-application)
2. [Generate Token](#2-generate-token)
3. [Create accounts and upload KYC details using onboarding APIs](#3-create-account-and-upload-kyc-details)
4. [Generate Onboarding URL and redirect users](#4-generate-onboarding-url)
5. [Fetch access token associated with the merchant](#5-fetch-access-token)
6. [Access resources using access token](#6-access-resources-using-access-token)
7. [Process Payments](#7-process-payments)
8. [Subscribe to onboarding webhooks to receive account activation updates](#8-subscribe-to-onboarding-webhooks)
## 1. Create an Application
The first step towards building an integration is creating an application on the Razorpay Partner Dashboard. Here, an application refers to a software entity that you register on Razorpay to facilitate OAuth-based authentication and authorisation for businesses on your platform.
It acts as an intermediary between you and Razorpay. Internally, Razorpay OAuth identifies the applications by their `client_id`.
* When you create an application on Razorpay, we generate two clients linked to the application: development and production clients.
* Each client has its own `client_id` and `client_secret`.
* You can use the development client in your sandbox environment or during the integration phase, and the production client once you go live.
### Development and Production Clients
Given below is a comparison of the development and production clients:
| Particulars | Development Client | Production Client |
| ----------------------------- | --------------------------------------------------------------------------------- | ----------------------------------- |
| **Redirect URI** | Can have any type of Redirect URIs whitelisted, including non-HTTP and localhost. | Cannot use non-HTTPS Redirect URIs. |
| **Test and Live Mode Access** | Can access both modes. | Can access only live mode data. |
**Watch Out!**
Only an **Owner** user can create applications on the Dashboard.
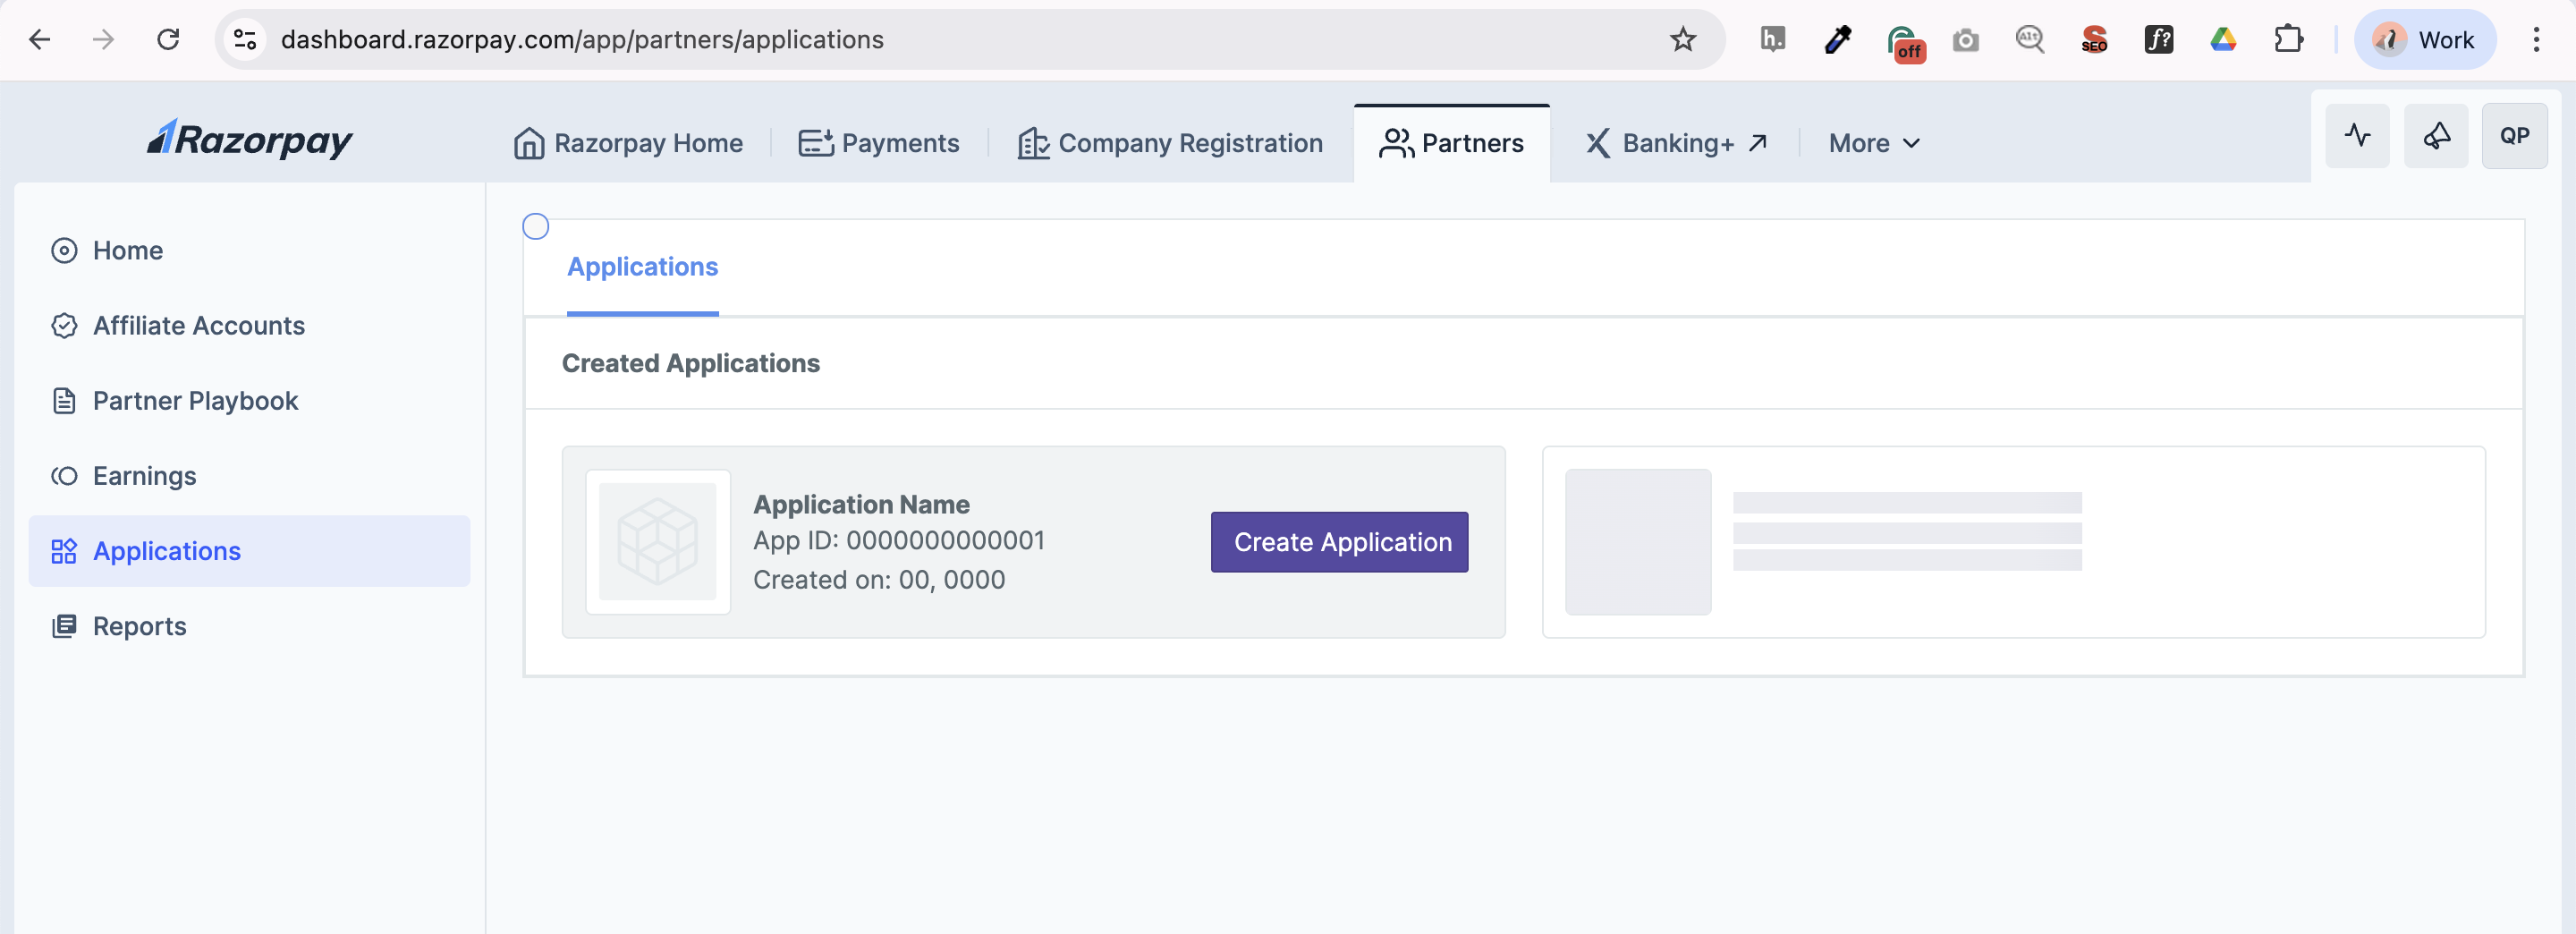
1. Log in to the Dashboard and navigate to **Applications** under **Partners**.
2. Click **Create Application** under **Created Applications**.
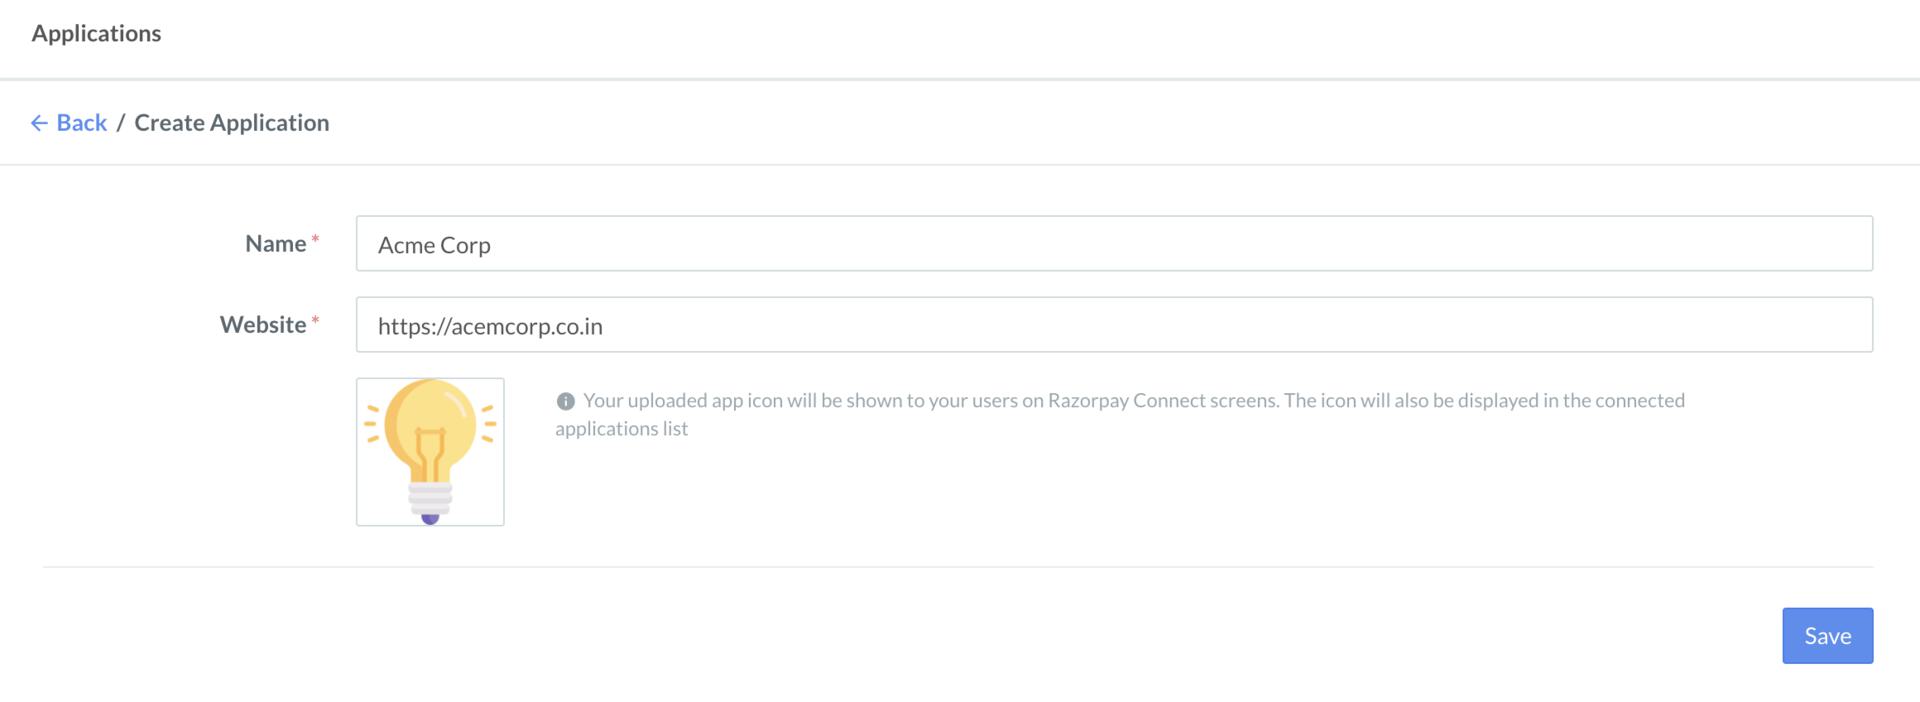
3. Provide the following details and click **Save**.
* **Name**: The application name provided here is displayed on the Razorpay authorisation interface.
* **Website**: Enter the URL of the application's website.
* **Logo**: Upload a square image for application logo. If logo is absent, a default logo is used.
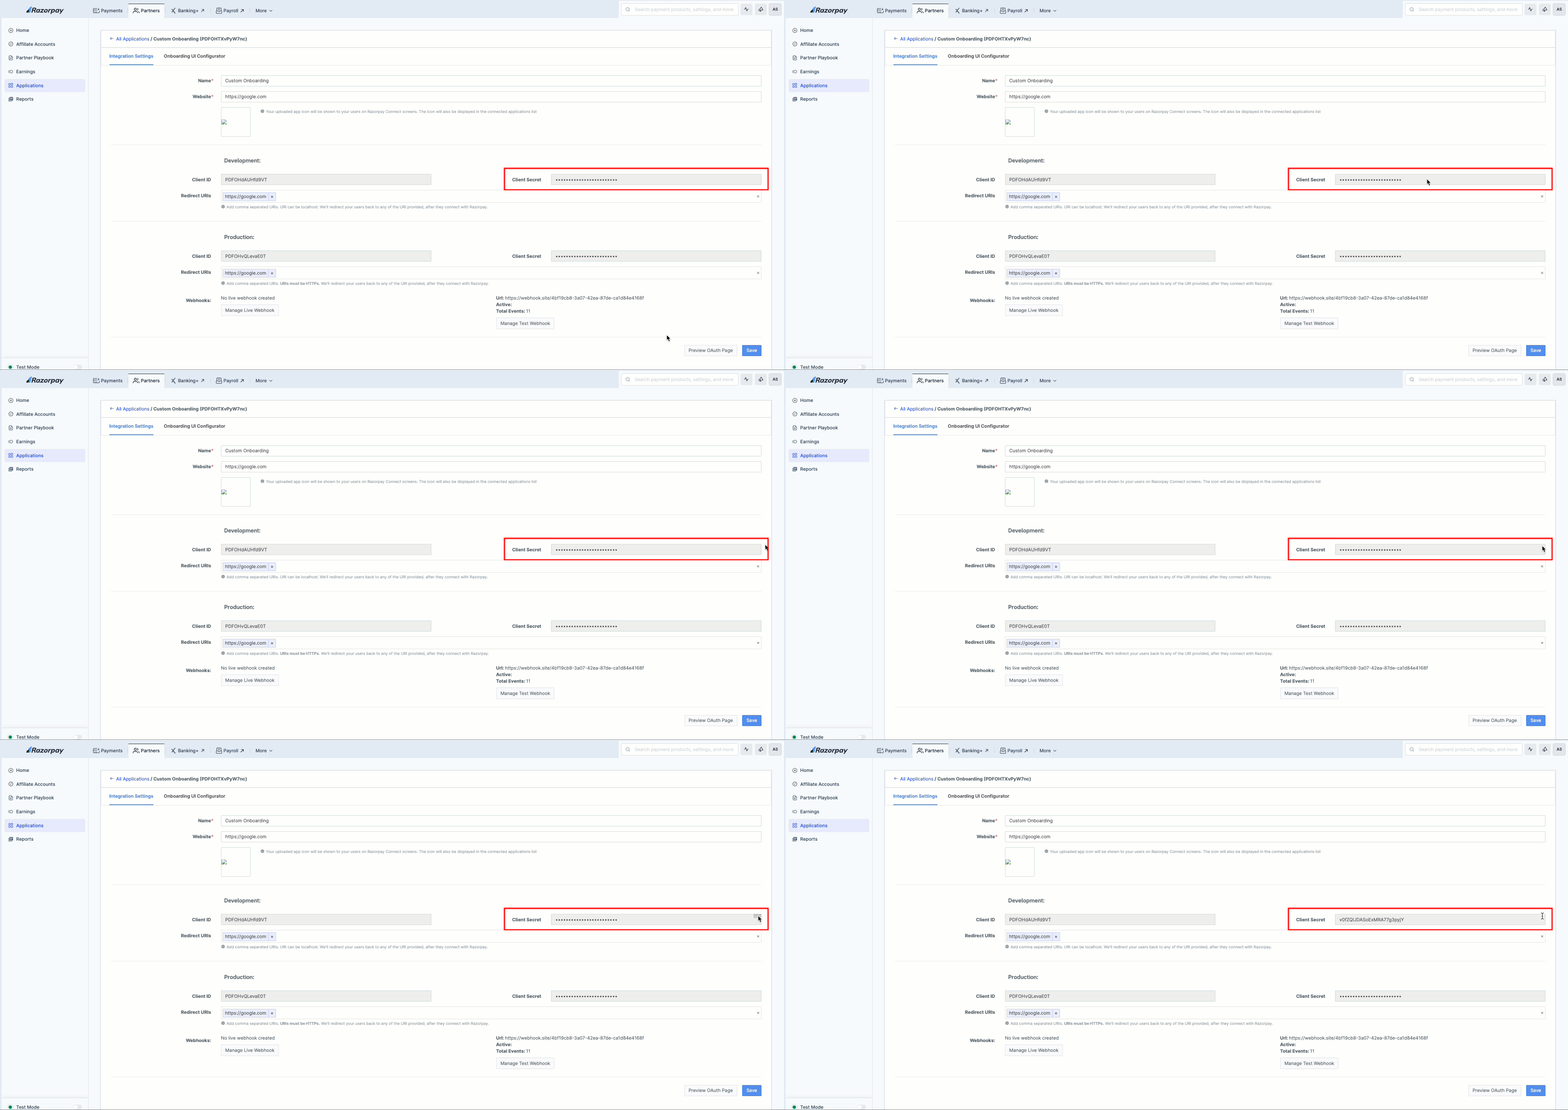
The following fields are displayed after the application is created, for development and production clients. These are read-only:
* **Client ID**: Publicly exposed identifier of the client which is generated uniquely. It helps identify your application on Razorpay.
* **Client Secret**: Privately shared string between the application and Razorpay. It helps to authenticate the identity of the application on server-to-server API calls. Do not expose the client secret publicly.
* **Redirect URIs**: A whitelisted set of URIs defined during creation. Production clients can only use secure HTTPS URIs to prevent man-in-the-middle attacks. You can define multiple redirect URIs.
4. Edit the Redirect URIs for your clients if needed.
5. Click **Save**.
## 2. Generate Token
The next step is to generate a bearer token to access onboarding APIs. You must use the access token generated in the response to hit the [onboarding APIs](#3-create-account-and-upload-kyc-details). Below is a sample code to generate a bearer token using Onboarding SDK.
```bash Curl theme={null}
curl --location 'https://auth.razorpay.com/token' \
--header 'Content-Type: application/json' \
--form 'client_id=""' \
--form 'client_secret=""' \
--form 'grant_type="client_credentials"' \
--form 'mode=""'
```
```java Java theme={null}
JSONObject accessTokenRequest = new JSONObject();
accessTokenRequest.put("client_id", "")
accessTokenRequest.put("client_secret", "")
accessTokenRequest.put("grant_type", "client_credentials")
accessTokenRequest.put("redirect_uri", "")
accessTokenRequest.put("mode", "test|live")
OAuthTokenClient oAuth = new OAuthTokenClient();
OAuthToken oAuthToken = oAuth.getAccessToken(accessTokenRequest)
String accessToken = oAuthToken.get("access_token")
// Initialize the client
RazorpayClient instance = new RazorpayClient("access_token");
```
```php PHP theme={null}
use Razorpay\Api\Api;
use Razorpay\Api\OAuth;
$oauth = new OAuth();
$oauthToken = $oauth->oauthClient->getAccessToken([
"client_id" => "",
"client_secret" => "",
"grant_type" => "client_credentials",
"redirect_uri" => "https://example.com",
"code" => "def50200d844dc80cc44dce2c665d07a374d76802",
"mode" => "test"
]);
$api = new Api(null, null, $oauthToken["access_token"]);
```
```csharp .NET theme={null}
Dictionary accessTokenRequest = new Dictionary();
accessTokenRequest.Add("client_id","");
accessTokenRequest.Add("client_secret","");
accessTokenRequest.Add("redirect_uri","");
accessTokenRequest.Add("grant_type","client_credentials");
accessTokenRequest.Add("mode","test|live");
OAuthTokenClient oAuth = new OAuthTokenClient();
OAuthTokenClient oAuthToken = oAuth.GetAccessToken(accessTokenRequest);
String accessToken = oAuthToken["access_token"];
// Initialize the client
RazorpayClient instance = new RazorpayClient(accessToken);
```
```ruby Ruby theme={null}
options = {
'client_id' => '',
'client_secret' => '',
'grant_type' => 'client_credentials',
'redirect_uri' => '',
'mode' => 'test'
}
oauth_token = Razorpay::OAuthToken.get_access_token(options)
#Initialize the client
Razorpay.setup_with_oauth(oauth_token.access_token)
```
```javascript Node.js theme={null}
const Razorpay = require("razorpay")
const OAuthTokenClient = require("razorpay/dist/oAuthTokenClient")
async function getAccessToken() {
try {
const oAuth = new OAuthTokenClient();
const token = await oAuth.getAccessToken({
"client_id": "",
"client_secret": "",
"grant_type": "authorization_code",
"redirect_uri": "https://example.com",
"code": "def50200d844dc80cc44dce2c665d07a374d76802",
"mode": "test"
});
const instance = new Razorpay({
oauthToken: token.access_token
});
console.log("OAuth Token:", token.access_token);
return instance;
} catch (error) {
console.error("Error getting access token:", error);
}
}
// Call the function
getAccessToken();
```
```json Response theme={null}
{
"public_token": "rzp_test_oauth_XXXXXXXXXXXXXX",
"razorpay_account_id": "",
"token_type": "Bearer",
"expires_in": 7775997,
"access_token": "eyJ0eXAiOiJKV1QiLCJhbGciOiJFUzI1NiJ9.eyJhdWQiOiJLdVRiTWxTM3FiQWFNNSIsImp0aSI6Ik5YNzJLYWJwWnZzdHliIiwiaWF0IjoxNzA3MTE3NDAwLCJuYmYiOjE3MDcxMTc0MDAsInN1YiI6IiIsImV4cCI6MTcxNDg5MzM5NywidXNlcl9pZCI6bnVsbCwibWVyY2hhbnRfaWQiOiJKWDFTYW5iU2JJaWRuZyIsInNjb3BlcyI6WyJyZWFkX3dyaXRlIl19.FLSvsKc03hzJ4vksAjnk3m8MHZDkWPoyGJsn0m32dZxE7OfT0Qet8kUFny7liTVqTvZsFUKSBo0euv-dE0YuXg"
}
```
The `access_token` is valid for 90 days. After your access token expires, you will receive a 4XX error response. Regenerate the access token using your credentials.
## 3. Create Account and Upload KYC Details
Use onboarding APIs to add KYC details of your clients. You can pre-fill all or a few KYC details using APIs and let the users fill in the remaining on the onboarding form.
Below are the APIs available to onboard clients.
| API | Action |
| ------------------------------------------------------------------------- | ------------------------------------------------------------------------------------------------------------------------------------------------------------------------------------------------------------------------------------------------------------------------ |
| [Account](/docs/api/partners/account-onboarding/create) | Create and update a client account. Add basic details like name, phone number, email ID and KYC details like business name, type and business PAN details. Check the [Account API Entity](/docs/api/partners/account-onboarding/entity) for the complete list of fields. |
| [Product Configuration](/docs/api/partners/product-configuration/request) | Configure products for an account. Update payment methods, settlement details and refund settings. Check the [Product Configuration API Entity](/docs/api/partners/product-configuration/entity) for the complete list of fields. |
| [Stakeholder](/docs/api/partners/stakeholder/create) | Add the KYC details of the authorised signatory or the owner of the business. Check the [Stakeholder API Entity](/docs/api/partners/stakeholder/entity) for the list of fields. |
| [Document](/docs/api/partners/upload-document/upload-account-documents) | Upload KYC documents for accounts and stakeholders. Know more about [Document APIs](/docs/api/partners/upload-document). |
[List of required KYC documents as per business type.](/docs/payments/business-types-kyc-documents#kyc-documents)
## 4. Generate Onboarding URL
Below is the sample code to generate the onboarding URL.
```java Java theme={null}
// Initialize client
OAuthTokenClient oAuth = new OAuthTokenClient();
JSONObject authUrlRequest = new JSONObject();
authUrlRequest.put("client_id","");
authUrlRequest.put("redirect_uri","");
JSONArray scopes = new JSONArray();
scopes.put("read_write");
authUrlRequest.put("scopes", scopes);
authUrlRequest.put("state","");
authUrlRequest.put("onboarding_signature", "");
String authUrl = oAuth.getAuthURL(authUrlRequest);
```
```php PHP theme={null}
use Razorpay\Api\OAuth;
use Razorpay\Api\Utility;
// Initialize client
$oauth = new OAuth();
$utility = new Utility();
$attributes = [
"submerchant_id" => "",
"timestamp" => floor(microtime(true))
];
$onboarding_signature = $utility->generateOnboardingSignature($attributes, "");
$authUrl = $oauth->oauthClient->getAuthURL([
"client_id" => "",
"response_type" => "code",
"redirect_uri" => "https://example.com/razorpay_callback",
"scopes" => ["read_write"],
"state" => "NOBYtv8r6c75ex6WZ",
"onboarding_signature" => $onboarding_signature
]);
```
```javascript Node.js theme={null}
const OAuthTokenClient = require("razorpay/dist/oAuthTokenClient");
const {
generateOnboardingSignature,
} = require("razorpay/dist/utils/razorpay-utils");
// Initialize client
let oAuth = new OAuthTokenClient();
let attributes = {
submerchant_id: "",
timestamp: Math.floor(Date.now() / 1000),
};
let onboarding_signature = generateOnboardingSignature(
attributes,
"",
);
// Not a promise
const authUrl = oAuth.generateAuthUrl({
client_id: "",
response_type: "code",
redirect_uri: "https://example.com/razorpay_callback",
scope: ["read_write"],
state: "NOBYtv8r6c75ex6WZ",
onboarding_signature: onboarding_signature,
});
```
```csharp .NET theme={null}
// Initialize client
OAuthTokenClient oAuth = new OAuthTokenClient();
Dictionary authUrlRequest = new Dictionary();
authUrlRequest.Add("client_id","");
authUrlRequest.Add("redirect_uri","");
authUrlRequest.Add("scopes", new List {"read_only", "read_write"});
authUrlRequest.Add("state","");
authUrlRequest.Add("onboarding_signature", "");
String authUrl = oAuth.GetAuthUrl(authUrlRequest);
```
```ruby Ruby theme={null}
options = {
'client_id' => '',
'redirect_uri' => '',
'scopes' => ["read_write"],
'state' => '',
'onboarding_signature' => ''
}
authorize_url = Razorpay::OAuthToken.get_auth_url(options)
```
```json Response theme={null}
{
"amount": 100,
"currency": "INR"
}
```
### Sample Onboarding URL
```json Sample Onboarding URL theme={null}
https://auth.razorpay.com/authorize
?client_id=8DXCMTshWSWECc
&response_type=code
&redirect_uri=https://example.com/razorpay_callback
&scope=read_write
&state=NOBYtv8r6c75ex6WZ
&onboarding_signature=MUOkjashBYtv8r6c75ex6WZ
```
Define the following query parameters in the URL.
`client_id` *mandatory*
: `string` The unique client identifier.
`response_type` *mandatory*
: `string` Specifies that the application is requesting an authorisation code grant. Possible value is `code`.
`redirect_uri` *mandatory*
: `string` Callback URL used by Razorpay to redirect after the user approves or denies the authorisation request. The client should whitelist the `redirect_uri`.
`scope` *mandatory*
: `string` Defines what access your application is requesting from the user. You can request multiple scopes by specifying each scope name separately in the URL using array notation. For example: `scope[]=read_only&scope[]=read_write`. Possible values:
* `read_only`: Provides read access to all resources. That is, all `GET` API requests.
* `read_write`: Provides read and write access to all resources on the API.
`state` *mandatory*
: `string` A random string generated by your service. This parameter helps prevent cross-site request forgery (CSRF) attacks. State validation has to be implemented by your application and should work as described below:
1. Your application should generate a unique random string and save it in the database.
2. Send the random string to Razorpay in the authorisation request in the `state` parameter.
3. Razorpay sends back the same `state` value as query params on your redirect URI.
4. In your backend, you validate that the state value stored in your database matches the one you received for the `client_id` and the user that initiated the authorisation.
`onboarding_signature` *conditionally mandatory*
: `string` This parameter is applicable only for accounts created using KYC pre-fill. This will reduce sub-merchant onboarding time. Know more about [onboarding signature](#onboarding-signature).
We send the following query parameters if the user approves the authorisation request:
`code`
: URL-encoded authorisation code. You can exchange this code for an access token in the next step.
`state`
: The value of the `state` parameter sent in the authorisation request.
| Error | Cause | Solution |
| ----------------------- | -------------------------------------------------------------------------------------------------------------------------------- | ----------------------------------------------------------------------------------------------------------------------------- |
| phone number unverified |
You are using an expired `onboarding_signature`.
`onboarding_signature` is not provided or is invalid.
| Use a valid `onboarding_signature`. An onboarding signature is valid for 24 hours. You can regenerate it using the same code. |
Refer to our [errors](/docs/partners/technology-partners/onboard-businesses/integrate-oauth/errors#initiating-authorisation-using-url) page for the complete list of errors and solutions.
### Redirect Users to Onboarding
You need to share the Razorpay-hosted co-branded onboarding URL with your clients. Clients use this URL to continue the onboarding process.
1. The user will be redirected to the co-branded onboarding form when they click the embedded onboarding button on your platform. The user has to enter any pending KYC details and verify the pre-filled information.
2. After the necessary details are submitted, the user is prompted to authorise your platform to access data and create payments and refunds.
3. The client gives authorisation, which allows Razorpay to connect their client account to your Partner account.
4. On successful authorisation, Razorpay redirects the user back to a URL configured by you in your application settings. While redirecting, Razorpay shares an authentication code. You need to use this Auth code in the token API request to generate an Auth token.
### Onboarding Signature
`onboarding_signature` is a mandatory parameter if you are pre-filling KYC details. The onboarding signature is used to verify the identity of the partner initiating the onboarding URL.
Use the below sample code to generate an `onboarding_signature`.
```java Java theme={null}
long timestamp = System.currentTimeMillis()/1000L;
JSONObject options = new JSONObject();
options.put("submerchant_id", "HQVlm3bnPmccC0");
options.put("timestamp", timestamp);
String signature = Utils.generateOnboardingSignature(options, "");
```
```php PHP theme={null}
use Razorpay\Api\Utility;
$utility = new Utility();
$attributes = [
"submerchant_id" => "",
"timestamp" => floor(microtime(true))
];
$onboarding_signature = $utility->generateOnboardingSignature($attributes, "");
```
```javascript Node.js theme={null}
const {
generateOnboardingSignature,
} = require("razorpay/dist/utils/razorpay-utils");
// Initialize client
let oAuth = new OAuthTokenClient();
let attributes = {
submerchant_id: "",
timestamp: Math.floor(Date.now() / 1000),
};
let onboarding_signature = generateOnboardingSignature(
attributes,
"",
);
```
```csharp .NET theme={null}
long timestamp = DateTimeOffset.UtcNow.ToUnixTimeSeconds();
Dictionary data = new Dictionary();
data.Add("submerchant_id", "HQVlm3bnPmccC0");
data.Add("timestamp", timestamp);
string signature = Utils.GenerateOnboardingSignature(data, "");
```
```ruby Ruby theme={null}
body = {
submerchant_id: "HQVlm3bnPmccC0",
timestamp: Time.now.to_i
}
signature = Razorpay::Utility.generate_onboarding_signature(body, "")
```
```json Response theme={null}
44813a7db24e30c65f10d5b06751f5cddfd5d9094033bd5e899d709f8f13361fff5eecf4d39ebb7c4547af3898a633f71f62196a8e06f85aa0272e6cc3e9faba470abbb0d8441e3864af
```
**Watch Out!**
The response of the account creation API, returns id as `acc_HQVlm3bnPmccC0`. However, for the onboarding signature, the sub-merchant id must be entered without the 'acc\_' which means `acc_HQVlm3bnPmccC0` must be entered as `HQVlm3bnPmccC0`.
### Authorisation Response
After completion, the browser is redirected to URI specified in the `redirect_uri` parameter.
## 5. Fetch Access Token
You require an access token to create payments and refunds on behalf of your clients using APIs. Exchange the authorisation code received in the previous step for an access token.
**Handy Tips**
The authorisation code is URL-encoded. Decode it before sending in this request.
Given below is a sample request to be made from the application's backend server.
```bash Curl theme={null}
curl --location 'https://auth.razorpay.com/token' \
--header 'Content-Type: application/json' \
'{
"client_id": "",
"client_secret": "",
"grant_type": "authorization_code",
"redirect_uri": "http://example.com/razorpay_callback",
"code": "def50200d844dc80cc44dce2c665d07a374d76802",
"mode": "test"
}'
```
```java Java theme={null}
JSONObject accessTokenRequest = new JSONObject();
accessTokenRequest.put("client_id", "")
accessTokenRequest.put("client_secret", "")
accessTokenRequest.put("grant_type", "authorization_code")
accessTokenRequest.put("redirect_uri", "")
accessTokenRequest.put("code", "")
accessTokenRequest.put("mode", "test|live")
OAuthTokenClient oAuth = new OAuthTokenClient();
OAuthToken oAuthToken = oAuth.getAccessToken(accessTokenRequest)
String accessToken = oAuthToken.get("access_token")
```
```php PHP theme={null}
use Razorpay\Api\Api;
use Razorpay\Api\OAuth;
$oauth = new OAuth();
$oauthToken = $oauth->oauthClient->getAccessToken([
"client_id" => "",
"client_secret" => "",
"grant_type" => "authorization_code",
"redirect_uri" => "https://example.com",
"code" => "def50200d844dc80cc44dce2c665d07a374d76802",
"mode" => "test"
]);
$api = new Api(null, null, $oauthToken["access_token"]);
```
```javascript Node.js theme={null}
const Razorpay = require("razorpay")
const OAuthTokenClient = require("razorpay/dist/oAuthTokenClient")
async function getAccessToken() {
try {
const oAuth = new OAuthTokenClient();
const token = await oAuth.getAccessToken({
"client_id": "",
"client_secret": "",
"grant_type": "authorization_code",
"redirect_uri": "https://example.com",
"code": "def50200d844dc80cc44dce2c665d07a374d76802",
"mode": "test"
});
const instance = new Razorpay({
oauthToken: token.access_token
});
console.log("OAuth Token:", token.access_token);
return instance;
} catch (error) {
console.error("Error getting access token:", error);
}
}
// Call the function
getAccessToken();
```
```csharp .NET theme={null}
Dictionary accessTokenRequest = new Dictionary();
accessTokenRequest.Add("client_id","");
accessTokenRequest.Add("client_secret","");
accessTokenRequest.Add("redirect_uri","");
accessTokenRequest.Add("grant_type","authorization_code");
accessTokenRequest.Add("code", "")
accessTokenRequest.Add("mode","test|live");
OAuthTokenClient oAuth = new OAuthTokenClient();
OAuthTokenClient oAuthToken = oAuth.GetAccessToken(accessTokenRequest);
String accessToken = oAuthToken["access_token"];
// Initialize the client
RazorpayClient instance = new RazorpayClient(accessToken);
```
```ruby Ruby theme={null}
options = {
'client_id' => '',
'client_secret' => '',
'grant_type' => 'authorization_code',
'redirect_uri' => '',
'code' => ''
'mode' => 'test|live'
}
oauth_token = Razorpay::OAuthToken.get_access_token(options)
# Initialize the client
Razorpay.setup_with_oauth(oauth_token.access_token)
```
```json Response theme={null}
{
"public_token": "rzp_test_oauth_XXXXXXXXXXXXXX",
"token_type": "Bearer",
"expires_in": 7862400,
"access_token": "eyJ0eXAiOiJKV1QiLCJhbGciOiJSUzI1NiIsImp0aSI6IkY1Z0NQYkhhRzRjcUpnIn0.eyJhdWQiOiJGNFNNeEgxanMxbkpPZiIsImp0aSI6IkY1Z0NQYkhhRzRjcUpnIiwiaWF0IjoxNTkyODMxMDExLCJuYmYiOjE1OTI4MzEwMTEsInN1YiI6IiIsImV4cCI6MTYwMDc3OTgxMSwidXNlcl9pZCI6IkYycVBpejJEdzRPRVFwIiwibWVyY2hhbnRfaWQiOiJGMnFQaVZ3N0lNV01GSyIsInNjb3BlcyI6WyJyZWFkX29ubHkiXX0.Wwqt5czhoWpVzP5_aoiymKXoGj-ydo-4A_X2jf_7rrSvk4pXdqzbA5BMrHxPdPbeFQWV6vsnsgbf99Q3g-W4kalHyH67LfAzc3qnJ-mkYDkFY93tkeG-MCco6GJW-Jm8xhaV9EPUak7z9J9jcdluu9rNXYMtd5qxD8auyRYhEgs",
"refresh_token": "def50200f42e07aded65a323f6c53181d802cc797b62cc5e78dd8038d6dff253e5877da9ad32f463a4da0ad895e3de298cbce40e162202170e763754122a6cb97910a1f58e2378ee3492dc295e1525009cccc45635308cce8575bdf373606c453ebb5eb2bec062ca197ac23810cf9d6cf31fbb9fcf5b7d4de9bf524c89a4aa90599b0151c9e4e2fa08acb6d2fe17f30a6cfecdfd671f090787e821f844e5d36f5eacb7dfb33d91e83b18216ad0ebeba2bef7721e10d436c3984daafd8654ed881c581d6be0bdc9ebfaee0dc5f9374d7184d60aae5aa85385690220690e21bc93209fb8a8cc25a6abf1108d8277f7c3d38217b47744d7",
"razorpay_account_id": "acc_Dhk2qDbmu6FwZH"
}
```
`client_id` *mandatory*
: `string` Unique client identifier.
`client_secret` *mandatory*
: `string` Client secret string.
`grant_type` *mandatory*
: `string` Defines the grant type for the request. Possible value is `authorization_code`.
`redirect_uri` *mandatory*
: `string` Specifies the same `redirect_uri` used in the authorisation request.
`code` *mandatory*
: `string` Decoded authorisation code received in the last step.
`mode` *optional*
: `string` The type of mode. Possible values:
* `test`
* `live` (default)
**Handy Tips**
Clients on production can only make requests for live mode.
The server responds with the following parameters:
`token_type`
: `string` Defines the type of access token. Possible value is `Bearer`.
`expires_in`
: `integer` Integer representing the TTL of the access token in seconds.
`access_token`
: `string` A private key used to access sub-merchant resources on Razorpay. Used for server-to-server calls only.
`public_token`
: `string` A public key is used only for public routes such as Checkout or Payments.
`refresh_token`
: `string` Used to refresh the access token when it expires.
`razorpay_account_id`
: `string` Identifies the sub-merchant ID who granted the authorisation.
Refer to our [errors](/docs/partners/technology-partners/onboard-businesses/integrate-oauth/errors#token-apis) page for the list of errors and solutions.
Store the `access_token` received above on your server. Using this token, you can access the sub-merchant's data, create payments and refunds using Razorpay APIs.
#### Regenerate Access Token
The `access_token` is valid for 90 days. After your access token expires, you will receive a 4XX error response. Use a refresh token to generate a new access token. You can make a request using your refresh token to generate a new (access\_token and refresh\_token) pair.
Below is a sample API request to request a new token.
```bash Curl theme={null}
curl -X POST https://auth.razorpay.com/token
-H "Content-type: application/json"
-d '{
"client_id": "",
"client_secret": "",
"grant_type": "refresh_token",
"refresh_token": "def5020096e1c470c901d34cd60fa53abdaf3662sa0"
}'
```
```csharp .NET theme={null}
Dictionary refreshTokenRequest = new Dictionary(); refreshTokenRequest.Add("client_id",""); refreshTokenRequest.Add("client_secret",""); refreshTokenRequest.Add("refresh_token","");
OAuthTokenClient oAuth = new OAuthTokenClient(); OAuthTokenClient oAuthToken = oAuth.RefreshToken(refreshTokenRequest); String accessToken = oAuthToken["access_token"];
// Initialize the client RazorpayClient instance = new RazorpayClient(accessToken);
```
```ruby Ruby theme={null}
options = {
'client_id' => '',
'client_secret' => '',
'refresh_token' => ''
}
oauth_token = Razorpay::OAuthToken.refresh_token(options)
#Initialize the client
Razorpay.setup_with_oauth(oauth_token.access_token)
```
```java Java theme={null}
JSONObject refreshTokenRequest = new JSONObject();
refreshTokenRequest.put("client_id", "")
refreshTokenRequest.put("client_secret", "")
refreshTokenRequest.put("refresh_token", "")
OAuthTokenClient oAuth = new OAuthTokenClient();
OAuthToken oAuthToken = oAuth.refreshToken(refreshTokenRequest)
String accessToken = oAuthToken.get("access_token")
// Initialize the client
RazorpayClient instance = new RazorpayClient(accessToken);
```
```php PHP theme={null}
use Razorpay\Api\Api;
use Razorpay\Api\OAuth;
$oauth = new OAuth();
$oauthToken = $oauth->oauthClient->getRefreshToken([
"client_id" => "",
"client_secret" => "",
"grant_type" => "refresh_token",
"refresh_token" => "def50200d844dc80cc44dce2c665d07a374d76802"
]);
$api = new Api(null, null, $oauthToken["access_token"]);
```
```javascript Node.js theme={null}
const Razorpay = require("razorpay")
const OAuthTokenClient = require("razorpay/dist/oAuthTokenClient")
async function refreshToken() {
try {
const oAuth = new OAuthTokenClient();
const token = await oAuth.refreshToken({
"client_id": "",
"client_secret": "",
"refresh_token": "def50200d844dc80cc44dce2c665d07a374d76802"
});
const instance = new Razorpay({
oauthToken: token.access_token
});
console.log("OAuth Token:", token);
return instance;
} catch (error) {
console.error("Error getting access token:", error);
}
}
// Call the function
refreshToken();
```
```json Response theme={null}
{
"public_token": "rzp_test_oauth_XXXXXXXXXXXXXX",
"token_type": "Bearer",
"expires_in": 7862400,
"access_token": "eyJ0eXAiOiJKV1QiLCJhbGciOiJSUzI1NiIsImp0aSI6Ijl4dTF",
"refresh_token": "def5020096e1c470c901d34cd60fa53abdaf36620e823ffa53"
}
```
## 6. Access Resources Using Access Token
After you obtain an access token, you can use it to access the sub-merchant's data on Razorpay APIs. The access is controlled based on the scope requested for and granted by the user during the authorisation process.
Provide the access token in the `Bearer` authorisation header while requesting [Razorpay APIs](/docs/api).
Given below is a sample code for the [Fetch all Payments API](/docs/api/payments#fetch-multiple-payments).
```bash Curl theme={null}
curl -X GET https://api.razorpay.com/v1/payments
-H "Authorization: Bearer "
```
```java Java theme={null}
RazorpayClient instance = new RazorpayClient("");
JSONObject params = new JSONObject();
params.put("count","1");
List payment = instance.payments.fetchAll(params);
```
```php PHP theme={null}
$api = new Api(null, null, "");
$api->payment->all(array("count"=> "1"));
```
```csharp .NET theme={null}
RazorpayClient instance = new RazorpayClient("");
Dictionary params = new Dictionary();
params.Add("count","1");
List payment = instance.Payment.All(params);
```
```ruby Ruby theme={null}
Razorpay.setup_with_oauth('')
option = {"count":1}
payments = Razorpay::Payment.all(option)
```
```json Response theme={null}
{
"entity": "collection",
"count": 2,
"items": [
{
"id": "pay_G8VaL2Z68LRtDs",
"entity": "payment",
"amount": 900,
"currency": "INR",
"status": "captured",
"order_id": "order_G8VXfKDWDEOHHd",
"invoice_id": null,
"international": false,
"method": "netbanking",
"amount_refunded": 0,
"refund_status": null,
"captured": true,
"description": "Purchase Shoes",
"card_id": null,
"bank": "KKBK",
"wallet": null,
"vpa": null,
"email": "gaurav.kumar@example.com",
"contact": "+919000090000",
"customer_id": "cust_DitrYCFtCIokBO",
"notes": [],
"fee": 22,
"tax": 4,
"error_code": null,
"error_description": null,
"error_source": null,
"error_step": null,
"error_reason": null,
"acquirer_data": {
"bank_transaction_id": "0125836177"
},
"created_at": 1606985740
},
{
"id": "pay_G8VQzjPLoAvm6D",
"entity": "payment",
"amount": 1000,
"currency": "INR",
"status": "captured",
"order_id": "order_G8VPOayFxWEU28",
"invoice_id": null,
"international": false,
"method": "upi",
"amount_refunded": 0,
"refund_status": null,
"captured": true,
"description": "#G8VPNzYJsQWMvY",
"card_id": null,
"bank": null,
"wallet": null,
"vpa": "gaurav.kumar@exampleupi",
"email": "gaurav.kumar@example.com",
"contact": "+919000090000",
"customer_id": "cust_DitrYCFtCIokBO",
"notes": [],
"fee": 24,
"tax": 4,
"error_code": null,
"error_description": null,
"error_source": null,
"error_step": null,
"error_reason": null,
"acquirer_data": {
"rrn": "033814379298"
},
"created_at": 1606985209
}
]
}
```
After you obtain an access token, you can use it to access the sub-merchant's data on Razorpay APIs. The access is controlled based on the scope requested for and granted by the user during the authorisation process.
## 7. Process Payments
As a Technology Partner, you can allow sub-merchants to accept payments through various Payment Methods and channels. after getting `access_token`.
You can process payments on behalf of your sub-merchants using [Razorpay APIs](/docs/api). Use the tokens generated during [OAuth integration](/docs/partners/technology-partners/onboard-businesses/integrate-oauth/integration-steps).
Use the `access_token` generated in the [build integration](/docs/partners/technology-partners/onboard-businesses/integrate-oauth/integration-steps#2-2-get-access-token) step to authenticate using `Bearer Auth`.
Below is a sample code to create an Order and process payments.
`POST /orders`
```bash Request theme={null}
curl -H "Authorization: Bearer " \
-X POST https://api.razorpay.com/v1/orders \
-H "content-type: application/json" \
-d '{
"amount": 50000,
"currency": "INR",
"receipt": "receipt#1",
"notes": {
"key1": "value3",
"key2": "value2"
}
}'
```
```json Success Response theme={null}
{
"id": "order_EKwxwAgItmmXdp",
"entity": "order",
"amount": 50000,
"amount_paid": 0,
"amount_due": 50000,
"currency": "INR",
"receipt": "receipt#1",
"offer_id": null,
"status": "created",
"attempts": 0,
"notes": [],
"created_at": 1582628071
}
```
```javascript Failure Response theme={null}
{
"error": {
"code": "BAD_REQUEST_ERROR",
"description": "The amount must be at least INR 1.00",
"source": "business",
"step": "payment_initiation",
"reason": "input_validation_failed",
"metadata": {},
"field": "amount"
}
}
```
The parameter descriptions and errors are present in the [Create an Order API](/docs/api/orders/create) documentation.
Using the `public_token` for authorisation can secure a public-facing implementation such as Razorpay Checkout. In such cases, the `public_token` can replace the `key_id` field as shown below:
```javascript Checkout theme={null}
```
Know more about [Web Standard Integration](/docs/payments/payment-gateway/web-integration/standard).
This is a mandatory step to confirm the authenticity of the details returned to the Checkout form for successful payments.
To verify the `razorpay_signature` returned to you by the Checkout form:
1. Create a signature in your server using the following attributes:
* `order_id`: Retrieve the `order_id` from your server. Do not use the `razorpay_order_id` returned by Checkout.
* `razorpay_payment_id`: Returned by Checkout.
* `client_secret`: Available in your server. The `client_secret` that was generated from the [RazorpayDashboard](/docs/api/authentication#generate-api-keys).
2. Use the SHA256 algorithm, the `razorpay_payment_id` and the `order_id` to construct a HMAC hex digest as shown below:
```html HMAC Hex Digest theme={null}
generated_signature = hmac_sha256(order_id + "|" + razorpay_payment_id, client_secret);
if (generated_signature == razorpay_signature) {
payment is successful
}
```
3. If the signature you generate on your server matches the `razorpay_signature` returned to you by the Checkout form, the payment received is from an authentic source.
#### Generate Signature on Your Server
Given below is the sample code for payment signature verification:
```java Java theme={null}
RazorpayClient razorpay = new RazorpayClient("[CLIENT_KEY_ID]", "[CLIENT_KEY_SECRET]");
String secret = "EnLs21M47BllR3X8PSFtjtbd";
JSONObject options = new JSONObject();
options.put("razorpay_order_id", "order_IEIaMR65cu6nz3");
options.put("razorpay_payment_id", "pay_IH4NVgf4Dreq1l");
options.put("razorpay_signature", "0d4e745a1838664ad6c9c9902212a32d627d68e917290b0ad5f08ff4561bc50f");
boolean status = Utils.verifyPaymentSignature(options, secret);
```
```ruby Ruby theme={null}
require "razorpay"
Razorpay.setup('YOUR_KEY_ID', 'YOUR_SECRET')
payment_response = {
razorpay_order_id: 'order_IEIaMR65cu6nz3',
razorpay_payment_id: 'pay_IH4NVgf4Dreq1l',
razorpay_signature: '0d4e745a1838664ad6c9c9902212a32d627d68e917290b0ad5f08ff4561bc50f'
}
Razorpay::Utility.verify_payment_signature(payment_response)
```
```csharp .NET theme={null}
RazorpayClient client = new RazorpayClient("[CLIENT_KEY_ID]", "[CLIENT_KEY_SECRET]");
Dictionary options = new Dictionary();
options.Add("razorpay_order_id", "order_IEIaMR65");
options.Add("razorpay_payment_id", "pay_IH4NVgf4Dreq1l");
options.Add("razorpay_signature", "0d4e745a1838664ad6c9c9902212a32d627d68e917290b0ad5f08ff4561bc50");
Utils.verifyPaymentSignature(options);
```
#### Post Signature Verification
With this, your integration is complete. Test the integration before going live. Replace the test key with the live key and integrate with other [APIs](/docs/api).
## 8. Subscribe to Onboarding Webhooks
Subscribe to webhook events to receive real time notifications on the onboarding status of your clients. Check the available [Partner Webhooks](/docs/partners/technology-partners/onboard-businesses/status).
With this, your integration is complete. Test the integration before going live.
### Related Information
* [Errors](/docs/api/partners/errors)
* [Razorpay Webhooks](/docs/webhooks)
 2. Click **Create Application** under **Created Applications**.
3. Provide the following details and click **Save**.
* **Name**: The application name provided here is displayed on the Razorpay authorisation interface.
* **Website**: Enter the URL of the application's website.
* **Logo**: Upload a square image for application logo. If logo is absent, a default logo is used.
2. Click **Create Application** under **Created Applications**.
3. Provide the following details and click **Save**.
* **Name**: The application name provided here is displayed on the Razorpay authorisation interface.
* **Website**: Enter the URL of the application's website.
* **Logo**: Upload a square image for application logo. If logo is absent, a default logo is used.
 The following fields are displayed after the application is created, for development and production clients. These are read-only:
* **Client ID**: Publicly exposed identifier of the client which is generated uniquely. It helps identify your application on Razorpay.
* **Client Secret**: Privately shared string between the application and Razorpay. It helps to authenticate the identity of the application on server-to-server API calls. Do not expose the client secret publicly.
* **Redirect URIs**: A whitelisted set of URIs defined during creation. Production clients can only use secure HTTPS URIs to prevent man-in-the-middle attacks. You can define multiple redirect URIs.
The following fields are displayed after the application is created, for development and production clients. These are read-only:
* **Client ID**: Publicly exposed identifier of the client which is generated uniquely. It helps identify your application on Razorpay.
* **Client Secret**: Privately shared string between the application and Razorpay. It helps to authenticate the identity of the application on server-to-server API calls. Do not expose the client secret publicly.
* **Redirect URIs**: A whitelisted set of URIs defined during creation. Production clients can only use secure HTTPS URIs to prevent man-in-the-middle attacks. You can define multiple redirect URIs.
 4. Edit the Redirect URIs for your clients if needed.
5. Click **Save**.
4. Edit the Redirect URIs for your clients if needed.
5. Click **Save**.