> ## Documentation Index
> Fetch the complete documentation index at: https://razorpay-881012b3.mintlify.site/llms.txt
> Use this file to discover all available pages before exploring further.
# Checkout Features
> Customise your checkout experience with options for language settings, email collection, quick flash checkout, personalised banners and more on the Razorpay Dashboard.
Available in
🇮🇳 India
Customise your checkout experience on the Dashboard by setting a default language, enabling email collection , activating flash checkout, making the summary page mandatory and adding a custom banner message to enhance customer engagement.
Set the default language for your checkout page when customers don't specify one.
Configure the email address field to collect customer email addresses on checkout.
Let customers securely save their card details for faster transactions.
Show custom messages to highlight offers, discounts or important updates.
Display the mandate summary screen for card payments to your users.
Find answers to frequently asked questions about checkout settings.
**Handy Tips**
* All the below changes will reflect on [Checkout page](/docs/payments/payment-gateway), [Invoices](/docs/payments/invoices), [Payment Button](/docs/payments/payment-button), [Webstore](/docs/payments/webstore), [Payment Links](/docs/payments/payment-links) and [Payment Pages](/docs/payments/payment-pages).
* You can switch between mobile and desktop views to preview changes.
## Default Language
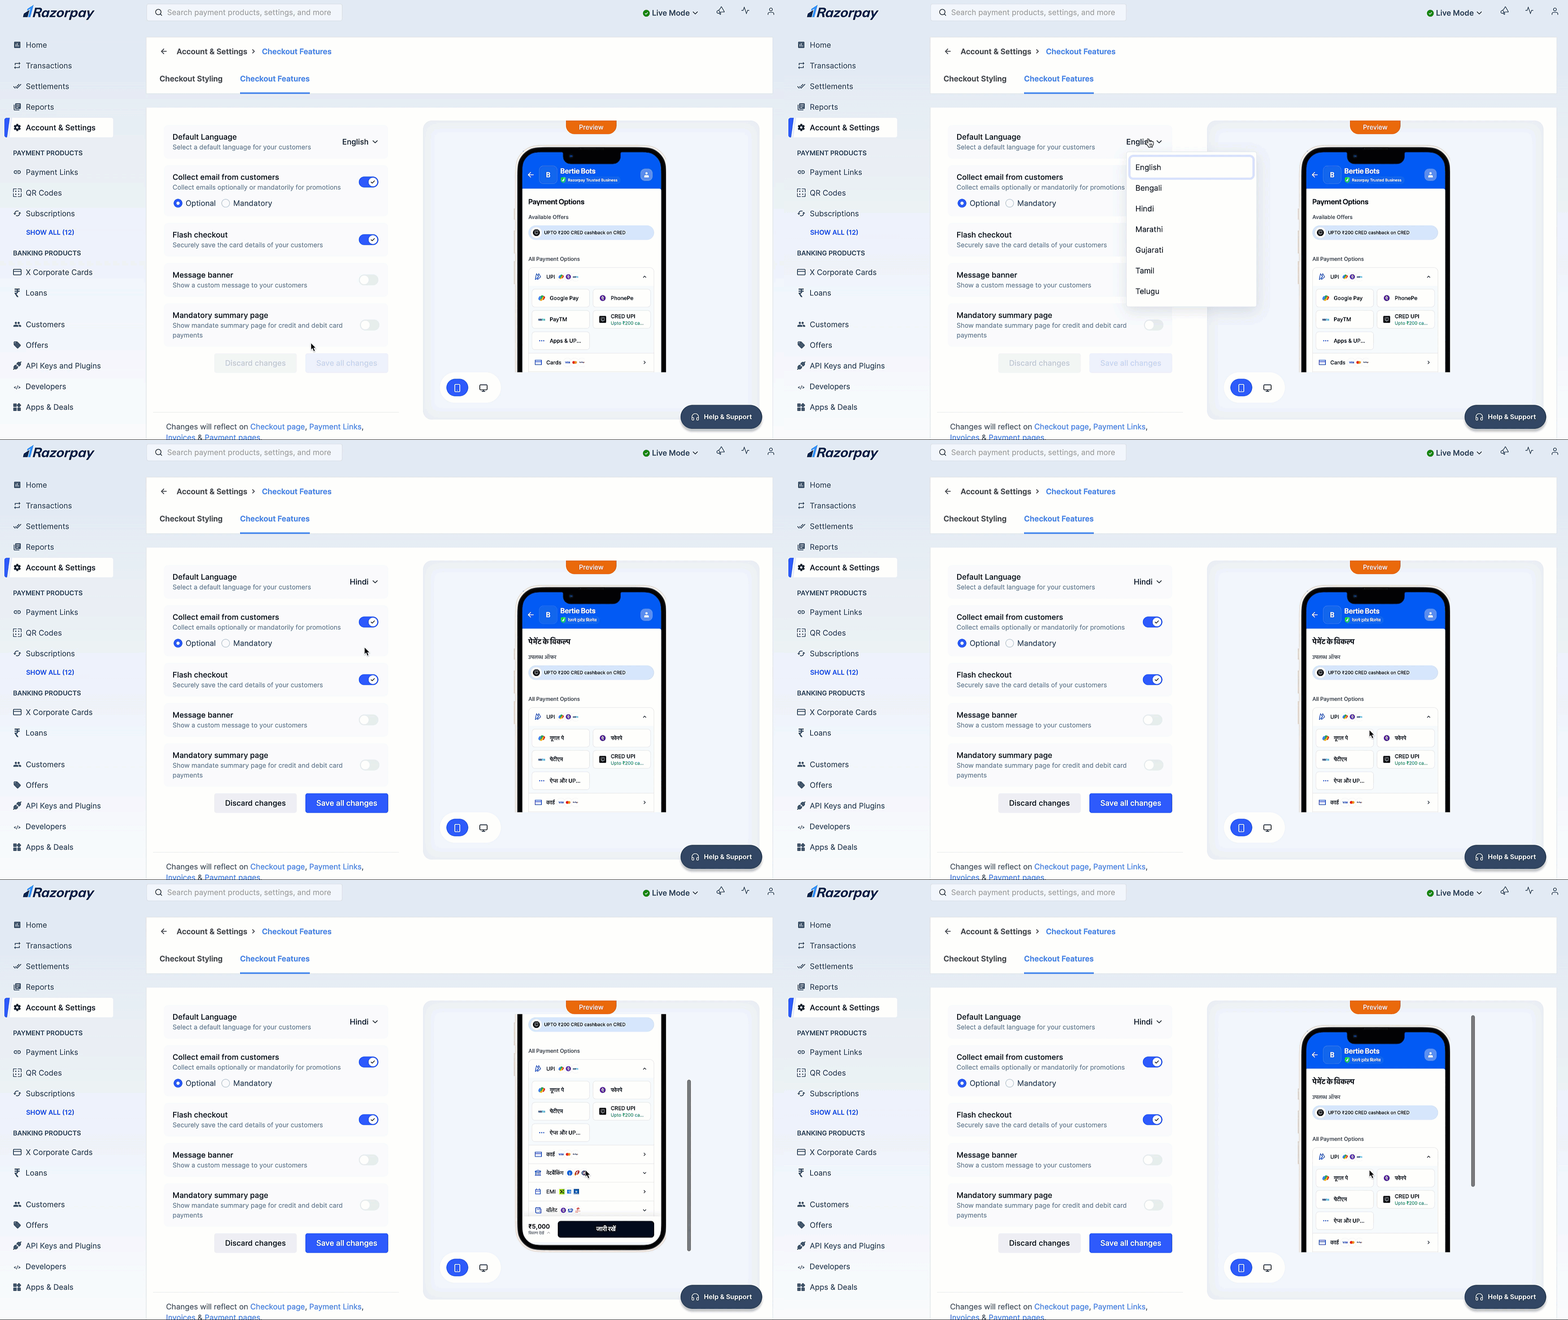
The customers can [view the Checkout page in their preferred language](/docs/payments/payment-gateway/features). If the customer does not specify a language, the default language will be used on the checkout page.
1. Log in to the Dashboard.
2. Navigate to **Accounts & Settings** → **Checkout Features** in the **Checkout settings** section.
3. Select the default language from the drop-down list. For example, **English**.
4. Click **Save all changes**.
 ## Collect Email Address From Customers
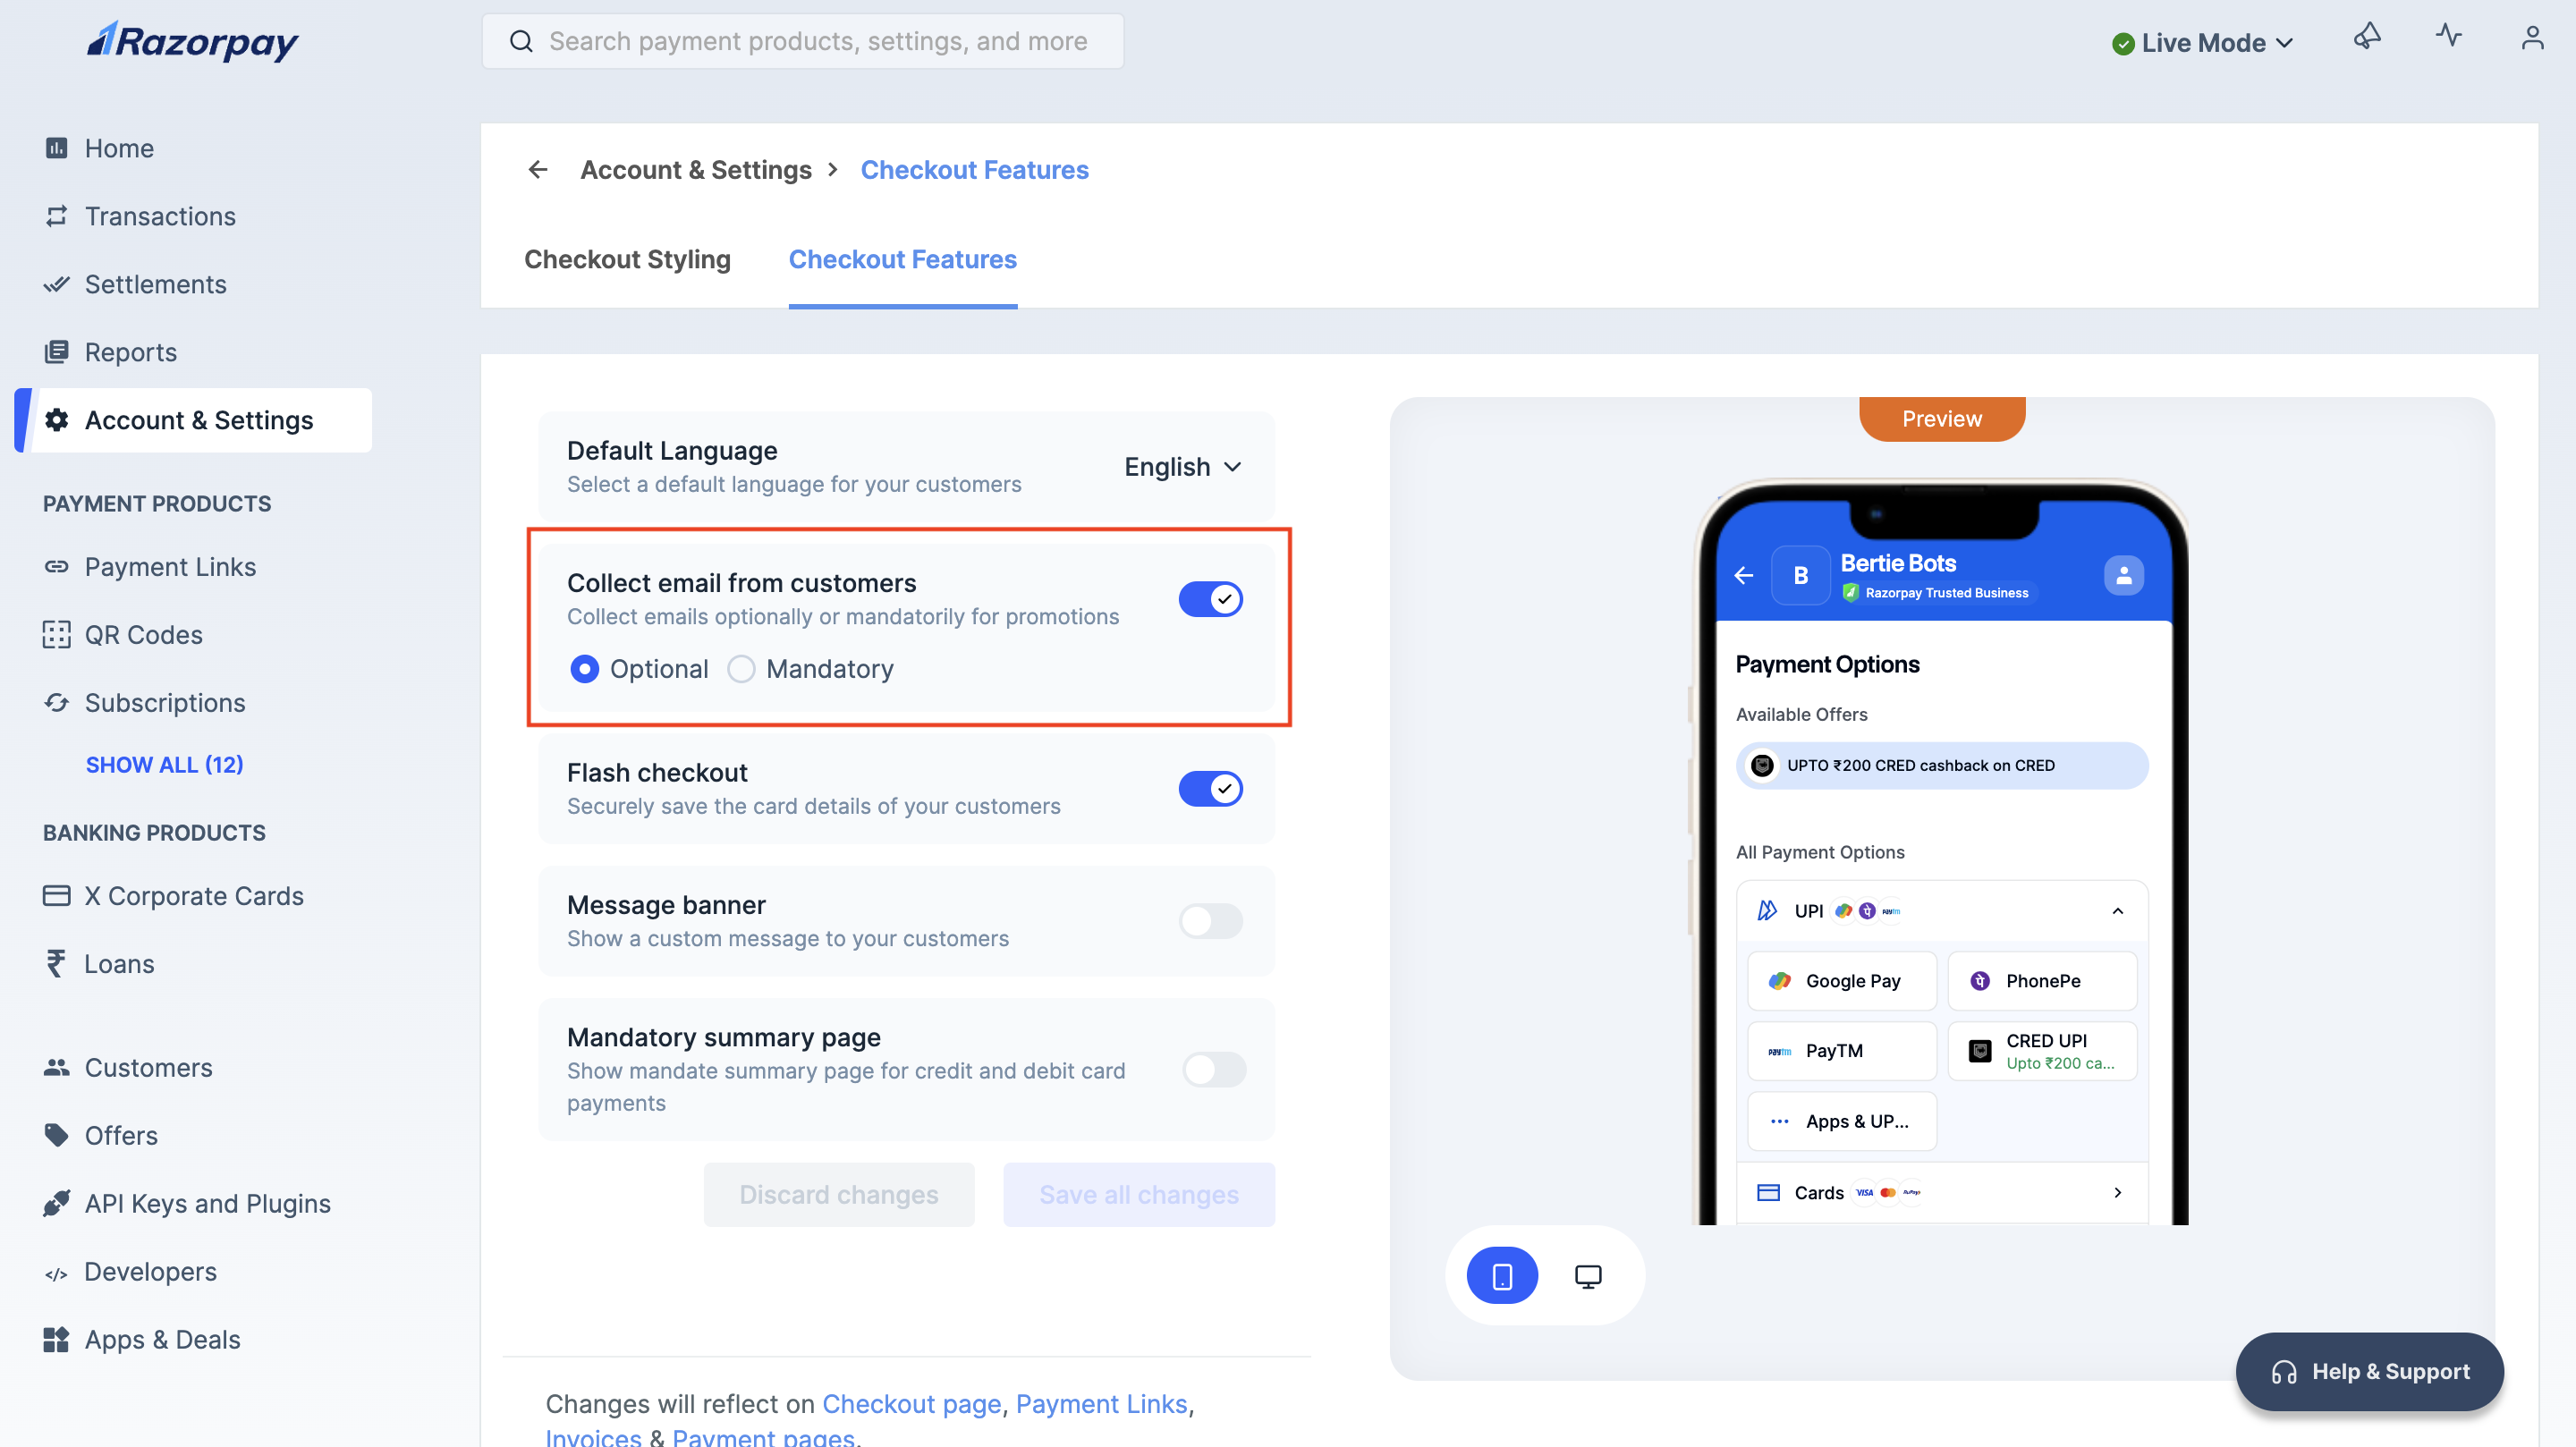
By default, the email address field is hidden on checkout. You can choose to configure the email address field based on your requirement.
1. Log in to the Dashboard.
2. Navigate to **Accounts & Settings** → **Checkout Features** in the **Checkout settings** section.
3. Turn on **Collect email from customers**.
4. Select either of the following options:
* **Optional (Default)**: Customers can either enter their email address or choose to skip it.
* **Mandatory**: Customers have to enter their email address to proceed.
5. Click **Save all changes**.
## Collect Email Address From Customers
By default, the email address field is hidden on checkout. You can choose to configure the email address field based on your requirement.
1. Log in to the Dashboard.
2. Navigate to **Accounts & Settings** → **Checkout Features** in the **Checkout settings** section.
3. Turn on **Collect email from customers**.
4. Select either of the following options:
* **Optional (Default)**: Customers can either enter their email address or choose to skip it.
* **Mandatory**: Customers have to enter their email address to proceed.
5. Click **Save all changes**.
 ## Flash Checkout
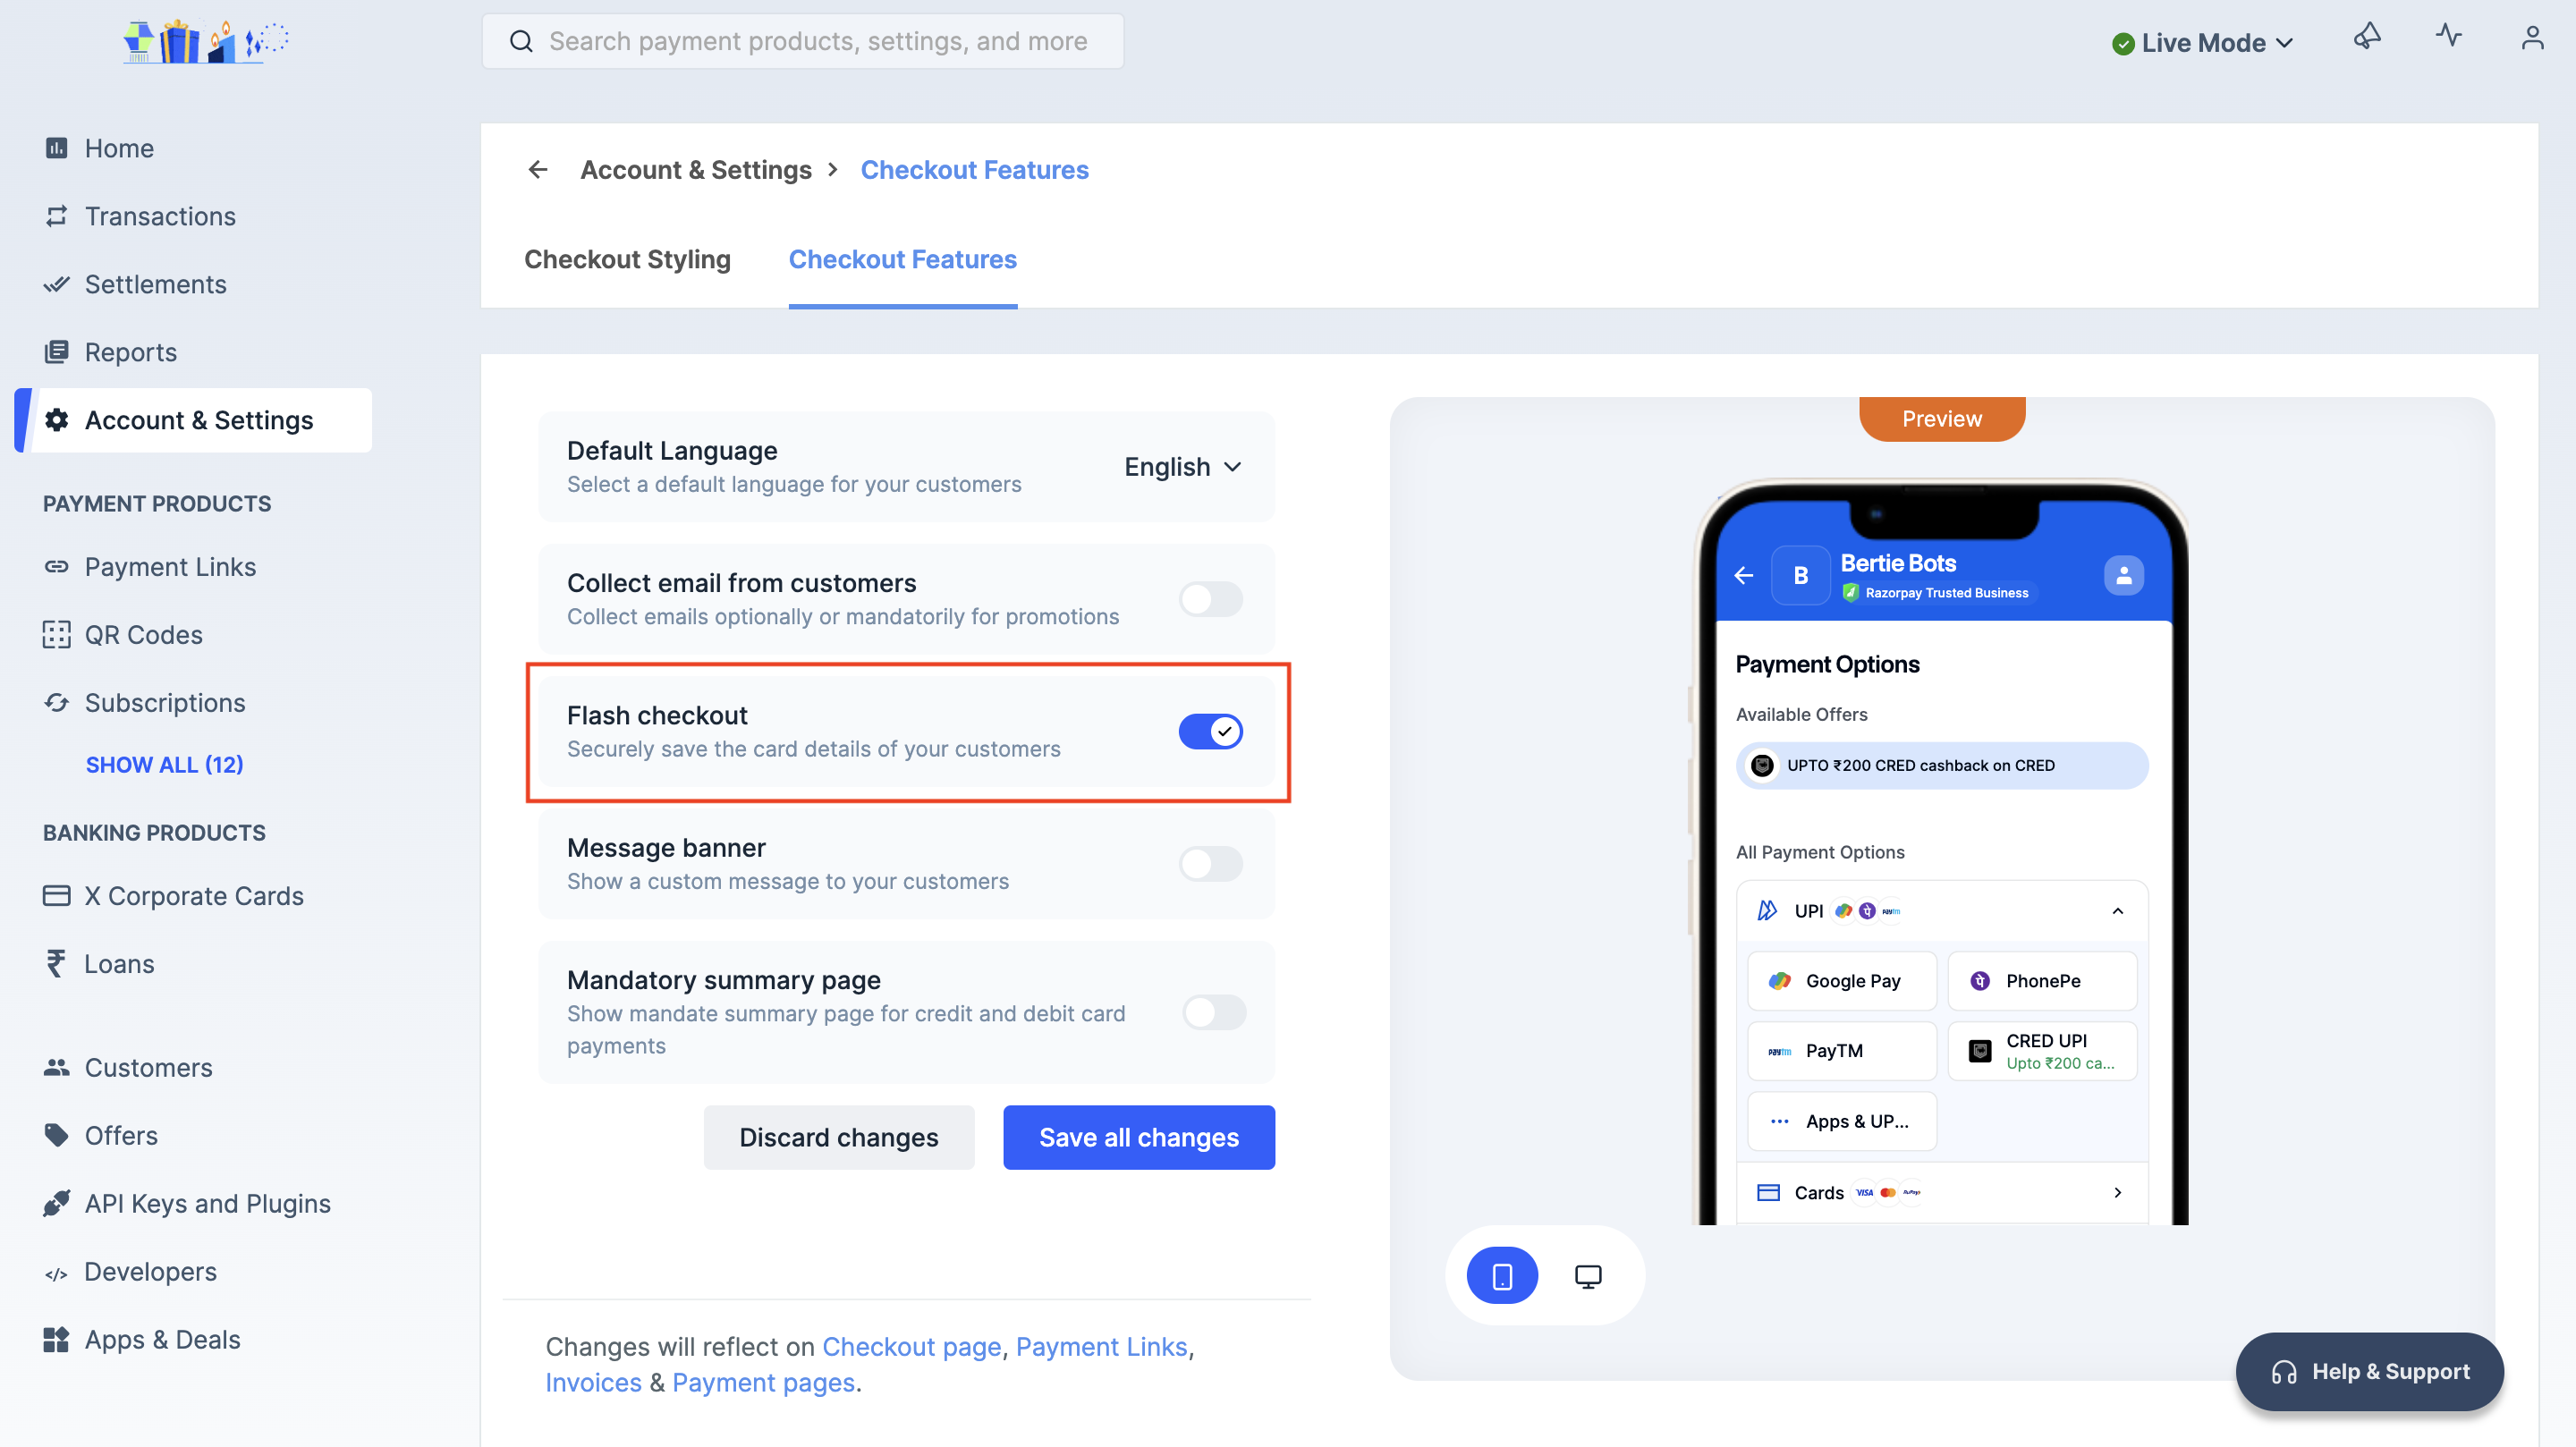
Use Flash Checkout to let your customers securely save their credit and/or debit card details with Razorpay, thereby reducing transaction time.
* Customers need to authenticate themselves only once on their mobile devices. Razorpay is PCI-DSS compliant. All the card information is securely saved on our servers.
* After the one-time authentication, customers' saved cards are available to accept payments online via Razorpay.
1. Log in to the Dashboard.
2. Navigate to **Accounts & Settings** → **Checkout Features** in the **Checkout settings** section.
3. Toggle on the **Flash checkout** field.
4. Click **Save all changes**.
## Flash Checkout
Use Flash Checkout to let your customers securely save their credit and/or debit card details with Razorpay, thereby reducing transaction time.
* Customers need to authenticate themselves only once on their mobile devices. Razorpay is PCI-DSS compliant. All the card information is securely saved on our servers.
* After the one-time authentication, customers' saved cards are available to accept payments online via Razorpay.
1. Log in to the Dashboard.
2. Navigate to **Accounts & Settings** → **Checkout Features** in the **Checkout settings** section.
3. Toggle on the **Flash checkout** field.
4. Click **Save all changes**.
 ## Message Banner
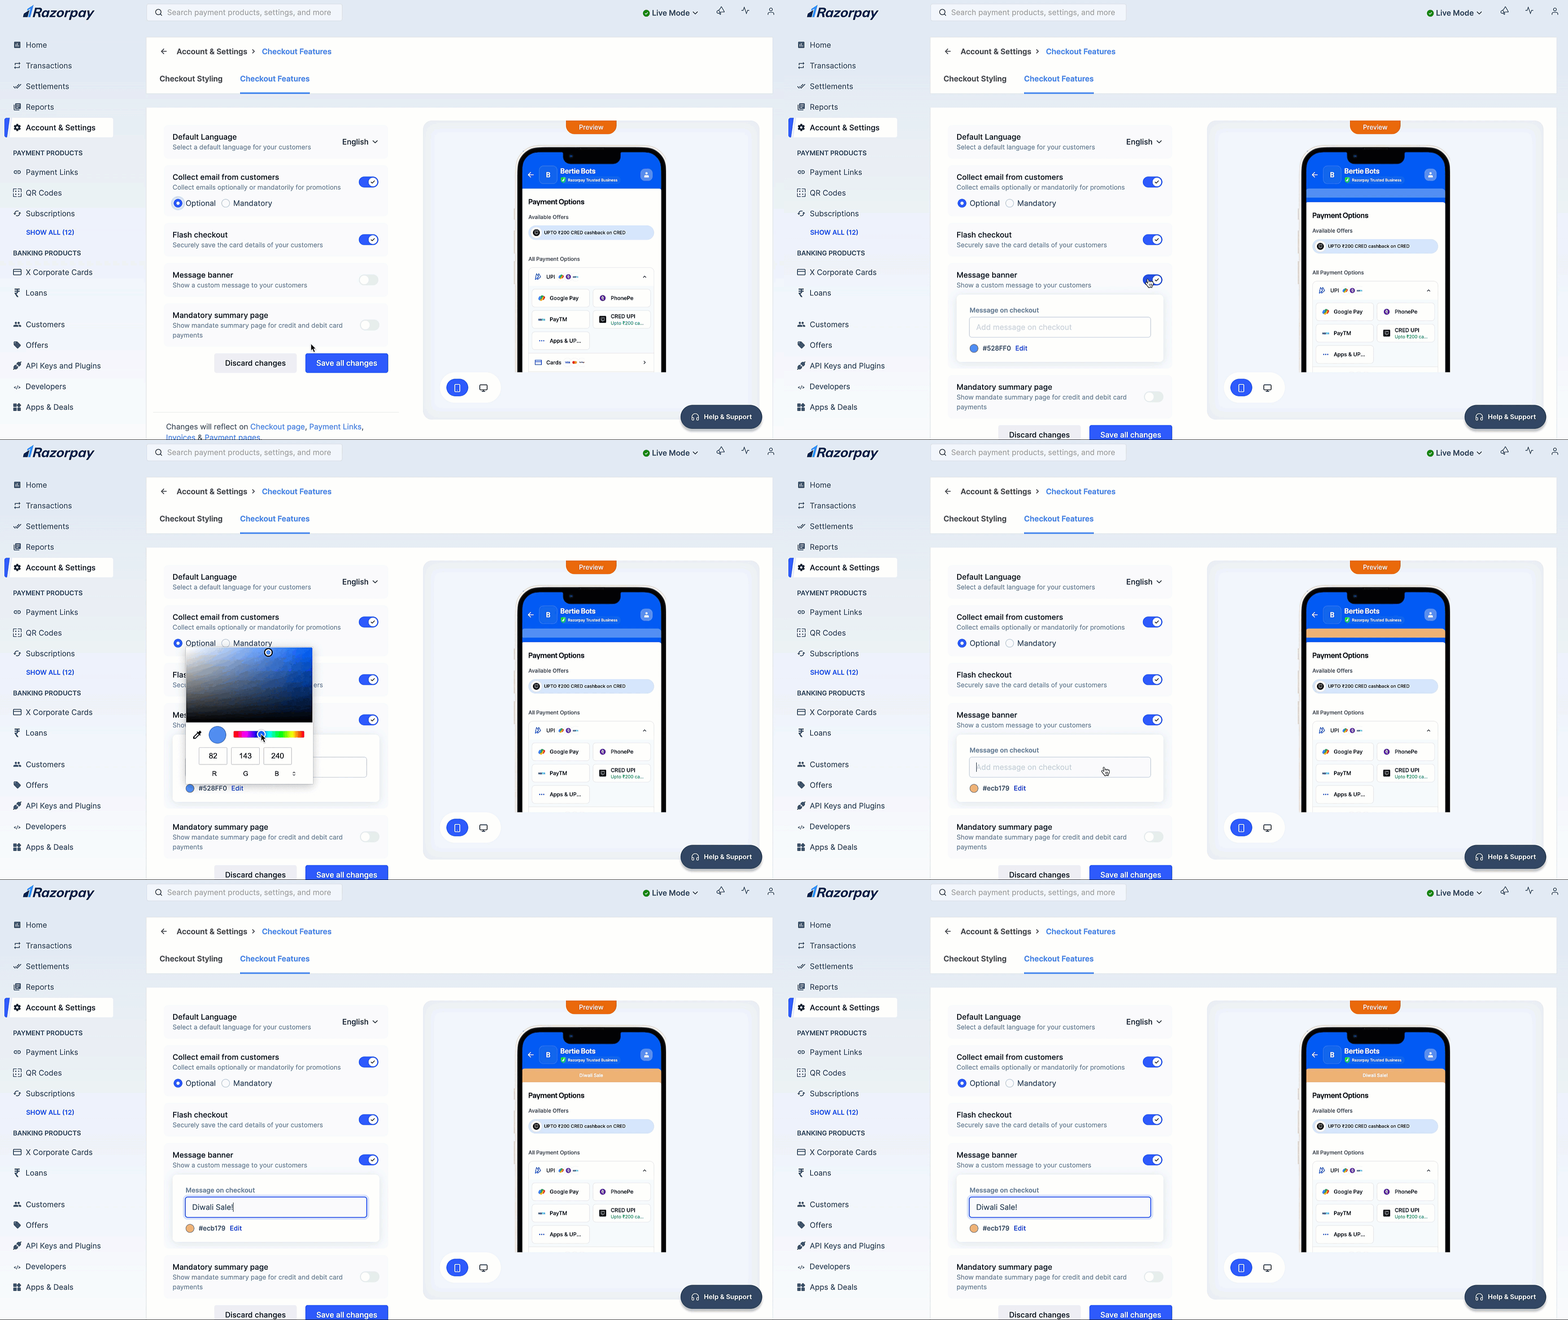
Show a custom message to your customers on checkout to highlight promotional offers, discounts or important updates, enhancing their shopping experience.
1. Log in to the Dashboard.
2. Navigate to **Accounts & Settings** → **Checkout Features** in the **Checkout settings** section.
3. Toggle on the **Message banner** field.
4. Enter your custom message.
5. Click **Edit** to select the banner color as preferred.
6. Click **Save all changes**.
## Message Banner
Show a custom message to your customers on checkout to highlight promotional offers, discounts or important updates, enhancing their shopping experience.
1. Log in to the Dashboard.
2. Navigate to **Accounts & Settings** → **Checkout Features** in the **Checkout settings** section.
3. Toggle on the **Message banner** field.
4. Enter your custom message.
5. Click **Edit** to select the banner color as preferred.
6. Click **Save all changes**.
 ## Mandate Summary Page
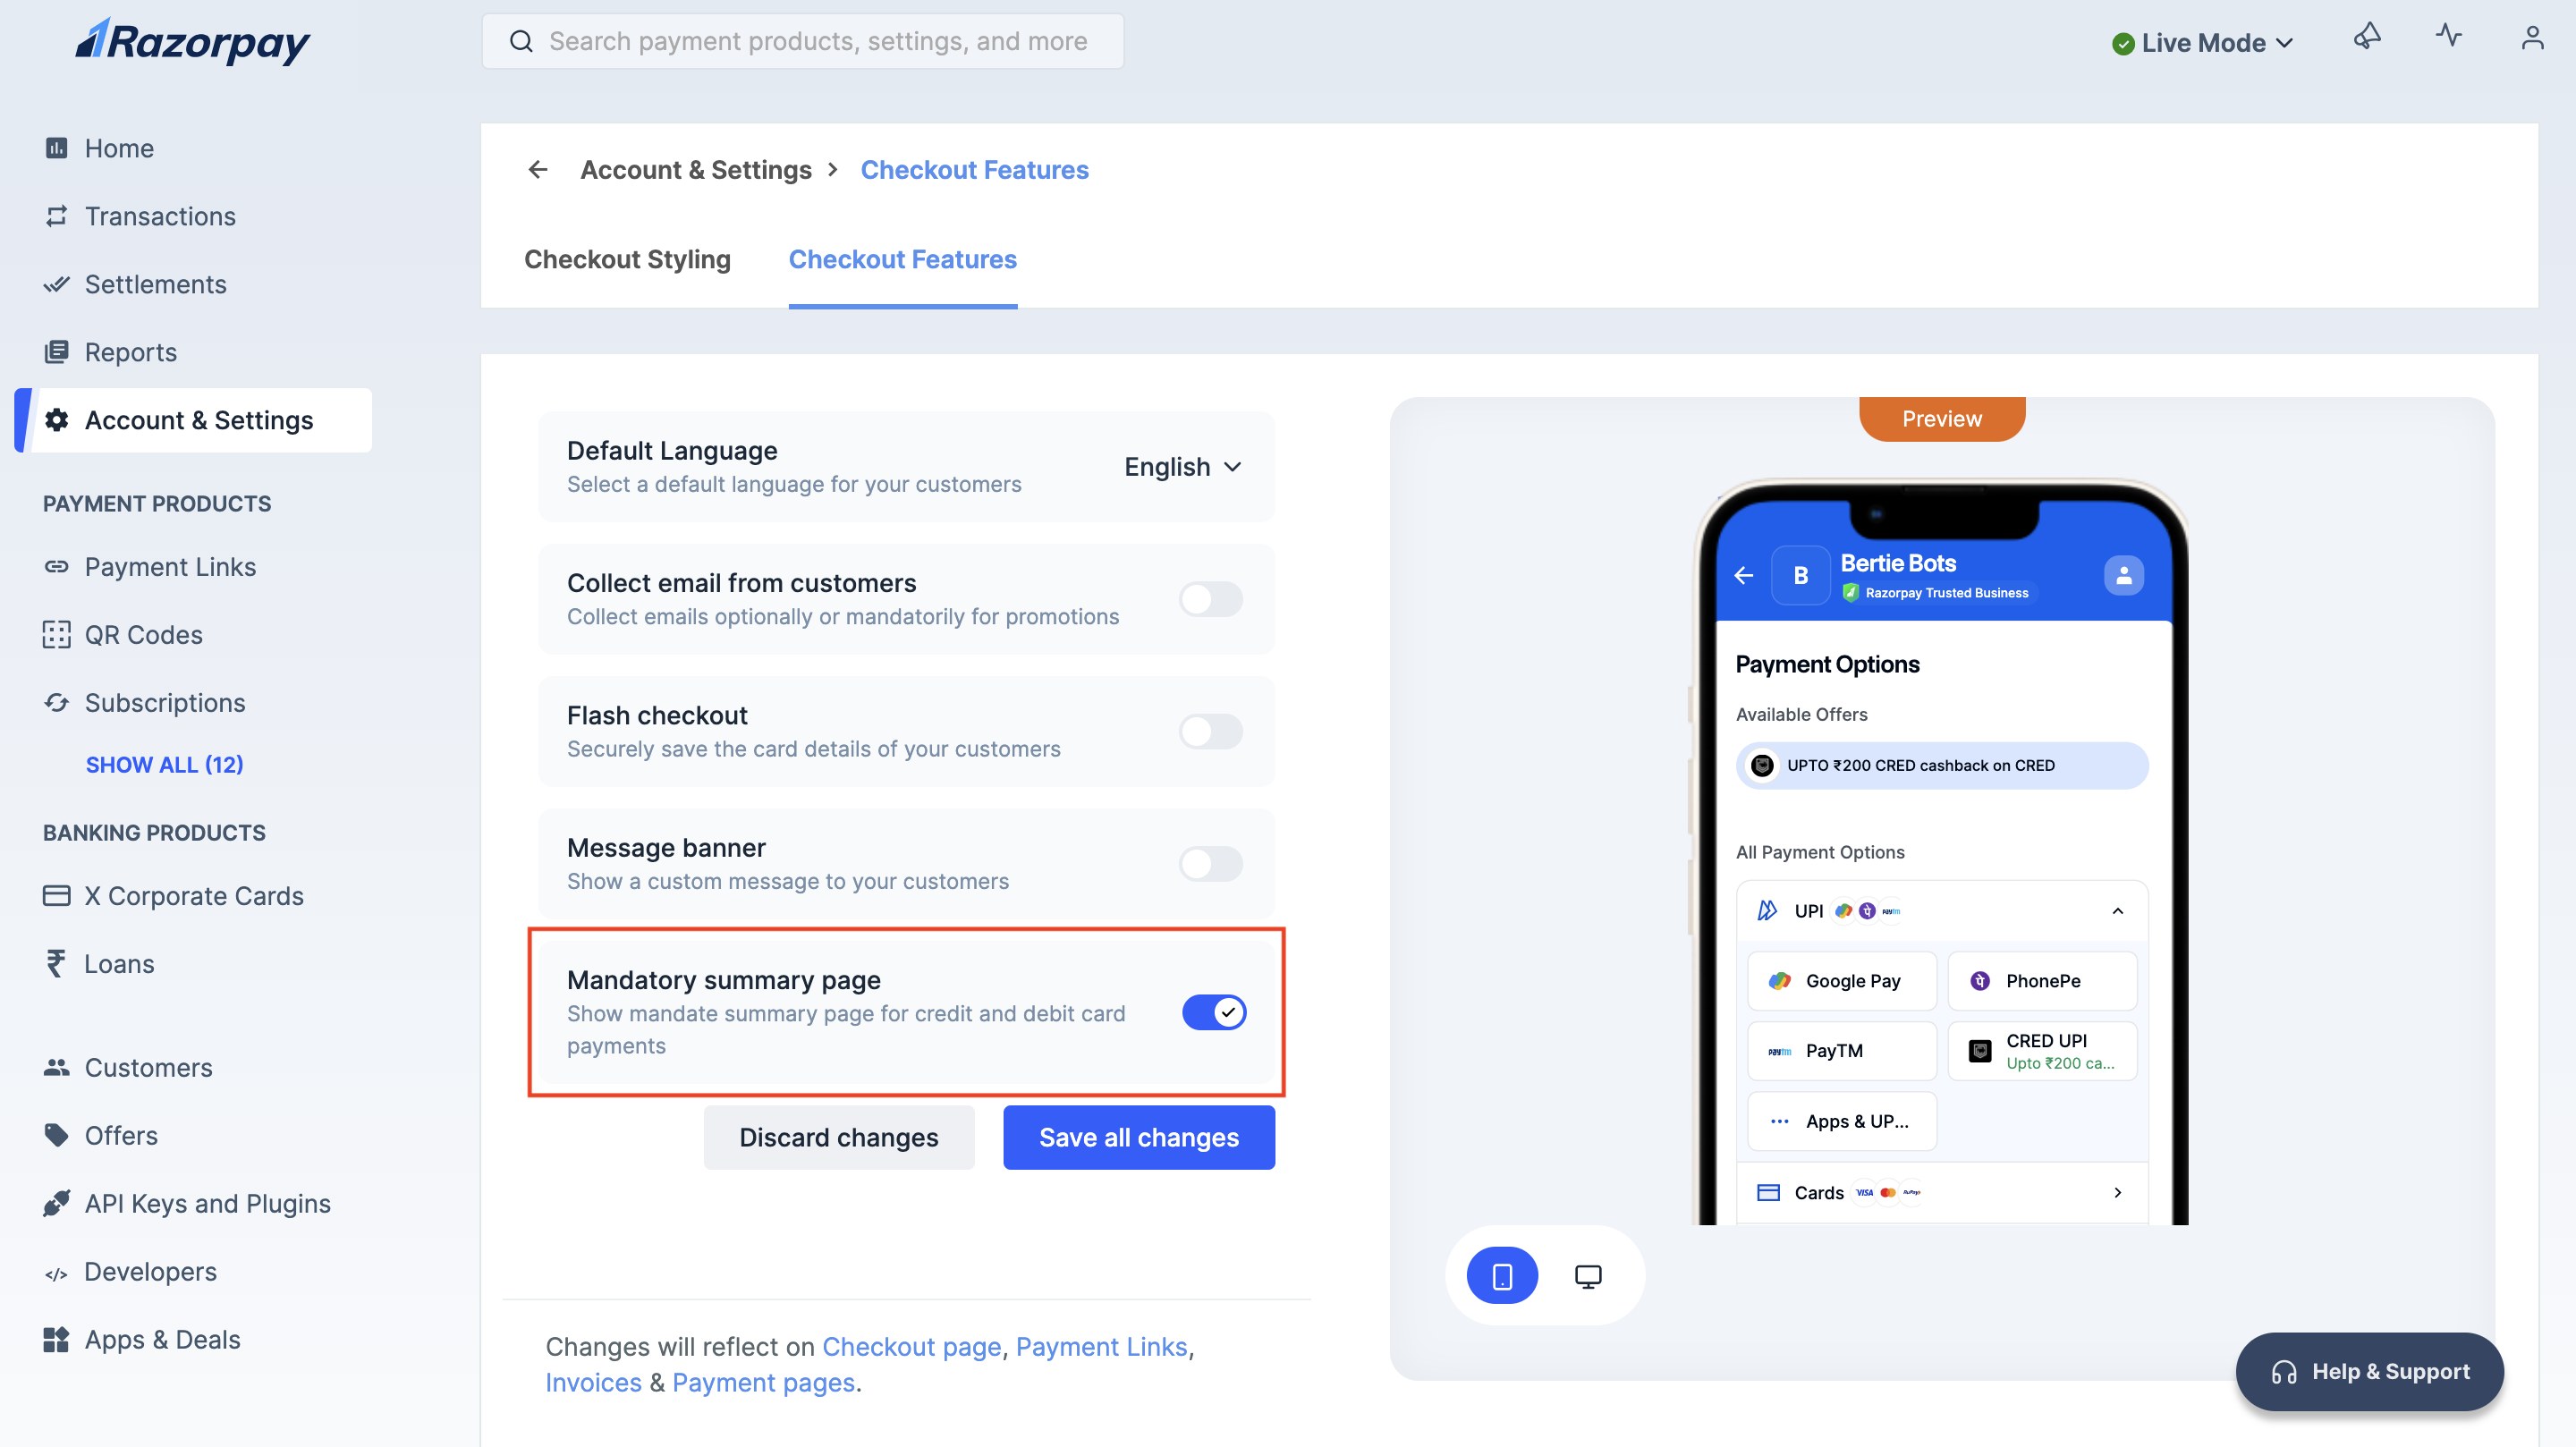
You can display the mandate summary screen for credit and debit card payments to your users.
1. Log in to the Dashboard.
2. Navigate to **Accounts & Settings** → **Checkout Features** in the **Checkout settings** section.
3. Toggle on the **Mandate summary page** field.
4. Click **Save all changes**.
## Mandate Summary Page
You can display the mandate summary screen for credit and debit card payments to your users.
1. Log in to the Dashboard.
2. Navigate to **Accounts & Settings** → **Checkout Features** in the **Checkout settings** section.
3. Toggle on the **Mandate summary page** field.
4. Click **Save all changes**.
 ## Order Banner
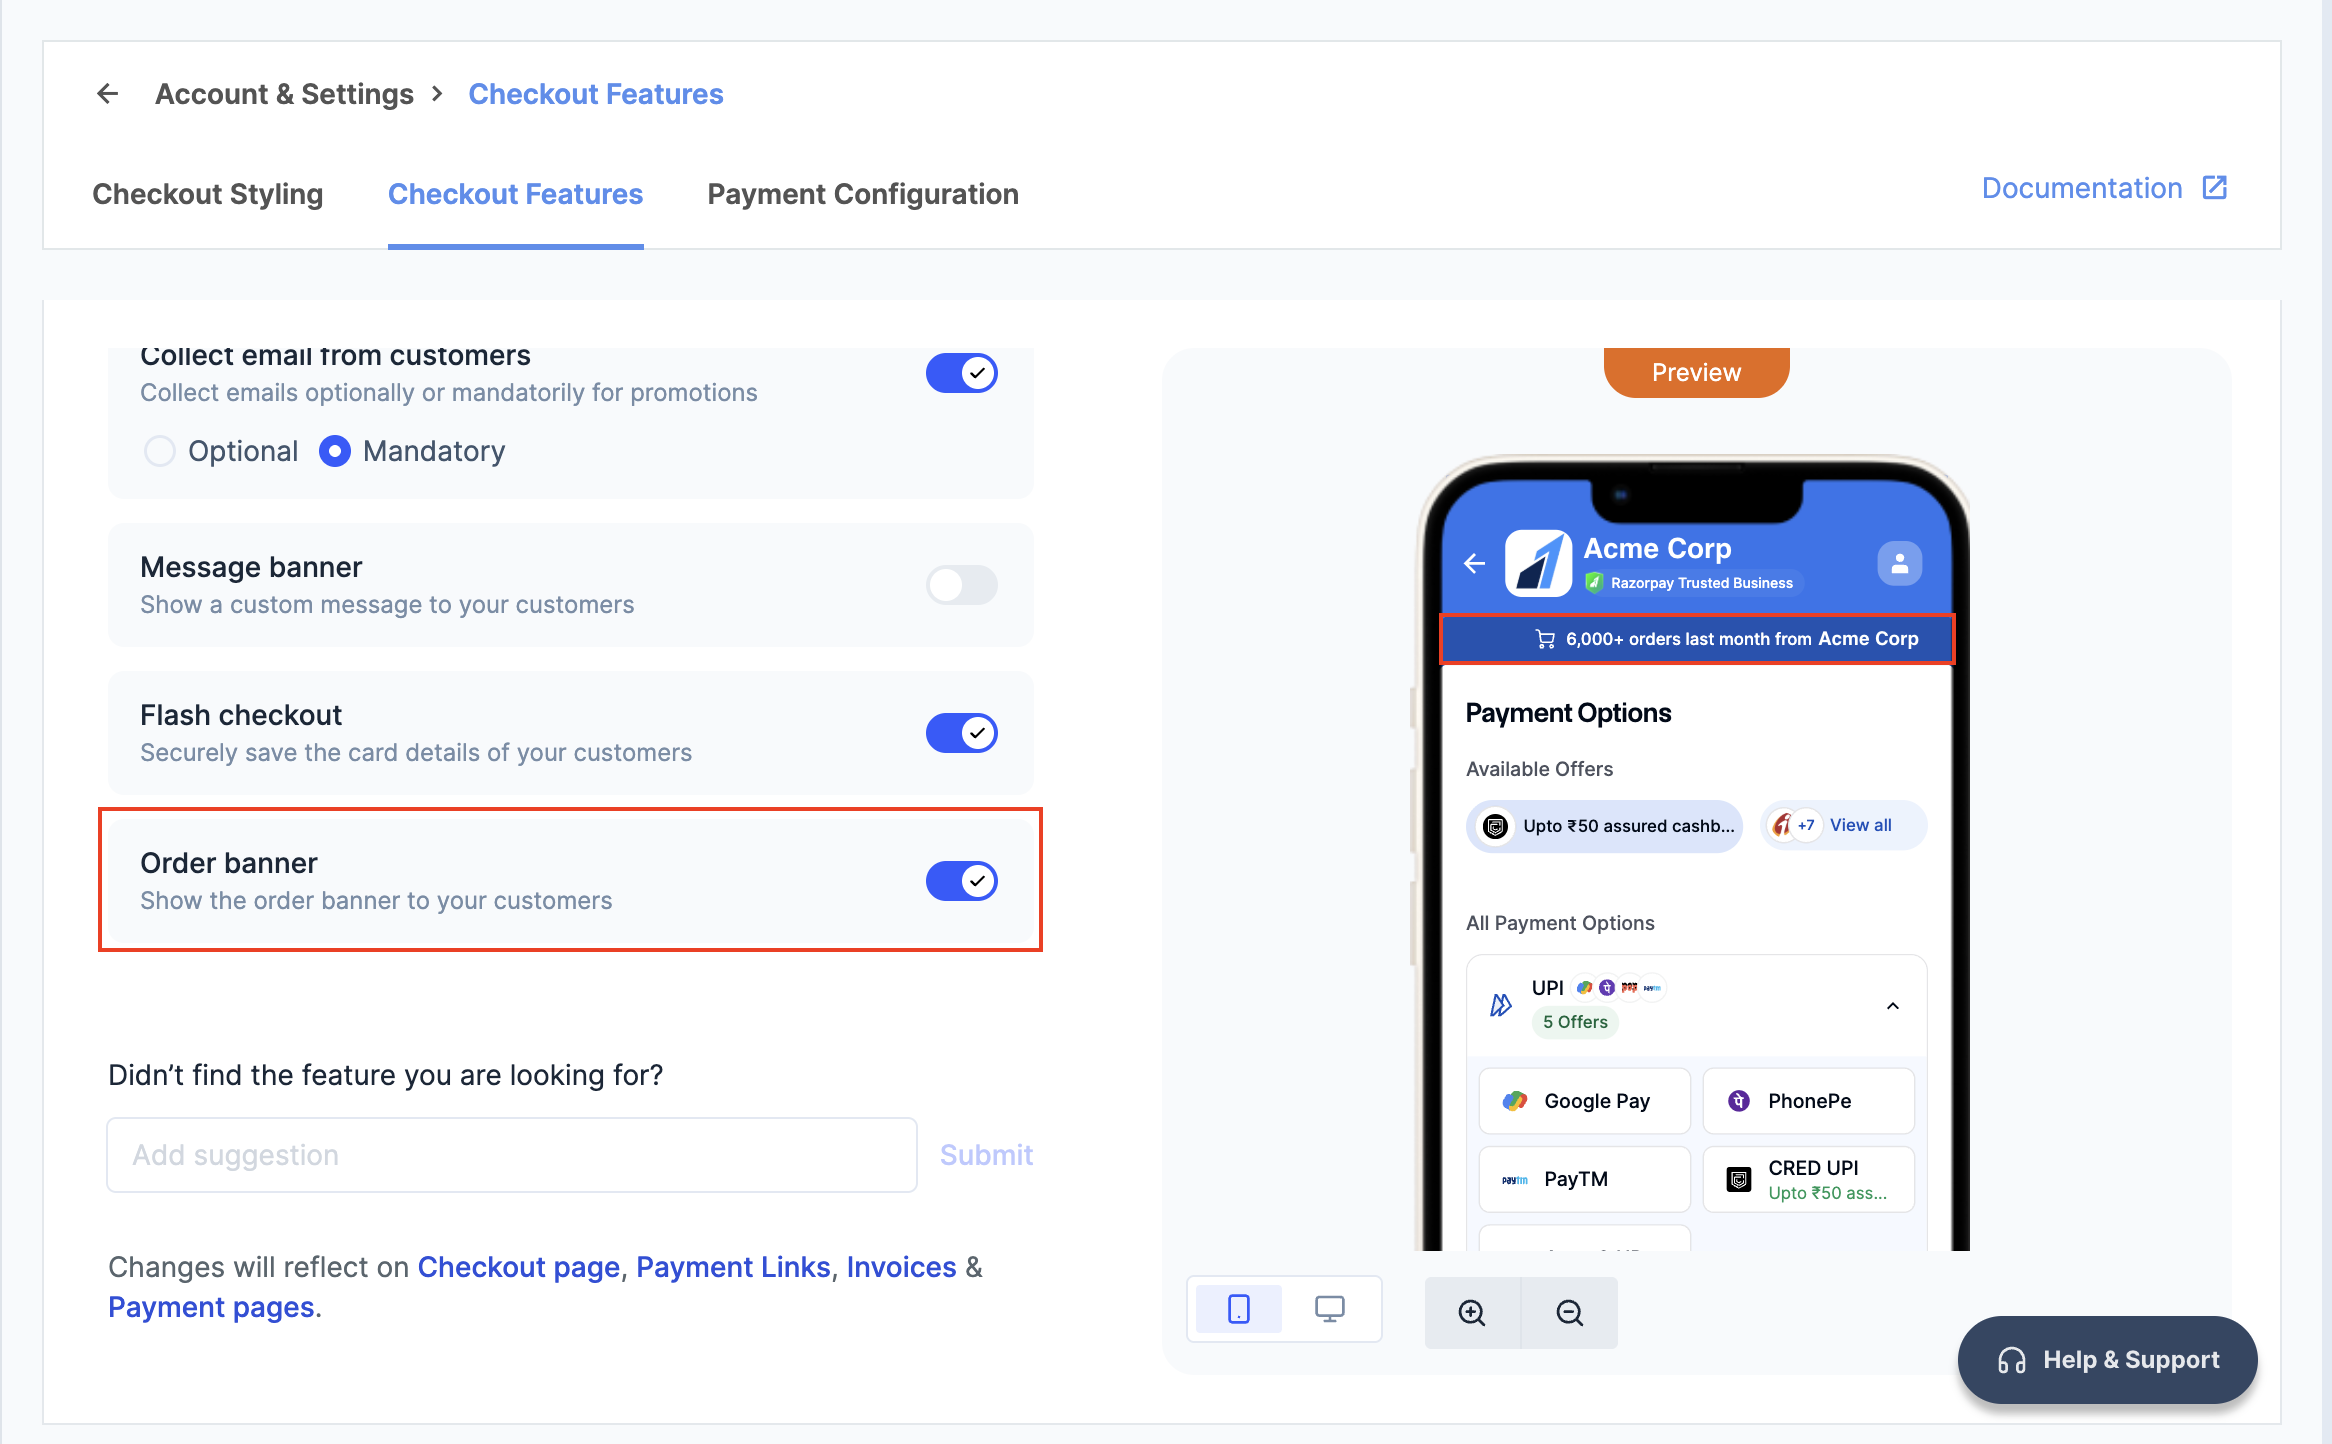
Display order milestone badges at checkout to boost customer trust and credibility. These badges highlight real order volumes, reassuring customers of your reliability and encouraging them to complete their purchase.
For example, if your store has processed 10,000+ successful orders, the badge showcases this achievement, reinforcing trust.
1. Log in to the Dashboard.
2. Navigate to **Accounts & Settings** → **Checkout Features** in the **Checkout settings** section.
3. Toggle on the **Order banner** field.
4. Click **Save all changes**.
## Order Banner
Display order milestone badges at checkout to boost customer trust and credibility. These badges highlight real order volumes, reassuring customers of your reliability and encouraging them to complete their purchase.
For example, if your store has processed 10,000+ successful orders, the badge showcases this achievement, reinforcing trust.
1. Log in to the Dashboard.
2. Navigate to **Accounts & Settings** → **Checkout Features** in the **Checkout settings** section.
3. Toggle on the **Order banner** field.
4. Click **Save all changes**.
 **Watch Out!**
* This feature is automatically enabled and currently available only for businesses with [RTB](/docs/payments/widgets/trusted-business) enabled.
* If a [message banner](#message-banner) exists on the checkout page, the badge information seamlessly integrates within the same section using vertical scrolling.
### Related Information
[FAQs](/docs/payments/dashboard/faqs#checkout-settings)
**Watch Out!**
* This feature is automatically enabled and currently available only for businesses with [RTB](/docs/payments/widgets/trusted-business) enabled.
* If a [message banner](#message-banner) exists on the checkout page, the badge information seamlessly integrates within the same section using vertical scrolling.
### Related Information
[FAQs](/docs/payments/dashboard/faqs#checkout-settings)