> ## Documentation Index
> Fetch the complete documentation index at: https://razorpay-881012b3.mintlify.site/llms.txt
> Use this file to discover all available pages before exploring further.
# Credits
> Know about the Amount credits, Fee credits and Refund credits available to you. Manage them and configure alerts from the Razorpay Dashboard.
Available in
🇮🇳 India
There are three types of credits [Amount credits](#amount-credits), [Fee credits](#fee-credits) and [Refund credits](#refund-credits). You can view and add funds to these credits from the Dashboard. Also, you can [configure alerts](#credit-alerts) to receive email notifications when your credits fall below the set threshold.
 ## Amount Credits
Amount credits are the credits against which you can receive payments without any fee deduction.
**Amount credits availablility for businesses**
* **Registered Businesses**: Cannot use Amount credits for prepaid cards or corporate credit cards.
* **Unregistered Businesses**: Cannot use Amount credits for prepaid cards, credit cards or corporate credit cards.
If you have a credit of , you will not be charged any fees for payments up to . However, if a transaction exceeds (for example, ), fees apply to the entire amount, and you cannot use your credits for this transaction. Amount credits might be assigned to your account during sign-up if Razorpay runs promotional campaigns.
You can view the Amount credits assigned to your Razorpay Dashboard account. However, you cannot add any funds to this credit.
To view Amount credits history:
1. Log in to the Dashboard.
2. Click **Account & Settings** in the left navigation.
3. Click **Credits** under **Payments and refunds** section.
4. Click **Past Coupons** under **Amount Credits**.
## Amount Credits
Amount credits are the credits against which you can receive payments without any fee deduction.
**Amount credits availablility for businesses**
* **Registered Businesses**: Cannot use Amount credits for prepaid cards or corporate credit cards.
* **Unregistered Businesses**: Cannot use Amount credits for prepaid cards, credit cards or corporate credit cards.
If you have a credit of , you will not be charged any fees for payments up to . However, if a transaction exceeds (for example, ), fees apply to the entire amount, and you cannot use your credits for this transaction. Amount credits might be assigned to your account during sign-up if Razorpay runs promotional campaigns.
You can view the Amount credits assigned to your Razorpay Dashboard account. However, you cannot add any funds to this credit.
To view Amount credits history:
1. Log in to the Dashboard.
2. Click **Account & Settings** in the left navigation.
3. Click **Credits** under **Payments and refunds** section.
4. Click **Past Coupons** under **Amount Credits**.
 A list of Amount credits assigned to the account in the past is displayed.
## Fee Credits
Fee credits are the credits using which businesses can receive the full settlement amount without any fee deduction. Specific business categories use these credits to help them meet regulatory requirements.
If you have a fee credit of , all the transactions will be settled in full, and the fees for these payments will be deducted from the ₹100 fee credit.
You can add funds to Fee credits using the Dashboard through UPI or Bank Transfer.
**Watch Out!**
You should add funds only through the settlement account registered with us.
A list of Amount credits assigned to the account in the past is displayed.
## Fee Credits
Fee credits are the credits using which businesses can receive the full settlement amount without any fee deduction. Specific business categories use these credits to help them meet regulatory requirements.
If you have a fee credit of , all the transactions will be settled in full, and the fees for these payments will be deducted from the ₹100 fee credit.
You can add funds to Fee credits using the Dashboard through UPI or Bank Transfer.
**Watch Out!**
You should add funds only through the settlement account registered with us.
To add Fee Credits using UPI:
1. Log in to the Dashboard.
2. Click **Account & Settings** in the left navigation.
3. Click **Credits** under **Payments and refunds** section.
4. Click **Add Fee Credits**.
 5. Select **UPI**.
6. Enter the description and amount to be added.
7. Click **Add Credits**.
8. Enter the email and contact number on the checkout pop-up page and click **Proceed**.
9. Select UPI, enter UPI ID or scan the QR, click **PayNow** and complete the payment.
Your Fee credits balance is updated.
**Handy Tips**
It may take 2-3 hours for the credits to reflect in your Razorpay account.
To add Fee Credits using Bank Transfer:
1. Log in to the Dashboard.
2. Click **Account & Settings** in the left navigation.
3. Click **Credits** under **Payments and refunds** section.
4. Click **Add Fee Credits**.
5. Select **Bank Transfer**.
6. Copy the account number and IFSC code.
5. Select **UPI**.
6. Enter the description and amount to be added.
7. Click **Add Credits**.
8. Enter the email and contact number on the checkout pop-up page and click **Proceed**.
9. Select UPI, enter UPI ID or scan the QR, click **PayNow** and complete the payment.
Your Fee credits balance is updated.
**Handy Tips**
It may take 2-3 hours for the credits to reflect in your Razorpay account.
To add Fee Credits using Bank Transfer:
1. Log in to the Dashboard.
2. Click **Account & Settings** in the left navigation.
3. Click **Credits** under **Payments and refunds** section.
4. Click **Add Fee Credits**.
5. Select **Bank Transfer**.
6. Copy the account number and IFSC code.
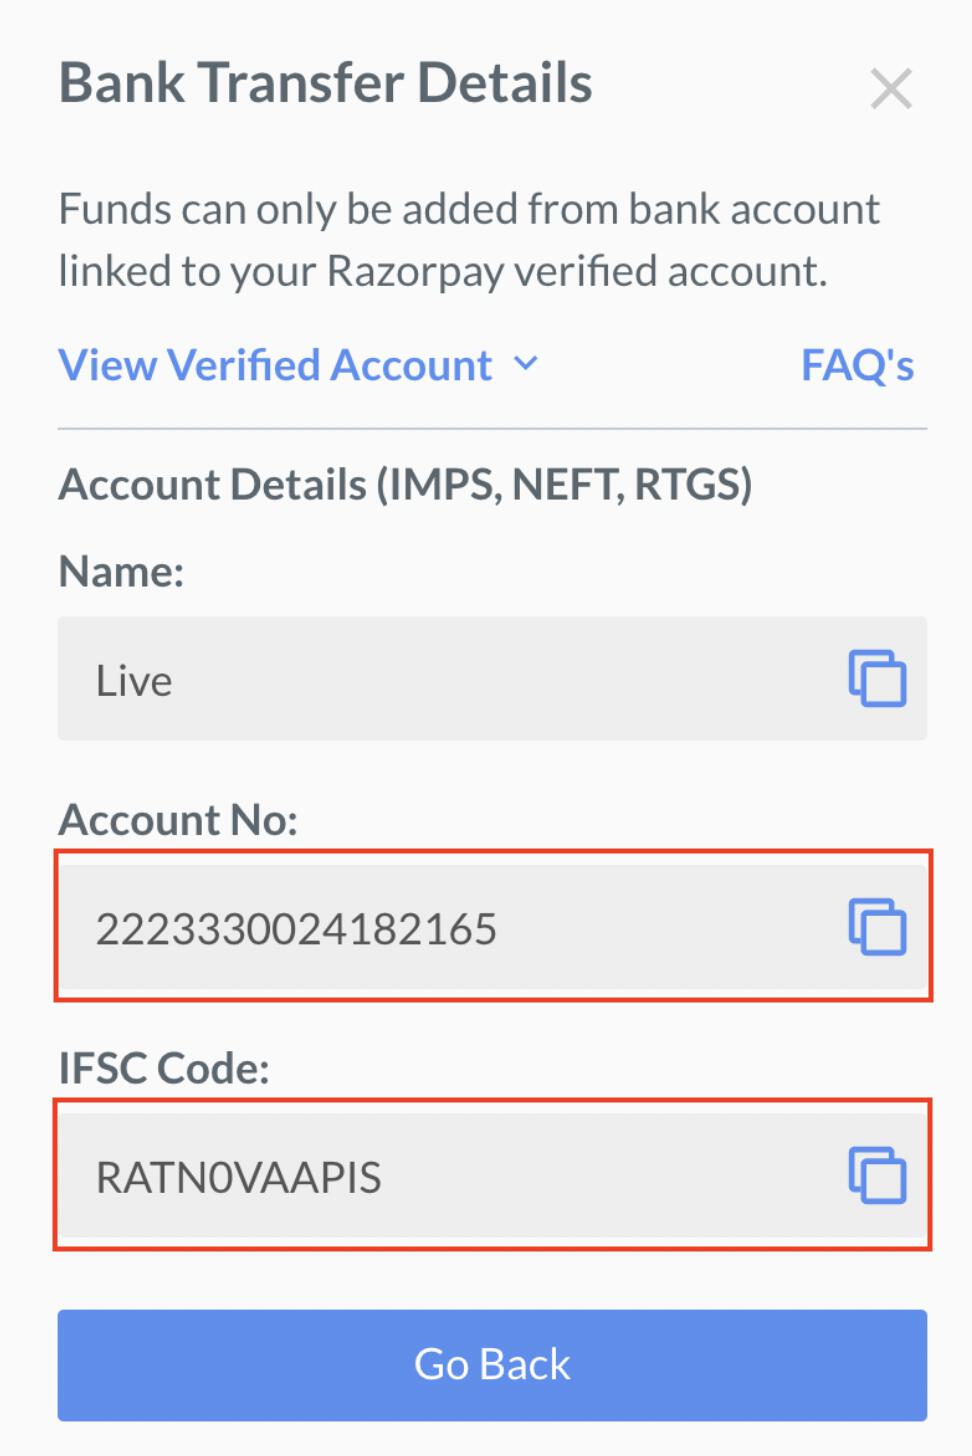 7. Open your netbanking portal, create a beneficiary with these details and transfer the amount.
**Handy Tips**
It may take 2-3 hours for the credits to reflect in your Razorpay account.
Your Fee credits balance is updated.
You can view the Fee credits previously added by you.
To view Fee credit history:
1. Log in to the Dashboard.
2. Click **Account & Settings** in the left navigation.
3. Click **Credits** under **Payments and refunds** section.
4. Click **View History** under **Fee Credits**.
A list of Fee credits previously added by you is displayed.
7. Open your netbanking portal, create a beneficiary with these details and transfer the amount.
**Handy Tips**
It may take 2-3 hours for the credits to reflect in your Razorpay account.
Your Fee credits balance is updated.
You can view the Fee credits previously added by you.
To view Fee credit history:
1. Log in to the Dashboard.
2. Click **Account & Settings** in the left navigation.
3. Click **Credits** under **Payments and refunds** section.
4. Click **View History** under **Fee Credits**.
A list of Fee credits previously added by you is displayed.
 ## Refund Credits
Refund credits are the credits you can use to make refunds to customers. This ensures that the refunds are not made from your settlement amount but from a separate credit pool.
If you have a Refund credit of , any refunds to be processed will be deducted from this credit and not from the actual payment.
You can add funds to Refund credits using the Dashboard through either UPI or Bank Transfer.
**Watch Out!**
You should add funds only through the settlement account registered with us.
## Refund Credits
Refund credits are the credits you can use to make refunds to customers. This ensures that the refunds are not made from your settlement amount but from a separate credit pool.
If you have a Refund credit of , any refunds to be processed will be deducted from this credit and not from the actual payment.
You can add funds to Refund credits using the Dashboard through either UPI or Bank Transfer.
**Watch Out!**
You should add funds only through the settlement account registered with us.
To add Refund credits using UPI:
1. Log in to the Dashboard.
2. Click **Account & Settings** in the left navigation.
3. Click **Credits** under **Payments and refunds** section.
4. Click **Add Refund Credits**.
 5. Select **UPI**.
6. Enter the description and amount to be added.
7. Click **Add Credits**.
8. Enter the email and contact number on the checkout pop-up page and click **Proceed**.
9. Select UPI, enter UPI ID or scan the QR, click **PayNow** and complete the payment.
Your Refund credits balance is updated.
**Handy Tips**
It may take 2-3 hours for the credits to reflect in your Razorpay account.
To add Refund credits using bank transfer:
1. Log in to the Dashboard.
2. Click **Account & Settings** in the left navigation.
3. Click **Credits** under **Payments and refunds** section.
4. Click **Add Refund Credits**.
5. Select **Bank Transfer**.
6. Copy the account number and IFSC code.
7. Open your netbanking portal, create a beneficiary with these details and transfer the amount.
**Handy Tips**
It may take 2-3 hours for the credits to reflect in your Razorpay account.
You can view the Refund credits previously added by you.
To view Refund credit history:
1. Log in to the Dashboard.
2. Click **Account & Settings** in the left navigation.
3. Click **Credits** under **Payments and refunds** section.
4. Click **View History** under **Refund Credits**.
A list of Refund credits previously added by you is displayed.
5. Select **UPI**.
6. Enter the description and amount to be added.
7. Click **Add Credits**.
8. Enter the email and contact number on the checkout pop-up page and click **Proceed**.
9. Select UPI, enter UPI ID or scan the QR, click **PayNow** and complete the payment.
Your Refund credits balance is updated.
**Handy Tips**
It may take 2-3 hours for the credits to reflect in your Razorpay account.
To add Refund credits using bank transfer:
1. Log in to the Dashboard.
2. Click **Account & Settings** in the left navigation.
3. Click **Credits** under **Payments and refunds** section.
4. Click **Add Refund Credits**.
5. Select **Bank Transfer**.
6. Copy the account number and IFSC code.
7. Open your netbanking portal, create a beneficiary with these details and transfer the amount.
**Handy Tips**
It may take 2-3 hours for the credits to reflect in your Razorpay account.
You can view the Refund credits previously added by you.
To view Refund credit history:
1. Log in to the Dashboard.
2. Click **Account & Settings** in the left navigation.
3. Click **Credits** under **Payments and refunds** section.
4. Click **View History** under **Refund Credits**.
A list of Refund credits previously added by you is displayed.
 ## Credit Alerts
You can configure alerts to receive email notifications when any of your credits fall below the set threshold amount. This helps you monitor your credit balance and add funds to them whenever necessary.
You can set three alert levels, wherein:
* Alert Level 1: Level set by you on the Dashboard.
* Alert Level 2: Automatically set as 50% of Alert Level 1.
* Alert Level 3: Automatically set as 25% of Alert Level 1.
You can set your Refunds credit alert as . This means that whenever your Refund credits balance falls below:
* : The first email is sent to your registered email address.
* : The second email is sent.
* : The third and final email is sent.
You can configure credit alerts using the Dashboard.
To configure alerts:
1. Log in to the Dashboard.
2. Click **Account & Settings** in the left navigation.
3. Click **Credits** under **Payments and refunds** section.
4. Click **Manage Alerts**.
5. Set up the alerts for each credit type. You need to enter the value of Alert Level 1 only.
**Handy Tips**
If you do not want to receive any alerts, set the value to `0`.
## Credit Alerts
You can configure alerts to receive email notifications when any of your credits fall below the set threshold amount. This helps you monitor your credit balance and add funds to them whenever necessary.
You can set three alert levels, wherein:
* Alert Level 1: Level set by you on the Dashboard.
* Alert Level 2: Automatically set as 50% of Alert Level 1.
* Alert Level 3: Automatically set as 25% of Alert Level 1.
You can set your Refunds credit alert as . This means that whenever your Refund credits balance falls below:
* : The first email is sent to your registered email address.
* : The second email is sent.
* : The third and final email is sent.
You can configure credit alerts using the Dashboard.
To configure alerts:
1. Log in to the Dashboard.
2. Click **Account & Settings** in the left navigation.
3. Click **Credits** under **Payments and refunds** section.
4. Click **Manage Alerts**.
5. Set up the alerts for each credit type. You need to enter the value of Alert Level 1 only.
**Handy Tips**
If you do not want to receive any alerts, set the value to `0`.