> ## Documentation Index
> Fetch the complete documentation index at: https://razorpay-881012b3.mintlify.site/llms.txt
> Use this file to discover all available pages before exploring further.
# Payment Configuration
> Select the payment methods and instruments you want to display, rearrange them to customise your checkout and create custom payment blocks for different customers.
Available in
🇮🇳 India
Perform multiple configurations related to the payment methods and instruments that you want to show on your checkout page.
* Choose the payment methods and instruments you want to display at checkout
* Arrange them in your preferred order
* Create custom payment blocks for specific customer segments, ensuring they see the most relevant options.
This enhances the user experience, improves discoverability and boosts conversion rates.
**Handy Tips**
* You can hide, show, create custom blocks and rearrange payment methods and instruments as required, but you cannot enable or disable them from this setting. Know more about how to [enable/disable payment methods](/docs/payments/dashboard/account-settings/payment-methods#enable-payment-methods).
* You can switch between mobile and desktop views to preview changes.
## View Default Configuration
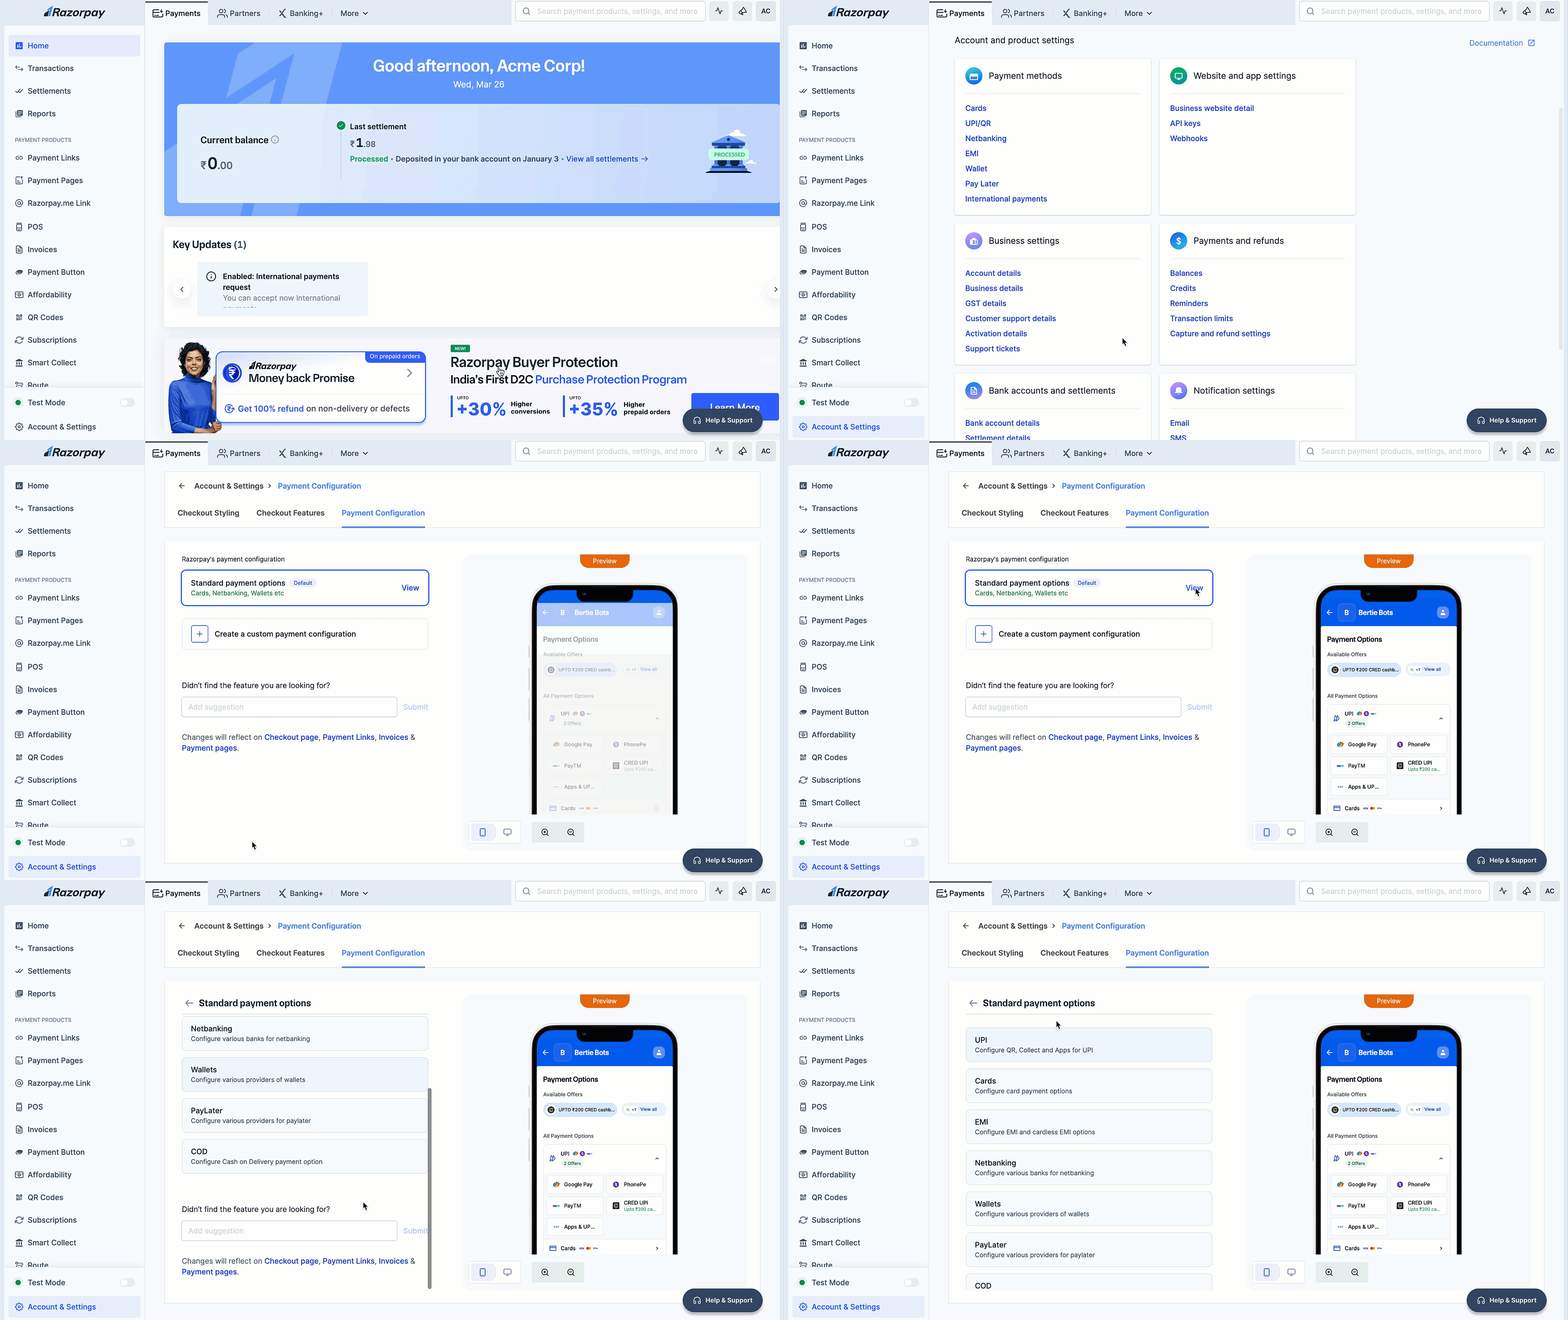
To view Razorpay's default payment configuration:
1. Navigate to **Accounts & Settings** → **Payment Configuration** under **Checkout settings** section.
2. Click **View** against the **Standard Payment Options** section. This setting is read-only and cannot be edited.
 ## Configure Payment Options
Follow these steps to configure your payment options:
1. Log in to the Dashboard.
2. Navigate to **Accounts & Settings** → **Payment Configuration** under **Checkout settings** section. Following are the types of configurations:
You can customise the payment options to display only the methods you want your customers to see, instead of Razorpay's default configuration.
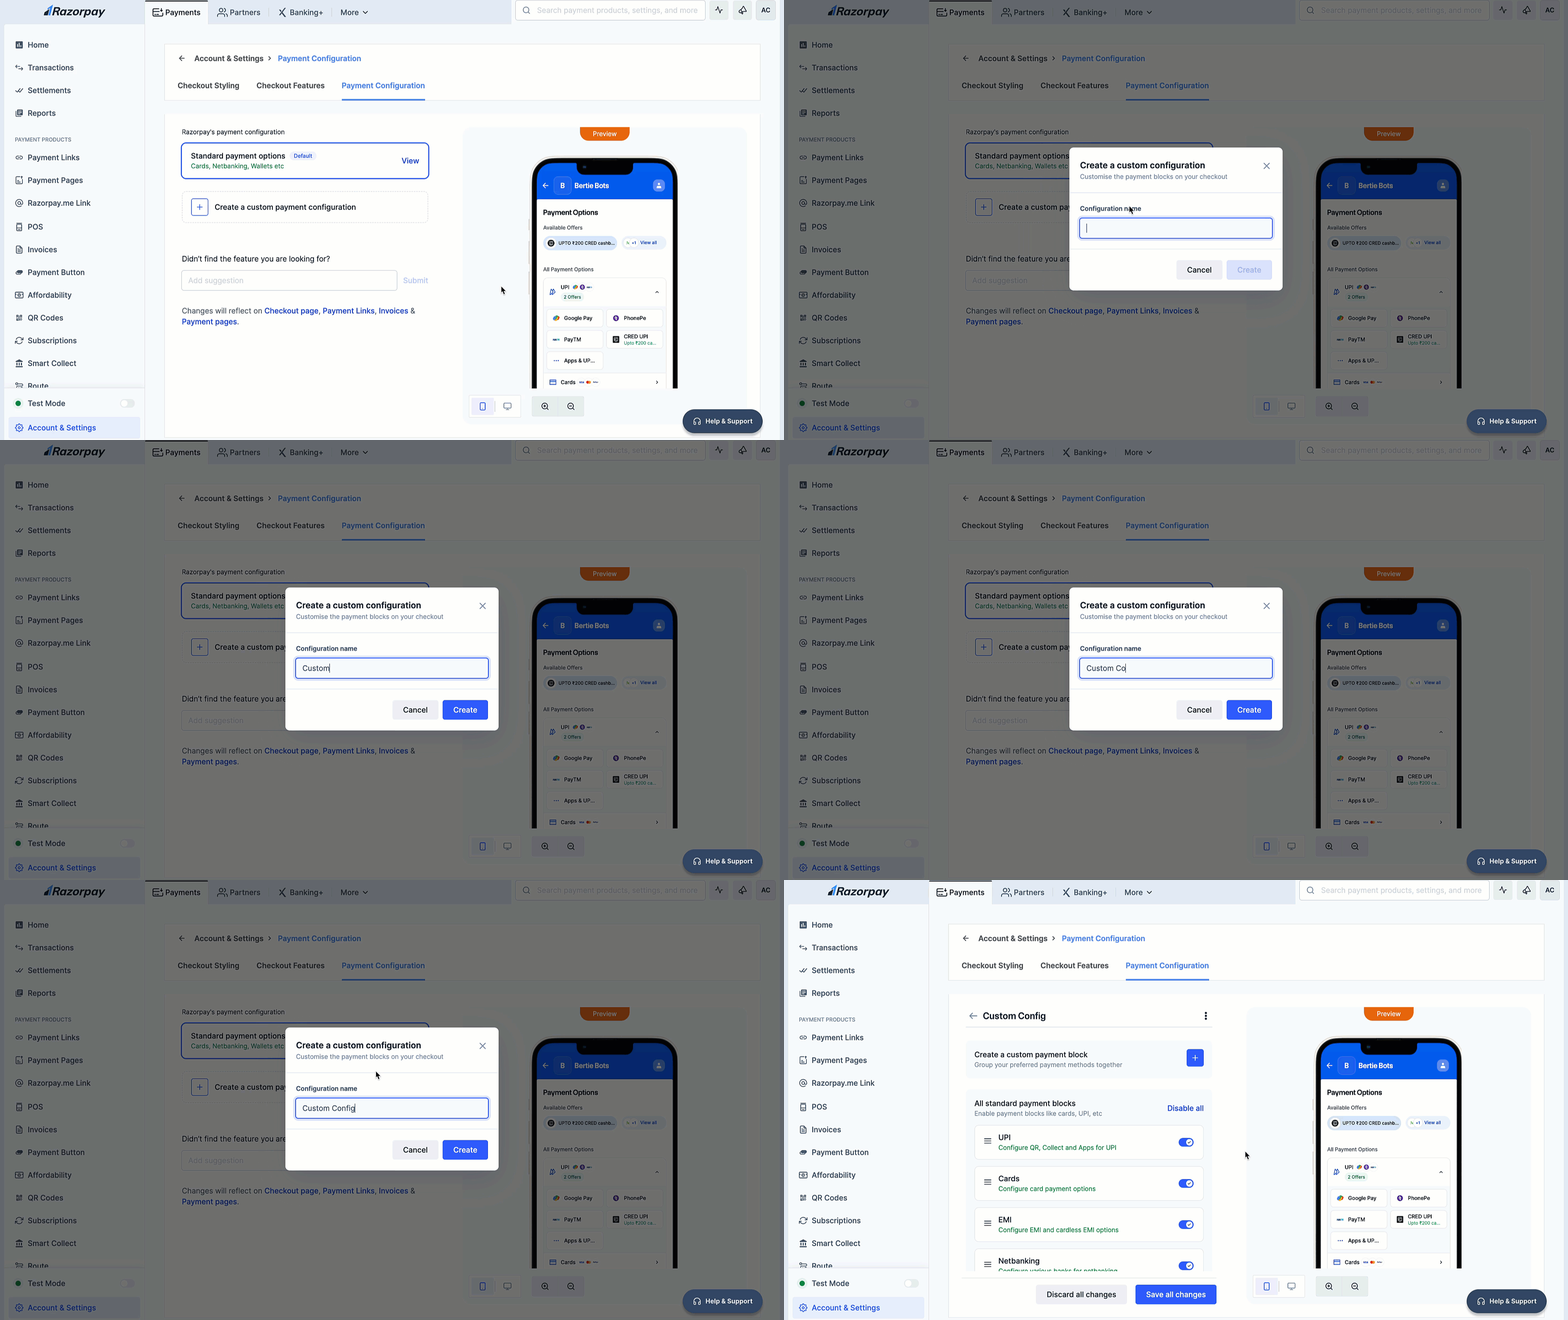
1. Click **Create a custom payment configuration**.
2. Enter the **Configuration name** and click **Save**.
## Configure Payment Options
Follow these steps to configure your payment options:
1. Log in to the Dashboard.
2. Navigate to **Accounts & Settings** → **Payment Configuration** under **Checkout settings** section. Following are the types of configurations:
You can customise the payment options to display only the methods you want your customers to see, instead of Razorpay's default configuration.
1. Click **Create a custom payment configuration**.
2. Enter the **Configuration name** and click **Save**.
 3. By default, all payment methods available on your account are enabled. You can show or hide payment methods as needed. Additionally, you can rearrange them in your preferred order by dragging and dropping, based on customer preferences, success rates, or usage frequency.
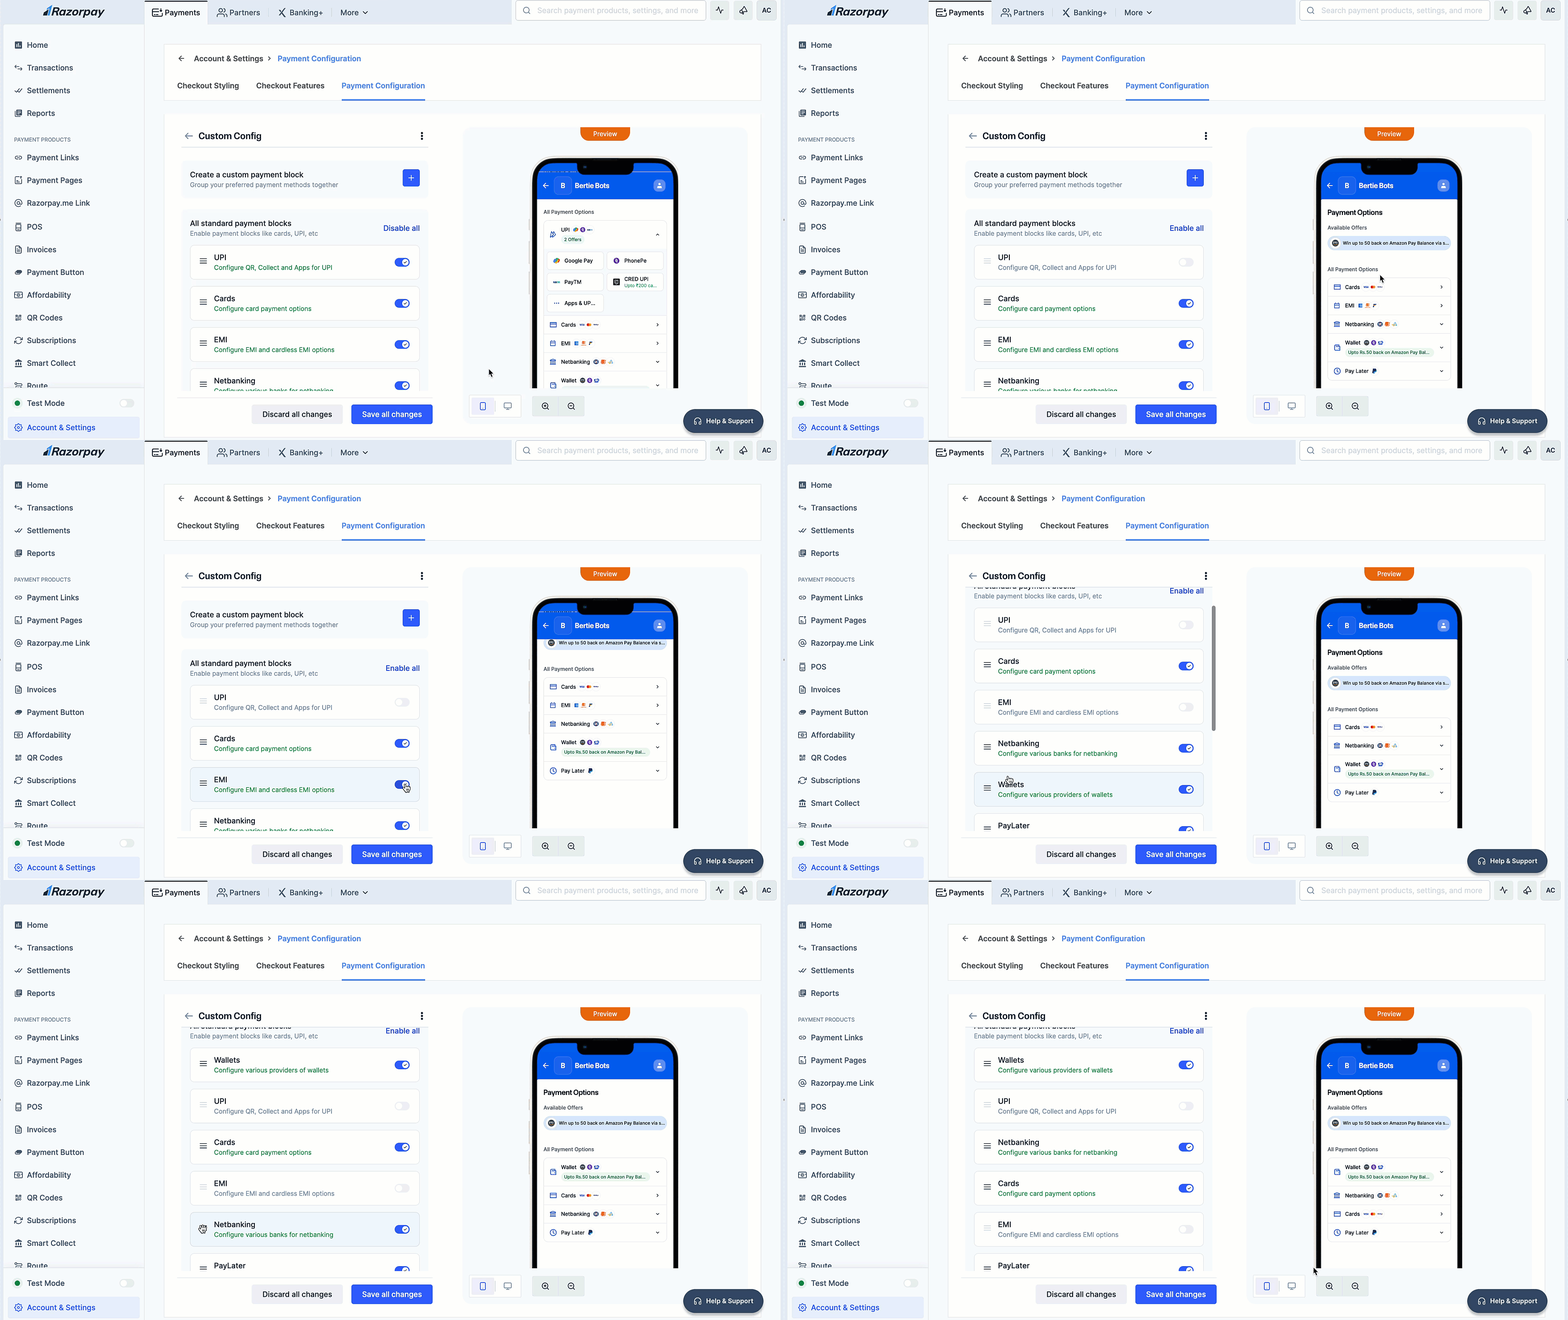 4. Click **Save all changes**.
Create custom blocks to highlight specific payment methods or instruments above other options. You can create multiple custom blocks as required.
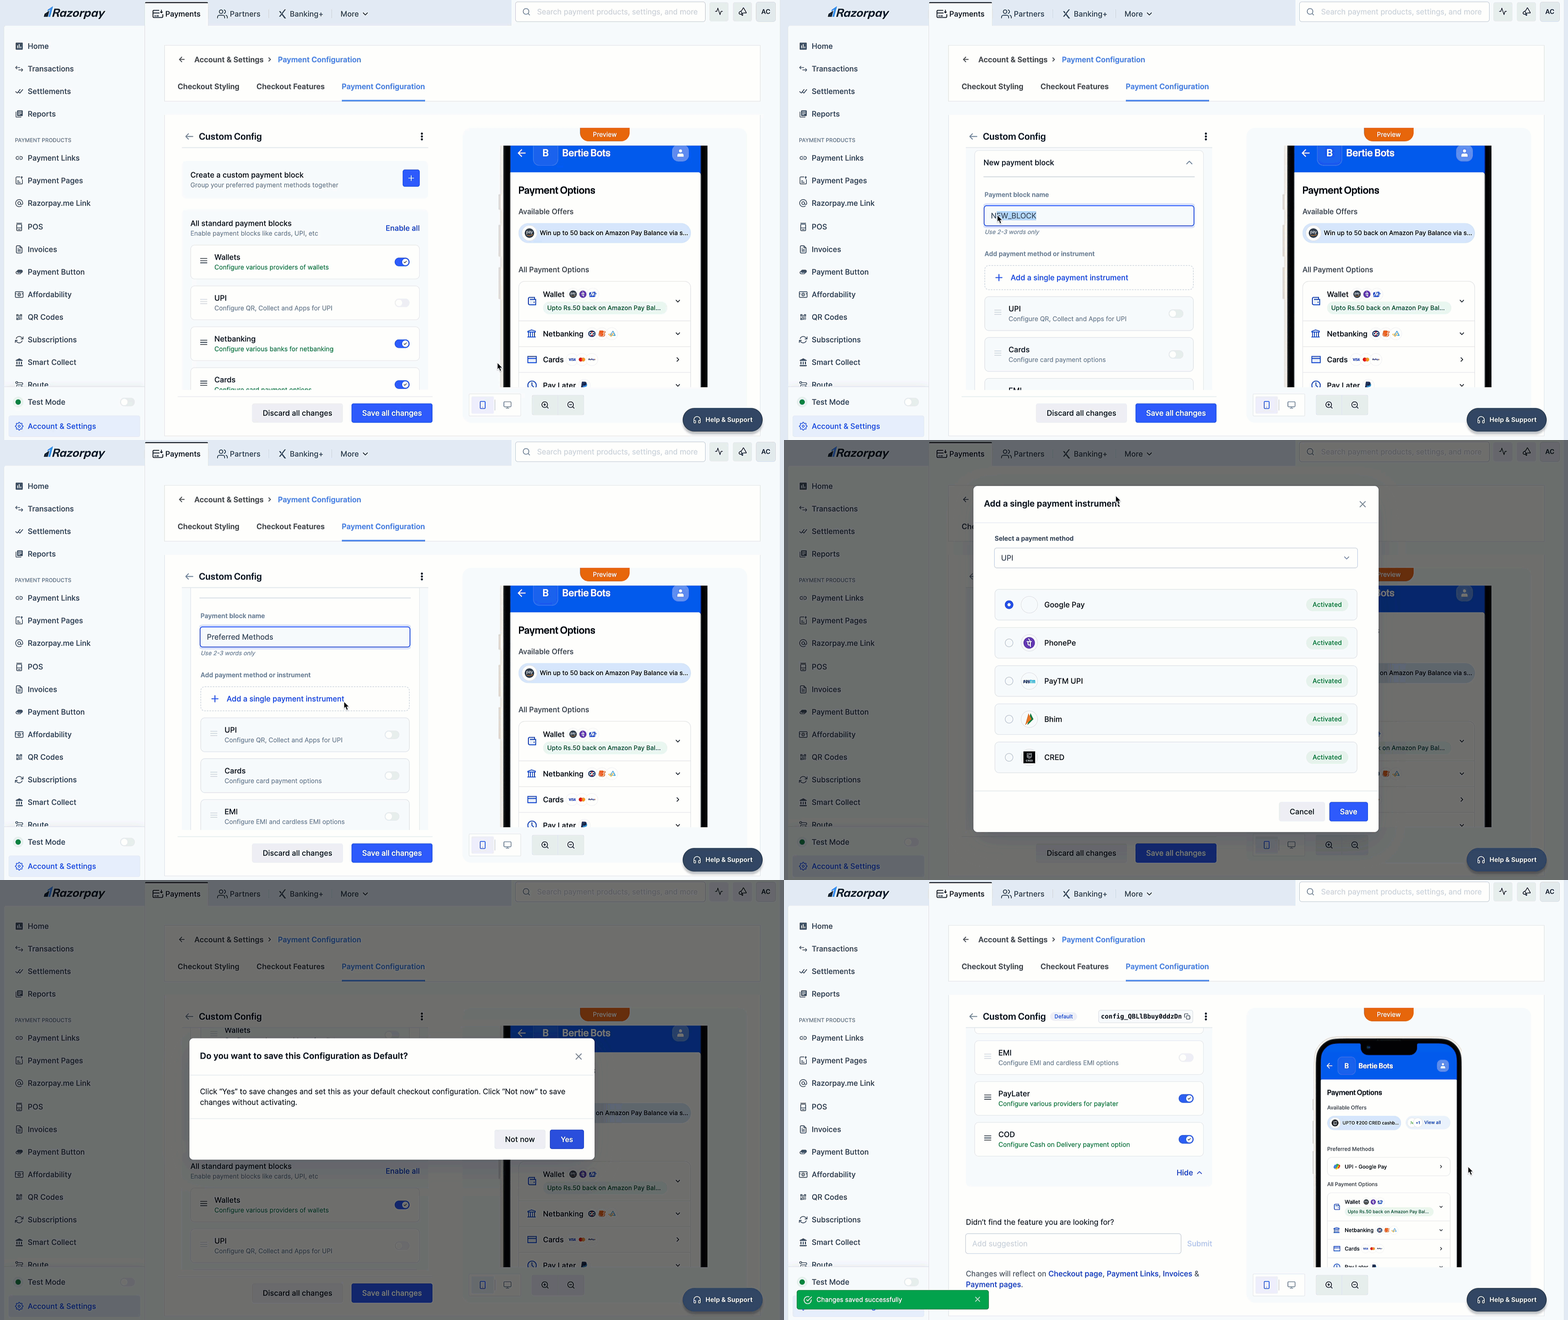
1. Click the plus icon next to **Create a custom payment block**
2. Enter a block name. For example, **Preferred Methods**. This appears at checkout as a separate section above the default standard payment options.
3. Click **+ Add a single payment instrument** to highlight a specific instrument.
4. Select a payment method from the drop-down and choose a payment instrument.
5. Click **Save**.
4. Click **Save all changes**.
Create custom blocks to highlight specific payment methods or instruments above other options. You can create multiple custom blocks as required.
1. Click the plus icon next to **Create a custom payment block**
2. Enter a block name. For example, **Preferred Methods**. This appears at checkout as a separate section above the default standard payment options.
3. Click **+ Add a single payment instrument** to highlight a specific instrument.
4. Select a payment method from the drop-down and choose a payment instrument.
5. Click **Save**.
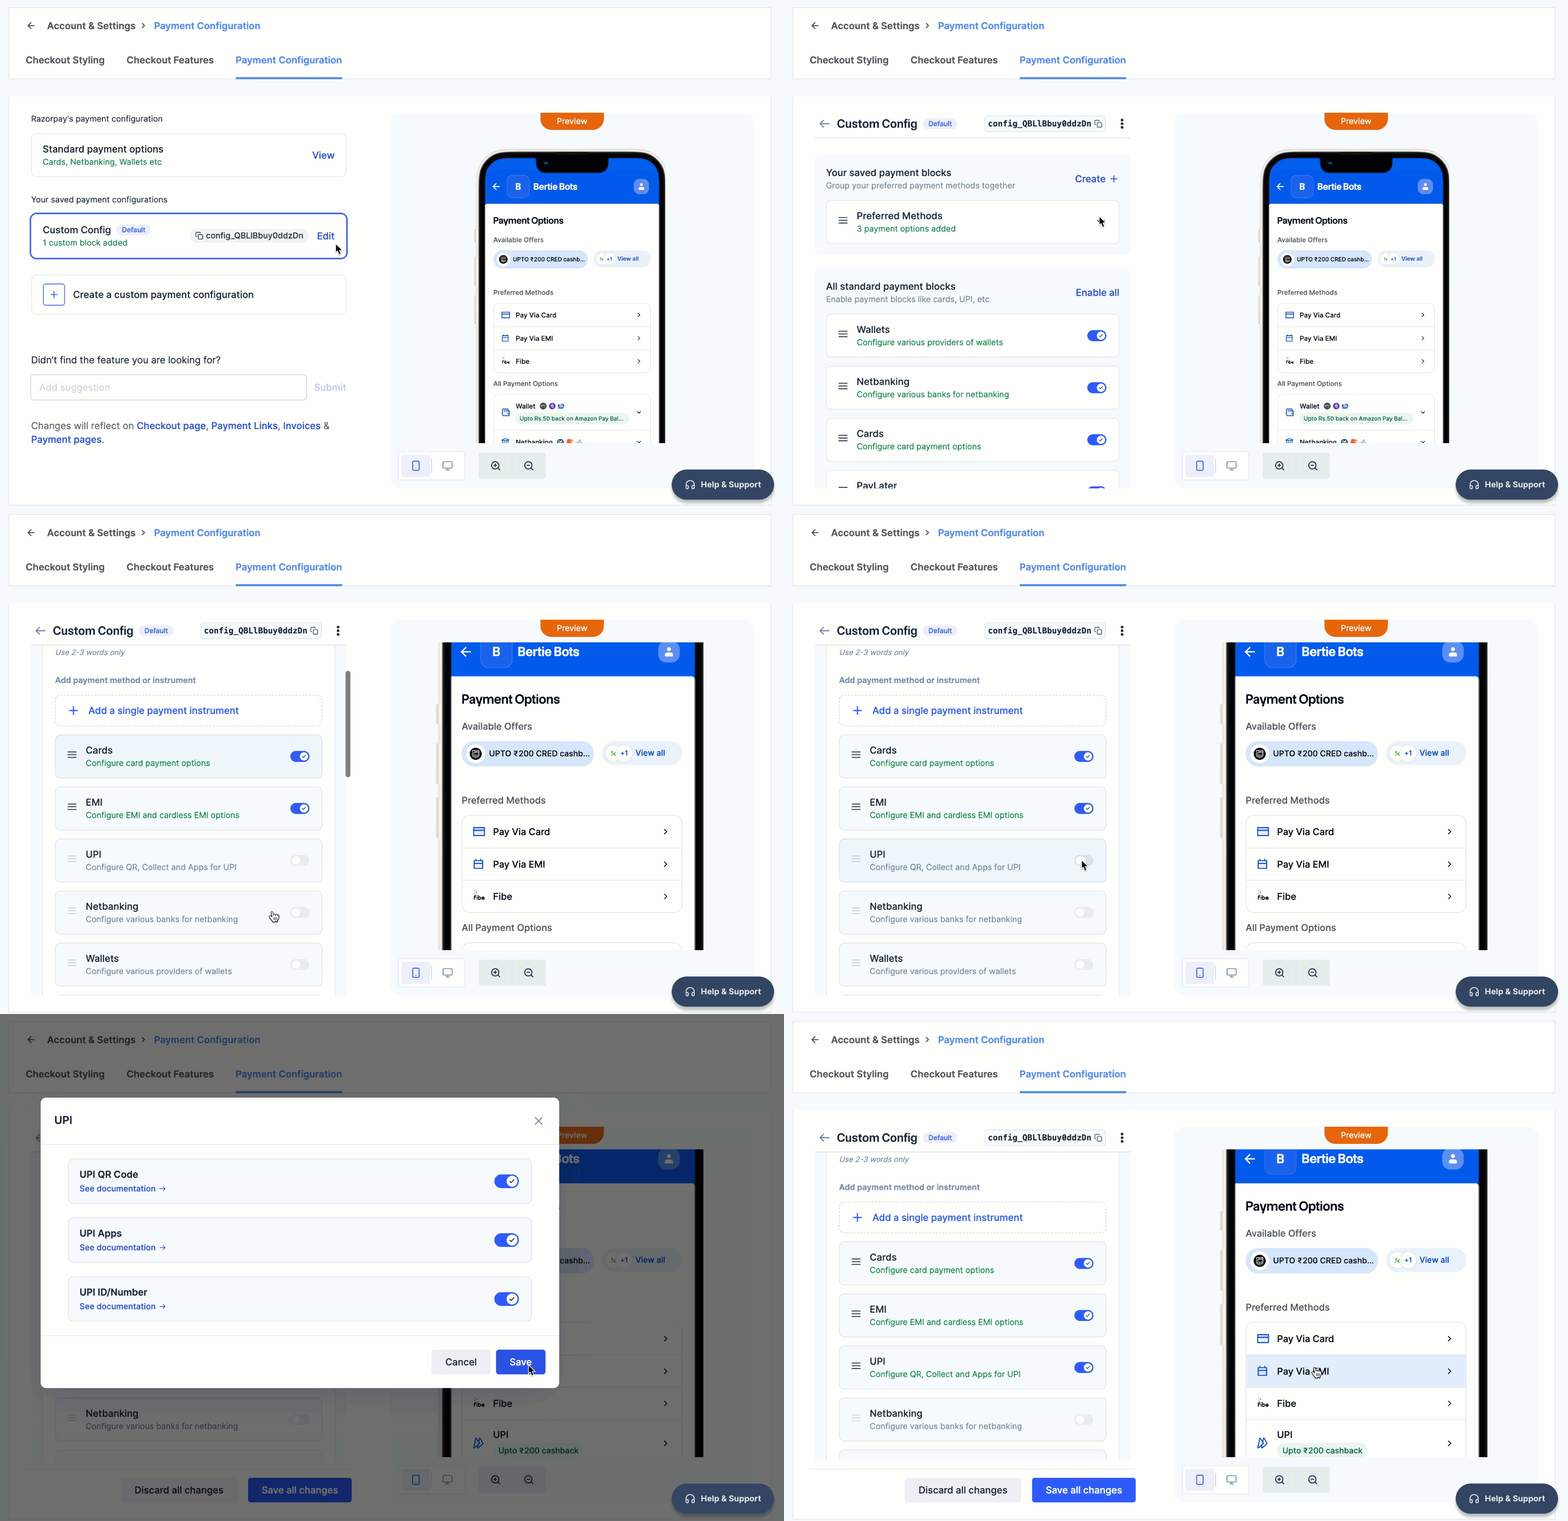
 6. You can further customise the following payment methods. Select a payment method:
Show/hide UPI QR Code, UPI Apps and UPI ID/Number.
6. You can further customise the following payment methods. Select a payment method:
Show/hide UPI QR Code, UPI Apps and UPI ID/Number.
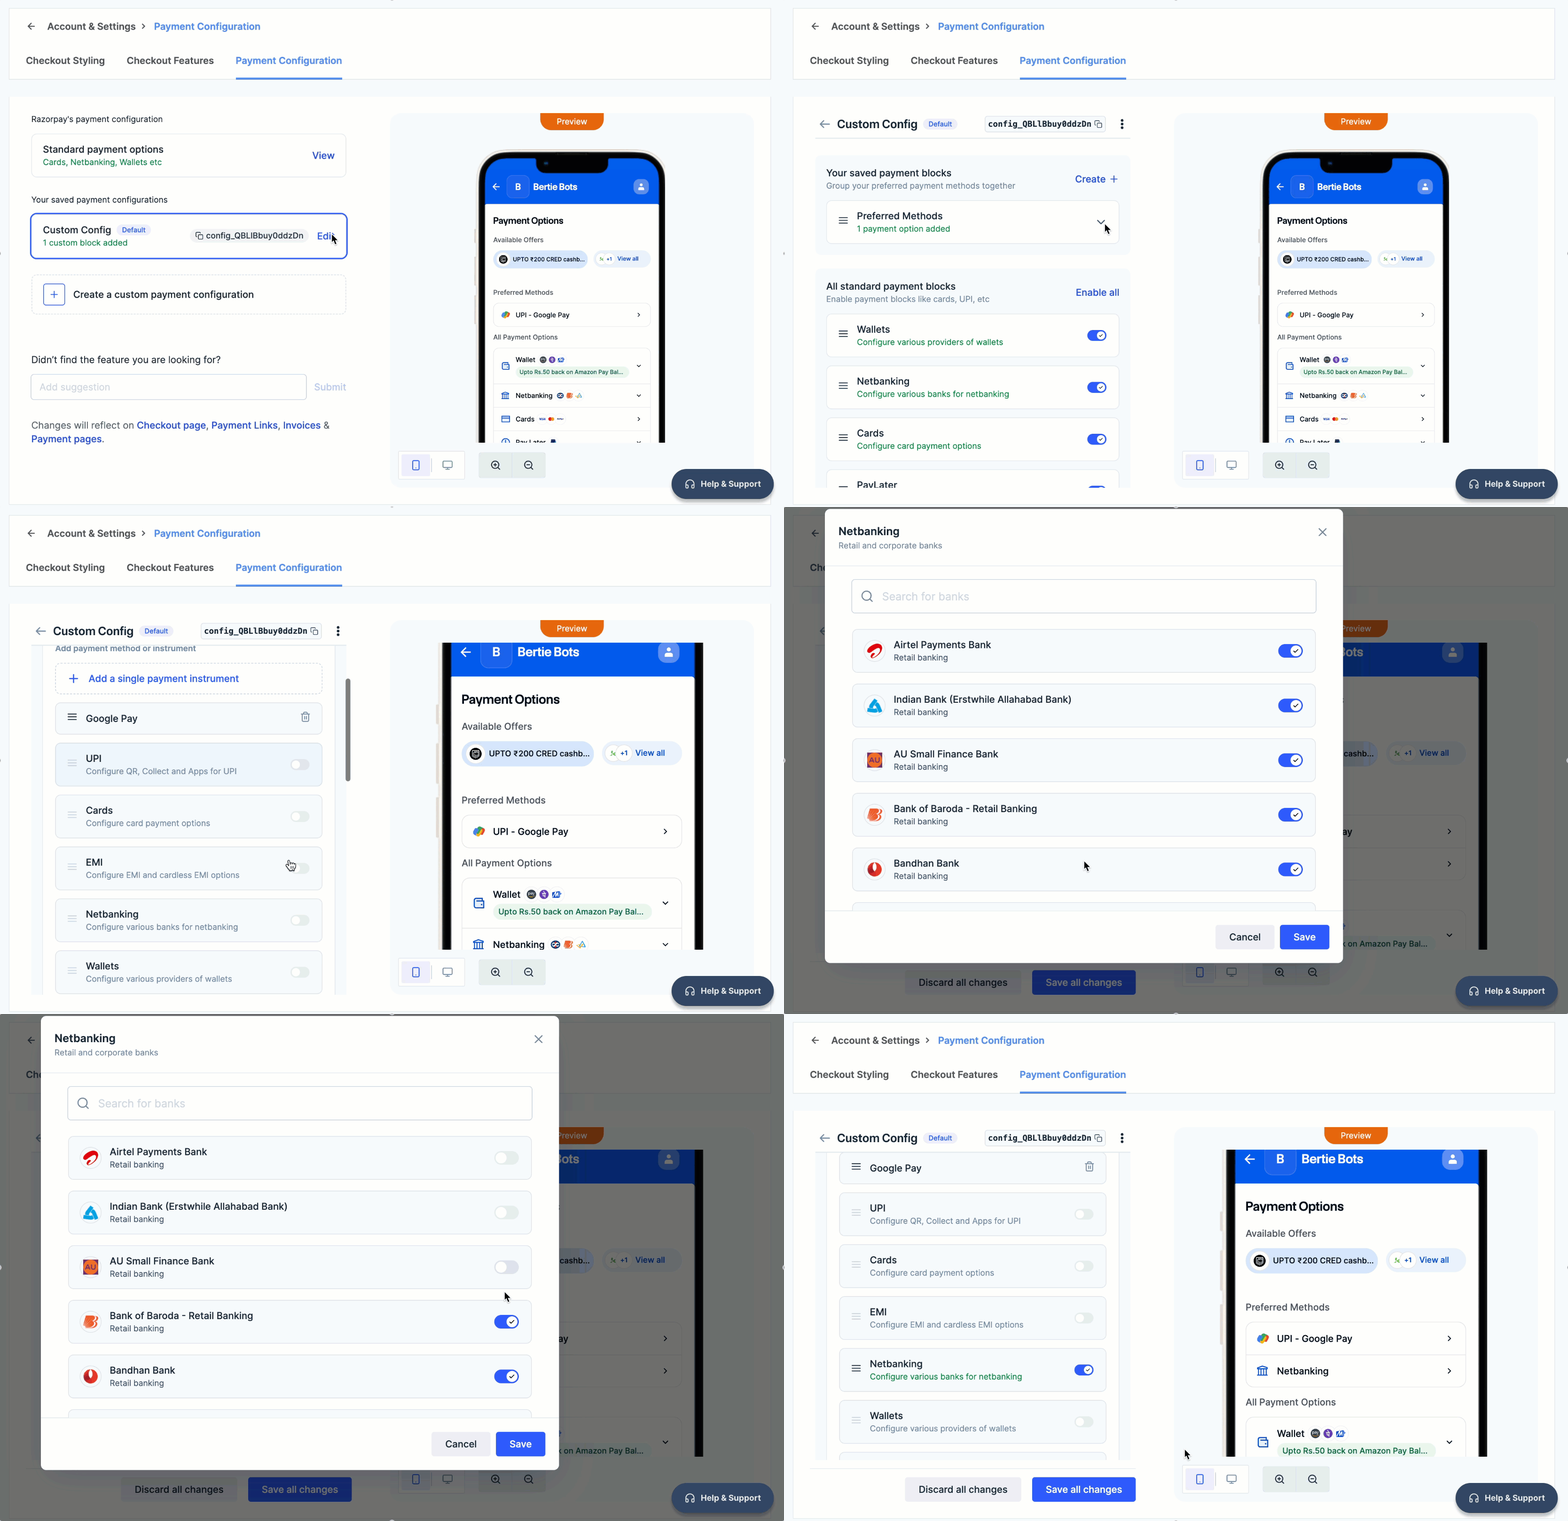
 Show/hide specific banks.
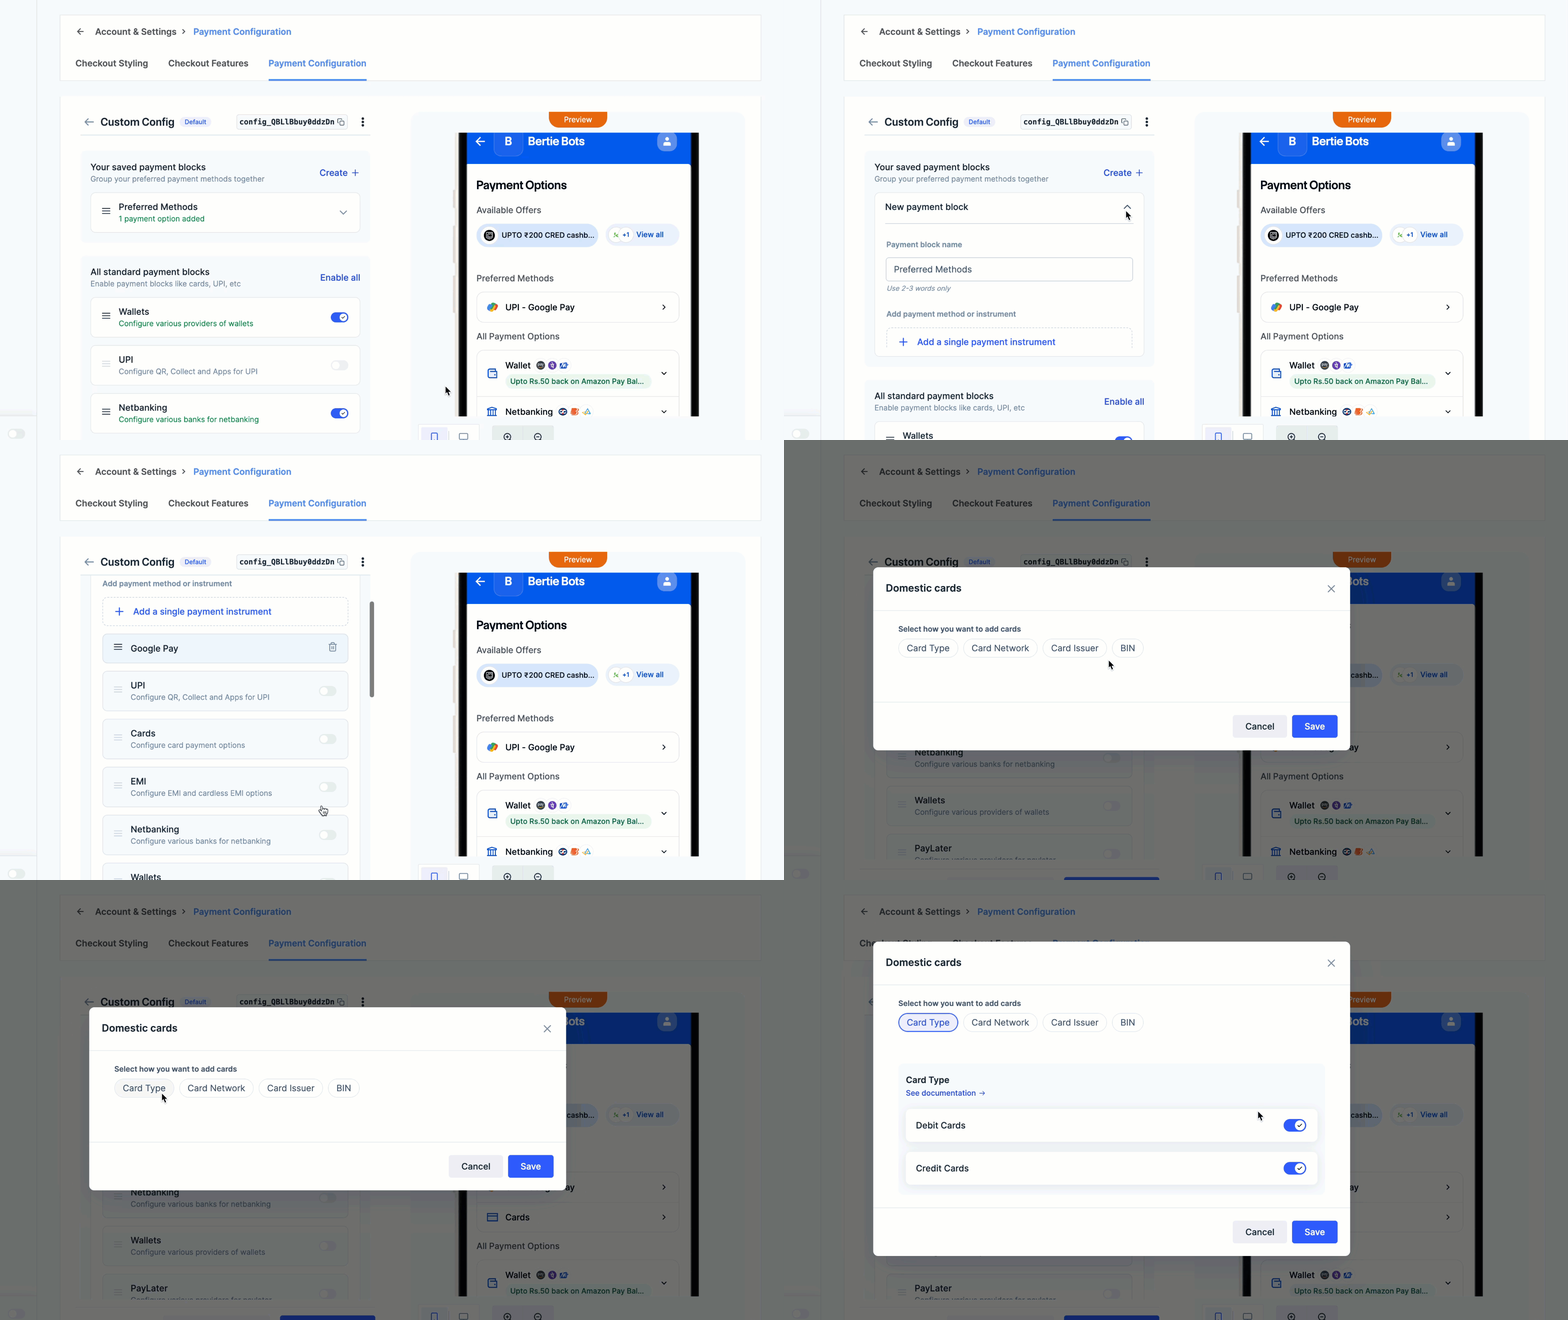
 Configure card payment options based on:
* **Card Type**: Show/hide debit and credit cards.
* **Card Provider**: Choose from available card networks.
* **Card Issuer**: Select specific issuers.
* **BIN Number**: Add one or multiple BINs (first 6-8 digits of a card number) to filter eligible cards. The system validates and saves the BINs, ensuring only specified cards are allowed for transactions.
Configure card payment options based on:
* **Card Type**: Show/hide debit and credit cards.
* **Card Provider**: Choose from available card networks.
* **Card Issuer**: Select specific issuers.
* **BIN Number**: Add one or multiple BINs (first 6-8 digits of a card number) to filter eligible cards. The system validates and saves the BINs, ensuring only specified cards are allowed for transactions.
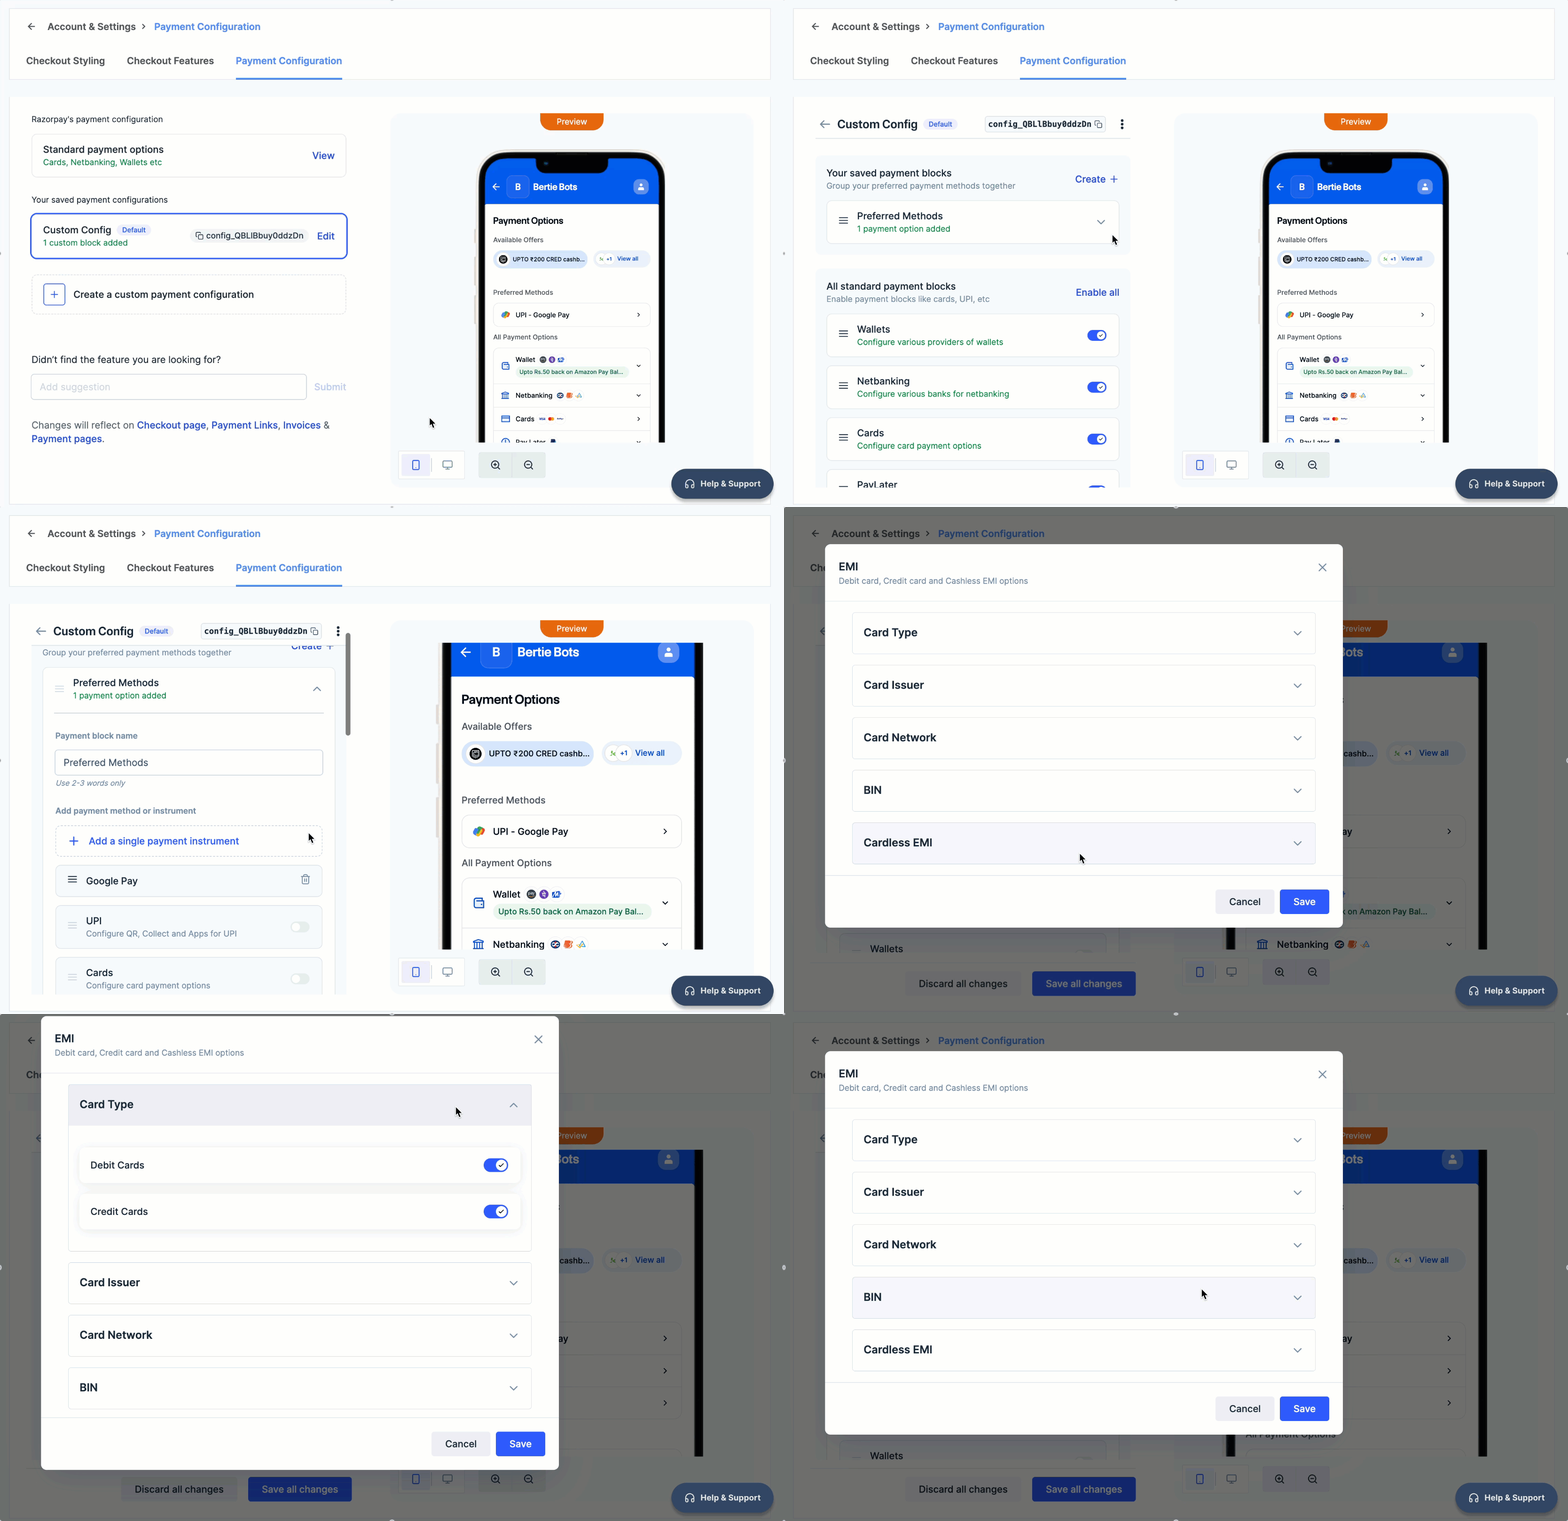
 Configure EMI payment options based on:
* **Card Type**: Show/hide debit and credit cards.
* **Card Provider**: Select the EMI card networks from the list.
* **Card Issuer**: Select the card issuer from the list.
* **BIN Number**: Add one or multiple BINs (first 6-8 digits of a card number) to filter eligible cards. The system validates and saves the BINs, ensuring only the specified cards are eligible for EMI plans.
Configure EMI payment options based on:
* **Card Type**: Show/hide debit and credit cards.
* **Card Provider**: Select the EMI card networks from the list.
* **Card Issuer**: Select the card issuer from the list.
* **BIN Number**: Add one or multiple BINs (first 6-8 digits of a card number) to filter eligible cards. The system validates and saves the BINs, ensuring only the specified cards are eligible for EMI plans.
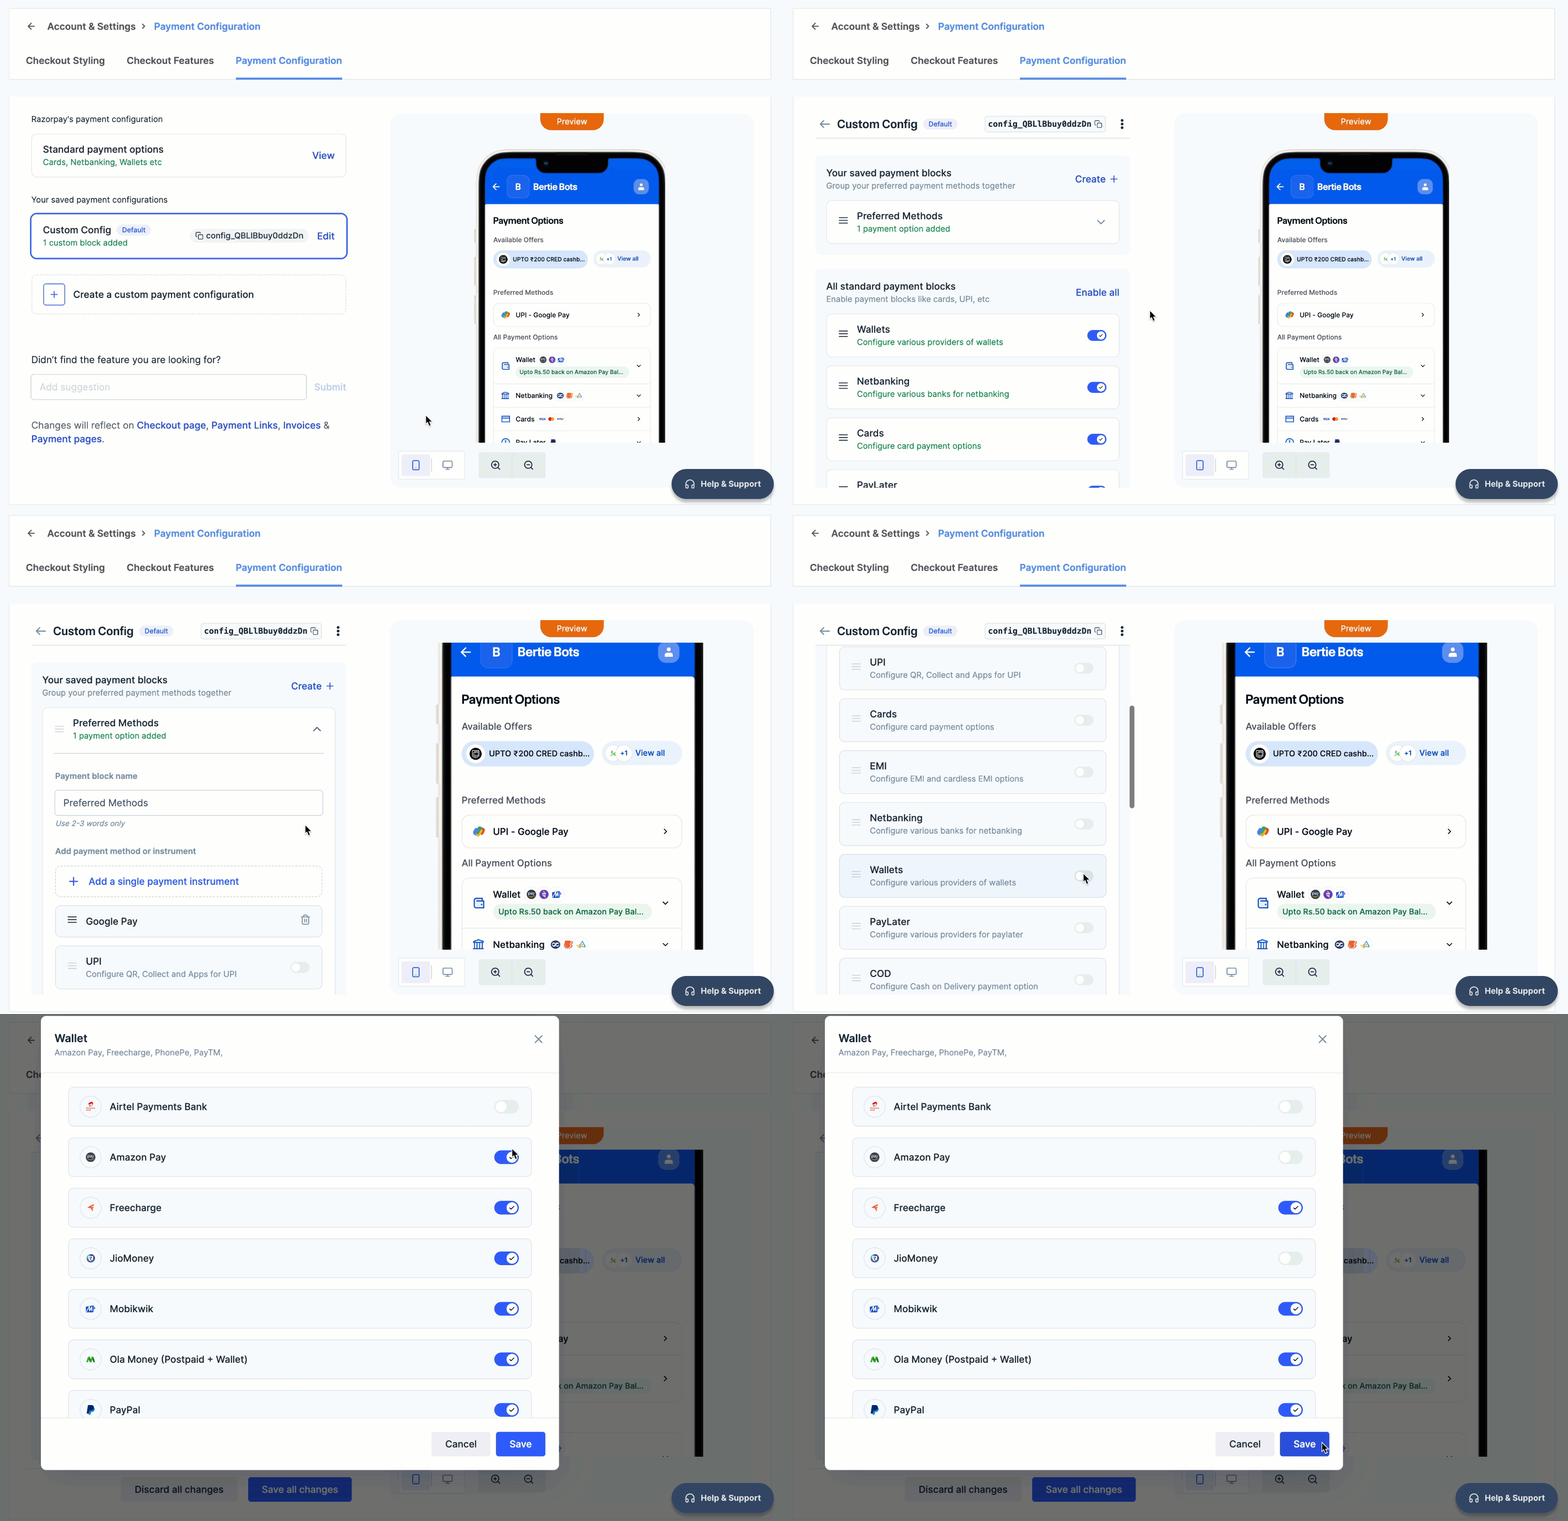
 Show/hide various providers of wallets.
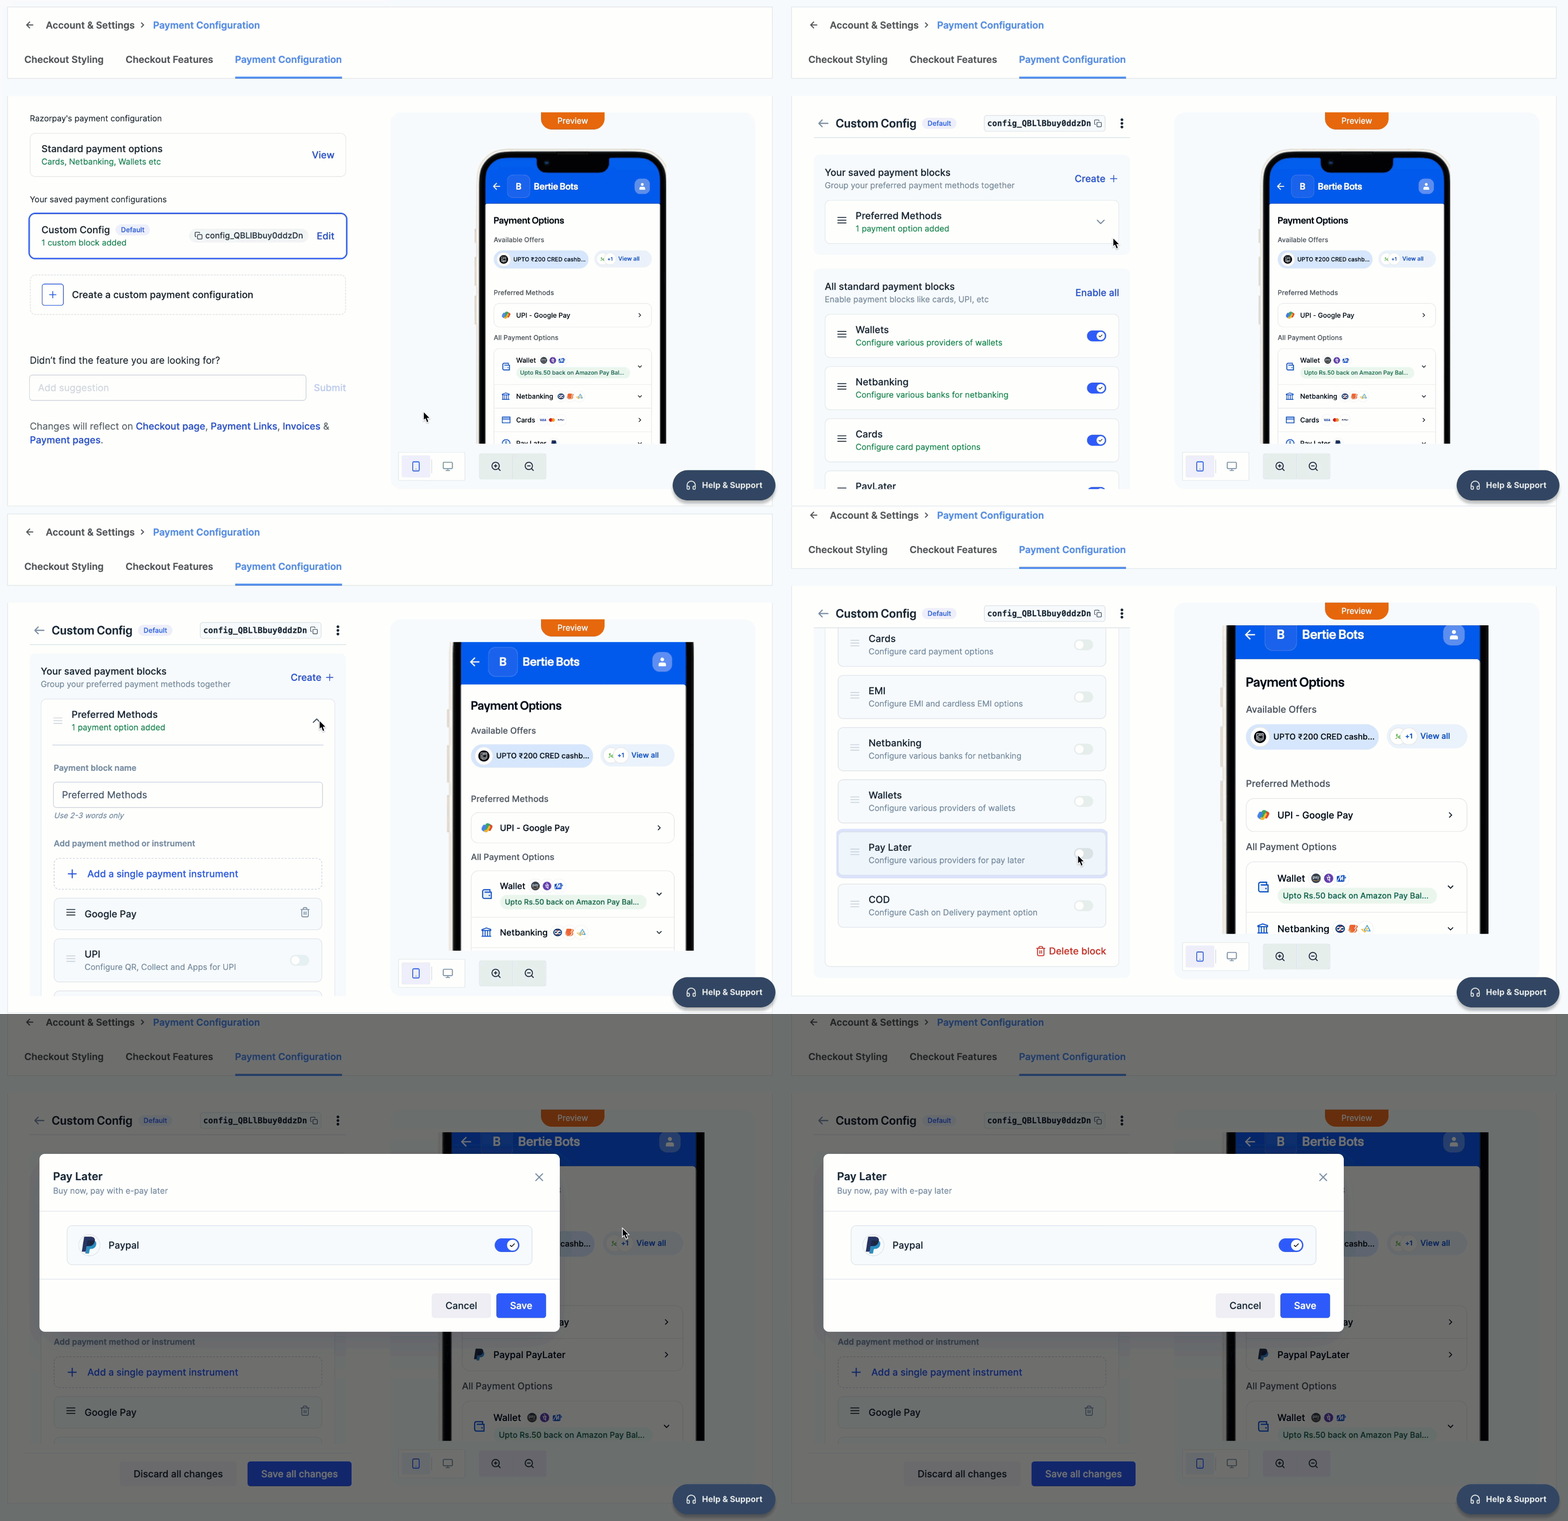
 Show/hide various providers of pay later.
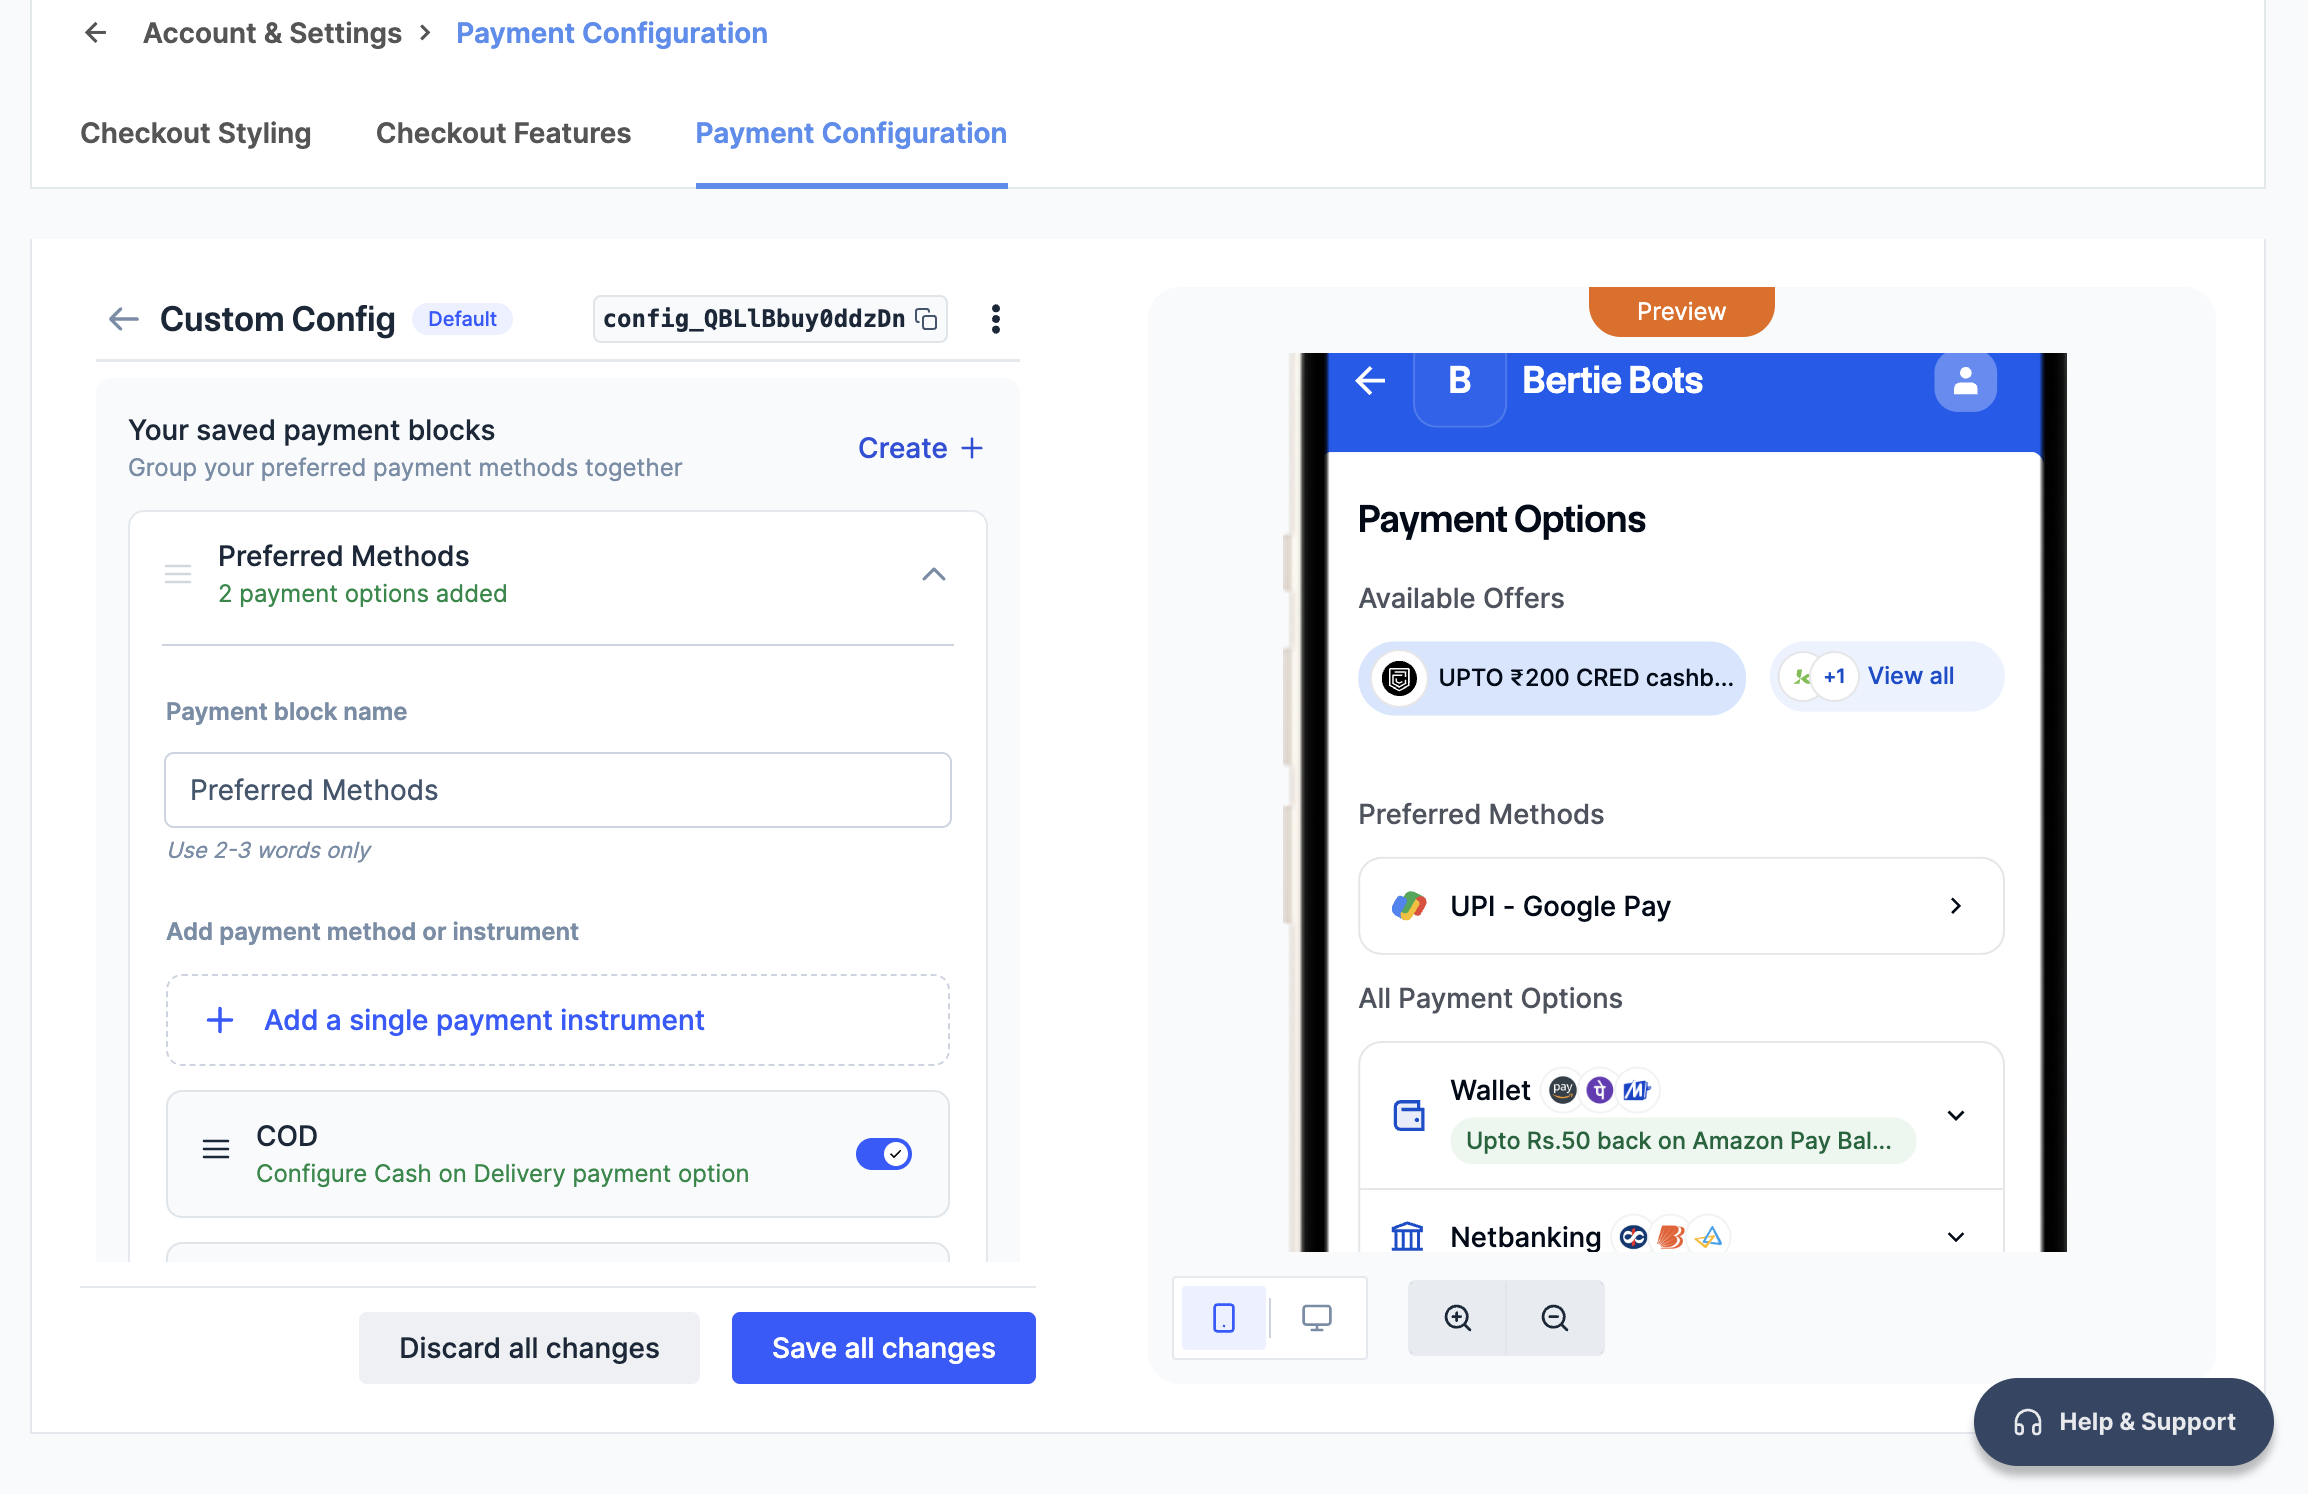
 Show/hide cash on delivery.
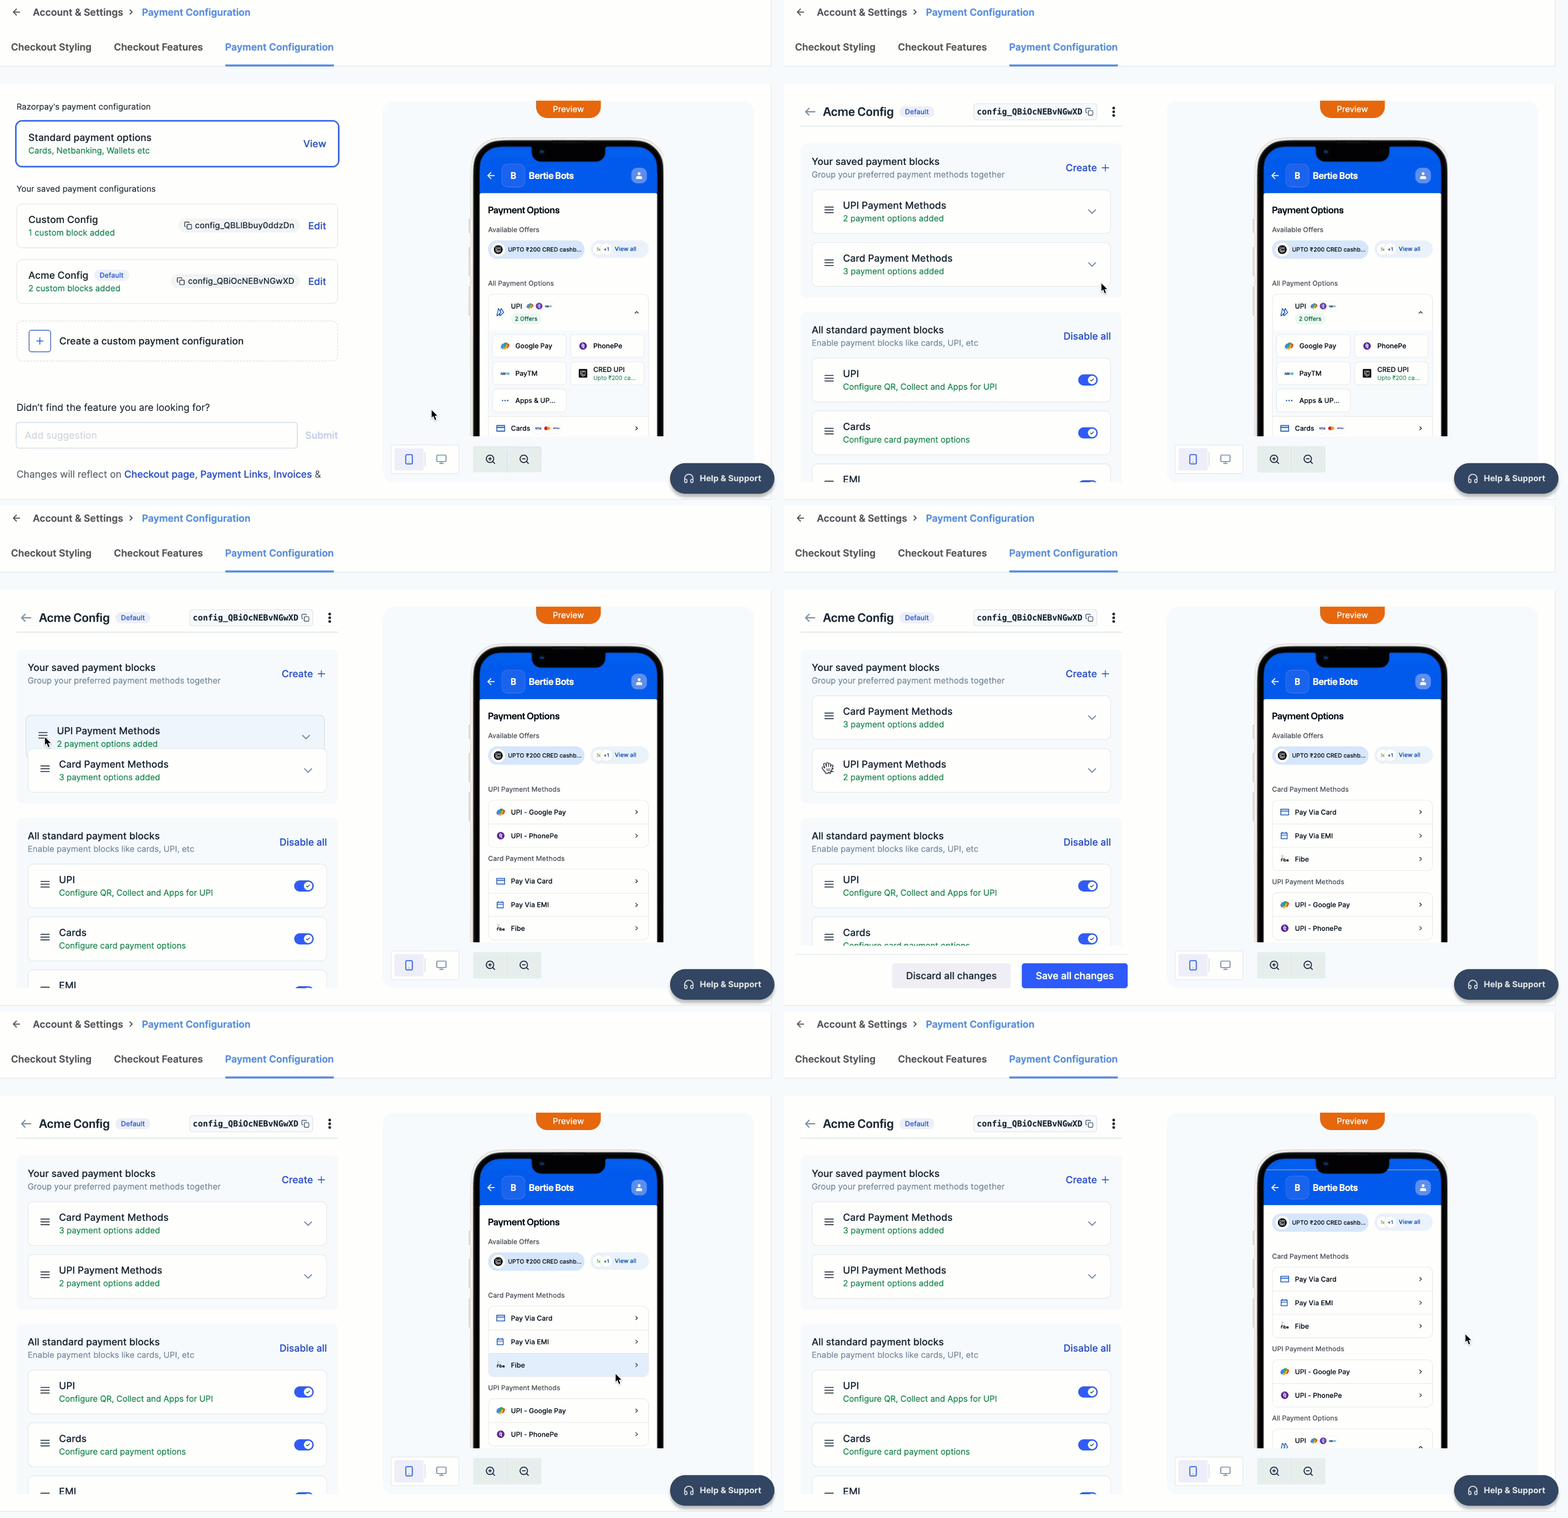
 7. Click **Save all changes**. If you have multiple custom blocks, drag and drop them to rearrange them in your preferred order.
 **Watch Out!**
To delete a block, navigate to your saved payment configurations. Identify the block, scroll to the bottom and click **Delete block** → **Delete** → **Save all changes**.
### Save Configuration as Default
If needed, you can save a configuration as the default, which displays the payment methods to your customers based on this setup.
1. Identify the configuration you want to set as default and click on the options icon → **Save as Default**. Click **Save all changes**.
2. Once saved, this configuration will be displayed to your customers at checkout.
**Watch Out!**
To delete a block, navigate to your saved payment configurations. Identify the block, scroll to the bottom and click **Delete block** → **Delete** → **Save all changes**.
### Save Configuration as Default
If needed, you can save a configuration as the default, which displays the payment methods to your customers based on this setup.
1. Identify the configuration you want to set as default and click on the options icon → **Save as Default**. Click **Save all changes**.
2. Once saved, this configuration will be displayed to your customers at checkout.
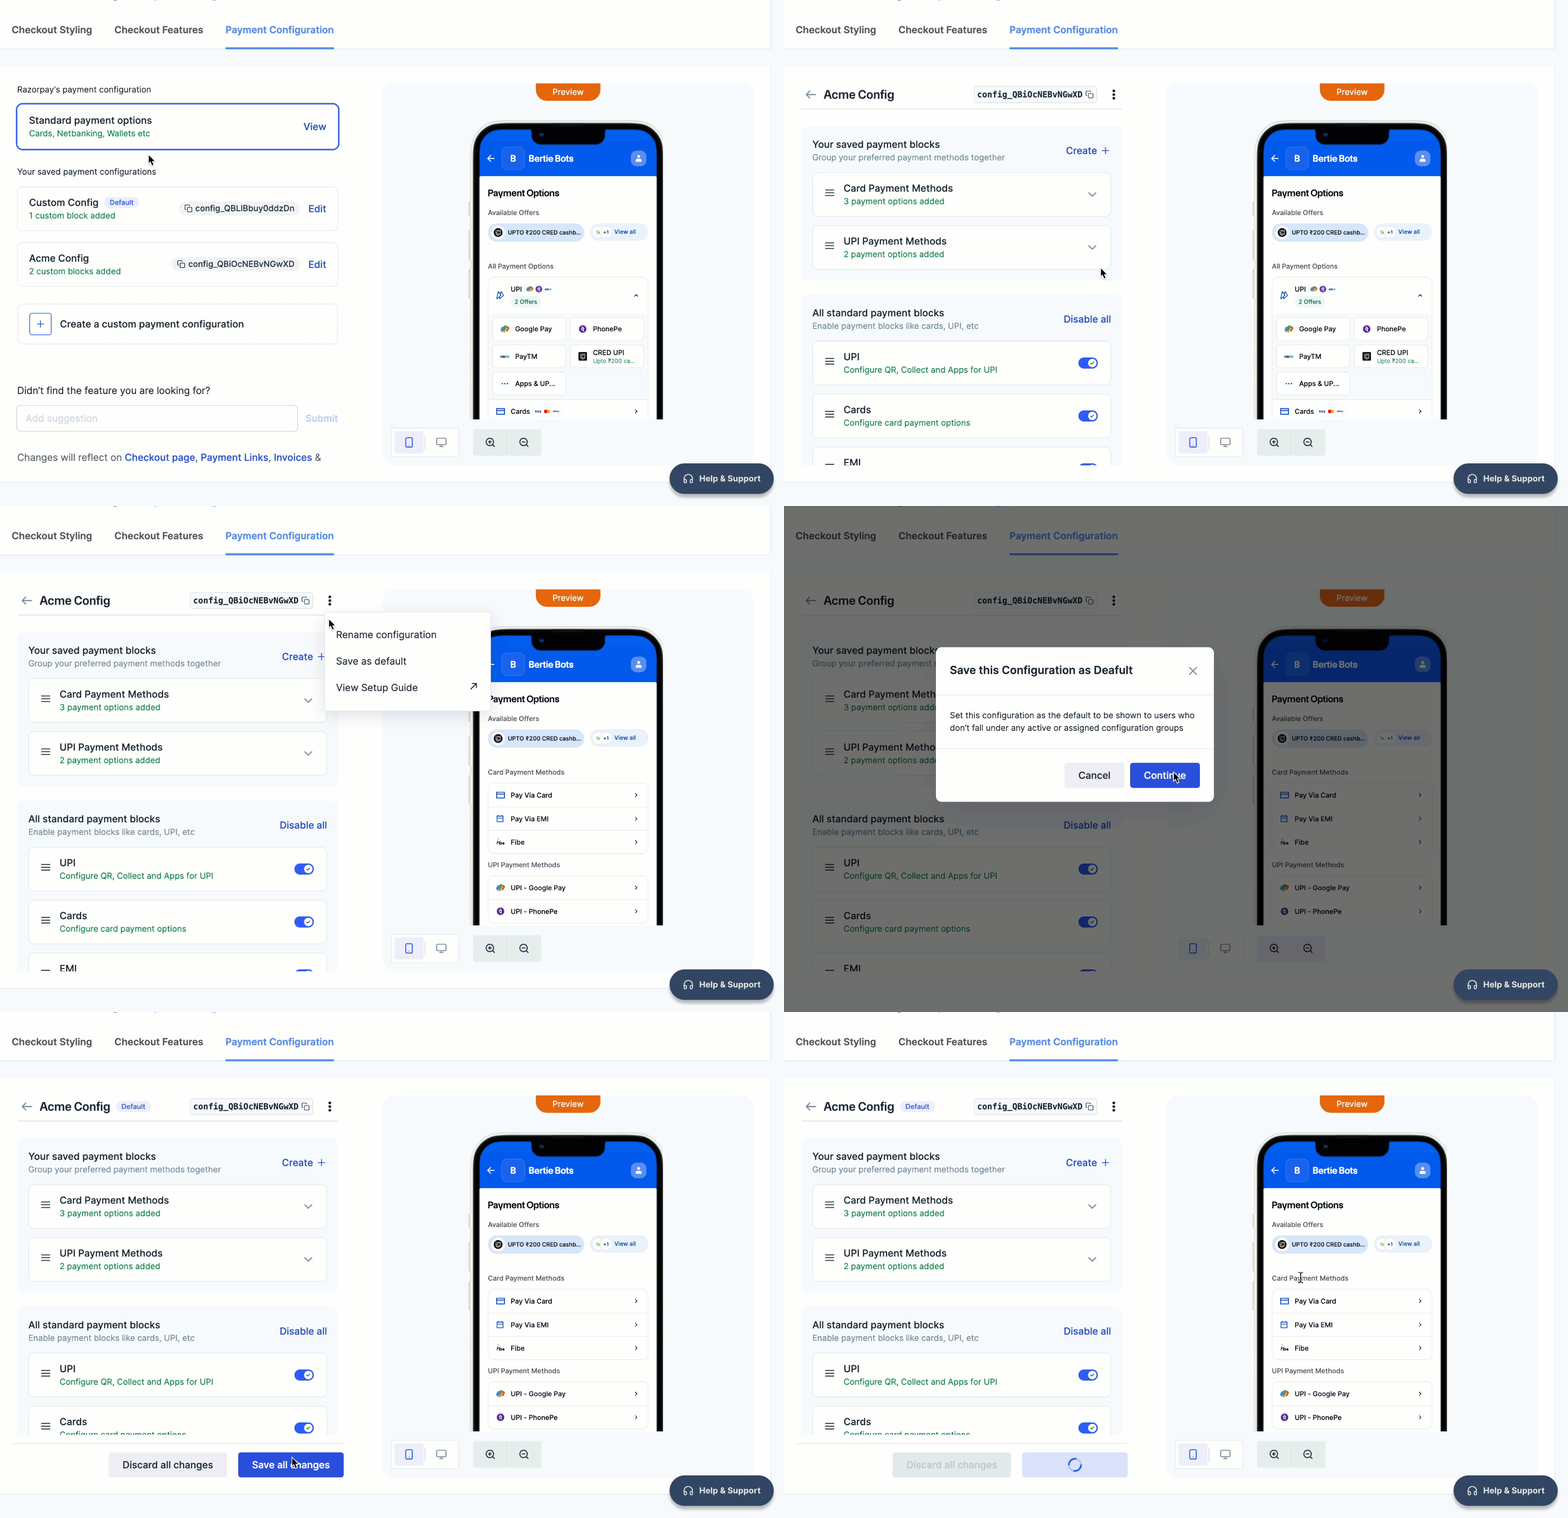 3. All the changes will reflect on the **Checkout** page, **Invoices**, **Payment Button**, **Webstore**, **Payment Links** and **Payment Pages**.
4. Share the Configuration ID with your developer to integrate this setup. You can also define conditions for displaying this configuration to a particular set of customers by using the Configuration ID.
### Sample Configuration
By default, the checkout displays payment options in the following order:
3. All the changes will reflect on the **Checkout** page, **Invoices**, **Payment Button**, **Webstore**, **Payment Links** and **Payment Pages**.
4. Share the Configuration ID with your developer to integrate this setup. You can also define conditions for displaying this configuration to a particular set of customers by using the Configuration ID.
### Sample Configuration
By default, the checkout displays payment options in the following order:
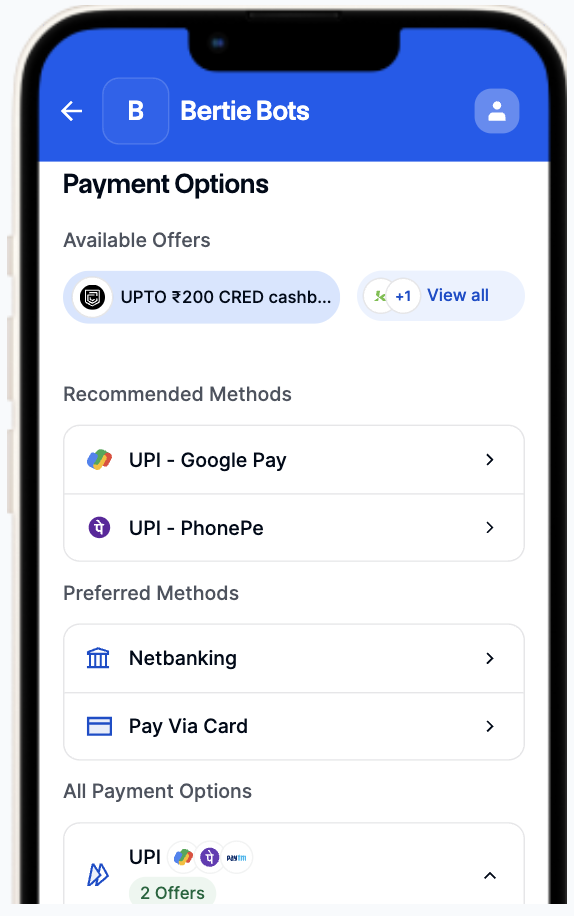 * **Recommended Methods**: These are automatically determined based on the customer's phone number, prioritising their most frequently used or preferred payment methods. This order cannot be modified or disabled.
* **Custom Blocks**: Payment methods/instruments configured within a custom block, if any.
* **All Payment Methods**: The remaining payment methods displayed based on your configuration.
* **Recommended Methods**: These are automatically determined based on the customer's phone number, prioritising their most frequently used or preferred payment methods. This order cannot be modified or disabled.
* **Custom Blocks**: Payment methods/instruments configured within a custom block, if any.
* **All Payment Methods**: The remaining payment methods displayed based on your configuration.