> ## Documentation Index
> Fetch the complete documentation index at: https://razorpay-881012b3.mintlify.site/llms.txt
> Use this file to discover all available pages before exploring further.
# Create Custom Rules
> Create custom rules on Optimizer.
Available in🇮🇳 India
You can create a set of custom rules for transactions using different parameters such as payment method, card type, and so on. Also, you can add gateways in priority order and split traffic between gateways.
Let us assume you want to set up a custom rule wherein:
| Priority Levels | Transaction Split - Payment Gateway/Provider |
| --------------- | ------------------------------------------------------------------------------------------------ |
| Priority 1 | • 80% of transactions to be routed via Razorpay • 20% of transactions to be routed via ABC |
| Priority 2 | • 100% of transactions to be routed via XYZ |
This means that if the success rate of Razorpay and ABC drops below a certain level, all transactions will automatically be routed to XYZ.
## Steps
To set up the custom rule:
1. Click **+Add New Rule**.
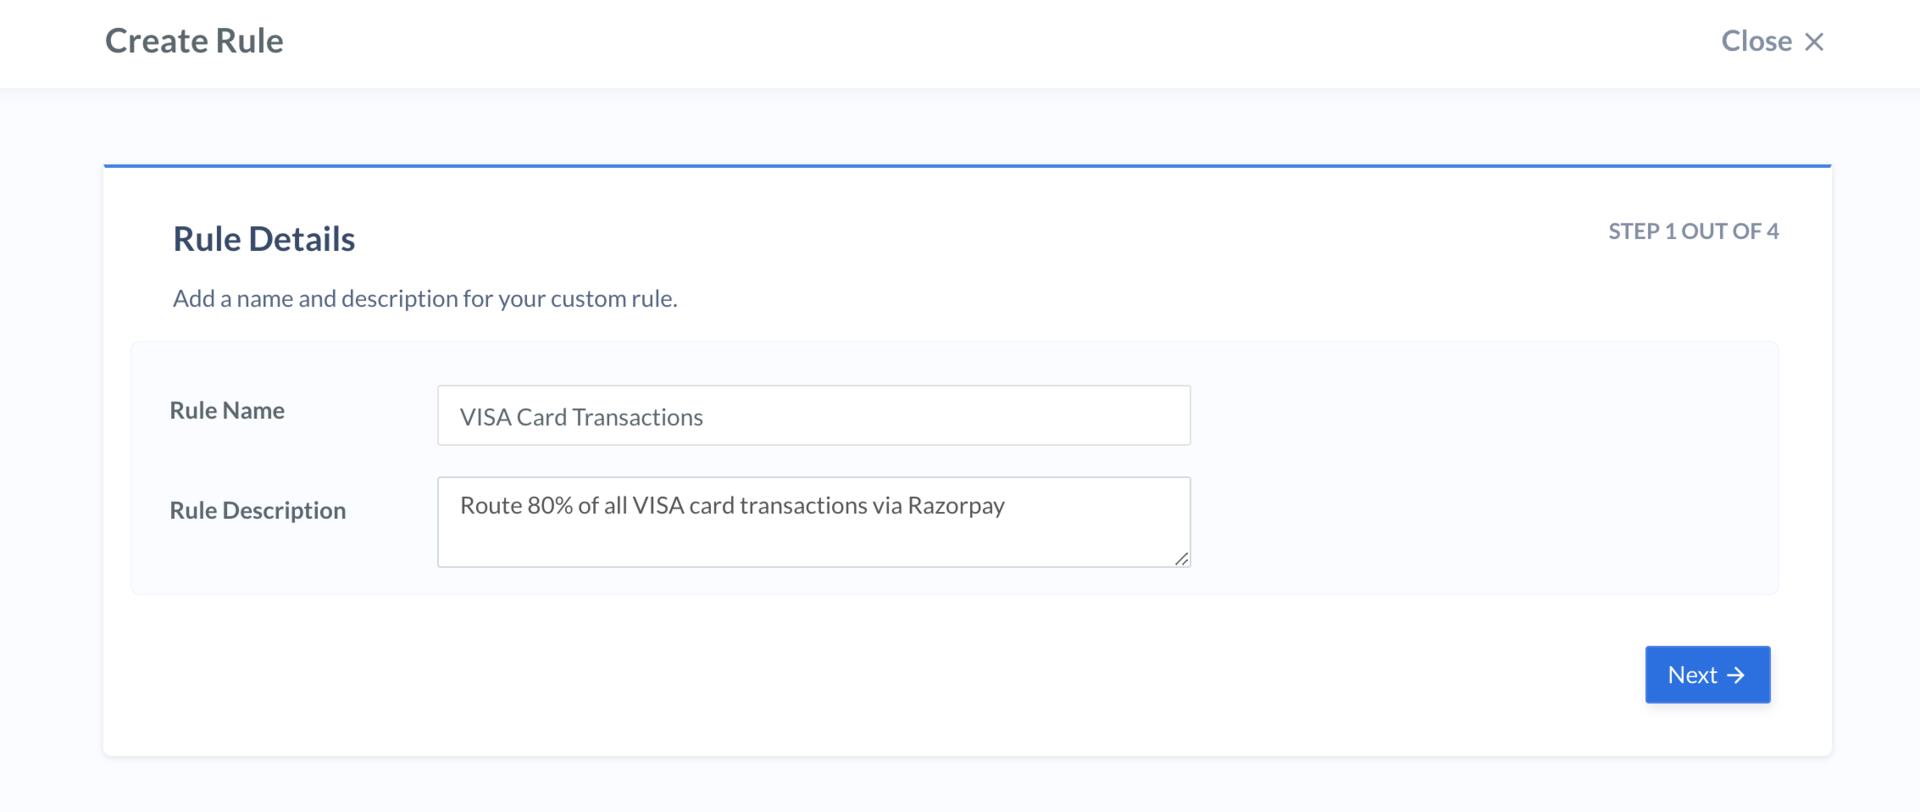
2. In the **Create Rule** screen, add the rule details:
1. **Rule Name** - Add a name for the rule. For example, `VISA Card Transactions`.
2. **Rule Description** - Enter a description. For example, `Route 80% of all VISA card transactions via Razorpay`.
3. Click **Next**.
4. Add the rule conditions:
| Field | Possible Values |
| ----- | ---------------------------------------------------------------------------------------------------------------------------------------------------------------------------------------------------------------------------------------------------------------------------------------------------------------------------------------------------------------------------------------------------------------------------------------------------------------------- |
| When | • Channels (Website, Android, iOS) • Payment Method (Card, Netbanking and UPI) • BIN Number (Card IIN Number) • Card Type (Debit, Credit, Prepaid, Corporate) • Card Brand (American Express, Diners Club, Discover and so on) • Card Issuer (SBIN, HDFC, ICIC, UTIB, KKBK) • Banks (SBIN, HDFC, ICIC, UTIB) • Amount (In Rupees) • Custom Identifier 1 • Custom Identifier 2 • Custom Identifier 3 |
**Custom Identifiers** Know more about [custom identifiers](#custom-identifiers).
|
\| Is | • One of • Equal to • Not equal to • Between • Starting with • Ending with • Less than • Greater than • Contains • Greater than equal • Less than equal |
\| Select Comparing Value | Depends on the **When** field value. |
Continuing with our VISA card rule example, the values will be as follows:
1. **When** - Select `Card Brand`.
2. **is** - Select `Equal to`.
3. **Select Comparing Value** - Select `VISA`.
4. Click **Next**.
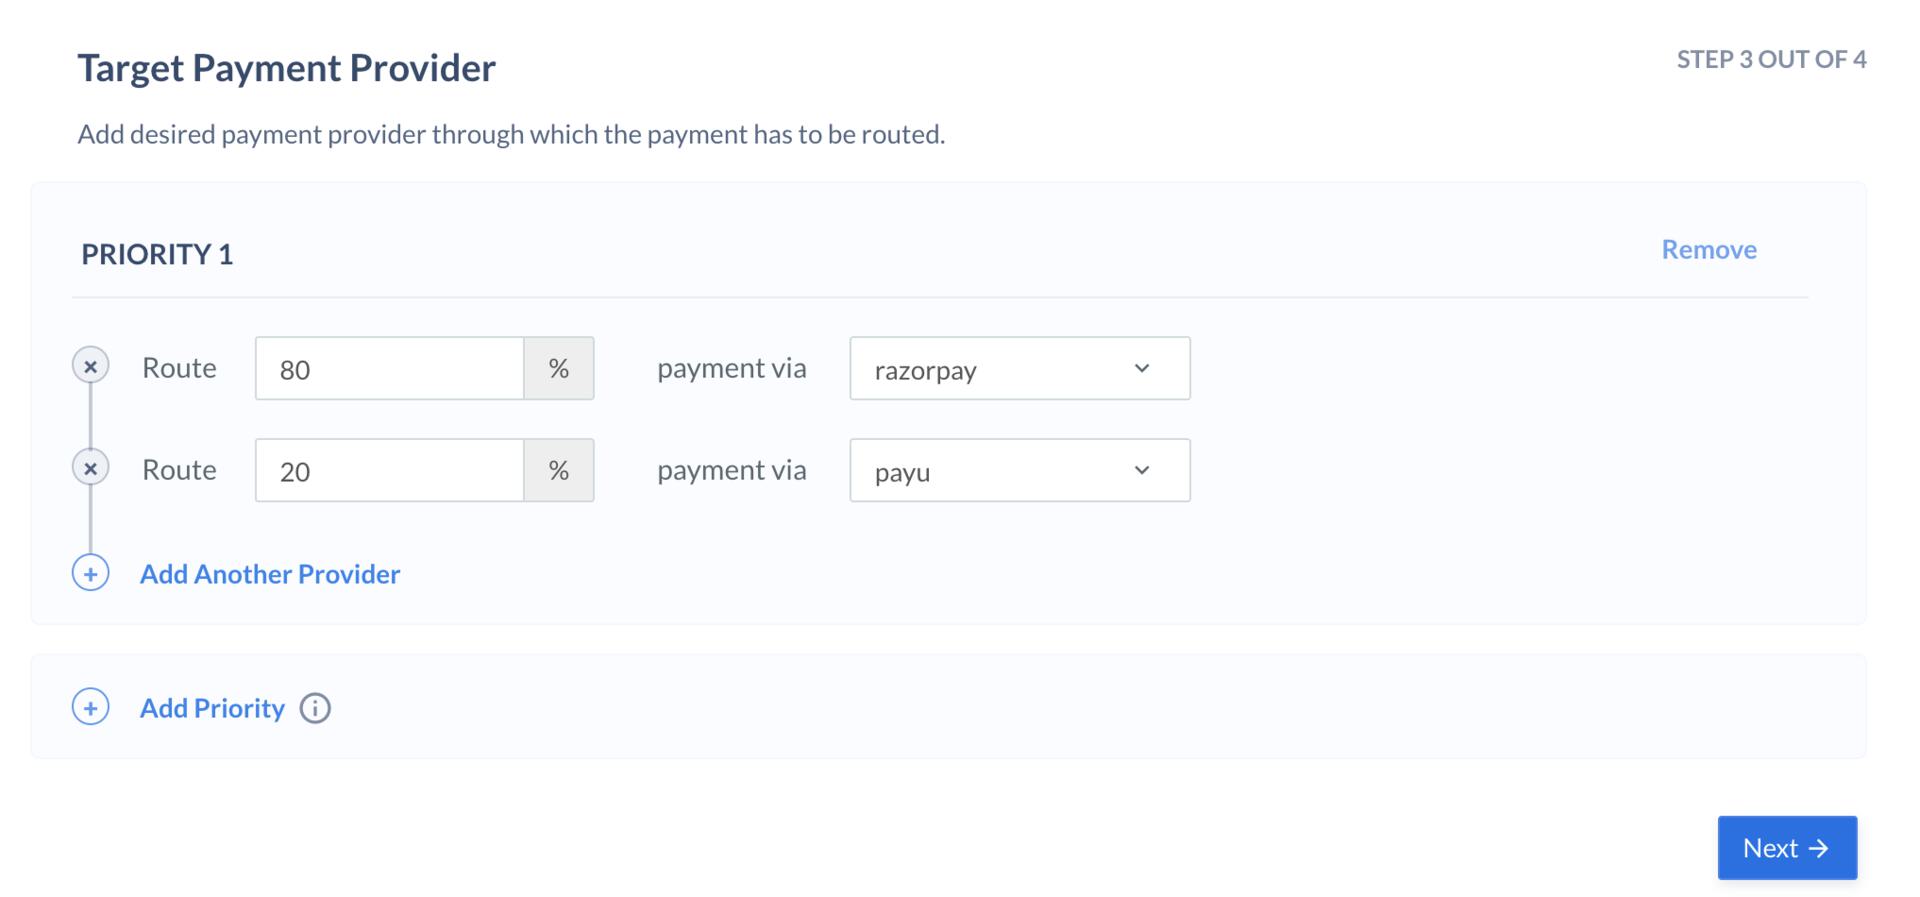
5. Add the target payment provider through which the transactions should be routed:
1. Click **Edit Target Provider** to set the priority.
2. Enter the following details:
1. For example, for Razorpay gateway, provide the values for **Route** as 80 and **payment via** as `Razorpay`.
2. Click **Add Another Provider**.
3. For example, for ABC gateway, provide the values for **Route** as 20 and **payment via** as `ABC`.
3. You can choose to add another provider as Priority 2. To do this, click **Add Priority** and enter the following details:
1. For example, for XYZ gateway, provide the values for **Route** as 100 and **payment via** as `XYZ`.
4. Click **Next**.
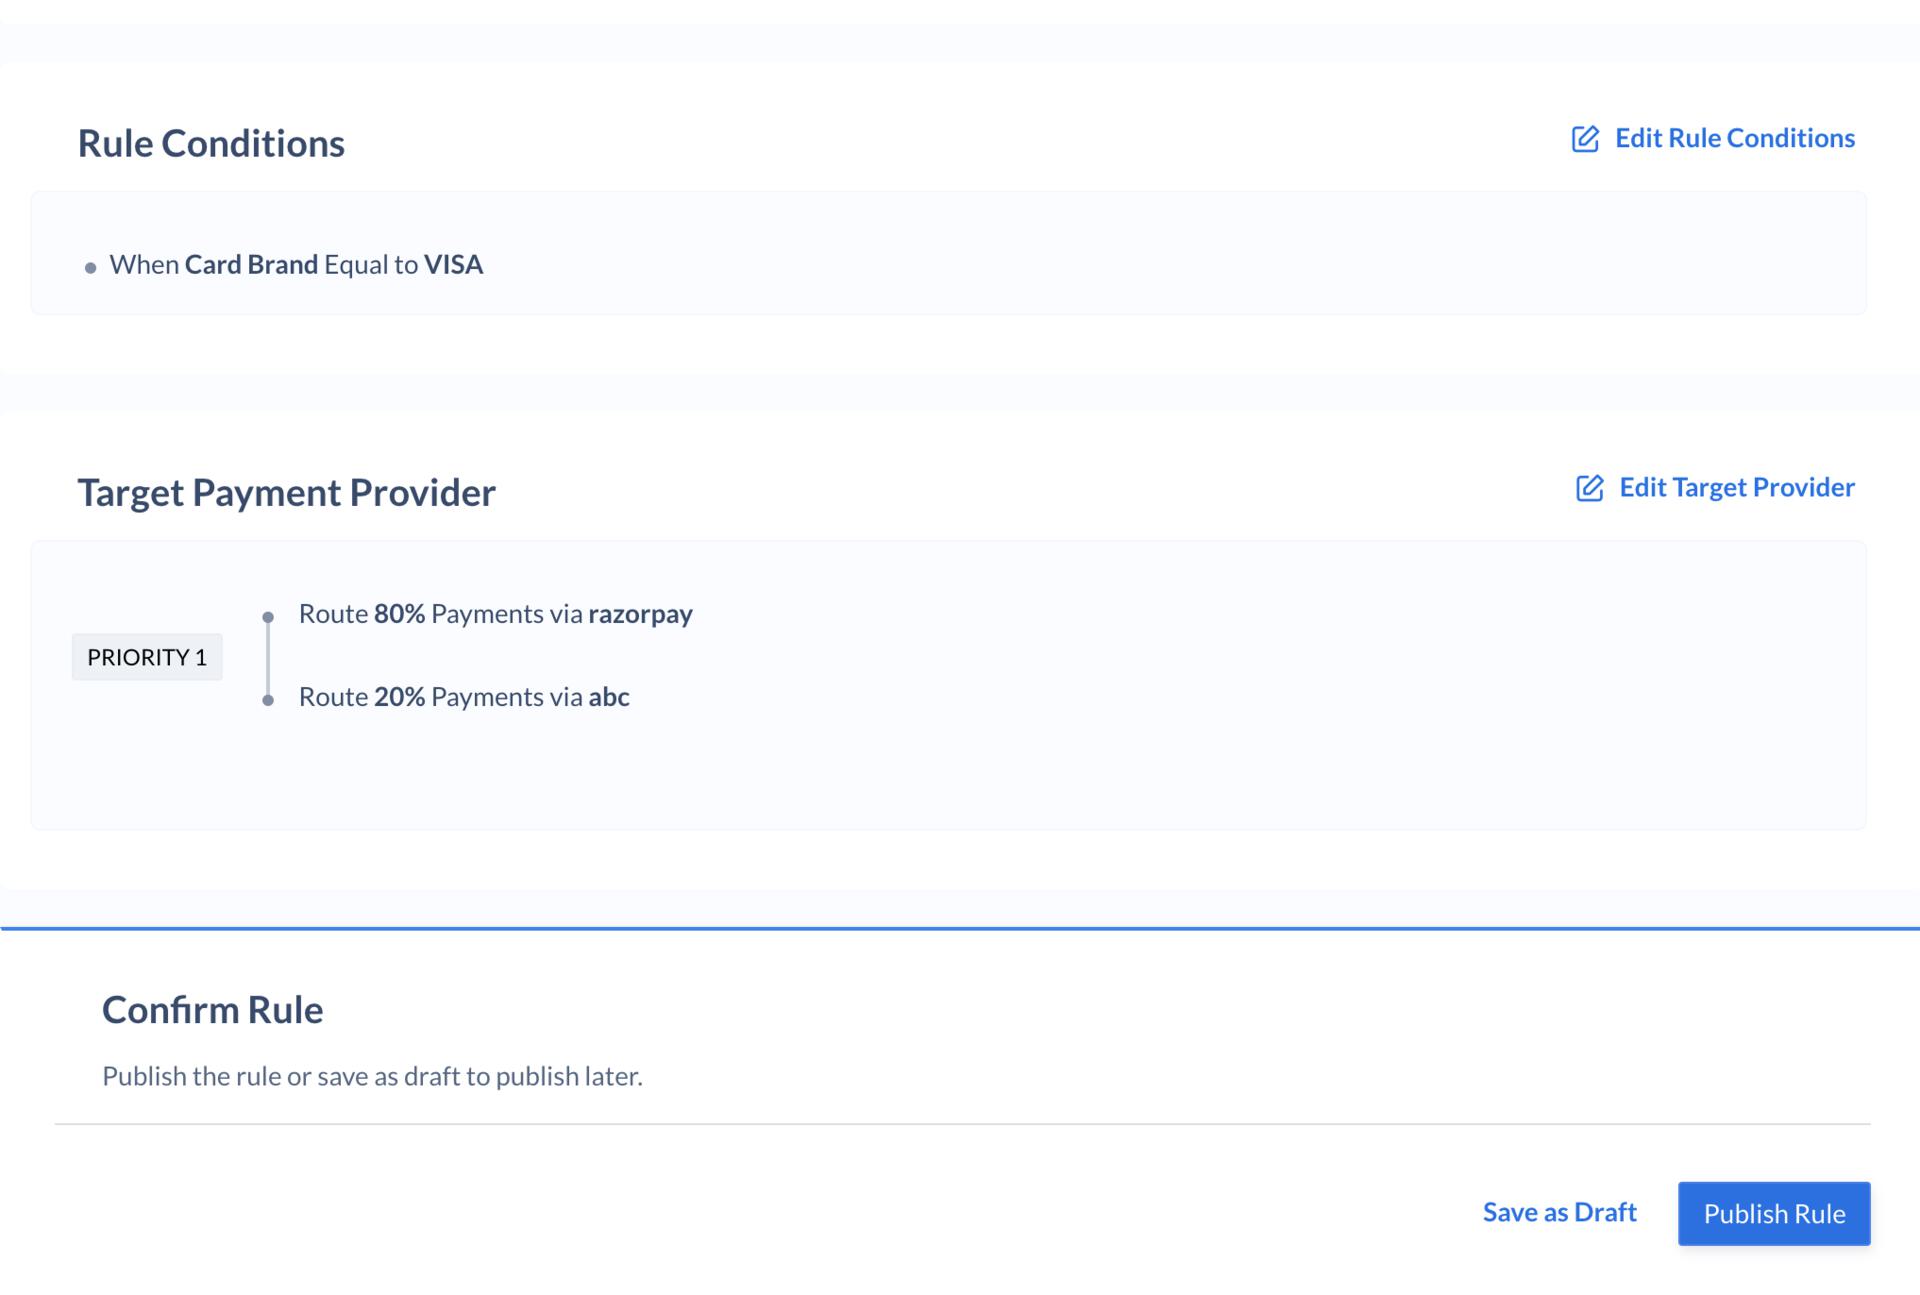
6. Click **Publish Rule** to publish immediately. Alternatively, you can save the rule in draft state and publish later.
## Custom Identifiers
Custom identifiers are texts (strings) that can be used to construct routing rules. For instance, you can use custom identifiers to route transactions through Razorpay when you pass a custom text `xyz` and to PayU when you pass the text `abc`.
**How to send the values for custom identifier?**
There are three field defined for custom identifiers:
1. optimizer\_identifier\_1
2. optimizer\_identifier\_2
3. optimizer\_identifier\_3
These fields can be sent within the notes object of the payment or order request. If this field is sent into the order request, it will be copied in the payment requests corresponding to the order id. This is done to ensure that you have both the options available. We recommend adding these fields in the order request since its more secure.
### Sample Code
Given below are sample codes which show how the `notes` parameter should be passed in the Orders API and the Standard Checkout code:
#### Orders API
```bash Curl theme={null}
curl -u [YOUR_KEY_ID]:[YOUR_KEY_SECRET] \
-X POST https://api.razorpay.com/v1/orders \
-H "content-type: application/json" \
-d '{
"amount": 50000,
"currency": "INR",
"receipt": "receipt#1",
"notes": {
"optimizer_identifier_1": "rzp",
"optimizer_identifier_2": "payu",
"optimizer_identifier_3": "atom"
}
}'
```
```java Java theme={null}
RazorpayClient razorpay = new RazorpayClient("[YOUR_KEY_ID]", "[YOUR_KEY_SECRET]");
JSONObject orderRequest = new JSONObject();
orderRequest.put("amount", 50000); // amount in the smallest currency unit
orderRequest.put("currency", "INR");
orderRequest.put("receipt", "receipt#1");
JSONObject notes = new JSONObject();
notes.put("optimizer_identifier_1", "rzp");
notes.put("optimizer_identifier_2", "payu");
notes.put("optimizer_identifier_3, atom);
request.put("notes", notes);
Order order = razorpay.orders.create(orderRequest);
```
```python Python theme={null}
import razorpay
client = razorpay.Client(auth=("YOUR_ID", "YOUR_SECRET"))
client.order.create({
"amount": 50000,
"currency": "INR",
"receipt": "receipt#1",
"notes": {
"optimizer_identifier_1": "rzp",
"optimizer_identifier_2": "payu",
"optimizer_identifier_3": "atom"
}
})
```
```php PHP theme={null}
$api = new Api($key_id, $secret);
$api->order->create(array('receipt' => 'receipt#1', 'amount' => 50000, 'currency' => 'INR',
'notes' => array( 'optimizer_identifier_1'=> 'rzp', 'optimizer_identifier_2'=> 'payu', 'optimizer_identifier_3'=> 'atom')));
```
```csharp .NET theme={null}
RazorpayClient client = new RazorpayClient("[YOUR_KEY_ID]", "[YOUR_KEY_SECRET]");
Dictionary options = new Dictionary();
options.Add("amount", 50000); // amount in the smallest currency unit
options.Add("receipt", "receipt#1");
options.Add("currency", "INR");
notes.optimizer_identifier_1="rzp";
notes.optimizer_identifier_2="payu";
notes.optimizer_identifier_3="atom";
options.Add("notes", notes);
Order order = client.Order.Create(options);
```
```ruby Ruby theme={null}
require "razorpay"
Razorpay.setup('YOUR_KEY_ID', 'YOUR_SECRET')
order = Razorpay::Order.create amount: 50000, currency: 'INR', receipt: 'receipt#1', "notes": {
"optimizer_identifier_1": "rzp",
"optimizer_identifier_2": "payu",
"optimizer_identifier_3": "atom"
}
```
```javascript Node.js theme={null}
var instance = new Razorpay({ key_id: 'YOUR_KEY_ID', key_secret: 'YOUR_SECRET' })
instance.orders.create({
amount: 50000,
currency: "INR",
receipt: "receipt#1",
notes: {
optimizer_identifier_1: "rzp",
optimizer_identifier_2: "payu",
optimizer_identifier_3: "atom"
}
})
```
```go Go theme={null}
import ( razorpay "github.com/razorpay/razorpay-go" )
client := razorpay.NewClient("YOUR_KEY_ID", "YOUR_SECRET")
data := map[string]interface{}{
"amount": 50000,
"currency": "INR",
"receipt": "receipt#1",
"notes": map[string]interface{}{
"optimizer_identifier_1": "rzp",
"optimizer_identifier_2": "payu",
"optimizer_identifier_3": "atom",
},
}
body, err := client.Order.Create(data, nil)
```
#### Standard Checkout
```javascript Standard Checkout Code theme={null}
```
## Turbo UPI on Optimizer
Watch this short video of how you to route your transactions for [Turbo UPI](/docs/payments/payment-gateway/android-integration/custom/payment-methods/turbo-upi) using Optimizer.
**Handy Tips**
Make sure that you have enabled Turbo UPI as a payment method. If it is not yet enabled, please get in touch with your sales POC to activate this feature for your account.
Below is an example of how you can route your transactions for [Turbo UPI](/docs/payments/payment-gateway/android-integration/custom/payment-methods/turbo-upi) using Optimizer:
1. Log in to your Dashboard.
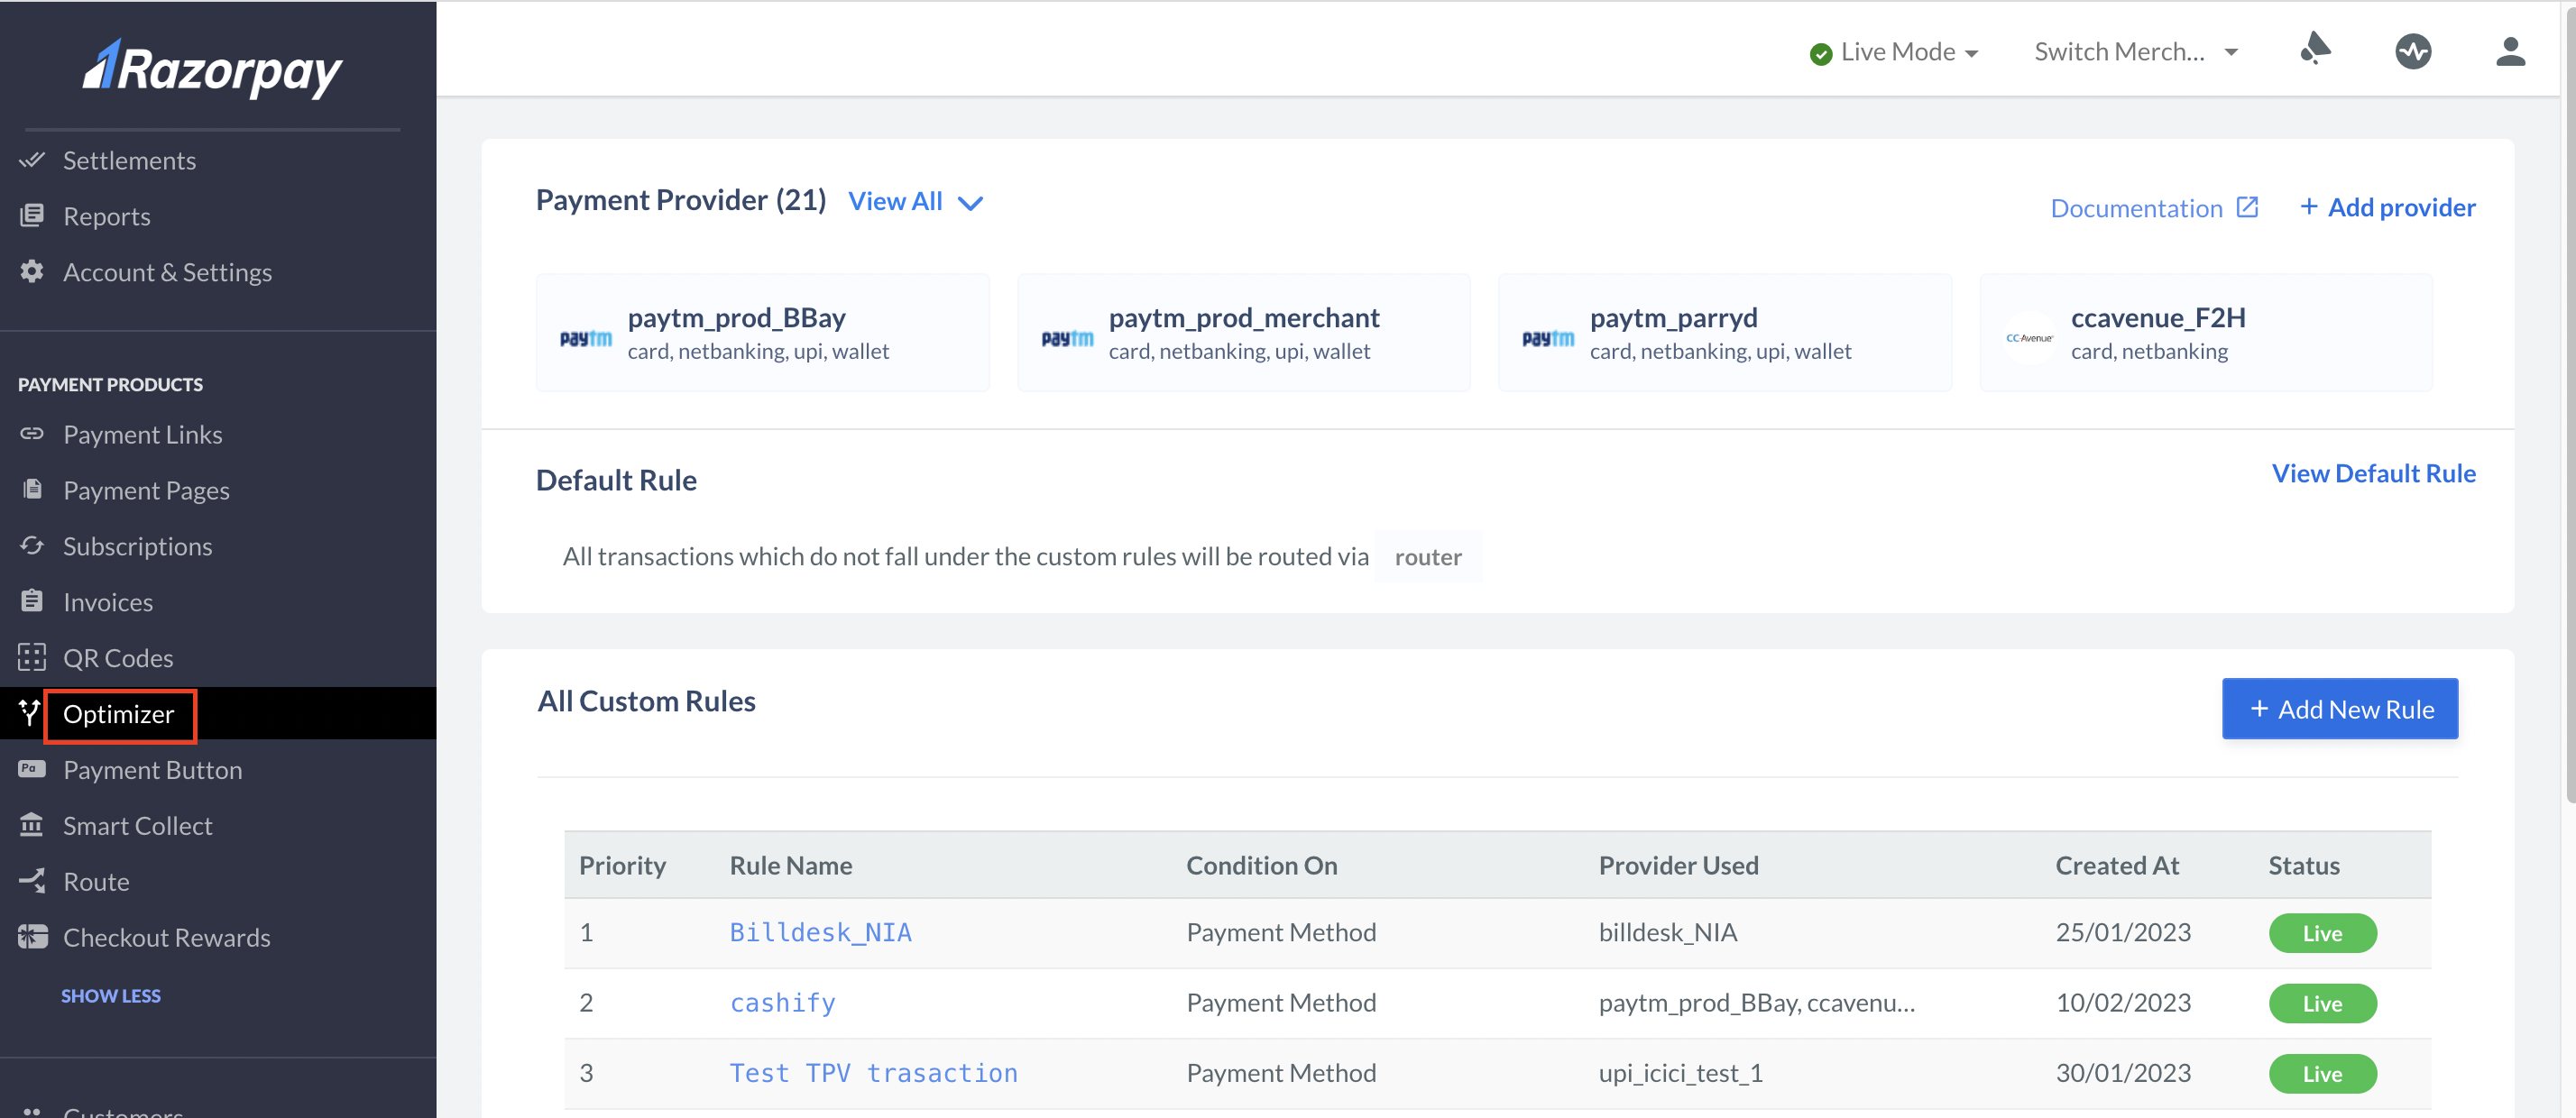
2. Go to the **PAYMENT PRODUCTS** section and click **Optimizer**.
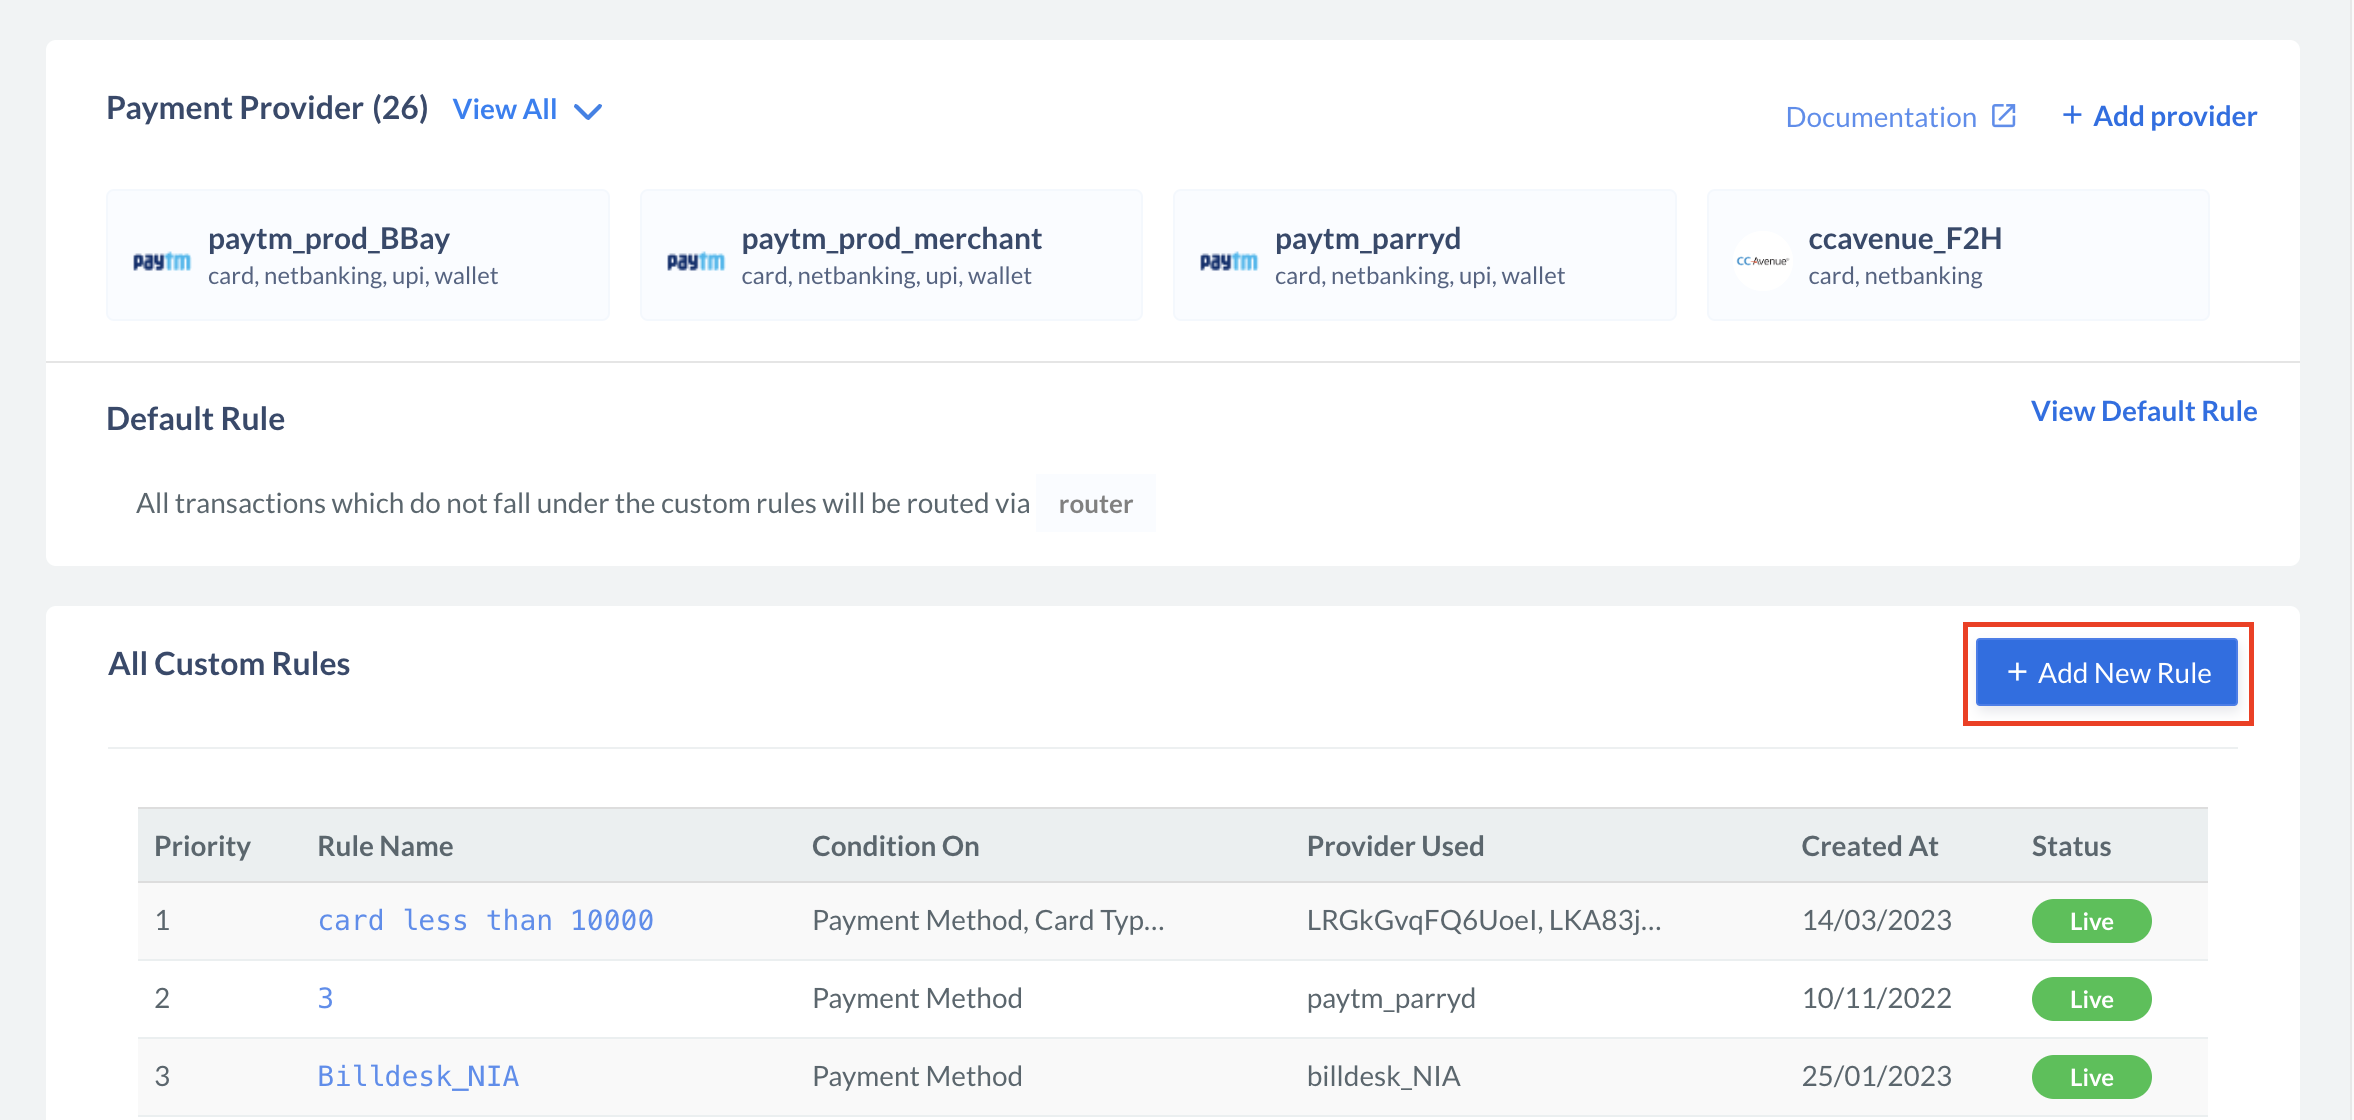
3. Click **Add New Rule**.
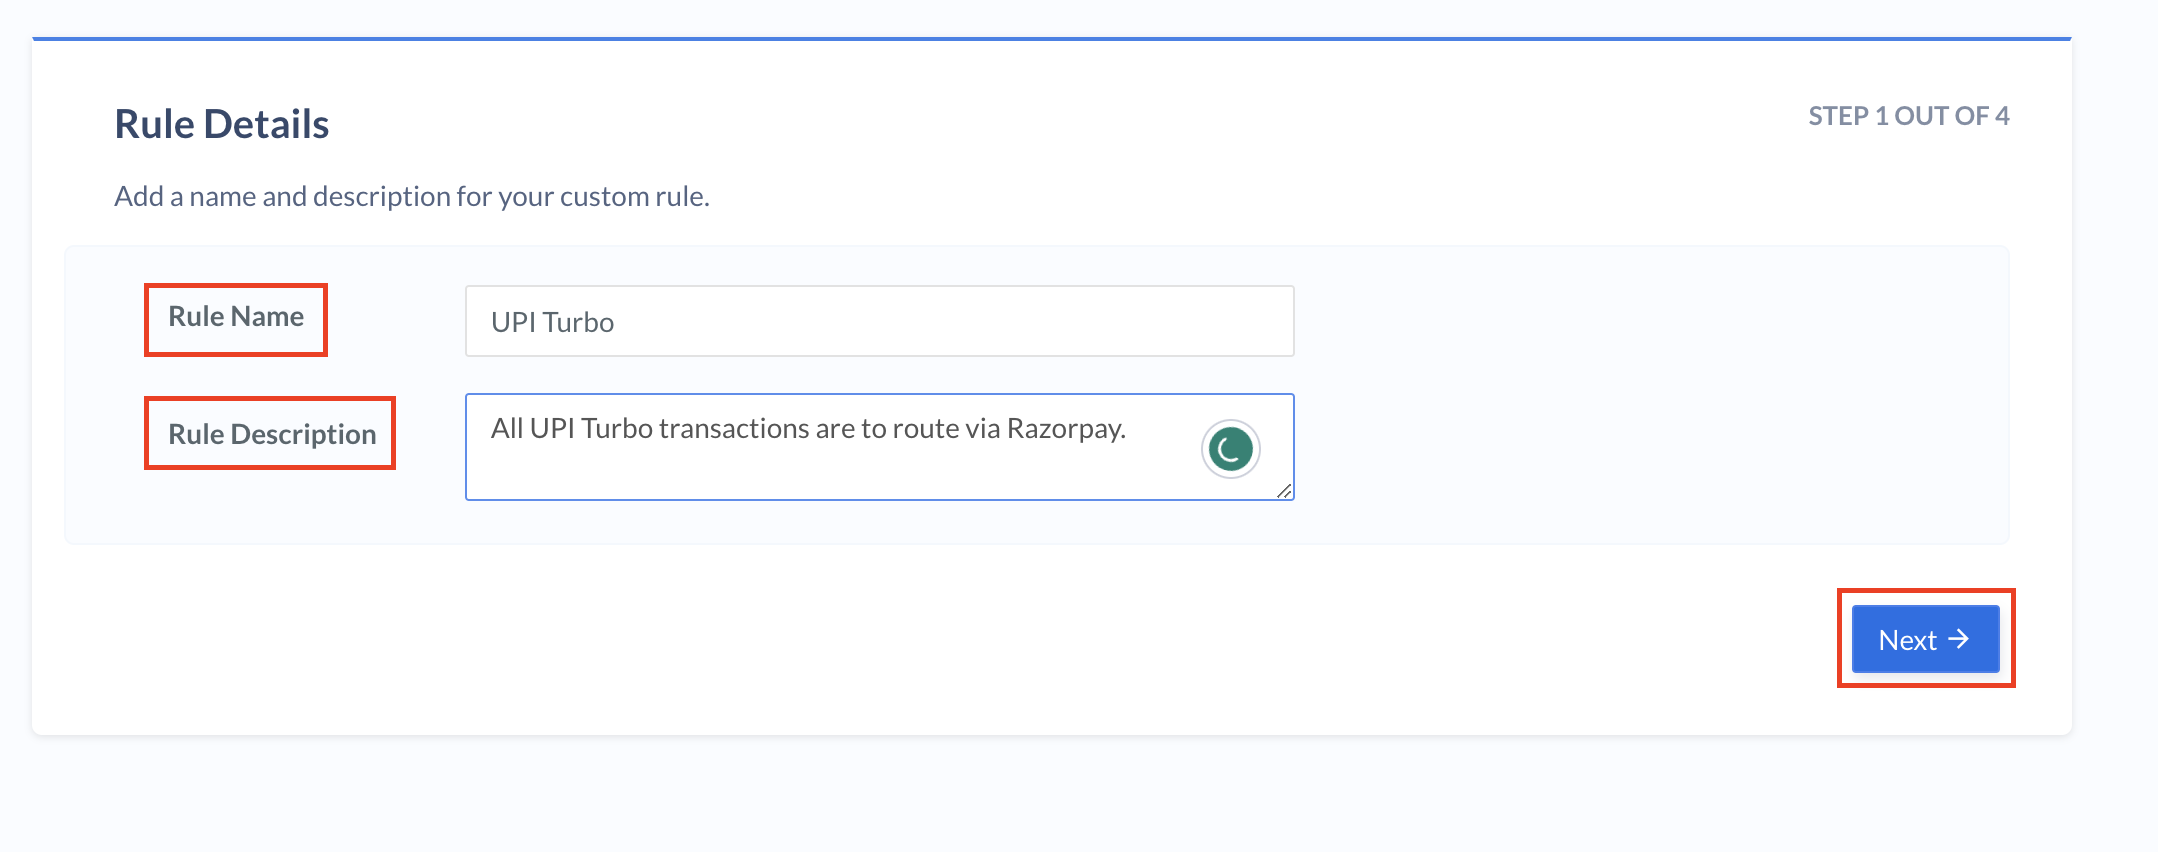
4. Enter the **Rule Name** and **Rule Description** and click **Next**.
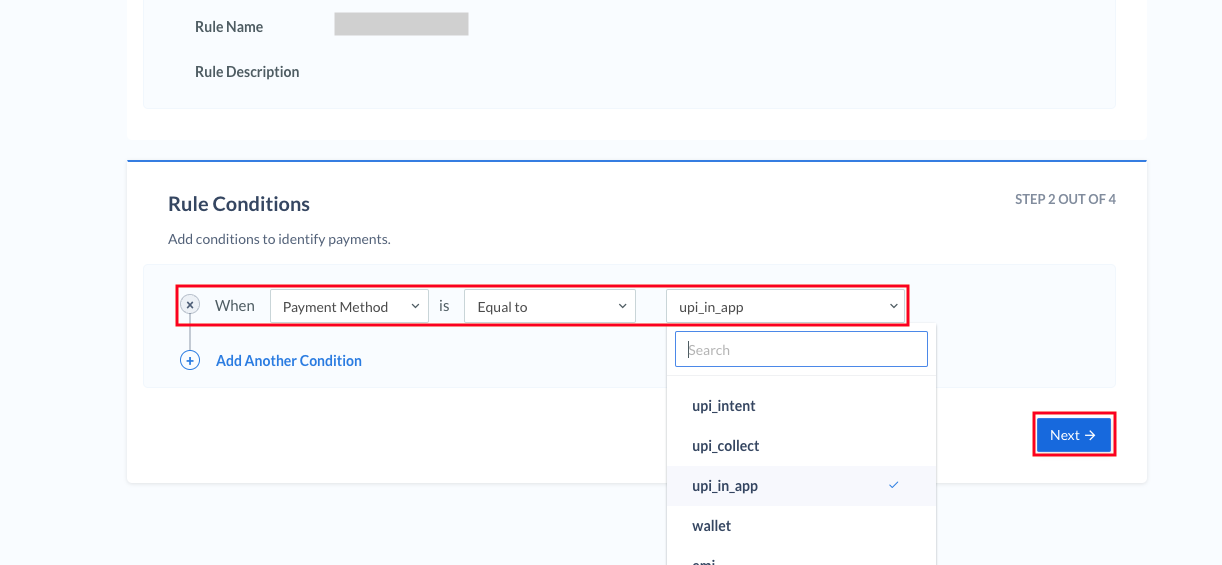
5. Enter the following values:
* **When** - Select `Payment Method`.
* **is** - Select `Equal to`.
* **Select Comparing Value** - Select `upi_in_app` and click **Next**.
**Watch Out!**
The comparing value `upi_in_app` will be enabled only when you have the payment method Turbo UPI enabled for you.
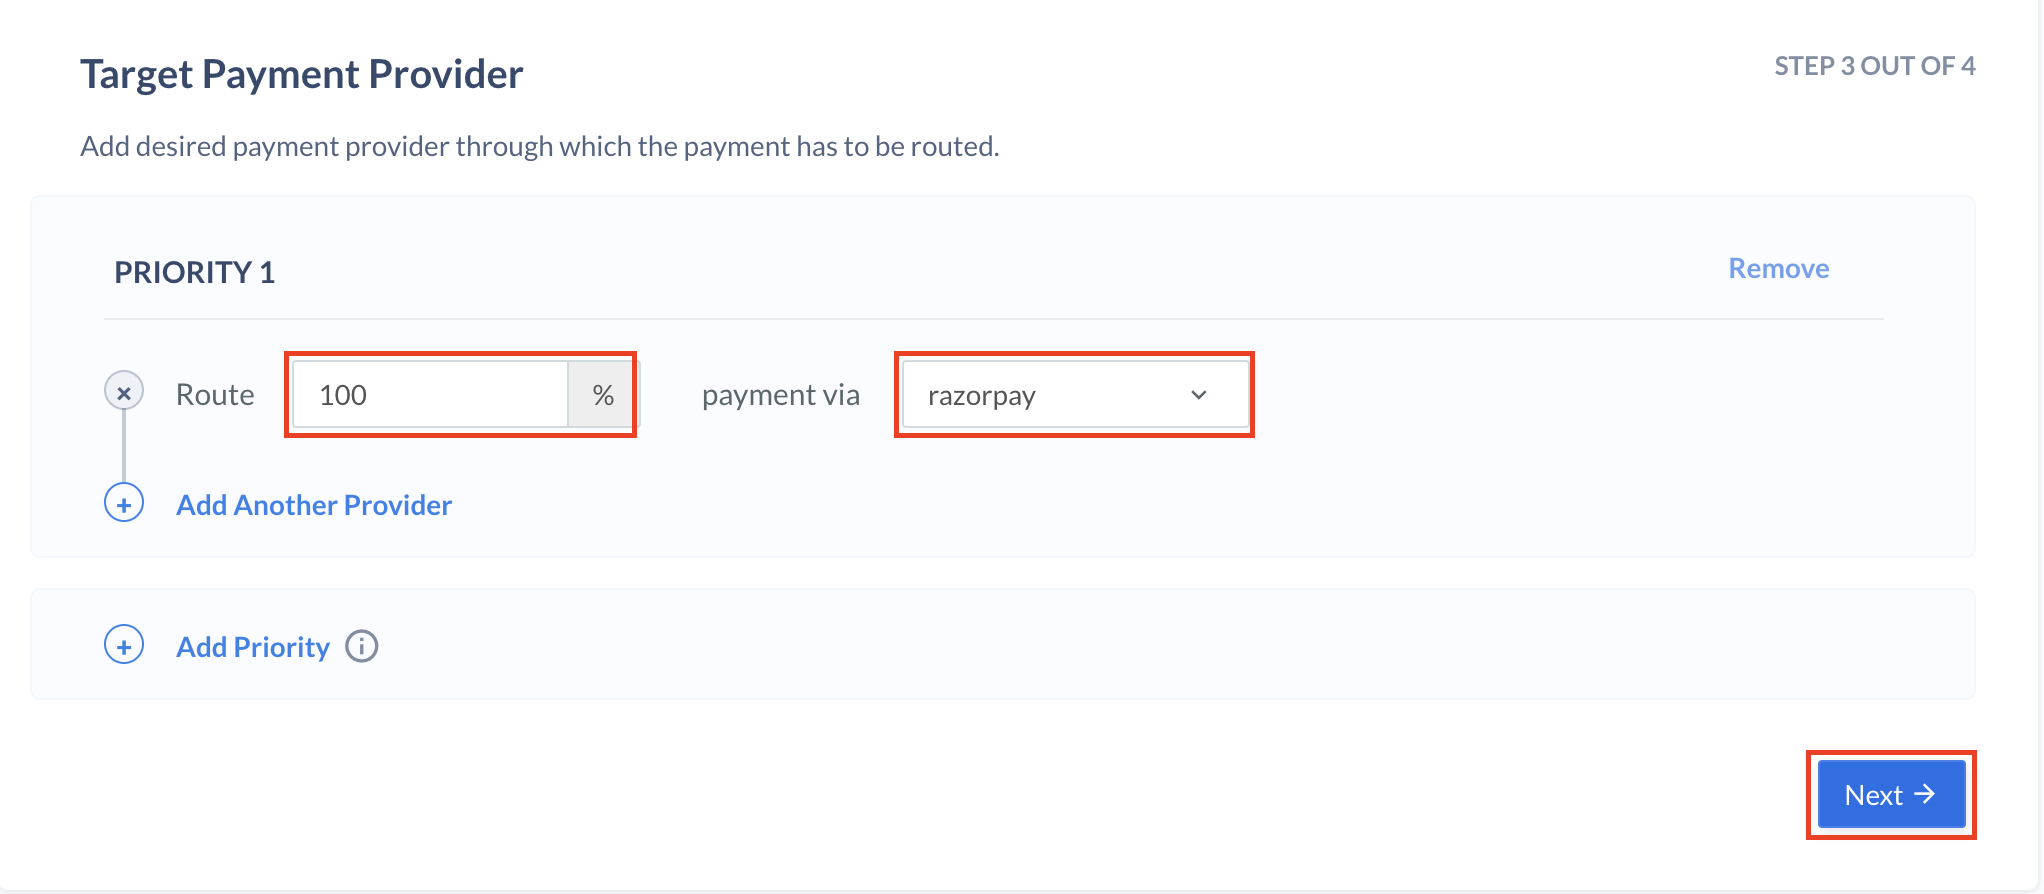
6. Enter the target payment provider details and click **Next**.
**Watch Out!**
* Razorpay is the only supported payment provider for Turbo UPI on Optimizer.
* If you do not set any routing rules, then by default, all transactions will be routed via Razorpay.
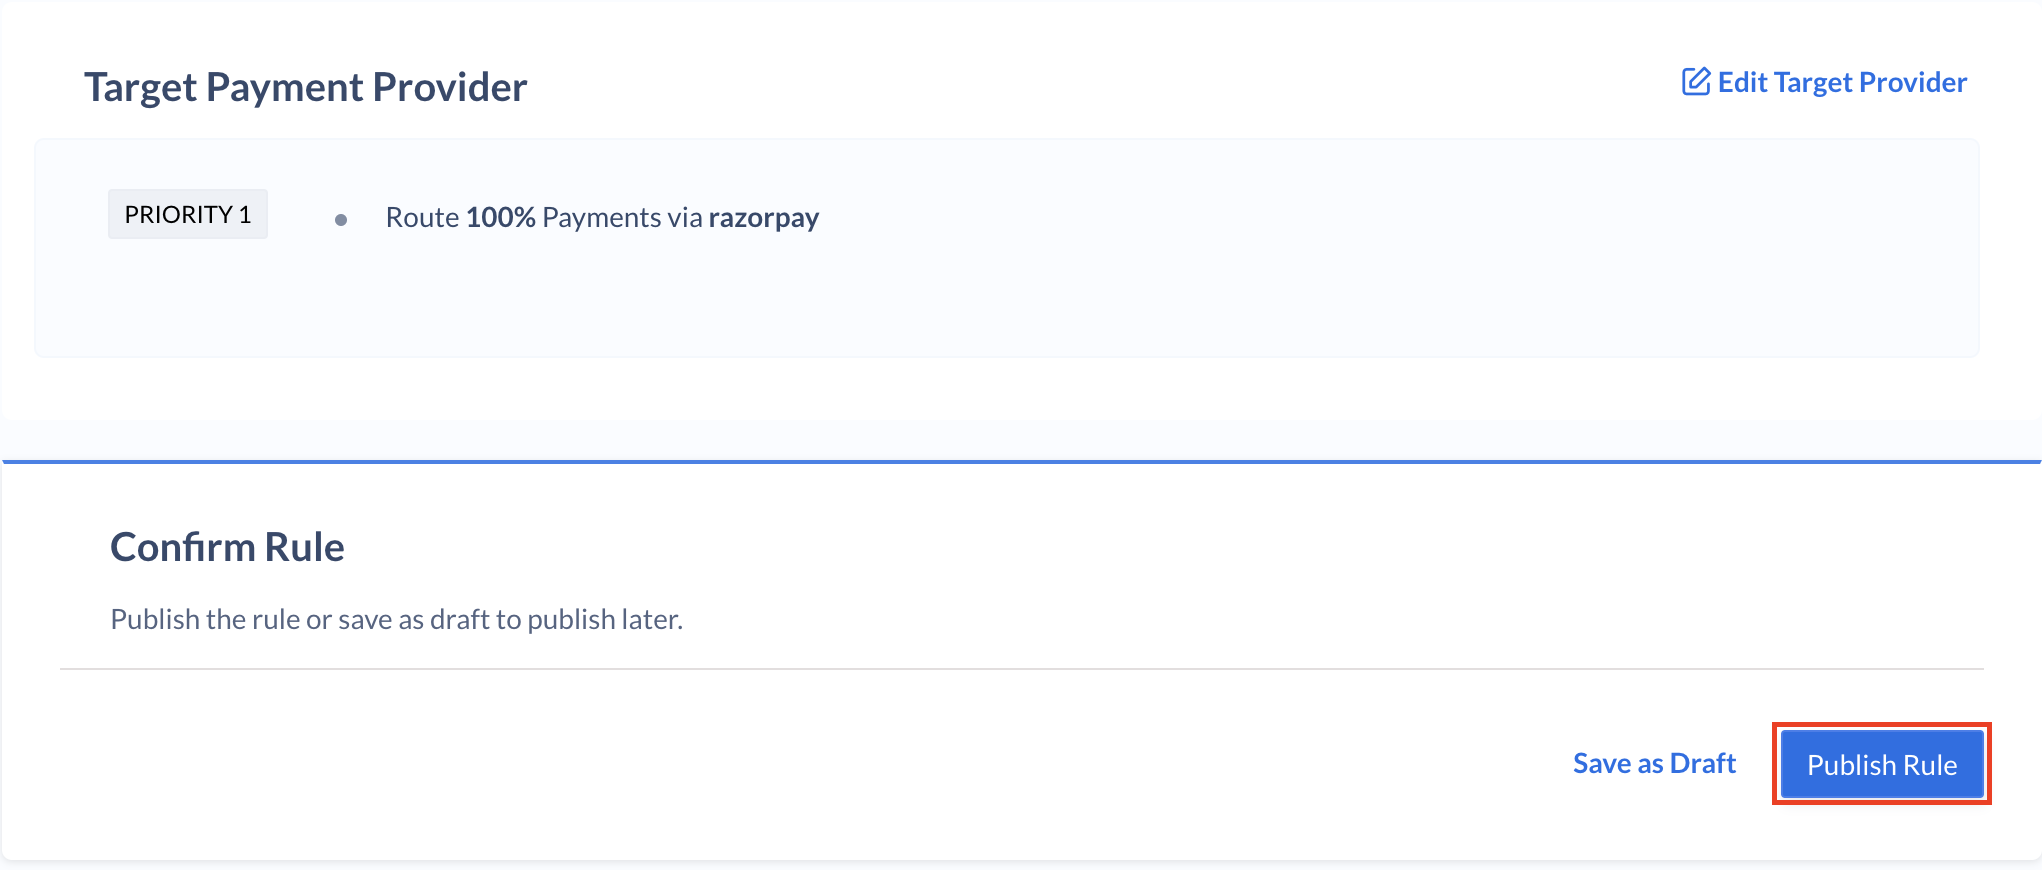
7. Click **Publish Rule**.
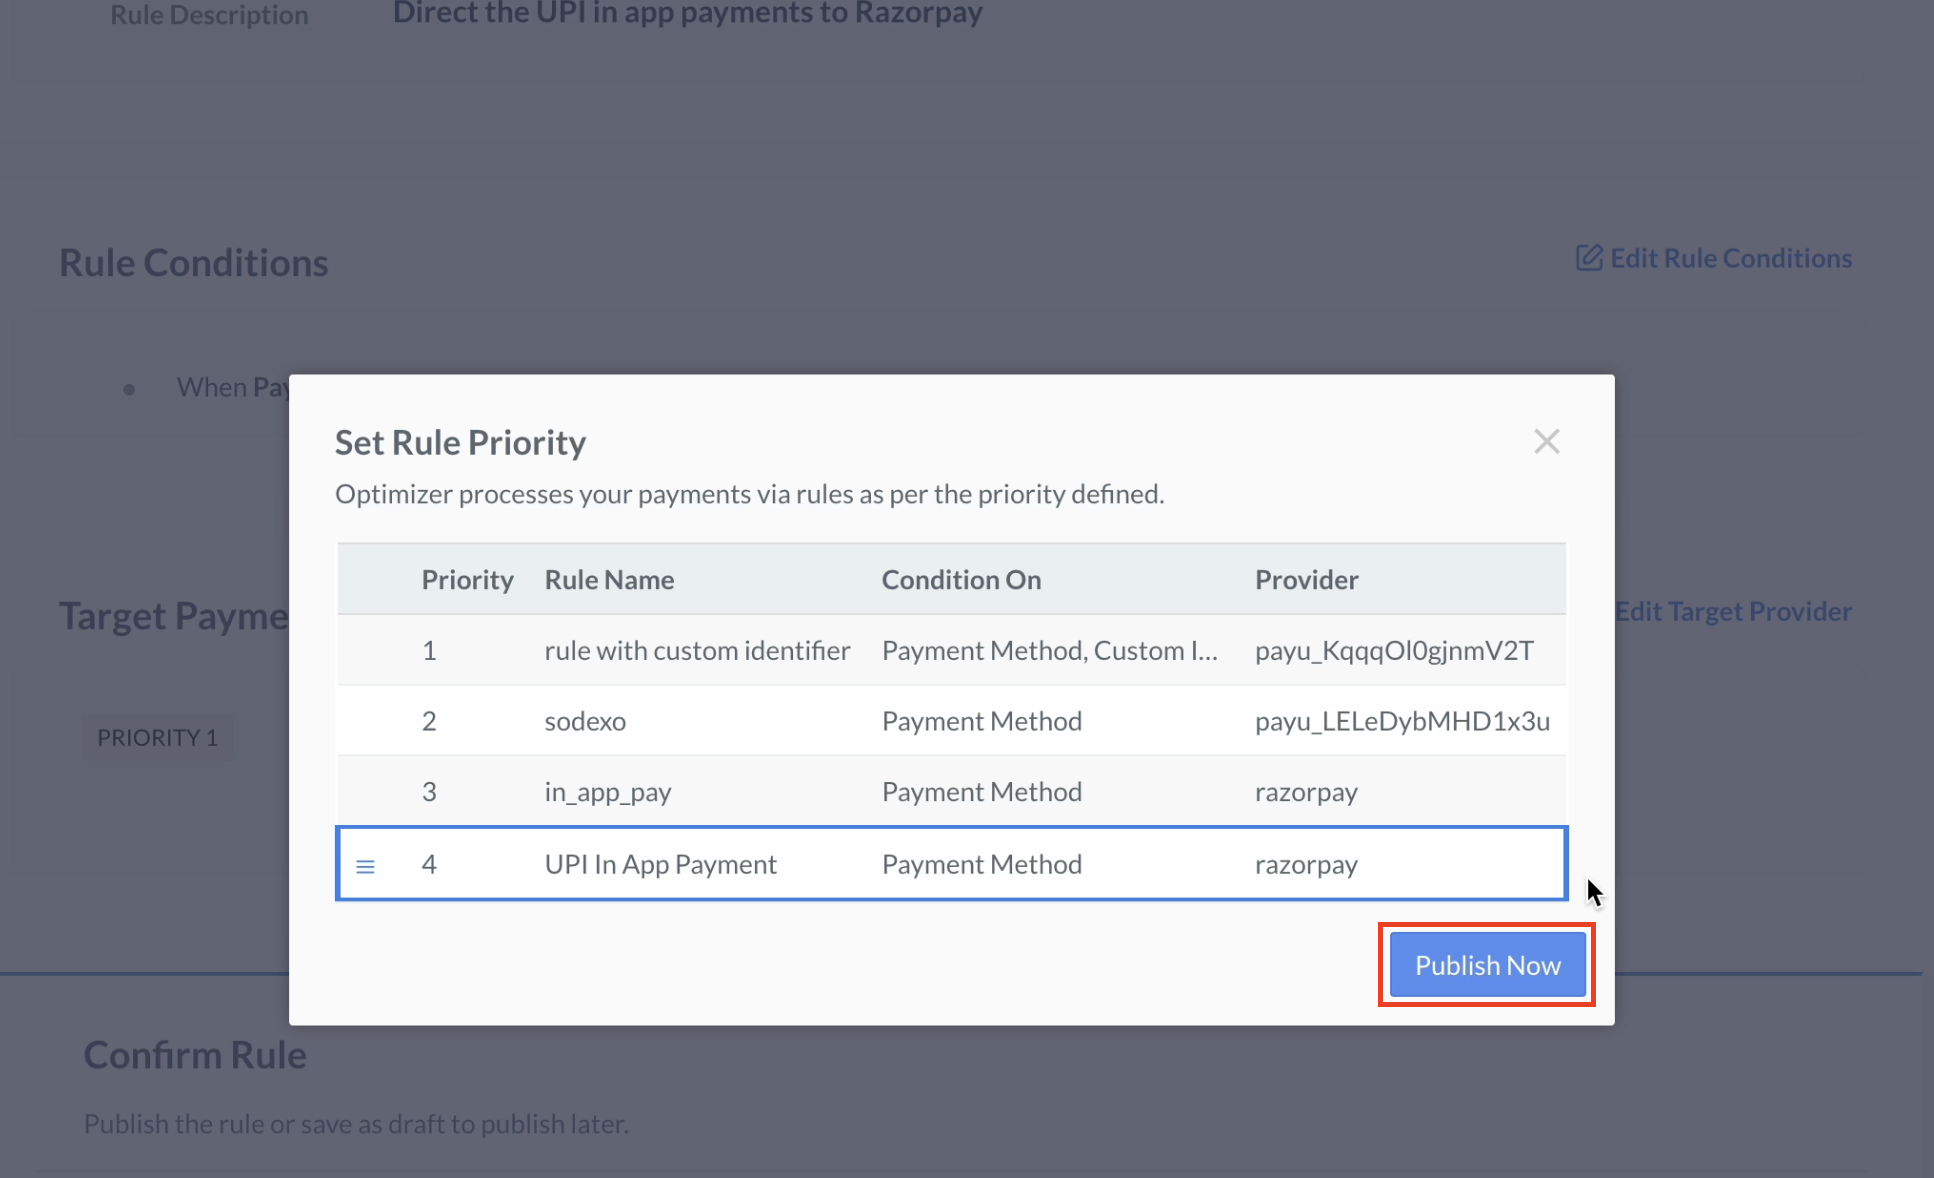
8. Click **Publish Now**.
### Related Information
* [Add Payment Providers](/docs/payments/optimizer/add-payment-providers)
* [Manage Rules](/docs/payments/optimizer/manage-rules)
 3. Click **Next**.
4. Add the rule conditions:
| Field | Possible Values |
| ----- | ---------------------------------------------------------------------------------------------------------------------------------------------------------------------------------------------------------------------------------------------------------------------------------------------------------------------------------------------------------------------------------------------------------------------------------------------------------------------- |
| When | • Channels (Website, Android, iOS)
3. Click **Next**.
4. Add the rule conditions:
| Field | Possible Values |
| ----- | ---------------------------------------------------------------------------------------------------------------------------------------------------------------------------------------------------------------------------------------------------------------------------------------------------------------------------------------------------------------------------------------------------------------------------------------------------------------------- |
| When | • Channels (Website, Android, iOS) 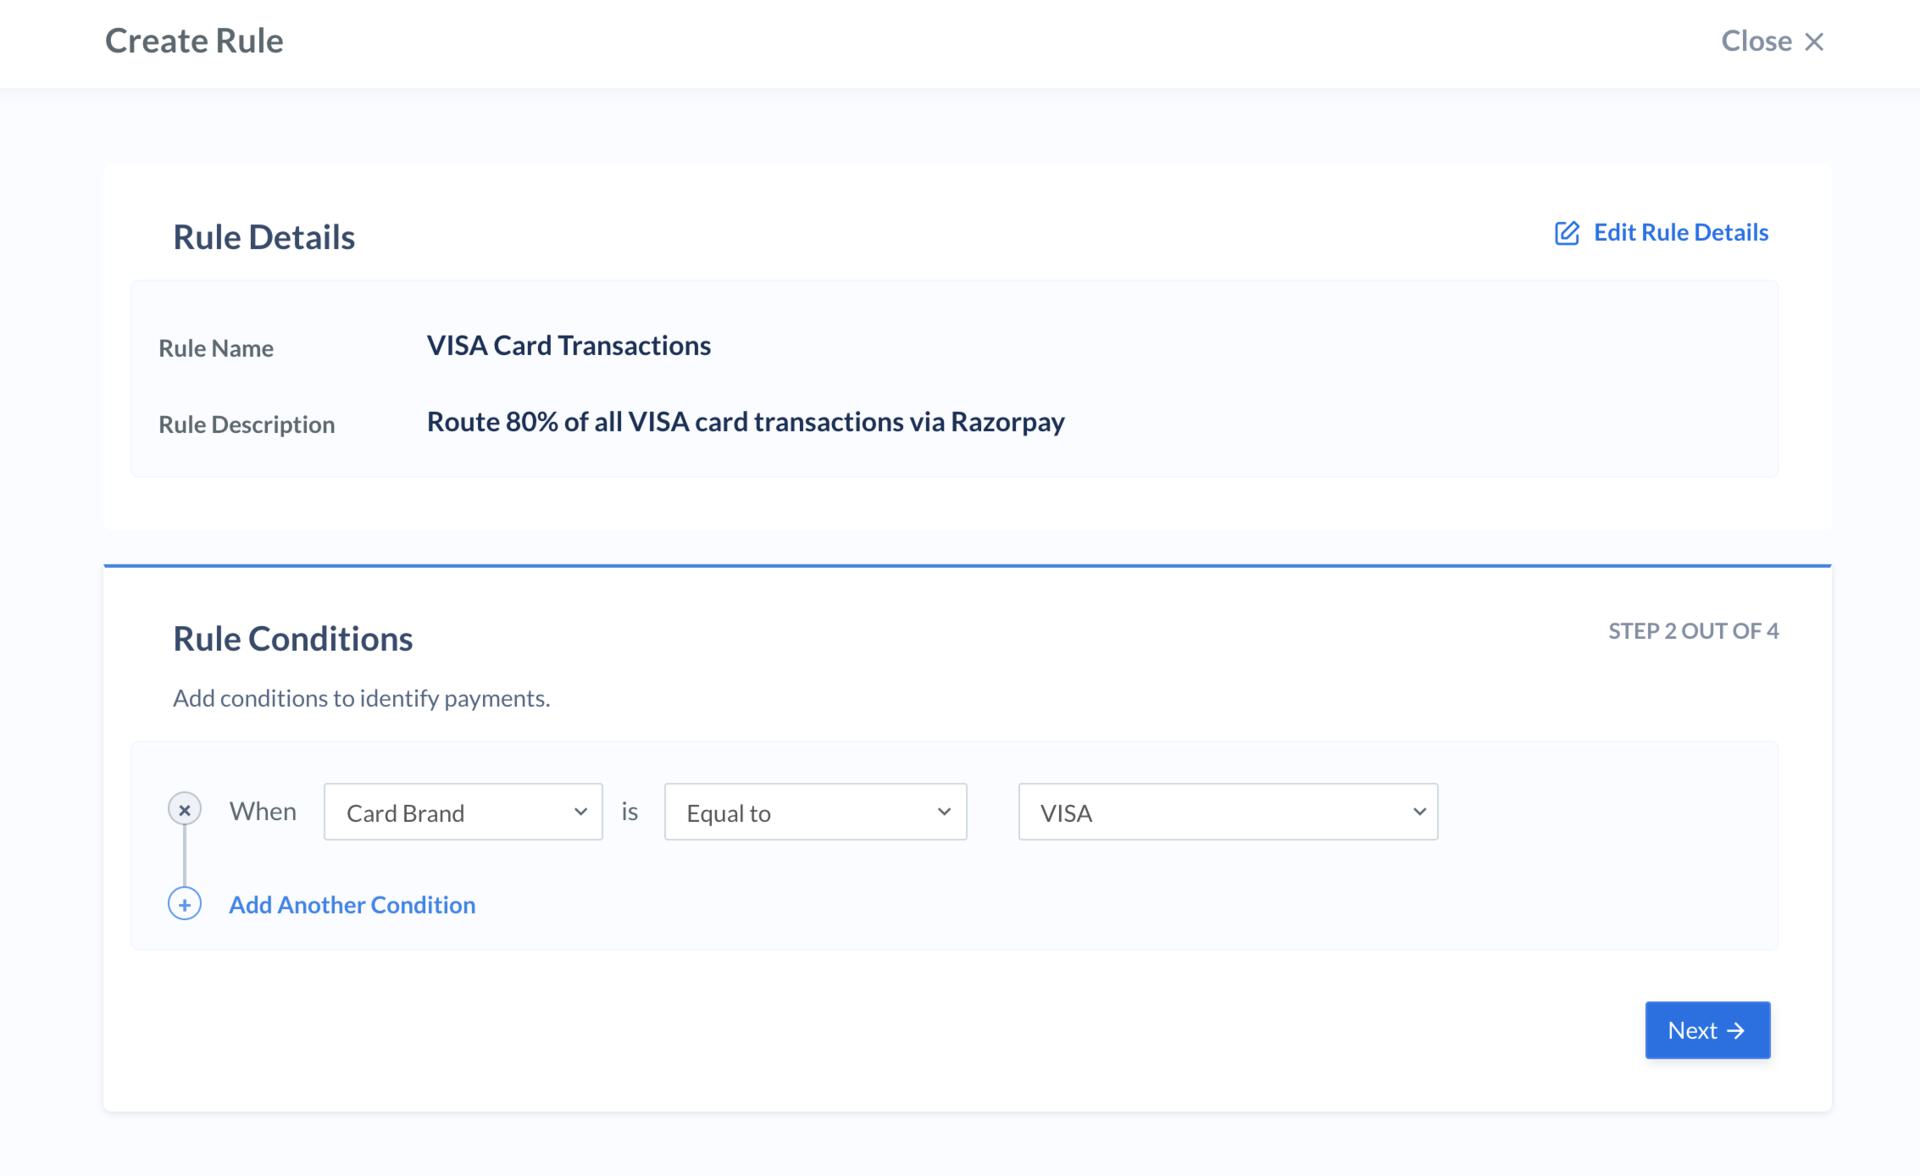 5. Add the target payment provider through which the transactions should be routed:
1. Click **Edit Target Provider** to set the priority.
2. Enter the following details:
1. For example, for Razorpay gateway, provide the values for **Route** as 80 and **payment via** as `Razorpay`.
2. Click **Add Another Provider**.
3. For example, for ABC gateway, provide the values for **Route** as 20 and **payment via** as `ABC`.
3. You can choose to add another provider as Priority 2. To do this, click **Add Priority** and enter the following details:
1. For example, for XYZ gateway, provide the values for **Route** as 100 and **payment via** as `XYZ`.
4. Click **Next**.
5. Add the target payment provider through which the transactions should be routed:
1. Click **Edit Target Provider** to set the priority.
2. Enter the following details:
1. For example, for Razorpay gateway, provide the values for **Route** as 80 and **payment via** as `Razorpay`.
2. Click **Add Another Provider**.
3. For example, for ABC gateway, provide the values for **Route** as 20 and **payment via** as `ABC`.
3. You can choose to add another provider as Priority 2. To do this, click **Add Priority** and enter the following details:
1. For example, for XYZ gateway, provide the values for **Route** as 100 and **payment via** as `XYZ`.
4. Click **Next**.
 6. Click **Publish Rule** to publish immediately. Alternatively, you can save the rule in draft state and publish later.
 ## Custom Identifiers
Custom identifiers are texts (strings) that can be used to construct routing rules. For instance, you can use custom identifiers to route transactions through Razorpay when you pass a custom text `xyz` and to PayU when you pass the text `abc`.
**How to send the values for custom identifier?**
## Custom Identifiers
Custom identifiers are texts (strings) that can be used to construct routing rules. For instance, you can use custom identifiers to route transactions through Razorpay when you pass a custom text `xyz` and to PayU when you pass the text `abc`.
**How to send the values for custom identifier?** 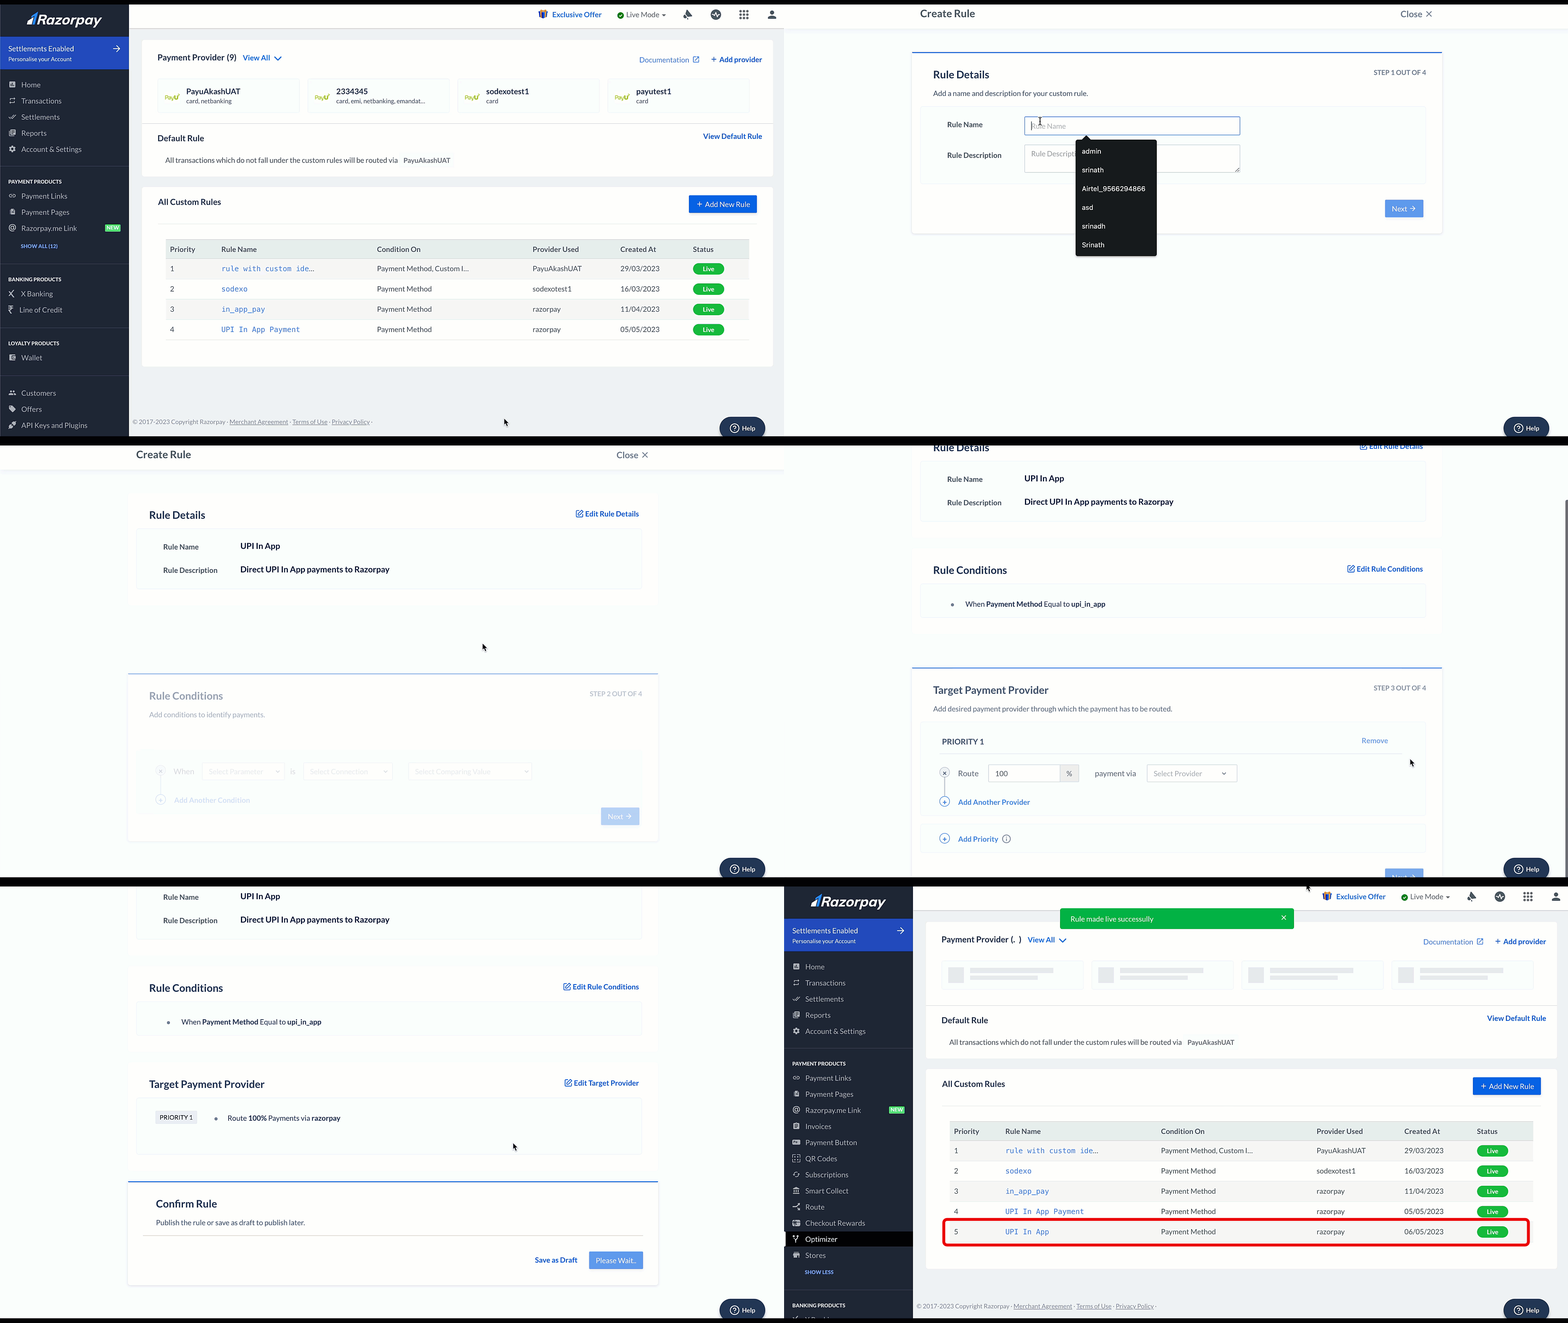
 3. Click **Add New Rule**.
 4. Enter the **Rule Name** and **Rule Description** and click **Next**.
 5. Enter the following values:
* **When** - Select `Payment Method`.
* **is** - Select `Equal to`.
* **Select Comparing Value** - Select `upi_in_app` and click **Next**.
5. Enter the following values:
* **When** - Select `Payment Method`.
* **is** - Select `Equal to`.
* **Select Comparing Value** - Select `upi_in_app` and click **Next**.
 8. Click **Publish Now**.
 ### Related Information
* [Add Payment Providers](/docs/payments/optimizer/add-payment-providers)
* [Manage Rules](/docs/payments/optimizer/manage-rules)
### Related Information
* [Add Payment Providers](/docs/payments/optimizer/add-payment-providers)
* [Manage Rules](/docs/payments/optimizer/manage-rules)