> ## Documentation Index
> Fetch the complete documentation index at: https://razorpay-881012b3.mintlify.site/llms.txt
> Use this file to discover all available pages before exploring further.
# Create and Embed Subscription Button
> Create a Subscribe Button and start accepting payments from your customers.
Available in
🇮🇳 India
You can create a Subscription Button via Dashboard and embed it on your website to accept payments from customers. This is useful in cases where you want to provide subscription plans.
**Example**
Suppose you are an Internet Service Provider who wants to provide subscription plans to your customers. You can use the Subscription Button on your site to accept payments based on subscription plans.
## Prerequisites
* Sign up for a Razorpay account.
* Log in to the Dashboard.
* The Dashboard has [test and live modes](/docs/payments/dashboard/test-live-modes). Subscription Buttons created in the test mode do not appear in the live environment. **You must create a new Subscription Button in live mode**.
## Create a Subscription Button
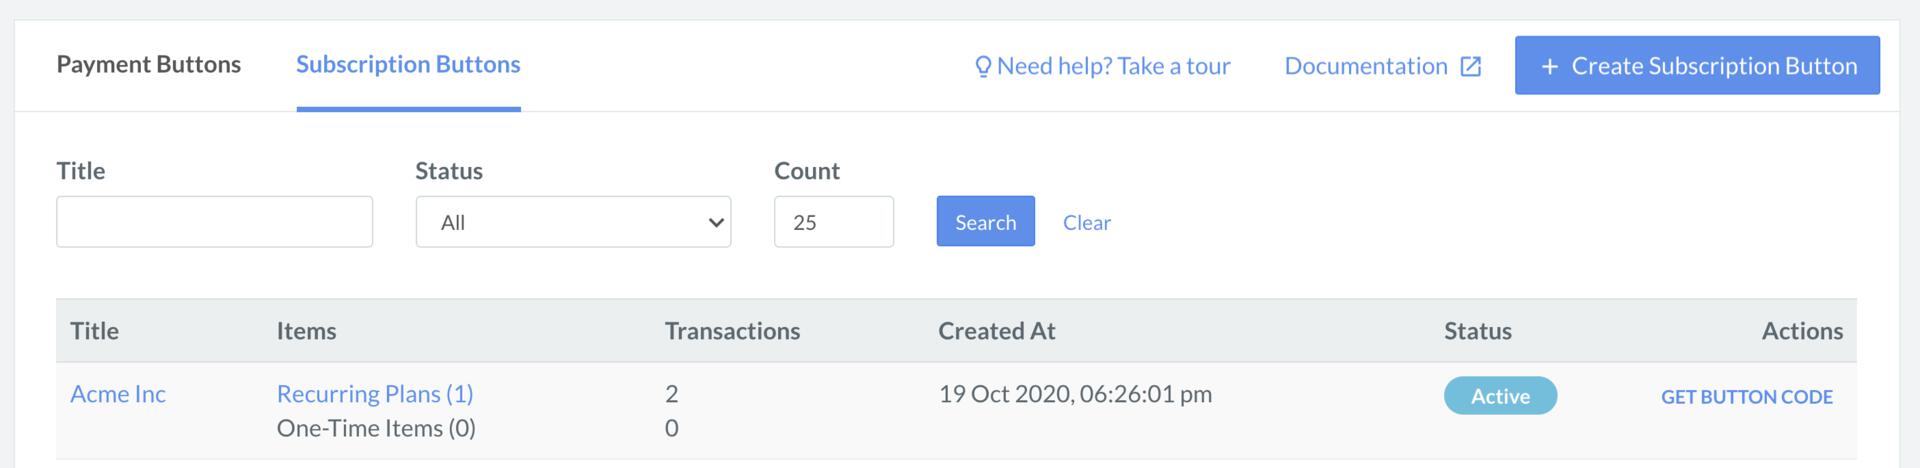
1. Log in to the Dashboard and navigate to **Payment Button**.
2. Click **Subscription Buttons** tab, and then click **+ Create Subscription Button**.
 3. Follow these steps to create the button:
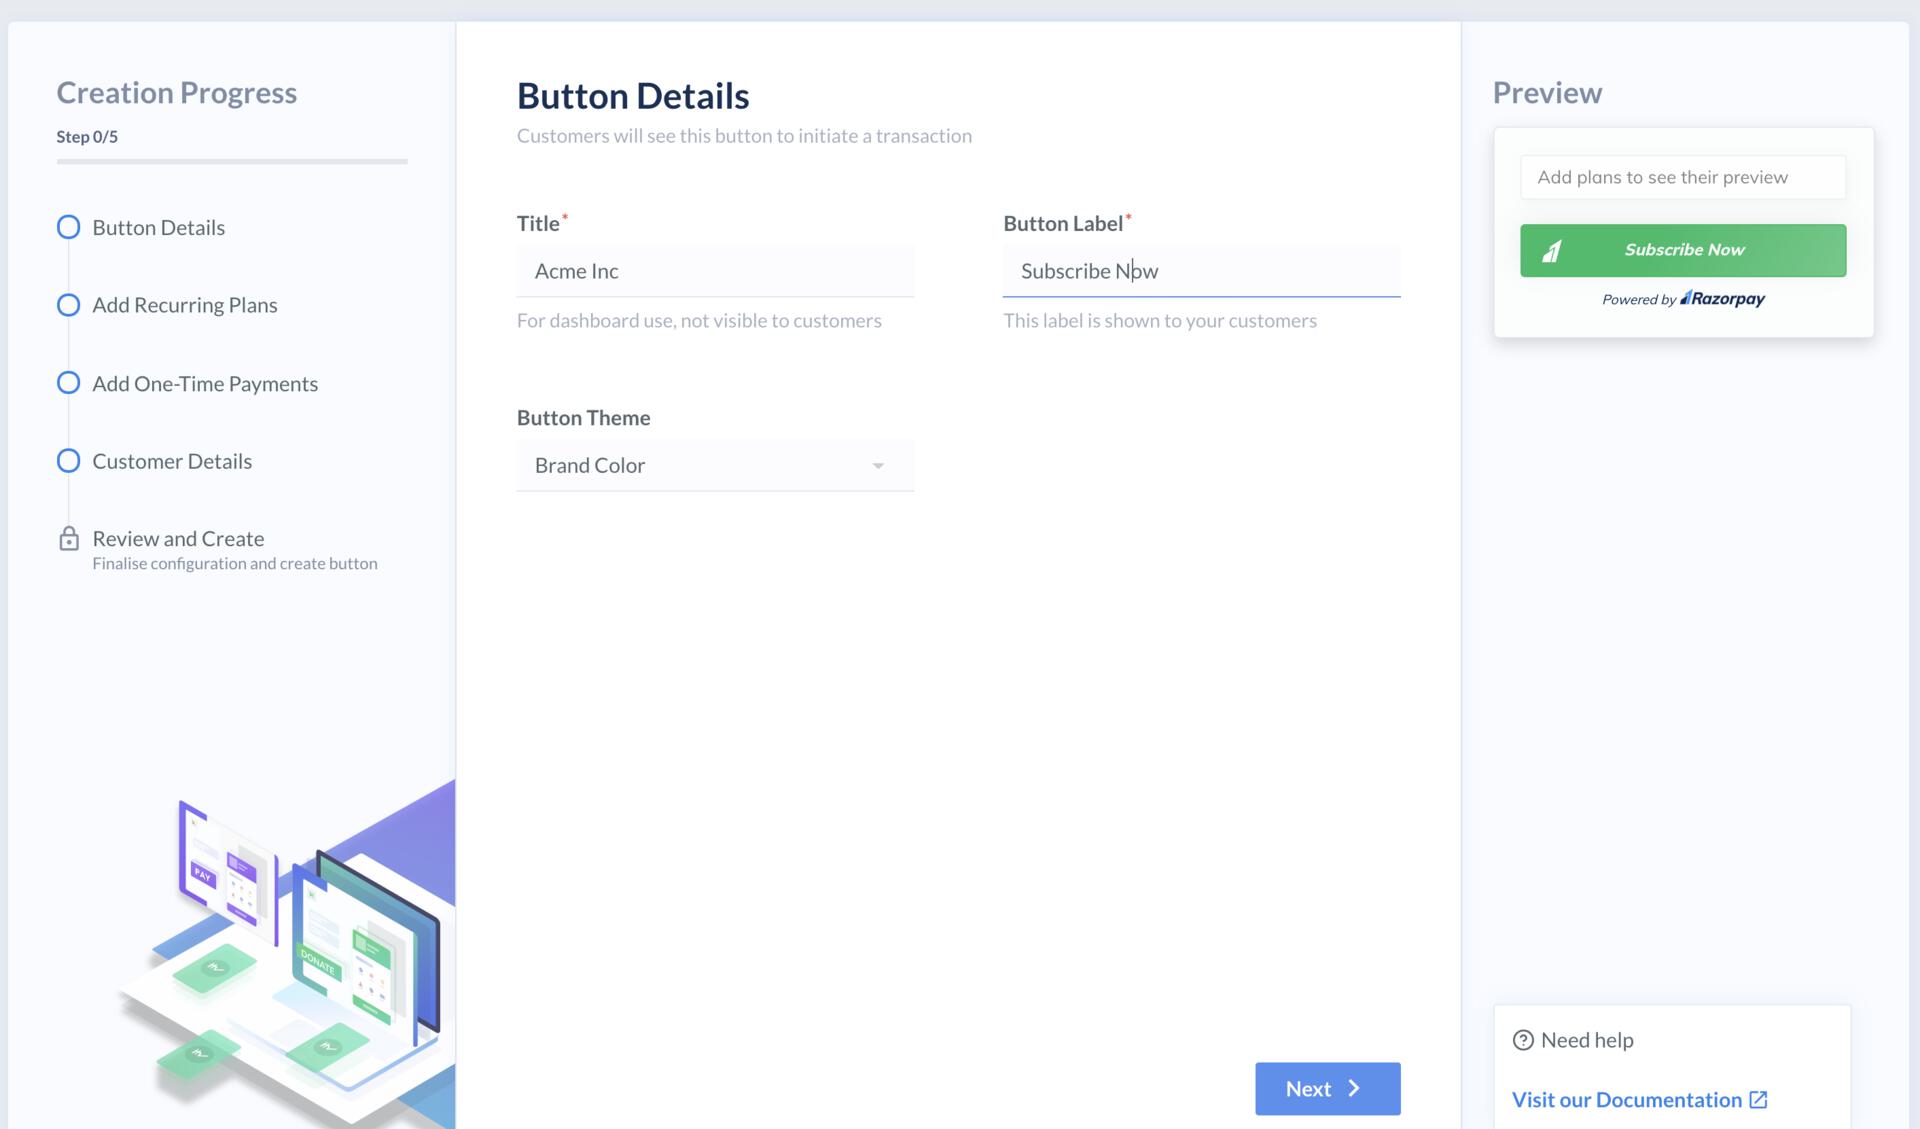
In **Button Details**, enter the relevant information:
1. **Title**: Provide a name for the button. This name is for your internal reference and will appear on the Dashboard. It **will not be visible** to your customers. For example, **Acme Inc**.
2. **Button Label**: Text on button to be displayed to customers. Please enter alphanumeric characters only. The maximum character limit is 20. For example, your button label can be **Subscribe Now**.
3. **Button Theme**: You can choose between the following themes:
* Razorpay Dark
* Razorpay Light
* Razorpay Outline
* Brand Color (This is the color configured by you on the Dashboard)
4. Click **Next**.
3. Follow these steps to create the button:
In **Button Details**, enter the relevant information:
1. **Title**: Provide a name for the button. This name is for your internal reference and will appear on the Dashboard. It **will not be visible** to your customers. For example, **Acme Inc**.
2. **Button Label**: Text on button to be displayed to customers. Please enter alphanumeric characters only. The maximum character limit is 20. For example, your button label can be **Subscribe Now**.
3. **Button Theme**: You can choose between the following themes:
* Razorpay Dark
* Razorpay Light
* Razorpay Outline
* Brand Color (This is the color configured by you on the Dashboard)
4. Click **Next**.
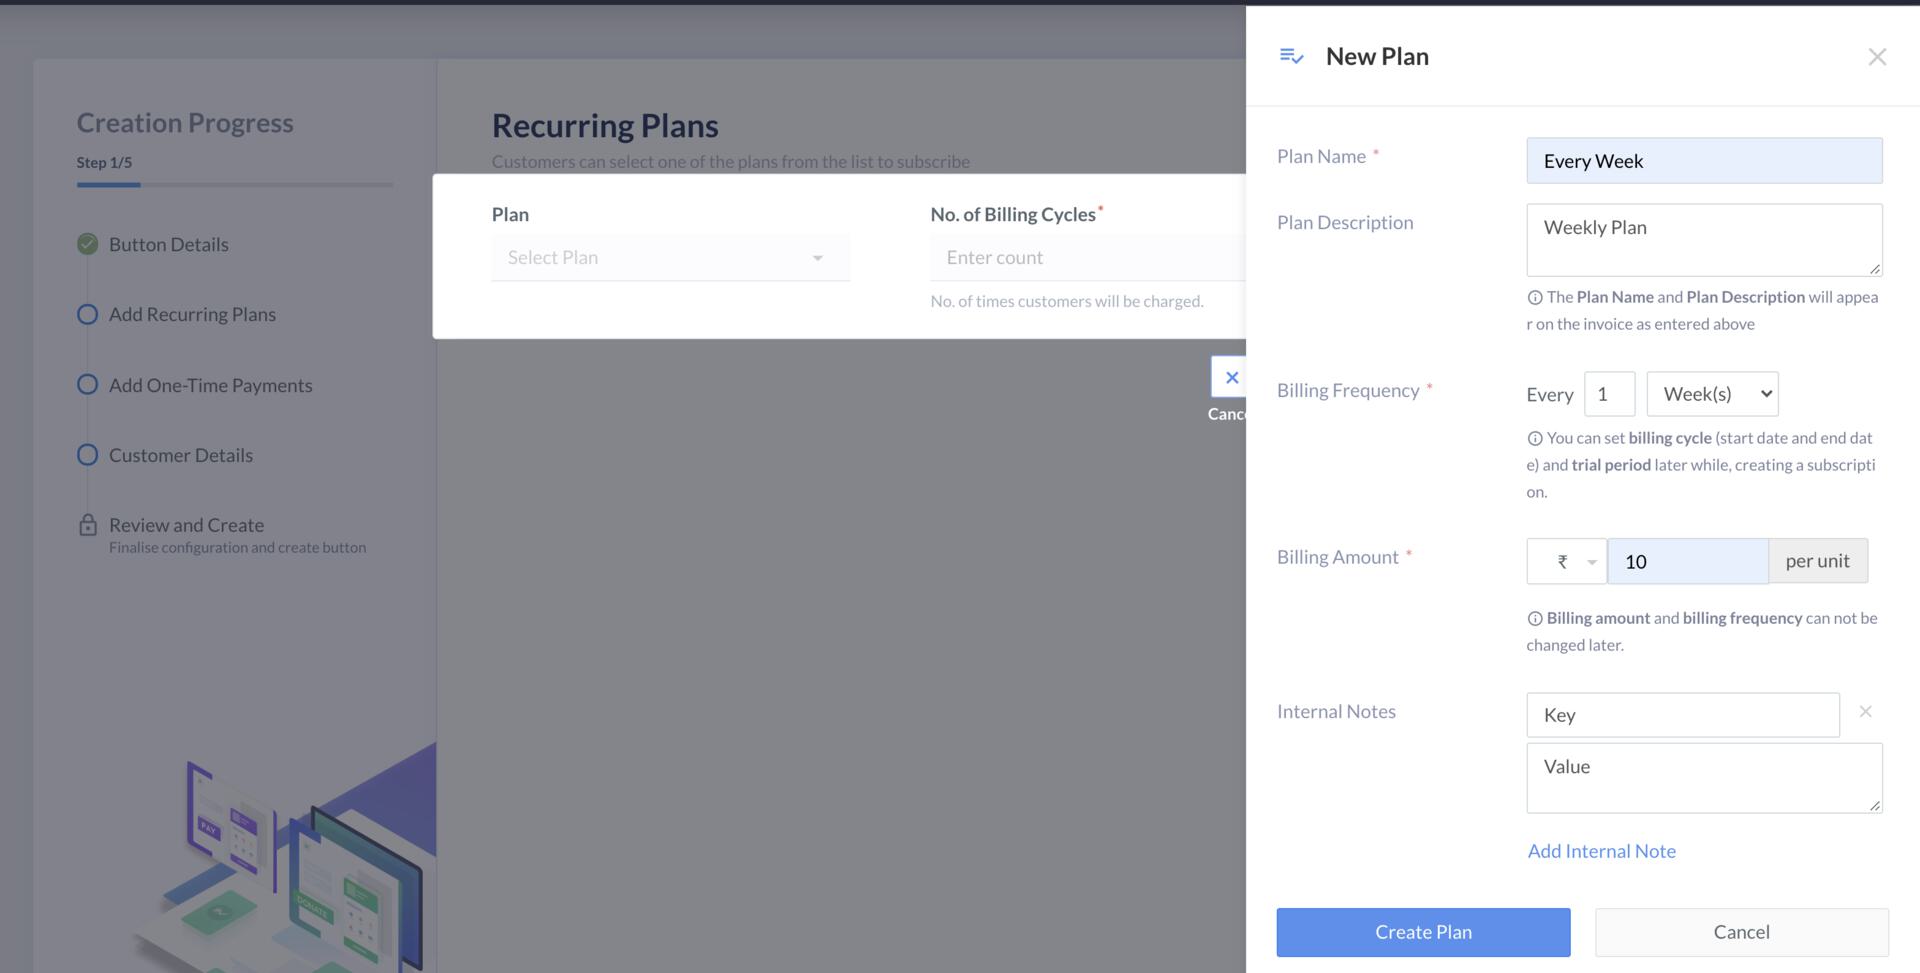
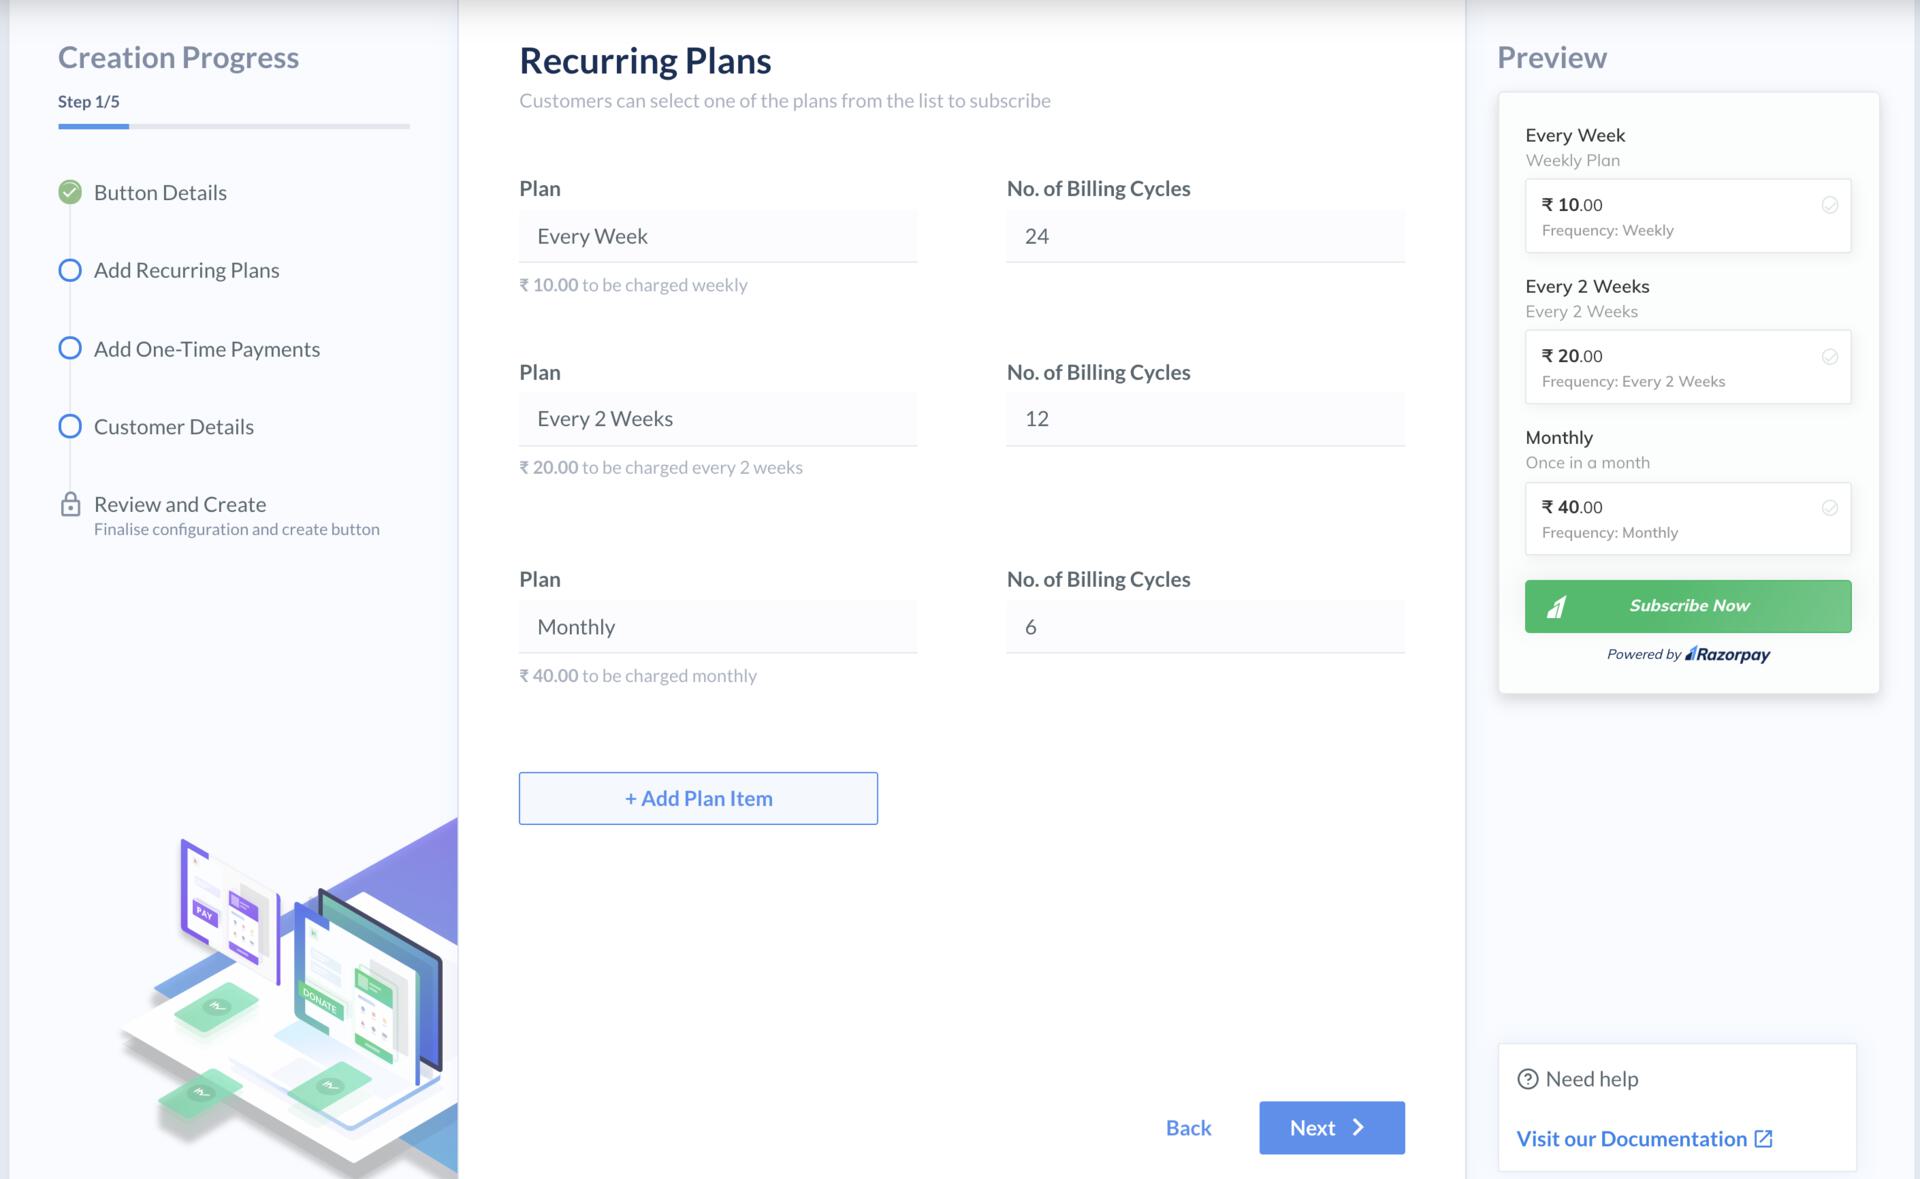
 In the **Recurring Plans**, add Plans and No. of Billing Cycles.
1. Click **+ Add Plan Item**.
2. To create a new plan, click **Add New Plan**.
3. Enter the following details:
* Plan Name
* Plan Description
* Billing Frequency: The time interval at which you want to charge your customer. For example, once in a week.
* Billing Amount: The amount you want to charge for every payment.
* Internal Notes.
4. Click **Create Plan**.
In the **Recurring Plans**, add Plans and No. of Billing Cycles.
1. Click **+ Add Plan Item**.
2. To create a new plan, click **Add New Plan**.
3. Enter the following details:
* Plan Name
* Plan Description
* Billing Frequency: The time interval at which you want to charge your customer. For example, once in a week.
* Billing Amount: The amount you want to charge for every payment.
* Internal Notes.
4. Click **Create Plan**.
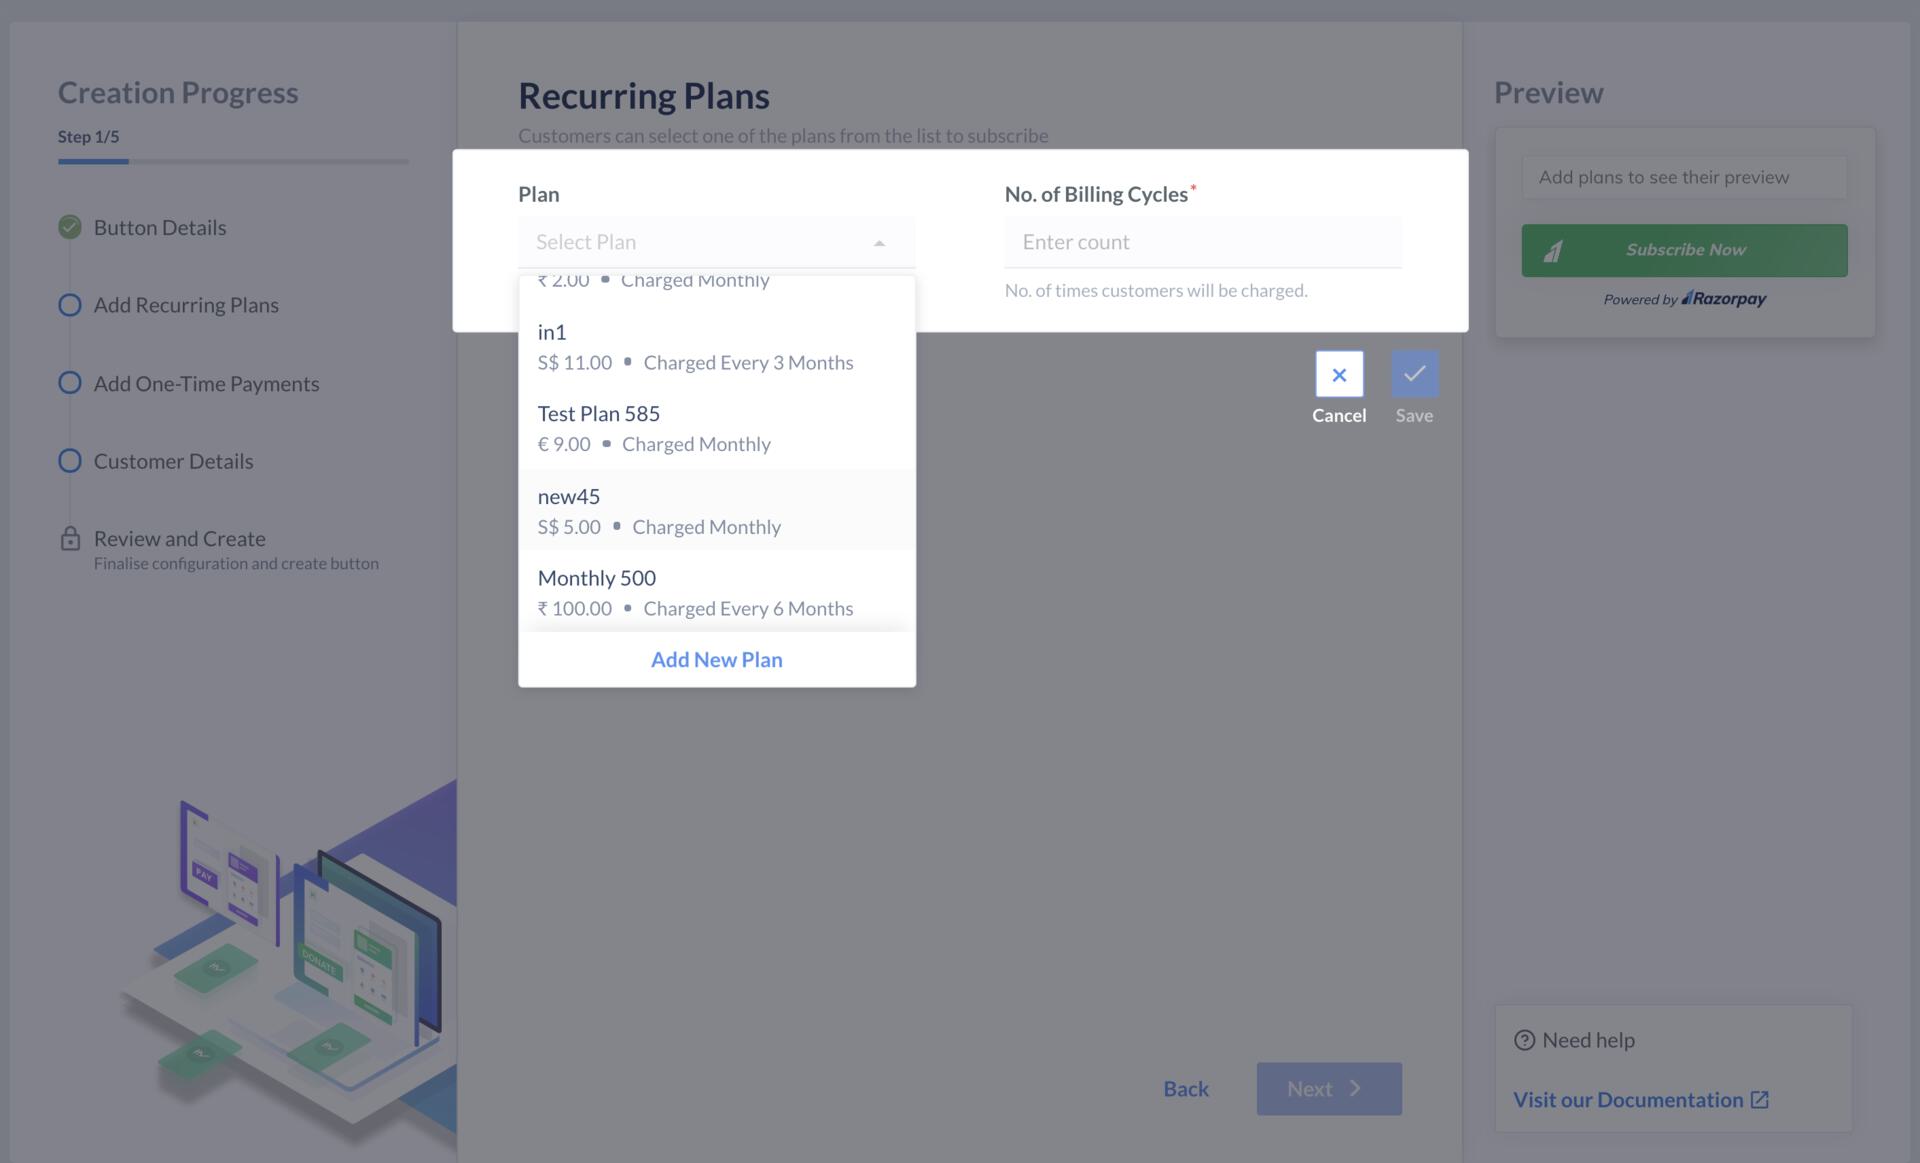
 5. Select a Plan from the list, add **No. of Billing Cycles** and click **Save**.
**Handy Tips**
You can add a maximum of 5 Plans.
5. Select a Plan from the list, add **No. of Billing Cycles** and click **Save**.
**Handy Tips**
You can add a maximum of 5 Plans.
 1. Click **+ Add Plan Item** to add more plans.
2. Click **Next**.
1. Click **+ Add Plan Item** to add more plans.
2. Click **Next**.
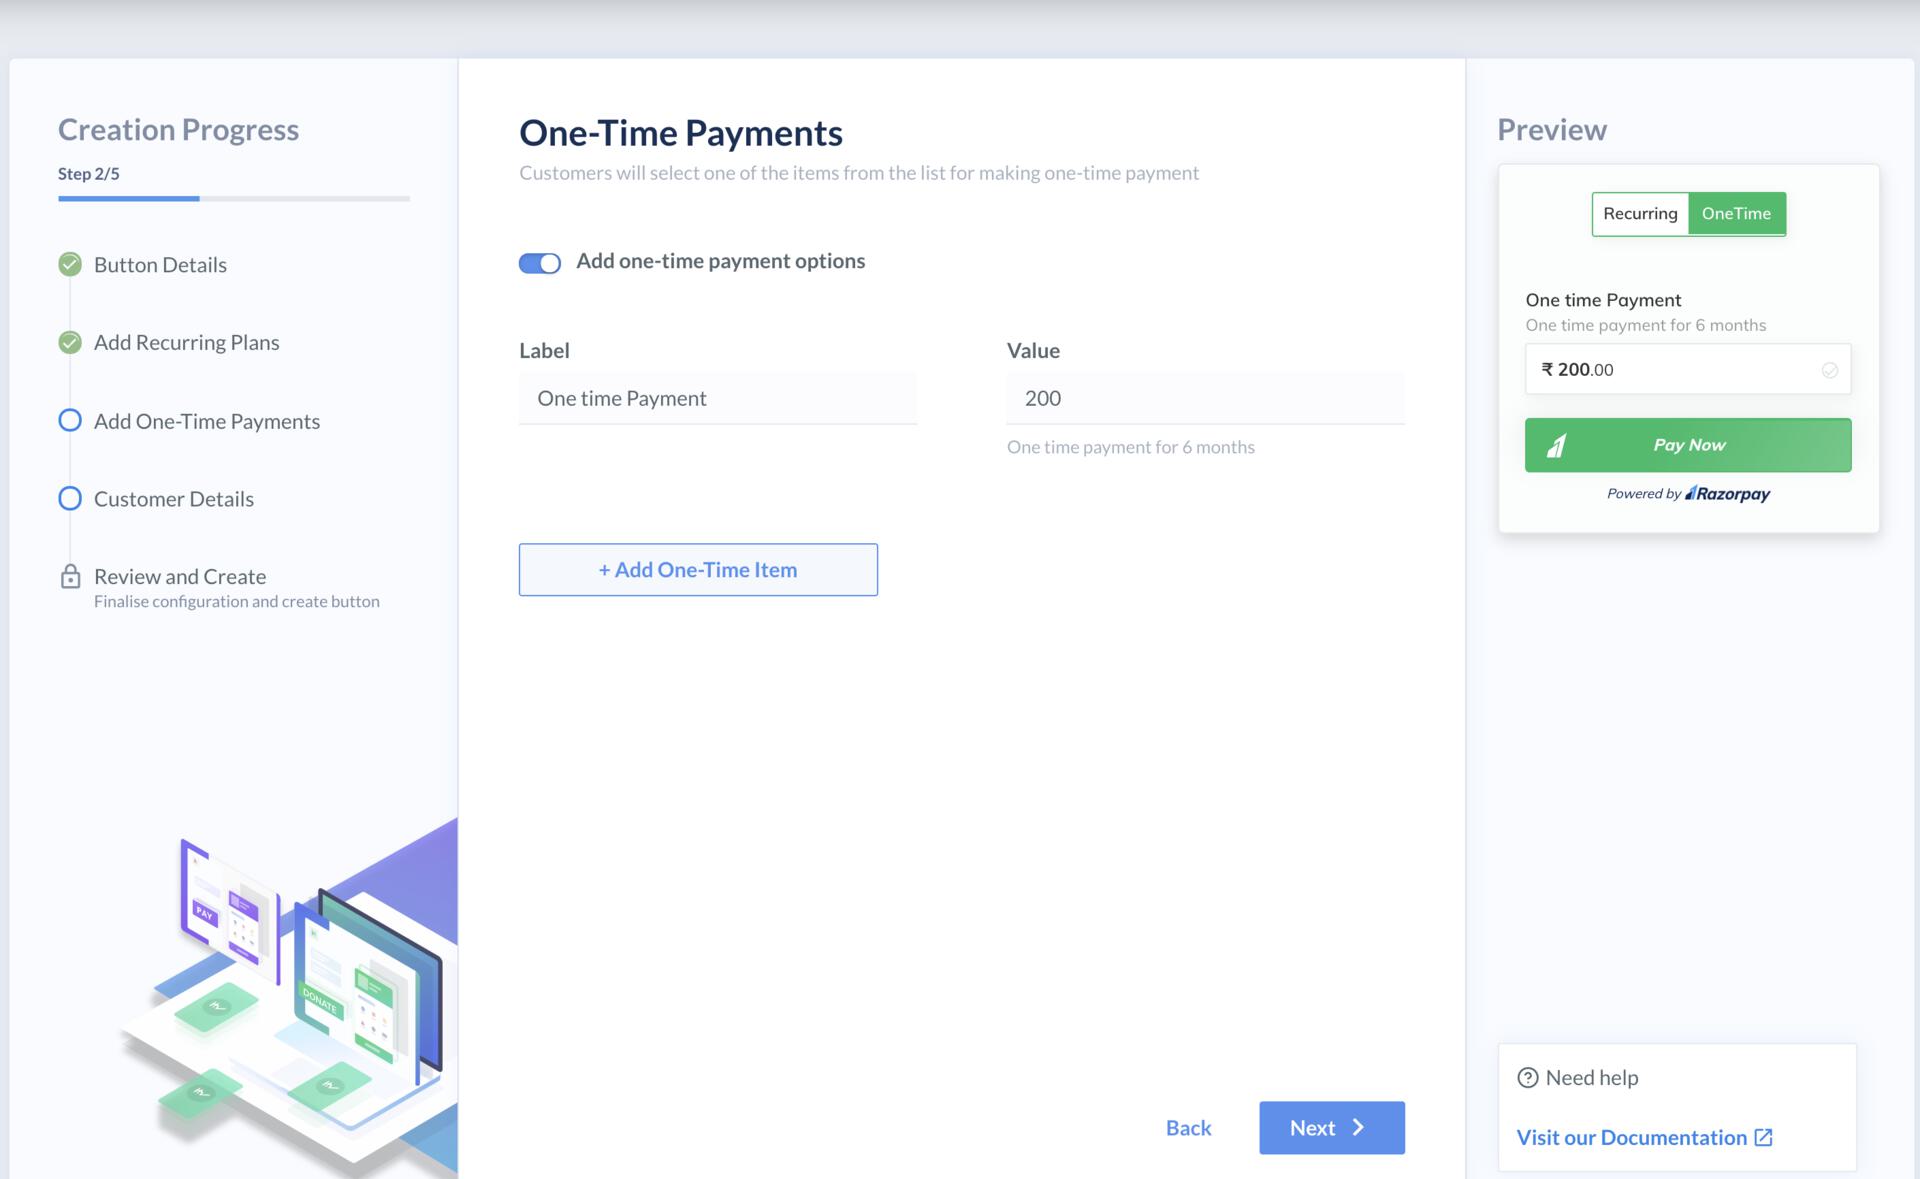
 This is an optional step. If you want to provide one time payment option, follow these steps:
1. Click the slide-bar.
2. Enter the name of label in the **Label** text box.
3. Enter the one time payment amount in the **Value** text box.
4. Add a description.
5. Click **+ Add One-time Item** to add more options.
6. Click **Next**.
This is an optional step. If you want to provide one time payment option, follow these steps:
1. Click the slide-bar.
2. Enter the name of label in the **Label** text box.
3. Enter the one time payment amount in the **Value** text box.
4. Add a description.
5. Click **+ Add One-time Item** to add more options.
6. Click **Next**.
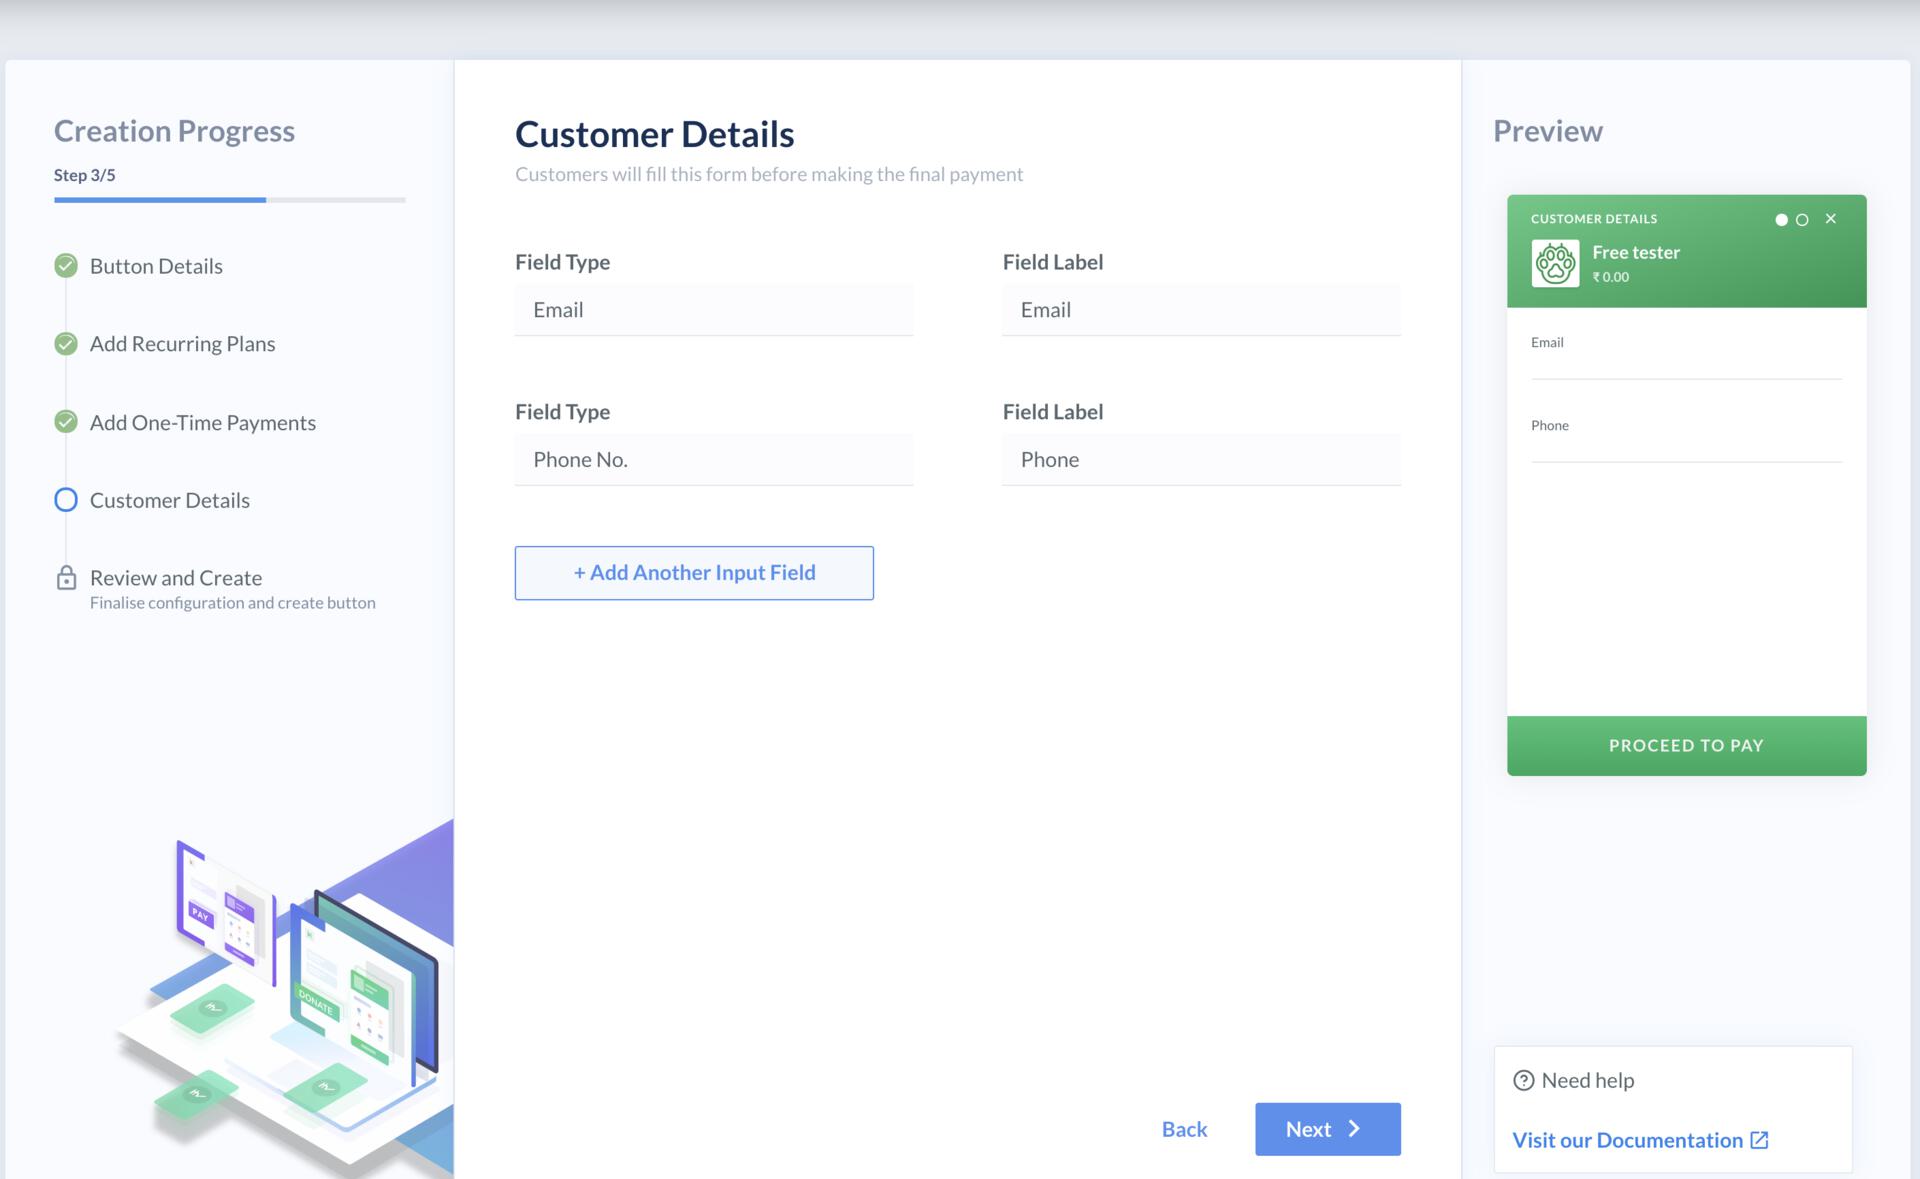
 In the **Customer Details**, configure the information that must be entered by the customer while making the payment. By default, `Email` and `Phone` must be entered. However, you can edit the labels of these fields.
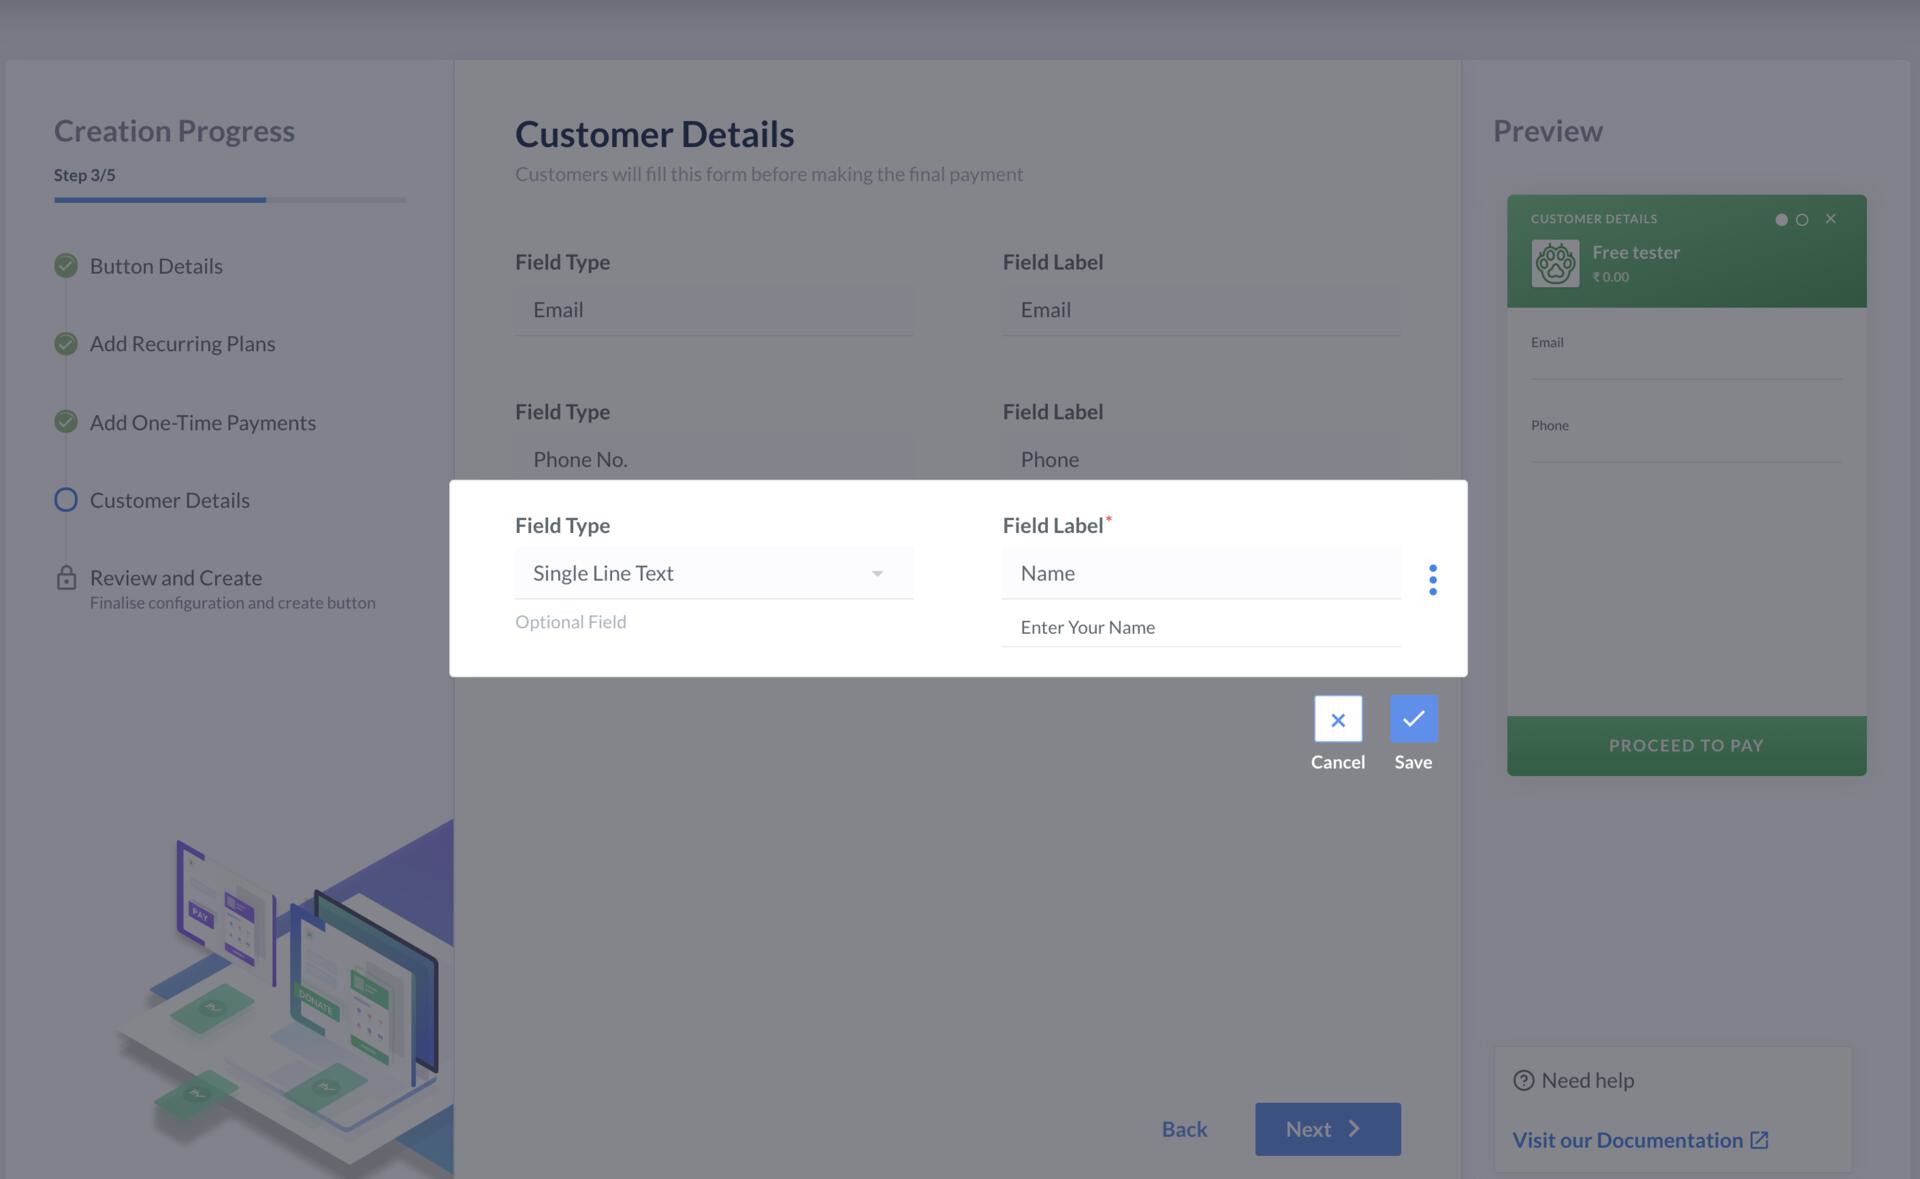
 Additionally, if you want to collect more information from the customer, you can add more custom fields:
1. Click **+ Add Another Input Field**.
2. Enter the following details in the modal:
1. Select the relevant field type. For example, if you want the customer to enter their name, select **Single Line Text**.
2. Enter the label for the custom field. For example, `Name`.
3. If required, click more and add a description for the field.
4. Select **Optional Field**.
5. Click **Save**.
Additionally, if you want to collect more information from the customer, you can add more custom fields:
1. Click **+ Add Another Input Field**.
2. Enter the following details in the modal:
1. Select the relevant field type. For example, if you want the customer to enter their name, select **Single Line Text**.
2. Enter the label for the custom field. For example, `Name`.
3. If required, click more and add a description for the field.
4. Select **Optional Field**.
5. Click **Save**.
 3. To proceed, click **Next**.
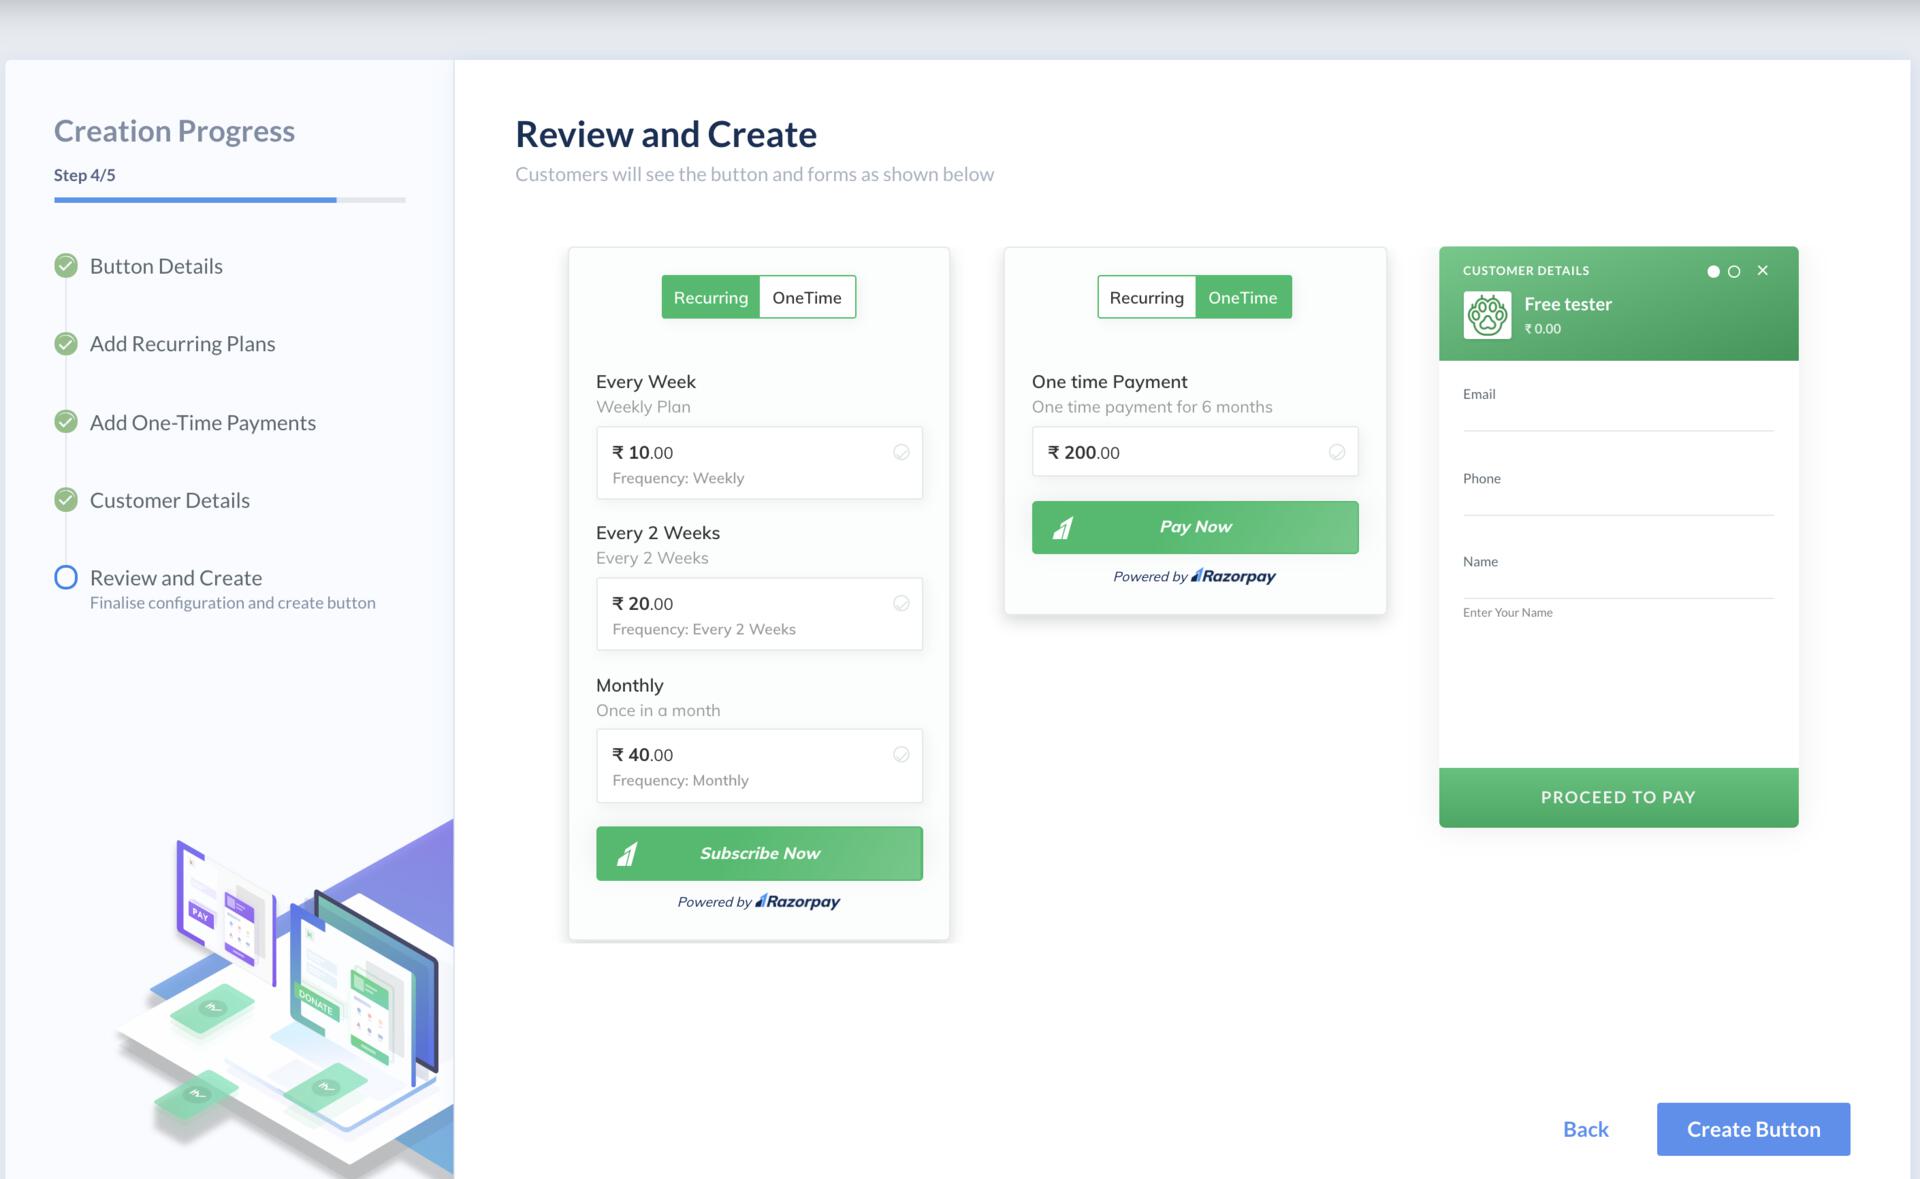
1. Review the details entered in the previous sections.
2. Click **Back** to navigate to the previous steps for any changes.
3. Click **Create Button**.
3. To proceed, click **Next**.
1. Review the details entered in the previous sections.
2. Click **Back** to navigate to the previous steps for any changes.
3. Click **Create Button**.
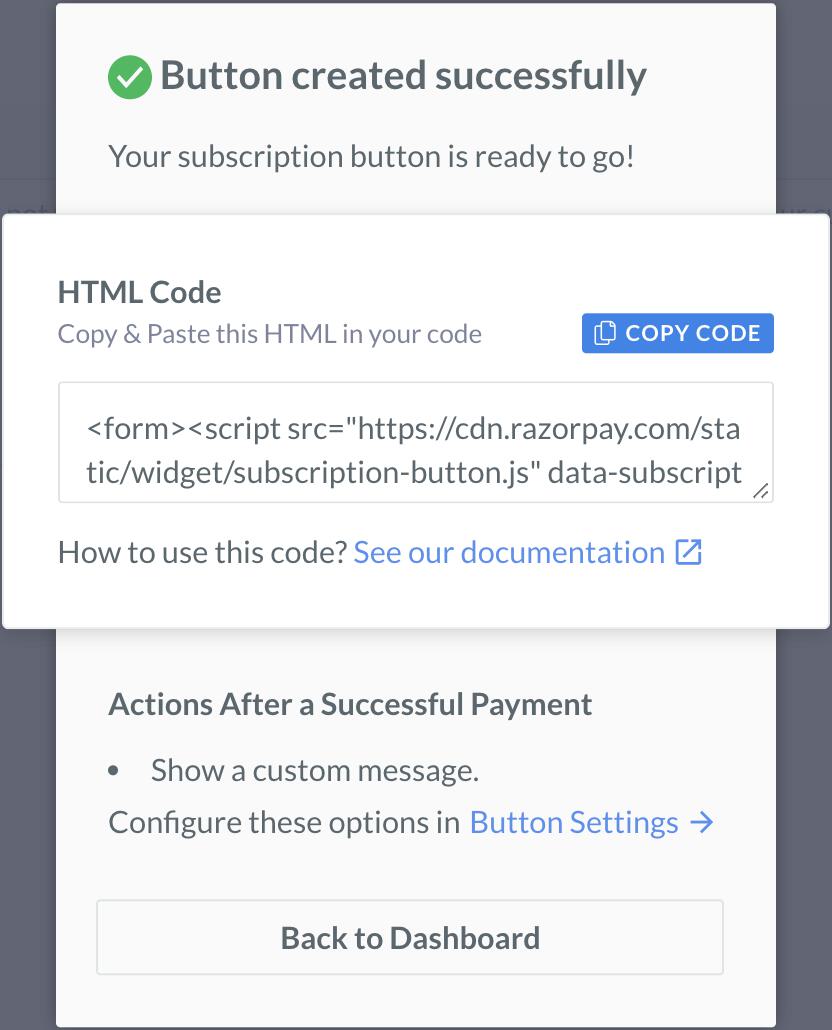
 4. A button is created successfully. Copy the HTML Code and embed it in your webpage. Once this is done, the Subscription button will appear on your website.
 ## Test Payment Buttons
You can test the Payment Button by [adding the code to this page](https://cdn.razorpay.com/static/widget/test-payment-button.html).
## Embed Subscription Button Code in Website
Copy the HTML Code and embed it in your webpage or one built on platforms such as WordPress, Wix or Google Sites. Once this is done, the Subscription button will appear on your website.
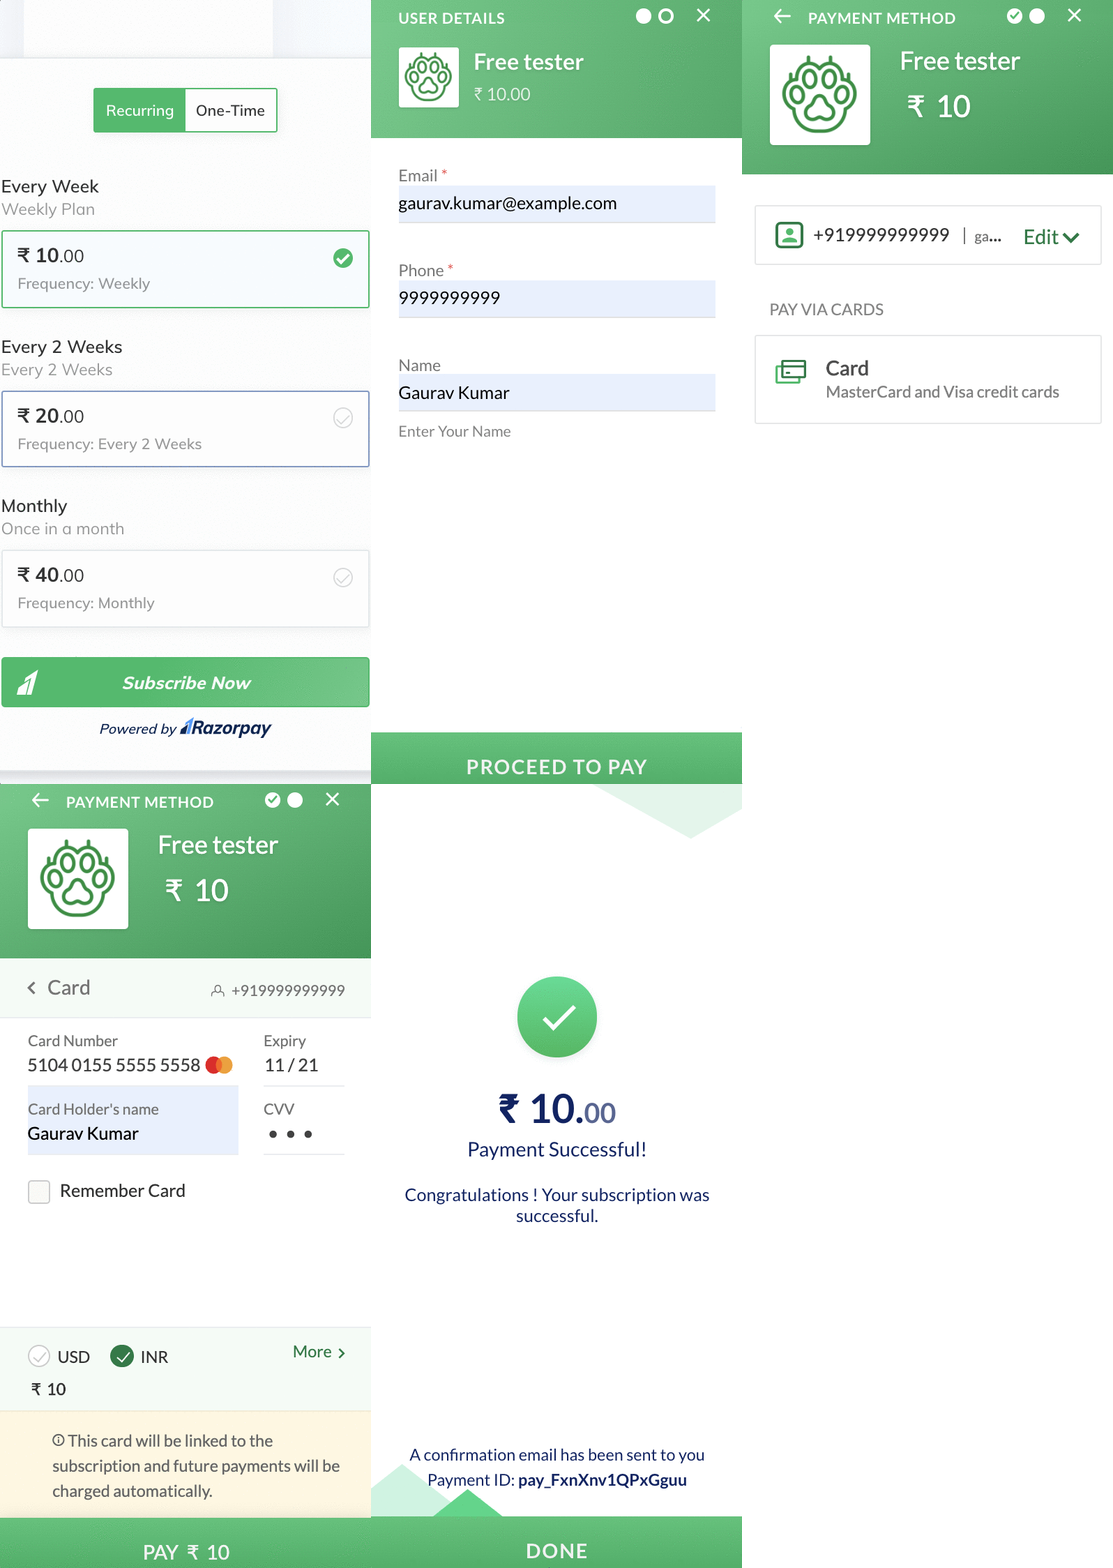
Customers can click this button to:
1. Open Razorpay Checkout.
2. Select the Recurring Plan.
3. Add their name and address.
4. Complete the payment.
### Customer Interaction
The short animation below shows you how to subscribe a plan.
## Test Payment Buttons
You can test the Payment Button by [adding the code to this page](https://cdn.razorpay.com/static/widget/test-payment-button.html).
## Embed Subscription Button Code in Website
Copy the HTML Code and embed it in your webpage or one built on platforms such as WordPress, Wix or Google Sites. Once this is done, the Subscription button will appear on your website.
Customers can click this button to:
1. Open Razorpay Checkout.
2. Select the Recurring Plan.
3. Add their name and address.
4. Complete the payment.
### Customer Interaction
The short animation below shows you how to subscribe a plan.
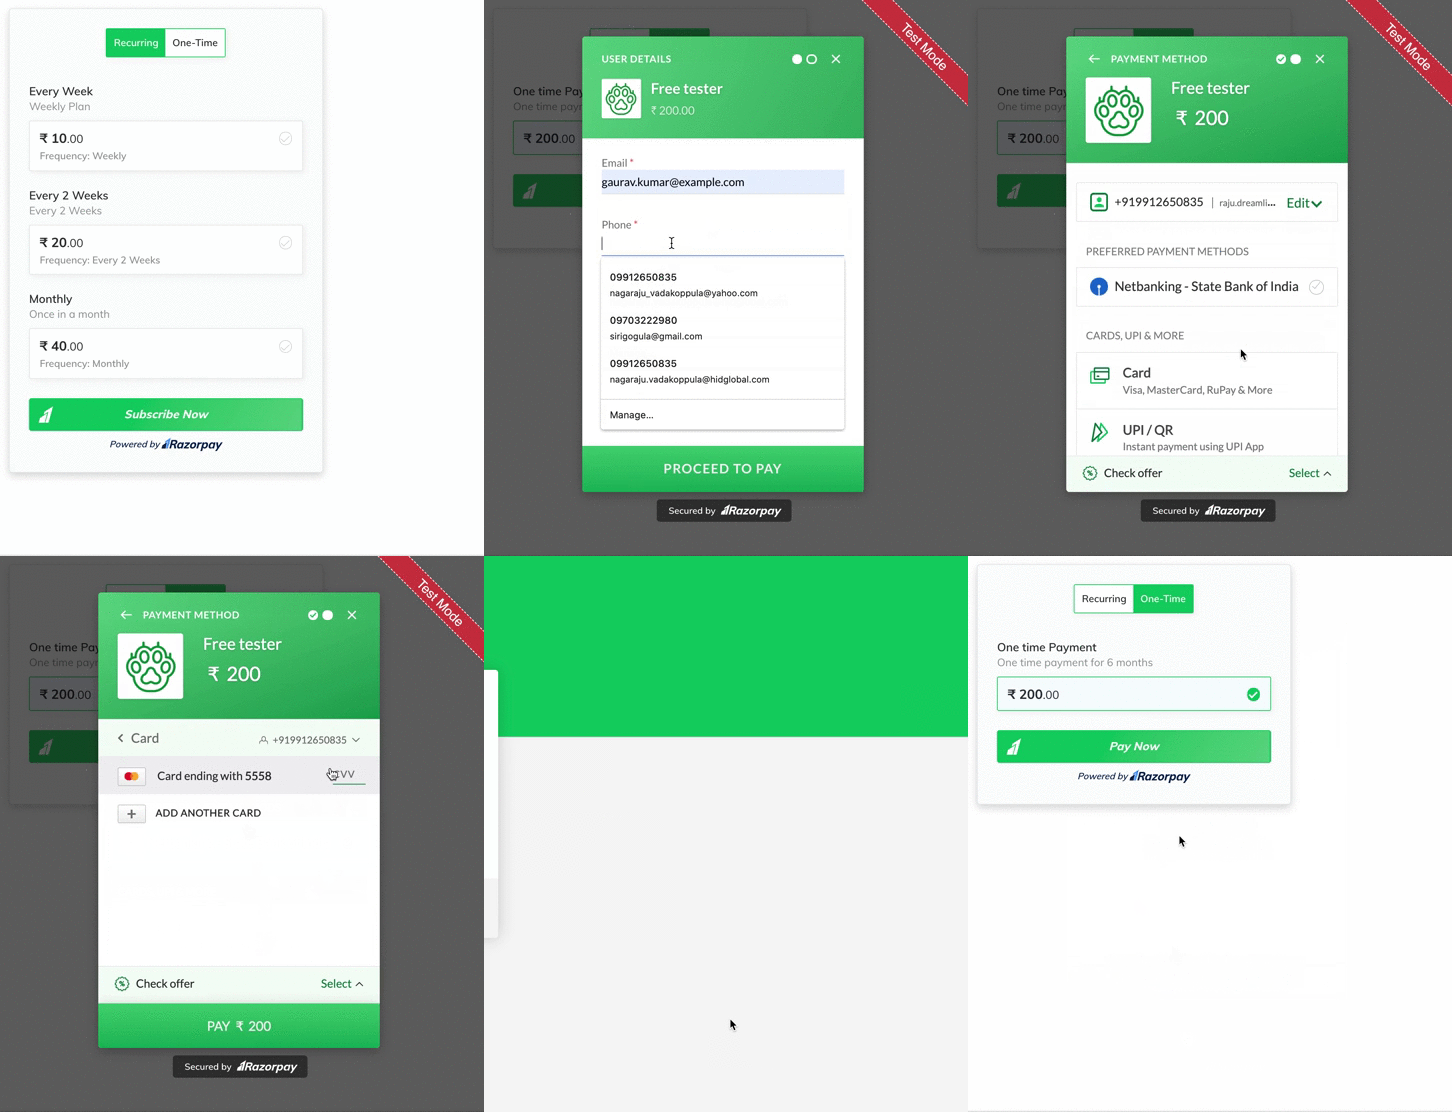
 The short animation below shows you how to make a one time payment.
 **Handy Tips**
One-Time payment option is shown only if you enabled **Add one-time payment options** while creating the payment button.
**Handy Tips**
One-Time payment option is shown only if you enabled **Add one-time payment options** while creating the payment button.
## View Subscription Details
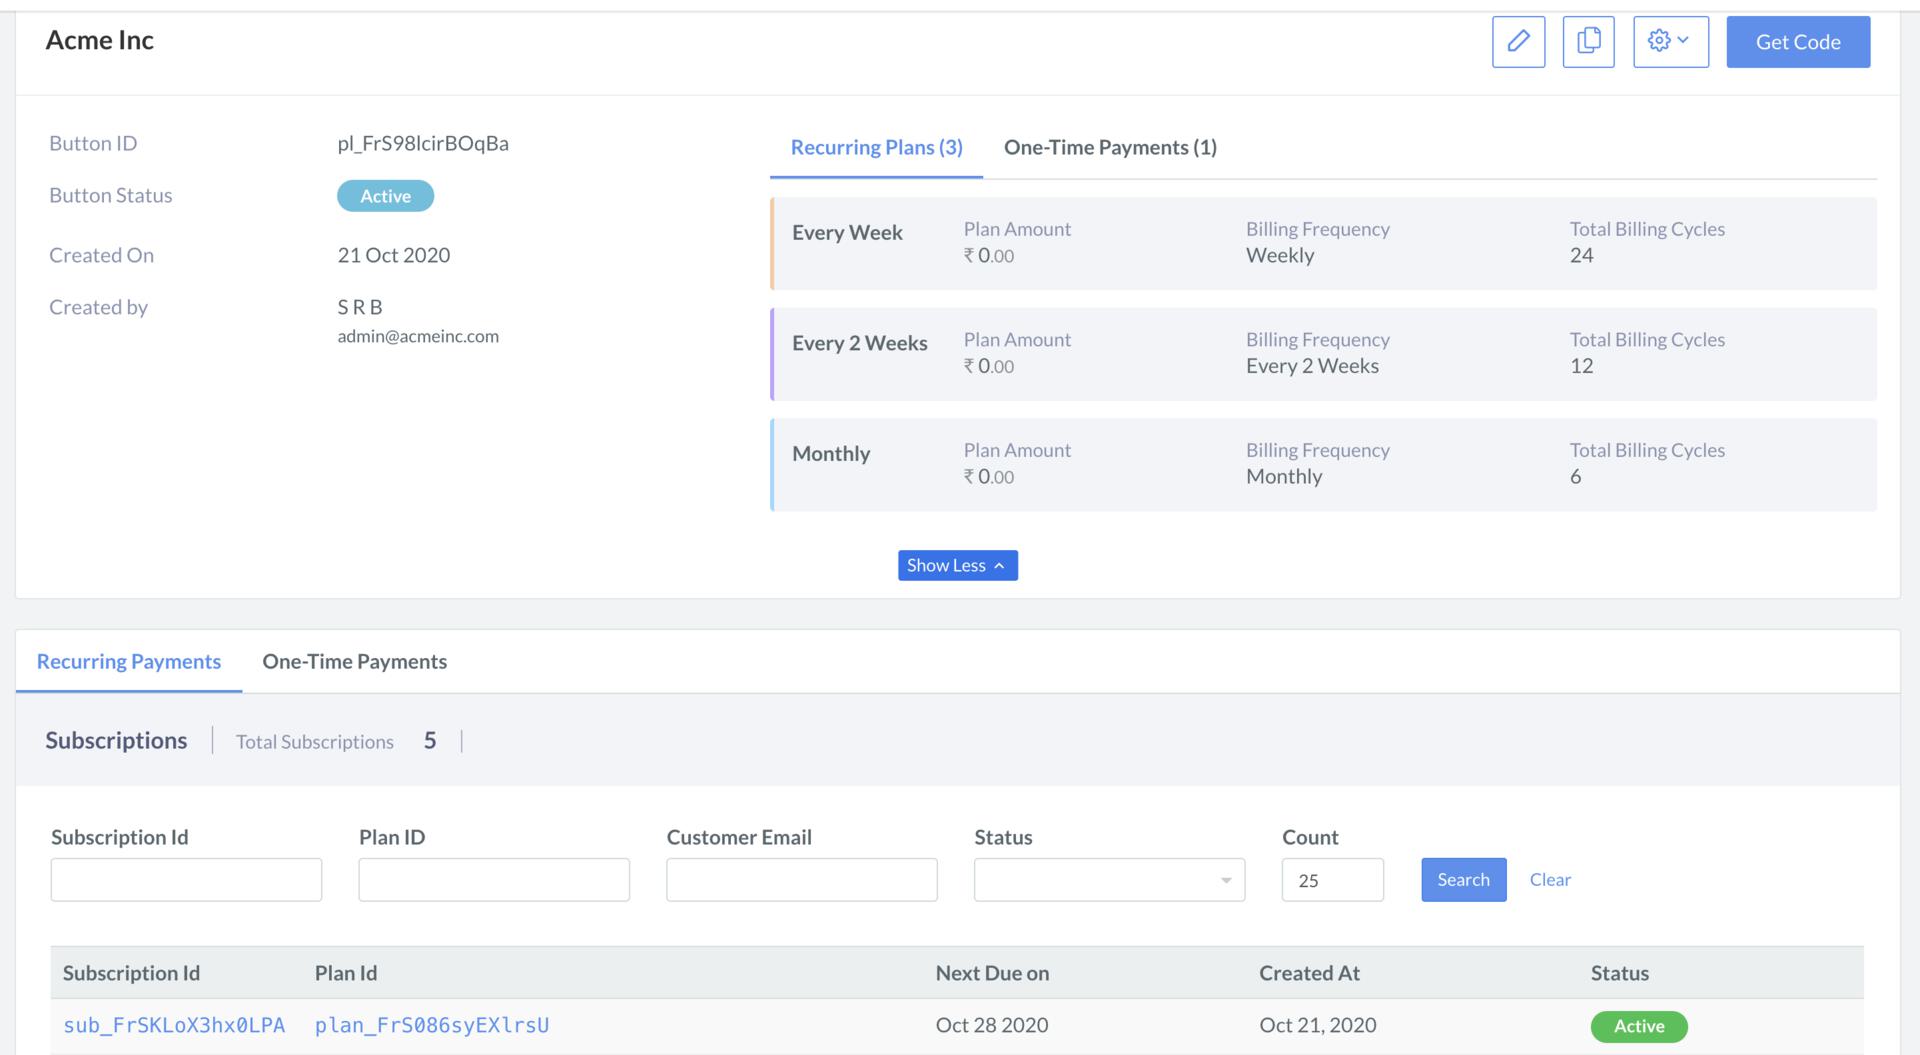
You can [View Subscriptions and One-time Payments](/docs/payments/payment-button/subscription-buttons/download-reports). To download reports, refer to the [Download Report](/docs/payments/payment-button/subscription-buttons/download-reports) section.
 ### Settlement
You will receive the payments in your bank account as per the settlement cycle agreed upon at the time of Razorpay account setup. Usually, this is T+2 days. In case of international payments, the settlement cycle is T+7 days.
### Related Information
* [Manage Subscription Buttons](/docs/payments/payment-button/subscription-buttons/manage)
* [View Notifications using Webhooks](/docs/payments/payment-button/subscription-buttons/subscribe-to-webhooks)
* [Subscription Button FAQs](/docs/payments/payment-button/subscription-buttons/faqs)
### Settlement
You will receive the payments in your bank account as per the settlement cycle agreed upon at the time of Razorpay account setup. Usually, this is T+2 days. In case of international payments, the settlement cycle is T+7 days.
### Related Information
* [Manage Subscription Buttons](/docs/payments/payment-button/subscription-buttons/manage)
* [View Notifications using Webhooks](/docs/payments/payment-button/subscription-buttons/subscribe-to-webhooks)
* [Subscription Button FAQs](/docs/payments/payment-button/subscription-buttons/faqs)