> ## Documentation Index
> Fetch the complete documentation index at: https://razorpay-881012b3.mintlify.site/llms.txt
> Use this file to discover all available pages before exploring further.
# About Affordability Widget
> Use the Affordability Widget to influence your customer's purchase decision by displaying various affordable payment options and offers.
Available in
🇮🇳 India
Use our Affordability Widget to spread awareness about the EMI²-based payment options (such as EMI, Cardless EMI, and Pay Later) and offers available to your customers before they checkout.
You can embed these payment options and offers on product listing pages, checkout pages, and other relevant screens to educate the customers and reduce cart abandonment.
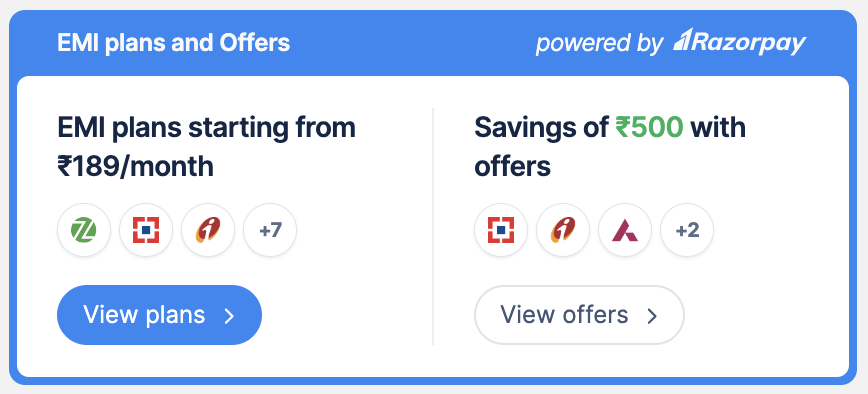 A quick glimpse of Affordability Widget:
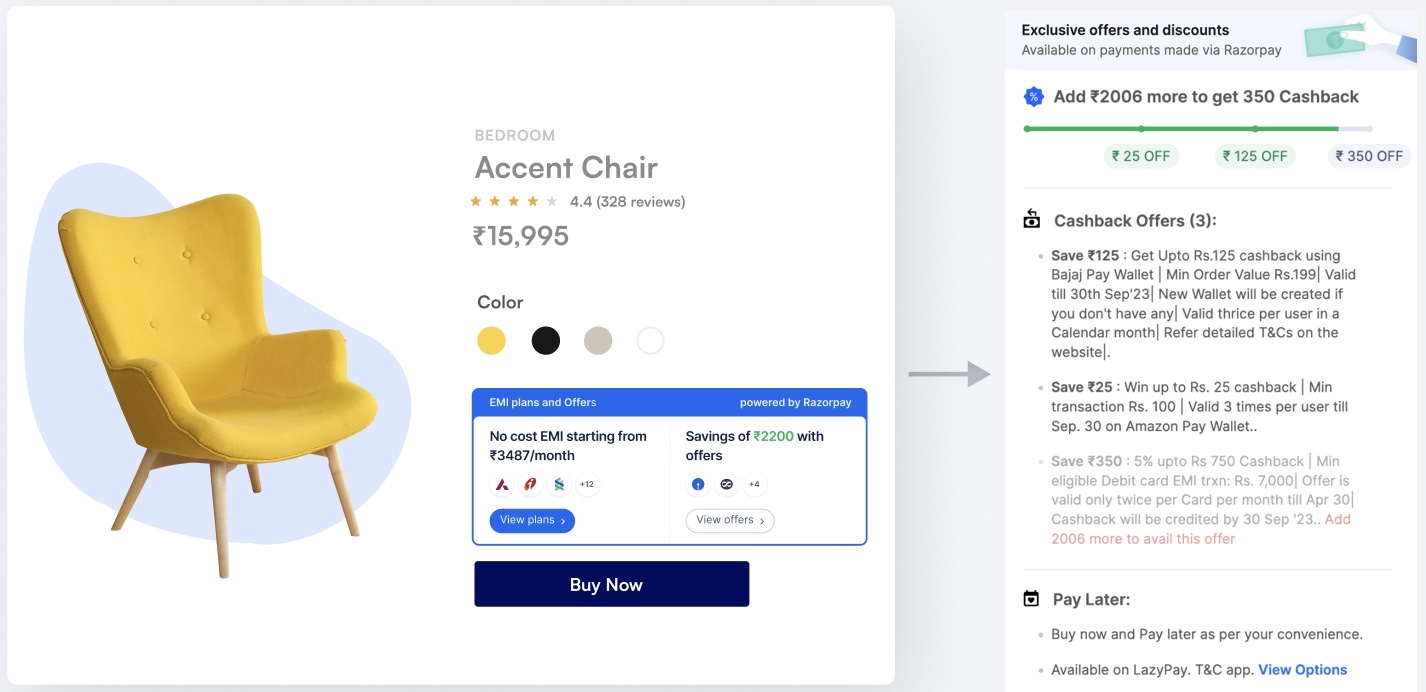
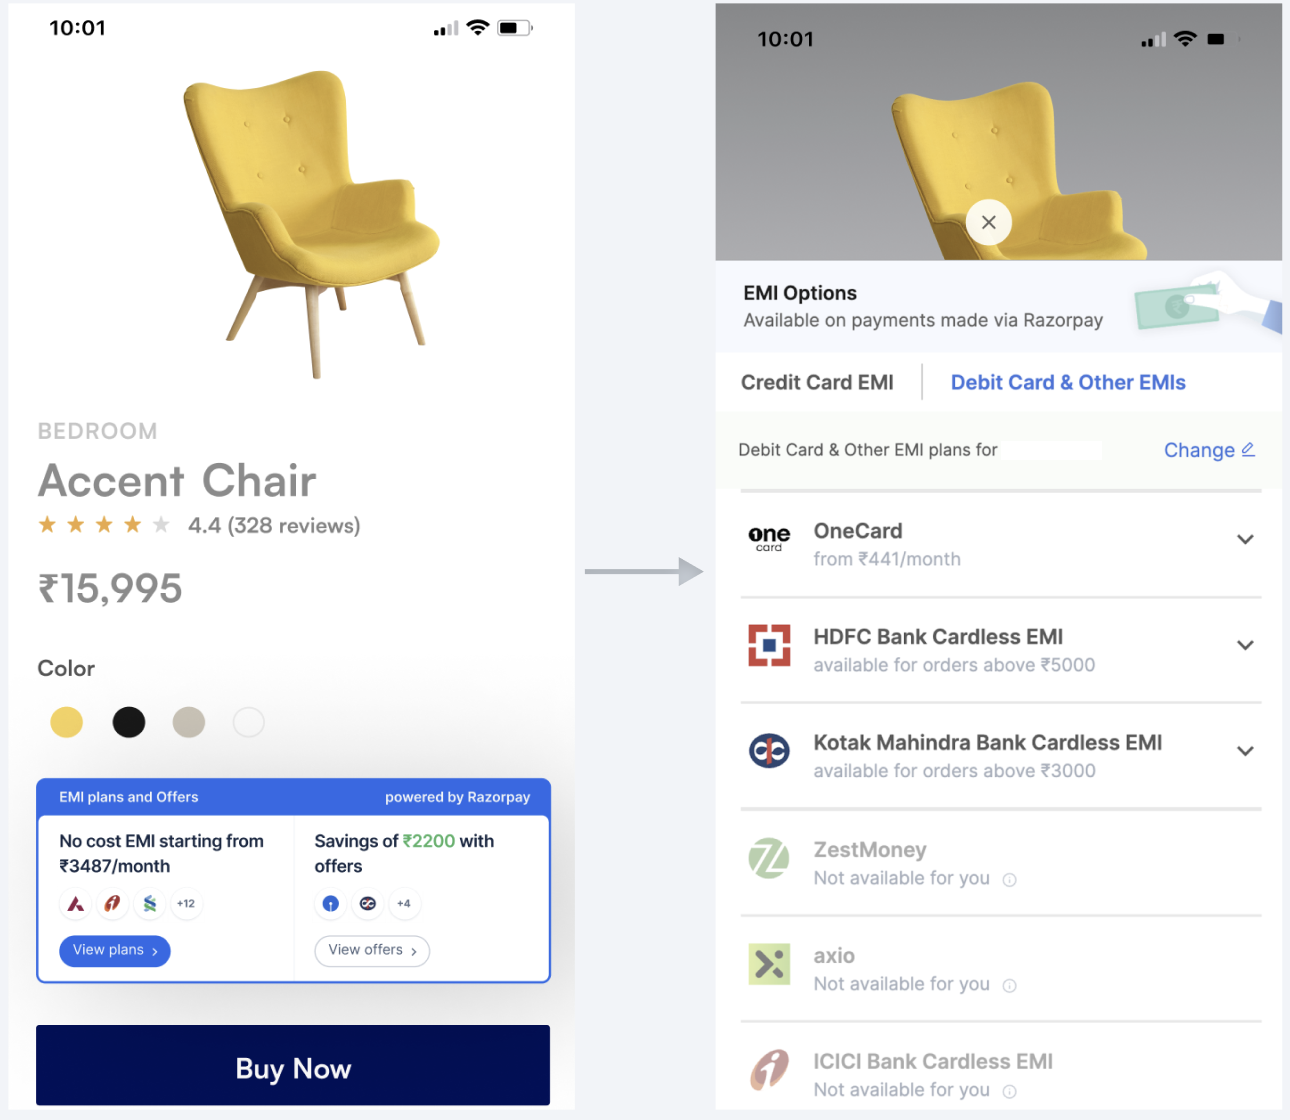 **Handy Tips**
* For Native users, you can [integrate the widget with checkout](/docs/payments/payment-gateway/emi²/widget/features#checkout-from-widget).
* For Shopify and WooCommerce user, this is a **view-only** widget.
* Only **offers** and **payment methods** configured via the Dashboard will appear on the widget.
* The widget **does not** support Internet Explorer browser and iOS SDKs.
* **Initiate checkout from widget**
**Handy Tips**
* For Native users, you can [integrate the widget with checkout](/docs/payments/payment-gateway/emi²/widget/features#checkout-from-widget).
* For Shopify and WooCommerce user, this is a **view-only** widget.
* Only **offers** and **payment methods** configured via the Dashboard will appear on the widget.
* The widget **does not** support Internet Explorer browser and iOS SDKs.
* **Initiate checkout from widget**
Customers can complete their purchase directly from the widget itself. The auto-selection functionality helps apply the chosen payment option/offer from the widget to the payment checkout page.
* **Enable discovery of affordable payment options early on**
Customers can discover affordable payment options and payment offers early on in the buying journey and \`make an informed buying decision.
* **Improve conversion rates**
The availability of affordable payment options such as [EMI](/docs/payments/payment-methods/emi) and [Pay Later](/docs/payments/payment-methods/pay-later) help boost conversion rates.
* **Increase Average Order Value**
Businesses typically see a 30% higher average order value with affordable payment options.
* **Stand out from your competitors**
Cultivate customer loyalty and establish a distinctive brand identity that distinguishes you from the competition.
* **Built for every business**
Whether you operate in e-commerce, education, healthcare, food and beverage, travel, hospitality, IT, or any other vertical, you can influence customers' purchasing decisions using the Affordability Widget.
## How Affordability Widget Works
The following diagram depicts the workflow:
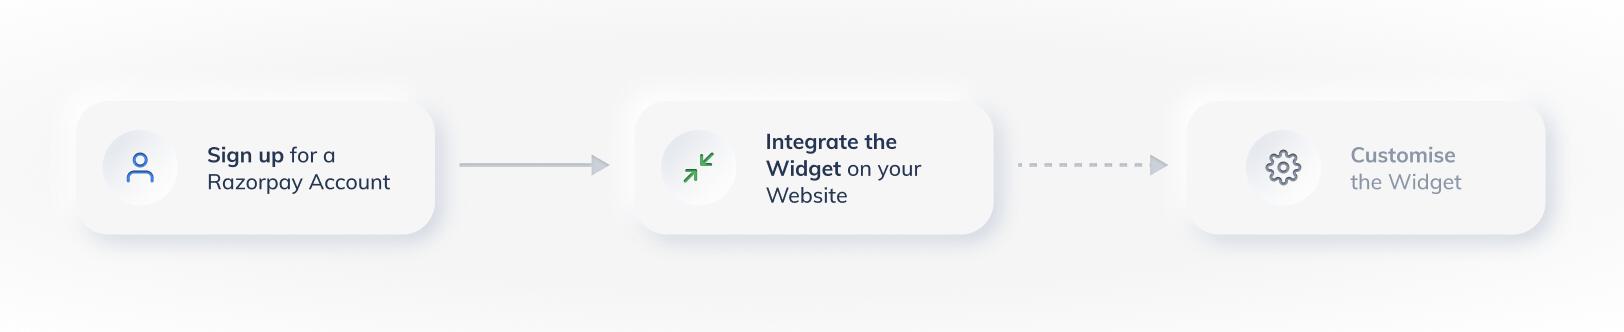 The workflow involves the following:
1. Set up your [Razorpay account](/docs/payments/set-up).
2. Integrate the widget with your [custom built-website](/docs/payments/payment-gateway/emi²/widget/native-web), [WooCommerce website](/docs/payments/payment-gateway/emi²/widget/woocommerce) or [Shopify store](/docs/payments/payment-gateway/emi²/widget/shopify).
3. Once you successfully integrate the widget on your website, you can choose to customise the [offers](/docs/payments/payment-gateway/emi²/widget/native-web/customise#1-offers), [payment methods](/docs/payments/payment-gateway/emi²/widget/native-web/customise#2-payment-methods) and the [themes and colours](/docs/payments/payment-gateway/emi²/widget/native-web/customise#3-themes-and-colours) based on your requirement.
## Customer Experience
On the product page, the customer:
1. Views the products on your website or app.
2. Clicks **View offers** to check the offers available on the widget.
3. Clicks **View plans** to choose EMI or Pay Later as the payment option on the widget.
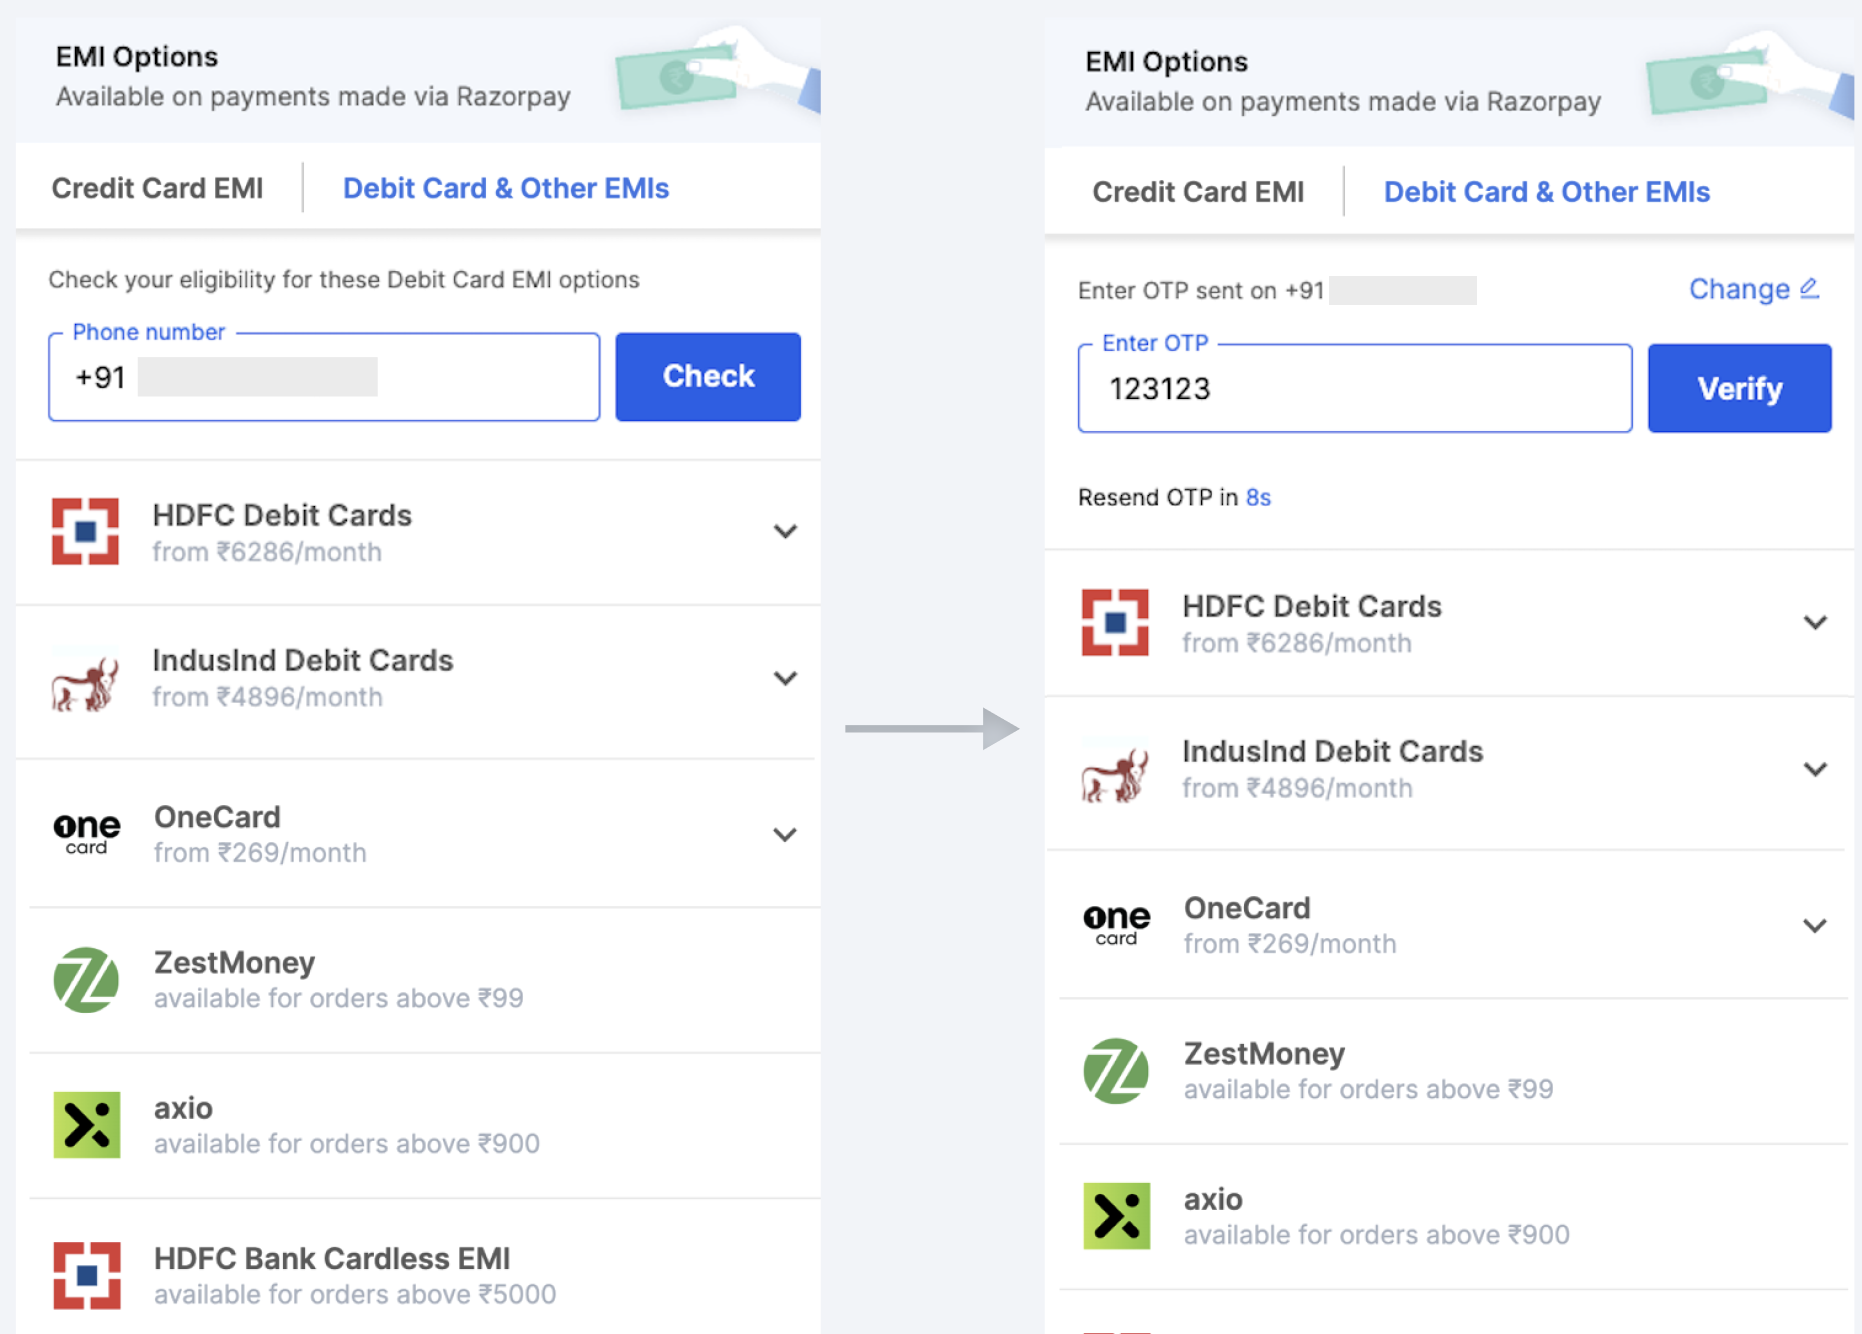
1. Enters the phone number and clicks **Check** to check their eligibility for payment options.
2. Enters the OTP sent to their phone number and clicks **Verify**. Our eligibility check is safeguarded by a secure OTP flow to eliminate the risk of unauthorised access.
The workflow involves the following:
1. Set up your [Razorpay account](/docs/payments/set-up).
2. Integrate the widget with your [custom built-website](/docs/payments/payment-gateway/emi²/widget/native-web), [WooCommerce website](/docs/payments/payment-gateway/emi²/widget/woocommerce) or [Shopify store](/docs/payments/payment-gateway/emi²/widget/shopify).
3. Once you successfully integrate the widget on your website, you can choose to customise the [offers](/docs/payments/payment-gateway/emi²/widget/native-web/customise#1-offers), [payment methods](/docs/payments/payment-gateway/emi²/widget/native-web/customise#2-payment-methods) and the [themes and colours](/docs/payments/payment-gateway/emi²/widget/native-web/customise#3-themes-and-colours) based on your requirement.
## Customer Experience
On the product page, the customer:
1. Views the products on your website or app.
2. Clicks **View offers** to check the offers available on the widget.
3. Clicks **View plans** to choose EMI or Pay Later as the payment option on the widget.
1. Enters the phone number and clicks **Check** to check their eligibility for payment options.
2. Enters the OTP sent to their phone number and clicks **Verify**. Our eligibility check is safeguarded by a secure OTP flow to eliminate the risk of unauthorised access.
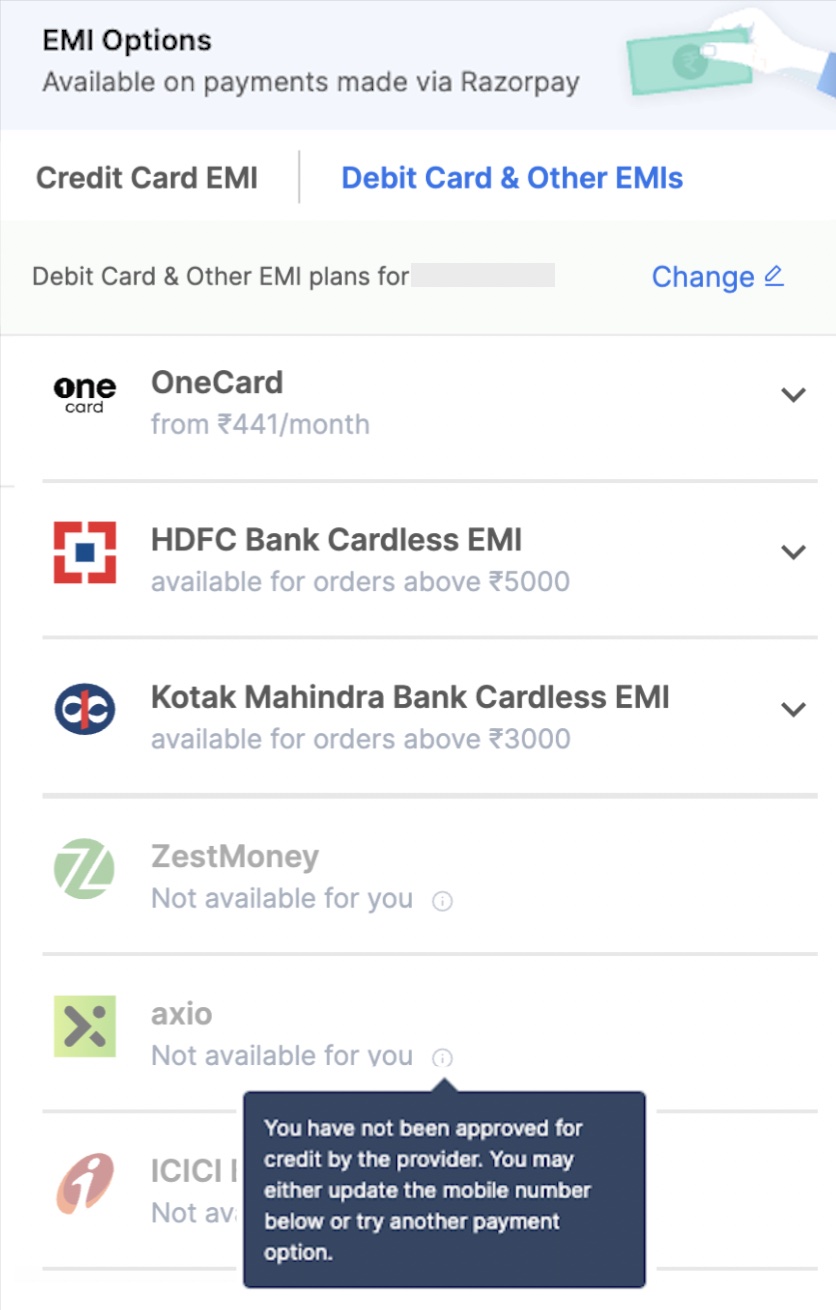
 3. They can clearly differentiate between the eligible and ineligible payment options.
* **Eligible**: The customer selects an eligible payment instrument and proceeds to checkout.
* **Ineligible**: The customer can view the reason for ineligibility as highlighted below.
3. They can clearly differentiate between the eligible and ineligible payment options.
* **Eligible**: The customer selects an eligible payment instrument and proceeds to checkout.
* **Ineligible**: The customer can view the reason for ineligibility as highlighted below.
 To proceed with the payment in case of ineligibility, the customer can choose to:
* Change the phone number for the chosen payment instrument and try again.
* Opt for an eligible payment instrument.
**Watch Out!**
[Eligibility Check on Widget](/docs/payments/payment-gateway/emi²/widget/features#eligibility-check) is an on-demand feature. Write to us at [affordability-widget@razorpay.com](mailto:affordability-widget@razorpay.com) to get this feature enabled.
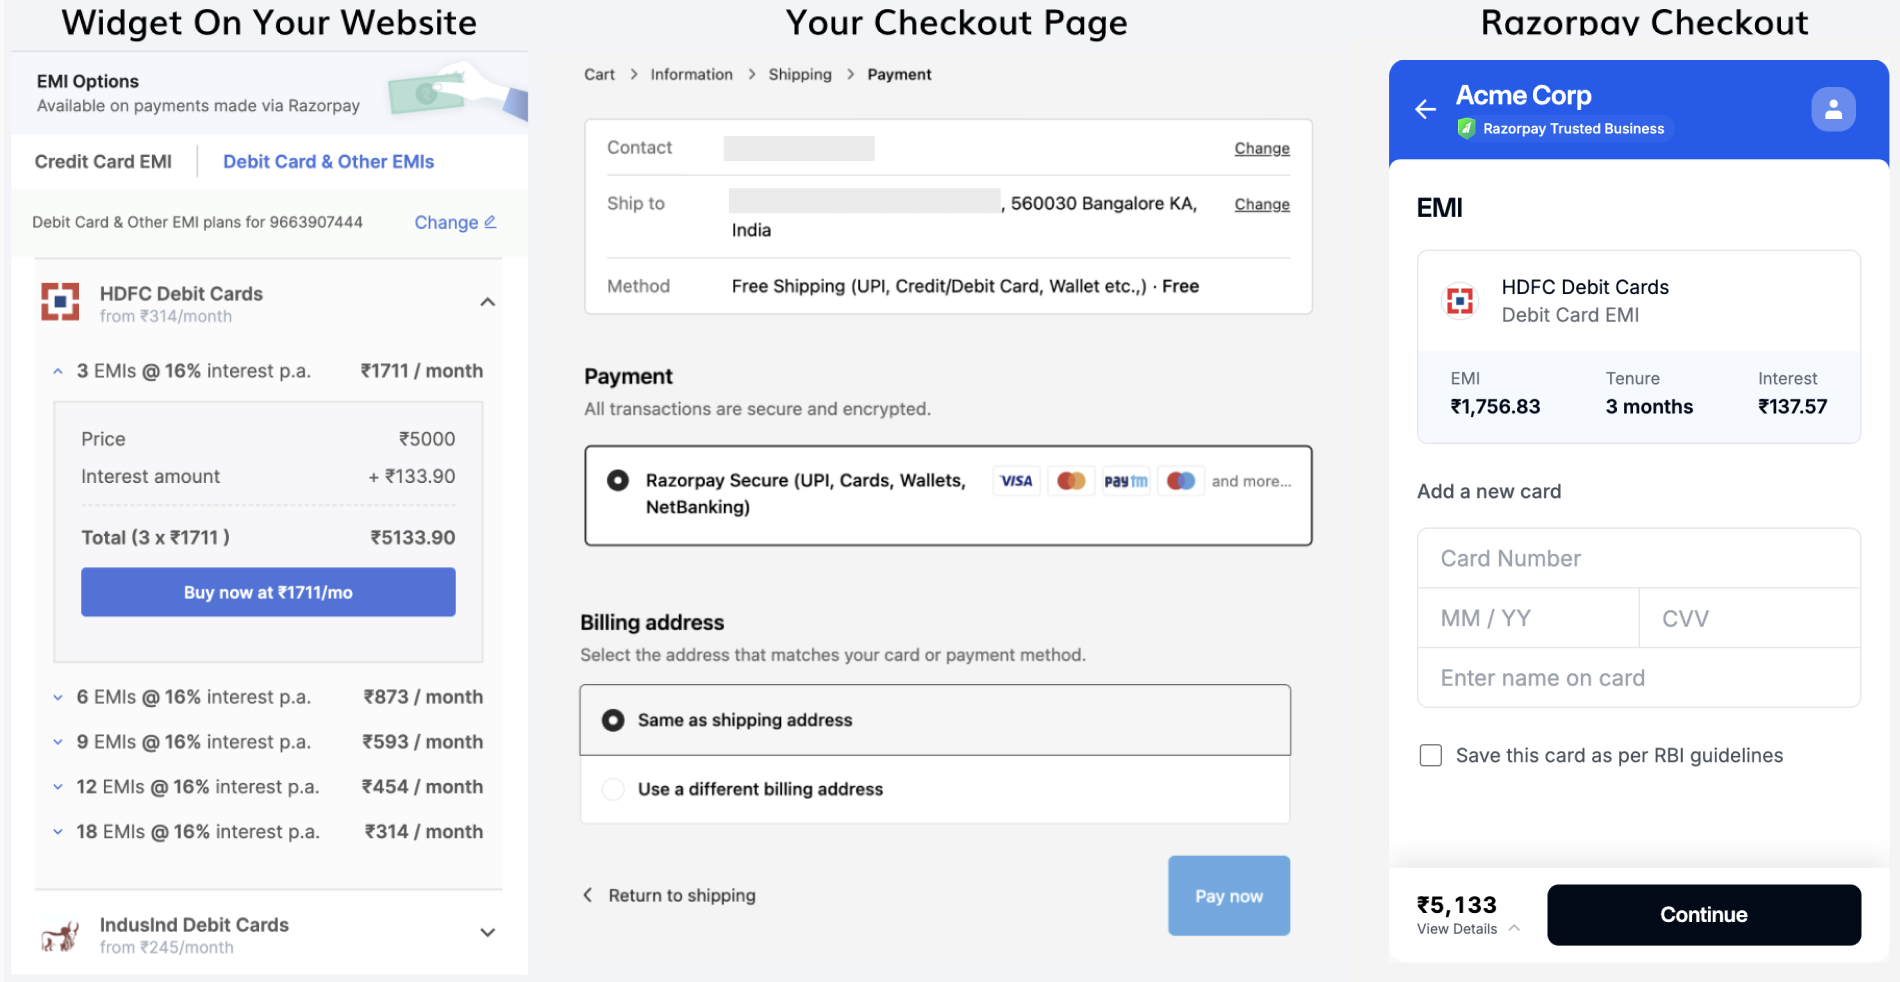
4. Chooses an eligible payment instrument or a relevant offer and clicks **Buy Now**.
5. They are redirected to your checkout page, where they enter their contact and address details and proceed to checkout.
6. The customer is redirected to the Razorpay checkout if you have integrated the widget with our [Standard Checkout](/docs/payments/payment-gateway/emi²/widget/standard-integration). If not, they are redirected to your custom-built checkout. Once redirected to our Standard Checkout, the payment option or offer the customer selects on the widget appears pre-selected on checkout.
**Watch Out!**
* [Checkout from the Widget](/docs/payments/payment-gateway/emi²/widget/features#checkout-from-widget) is an on-demand feature. Write to us at [affordability-widget@razorpay.com](mailto:affordability-widget@razorpay.com) to get this feature enabled.
* If you have a [custom-built checkout](/docs/payments/payment-gateway/web-integration/custom), integrate with checkout from the widget using [Custom Integration](/docs/payments/payment-gateway/emi²/widget/custom-integration).
7. They enter the relevant details and complete the payment.
To proceed with the payment in case of ineligibility, the customer can choose to:
* Change the phone number for the chosen payment instrument and try again.
* Opt for an eligible payment instrument.
**Watch Out!**
[Eligibility Check on Widget](/docs/payments/payment-gateway/emi²/widget/features#eligibility-check) is an on-demand feature. Write to us at [affordability-widget@razorpay.com](mailto:affordability-widget@razorpay.com) to get this feature enabled.
4. Chooses an eligible payment instrument or a relevant offer and clicks **Buy Now**.
5. They are redirected to your checkout page, where they enter their contact and address details and proceed to checkout.
6. The customer is redirected to the Razorpay checkout if you have integrated the widget with our [Standard Checkout](/docs/payments/payment-gateway/emi²/widget/standard-integration). If not, they are redirected to your custom-built checkout. Once redirected to our Standard Checkout, the payment option or offer the customer selects on the widget appears pre-selected on checkout.
**Watch Out!**
* [Checkout from the Widget](/docs/payments/payment-gateway/emi²/widget/features#checkout-from-widget) is an on-demand feature. Write to us at [affordability-widget@razorpay.com](mailto:affordability-widget@razorpay.com) to get this feature enabled.
* If you have a [custom-built checkout](/docs/payments/payment-gateway/web-integration/custom), integrate with checkout from the widget using [Custom Integration](/docs/payments/payment-gateway/emi²/widget/custom-integration).
7. They enter the relevant details and complete the payment.
 **Watch Out!**
For Shopify and WooCommerce users, this is a view-only widget. Customers can select their preferred offer and plan **only** at checkout.
## Supported Platforms
Razorpay Affordability Widget is supported on the following platforms:
| DWeb | MWeb | Android | iOS |
| ---- | ---- | ------- | --- |
| ✓ | ✓ | ✓ | x |
| DWeb | MWeb | Android | iOS |
| ---- | ---- | ------- | --- |
| ✓ | ✓ | ✓ | x |
## Next Steps
You can choose to:
* [Integrate Affordability Widget on Web](/docs/payments/payment-gateway/emi²/widget/native-web)
* [Integrate Affordability Widget on Woocommerce website](/docs/payments/payment-gateway/emi²/widget/woocommerce)
* [Integrate Affordability Widget on your Shopify store](/docs/payments/payment-gateway/emi²/widget/shopify)
* [Integrate Affordability Widget on Android App](/docs/payments/payment-gateway/emi²/widget/android)
### Related Information
* [Features](/docs/payments/payment-gateway/emi²/widget/features)
* [FAQs](/docs/payments/payment-gateway/emi²/widget/faqs)
* [Customise the Widget on Web](/docs/payments/payment-gateway/emi²/widget/native-web/customise)
* [Customise the Widget on WooCommerce](/docs/payments/payment-gateway/emi²/widget/woocommerce/customise)
* [Customise the Widget on Shopify](/docs/payments/payment-gateway/emi²/widget/shopify/customise)
* [Create Offers](/docs/payments/offers/create)
* [Create No Cost EMI Offers](/docs/payments/offers/no-cost-emi/create)
* [Create Low Cost EMI Offers](/docs/payments/offers/low-cost-emi/create)
* [Payment Methods](/docs/payments/payment-gateway/emi²#payment-methods)
**Watch Out!**
For Shopify and WooCommerce users, this is a view-only widget. Customers can select their preferred offer and plan **only** at checkout.
## Supported Platforms
Razorpay Affordability Widget is supported on the following platforms:
| DWeb | MWeb | Android | iOS |
| ---- | ---- | ------- | --- |
| ✓ | ✓ | ✓ | x |
| DWeb | MWeb | Android | iOS |
| ---- | ---- | ------- | --- |
| ✓ | ✓ | ✓ | x |
## Next Steps
You can choose to:
* [Integrate Affordability Widget on Web](/docs/payments/payment-gateway/emi²/widget/native-web)
* [Integrate Affordability Widget on Woocommerce website](/docs/payments/payment-gateway/emi²/widget/woocommerce)
* [Integrate Affordability Widget on your Shopify store](/docs/payments/payment-gateway/emi²/widget/shopify)
* [Integrate Affordability Widget on Android App](/docs/payments/payment-gateway/emi²/widget/android)
### Related Information
* [Features](/docs/payments/payment-gateway/emi²/widget/features)
* [FAQs](/docs/payments/payment-gateway/emi²/widget/faqs)
* [Customise the Widget on Web](/docs/payments/payment-gateway/emi²/widget/native-web/customise)
* [Customise the Widget on WooCommerce](/docs/payments/payment-gateway/emi²/widget/woocommerce/customise)
* [Customise the Widget on Shopify](/docs/payments/payment-gateway/emi²/widget/shopify/customise)
* [Create Offers](/docs/payments/offers/create)
* [Create No Cost EMI Offers](/docs/payments/offers/no-cost-emi/create)
* [Create Low Cost EMI Offers](/docs/payments/offers/low-cost-emi/create)
* [Payment Methods](/docs/payments/payment-gateway/emi²#payment-methods)