> ## Documentation Index
> Fetch the complete documentation index at: https://razorpay-881012b3.mintlify.site/llms.txt
> Use this file to discover all available pages before exploring further.

# Integrate Affordability Widget With WooCommerce Website

> Integrate your WooCommerce website with Affordability Widget to spread awareness about the EMI²-based payment options before they reach checkout.

<div style={{display:"flex",flexWrap:"wrap",alignItems:"center",gap:"0.35rem 0.9rem",border:"1px solid rgba(128,128,128,0.28)",borderRadius:"0.5rem",padding:"0.45rem 0.75rem",margin:"0 0 1.25rem",fontSize:"0.875rem"}}>
  <span style={{fontWeight:600}}>Available in</span>
  <span>🇮🇳 India</span>
</div>

You can integrate Affordability Widget with your WooCommerce website to influence your customer's purchase decisions before they reach checkout by displaying various affordable payment options and offers.

<Info>
  **Handy Tips**

  Only the Owner, Admin and Manager roles can enable the widget.
</Info>

## Prerequisites

* Create a [Razorpay account](https://dashboard.razorpay.com/).
* Generate the [API keys](/docs/api/authentication#generate-api-keys) from the Dashboard by navigating to **Account & Settings** → **Website and app settings** → **API keys**.
  * You can use the **Test Mode** keys to test the integration and preview the Widget.
  * Switch to **Live Mode** on the Razorpay Dashboard → Generate the [Live API keys](/docs/api/authentication#live-mode-api-keys) and replace it with the test keys.
* Install the plugin version **4.3.4** directly from the [WordPress Plugin Directory](https://wordpress.org/plugins/woo-razorpay/).

<Info>
  **Handy Tips**

  Ensure you have the PHP-curl extension installed to make network requests.
</Info>

<Warning>
  **Watch Out!**

  Refer to [FAQs](/docs/payments/payment-gateway/emi²/widget/faqs#1-i-am-integrating-with-razorpay-plugin-for) if you are integrating with our plugin for the first time.
</Warning>

<AccordionGroup>
  <Accordion title="List of Supported Themes">
    Razorpay Affordability Widget WooCommerce is supported on the following popular themes:

    | Theme           | Supported |
    | --------------- | --------- |
    | Asta            | ✓         |
    | BigStore        | ✓         |
    | Blossom Shop    | ✓         |
    | Electro         | ✓         |
    | Elessi          | ✓         |
    | Flatsome        | ✓         |
    | Lebe            | ✓         |
    | Martfury Porto  | ✓         |
    | Molla           | ✓         |
    | Puca            | ✓         |
    | Razzi           | ✓         |
    | Rehub           | x         |
    | Shoptimizer     | ✓         |
    | Storefront      | ✓         |
    | TwentyNineteen  | ✓         |
    | TwentyTwenty    | ✓         |
    | TwentyTwentyOne | ✓         |
    | TwentyTwentyTwo | ✓         |
    | Woodmart        | x         |
    | Woostify        | ✓         |
    | WooVina         | ✓         |
    | Zoa             | ✓         |

    <Info>
      **Handy Tip**

      This is not a complete list, and it is recommended to try it on your themes as well.
    </Info>
  </Accordion>
</AccordionGroup>

## Integration Steps

1. [Enable the Widget](#step-1-enable-the-widget).
2. [Preview and Go Live](#step-2-preview-and-go-live).

### Step 1: Enable the Widget

Follow the steps given below to enable the widget:

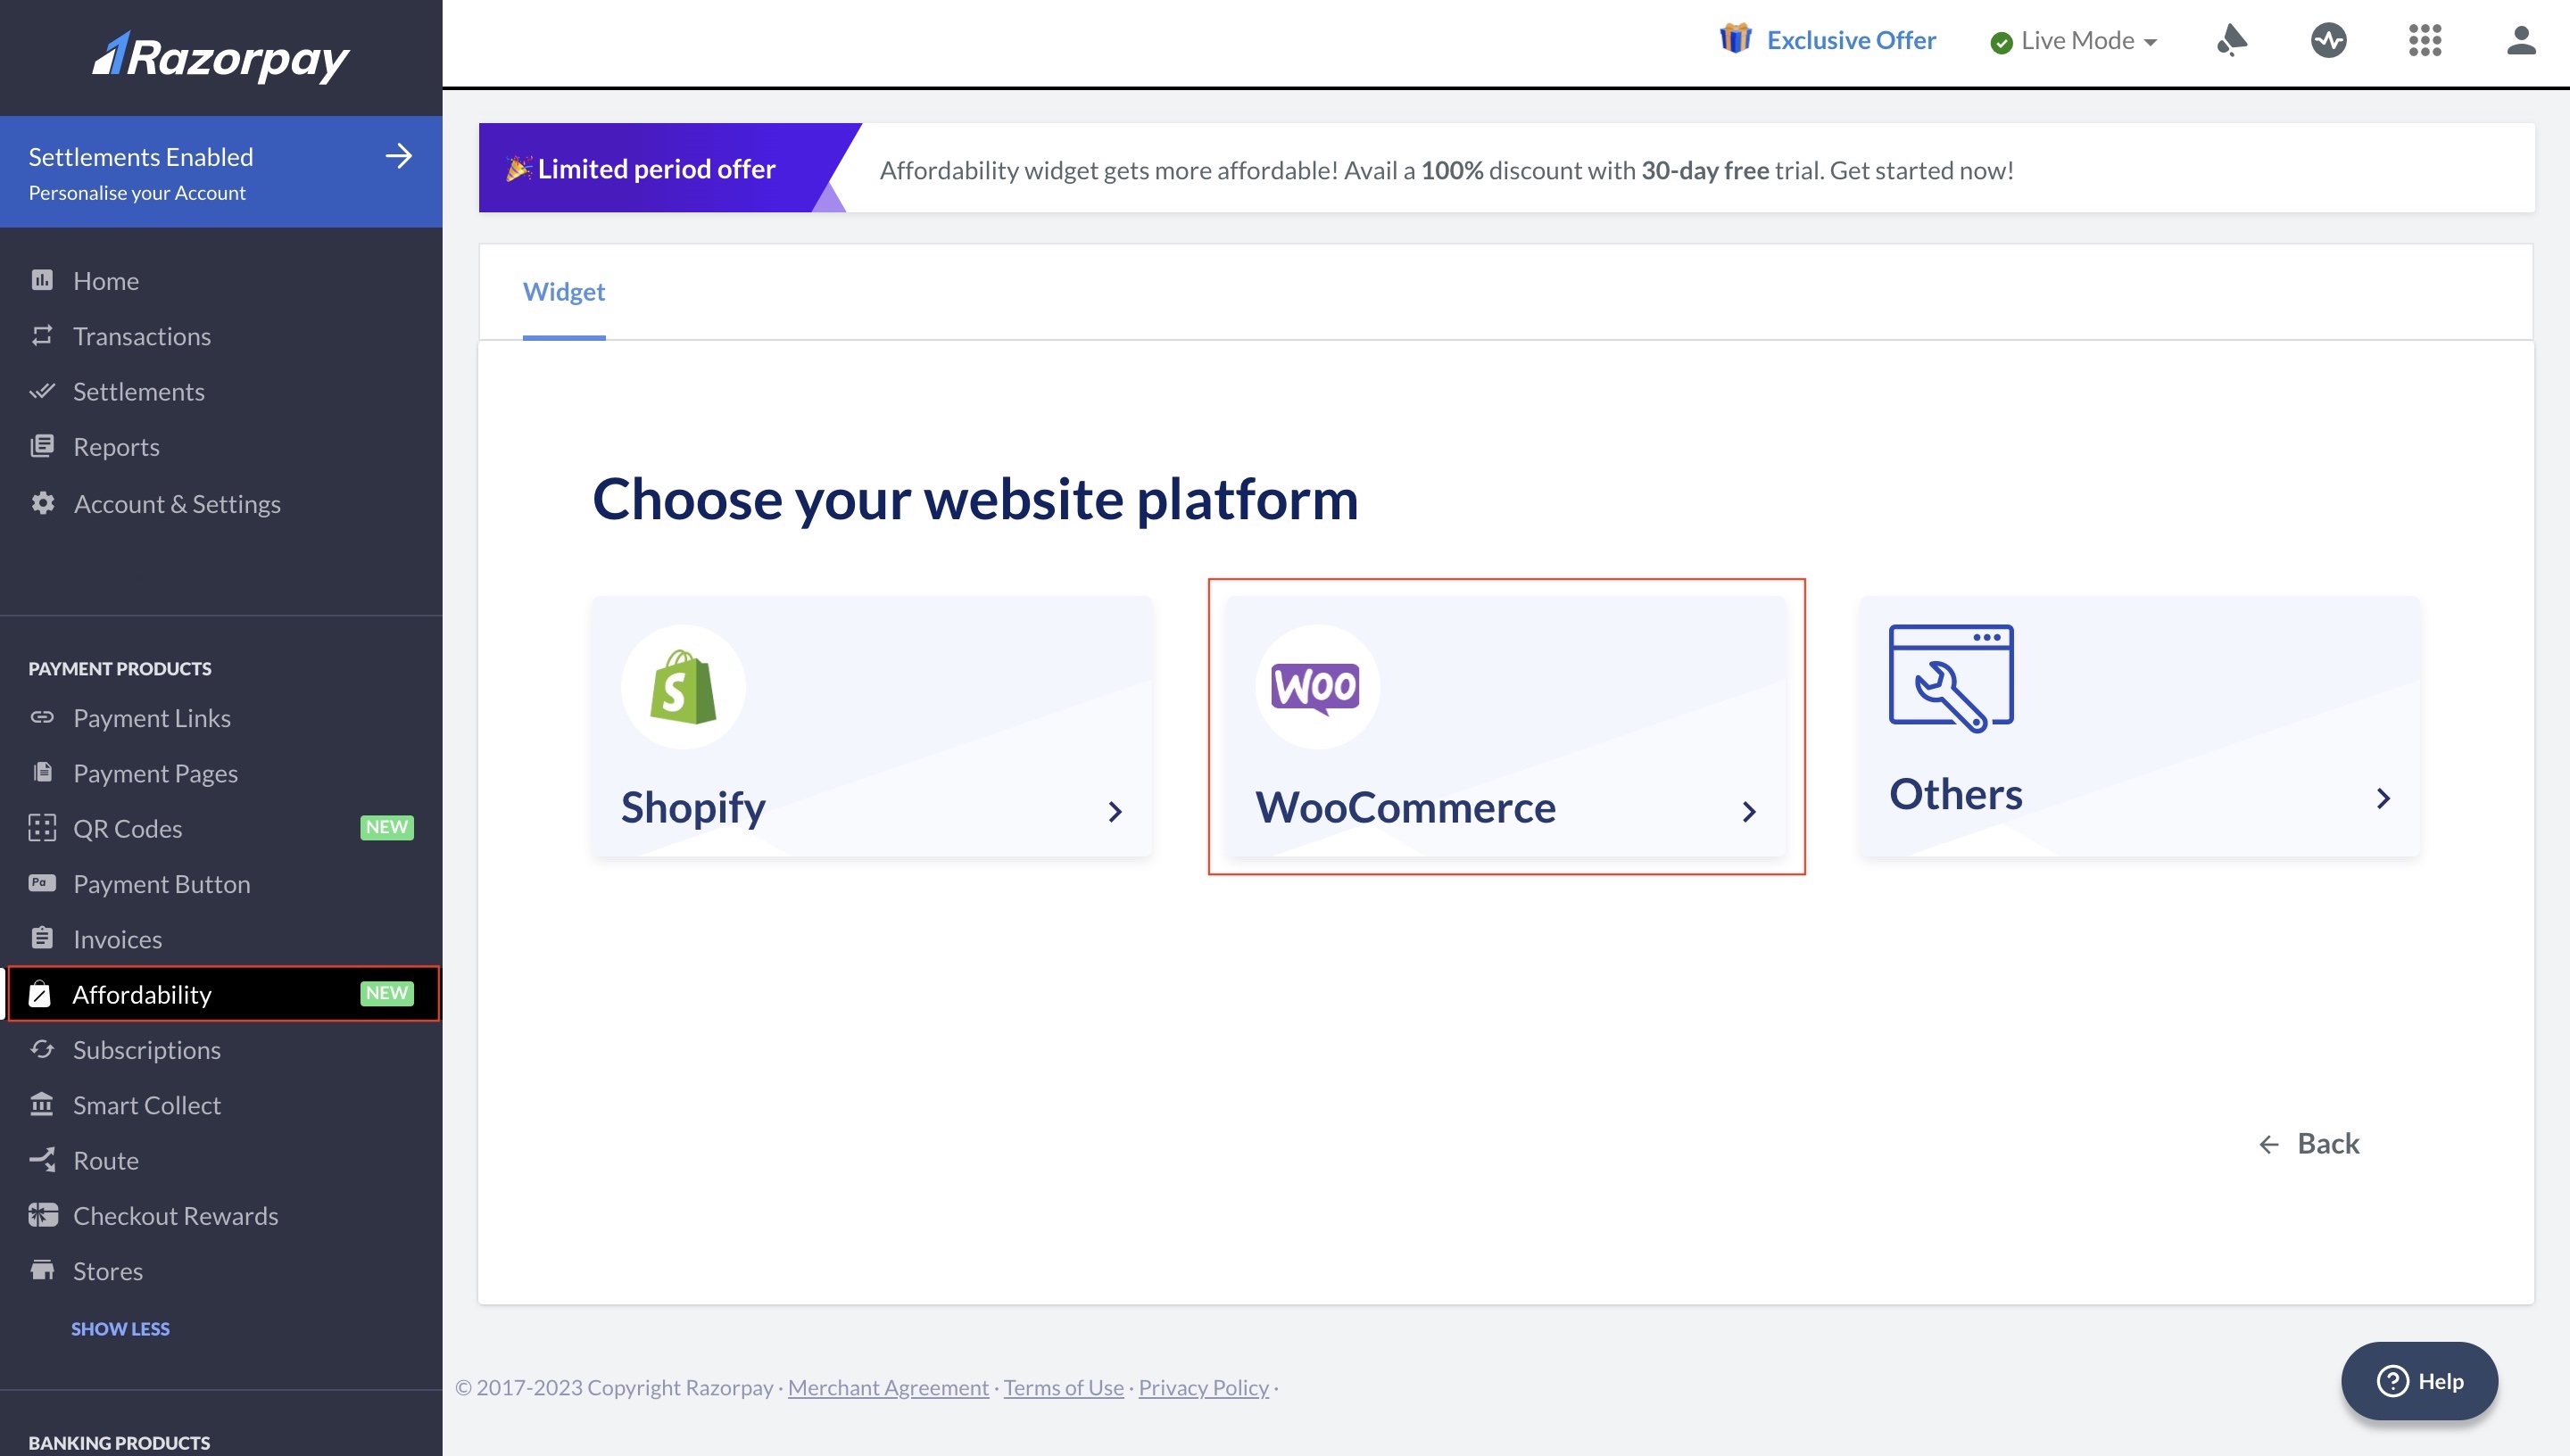
1. Log in to the Dashboard and navigate to **Affordability** in the **Payment Products** section.
2. Choose **WooCommerce** as your **website platform**.
   <img src="https://razorpay.com/docs/build/browser/assets/images/widget-woocommerce-platform.jpg" alt="Select website platform for widget" width="800" />
3. In the **Activate on your website** section, click **Enable Widget**.
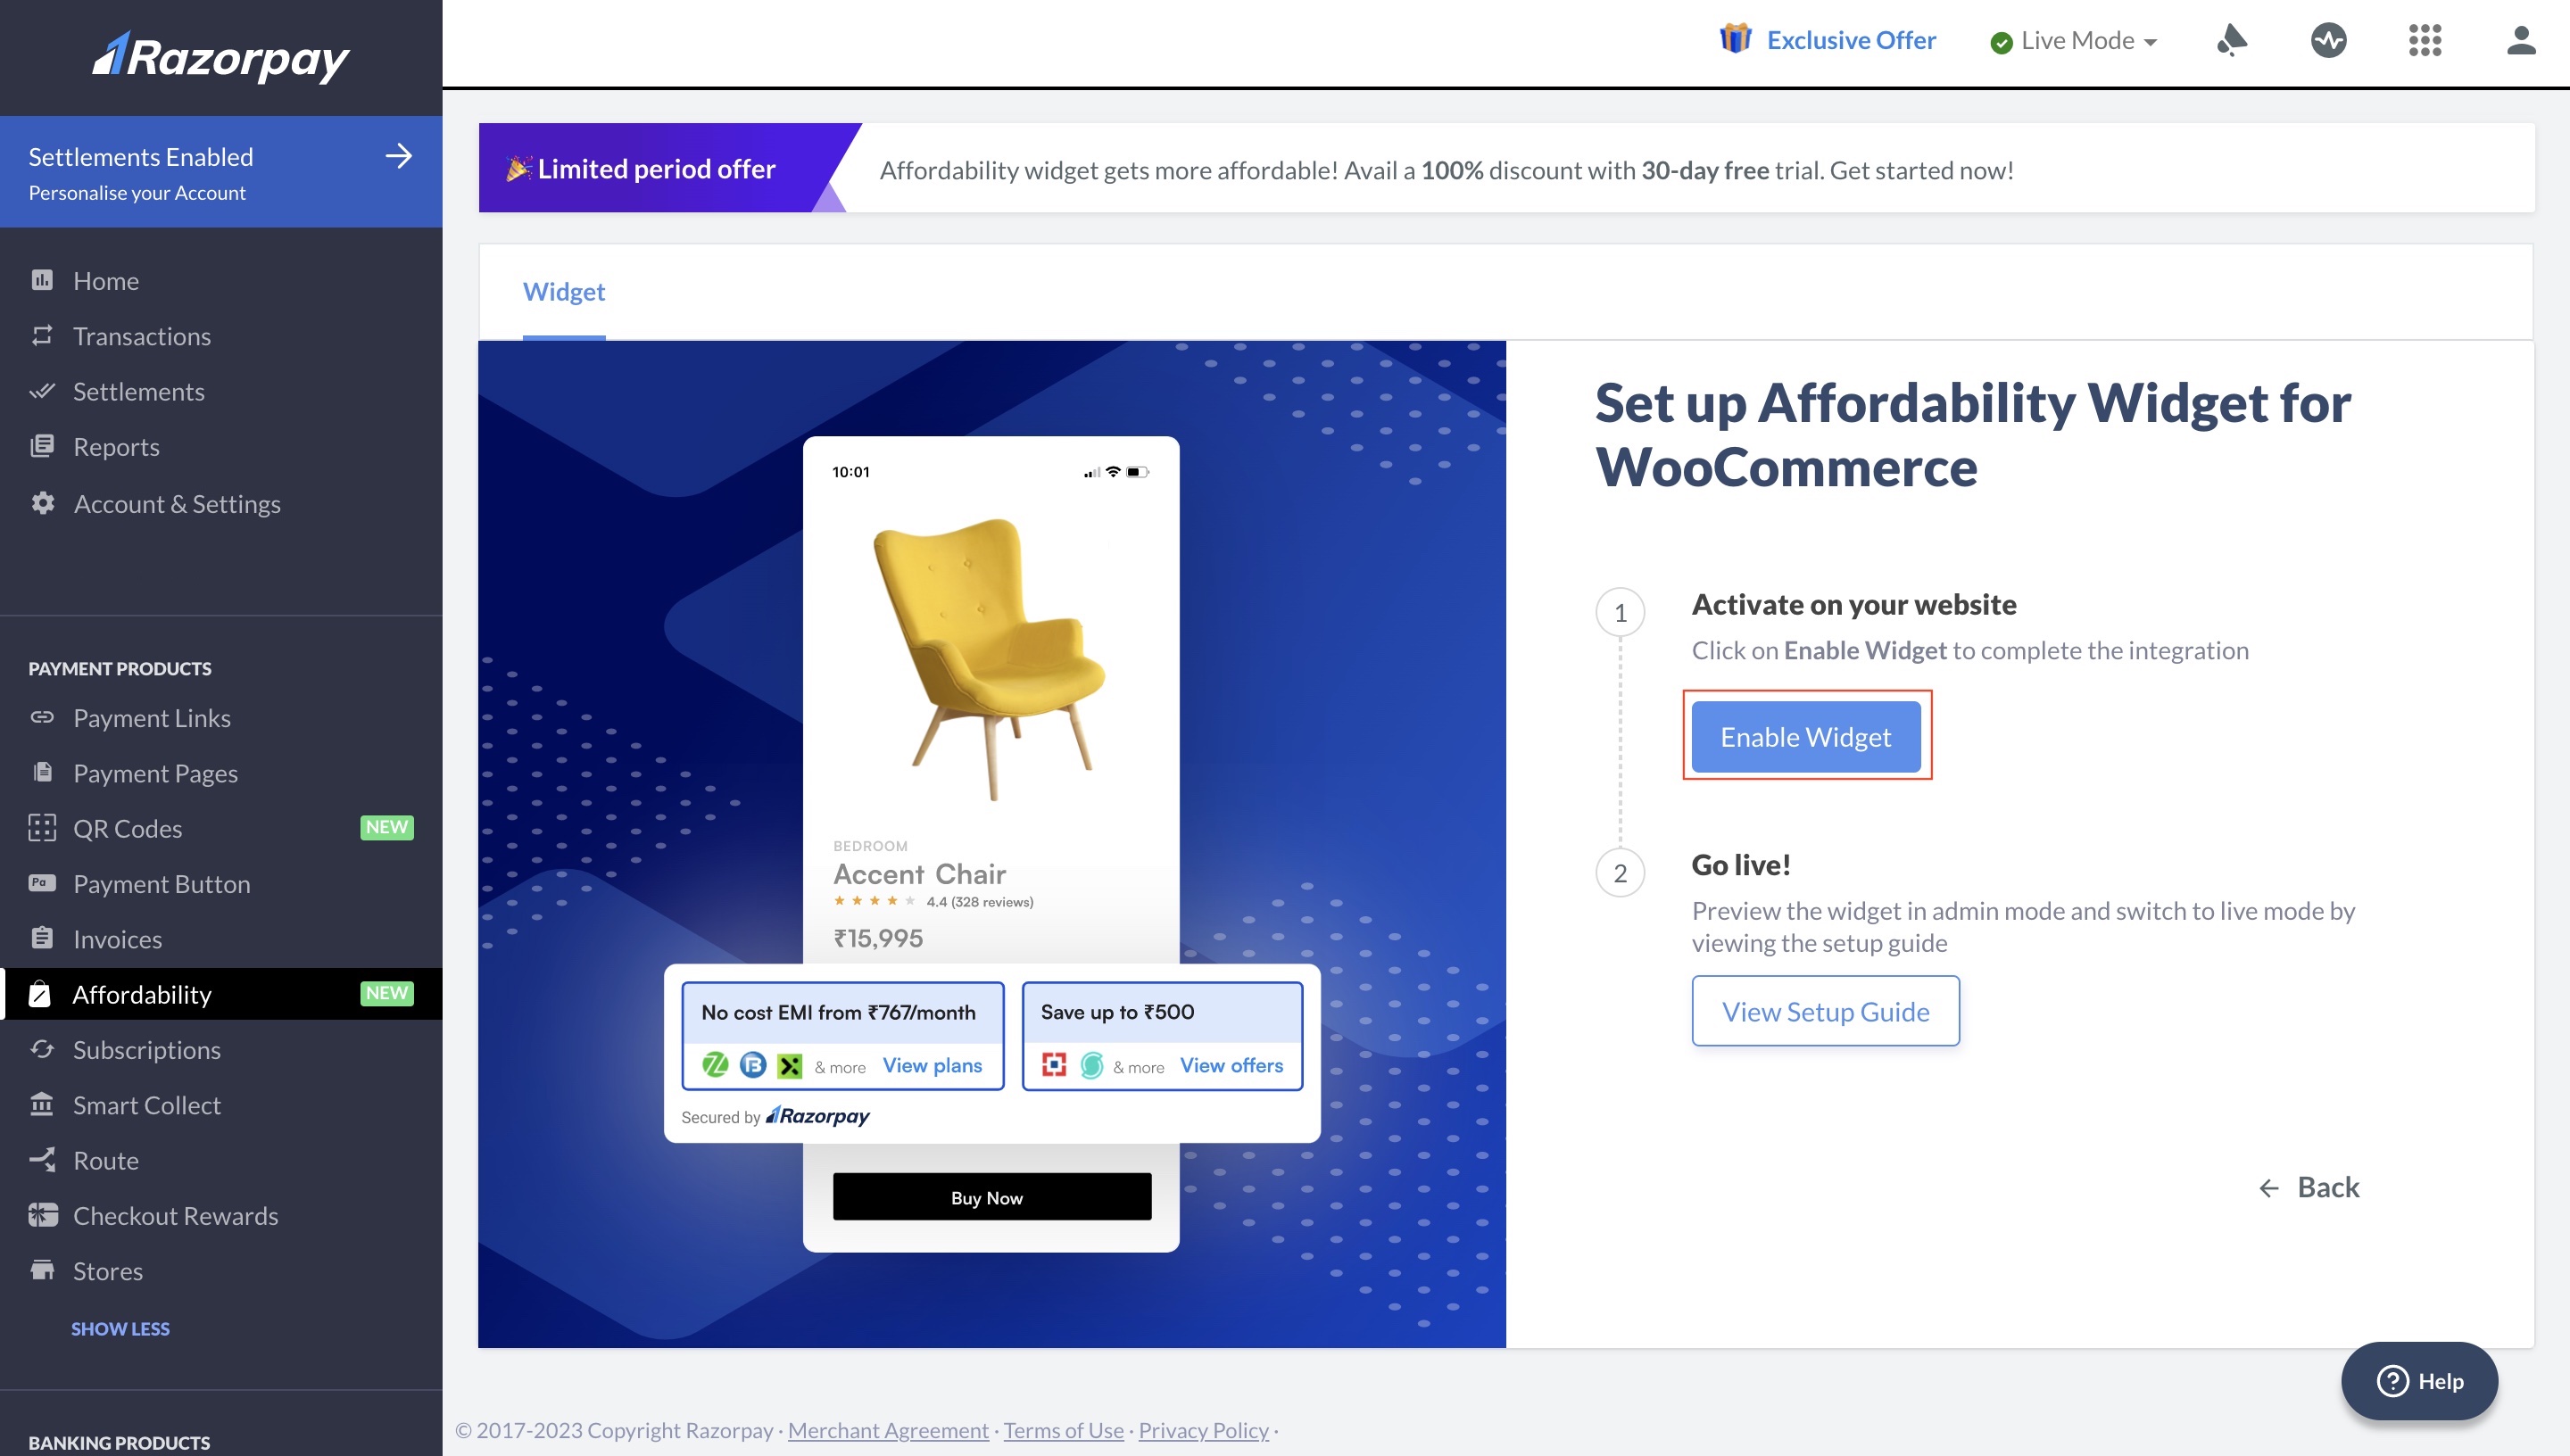
   <img src="https://razorpay.com/docs/build/browser/assets/images/woocommerce-widget-enable.jpg" alt="Enable the widget" width="800" />
4. Select the check box if you consent to enable the widget and click **Yes, enable**.

### Step 2: Preview and Go Live

Follow the steps given below:

1. Log in to the [WordPress account](https://wordpress.com/log-in).
2. Follow the steps given below to preview the widget in admin mode:
   1. Hover over **Razorpay Wordpress** and click **Visit Store**.
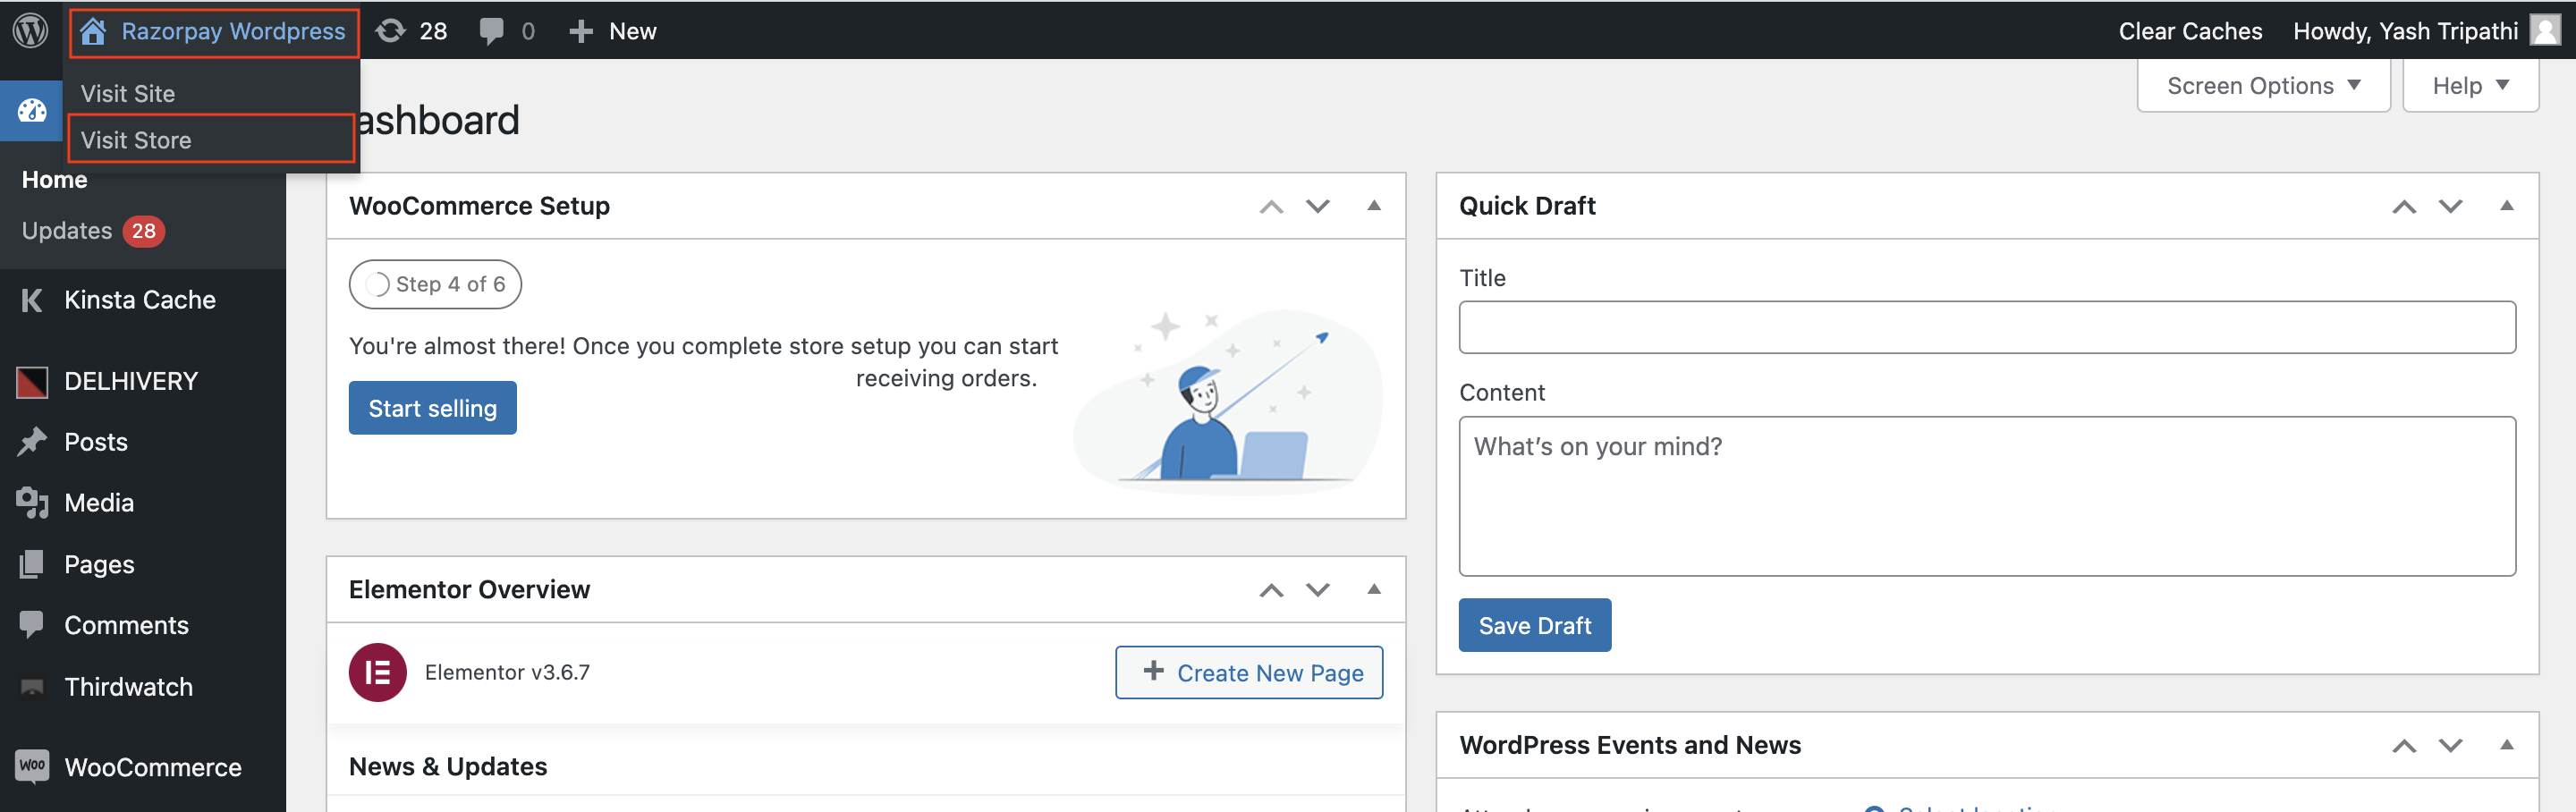
      <img src="https://razorpay.com/docs/build/browser/assets/images/widget-woocommerce-test.jpg" alt="Click visit store to test the widget" width="800" />
   2. Click on a product to view the widget.
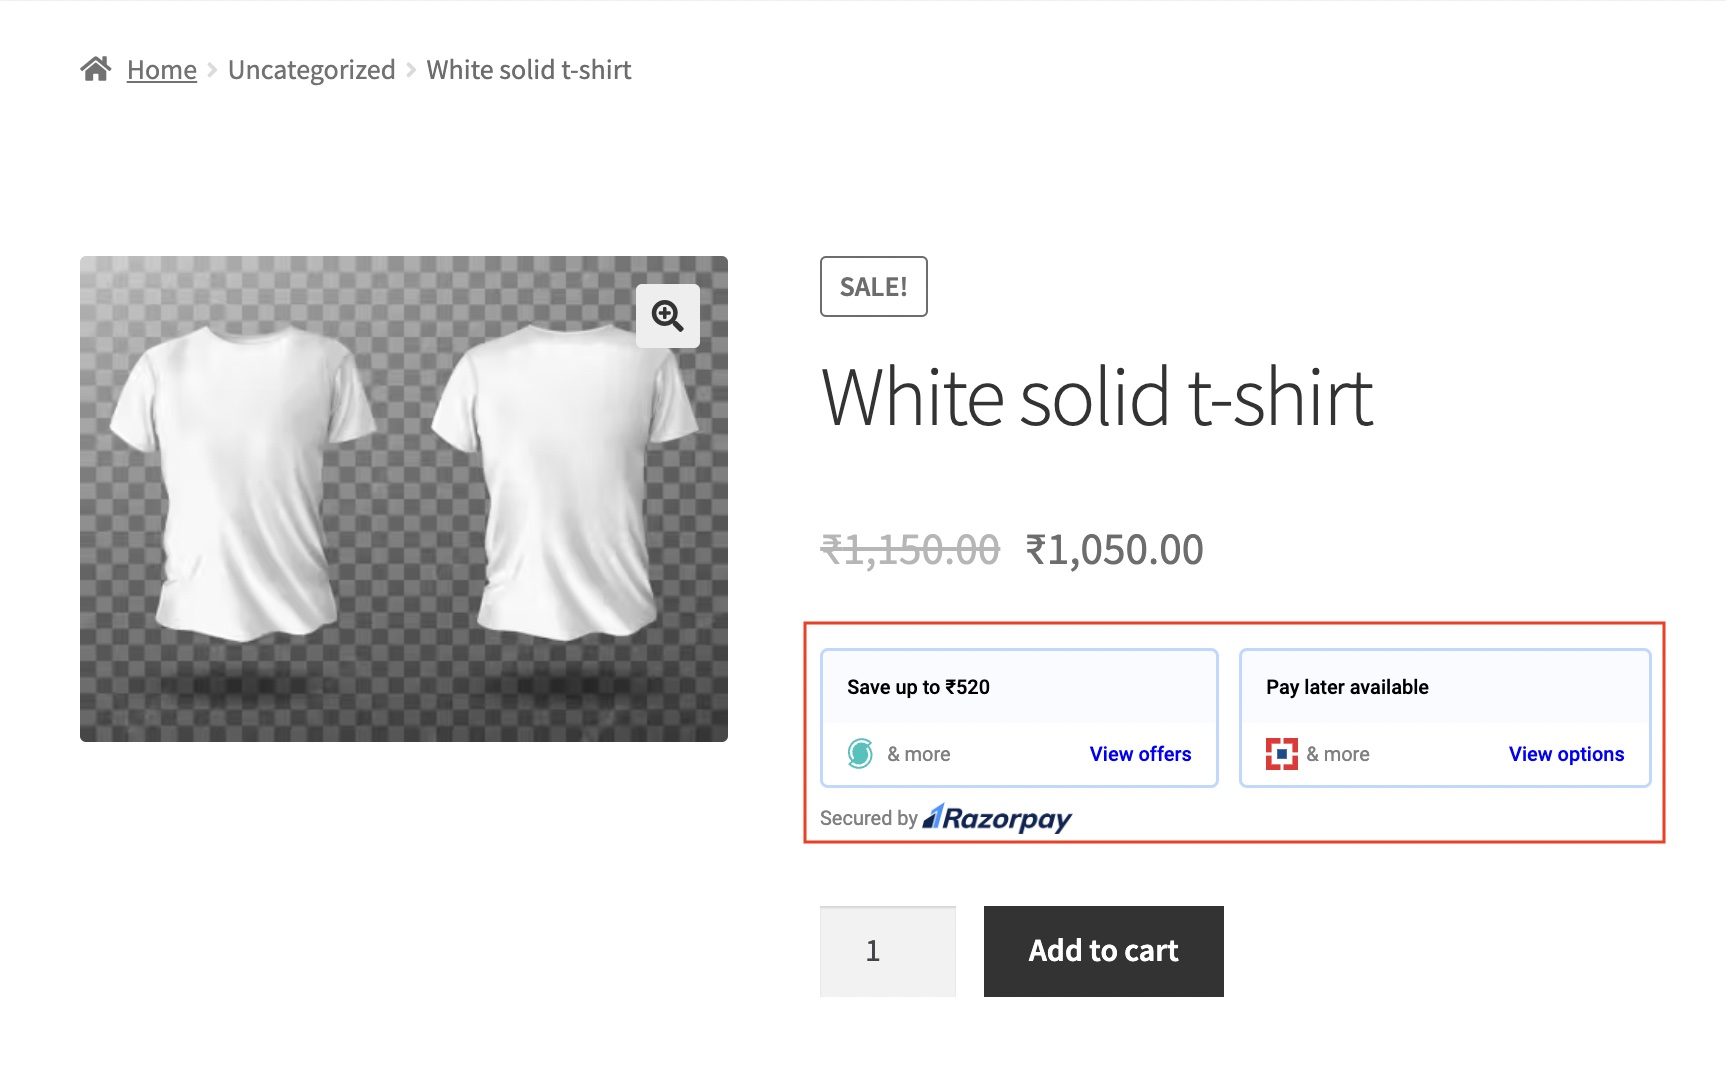
      <img src="https://razorpay.com/docs/build/browser/assets/images/widget-woocommerce-preview.jpg" alt="Preview the widget before publishing" width="800" />

<Warning>
  **Watch Out!**

  It is mandatory to preview the widget before displaying it to your customers on the WooCommerce website.
</Warning>

## Successful Activation

Here is a glimpse of the default widget with offers and payment method options enabled.

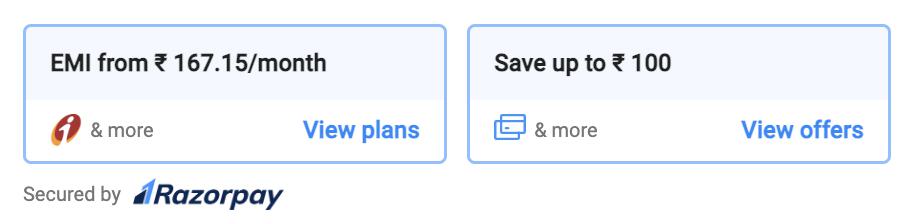
<img src="https://razorpay.com/docs/build/browser/assets/images/default-widget.jpg" alt="Glimpse of the default widget" width="450" />

<Info>
  **Minimum Order Limit**

  All the payment method options that are enabled and that satisfy the minimum order limit appear on the widget. Know more about the minimum order limit for:

  * [EMI](/docs/payments/payment-gateway/emi²/faqs#1-what-are-the-standard-credit-card-interest)
  * [Cardless EMI](/docs/payments/payment-gateway/emi²/faqs#cardless-emi)
  * [Pay Later](/docs/payments/payment-gateway/emi²/faqs#2-what-are-the-standard-interest-rates-charged)
</Info>

## Next Steps

After you successfully integrate the widget on your WooCommerce website, you can choose to [customise the widget](/docs/payments/payment-gateway/emi²/widget/woocommerce/customise) based on your requirement.

<Info>
  **Handy Tips**

  * Fill in the [integration support form](https://form.typeform.com/to/Ro3nJPzp) in case you are facing any issues with the integration.
  * In case you have any queries, raise a ticket on the [Razorpay Support Portal](https://razorpay.com/support/).
</Info>

### Related Information

[Affordability Widget FAQs for WooCommerce](/docs/payments/payment-gateway/emi²/widget/faqs#woocommerce)