> ## Documentation Index
> Fetch the complete documentation index at: https://razorpay-881012b3.mintlify.site/llms.txt
> Use this file to discover all available pages before exploring further.
# Checkout Blocks Integration
> Enable express Checkout with digital Wallets like Apple Pay and Google Pay on your website using Razorpay Checkout Blocks SDK.
Available in🇮🇳 India
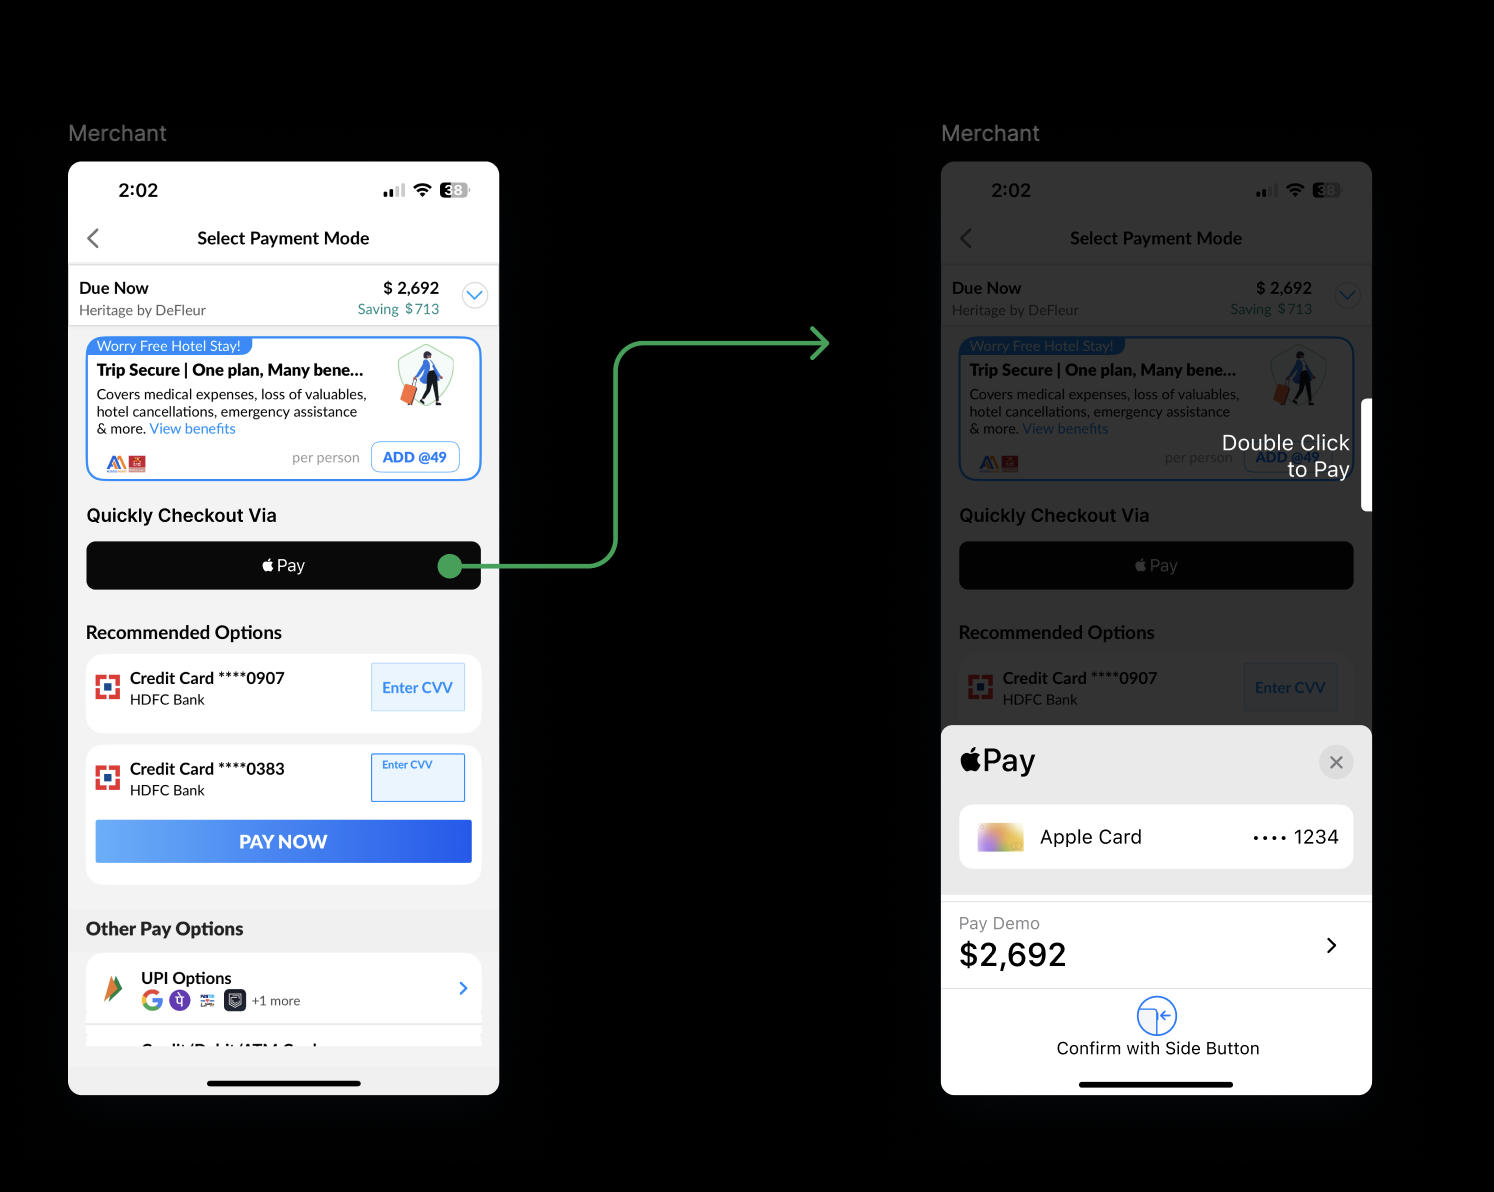
Razorpay Checkout Blocks is a client-side JavaScript SDK that enables businesses to offer express checkout experiences with digital wallets such as Apple Pay, Google Pay and more, directly on their own checkout page. The SDK abstracts the complexities of integrating individual wallet providers, allowing you to go live with single-click payments. Know more about [Razorpay Payments](https://razorpay.com/docs/payments).
Instead of redirecting customers to a Razorpay-hosted page, the SDK renders natively on your site, providing a seamless, single-click payment experience with no extra page loads or redirects.
* Offer single-click express checkout with digital wallet. No redirects, no extra page loads.
* Support multiple wallet (Apple Pay, Google Pay and more) through a single, unified SDK.
The Checkout Blocks SDK manages the full payment lifecycle for each supported wallet. At a high level:
1. Your Checkout page loads the Checkout Blocks SDK script.
2. The SDK dynamically loads only the wallet adapters you need (for example, Apple Pay, Google Pay).
3. You check wallet eligibility on the customer's device using `isSupported()`.
4. If eligible, render the payment button and call `initiatePayment()` on user click.
5. The SDK handles merchant validation, payment authorisation, DCC (if applicable) and completion.
6. Your page receives payment events (`onPaymentComplete`, `onError`) via callbacks.
No redirect to `api.razorpay.com` is required, the entire flow happens on your domain.
## Prerequisites
Before you begin the integration, ensure you have:
* **Active Razorpay Account**: A Razorpay account with payments enabled.
* **Order Creation via Backend**: Your server must be able to create orders using the [Orders API](/docs/api/orders/create) and pass the `order_id` to the frontend.
* **HTTPS Protocol**: Your website must be served over HTTPS for security compliance. Digital wallet require a secure context.
**Handy Tips**
Razorpay manages all Apple Pay certificates and business verification on your behalf. You only need to host the domain association file.
## Integration Steps
Follow the steps given below to integrate Checkout Blocks and accept express checkout payments on your website.
**1.1** [Load the Checkout Blocks SDK](#1-1-load-the-checkout-blocks-sdk)
**1.2** [Create an Order](#1-2-create-an-order)
**1.3** [Initialise SDK and Check Wallet Eligibility](#1-3-initialise-sdk-and-check-wallet-eligibility)
**1.4** [Handle Payment Events](#1-4-handle-payment-events)
**1.5** [Verify Payment Signature](#1-5-verify-payment-signature)
**1.6** [Integrate Payments Rainy Day Kit](#1-6-integrate-payments-rainy-day-kit)
**1.7** [Verify Payment Status](#1-7-verify-payment-status)
### 1.1 Load the Checkout Blocks SDK
Add the Checkout Blocks SDK script to the `` section of your Checkout page. The SDK exposes a global `RazorpayCheckoutBlocks` object that you use to interact with wallet.
Add the following to your HTML ``:
```html HTML theme={null}
```
**Handy Tips**
Adding `preconnect` and `dns-prefetch` hints can reduce script load time by up to 75%. We strongly recommend including these in your `` tag.
The SDK core is under 10 KB (gzipped). Wallet-specific adapters are loaded dynamically only when needed:
* Core SDK — `https://checkout.razorpay.com/checkout-blocks/checkout-blocks.js`
* Apple Pay Adapter — `https://checkout.razorpay.com/checkout-blocks/rzp-apple-pay.js`
* Google Pay Adapter — `https://checkout.razorpay.com/checkout-blocks/rzp-google-pay.js`
### 1.2 Create an Order
Before initiating a payment, create an order on your backend using the [Razorpay Orders API](/docs/api/orders/create). Pass the resulting `order_id` to your frontend to initialise the SDK.
The SDK flow requires your site to call `Create Order (amount, currency)` on the Razorpay backend and receive an `order_id` in response. Use this `order_id` when initialising the SDK in [step 1.3](#1-3-initialise-sdk-and-check-wallet-eligibility).
Refer to the [Orders API documentation](/docs/api/orders/create) for detailed request and response parameters.
### 1.3 Initialise SDK and Check Wallet Eligibility
Once the SDK is loaded and you have an `order_id`, you can initialise Checkout Blocks and check whether the customer's device supports a given wallet.
Use this approach if you want Razorpay to handle button rendering and payment initiation automatically. Simply place the `` web component on your page.
```javascript JavaScript theme={null}
// 1. Add checkout-blocks.js script tag in head
// 2. Render the web component exposed by razorpay
;
// 3. Listen for events
document
.getElementById('apple-pay')
.addEventListener('complete-payment', () => {});
document.getElementById('apple-pay').attachListeners({
onCompletePayment: () => {},
onError: () => {},
});
```
The web component automatically checks device eligibility and renders the appropriate payment button. If the wallet is not supported on the customer's device, nothing is rendered.
Use this approach if you want full control over button rendering and payment initiation. You use the SDK's JavaScript API to check eligibility and trigger payments programmatically.
```javascript JavaScript theme={null}
// 1. Add checkout-blocks.js script tag in head
const rce = window.RazorpayCheckoutBlocks; // Exposed by the script
rce.load(rce.APPLE_PAY, rce.GOOGLE_PAY); // Business chooses the wallet to accept payments from
// 2. Check if wallet is supported and initiatePayment using razorpay
if (await rce.isSupported(rce.APPLE_PAY)) {
}
```
**Watch Out!**
`initiatePayment()` can only be called once per transaction. Calling it again will not start a new payment unless the current transaction has ended (completed, failed or cancelled).
### 1.4 Handle Payment Events
Subscribe to payment lifecycle events to track the payment status and update your UI accordingly.
| Event | Description |
| ------------------- | --------------------------------------------------------------------------------------------------------- |
| `onPaymentComplete` | Fired when payment is complete. Resolves to either success or failure. |
| `onPaymentCancel` | Fired when payment is cancelled by the user. |
| `onError` | Indicates any error that happens within the payment cycle. Could be vendor-specific or Razorpay-specific. |
If the payment is successful, the `onPaymentComplete` event contains the following fields:
* `razorpay_payment_id`
* `razorpay_order_id`
* `razorpay_signature`
Send these values to your server for [signature verification](#1-5-verify-payment-signature).
If the payment fails, the `onError` event contains details about the failure. Common error codes:
| Error Code | Description | Retryable |
| --------------------------- | ---------------------------------------------- | --------- |
| `BAD_REQUEST_ERROR` | Invalid request parameters or payment failure. | No |
| `GATEWAY_ERROR` | Payment gateway error during processing. | Yes |
| `SERVER_ERROR` | Internal server error. | Yes |
| `INVALID_MERCHANT_ERROR` | Invalid merchant configuration. | No |
| `PAYMENT_ALREADY_PROCESSED` | Payment already authorised/captured. | No |
| `INSUFFICIENT_FUNDS` | Card has insufficient balance. | No |
| `CARD_DECLINED` | Card declined by issuer. | No |
| `AUTHENTICATION_FAILED` | 3DS authentication failed. | No |
On retryable errors, the SDK automatically re-renders the payment buttons so the customer can attempt payment again.
### 1.5 Verify Payment Signature
Signature verification is a mandatory step to ensure that the payment callback is authentic and sent by Razorpay. The `razorpay_signature` contained in the success callback can be regenerated by your system and verified as follows.
Create a string to be hashed using the `razorpay_payment_id` contained in the callback and the `order_id` generated in step 1.2, separated by a `|`. Hash this string using SHA256 and your API Secret.
```
generated_signature = hmac_sha256(order_id + "|" + razorpay_payment_id, secret);
if (generated_signature == razorpay_signature) {
payment is successful
}
```
#### Generate Signature on your Server
```java Java theme={null}
/**
* This class defines common routines for generating
* authentication signatures for Razorpay Webhook requests.
*/
public class Signature
{
private static final String HMAC_SHA256_ALGORITHM = "HmacSHA256";
/**
* Computes RFC 2104-compliant HMAC signature.
* * @param data
* The data to be signed.
* @param key
* The signing key.
* @return
* The Base64-encoded RFC 2104-compliant HMAC signature.
* @throws
* java.security.SignatureException when signature generation fails
*/
public static String calculateRFC2104HMAC(String data, String secret)
throws java.security.SignatureException
{
String result;
try {
// get an hmac_sha256 key from the raw secret bytes
SecretKeySpec signingKey = new SecretKeySpec(secret.getBytes(), HMAC_SHA256_ALGORITHM);
// get an hmac_sha256 Mac instance and initialize with the signing key
Mac mac = Mac.getInstance(HMAC_SHA256_ALGORITHM);
mac.init(signingKey);
// compute the hmac on input data bytes
byte[] rawHmac = mac.doFinal(data.getBytes());
// base64-encode the hmac
result = DatatypeConverter.printHexBinary(rawHmac).toLowerCase();
} catch (Exception e) {
throw new SignatureException("Failed to generate HMAC : " + e.getMessage());
}
return result;
}
}
```
```php PHP theme={null}
use Razorpay\Api\Api;
$api = new Api($key_id, $key_secret);
$attributes = array('razorpay_signature' => '23233', 'razorpay_payment_id' => '332' , 'razorpay_order_id' => '12122');
$order = $api->utility->verifyPaymentSignature($attributes)
```
```ruby Ruby theme={null}
require 'razorpay'
Razorpay.setup('key_id', 'key_secret')
payment_response = {
'razorpay_order_id': '12122',
'razorpay_payment_id': '332',
'razorpay_signature': '23233'
}
Razorpay::Utility.verify_payment_signature(payment_response)
```
```python Python theme={null}
import razorpay
client = razorpay.Client(auth=("YOUR_ID", "YOUR_SECRET"))
client.utility.verify_payment_signature({
'razorpay_order_id': razorpay_order_id,
'razorpay_payment_id': razorpay_payment_id,
'razorpay_signature': razorpay_signature
})
```
```c .NET theme={null}
Dictionary attributes = new Dictionary();
attributes.Add("razorpay_payment_id", paymentId);
attributes.Add("razorpay_order_id", Request.Form["razorpay_order_id"]);
attributes.Add("razorpay_signature", Request.Form["razorpay_signature"]);
Utils.verifyPaymentSignature(attributes);
```
```javascript Node.js theme={null}
var { validatePaymentVerification } = require('./dist/utils/razorpay-utils');
validatePaymentVerification({"order_id": razorpayOrderId, "payment_id": razorpayPaymentId }, signature, secret);
```
```go Go theme={null}
import (
"crypto/hmac"
"crypto/sha256"
"crypto/subtle"
"encoding/hex"
"fmt"
)
func main() {
signature := "477d1cdb3f8122a7b0963704b9bcbf294f65a03841a5f1d7a4f3ed8cd1810f9b"
secret := "qp3zKxwLZxbMORJgEVWi3Gou"
data := "order_J2AeF1ZpvfqRGH|pay_J2AfAxNHgqqBiI"
//fmt.Printf("Secret: %s Data: %s\n", secret, data)
// Create a new HMAC by defining the hash type and the key (as byte array)
h := hmac.New(sha256.New, []byte(secret))
// Write Data to it
_, err := h.Write([]byte(data))
if err != nil {
panic(err)
}
// Get result and encode as hexadecimal string
sha := hex.EncodeToString(h.Sum(nil))
fmt.Printf("Result: %s\n", sha)
if subtle.ConstantTimeCompare([]byte(sha), []byte(signature)) == 1 {
fmt.Println("Works")
}
}
```
### 1.6 Integrate Payments Rainy Day Kit
Use Payments Rainy Day kit to overcome payments exceptions such as:
* [Late Authorisation](/docs/payments/payments/late-authorisation)
* [Payment Downtime](/docs/api/payments/downtime)
* [Payment Errors](/docs/errors)
### 1.7 Verify Payment Status
**Handy Tips**
On the Razorpay Dashboard, ensure that the payment status is `captured`. Refer to the payment capture settings page to know how to [capture payments automatically](/docs/payments/payments/capture-settings).
To verify the payment status from the Razorpay Dashboard:
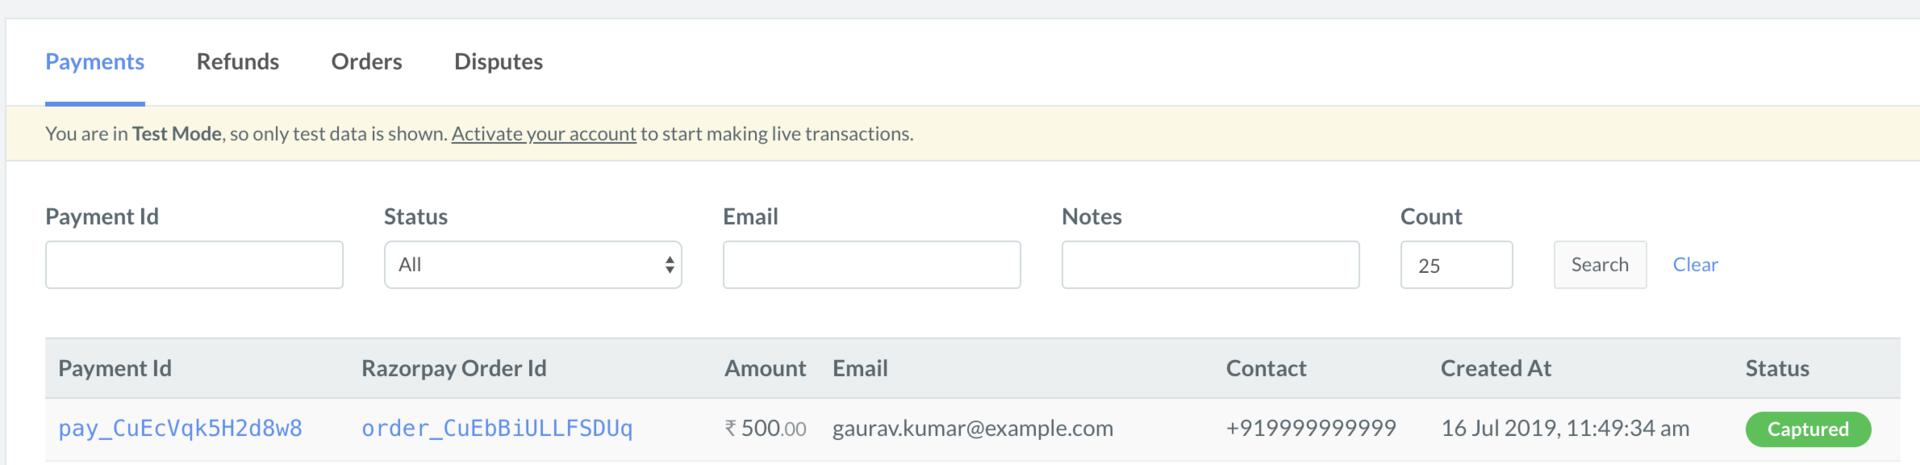
1. Log in to the Razorpay Dashboard and navigate to **Transactions** → **Payments**.
2. Check if a **Payment Id** has been generated and note the status. In case of a successful payment, the status is marked as **Captured**.
You can use Razorpay webhooks to configure and receive notifications when a specific event occurs. When one of these events is triggered, we send an HTTP POST payload in JSON to the webhook's configured URL. Know how to [set up webhooks.](/docs/webhooks/setup-edit-payments)
#### Example
If you have subscribed to the `order.paid` webhook event, you will receive a notification every time a customer pays you for an order.
[Poll Payment APIs](/docs/api/payments/fetch-all-payments) to check the payment status.
## Apple Pay - Domain Verification
To accept Apple Pay payments, your domain must be verified with Apple via Razorpay. Follow the steps below:
1. Log in to your [Razorpay Dashboard](https://dashboard.razorpay.com).
2. Navigate to the Apple Pay settings section and download the domain association file provided by Razorpay.
3. Host the file on your server at the following path:
`https://yourdomain.com/.well-known/apple-developer-merchantid-domain-association`
4. Ensure the file is publicly accessible over HTTPS.
5. Razorpay will use its own Apple Merchant ID. Your domain is whitelisted automatically once onboarding is complete.
**Watch Out!**
The domain association file must be served with `Content-Type: application/octet-stream` or `text/plain`. Ensure your server does not block or redirect requests to the `.well-known` directory.
**Best Practice: Apple Pay with iFrames**
As a best practice, if you want to show Apple Pay in an iframe element when the shopper is using Safari as their browser:
* For shoppers on Safari 17 later: add the `allow` attribute to the iframe to let the iframe communicate correctly with Apple Pay APIs:
``
* Safari 17 is available on iOS 17 and later, and macOS 12 and later.
* For shoppers on Safari 16 or earlier: match the iframe origin and your top-level origin. The protocols, hosts (full domain name), and ports, when specified, must be the same for both pages.
## Frequently Asked Questions
Yes. Checkout Blocks is designed to support multiple digital wallet through a single integration. You load the SDK once and specify which wallet to enable. Each wallet adapter is loaded dynamically, keeping the core bundle lightweight.
The `isSupported()` method returns `false` for unsupported wallet. In the Web Component approach, the element simply does not render. You should always check eligibility before displaying a payment button.
Yes. On payment failure, the customer can attempt payment again without refreshing the page.