> ## Documentation Index
> Fetch the complete documentation index at: https://razorpay-881012b3.mintlify.site/llms.txt
> Use this file to discover all available pages before exploring further.
# Web Component Integration
> Integrate Apple Pay on your checkout page using the Razorpay web component. Render the Apple Pay button with minimal JavaScript and handle payment events.
Available in
🇮🇳 India
The `` web component offers you the option to embed an Apple Pay button directly on your checkout page with minimal JavaScript. The component renders its own button, checks Apple Pay eligibility automatically and reports results via DOM events. Know more about [Apple Pay](https://www.apple.com/apple-pay/).
Integrating Apple Pay using the web component offers you the following advantages:
* **Minimal code**: Drop in the HTML tag and wire up event listeners. No JavaScript setup needed for button rendering.
* **Customisable appearance**: Configure the button theme, label, width and height using component attributes.
* **Device-aware rendering**: The component automatically checks device eligibility and only renders the button when Apple Pay is supported.
* **Seamless event handling**: Built-in events for payment success, failure and component errors integrate directly with your existing checkout logic.
* **No extra script for existing merchants**: The component ships with the Custom Checkout script you already use.
## Prerequisites
Before starting the integration, ensure you have the following:
* A Razorpay account with Apple Pay enabled.
* An existing Razorpay Custom Checkout integration.
* International Payments enabled on your Razorpay account.
* Your API Key Id available. Know how to generate [API Keys from the Dashboard](/docs/payments/dashboard/account-settings/api-keys#generate-api-keys).
* An HTTPS-enabled domain (TLS 1.2 or higher). Apple Pay requires a secure context and will not function over HTTP.
* Server-side capability to create orders via the Razorpay Orders API.
* Domains verified in the Dashboard for Apple Pay.
## Integration Steps
Follow the steps given below.
Verify your checkout domain(s) for Apple Pay before you go live. To find the list of these domains, please log in to the [dashboard](https://dashboard.razorpay.com/app/payment-methods/apple-pay).
**Handy Tip**
Only domains whitelisted with the accounts service will be visible here. Similar domains are visible as well. Please contact our [Support team](https://razorpay.com/support/) if you cannot find your Apple Pay showing domain here. You need to whitelist your URL.
Dashboard Configuration and Verification
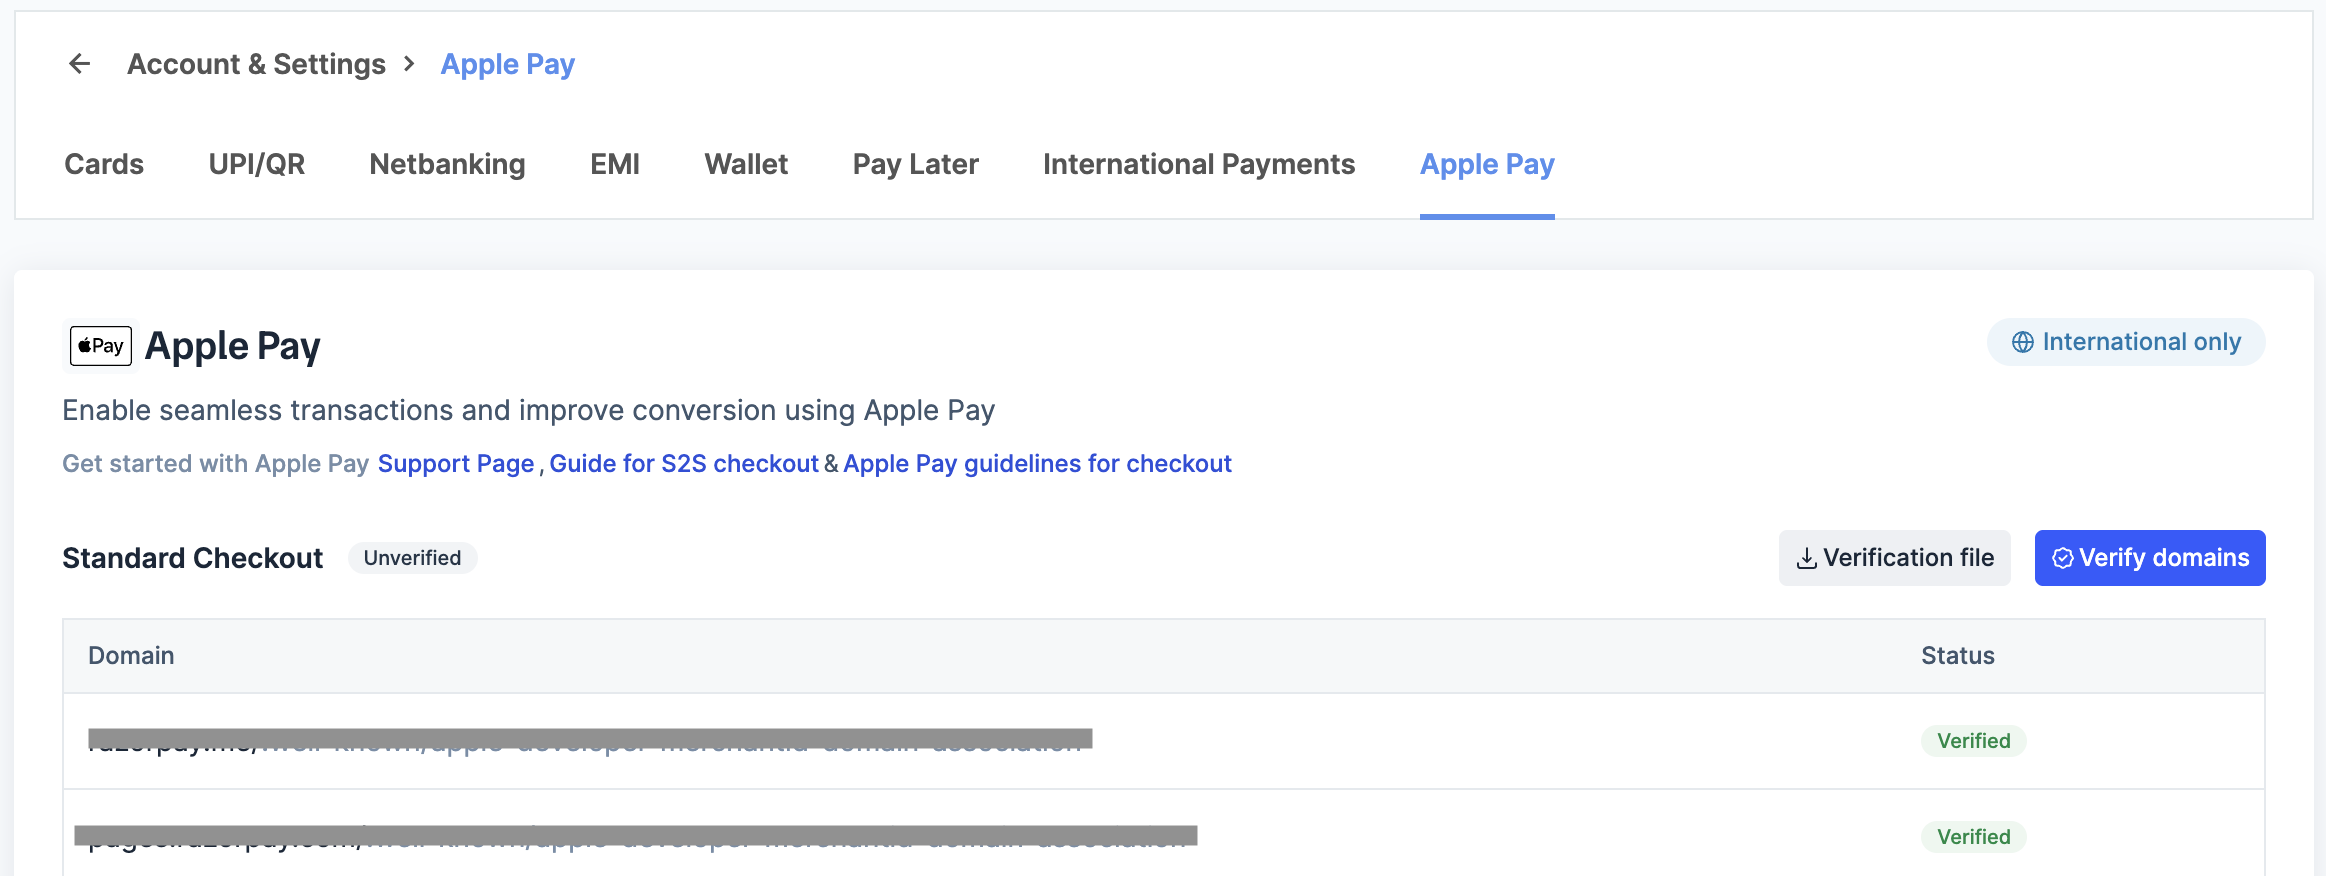
* Log in to the Dashboard and navigate to **Account & Settings** → **International payments** (under Payment methods). Click [**Apple Pay**](https://dashboard.razorpay.com/app/payment-methods/apple-pay).
 **Important**
This will only be visible if the business has International payments activated. If you do not have international payments active, you will not see Apple Pay.
* You will see a list of domains associated with your business account:
* **Verified domains**: Ready for Apple Pay.
* **Unverified domains**: Need to be verified.
* Click **Verify domains** for any unverified domains.
Include the Razorpay Custom Checkout script in your page's `` tag. This script registers the `` web component and makes it available for use in your HTML.
```html HTML theme={null}
```
**Handy Tip**
Load this script on every page where you intend to render the Apple Pay button. The script must be loaded before the `` component is placed in the DOM. Existing Custom Checkout merchants already load this script and do not need to add a new one.
If the same page also uses Razorpay Standard Checkout, load `razorpay.js` before `checkout.js`.
```html HTML theme={null}
```
The `` web component is self-contained — it does not read from or write to `window.Razorpay`. So once `checkout.js` finishes loading and sets up `window.Razorpay` for Standard Checkout, no restore step is needed on your end; both integrations continue to work independently on the same page.
You must create a Razorpay order on your server before rendering the Apple Pay button. The `order_id` returned from this call is passed directly to the web component.
```bash Request theme={null}
curl -X POST https://api.razorpay.com/v1/orders \
-u [YOUR_KEY_ID]:[YOUR_KEY_SECRET] \
-H 'content-type:application/json' \
-d '{
"amount": 50000,
"currency": "USD",
"receipt": "receipt_1"
}'
```
The response includes an `id` field (for example, `order_XXXXXXXXXX`). Pass this value to your frontend to use as the `order-id` attribute on the component.
The parameter descriptions and errors are present in the [Create an Order API](/docs/api/orders/create).
Place the `` component in your HTML at the exact location where you want the Apple Pay button to render. The button loads inline at the position of this component.
```html HTML theme={null}
```
To customise the button appearance, add the optional design attributes:
```html HTML theme={null}
```
The component fetches order details as soon as it is attached, checks Apple Pay eligibility and renders the button automatically once ready. No JavaScript setup is needed for that part.
**Handy Tip**
The component checks device eligibility on mount and renders the Apple Pay button only if the customer's device supports it. If Apple Pay is not available, nothing is rendered — no additional conditional logic is needed on your end.
Attach event listeners to the component to handle the payment outcome.
```js JavaScript theme={null}
const checkoutEl = document.getElementById('checkout');
checkoutEl.addEventListener('payment.success', (e) => {
// e.detail.paymentData.razorpay_payment_id
// e.detail.paymentData.razorpay_order_id
// e.detail.paymentData.razorpay_signature
});
checkoutEl.addEventListener('payment.failure', (e) => {
// e.detail.error -> { code, description, source, reason }
});
checkoutEl.addEventListener('error', (e) => {
// init/validation failures (bad key, bad order-id, etc.)
});
```
That is the whole integration.
After a successful payment (the `payment.success` event fires), verify the payment signature on your server before fulfilling the order.
Send the following fields to your backend:
* `razorpay_payment_id`
* `razorpay_order_id`
* `razorpay_signature`
Verify them using the standard [Razorpay signature verification process](/docs/payments/server-integration/python/integration-steps#14-verify-payment-signature).
**Watch Out!**
Never fulfil an order based solely on the client-side `payment.success` event. Signature verification ensures the payment was genuinely processed by Razorpay and has not been tampered with.
## Component Reference
| Attribute | Type | Required | Default | Description |
| --------------- | ------ | -------- | ------- | ------------------------------------------------------------------------------------------------------------------------ |
| `key` | string | Yes | — | Your Razorpay key id (`rzp_test_*` or `rzp_live_*`). |
| `order-id` | string | Yes | — | Razorpay order id created server-side (for example, `order_XXXXXXXXXX`). |
| `contact` | string | Yes | — | Customer's phone number in E.164 format (for example, `+919876543210`). |
| `email` | string | No | — | Customer's email address (for example, `user@example.com`). Recommended for payment confirmation and dispute resolution. |
| `method` | string | Yes | — | Payment method. Use `card`. |
| `app-name` | string | Yes | — | Name of the payment app. Use `apple_pay`. |
| `button-label` | string | No | `pay` | Button label. Values: `pay`, `buy`, `plain`, `checkout`, `donate`. |
| `button-theme` | string | No | `dark` | Button background. `dark` for dark background with light text, `light` for light background with dark text. |
| `button-width` | string | No | `100px` | Button width — any valid CSS value (for example, `148px`). |
| `button-height` | string | No | `44px` | Button height — any valid CSS value (for example, `32px`). |
| `theme-color` | string | No | — | Hex colour for theming the DCC UI (for example, `#528FF0`), shown when Dynamic Currency Conversion is applicable. |
### Events
Fired when the payment completes successfully. The event detail contains:
```js JavaScript theme={null}
{
status: 'success',
paymentData: {
razorpay_payment_id: string,
razorpay_order_id: string,
razorpay_signature: string
}
}
```
Use these three values to verify the payment on your server before fulfilling the order.
Fired when the payment fails or the customer cancels the payment sheet.
```js JavaScript theme={null}
{
status: 'failure',
error: {
code: string,
description: string,
source: string,
reason: string
}
}
```
Fired if the component fails to initialise — for example, due to an invalid attribute or Apple Pay not being enabled for your business account.
```js JavaScript theme={null}
{
errorCode: string,
message: string
}
```
Check that `key`, `order-id`, `method` and `app-name` are all correctly set if you receive this event on load.
## Error Handling Reference
Every failure — from `payment.failure` or the `error` event — carries the same shape:
```js JavaScript theme={null}
{
code: 'PAYMENT_CANCELLED' | 'PAYMENT_FAILED' | 'INTERNAL_ERROR',
description: string, // safe to show to the customer
source: 'customer' | 'merchant' | 'bank' | 'internal',
reason: string, // machine-readable, for logging
}
```
| Code | Meaning | Suggested Handling |
| ------------------- | ------------------------------------------------------------ | ----------------------------------------------- |
| `PAYMENT_CANCELLED` | Customer closed the sheet, or you called `abort()` | Return to the product/cart page |
| `PAYMENT_FAILED` | Payment was attempted but declined/failed | Show description, offer retry or another method |
| `INTERNAL_ERROR` | Something went wrong on our end (network, script load, etc.) | Show a generic "try again later" message |
## Quick Checklist
* Load `https://checkout.razorpay.com/v1/razorpay.js`
* Create the order on your server before rendering the tag
* Add `` with required attributes
* Wire up `payment.success` / `payment.failure` / `error` listeners
* Verify the payment signature on your server before fulfilling the order
### Related Information
* [Web JS Integration](/docs/payments/payment-methods/apple-pay/custom-integration/web-sdk/web-js-integration)
* [Apple Pay Standard Checkout](/docs/payments/payment-methods/apple-pay)
**Important**
This will only be visible if the business has International payments activated. If you do not have international payments active, you will not see Apple Pay.
* You will see a list of domains associated with your business account:
* **Verified domains**: Ready for Apple Pay.
* **Unverified domains**: Need to be verified.
* Click **Verify domains** for any unverified domains.
Include the Razorpay Custom Checkout script in your page's `` tag. This script registers the `` web component and makes it available for use in your HTML.
```html HTML theme={null}
```
**Handy Tip**
Load this script on every page where you intend to render the Apple Pay button. The script must be loaded before the `` component is placed in the DOM. Existing Custom Checkout merchants already load this script and do not need to add a new one.
If the same page also uses Razorpay Standard Checkout, load `razorpay.js` before `checkout.js`.
```html HTML theme={null}
```
The `` web component is self-contained — it does not read from or write to `window.Razorpay`. So once `checkout.js` finishes loading and sets up `window.Razorpay` for Standard Checkout, no restore step is needed on your end; both integrations continue to work independently on the same page.
You must create a Razorpay order on your server before rendering the Apple Pay button. The `order_id` returned from this call is passed directly to the web component.
```bash Request theme={null}
curl -X POST https://api.razorpay.com/v1/orders \
-u [YOUR_KEY_ID]:[YOUR_KEY_SECRET] \
-H 'content-type:application/json' \
-d '{
"amount": 50000,
"currency": "USD",
"receipt": "receipt_1"
}'
```
The response includes an `id` field (for example, `order_XXXXXXXXXX`). Pass this value to your frontend to use as the `order-id` attribute on the component.
The parameter descriptions and errors are present in the [Create an Order API](/docs/api/orders/create).
Place the `` component in your HTML at the exact location where you want the Apple Pay button to render. The button loads inline at the position of this component.
```html HTML theme={null}
```
To customise the button appearance, add the optional design attributes:
```html HTML theme={null}
```
The component fetches order details as soon as it is attached, checks Apple Pay eligibility and renders the button automatically once ready. No JavaScript setup is needed for that part.
**Handy Tip**
The component checks device eligibility on mount and renders the Apple Pay button only if the customer's device supports it. If Apple Pay is not available, nothing is rendered — no additional conditional logic is needed on your end.
Attach event listeners to the component to handle the payment outcome.
```js JavaScript theme={null}
const checkoutEl = document.getElementById('checkout');
checkoutEl.addEventListener('payment.success', (e) => {
// e.detail.paymentData.razorpay_payment_id
// e.detail.paymentData.razorpay_order_id
// e.detail.paymentData.razorpay_signature
});
checkoutEl.addEventListener('payment.failure', (e) => {
// e.detail.error -> { code, description, source, reason }
});
checkoutEl.addEventListener('error', (e) => {
// init/validation failures (bad key, bad order-id, etc.)
});
```
That is the whole integration.
After a successful payment (the `payment.success` event fires), verify the payment signature on your server before fulfilling the order.
Send the following fields to your backend:
* `razorpay_payment_id`
* `razorpay_order_id`
* `razorpay_signature`
Verify them using the standard [Razorpay signature verification process](/docs/payments/server-integration/python/integration-steps#14-verify-payment-signature).
**Watch Out!**
Never fulfil an order based solely on the client-side `payment.success` event. Signature verification ensures the payment was genuinely processed by Razorpay and has not been tampered with.
## Component Reference
| Attribute | Type | Required | Default | Description |
| --------------- | ------ | -------- | ------- | ------------------------------------------------------------------------------------------------------------------------ |
| `key` | string | Yes | — | Your Razorpay key id (`rzp_test_*` or `rzp_live_*`). |
| `order-id` | string | Yes | — | Razorpay order id created server-side (for example, `order_XXXXXXXXXX`). |
| `contact` | string | Yes | — | Customer's phone number in E.164 format (for example, `+919876543210`). |
| `email` | string | No | — | Customer's email address (for example, `user@example.com`). Recommended for payment confirmation and dispute resolution. |
| `method` | string | Yes | — | Payment method. Use `card`. |
| `app-name` | string | Yes | — | Name of the payment app. Use `apple_pay`. |
| `button-label` | string | No | `pay` | Button label. Values: `pay`, `buy`, `plain`, `checkout`, `donate`. |
| `button-theme` | string | No | `dark` | Button background. `dark` for dark background with light text, `light` for light background with dark text. |
| `button-width` | string | No | `100px` | Button width — any valid CSS value (for example, `148px`). |
| `button-height` | string | No | `44px` | Button height — any valid CSS value (for example, `32px`). |
| `theme-color` | string | No | — | Hex colour for theming the DCC UI (for example, `#528FF0`), shown when Dynamic Currency Conversion is applicable. |
### Events
Fired when the payment completes successfully. The event detail contains:
```js JavaScript theme={null}
{
status: 'success',
paymentData: {
razorpay_payment_id: string,
razorpay_order_id: string,
razorpay_signature: string
}
}
```
Use these three values to verify the payment on your server before fulfilling the order.
Fired when the payment fails or the customer cancels the payment sheet.
```js JavaScript theme={null}
{
status: 'failure',
error: {
code: string,
description: string,
source: string,
reason: string
}
}
```
Fired if the component fails to initialise — for example, due to an invalid attribute or Apple Pay not being enabled for your business account.
```js JavaScript theme={null}
{
errorCode: string,
message: string
}
```
Check that `key`, `order-id`, `method` and `app-name` are all correctly set if you receive this event on load.
## Error Handling Reference
Every failure — from `payment.failure` or the `error` event — carries the same shape:
```js JavaScript theme={null}
{
code: 'PAYMENT_CANCELLED' | 'PAYMENT_FAILED' | 'INTERNAL_ERROR',
description: string, // safe to show to the customer
source: 'customer' | 'merchant' | 'bank' | 'internal',
reason: string, // machine-readable, for logging
}
```
| Code | Meaning | Suggested Handling |
| ------------------- | ------------------------------------------------------------ | ----------------------------------------------- |
| `PAYMENT_CANCELLED` | Customer closed the sheet, or you called `abort()` | Return to the product/cart page |
| `PAYMENT_FAILED` | Payment was attempted but declined/failed | Show description, offer retry or another method |
| `INTERNAL_ERROR` | Something went wrong on our end (network, script load, etc.) | Show a generic "try again later" message |
## Quick Checklist
* Load `https://checkout.razorpay.com/v1/razorpay.js`
* Create the order on your server before rendering the tag
* Add `` with required attributes
* Wire up `payment.success` / `payment.failure` / `error` listeners
* Verify the payment signature on your server before fulfilling the order
### Related Information
* [Web JS Integration](/docs/payments/payment-methods/apple-pay/custom-integration/web-sdk/web-js-integration)
* [Apple Pay Standard Checkout](/docs/payments/payment-methods/apple-pay)