> ## Documentation Index
> Fetch the complete documentation index at: https://razorpay-881012b3.mintlify.site/llms.txt
> Use this file to discover all available pages before exploring further.

# Bajaj Pay - Standard Checkout

> Let your customers make payments using the Bajaj Pay wallet on Razorpay Standard Checkout.

<div style={{display:"flex",flexWrap:"wrap",alignItems:"center",gap:"0.35rem 0.9rem",border:"1px solid rgba(128,128,128,0.28)",borderRadius:"0.5rem",padding:"0.45rem 0.75rem",margin:"0 0 1.25rem",fontSize:"0.875rem"}}>
  <span style={{fontWeight:600}}>Available in</span>
  <span>🇮🇳 India</span>
</div>

Bajaj Pay Wallet is a secure digital wallet that simplifies everyday payments for your customers. Customers can pay bills on the go or easily initiate fund transfers from their phones.

## Enable Bajaj Pay Using Dashboard

Enable Bajaj Pay payment method on the Dashboard if not already enabled:

1. Log in to the Dashboard.
2. Navigate to **Account & Settings** → **Payment Methods**.
3. Select **Wallet**.
4. Click **Request** beside **Bajaj Pay Wallet**.
   <img src="https://razorpay.com/docs/build/browser/assets/images/bajaj-pay-wallet-request.jpg" alt="Dashboard image of bank transfer request" width="800" />
5. A request form appears. Select the payment instrument to be enabled on your Checkout. Click **Save & Next**.
6. Fill in the required details and click **Save & Next**.
<Info>
  **Handy Tips**

  * If you are an existing business, some of the required details will be auto-filled.
  * You can click the **Edit** button to fill in the incomplete details before submitting the form.
</Info>

7. Fill in the **Management/Ownership** details in the form. When complete form details are filled, click **Submit Form**.
8. After the form is submitted, the request is sent to activate the selected payment instruments. The feature enablement request will take 2 business days to be approved.

After the payment instrument is enabled, you will see the **Activated** status beside the selected one.

### Standard Integration

After Bajaj Pay is enabled, it is listed on the Razorpay Standard Checkout as an option under the wallet payment method. No additional integration is needed. You can view the wallets enabled for your account under the **Account & Settings → Payment Methods** tab.

## Payment Flow for Standard Checkout

On your website or app, customers select the products and proceed to Checkout. On the Checkout page, the customers:

1. Enter the **Phone Number** and click **Continue**.
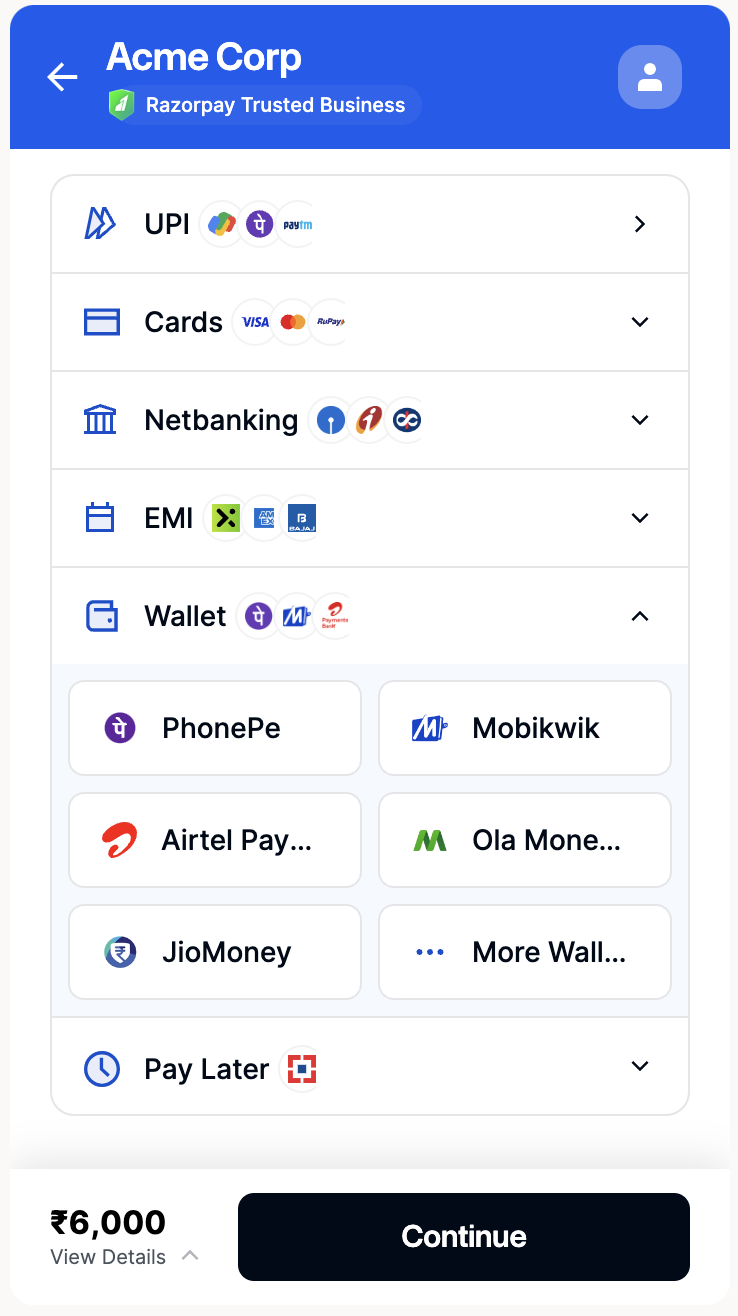
2. Select **Wallet** as the payment method.
   <img src="https://razorpay.com/docs/build/browser/assets/images/pay-pm-wallets-checkout.jpg" alt="Select Wallets" width="300" />
3. Select **Bajaj Pay** and click **Continue**.
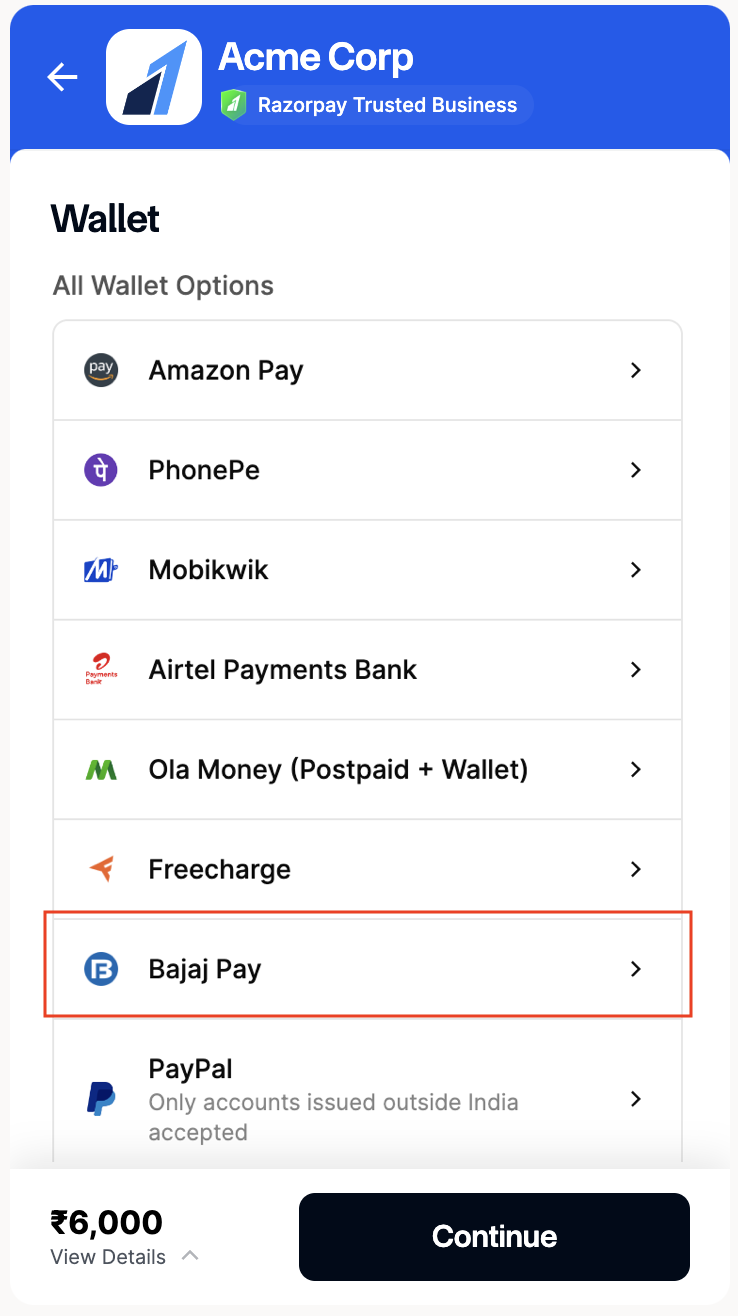
   <img src="https://razorpay.com/docs/build/browser/assets/images/pay-pm-wallet-bajaj.jpg" alt="Select Bajaj Wallet" width="300" />
4. Enter the **OTP** sent to their mobile number. In case of insufficient balance, click **Add Funds**.
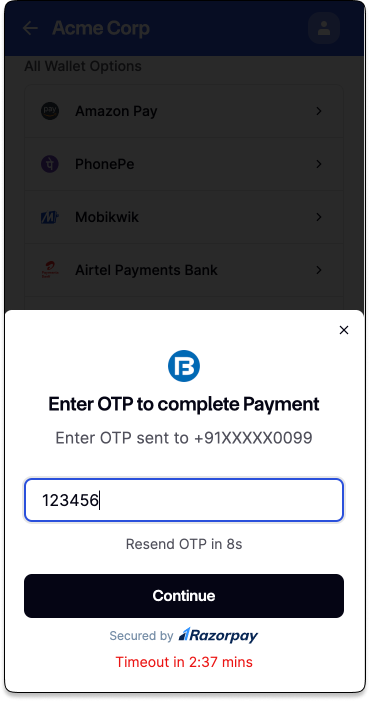
   <img src="https://razorpay.com/docs/build/browser/assets/images/pay-pm-wallet-bajaj-otp.jpg" alt="Bajaj Wallet - OTP Screen" width="300" />
5. The payment is completed if they have sufficient balance in the wallet.

After the successful payment, customers are directed to your application or website. You receive the amount in your wallet as per your settlement cycle.
