> ## Documentation Index
> Fetch the complete documentation index at: https://razorpay-881012b3.mintlify.site/llms.txt
> Use this file to discover all available pages before exploring further.

# Configure 80G-Enabled Payment Pages Receipt

> Generate, download and share 80G-enabled receipts for donations on NGO Payment Pages. Send email notifications and PDF receipts to your customers.

<div style={{display:"flex",flexWrap:"wrap",alignItems:"center",gap:"0.35rem 0.9rem",border:"1px solid rgba(128,128,128,0.28)",borderRadius:"0.5rem",padding:"0.45rem 0.75rem",margin:"0 0 1.25rem",fontSize:"0.875rem"}}>
  <span style={{fontWeight:600}}>Available in</span>
  <span>🇮🇳 India</span>
</div>

If you are an NGO using Payment Pages to accept donations, you can share payment receipts with 80G details to your customers via email once they make the payment.

## Set Up Payment Receipt

Payment Receipts can be generated and shared using **Automated Rececipts** or **Manual Receipts**.

Watch this video on how to configure 80G-enabled Payment Receipts.

<iframe width="560" height="315" src="https://www.youtube.com/embed/fLF3dOdi1CM" frameBorder="0" allow="accelerometer; autoplay; encrypted-media; gyroscope; picture-in-picture" allowFullScreen />

<br />

<Tabs>
  <Tab title="Automated Receipt">
    You can automatically share the payment receipt with customers via email and SMS. An auto-generated reference number is added by Razorpay.

    To configure automated Payment Page receipts:

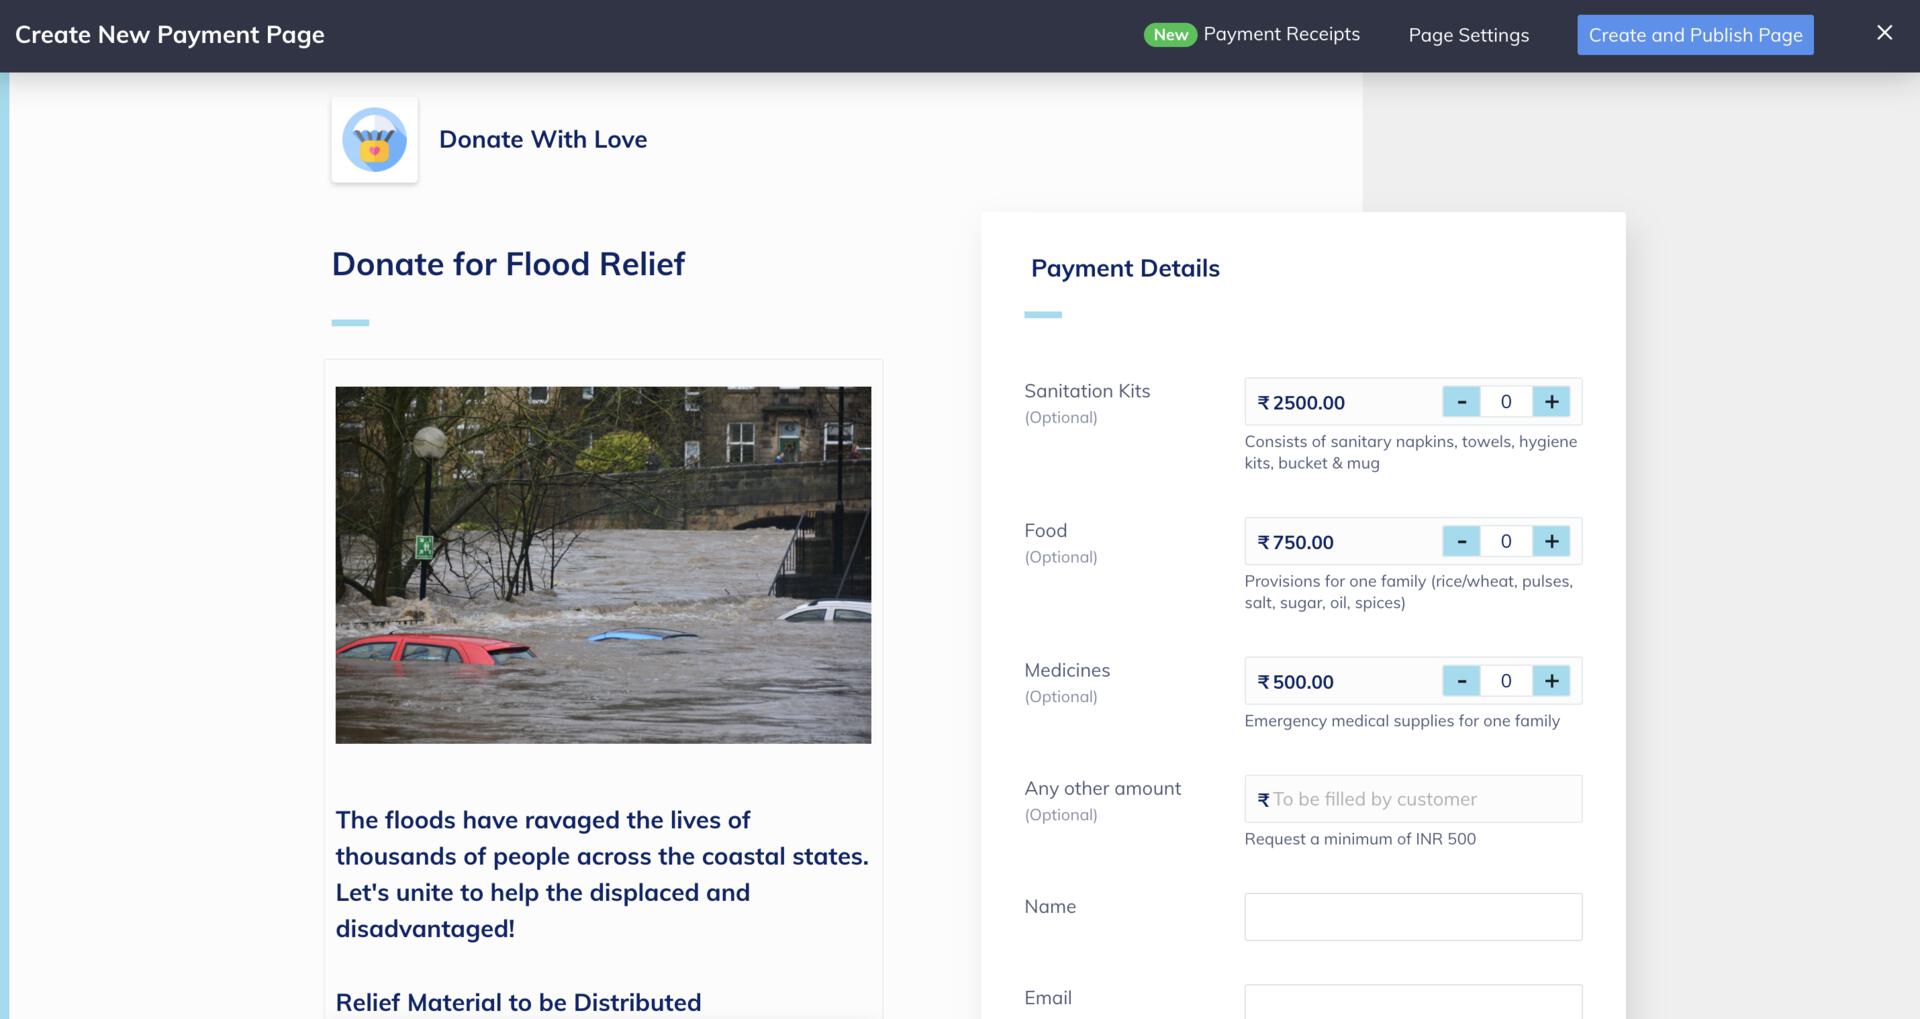
    1. While creating or editing the Payment Page, select **Payment Receipts** from the top menu ribbon.
           <img src="https://razorpay.com/docs/build/browser/assets/images/payment-pages-receipt-pp-receipt.jpg" alt="Edit an 80G-enabled Payment Page" />
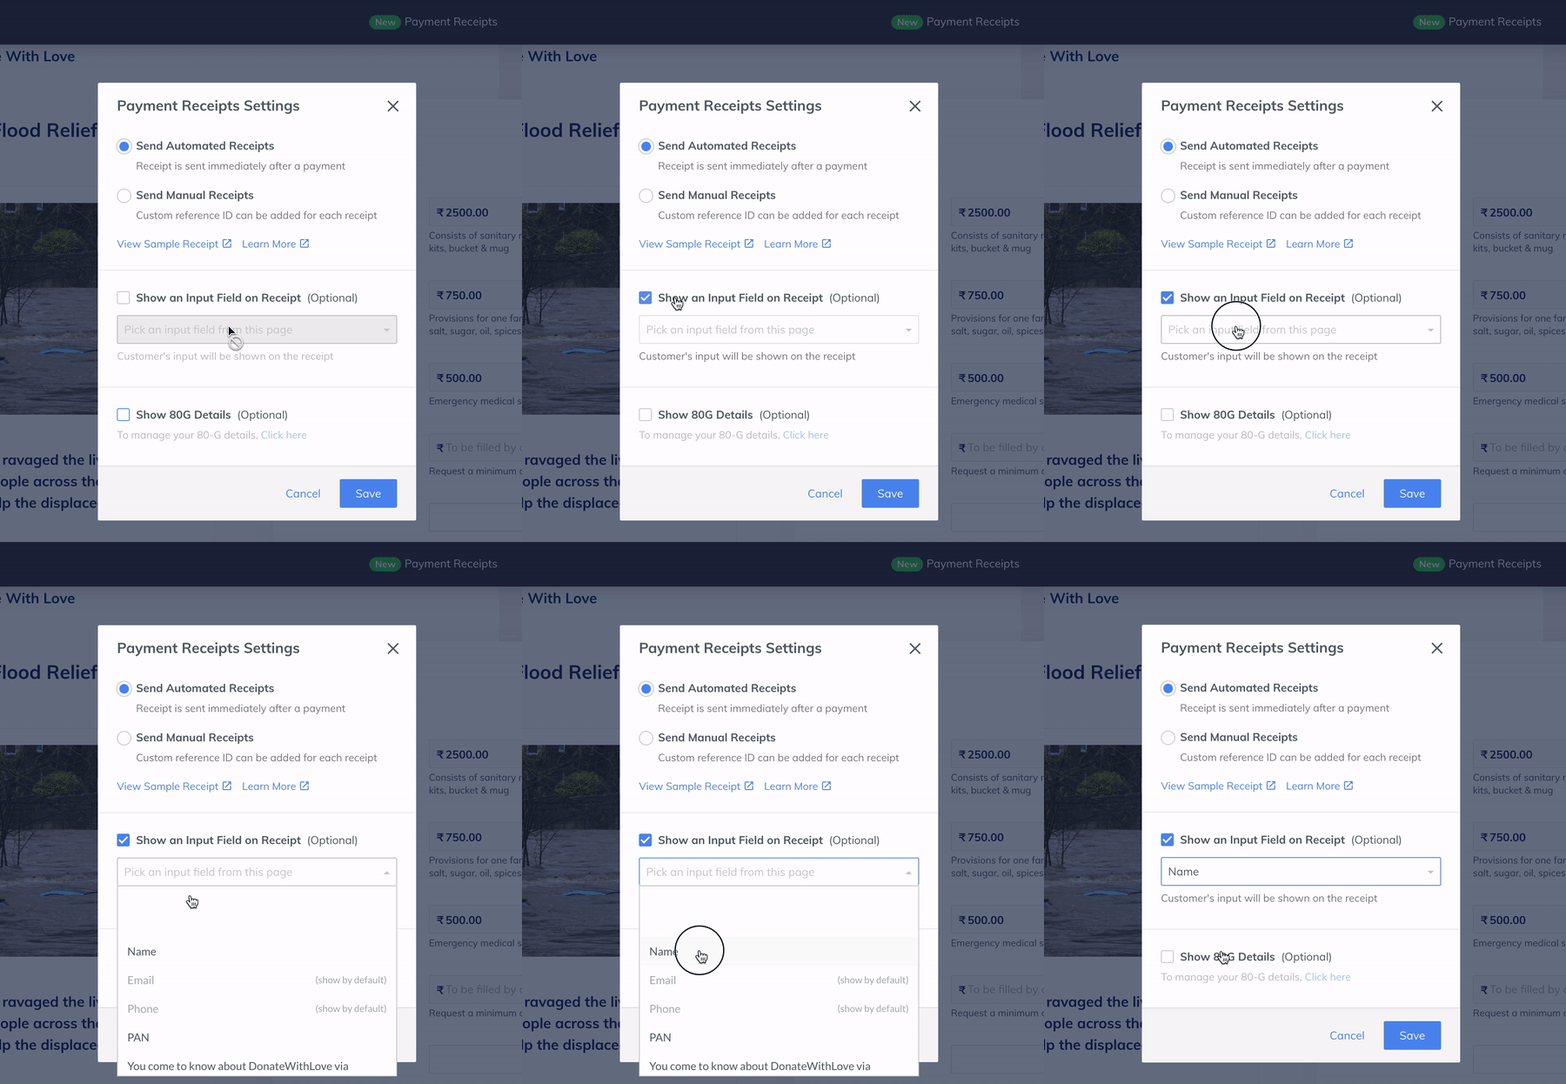
    2. On the **Payment Receipts Settings** pop-up page, select **Send Automated Receipts**.
    3. To show an input field such as `Name`, `Address` and its associated value on the receipt:
       1. Enable the **Show an Input Field on Receipt** option.
       2. In the drop-down list, select one of the custom input fields such as `Name`, `Address` or `Landmark`, used on the Payment Page. For example, if you selected `Name`, the patron's name `Gaurav Kumar` will appear on the payment receipt.<br />
    <img src="https://razorpay.com/docs/build/browser/assets/images/payment-pages-receipt-pp-receipt-80g-setting.gif" alt="Send automated receipts from 80G-enabled Payment Pages" width="400" />

    <br />

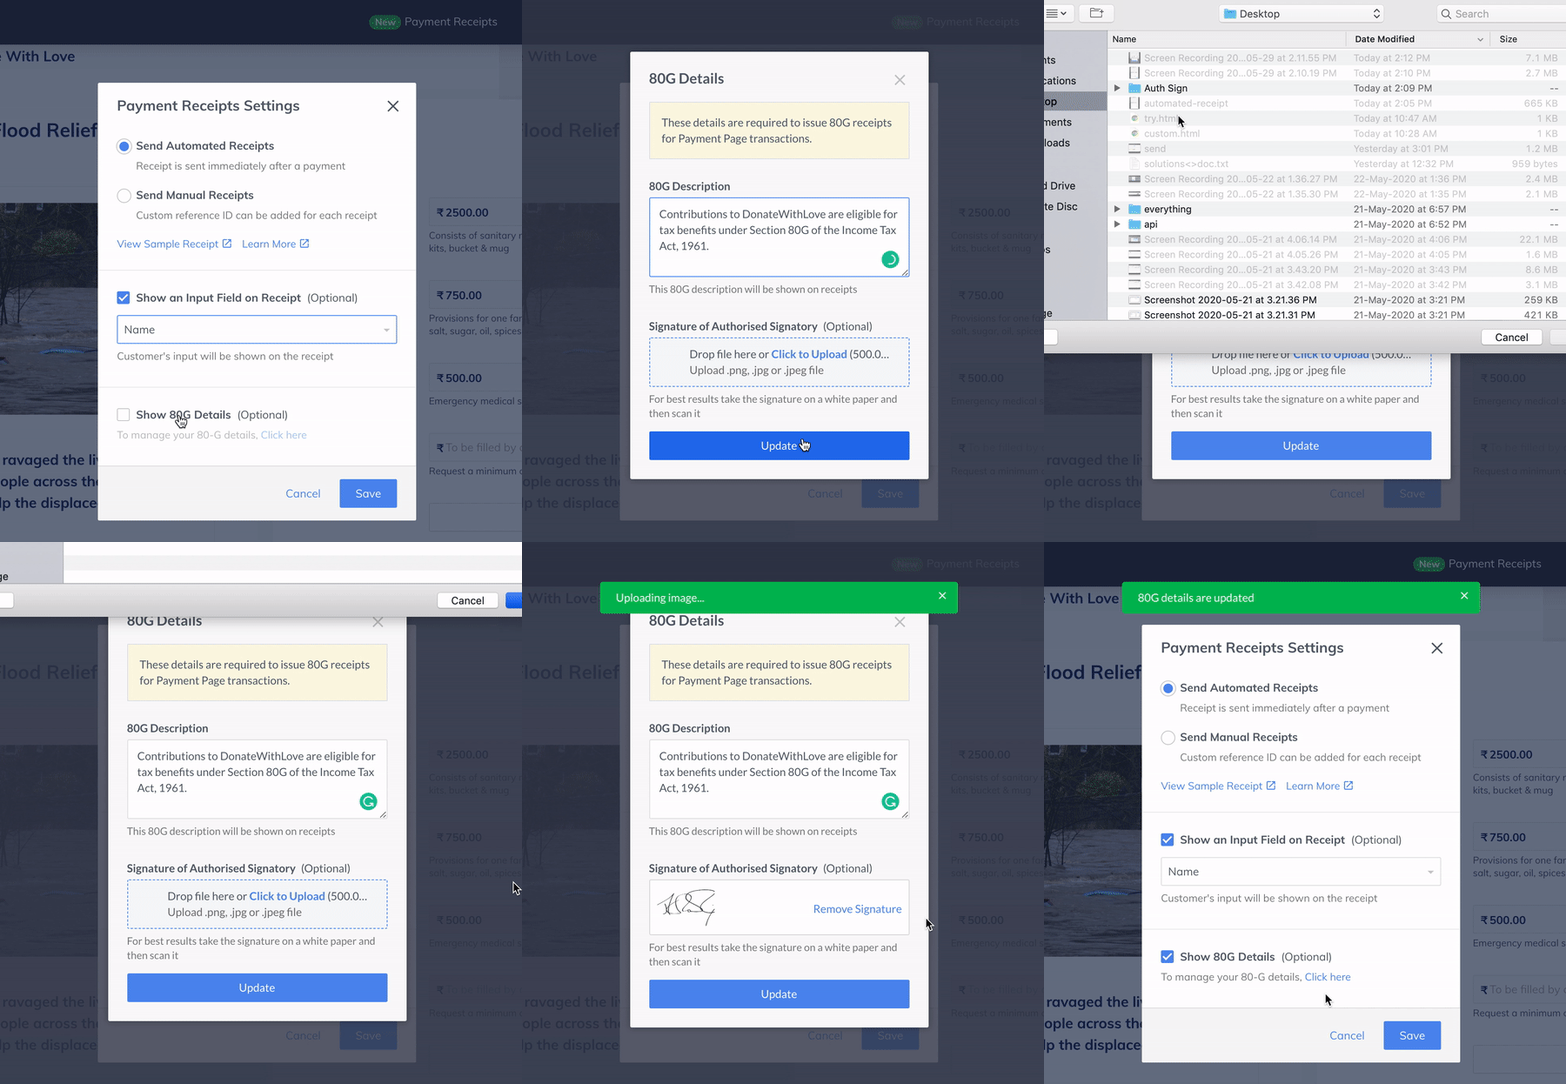
    4. To issue receipts with 80G details, enable the **Show 80G Details** option.
    5. Use the **Click here** link to add relevant 80-G text to be displayed in the payment receipt. This opens the **Manage 80-G** pop-up page where you can add a description and upload the signature of the authorised signatory.
       1. Enter the description. For example:<br />
          `Donation eligible for exemption under 80-G under IT Act 1861 .. with ID DIT(E)/2009-2010/W-110/15XX dated 24.09.2009`
       2. Upload an image of the **Signature of Authorized Signatory** field and click **Save**.<br />

    <img src="https://razorpay.com/docs/build/browser/assets/images/payment-pages-receipt-pp-receipt-80g-sign.gif" alt="Resend payment receipt from Razorpay Dashboard" width="400" />

    6. Click **Save**.
  </Tab>

  <Tab title="Manual Receipt">
    You can also manually add a reference number to the receipt and share it with your customers.

    To configure manual Payment Page receipt:

    1. On the Payment Page creation page, select **Payment Receipts** from the top menu ribbon.
           <img src="https://razorpay.com/docs/build/browser/assets/images/payment-pages-receipt-pp-receipt.jpg" alt="Edit an 80G-enabled Payment Page" />
    2. On the **Payment Receipts Settings** pop-up page, select **Send Manual Receipts**.
    3. To show an input field such as `Name`, `Address` and its associated value on the receipt:
       1. Enable the **Show an Input Field on Receipt** feature.
       2. In the drop-down list, select one of the custom input fields such as `Name`, `Address` or `Landmark`, used on the Payment Page. For example, if you select `Name`, the patron's name `Gaurav Kumar` will appear on the payment receipt.<br />
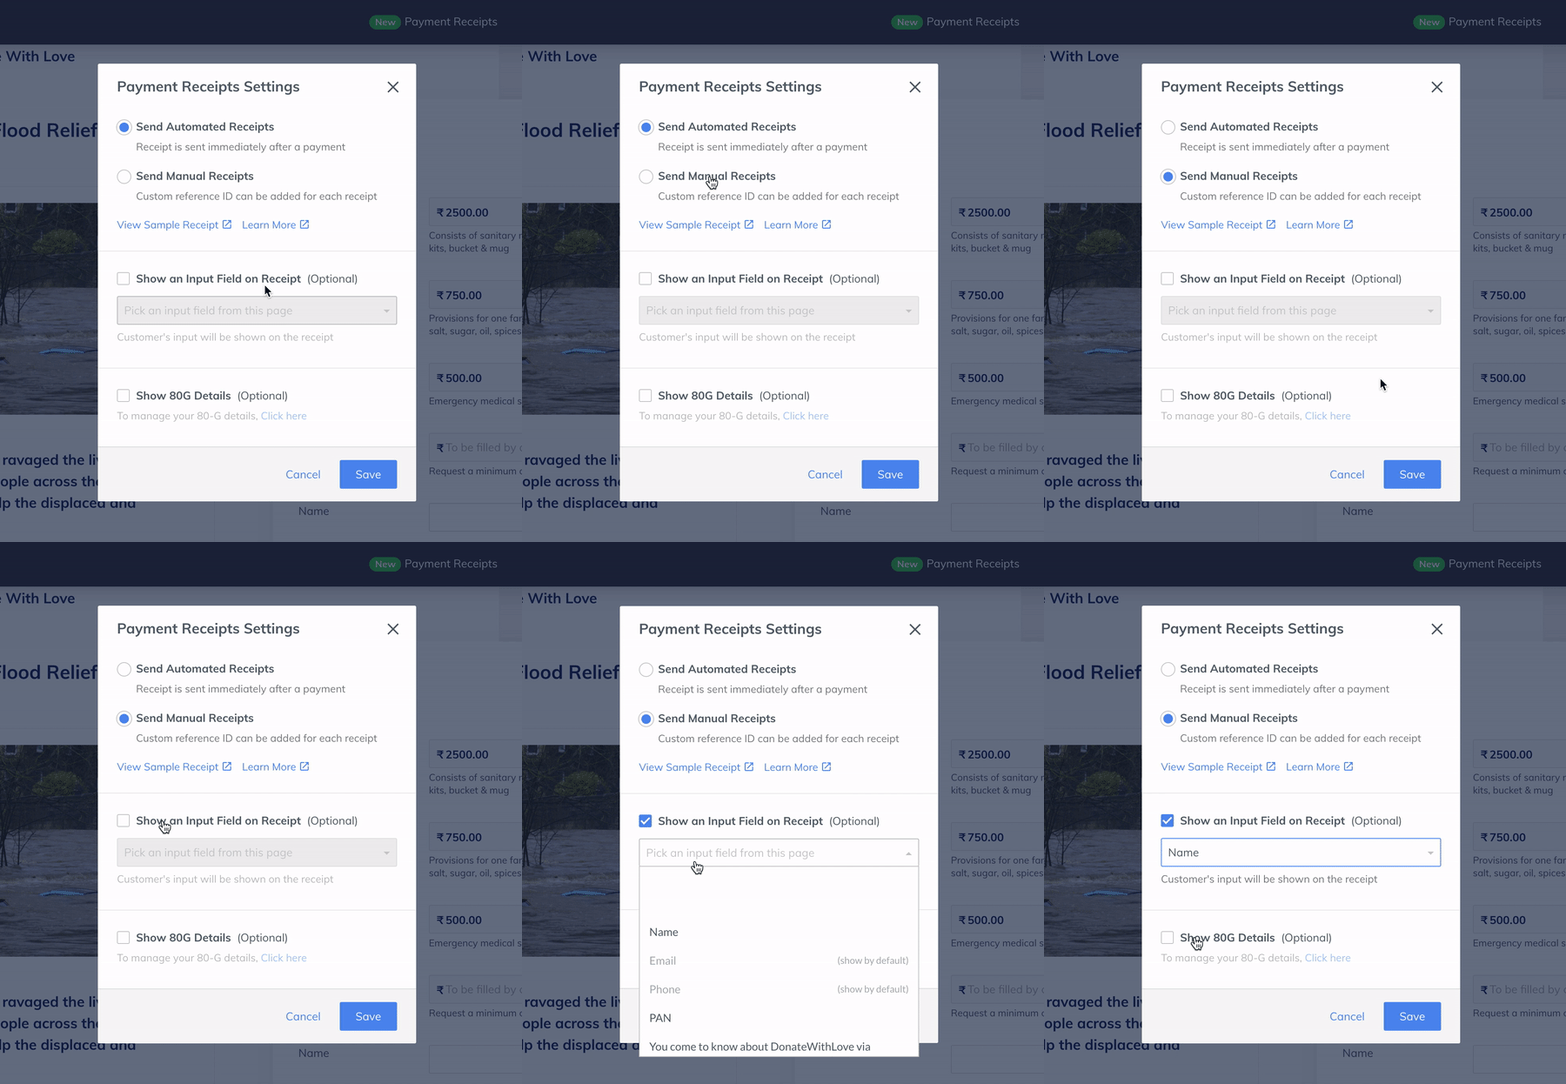
    <img src="https://razorpay.com/docs/build/browser/assets/images/payment-pages-receipt-80g-manual-pp-receipt.gif" alt="Send manual receipts from 80G-enabled Payment Pages" width="400" />

    <br />

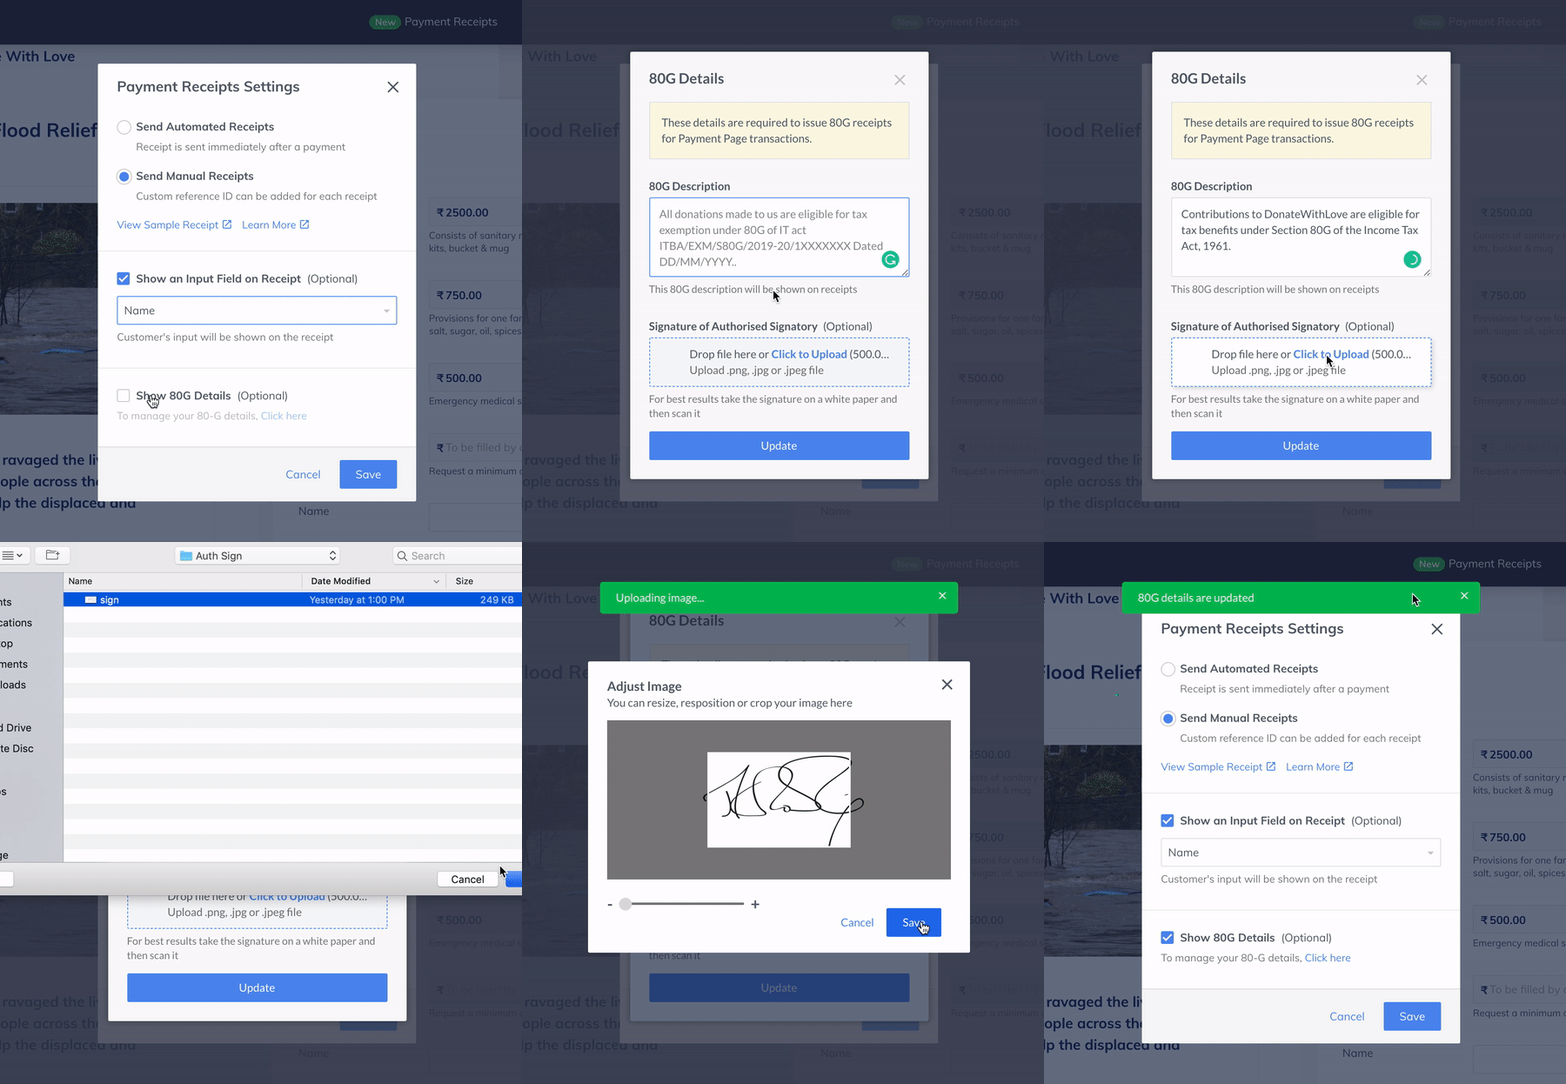
    4. To issue receipts with 80G details, enable the **Issue 80G Receipts** option.
    5. Use the **Click here** link to add relevant 80-G text to be displayed in the payment receipt. This opens the **Manage 80G** pop-up page where you can add a description and upload the signature of the authorised signatory.
       1. Enter the description. For example:<br />
          `Donation eligible for exemption under 80G under IT Act 1861 .. with ID DIT(E)/2009-2010/W-110/15XX dated 24.09.2009`
       2. Upload an image of the signature in the **Signature of the Authorised Signatory** field and click **Save**.<br />

    <img src="https://razorpay.com/docs/build/browser/assets/images/payment-pages-receipt-80g-manual-pp-receipt-sign.gif" alt="Add 80G description and signature of the authorised signatory to send manual receipts" width="400" />

    <br />

    6. Click **Save**.
    7. Navigate to the page's **Transactions Details** page. All the payments made using the Payment Page are listed here.
           <img src="https://razorpay.com/docs/build/browser/assets/images/payment-pages-receipt-pp-transactions-send.jpg" alt="Transaction details of payments made using 80G-enabled Payment Pages" />
           <br />
    8. Click the Payment id to view the payment details.
    9. In the **Payment Receipt** field, click the **Send** button.
    10. Enter a reference number for the receipt as per your business requirements.
            <img src="https://razorpay.com/docs/build/browser/assets/images/payment-pages-receipt-pp-manual-ref.jpg" width="300" alt="Add a reference number for an 80G payment receipt" />
            <br />
    11. Click **Send**.

    You can also download the payment receipt using the **Download** button.
  </Tab>
</Tabs>

<AccordionGroup>
  <Accordion title="Resend and Download Payment Receipt">
    To resend the receipt to a customer:

    1. Navigate to the page's **Transactions Details** screen. All the payments made using the Payment Page are listed here.
    2. Click on the Payment id to view the payment details.
    3. In the **Payment Receipt** field, click the **Send** button. This will resend the receipt to the customer.

    <video width="650" controls>
      <source src="https://razorpay.com/docs/build/browser/assets/images/payment-pages-invoice.mp4" type="video/mp4" />

      download payment receipt
    </video>

    You can download the payment receipt using the **Download** button.
  </Accordion>
</AccordionGroup>

<AccordionGroup>
  <Accordion title="Email Notification to Customers">
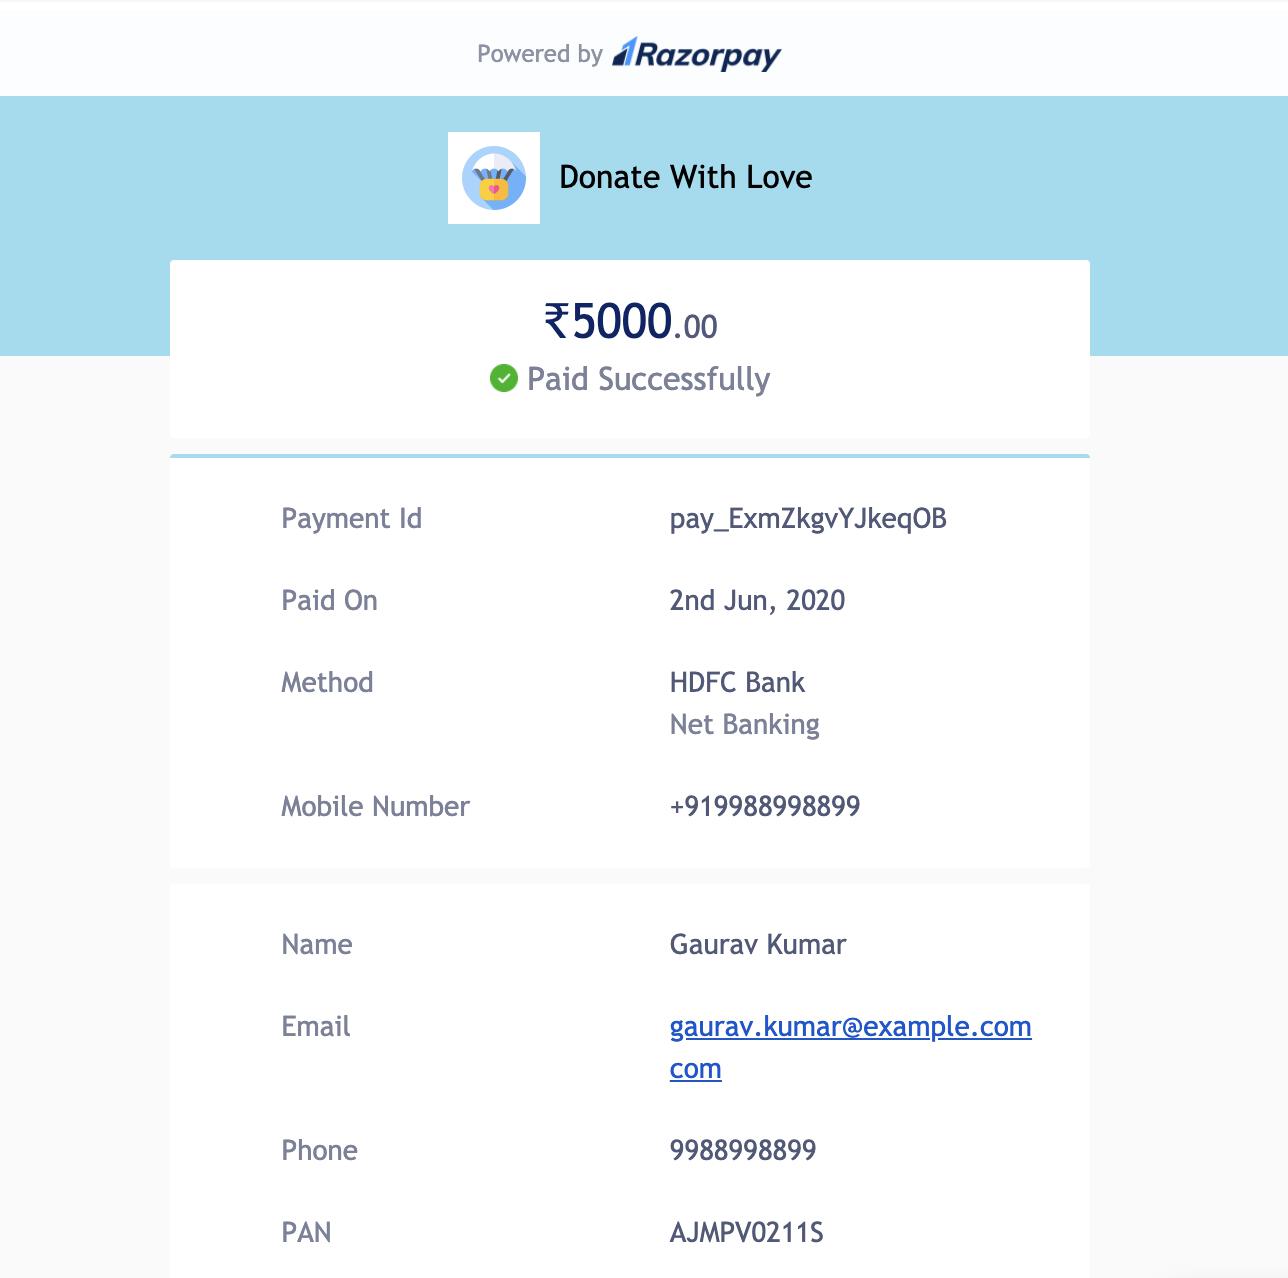
    After your customers complete the payment using the Payment Page, the payment receipt is sent to them via email as a PDF attachment. The details entered by the customer on the Payment Page appear on the email body as shown below:

    <img src="https://razorpay.com/docs/build/browser/assets/images/payment-pages-receipt-email.jpg" alt="80G Payment receipt sent via email notification to a customer" width="600" />

    <br />
  </Accordion>
</AccordionGroup>

<AccordionGroup>
  <Accordion title="PDF Receipt to Customers">
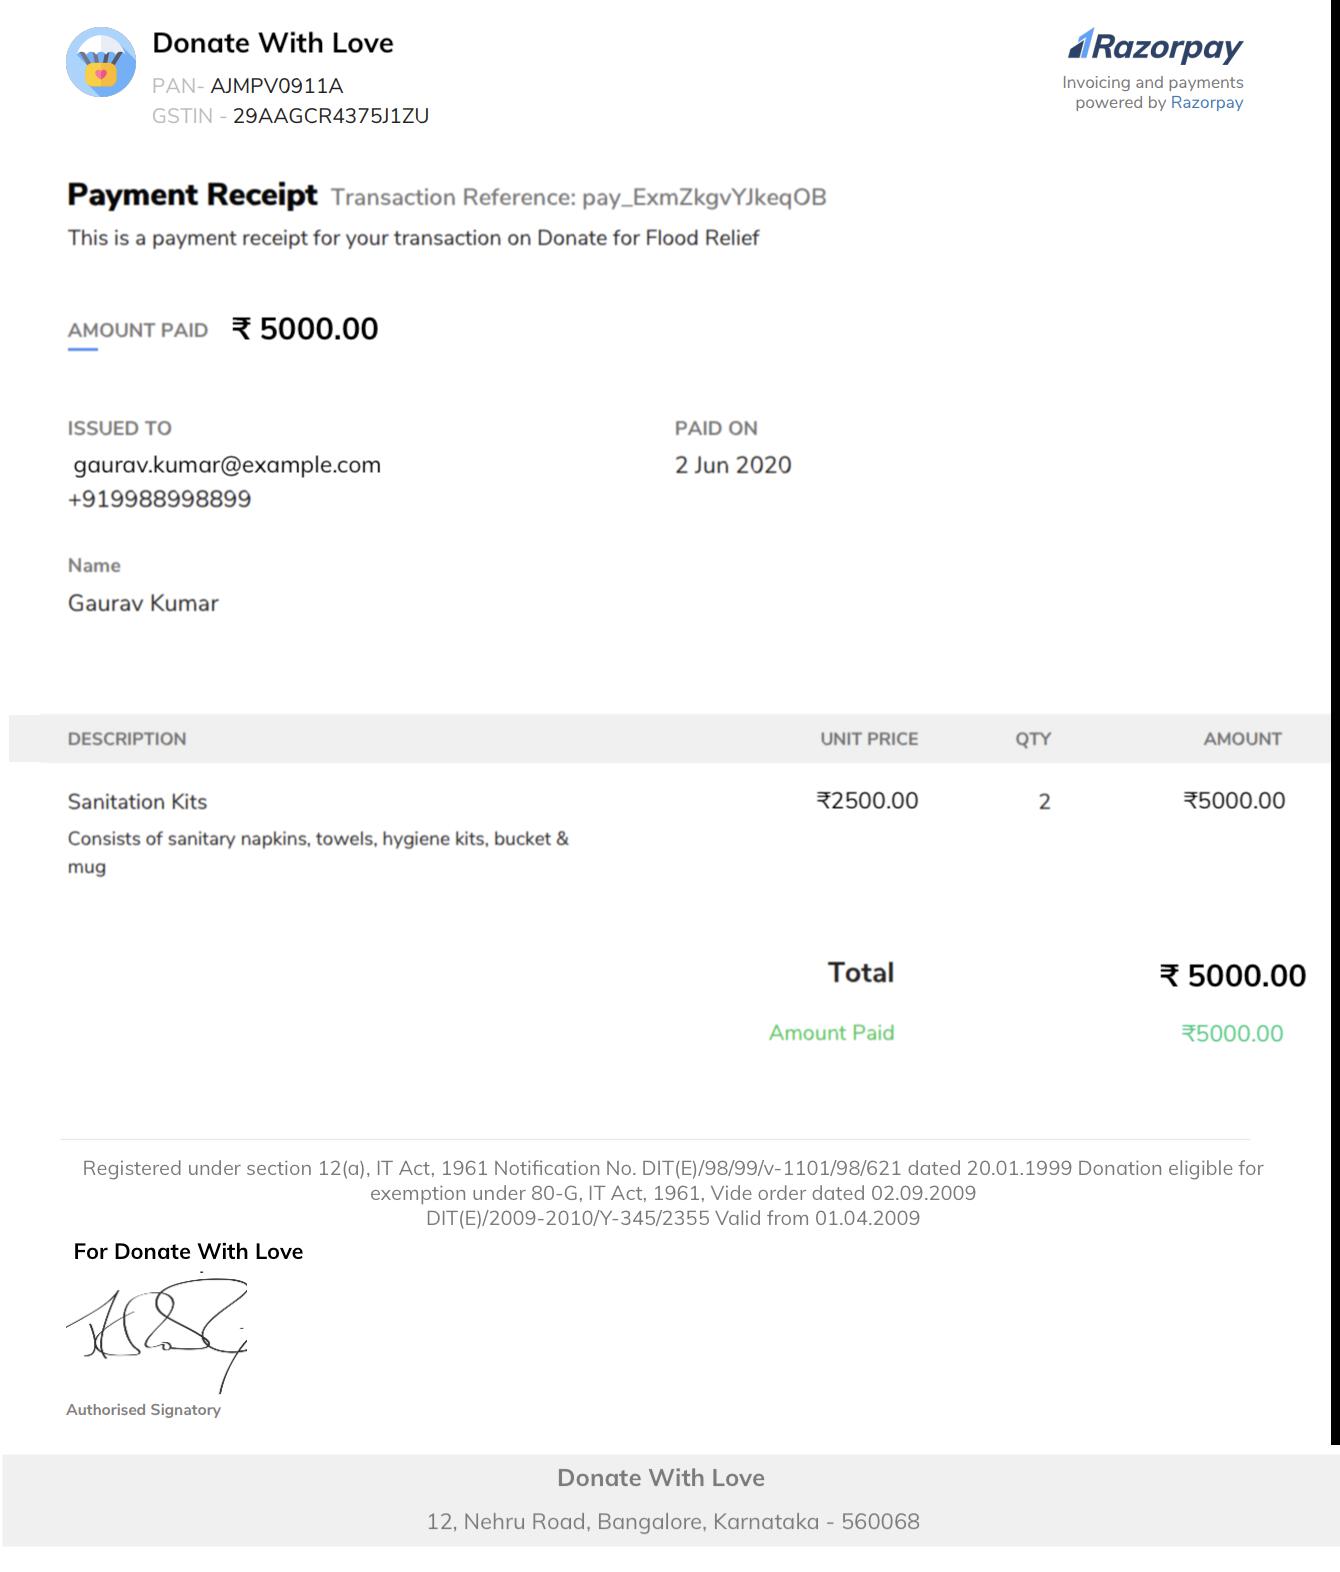
    Here is a sample PDF of the payment receipt.

    <img src="https://razorpay.com/docs/build/browser/assets/images/payment-pages-receipt-receipt-80g-example.jpg" alt="PDF of 80G payment receipt sent to a customer" width="400" />
  </Accordion>
</AccordionGroup>

### Related Information

[Configure Payment Pages Receipt](/docs/payments/payment-pages/receipt)