> ## Documentation Index
> Fetch the complete documentation index at: https://razorpay-881012b3.mintlify.site/llms.txt
> Use this file to discover all available pages before exploring further.
# Add Facebook Pixel
> Add your Facebook Pixel to your Payment Pages to track payments and conversions from your Facebook advertisements.
Available in
🇮🇳 India
🇸🇬 Singapore
🇺🇸 United States
You can add your Facebook Pixel to your Payment Pages Storefront to track payments and conversions from your Facebook advertisements.
**Available Tracking Metrics**
| Metrics | Description |
| ----------------- | -------------------------------------------------------------------------------------------- |
| Page Views | When a customer lands on your Payment Page. This is the default metric to track page visits. |
| Add to Cart | When a customer clicks on an add-to-cart button. |
| Initiate Checkout | When a customer clicks on a checkout button. |
| Purchase | When a customer finishes the purchase or checkout flow and lands post-payment success page. |
## Prerequisites
Create a Facebook Pixel.
## Add Facebook Pixel to Your Payment Page
To add Facebook Pixel to your Payment Page:
1. Navigate to your Payment Page in the edit mode.
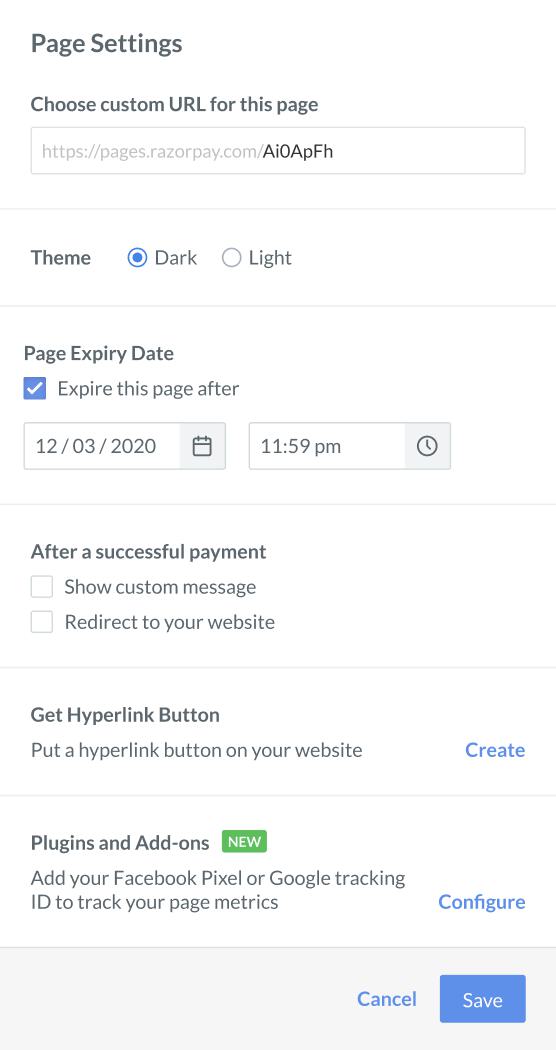
2. Click **Page Settings**.
3. Go to **Plugins and Add-ons** and click **Configure**.
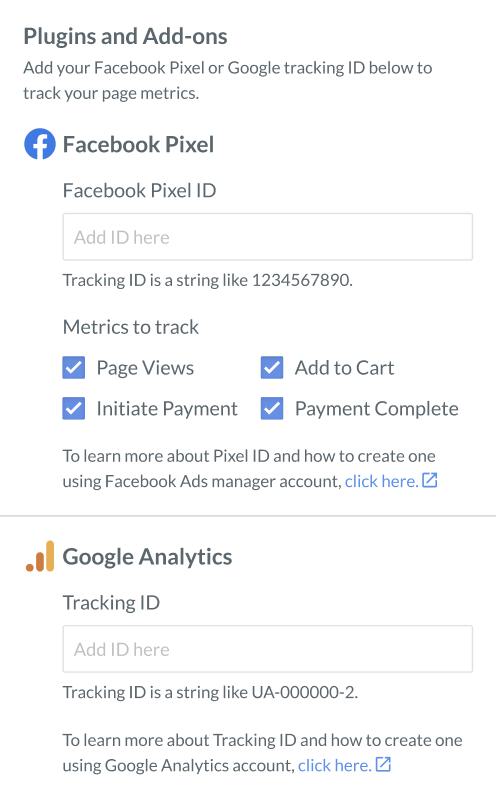
 4. Add the details:
1. **Facebook Pixel ID**: Enter the Facebook Pixel ID.
2. Select the metrics you want to track from the following:
* Page Views
* Initiate Payment
* Add to Cart
* Payment Complete
4. Add the details:
1. **Facebook Pixel ID**: Enter the Facebook Pixel ID.
2. Select the metrics you want to track from the following:
* Page Views
* Initiate Payment
* Add to Cart
* Payment Complete
 5. Click **Save**.
### Related Information
* [Add Facebook Pixel to your payment success page](/docs/payments/payment-pages/plugins-add-ons/fb-payment-success)
* [Add Google Analytics Tracking ID](/docs/payments/payment-pages/plugins-add-ons/google-analytics)
5. Click **Save**.
### Related Information
* [Add Facebook Pixel to your payment success page](/docs/payments/payment-pages/plugins-add-ons/fb-payment-success)
* [Add Google Analytics Tracking ID](/docs/payments/payment-pages/plugins-add-ons/google-analytics)