> ## Documentation Index
> Fetch the complete documentation index at: https://razorpay-881012b3.mintlify.site/llms.txt
> Use this file to discover all available pages before exploring further.
# Integrate Recurring Payments Using Emandate
> Know how to integrate Recurring Payments using Emandate as a payment method.
Available in🇮🇳 India
The Recurring Payment integration for Emandate payment method involves the following steps:
1. [Emandate Registration](#1-emandate-registration)
2. [Fetch Emandate Registration Details](#2-fetch-emandate-registration-details)
3. [Charge Customers](#3-charge-customers)
## Prerequisites
* Emandate is enabled by default. If it is not active on your account, contact [Razorpay Support](https://razorpay.com/support/).
* Use the [Fetch Methods API](/docs/payments/recurring-payments/emandate/supported-banks#fetch-supported-methods) to verify supported payment methods.
* Ensure the required banks from the [List of Supported Banks](/docs/payments/recurring-payments/emandate/supported-banks#emandate) are enabled for your account.
## 1. Emandate Registration
Emandate registration is a process of creating a payment checkout form for customers to make **Authorisation Transaction** and register their Emandate. A token will be generated once a customer makes this transaction.
Using this authorisation transaction, we can authenticate the customer's Emandate and ensure that we can charge them recurring payments.
### 1.1 Create Authentication Transaction
The authorisation transaction can be created using:
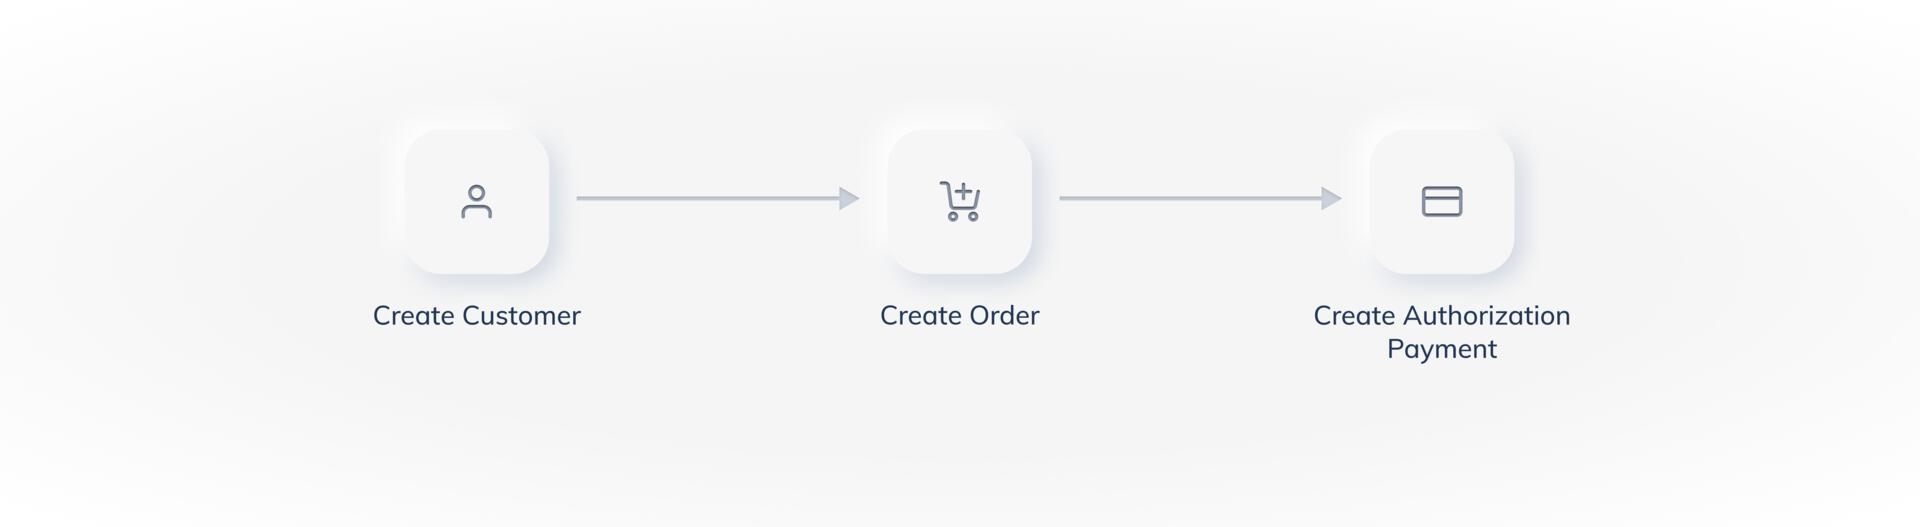
Following is the authorisation transaction flow for Razorpay Standard Checkout method.
To create checkout form for customers to complete authorisation transaction using the Razorpay Standard Checkout method:
**Watch Out!**
The authorisation transaction using Standard Checkout can be created only using Razorpay APIs.
1. [**Create a customer**](/docs/api/payments/recurring-payments/emandate/create-authorization-transaction#1-1-1-create-a-customer) This returns a `customer_id`.
2. [**Create an order**](/docs/api/payments/recurring-payments/emandate/create-authorization-transaction#1-1-2-create-an-order) This returns an `order_id`. The order must be created for:
3. [**Create authorisation transaction**](/docs/api/payments/recurring-payments/emandate/create-authorization-transaction#113-create-an-authorization-payment) Pass the `customer_id`, `order_id` and a few additional parameters in your checkout to create the authorisation payment. The customer completes the authorisation payment, which generates a `token`.
Watch the below video to learn how to integrate recurring payments via the Standard Checkout method.
Registration Links are securely generated web addresses that allow your customers to complete the authorisation transaction. Registration links can be sent via SMS or email.
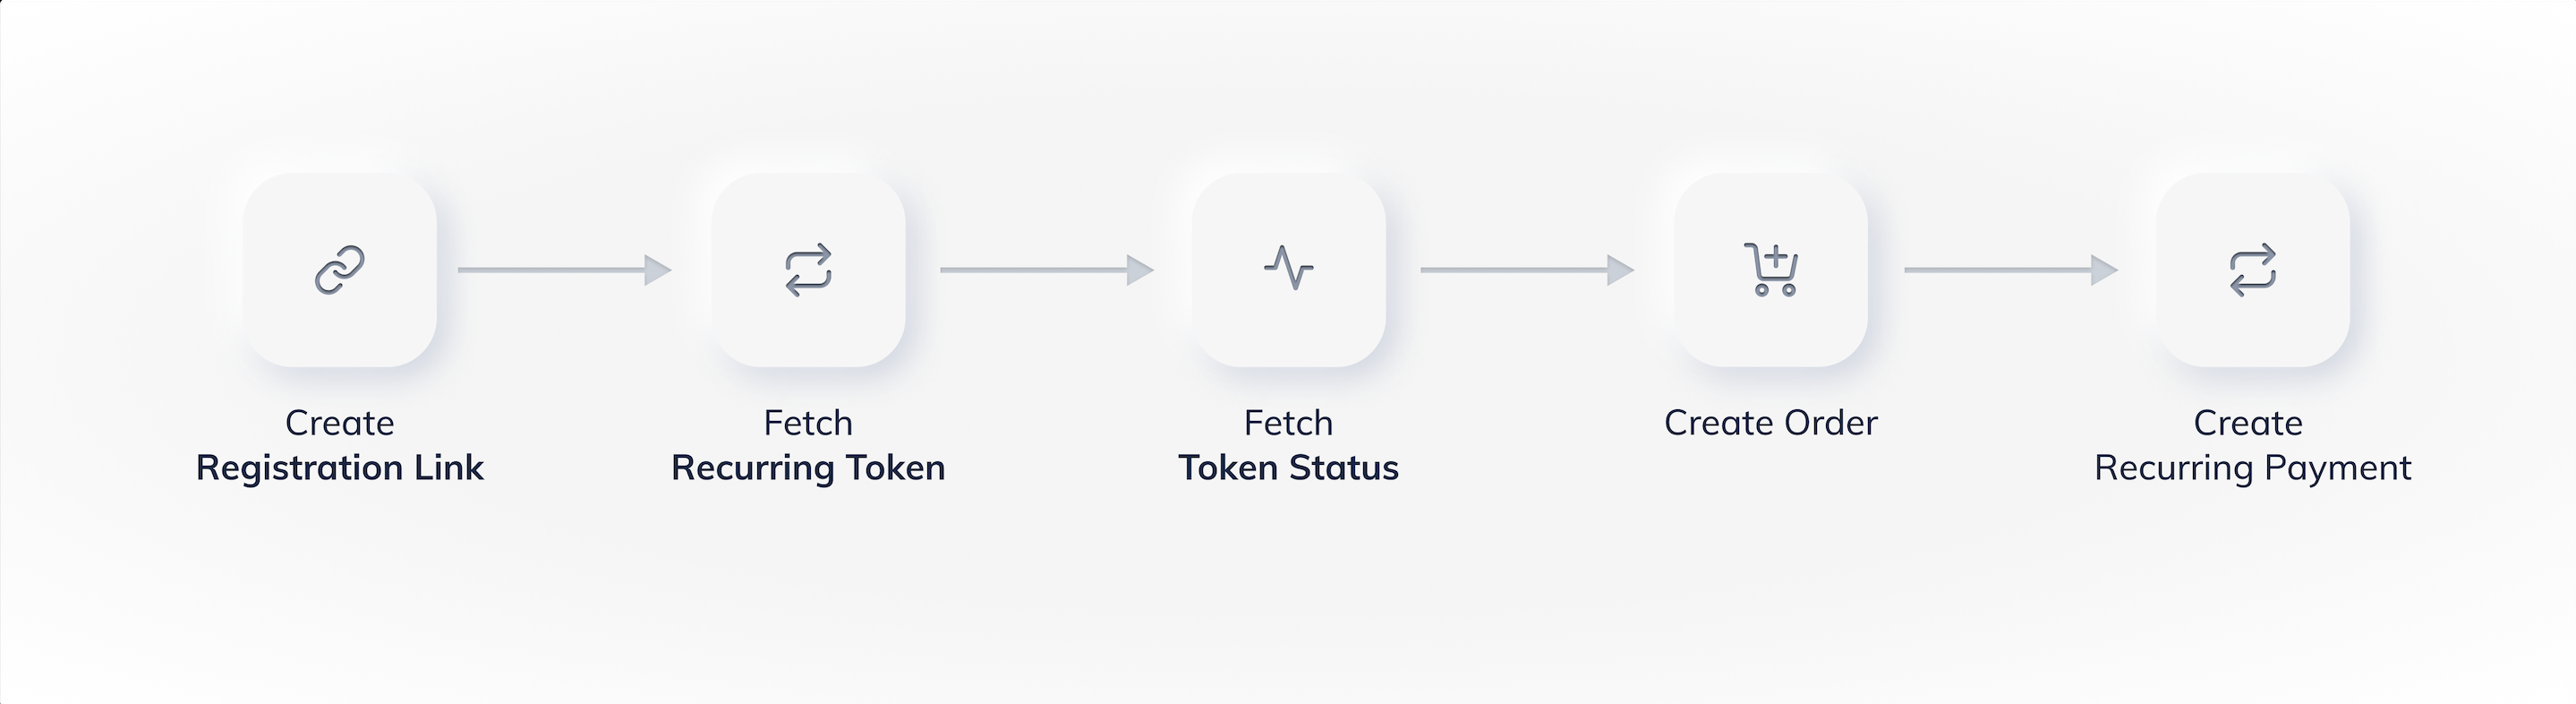
Following is the authorisation transaction flow for Razorpay registration link method:
For customers to complete the authorisation transaction via a registration link, you should **create a registration link and send it to your customer**
You can create a Registration Link using:
* [APIs](/docs/api/payments/recurring-payments/emandate/create-authorization-transaction#1-2-1-create-a-registration-link)
* [Dashboard](/docs/payments/recurring-payments/create#1-create-a-registration-link)
The customer completes the authorisation payment, which generates a `token`.
**No Need to Create a Customer and Order Separately**
If you use a registration link to create the authorisation transaction, Razorpay automatically creates a customer and the order for you.
Watch the below video to learn how to integrate recurring payments via the registration link method using Dashboard.
Watch the below video to learn how to integrate recurring payments via the registration link method using APIs.
A registration link moves through the following states during its life cycle:
| Status | Description | Webhook |
| --------- | ----------------------------------------------------------------------------------------------------------------------------------------- | --------------------------------------------------------------------------------- |
| Issued | A registration Link is created and sent to the customer. | NA |
| Paid | Payment is made for the issued registration Link. Once the registration Link is paid, search for Token corresponding to the payment. | [invoice.paid](/docs/api/payments/recurring-payments/webhooks#invoice-paid) |
| Cancelled | The registration link has been canceled. In such cases, you need to create a registration link again. | NA |
| Expired | The registration link has expired. You can set an expiry timestamp at the time of creation. | [invoice.expired](/docs/api/payments/recurring-payments/webhooks#invoice-expired) |
### 1.2 Complete Authentication
When setting up an Emandate, customers can authenticate the registration using one of three methods depending on their preferences.
* **Aadhaar-based authentication** (recommended): Provides real-time registration and instant confirmation.
* **Netbanking authentication**: Redirects customers to their bank's internet banking portal for credential-based verification.
* **Debit card authentication**: Allows customers to verify using their card details and OTP.
Given below are the detailed steps for each authentication method:
**Handy Tips**
Razorpay's real-time Aadhaar Emandate registration solution eliminates the traditional 2-4 day manual approval process, delivering instant registration confirmation in minutes.
By streamlining the authentication flow, Razorpay reduces failed first debits and customer drop-off, providing immediate status visibility to both businesses and customers.
Given below is the authentication process via Aadhaar:
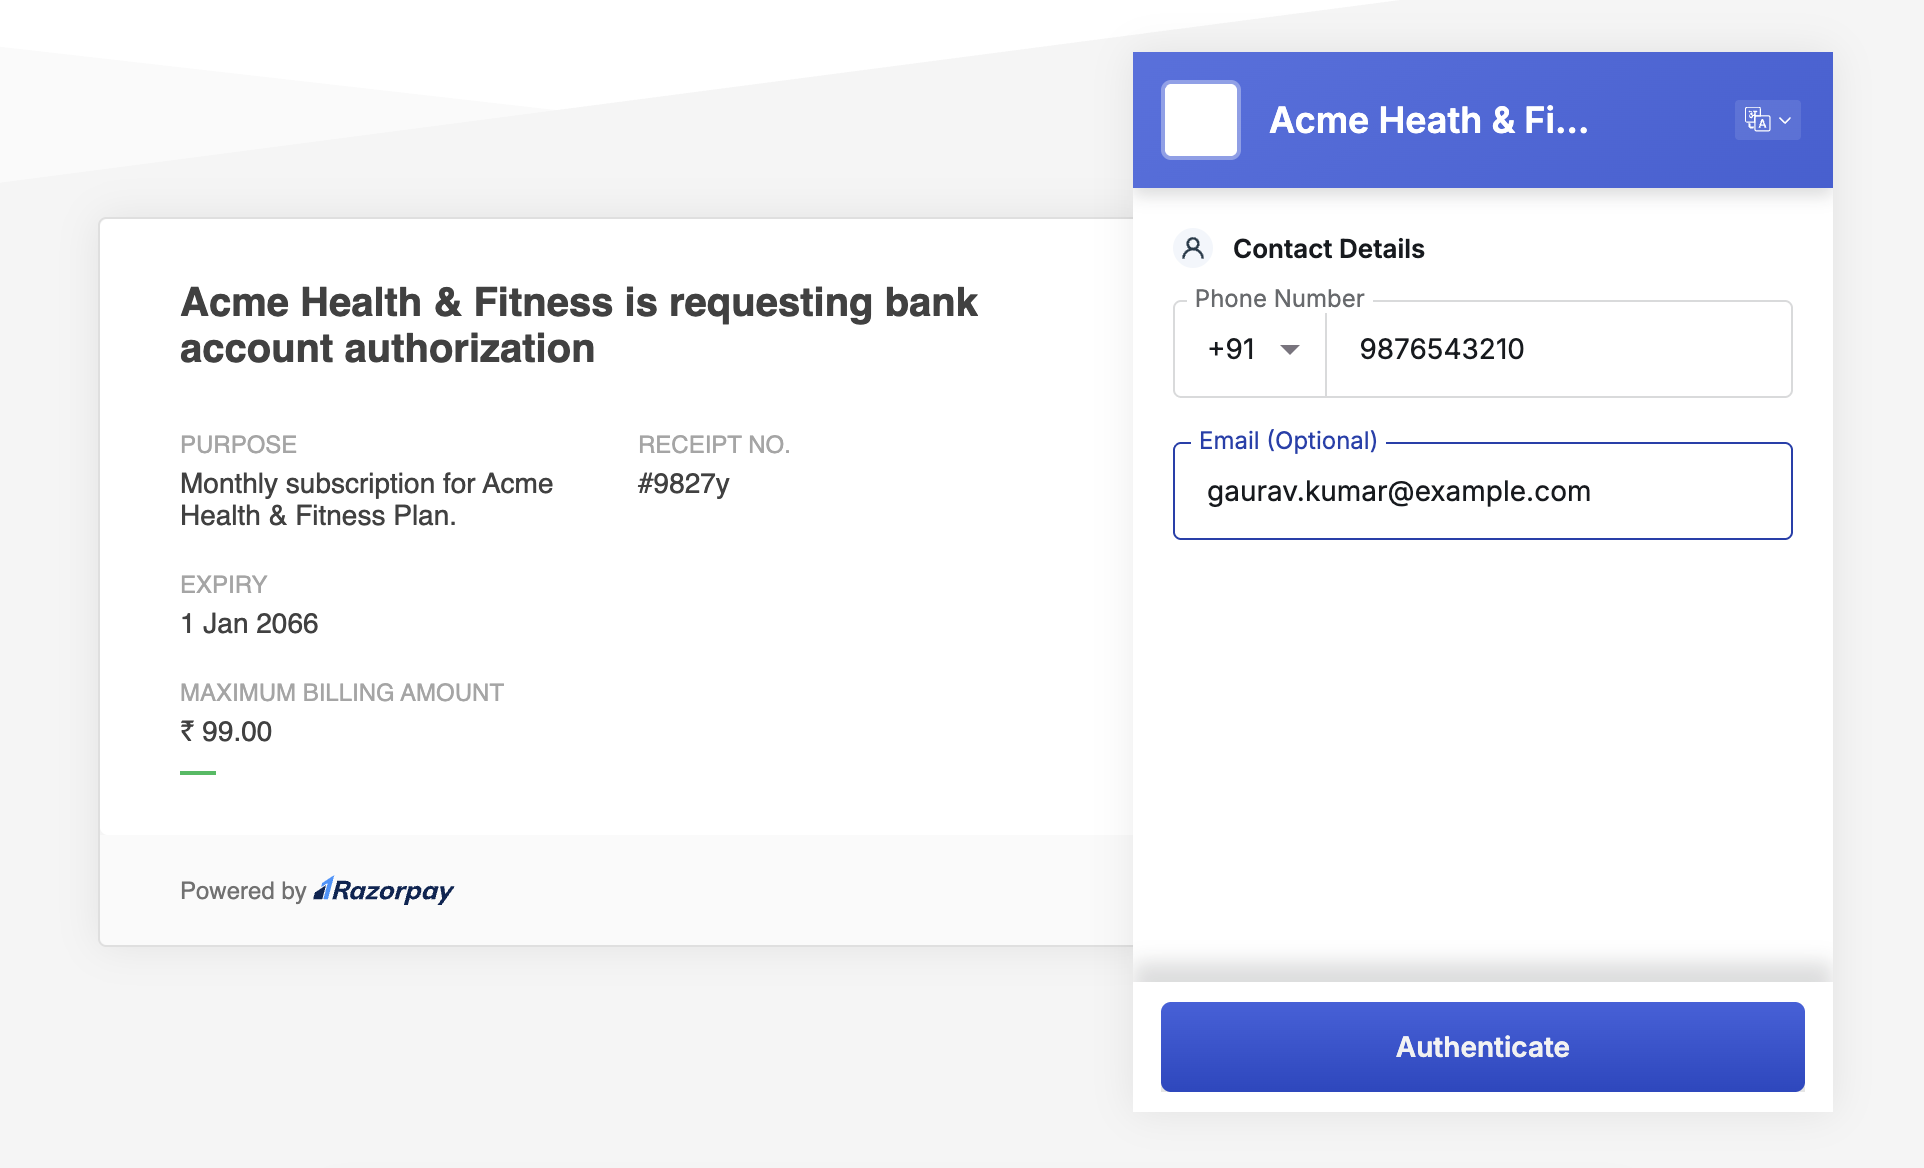
1. The customer visits the registration link shared by you. This opens the invoice and displays the checkout. They enter their phone number and email and click **Authenticate**.
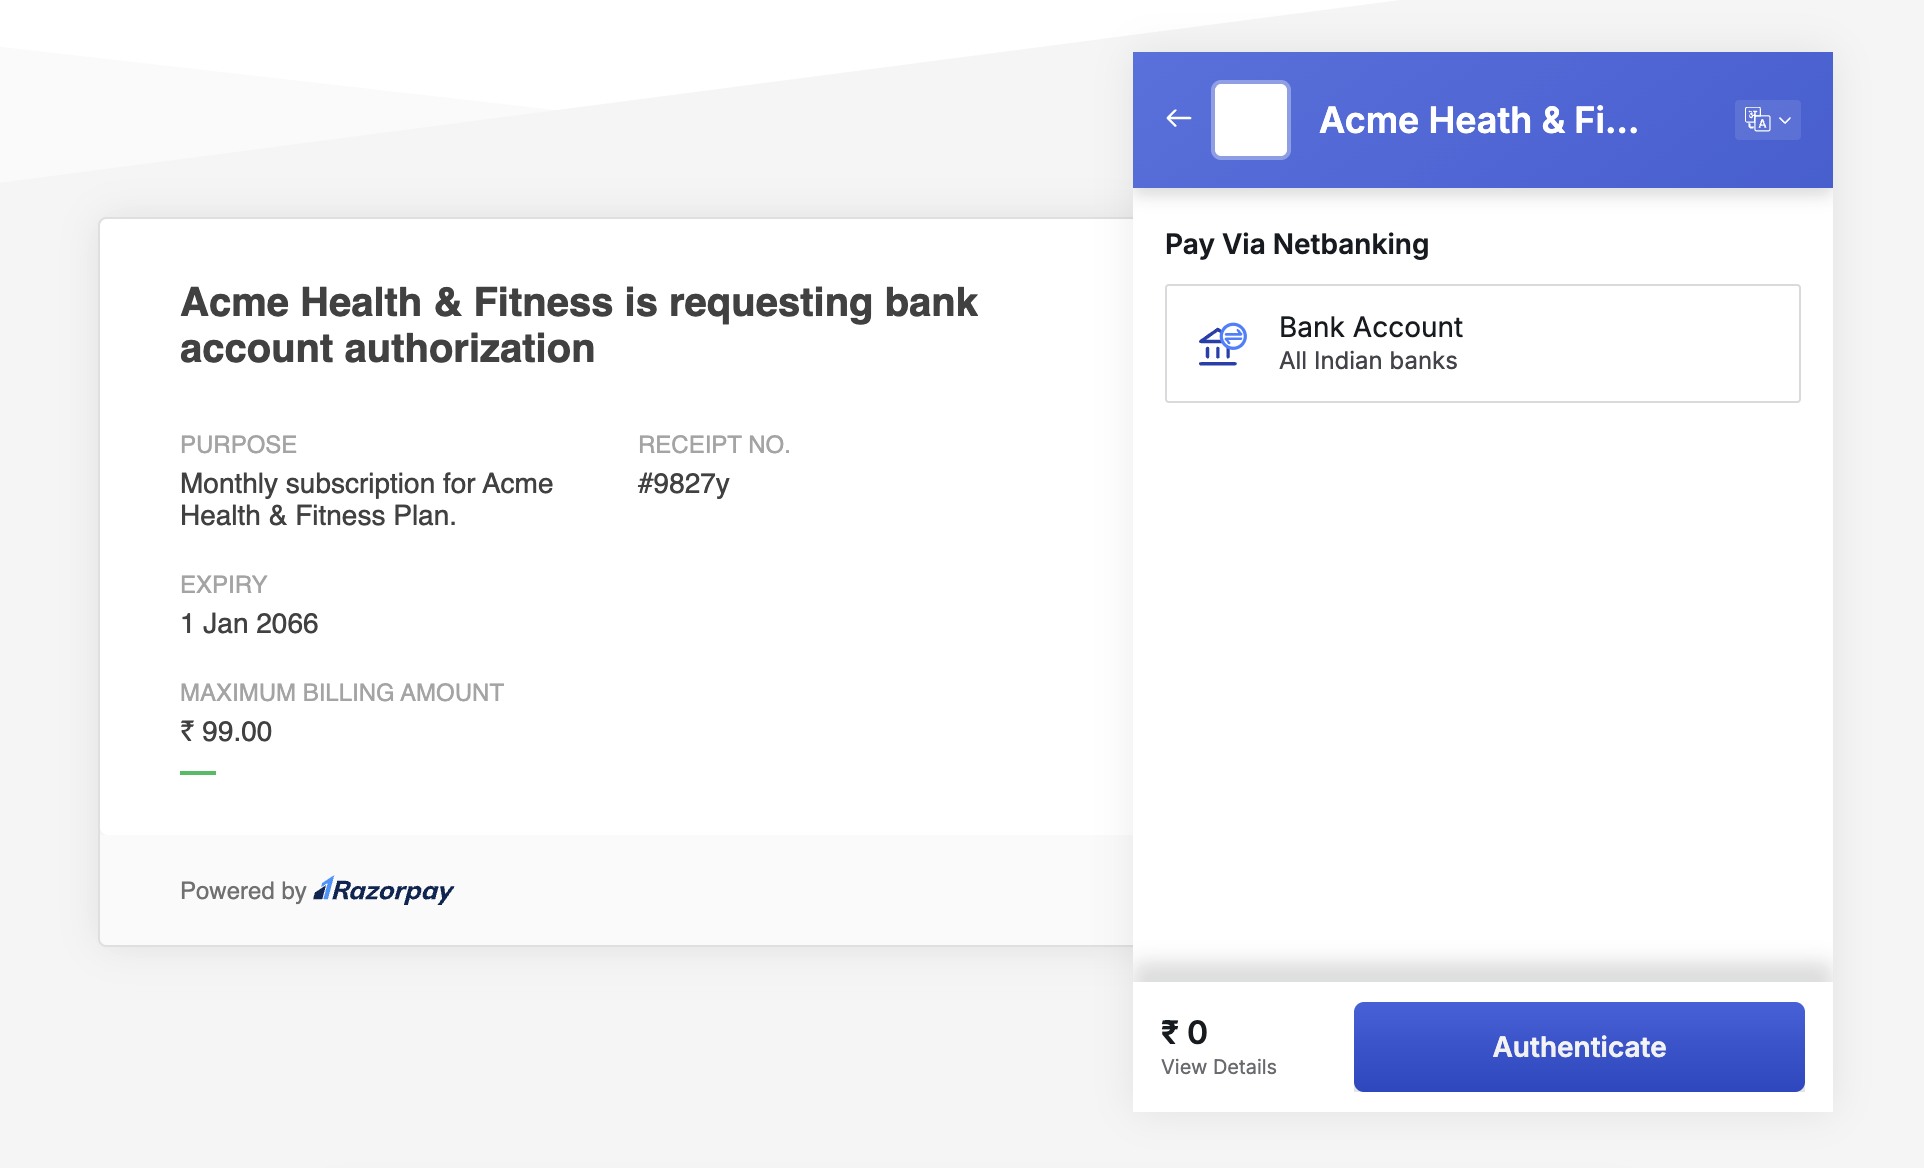
2. They select the **Pay via Netbanking - Bank Account** payment method and proceed.
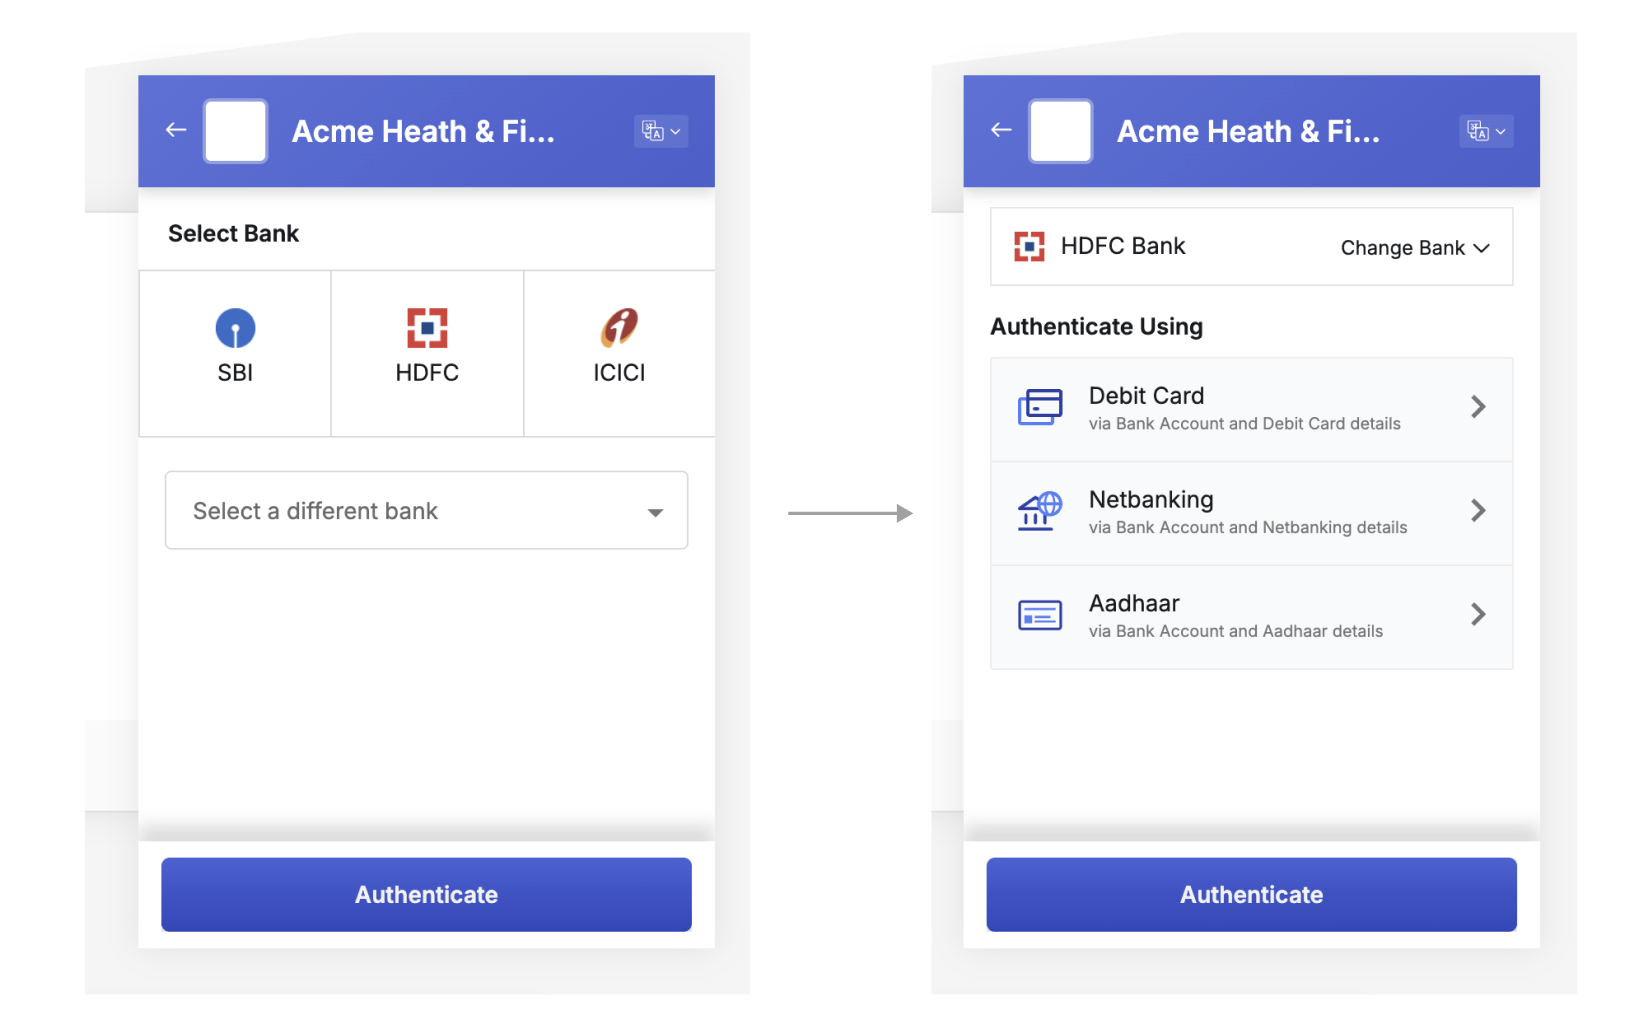
3. They select their preferred bank and the authentication mechanism. In this case, it is Aadhaar.
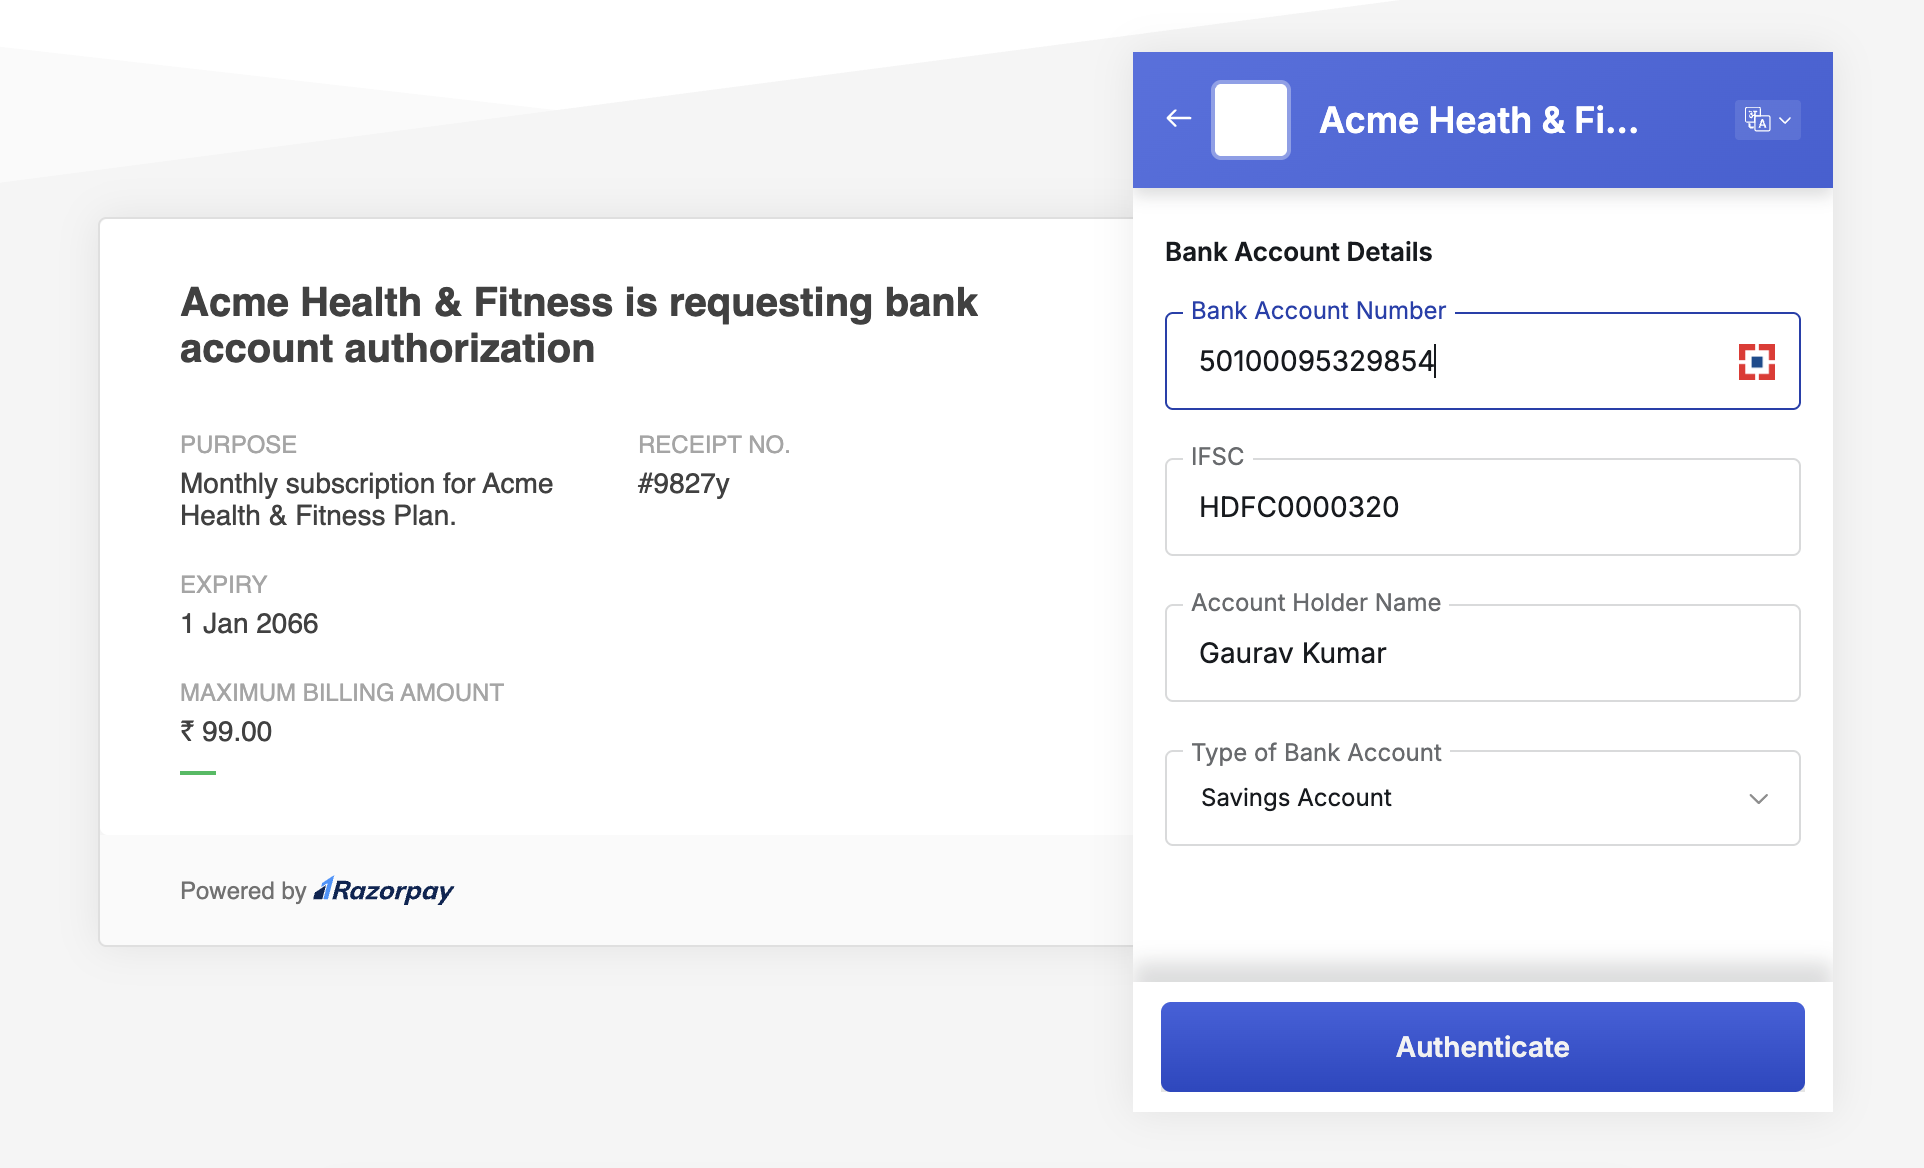
4. They enter their bank details such as account number, account type, IFSC and account holder name.
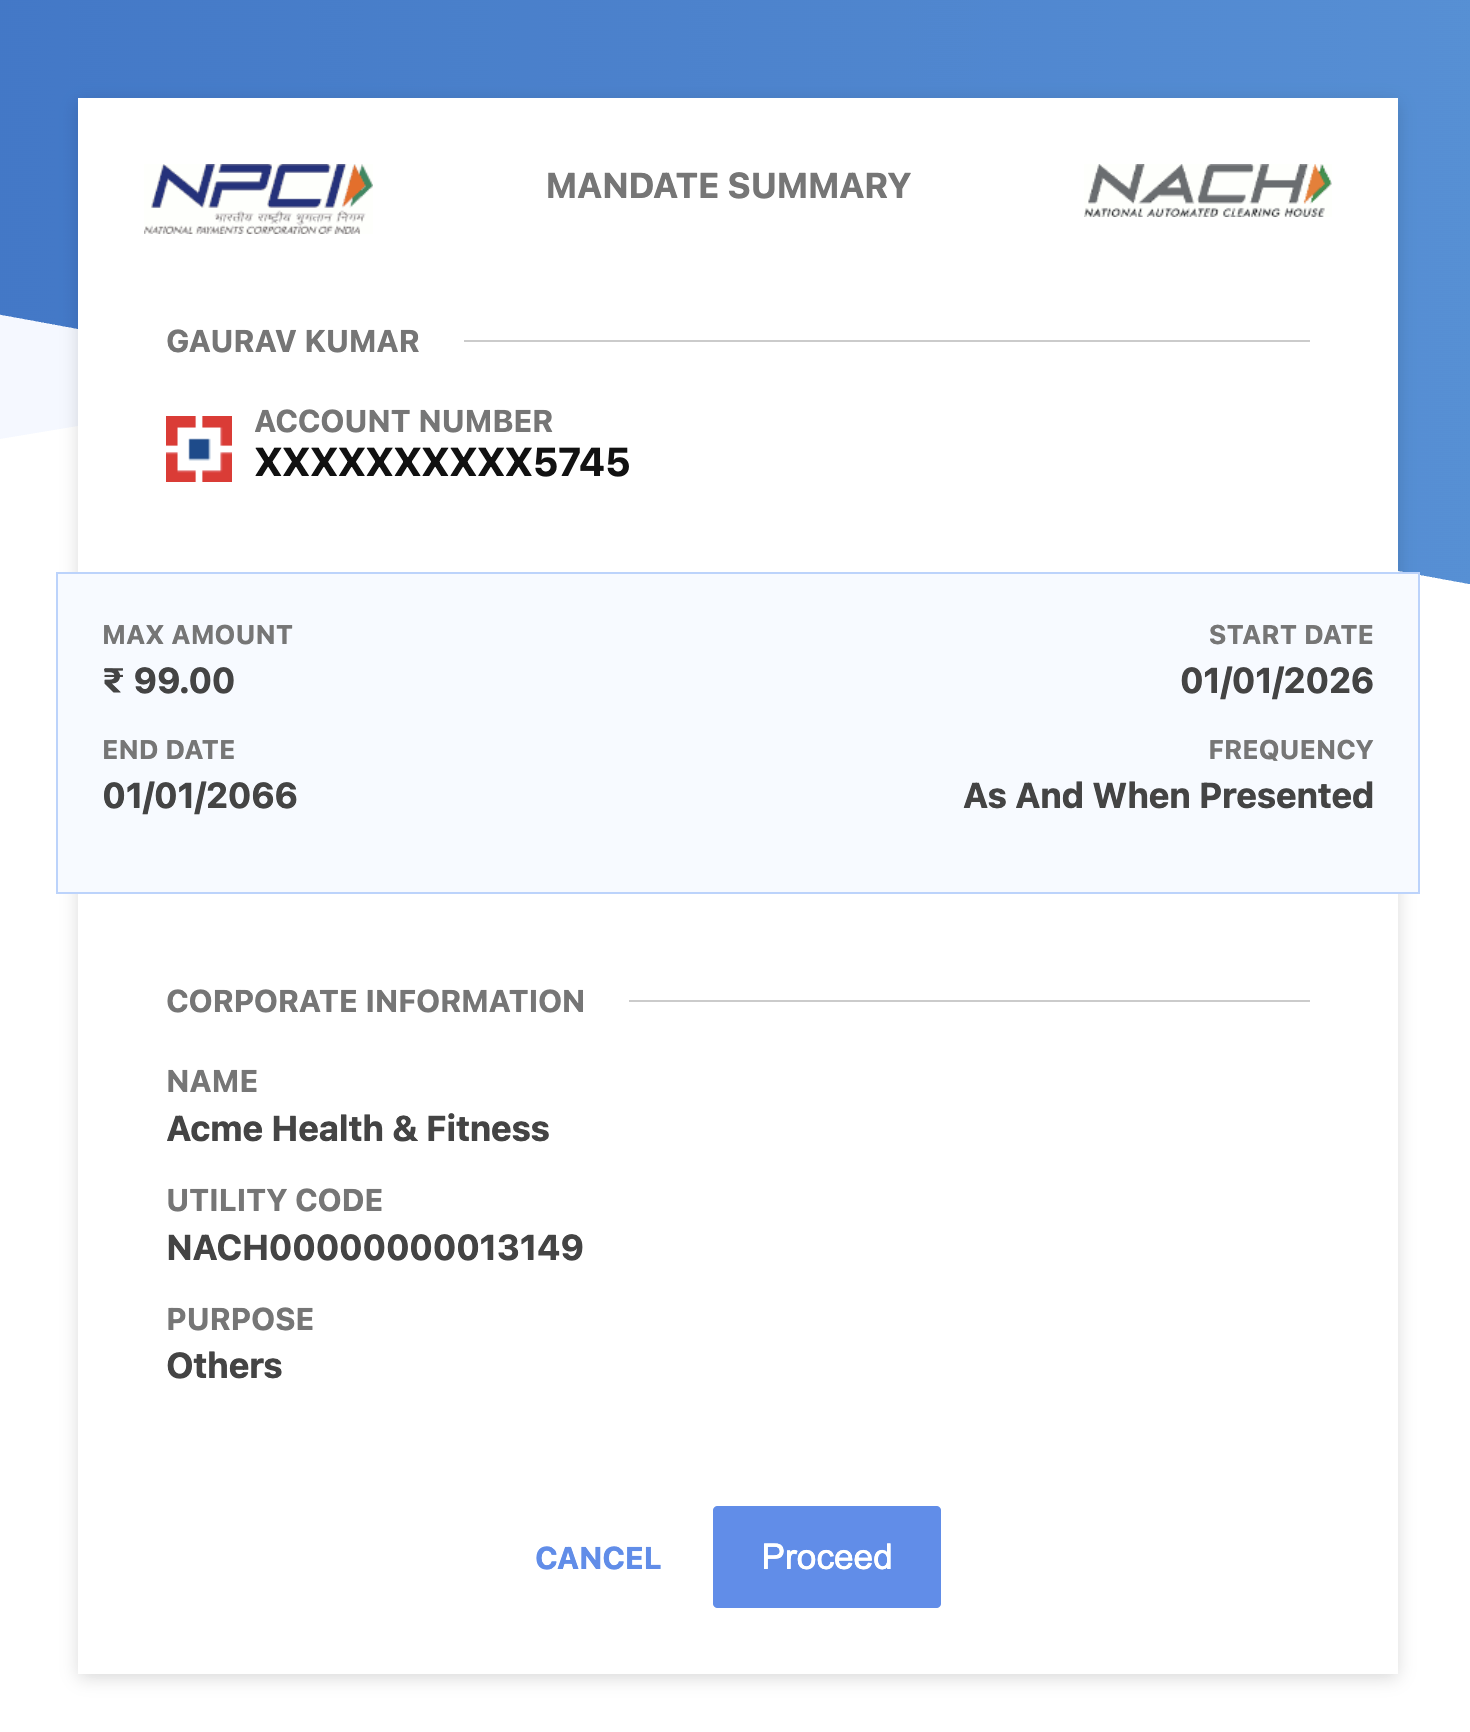
5. The mandate summary page opens where customer then reviews the details and clicks **Proceed**.
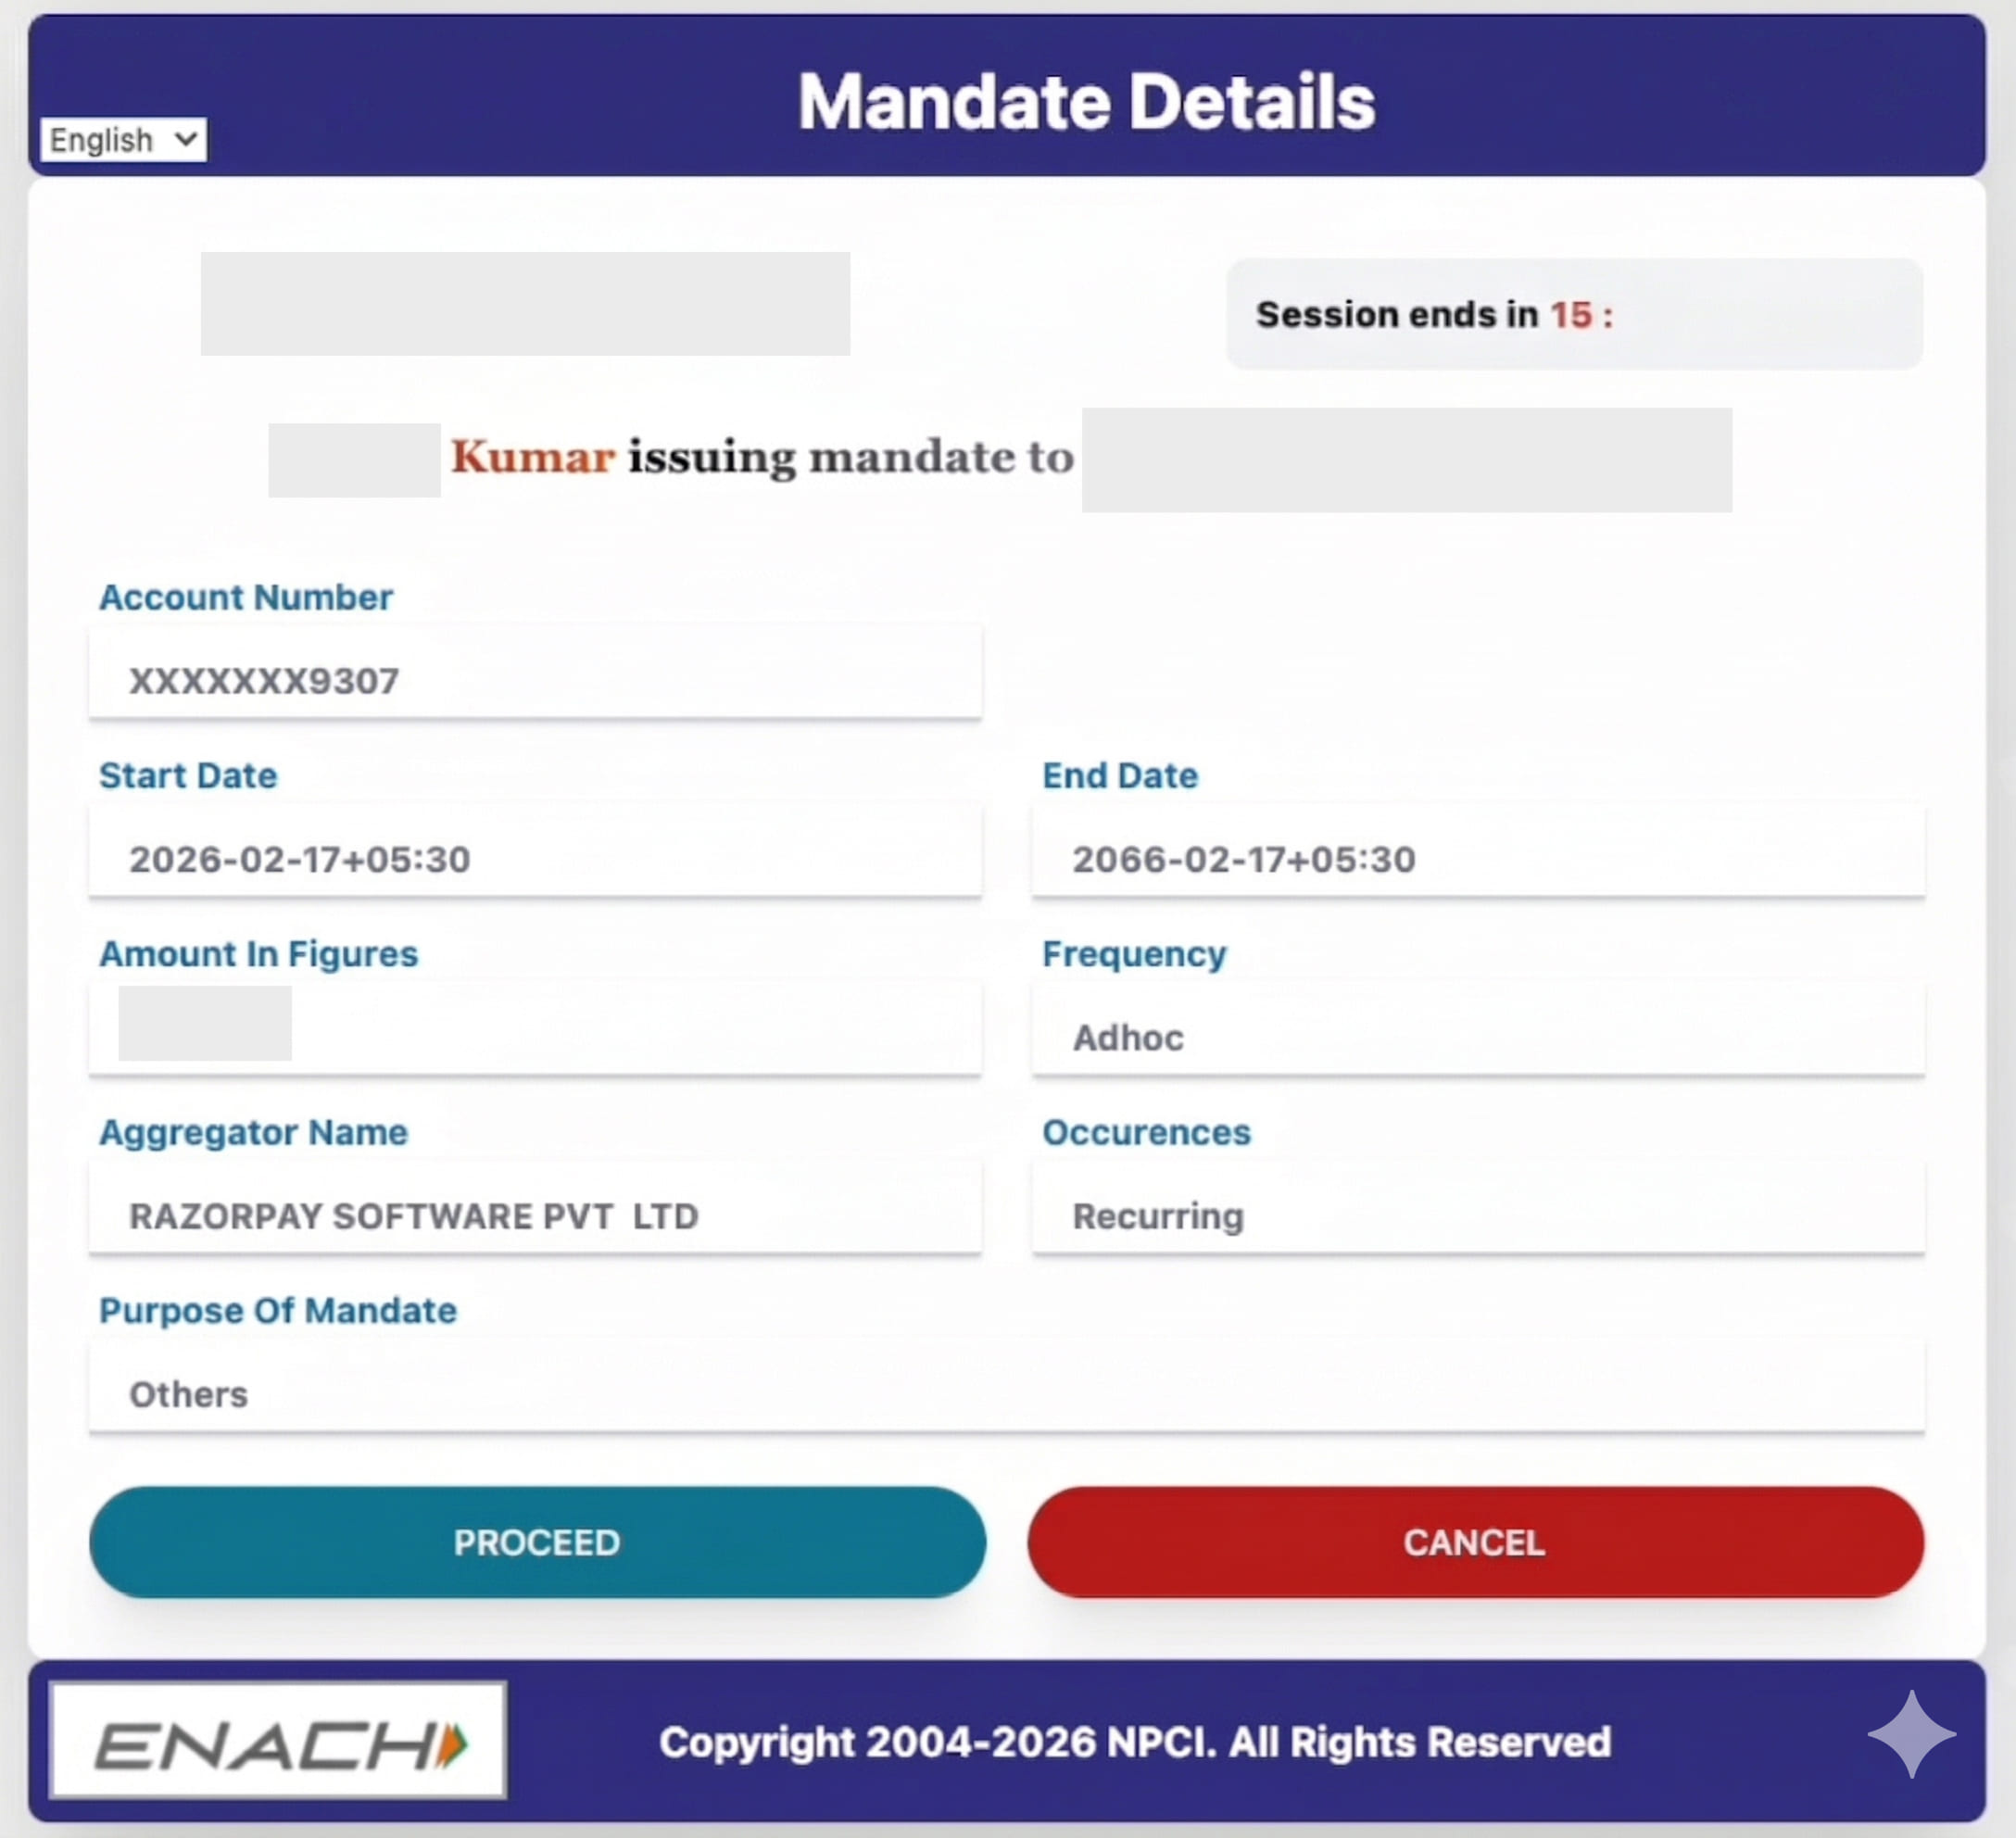
6. The bank's mandate registration form opens. Customer confirms the details and submits the mandate registration request.
7. The customer reads the Aadhaar disclaimer and agrees to provide their Aadhaar details for authentication.
8. The customer submits their Aadhaar details.
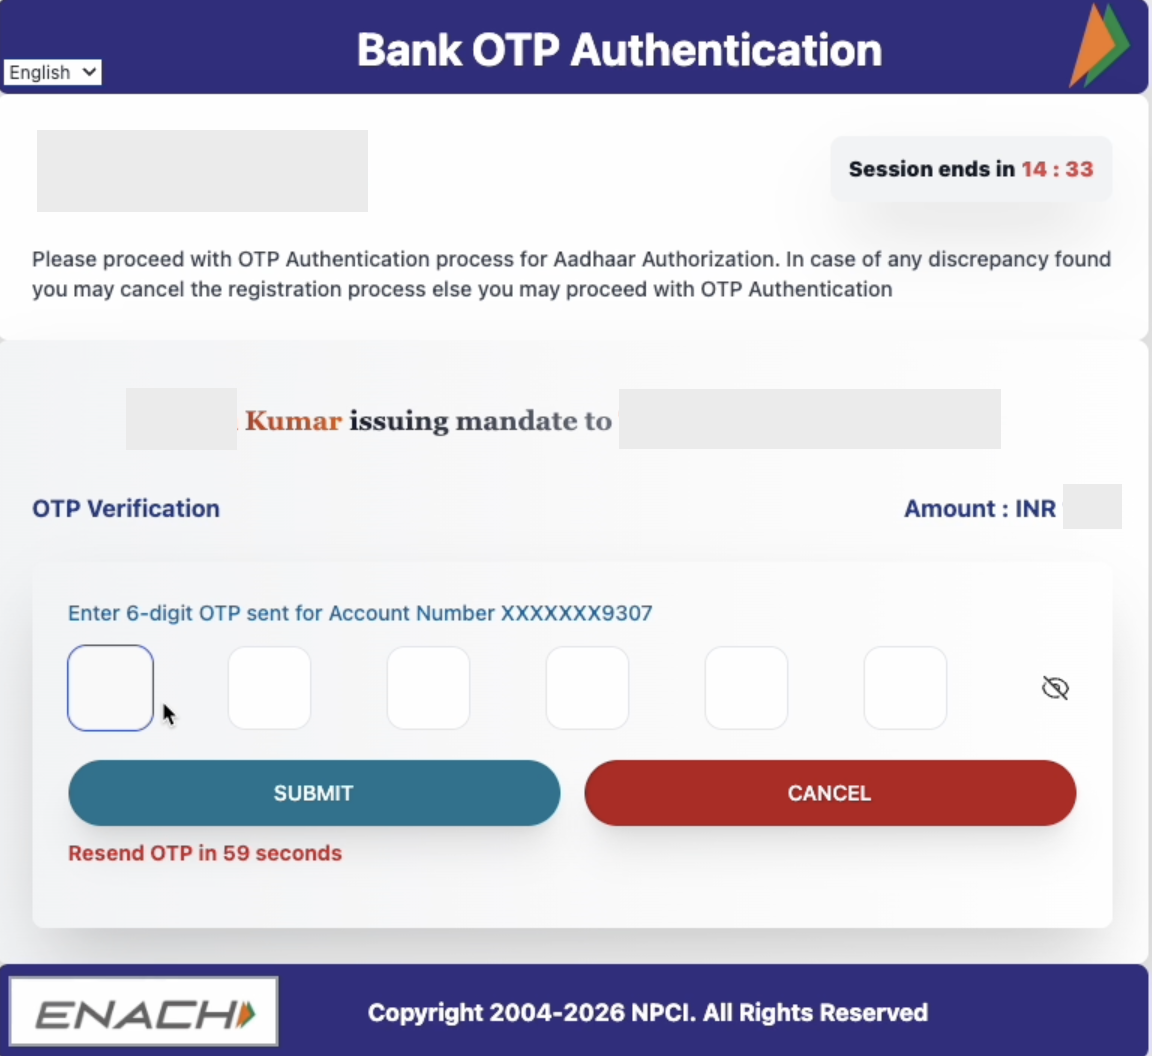
9. The customer enters the OTP to complete 2FA.
**Handy Tips**
For mandate amounts above ₹50,000 (effective July 1, 2026), the customer must complete a second OTP verification as part of Aadhaar authentication.
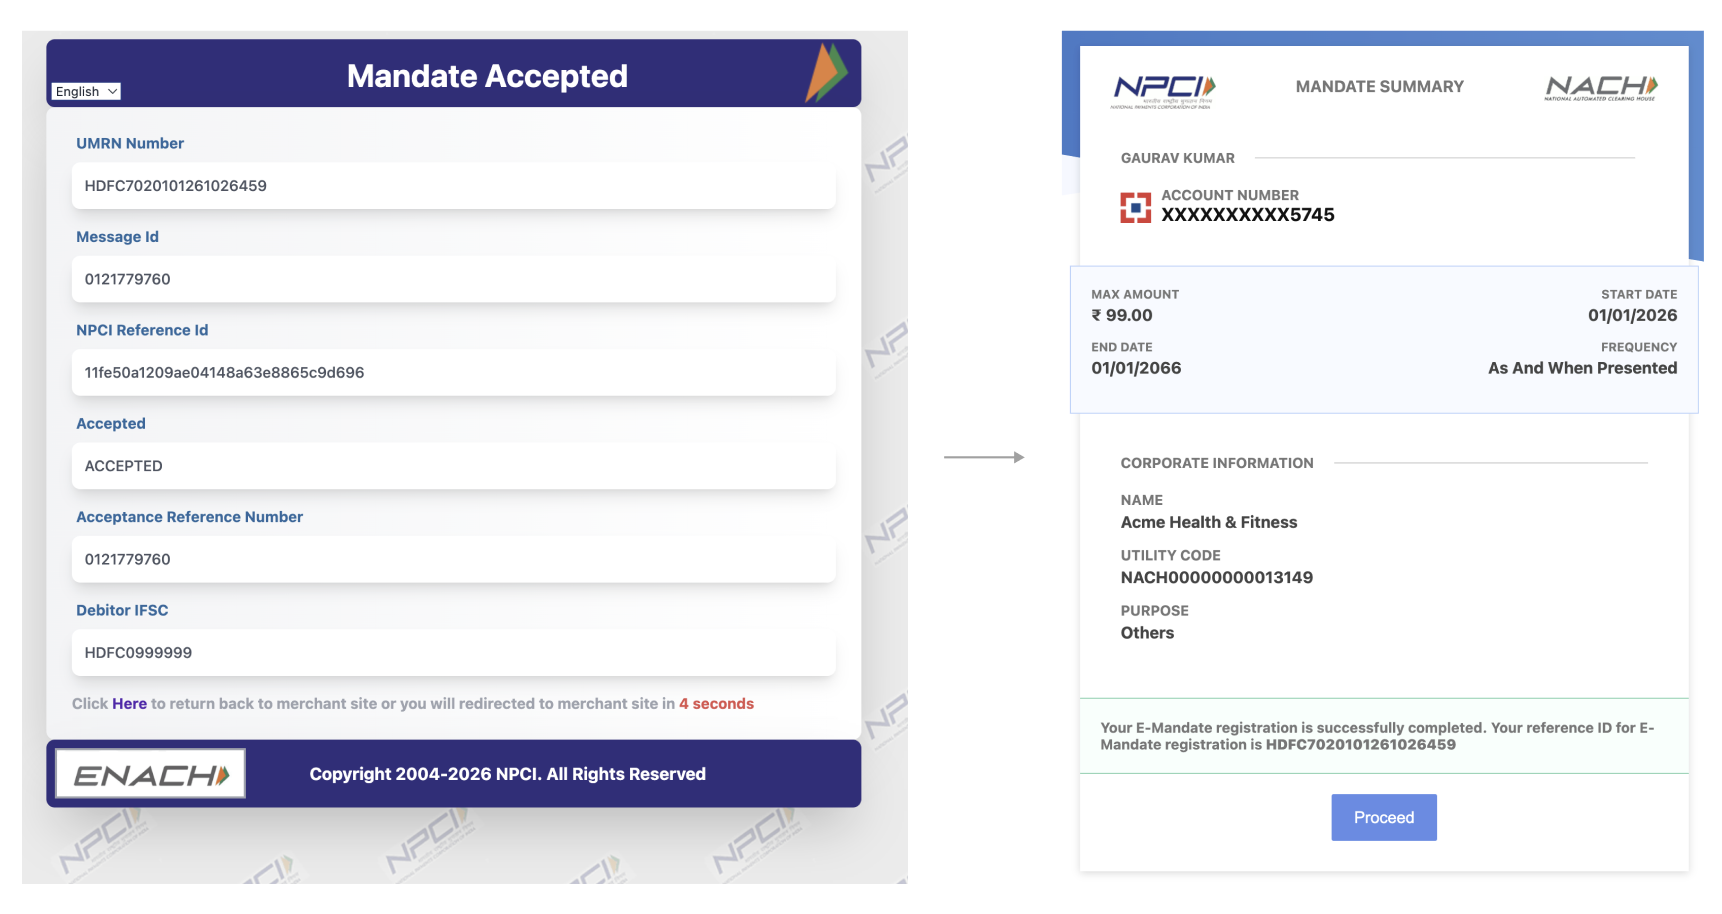
10. The customer is redirected to the NPCI mandate acceptance page.
11. They are then automatically redirected to the Razorpay mandate success page, where they must click **Proceed**.
12. The customer is redirected to the invoice checkout page which shows the final status. This completes the netbanking authentication process.
Given below is the authentication process via netbanking:
1. The customer visits the registration link shared by you. This opens the invoice and displays the checkout. They enter their phone number and email and click **Authenticate**.
2. They select the **Pay via Netbanking - Bank Account** payment method and proceed.
3. They select their preferred bank and the authentication mechanism. In this case, it is Netbanking.
4. They enter their bank details such as account number, account type, IFSC and account holder name.
5. The mandate summary page opens where customer then reviews the details and clicks **Proceed**.
6. The bank's mandate registration form opens. Customer confirms the details and submits the mandate registration request.
7. The bank's netbanking login page opens. Here, customer enters their login credentials and completes OTP verification process.
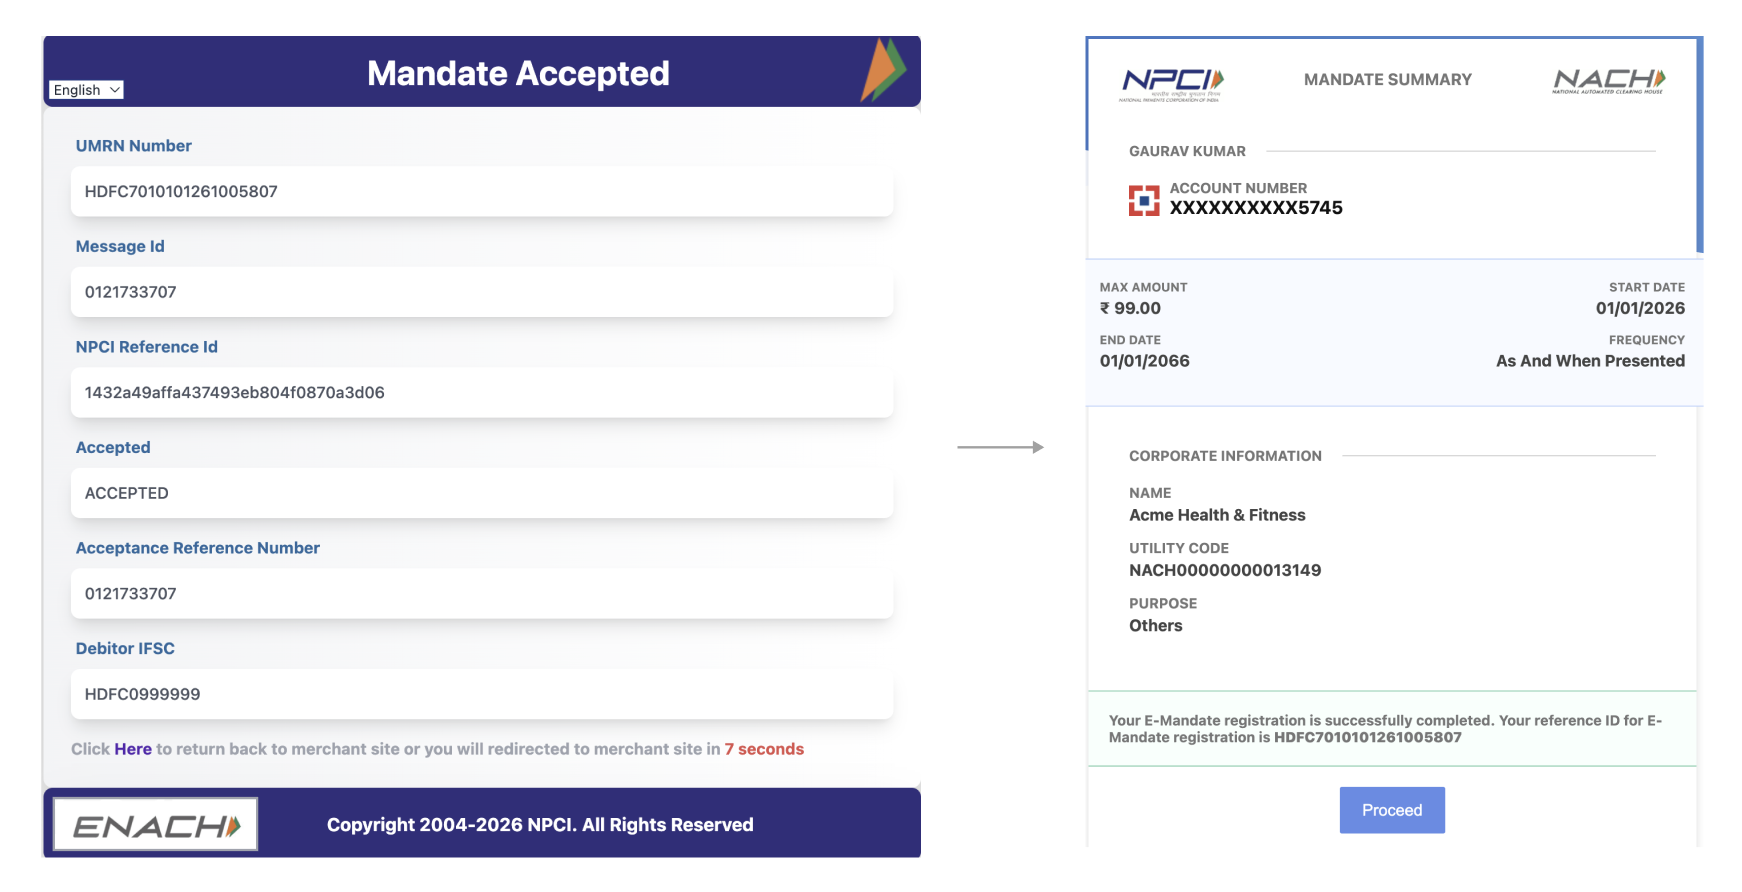
8. The customer is redirected to the NPCI mandate acceptance page. They are then automatically redirected to the Razorpay mandate success page, where they must click **Proceed**.
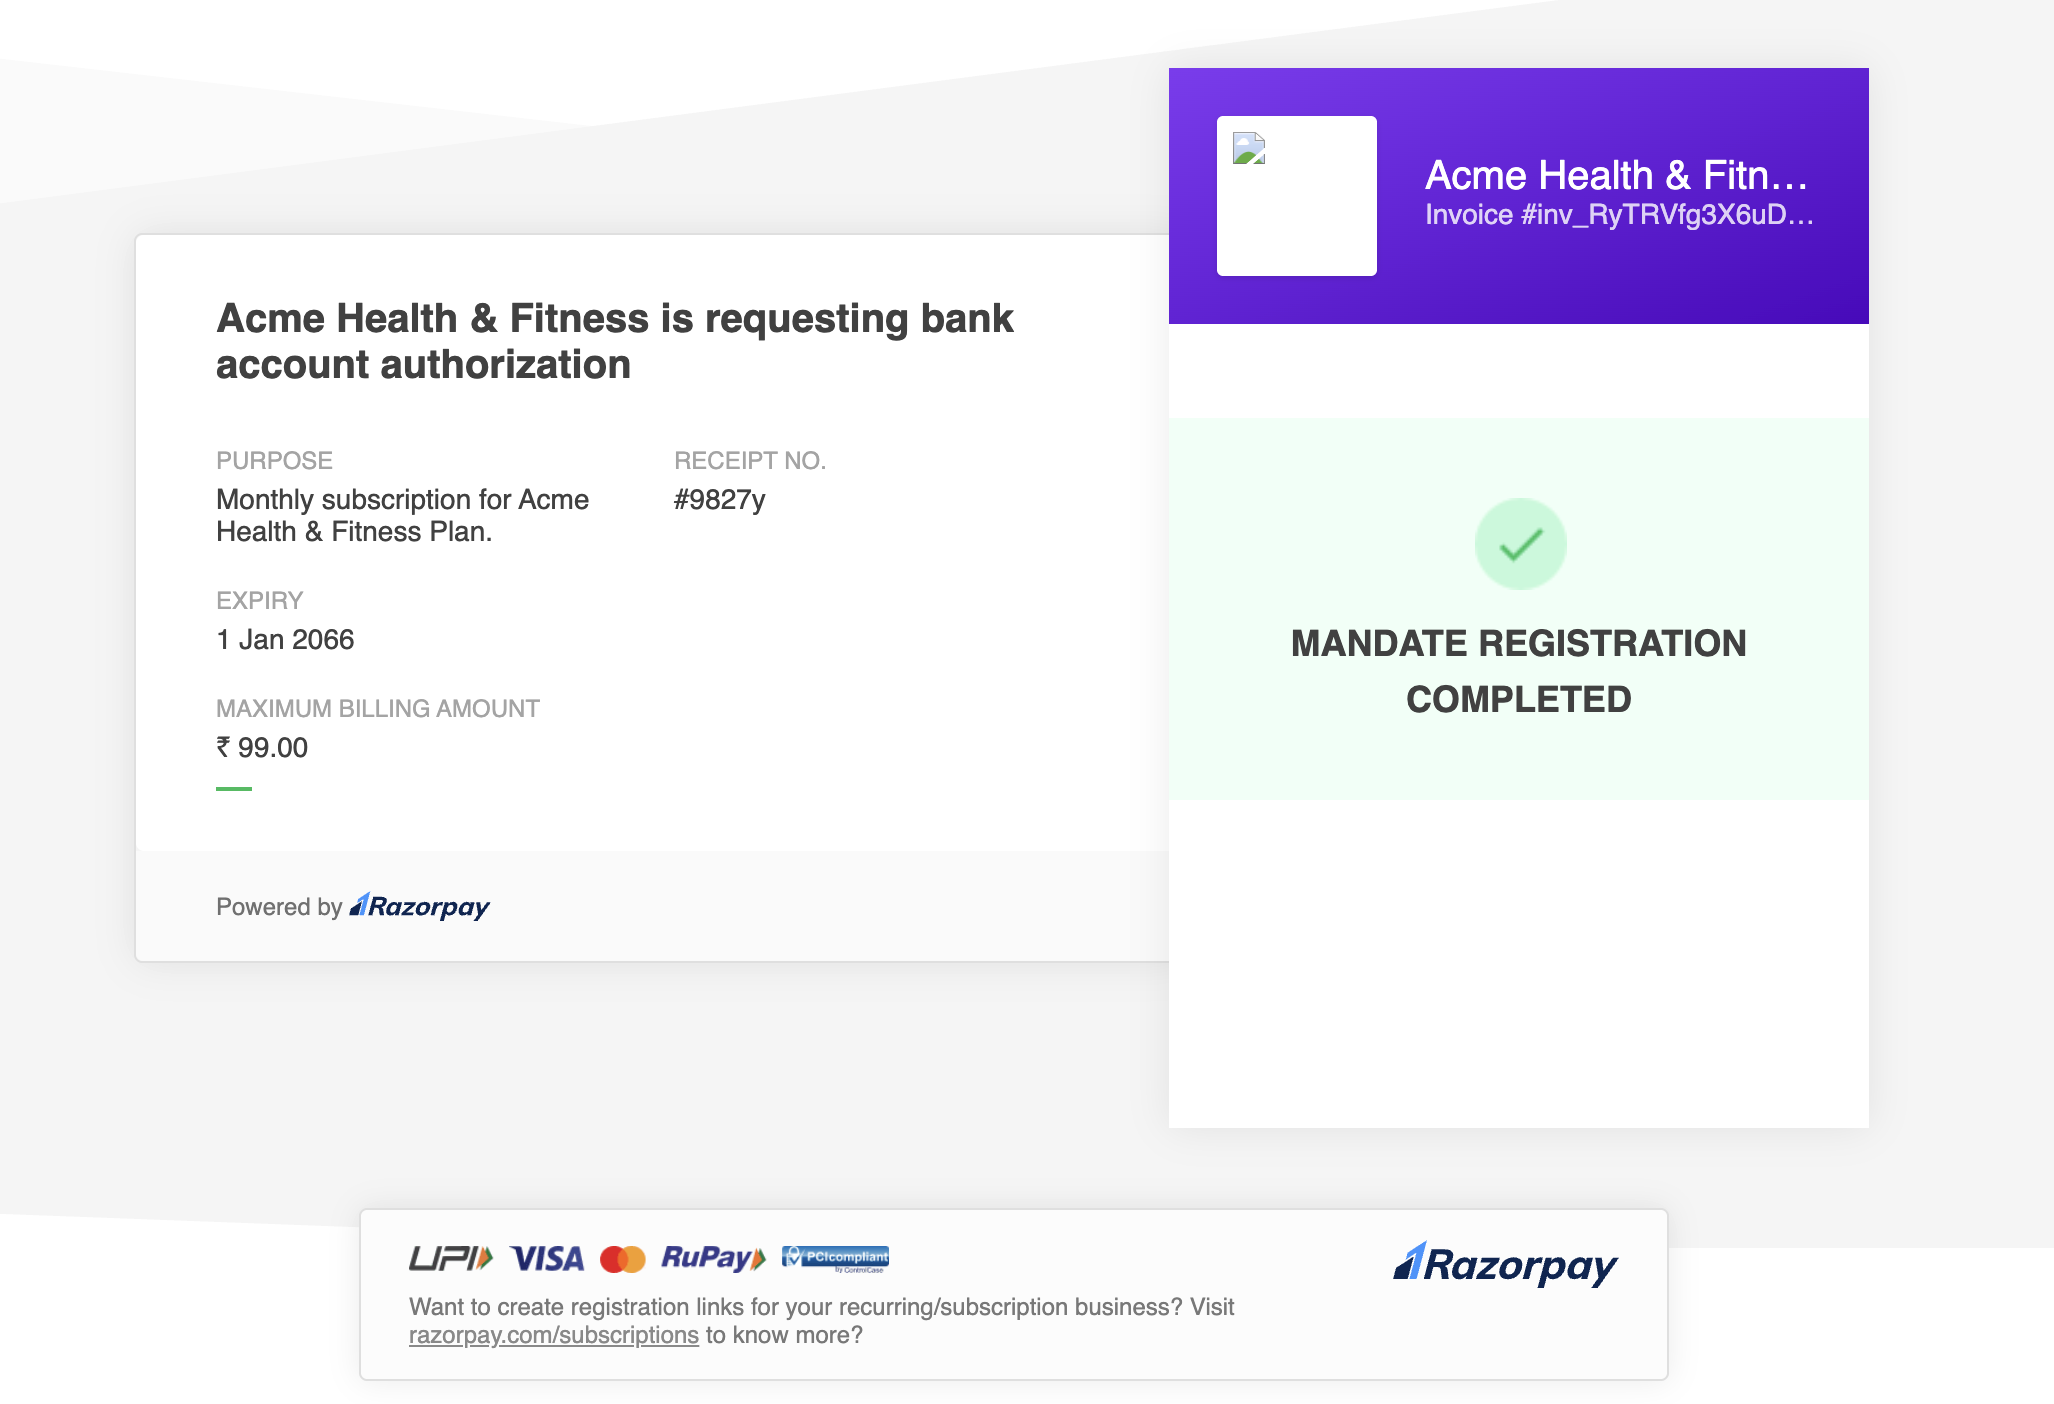
9. The customer is redirected to the invoice checkout page which shows the final status. This completes the netbanking authentication process.
Given below is the authentication process via debit card:
1. The customer visits the registration link shared by you. This opens the invoice and displays the checkout. They enter their phone number and email and click **Authenticate**.
2. They select the **Pay via Netbanking - Bank Account** payment method and proceed.
3. They select their preferred bank and the authentication mechanism. In this case, it is debit card.
4. They enter their bank details such as account number, account type, IFSC and account holder name.
5. The mandate summary page opens where customer then reviews the details and clicks **Proceed**.
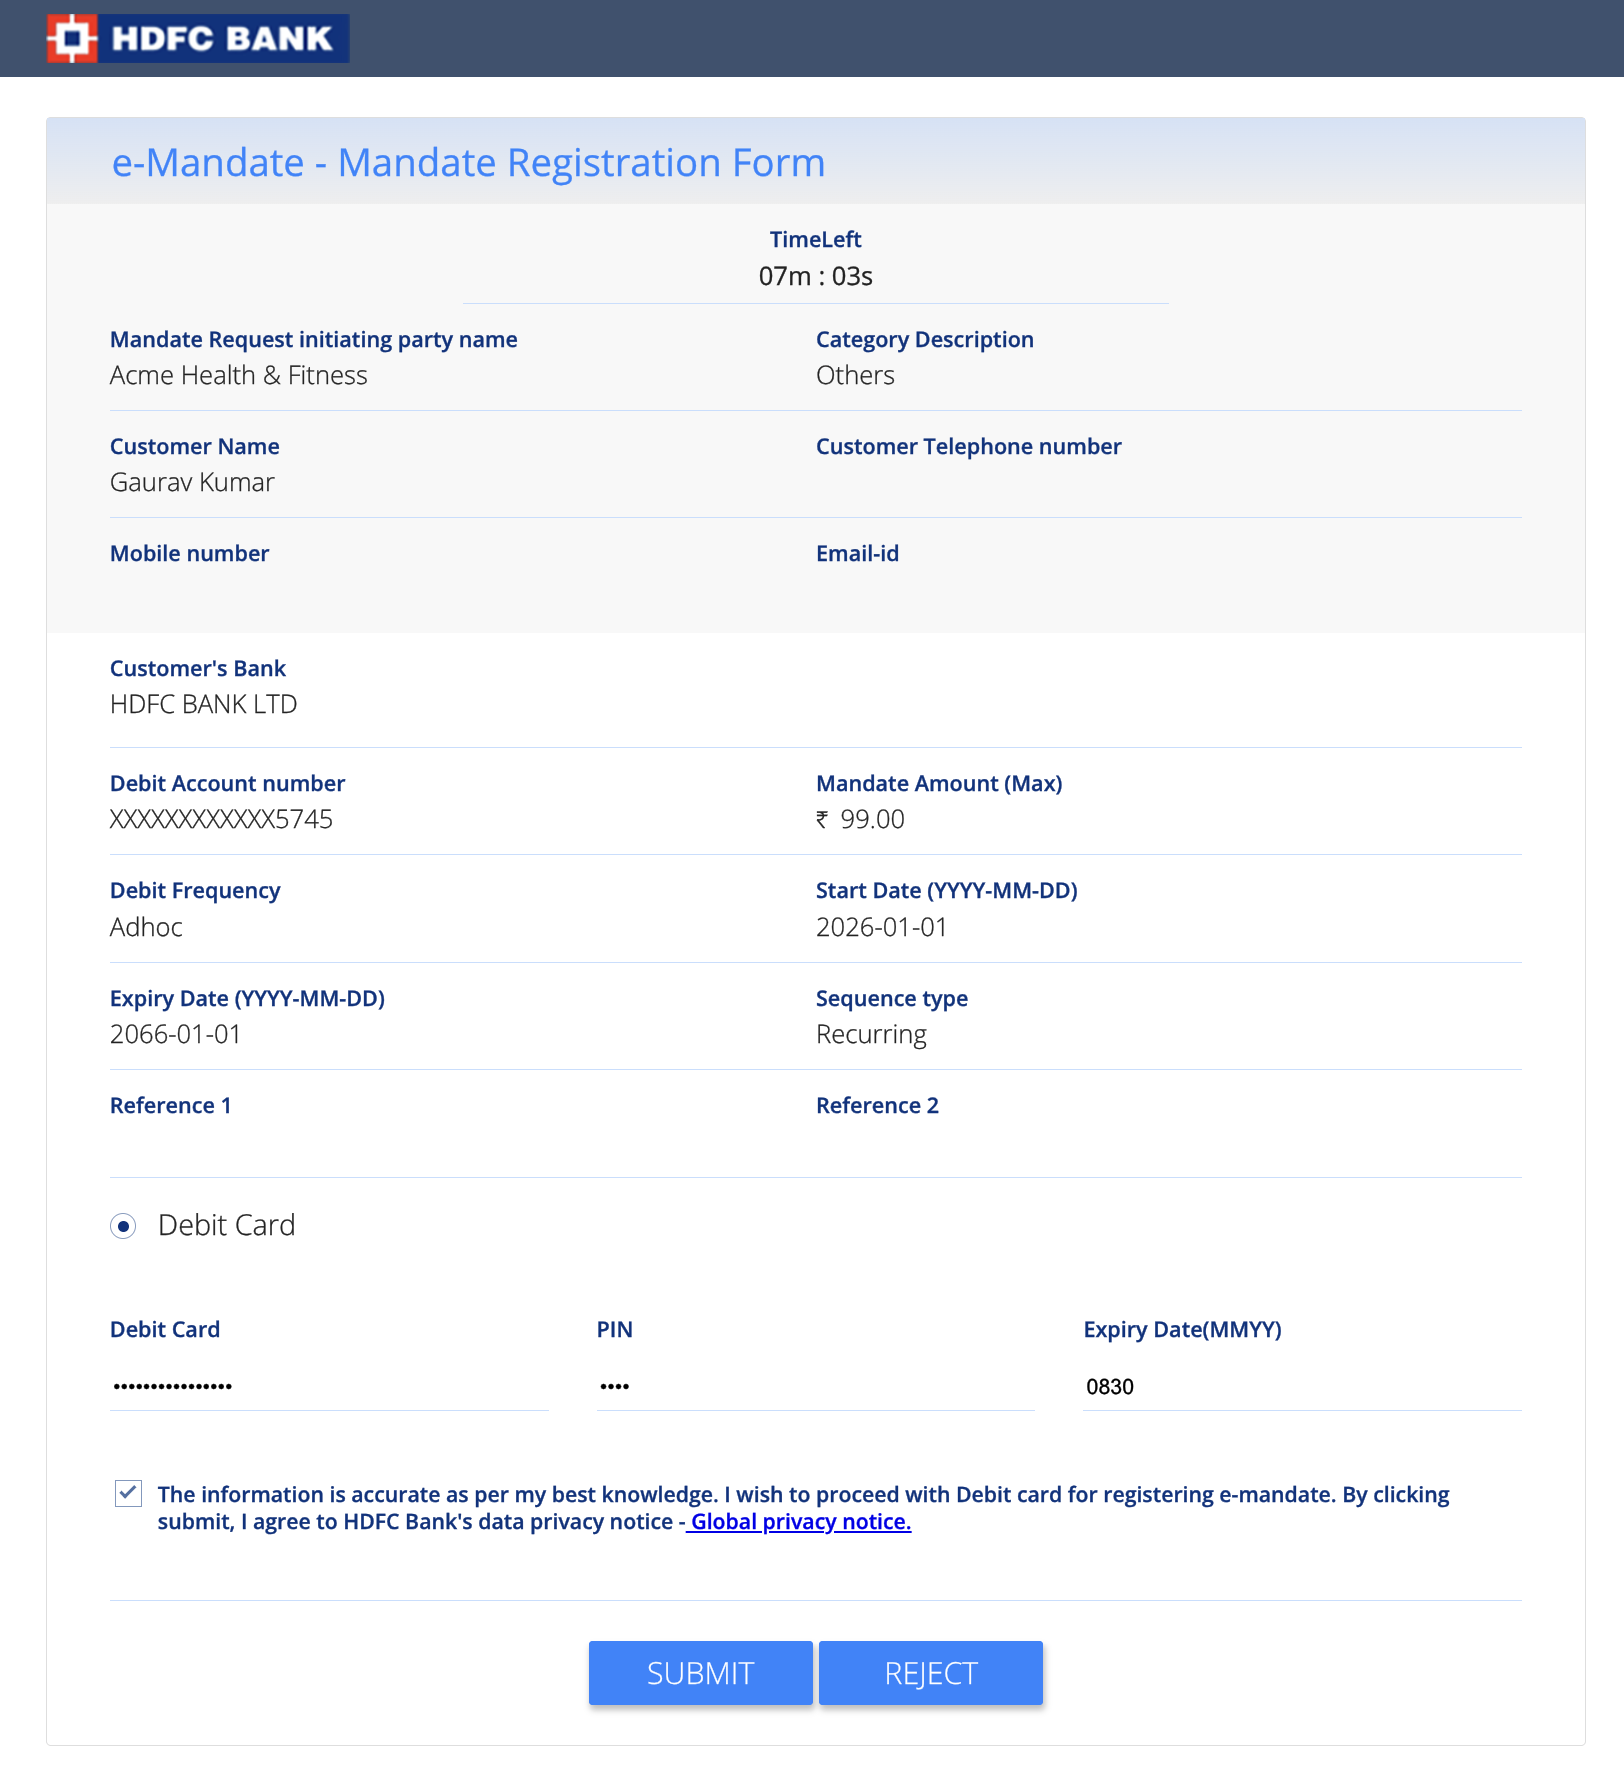
6. The bank's mandate registration form opens. The customer enters the debit card details and submits the mandate registration request.
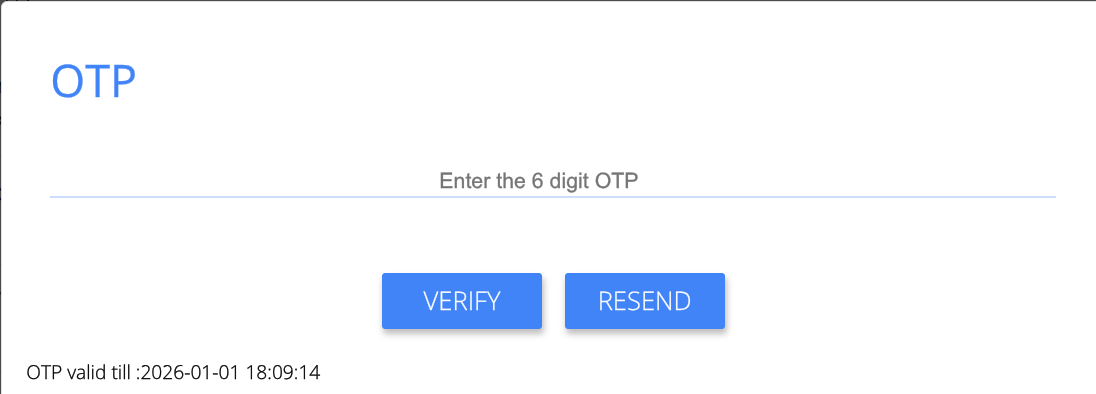
7. They complete the OTP verification process.
8. The customer is redirected to the NPCI mandate acceptance page. They are then automatically redirected to the Razorpay mandate success page, where they must click **Proceed**.
9. The customer is redirected to the invoice checkout page which shows the final status. This completes the netbanking authentication process.
### Authorisation Payment Statuses
Once the customer has made the Authorisation Payment, it moves through the following states as per the [payment flow](/docs/payments/payment-gateway/how-it-works):
| Status | Description | Webhook |
| ---------- | ------------------------------------------------------------------------------------------------------------------------------------------------------------------------------------------------------------- | -------------------------------------------------------------------------------------------------------------------------------------------------------------- |
| Created | Payment is created when a customer enters and submits the payment information. | NA |
| Authorized | Payment is authorized when the customer’s payment details are successfully authenticated by the bank. | [payment.authorized](/docs/api/payments/recurring-payments/webhooks#payment-authorized) |
| Captured | Indicates that the payment is verified by you. Once a payment is captured you can [retrieve the token](/docs/payments/recurring-payments/create#3-search-for-the-token). | [payment.captured](/docs/api/payments/recurring-payments/webhooks#payment-captured) or [order.paid](/docs/api/payments/recurring-payments/webhooks#order-paid) |
| Failed | Indicates that the payment has failed. If the payment has failed, you need to [create an authorisation transaction](/docs/api/payments/recurring-payments/cards/create-authorization-transaction) again. | [payment.failed](/docs/api/payments/recurring-payments/webhooks#payment-failed) |
## 2. Fetch Token and Verify States
This is a process of fetching the token that contains the registration details of the customer and checking its status.
A token represents a mandate registration and is generated after the authorisation transaction is successfully captured. A token contains customer's payment details stored by Razorpay and is used to create a recurring payment.
**Handy Tips**
For simplicity, tokens are considered to be mandates. Hence, the status of the token determines the status of the mandate registration.
You can search for the tokens using the following:
* [APIs](/docs/api/payments/recurring-payments/emandate/tokens)
* [Dashboard](/docs/payments/recurring-payments/create#3-search-for-the-token)
* [Webhooks](/docs/api/payments/recurring-payments/webhooks#check-token-status-using-webhooks)
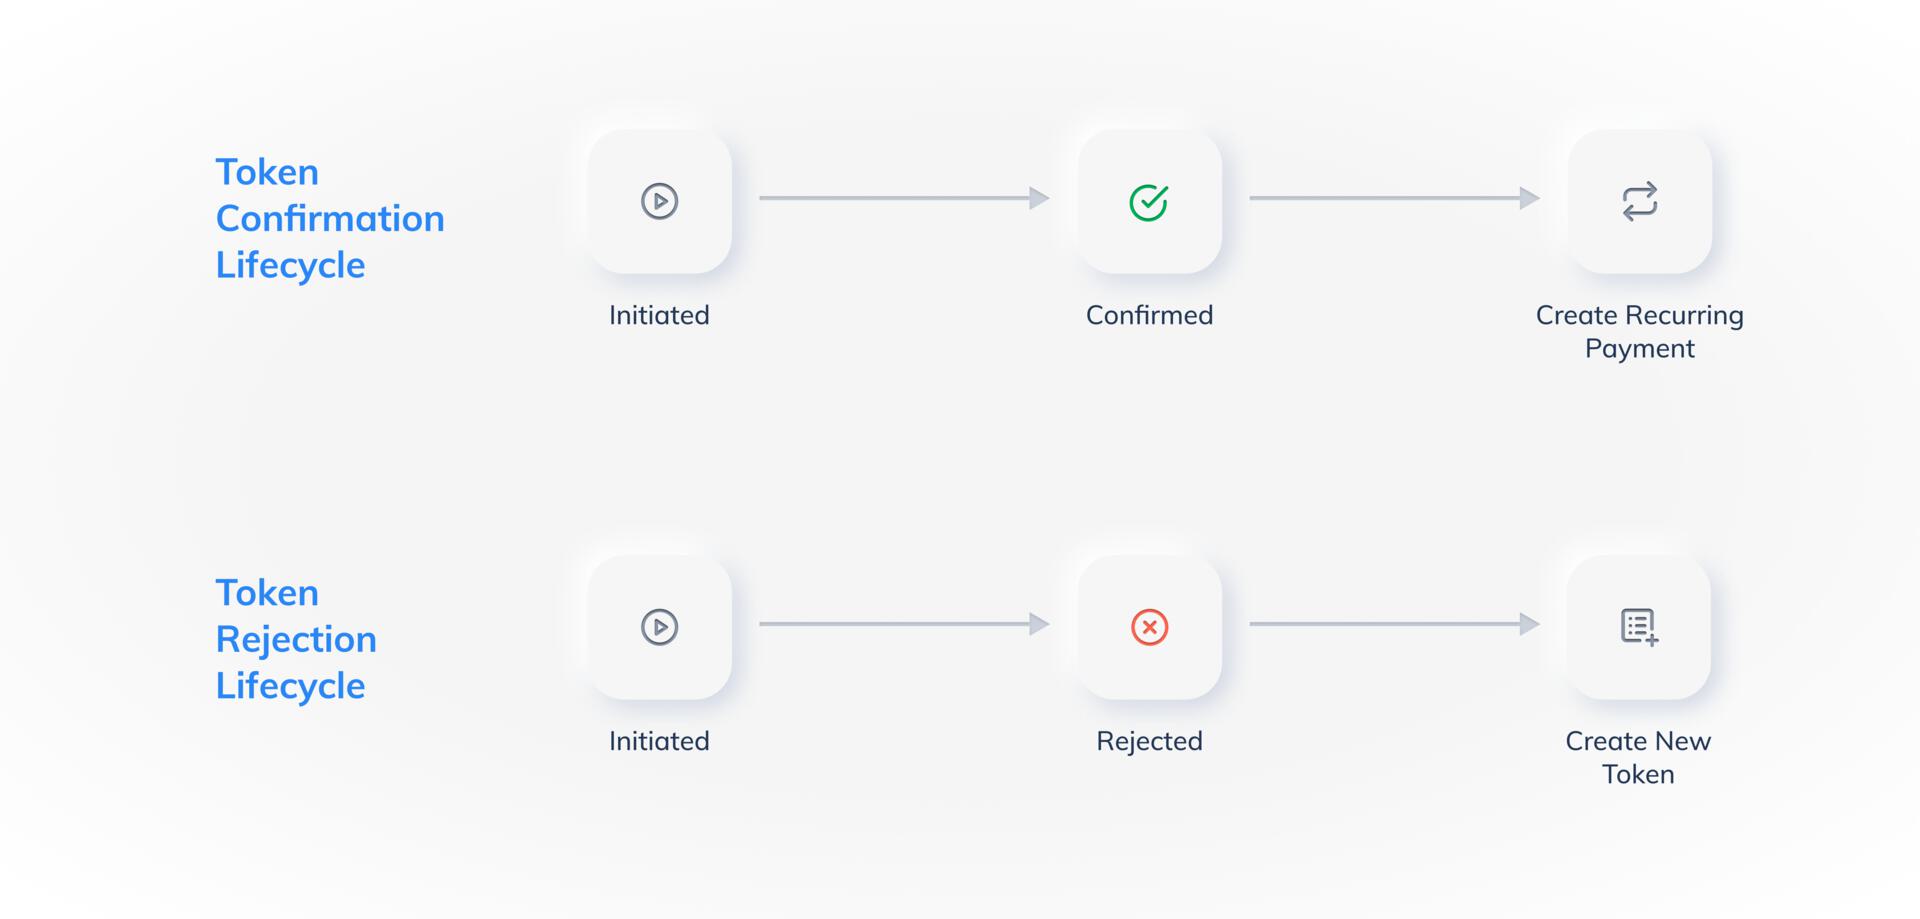
As the authorisation transaction moves through its different states, the token that is generated also undergoes state changes. Following is the life cycle of a token:
| `token_status` | Description | Next Step |
| -------------- | --------------------------------------------------------------- | ------------------------------------------------------------------------------------------------------- |
| `initiated` | Indicates that the bank is processing the mandate registration. | Wait for the [token.confirmed](/docs/api/payments/recurring-payments/webhooks#token-confirmed) webhook. |
| `confirmed` | Indicates that the bank has completed the mandate registration. | [Create recurring payment](/docs/payments/recurring-payments/create) |
| `rejected` | Indicates that the mandate registration has failed. | Create the authorisation transaction again. |
| `cancelled` | Indicates that the token has been cancelled. | Create the authorisation transaction again if you want to charge the customer. |
| `paused` | Indicates that the token has been paused by your customer. | The token is inactive. Your customer has paused the token. Ask them to resume the token to charge them. |
Know more about the turnaround time (TAT) for Emandate from the [FAQs](/docs/payments/recurring-payments/emandate/faqs#5-what-is-the-timeline-for-emandate-token).
## 3. Charge Customers
This is the process of charging customers the actual subsequent amount using the fetched token and customer details.
**Handy Tips**
Subsequent payments can be charged without the need of any intervention from the customer. However, subsequent payments need to be created manually by you.
Once a token goes to the confirmed state, you can start creating recurring payments for the customer as per your business requirements.
**Handy Tips**
If you want to collect the first payment immediately, you can [charge customers during registration](/docs/payments/recurring-payments/emandate/charge-customer-during-registration) itself, combining authorisation and the first debit into a single step.
You can create subsequent payments using:
To create subsequent payments using the Dashboard:
1. [**Search for the token and check its status**](/docs/payments/recurring-payments/create#3-search-for-the-token) After the authorisation transaction is complete, a token is generated. You can use the search feature on the Dashboard to find the required token and check its status.
2. [**Charge the token**](/docs/payments/recurring-payments/create#4-charge-the-token) After you have found the required confirmed token, you can create a subsequent payment by charging the token according to your business needs.
**Order is Created Automatically**
While creating a subsequent charge using the Dashboard, Razorpay automatically creates an order for you when you charge a token. There is no need to create an order separately.
To create subsequent payments using APIs:
1. [**Create a new Order**](/docs/api/payments/recurring-payments/emandate/create-subsequent-payments#3-1-create-an-order-to-charge-the-customer) Like any other payment, each subsequent payment is tied to a unique order id. Associating a payment with an order id makes it easier to query Razorpay systems and handle multiple payment attempts and allows automatic capturing of payments.
2. [**Create a Payment**](/docs/api/payments/recurring-payments/emandate/create-subsequent-payments#3-2-create-a-recurring-payment) Once the order is created, you can create a payment for it. After our system validates the payment along with `token_id`, a `razorpay_payment_id` is returned. In some cases, the payment entity returned is in the created state and may take 1 working day for confirmation.
### Related Information
* [Supported Banks and Apps](/docs/payments/recurring-payments/emandate/supported-banks)
* [APIs](/docs/payments/recurring-payments/emandate/apis)
* [Handle Errors](/docs/payments/recurring-payments/emandate/errors)
 To create checkout form for customers to complete authorisation transaction using the Razorpay Standard Checkout method:
 For customers to complete the authorisation transaction via a registration link, you should **create a registration link and send it to your customer**
You can create a Registration Link using:
* [APIs](/docs/api/payments/recurring-payments/emandate/create-authorization-transaction#1-2-1-create-a-registration-link)
* [Dashboard](/docs/payments/recurring-payments/create#1-create-a-registration-link)
The customer completes the authorisation payment, which generates a `token`.
For customers to complete the authorisation transaction via a registration link, you should **create a registration link and send it to your customer**
You can create a Registration Link using:
* [APIs](/docs/api/payments/recurring-payments/emandate/create-authorization-transaction#1-2-1-create-a-registration-link)
* [Dashboard](/docs/payments/recurring-payments/create#1-create-a-registration-link)
The customer completes the authorisation payment, which generates a `token`.
 2. They select the **Pay via Netbanking - Bank Account** payment method and proceed.
 3. They select their preferred bank and the authentication mechanism. In this case, it is Aadhaar.
 4. They enter their bank details such as account number, account type, IFSC and account holder name.
 5. The mandate summary page opens where customer then reviews the details and clicks **Proceed**.
 6. The bank's mandate registration form opens. Customer confirms the details and submits the mandate registration request.
 7. The customer reads the Aadhaar disclaimer and agrees to provide their Aadhaar details for authentication.
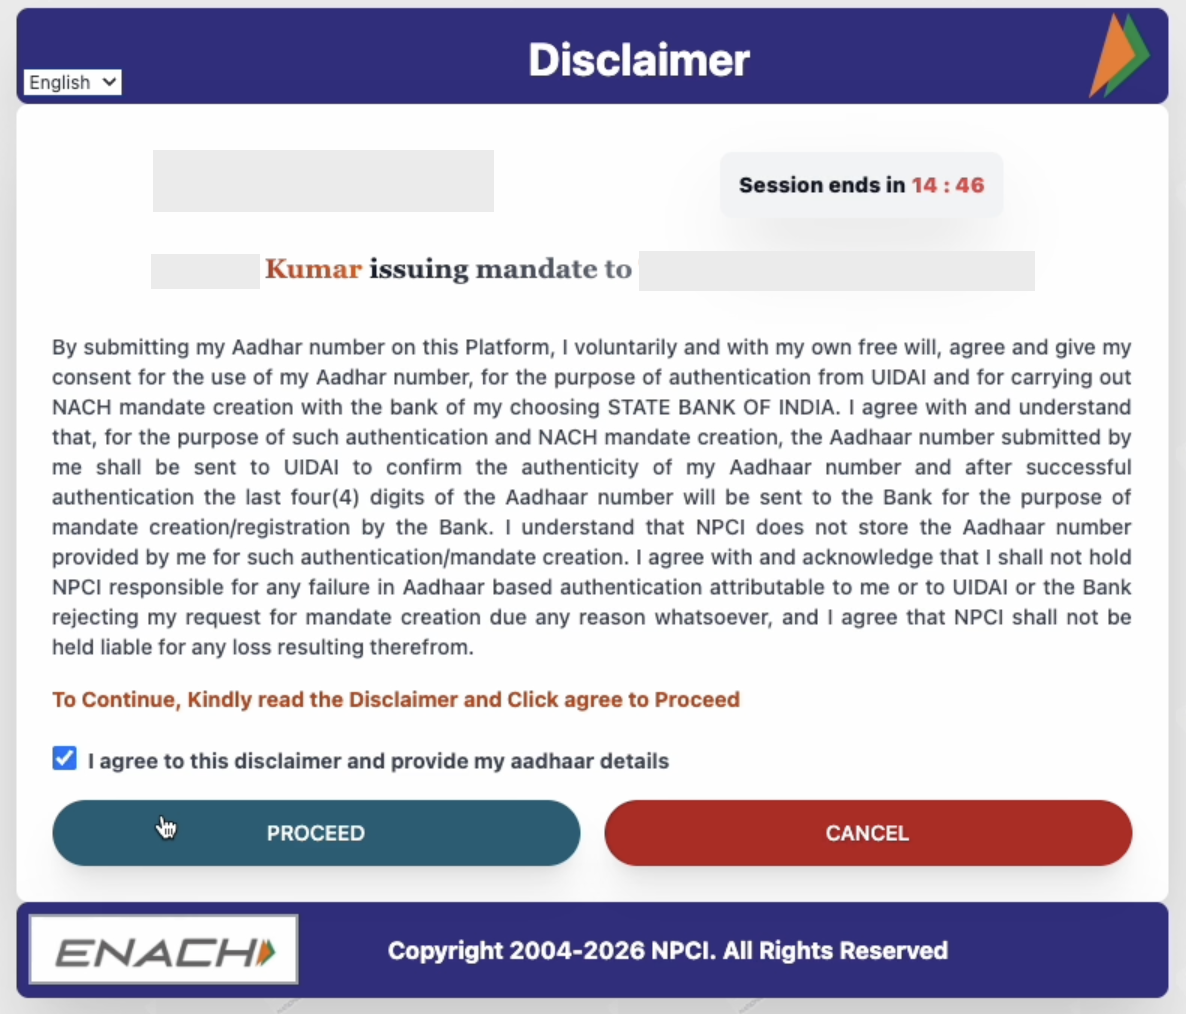 8. The customer submits their Aadhaar details.
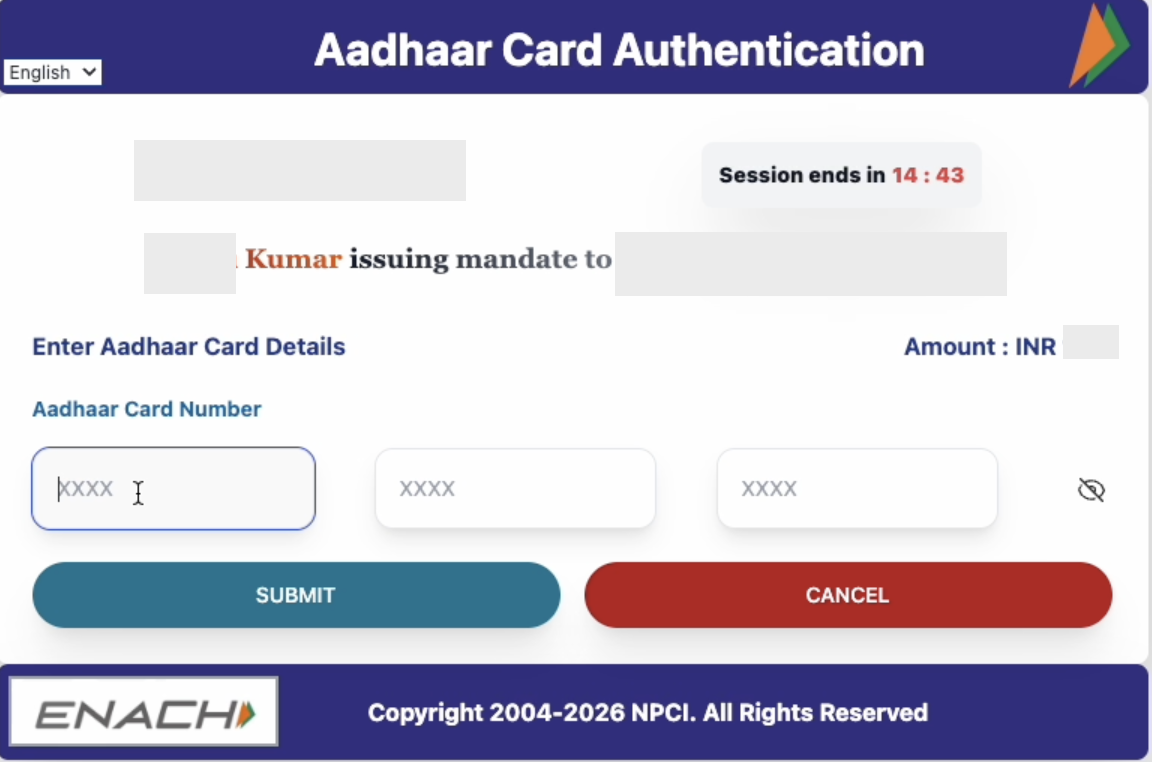 9. The customer enters the OTP to complete 2FA.
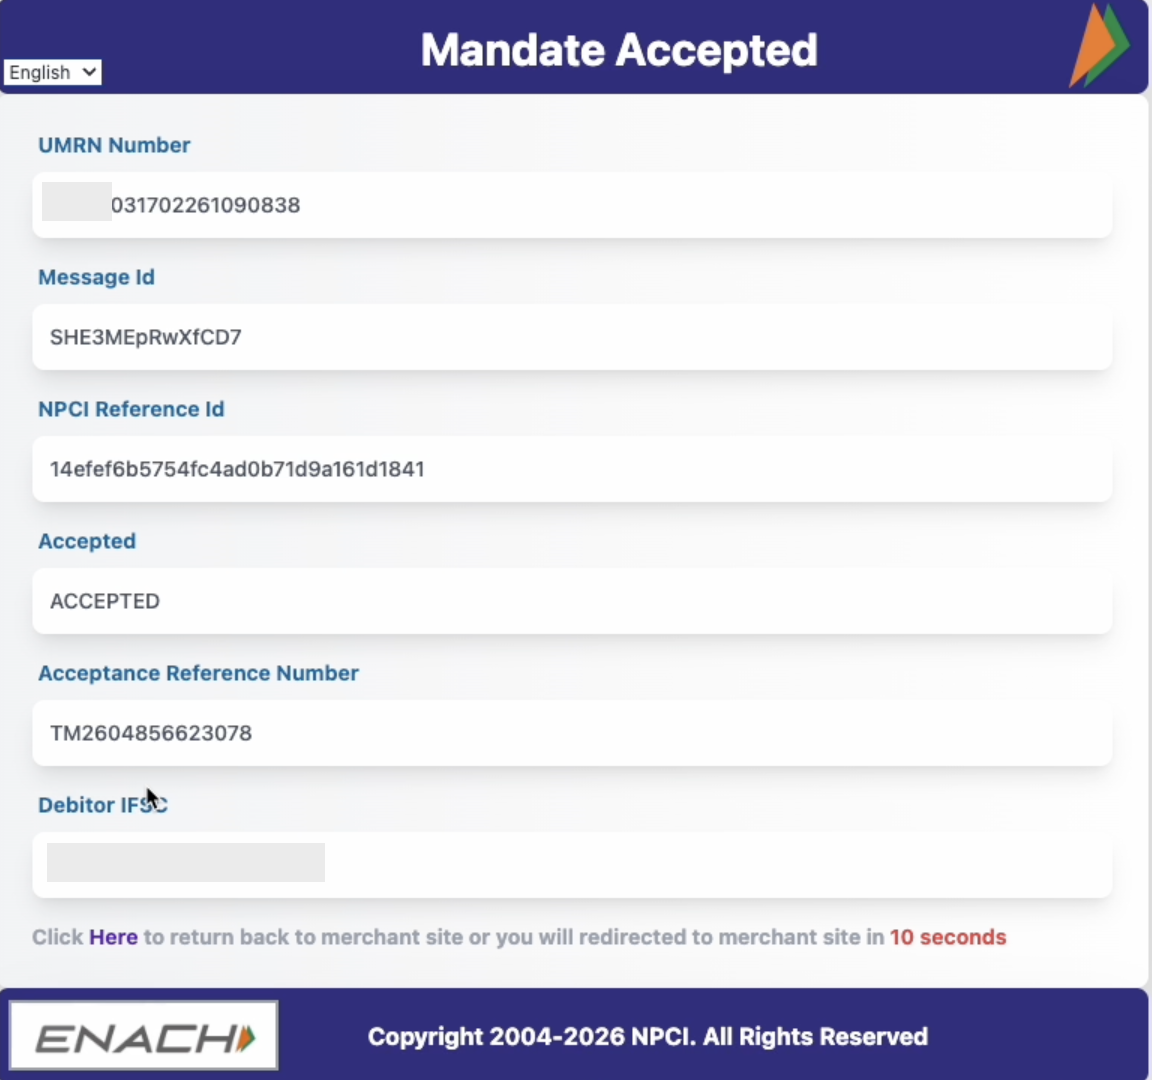 11. They are then automatically redirected to the Razorpay mandate success page, where they must click **Proceed**.
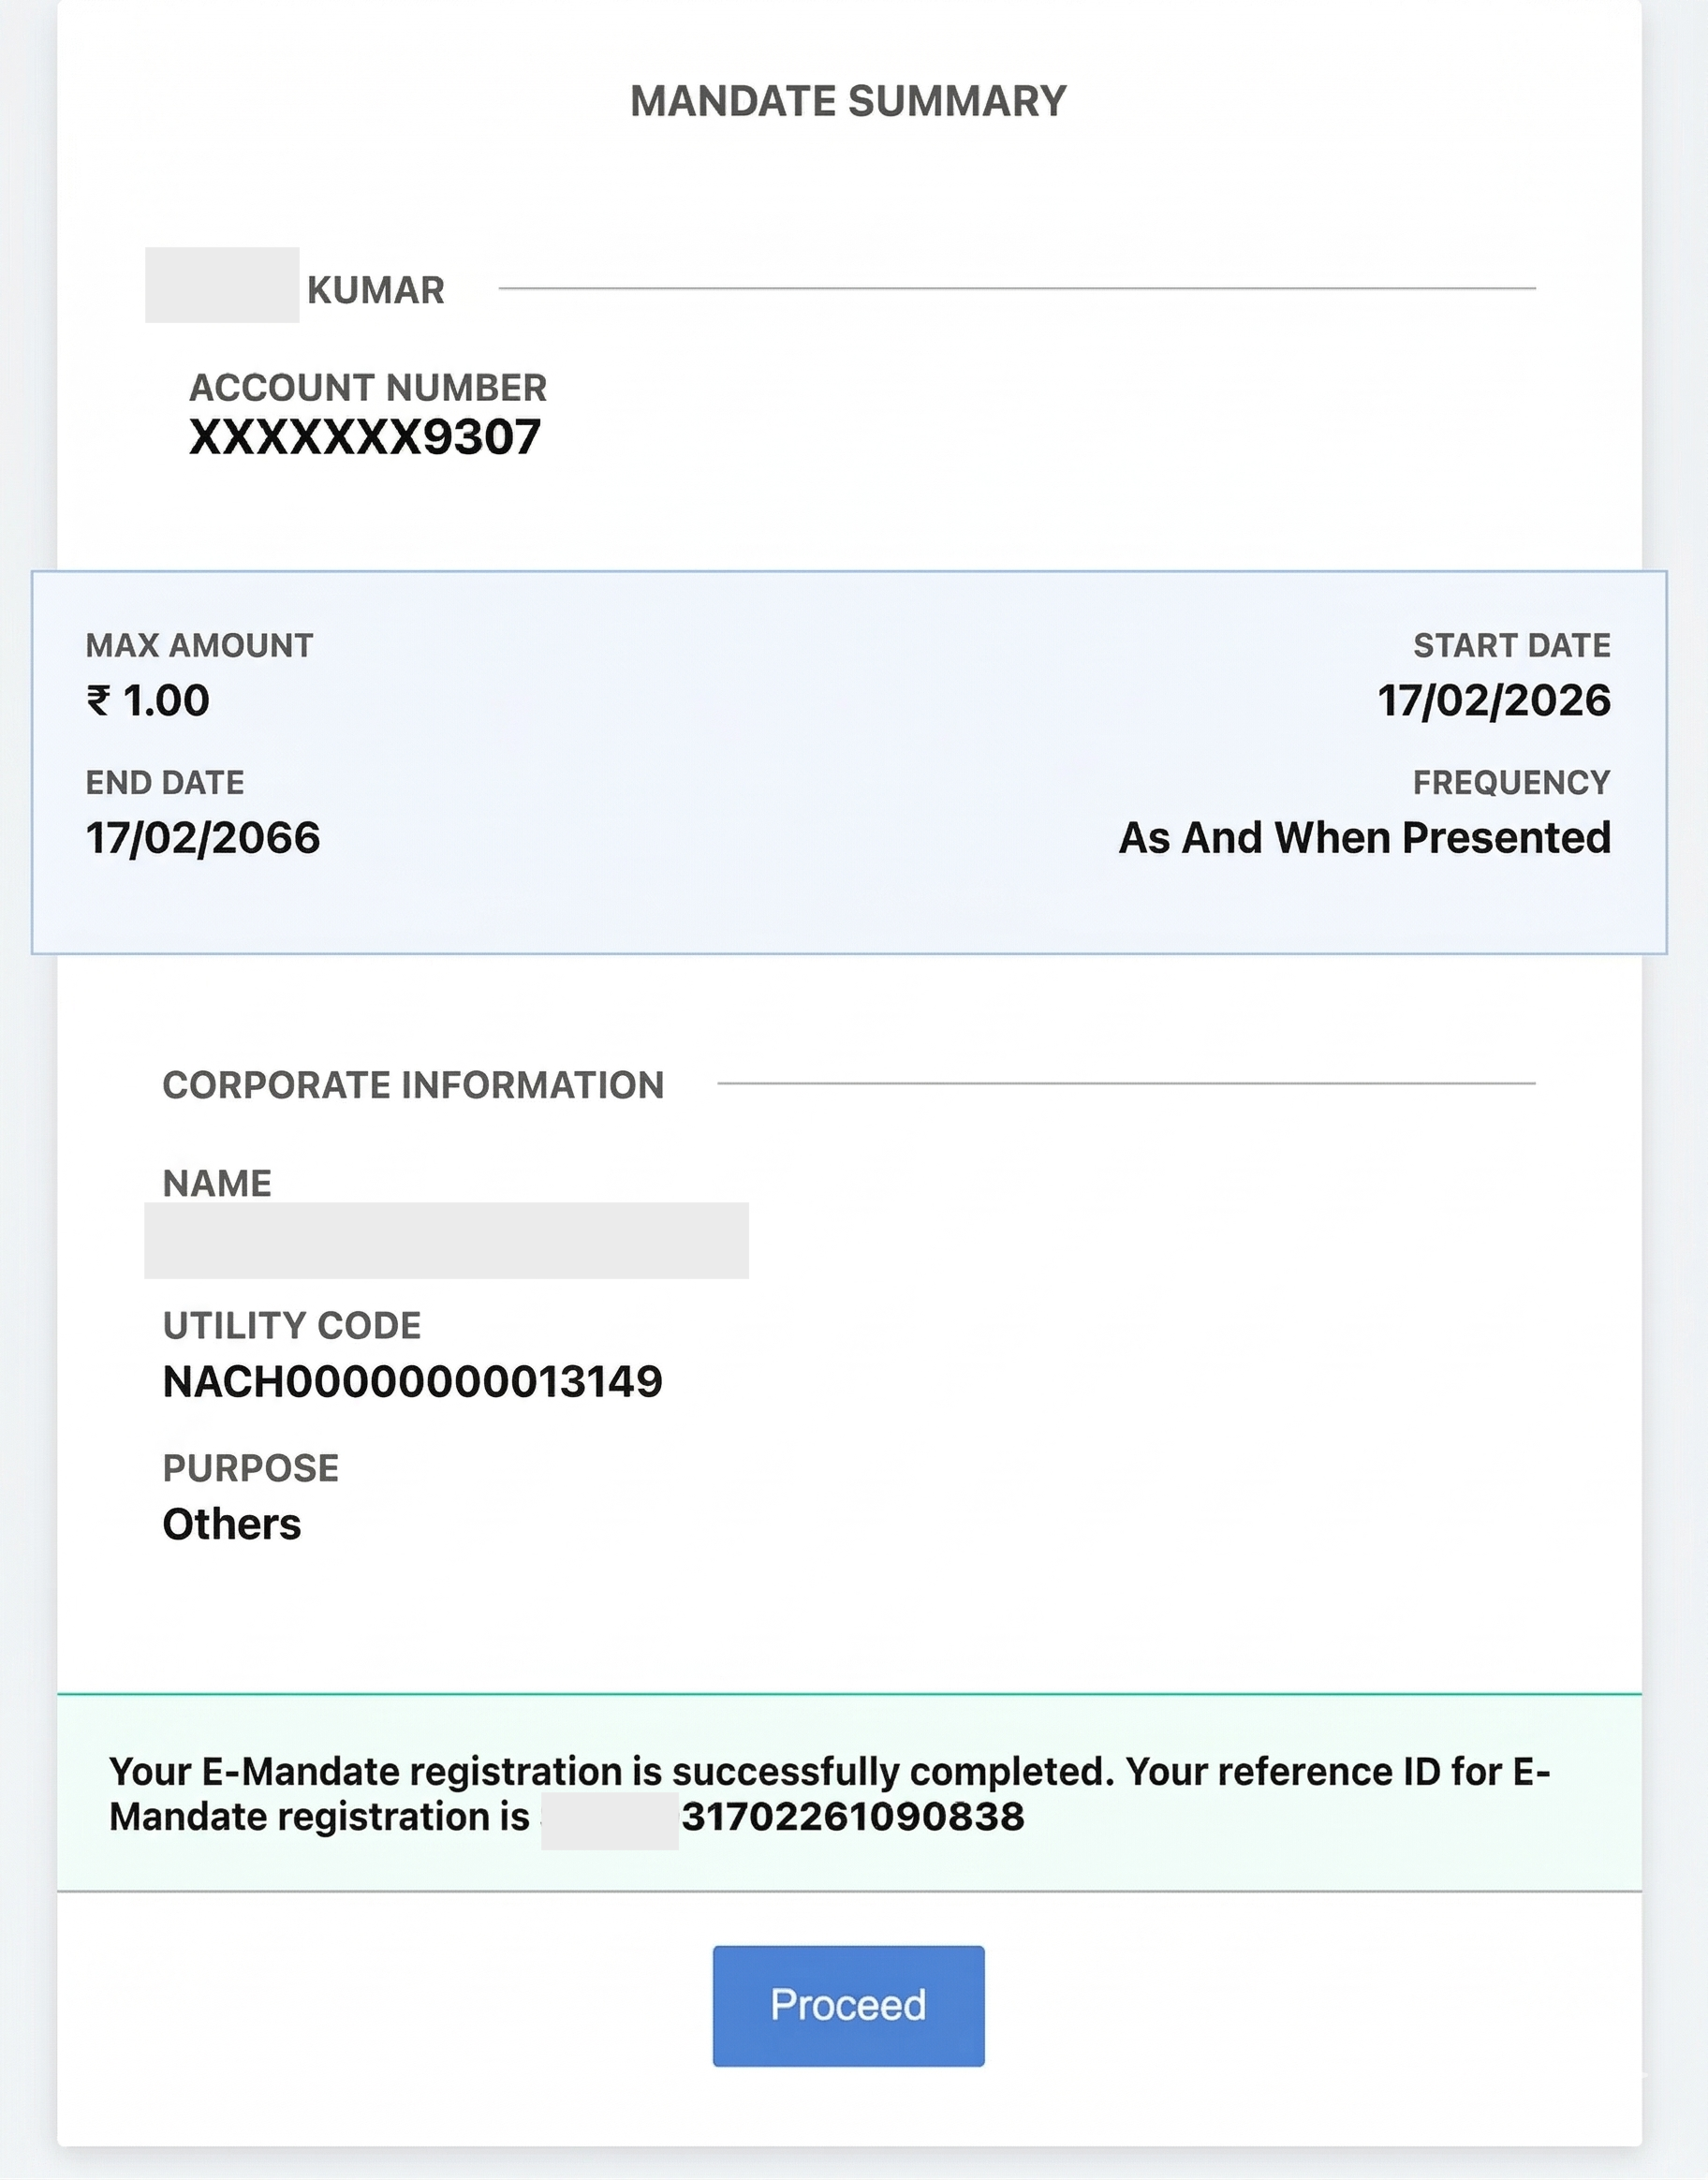 12. The customer is redirected to the invoice checkout page which shows the final status. This completes the netbanking authentication process.
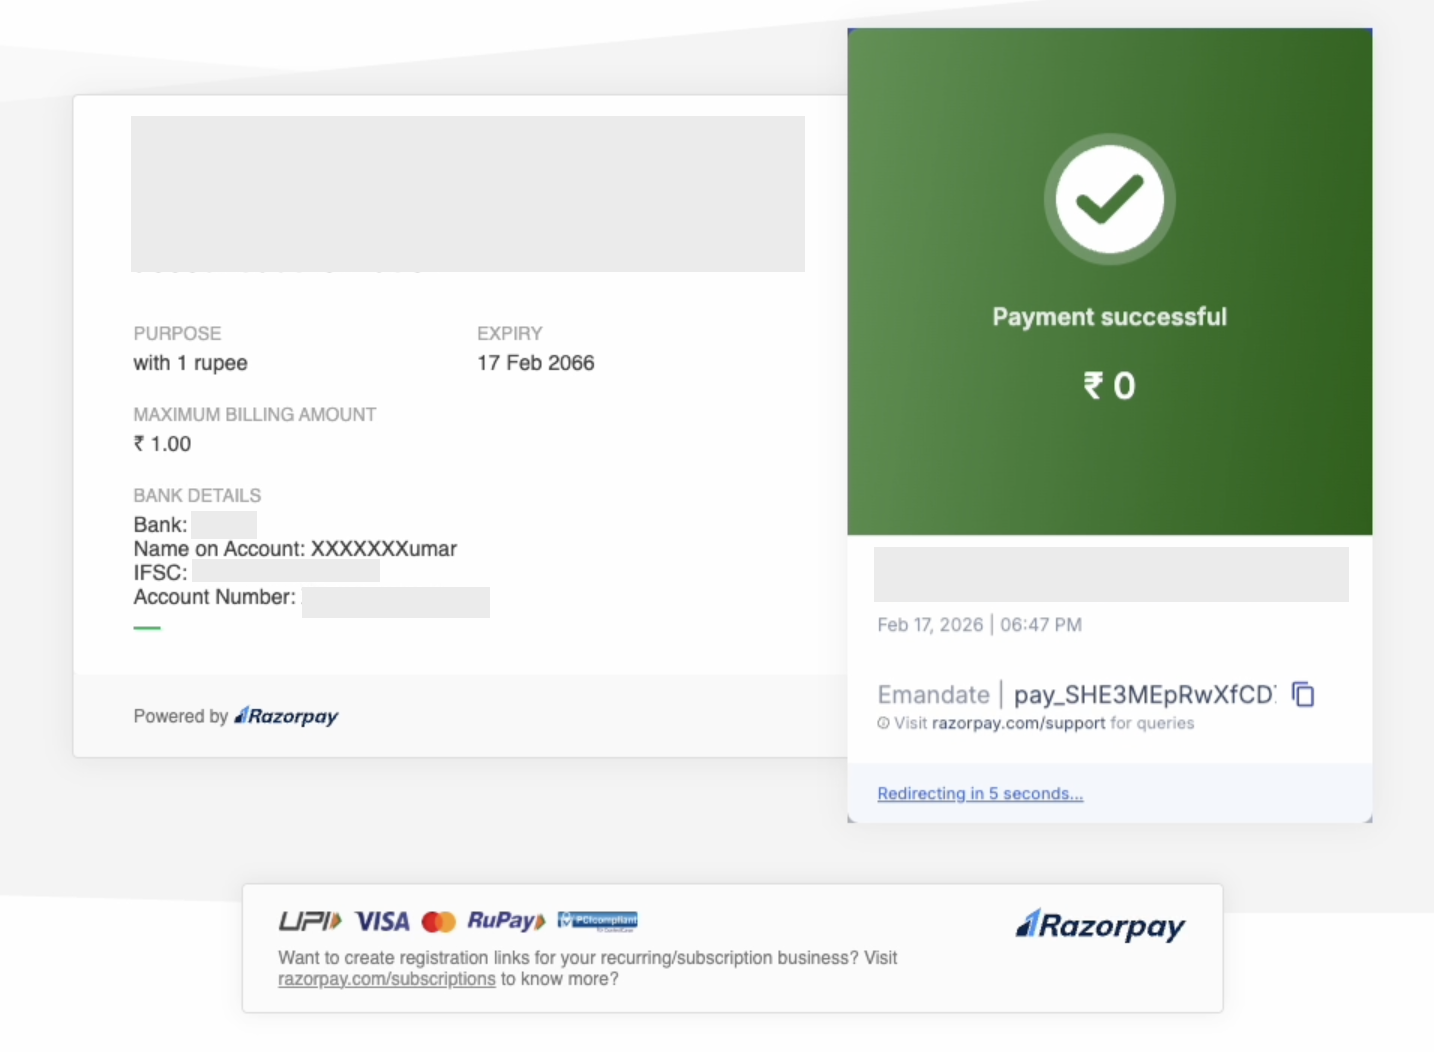
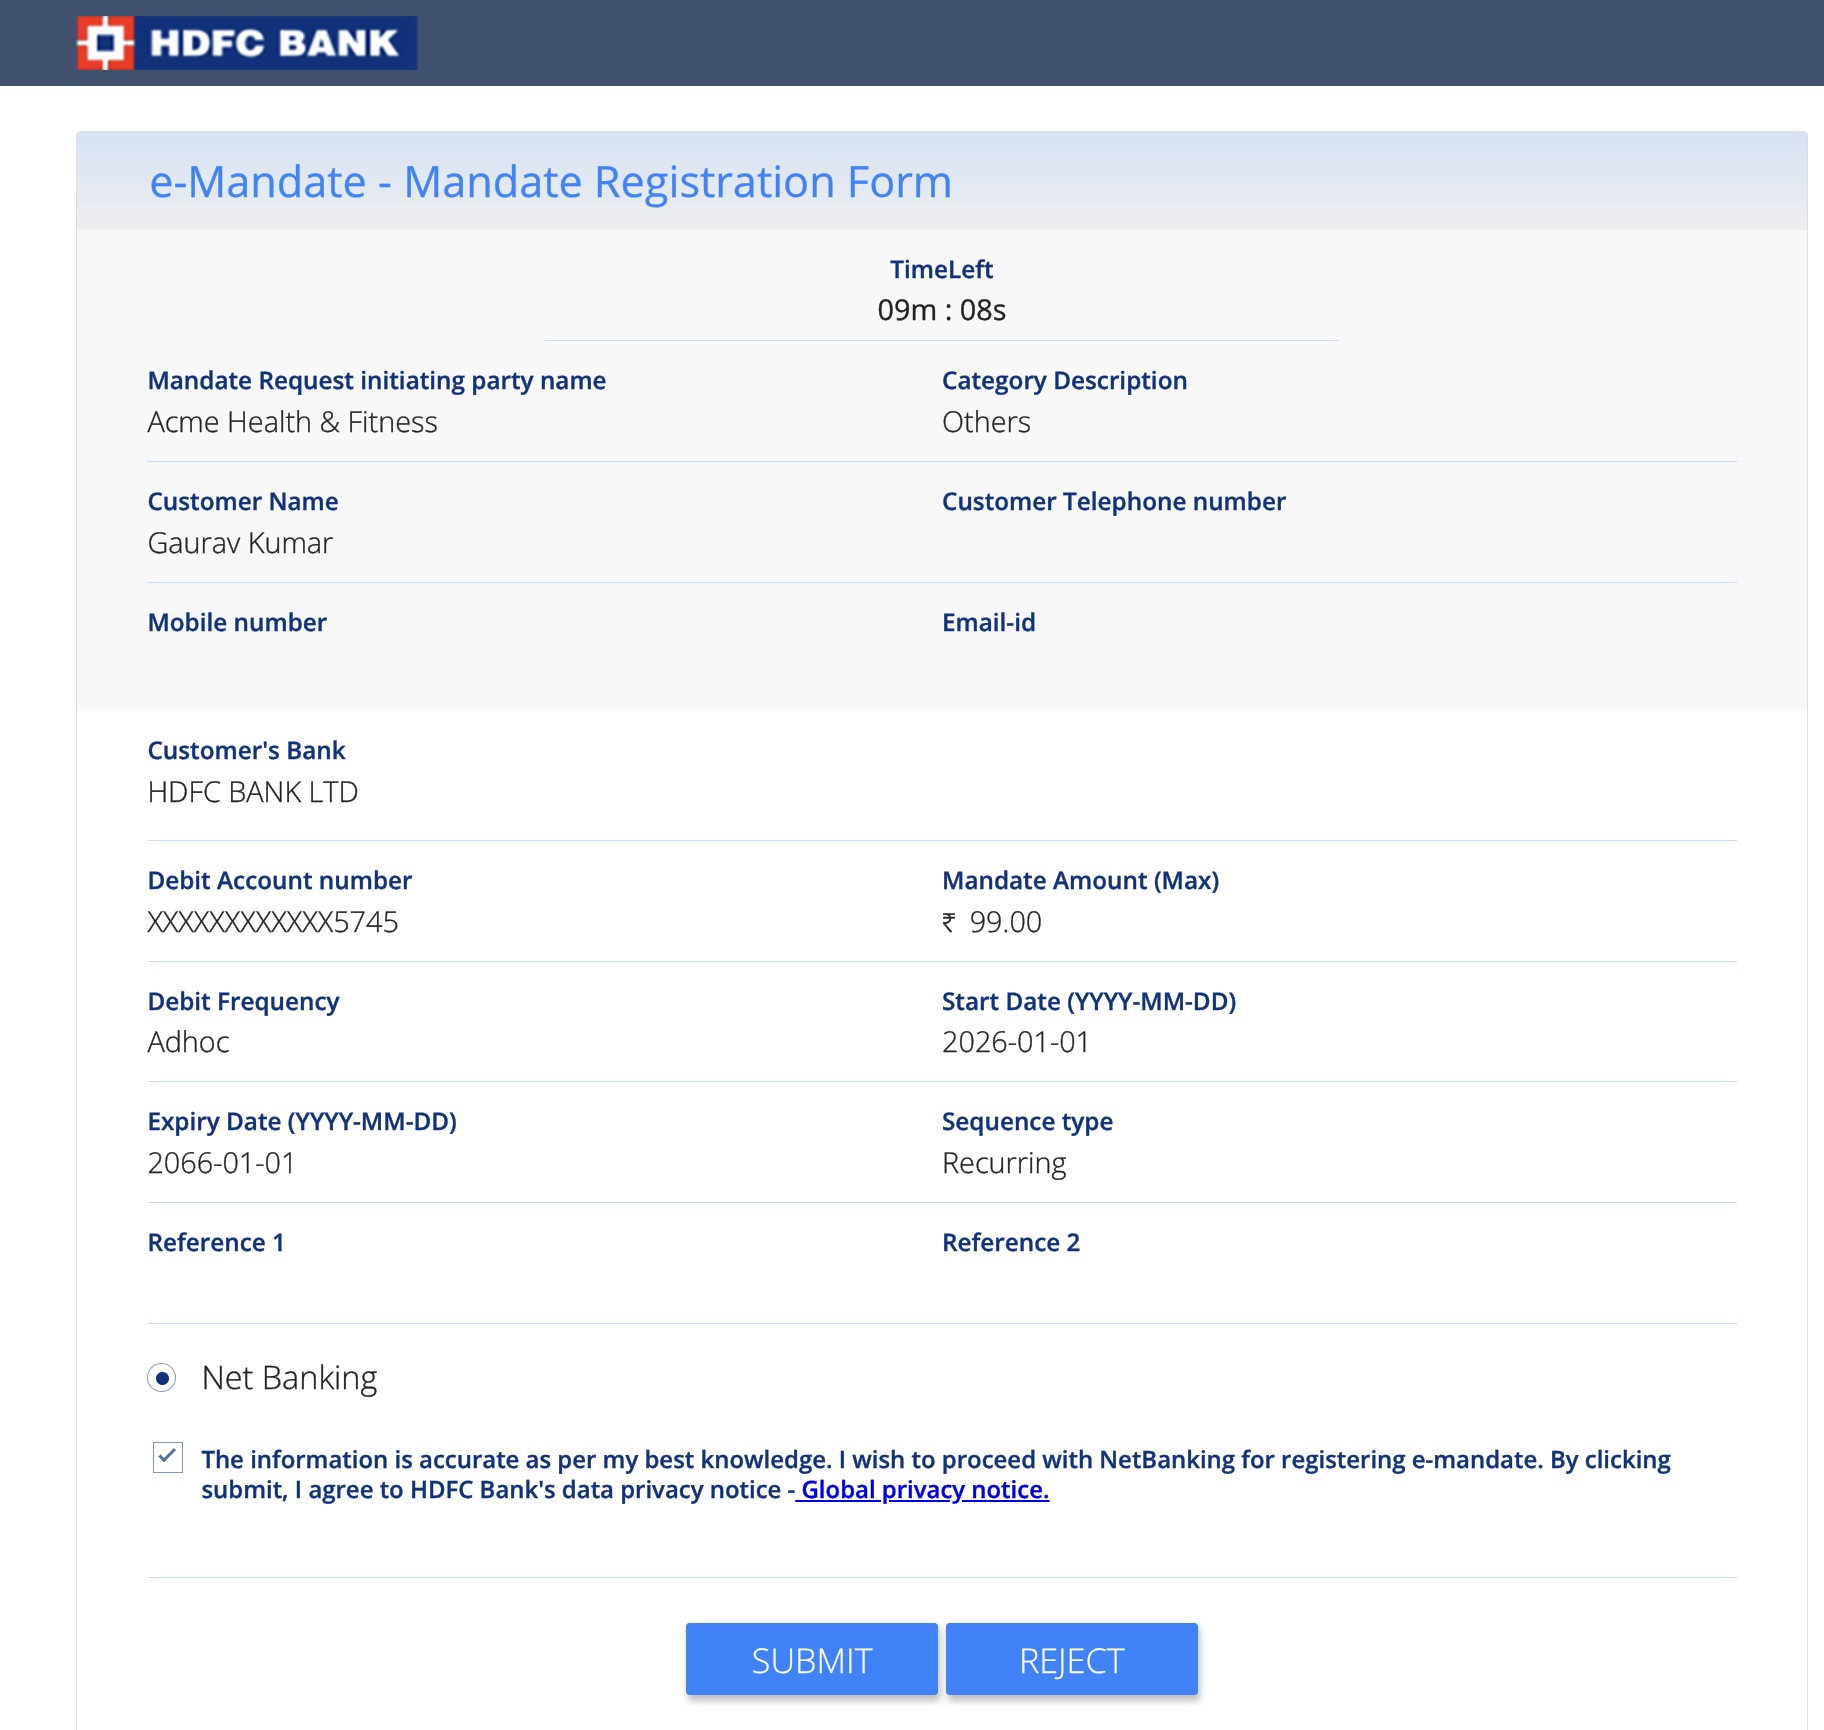 7. The bank's netbanking login page opens. Here, customer enters their login credentials and completes OTP verification process.
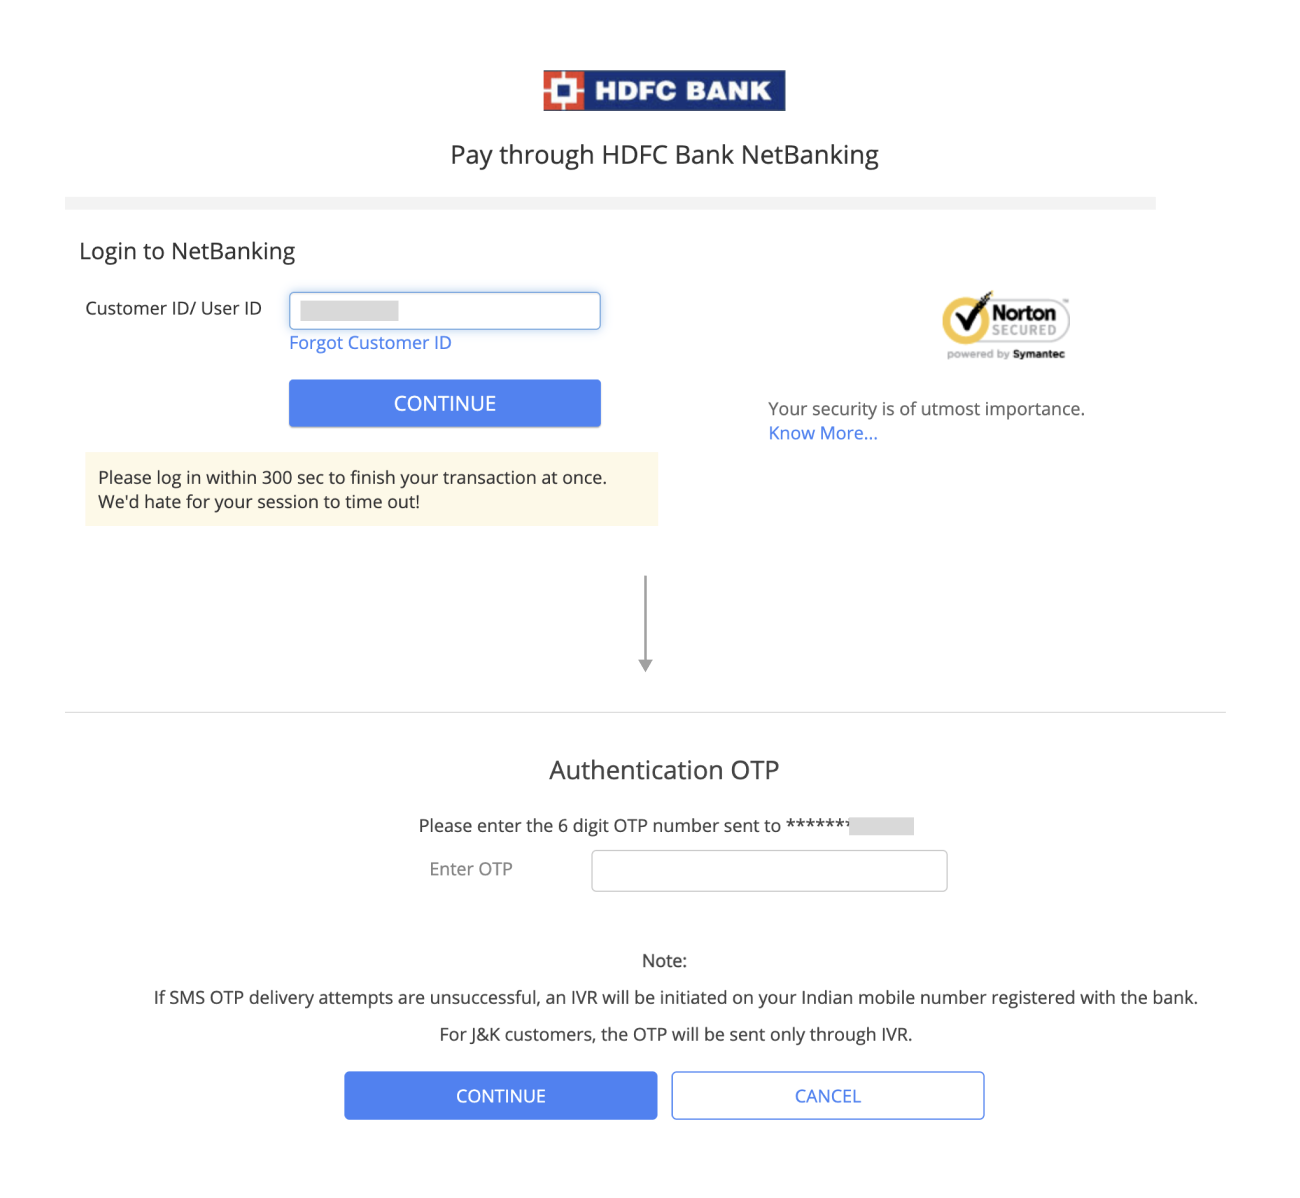 8. The customer is redirected to the NPCI mandate acceptance page. They are then automatically redirected to the Razorpay mandate success page, where they must click **Proceed**.
 9. The customer is redirected to the invoice checkout page which shows the final status. This completes the netbanking authentication process.
 7. They complete the OTP verification process.
 8. The customer is redirected to the NPCI mandate acceptance page. They are then automatically redirected to the Razorpay mandate success page, where they must click **Proceed**.
 9. The customer is redirected to the invoice checkout page which shows the final status. This completes the netbanking authentication process.
 To create subsequent payments using APIs:
1. [**Create a new Order**](/docs/api/payments/recurring-payments/emandate/create-subsequent-payments#3-1-create-an-order-to-charge-the-customer)
To create subsequent payments using APIs:
1. [**Create a new Order**](/docs/api/payments/recurring-payments/emandate/create-subsequent-payments#3-1-create-an-order-to-charge-the-customer)