> ## Documentation Index
> Fetch the complete documentation index at: https://razorpay-881012b3.mintlify.site/llms.txt
> Use this file to discover all available pages before exploring further.
# Route Dashboard
> Access Razorpay Route Dashboard, split payments to multiple third parties and initiate reversals and refunds.
Available in
🇮🇳 India
Use the Dashboard to add and manage linked accounts, transfer funds to them and initiate reversals in case of refunds to customers.
To access Route:
1. Log in to the Dashboard.
2. Click **Route** from the left pane.
You can perform the following actions using Route:
* Add and Manage Linked Accounts
* Initiate a Transfer
* Direct Transfer - Transfer amount to linked account from current balance.
* Transfer from Payments - Transfer payment received from customers to linked accounts.
* Issue a Refund
* Create a Reversal
* View Transfers and Reversals Reports
## Eligibility Requirements
As per RBI Payment Aggregator guidelines issued in September 2025, businesses must meet the following criteria to access or continue using Route.
### Minimum Financial Turnover
Your business must meet at least one of the following thresholds in either the current (FY26) or preceding (FY25) financial year:
| Turnover Type | Minimum Threshold | Accepted Document |
| ------------- | ----------------- | ------------------------------------------------------- |
| Domestic | > ₹40 Lakhs | GST-3B returns (cumulative taxable outward supplies) |
| Export | > ₹5 Lakhs | Bank-issued FIRC (INR equivalent of inward remittances) |
### Payer-Payee Transparency
The third party listed as your linked account must directly interface with your customers to provide goods or services. To meet this requirement, submit a written confirmation describing your Route use case. Razorpay will review the submission and, once approved, it will be treated as a valid declaration of Payer-Payee Transparency for your account.
**Watch Out!**
The deadline to submit compliance information was **December 31, 2025**. If you were using Route before this date and did not submit the required proofs, your Route access has been disabled. Please reach out to [Razorpay Support](https://razorpay.com/support/) to re-enable Route.
For answers to common questions about these requirements, refer to the [RBI Compliance FAQs](/docs/payments/route/faqs#rbi-compliance-requirements-for-route).
## Add and Manage Linked Accounts
From the Dashboard, create a linked account and provide the bank account details:
1. Click **Accounts** tab, and then click **+ Add Account**.
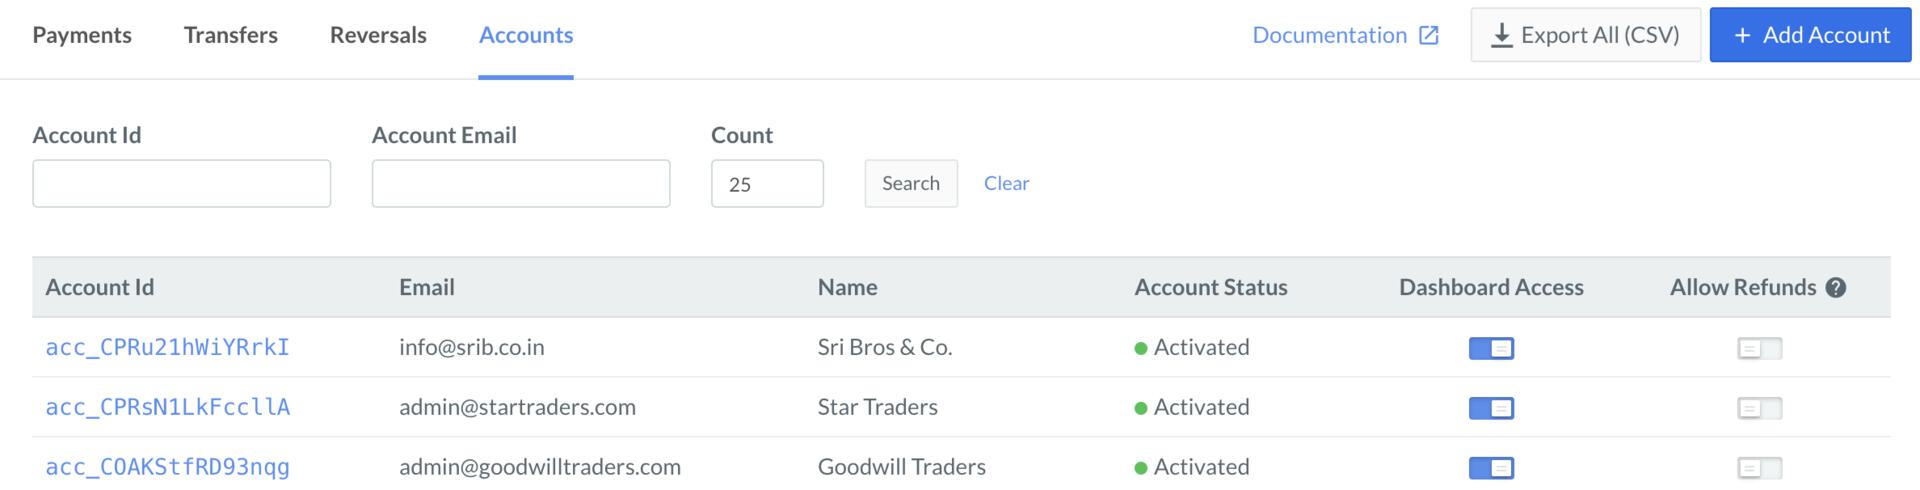 2. Enter **Account Name** and **Account Email**.
3. If you want to enable the Dashboard access for the linked account, turn on the toggle bar.
4. Click **Add**.
2. Enter **Account Name** and **Account Email**.
3. If you want to enable the Dashboard access for the linked account, turn on the toggle bar.
4. Click **Add**.
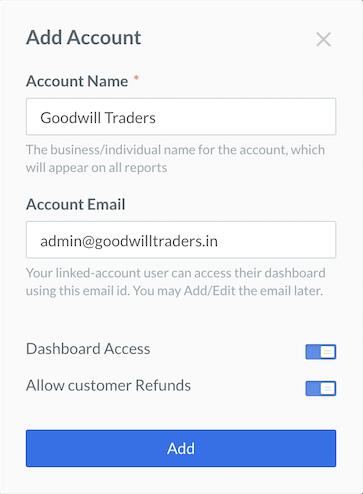 In the **KYC Form**, enter **Business Details** and **Bank Account Details**, and then click **Submit Form**.
## Grant Dashboard Access for Linked Accounts
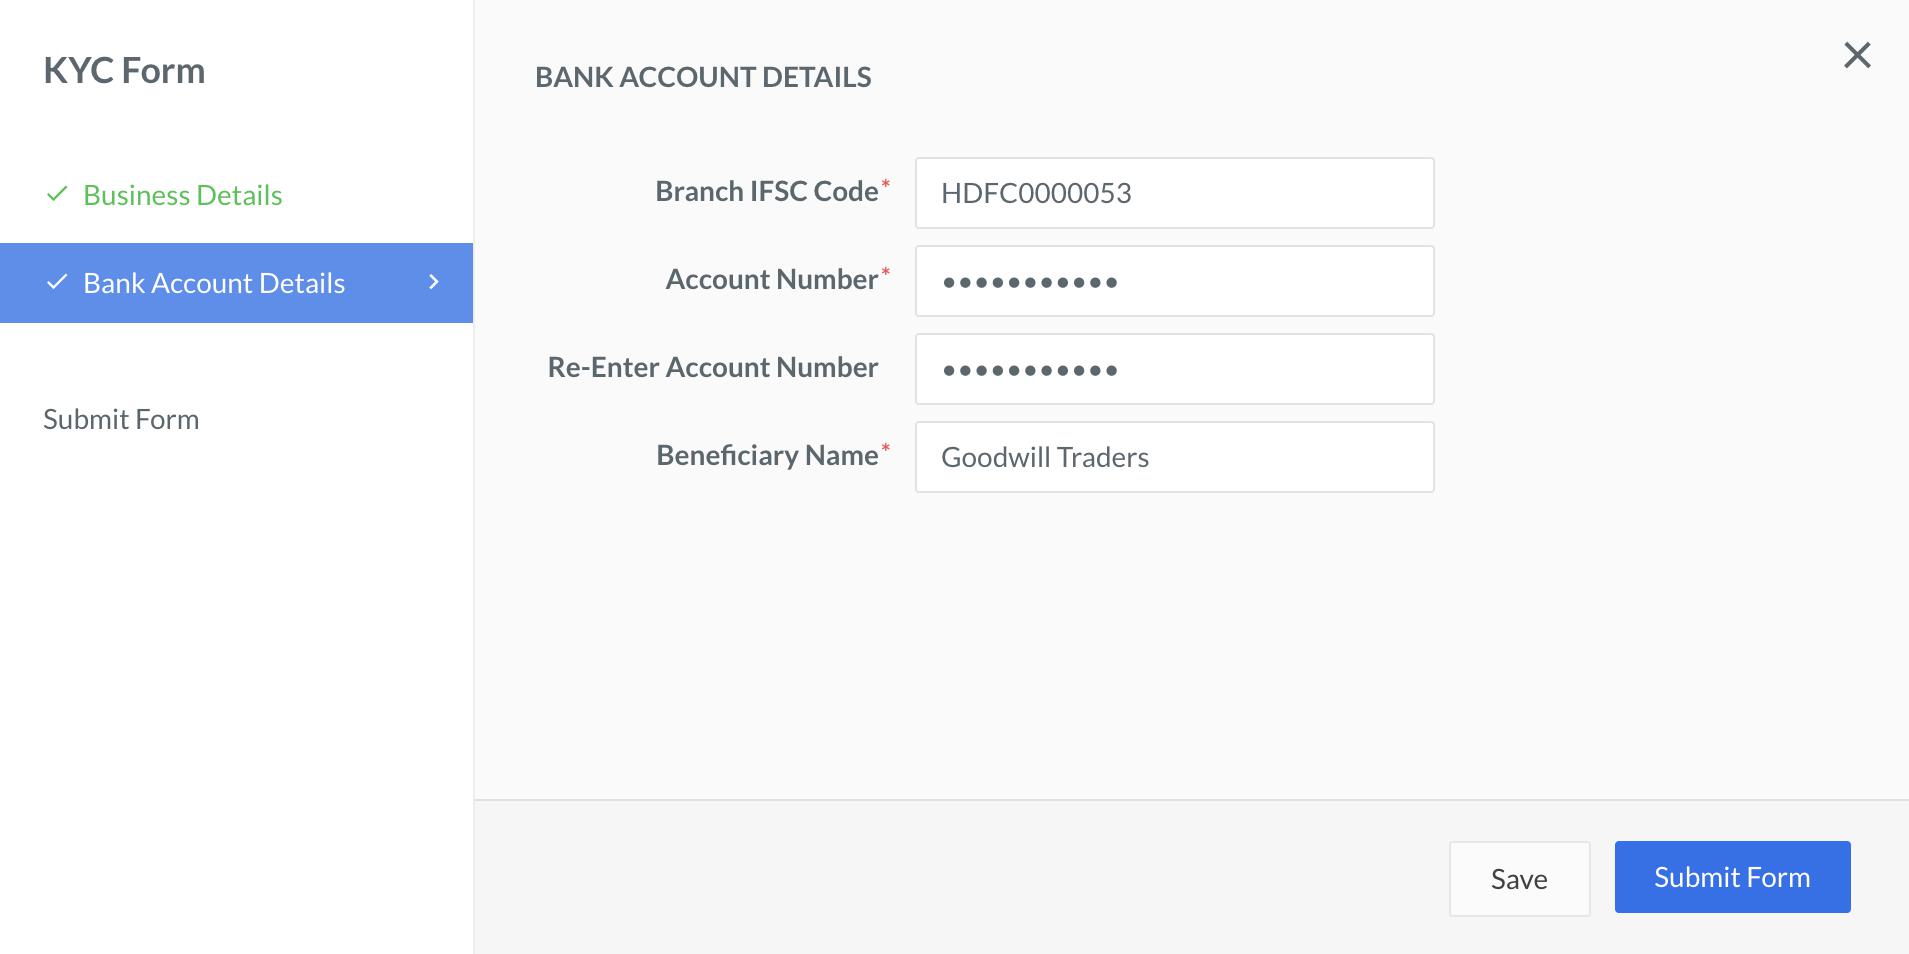
You can grant Dashboard access, enable refunds capability and refund credits for the linked accounts.
### Grant Dashboard Access
You can grant Dashboard access to your linked accounts. After the access is granted, the recipient linked account is notified of this action through a mail (sent to the email address used for onboarding), along with a password reset option.
You can provide Dashboard access while adding a new account.
If you want to provide access to the Dashboard for an existing account:
1. Navigate to the **Accounts** tab.
2. Turn on the **Dashboard Access** toggle against the relevant account.
For more details, refer to the [Linked Account Dashboard](/docs/payments/route/linked-account#grant-dashboard-access-to-linked-accounts) documentation.
### Enable Refunds Capability
Due to government regulations, in certain cases, linked accounts have to directly process refunds to customers.
You can enable refunds capability while adding a new account.
If you want to enable refunds capability for an existing account:
1. Navigate to the **Accounts** tab.
2. Turn on the **Enable Refunds** toggle against the relevant account.
### Enable Refund Credits
By default, refunds are processed using the linked account's unsettled balance. However, Razorpay Route provides the option to use a Refund Credits pool to process these transactions, instead of the existing unsettled balance.
Upon gaining access, funds can be transferred to the Refunds Credits pool through a specific account number shared by you. Enable Refund Credits for a linked account by sending an email to your Razorpay account manager with these details:
* Linked account name
* Email id
* Balance type (Refund Credit)
## Export Account Information
You can export account information in .csv format for your business needs. Click **Export All (CSV)** to initiate the download.
## Initiate a Transfer
### Direct Transfer
You can transfer funds to your linked accounts directly from your account balance using Direct Transfers.
**Feature Request**
This is an on-demand feature. Please raise a request with our [Support team](https://razorpay.com/support/#request) to get this feature activated on your Razorpay account.
Follow these steps to create a direct transfer to a linked account:
1. Log in to the Dashboard.
2. Under **PAYMENT PRODUCTS**, navigate to **Route** → **Transfers**.
3. Click **+Create Direct Transfer**.
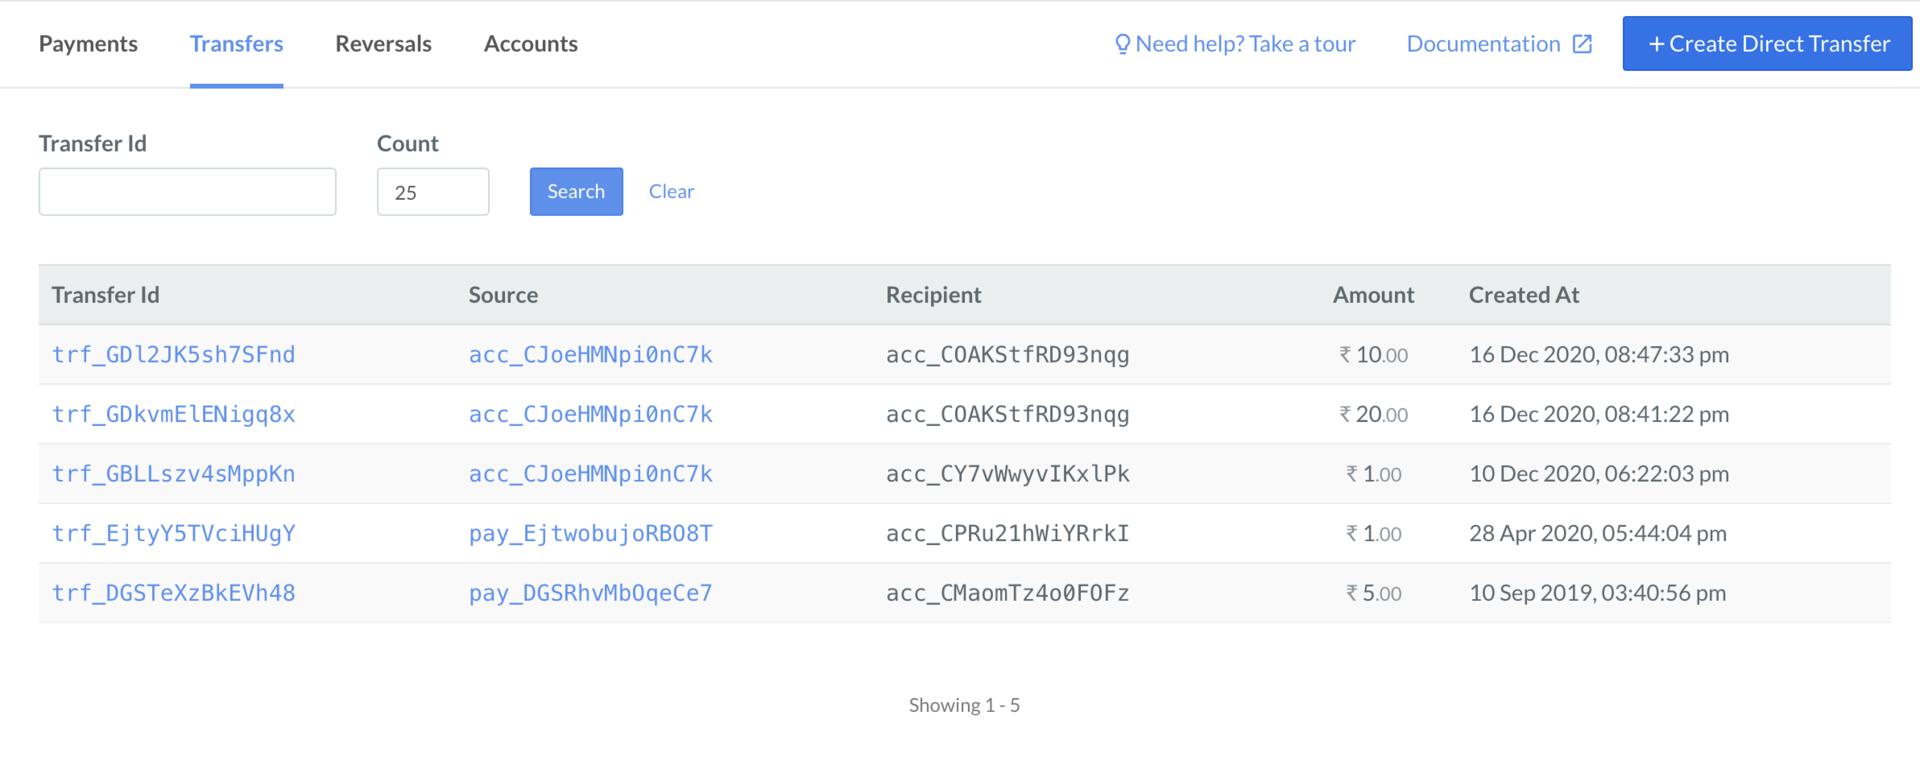 4. In the popup, provide the following details:
1. **Account** - Select the linked account to whom the amount should be transferred.
2. **Billing Amount** - Enter the amount to be transferred.
3. **Settlement Schedule** - The following options are available:
* **Settle Now** - Settle the transfer in the next available settlement slot.
* **Schedule Settlement on** - Settle the amount on a scheduled date.
* **Put on hold** - Put the settlement on hold indefinitely.
4. **Notes** - You can add any additional information regarding the transfer.
5. Click **Create Transfer**.
4. In the popup, provide the following details:
1. **Account** - Select the linked account to whom the amount should be transferred.
2. **Billing Amount** - Enter the amount to be transferred.
3. **Settlement Schedule** - The following options are available:
* **Settle Now** - Settle the transfer in the next available settlement slot.
* **Schedule Settlement on** - Settle the amount on a scheduled date.
* **Put on hold** - Put the settlement on hold indefinitely.
4. **Notes** - You can add any additional information regarding the transfer.
5. Click **Create Transfer**.
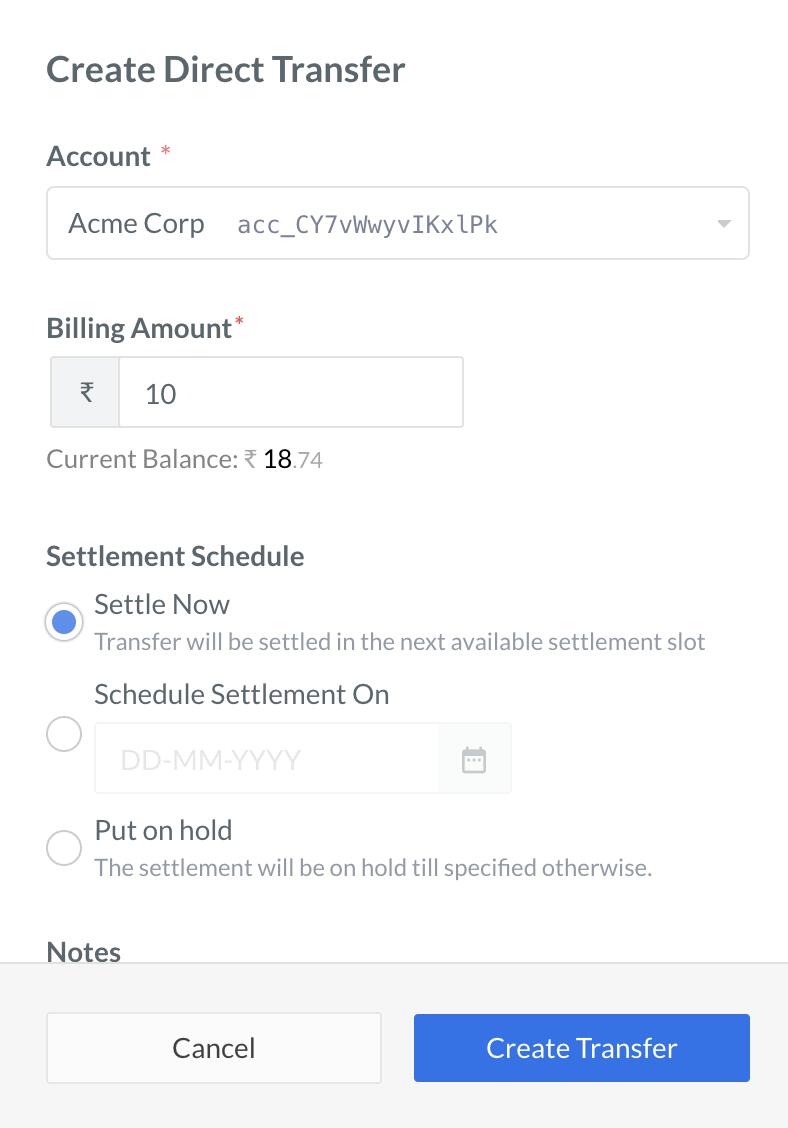 #### View Direct Transfers
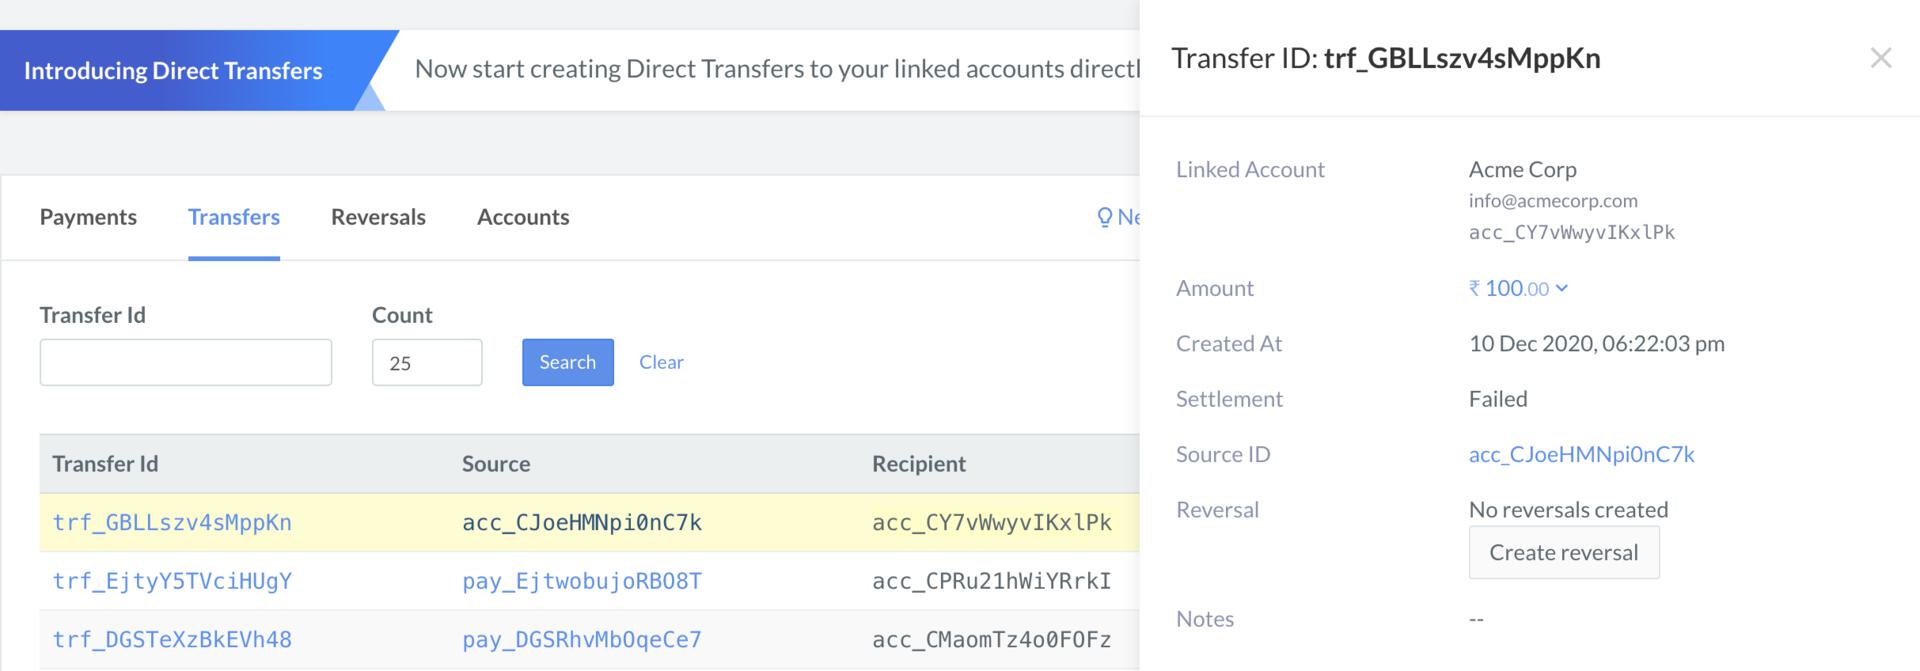
Once created, the direct transfer appears on the Transfers list. Click on the transfer id to view the details on the side panel. For a direct transfer, the **account id** will appear as the source.
#### View Direct Transfers
Once created, the direct transfer appears on the Transfers list. Click on the transfer id to view the details on the side panel. For a direct transfer, the **account id** will appear as the source.
 ### Transfer from a Payment
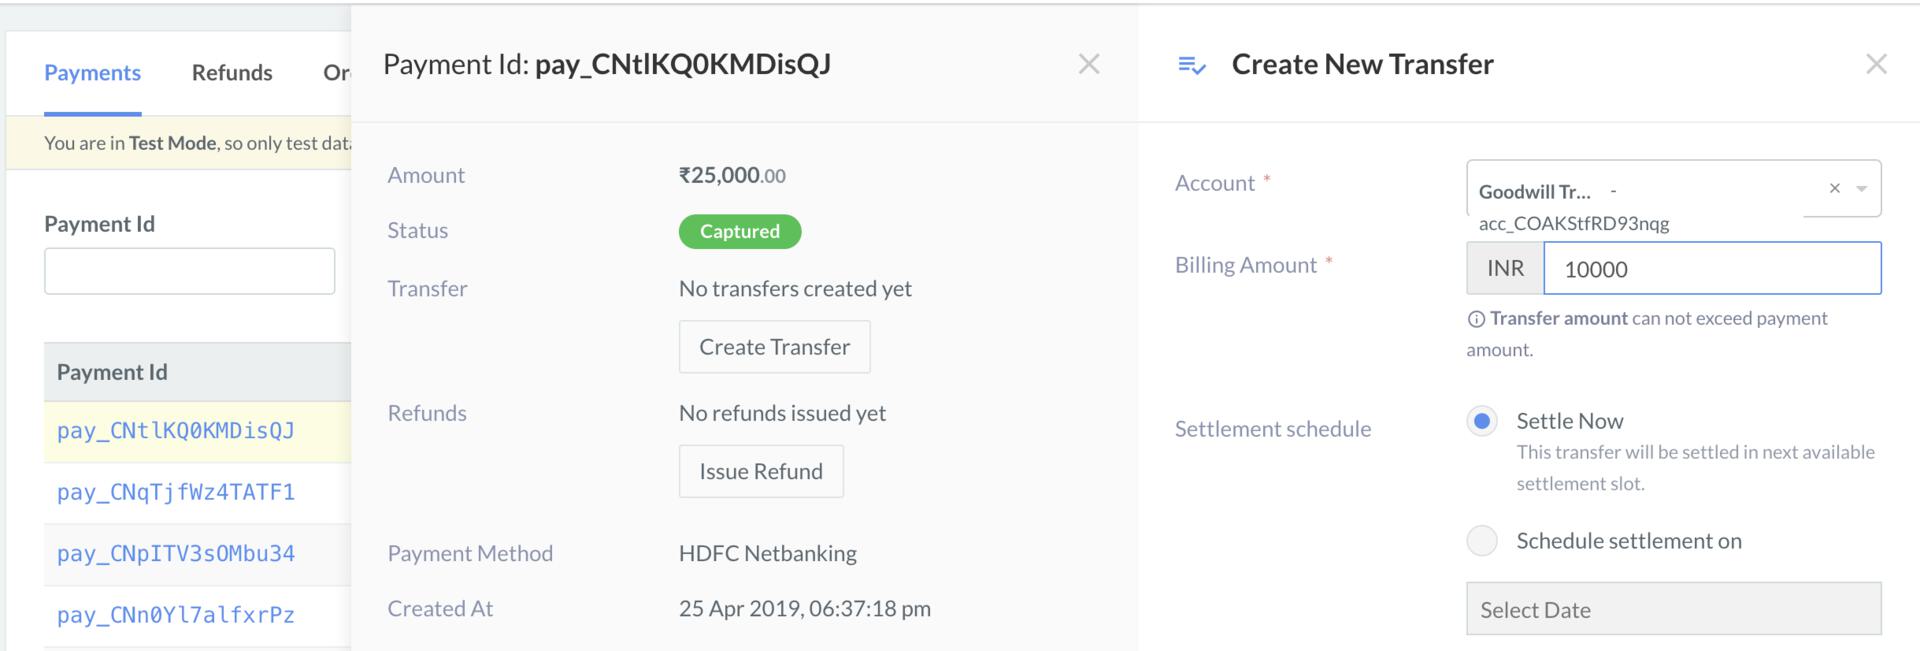
The payments received from customers appear in the **Transactions** tab. To view these in detail, click the relevant Payment id. After the payment is captured, you can initiate the transfer to the linked account:
1. Under the **Payments** tab, click the relevant **Payment ID**.
2. In the Payment details pane,
1. Select the linked account to transfer to from the drop-down list.
2. Enter the billing amount. It can be a full or partial transfer.
3. Select the **Settlement Schedule** option:
1. **Settle Now** - Use this to settle in the next available settlement slot. If your schedule is T+3, the transfer will happen accordingly.
2. **Schedule Settlement On** - Select this to schedule the transfer to a later date using the calendar.
3. **Put on Hold** - Use this to defer the transfer until specified otherwise.
3. Add internal notes relevant to the transfer if any. You can choose to share the note with your linked account.
4. Click **Create Transfer**.
### Transfer from a Payment
The payments received from customers appear in the **Transactions** tab. To view these in detail, click the relevant Payment id. After the payment is captured, you can initiate the transfer to the linked account:
1. Under the **Payments** tab, click the relevant **Payment ID**.
2. In the Payment details pane,
1. Select the linked account to transfer to from the drop-down list.
2. Enter the billing amount. It can be a full or partial transfer.
3. Select the **Settlement Schedule** option:
1. **Settle Now** - Use this to settle in the next available settlement slot. If your schedule is T+3, the transfer will happen accordingly.
2. **Schedule Settlement On** - Select this to schedule the transfer to a later date using the calendar.
3. **Put on Hold** - Use this to defer the transfer until specified otherwise.
3. Add internal notes relevant to the transfer if any. You can choose to share the note with your linked account.
4. Click **Create Transfer**.
 The transaction is available in the **Route** section under the **Payments** and **Transfers** tabs. From here, you can initiate transfers and reversals for linked accounts.
## Issue a Refund
To issue a refund to the customer:
1. Under the **Payments** tab, click the relevant **Payment ID**.
2. In the **Payment details** pane, click **Issue Refund**.
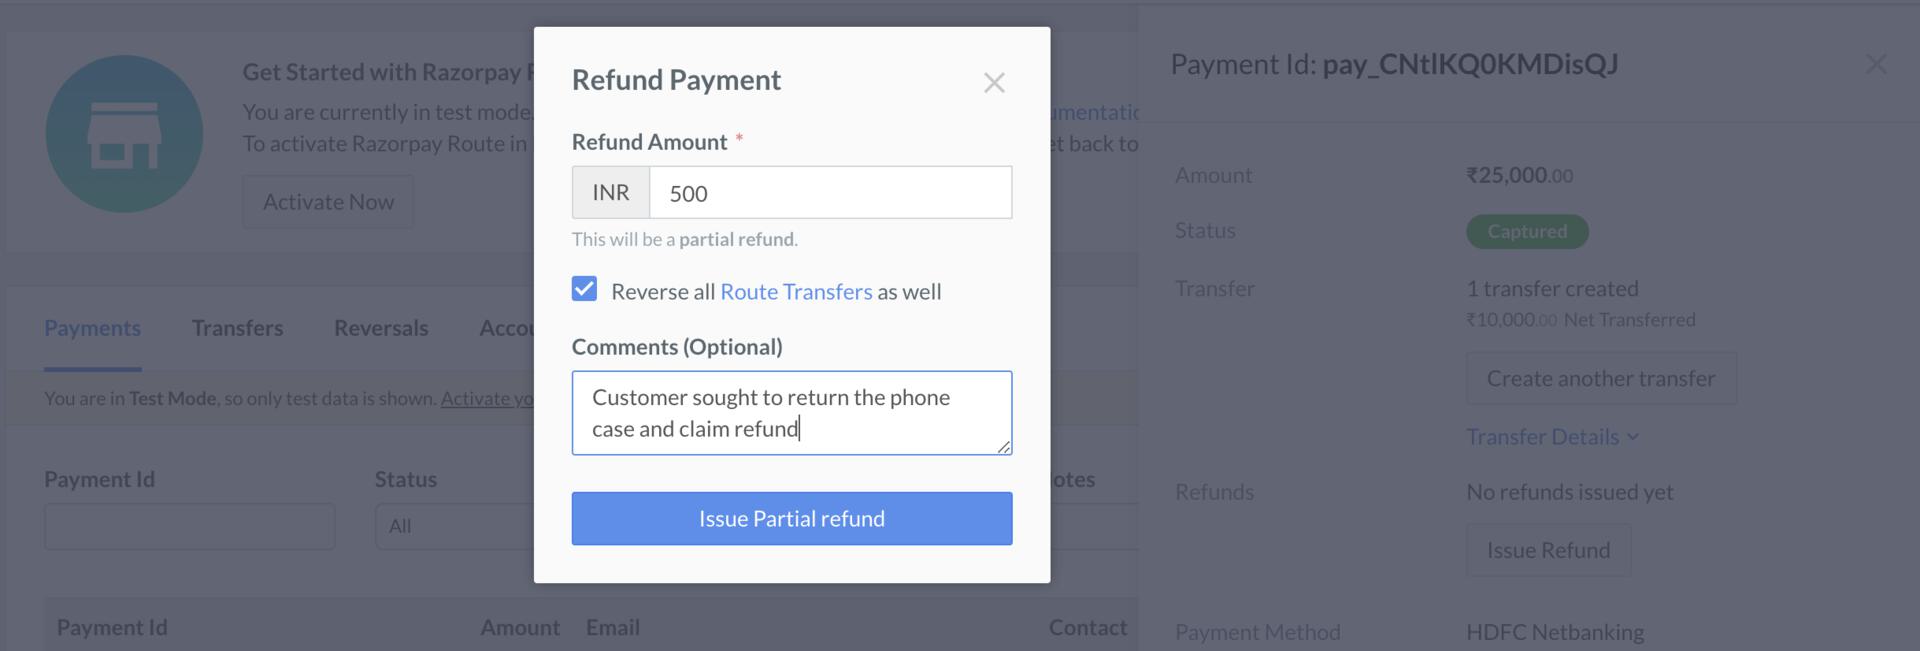
1. For a full refund, enter the total transaction amount. Enter comments if required, and then click **Issue Full Refund**.
2. For a partial refund, enter the amount. Enter comments if required, and then click **Issue Partial Refund**.
3. The refund transfer takes place from your primary account. Hence, you must create a corresponding reversal for the linked account. This can be done manually, or you may use the **Reverse all Route Transfers as well** option for automatic reversal.
4. In the dialog box that appears, confirm refund by clicking **Yes, Refund**.
The transaction is available in the **Route** section under the **Payments** and **Transfers** tabs. From here, you can initiate transfers and reversals for linked accounts.
## Issue a Refund
To issue a refund to the customer:
1. Under the **Payments** tab, click the relevant **Payment ID**.
2. In the **Payment details** pane, click **Issue Refund**.
1. For a full refund, enter the total transaction amount. Enter comments if required, and then click **Issue Full Refund**.
2. For a partial refund, enter the amount. Enter comments if required, and then click **Issue Partial Refund**.
3. The refund transfer takes place from your primary account. Hence, you must create a corresponding reversal for the linked account. This can be done manually, or you may use the **Reverse all Route Transfers as well** option for automatic reversal.
4. In the dialog box that appears, confirm refund by clicking **Yes, Refund**.
 ## Create a Reversal
To move funds back from the linked account to your account, follow the below steps:
1. Under the **Transfers** tab, click the relevant **Transfer ID**.
2. In the **Transfers details** pane, click **Create Reversal**.
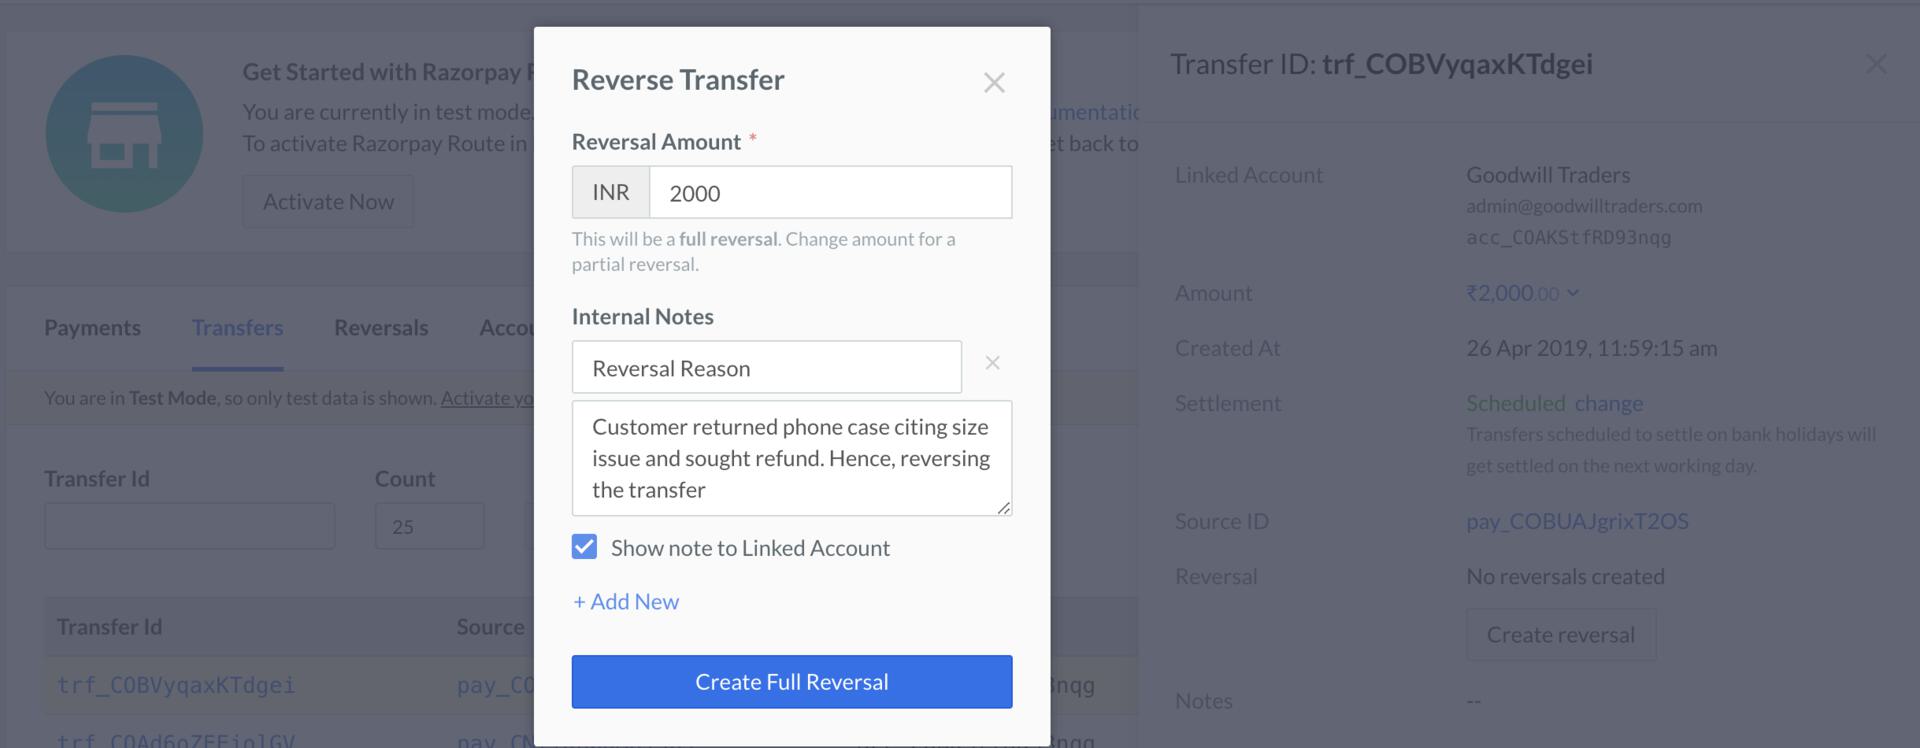
1. For a full reversal, enter the total transfer amount. Add internal notes and share it with linked account if required. Click **Create Full Reversal**.
2. You can also make a partial reversal. Enter the amount, add notes if required and click **Issue Partial Refund**.
3. In the dialog box that appears, confirm reversal by clicking **Yes, Reverse**.
You can view the reversal in the **Reversals** tab.
## Create a Reversal
To move funds back from the linked account to your account, follow the below steps:
1. Under the **Transfers** tab, click the relevant **Transfer ID**.
2. In the **Transfers details** pane, click **Create Reversal**.
1. For a full reversal, enter the total transfer amount. Add internal notes and share it with linked account if required. Click **Create Full Reversal**.
2. You can also make a partial reversal. Enter the amount, add notes if required and click **Issue Partial Refund**.
3. In the dialog box that appears, confirm reversal by clicking **Yes, Reverse**.
You can view the reversal in the **Reversals** tab.
 ## View Transfers and Reversals Reports
You can view the transfers made to and reversals initiated from linked accounts in the Transfers and Reversals reports available in **Dashboard** → **Reports**.
### Transfers Report
To view the **Transfers** report:
1. Under the **Transfers** tab, select the **Period** - Daily or Monthly and choose the date or month.
2. Select the file format - You can choose CSV, XLSX or XLS formats.
3. Click **Download Report** or get it emailed to your registered email address by clicking **Email Report**.
This report is displayed as shown below:
## View Transfers and Reversals Reports
You can view the transfers made to and reversals initiated from linked accounts in the Transfers and Reversals reports available in **Dashboard** → **Reports**.
### Transfers Report
To view the **Transfers** report:
1. Under the **Transfers** tab, select the **Period** - Daily or Monthly and choose the date or month.
2. Select the file format - You can choose CSV, XLSX or XLS formats.
3. Click **Download Report** or get it emailed to your registered email address by clicking **Email Report**.
This report is displayed as shown below:
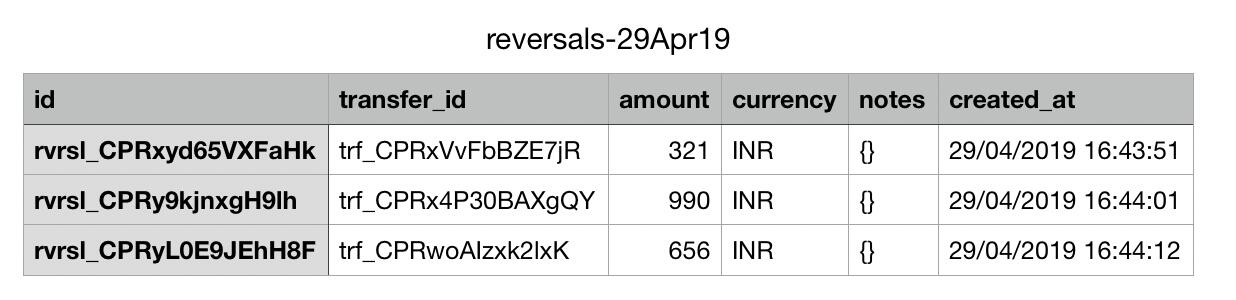
 ### Reversals Report
To view the Reversals report:
1. Under the **Reversals** tab, select the **Period** - Daily or Monthly and choose the date or month.
2. Select the file format - You can choose CSV, XLSX or XLS formats.
3. Click **Download Report** or get it emailed to your registered email address by clicking **Email Report**.
This report is displayed as shown below:
### Reversals Report
To view the Reversals report:
1. Under the **Reversals** tab, select the **Period** - Daily or Monthly and choose the date or month.
2. Select the file format - You can choose CSV, XLSX or XLS formats.
3. Click **Download Report** or get it emailed to your registered email address by clicking **Email Report**.
This report is displayed as shown below: