> ## Documentation Index
> Fetch the complete documentation index at: https://razorpay-881012b3.mintlify.site/llms.txt
> Use this file to discover all available pages before exploring further.
# Initiate Refund - Linked Account Dashboard
> Initiate a refund from the Linked Account Dashboard.
Available in🇮🇳 India
The Linked Account users can initiate a refund for individual transaction levels or in batches from the Linked Account Dashboard. They can also make full and partial refunds to the customers.
## Use Refund Credits
By default, refunds are processed using the Linked Account’s unsettled balance. However, Razorpay Route provides the option to use a Refund Credits pool to process these transactions, instead of the existing unsettled balance.
The Linked Account holders must send an offline request to you to use [Refund Credits](/docs/payments/route/dashboard#enable-refund-credits). Upon gaining access, funds can be transferred to the Refund Credits pool through the account number that you share.
Once enabled, only Refund Credits can be used to process refunds. The **Refund Credits** can be seen on the **Reversals** screen as shown below:
You can initiate the following types of refunds from the Linked Account: [Individual Refund](/docs/payments/route/linked-account/initiate-refund#individual-refunds), [Full Refund](/docs/payments/route/linked-account/initiate-refund#full-refund), [Partial Refund](/docs/payments/route/linked-account/initiate-refund#partial-refund) and [Batch Refund](/docs/payments/route/linked-account/initiate-refund#batch-refunds).
## Refund Checklist
* Ensure you have sufficient nodal balance to create a refund.
* To enable Refund Credits for a Linked Account, send an email to your Razorpay Account Manager with details of the linked account, email id and balance type (refund credits).
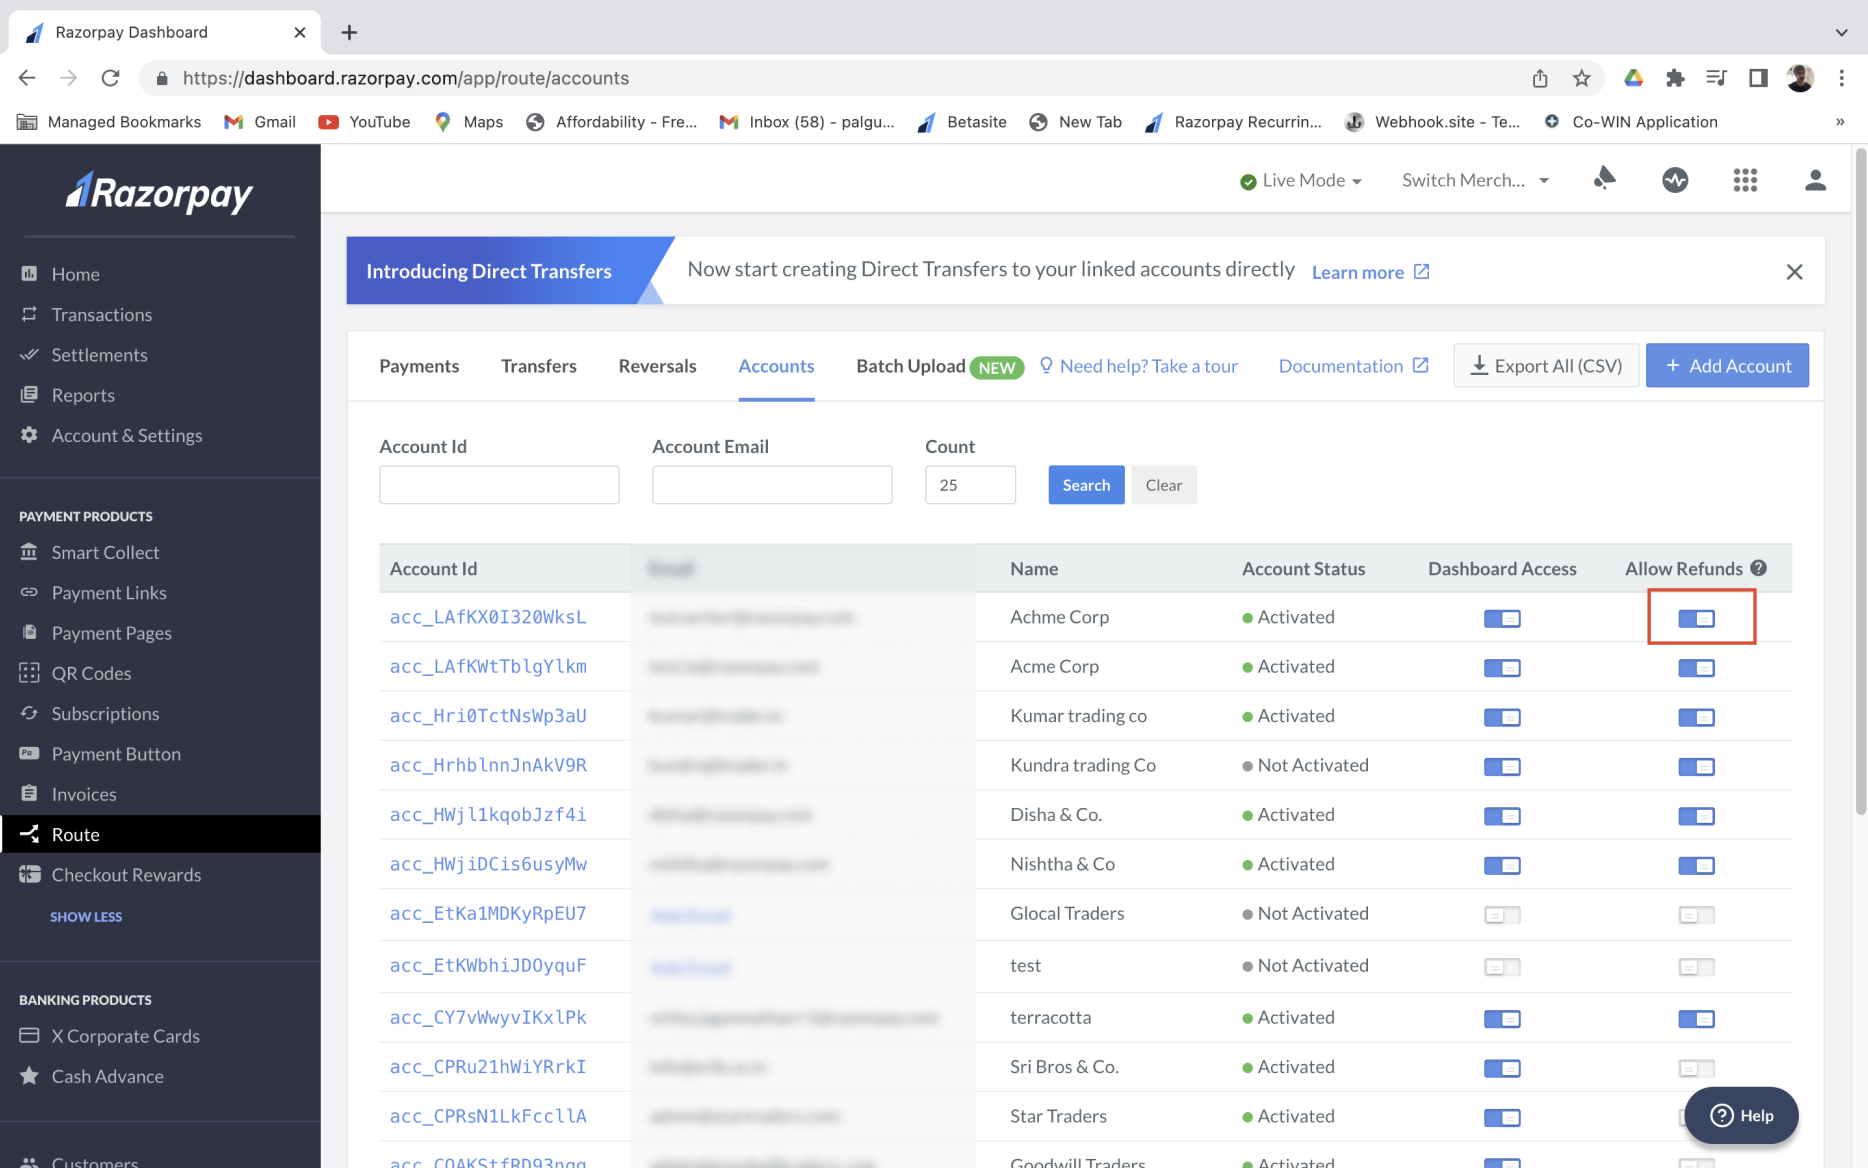
* To allow refund capability for an existing account, go to the **Accounts** tab and enable the **Allow Refunds** option against the relevant account.
## Initiate Refund
See how you can initiate the following types of refunds from your Dashboard.
Watch this video to see how to initiate a refund for an individual transaction.
To issue an individual refund:
1. Log in to the Dashboard and click **Route** under **PAYMENT PRODUCTS**.
2. Go to the **Transfers** tab.
3. Select the **Refund to Customer** option.
4. Enter the refund amount and add a description in the **Notes** field.
To initiate a full refund:
1. Enter the full transaction amount.
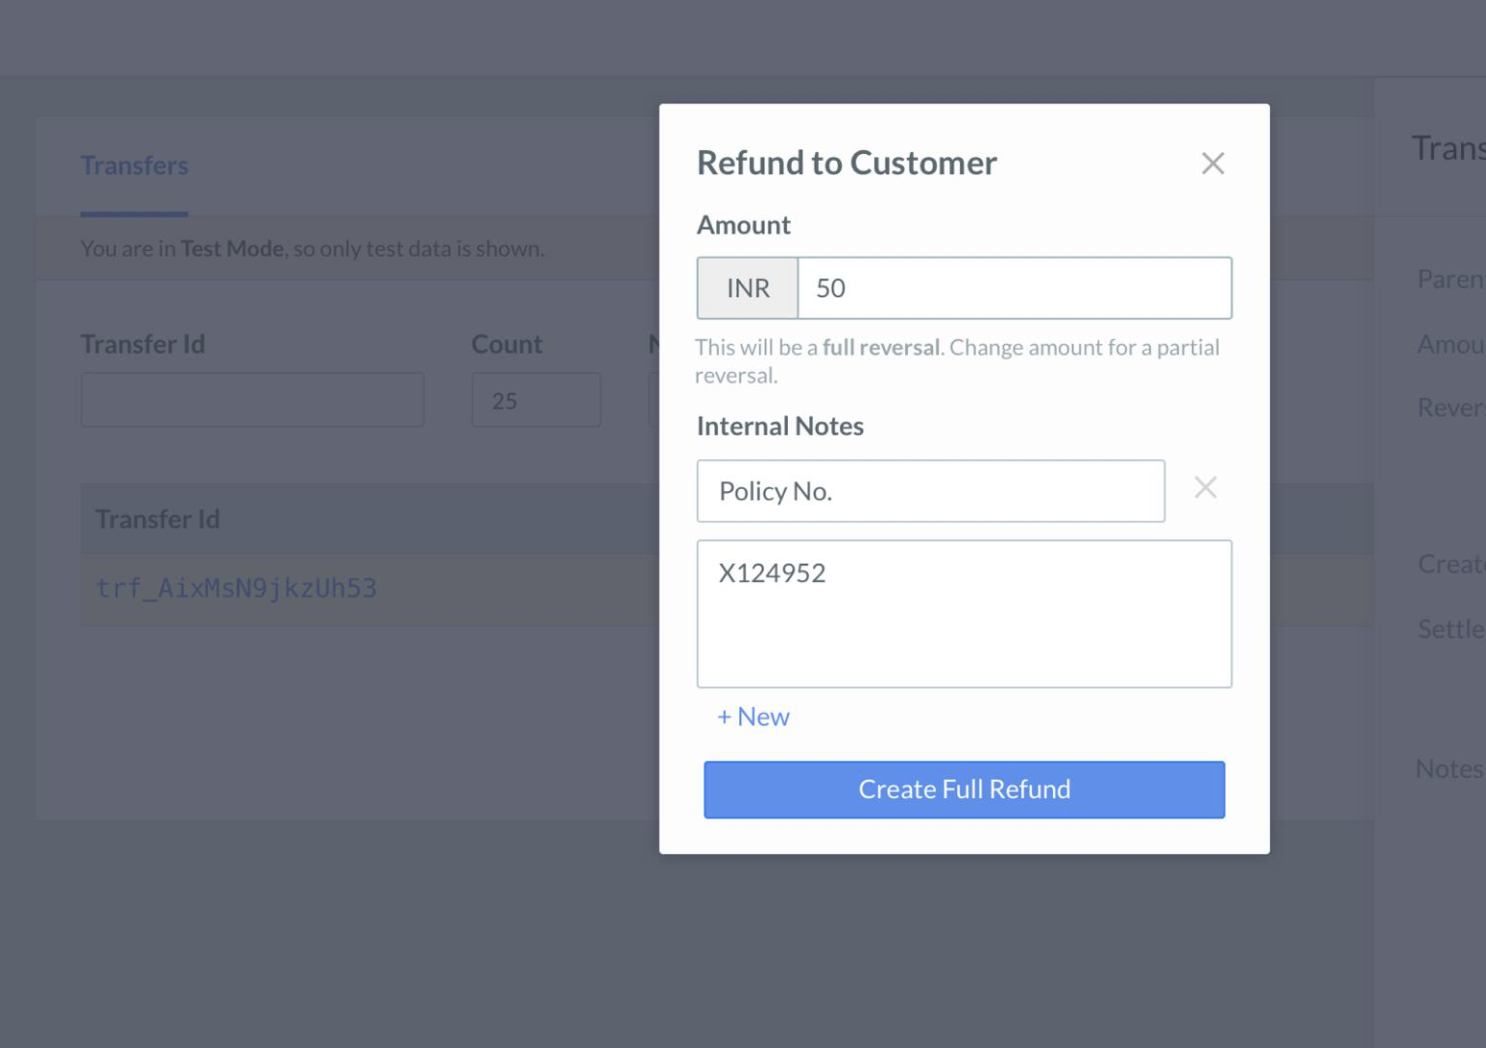
2. Click **Create Full Refund**.
The screen appears as shown below:
To initiate a partial refund:
1. Enter an amount lower than the total transaction value.
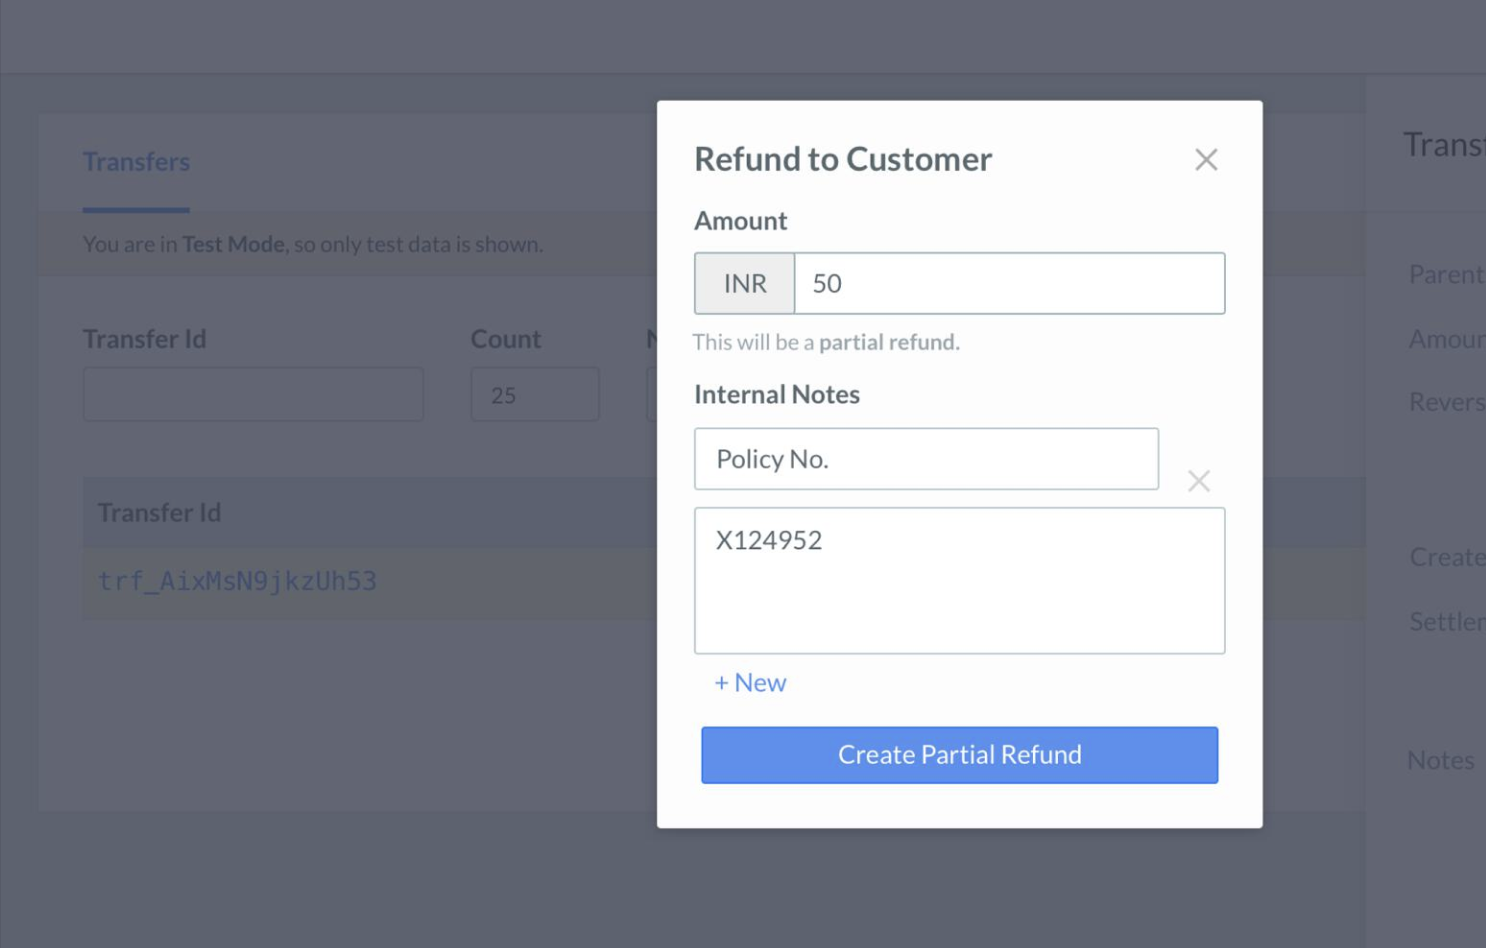
2. Click **Create Partial Refund**.
The screen appears as shown below:
Using Batch refund, you can process a large volume of refund from the Linked Accounts Dashboard.
To initiate batch refund:
1. Download the Batch Refund Format - Click the download button to obtain the .csv format, wherein the transaction details can be entered.
2. Enter the necessary information in the file.
3. Upload the Batch Refund Format - After entering all the necessary details, upload the file.
Once uploaded, if the funds are sufficient, the batch file is processed.
**Watch Out!**
While performing batch refund, the Linked Account user must ensure that the refund amount is entered in paise and not in INR.
#### Process Batch Refund
After the batch refund is processed, you can download the output file to view the reversals. In case some of the batch records were not processed, an error is displayed for such records. You may then attempt a repeat refund after handling the errors.
### Related Information
* [Route](/docs/payments/route)
* [Linked Accounts](/docs/payments/route/linked-account)
* [Reversals and Settlements](/docs/payments/route/linked-account/reversals-settlements)
* [Manage Profile and Team](/docs/payments/route/linked-account/manage-profile)
 You can initiate the following types of refunds from the Linked Account: [Individual Refund](/docs/payments/route/linked-account/initiate-refund#individual-refunds), [Full Refund](/docs/payments/route/linked-account/initiate-refund#full-refund), [Partial Refund](/docs/payments/route/linked-account/initiate-refund#partial-refund) and [Batch Refund](/docs/payments/route/linked-account/initiate-refund#batch-refunds).
## Refund Checklist
* Ensure you have sufficient nodal balance to create a refund.
* To enable Refund Credits for a Linked Account, send an email to your Razorpay Account Manager with details of the linked account, email id and balance type (refund credits).
* To allow refund capability for an existing account, go to the **Accounts** tab and enable the **Allow Refunds** option against the relevant account.
You can initiate the following types of refunds from the Linked Account: [Individual Refund](/docs/payments/route/linked-account/initiate-refund#individual-refunds), [Full Refund](/docs/payments/route/linked-account/initiate-refund#full-refund), [Partial Refund](/docs/payments/route/linked-account/initiate-refund#partial-refund) and [Batch Refund](/docs/payments/route/linked-account/initiate-refund#batch-refunds).
## Refund Checklist
* Ensure you have sufficient nodal balance to create a refund.
* To enable Refund Credits for a Linked Account, send an email to your Razorpay Account Manager with details of the linked account, email id and balance type (refund credits).
* To allow refund capability for an existing account, go to the **Accounts** tab and enable the **Allow Refunds** option against the relevant account.
 ## Initiate Refund
See how you can initiate the following types of refunds from your Dashboard.
## Initiate Refund
See how you can initiate the following types of refunds from your Dashboard.