> ## Documentation Index
> Fetch the complete documentation index at: https://razorpay-881012b3.mintlify.site/llms.txt
> Use this file to discover all available pages before exploring further.
# Create Customer Identifiers
> Create and view Customer Identifiers and UPI IDs using the Razorpay Dashboard.
Available in
🇮🇳 India
Smart Collect simplifies the reconciliation of payments received via bank transfers. It allows you to create unique Customer Identifiers for specific customers. Payments are then automatically reconciled against these identifiers, reducing manual effort.
**Watch Out**
* You can create Customer Identifiers associated with UPI Transfers only with Smart Collect 2.0.
* Bank account is mandatory to create a Customer Identifier. You cannot create a Customer Identifier using VPA (UPI) alone.
## Create Customer Identifiers for Smart Collect
You can create a Customer Identifier from the Dashboard:
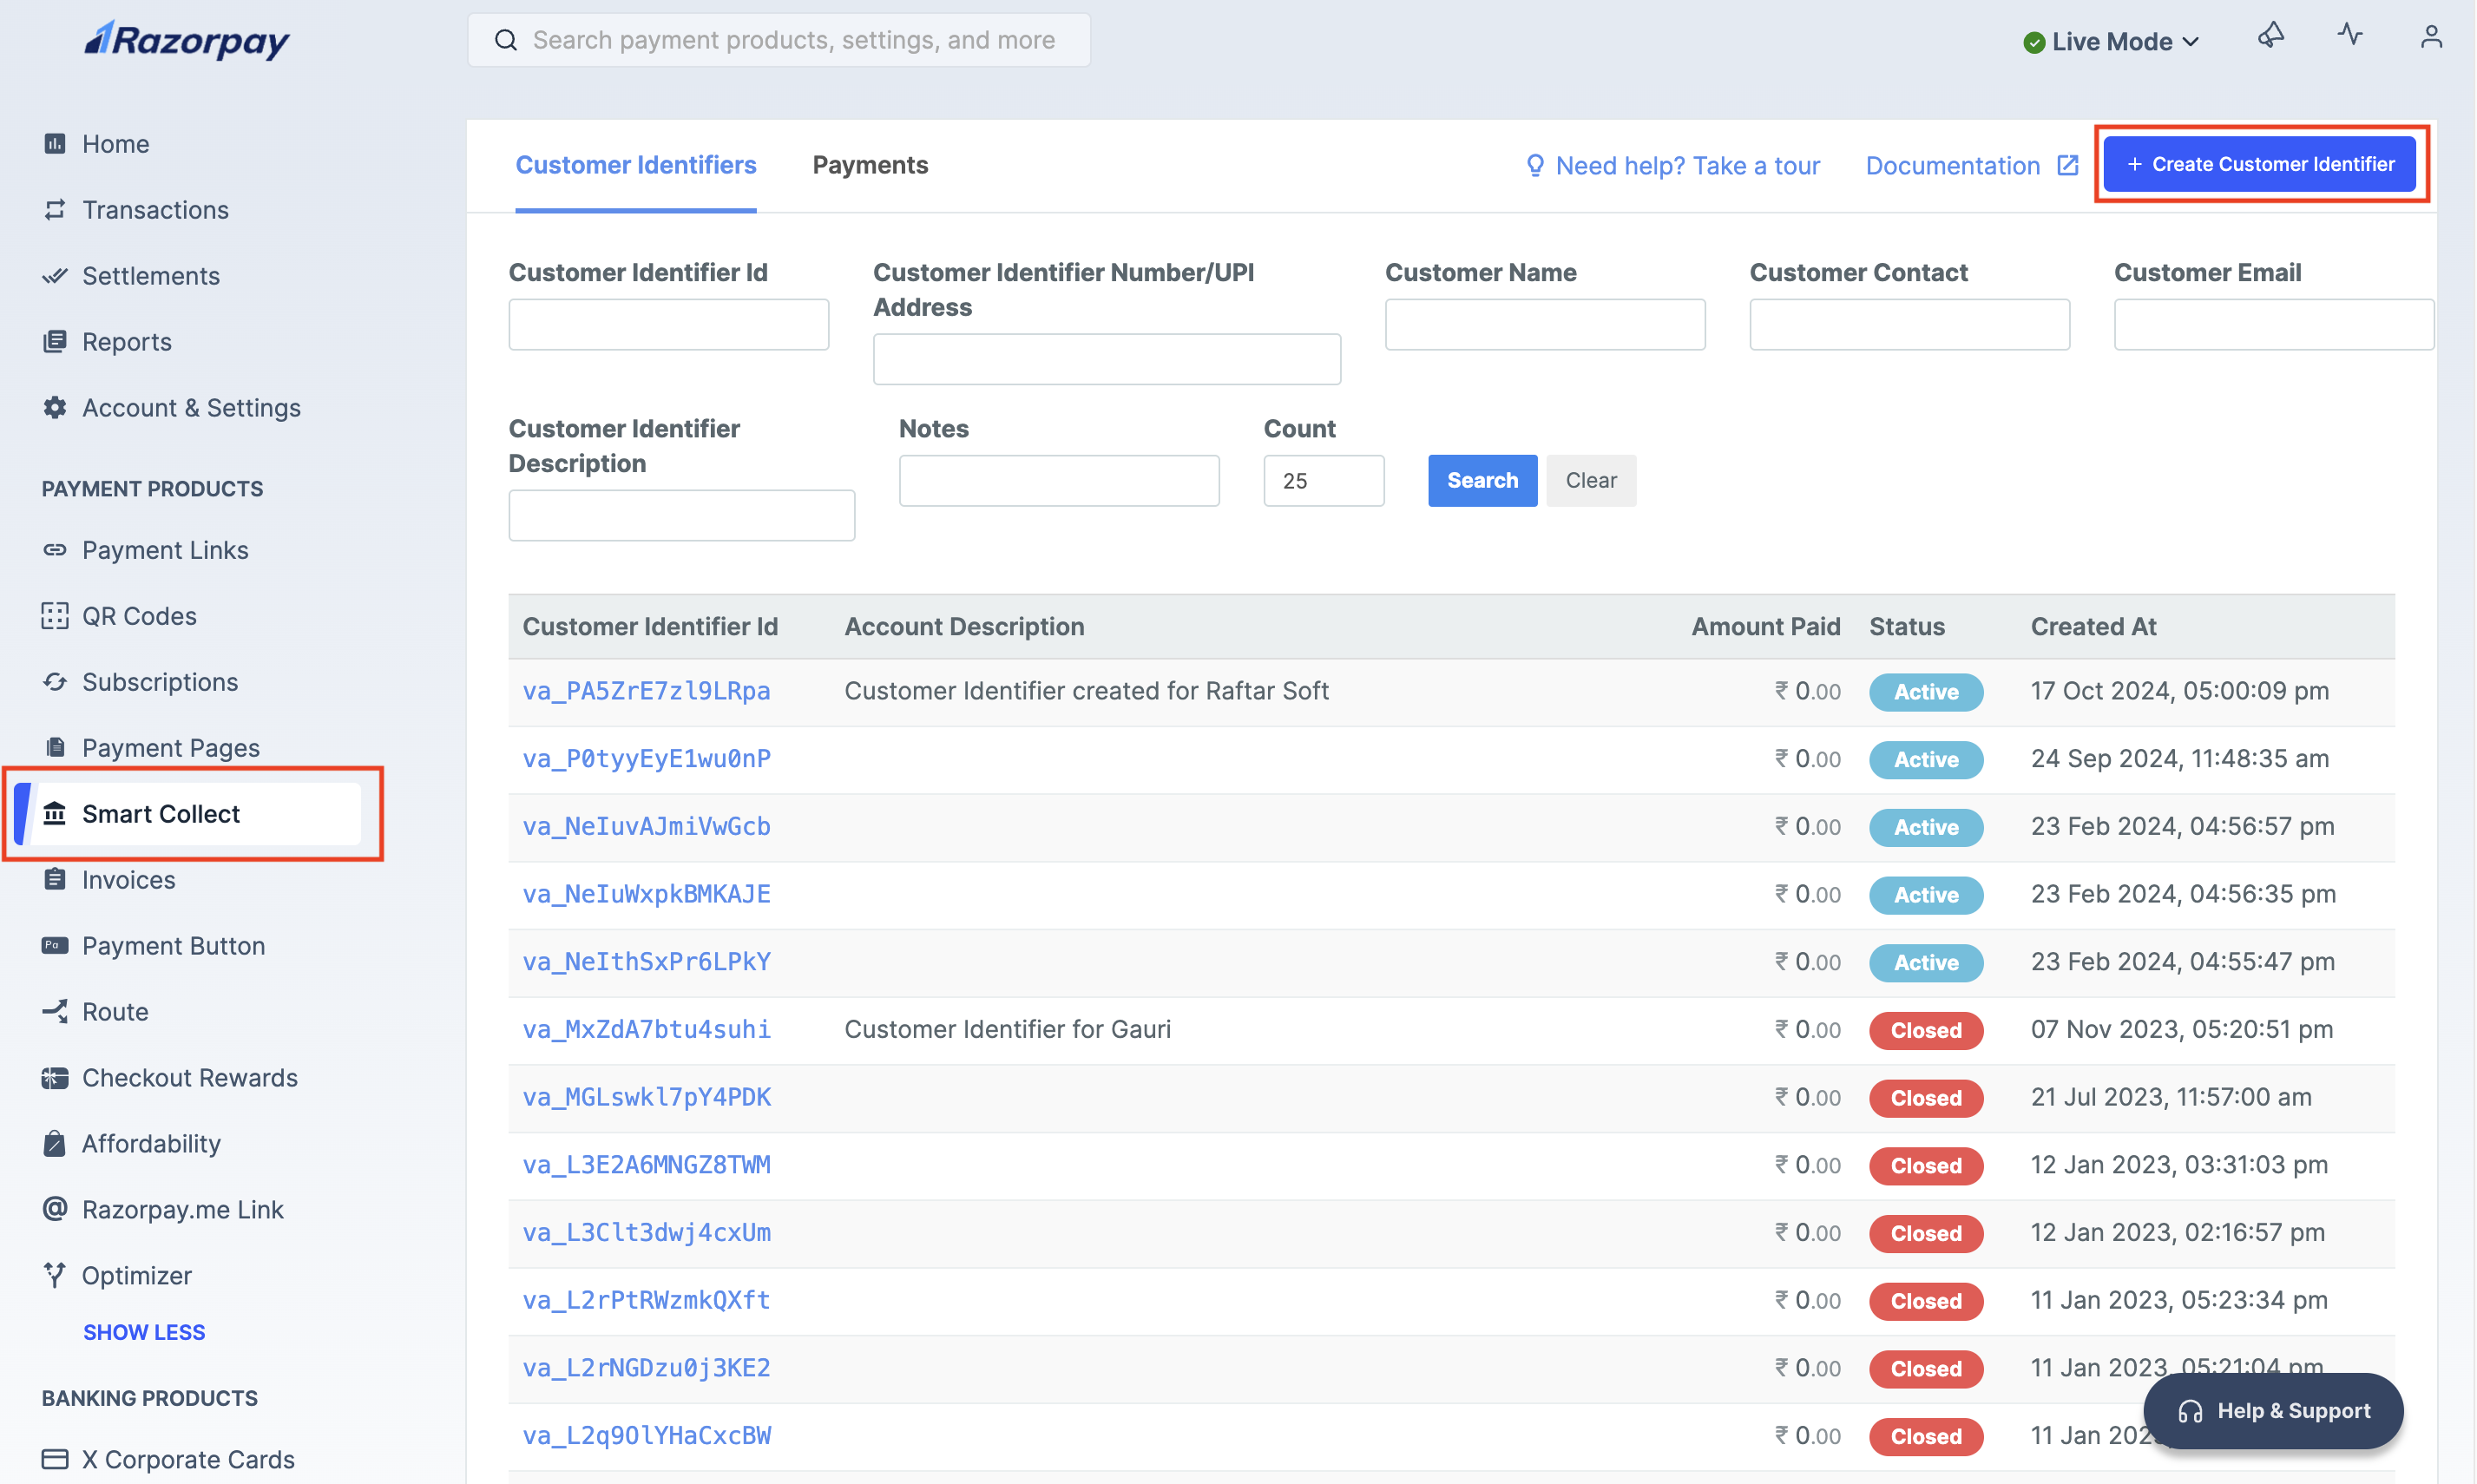
1. Log in to the Dashboard and click **Smart Collect**.
2. Click **+ Create Customer Identifier**.
3. Select the type of receiver in **Methods to accept payments in this customer identifier**. Only Bank Transfer (NEFT, RTGS, IMPS) is live, and enabled by default.
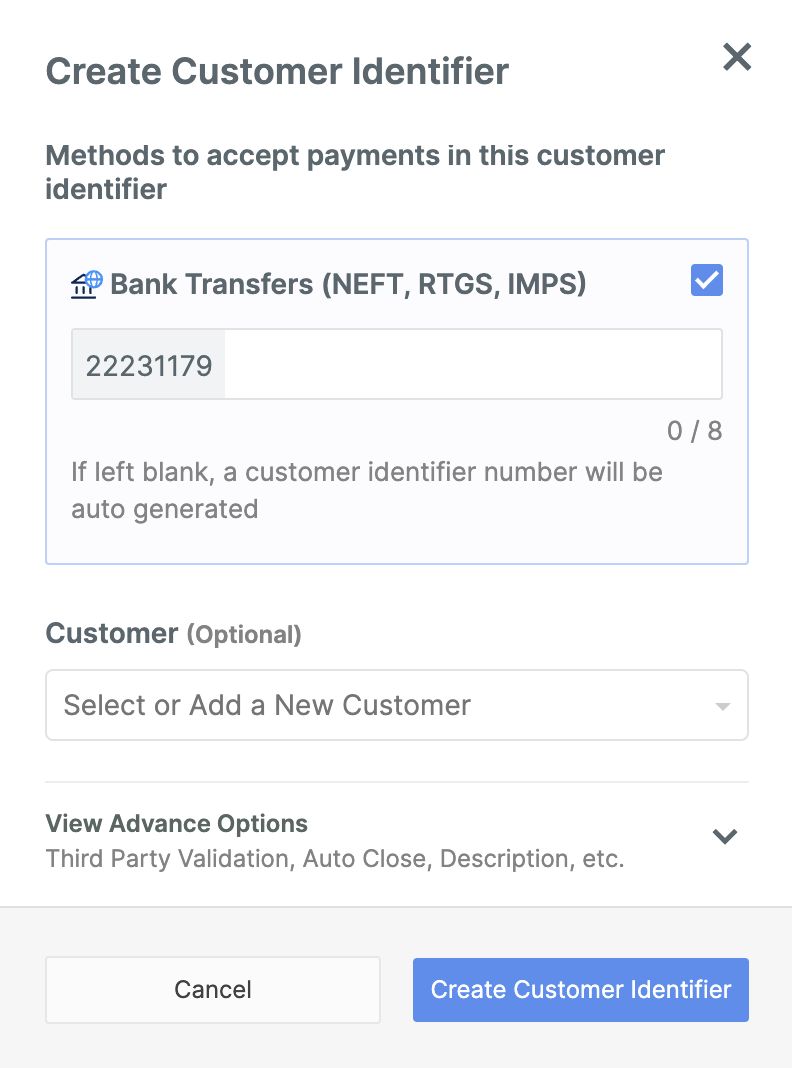 4. Select **Customer** from the drop-down list. You can also create a new customer instantly. You may skip this step and proceed with creation, if you do not wish to tag it to a specific customer. However, you cannot modify the Customer Identifier and tag it to the customer later.
5. Click **View Advance Options**.
6. Add an **Account Description** for your internal reference.
7. You can set a closure date for the Customer Identifier using the **Close By** option. Click **Disable Auto Close** option and select the date and time at which the account must be automatically closed. Ensure that the time specified is at least 15 minutes after the creation time.
4. Select **Customer** from the drop-down list. You can also create a new customer instantly. You may skip this step and proceed with creation, if you do not wish to tag it to a specific customer. However, you cannot modify the Customer Identifier and tag it to the customer later.
5. Click **View Advance Options**.
6. Add an **Account Description** for your internal reference.
7. You can set a closure date for the Customer Identifier using the **Close By** option. Click **Disable Auto Close** option and select the date and time at which the account must be automatically closed. Ensure that the time specified is at least 15 minutes after the creation time.
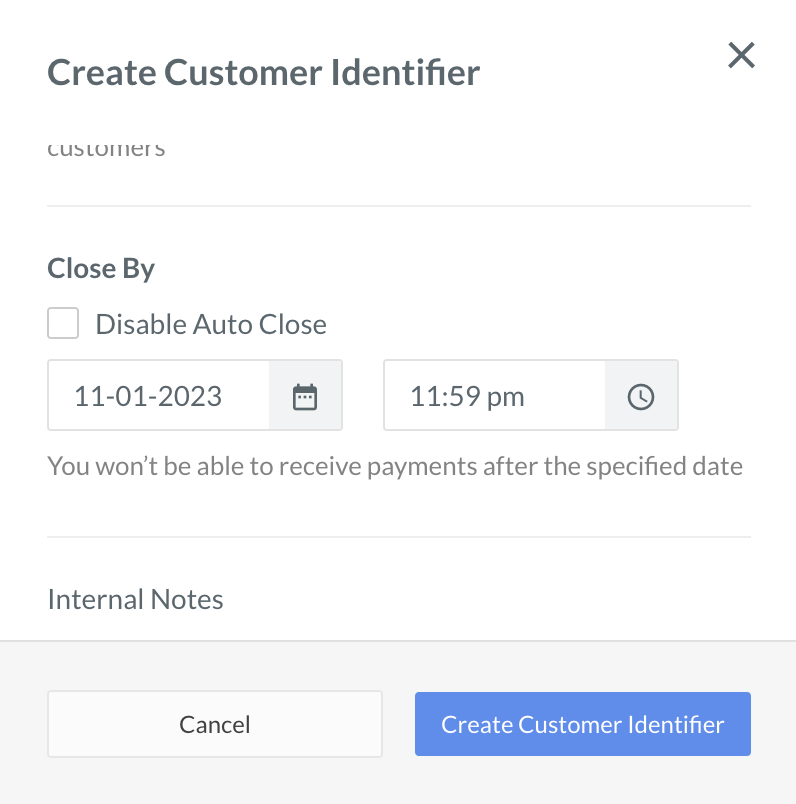 8. Click **Add Internal Note** to enter any notes for internal reference.
9. Click **Create Customer Identifier**.
8. Click **Add Internal Note** to enter any notes for internal reference.
9. Click **Create Customer Identifier**.
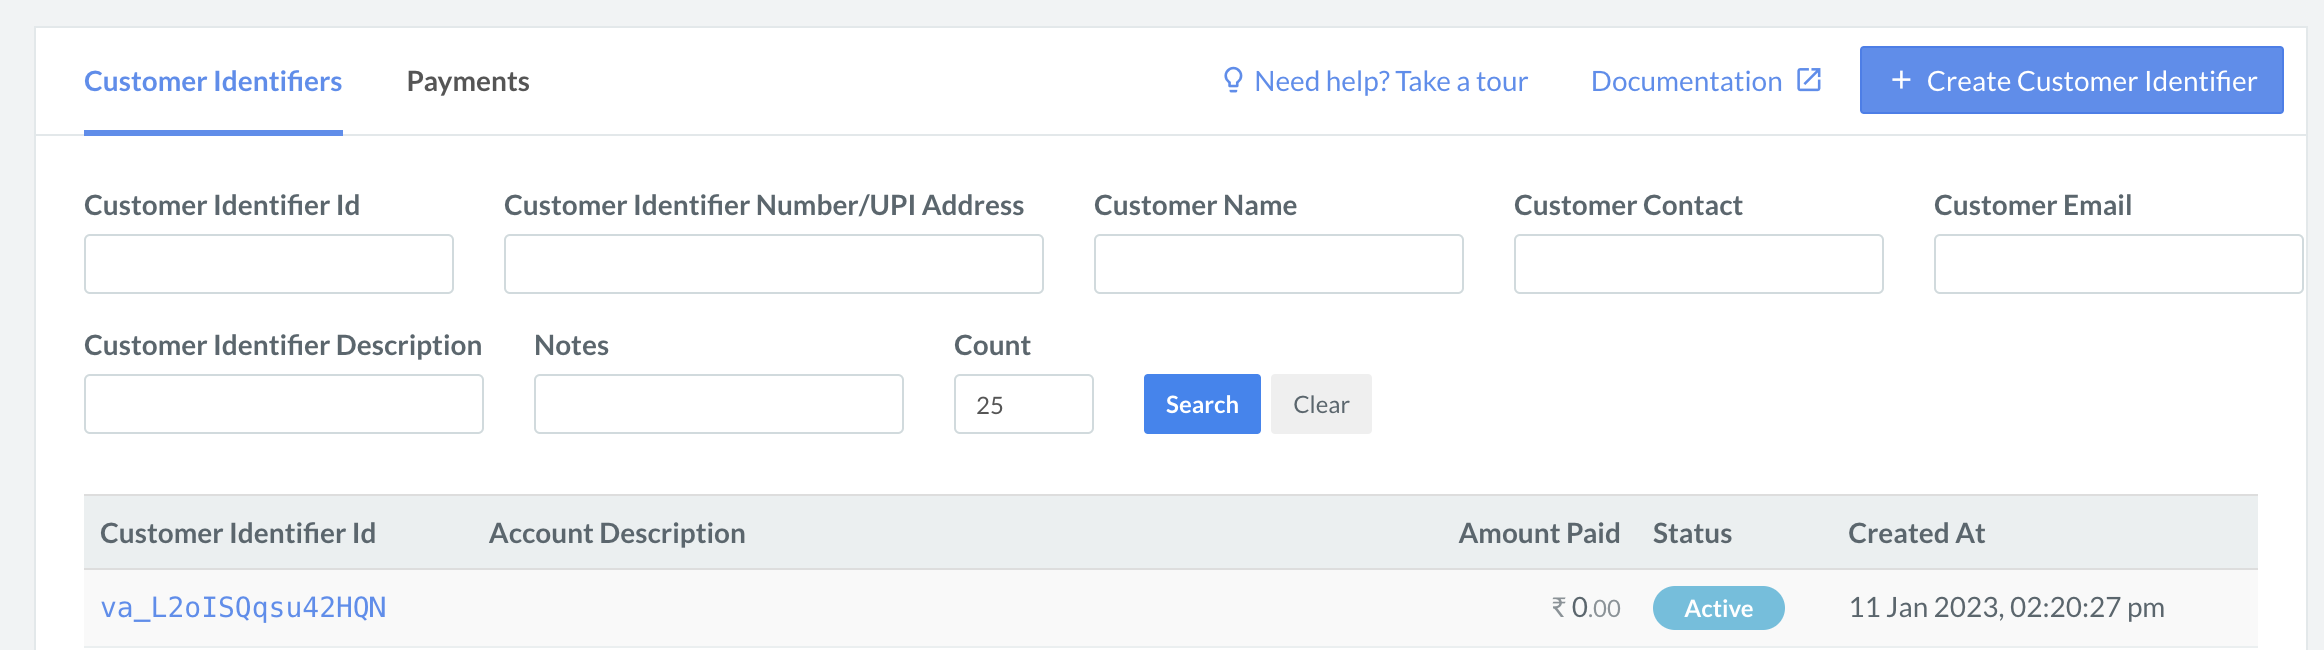
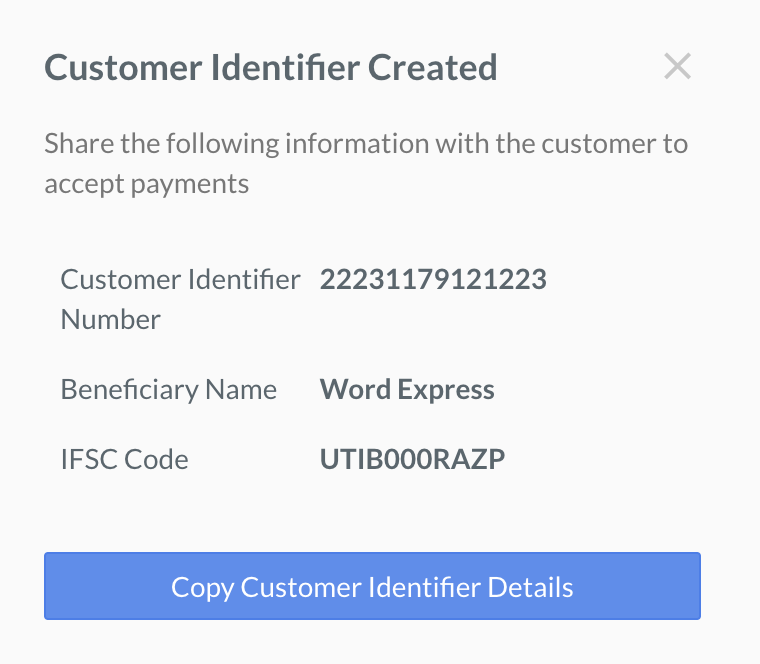 After the Customer Identifier is created, copy the details and share them with your customer. The Customer Identifier appears in the list as shown below:
 **Watch Out!**
* If a Customer Identifier has been inactive for 90 days without any transactions, it will be considered dormant and subsequently closed.
* While sharing the details of CI (created using RBL bank) with the customers, ensure that the fifth character in the IFSC is number `0` and not the letter O. For example, valid IFSC is `RATN0VAAPIS` and not `RATNOVAAPIS`.
### View Payments
You can view the payments made to your Customer Identifiers on the Dashboard.
To view payments made to Customer Identifiers:
1. Log in to the Dashboard.
2. Navigate to **Smart Collect** → **Payments**.
1. Follow the same steps as **Create Customer Identifiers** until customer selection.
2. Click **View Advance Options**.
3. Complete these steps to add account details for the **Third Party Validation**:
1. Select the **Bank Transfers (NEFT, RTGS, IMPS)** checkbox to create Customer Identifier details with TPV for bank transfers. Know more about [Third Party Validation](/docs/payments/smart-collect/third-party-validation).
2. Click **Configure** to add details of **Authorised Accounts**.
**Watch Out!**
* If a Customer Identifier has been inactive for 90 days without any transactions, it will be considered dormant and subsequently closed.
* While sharing the details of CI (created using RBL bank) with the customers, ensure that the fifth character in the IFSC is number `0` and not the letter O. For example, valid IFSC is `RATN0VAAPIS` and not `RATNOVAAPIS`.
### View Payments
You can view the payments made to your Customer Identifiers on the Dashboard.
To view payments made to Customer Identifiers:
1. Log in to the Dashboard.
2. Navigate to **Smart Collect** → **Payments**.
1. Follow the same steps as **Create Customer Identifiers** until customer selection.
2. Click **View Advance Options**.
3. Complete these steps to add account details for the **Third Party Validation**:
1. Select the **Bank Transfers (NEFT, RTGS, IMPS)** checkbox to create Customer Identifier details with TPV for bank transfers. Know more about [Third Party Validation](/docs/payments/smart-collect/third-party-validation).
2. Click **Configure** to add details of **Authorised Accounts**.
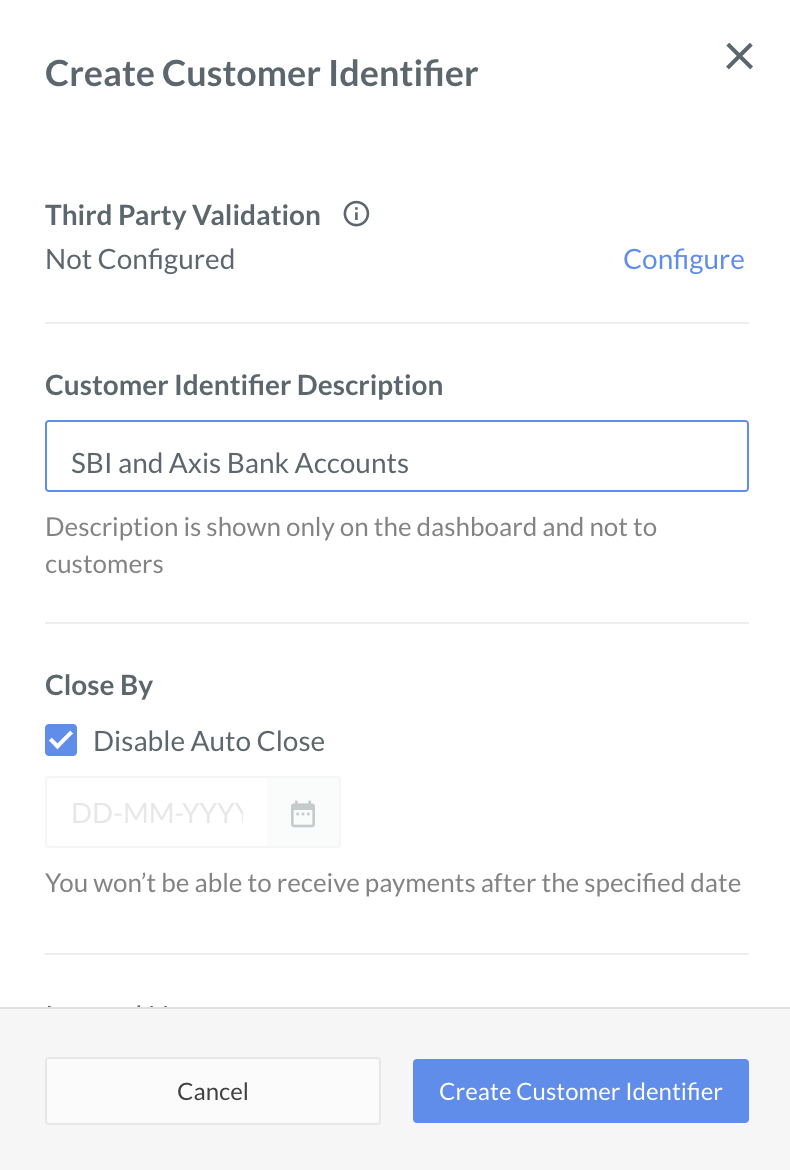 3. Enter **IFSC Code** and **Account Number**.
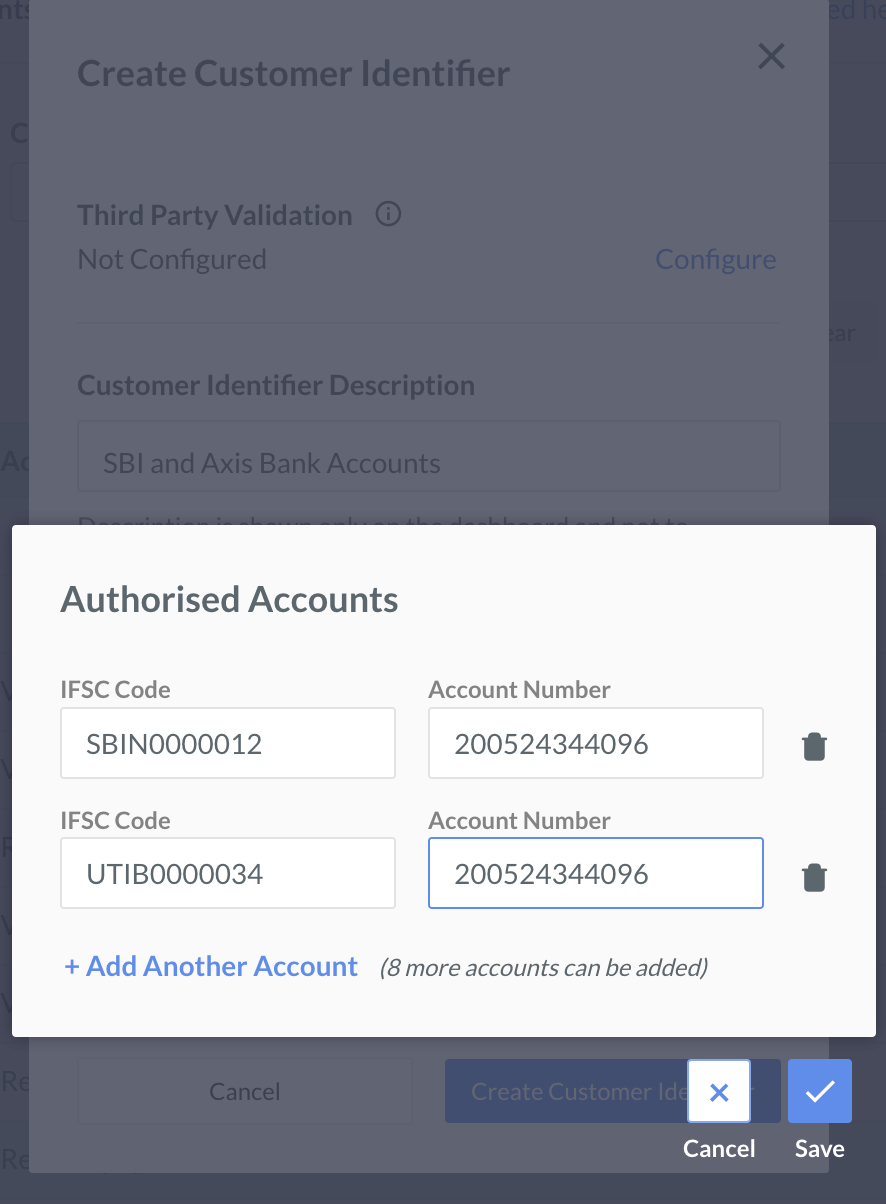 4. Click **+ Add Another Account** to add accounts. You can add up to 10 **Authorised Accounts**.
5. Click **Save**.
Complete the other steps mentioned on screen and click **Create Customer Identifier**. After a Identifier is created, copy the details and share them with your customer.
The Customer Identifier appears in the list as shown below:
**Handy Tips**
While sharing the details of CIs (created using RBL bank) with the customers, ensure that the fifth character in the IFSC is number `0` and not the letter O. For example, valid IFSC is `RATN0VAAPIS` and not `RATNOVAAPIS`.
## Create Customer Identifiers for Smart Collect 2.0
You can create Customer Identifiers via the Dashboard or using the APIs:
1. Log in to the [Dashboard](https://dashboard.razorpay.com/#/access/signin).
2. Navigate to **Smart Collect** in the left menu → click **+ Create Customer Identifier**.
4. Click **+ Add Another Account** to add accounts. You can add up to 10 **Authorised Accounts**.
5. Click **Save**.
Complete the other steps mentioned on screen and click **Create Customer Identifier**. After a Identifier is created, copy the details and share them with your customer.
The Customer Identifier appears in the list as shown below:
**Handy Tips**
While sharing the details of CIs (created using RBL bank) with the customers, ensure that the fifth character in the IFSC is number `0` and not the letter O. For example, valid IFSC is `RATN0VAAPIS` and not `RATNOVAAPIS`.
## Create Customer Identifiers for Smart Collect 2.0
You can create Customer Identifiers via the Dashboard or using the APIs:
1. Log in to the [Dashboard](https://dashboard.razorpay.com/#/access/signin).
2. Navigate to **Smart Collect** in the left menu → click **+ Create Customer Identifier**.
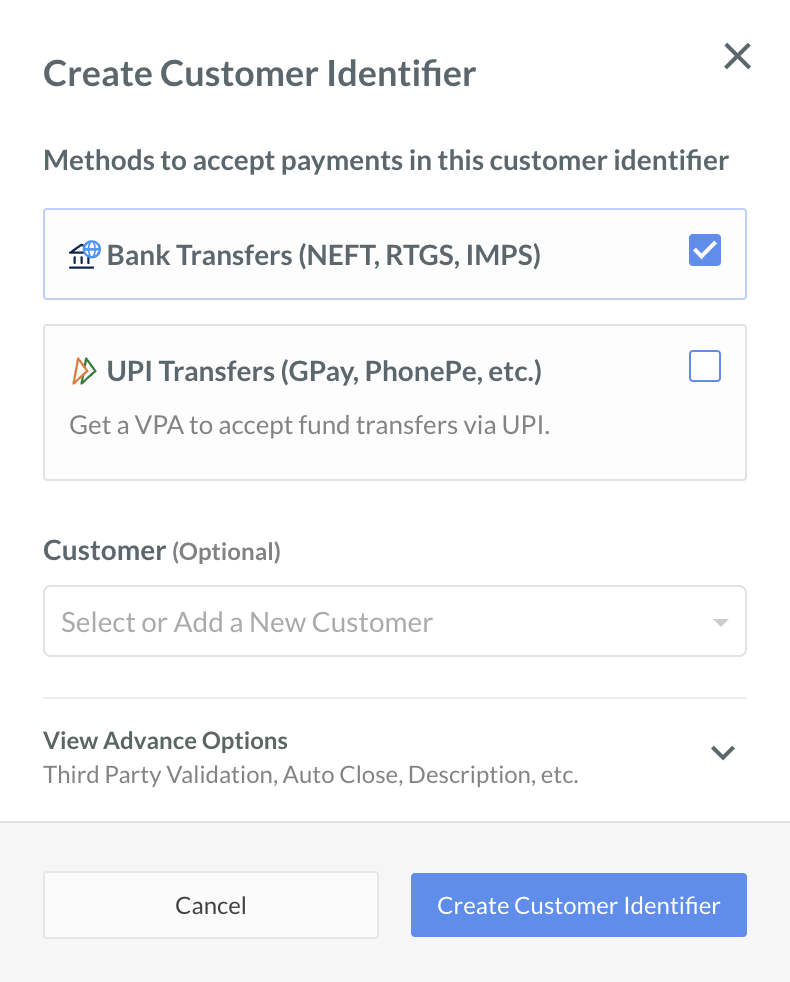
 3. Select the type of receiver in **Methods to accept payments in this customer identifier**. Both **Bank Transfers (NEFT, RTGS, IMPS)** and **UPI Transfer** are enabled by default. You can choose to disable either as needed.
* Enable **Bank Transfer (NEFT, RTGS, IMPS)** to create a Customer Identifier.
* Enable **UPI Transfer** to create a virtual UPI ID.
3. Select the type of receiver in **Methods to accept payments in this customer identifier**. Both **Bank Transfers (NEFT, RTGS, IMPS)** and **UPI Transfer** are enabled by default. You can choose to disable either as needed.
* Enable **Bank Transfer (NEFT, RTGS, IMPS)** to create a Customer Identifier.
* Enable **UPI Transfer** to create a virtual UPI ID.
 1. Select **Customer** from the drop-down list. You can also create a new customer instantly. This is an optional step. Select the **Add Billing Address** check box if necessary.
**Watch Out!**
You cannot modify customers for Customer Identifiers after you create and save them. Ensure you tag the Customers to Customer Identifiers when you create them.
#### Configure Advance Options
The following advance options are available when you click **View Advance Options**:
* Configure **Third Party Validation**. Authorise bank accounts using IFSC and Account Number.
* Add an **Customer Identifier Description** for your internal reference.
* Add a closure date for the Customer Identifier.
* Clear the **Disable Auto Close** option to close the Customer Identifier on a certain future date.
* Select **Disable Auto Close** option and choose the date and time when the Identifier must automatically close. Ensure that the time specified is at least 15 minutes after the creation time.
* Click **Add Internal Note** to enter any notes for internal reference.
1. Click **Create Customer Identifier**.
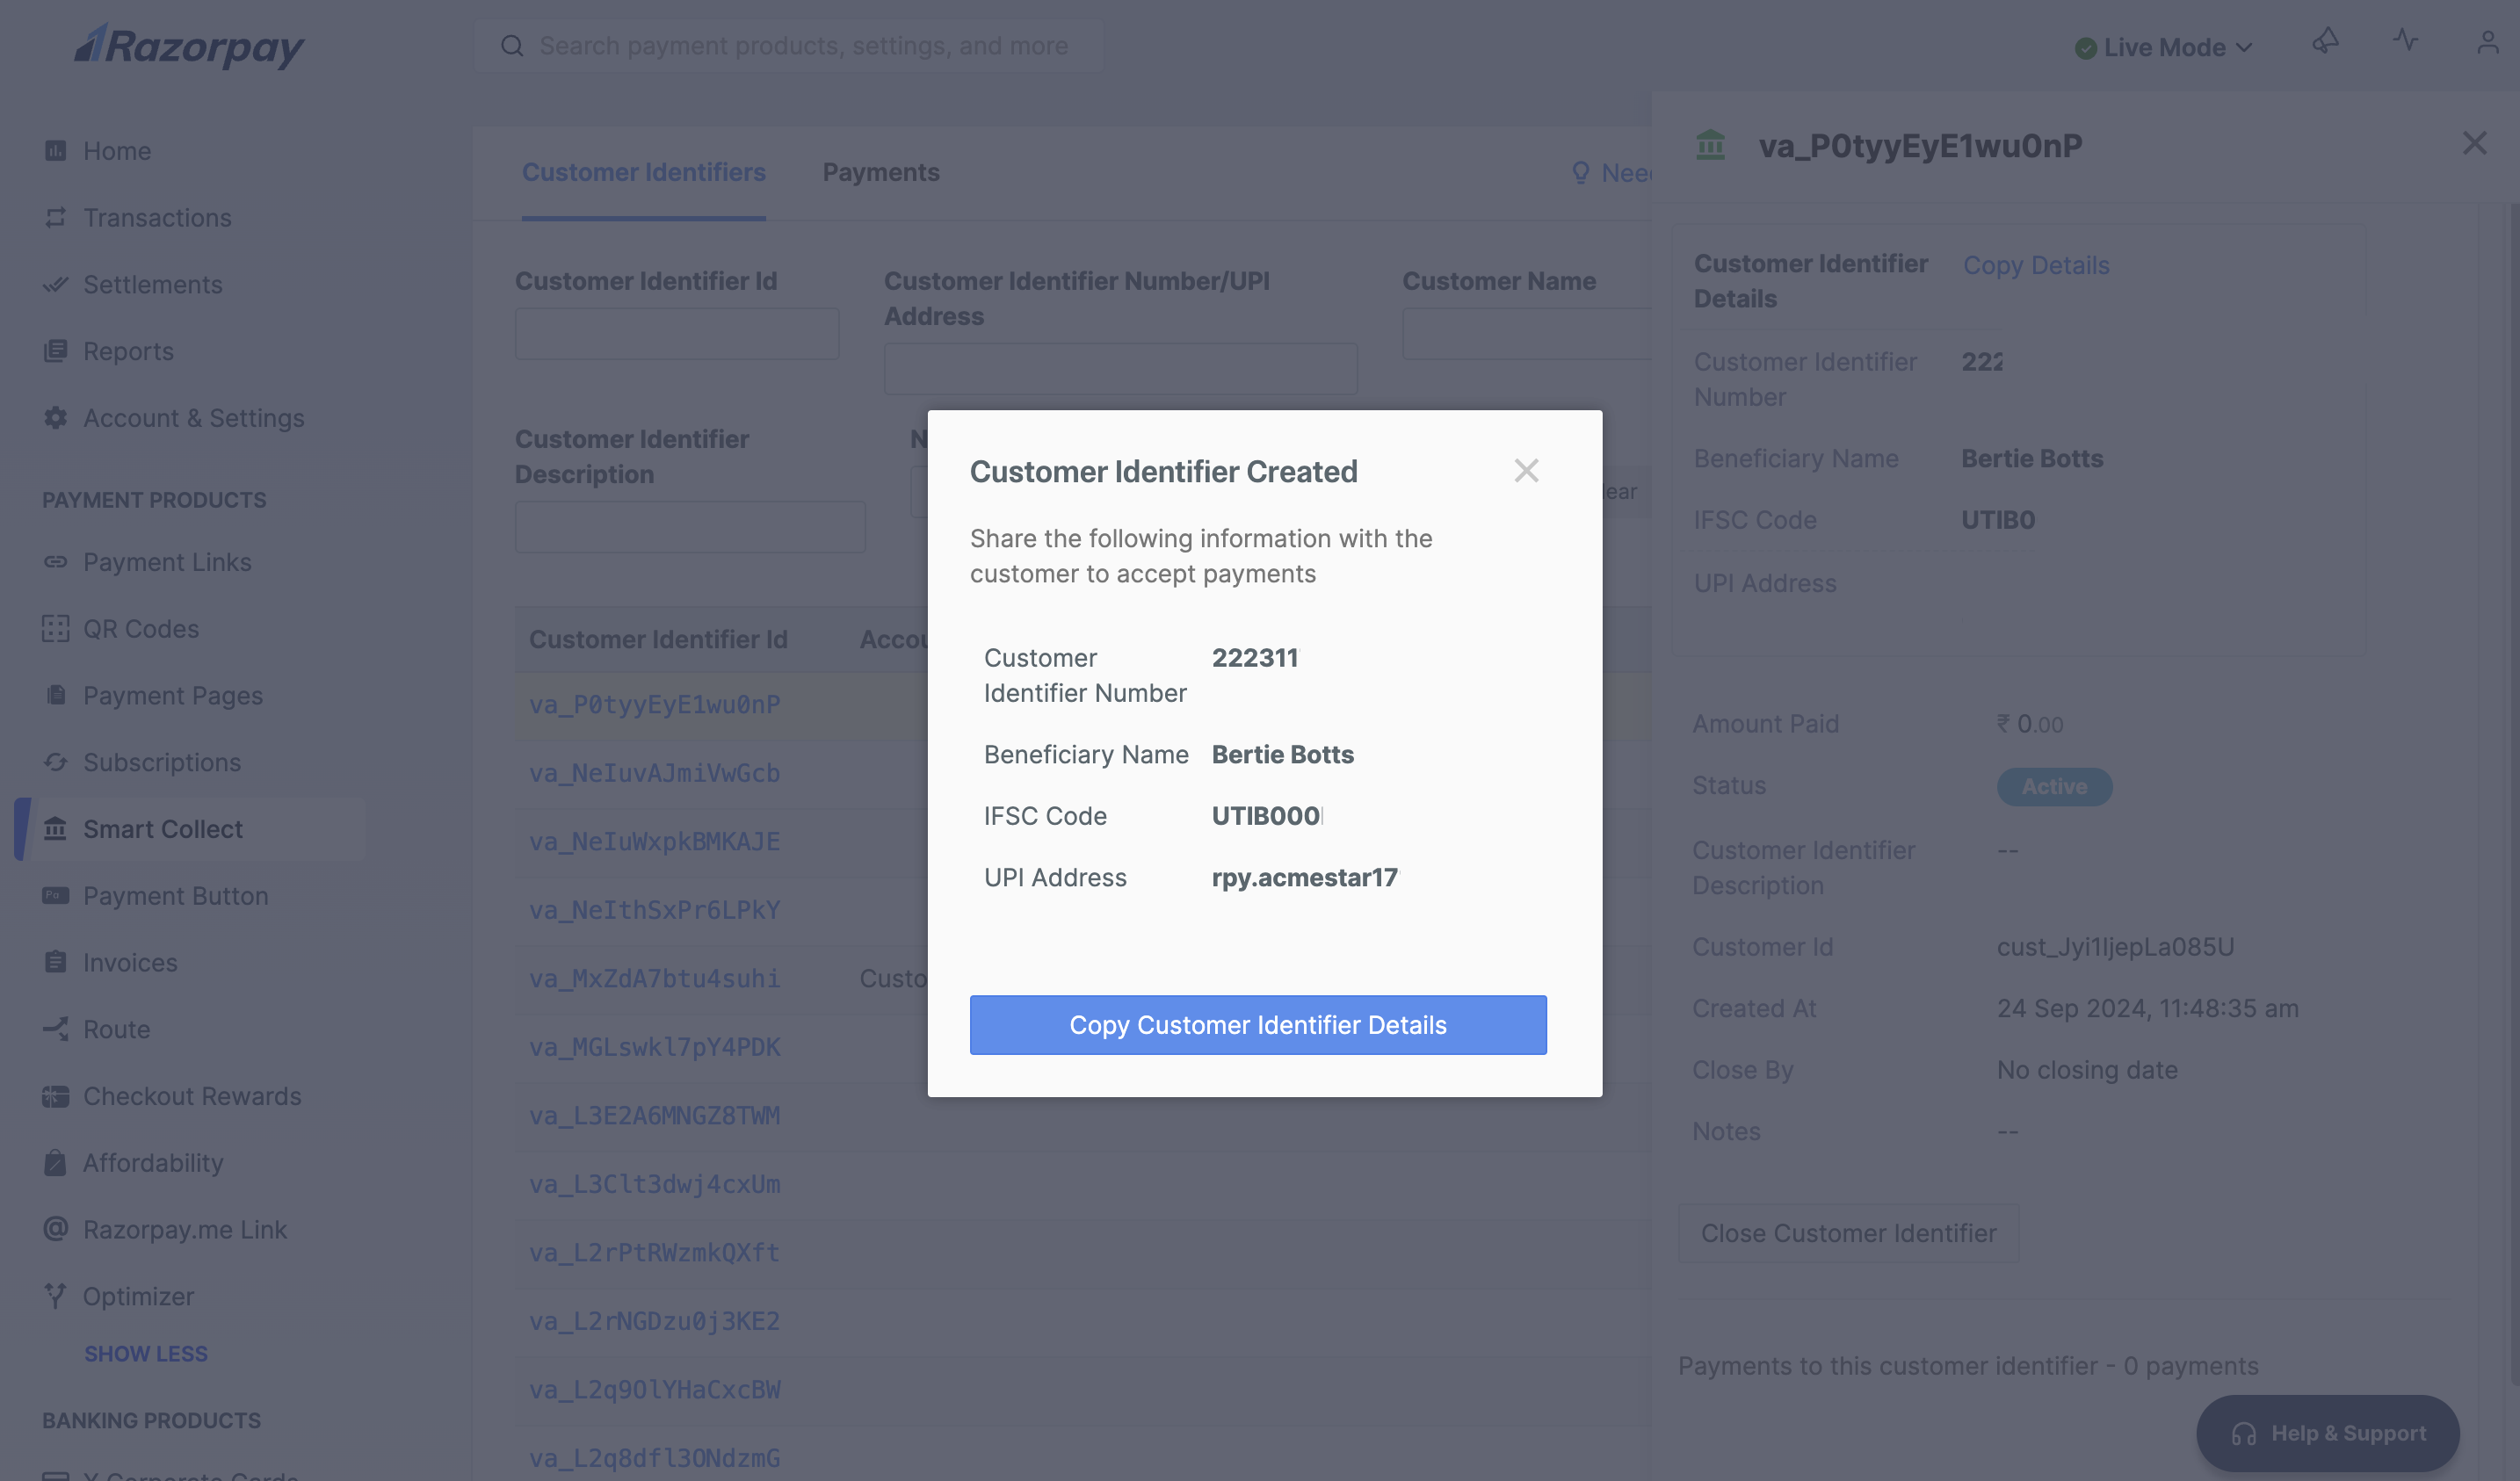
This successfully creates a Customer Identifier. Click **Copy Customer Identifier Details** and share it with your merchants/customers.
1. Select **Customer** from the drop-down list. You can also create a new customer instantly. This is an optional step. Select the **Add Billing Address** check box if necessary.
**Watch Out!**
You cannot modify customers for Customer Identifiers after you create and save them. Ensure you tag the Customers to Customer Identifiers when you create them.
#### Configure Advance Options
The following advance options are available when you click **View Advance Options**:
* Configure **Third Party Validation**. Authorise bank accounts using IFSC and Account Number.
* Add an **Customer Identifier Description** for your internal reference.
* Add a closure date for the Customer Identifier.
* Clear the **Disable Auto Close** option to close the Customer Identifier on a certain future date.
* Select **Disable Auto Close** option and choose the date and time when the Identifier must automatically close. Ensure that the time specified is at least 15 minutes after the creation time.
* Click **Add Internal Note** to enter any notes for internal reference.
1. Click **Create Customer Identifier**.
This successfully creates a Customer Identifier. Click **Copy Customer Identifier Details** and share it with your merchants/customers.
 Use any of the following APIs to create Customer Identifiers as necessary:
* [Create Customer Identifier With Bank Account Receiver](/docs/api/payments/smart-collect/create-cust-id-bank-account)
* [Create a Customer Identifier With VPA Receiver](/docs/api/payments/smart-collect-2/create-cust-id-vpa)
* [Create a Customer Identifier With VPA and Bank Account Receivers](/docs/api/payments/smart-collect-2/create-cust-id-bank-account-vpa)
1. Follow the steps to [create Smart Collect 2.0 Customer Identifiers](/docs/payments/smart-collect/create#to-create-smart-collect-2-0-customer-identifiers).
2. Click **View Advance Options**.
3. Click **Configure** for **Third Party Validation**.
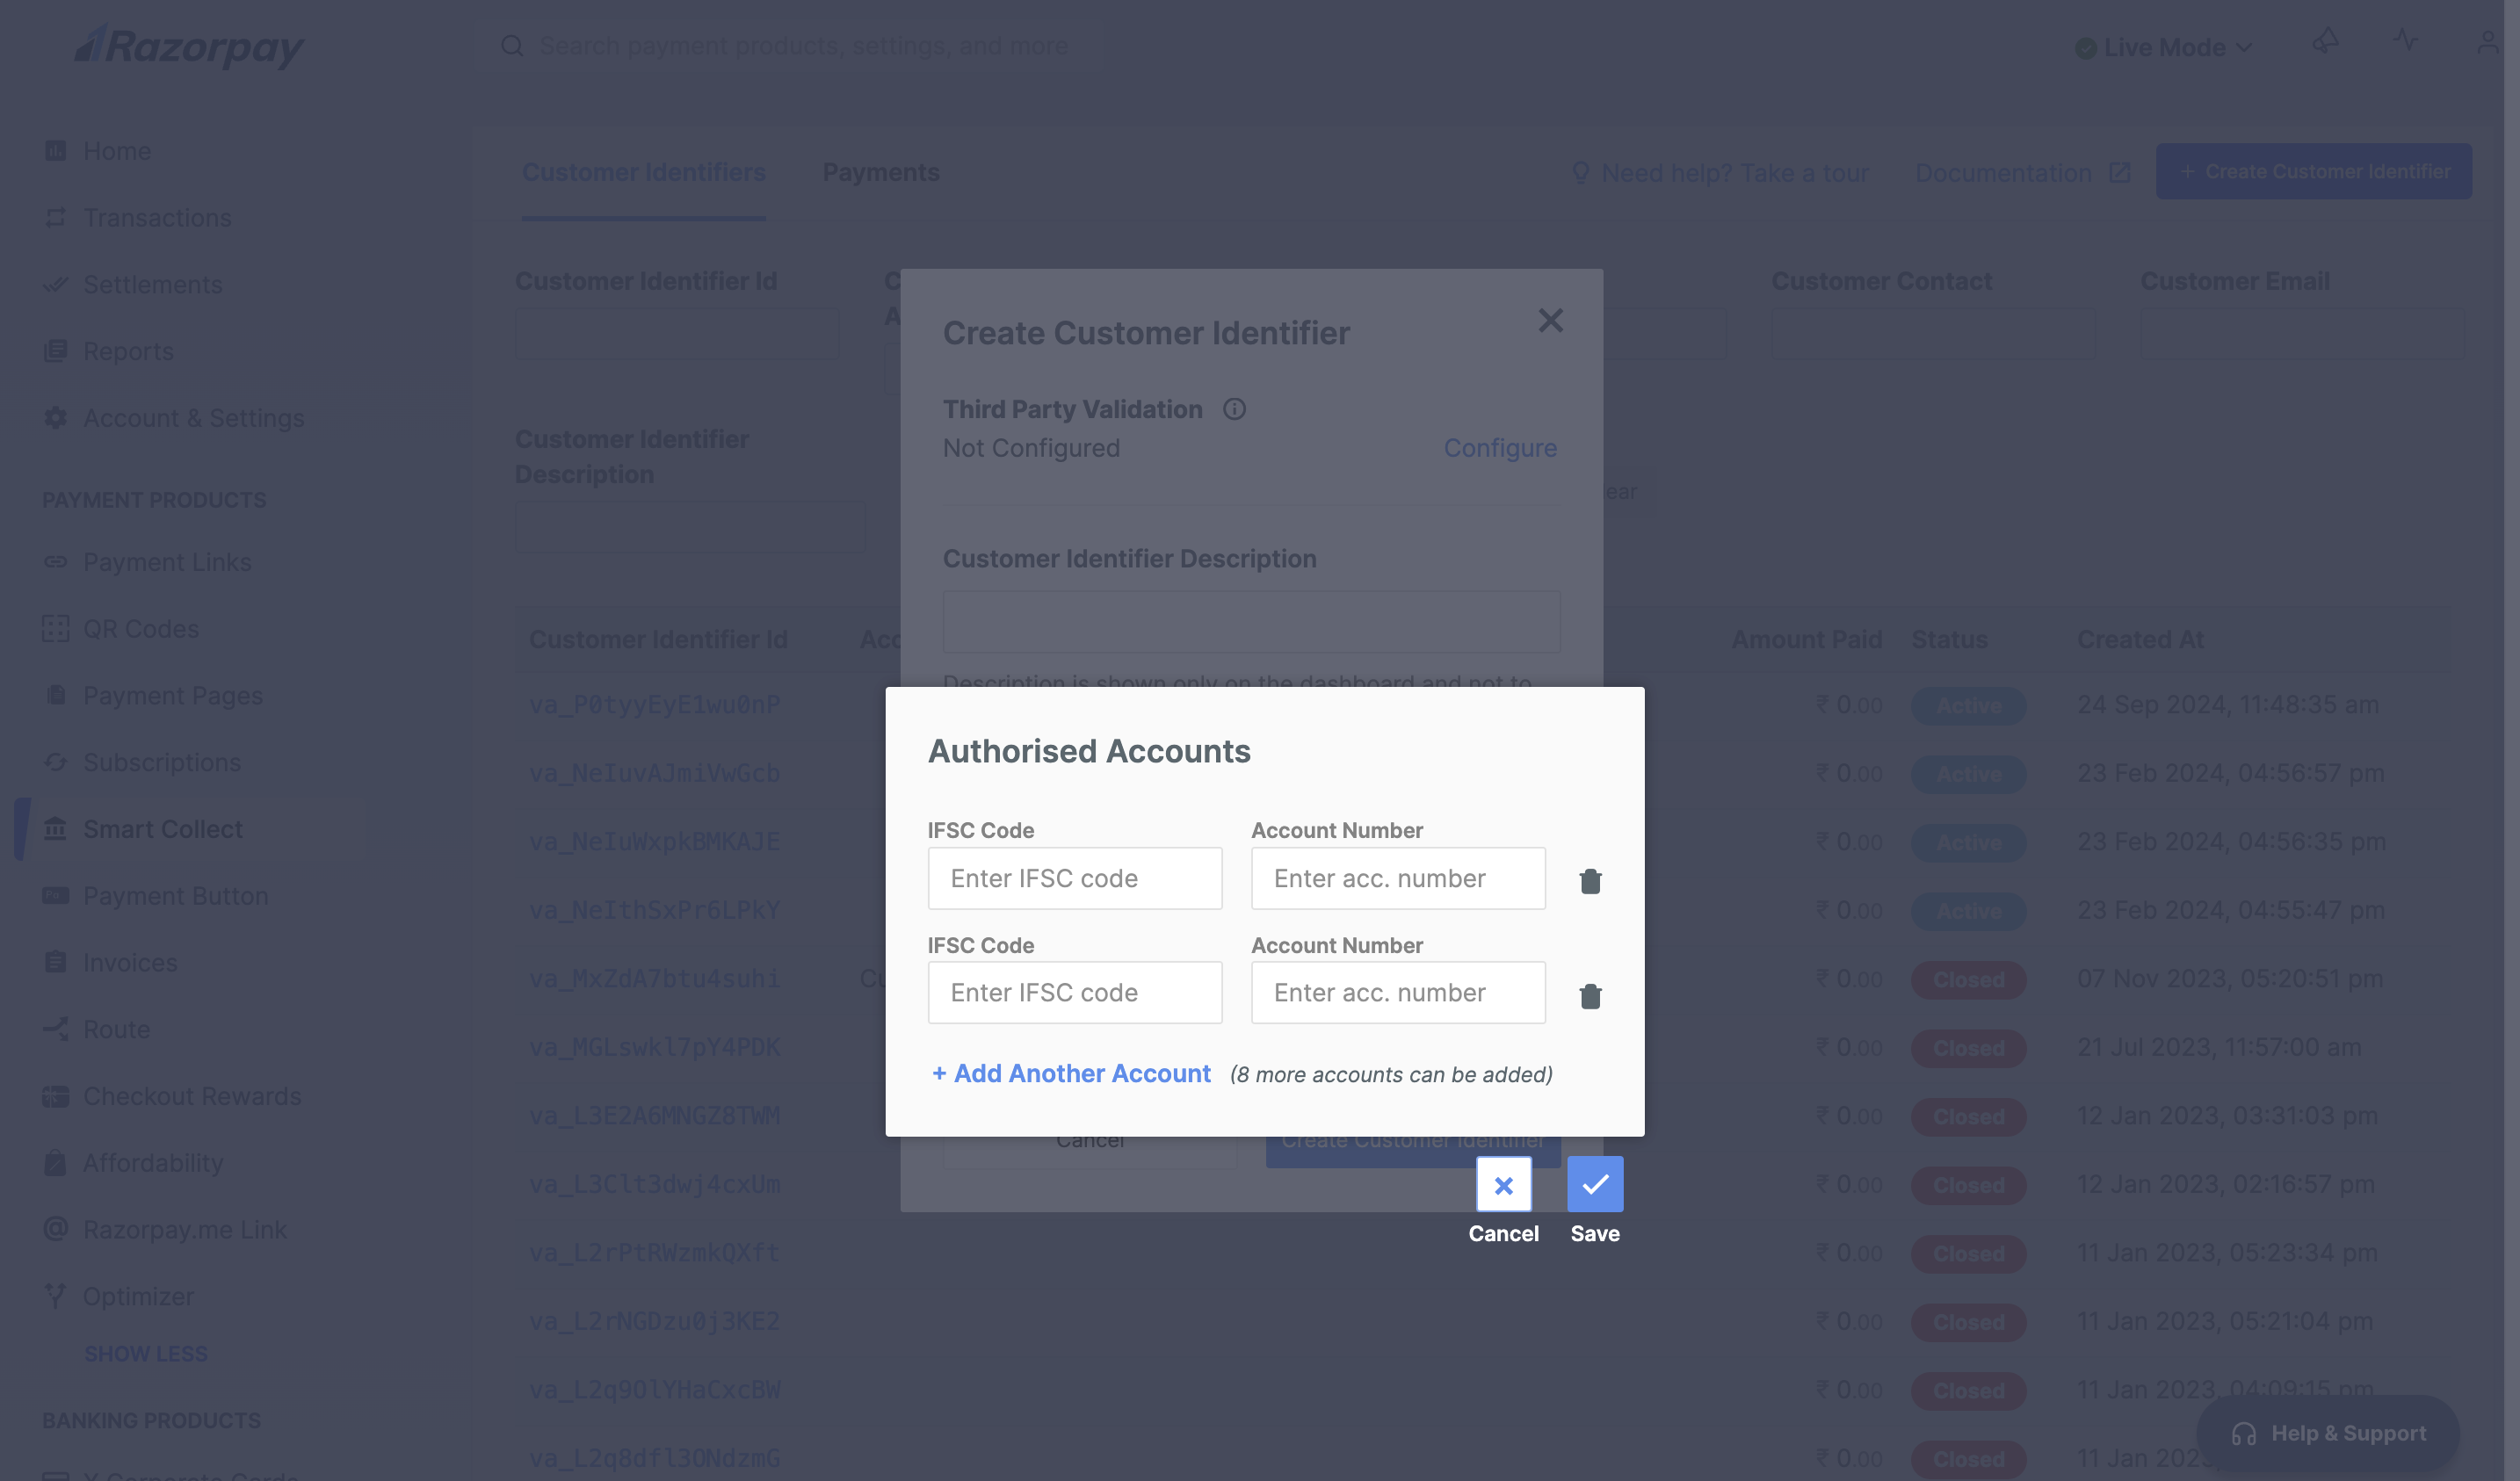
4. In the **Authorised Accounts** pop-up modal, **IFSC Code** and **Account Number**. You can add up to 10 accounts.
For RBL banks, ensure the fifth character in the IFSC is number `0` and not the letter O.
5. Click **Save**.
Use any of the following APIs to create Customer Identifiers as necessary:
* [Create Customer Identifier With Bank Account Receiver](/docs/api/payments/smart-collect/create-cust-id-bank-account)
* [Create a Customer Identifier With VPA Receiver](/docs/api/payments/smart-collect-2/create-cust-id-vpa)
* [Create a Customer Identifier With VPA and Bank Account Receivers](/docs/api/payments/smart-collect-2/create-cust-id-bank-account-vpa)
1. Follow the steps to [create Smart Collect 2.0 Customer Identifiers](/docs/payments/smart-collect/create#to-create-smart-collect-2-0-customer-identifiers).
2. Click **View Advance Options**.
3. Click **Configure** for **Third Party Validation**.
4. In the **Authorised Accounts** pop-up modal, **IFSC Code** and **Account Number**. You can add up to 10 accounts.
For RBL banks, ensure the fifth character in the IFSC is number `0` and not the letter O.
5. Click **Save**.
 6. Add other Advance Options as necessary.
7. Click **Create Customer Identifier**.
This successfully creates a [Customer Identifiers with TPV](/docs/payments/smart-collect/create-tpv).
Use any of the following APIs to create Customer Identifiers as necessary:
* [Create Customer Identifier](/docs/api/payments/smart-collect-tpv/create)
* [Add an Allowed Payer Account](/docs/api/payments/smart-collect-tpv/add-allowed-payer)
* [Add VPA Receiver to an Existing Customer Identifier](/docs/api/payments/smart-collect-2/add-receiver-vpa)
* [Add Bank Account Receiver to an Existing Customer Identifier](/docs/api/payments/smart-collect-2/add-receiver-bank-transfer)
**Handy Tips**
* After you create a Customer Identifier, it moves to `active` status. Know more about the [states of Customer Identifiers](/docs/payments/smart-collect/states).
* You can disable/[close a Customer Identifier using APIs](/docs/api/payments/smart-collect/close) if you no longer need it to accept payments.
* You can create as many Customer Identifiers as required for your business. Share the Customer Identifiers with your beneficiaries to receive payments.
### Related Information
* [Close Customer Identifiers](/docs/payments/smart-collect/close)
* [Refund Payments](/docs/payments/smart-collect/refund)
* [Make Test Payments](/docs/payments/smart-collect/test-payments)
* [Search for a Customer Identifier](/docs/payments/smart-collect/search)
6. Add other Advance Options as necessary.
7. Click **Create Customer Identifier**.
This successfully creates a [Customer Identifiers with TPV](/docs/payments/smart-collect/create-tpv).
Use any of the following APIs to create Customer Identifiers as necessary:
* [Create Customer Identifier](/docs/api/payments/smart-collect-tpv/create)
* [Add an Allowed Payer Account](/docs/api/payments/smart-collect-tpv/add-allowed-payer)
* [Add VPA Receiver to an Existing Customer Identifier](/docs/api/payments/smart-collect-2/add-receiver-vpa)
* [Add Bank Account Receiver to an Existing Customer Identifier](/docs/api/payments/smart-collect-2/add-receiver-bank-transfer)
**Handy Tips**
* After you create a Customer Identifier, it moves to `active` status. Know more about the [states of Customer Identifiers](/docs/payments/smart-collect/states).
* You can disable/[close a Customer Identifier using APIs](/docs/api/payments/smart-collect/close) if you no longer need it to accept payments.
* You can create as many Customer Identifiers as required for your business. Share the Customer Identifiers with your beneficiaries to receive payments.
### Related Information
* [Close Customer Identifiers](/docs/payments/smart-collect/close)
* [Refund Payments](/docs/payments/smart-collect/refund)
* [Make Test Payments](/docs/payments/smart-collect/test-payments)
* [Search for a Customer Identifier](/docs/payments/smart-collect/search)