> ## Documentation Index
> Fetch the complete documentation index at: https://razorpay-881012b3.mintlify.site/llms.txt
> Use this file to discover all available pages before exploring further.
# Update Customer Identifier Expiry Date in Bulk
> Know how to update the expiry date of Customer Identifiers in bulk.
Available in
🇮🇳 India
Follow the steps given below to update the expiry dates of Customer Identifiers in bulk.
## Workflow
1. [Download the sample batch file](#step-1-download-the-sample-batch-file).
2. [Add Customer Identifier details in the file](#step-2-add-customer-identifier-details-in-the).
3. [Upload batch file on Dashboard](#step-3-upload-batch-file-on-dashboard).
4. [Perform post-batch creation operations](#step-4-perform-post-batch-creation-actions).
5. [Handle errors, if any](#step-5-handle-errors).
## Step 1: Download the Sample Batch File
1. Log in to the Dashboard and navigate to Smart Collect.
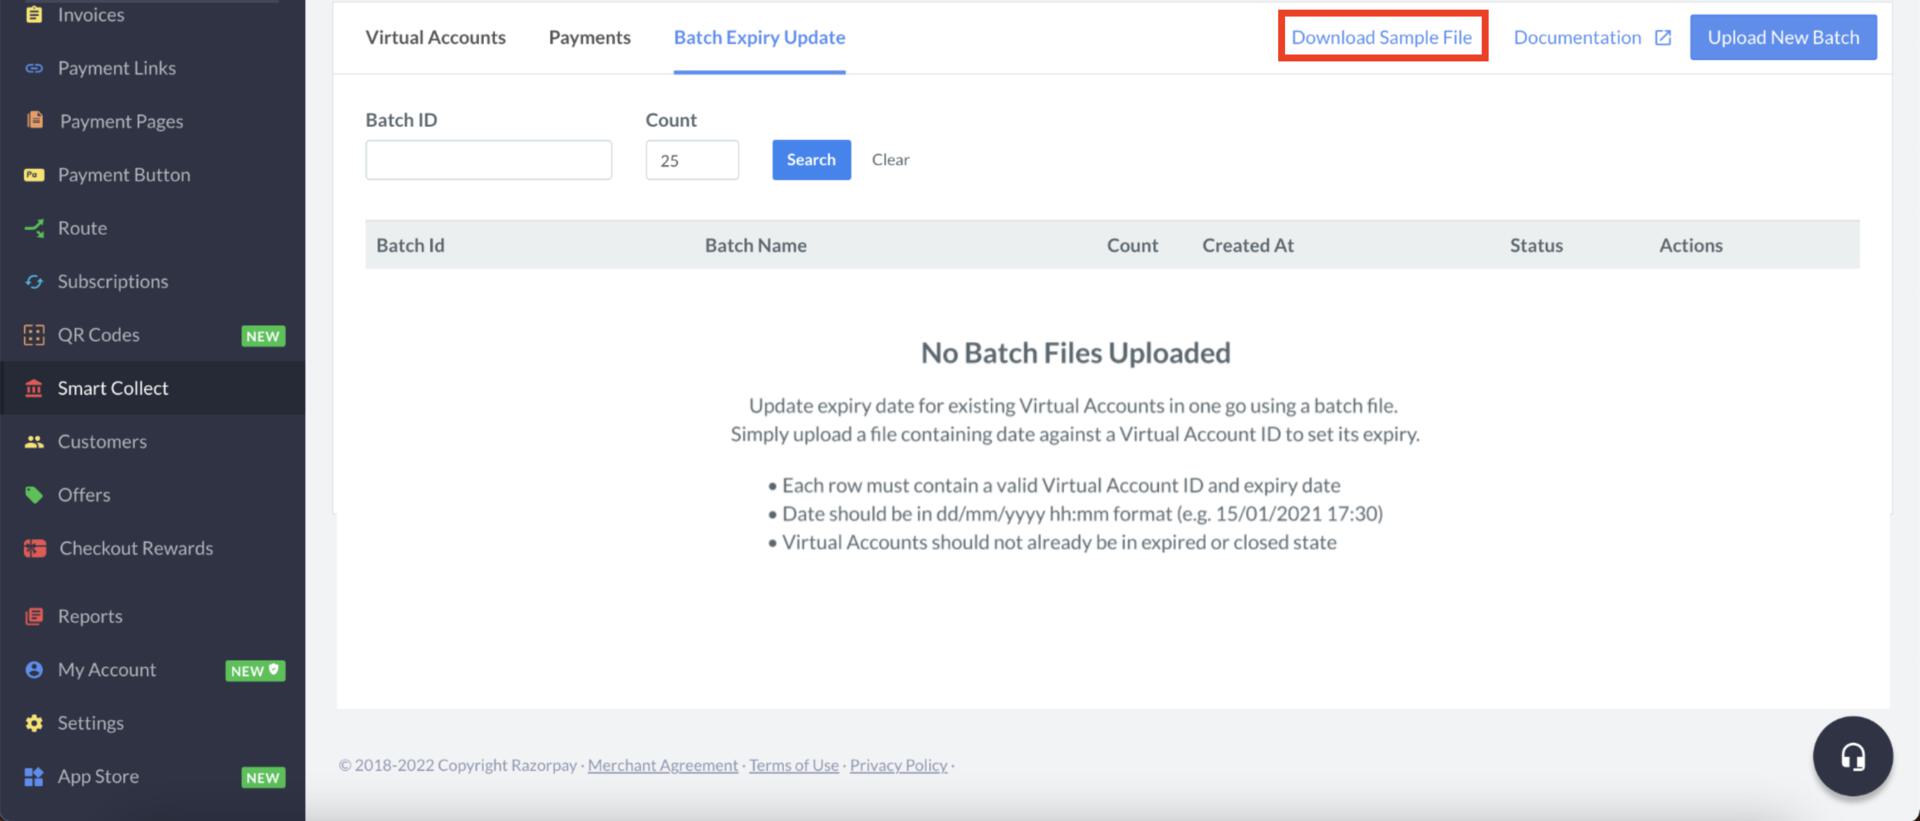
2. Click **Batch Expiry Update** → **Download Sample File** to download the sample batch file.
 ## Step 2: Add Customer Identifier details in the file
**Handy Tips**
* The size of a batch file can be up to 10 MB. You can add up to 10,000 rows in a particular file. Customer Identifiers are processed in the same sequence as listed in the file.
* The Field names/headers in a batch should not be modified. Modifications can cause upload failure.
The batch file contains all the necessary details to update the expiry date. Given below are the required fields for creating a batch file:
`Virtual Account Id` *mandatory*
: The Customer Identifier Id for which you wish to update the expiry date.
`Expire By` *mandatory*
: The updated expiry date for your Customer Identifier. The correct format to enter expiry date is DD-MM-YYYY hh:mm.
Below is a table showing what a sample batch file will look like:
| Virtual Account ID | Expire By |
| ------------------ | ---------------- |
| va\_IpAsyvL7psCbxH | 12-12-2023 12:12 |
| va\_IVSvSuaskJqc8n | 29-12-2023 12:12 |
## Step 3: Upload Batch File on Dashboard
To upload a batch file:
1. Navigate to **Smart Collect** → **Batch Expiry Update**.
2. Click the **Upload New Batch** button.
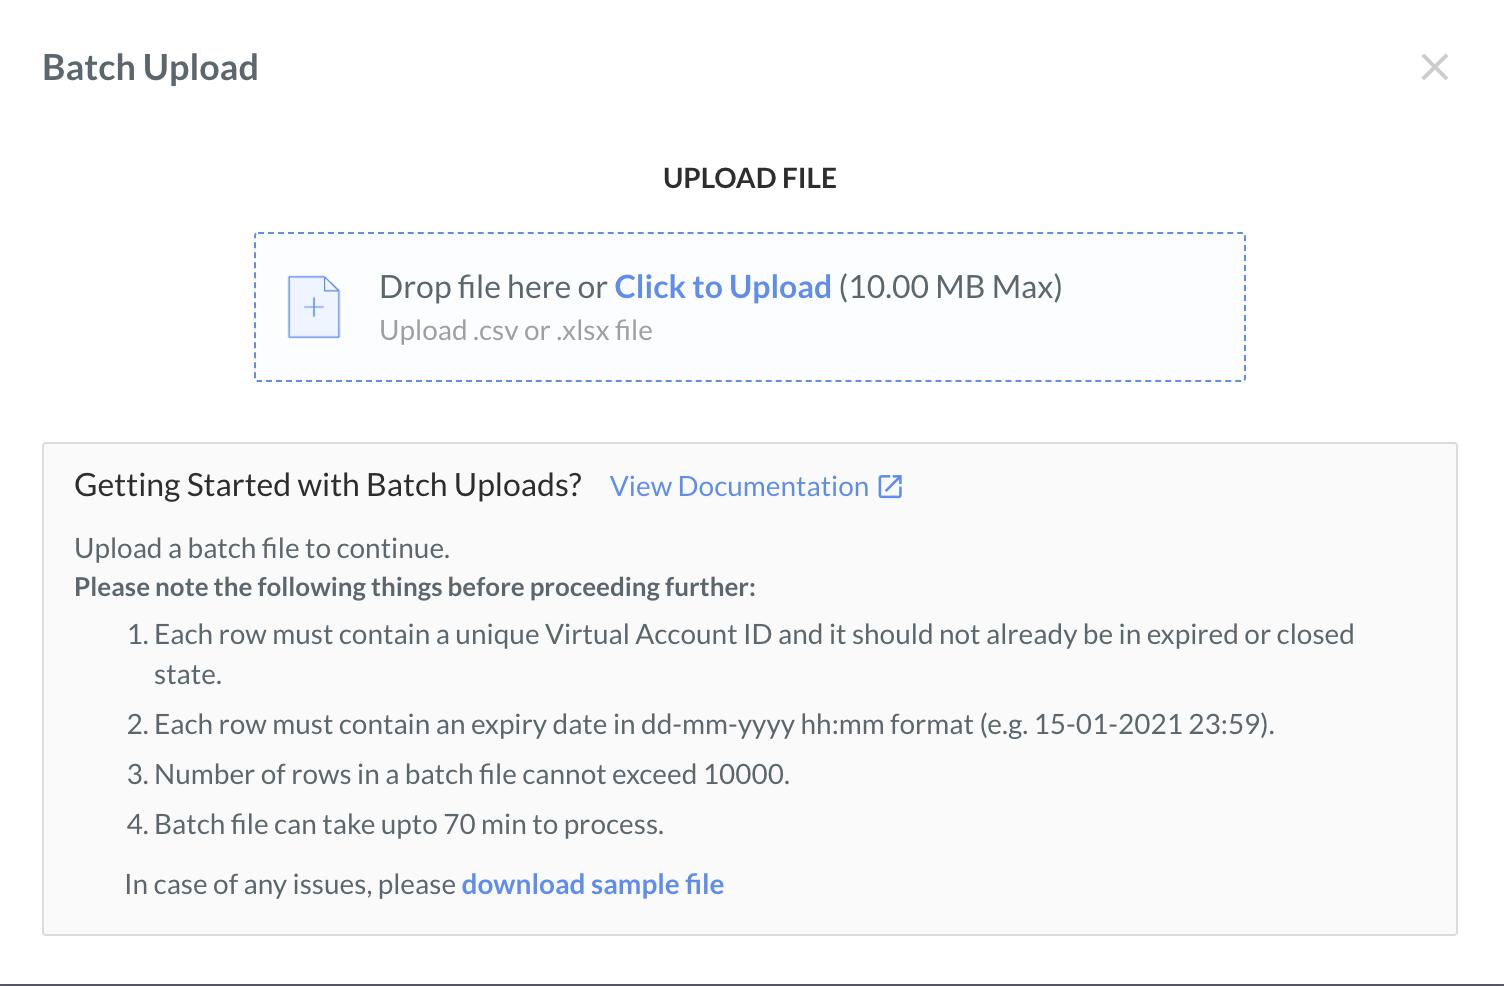
3. On the pop-up page, drag and drop the file over the highlighted area. Alternatively, click the **Click to Upload** option to select your file from your system.
## Step 2: Add Customer Identifier details in the file
**Handy Tips**
* The size of a batch file can be up to 10 MB. You can add up to 10,000 rows in a particular file. Customer Identifiers are processed in the same sequence as listed in the file.
* The Field names/headers in a batch should not be modified. Modifications can cause upload failure.
The batch file contains all the necessary details to update the expiry date. Given below are the required fields for creating a batch file:
`Virtual Account Id` *mandatory*
: The Customer Identifier Id for which you wish to update the expiry date.
`Expire By` *mandatory*
: The updated expiry date for your Customer Identifier. The correct format to enter expiry date is DD-MM-YYYY hh:mm.
Below is a table showing what a sample batch file will look like:
| Virtual Account ID | Expire By |
| ------------------ | ---------------- |
| va\_IpAsyvL7psCbxH | 12-12-2023 12:12 |
| va\_IVSvSuaskJqc8n | 29-12-2023 12:12 |
## Step 3: Upload Batch File on Dashboard
To upload a batch file:
1. Navigate to **Smart Collect** → **Batch Expiry Update**.
2. Click the **Upload New Batch** button.
3. On the pop-up page, drag and drop the file over the highlighted area. Alternatively, click the **Click to Upload** option to select your file from your system.
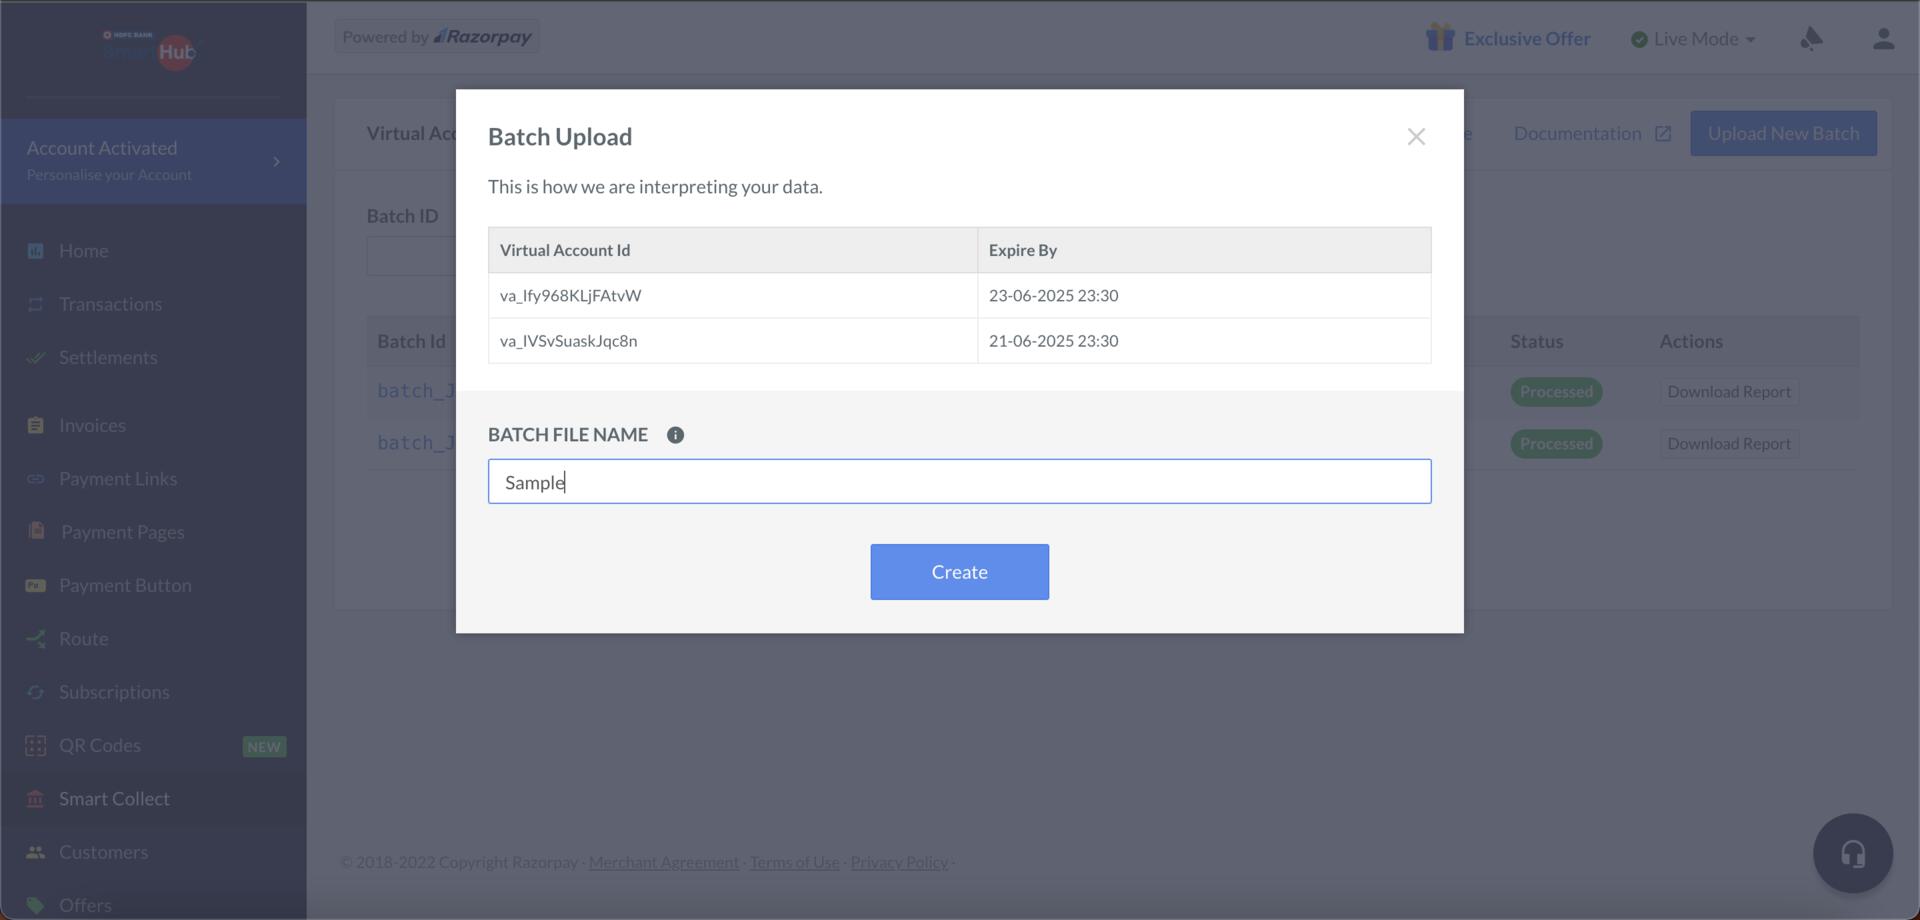
 The file is validated and uploaded to the Razorpay server. After the file is successfully uploaded, a snippet view of the file is displayed in the **Batch Upload** pop-up page.
 ## Step 4: Perform Post-batch Creation Actions
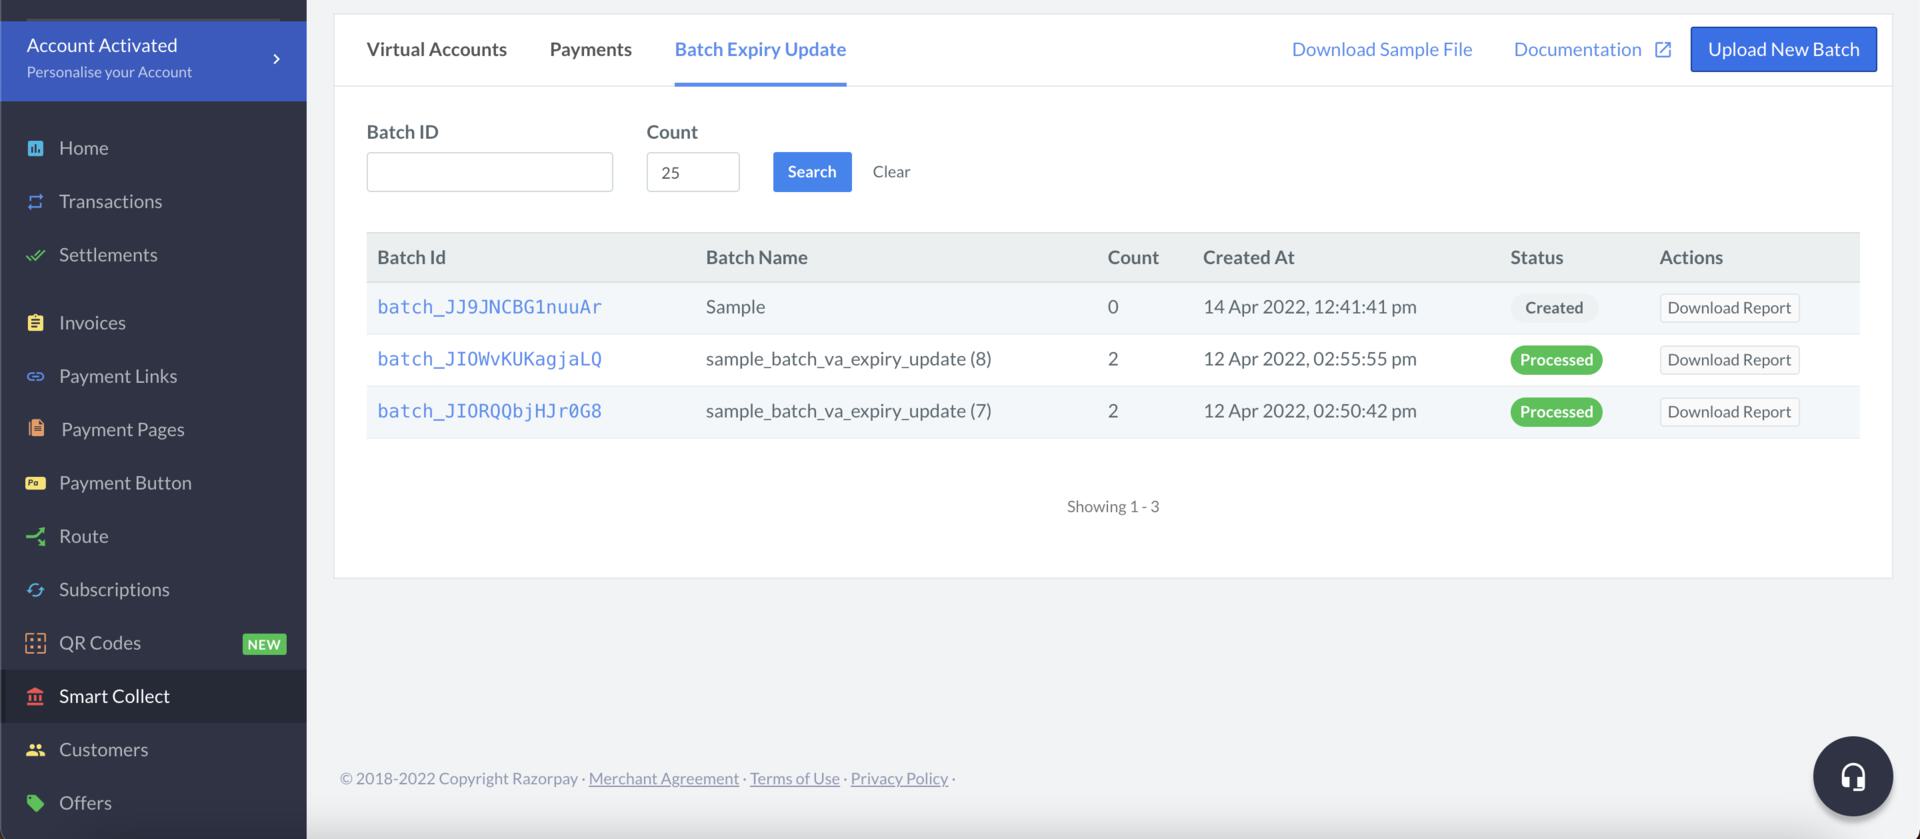
After the batch is created, you can see a **Batch Created Successfully** pop-up page. Click **Close** and reload the page. The newly created batch file will appear in the list of **Batch Uploads**.
The **Batch Uploads** screen displays the following fields:
## Step 4: Perform Post-batch Creation Actions
After the batch is created, you can see a **Batch Created Successfully** pop-up page. Click **Close** and reload the page. The newly created batch file will appear in the list of **Batch Uploads**.
The **Batch Uploads** screen displays the following fields:
| Field | Descriptions |
| ---------- | ---------------------------------------------------------------------------------------- |
| Batch ID | Unique identifier of a batch upload. |
| Batch Name | Name of the batch file. |
| Count | The number of processed rows in a batch. |
| Created At | The time when the batch file was created. |
| Status | Current [state](#batch-file-states) of the batch file. |
| Actions | The operations you can perform on a particular batch file. For example, Download Report. |
 ### Batch File States
The batch file states are explained in the table given below:
| State | Description |
| -------------- | -------------------------------------------------------------------------------------------------------------------------------------------- |
| **Created** | This is the initial state of the file when it is uploaded. Once you upload a file, it stays in the **Created** state for 70 minutes. |
| **Processing** | This state indicates that the batch file is getting processed. |
| **Processed** | This is the final state of the file. It indicates that all the rows in the batch file were processed, either successfully or unsuccessfully. |
**Handy Tips**
* The **Processed** state does not mean all rows in the file were successfully processed. It just means the file was successfully processed, with or without errors.
* Download the report to check for errors. You can correct these errors and upload the data again in another file.
## Step 5: Handle Errors
Batch file errors are detected during file upload. You can also download the batch file report after the upload to check for errors.
A processed batch file does not necessarily mean that that the expiry dates were updated for all Customer Identifiers. There is a chance that a few Customer Identifiers did not get added because of certain issues in the entered data. For example, data was missing in a few fields.
Download the **Batch Report** to understand the reason for the error. This contains the following additional fields to help you check if the expiry date for a Customer Identifier is update or not.
| Additional Fields | Datatype | Description |
| ------------------ | -------- | ---------------------------------------------------------------------------------------------------------------- |
| Virtual Account Id | *string* | The unique identifier of the Customer Identifier. This is null/empty if there are errors during the creation. |
| Expire By | *string* | The updated expiry date for the Customer Identifier. This is null/empty if there are errors during the creation. |
| Success | *string* | This indicates the processing status of the row. It can either be "true" or "false". |
| Error Code | *string* | In case of an error, this column has an error code. |
| Error Description | *string* | In case of an error, this column has the error message. |
To fix the errors, make the required changes and re-upload the batch file.
### Batch File States
The batch file states are explained in the table given below:
| State | Description |
| -------------- | -------------------------------------------------------------------------------------------------------------------------------------------- |
| **Created** | This is the initial state of the file when it is uploaded. Once you upload a file, it stays in the **Created** state for 70 minutes. |
| **Processing** | This state indicates that the batch file is getting processed. |
| **Processed** | This is the final state of the file. It indicates that all the rows in the batch file were processed, either successfully or unsuccessfully. |
**Handy Tips**
* The **Processed** state does not mean all rows in the file were successfully processed. It just means the file was successfully processed, with or without errors.
* Download the report to check for errors. You can correct these errors and upload the data again in another file.
## Step 5: Handle Errors
Batch file errors are detected during file upload. You can also download the batch file report after the upload to check for errors.
A processed batch file does not necessarily mean that that the expiry dates were updated for all Customer Identifiers. There is a chance that a few Customer Identifiers did not get added because of certain issues in the entered data. For example, data was missing in a few fields.
Download the **Batch Report** to understand the reason for the error. This contains the following additional fields to help you check if the expiry date for a Customer Identifier is update or not.
| Additional Fields | Datatype | Description |
| ------------------ | -------- | ---------------------------------------------------------------------------------------------------------------- |
| Virtual Account Id | *string* | The unique identifier of the Customer Identifier. This is null/empty if there are errors during the creation. |
| Expire By | *string* | The updated expiry date for the Customer Identifier. This is null/empty if there are errors during the creation. |
| Success | *string* | This indicates the processing status of the row. It can either be "true" or "false". |
| Error Code | *string* | In case of an error, this column has an error code. |
| Error Description | *string* | In case of an error, this column has the error message. |
To fix the errors, make the required changes and re-upload the batch file.