> ## Documentation Index
> Fetch the complete documentation index at: https://razorpay-881012b3.mintlify.site/llms.txt
> Use this file to discover all available pages before exploring further.
# Manage Razorpay Webstore
> Edit content, change settings or deactivate your Webstore.
Available in
🇮🇳 India
You can perform the following actions:
* [Edit Webstore Content](#edit-webstore-content)
* [Update Stock](#update-stock)
* [Edit Webstore Settings](#edit-webstore-settings)
* [Deactivate Webstore](#deactivate-webstore)
## Edit Webstore Content
To edit content:
1. Navigate to **Payment Pages** on the Dashboard and select **Razorpay Webstore**.
2. From the list, select the Webstore you want to modify.
3. In the top right corner, click the **Edit Page** button.
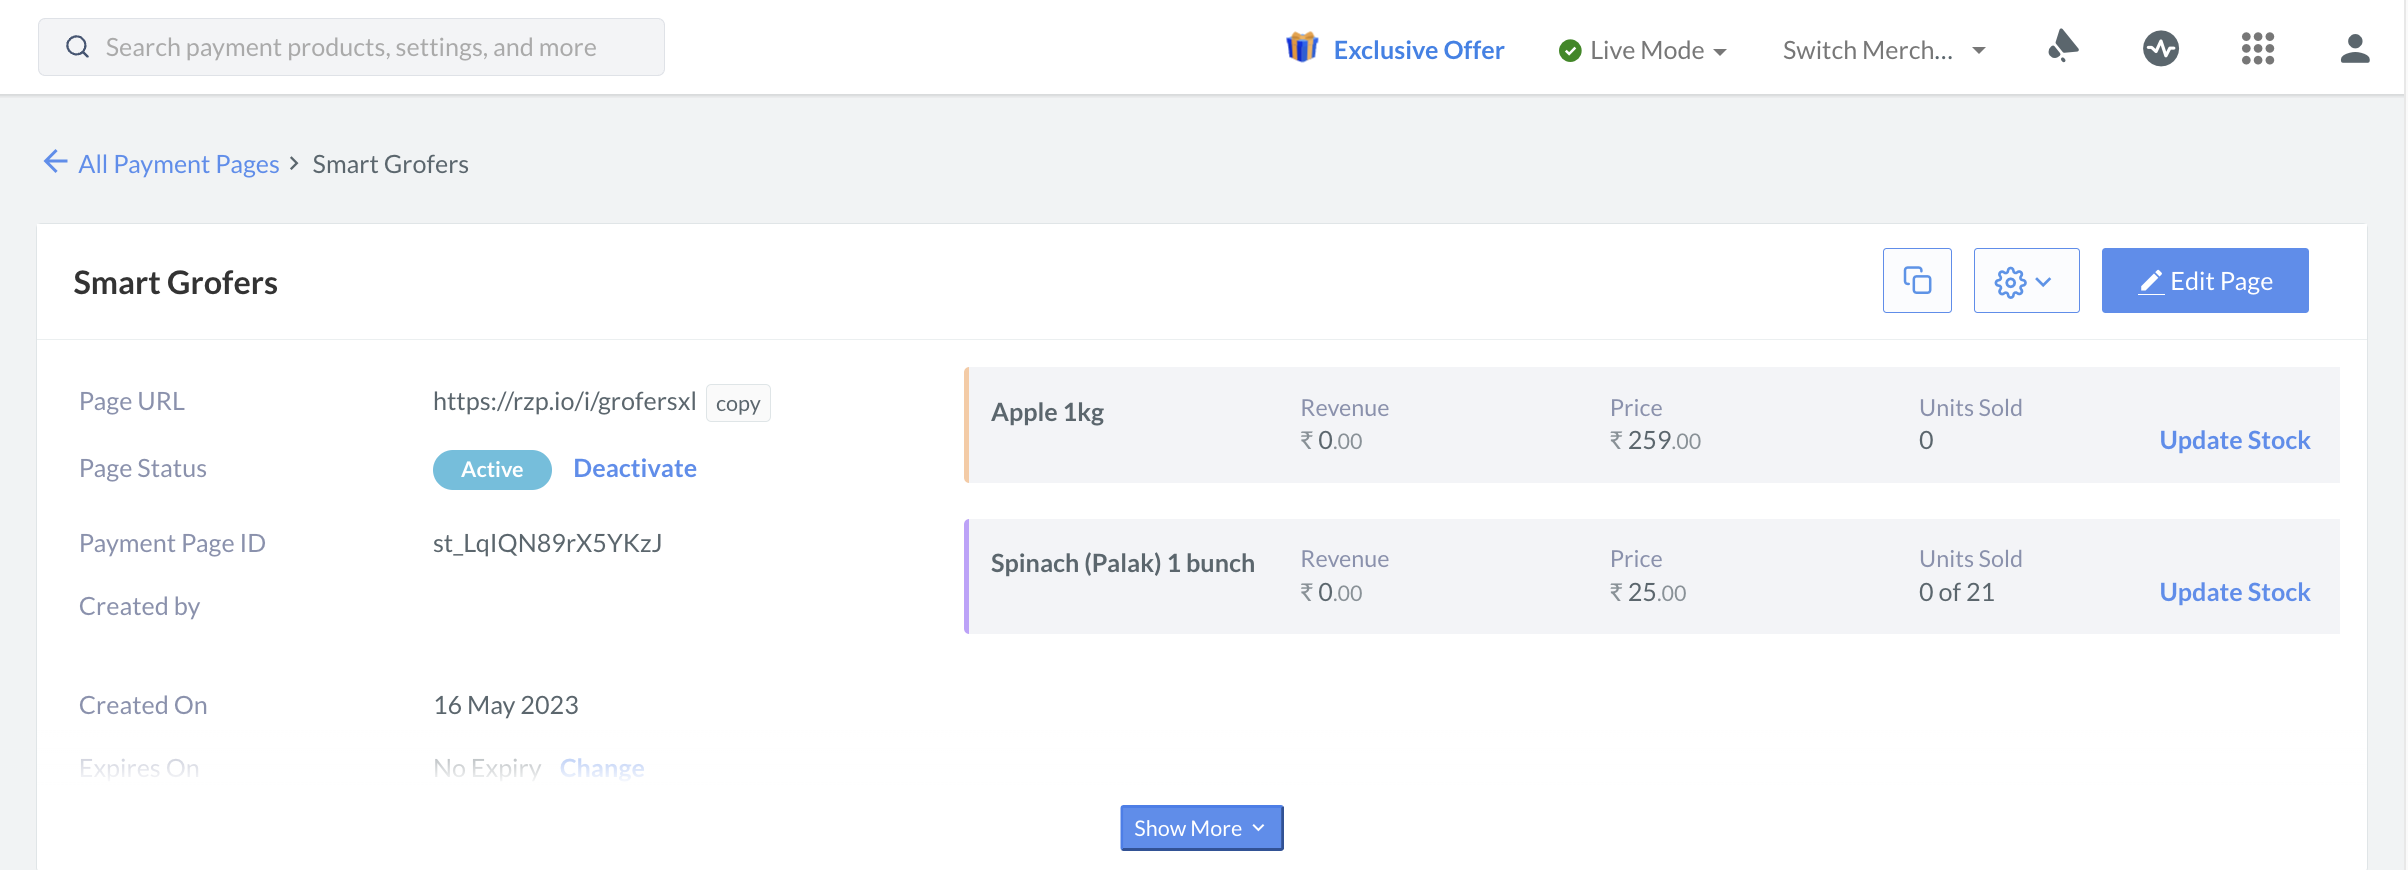 The Webstore appears in edit mode. You can now edit any of the fields to update the details, including the price fields.
## Update Stock
You can update the stock quantity of a price field, for example `Individuals Entry Ticket`, in the edit mode of the Webstore.
To update stock:
1. Navigate to **Payment Pages** on the Dashboard and select **Razorpay Webstore**.
The Webstore appears in edit mode. You can now edit any of the fields to update the details, including the price fields.
## Update Stock
You can update the stock quantity of a price field, for example `Individuals Entry Ticket`, in the edit mode of the Webstore.
To update stock:
1. Navigate to **Payment Pages** on the Dashboard and select **Razorpay Webstore**.
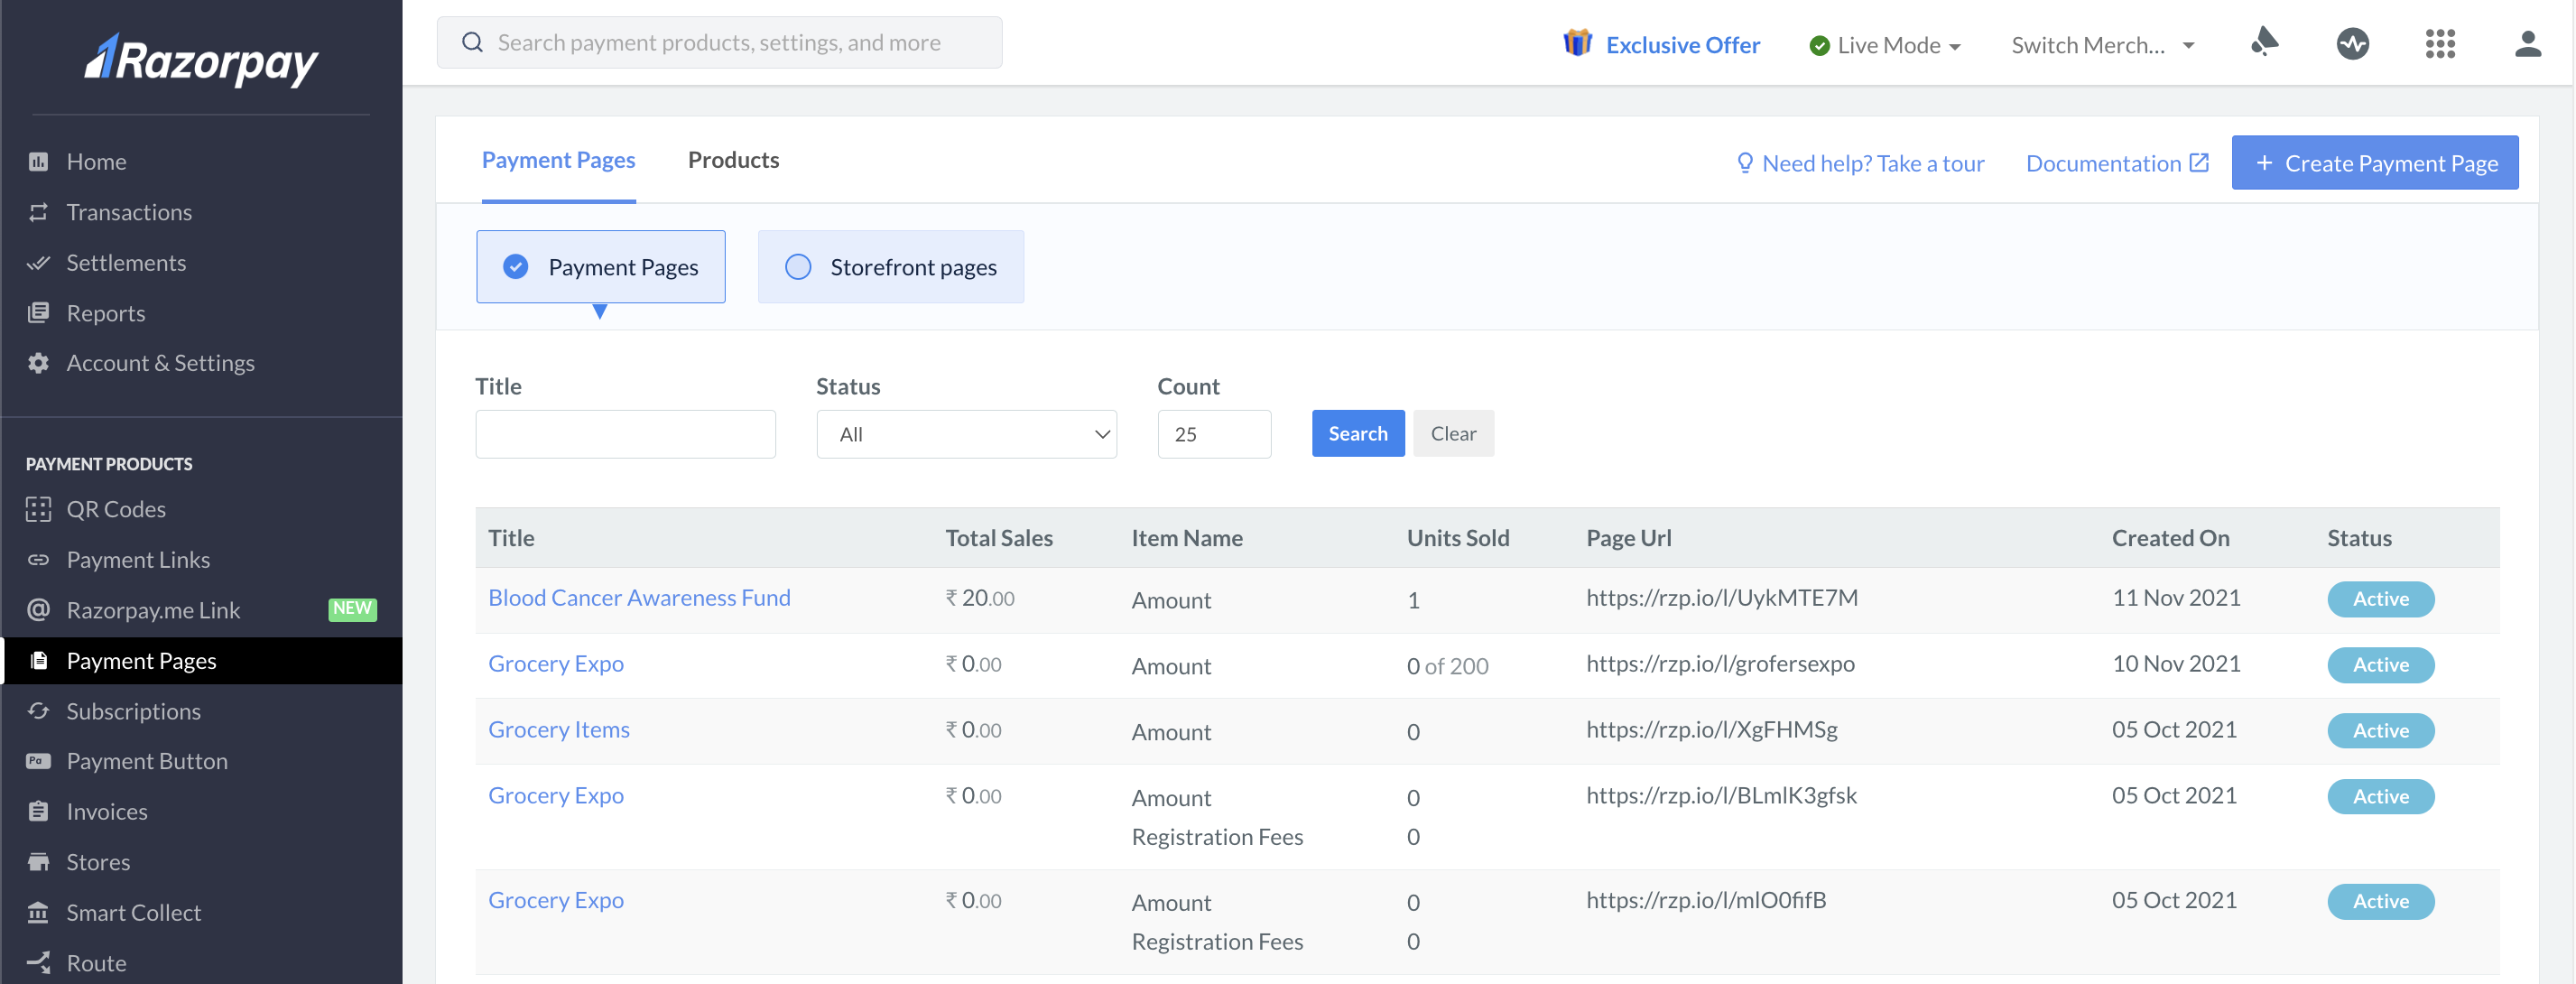 2. Select the Webstore you want to modify.
3. In the top right corner, the different price fields are displayed. Click **Update Stock** against the relevant price item.
4. You can either make the stock quantity unlimited, using **No Limit**, or enter an amount in the box given below.
5. Click **Save**.
## Edit Webstore Settings
To modify Webstore settings:
1. Navigate to **Payment Pages** on the Dashboard and select **Razorpay Webstore**.
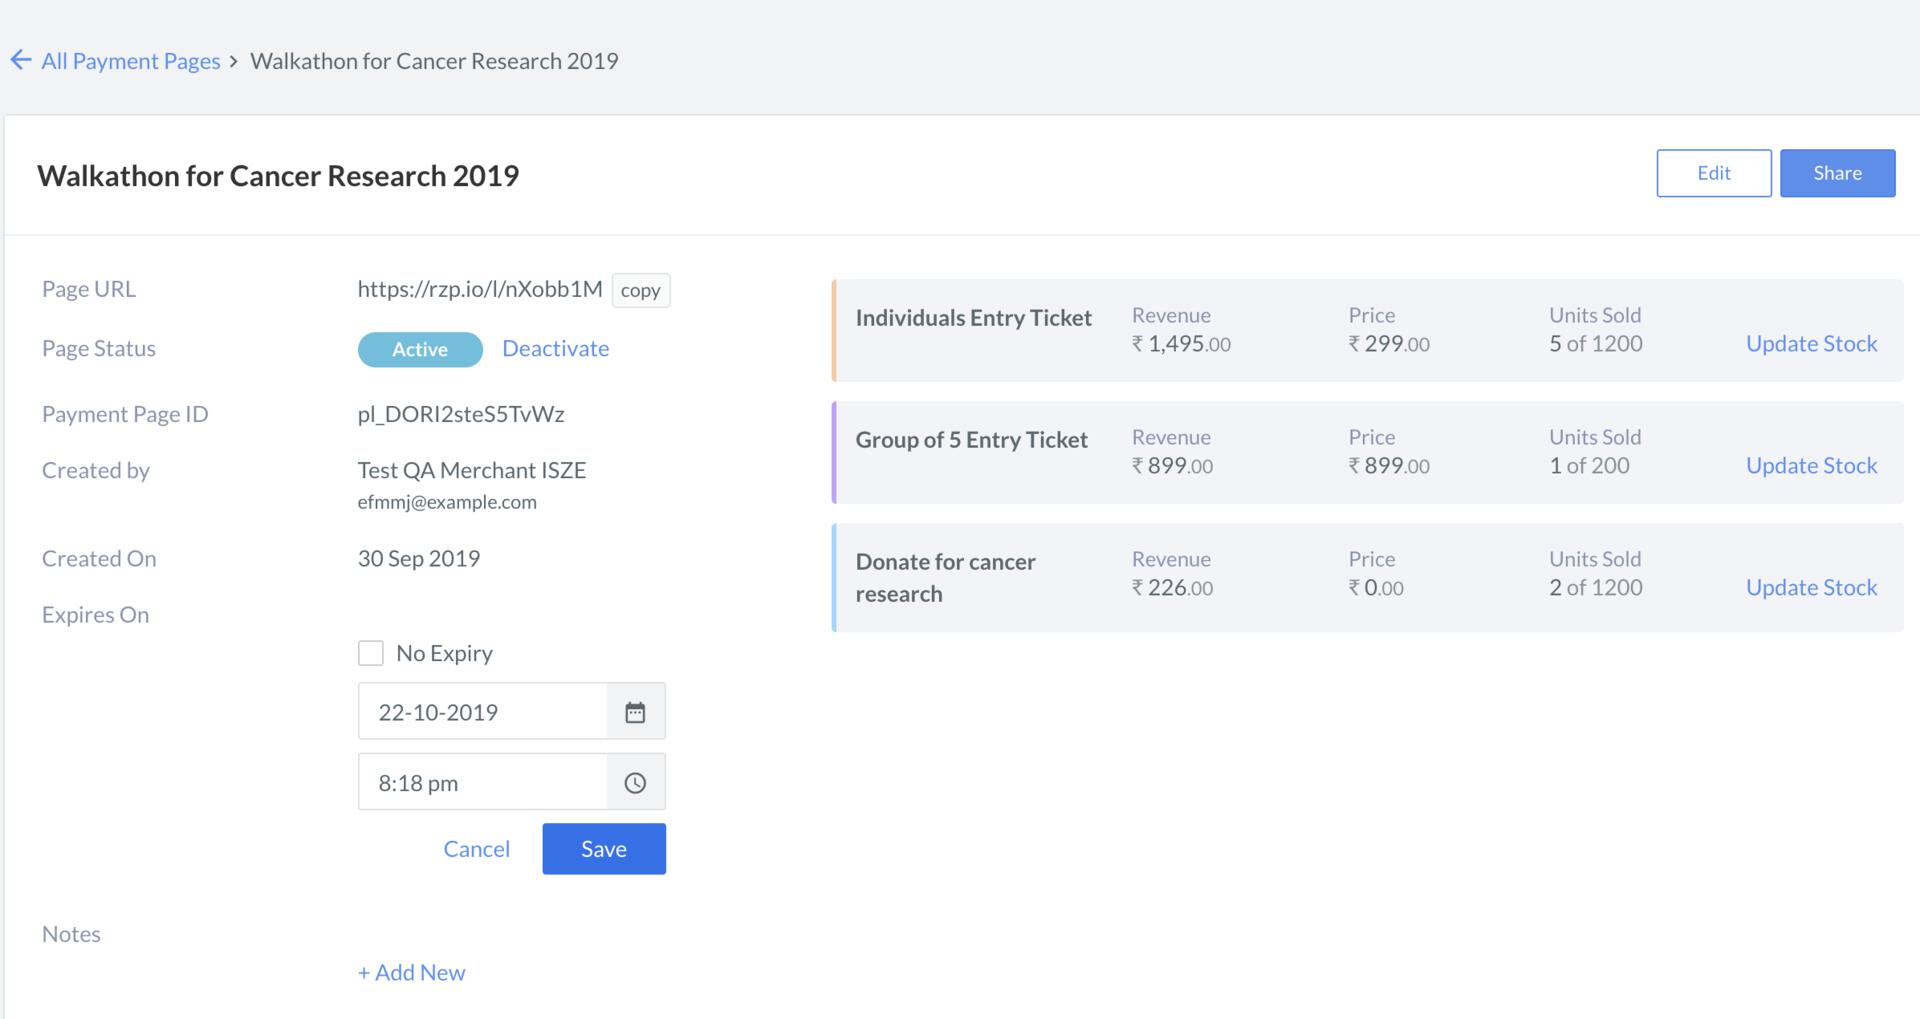
2. Click on the Webstore id. This opens the Webstore details panel where you can perform the following actions:
| Action | Effect |
| --------------------------------- | -------------------------------------------------------------------------------------------------------------------------------------------------------------------------------------- |
| **Edit** the Webstore | Editing re-opens the editor with saved details. You can make changes to the Webstore content. |
| **Deactivate** the Webstore | Deactivating a Webstore makes it inaccessible to your customers. |
| Configure **Expires on** | Enables you to set an expiry date and time for the Webstore using the date and time picker. You can also select the **No Expiry** checkbox to run the Webstore for an indefinite time. |
| **Add New** notes on the Webstore | You can add up to 5 custom notes on the Webstore. |
2. Select the Webstore you want to modify.
3. In the top right corner, the different price fields are displayed. Click **Update Stock** against the relevant price item.
4. You can either make the stock quantity unlimited, using **No Limit**, or enter an amount in the box given below.
5. Click **Save**.
## Edit Webstore Settings
To modify Webstore settings:
1. Navigate to **Payment Pages** on the Dashboard and select **Razorpay Webstore**.
2. Click on the Webstore id. This opens the Webstore details panel where you can perform the following actions:
| Action | Effect |
| --------------------------------- | -------------------------------------------------------------------------------------------------------------------------------------------------------------------------------------- |
| **Edit** the Webstore | Editing re-opens the editor with saved details. You can make changes to the Webstore content. |
| **Deactivate** the Webstore | Deactivating a Webstore makes it inaccessible to your customers. |
| Configure **Expires on** | Enables you to set an expiry date and time for the Webstore using the date and time picker. You can also select the **No Expiry** checkbox to run the Webstore for an indefinite time. |
| **Add New** notes on the Webstore | You can add up to 5 custom notes on the Webstore. |
 **Best Practices**
* To avoid confusion, ensure that no two Webstores have the same **Title**.
* You can edit an expired or inactive Webstore and republish it with new changes. This helps avoid Webstore duplication and allows you to query the system efficiently.
## Deactivate Webstore
A Webstore can have two states, active and inactive.
| Status | Description |
| ---------- | ------------------------------------------------------------------------------------------------------------------------------- |
| `active` | The Webstore is published and live. |
| `inactive` | The Webstore becomes inactive due to one of the following actions:
**Best Practices**
* To avoid confusion, ensure that no two Webstores have the same **Title**.
* You can edit an expired or inactive Webstore and republish it with new changes. This helps avoid Webstore duplication and allows you to query the system efficiently.
## Deactivate Webstore
A Webstore can have two states, active and inactive.
| Status | Description |
| ---------- | ------------------------------------------------------------------------------------------------------------------------------- |
| `active` | The Webstore is published and live. |
| `inactive` | The Webstore becomes inactive due to one of the following actions:- Manual deactivation
- Webstore expiry
|
You can make an existing Webstore inactive if you no longer wish to accept payments using it.
### Manual Deactivation
To deactivate manually:
1. Log in to Dashboard and navigate to **Payment Pages**.
2. Select **Razorpay Webstore**.
3. From the list, click the Webstore that you want to deactivate.
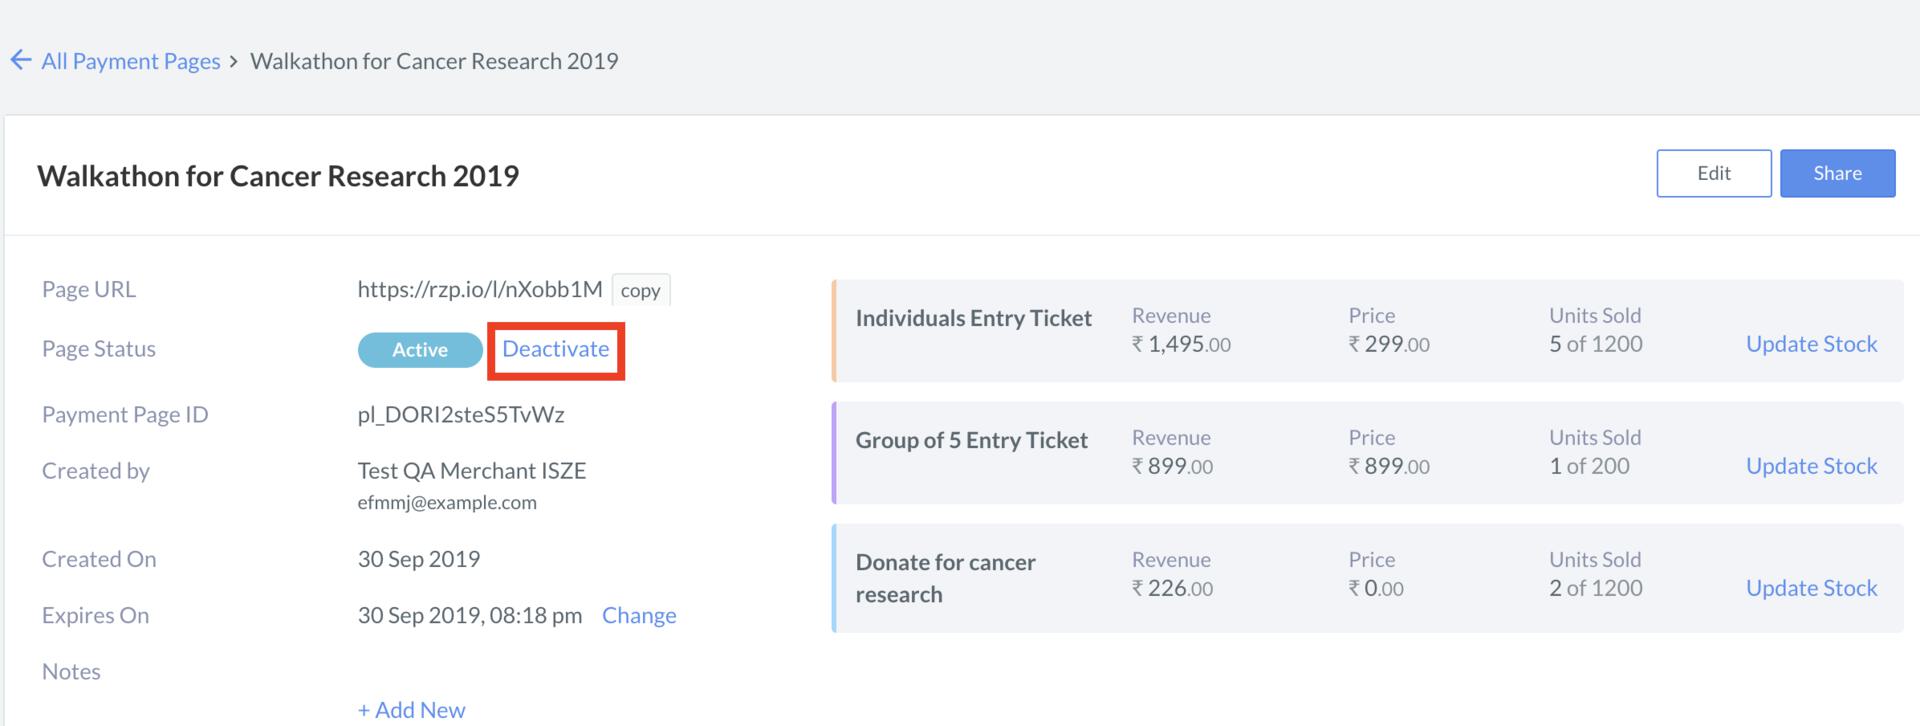
4. In the Webstore details screen, go to **Page Status** field and click **Deactivate**.
5. In the dialog box that appears, confirm the action by clicking the **Yes, deactivate** button.
 ### Deactivation Using Expiry Date
You can also automate Webstore deactivation by setting an expiry date. You can set expiry date:
* At the time of Creation
* After Creation
#### At the Time of Creation
Know how to [set the Webstore's expiry date](/docs/payments/mobile-app/accept-payments/webstore#step-3-configure-store-settings) at the time of creation.
#### After Creation
To set the expiry mode:
1. Navigate to the Dashboard → **Payment Pages**.
2. Select **Razorpay Webstore**.
3. From the list, click the Webstore that you want to set expiry for.
4. In the Webstore details screen, go to **Expires On** field and click **Change**.
5. The field now shows a **No Expiry** checkbox selected. Unselect the box for the calendar to appear.
6. In the calendar, set the date and time of expiry and click **Save**.
**Handy Tips**
The expiry time must be at least 15 minutes after current time.
### Related Information
* [Create a Razorpay Webstore](/docs/payments/webstore/create)
* [Search for Webstore](/docs/payments/webstore/search)
### Deactivation Using Expiry Date
You can also automate Webstore deactivation by setting an expiry date. You can set expiry date:
* At the time of Creation
* After Creation
#### At the Time of Creation
Know how to [set the Webstore's expiry date](/docs/payments/mobile-app/accept-payments/webstore#step-3-configure-store-settings) at the time of creation.
#### After Creation
To set the expiry mode:
1. Navigate to the Dashboard → **Payment Pages**.
2. Select **Razorpay Webstore**.
3. From the list, click the Webstore that you want to set expiry for.
4. In the Webstore details screen, go to **Expires On** field and click **Change**.
5. The field now shows a **No Expiry** checkbox selected. Unselect the box for the calendar to appear.
6. In the calendar, set the date and time of expiry and click **Save**.
**Handy Tips**
The expiry time must be at least 15 minutes after current time.
### Related Information
* [Create a Razorpay Webstore](/docs/payments/webstore/create)
* [Search for Webstore](/docs/payments/webstore/search)