> ## Documentation Index
> Fetch the complete documentation index at: https://razorpay-881012b3.mintlify.site/llms.txt
> Use this file to discover all available pages before exploring further.
# Salary Component Library
> Standardise payroll with Payroll's Salary Component Library for accuracy & compliance.
Available in🇮🇳 India
The Salary Component Library in Payroll is a structured repository that standardises salary components. It categorises additions and deductions so you can easily define and manage salary components. It also ensures compliance with tax and statutory regulations.
**Flexible Benefit Plan (FBP) components** are managed separately. To set up tax-friendly benefits such as Meal Allowance, Car Lease Reimbursement or Employer NPS Contribution, see the [Flexi Component Library](/docs/payroll/component-library/flexible-benefits).
When setting up payroll, different components make up an employee's salary, some add to their pay like bonuses, while others deduct from it like ad-hoc damage repairs. In Payroll, you can customise both addition and deduction components to suit your organisation's salary structure.
| Feature | Description | Example |
| --------------------------------- | ---------------------------------------------------------------------------------------------------------------------------- | ----------------------------------------------------------------------------------------------------------------------------------------------------------------------------------------------------------------------------------------------- |
| **Standardised Salary Component** |
Admins can set up a salary component library with predefined and custom components for consistency.
| Earlier, one employee's bonus was labelled "Performance Bonus" and another's as "Year-end Bonus," creating confusion. Now, admins define a single "Bonus" component, ensuring uniform payroll calculations. |
| **Controlled Component Editing** |
Only the amount can be modified while executing payroll by admins; name and taxability remain fixed for uniformity.
| HR teams often renamed allowances per employee, leading to payroll mismatches. Now, admins lock names and taxability while allowing only amount adjustments for consistency. |
| **Tax Calculations** |
Admins ensure accurate tax handling with a clear distinction between gross and net pay deductions.
| An employee eligible for a ₹15,000 exemption had only ₹10,000 exempted due to manual errors, resulting in unnecessary taxation. Now, predefined setup ensures the correct exemption based on salary eliminating errors and ensuring compliance. |
| **Compliance Updates** |
Payroll enables automatic tax compliance with government regulations.
| If the PF wage ceiling increased, outdated deductions could lead to penalties. Now, the system alerts admins to regulatory changes and blocks payroll processing until compliance is ensured, preventing errors and legal risks. |
## Component Library Overview
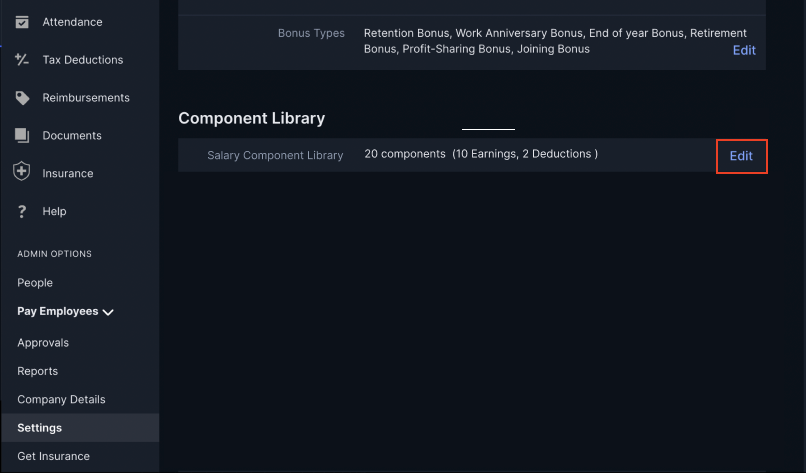
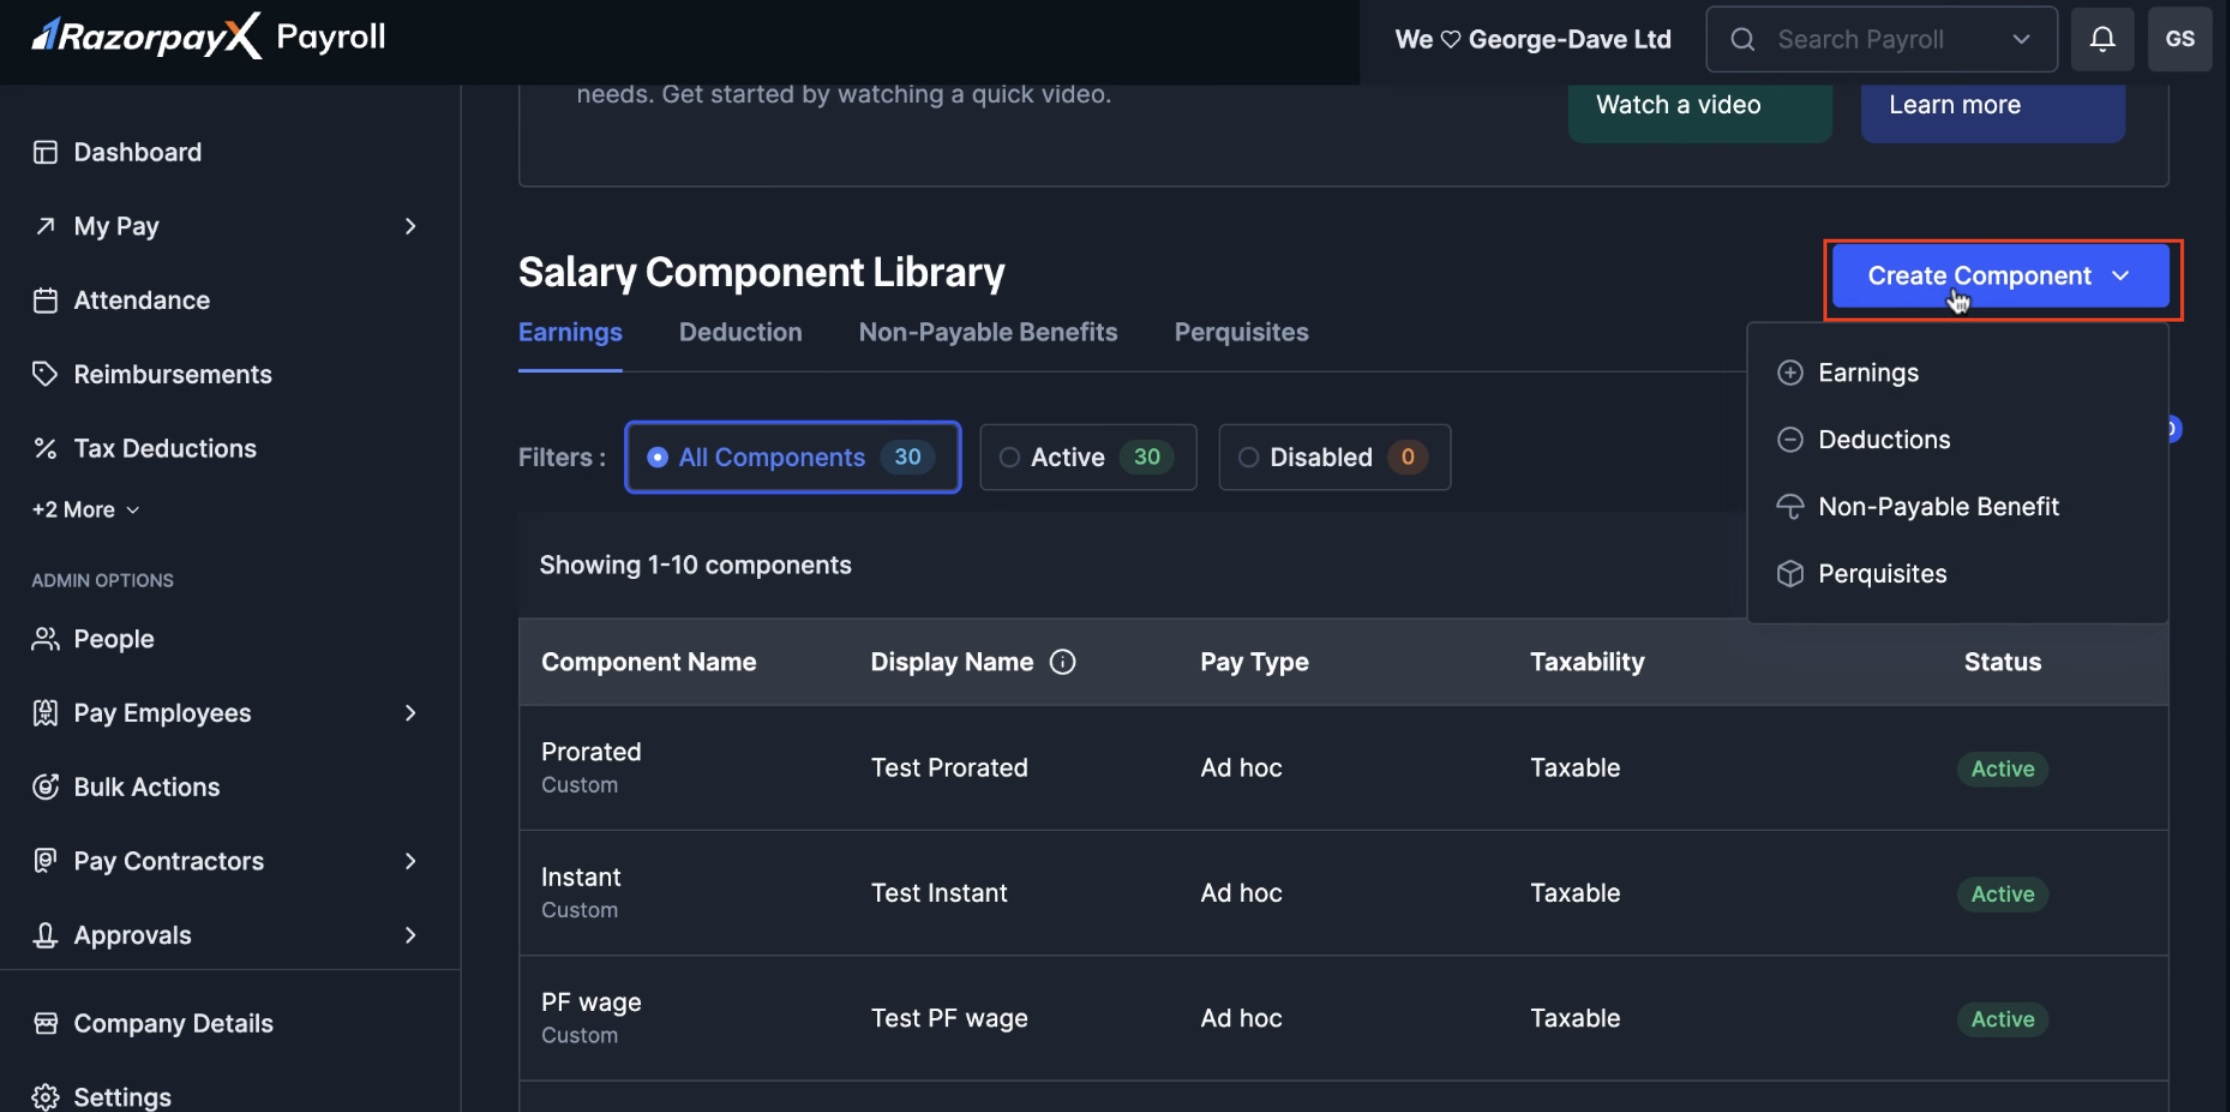
Navigate to **Settings → Salary Component Library** to access the central repository of all salary components. The library displays comprehensive information about each component including:
* **Component Name** - Internal identifier for the component.
* **Display Name** - Name that appears on payslips and salary registers.
* **Pay Type** - Classification as Ad hoc or Regular.
* **Taxability** - Tax treatment of the component.
* **Status** - Active or Disabled state.
### Component Categories
The library organises components into four main categories:
1. **Earnings** - Components that add to employee salary (32 available).
2. **Deduction** - Components that reduce employee salary (18 available).
3. **Non-Payable Benefits** - Benefits included in CTC but not paid directly.
4. **Perquisites** - Additional benefits subject to special tax treatment.
### Filtering Options
Use filters to manage your component library effectively:
* **All Components** - View complete list of components.
* **Active** - Show only currently usable components.
* **Disabled** - Display archived components no longer in use.
The system shows component counts for each filter, making it easy to track library size and usage.
An Earnings Component is any salary element that increases an employee's total compensation.
By defining earnings components, you can ensure employees receive the right benefits while maintaining compliance with tax rules. You also get to standardise salary components so that similar components are treated the same way for all employees.
To add a new earnings component:
1. Navigate to **Settings → Salary Component Library**.
2. Click **Create Component** dropdown and select **Earnings**.
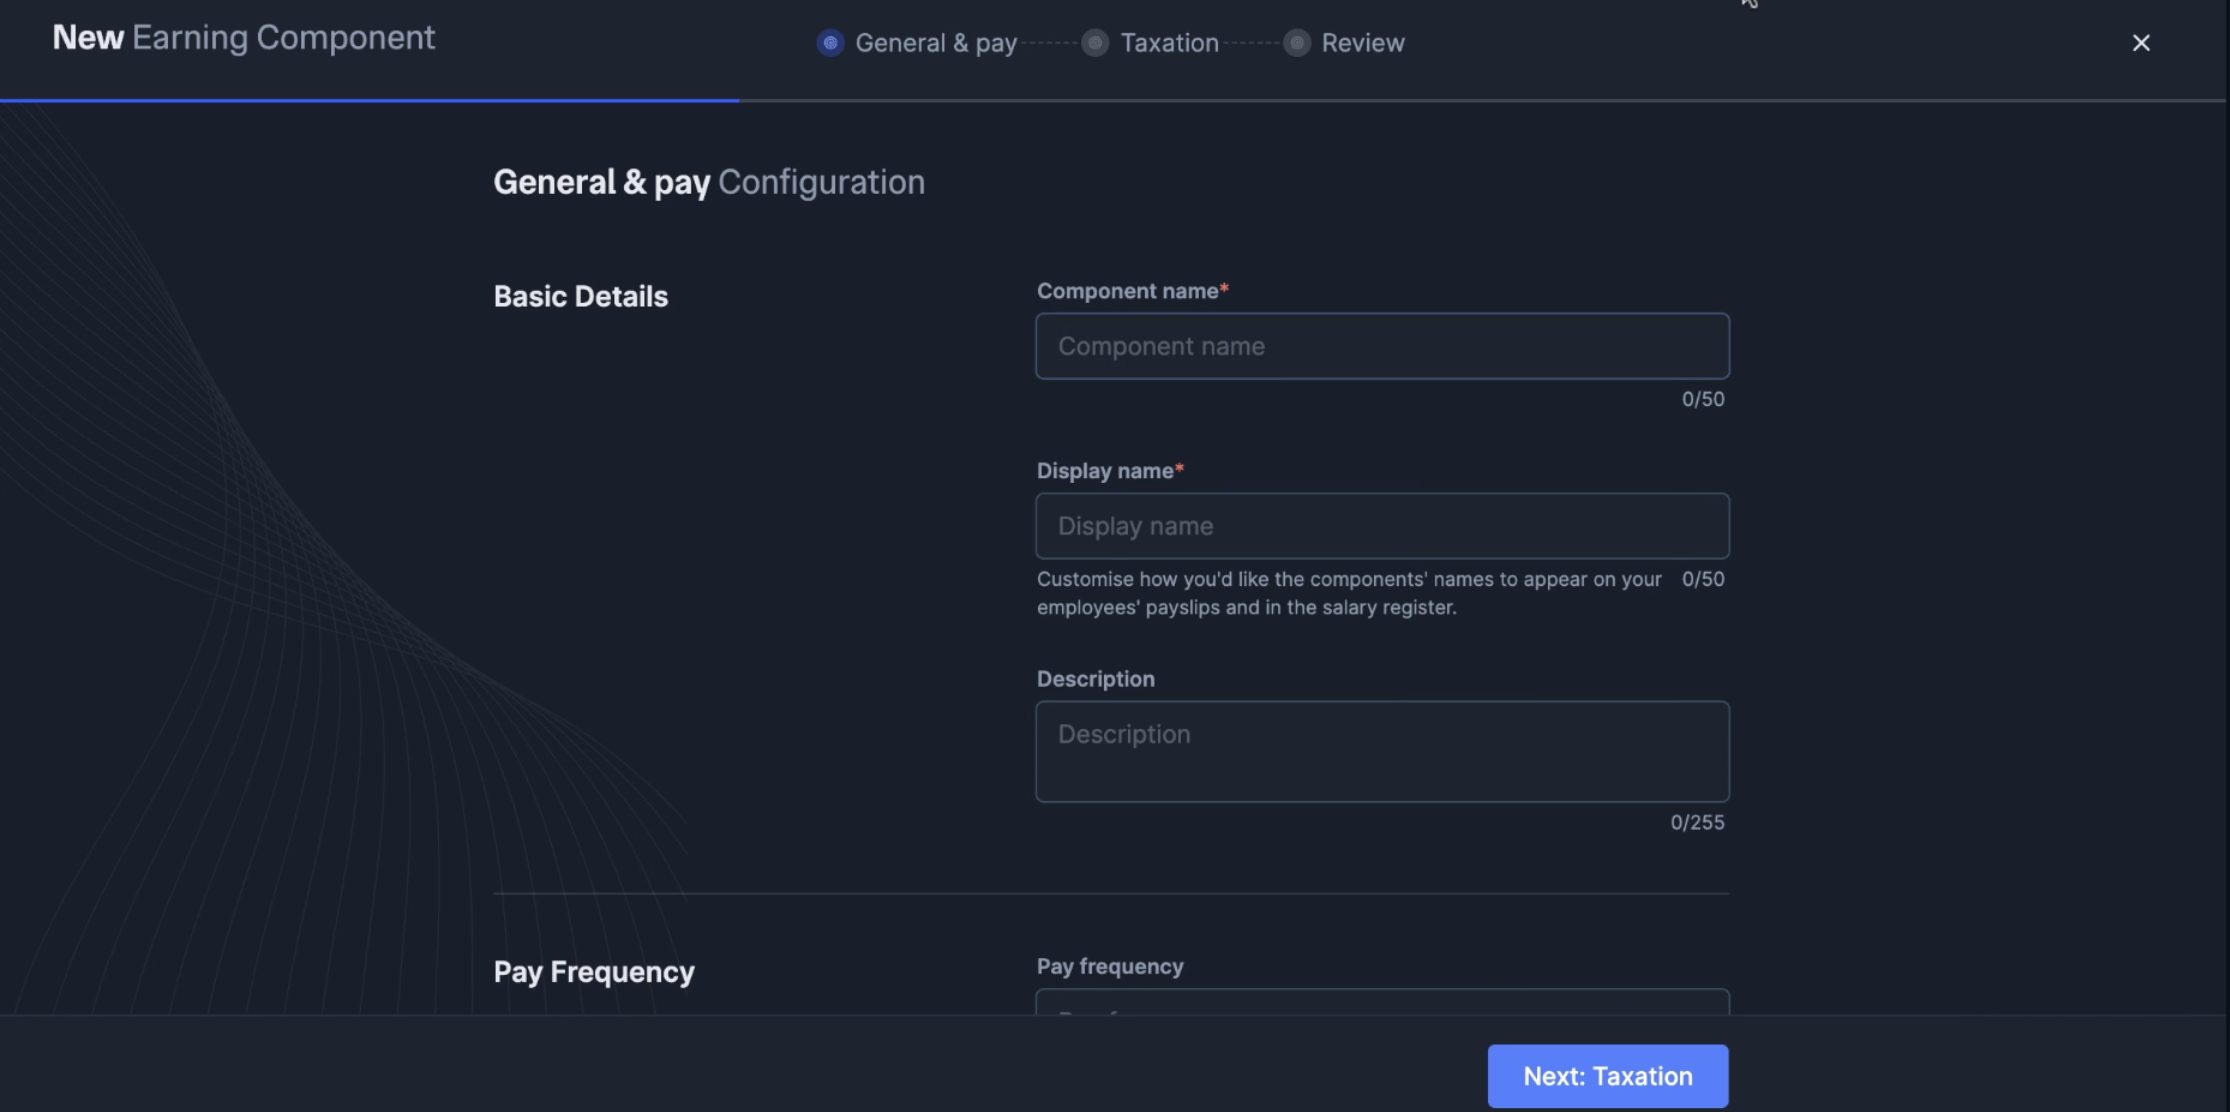
3. Fill in the **General & Pay Configuration** details:
* Enter a **Component name** (must be unique across all components).
* Add a **Display name** for payslips and salary registers.
* Write a **Description** explaining the component's purpose.
* Select **Pay Frequency** (Monthly, Quarterly, Annually or Ad hoc).
4. Click **Next: Taxation** to configure tax settings.
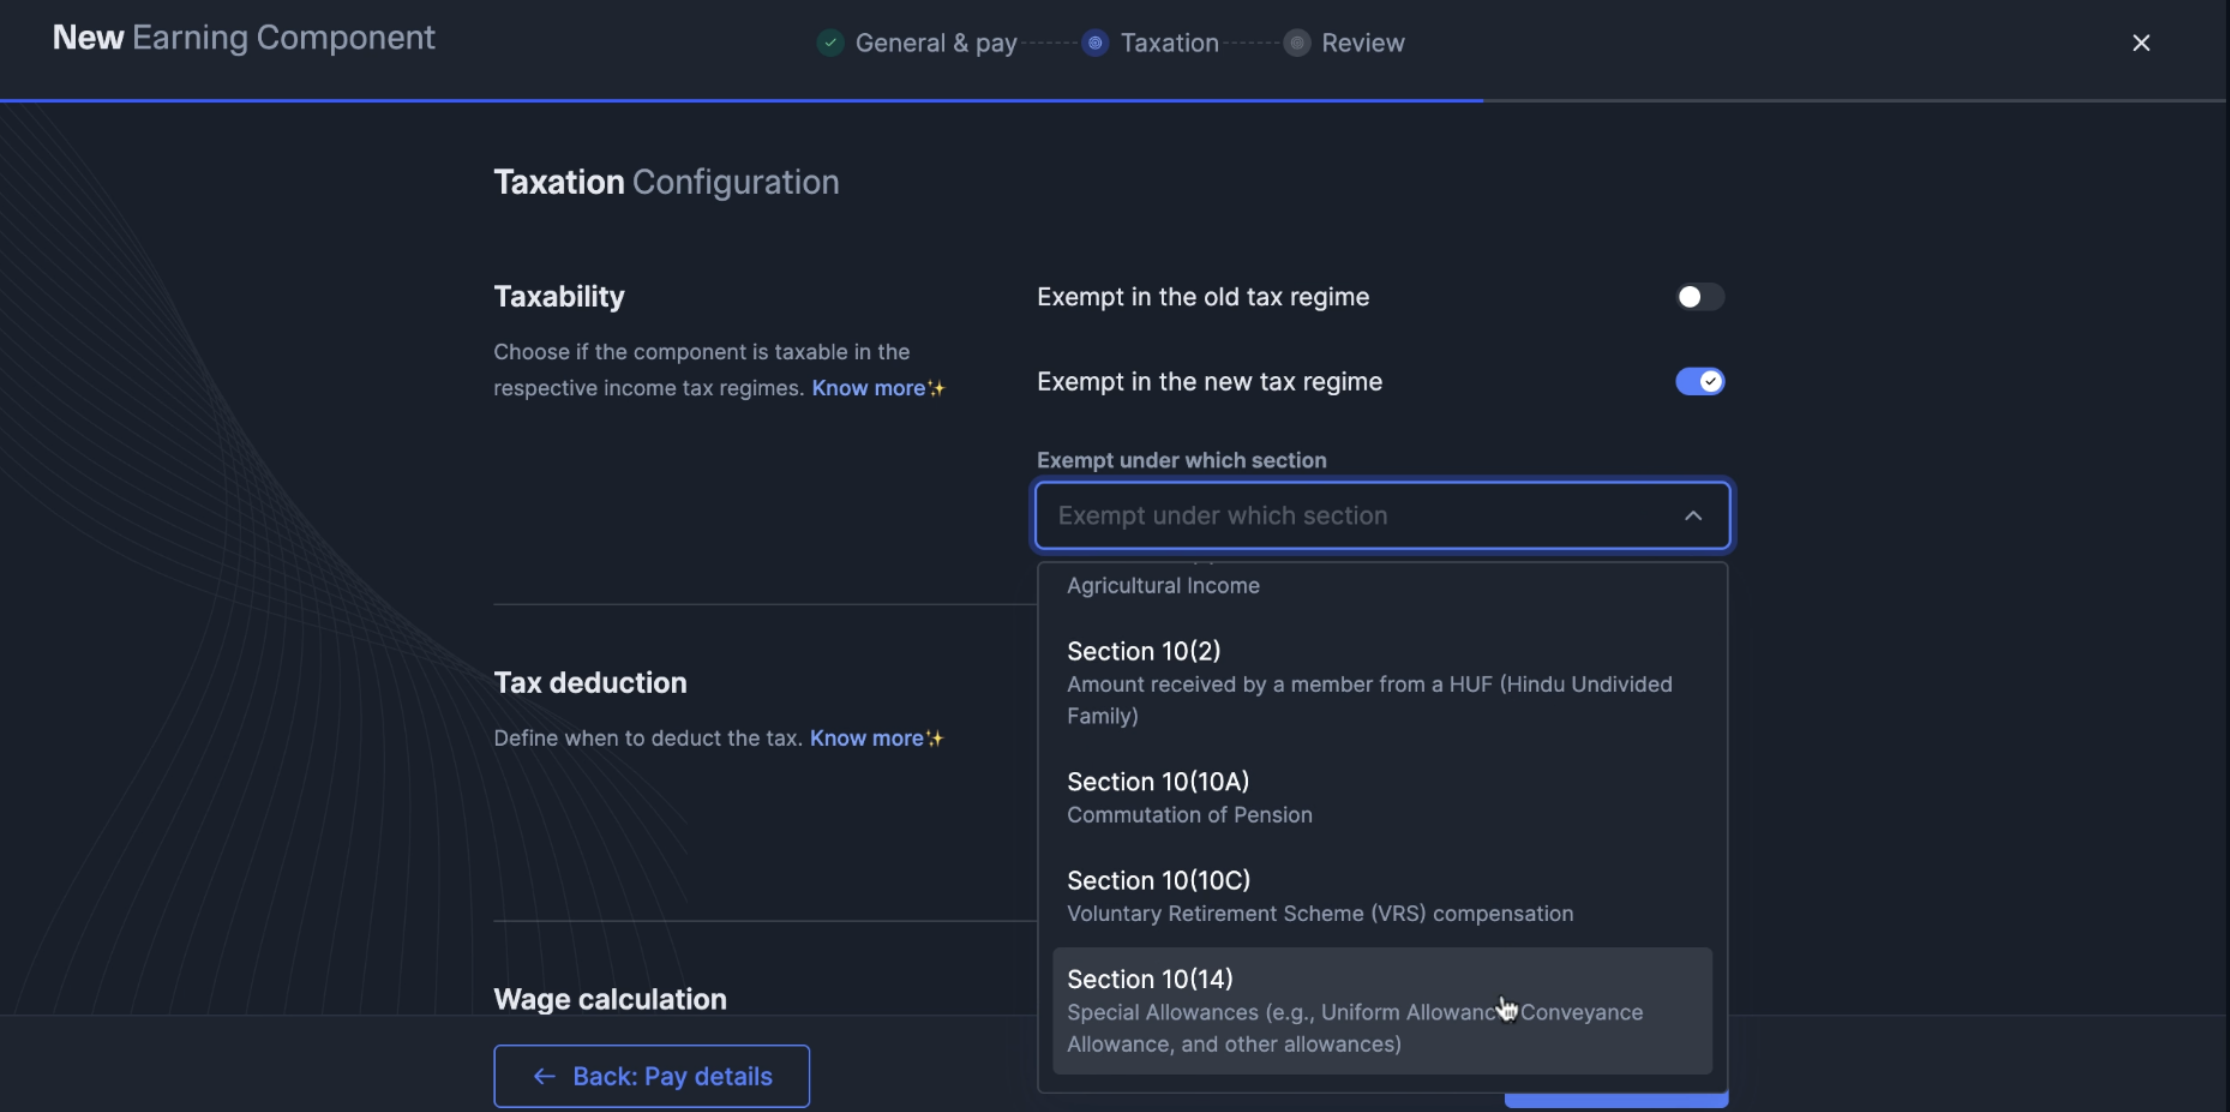
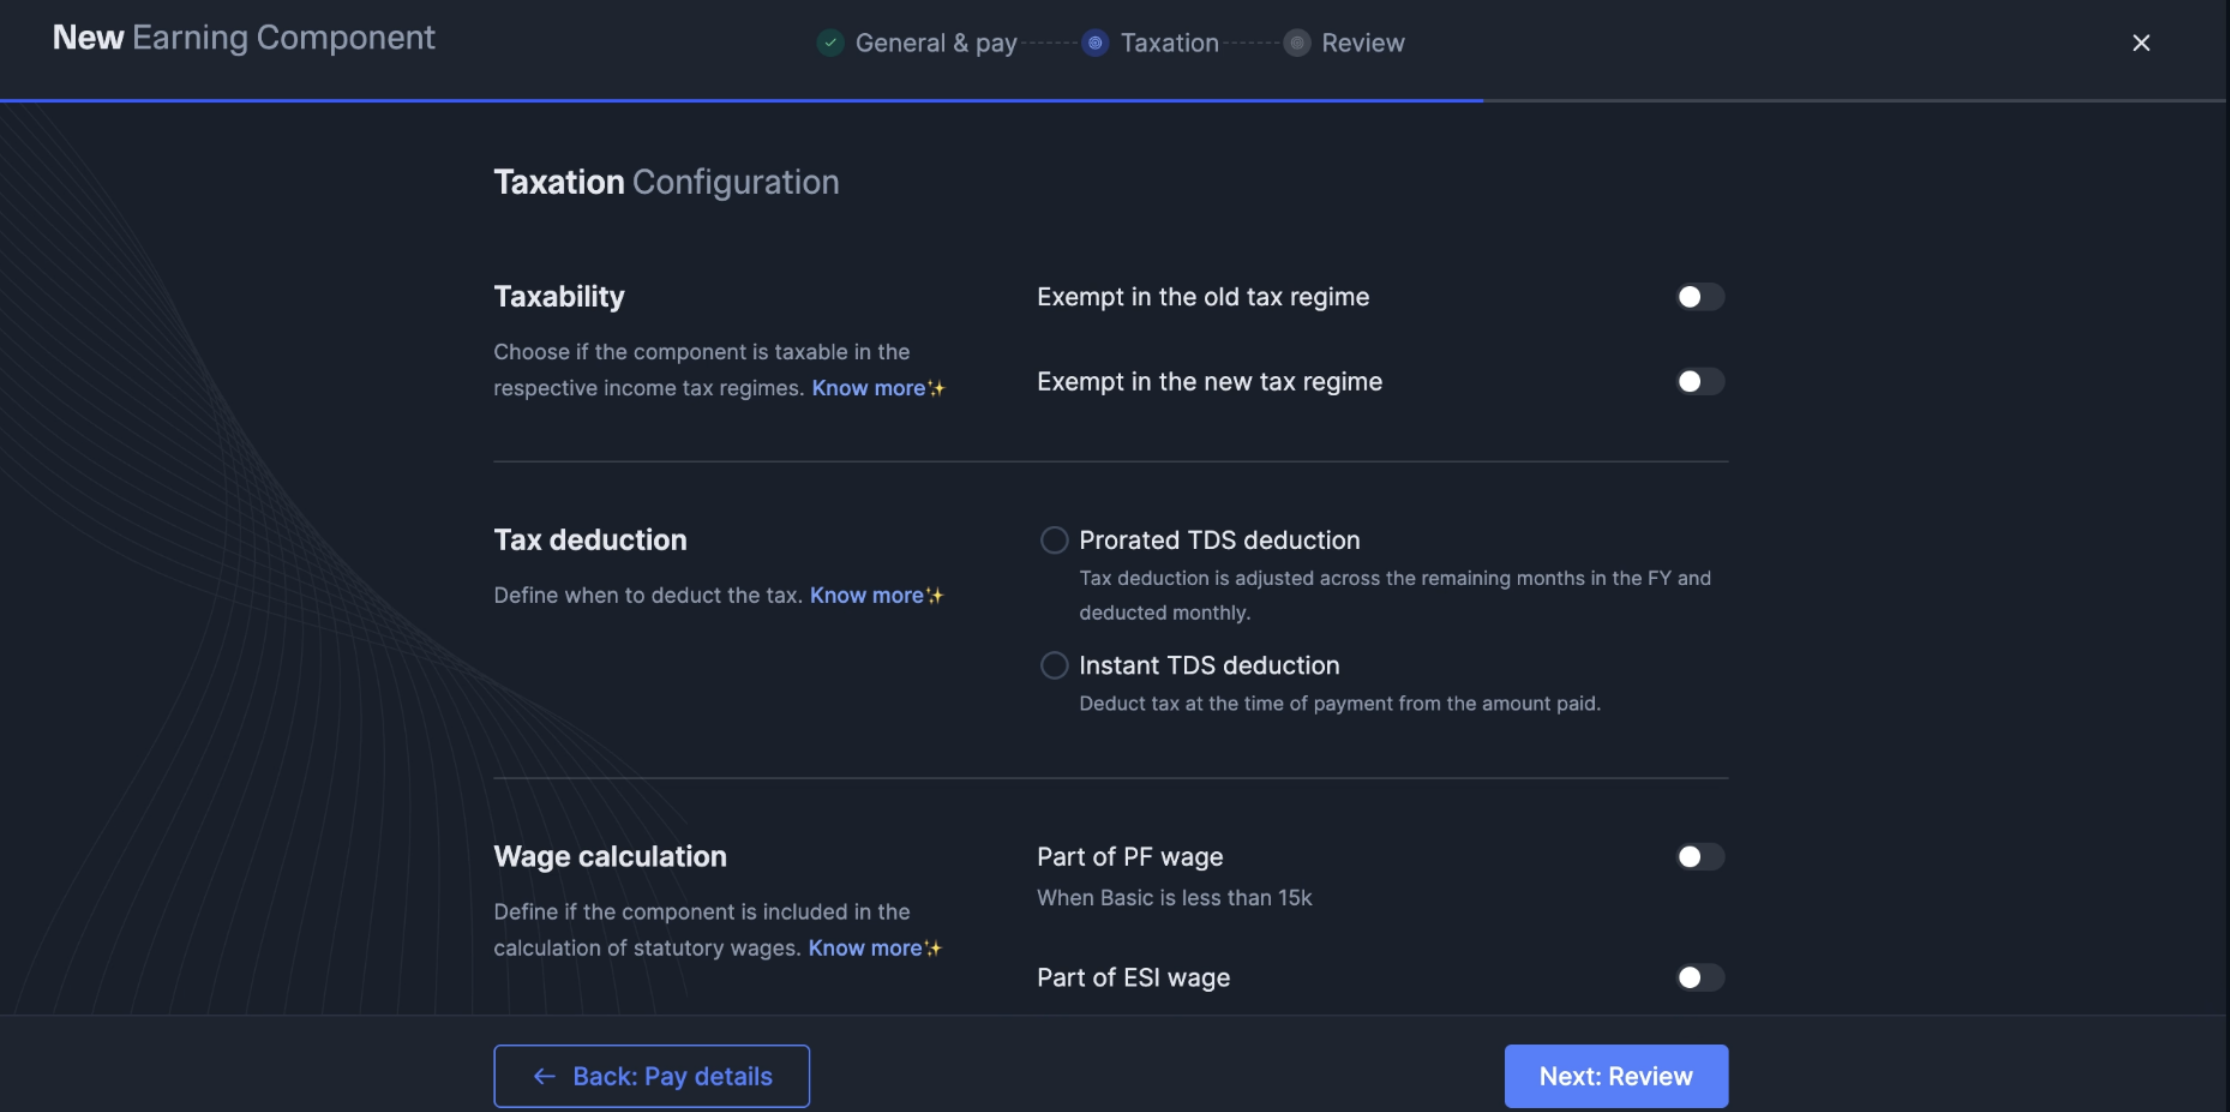
5. Configure **Taxation Configuration**:
* Set **Taxability** - Choose exemption status for old and new tax regimes.
* If exempt in new regime, select the **Exemption section** from dropdown.
* Configure **Tax deduction** type:
* **Prorated TDS deduction** - Tax adjusted across remaining months in FY.
* **Instant TDS deduction** - Tax deducted at payment time.
6. Set **Wage calculation** parameters:
* **Part of PF wage** - Include in Provident Fund calculations (when Basic \< 15k).
* **Part of ESI wage** - Include in ESI calculations.
* **Part of PT wage** - Include in Professional Tax calculations.
* **Part of LWF wage** - Include in Labour Welfare Fund calculations.
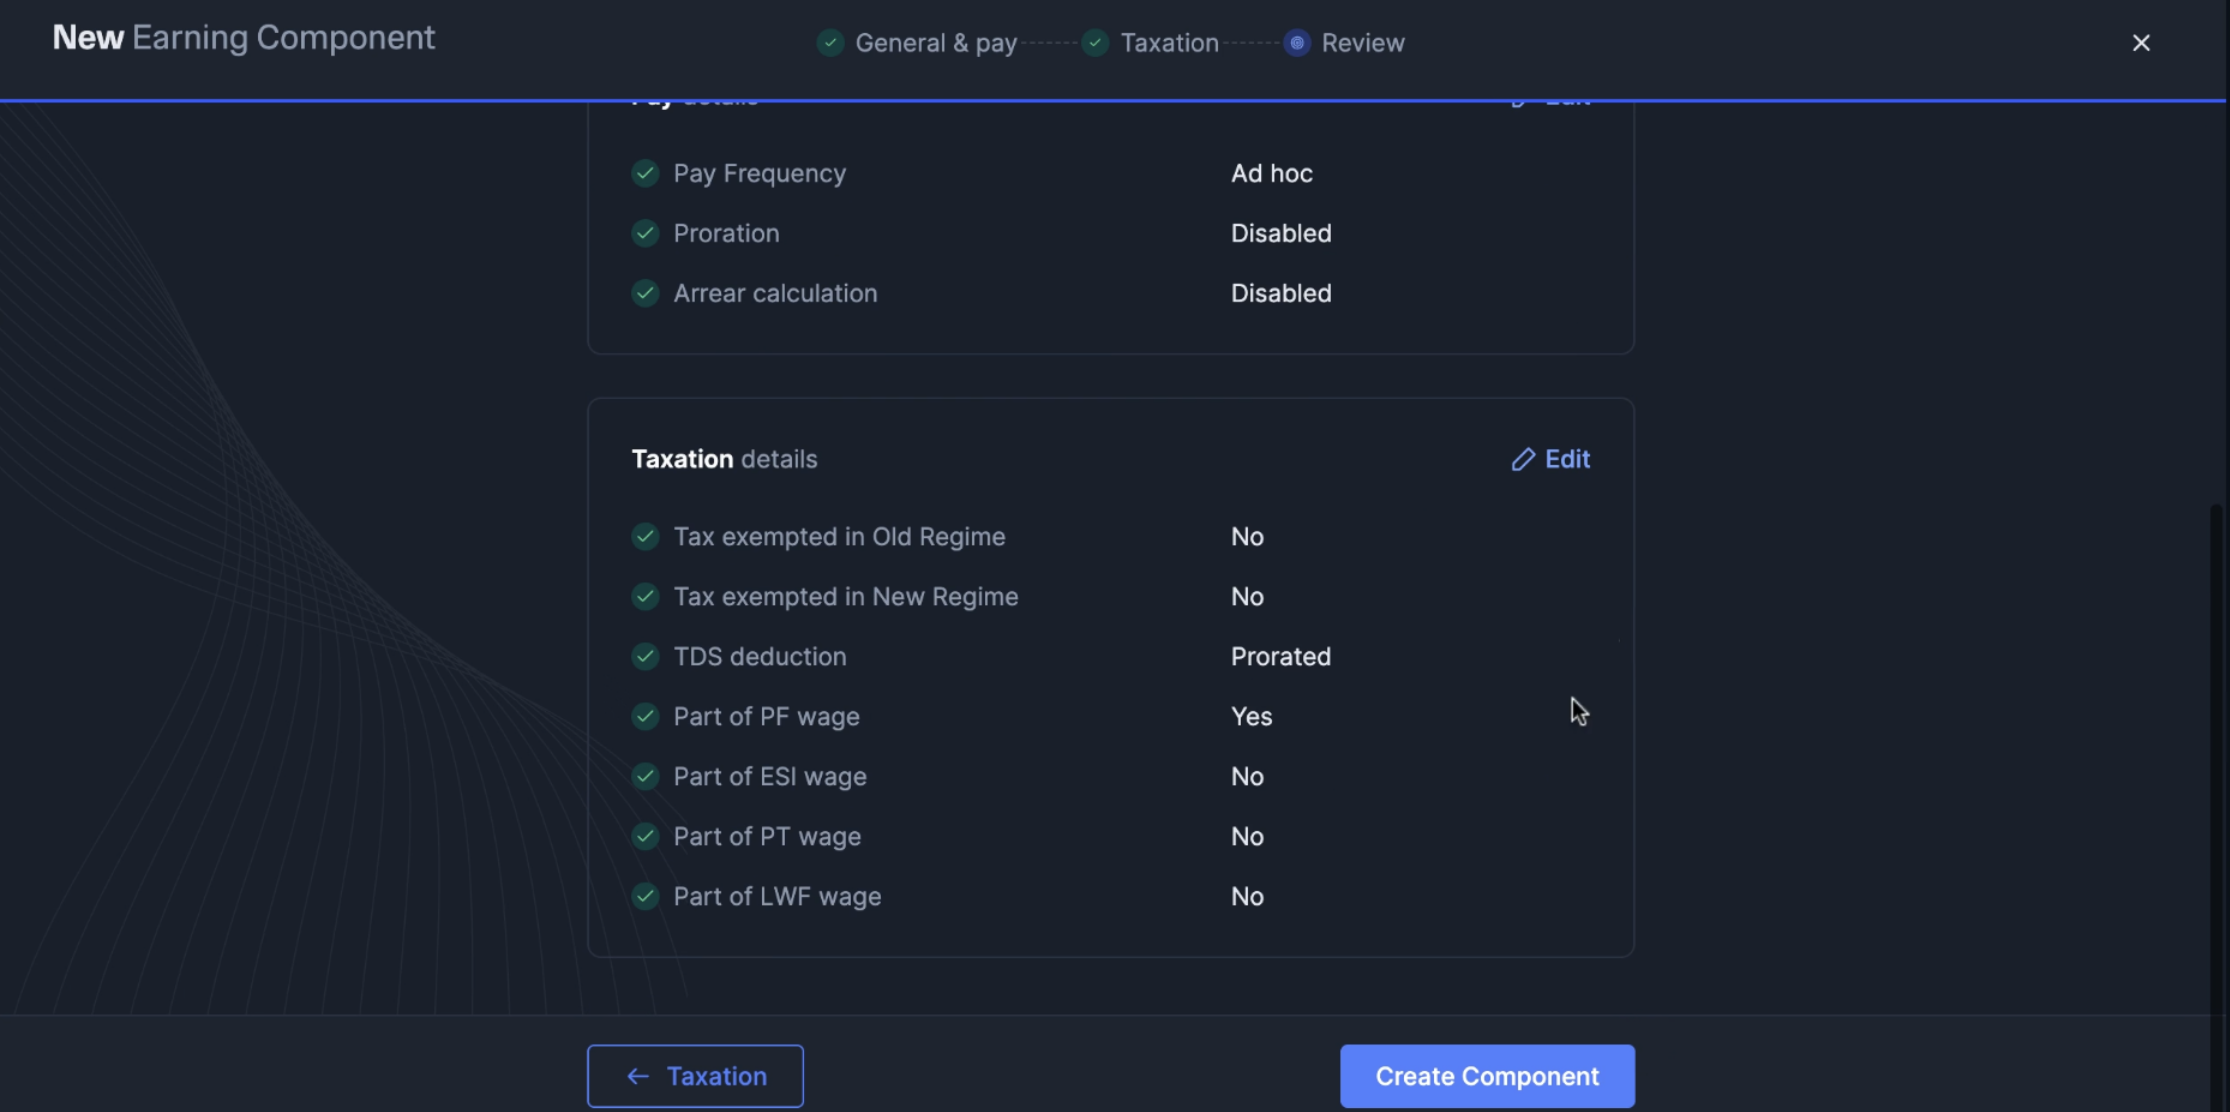
7. Click **Next: Review** to verify all configurations.
8. Review all settings and click **Create Component** to save.
To modify an earnings component:
1. Navigate to **Salary Component Library**.
2. Locate the component and click **View Details**.
3. Click **Modify component** button.
4. Make necessary changes to configuration.
5. Click **Save Component** to apply changes.
To disable an earnings component:
1. Follow steps 1-2 from modification process.
2. Click **Disable** button.
3. Confirm the action in the popup dialog.
**Watch Out!**
If the component is included in a current payroll that has not yet been executed or is used in any active employee's salary structure, it cannot be disabled.
A Deduction Component is an amount subtracted from an employee's salary. These can be recurring deductions or ad-hoc deductions like laptop repair costs or salary advance recovery.
Deductions can be applied either before tax (gross pay deductions) or after tax (net pay deductions).
Set these up correctly to ensure your payroll is accurate, tax-compliant and transparent for employees.
To add a new deduction component:
1. Navigate to **Settings → Salary Component Library**.
2. Click **Create Component** and select **Deduction** from dropdown.
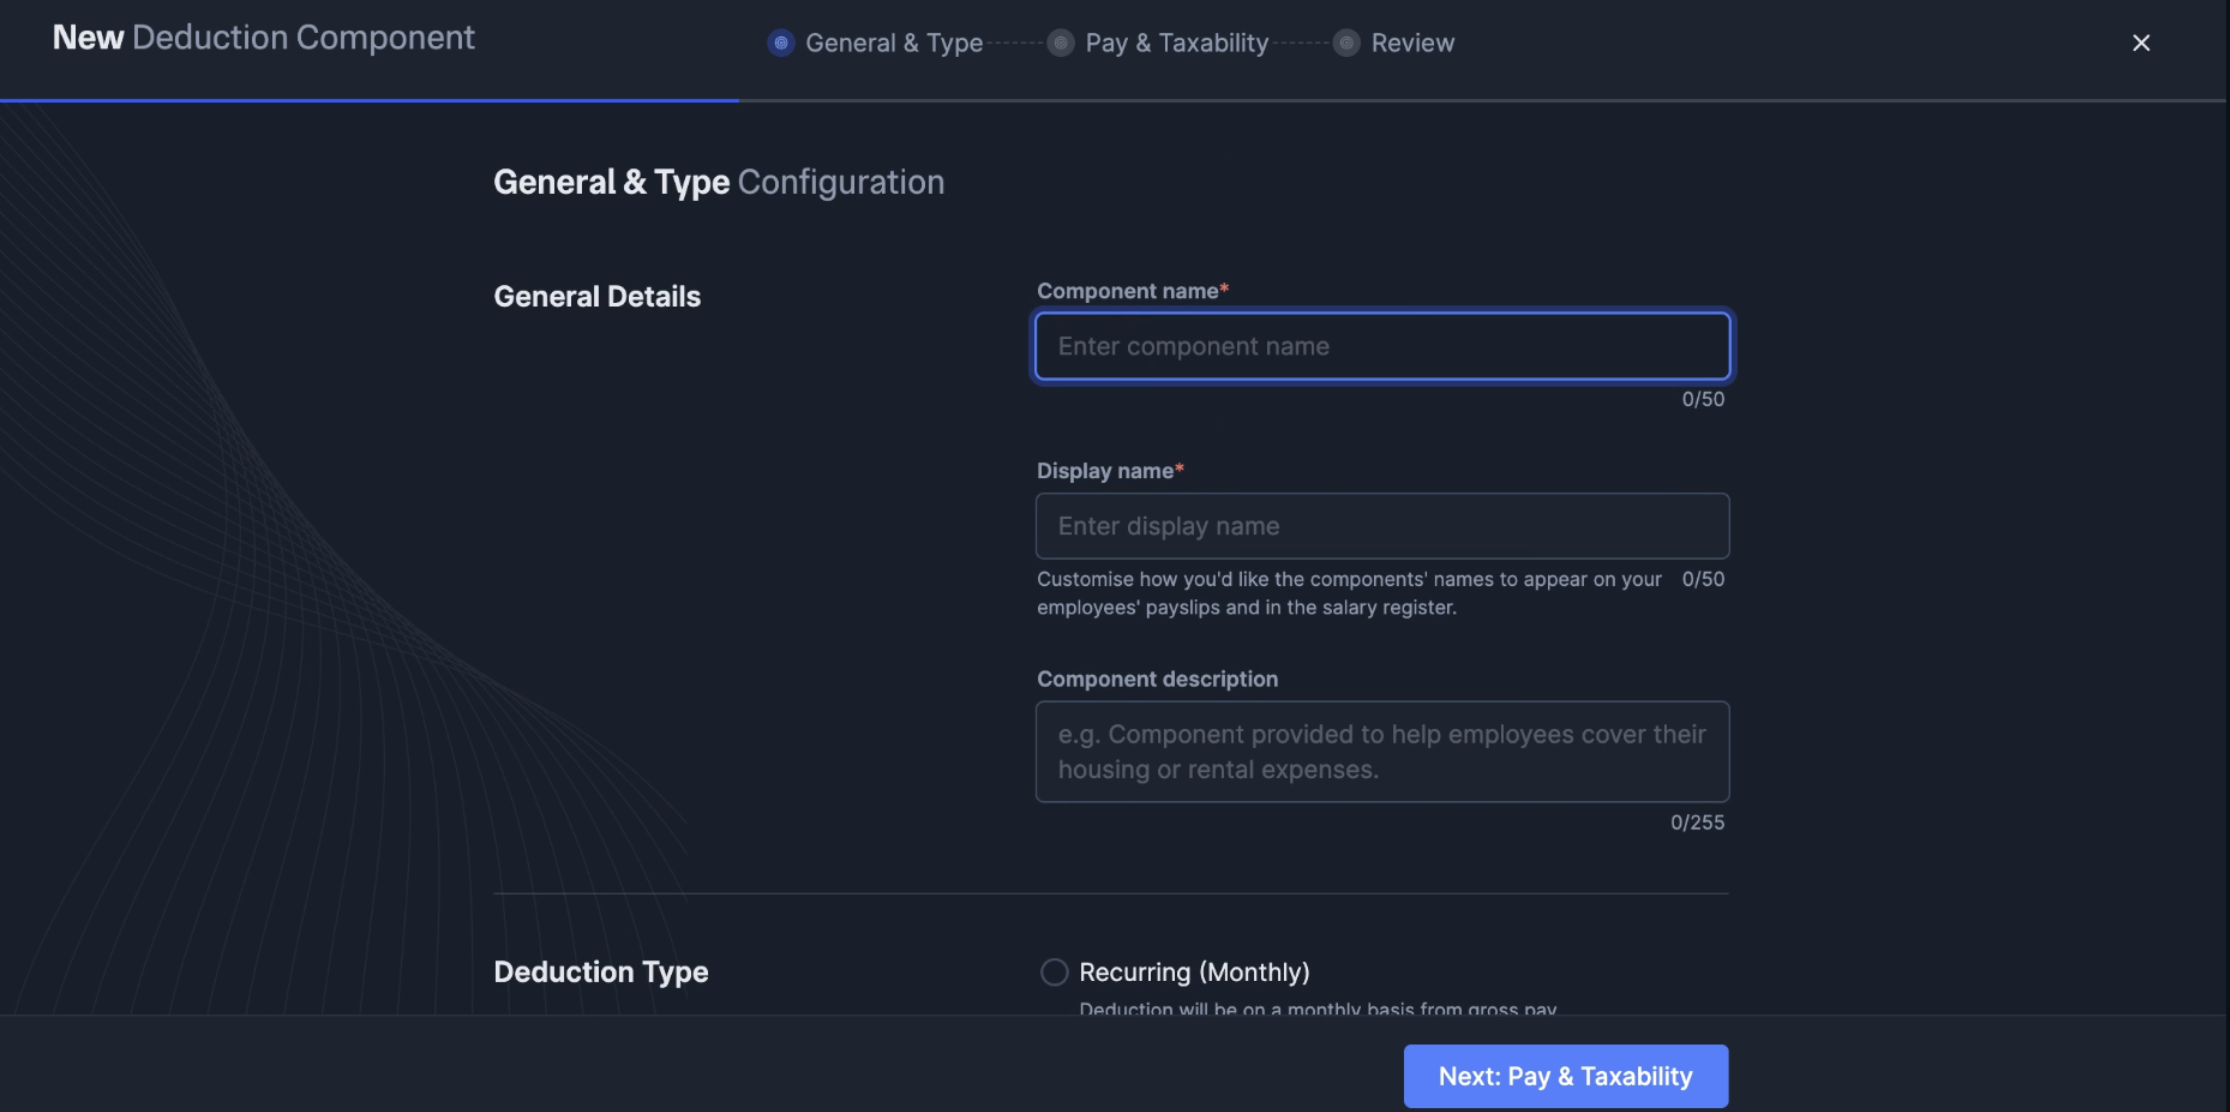
3. Fill in **General & Type Configuration**:
* Enter **Component name** (for example, 'Laptop Repair').
* Add **Display name** for payslips.
* Provide **Component description**.
* Select **Deduction Type**:
* **Recurring (Monthly)** - Regular monthly deductions.
* **Ad-hoc** - One-time or irregular deductions.
4. Click **Next: Pay & Taxability** to configure deduction settings.
5. Configure **Pay & Taxability details**:
* **Prorate the component** - Enable/disable proration.
* **Calculate arrears** - Configure arrear calculations.
* **Tax exempted in Old Regime** - Set tax exemption status.
* **Tax exempted in New Regime** - Set tax exemption status.
* **Exemption under** - Select applicable section if exempt.
6. Click **Next: Review** to verify configurations.
7. Review all settings and click **Create Component** to save.
To modify a deduction component:
1. Navigate to **Salary Component Library**.
2. Select the deduction component to edit.
3. Click **View details** to open settings.
4. Click **Modify** and make required changes.
5. Click **Save Component** to apply changes.
To disable a deduction component:
1. Follow steps 1-3 from modification process.
2. Click **Disable** button.
3. Review the warning message about component usage.
4. Click **Disable Now** to confirm.
**Note**
The system displays an error if you try to disable a component currently used in employee payslips. Remove the component from active payrolls before disabling.
Non-Payable Benefits are components included in the CTC but not paid directly to employees. These typically include employer contributions like insurance premiums.
These components help provide a complete picture of employee compensation while maintaining clear distinction between take-home pay and total benefits.
To add a non-payable benefit:
1. Navigate to **Settings → Salary Component Library**.
2. Click **Create Component** and select **Non-Payable Benefits**.
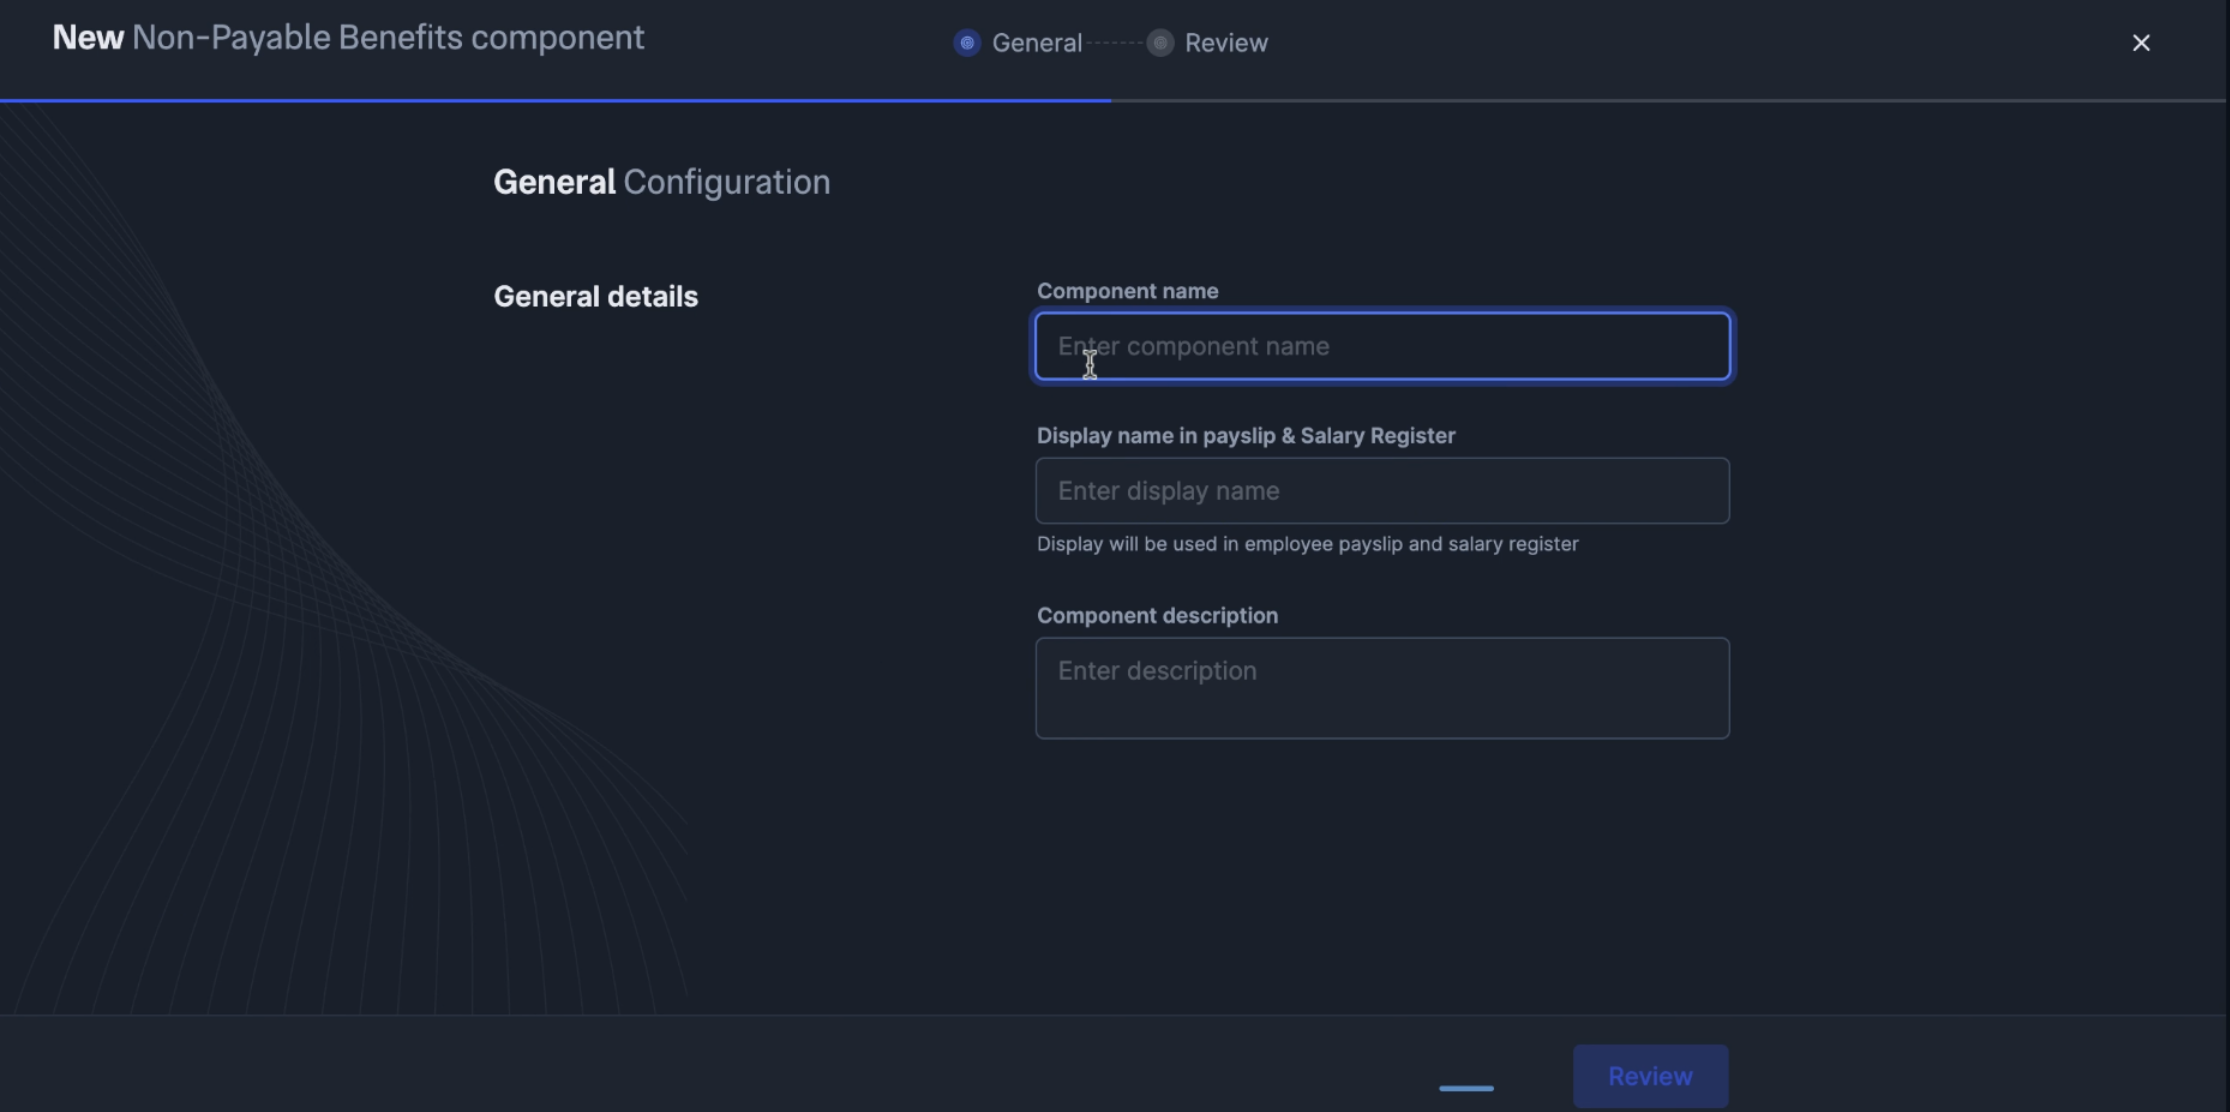
3. Fill in **General Configuration**:
* Enter **Component name** (for example, 'Health Insurance').
* Add **Display name in payslip & Salary Register**.
* Provide **Component description** explaining the benefit.
4. Click **Review** to verify the configuration.
5. Review all details and click **Create Component** to save.
Non-payable benefits characteristics:
* Not included in monthly take-home salary.
* Form part of annual CTC calculations.
* Visible on payslips for transparency.
* May have tax implications based on regulations.
To modify a non-payable benefit:
1. Navigate to the component in library.
2. Click **View Details**.
3. Click **Modify** to edit.
4. Update required fields.
5. Save changes.
Common non-payable benefits include:
* Employer PF contribution.
* Group health insurance.
* Group life insurance.
* Accident insurance.
* Professional development allowances.
Perquisites are special benefits provided to employees beyond regular salary, often subject to specific tax treatment under income tax regulations.
These components require careful configuration to ensure proper tax calculation and compliance with perquisite valuation rules.
To add a perquisite component:
1. Navigate to **Settings → Salary Component Library**.
2. Click **Create Component** and select **Perquisites**.
3. Fill in **General Configuration**:
* Enter **Component name** (for example, 'Employer Provided Vehicle').
* Add **Display name in payslip & Salary Register**.
* Provide **Component description** with details about the perk.
4. Click **Continue** to proceed.
5. Review configuration and click **Create Component**.
Perquisite characteristics:
* Subject to special tax valuation rules.
* Must be reported separately in tax statements.
* May have different tax rates than regular income.
* Require proper documentation for tax purposes.
Common perquisites include:
* Company car for personal use.
* Accommodation provided by employer.
* Club memberships.
* Stock options (ESOPs).
* Interest-free or concessional loans.
Tax considerations for perquisites:
* Valuation as per Income Tax rules.
* May be fully or partially taxable.
* Different treatment in old vs new tax regime.
* Require Form 16 reporting.
**Important**
Perquisites are defined as "Perks provided on top of the regular salary and wages." Ensure proper valuation methods are applied as per tax regulations.
To view detailed information about any component:
1. Navigate to **Salary Component Library**.
2. Locate the component in the list.
3. Click **View Details** arrow on the right.
The detail view displays:
* **General details** - Component name, display name, description.
* **Pay details** - Frequency, proration, arrear settings.
* **Taxation details** - Tax exemptions, TDS configuration.
* **Wage calculation** - PF, ESI, PT, LWF inclusion.
Components can be modified even after creation:
1. Open component details.
2. Click **Modify component** button.
3. Edit required fields.
4. Save changes.
Note: Changes apply only to future payroll runs, not historical data.
To disable a component no longer needed:
1. Open component details.
2. Click **Disable** button.
3. Review the warning message:
* "Once disabled, it cannot be used in an employee's salary structure."
* "A component can only be disabled if not used in any salary structure of active employee."
4. Click **Disable Now** to confirm.
If the component is currently in use, the system shows an error: "There was an error changing status: This component cannot be disabled as it is used in employee's payslips."
Components defined in the library are applied to an employee's salary during payroll execution from the **Addition** or **Deduction** sections of the Edit Salary screen. For step-by-step guidance, see [Additions and Deductions in Run Payroll](/docs/payroll/run-payroll#additions-and-deductions).
Note: Only the **amount** can be edited during payroll execution. **Name and taxability remain fixed** as defined in the library.
When configuring tax-exempt components, select from available sections:
* **Agricultural Income** - Income from agricultural operations.
* **Section 10(2)** - Amount received from HUF.
* **Section 10(10A)** - Commutation of Pension.
* **Section 10(10C)** - Voluntary Retirement Scheme compensation.
* **Section 10(14)** - Special Allowances (Uniform, Conveyance and so on).
Choose appropriate TDS deduction method:
1. **Prorated TDS deduction**:
* Tax deduction adjusted across remaining months in FY.
* Deducted monthly in equal instalments.
* Recommended for regular components.
2. **Instant TDS deduction**:
* Deduct tax at the time of payment.
* Full tax deducted in the payment month.
* Suitable for one-time payments or bonuses.
Configure which statutory calculations include the component:
* **PF wage** - Include when Basic is less than ₹15,000.
* **ESI wage** - Include for ESI contribution calculations.
* **PT wage** - Include for Professional Tax calculations.
* **LWF wage** - Include for Labour Welfare Fund calculations.
The Salary Component Library integrates with other payroll settings:
* **Allow Updates to Tax Deductions** - Yes/No.
* **XPayroll Verification of Tax Deductions** - Yes/No.
* **Disable 80C declarations** - No.
* **Declaration Window** - Always Open.
* **Proof Upload Window** - 16th of December to 22nd of January.
Watch the video below to know how Salary Component Library Works:
 ### Component Categories
The library organises components into four main categories:
1. **Earnings** - Components that add to employee salary (32 available).
2. **Deduction** - Components that reduce employee salary (18 available).
3. **Non-Payable Benefits** - Benefits included in CTC but not paid directly.
4. **Perquisites** - Additional benefits subject to special tax treatment.
### Filtering Options
Use filters to manage your component library effectively:
* **All Components** - View complete list of components.
* **Active** - Show only currently usable components.
* **Disabled** - Display archived components no longer in use.
The system shows component counts for each filter, making it easy to track library size and usage.
### Component Categories
The library organises components into four main categories:
1. **Earnings** - Components that add to employee salary (32 available).
2. **Deduction** - Components that reduce employee salary (18 available).
3. **Non-Payable Benefits** - Benefits included in CTC but not paid directly.
4. **Perquisites** - Additional benefits subject to special tax treatment.
### Filtering Options
Use filters to manage your component library effectively:
* **All Components** - View complete list of components.
* **Active** - Show only currently usable components.
* **Disabled** - Display archived components no longer in use.
The system shows component counts for each filter, making it easy to track library size and usage.
 3. Fill in the **General & Pay Configuration** details:
* Enter a **Component name** (must be unique across all components).
* Add a **Display name** for payslips and salary registers.
* Write a **Description** explaining the component's purpose.
* Select **Pay Frequency** (Monthly, Quarterly, Annually or Ad hoc).
3. Fill in the **General & Pay Configuration** details:
* Enter a **Component name** (must be unique across all components).
* Add a **Display name** for payslips and salary registers.
* Write a **Description** explaining the component's purpose.
* Select **Pay Frequency** (Monthly, Quarterly, Annually or Ad hoc).
 4. Click **Next: Taxation** to configure tax settings.
5. Configure **Taxation Configuration**:
* Set **Taxability** - Choose exemption status for old and new tax regimes.
* If exempt in new regime, select the **Exemption section** from dropdown.
4. Click **Next: Taxation** to configure tax settings.
5. Configure **Taxation Configuration**:
* Set **Taxability** - Choose exemption status for old and new tax regimes.
* If exempt in new regime, select the **Exemption section** from dropdown.
 * Configure **Tax deduction** type:
* **Prorated TDS deduction** - Tax adjusted across remaining months in FY.
* **Instant TDS deduction** - Tax deducted at payment time.
* Configure **Tax deduction** type:
* **Prorated TDS deduction** - Tax adjusted across remaining months in FY.
* **Instant TDS deduction** - Tax deducted at payment time.
 6. Set **Wage calculation** parameters:
* **Part of PF wage** - Include in Provident Fund calculations (when Basic \< 15k).
* **Part of ESI wage** - Include in ESI calculations.
* **Part of PT wage** - Include in Professional Tax calculations.
* **Part of LWF wage** - Include in Labour Welfare Fund calculations.
7. Click **Next: Review** to verify all configurations.
8. Review all settings and click **Create Component** to save.
6. Set **Wage calculation** parameters:
* **Part of PF wage** - Include in Provident Fund calculations (when Basic \< 15k).
* **Part of ESI wage** - Include in ESI calculations.
* **Part of PT wage** - Include in Professional Tax calculations.
* **Part of LWF wage** - Include in Labour Welfare Fund calculations.
7. Click **Next: Review** to verify all configurations.
8. Review all settings and click **Create Component** to save.
 To modify an earnings component:
1. Navigate to **Salary Component Library**.
2. Locate the component and click **View Details**.
3. Click **Modify component** button.
4. Make necessary changes to configuration.
5. Click **Save Component** to apply changes.
To disable an earnings component:
1. Follow steps 1-2 from modification process.
2. Click **Disable** button.
3. Confirm the action in the popup dialog.
To modify an earnings component:
1. Navigate to **Salary Component Library**.
2. Locate the component and click **View Details**.
3. Click **Modify component** button.
4. Make necessary changes to configuration.
5. Click **Save Component** to apply changes.
To disable an earnings component:
1. Follow steps 1-2 from modification process.
2. Click **Disable** button.
3. Confirm the action in the popup dialog.
 4. Click **Next: Pay & Taxability** to configure deduction settings.
5. Configure **Pay & Taxability details**:
* **Prorate the component** - Enable/disable proration.
* **Calculate arrears** - Configure arrear calculations.
* **Tax exempted in Old Regime** - Set tax exemption status.
* **Tax exempted in New Regime** - Set tax exemption status.
* **Exemption under** - Select applicable section if exempt.
6. Click **Next: Review** to verify configurations.
7. Review all settings and click **Create Component** to save.
To modify a deduction component:
1. Navigate to **Salary Component Library**.
2. Select the deduction component to edit.
3. Click **View details** to open settings.
4. Click **Modify** and make required changes.
5. Click **Save Component** to apply changes.
To disable a deduction component:
1. Follow steps 1-3 from modification process.
2. Click **Disable** button.
3. Review the warning message about component usage.
4. Click **Disable Now** to confirm.
4. Click **Next: Pay & Taxability** to configure deduction settings.
5. Configure **Pay & Taxability details**:
* **Prorate the component** - Enable/disable proration.
* **Calculate arrears** - Configure arrear calculations.
* **Tax exempted in Old Regime** - Set tax exemption status.
* **Tax exempted in New Regime** - Set tax exemption status.
* **Exemption under** - Select applicable section if exempt.
6. Click **Next: Review** to verify configurations.
7. Review all settings and click **Create Component** to save.
To modify a deduction component:
1. Navigate to **Salary Component Library**.
2. Select the deduction component to edit.
3. Click **View details** to open settings.
4. Click **Modify** and make required changes.
5. Click **Save Component** to apply changes.
To disable a deduction component:
1. Follow steps 1-3 from modification process.
2. Click **Disable** button.
3. Review the warning message about component usage.
4. Click **Disable Now** to confirm.
 4. Click **Review** to verify the configuration.
5. Review all details and click **Create Component** to save.
Non-payable benefits characteristics:
* Not included in monthly take-home salary.
* Form part of annual CTC calculations.
* Visible on payslips for transparency.
* May have tax implications based on regulations.
To modify a non-payable benefit:
1. Navigate to the component in library.
2. Click **View Details**.
3. Click **Modify** to edit.
4. Update required fields.
5. Save changes.
Common non-payable benefits include:
* Employer PF contribution.
* Group health insurance.
* Group life insurance.
* Accident insurance.
* Professional development allowances.
4. Click **Review** to verify the configuration.
5. Review all details and click **Create Component** to save.
Non-payable benefits characteristics:
* Not included in monthly take-home salary.
* Form part of annual CTC calculations.
* Visible on payslips for transparency.
* May have tax implications based on regulations.
To modify a non-payable benefit:
1. Navigate to the component in library.
2. Click **View Details**.
3. Click **Modify** to edit.
4. Update required fields.
5. Save changes.
Common non-payable benefits include:
* Employer PF contribution.
* Group health insurance.
* Group life insurance.
* Accident insurance.
* Professional development allowances.
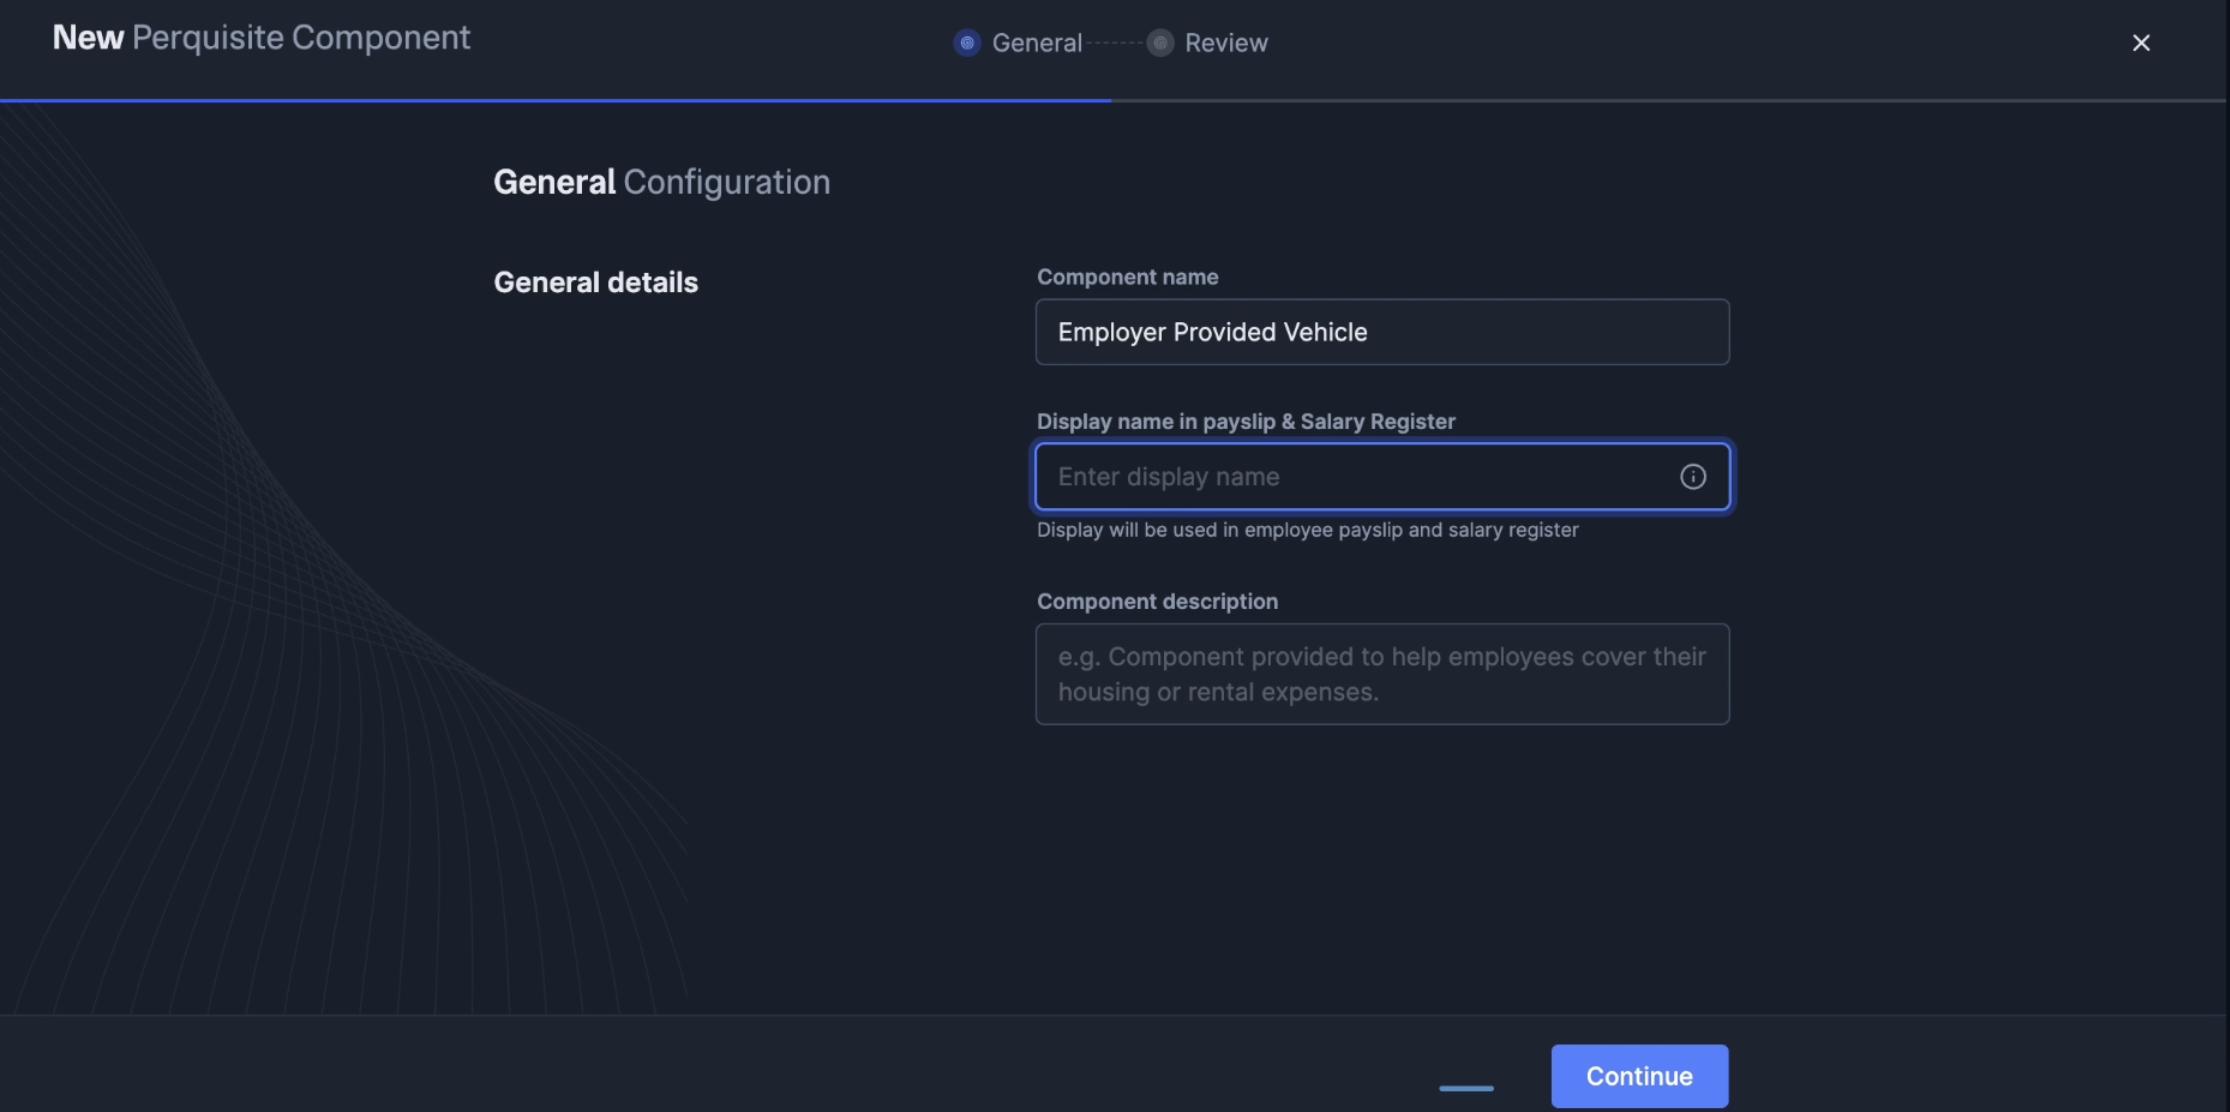 4. Click **Continue** to proceed.
5. Review configuration and click **Create Component**.
Perquisite characteristics:
* Subject to special tax valuation rules.
* Must be reported separately in tax statements.
* May have different tax rates than regular income.
* Require proper documentation for tax purposes.
Common perquisites include:
* Company car for personal use.
* Accommodation provided by employer.
* Club memberships.
* Stock options (ESOPs).
* Interest-free or concessional loans.
Tax considerations for perquisites:
* Valuation as per Income Tax rules.
* May be fully or partially taxable.
* Different treatment in old vs new tax regime.
* Require Form 16 reporting.
4. Click **Continue** to proceed.
5. Review configuration and click **Create Component**.
Perquisite characteristics:
* Subject to special tax valuation rules.
* Must be reported separately in tax statements.
* May have different tax rates than regular income.
* Require proper documentation for tax purposes.
Common perquisites include:
* Company car for personal use.
* Accommodation provided by employer.
* Club memberships.
* Stock options (ESOPs).
* Interest-free or concessional loans.
Tax considerations for perquisites:
* Valuation as per Income Tax rules.
* May be fully or partially taxable.
* Different treatment in old vs new tax regime.
* Require Form 16 reporting.
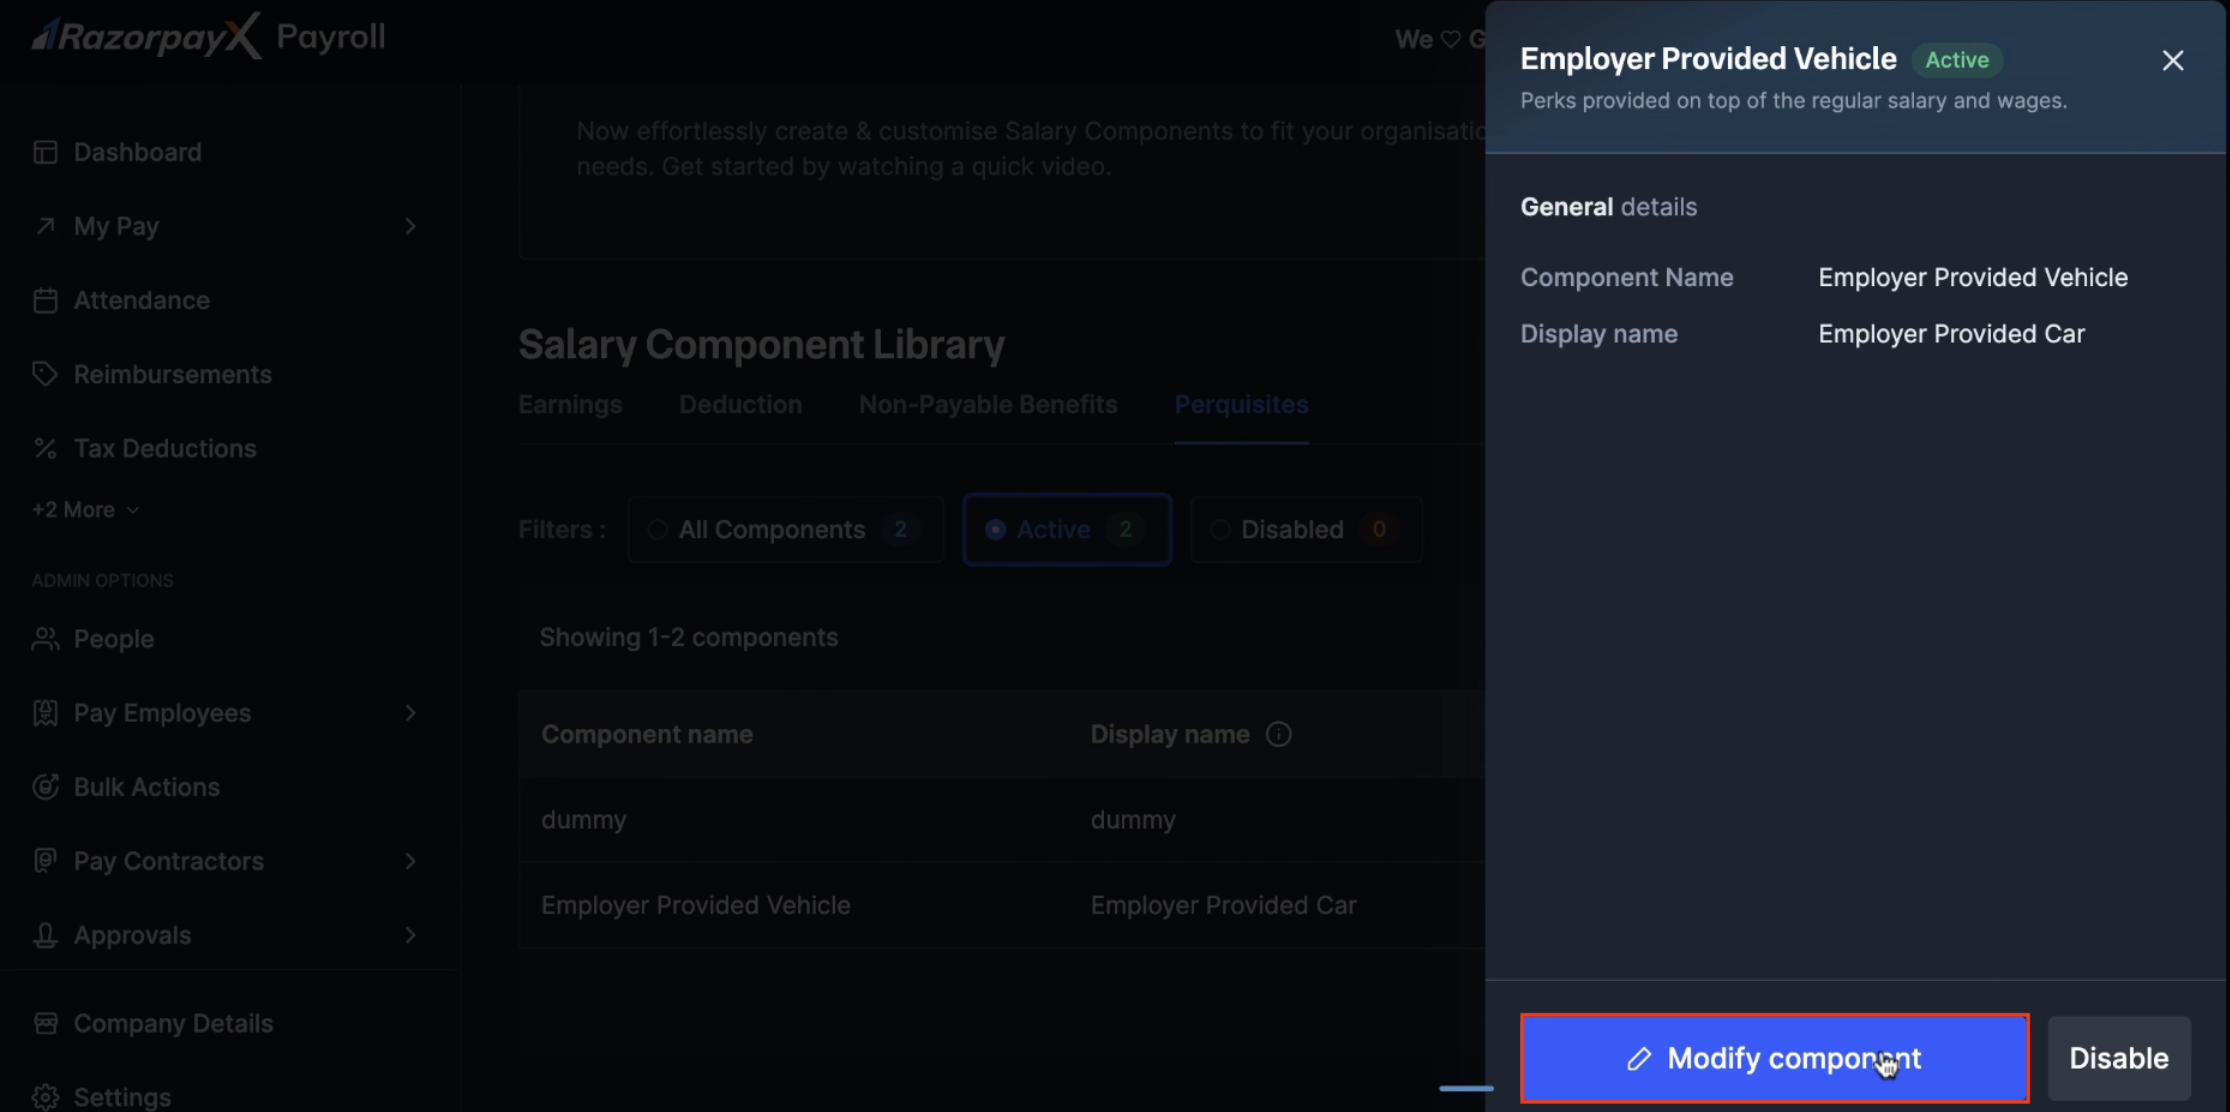 3. Edit required fields.
4. Save changes.
Note: Changes apply only to future payroll runs, not historical data.
3. Edit required fields.
4. Save changes.
Note: Changes apply only to future payroll runs, not historical data.
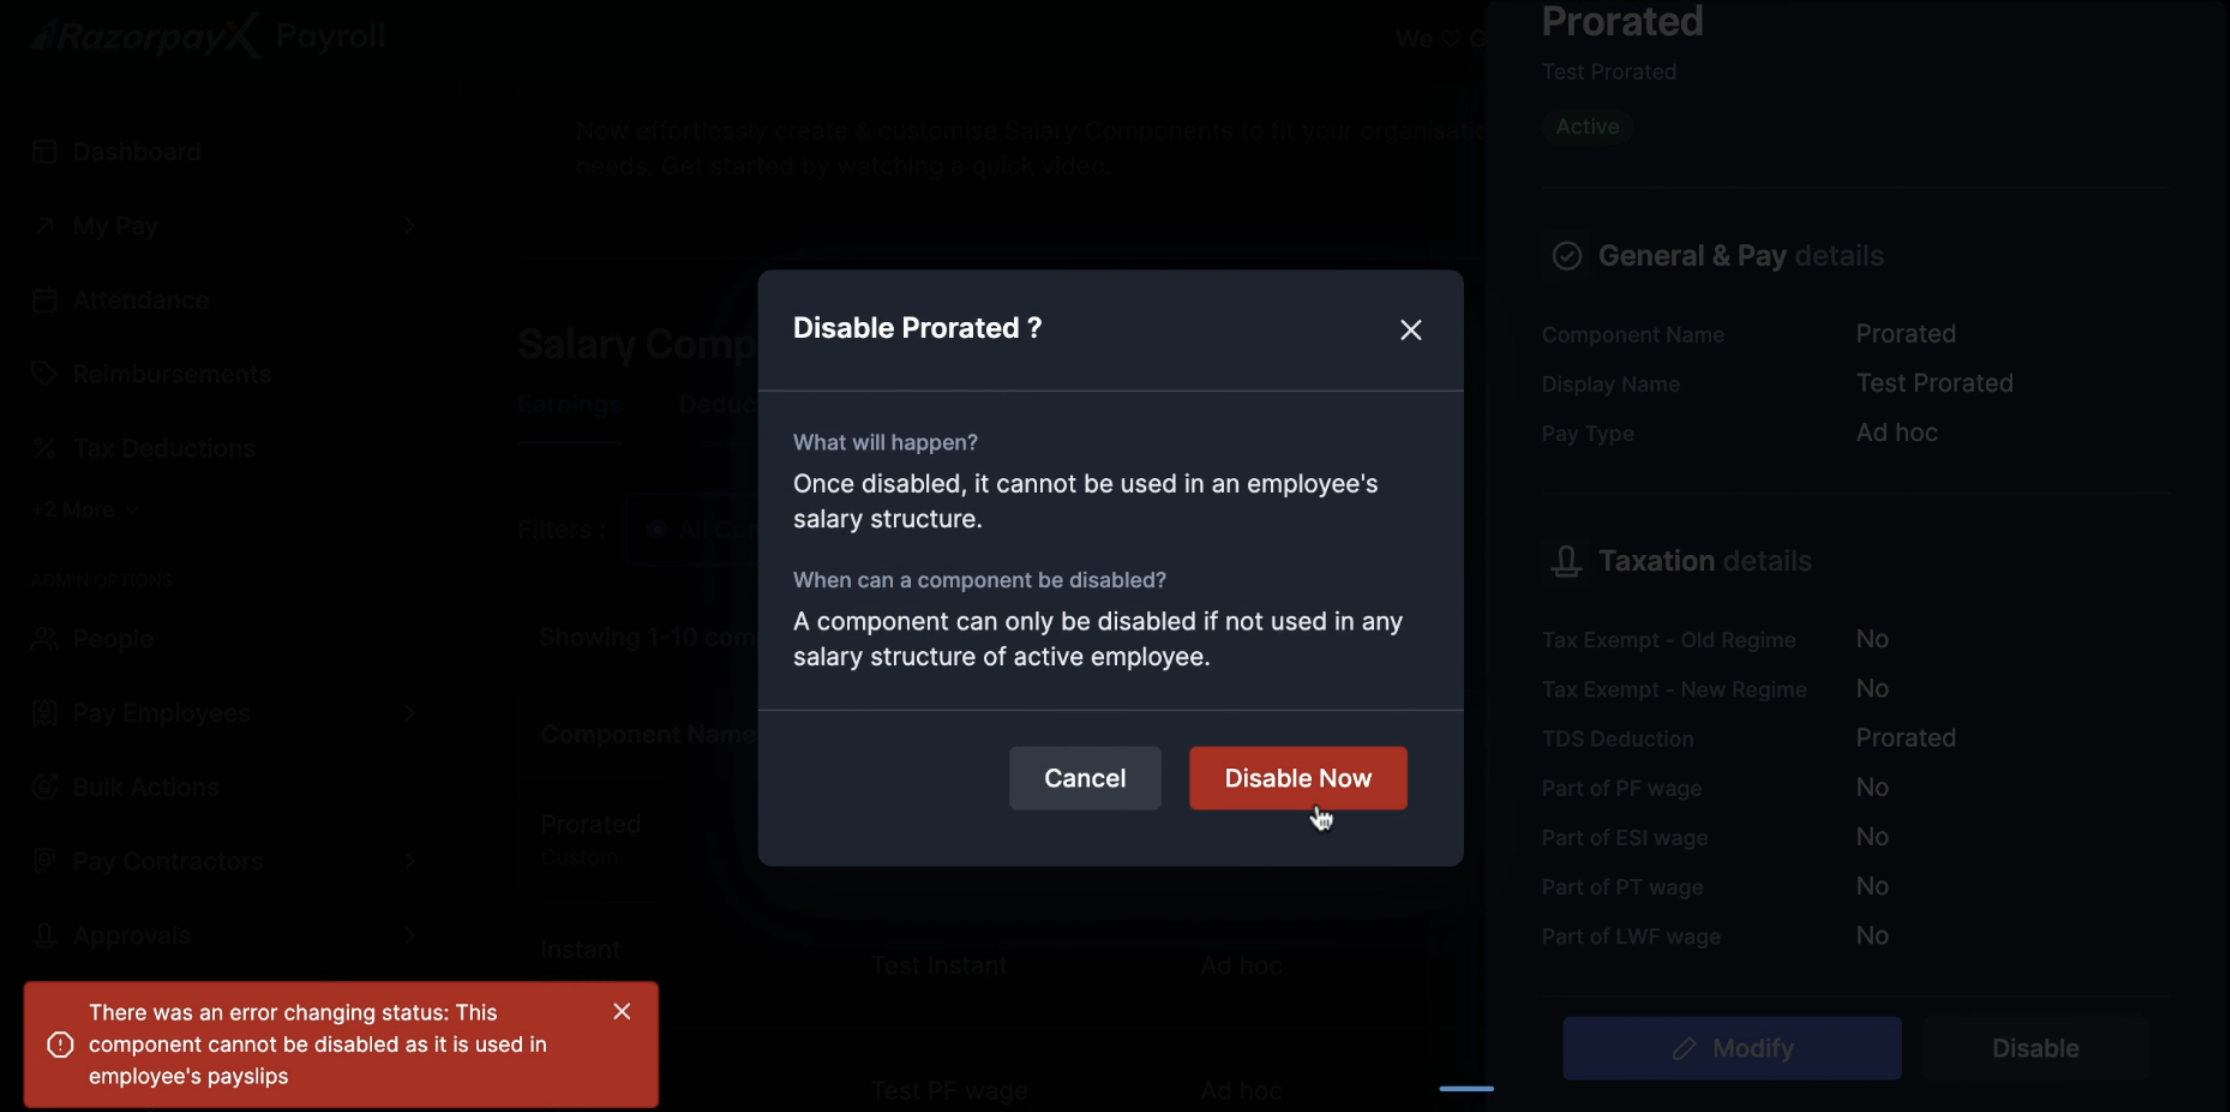 If the component is currently in use, the system shows an error: "There was an error changing status: This component cannot be disabled as it is used in employee's payslips."