> ## Documentation Index
> Fetch the complete documentation index at: https://razorpay-881012b3.mintlify.site/llms.txt
> Use this file to discover all available pages before exploring further.
# Flexible Benefits
> Set up and manage Flexi Benefit Plan (FBP) components in Payroll to give employees tax-friendly compensation choices.
Available in
🇮🇳 India
The **Flexi Component Library** in Payroll lets you define and manage Flexible Benefit Plan (FBP) components. These components allow employees to allocate a portion of their CTC toward tax-friendly benefits such as Meal Allowance, Car Lease Reimbursement, Employer NPS Contribution and other custom benefits.
Each flexi component is configured once at the organisation level and can then be added to an employee's compensation. Employees can either declare an amount of their choice (within the limit) or have the maximum eligible amount auto-applied, depending on how the component is set up.
| Feature | Improvement | Example |
| ---------------------------------- | ---------------------------------------------------------------------------------------------------------------------------------------------- | --------------------------------------------------------------------------------------------------------------------------------------------------------------------------------------------------- |
| **Predefined & Custom Components** | Use predefined components like Employer NPS or create your own custom flexi benefits.
| Employer NPS Contribution is available as a predefined component with Section 80CCD(2) exemption preconfigured. You can also create custom benefits like Meal Allowance with a fixed monthly limit. |
| **Declaration Modes** | Choose between Allow Declaration (employees decide the amount) or Auto-Apply Full Amount (max eligible amount applied automatically).
| For Meal Allowance, you can let employees declare any value between ₹0 and ₹1,000 each month, or auto-apply ₹1,000 for everyone. |
| **Benefit Limits** | Set a maximum limit as a fixed amount, a percentage of Basic or a list of values for employees to choose from.
| Employer NPS can be capped at 14% of Basic; Meal Allowance can offer a dropdown of ₹1,000 and ₹10,000 for employees to pick from. |
| **Tax Exemption Mapping** | Mark a component as exempt in the Old Regime, New Regime or both and map it to the applicable Income Tax Section.
| Employer NPS contribution is tax exempt under Section 80CCD(2) in both Old and New regimes. |
| **Proration & Arrears** | Prorate the benefit based on the employee's working period within the pay cycle. Arrears calculation is coming soon.
| If an employee joins mid-month, the flexi benefit is adjusted based on the days worked. |
| **Unclaimed Amount Handling** | Choose whether unclaimed amounts are held till March of the financial year or released every payroll month as taxable income.
| If an employee does not claim the full Meal Allowance, the unclaimed portion can be released monthly as taxable income. |
## Access the Flexi Component Library
To open the Flexi Component Library:
1. Navigate to **Settings → Component Library**.
2. In the **Component Library** section, find **Flexible Benefits** and click **Edit**.
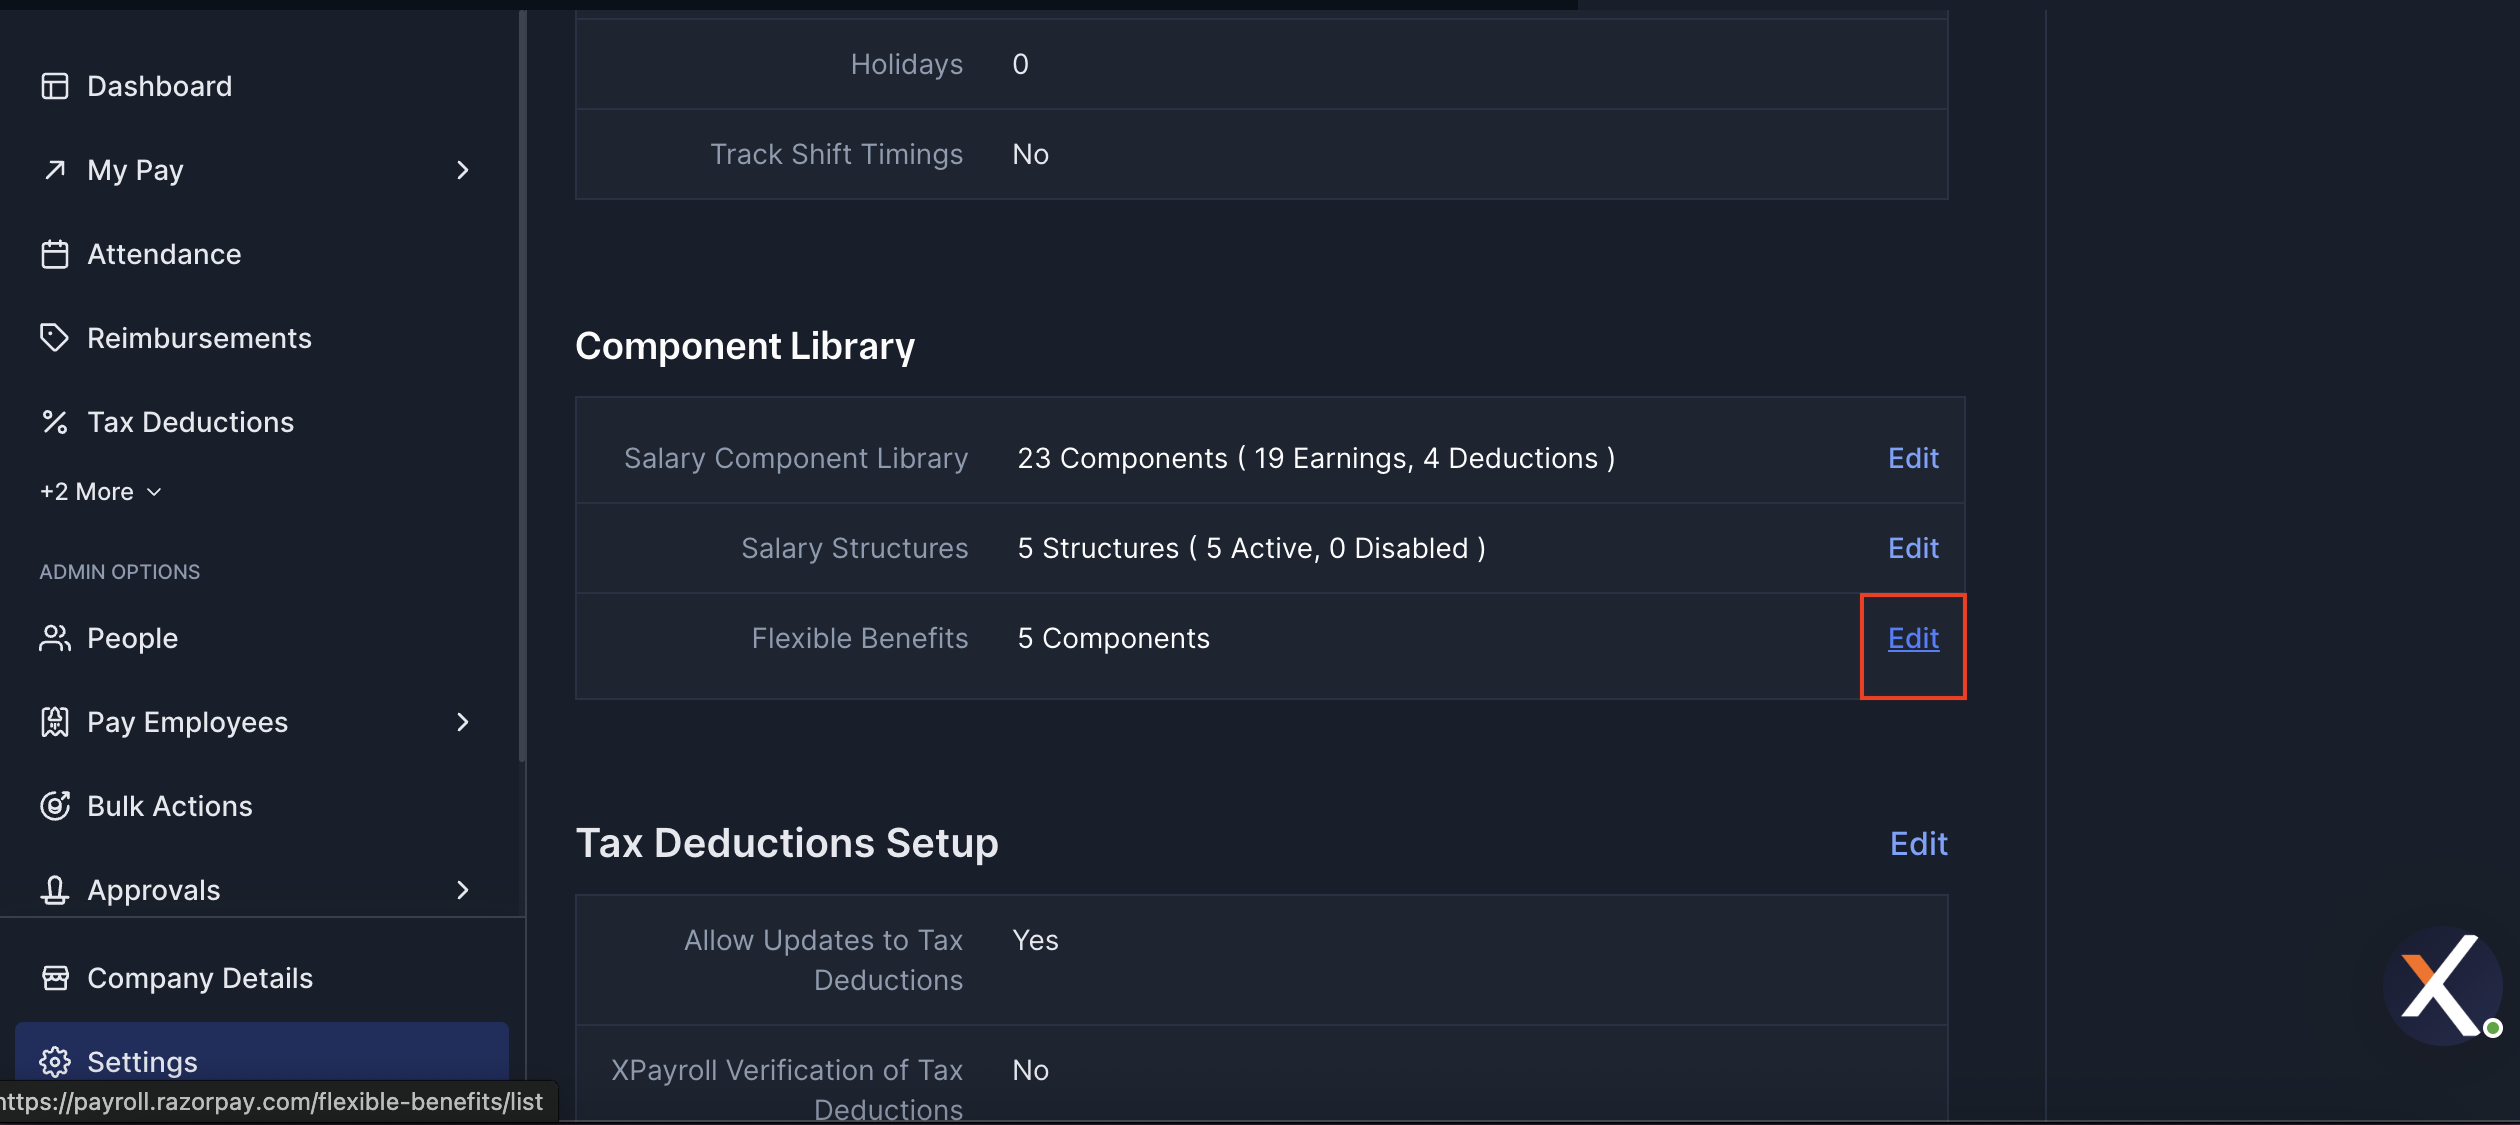 3. The **Flexi component library** page opens, listing all flexi benefit components configured for your organisation.
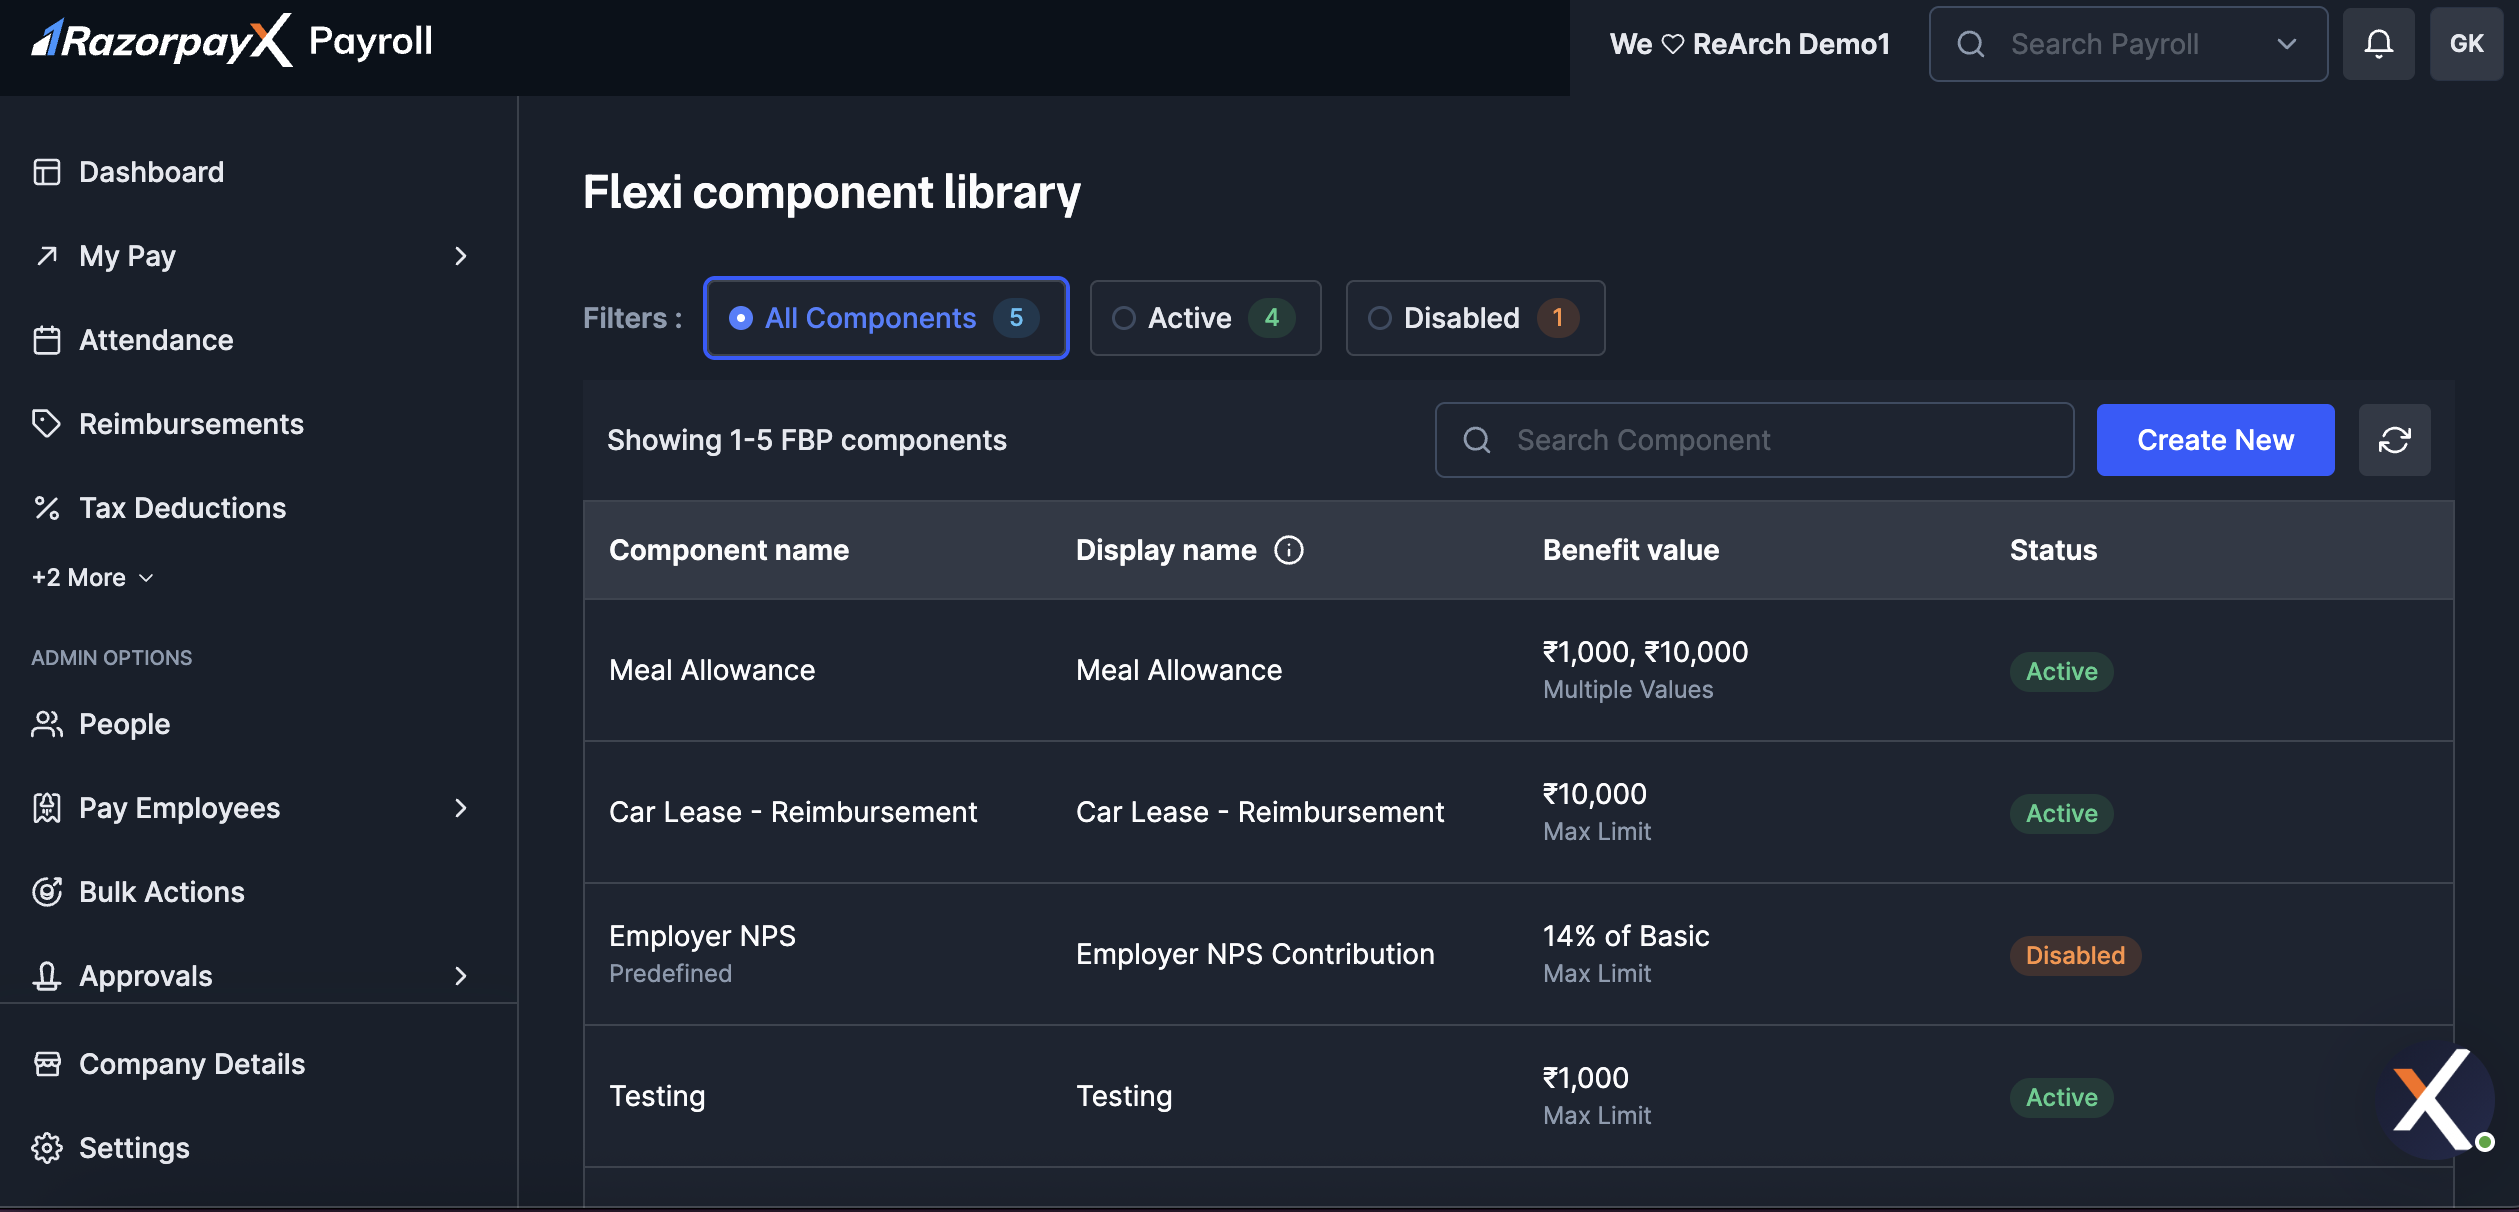 Use this flow to add a new flexi benefit such as a custom allowance or reimbursement that your organisation offers.
To create a new flexi component:
1. On the **Flexi component library** page, click **Create New**.
2. Fill in the **Basic Details**:
* **Component name:** internal name used for payroll processing (must be unique).
* **Display name:** the name visible to employees in payslips and the FBP declaration screen.
* **Component description:** a short summary of what this benefit covers.
Use this flow to add a new flexi benefit such as a custom allowance or reimbursement that your organisation offers.
To create a new flexi component:
1. On the **Flexi component library** page, click **Create New**.
2. Fill in the **Basic Details**:
* **Component name:** internal name used for payroll processing (must be unique).
* **Display name:** the name visible to employees in payslips and the FBP declaration screen.
* **Component description:** a short summary of what this benefit covers.
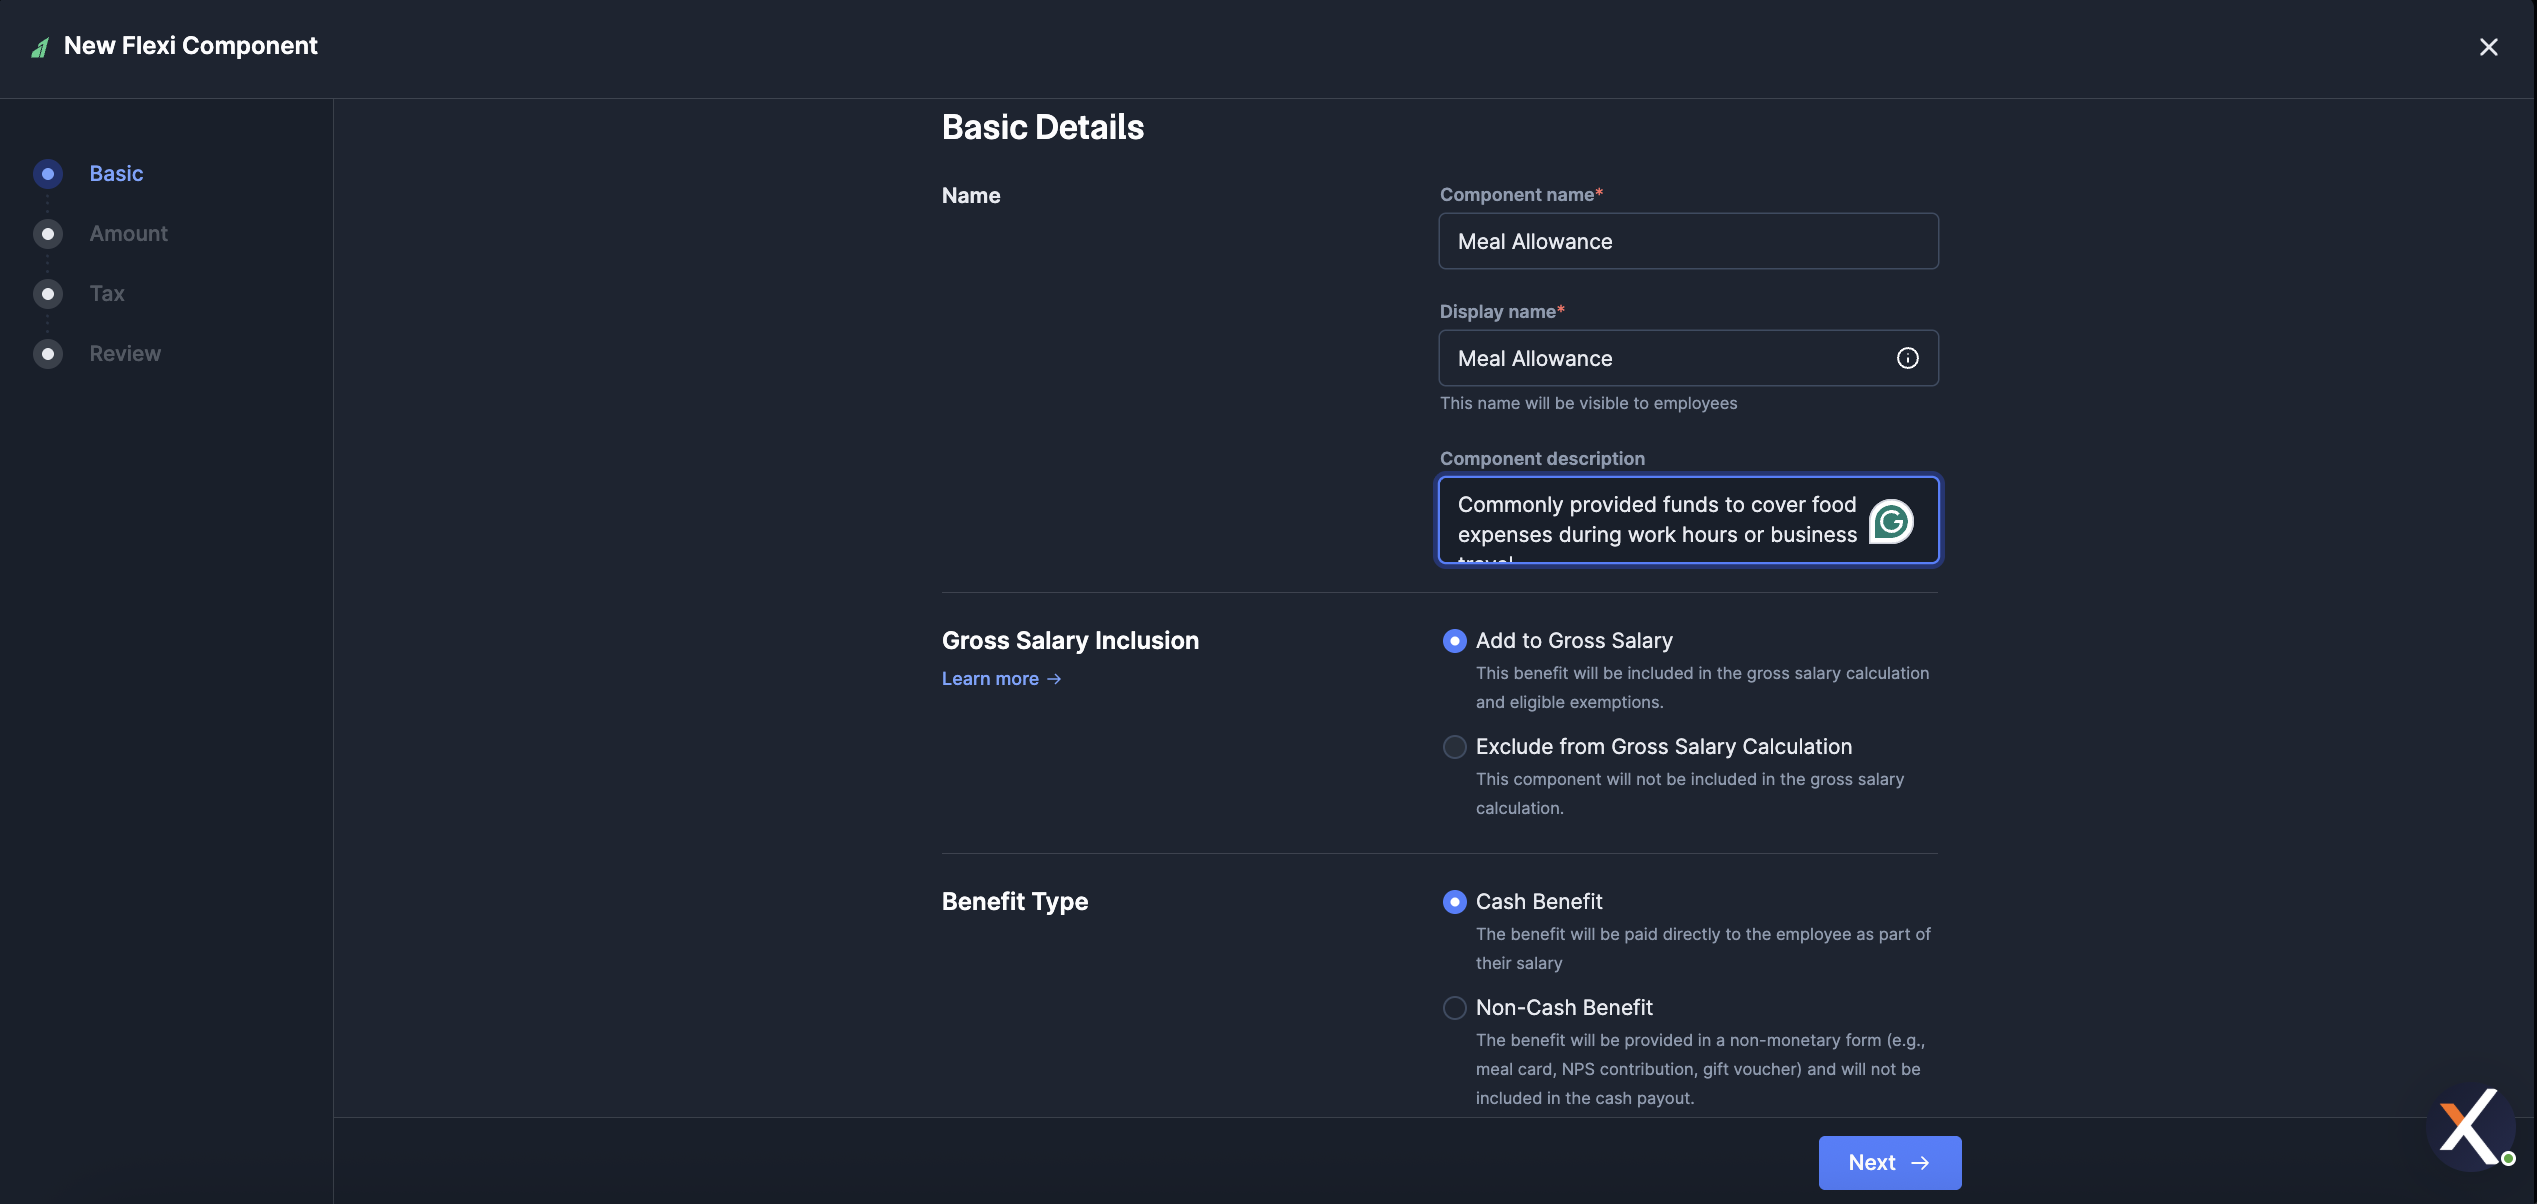 3. Set the **Gross Salary Inclusion**:
* **Add to Gross Salary:** the benefit is included in gross salary calculation and eligible exemptions.
* **Exclude from Gross Salary Calculation:** the component is not included in the gross salary calculation.
4. Choose the **Benefit Type**:
* **Cash Benefit:** the benefit is paid directly to the employee as part of their salary.
* **Non-Cash Benefit:** the benefit is provided in a non-monetary form (for example, meal card, NPS contribution, gift voucher) and is not part of the cash payout.
5. Click **Next** to configure the **Amount Details**.
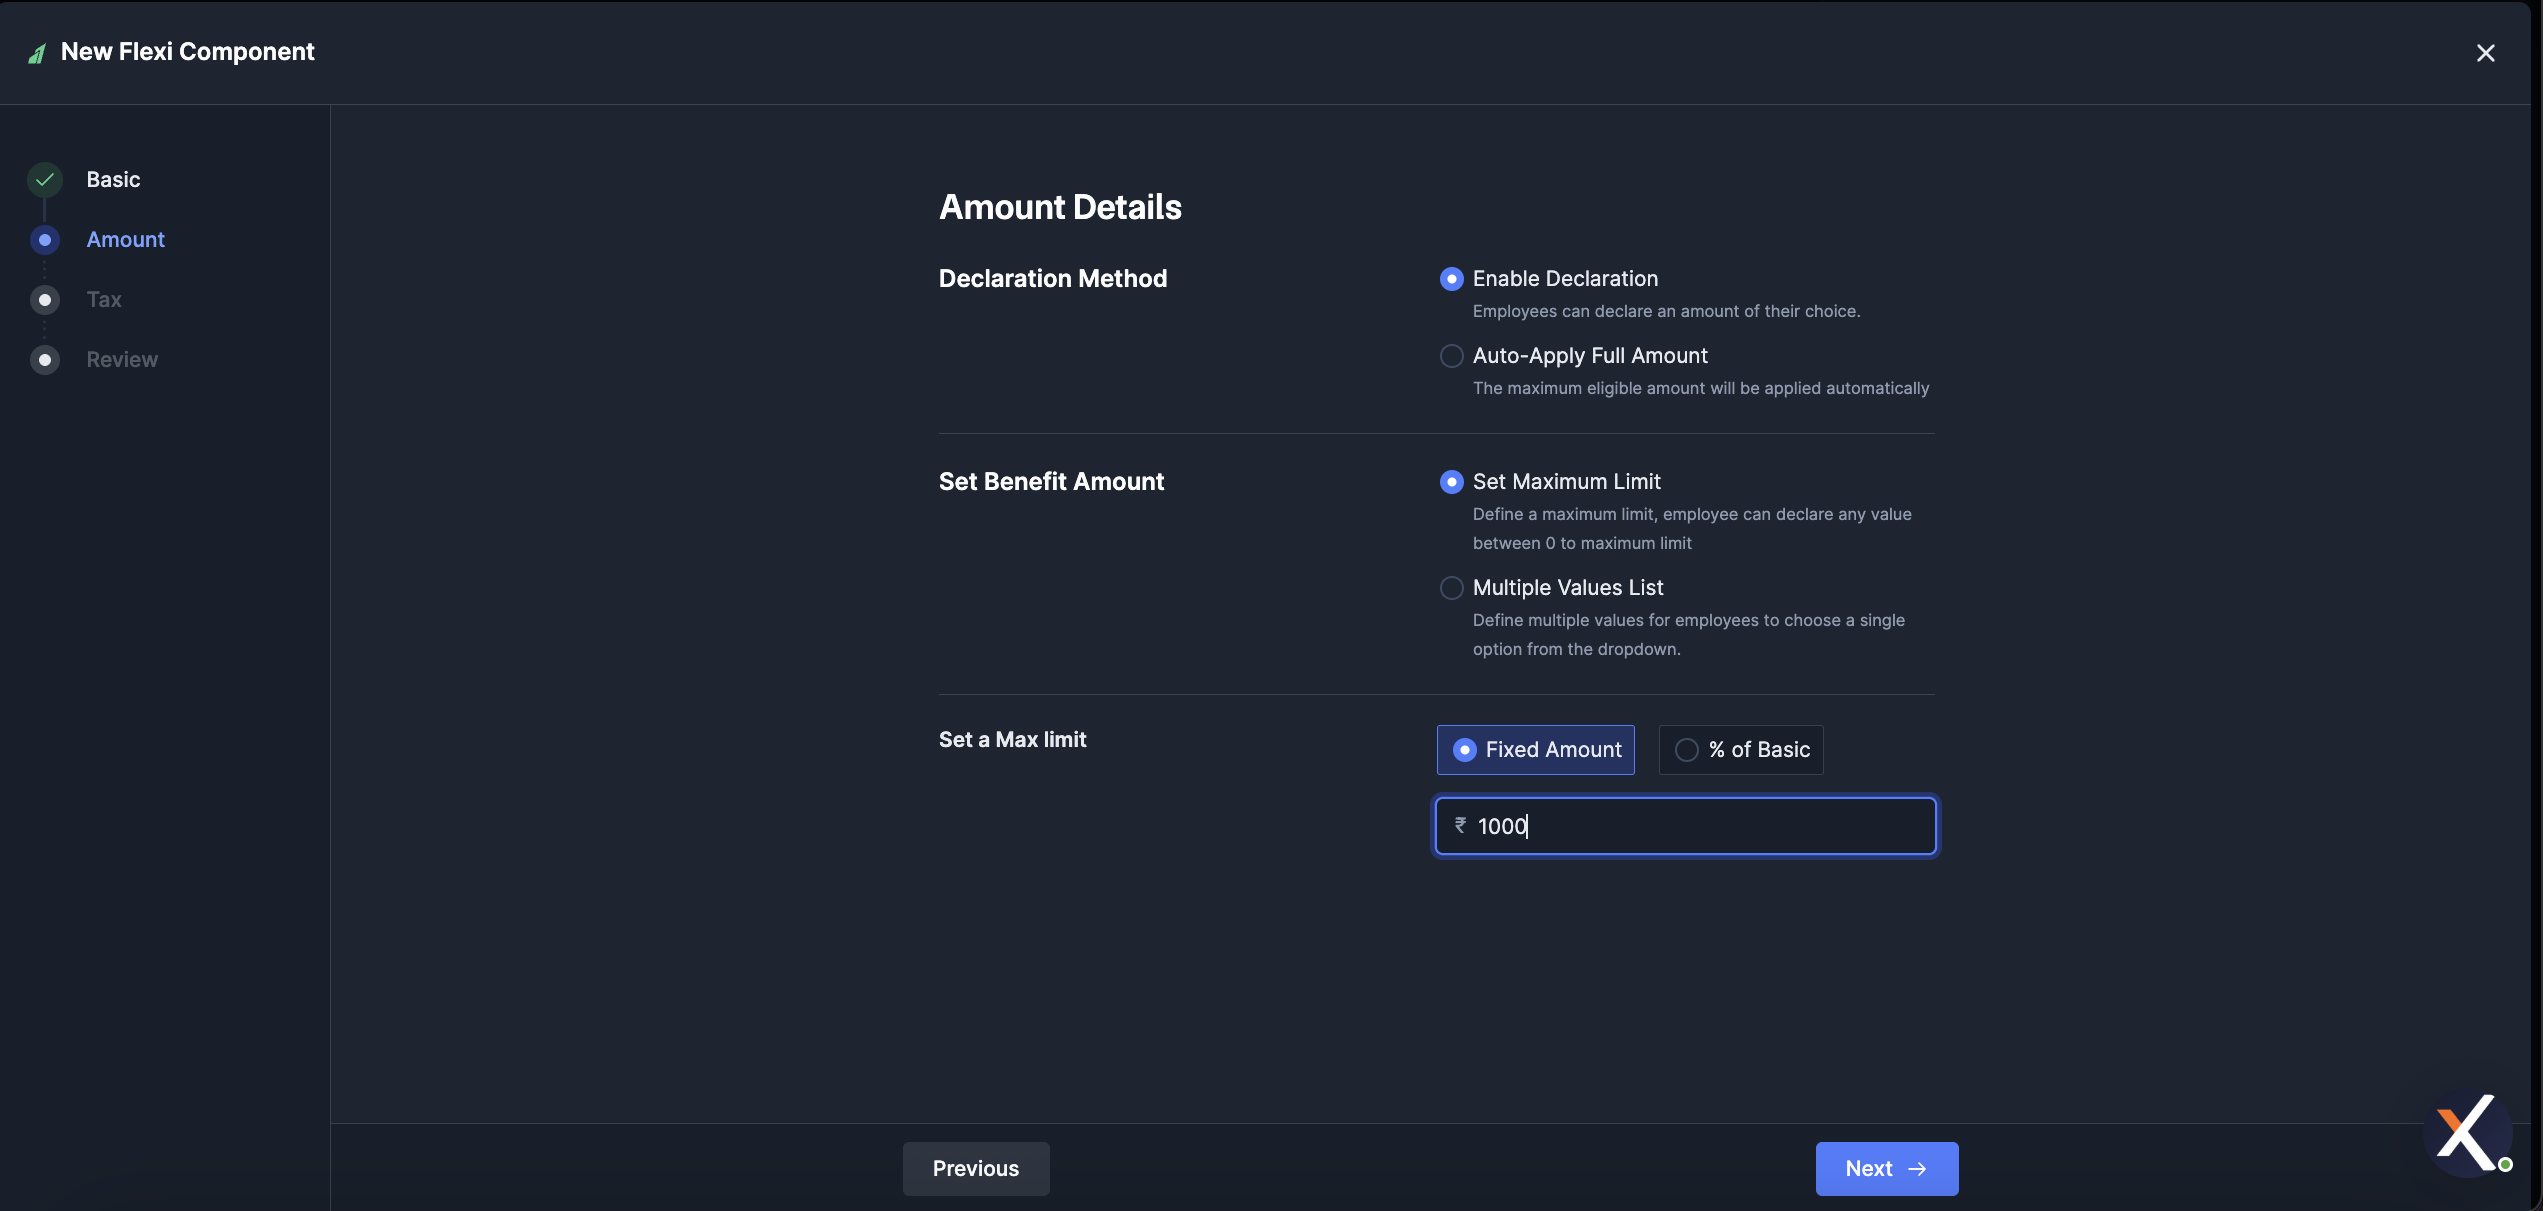
6. Set the **Declaration Method**:
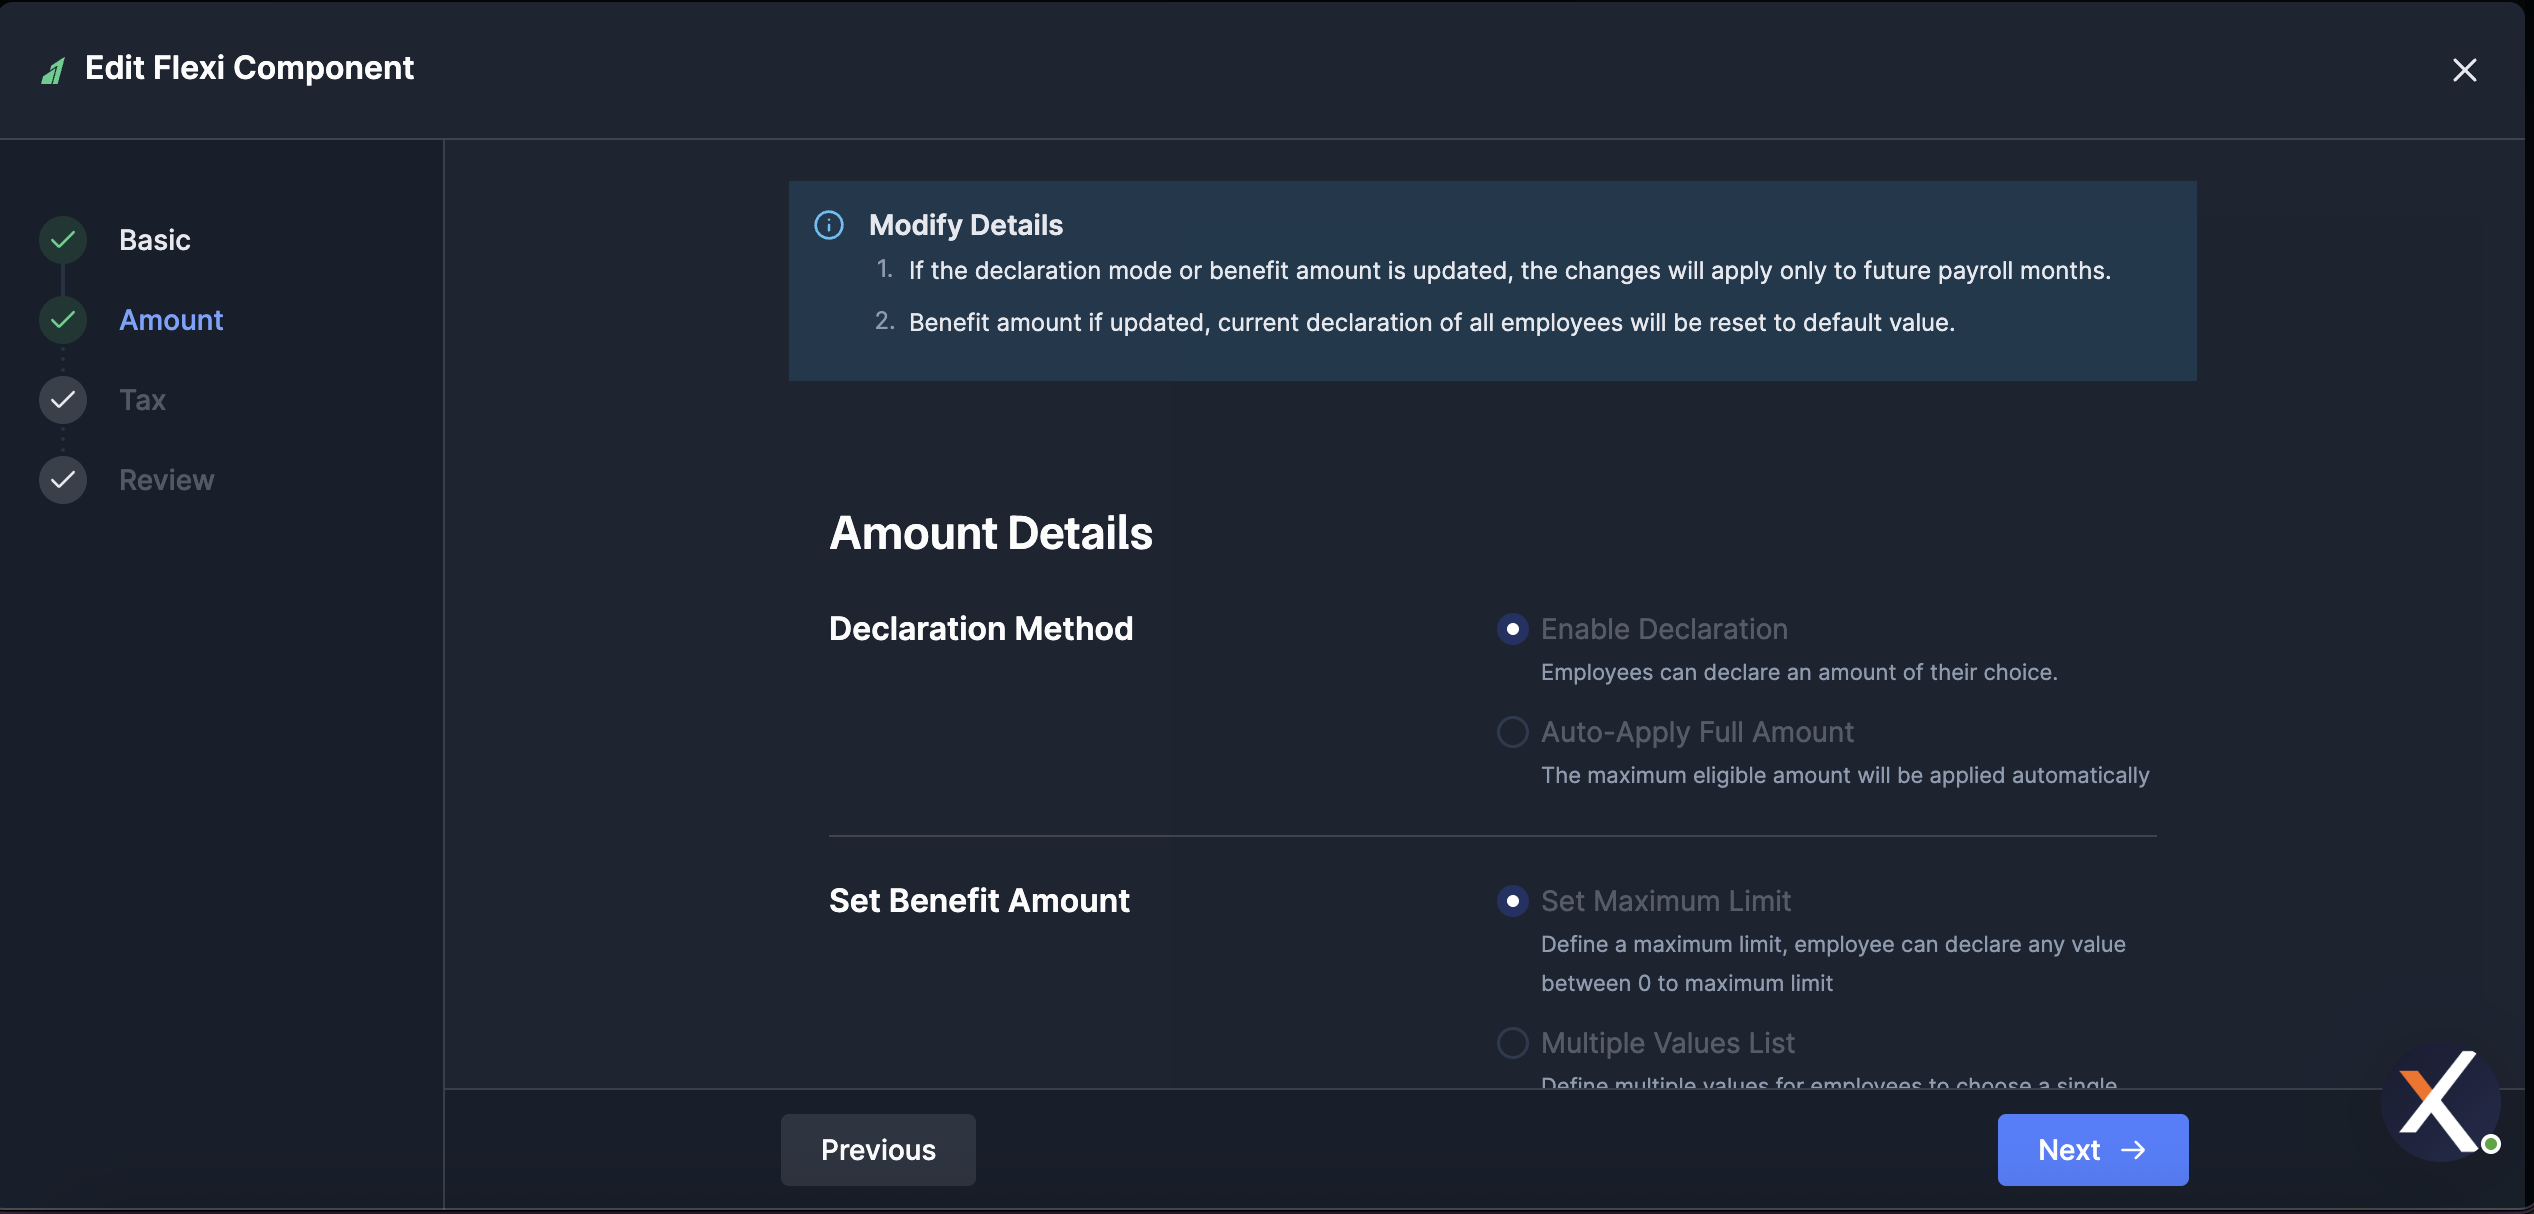
* **Enable Declaration:** employees can declare an amount of their choice within the limit.
* **Auto-Apply Full Amount:** the maximum eligible amount is applied automatically without employee action.
7. Set the **Benefit Amount**:
* **Set Maximum Limit:** define a maximum value; employees can declare any value between 0 and the maximum.
* **Multiple Values List:** define a list of values that employees pick a single option from in a dropdown.
8. Set the **Max limit** as either a **Fixed Amount** (in ₹) or a **% of Basic**.
3. Set the **Gross Salary Inclusion**:
* **Add to Gross Salary:** the benefit is included in gross salary calculation and eligible exemptions.
* **Exclude from Gross Salary Calculation:** the component is not included in the gross salary calculation.
4. Choose the **Benefit Type**:
* **Cash Benefit:** the benefit is paid directly to the employee as part of their salary.
* **Non-Cash Benefit:** the benefit is provided in a non-monetary form (for example, meal card, NPS contribution, gift voucher) and is not part of the cash payout.
5. Click **Next** to configure the **Amount Details**.
6. Set the **Declaration Method**:
* **Enable Declaration:** employees can declare an amount of their choice within the limit.
* **Auto-Apply Full Amount:** the maximum eligible amount is applied automatically without employee action.
7. Set the **Benefit Amount**:
* **Set Maximum Limit:** define a maximum value; employees can declare any value between 0 and the maximum.
* **Multiple Values List:** define a list of values that employees pick a single option from in a dropdown.
8. Set the **Max limit** as either a **Fixed Amount** (in ₹) or a **% of Basic**.
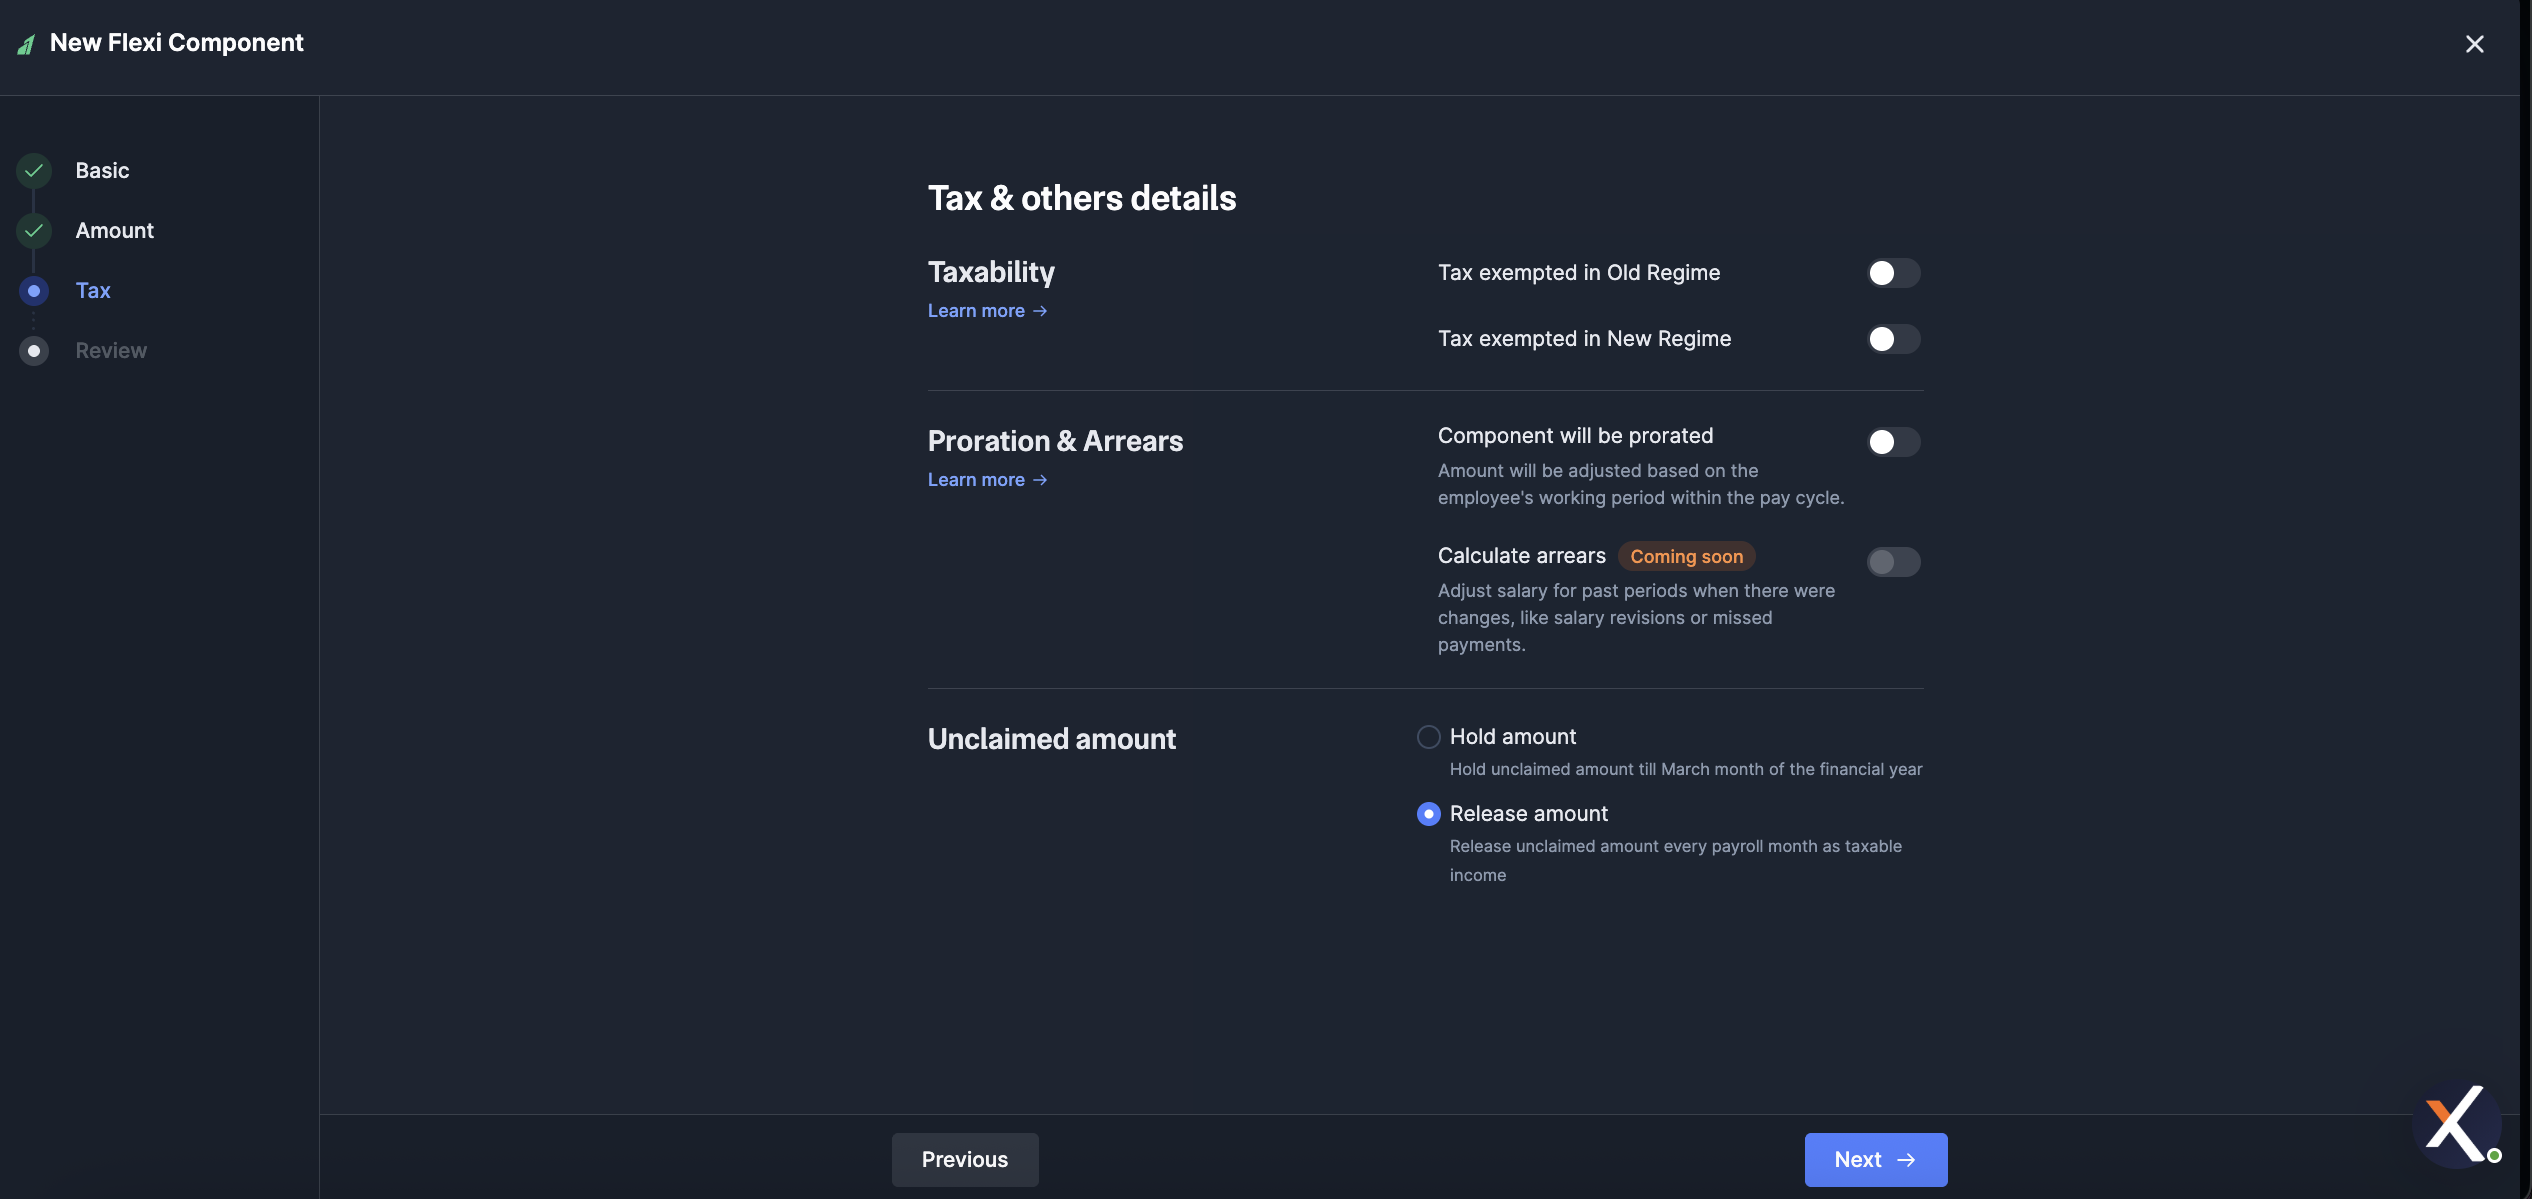
 9. Click **Next** to configure **Tax & others details**:
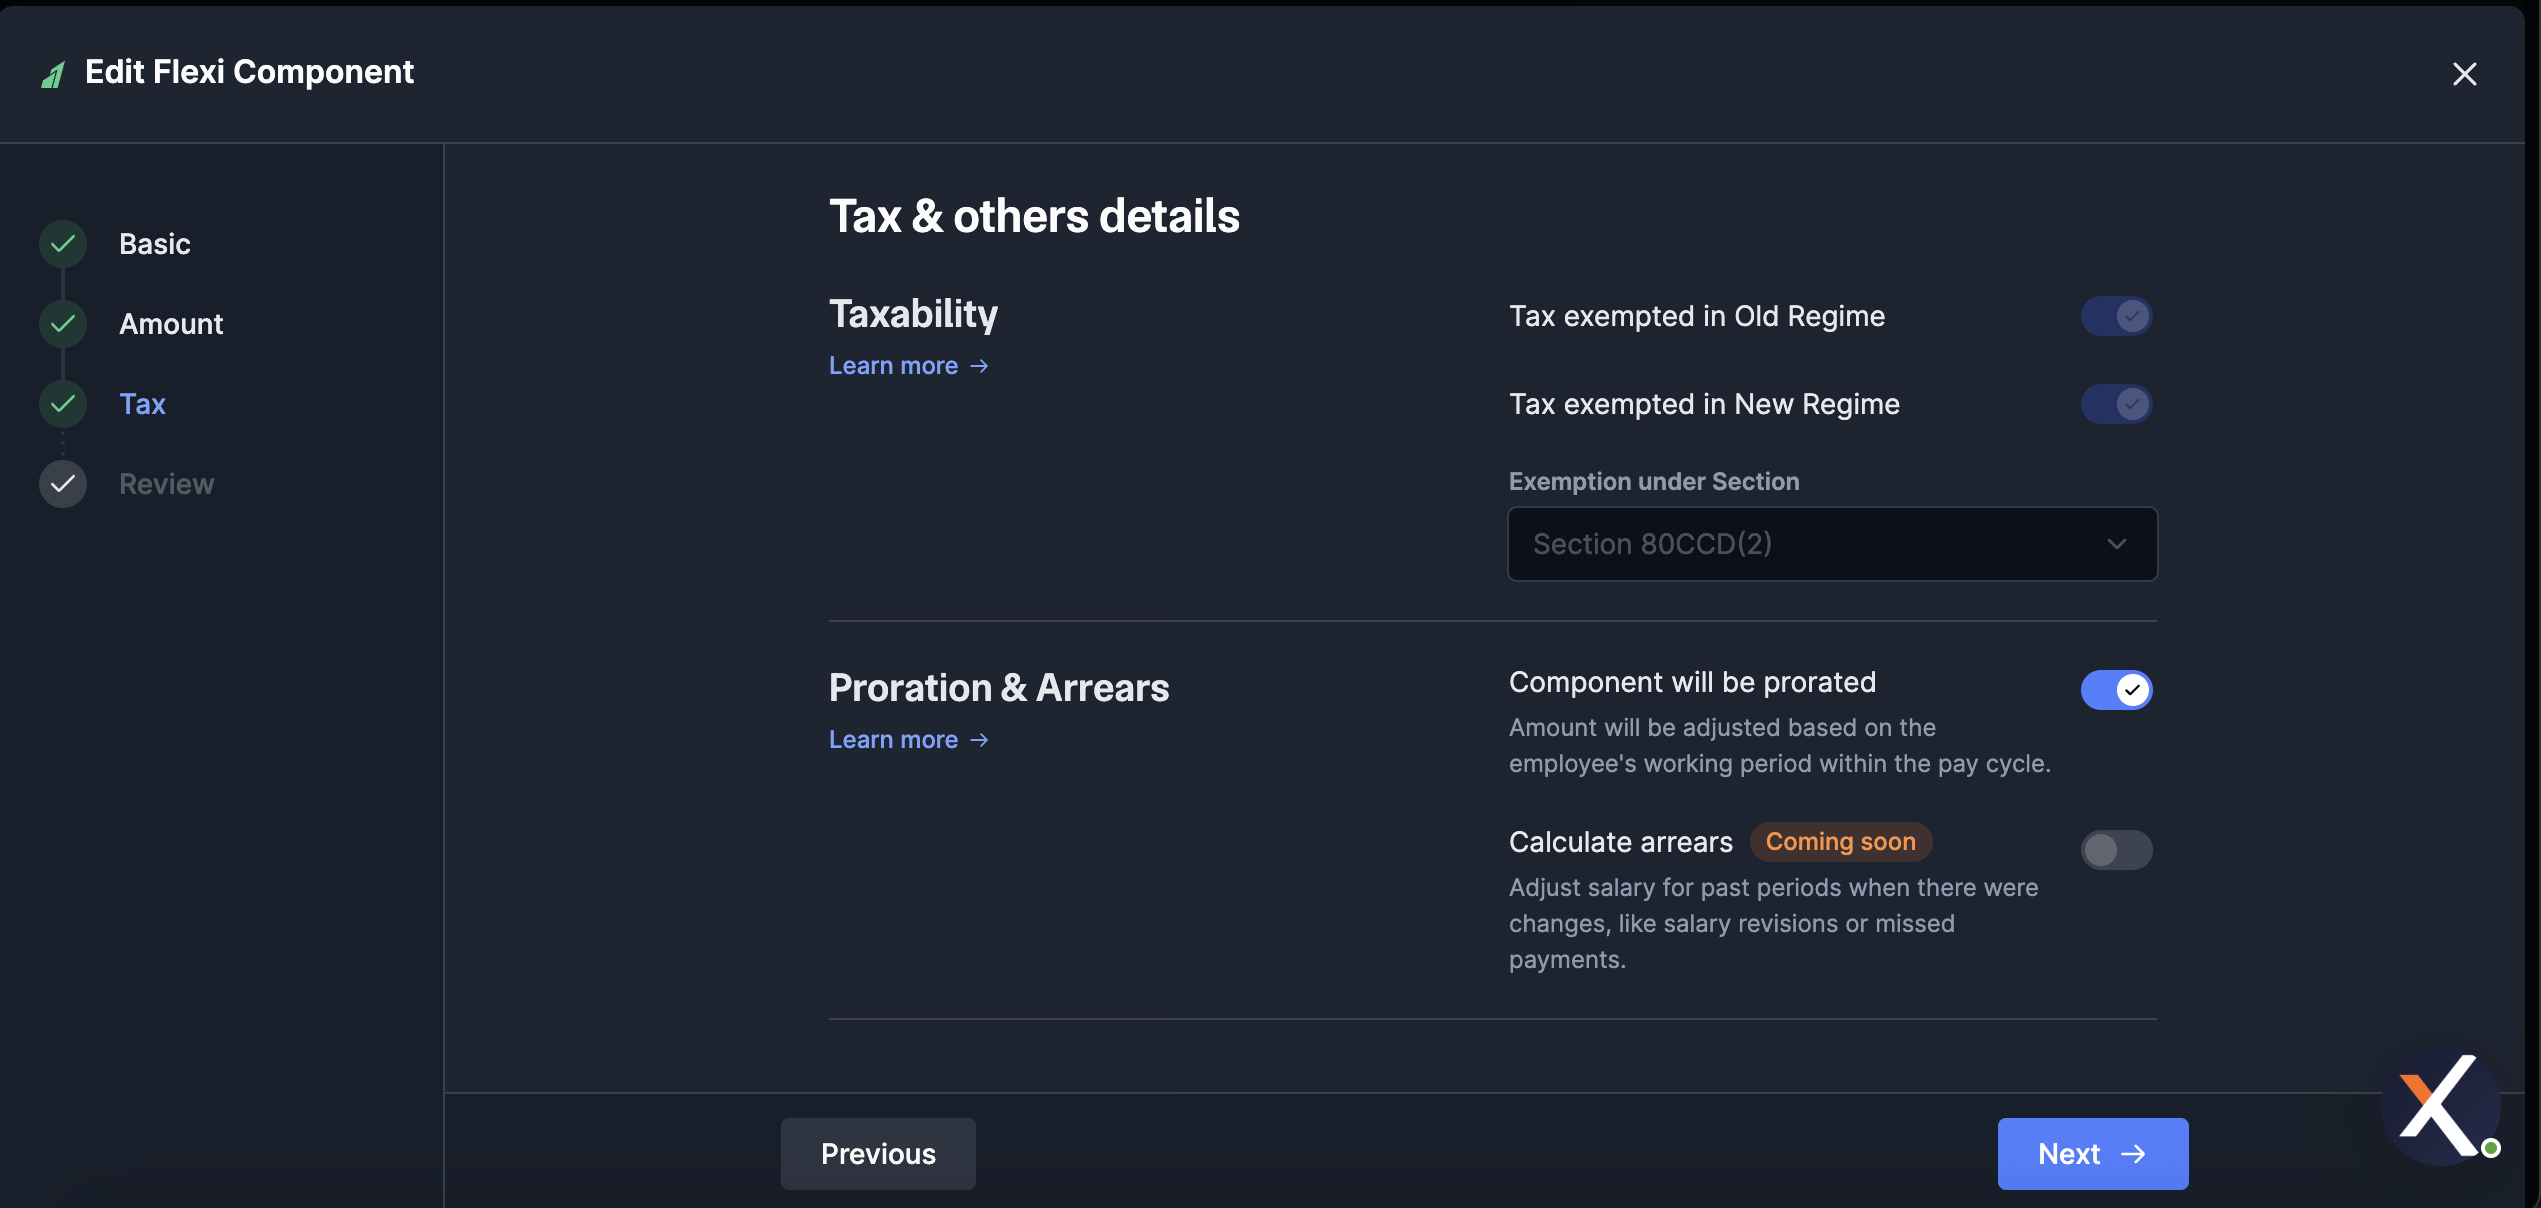
* **Taxability:** toggle **Tax exempted in Old Regime** and **Tax exempted in New Regime** based on the applicable rules.
* **Exemption under Section:** select the Income Tax Section under which this benefit is exempt (for example, Section 80CCD(2) for Employer NPS).
* **Proration & Arrears:** enable **Component will be prorated** to adjust the amount based on the employee's working period within the pay cycle. Arrear calculation is **Coming soon**.
* **Unclaimed amount**:
* **Hold amount:** hold the unclaimed amount till March of the financial year.
* **Release amount:** release the unclaimed amount every payroll month as taxable income.
9. Click **Next** to configure **Tax & others details**:
* **Taxability:** toggle **Tax exempted in Old Regime** and **Tax exempted in New Regime** based on the applicable rules.
* **Exemption under Section:** select the Income Tax Section under which this benefit is exempt (for example, Section 80CCD(2) for Employer NPS).
* **Proration & Arrears:** enable **Component will be prorated** to adjust the amount based on the employee's working period within the pay cycle. Arrear calculation is **Coming soon**.
* **Unclaimed amount**:
* **Hold amount:** hold the unclaimed amount till March of the financial year.
* **Release amount:** release the unclaimed amount every payroll month as taxable income.
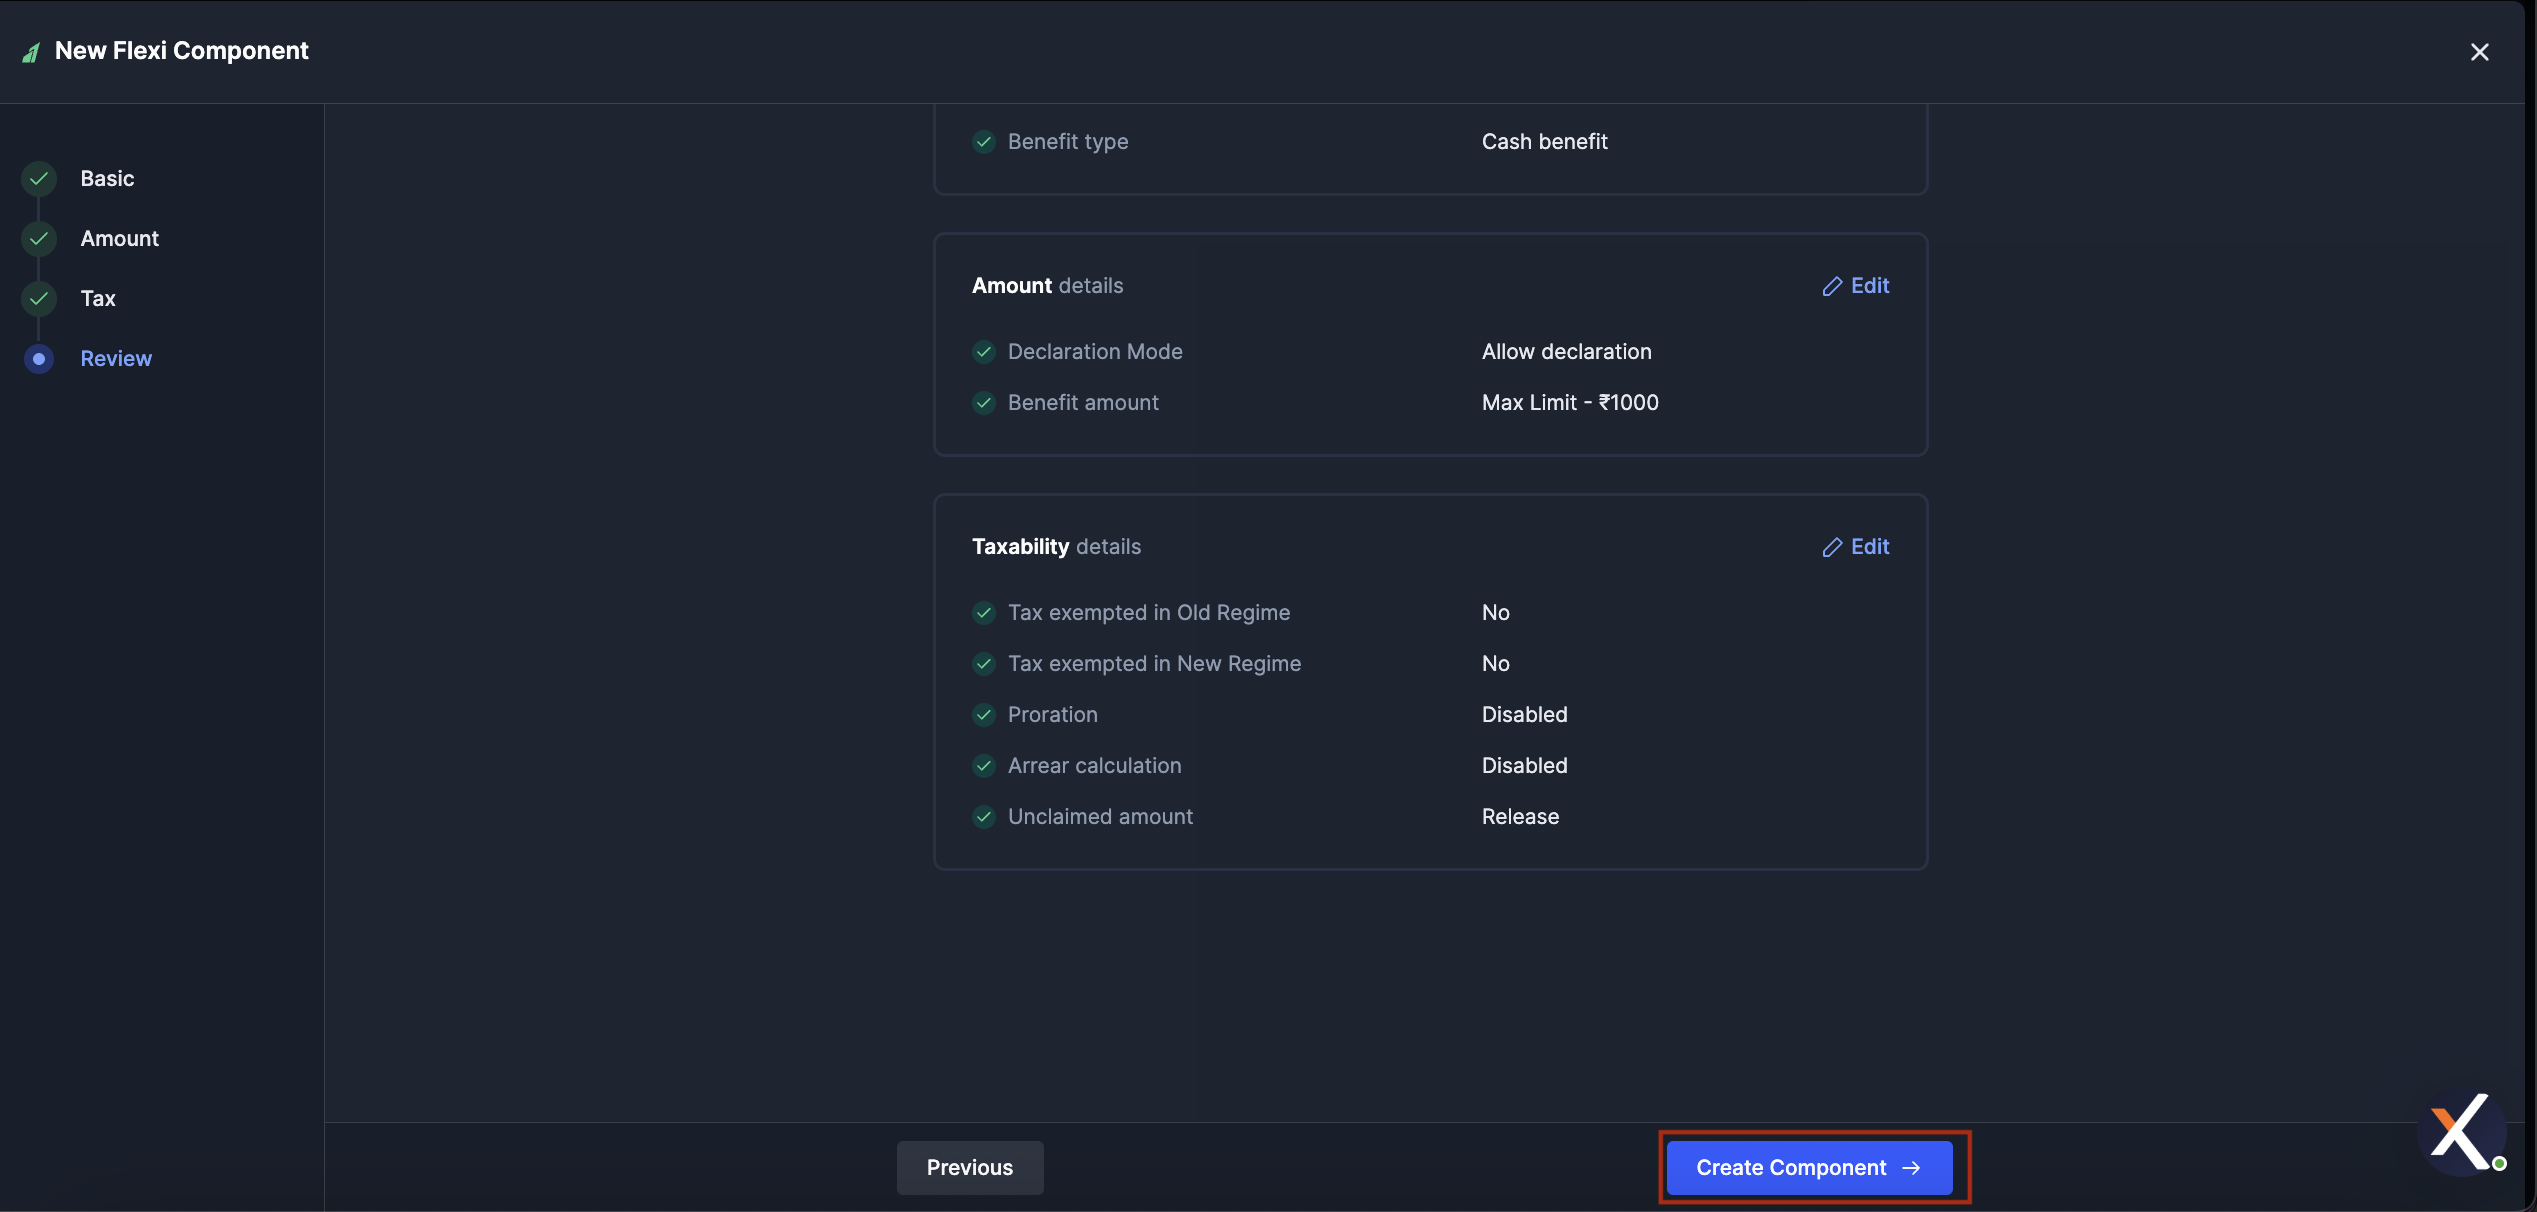
 10. Click **Next** to **Review** the configuration:
* Verify the **Basic**, **Amount** and **Taxability** details.
* Use the inline **Edit** links to go back and update any section.
11. Click **Create Component** to add the new flexi benefit to your library.
10. Click **Next** to **Review** the configuration:
* Verify the **Basic**, **Amount** and **Taxability** details.
* Use the inline **Edit** links to go back and update any section.
11. Click **Create Component** to add the new flexi benefit to your library.
 The new component is now available to be added to an active employee's compensation.
Each flexi component can be inspected and updated from the library.
To view the details of a flexi component:
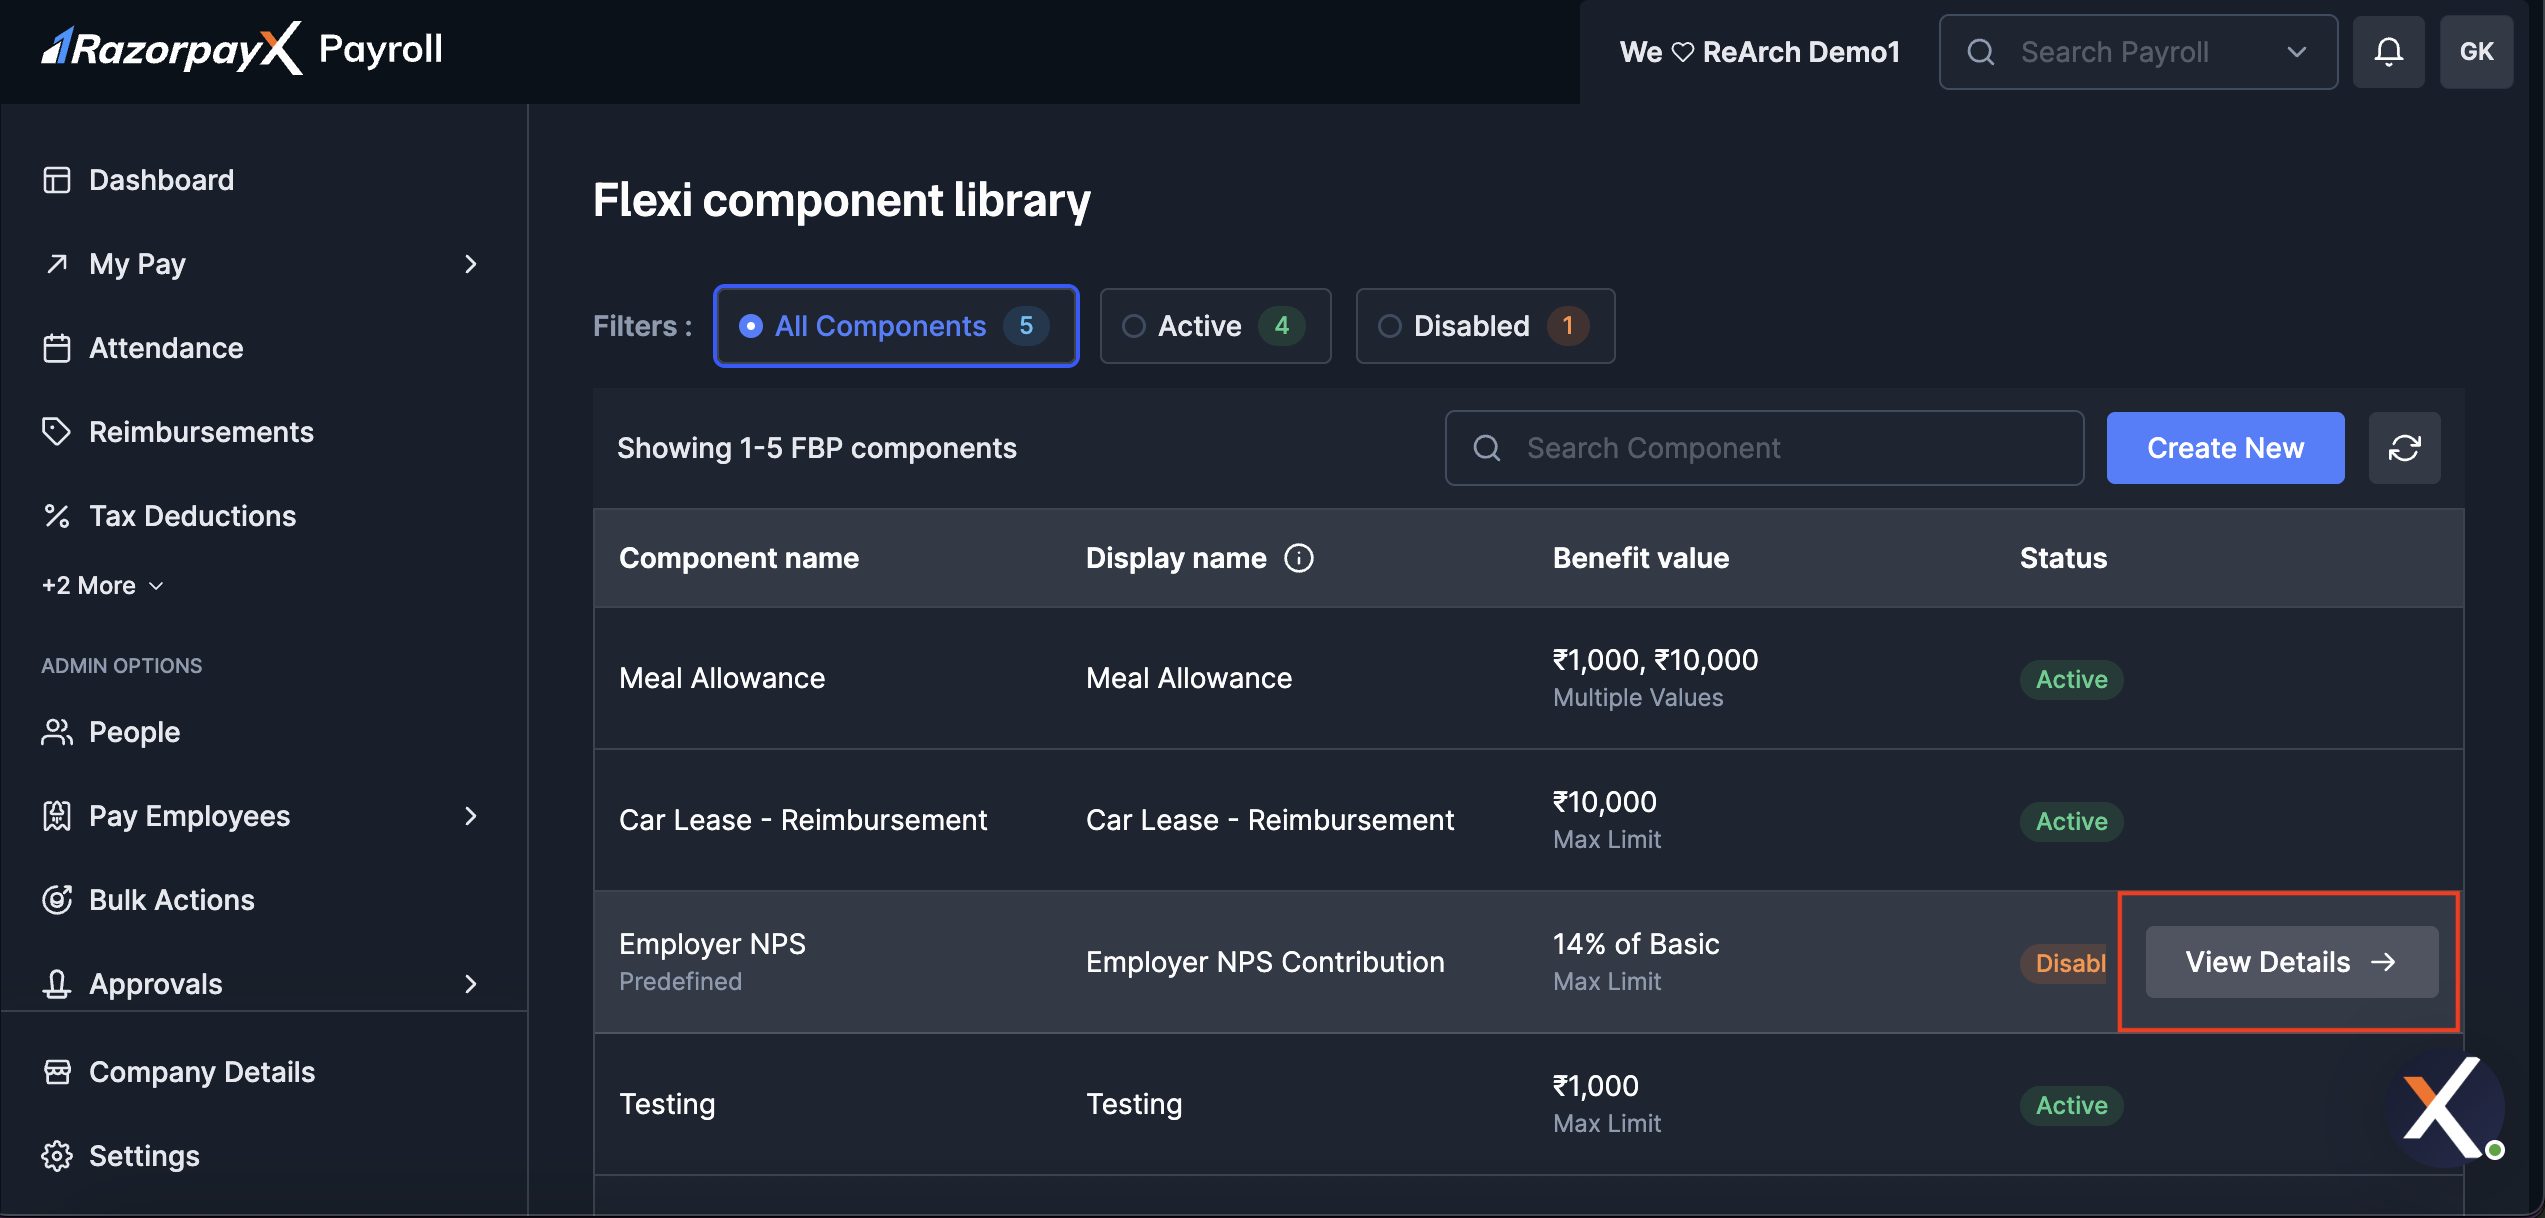
1. On the **Flexi component library** page, hover over the component you want to inspect.
2. Click **View Details**.
The new component is now available to be added to an active employee's compensation.
Each flexi component can be inspected and updated from the library.
To view the details of a flexi component:
1. On the **Flexi component library** page, hover over the component you want to inspect.
2. Click **View Details**.
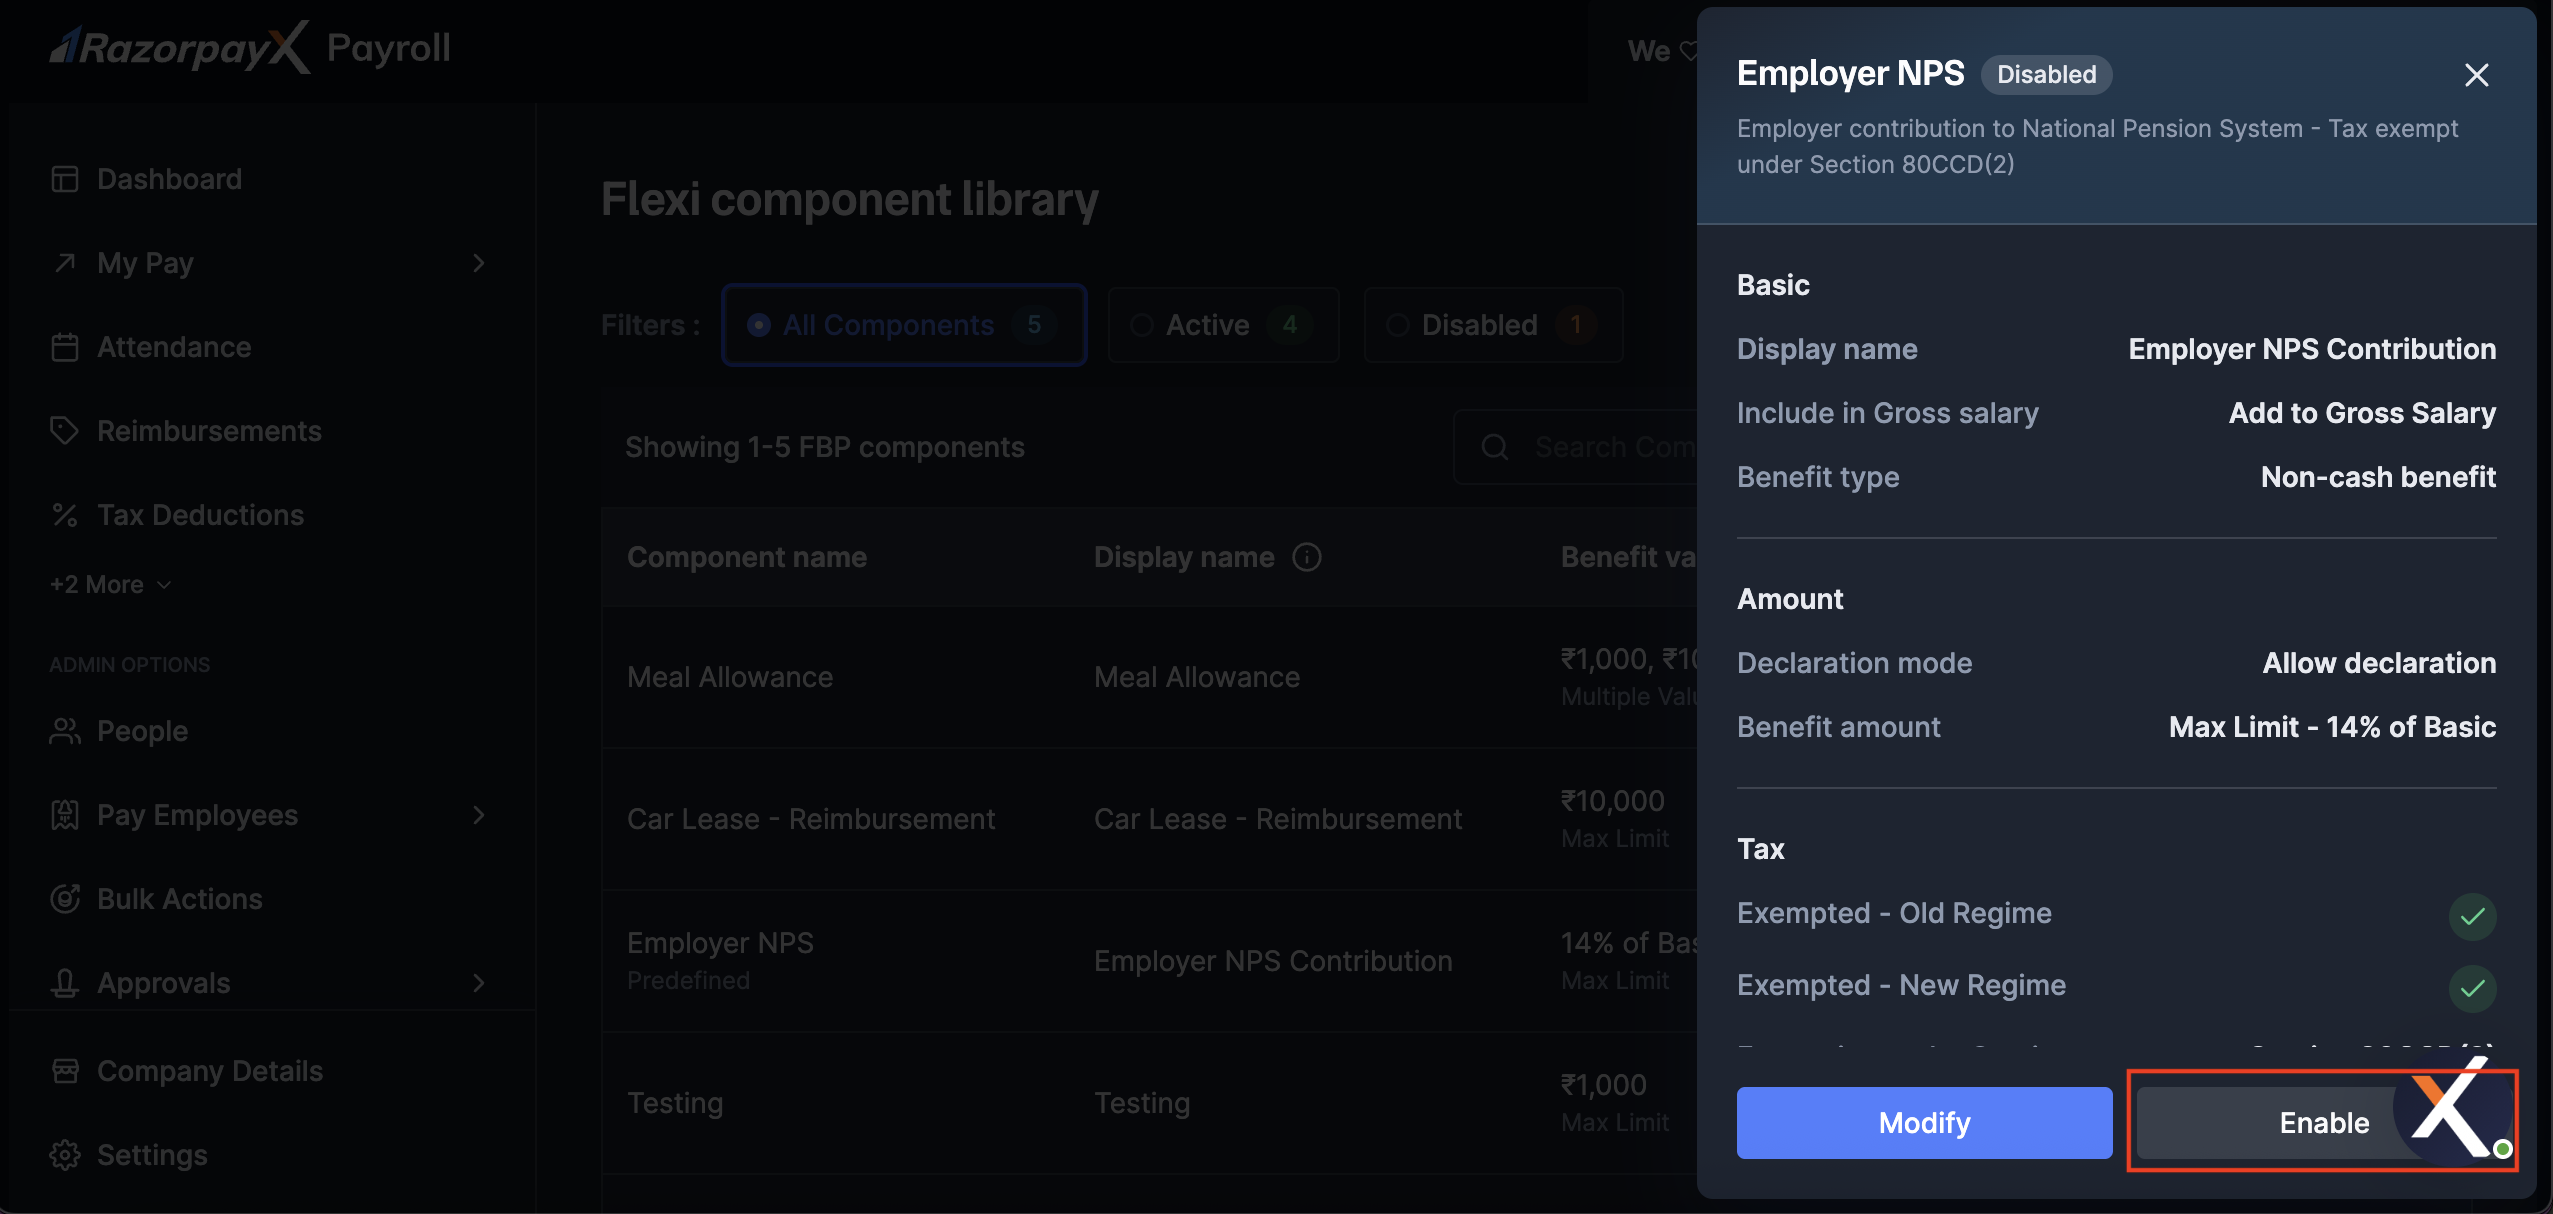
 3. A side panel opens with the component's configuration grouped into **Basic**, **Amount** and **Tax** sections.
 To modify a flexi component:
1. From the side panel, click **Modify**.
2. The **Edit Flexi Component** opens with four steps: **Basic**, **Amount**, **Tax** and **Review**.
**Watch Out!**
* If the **Display name** is updated, past salary registers and payslips will reflect the new Display Name.
* Changes in **Gross Salary Inclusion** are applied retrospectively for flexi allowances already disbursed.
* **Benefit type** cannot be updated.
3. Update the **Basic Details** as required and click **Next**.
To modify a flexi component:
1. From the side panel, click **Modify**.
2. The **Edit Flexi Component** opens with four steps: **Basic**, **Amount**, **Tax** and **Review**.
**Watch Out!**
* If the **Display name** is updated, past salary registers and payslips will reflect the new Display Name.
* Changes in **Gross Salary Inclusion** are applied retrospectively for flexi allowances already disbursed.
* **Benefit type** cannot be updated.
3. Update the **Basic Details** as required and click **Next**.
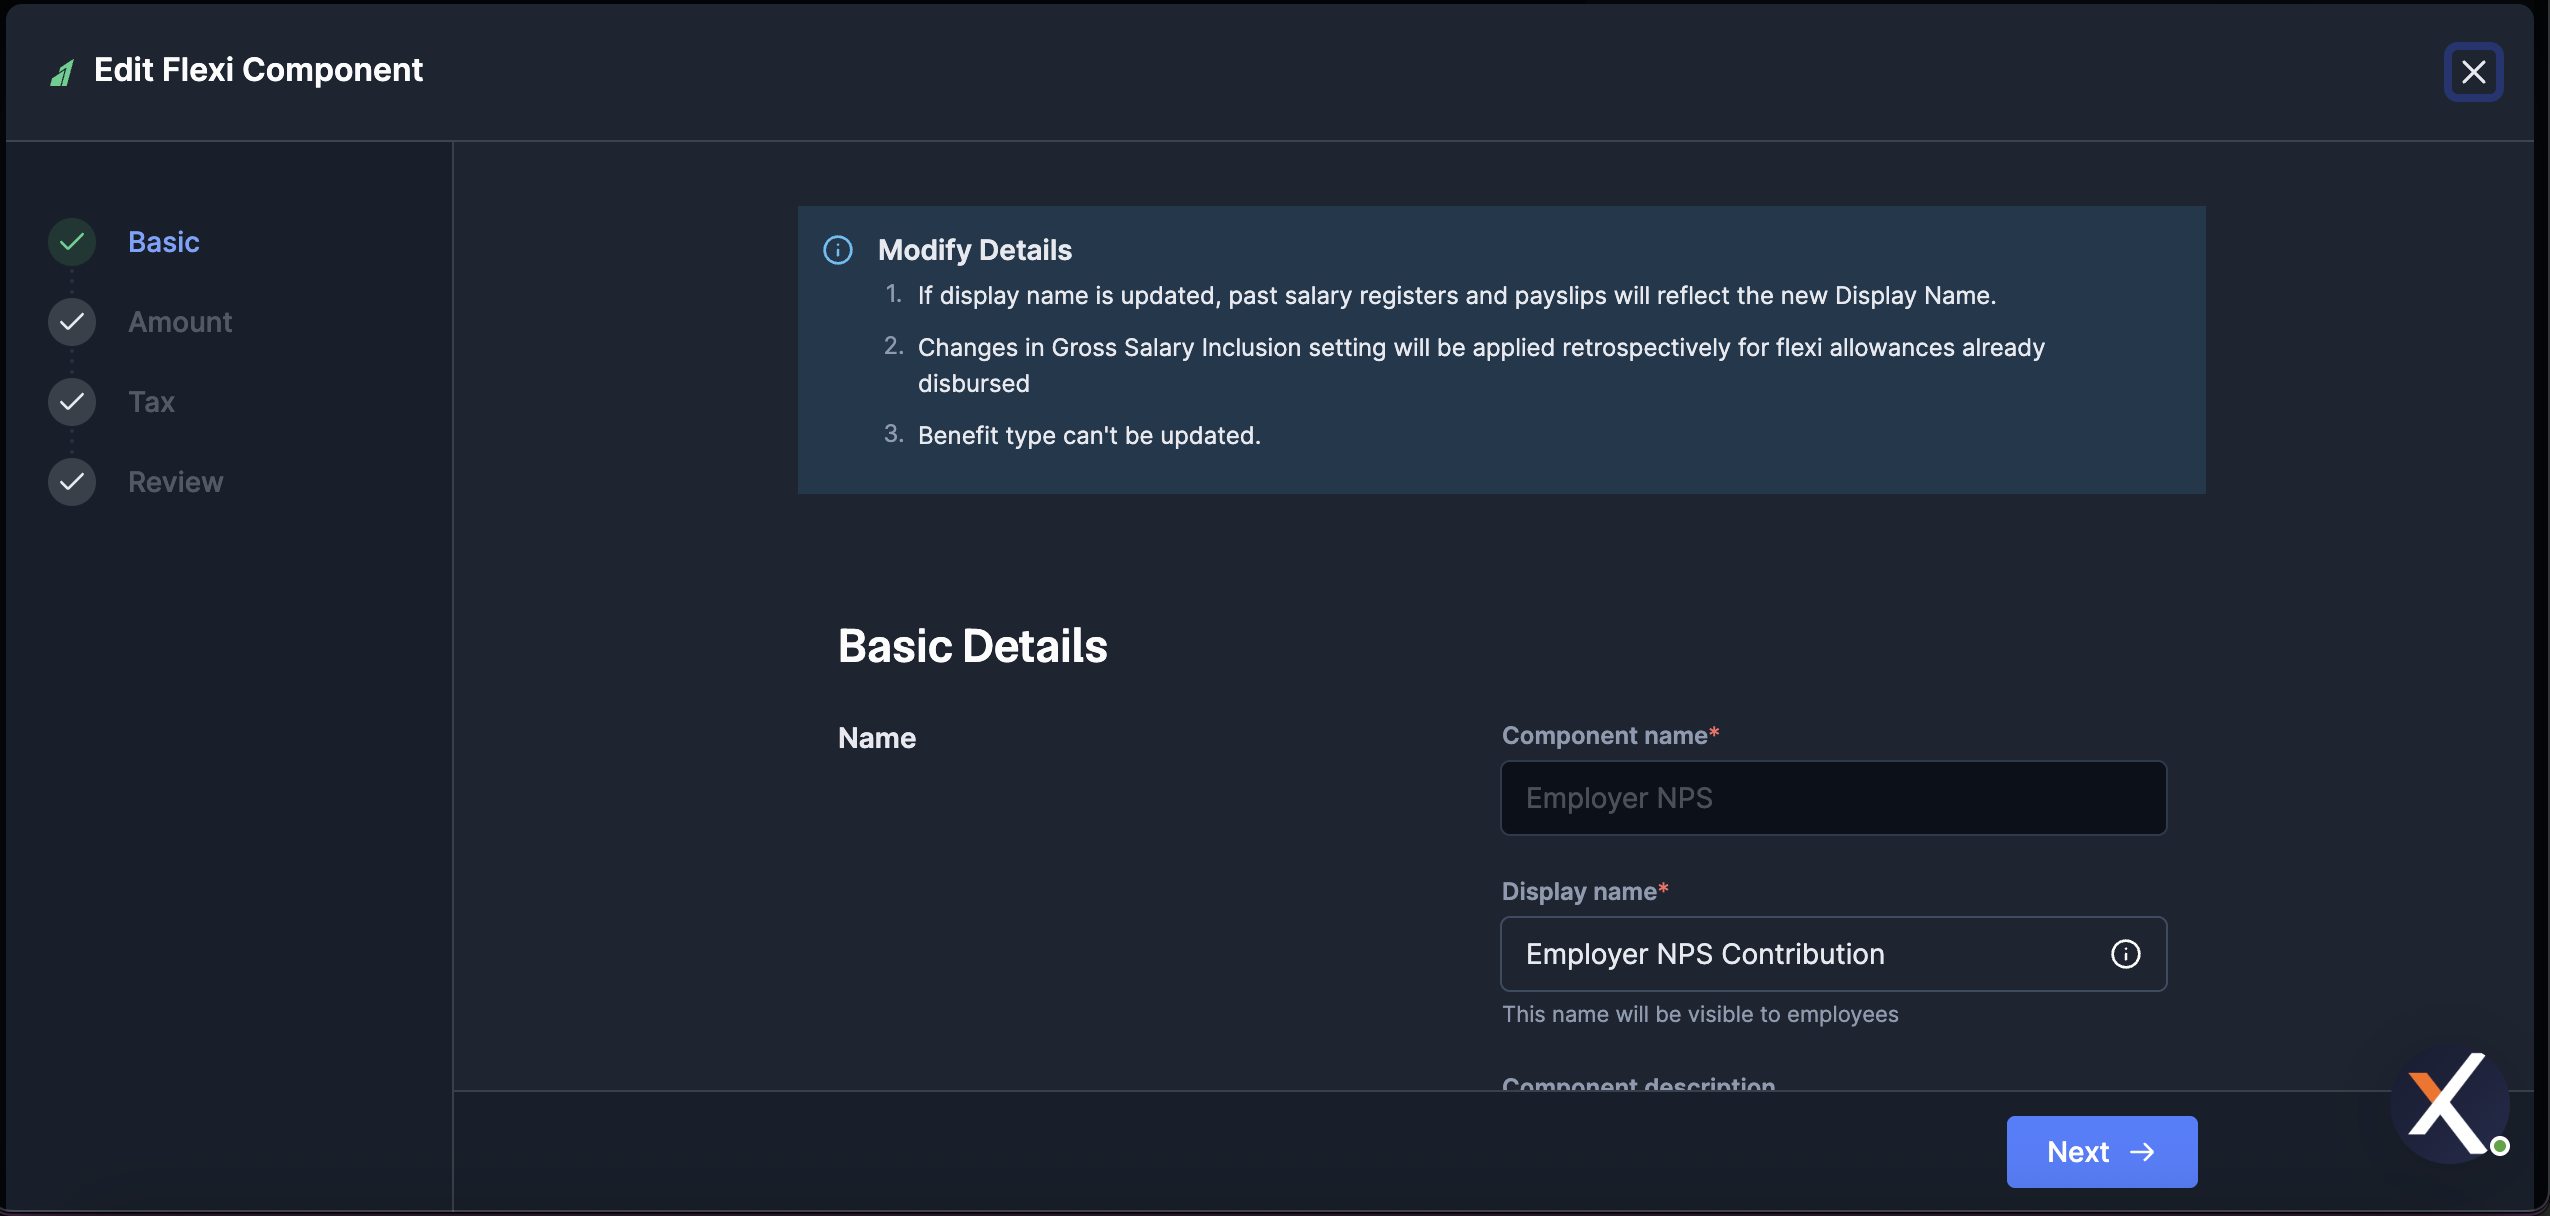 4. Update the **Amount Details**:
**Watch Out!**
* If the **Declaration mode** or **Benefit amount** is updated, the changes apply only to future payroll months.
* If the **Benefit amount** is updated, the current declaration of all employees is reset to the default value.
4. Update the **Amount Details**:
**Watch Out!**
* If the **Declaration mode** or **Benefit amount** is updated, the changes apply only to future payroll months.
* If the **Benefit amount** is updated, the current declaration of all employees is reset to the default value.
 5. Update the **Tax & others details**:
**Watch Out!**
* **Taxability** setting updates are applied retrospectively for all payroll months of the financial year.
* The exemption limit of the updated section applies for the financial year.
* **Proration** and arrears changes apply only to future payroll months.
* **Unclaimed amount** behaviour cannot be updated once the component has been created.
5. Update the **Tax & others details**:
**Watch Out!**
* **Taxability** setting updates are applied retrospectively for all payroll months of the financial year.
* The exemption limit of the updated section applies for the financial year.
* **Proration** and arrears changes apply only to future payroll months.
* **Unclaimed amount** behaviour cannot be updated once the component has been created.
 6. Click **Next** to open the **Review** step. Verify the updated **Amount** and **Taxability** details.
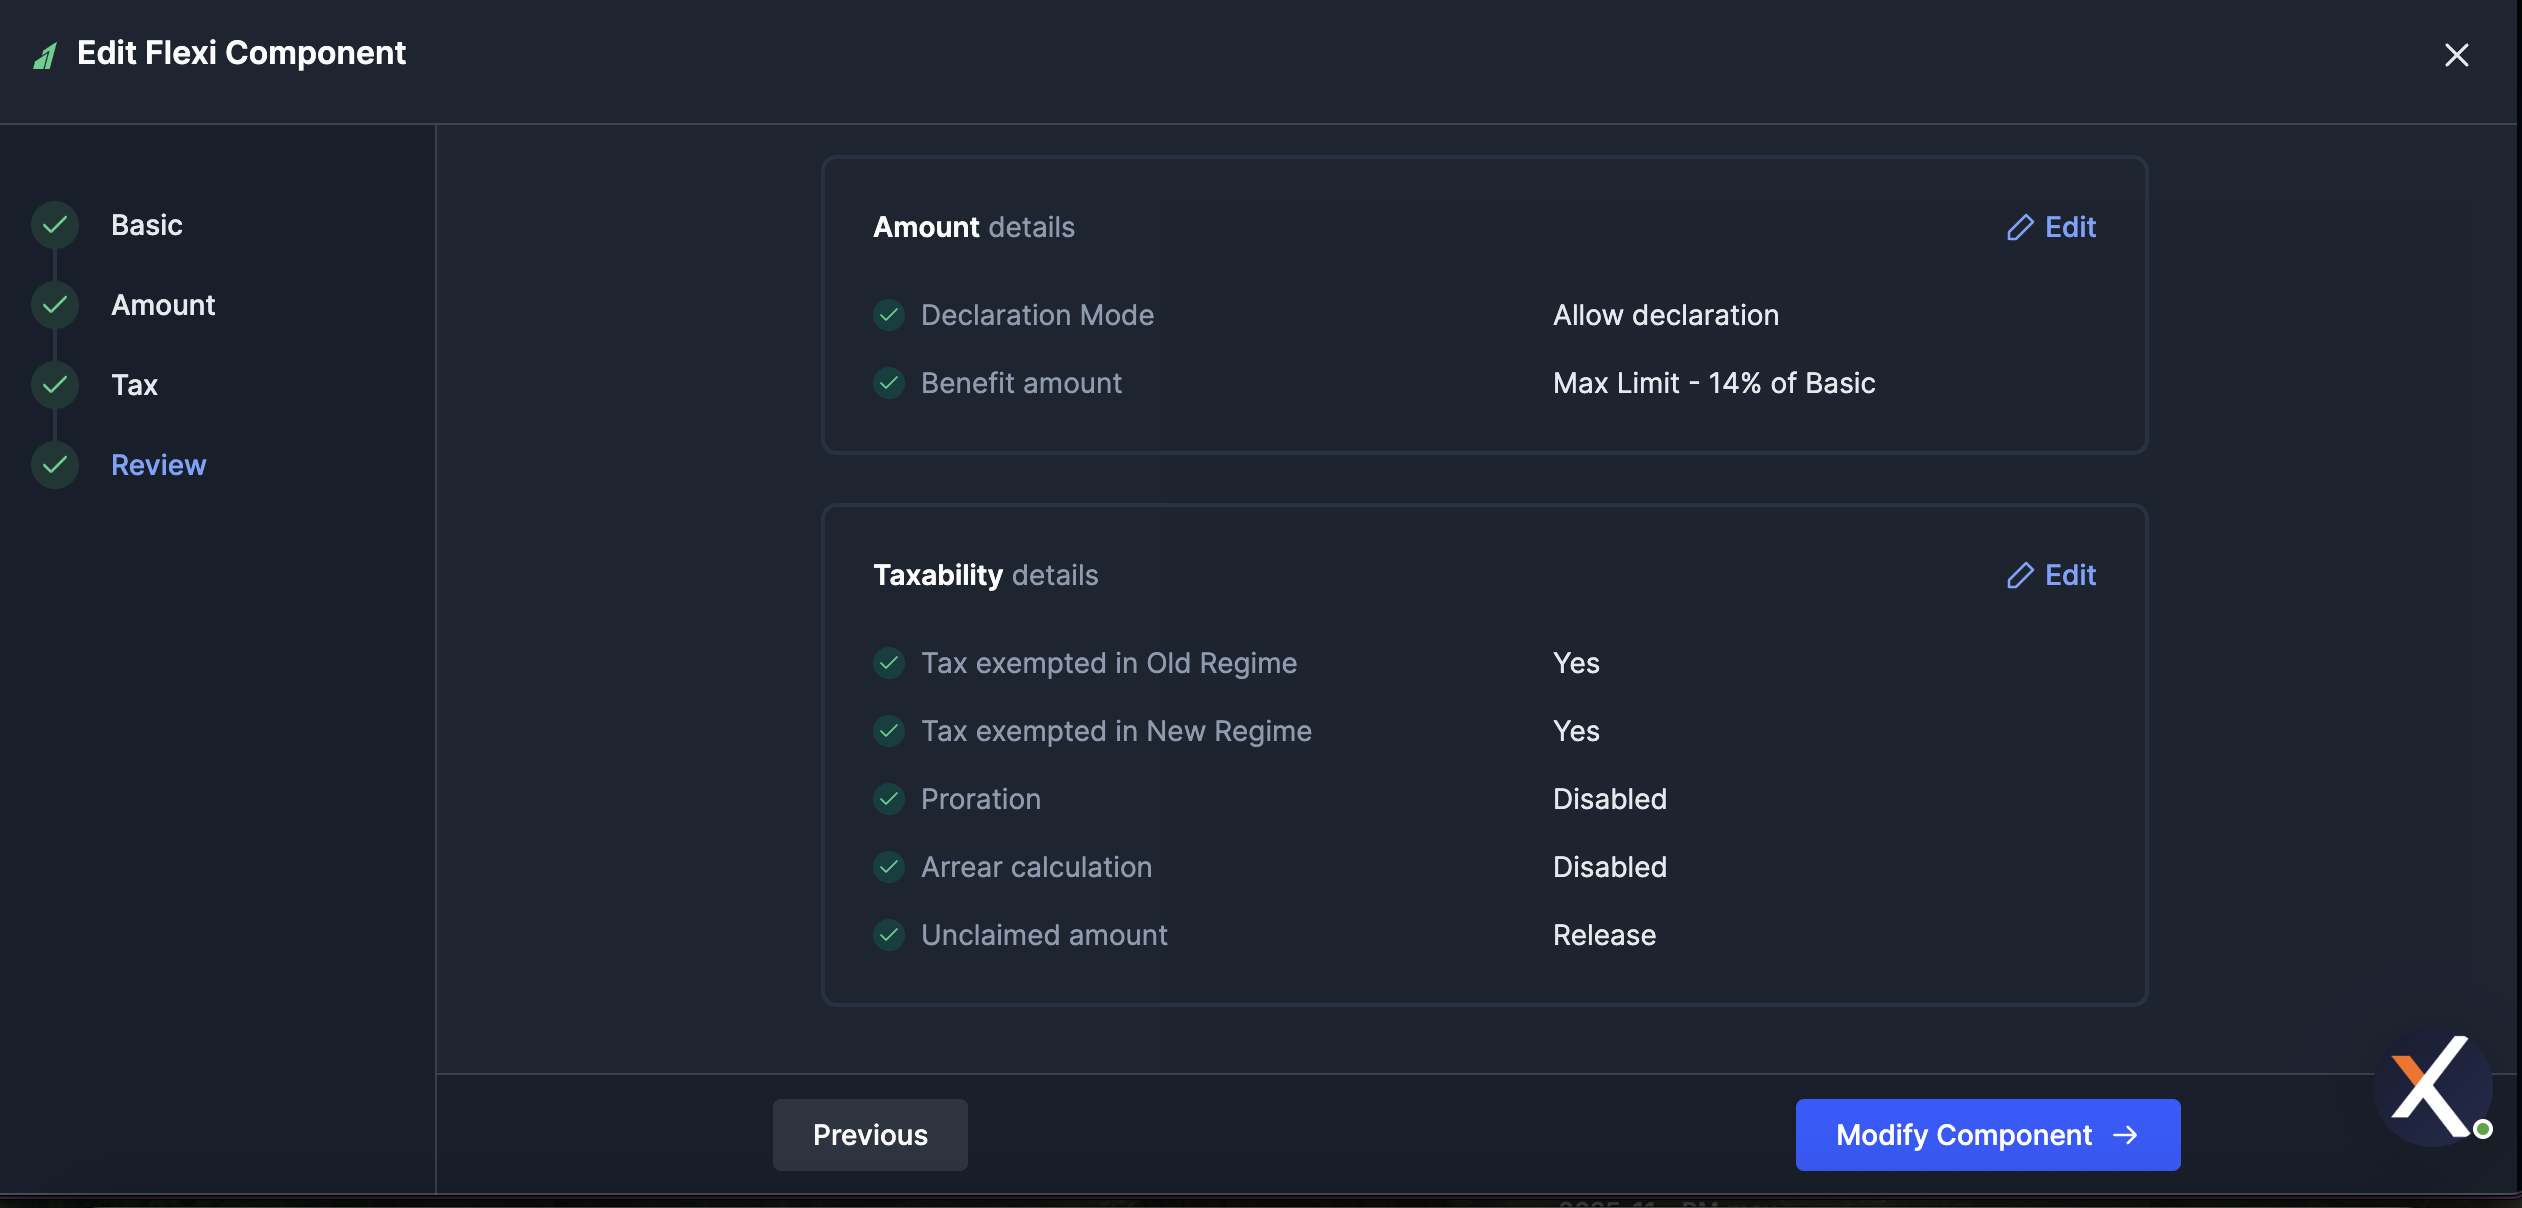 7. Click **Modify Component** to save the changes.
## Employer NPS Contribution
**Employer NPS** is a mandated, predefined flexi component that ships with every Payroll account. It represents the employer's contribution to the **National Pension System** and is tax exempt under **Section 80CCD(2)** of the Income Tax Act, in both the Old and New regimes, up to **14% of Basic** salary.
**Watch Out!**
This component ships in a **Disabled** state. You must enable it before it can be added to an active employee's compensation.
The Employer NPS Contribution component comes preconfigured with the following settings. The **Component name** and **Benefit type** cannot be modified, but other fields can be updated through the **Modify** flow.
| Field | Value |
| ------------------------------ | ------------------------------------------------------------------------------------ |
| **Component name** | Employer NPS |
| **Display name** | Employer NPS Contribution |
| **Description** | Employer contribution to National Pension System - Tax exempt under Section 80CCD(2) |
| **Include in Gross salary** | Add to Gross Salary |
| **Benefit type** | Non-cash benefit |
| **Declaration mode** | Allow declaration |
| **Benefit amount** | Max Limit, 14% of Basic |
| **Tax exempted in Old Regime** | Yes(Upto 10% of Basic) |
| **Tax exempted in New Regime** | Yes(Upto 14% of Basic) |
| **Exemption under Section** | Section 80CCD(2) |
Enable the component before assigning it to an employee's compensation.
1. On the **Flexi component library** page, locate the **Employer NPS** row (marked **Disabled**) and hover over it.
2. Click **View Details**.
3. In the side panel, review the preconfigured Basic, Amount and Tax details, then click **Enable**.
7. Click **Modify Component** to save the changes.
## Employer NPS Contribution
**Employer NPS** is a mandated, predefined flexi component that ships with every Payroll account. It represents the employer's contribution to the **National Pension System** and is tax exempt under **Section 80CCD(2)** of the Income Tax Act, in both the Old and New regimes, up to **14% of Basic** salary.
**Watch Out!**
This component ships in a **Disabled** state. You must enable it before it can be added to an active employee's compensation.
The Employer NPS Contribution component comes preconfigured with the following settings. The **Component name** and **Benefit type** cannot be modified, but other fields can be updated through the **Modify** flow.
| Field | Value |
| ------------------------------ | ------------------------------------------------------------------------------------ |
| **Component name** | Employer NPS |
| **Display name** | Employer NPS Contribution |
| **Description** | Employer contribution to National Pension System - Tax exempt under Section 80CCD(2) |
| **Include in Gross salary** | Add to Gross Salary |
| **Benefit type** | Non-cash benefit |
| **Declaration mode** | Allow declaration |
| **Benefit amount** | Max Limit, 14% of Basic |
| **Tax exempted in Old Regime** | Yes(Upto 10% of Basic) |
| **Tax exempted in New Regime** | Yes(Upto 14% of Basic) |
| **Exemption under Section** | Section 80CCD(2) |
Enable the component before assigning it to an employee's compensation.
1. On the **Flexi component library** page, locate the **Employer NPS** row (marked **Disabled**) and hover over it.
2. Click **View Details**.
3. In the side panel, review the preconfigured Basic, Amount and Tax details, then click **Enable**.
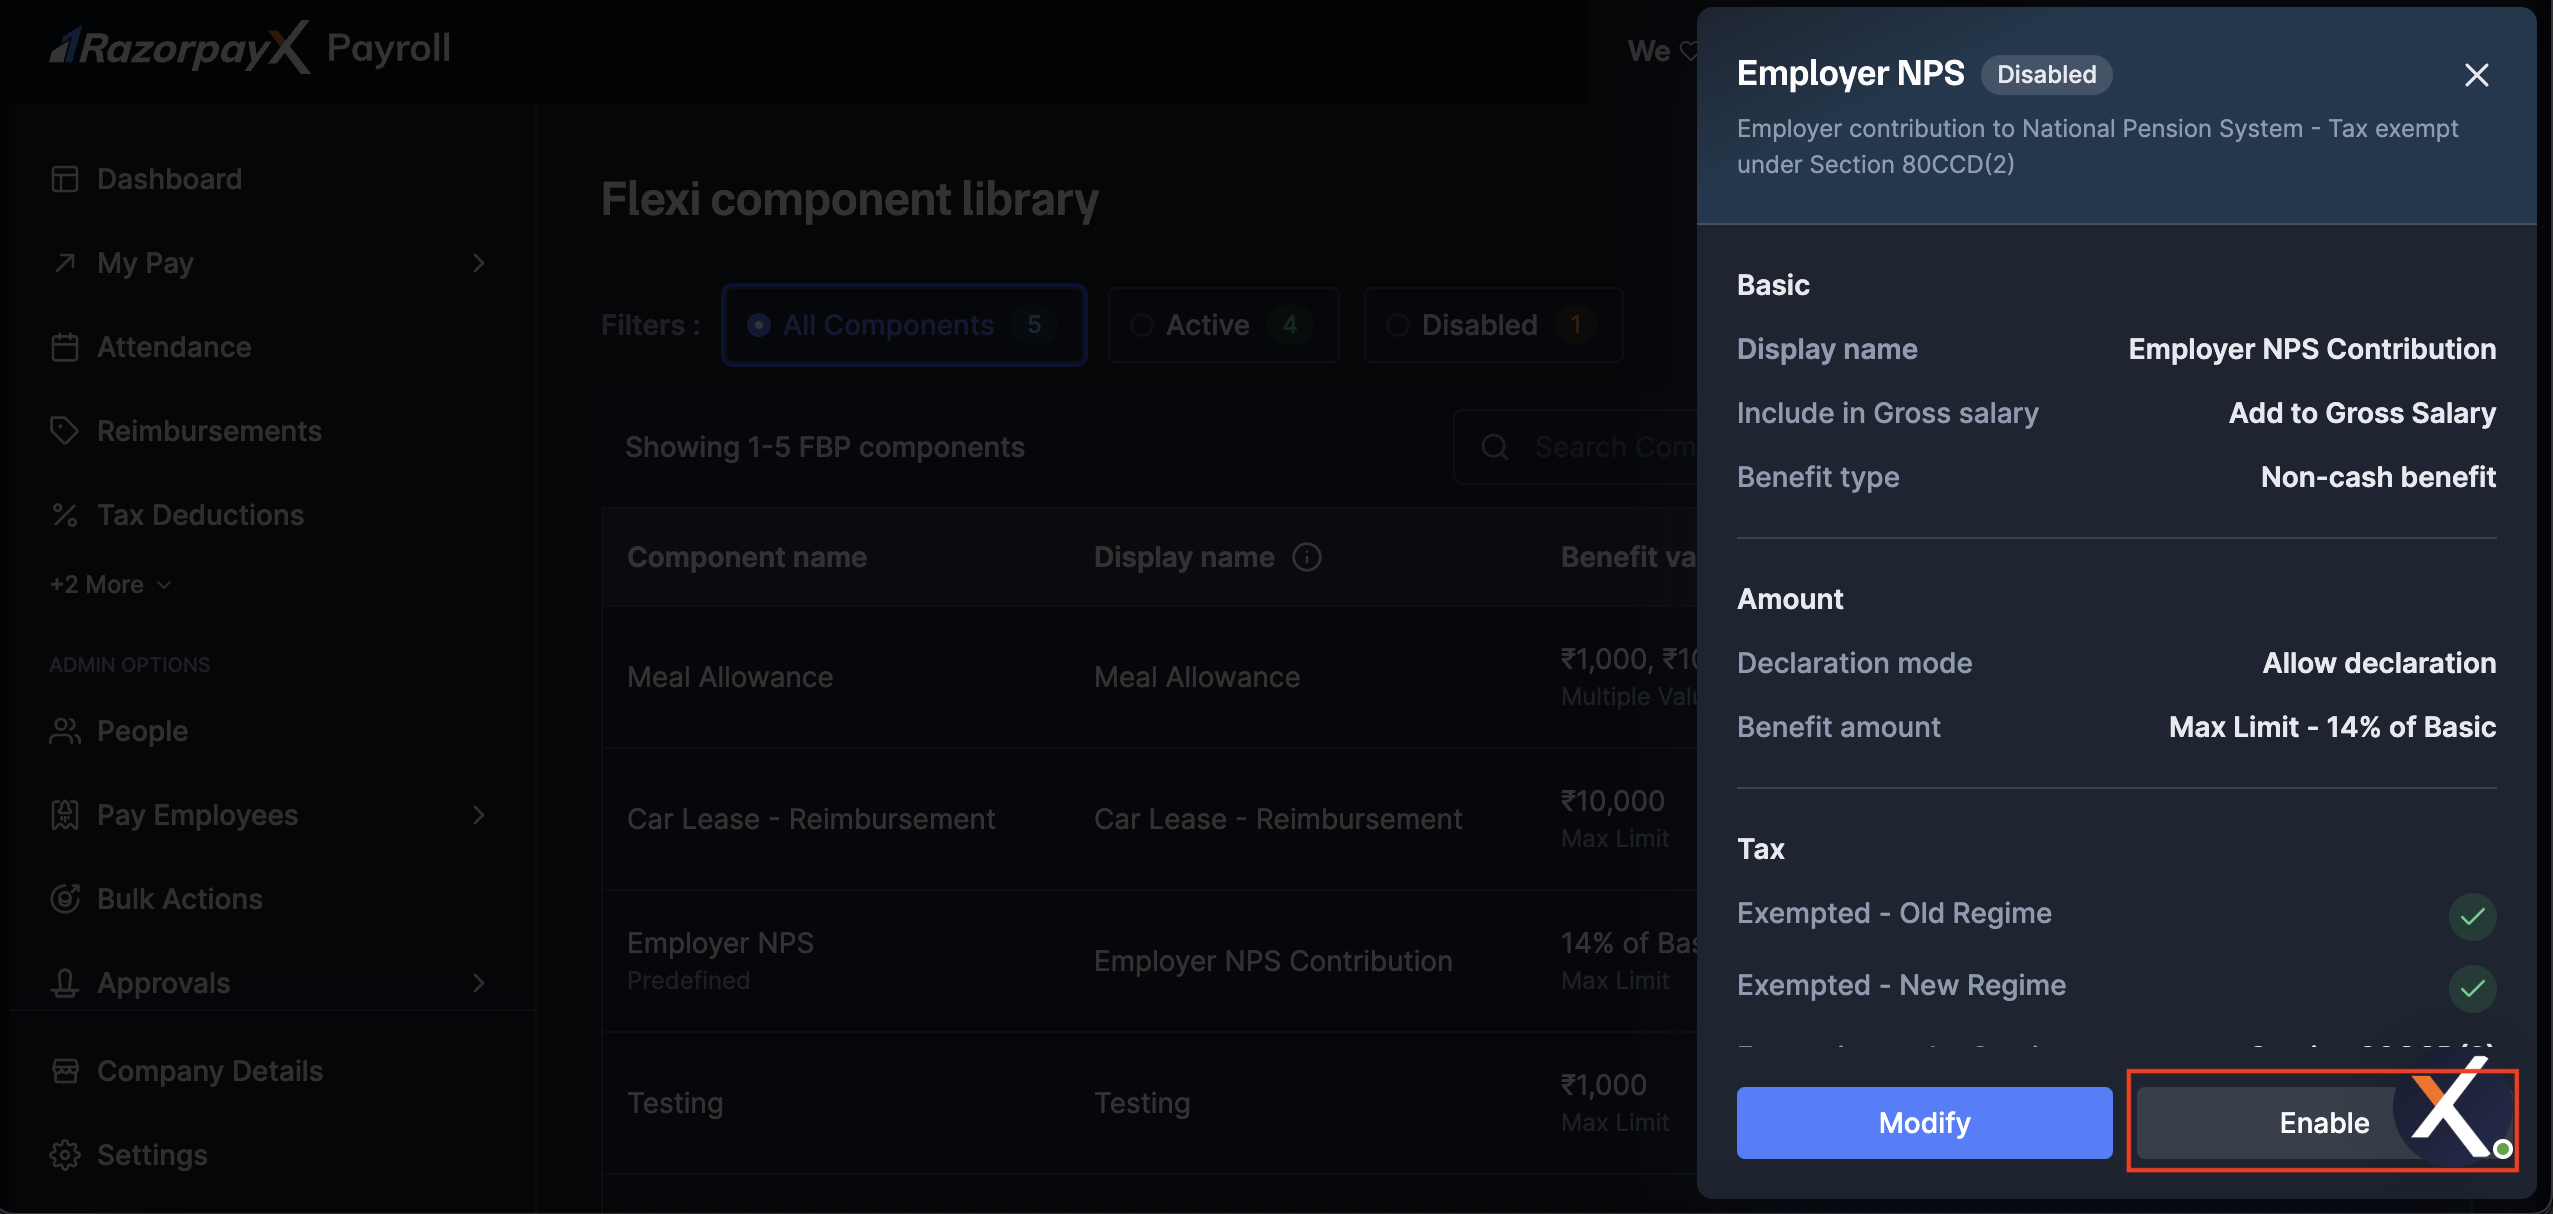 4. A confirmation dialog appears: *Once enabled, you can add the component to an active employee's compensation.* Click **Enable Now** to confirm.
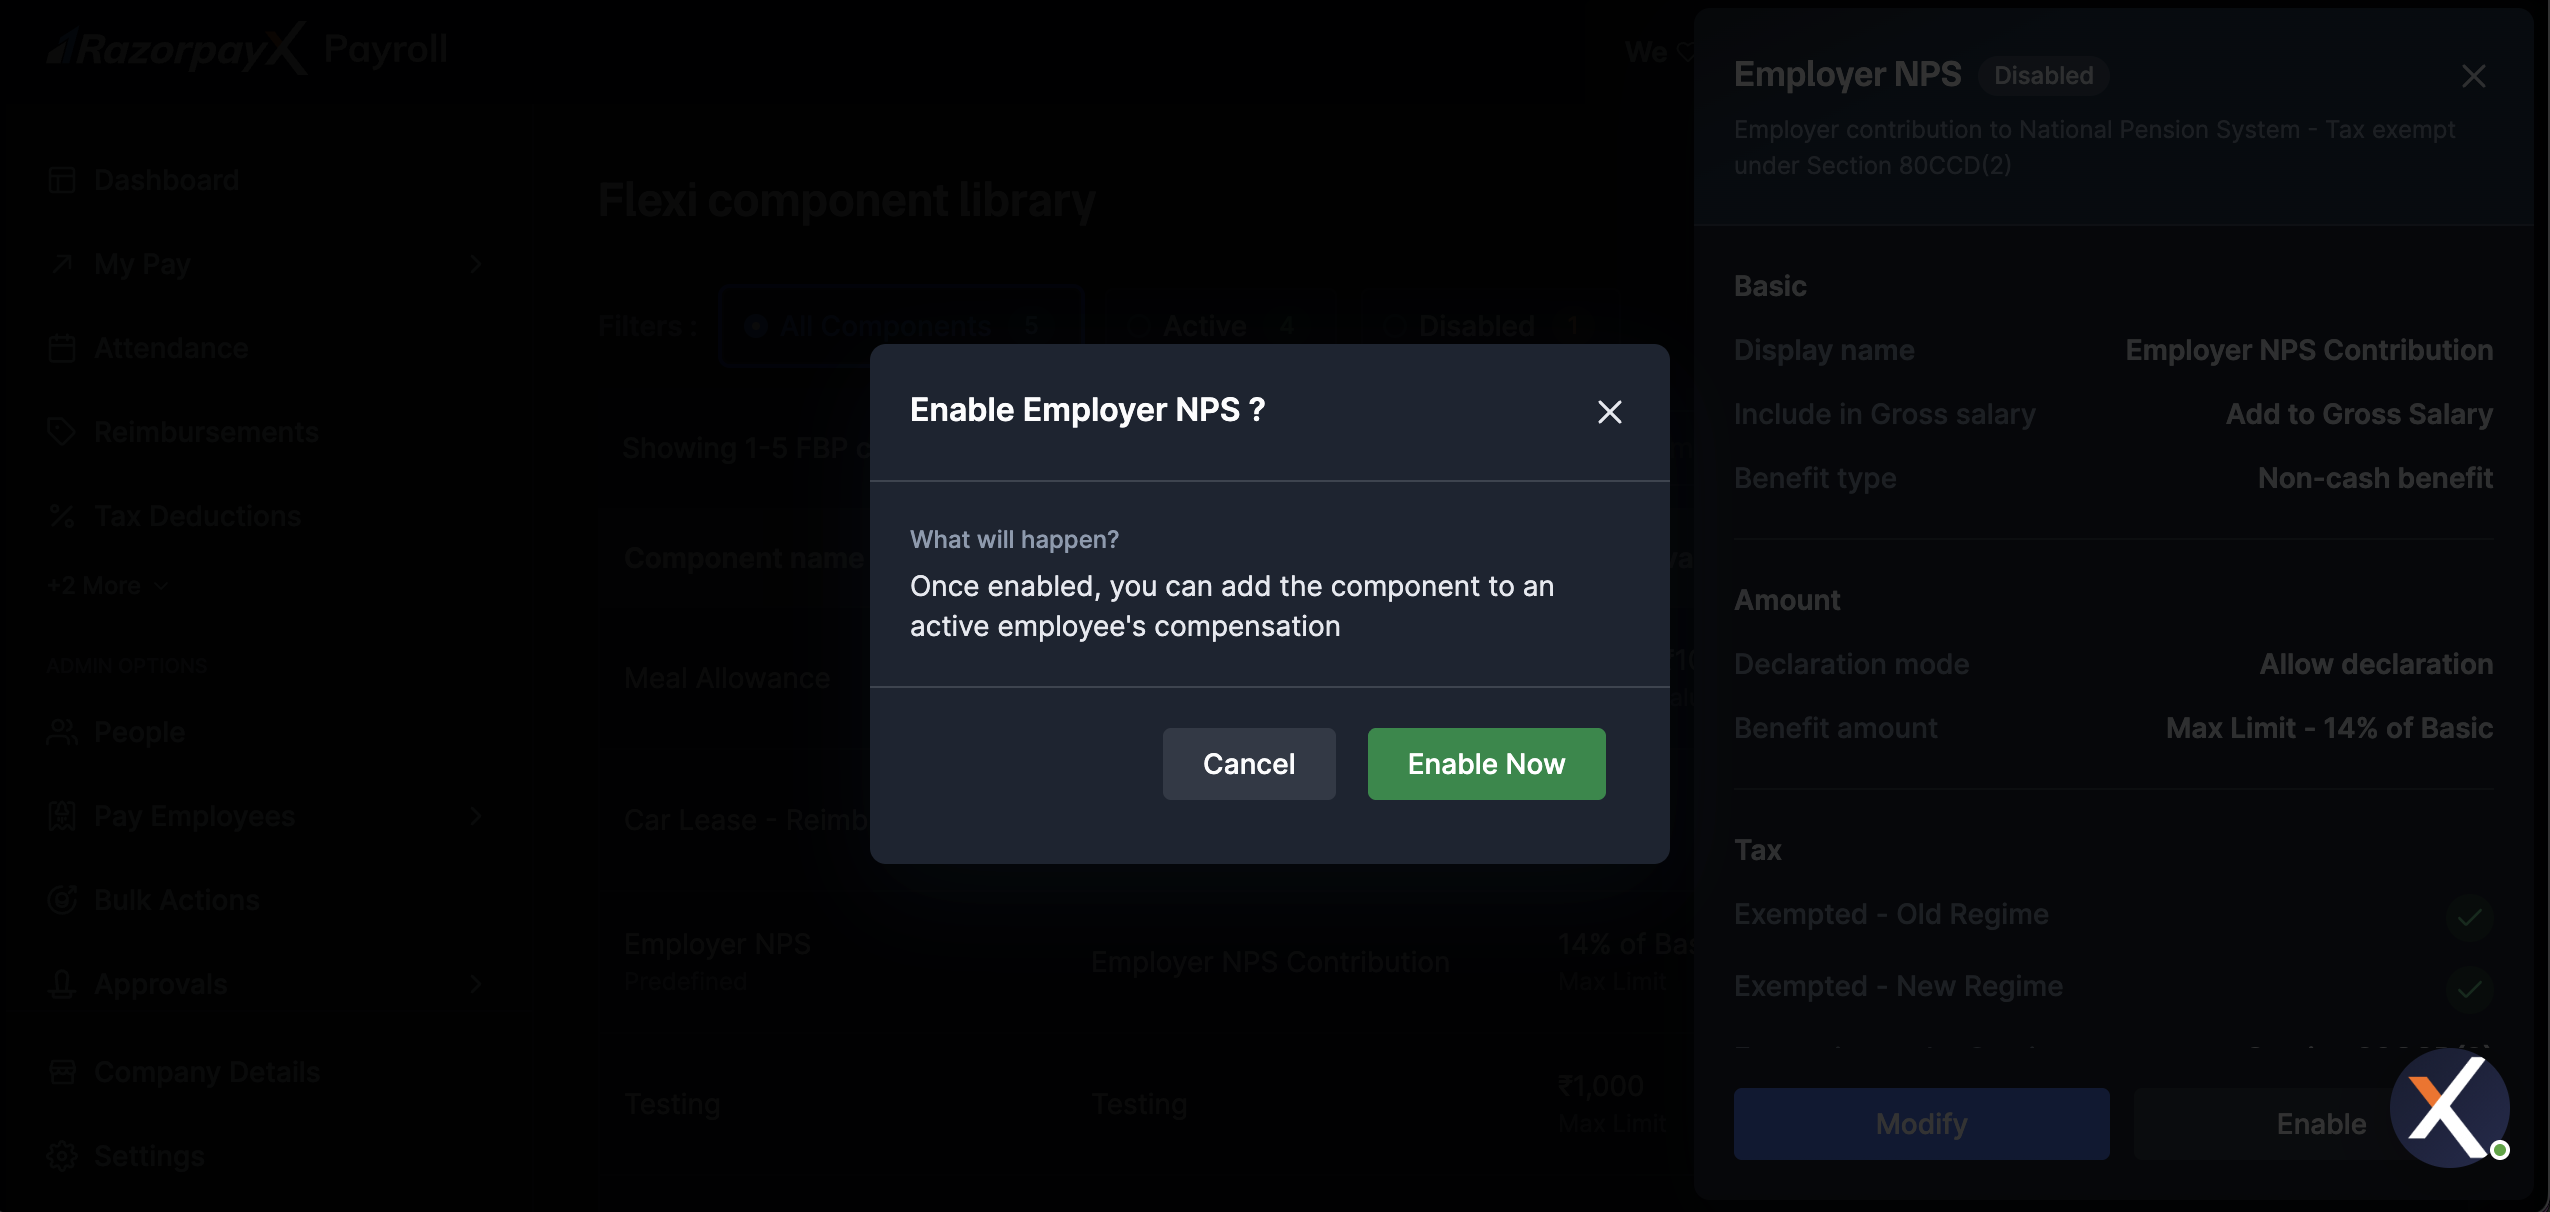 Employer NPS is now active and can be added to any active employee's compensation as part of their flexi benefits.
Disable the component to stop it from being assigned to new employees. Employees who already have Employer NPS in their compensation are not affected.
1. On the **Flexi component library** page, hover over the **Employer NPS** row and click **View Details**.
2. In the side panel, click **Disable**.
**Watch Out!**
A component that is currently part of an employee's compensation cannot be removed retrospectively by disabling it. Disabling only prevents the component from being added to future payroll.
### Related Information
* [Salary Setup](/docs/payroll/salary)
* [Default Salary Structure](/docs/payroll/account#setup-default-salary-structure)
* [Salary Component Library](/docs/payroll/component-library)
* [Declare Flexible Benefits (Employees)](/docs/payroll/employees/declarations/flexible-benefits)
Employer NPS is now active and can be added to any active employee's compensation as part of their flexi benefits.
Disable the component to stop it from being assigned to new employees. Employees who already have Employer NPS in their compensation are not affected.
1. On the **Flexi component library** page, hover over the **Employer NPS** row and click **View Details**.
2. In the side panel, click **Disable**.
**Watch Out!**
A component that is currently part of an employee's compensation cannot be removed retrospectively by disabling it. Disabling only prevents the component from being added to future payroll.
### Related Information
* [Salary Setup](/docs/payroll/salary)
* [Default Salary Structure](/docs/payroll/account#setup-default-salary-structure)
* [Salary Component Library](/docs/payroll/component-library)
* [Declare Flexible Benefits (Employees)](/docs/payroll/employees/declarations/flexible-benefits)