> ## Documentation Index
> Fetch the complete documentation index at: https://razorpay-881012b3.mintlify.site/llms.txt
> Use this file to discover all available pages before exploring further.
# Setup Provident Fund (PF)
> Set up and process provident fund calculations in RazorpayX Payroll.
Available in🇮🇳 India
[Employee Provident Fund (EPF)](https://razorpay.com/payroll/learn/employee-provident-fund-epf-scheme/) is a joint contribution made by both the employer and the employee. The employer contributes 12% of the employee’s basic salary and dearness allowance to PF. It is mandatory for all organisations to allocate EPF as part of an employee’s CTC.
Know how PF is calculated.
Check how to set up Provident Fund for your organisation in Payroll.
Employers and organisations qualify to contribute to EPF when any of the following conditions is true:
* The employee earns less than ₹15,000 per month.
* EPF is also available for employees earning more than ₹15,000.
* The employee has contributed to PF before through any past employer.
* The company has more than 20 employees.
Organisations under 20 employees are not mandated to contribute to the EPF. However, such an organisation can still enable it voluntarily.
PF Wages refer to the employer's contribution to EPF and basic salary. It is calculated basis the employee's basic salary and allowances (excluding HRA).
* If employee's basic salary is less than ₹15,000, PF Wages = Gross Pay (Basic + (Dearness Allowance) DA + Special allowances) - HRA
* If employee's basic salary is more than ₹15,000, PF Wages = Dearness Allowance
* If employee's basic salary is more than ₹15,000, and you [enforce PF upper limit](#setup-pf) of ₹15,000, PF Wages = ₹15,000.
This means that employers contribute a percentage of ₹15,000 towards EPF.
The total 12% contribution from employer is divided into multiple categories. They include:
| Category | Percentage of contribution from PF Wages (%) |
| ------------------------------------------------ | -------------------------------------------- |
| Employee Provident Fund | 3.67% |
| Employee Pension Scheme (EPS) | 8.33% |
| Employee’s Deposit Link Insurance Scheme (EDLIS) | 0.5% (Upper limit: ₹75) |
| EPF Admin Charges | 0.5% (No upper limit) |
| EDLIS Admin Charges | 0.01% |
Employer's contribution to PF is only 3.67%. The remaining amount is added to Employee Pension Scheme (EPS).
The employee's contribution of 12% is added entirely to the Employee's Provident Fund (EPF).
**Watch Out!**
As of 2019, all allowances, excluding the House Rent Allowance (HRA), are considered PF wages. PF contribution must be calculated as the sum of basic salary and all other allowances, after excluding HRA.
In specific cases, the employer can contribute only 10% to EPF instead of 12%. This is when:
* The number of employees is less than 20.
* The company incurs more losses than its net worth.
* The company is involved in the beedi, jute, brick, guar gum and coir industries.
To bridge the gender gap, some companies contribute 8% of new women employees' contribution towards EPF while maintaining 12% of the employer's contribution.
## Setup PF
You must set up PF organisation on the Payroll Dashboard to collect employee information and process PF.
**Watch Out!**
* By default, Payroll calculates PF on all wages (except HRA). You can change this configuration. However, Payroll is NOT responsible for any compliance issues resulting from this. Know more about [PF Calculation](#how-pf-is-calculated).
* Ensure you set up PF for your organisation before adding employees.
1. Log in to the [Payroll Dashboard](https://payroll.razorpay.com/dashboard).
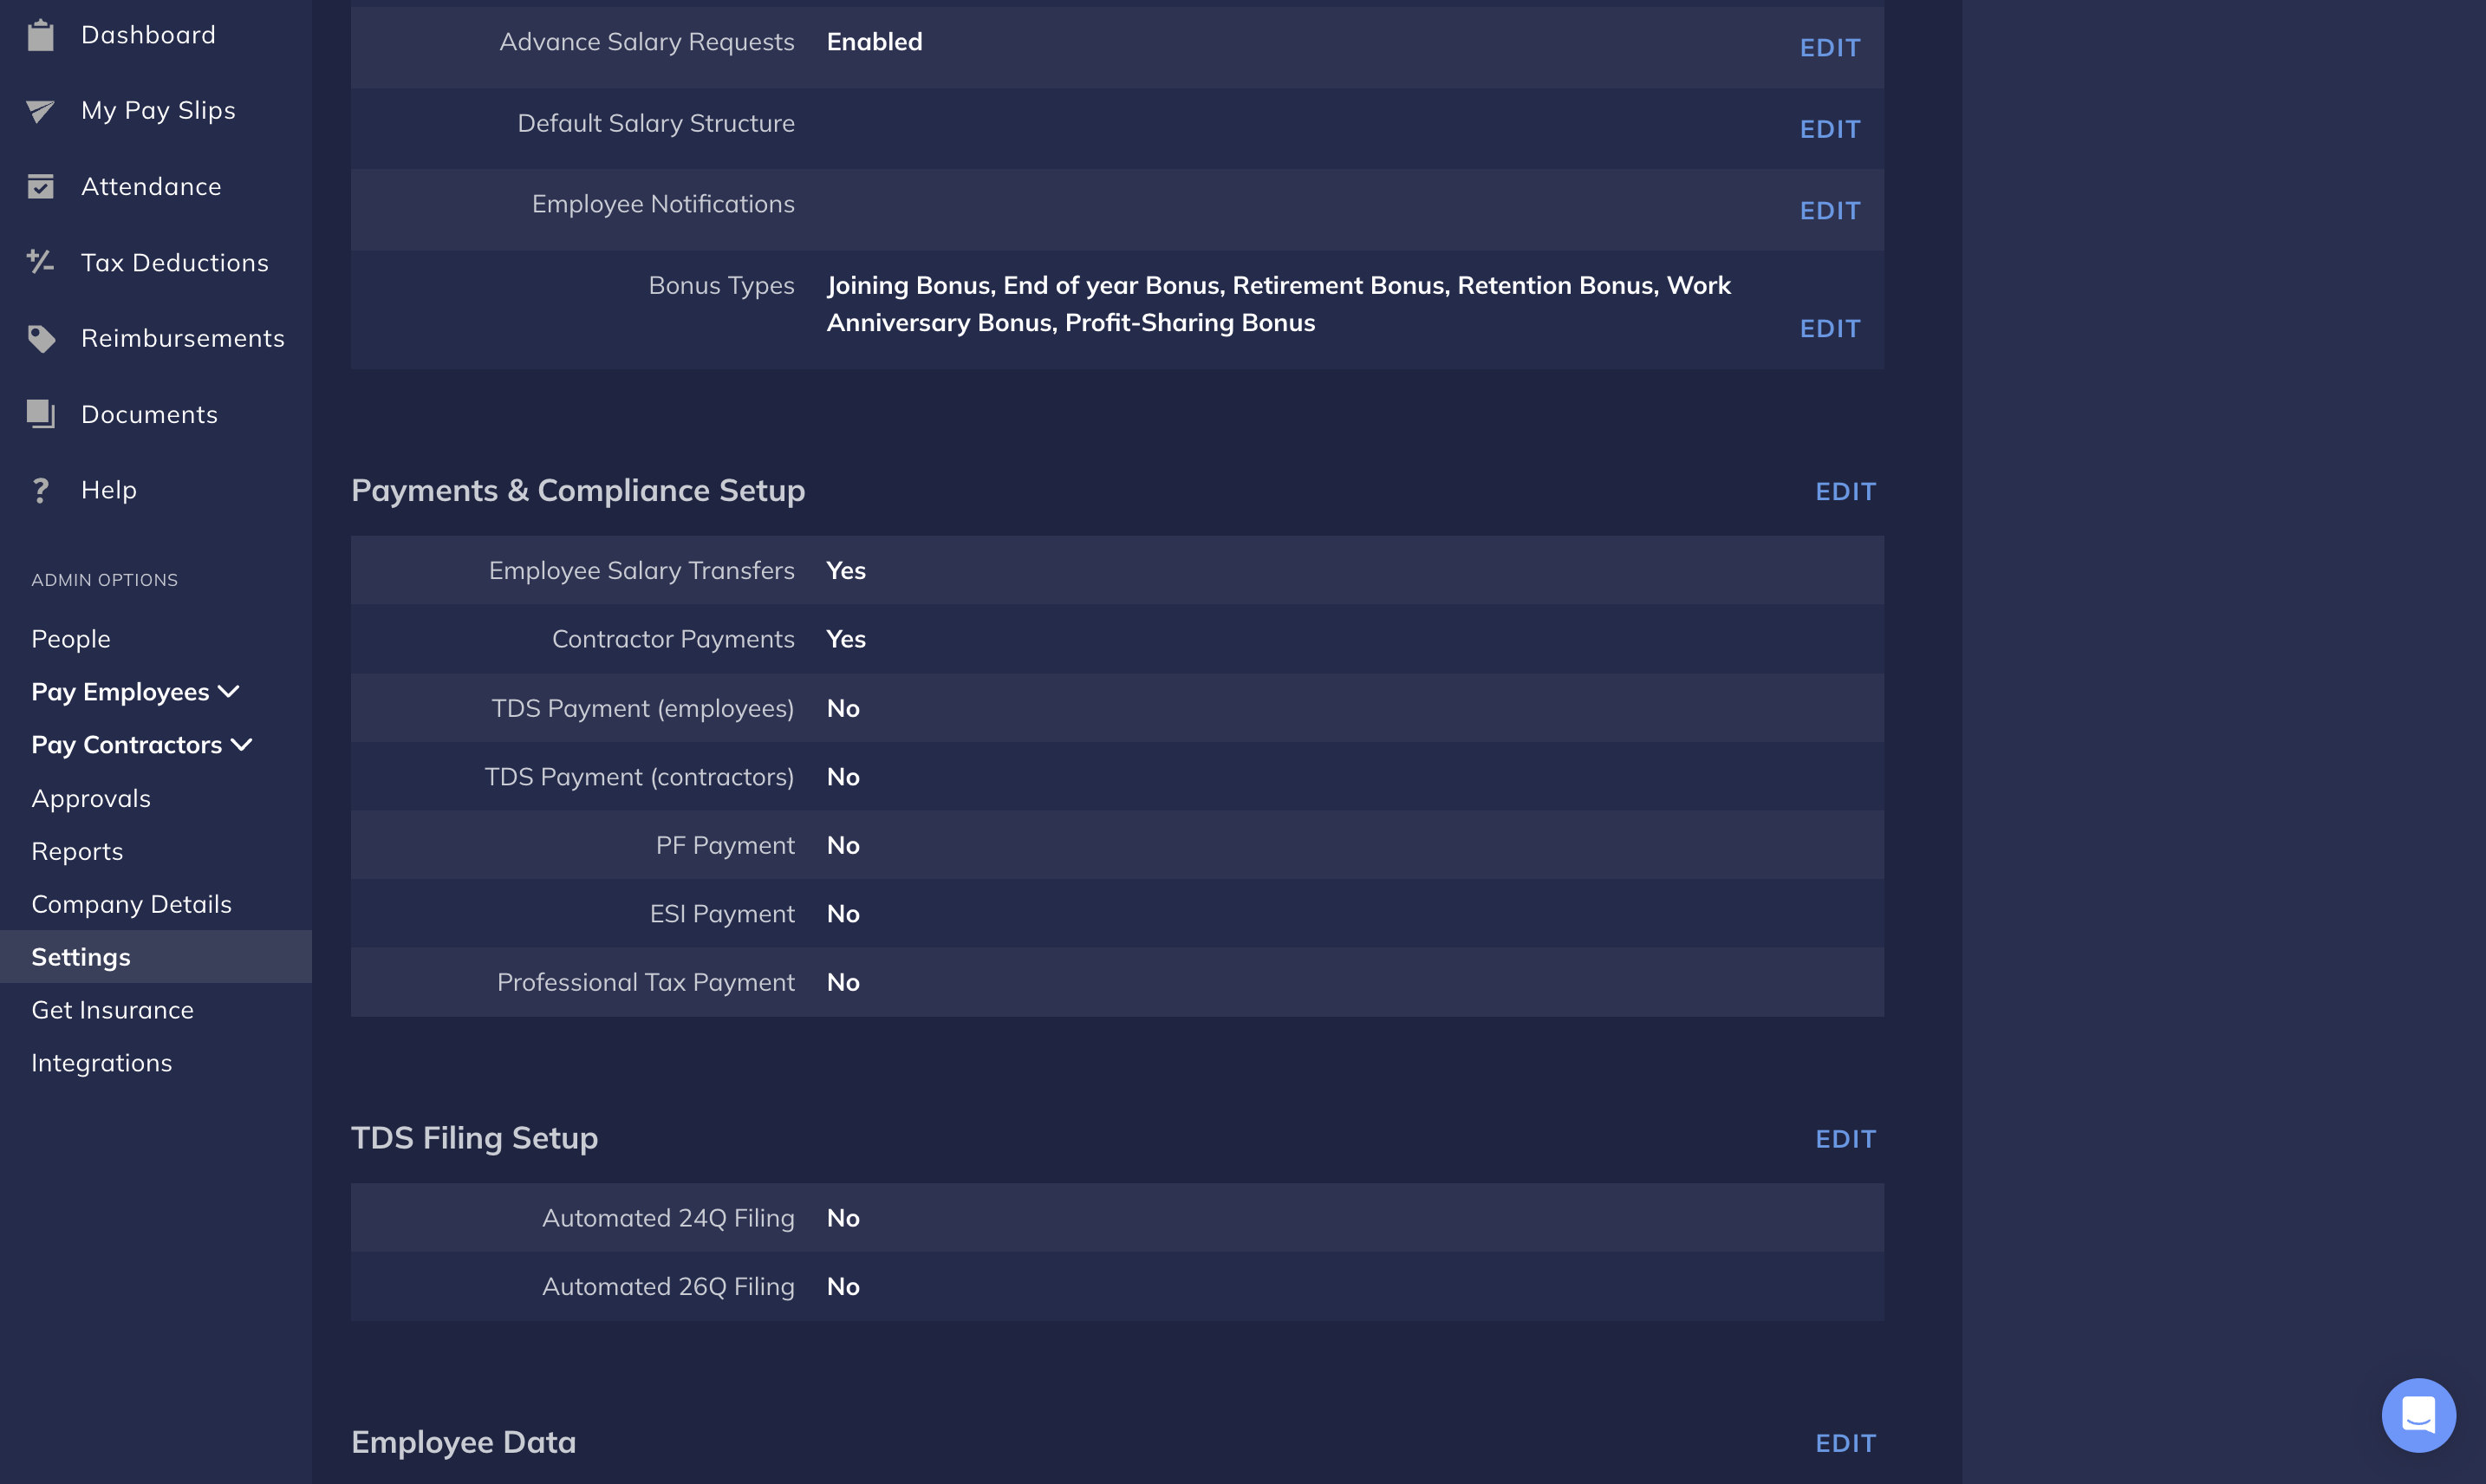
2. Go to **Settings** → **Payments & Compliance Setup**. Click **EDIT**.
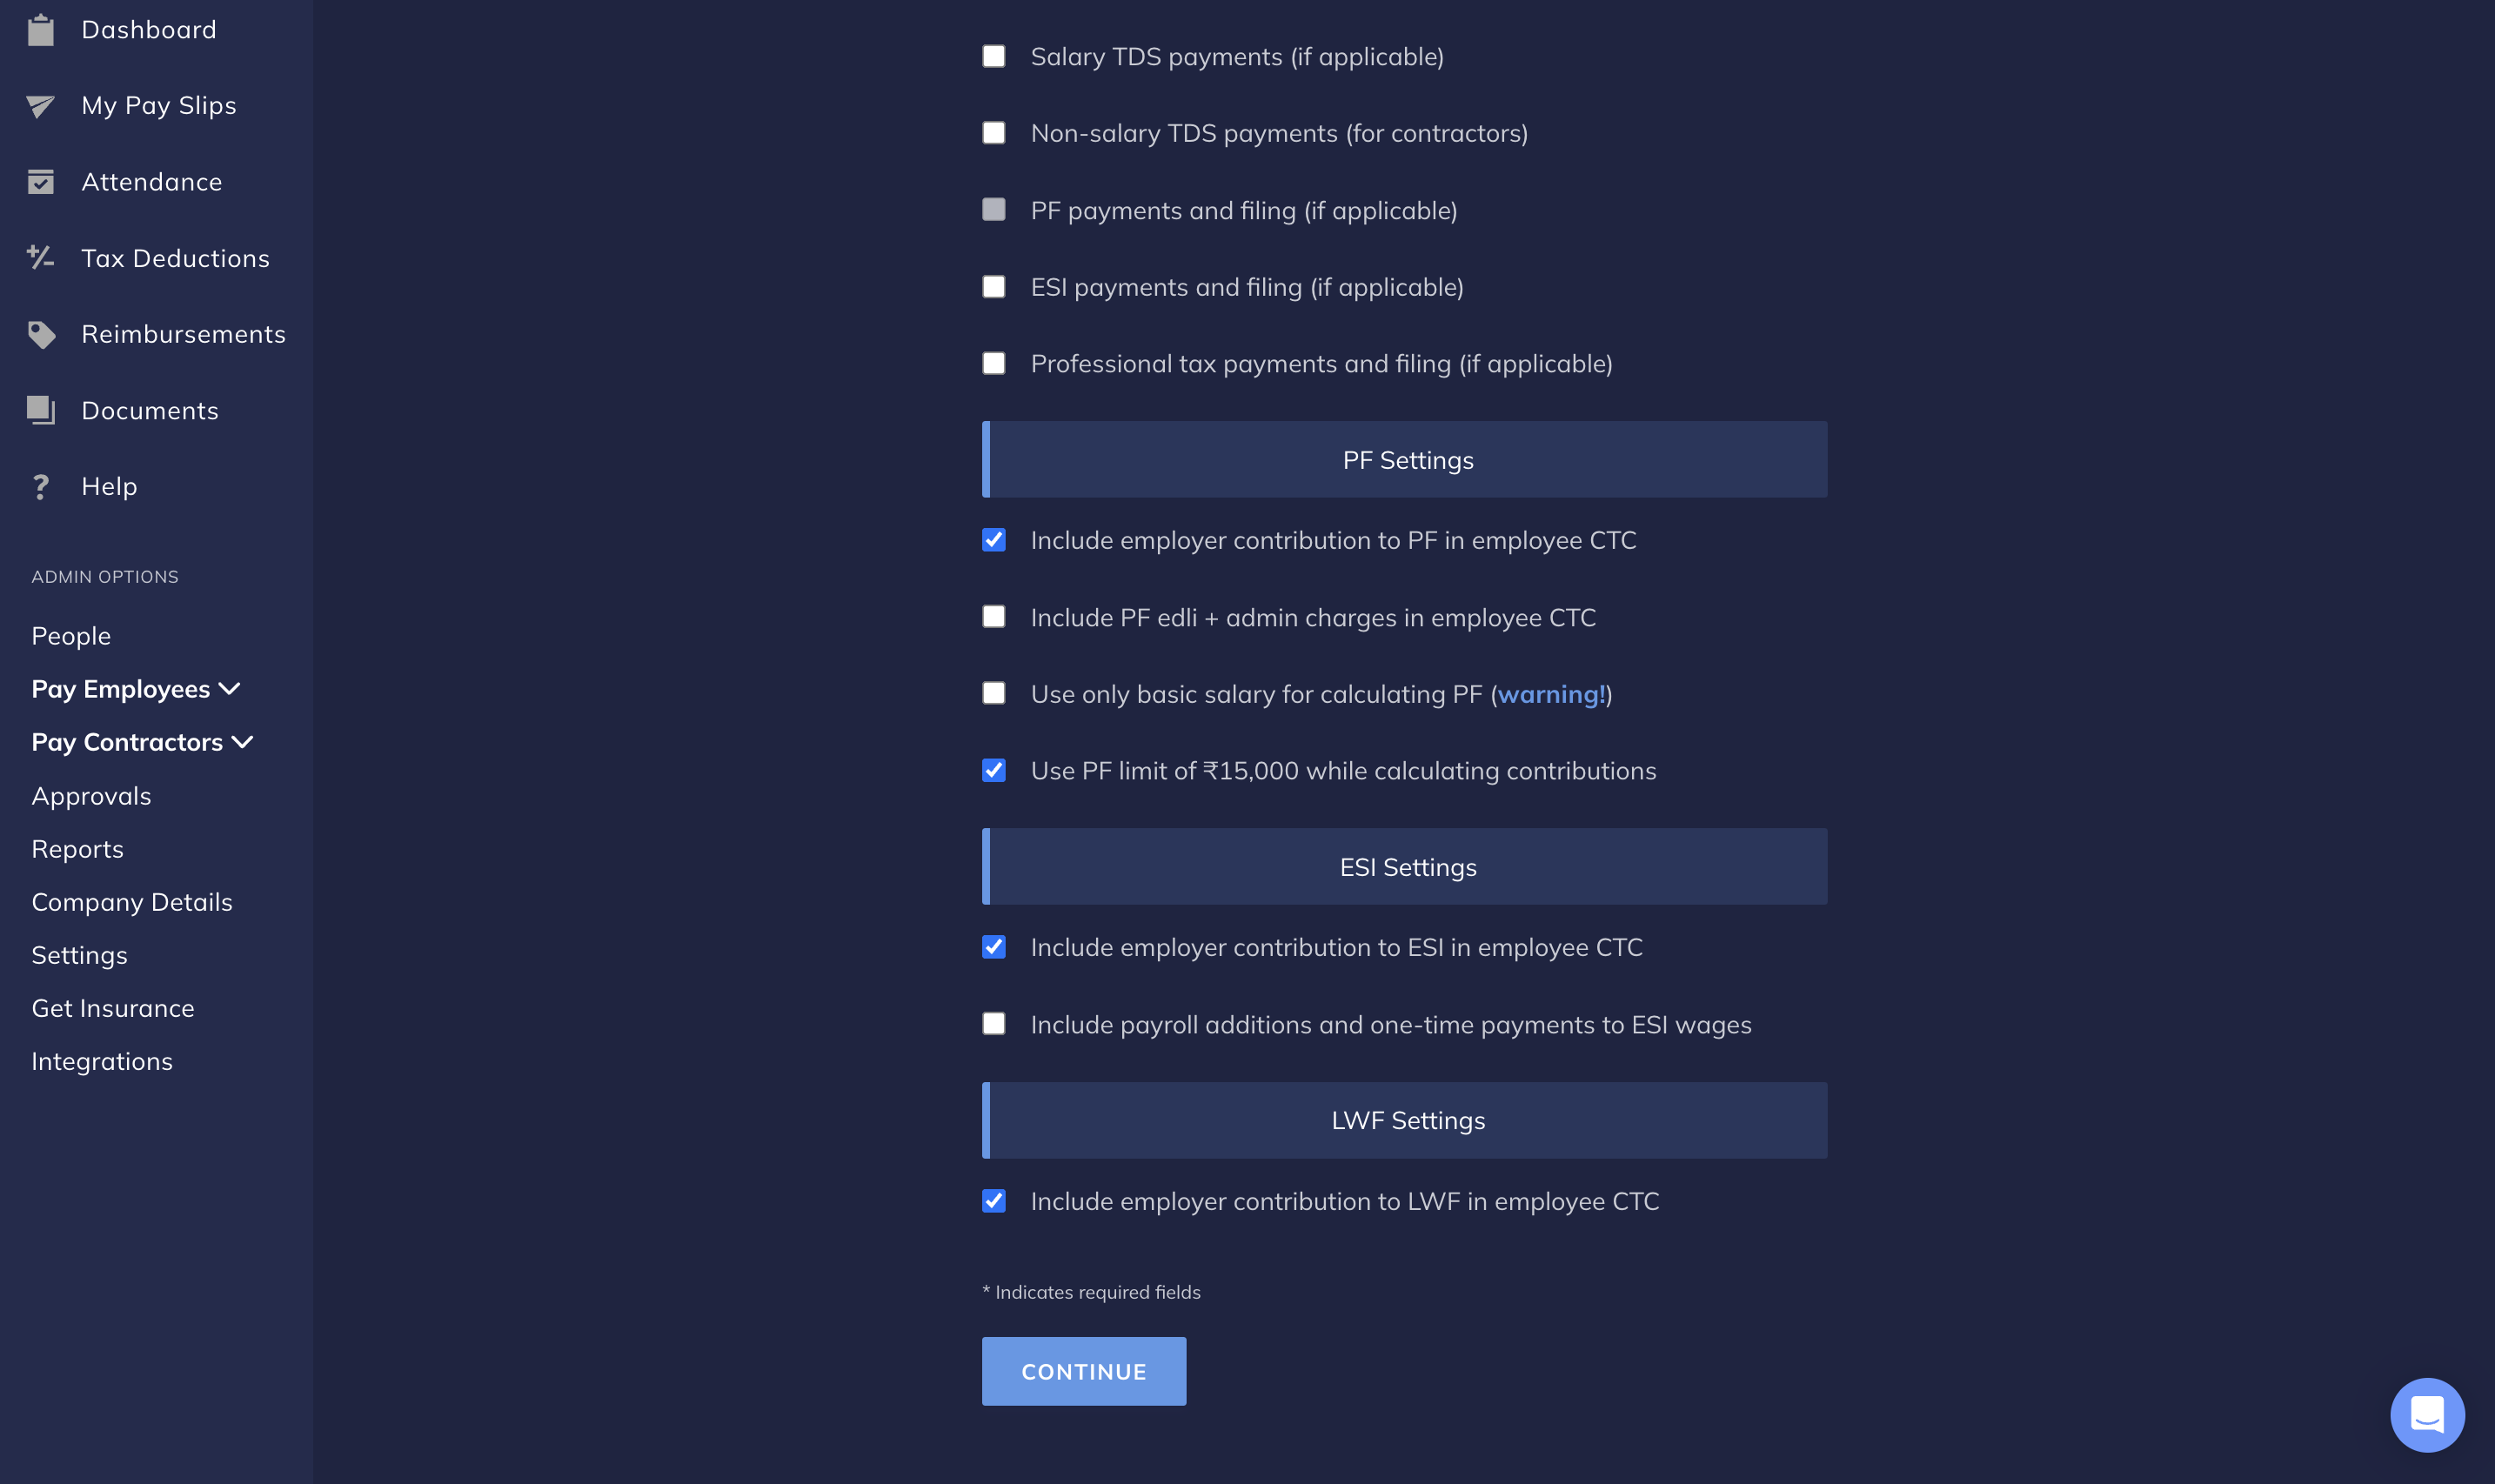
3. On the **Payments Settings** page, navigate to the **PF Settings** section.
4. Select the relevant check boxes to enable or disable PF Settings. You can choose to:
* Include [employer's contribution](#how-pf-is-calculated) in employee's CTC.
* Include PF EDLI and [admin charges](#additional-charges) in employee's CTC.
* Use only basic salary to calculate PF.
* Use PF limit as ₹15,000 when calculating PF contributions.
1. Click **CONTINUE**.
You have successfully set up PF payments for your organisation and employees.
## Register Employees
You must register your employees for PF individually. You can register employees for Provident whose UAN is already available, and generate UAN for new employees as well.
There are two steps to individually register employees for Provident Fund:
To configure employee-level PF settings:
1. Log in to the [Payroll Dashboard](https://payroll.razorpay.com/dashboard).
2. Navigate to **People** from the left menu.
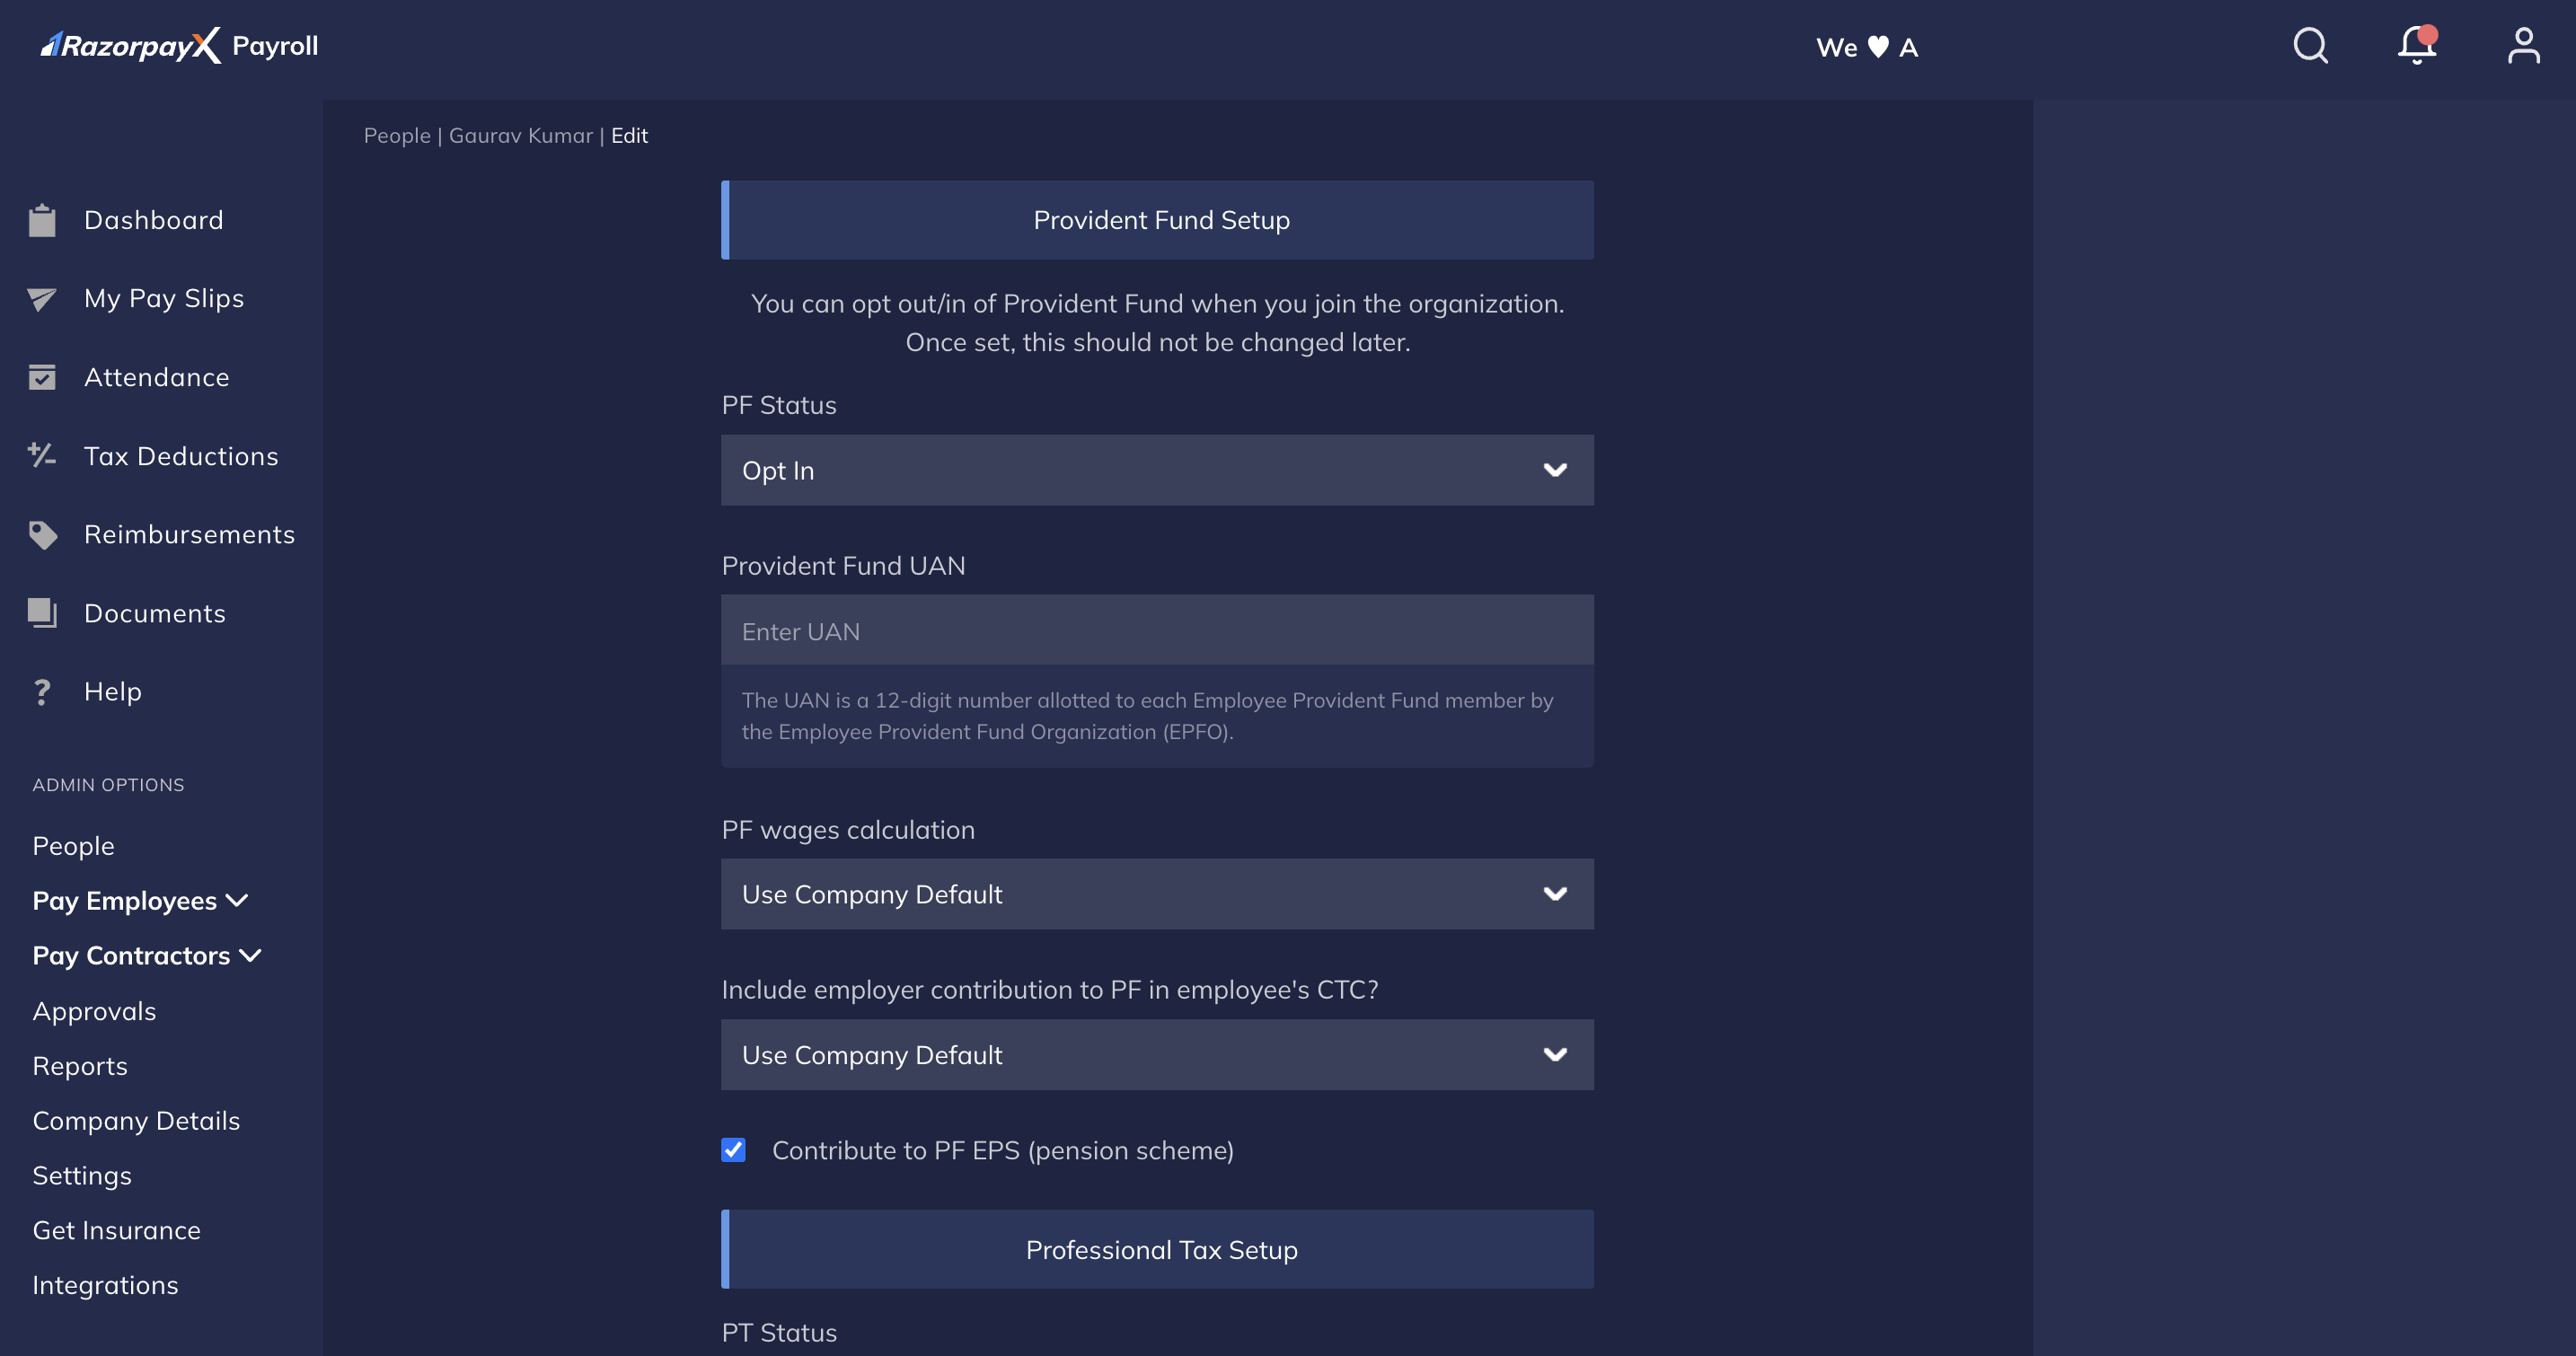
3. Open the employee's profile and navigate to **Provident Fund, Professional Tax & ESI**. Click **EDIT**.
4. In **PF Status**, select **Opt In**. Enter the UAN in the **Provident Fund UAN** text box.
If the employee does not have a UAN, follow the steps to register employees for PF on the EPFO portal.
5. Click **CONTINUE**.
This saves the employee's UAN on the Payroll Dashboard.
The Employees' Provident Fund Organisation (EPFO) has **mandated Digital Signature Certificate (DSC) registration** for all establishments. In the absence of a registered DSC, **RazorpayX Payroll** will be unable to process your PF filings, and contribution processing for your employees will be blocked. We request you to kindly complete the DSC registration at the earliest to ensure uninterrupted PF compliance.
**Watch Out!**
If you’ve already registered your DSC and it is working for filings, no further action is needed. To verify your registration, visit the EPFO Unified Portal and navigate to **Establishment > DSC/e-sign > View Registered DSC** details first.
#### Prerequisites
Before beginning the DSC registration process, ensure you have:
1. **Digital Signature Certificate:** Class 2 or Class 3 DSC of the authorised signatory
2. **DSC Token and PIN:** Physical USB token containing your DSC
3. **DSC Driver Software:** Installed from the CD provided by your Certifying Authority
4. **Java Environment:**
* Java installed (recommended: Java 8 Update 151 or 161)
* Java security settings configured to allow EPFO site
5. **Browser Compatibility:**
* Internet Explorer 11 or Microsoft Edge in IE Mode (recommended)
* Mozilla Firefox ESR is also supported
6. **Scanned Documents:** All required documents ready in digital format
7. **Update EPFO Form 5A:**
* Make sure the authorised signatory's details are up to date in the "Ownership Details" section.
### Registration Process
The DSC registration process for EPFO includes logging into the Employer Portal, updating and filing Form 5A, preparing and submitting the necessary signed documents and completing DSC registration upon approval of Form 5A.
Take a look at the detailed steps below to complete your DSC registration smoothly:
#### Login to EPFO Employer Portal
1. Visit [EPFO Unified Portal](https://unifiedportal-emp.epfindia.gov.in/epfo/)
2. Select "Employer Sign In"
3. Enter your Establishment ID and Password to login
#### Form 5A Filing and Document Preparation
**Start Filing Form 5A**
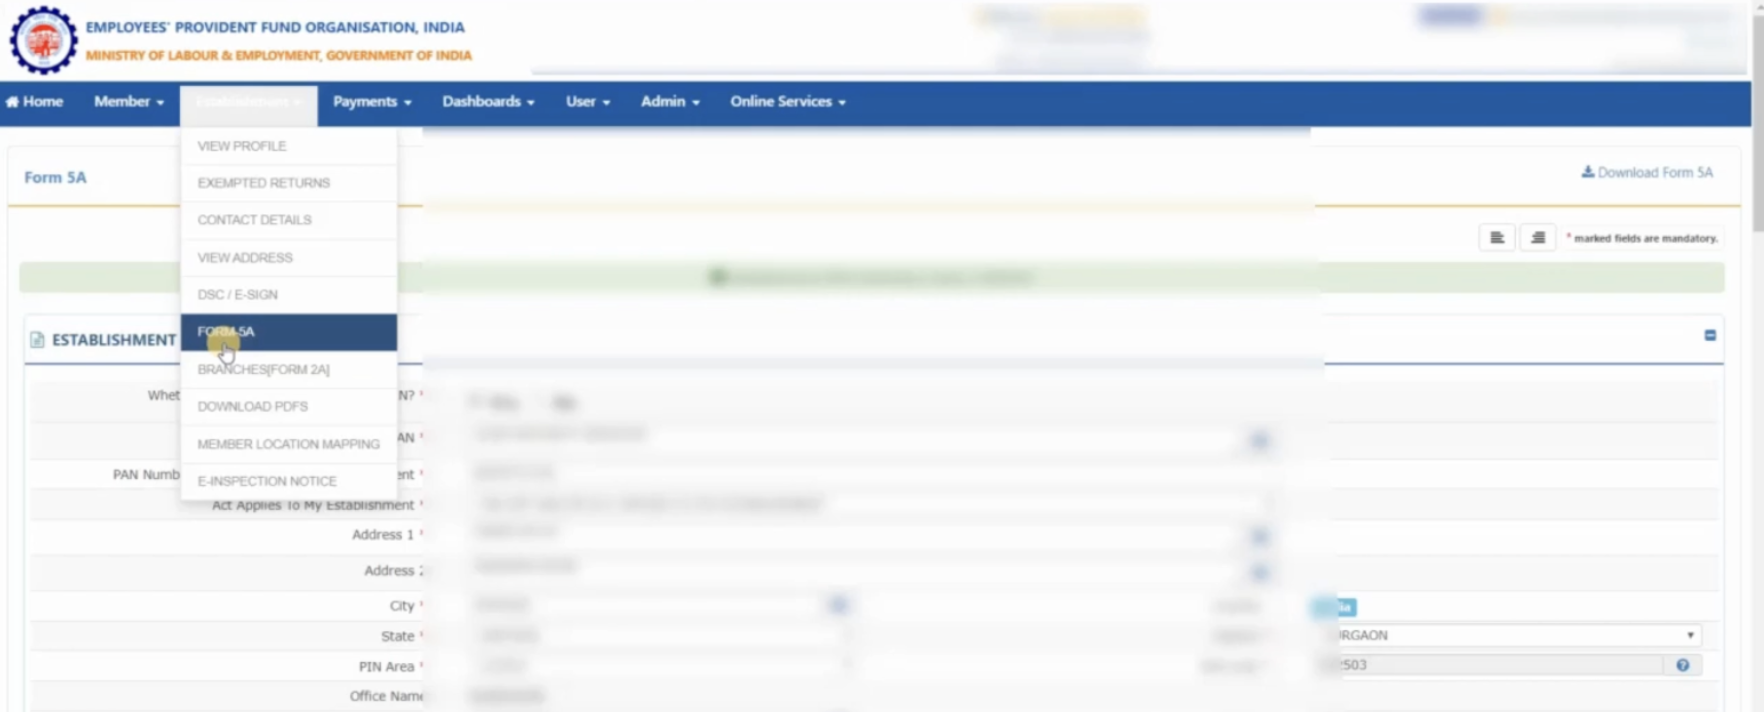
1. Navigate to **Establishment → Form 5A**
2. Verify and update the following:
* Establishment details
* Owner/Director details (must match MCA records)
* Bank details (upload cancelled cheque with company name printed)
3. Authorised signatory details:
* Name (must match exactly with the DSC)
* Designation
* PAN
* Mobile Number
* Email ID
4. Click Save and download Form 5A preview in PDF format
**Preparation of Physical Documentation**
**Watch Out!**
* All signatures must be physical and original (no digital/e-signatures allowed at this stage).
* Use blue ink for all signatures.
* All documents must bear the company seal/stamp.
| Document | Requirements |
| -------------------------------- | ----------------------------------------------------------------------------------------------- |
| **Form 5A** | Printed on letterhead and signed by all directors and company seal on it. |
| **DSC Registration Letter** | Signed by Authorised Signatory and Directors with Company Stamp. |
| **Aadhaar Copies** | Aadhar copies of all directors and to be Signed by all directors along with company seal on it. |
| **PAN Copies** | PAN copies of all directors and to be Signed by all directors along with company seal on it. |
| **Cancelled Cheque** | Must have company Name Printed. |
| **GST Registration Certificate** | Signed by all directors and stamped. |
| **Certificate of Incorporation** | Signed by all directors and stamped. |
| **Company PAN Card** | Signed by all directors and stamped. |
**Watch Out!**
* EPFO authority verification and approval may take up days.
* Track status regularly through the Employer Portal.
* No digital transactions can be processed until approval is granted.
#### Post-Approval: DSC Registration on EPFO
After receiving approval for Form 5A:
1. Login to EPFO Employer Portal.
2. Insert your DSC Token into your computer.
3. Navigate to **Establishment → DSC/eSign → Register Certificate.**
4. Select the authorised signatory's name from the dropdown list (as per Form 5A).
5. The system will launch a **DSC Signer Utility** (Java applet).
6. Allow the Java applet to run when prompted.
7. Select your DSC from the list of certificates displayed.
8. Enter your DSC token PIN when prompted.
9. Upon successful verification, a confirmation message will appear.
10. Download and save the PDF acknowledgment for your records.
#### Authorised Signatory Requirements
The DSC must belong to the **appropriate authorised signatory** based on your organisation type:
| Organisation Type | Signatory |
| ------------------------------------ | -------------------------------------------------- |
| **Sole Proprietorships** | Business owner/proprietor |
| **Partnership Firms** | Any designated partner |
| **Private/Public Limited Companies** | Director or Managing Director |
| **Trusts/Societies** | Authorised trustee or office bearer |
| **Any Organisation Type** | Individual legally authorised to sign PF documents |
When a new employee joins your organisation, you must either generate a UAN for that employee or map their existing UAN to your organisation.
Read the documentation below or watch the video tutorials on how to:
To register employees for PF on the EPFO portal:
1. Log in to the EPFO portal using your credentials. You can also retrieve your credentials from **Company Details** → **External Credentials** on the Payroll Dashboard.
2. Enter the OTP sent to your registered mobile number to authenticate your log in.
3. On the EPFO website, navigate to **Member** in the top menu. Click **REGISTER INDIVIDUAL** in the drop-down menu.
4. On the **Member Registration** page and section:
* Select the **Yes** option for **Previous Employment/UAN** if the UAN if is already available for the employee.
* Select the **No** option to register the employee for PF.
1. Provide the employee's identity details such as **Name** and **Date of Birth** as on Aadhaar, **Gender**, **Father/Husband's Name**, **Nationality**, **Religion**, **Marital Status** and more.
2. Enter the **Date of Joining** and **Monthly EPF Wages as on Joining**. The monthly wages are as decided during [PF setup](#setup-pf).
5. In the KYC Details section, select the **Document Type** to verify employee details. Employee's Aadhaar is mandatory.
1. Select the check boxes for the documents you choose to upload.
2. Enter the **DOCUMENT NUMBER**. For Aadhaar, you must enter the employee's Aadhaar number.
3. Enter the **Name as per Document**.
6. Select the check box to affirm that you have the employee's consent to upload the above information. Click **Save**.
This completes the registration process. Employee's details are now moved to the **Member details pending for approval section**. You can also edit or delete the registration as necessary. You must now approve the changes.
1. Navigate to **Member** in the top menu. Click **APPROVALS**.
2. On the **Pending** page, review the details and click **Approve**.
You have successfully registered your employees for PF via your organisation. Add the UAN on the employee's profile on the Payroll Dashboard.
## Manage PF Payments
PF contributions on Payroll are calculated as 12% of **all fixed wages (except HRA)**. You can set a PF capping to see how the 12% calculation reflects as part of the basic salary.
When enabled, Payroll will cap the fixed wages at ₹15,000. The maximum contribution calculated by Payroll will be 12% of ₹15,000, which is ₹1,800. This ₹1,800 will be deducted from the employee's salary and credited to their PF account.
If you have not set a cap, the Payroll will calculate PF at 12% of basic salary, assuming it is above ₹15,000.
Employers’ contribution towards PF can be greater than 1%, depending on whether you choose to include and [allocate EDLI and admin charges](#setup-pf) in the employee’s CTC.
The EPFO imposes a minimum of ₹500 as administration charges. If you have fewer than 7 employees, Payroll charges you this amount separately.
Your organisation must make Provident Fund contribution payments on or before the 15th of the following month. For example, your January contribution to EPF must happen before February 15.
If the PF payment is pending, EPFO sends notices with delayed amount payable under Damages (Section 14B) and Interest (Section 7Q). These delays occur due to the following reasons:
In some cases, new/existing employees' PF registration may be pending. Even though the salary is processed, the PF payment remains on hold due to incomplete PF/UAN information. Know more about [enabling compliances](/docs/payroll/quickstart#enable-compliances).
To resolve this:
1. Log in to the [Payroll Dashboard](https://payroll.razorpay.com/dashboard).
2. Go to **People** from the left menu → employee/s profiles → **Provident Fund, Professional Tax, ESI & LWF**.
Check the status of your employee/s PF registration and ensure you complete it before the payroll execution date of the respective month.
Delayed salary processing can create delayed PF payments as the PF payment is made after the PF contribution due date (15th of the following month). For example, PF payment due for January 15 and is paid on January 20 creates delays in the PF payments.
To resolve this:
1. Log in to the [EPFO portal](https://unifiedportal-emp.epfindia.gov.in/epfo/).
2. Navigate to to the **PAYMENTS** page from the drop-down menu on the portal.
3. Click **Prepare 7Q-14B Challan** against **Damages and Interest** in the **ECR Quick Links** table and pay the delayed PF payments amount.
Due to recent changes in the EPFO portal, payroll finalisation will now be automatically skipped for employees where Employee and Employer PF contributions do not match exactly.
The Employee PF contribution and Employer PF contribution must match **exactly to the rupee**. Even a ₹1 difference will cause the employee's payroll finalisation to be skipped.
For example:
| | Scenario | Employee PF | Employer PF | Match Status | Result | |
| - | --------------- | ----------- | ----------- | ------------- | ---------------- | - |
| | **✅ Correct** | ₹1,800 | ₹1,800 | Matching | Payroll proceeds | |
| | **❌ Incorrect** | ₹1,800 | ₹1,795 | ₹5 mismatch | Payroll skipped | |
| | **❌ Incorrect** | ₹1,800 | ₹1,950 | ₹150 mismatch | Payroll skipped | |
**Watch Out!**
When comparing contributions, the Employer PF amount should exclude PF admin charges (0.5%) and EDLI charges (0.5%), which are paid separately by the employer.
If an employee is skipped due to PF mismatch, you can correct it by:
**Step 1: Identify Affected Employees**
1. Go to **Reports** → **Ledgers**.
2. Select **Type: PF** and select the relevant month.
3. Look for employees with **"Deferred"** status.
4. Click on "PF - \[Month] 2025" to open the employee's payslip.
**Step 2: Check the Mismatch**
In the payslip's **Deduction** section:
* Note the **PF Employee Contribution** amount.
* Compare with **PF Employer Contribution**.
* These amounts should match.
**Step 3: Update Employee Compensation**
1. Go to **People** section.
2. Search for the employee and open their profile.
3. Navigate to **Compensation & Perquisites** → Click **Edit** → Click **Revise Compensation**.
**Step 4: Correct Employer PF Contribution**
Update the Employer PF contribution to:
| | Option | Condition | Set Employer PF Contribution to | |
| - | ------------ | ----------------------------------------------- | ------------------------------------------------------ | - |
| | **Option A** | PF EDLI & Admin Charges are **NOT** part of CTC | Exact **Employee PF Contribution** amount from payslip | |
| | **Option B** | PF EDLI & Admin Charges **ARE** part of CTC | **Employee PF Contribution + PF EDLI & Admin Charges** | |
**Watch Out!**
For Custom Salary Structures ensure:
* Employer contribution matches the new validation requirements.
* This correction is done for both current deferred payments and future months.
In August, due to 2FA implementation on Payroll, automated PF payments were paused. To make PF payments, you had to manually make payments on via EPFO. However, as of February 2025, Payroll has resumed making PF payments for employees automatically.
**Watch Out!**
Ensure you make the pending PF payments for August before **September 15, 2024**.
Watch the video tutorial on how to make payments for all employees on the EPFO portal or read on.
There are two steps to make PF payments on the EPFO portal:
1. Log in to the [Payroll Dashboard](https://payroll.razorpay.com/dashboard).
2. Navigate to **ADMIN OPTIONS** → **Pay Employees** → **Run Payroll**.
3. Click **Email ECR File**.
This emails the PF ECR .txt file to your registered email address. You must now validate and verify this file on the EPFO portal.
1. Log in to the EPFO portal using your credentials. You can also retrieve your credentials from **Company Details** → **External Credentials** on the Payroll Dashboard.
2. Enter the OTP sent to your registered mobile number and authenticate your login.
3. On the EPFO portal, navigate to **Payments** tab in the top menu → **ECR/RETURN FILING** in the drop-down menu.
4. Go to **ECR Quick Links** and click **ECR Upload**.
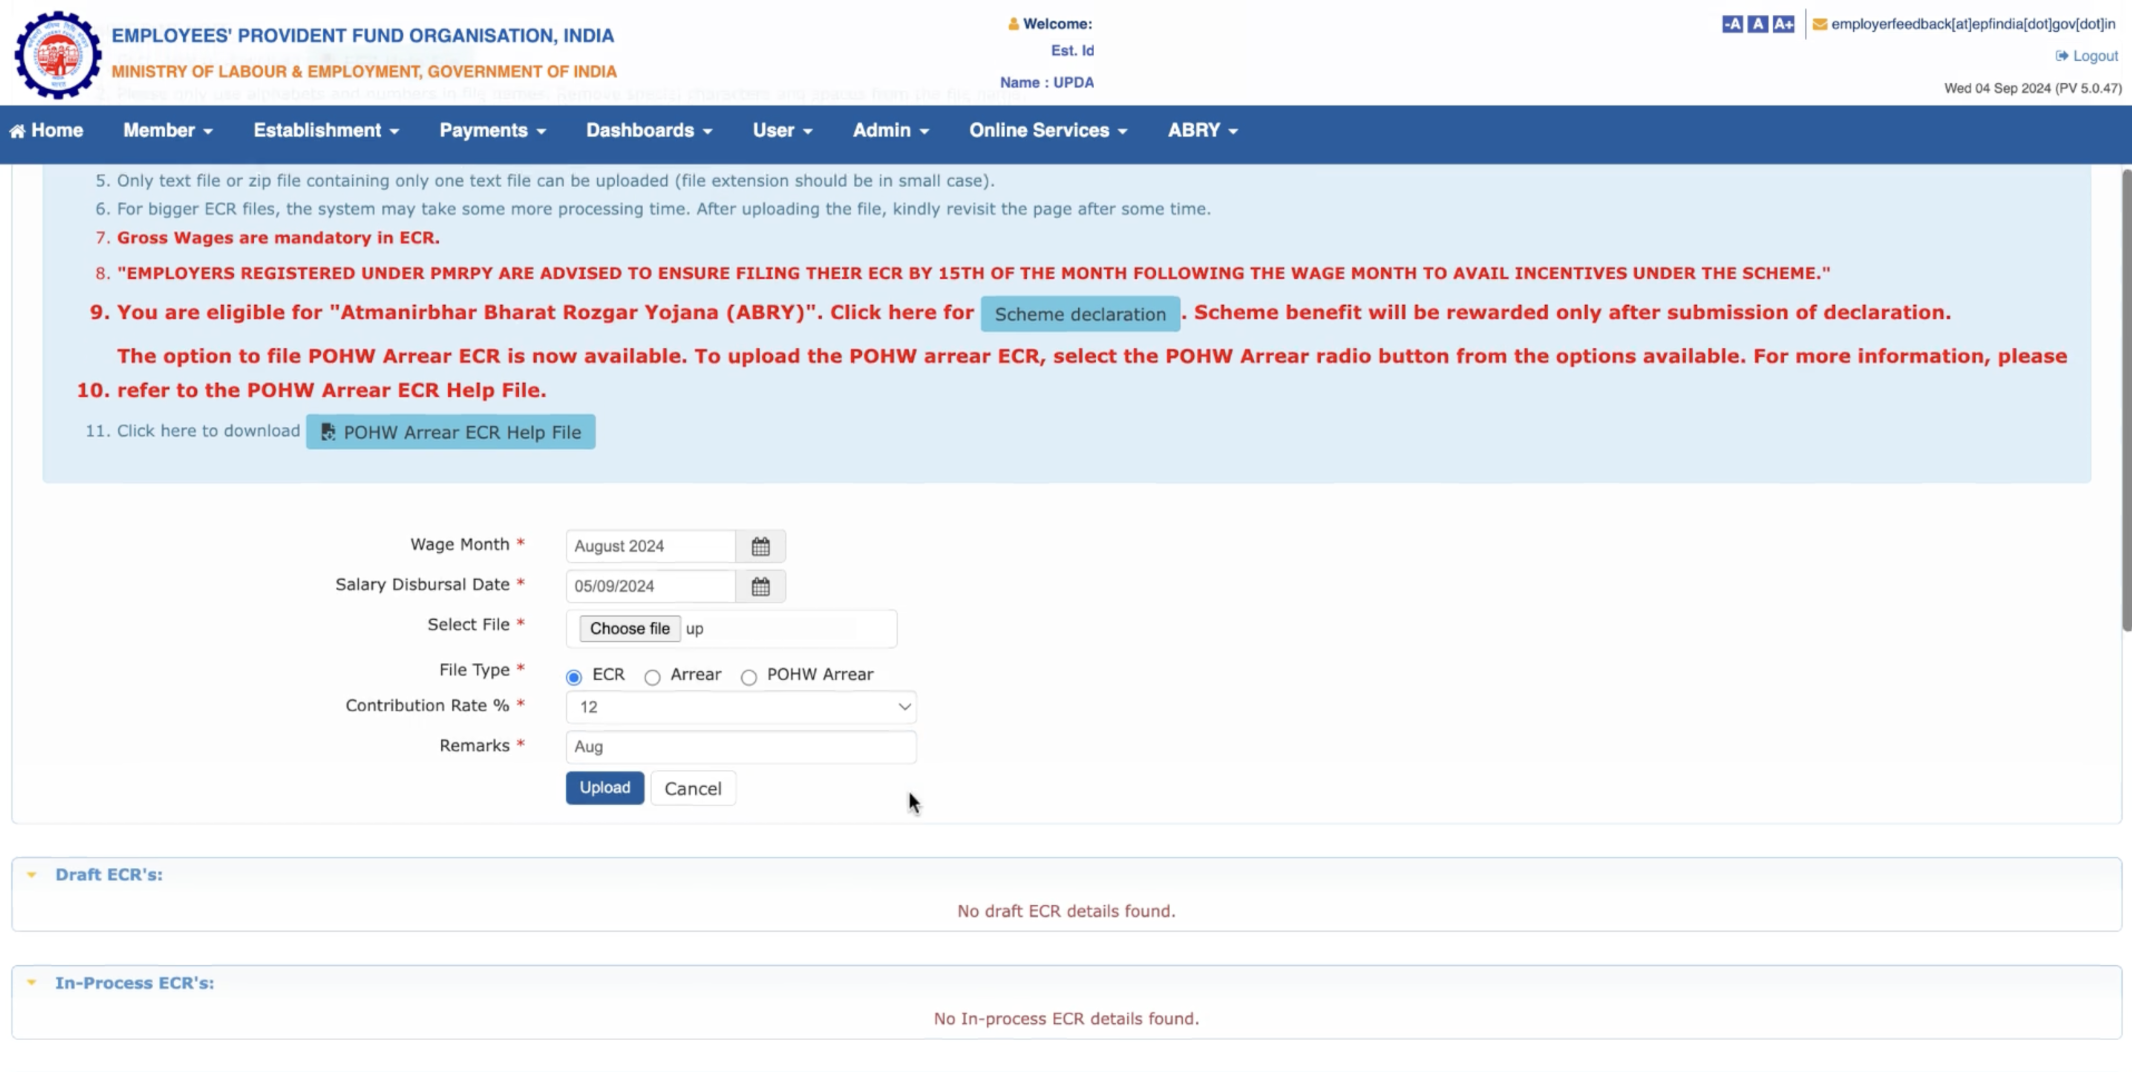
5. On the **ECR Upload** page, enter the following:
1. **Wage Month**. Select the payroll month, For example, August 2024.
2. **Salary Disbursal Date**.
3. **Select File**. Upload the .txt ECR downloaded from the Payroll Dashboard.
4. **File Type**. Select **ECR**.
5. **Contribution Rate %**. Select the number from the drop-down menu to indicate the percentage of employer's contribution. For example, 12%.
6. **Remarks**. Specify the payroll month, or any other remarks.
6. Click **Upload**.
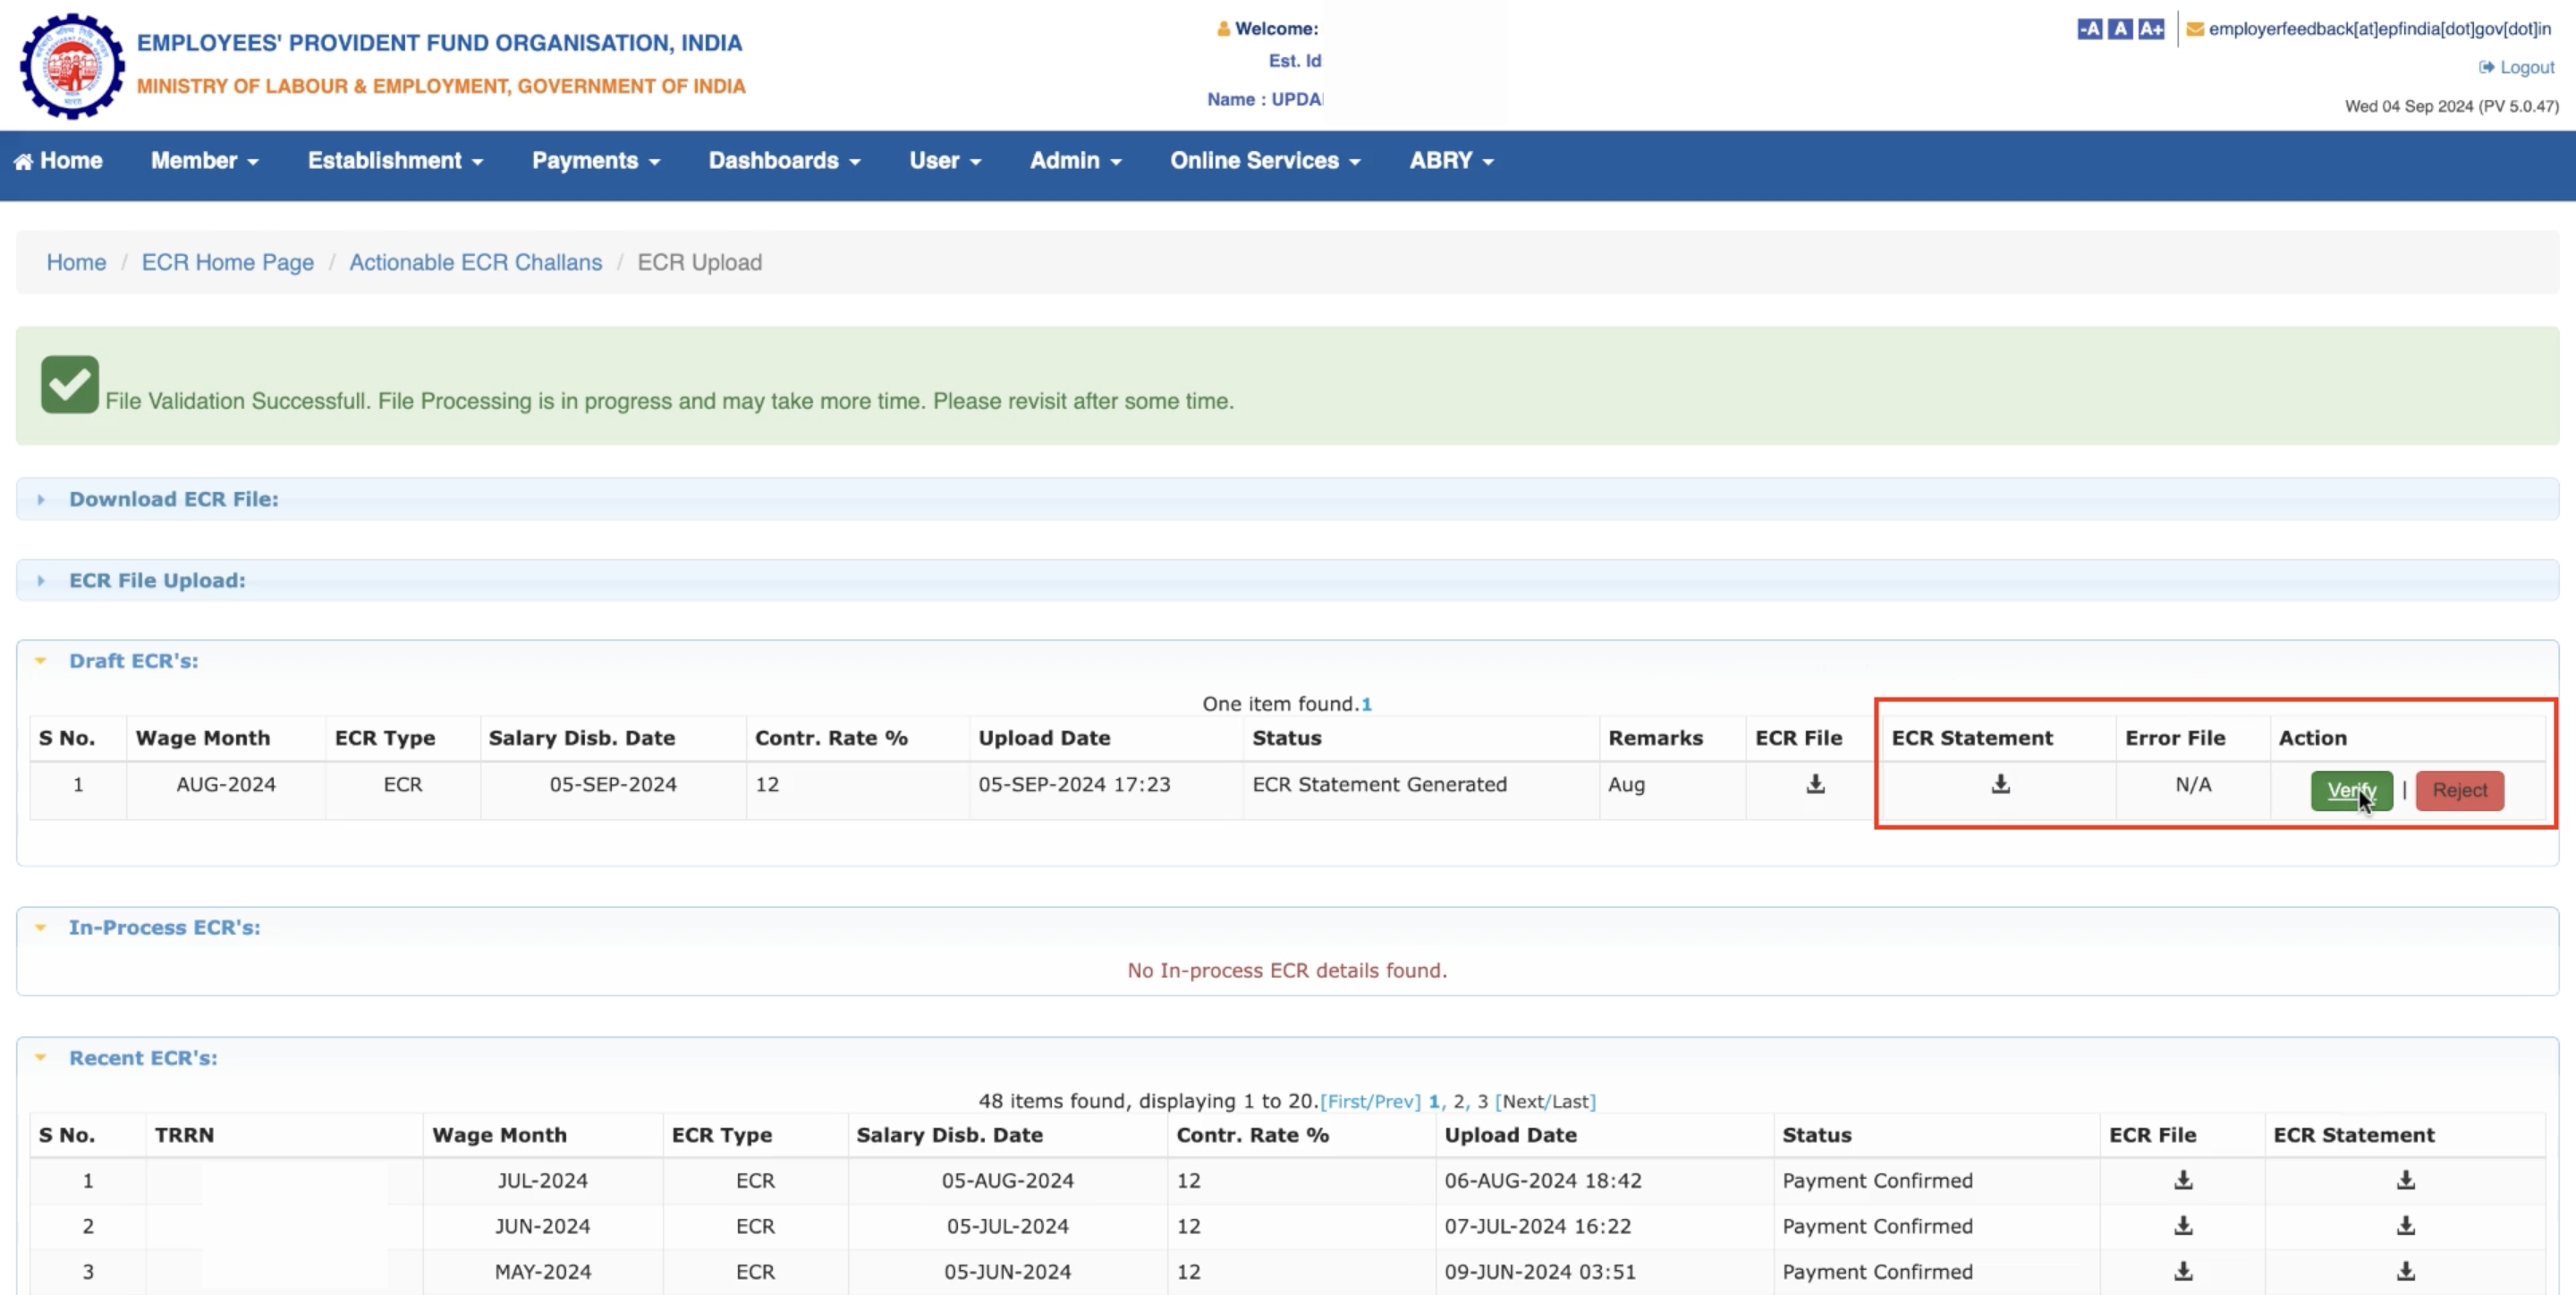
This successfully submits your organisation's ECR file for validation. The processed ECR file now moves to **Draft ECR's**.
1. In the **Draft ECR's:** section, click the download icon in the **ECR Statement** column.
2. Verify the ECR Statement. Click **Verify** in the **Action** column to proceed.
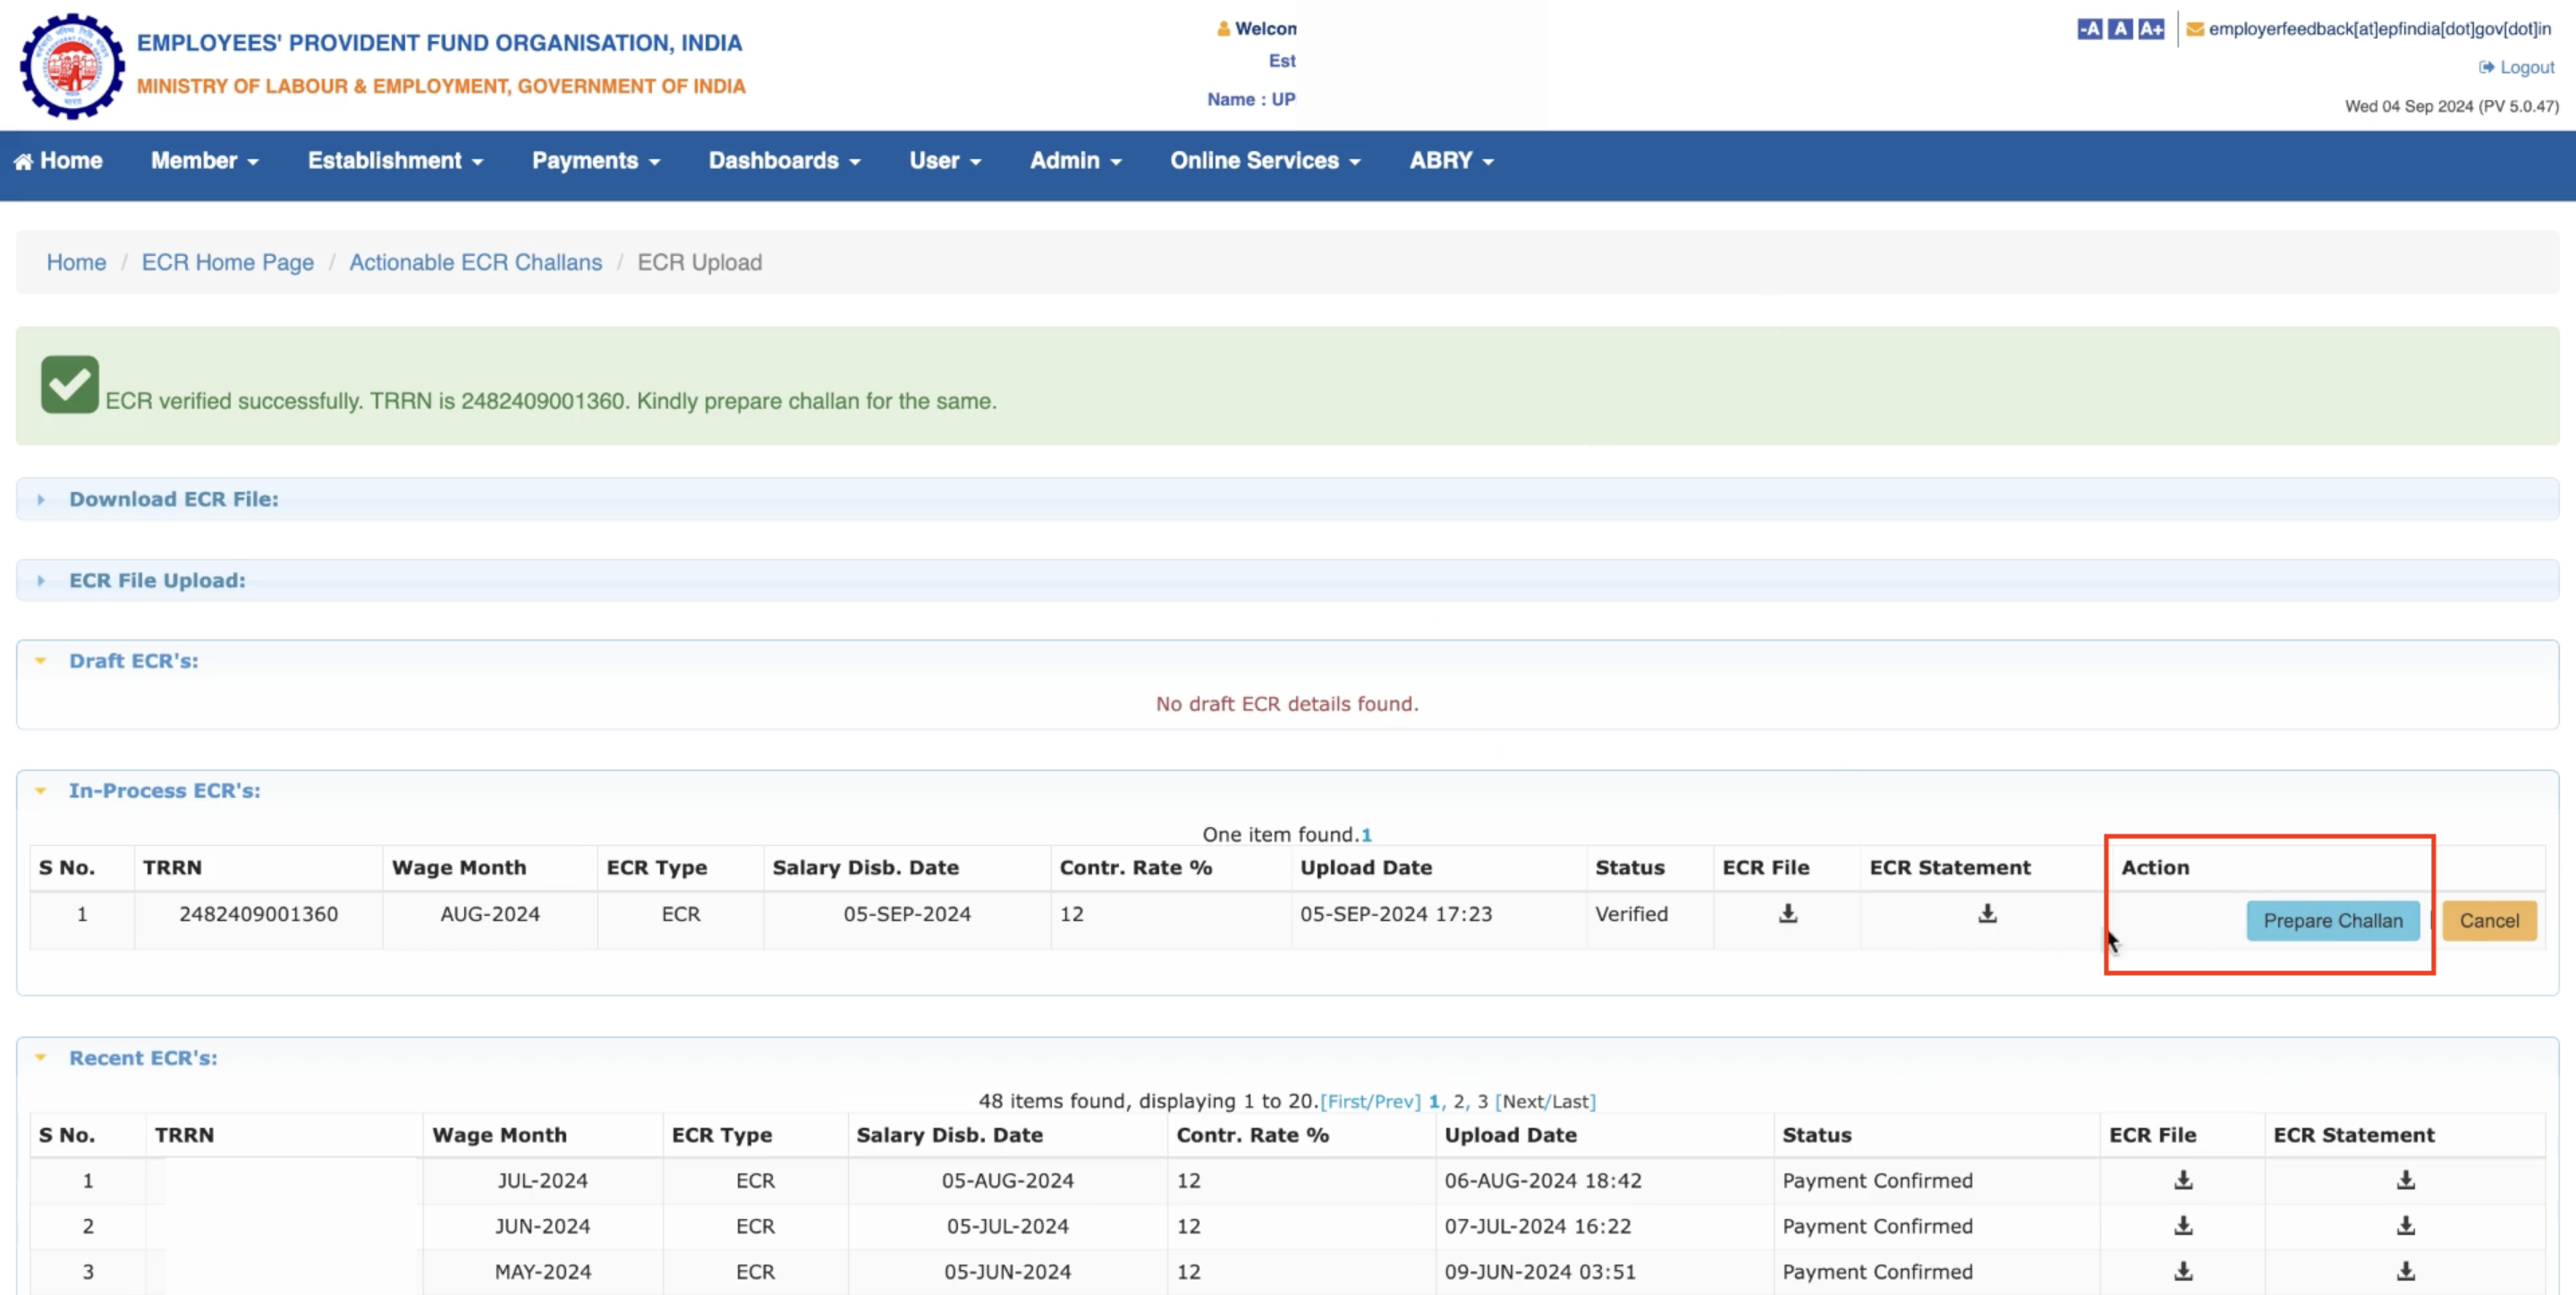
This successfully validates the ECR file. You can now prepare the PF challan to make the payment.
1. In the **In-Process ECR's** section, click **Prepare Challan** in the Action column.
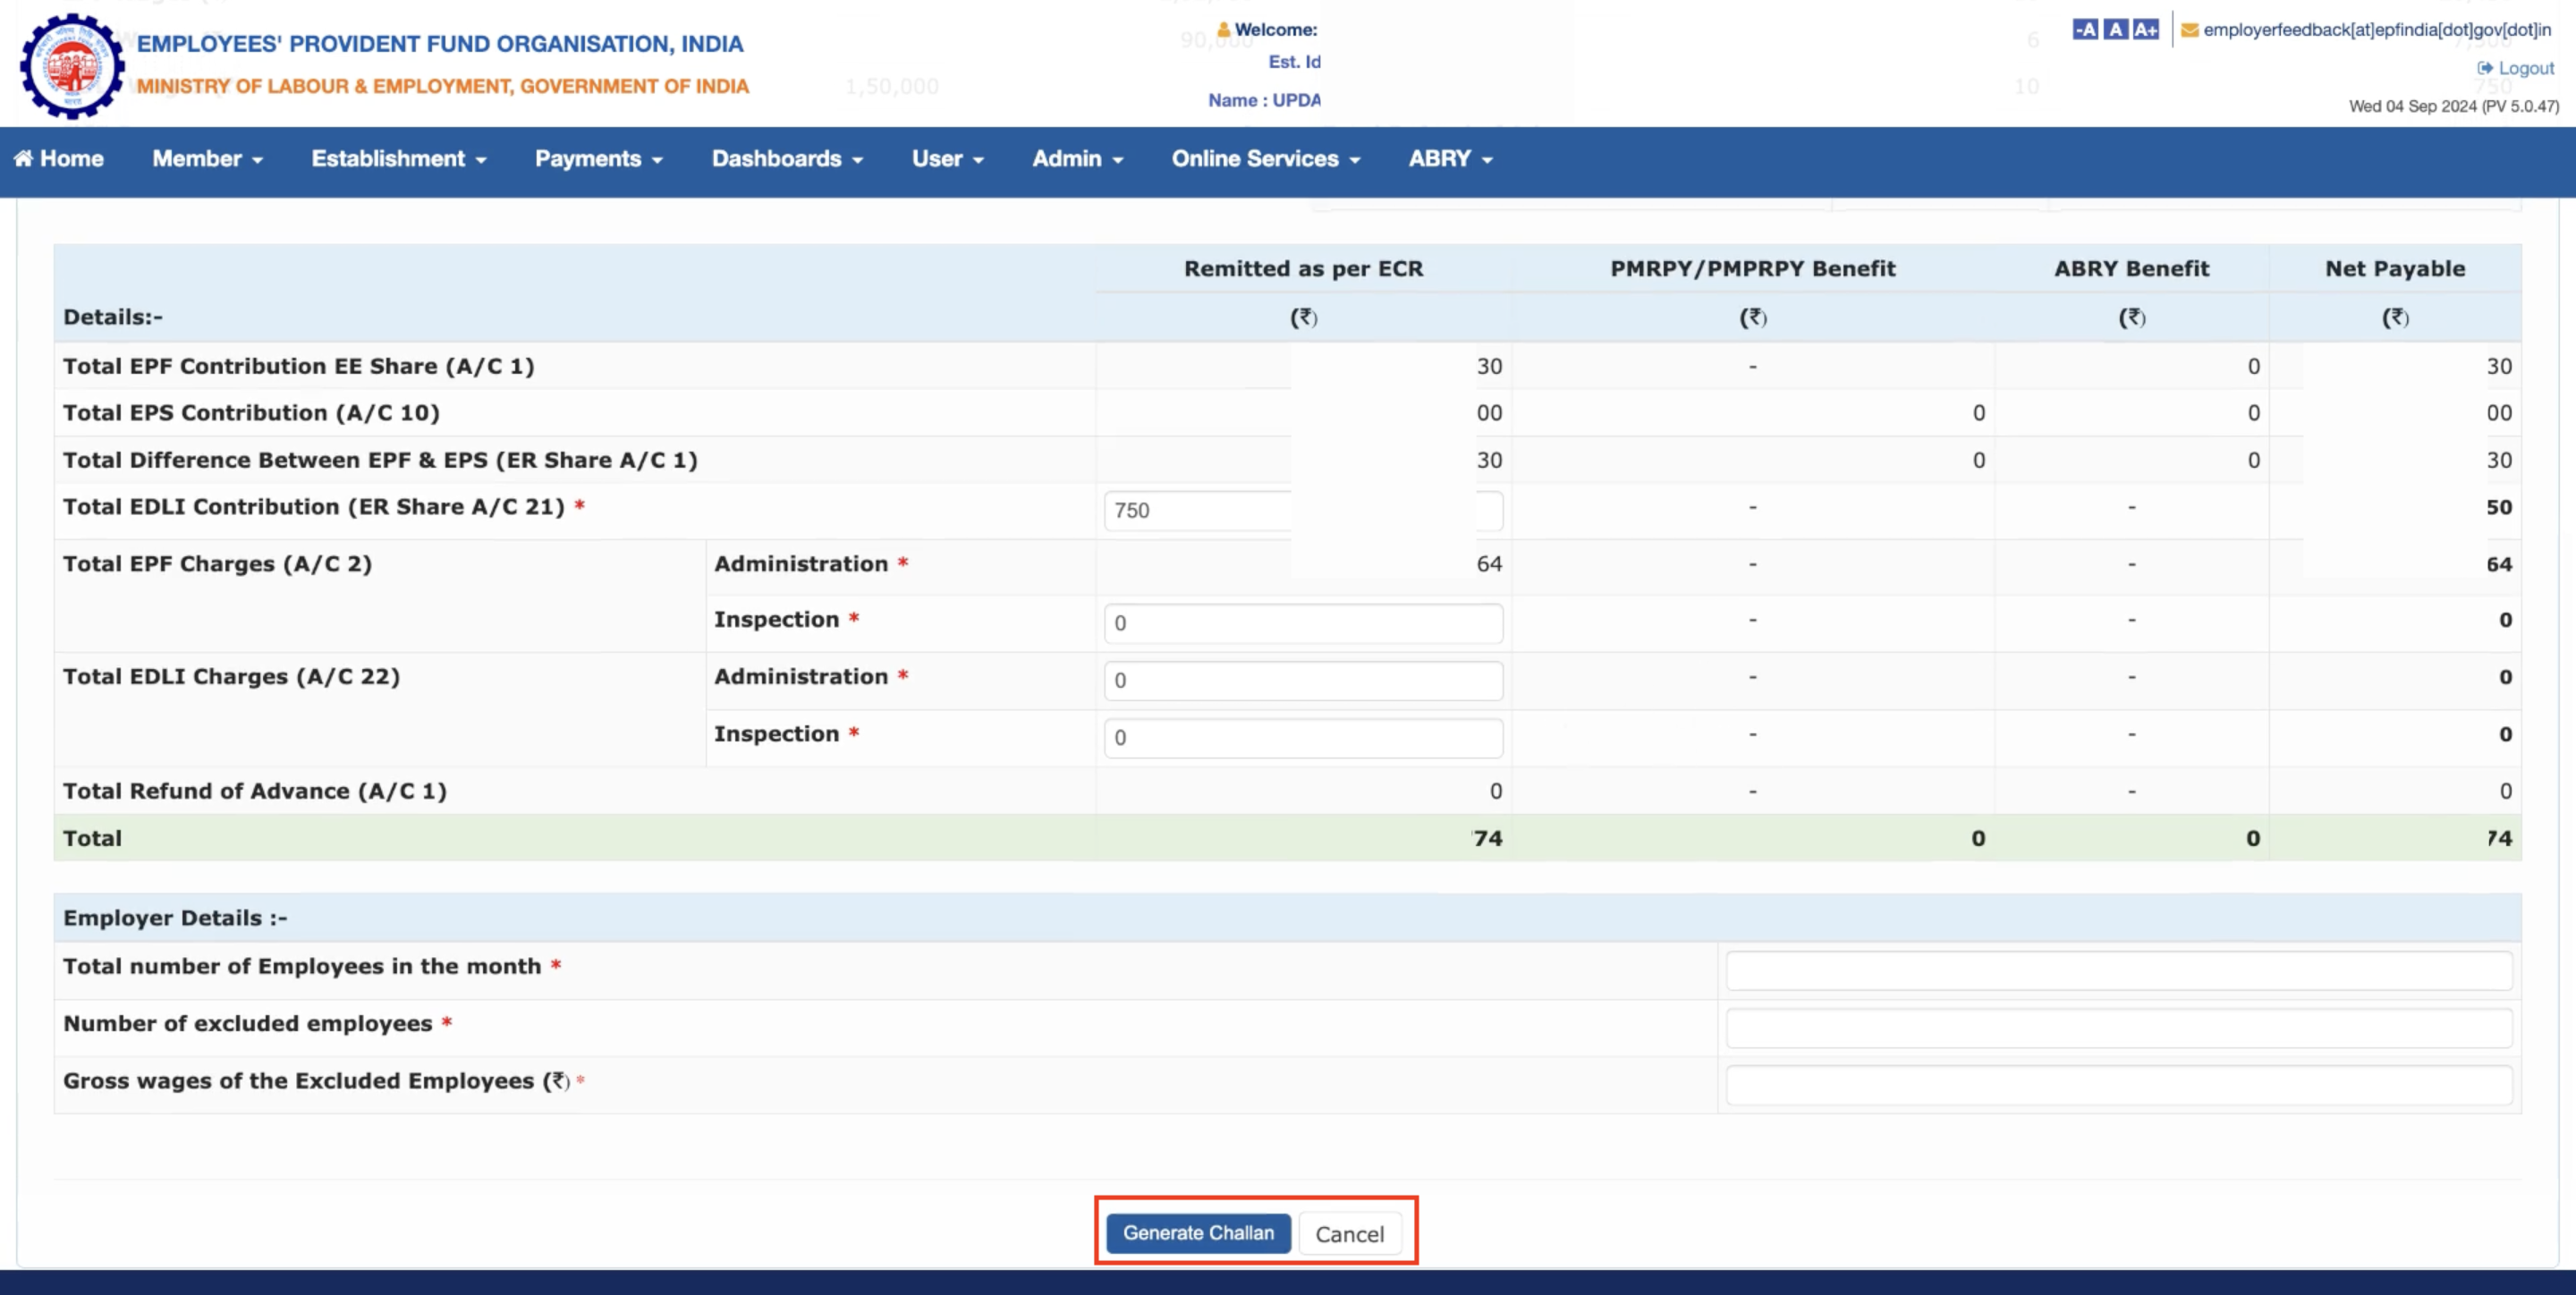
2. The **Summary of Electronic Challan cum Return (ECR) page opens**. Here:
1. Review the ECR details.
2. Go to the **Employer details** section at the bottom of the challan.
3. Enter the **Total number of Employees in the month**. These are the number of employees for whom ECR is generated.
4. Provide the **Number of excluded employees** who are part of your organisation but are not present in the ECR file.
5. Enter the **Gross wages of the Excluded employees**. If two employees were excluded, provide the sum of their wages.
3. Click **Generate Challan** at the bottom of the page.
This successfully finalises the challan. Click **Pay** in the **Payment** column to make the PF payment.
On the Challan Payment page:
1. Select the bank from the drop-down menu to make the PF payment from.
2. Click **Continue**.
3. Log in to your banking account and complete the payment.
You have successfully made the PF payments for your employees.
### Related Information
[Statutory Compliance](/docs/payroll/statutory-compliance)
 3. On the **Payments Settings** page, navigate to the **PF Settings** section.
4. Select the relevant check boxes to enable or disable PF Settings. You can choose to:
* Include [employer's contribution](#how-pf-is-calculated) in employee's CTC.
* Include PF EDLI and [admin charges](#additional-charges) in employee's CTC.
* Use only basic salary to calculate PF.
* Use PF limit as ₹15,000 when calculating PF contributions.
3. On the **Payments Settings** page, navigate to the **PF Settings** section.
4. Select the relevant check boxes to enable or disable PF Settings. You can choose to:
* Include [employer's contribution](#how-pf-is-calculated) in employee's CTC.
* Include PF EDLI and [admin charges](#additional-charges) in employee's CTC.
* Use only basic salary to calculate PF.
* Use PF limit as ₹15,000 when calculating PF contributions.
 1. Click **CONTINUE**.
You have successfully set up PF payments for your organisation and employees.
## Register Employees
You must register your employees for PF individually. You can register employees for Provident whose UAN is already available, and generate UAN for new employees as well.
There are two steps to individually register employees for Provident Fund:
1. Click **CONTINUE**.
You have successfully set up PF payments for your organisation and employees.
## Register Employees
You must register your employees for PF individually. You can register employees for Provident whose UAN is already available, and generate UAN for new employees as well.
There are two steps to individually register employees for Provident Fund:
 5. Click **CONTINUE**.
This saves the employee's UAN on the Payroll Dashboard.
5. Click **CONTINUE**.
This saves the employee's UAN on the Payroll Dashboard.
 2. Verify and update the following:
* Establishment details
* Owner/Director details (must match MCA records)
* Bank details (upload cancelled cheque with company name printed)
2. Verify and update the following:
* Establishment details
* Owner/Director details (must match MCA records)
* Bank details (upload cancelled cheque with company name printed)
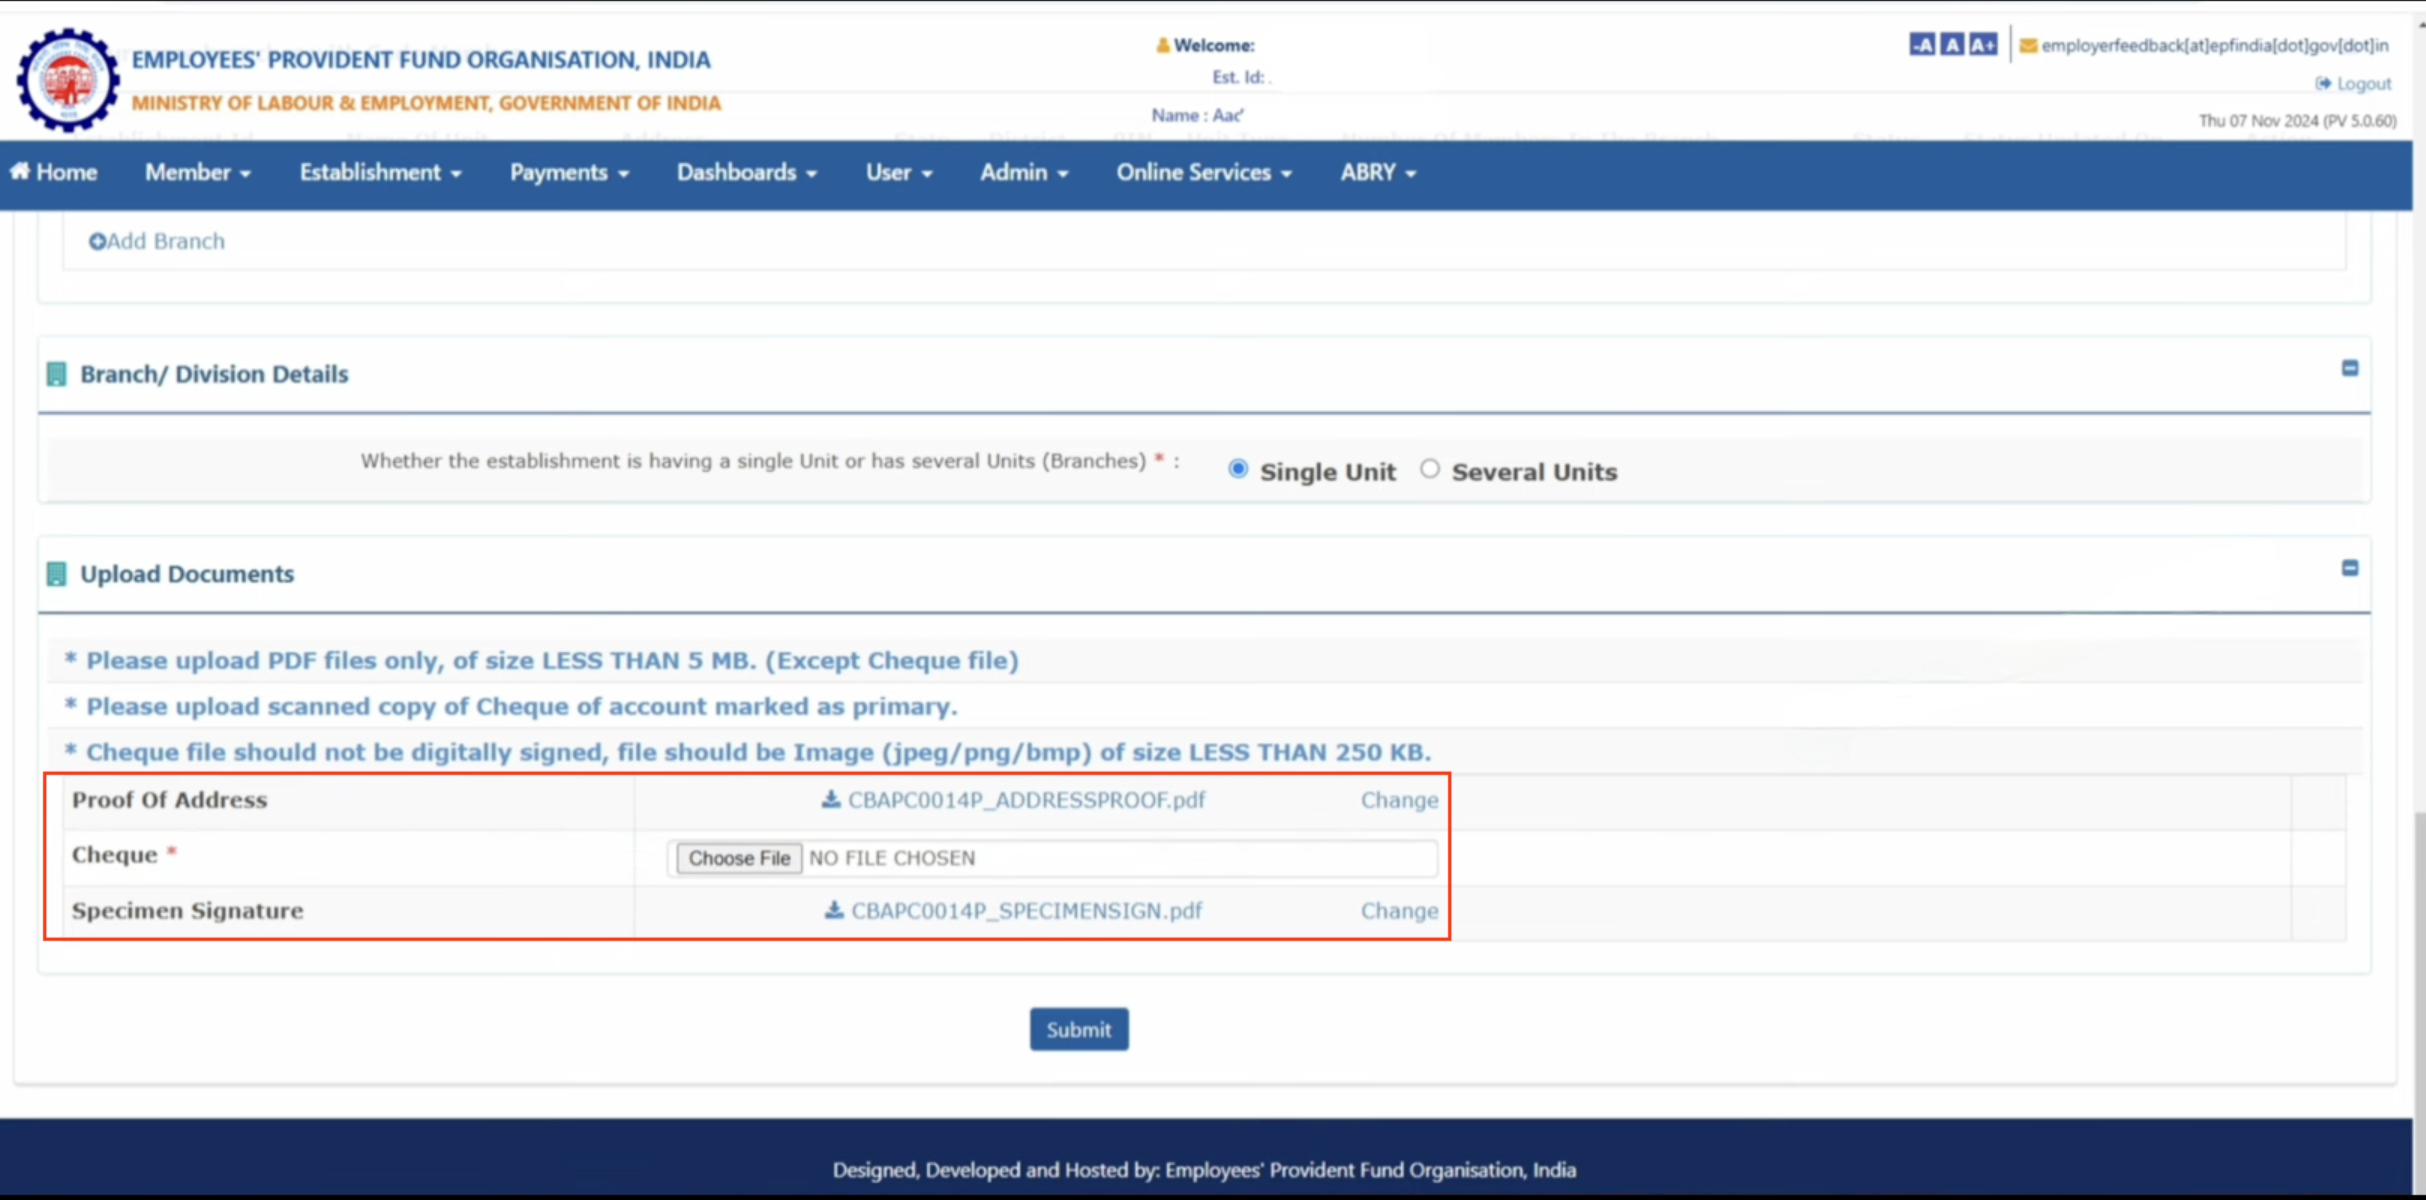 3. Authorised signatory details:
* Name (must match exactly with the DSC)
* Designation
* PAN
* Mobile Number
* Email ID
4. Click Save and download Form 5A preview in PDF format
**Preparation of Physical Documentation**
3. Authorised signatory details:
* Name (must match exactly with the DSC)
* Designation
* PAN
* Mobile Number
* Email ID
4. Click Save and download Form 5A preview in PDF format
**Preparation of Physical Documentation**
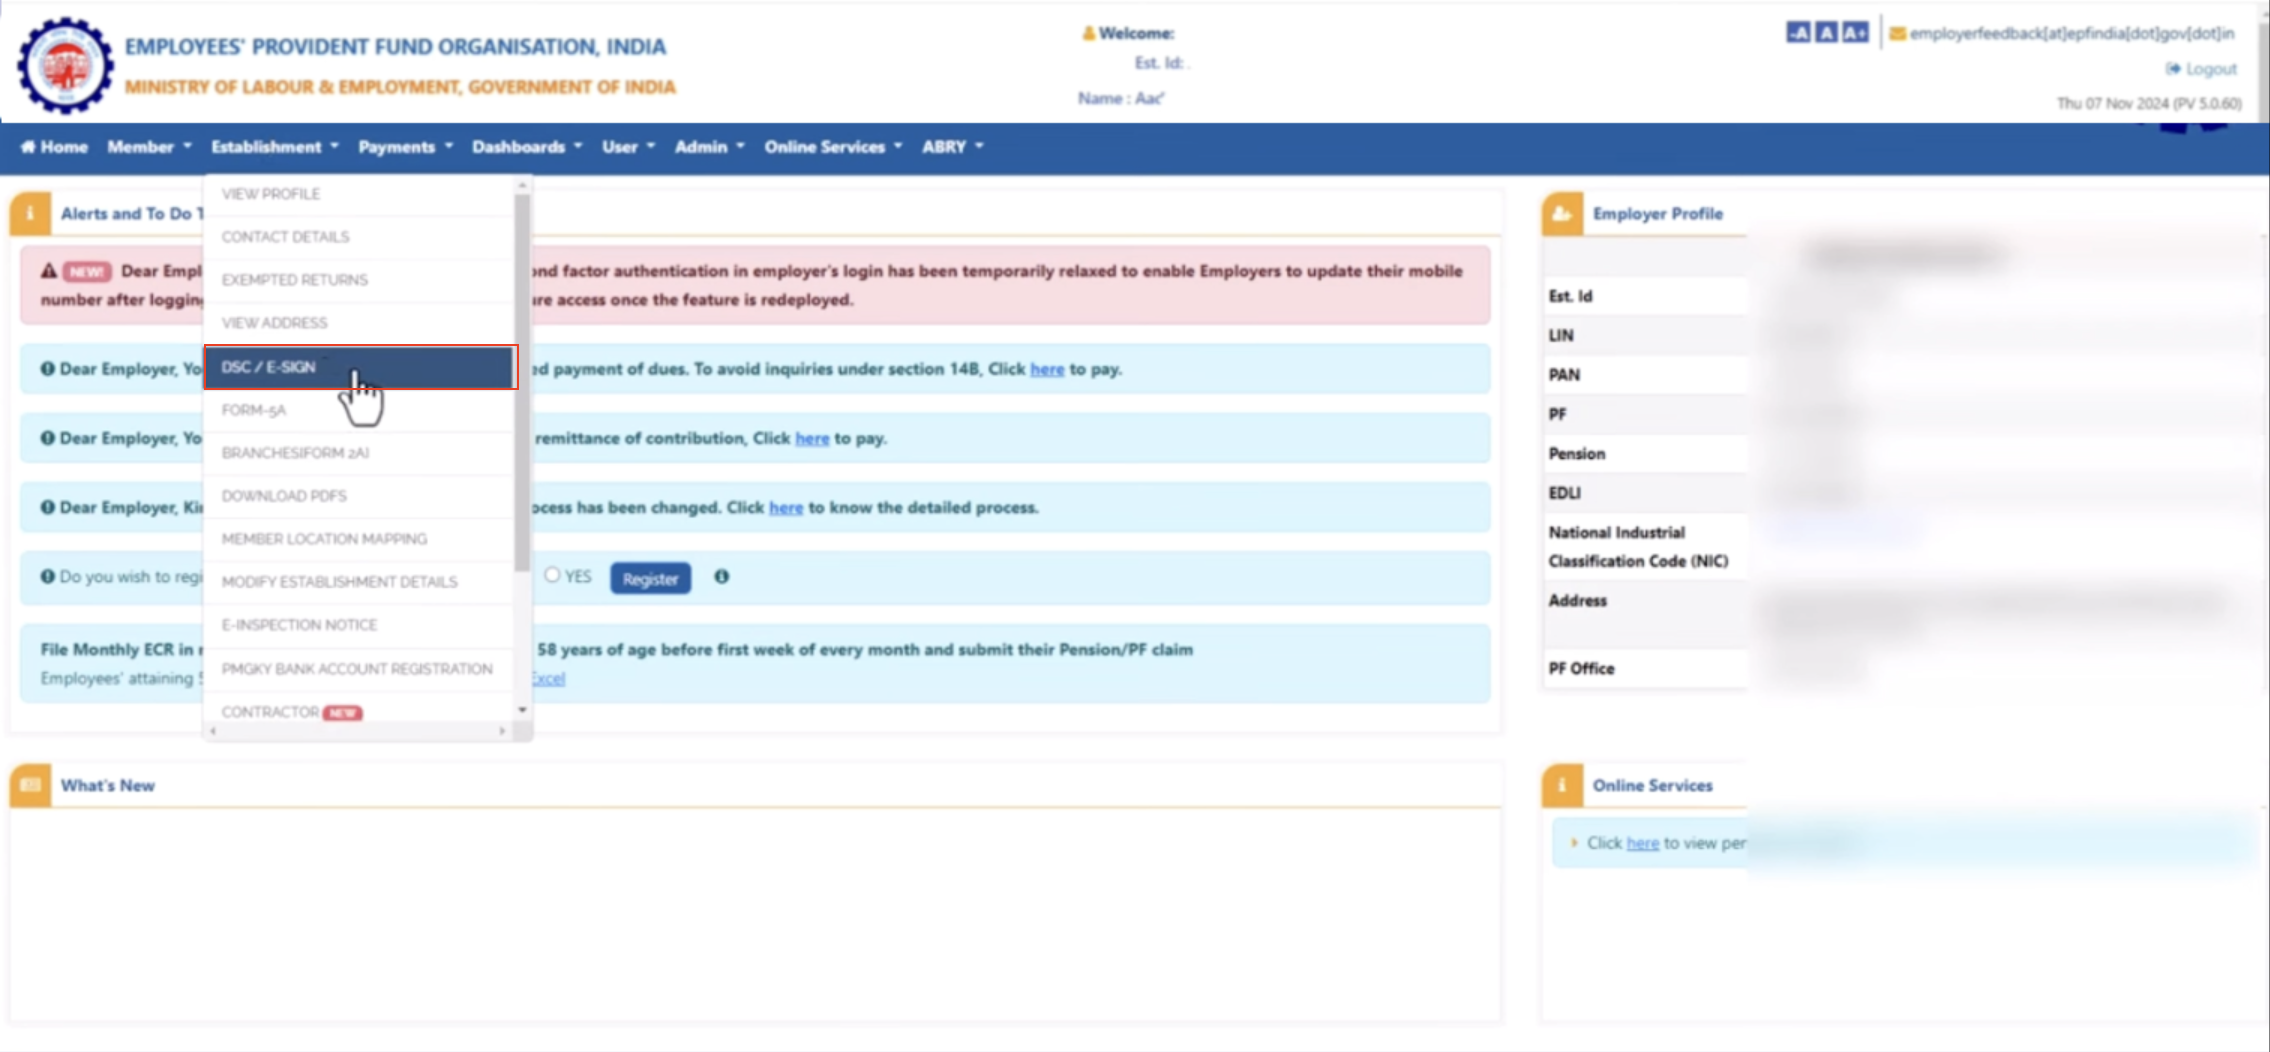 4. Select the authorised signatory's name from the dropdown list (as per Form 5A).
5. The system will launch a **DSC Signer Utility** (Java applet).
4. Select the authorised signatory's name from the dropdown list (as per Form 5A).
5. The system will launch a **DSC Signer Utility** (Java applet).
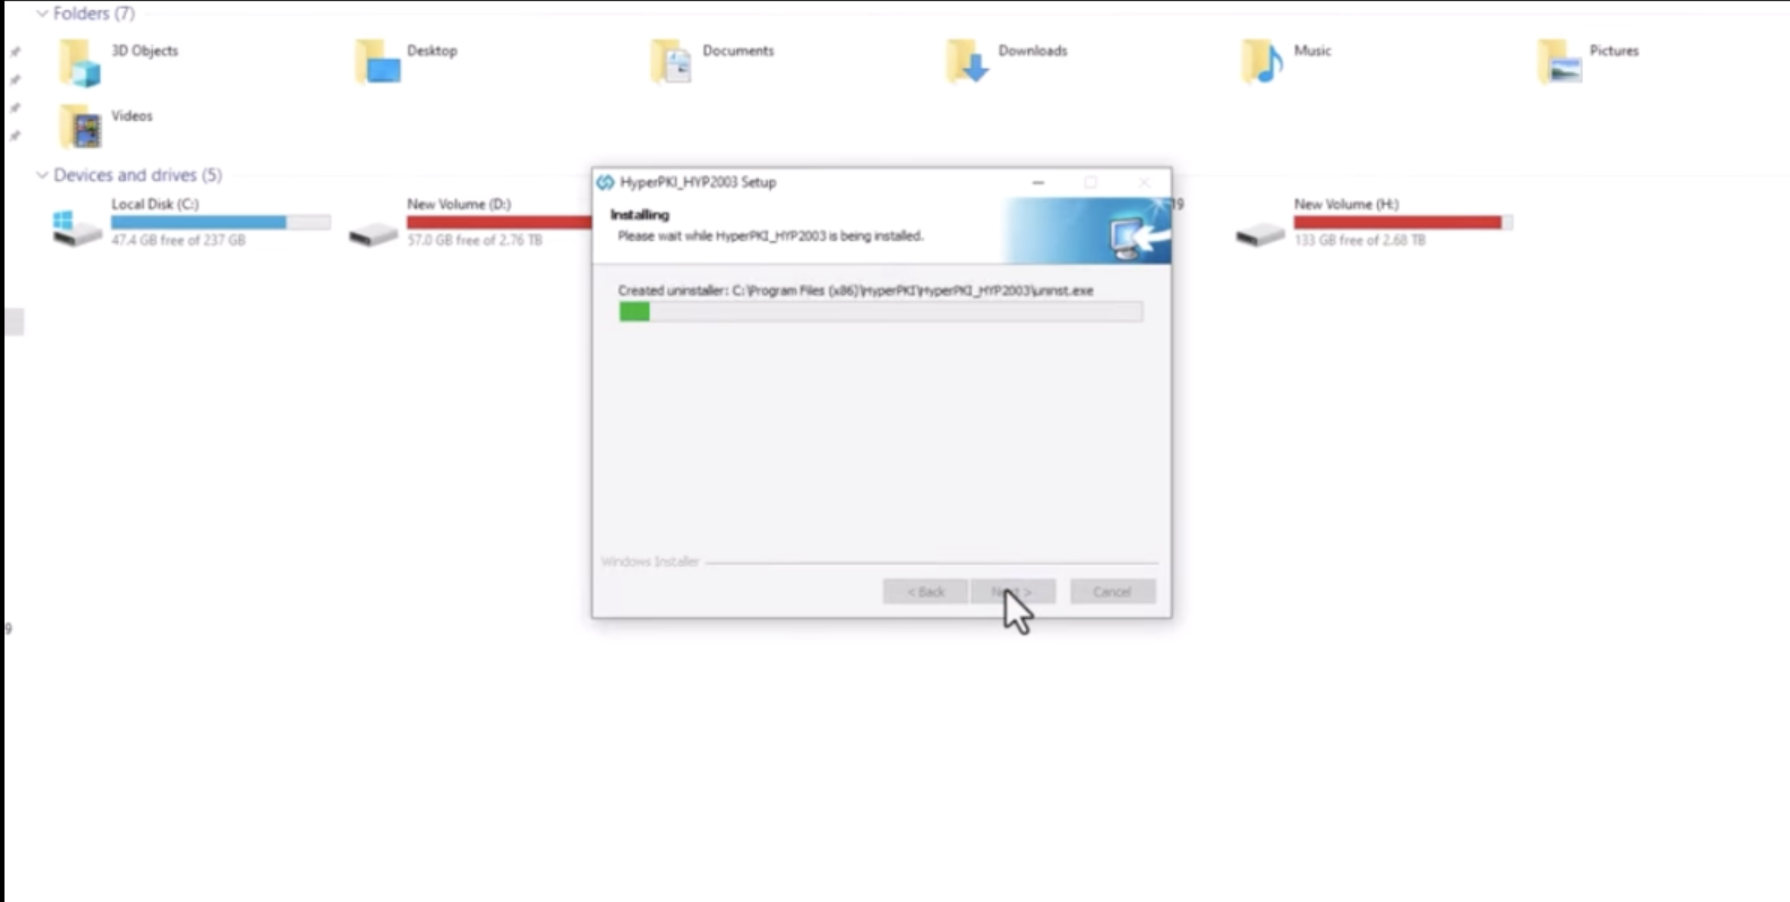 6. Allow the Java applet to run when prompted.
7. Select your DSC from the list of certificates displayed.
8. Enter your DSC token PIN when prompted.
9. Upon successful verification, a confirmation message will appear.
10. Download and save the PDF acknowledgment for your records.
#### Authorised Signatory Requirements
The DSC must belong to the **appropriate authorised signatory** based on your organisation type:
| Organisation Type | Signatory |
| ------------------------------------ | -------------------------------------------------- |
| **Sole Proprietorships** | Business owner/proprietor |
| **Partnership Firms** | Any designated partner |
| **Private/Public Limited Companies** | Director or Managing Director |
| **Trusts/Societies** | Authorised trustee or office bearer |
| **Any Organisation Type** | Individual legally authorised to sign PF documents |
6. Allow the Java applet to run when prompted.
7. Select your DSC from the list of certificates displayed.
8. Enter your DSC token PIN when prompted.
9. Upon successful verification, a confirmation message will appear.
10. Download and save the PDF acknowledgment for your records.
#### Authorised Signatory Requirements
The DSC must belong to the **appropriate authorised signatory** based on your organisation type:
| Organisation Type | Signatory |
| ------------------------------------ | -------------------------------------------------- |
| **Sole Proprietorships** | Business owner/proprietor |
| **Partnership Firms** | Any designated partner |
| **Private/Public Limited Companies** | Director or Managing Director |
| **Trusts/Societies** | Authorised trustee or office bearer |
| **Any Organisation Type** | Individual legally authorised to sign PF documents |
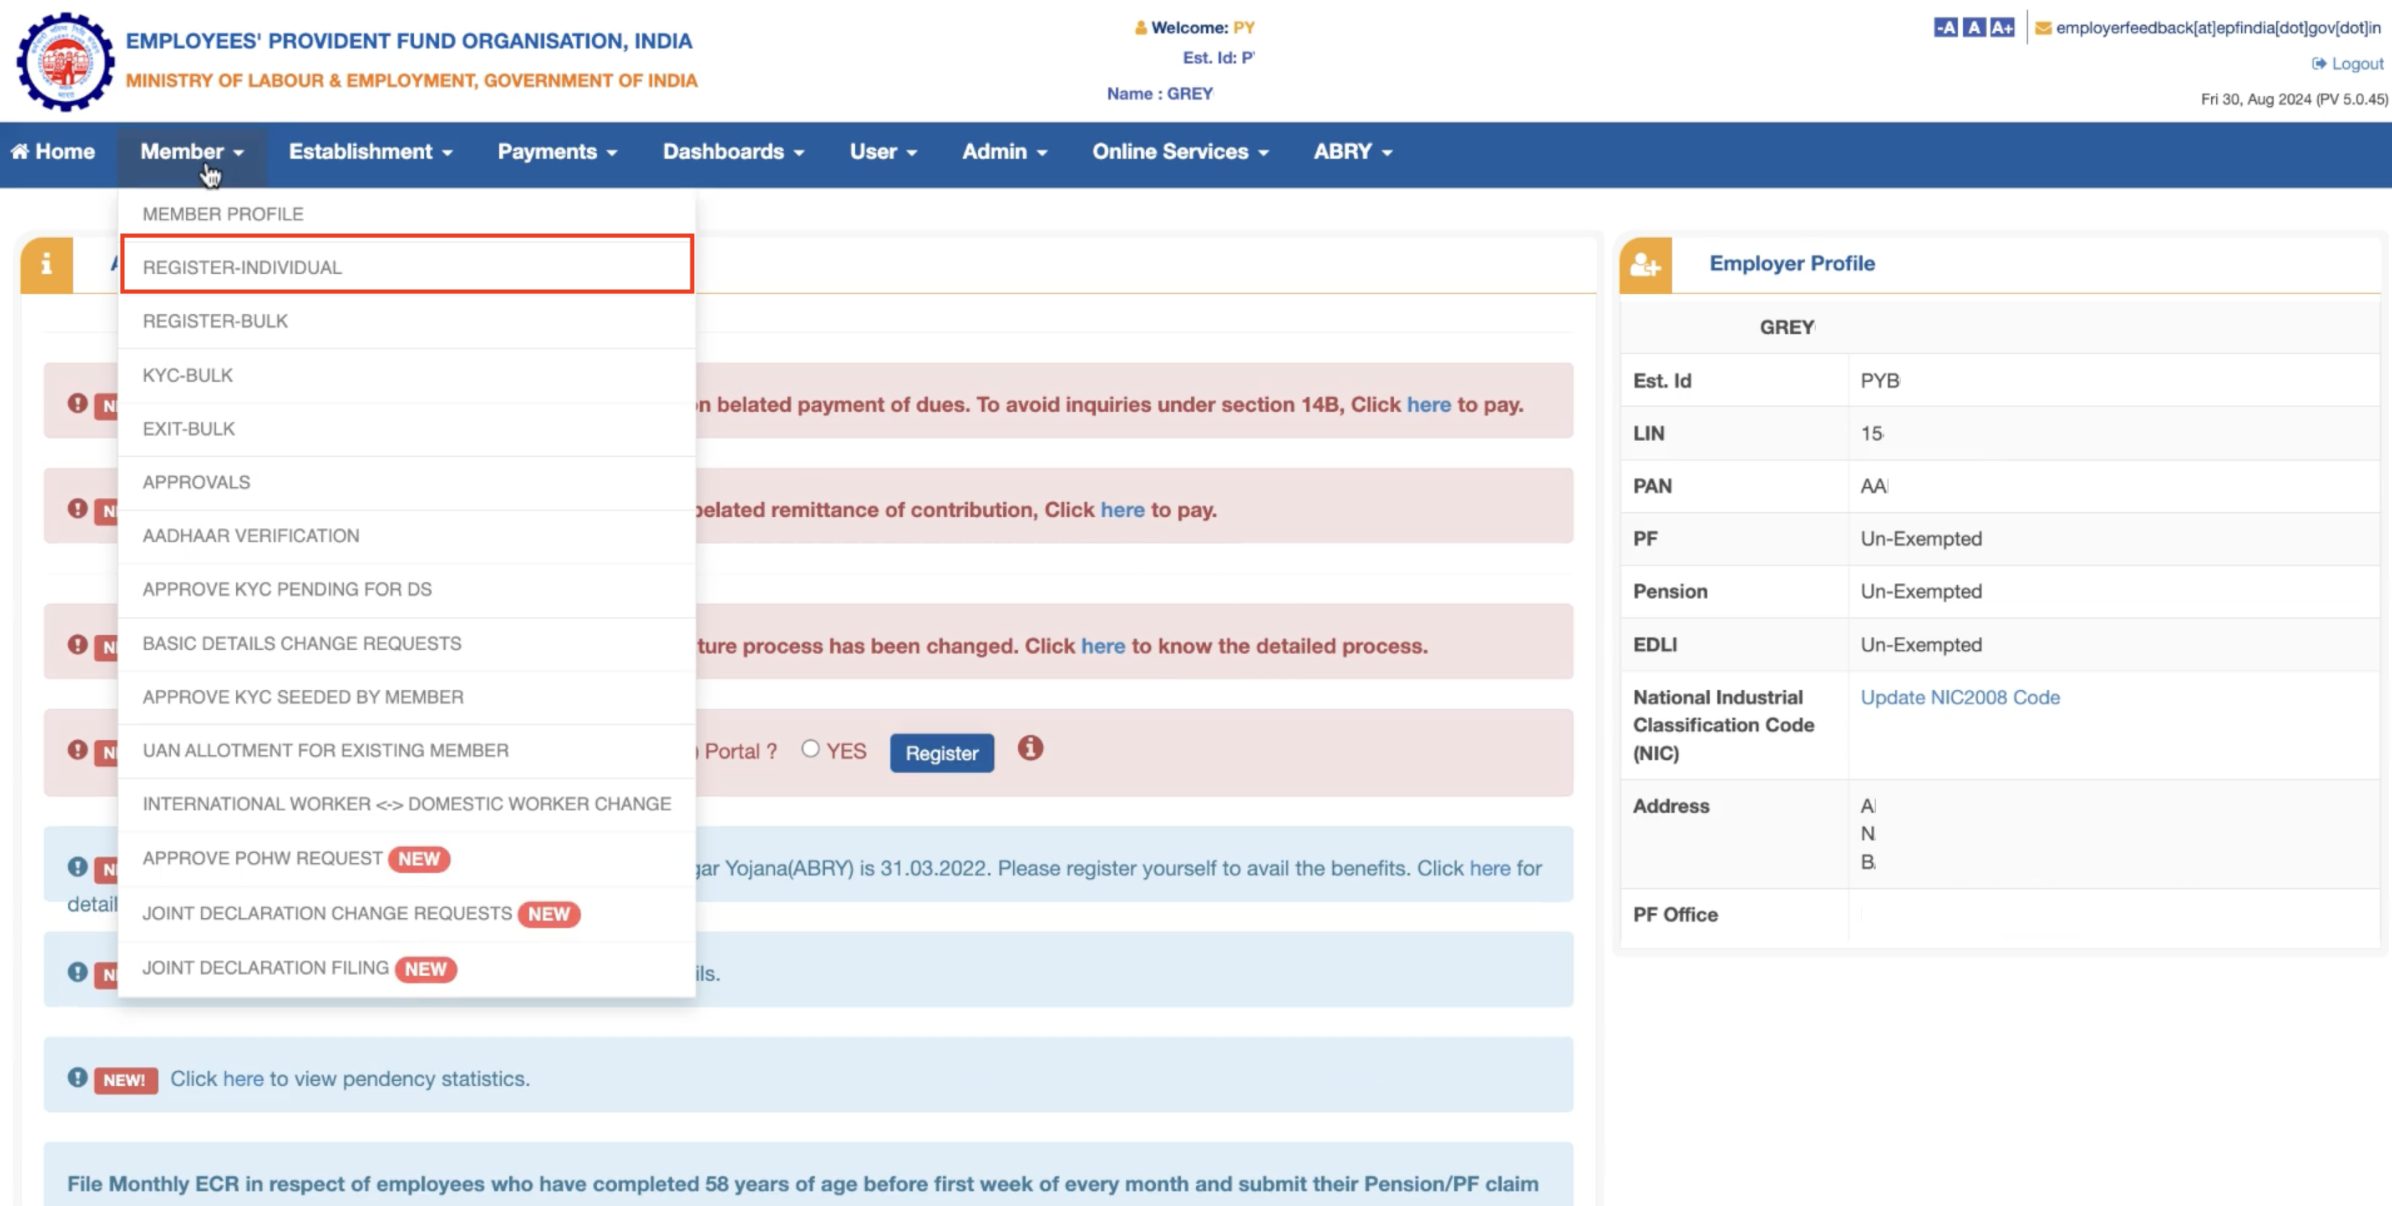 4. On the **Member Registration** page and section:
* Select the **Yes** option for **Previous Employment/UAN** if the UAN if is already available for the employee.
* Select the **No** option to register the employee for PF.
1. Provide the employee's identity details such as **Name** and **Date of Birth** as on Aadhaar, **Gender**, **Father/Husband's Name**, **Nationality**, **Religion**, **Marital Status** and more.
2. Enter the **Date of Joining** and **Monthly EPF Wages as on Joining**. The monthly wages are as decided during [PF setup](#setup-pf).
4. On the **Member Registration** page and section:
* Select the **Yes** option for **Previous Employment/UAN** if the UAN if is already available for the employee.
* Select the **No** option to register the employee for PF.
1. Provide the employee's identity details such as **Name** and **Date of Birth** as on Aadhaar, **Gender**, **Father/Husband's Name**, **Nationality**, **Religion**, **Marital Status** and more.
2. Enter the **Date of Joining** and **Monthly EPF Wages as on Joining**. The monthly wages are as decided during [PF setup](#setup-pf).
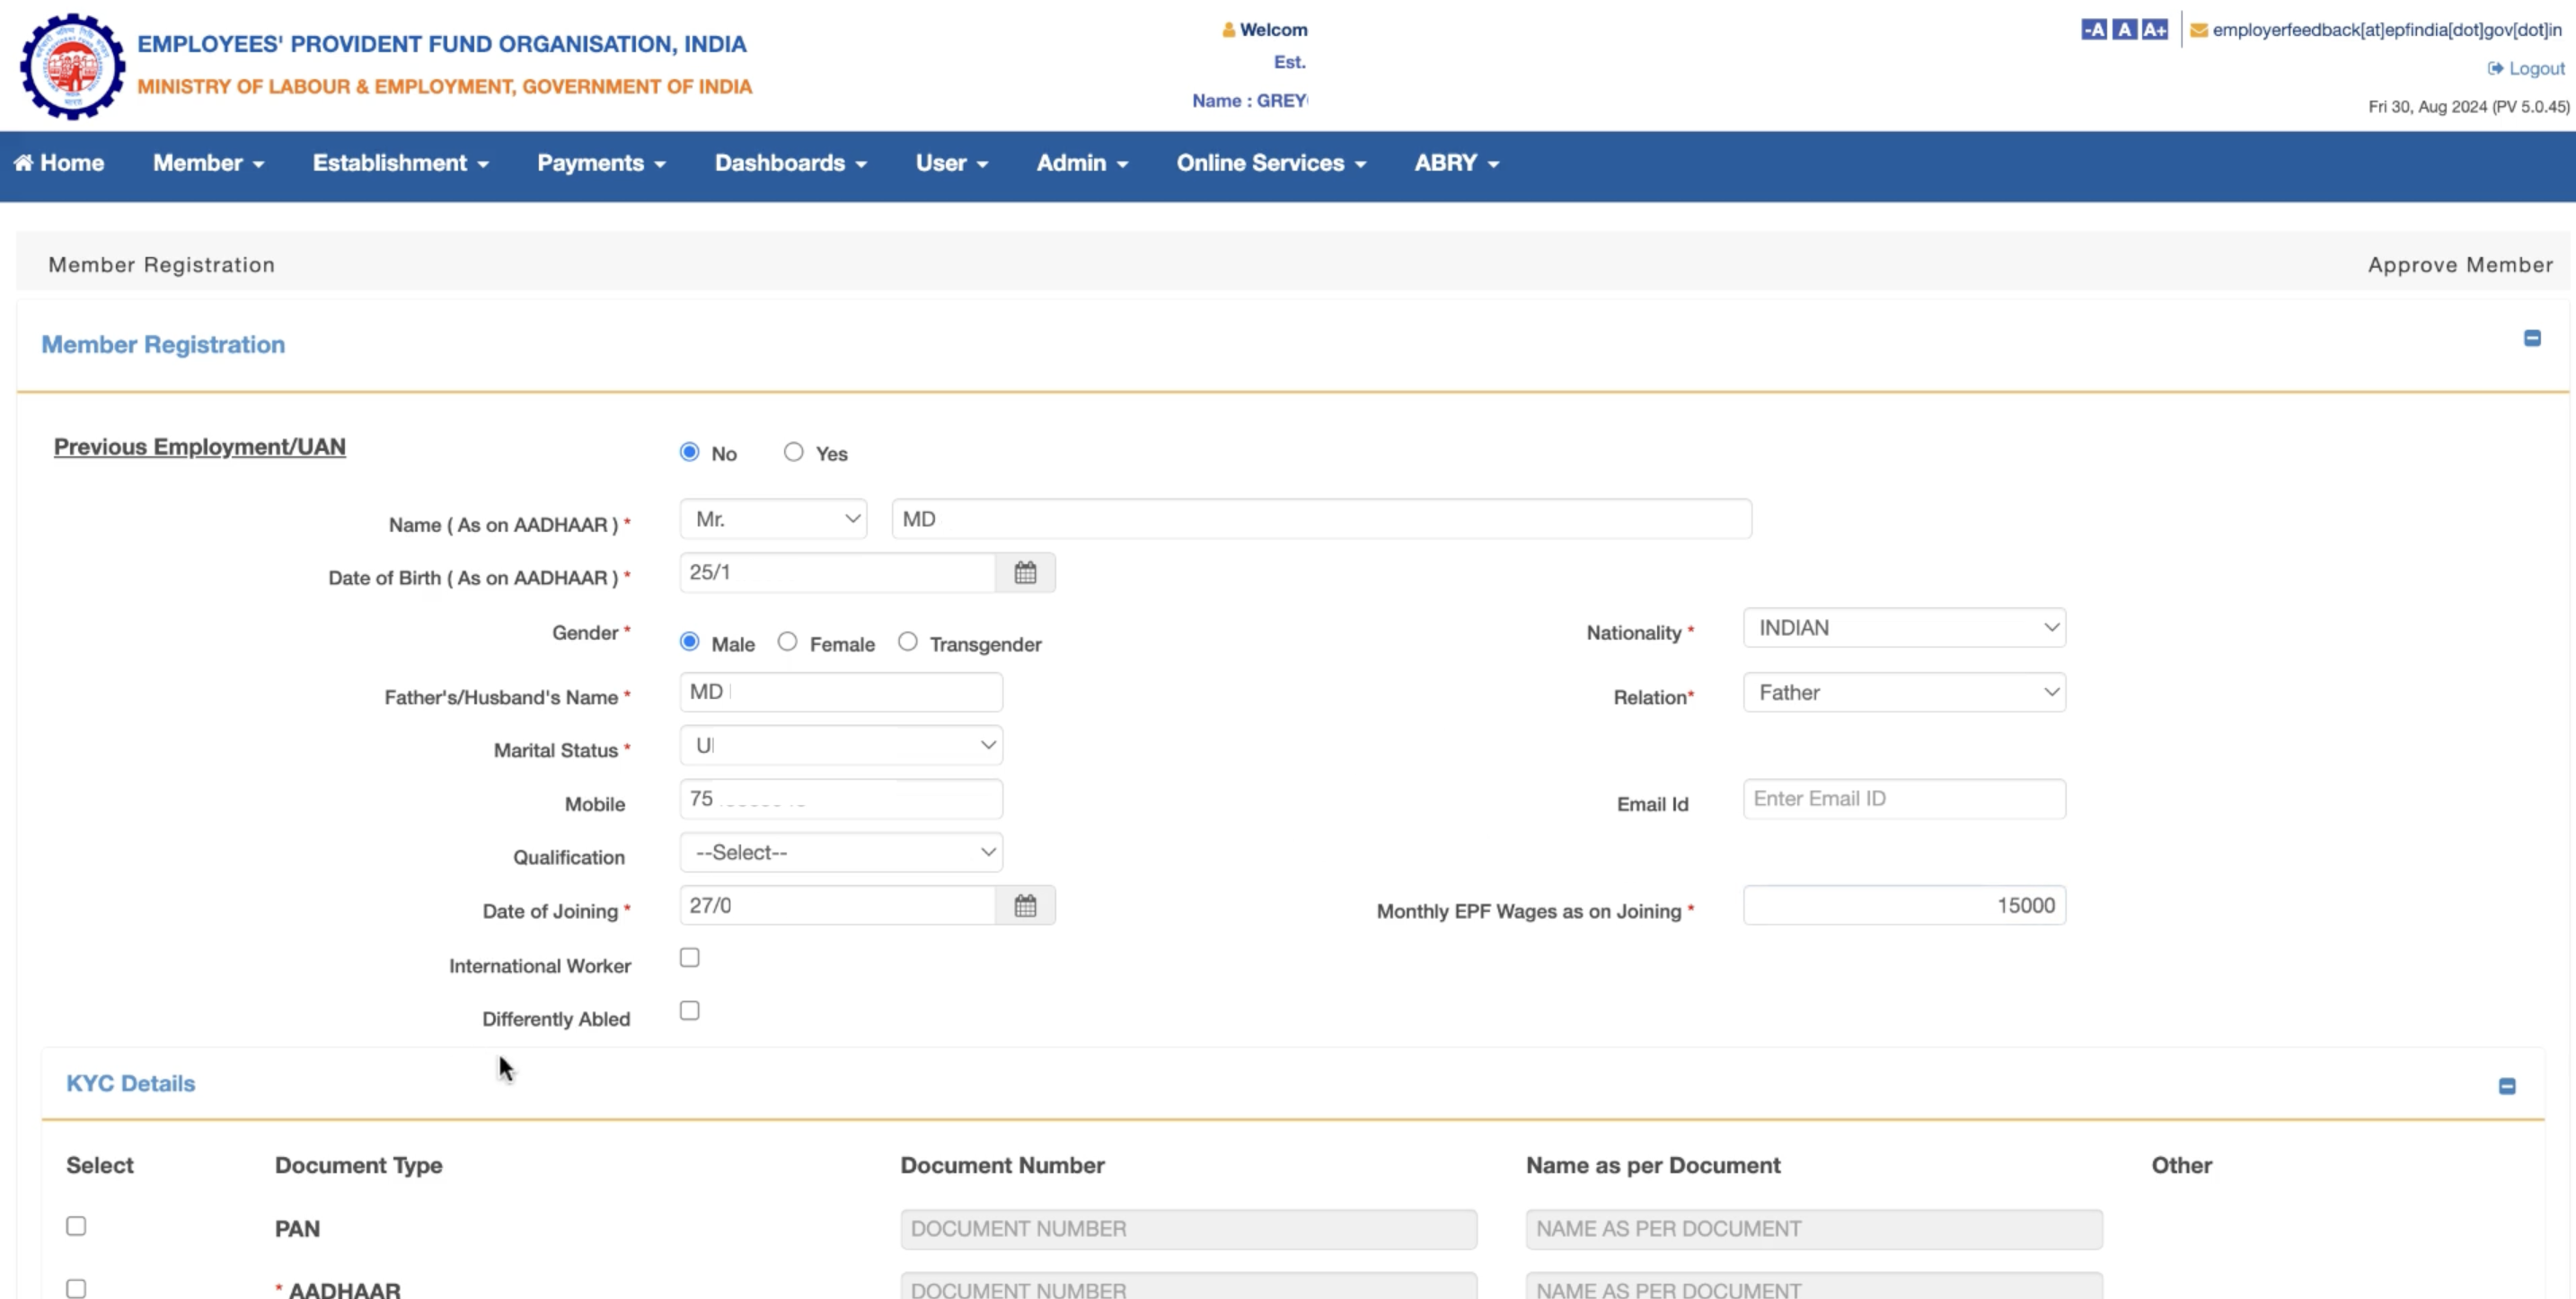 5. In the KYC Details section, select the **Document Type** to verify employee details. Employee's Aadhaar is mandatory.
1. Select the check boxes for the documents you choose to upload.
2. Enter the **DOCUMENT NUMBER**. For Aadhaar, you must enter the employee's Aadhaar number.
3. Enter the **Name as per Document**.
5. In the KYC Details section, select the **Document Type** to verify employee details. Employee's Aadhaar is mandatory.
1. Select the check boxes for the documents you choose to upload.
2. Enter the **DOCUMENT NUMBER**. For Aadhaar, you must enter the employee's Aadhaar number.
3. Enter the **Name as per Document**.
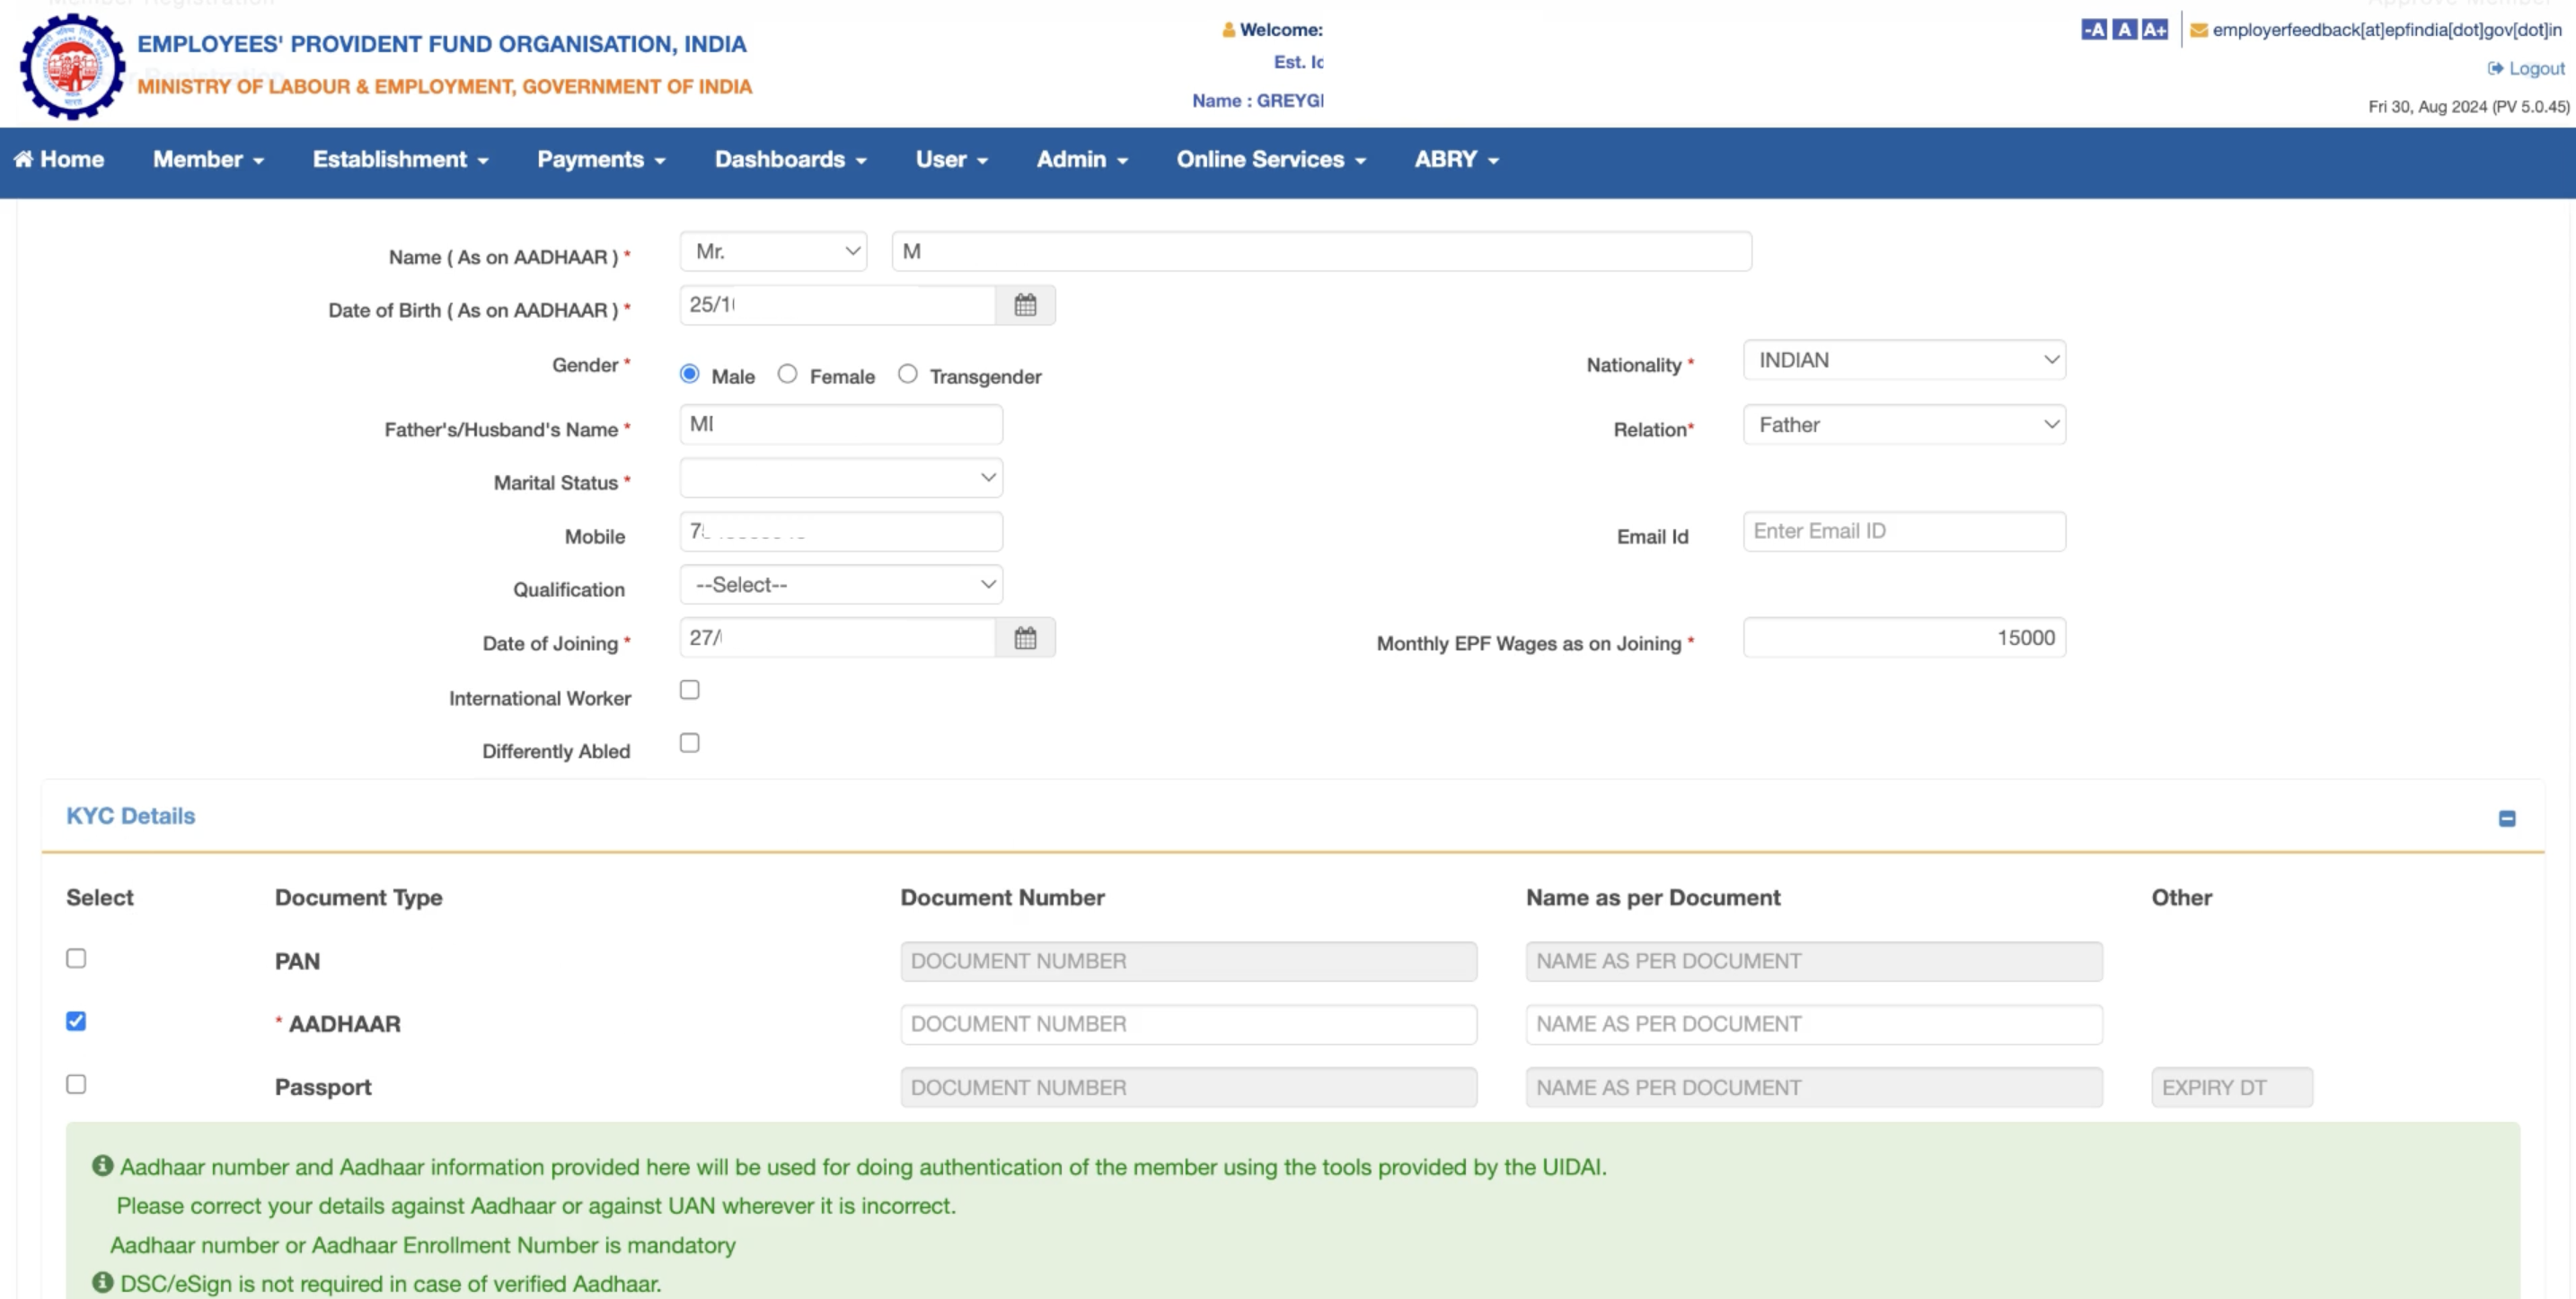 6. Select the check box to affirm that you have the employee's consent to upload the above information. Click **Save**.
This completes the registration process. Employee's details are now moved to the **Member details pending for approval section**. You can also edit or delete the registration as necessary. You must now approve the changes.
1. Navigate to **Member** in the top menu. Click **APPROVALS**.
2. On the **Pending** page, review the details and click **Approve**.
6. Select the check box to affirm that you have the employee's consent to upload the above information. Click **Save**.
This completes the registration process. Employee's details are now moved to the **Member details pending for approval section**. You can also edit or delete the registration as necessary. You must now approve the changes.
1. Navigate to **Member** in the top menu. Click **APPROVALS**.
2. On the **Pending** page, review the details and click **Approve**.
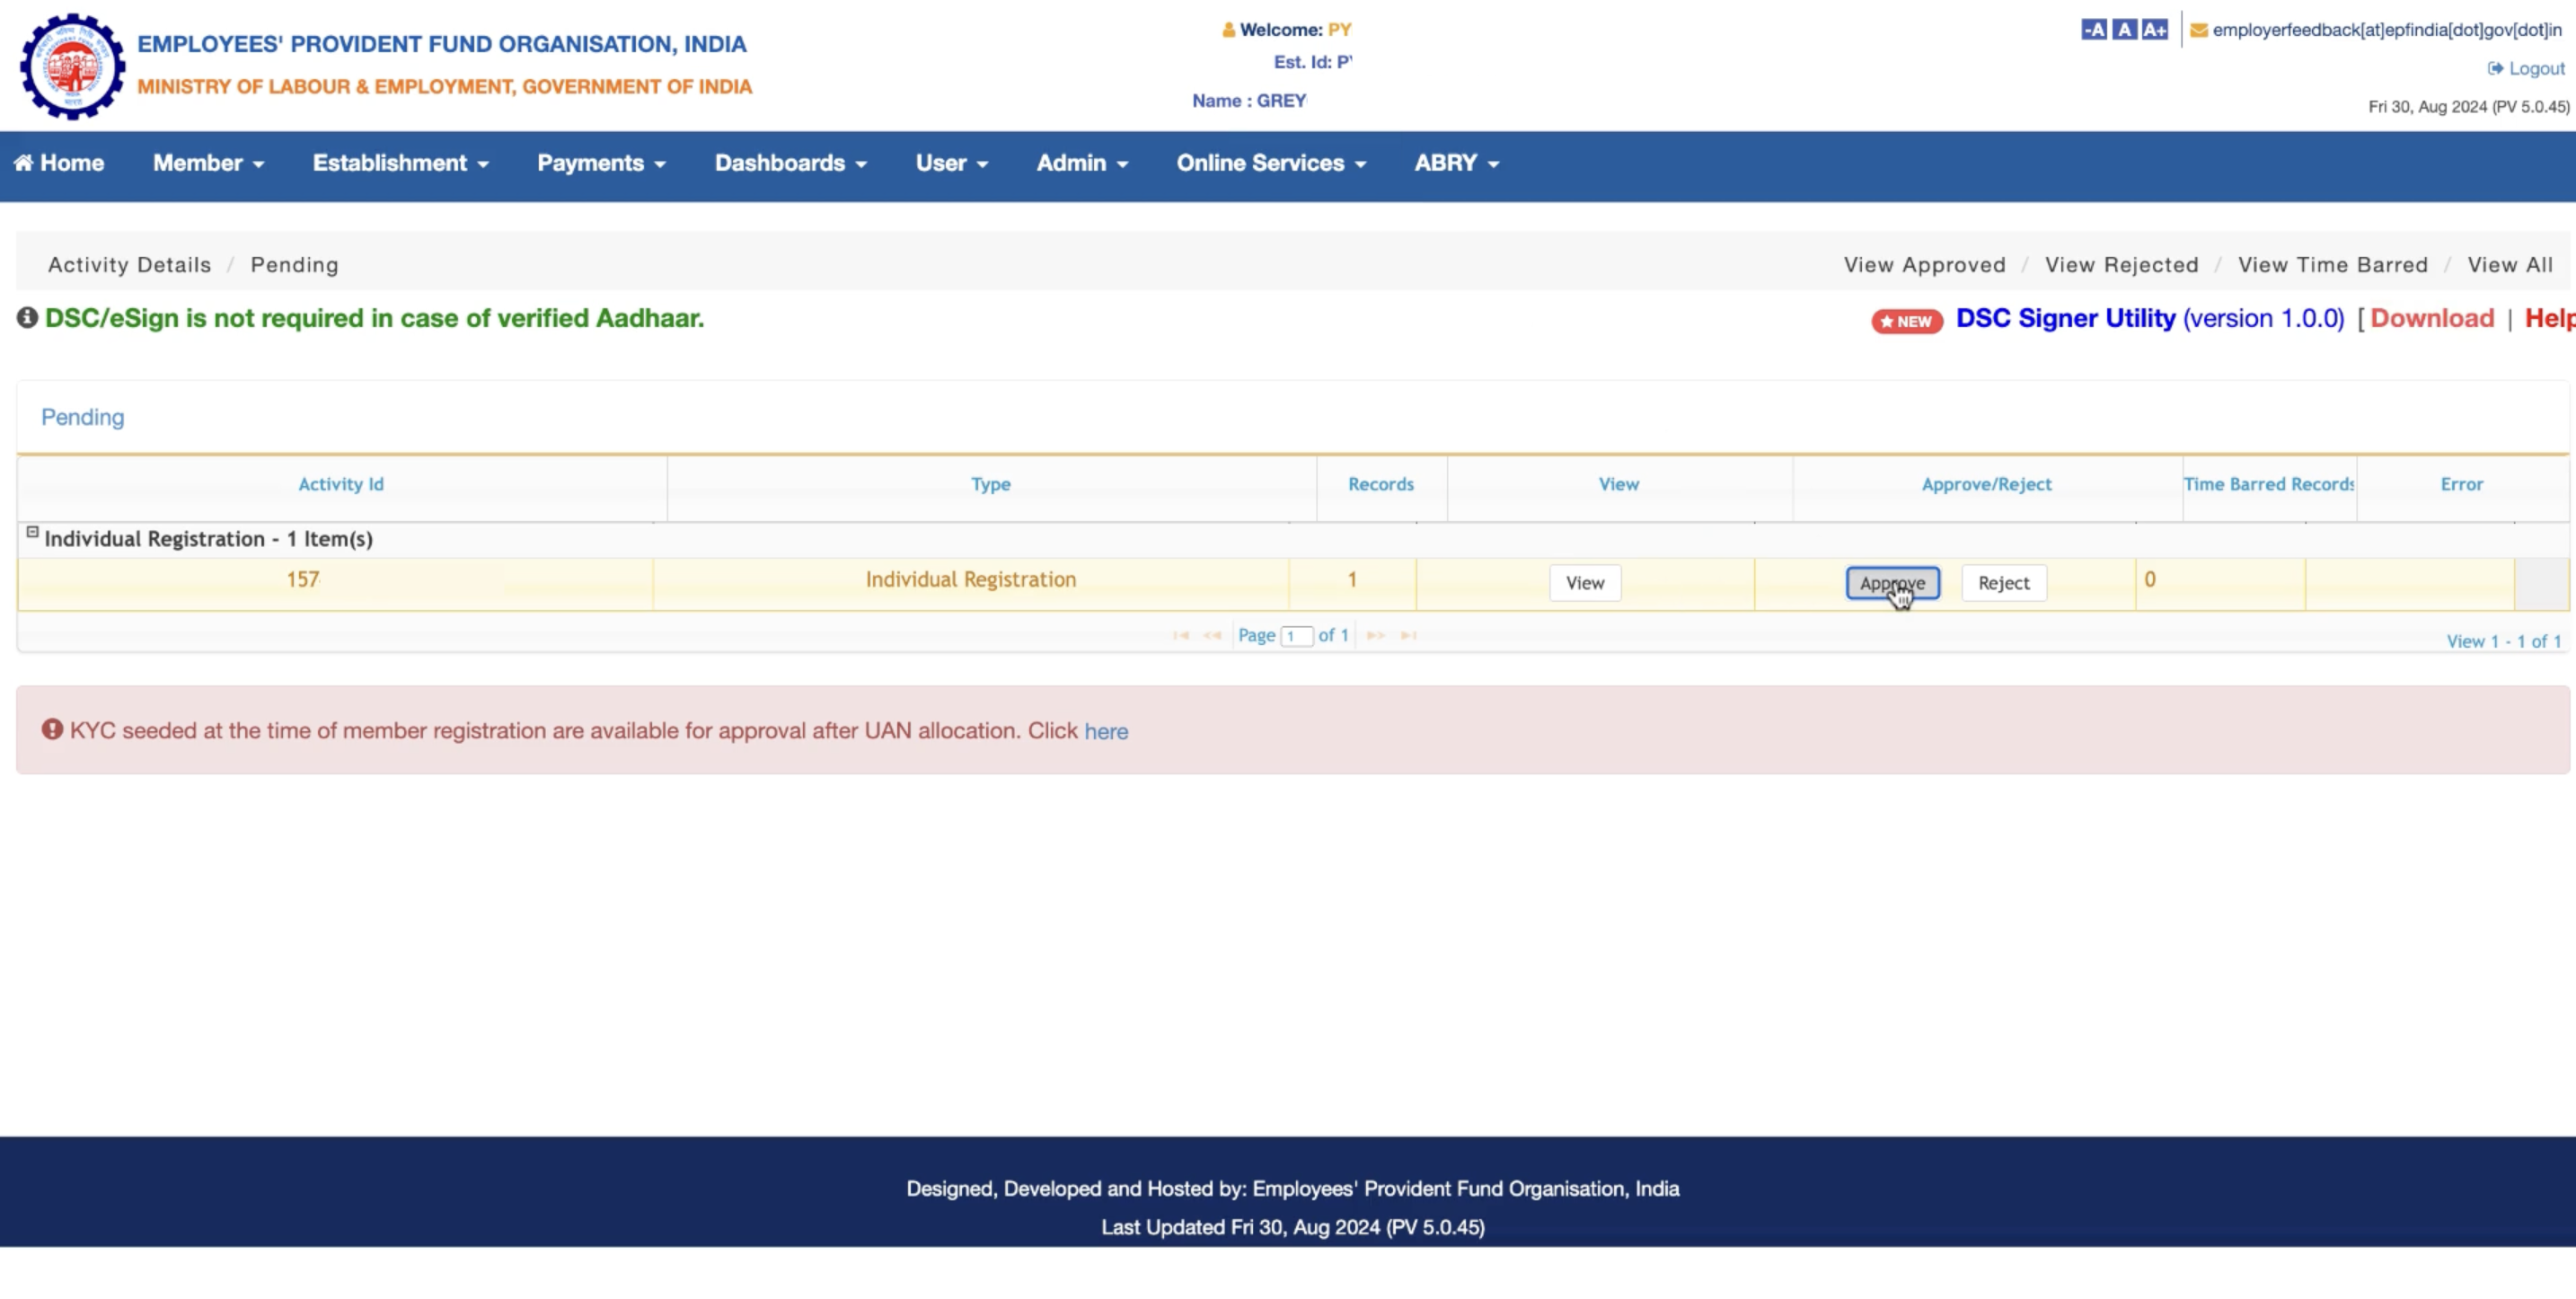 You have successfully registered your employees for PF via your organisation. Add the UAN on the employee's profile on the Payroll Dashboard.
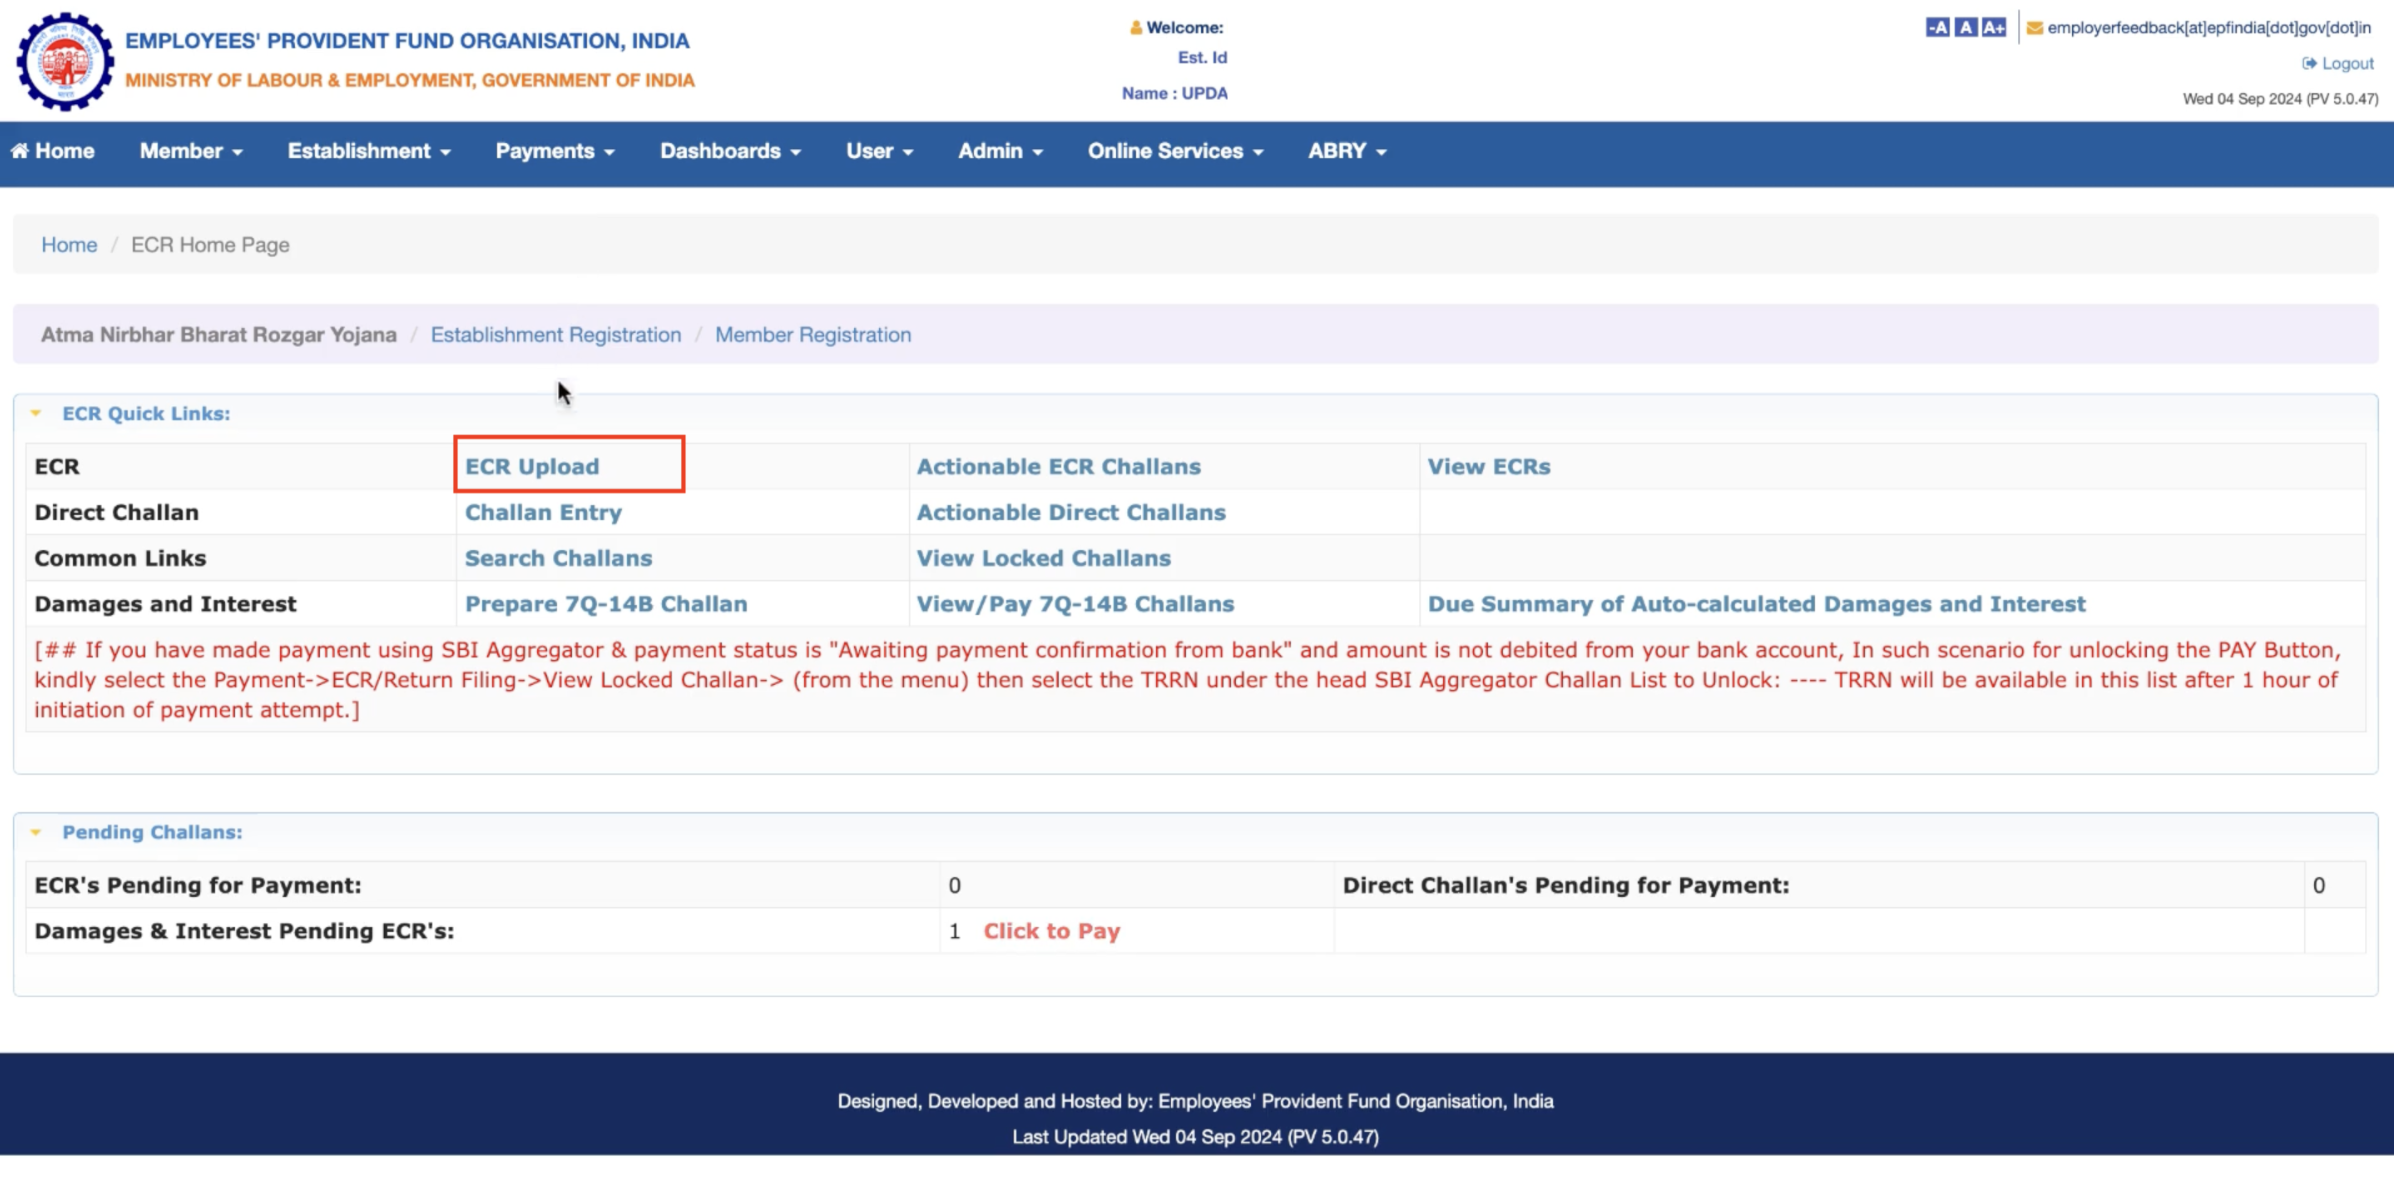 5. On the **ECR Upload** page, enter the following:
1. **Wage Month**. Select the payroll month, For example, August 2024.
2. **Salary Disbursal Date**.
3. **Select File**. Upload the .txt ECR downloaded from the Payroll Dashboard.
4. **File Type**. Select **ECR**.
5. **Contribution Rate %**. Select the number from the drop-down menu to indicate the percentage of employer's contribution. For example, 12%.
6. **Remarks**. Specify the payroll month, or any other remarks.
5. On the **ECR Upload** page, enter the following:
1. **Wage Month**. Select the payroll month, For example, August 2024.
2. **Salary Disbursal Date**.
3. **Select File**. Upload the .txt ECR downloaded from the Payroll Dashboard.
4. **File Type**. Select **ECR**.
5. **Contribution Rate %**. Select the number from the drop-down menu to indicate the percentage of employer's contribution. For example, 12%.
6. **Remarks**. Specify the payroll month, or any other remarks.
 6. Click **Upload**.
This successfully submits your organisation's ECR file for validation. The processed ECR file now moves to **Draft ECR's**.
1. In the **Draft ECR's:** section, click the download icon in the **ECR Statement** column.
2. Verify the ECR Statement. Click **Verify** in the **Action** column to proceed.
6. Click **Upload**.
This successfully submits your organisation's ECR file for validation. The processed ECR file now moves to **Draft ECR's**.
1. In the **Draft ECR's:** section, click the download icon in the **ECR Statement** column.
2. Verify the ECR Statement. Click **Verify** in the **Action** column to proceed.
 This successfully validates the ECR file. You can now prepare the PF challan to make the payment.
1. In the **In-Process ECR's** section, click **Prepare Challan** in the Action column.
This successfully validates the ECR file. You can now prepare the PF challan to make the payment.
1. In the **In-Process ECR's** section, click **Prepare Challan** in the Action column.
 2. The **Summary of Electronic Challan cum Return (ECR) page opens**. Here:
1. Review the ECR details.
2. Go to the **Employer details** section at the bottom of the challan.
3. Enter the **Total number of Employees in the month**. These are the number of employees for whom ECR is generated.
4. Provide the **Number of excluded employees** who are part of your organisation but are not present in the ECR file.
5. Enter the **Gross wages of the Excluded employees**. If two employees were excluded, provide the sum of their wages.
3. Click **Generate Challan** at the bottom of the page.
2. The **Summary of Electronic Challan cum Return (ECR) page opens**. Here:
1. Review the ECR details.
2. Go to the **Employer details** section at the bottom of the challan.
3. Enter the **Total number of Employees in the month**. These are the number of employees for whom ECR is generated.
4. Provide the **Number of excluded employees** who are part of your organisation but are not present in the ECR file.
5. Enter the **Gross wages of the Excluded employees**. If two employees were excluded, provide the sum of their wages.
3. Click **Generate Challan** at the bottom of the page.
 This successfully finalises the challan. Click **Pay** in the **Payment** column to make the PF payment.
On the Challan Payment page:
1. Select the bank from the drop-down menu to make the PF payment from.
2. Click **Continue**.
3. Log in to your banking account and complete the payment.
This successfully finalises the challan. Click **Pay** in the **Payment** column to make the PF payment.
On the Challan Payment page:
1. Select the bank from the drop-down menu to make the PF payment from.
2. Click **Continue**.
3. Log in to your banking account and complete the payment.