> ## Documentation Index
> Fetch the complete documentation index at: https://razorpay-881012b3.mintlify.site/llms.txt
> Use this file to discover all available pages before exploring further.

# Quickstart Guide

> Complete guide to get started with RazorpayX Payroll.

<div style={{display:"flex",flexWrap:"wrap",alignItems:"center",gap:"0.35rem 0.9rem",border:"1px solid rgba(128,128,128,0.28)",borderRadius:"0.5rem",padding:"0.45rem 0.75rem",margin:"0 0 1.25rem",fontSize:"0.875rem"}}>
  <span style={{fontWeight:600}}>Available in</span>
  <span>🇮🇳 India</span>
</div>

After you sign up with [Payroll](https://payroll.razorpay.com/login), you can begin to set up your account and Dashboard.

## Set Up Payroll Account

The following guide provides a checklist of prerequisite steps and best practices to set up your organisation's payroll account and system.

<Warning>
  **Watch Out!**

  Automated Professional Tax (PT) payments for employees in Karnataka are temporarily unavailable on Payroll. Know more about the [PT rule change](/docs/payroll/faqs#professional-tax).
</Warning>

<AccordionGroup>
  <Accordion title="Add All Employees">
    You can add employees individually or in bulk on the Payroll Dashboard to set up the payroll recipients.

    To add employees:

    1. Log in to the [Payroll Dashboard](https://payroll.razorpay.com/dashboard).
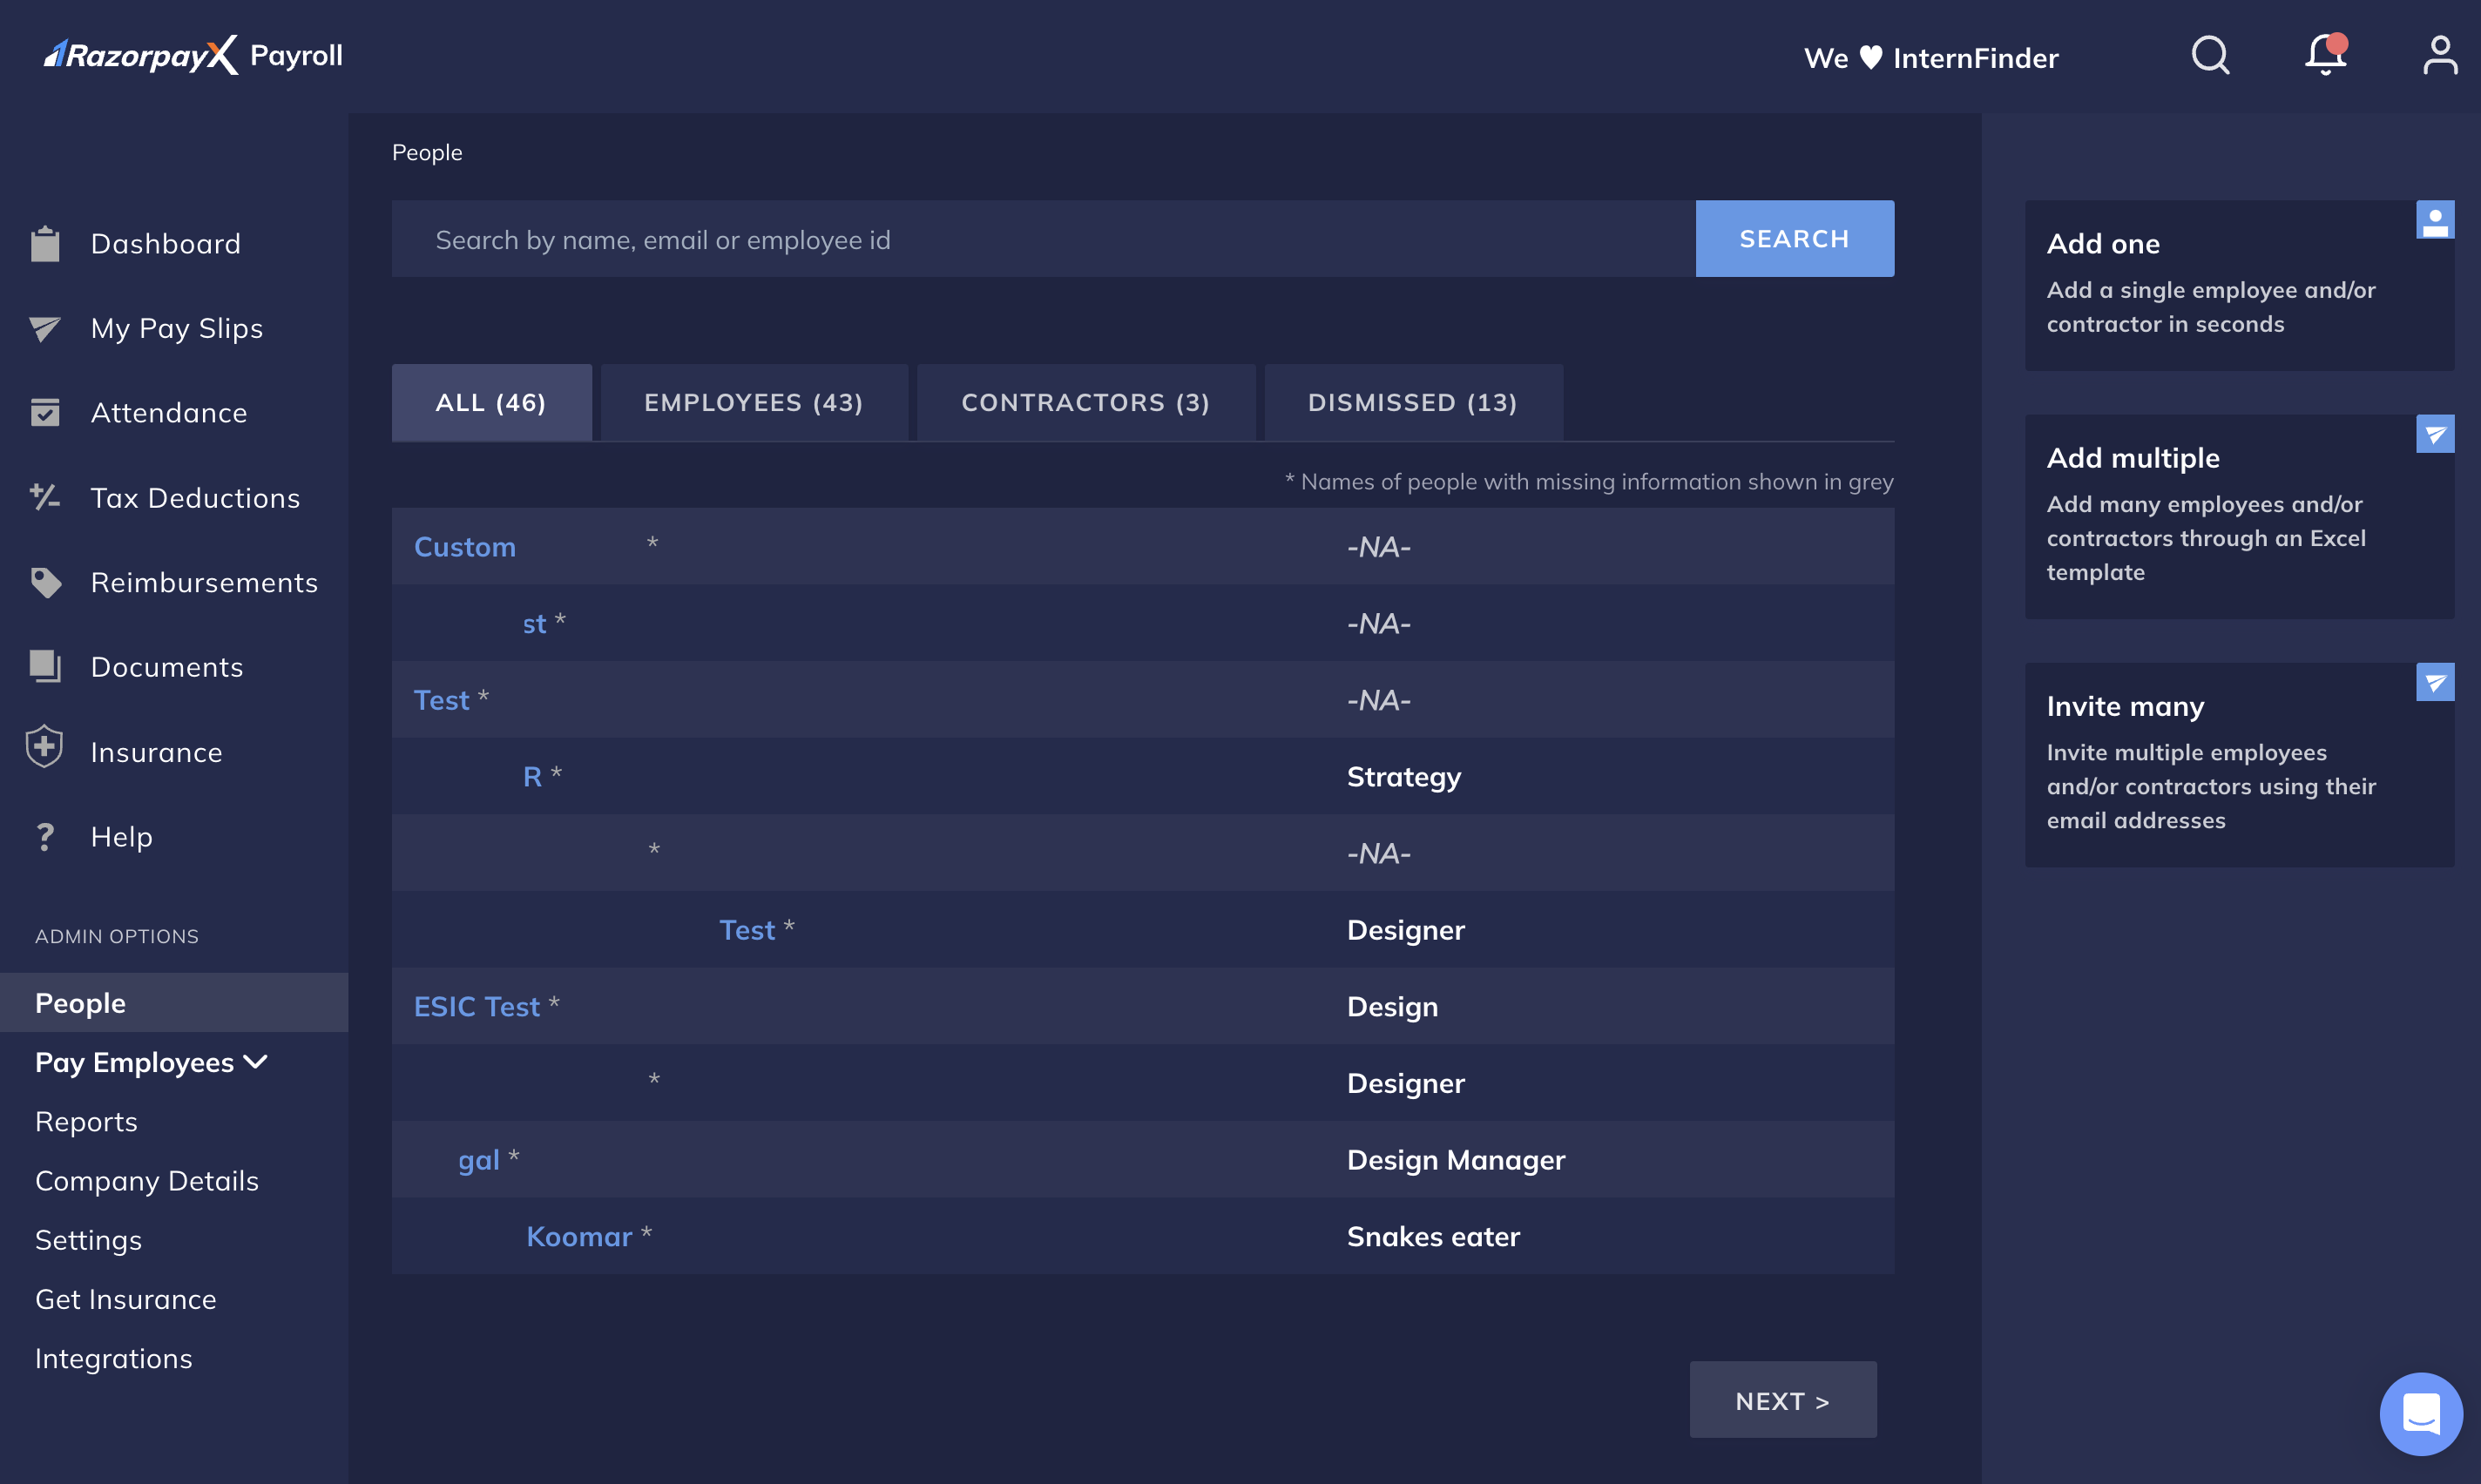
    2. Navigate to **ADMIN OPTIONS** → **People**.
    3. Click **Add One** to add an individual employee, or **Add Multiple** to add multiple employees. You can also invite your employees using their email ids using **Invite many**.
           <img src="https://razorpay.com/docs/build/browser/assets/images/x-xpayroll-add-emp.jpg" alt="Add employees on RazorpayX Payroll Dashboard" width="800" />
    4. Enter the employees' information such as joining date, authorised email id, salary information and more.
    5. Click **CONTINUE**.

    You have successfully added employees/contractors to the Dashboard. Your employees can complete their [onboarding and profile set up](/docs/payroll/employees#employee-onboarding) using the welcome mail they receive at their registered email id.
    <Warning>
      **Watch Out!**

      Sometimes your employees may not be added to your system due to operational discrepancies like [not receiving the welcome mail](/docs/payroll/administrator#welcome-mail). Re-trigger a welcome mail or invite them to your company and payroll system.
    </Warning>
  </Accordion>

  <Accordion title="Enable Compliances">
    Update your organisation's compliance details as applicable. We support and automate many monthly [statutory compliance](/docs/payroll/statutory-compliance) payments.

    To enable compliances applicable:

    1. Log in to the [Payroll Dashboard](https://payroll.razorpay.com/dashboard).
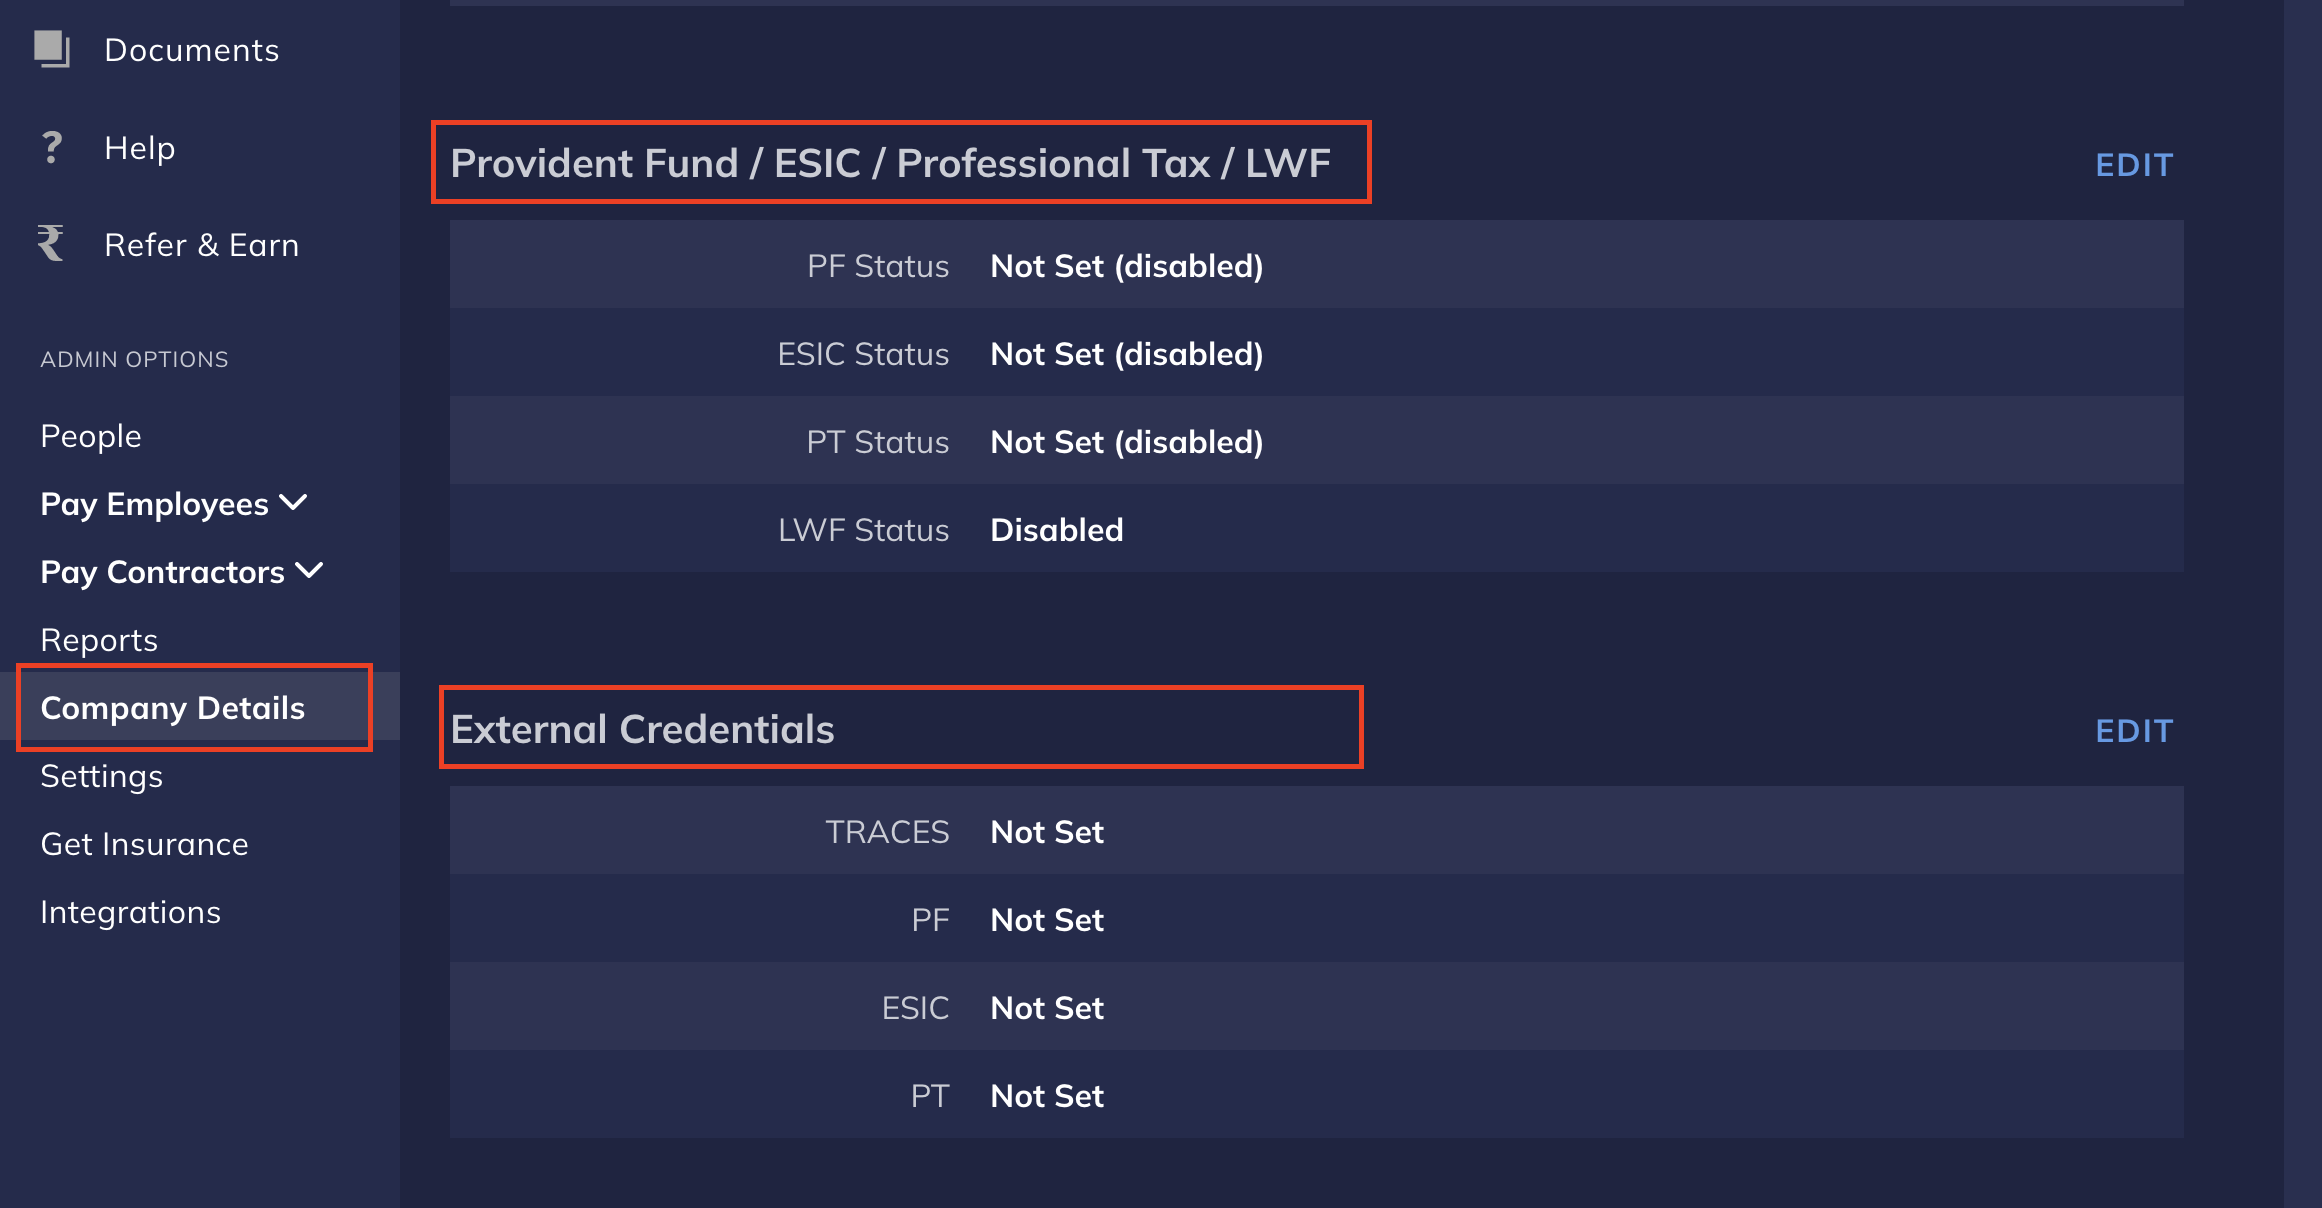
    2. Navigate to **ADMIN OPTIONS** → **Company Details** in the left menu.
    3. Click **Provident Fund / ESIC / Professional Tax / LWF** → **EDIT** and enable compliances from the respective drop-down menu as applicable.
    4. Click **CONTINUE** to save the changes.

           <img src="https://razorpay.com/docs/build/browser/assets/images/x-payroll-enable-compliances.jpg" alt="Changing compliance settings like PF and external credentials in Payroll" width="800" />

    If you want us to handle your external compliances, connect your Payroll account to your compliance portals as applicable.

    1. Go to **External Credentials** in **Company Details** → **EDIT**.
    2. Enter the user ids and passwords to authenticate your credentials.
    3. Click **CONTINUE** to save the changes.

    You have successfully enabled the applicable compliances. Know more about [compliance payments and automation](/docs/payroll/statutory-compliance).
  </Accordion>

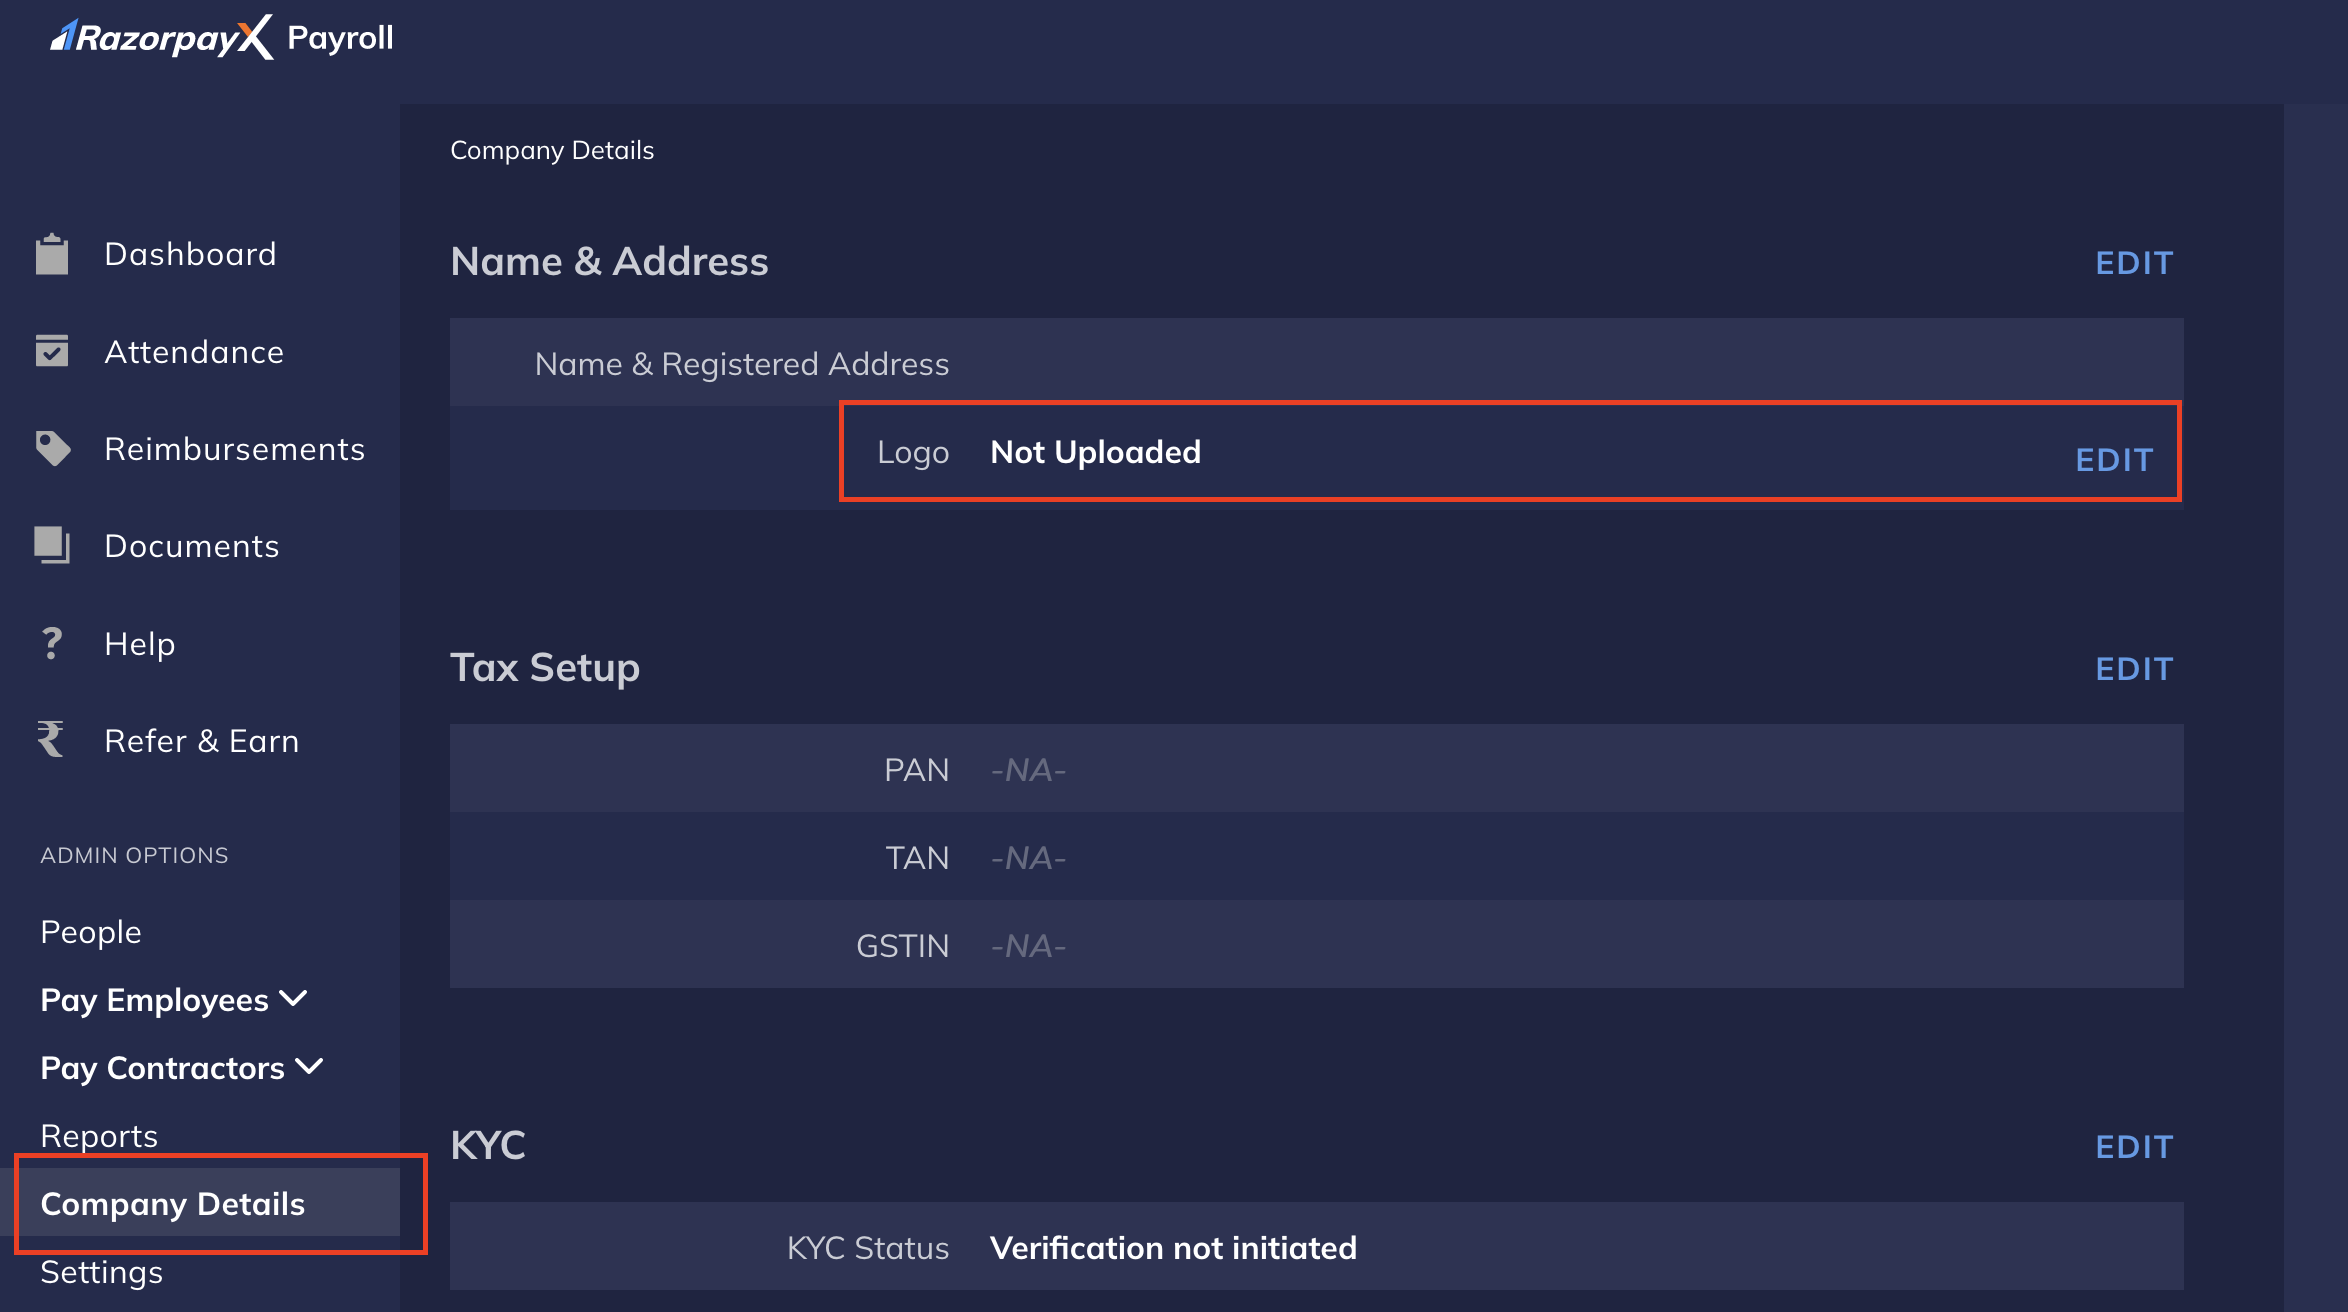
  <Accordion title="Upload Company Logo">
    You can upload your company logo to reflect on both the Dashboard and the payslips. Ensure you meet the following conditions for the logo:

    * Must be a PNG file.
    * Must have a 5:1 aspect ratio or be rectangular shaped.
    * Must have a transparent background.

    To upload the logo:

    1. Log in to the [Payroll Dashboard](https://payroll.razorpay.com/dashboard).
    2. Navigate to **Company Details** → **Name & Address** → **EDIT**.
    3. Upload the photograph and click **PREVIEW**.

           <img src="https://razorpay.com/docs/build/browser/assets/images/xpayroll-upload-logo.jpg" alt="Upload Company Logo under Company Details in Payroll" width="800" />
  </Accordion>

  <Accordion title="Setup Default Salary Structure">
    See [default salary structure](/docs/payroll/salary#setup-salary-structure) set up.
  </Accordion>

  <Accordion title="Check for Missing Information">
    Before you [execute payroll](/docs/payroll/execute-payroll), ensure you your employees' data is available and up-to-date.

    To check for missing information:

    1. Log in to the [Payroll Dashboard](https://payroll.razorpay.com/dashboard).
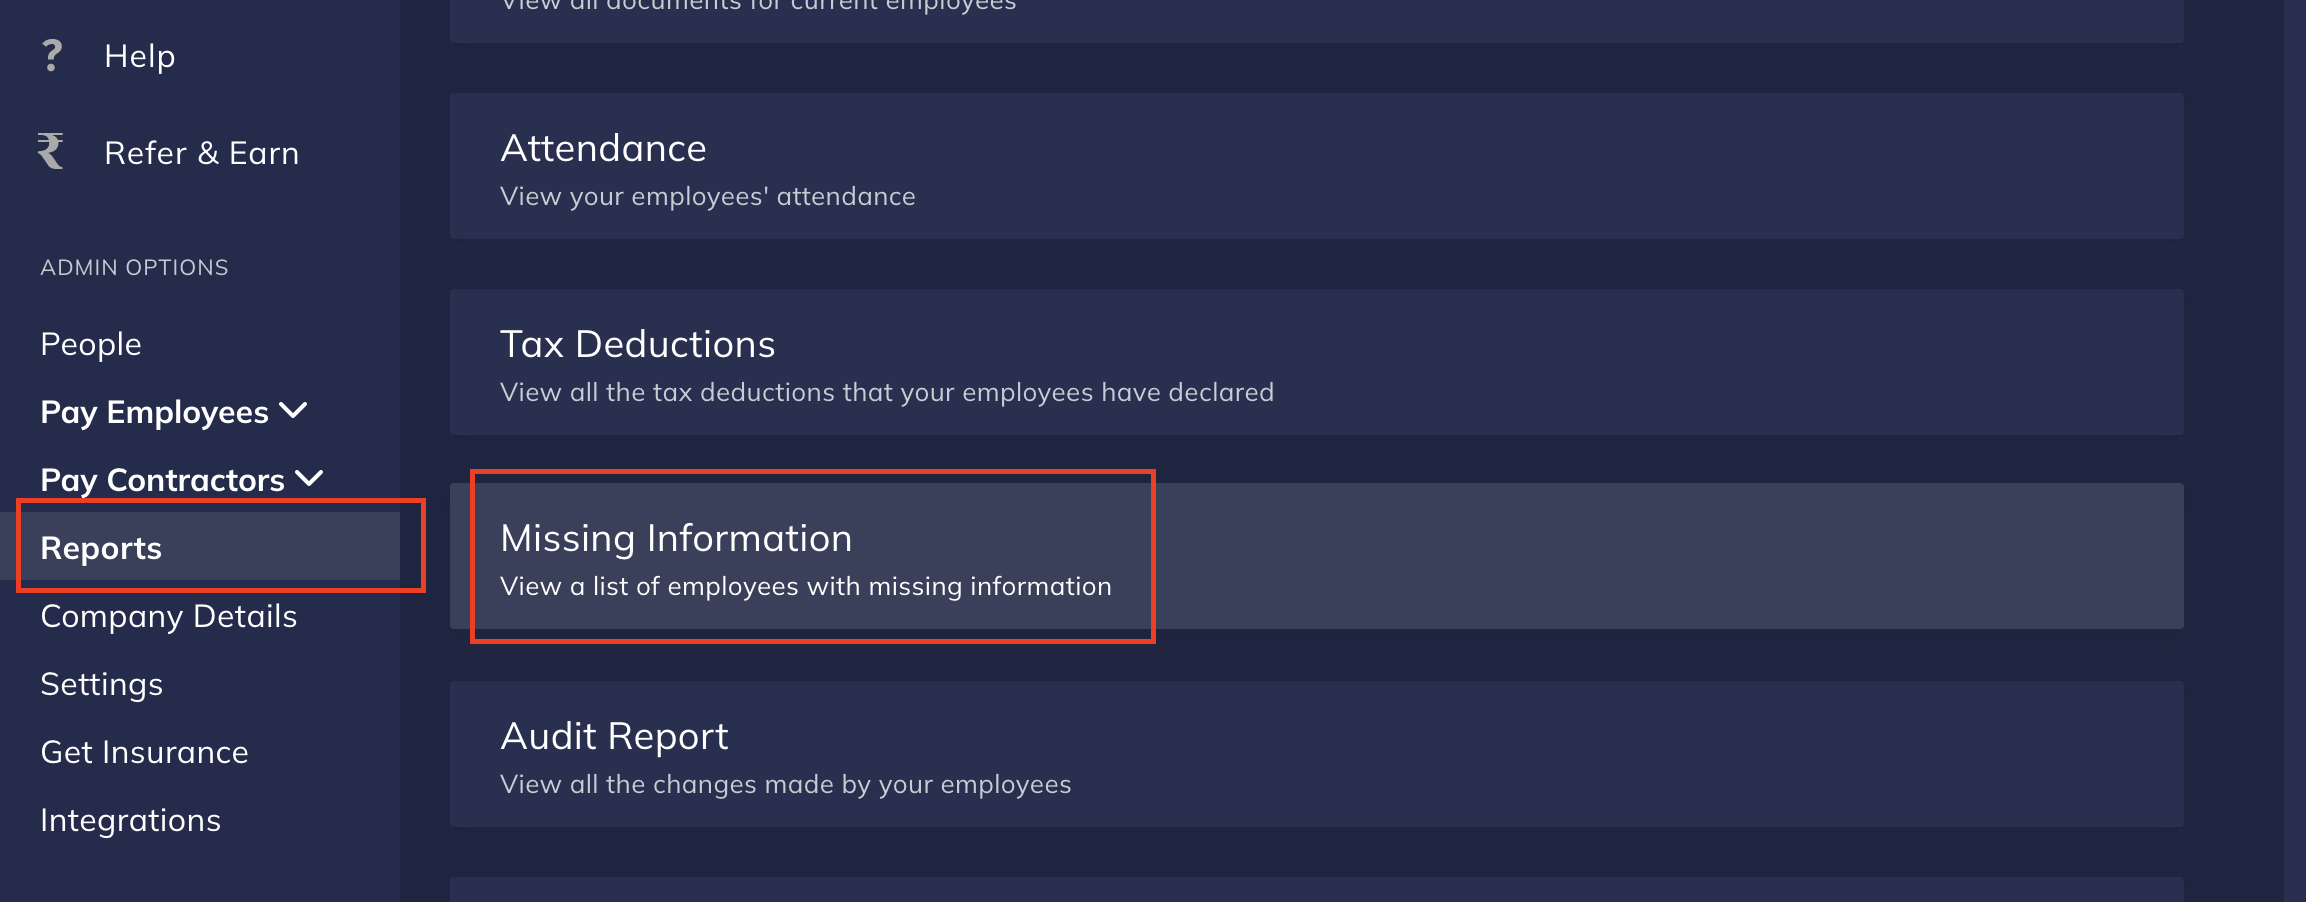
    2. Go to **ADMIN OPTIONS** → **Reports** → **Missing Information**. This opens the **Missing Information** page with a list of employees and their missing information.
    3. Select the checkboxes against the employees' names and click **SEND EMAILS**. You can also select all employees using the checkbox against **Employee Name**.
    4. Click **SEND EMAILS** to re-confirm.

    Your employee/s receive an email at their registered email address to update their missing information.

    <img src="https://razorpay.com/docs/build/browser/assets/images/xpayroll-missing-info.jpg" alt="Missing Information settings in Payroll" width="800" />
  </Accordion>

  <Accordion title="Confirm Salary Components">
    You should re-check the salary components and net salary calculations.

    To re-check salary information:

    1. Log in to the [Payroll Dashboard](https://payroll.razorpay.com/dashboard)
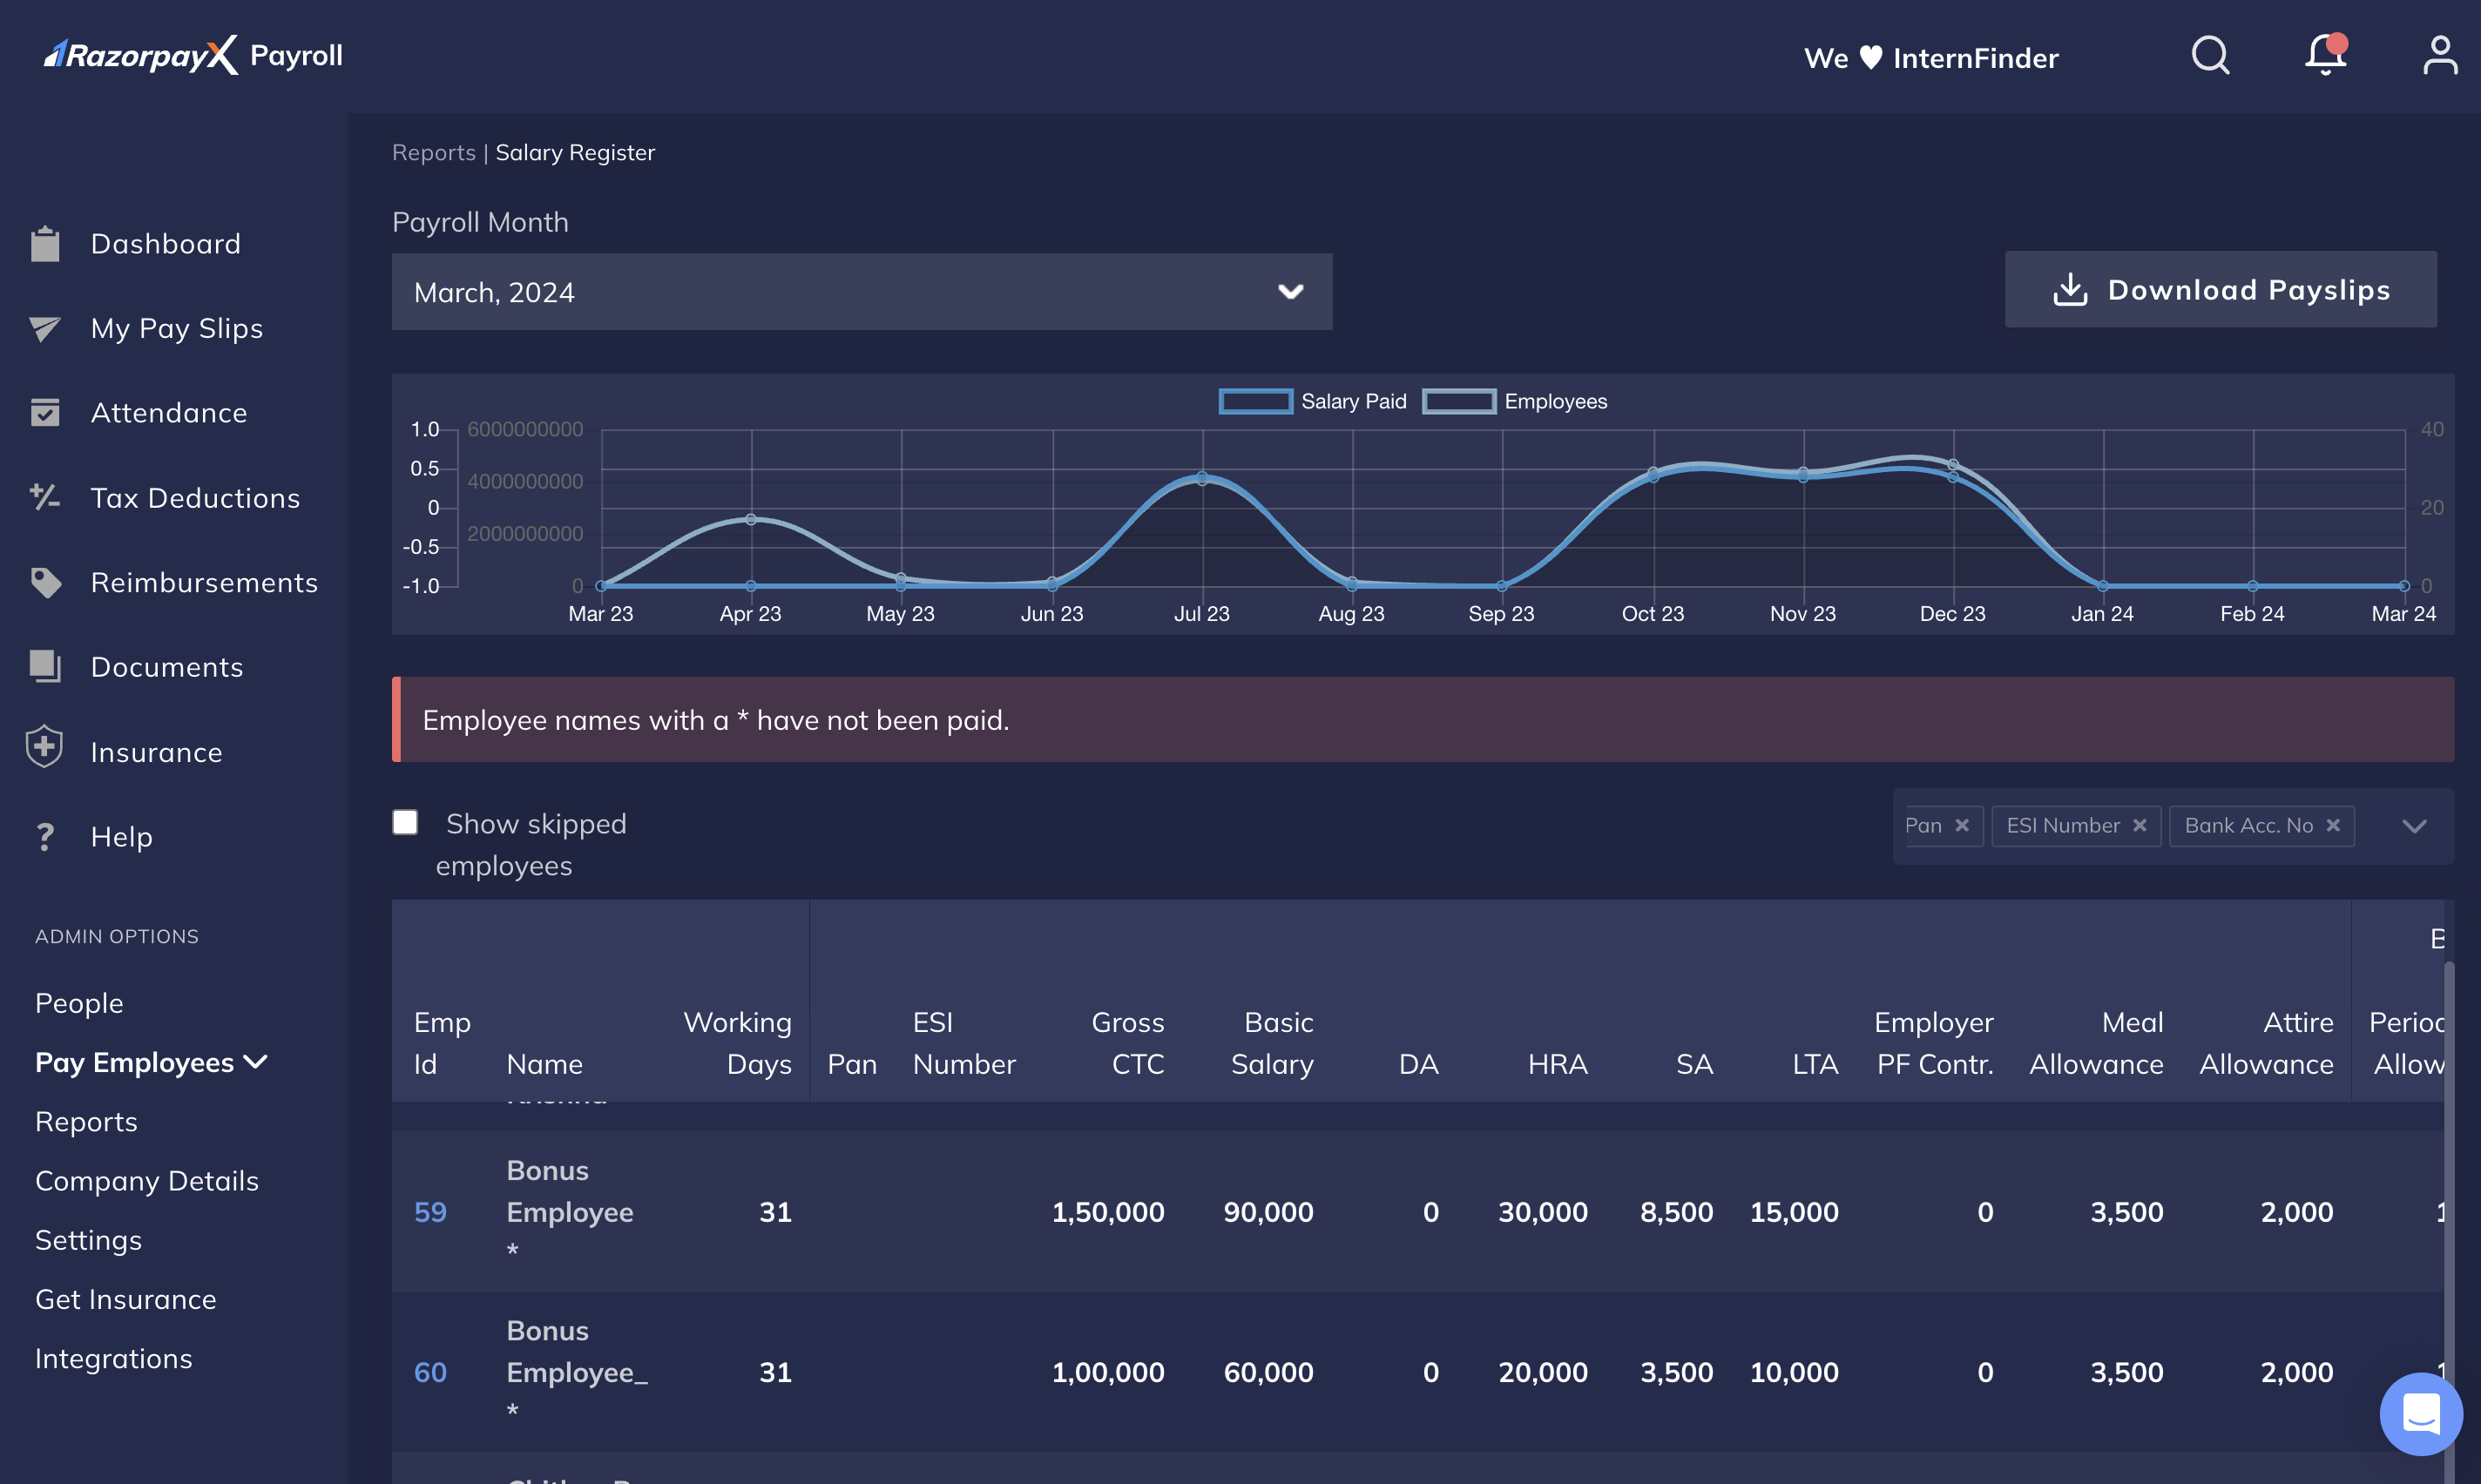
    2. Navigate to **ADMIN OPTIONS** → **Reports**.
    3. Select **Salary Register** and select the relevant month. You can filter the information, download the payslips for that month and download the data as a .CSV file to process the data better.

    <img src="https://razorpay.com/docs/build/browser/assets/images/xpayroll-check-salary-register.jpg" alt="Salary Register in Payroll Dashboard" width="800" />
  </Accordion>

  <Accordion title="Employee Tax Declarations">
    You must ask your employees to update their tax deductions and declarations on the [Employee Dashboard](/docs/payroll/employees/declarations).

    Employees must navigate to **Tax Deductions** on their Dashboard to update their tax details and minimise their deductible taxes.
  </Accordion>

  <Accordion title="Add RazorpayX Payroll as Beneficiary">
    To enable fund transfers, you need to add your Payroll Account as a beneficiary. You can find your account details in the Payroll [Money Transfer page](https://payroll.razorpay.com/moneyTransfer).
  </Accordion>

  <Accordion title="Update UAN">
    Update your employees' Universal Account Number (UAN) if applicable.

    To update UAN:

    1. Log in to the [Payroll Dashboard](https://payroll.razorpay.com/dashboard).
    2. Navigate to **ADMIN OPTIONS** → **People**.
    3. Select the employee From the list of employees and open their profile.
    4. Update their PF details in **Provident Fund** → **Professional Tax & ESI**.
  </Accordion>

  <Accordion title="Enable Resignation">
    You can enable employee resignations and allow employees to submit resignation requests.

    1. Log in to the [Payroll Dashboard](https://payroll.razorpay.com/dashboard).
    2. Go to **Settings** → **Employee Resignation Setup** → **EDIT**.
    3. Select the **Enable resignations feature** check box.
  </Accordion>
</AccordionGroup>

With all of the above done, your account is completely set up to process payroll.

### Related Information

* [Execute Payroll](/docs/payroll/execute-payroll)
* [Statutory Compliance](/docs/payroll/statutory-compliance)
* [Administrative Role](/docs/payroll/administrator)
* [Salary](/docs/payroll/salary)