> ## Documentation Index
> Fetch the complete documentation index at: https://razorpay-881012b3.mintlify.site/llms.txt
> Use this file to discover all available pages before exploring further.
# Apple Pay
Available in
🇮🇳 India
🇸🇬 Singapore
🇺🇸 United States
Apple Pay is a secure, contactless payment method that allows customers to pay using their Apple devices with Face ID/Touch ID authentication. Once Apple Pay is enabled and integrated, it appears on your Checkout page as a payment option, providing a frictionless checkout experience for customers. Know more about [Apple Pay](https://www.apple.com/apple-pay/).
Integrating Apple Pay as a payment method on Checkout offers you the following advantages:
* **Higher Conversion Rates**: Up to 58% improvement in checkout conversion rates for customers.
* **Reduced Friction**: Eliminate manual card entry with biometric authentication (Face ID/Touch ID).
* **Enhanced Security**: Benefit from Apple's tokenisation and liability shift protection.
* **Faster Checkout**: 45% reduction in checkout time for Apple device users.
* **Increased Average Order Value**: Potential 12% increase in transaction value.
* **Global Reach**: Accept payments from customers in 70+ countries.
## Prerequisites
Before enabling Apple Pay, ensure you have:
* Razorpay Standard Checkout.
* HTTPS-enabled website with TLS 1.2 or higher.
* Access to your web server to upload verification files.
* Registered business entity (non-profit organisations are not eligible).
* Display the Apple Pay [brand mark](https://developer.apple.com/apple-pay/marketing/Apple-Pay-Mark.zip) on your website in the payment methods section. Follow [Apple's official marketing guidelines](https://developer.apple.com/apple-pay/marketing/) to display the Apple Pay brand mark to indicate support before checkout.
## Integrate Apple Pay on Standard Checkout
Follow the steps given below:
Apple Pay needs you to host a file in your domain.
**Watch Out!**
* The file path must be exactly as specified (case-sensitive).
* File hosting is required on websites where Razorpay Checkout loads as an overlay/iframe. This includes:
* WooCommerce, Magento and other ecommerce platforms where Razorpay appears as an overlay. Any website where `checkout.razorpay.com` iframe is embedded.
* No file hosting required on:
* Shopify, Mobile SDKs (Flutter, Native iOS, React Native) and Razorpay no-code solutions, such as [Payment Links](/docs/sg/payments/payment-links) and [Payment Pages](/docs/sg/payments/payment-pages).
* File hosting is required if you use both hosted checkouts and overlay iframe integration (a non-Shopify website where an iframe loads as an overlay and Payment Buttons) on your business id. Please do not activate Apple Pay if you have both these kinds of checkouts unless you have hosted the file at the exact path.
#### Domain Verification Process:
1. Download the [verification file](https://razorpay.com/docs/build/browser/assets/images/apple-developer-merchantid-domain-association.zip).
2. Host the file on your server.
* Upload the file to this exact path on your website:
```
/.well-known/apple-developer-merchantid-domain-association
```
* For example, if your domain is `https://www.yourstorename.com`, the file must be accessible at:
```
https://www.yourstorename.com/.well-known/apple-developer-merchantid-domain-association
```
3. Ensure correct configuration. When setting up Apple Pay domain verification, follow these requirements:
File Path and Response
* The verification file must be accessible at the exact path, `/.well-known/apple-developer-merchantid-domain-association`.
* The file must return a direct HTTP 200 status code and not a 301, 302 or any 3xx redirects.
* Apple does not support HTTP URL redirects for the domain association file.
Server Configuration
* The file must be served via HTTPS 1.1 protocol.
* The file must have Content-Type: text/plain in the header.
* The file must be externally accessible (not behind authentication).
* The file must not be password protected.
* The file must not be behind a proxy or redirect.
Network Access
* Ensure the file is not behind a firewall or access restrictions.
* If using a firewall, configure it to allow Apple's [IP addresses](https://developer.apple.com/documentation/applepayontheweb/setting-up-your-server).
4. Dashboard Configuration and Verification
* Log in to the Dashboard and navigate to **Account & Settings** → **International payments** (under Payment methods). Click [**Apple Pay**](https://dashboard.razorpay.com/app/payment-methods/apple-pay).
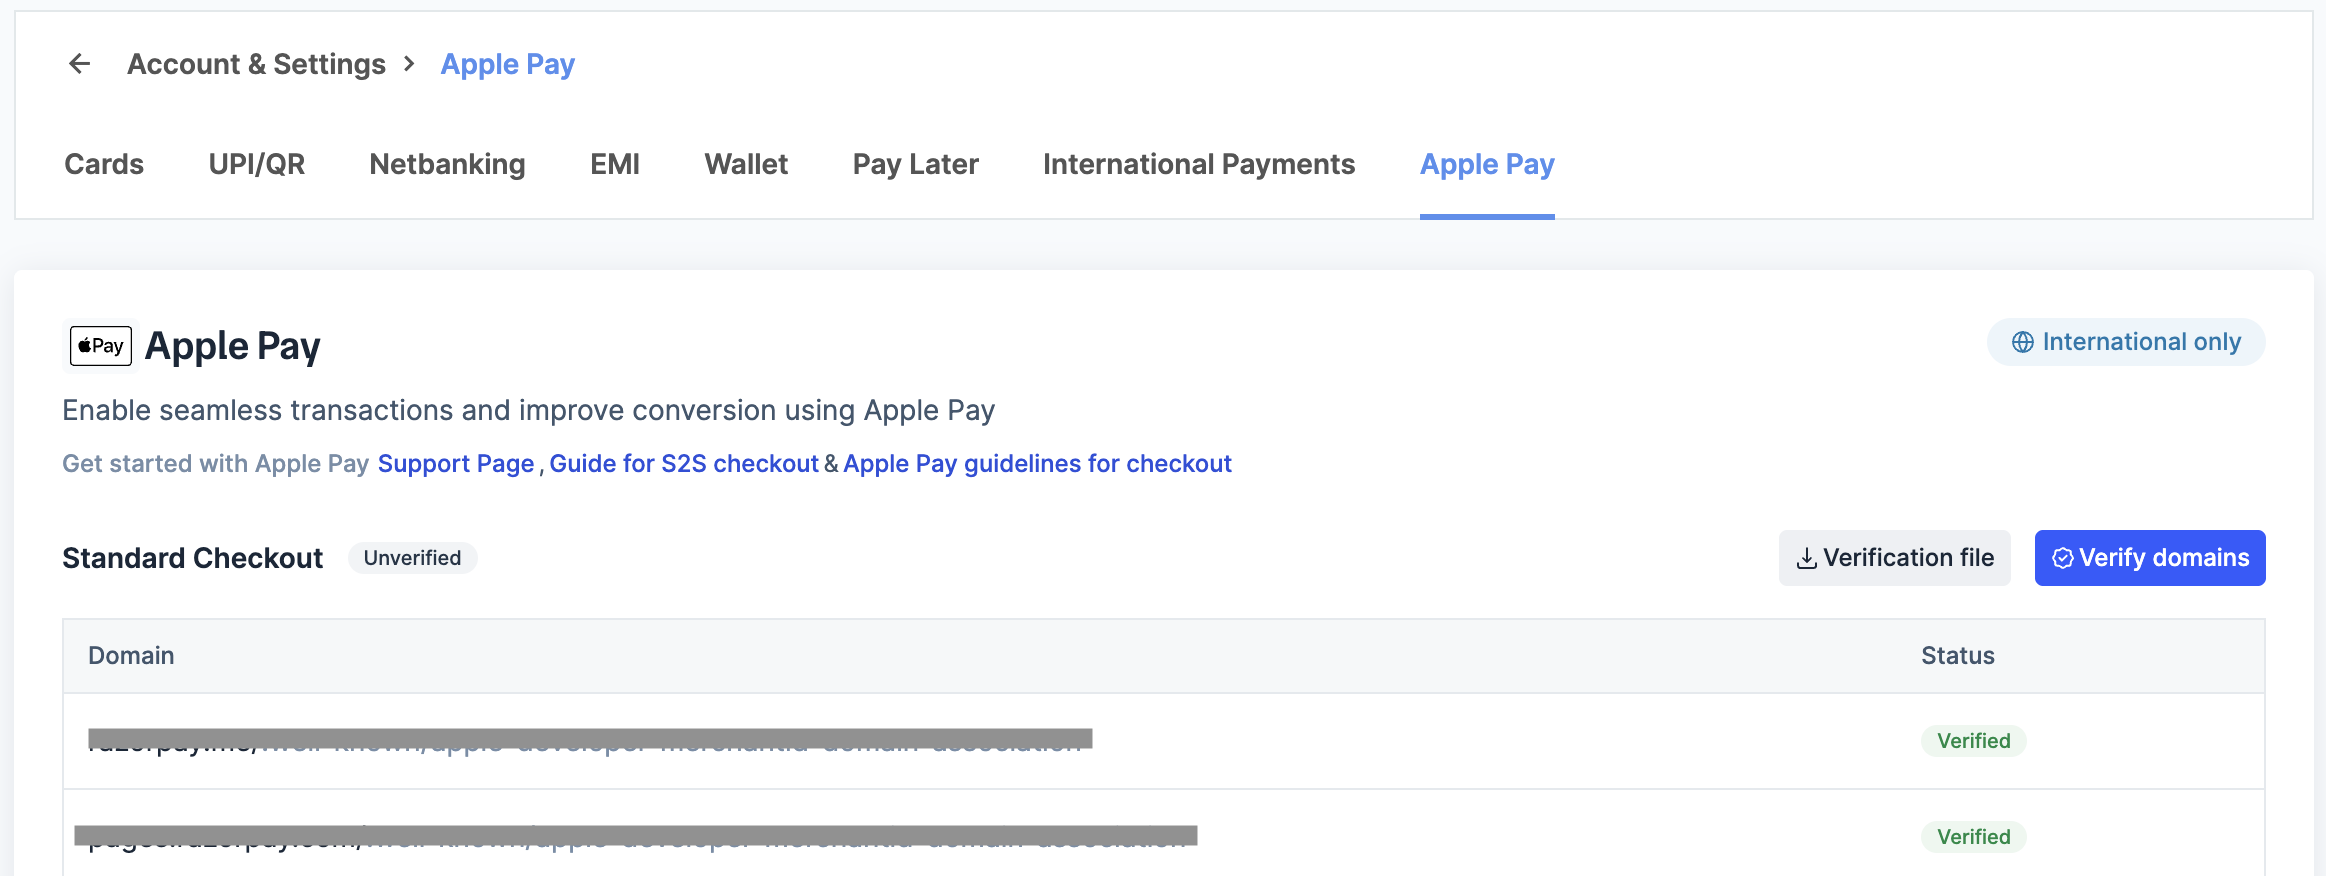 **Important**
This will only be visible if the business has International payments activated. If you do not have international payments active, you will not see Apple Pay.
* You will see a list of domains associated with your business account:
* **Verified domains**: Ready for Apple Pay.
* **Unverified domains**: Require file hosting and verification.
* Click **Verify domains** for any unverified domains.
* Domain status will change to "Verified" once file hosting is correctly configured.
After completing the above steps, please contact the [Support team](https://razorpay.com/sg/support/) to enable Apple Pay.
If you have uploaded the file or have not requested to opt out of Apple Pay, we will assume you are okay with [Apple's guidelines](https://developer.apple.com/apple-pay/acceptable-use-guidelines-for-websites/).
Once domain verification is complete and terms are accepted:
* Apple Pay will automatically appear on your checkout when accessed by eligible customers.
* No code changes are required for Standard Checkout integration.
* The payment button displays dynamically based on device compatibility.
## Payment Flow For Customers
Given below is the payment flow for Apple Pay at Razorpay Checkout:
1. The customer selects **Apple Pay** at checkout.
**Important**
This will only be visible if the business has International payments activated. If you do not have international payments active, you will not see Apple Pay.
* You will see a list of domains associated with your business account:
* **Verified domains**: Ready for Apple Pay.
* **Unverified domains**: Require file hosting and verification.
* Click **Verify domains** for any unverified domains.
* Domain status will change to "Verified" once file hosting is correctly configured.
After completing the above steps, please contact the [Support team](https://razorpay.com/sg/support/) to enable Apple Pay.
If you have uploaded the file or have not requested to opt out of Apple Pay, we will assume you are okay with [Apple's guidelines](https://developer.apple.com/apple-pay/acceptable-use-guidelines-for-websites/).
Once domain verification is complete and terms are accepted:
* Apple Pay will automatically appear on your checkout when accessed by eligible customers.
* No code changes are required for Standard Checkout integration.
* The payment button displays dynamically based on device compatibility.
## Payment Flow For Customers
Given below is the payment flow for Apple Pay at Razorpay Checkout:
1. The customer selects **Apple Pay** at checkout.
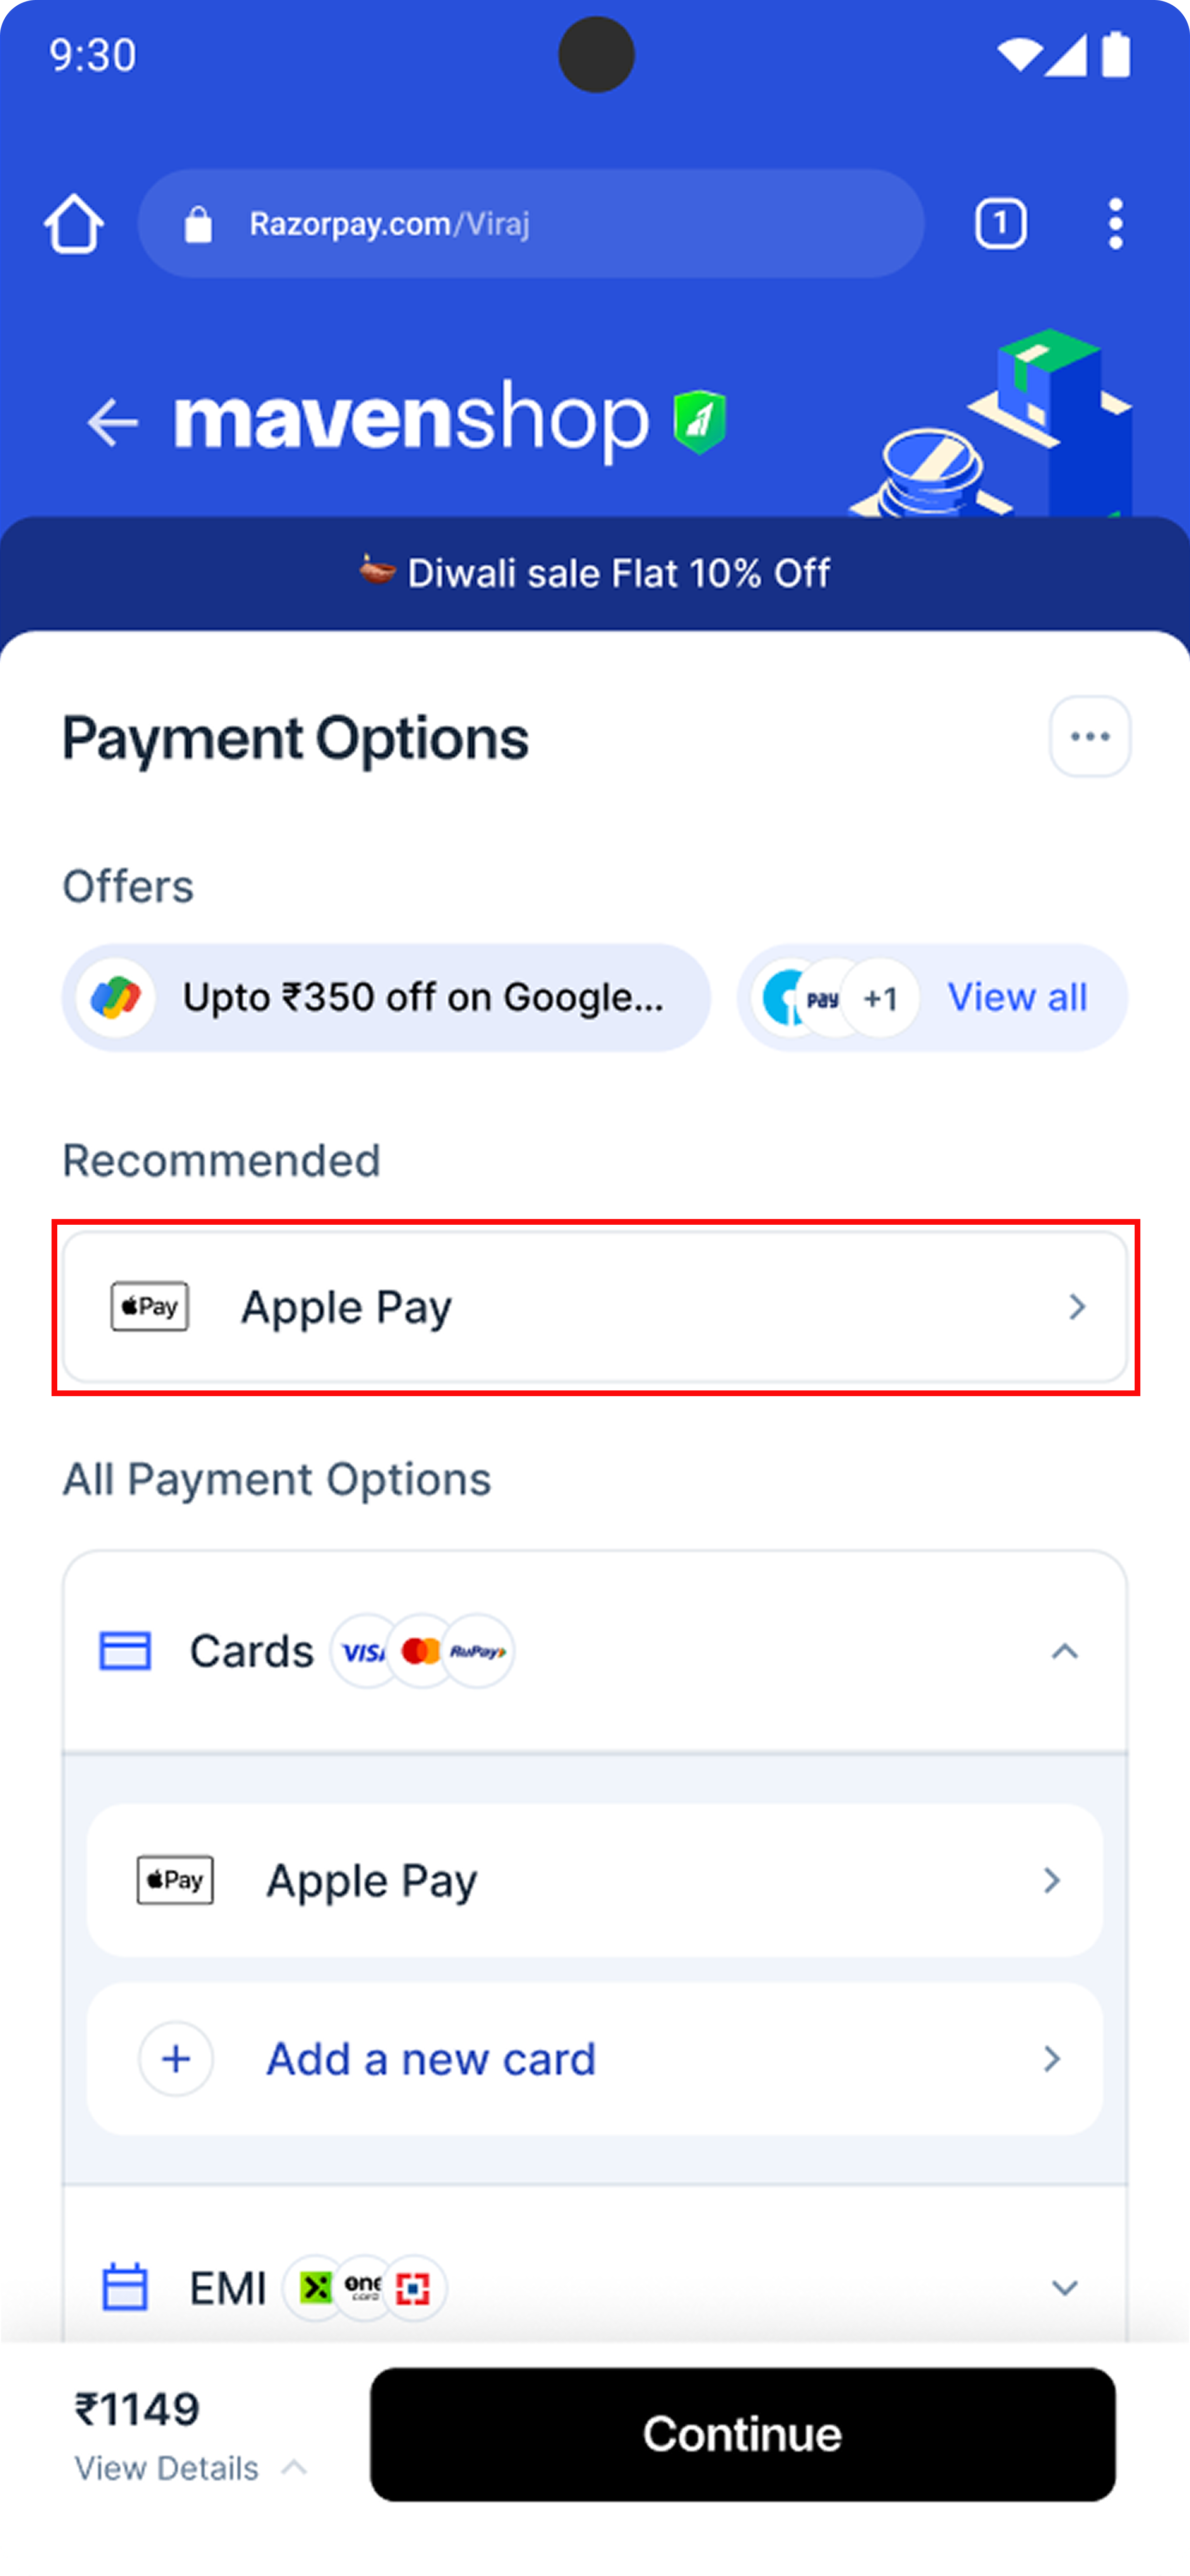 2. Apple Pay displays their default card, billing address and the payment amount.
3. They authenticate using Face ID, Touch ID or double-click the side button following the on-screen prompt **Double Click to Pay**.
2. Apple Pay displays their default card, billing address and the payment amount.
3. They authenticate using Face ID, Touch ID or double-click the side button following the on-screen prompt **Double Click to Pay**.
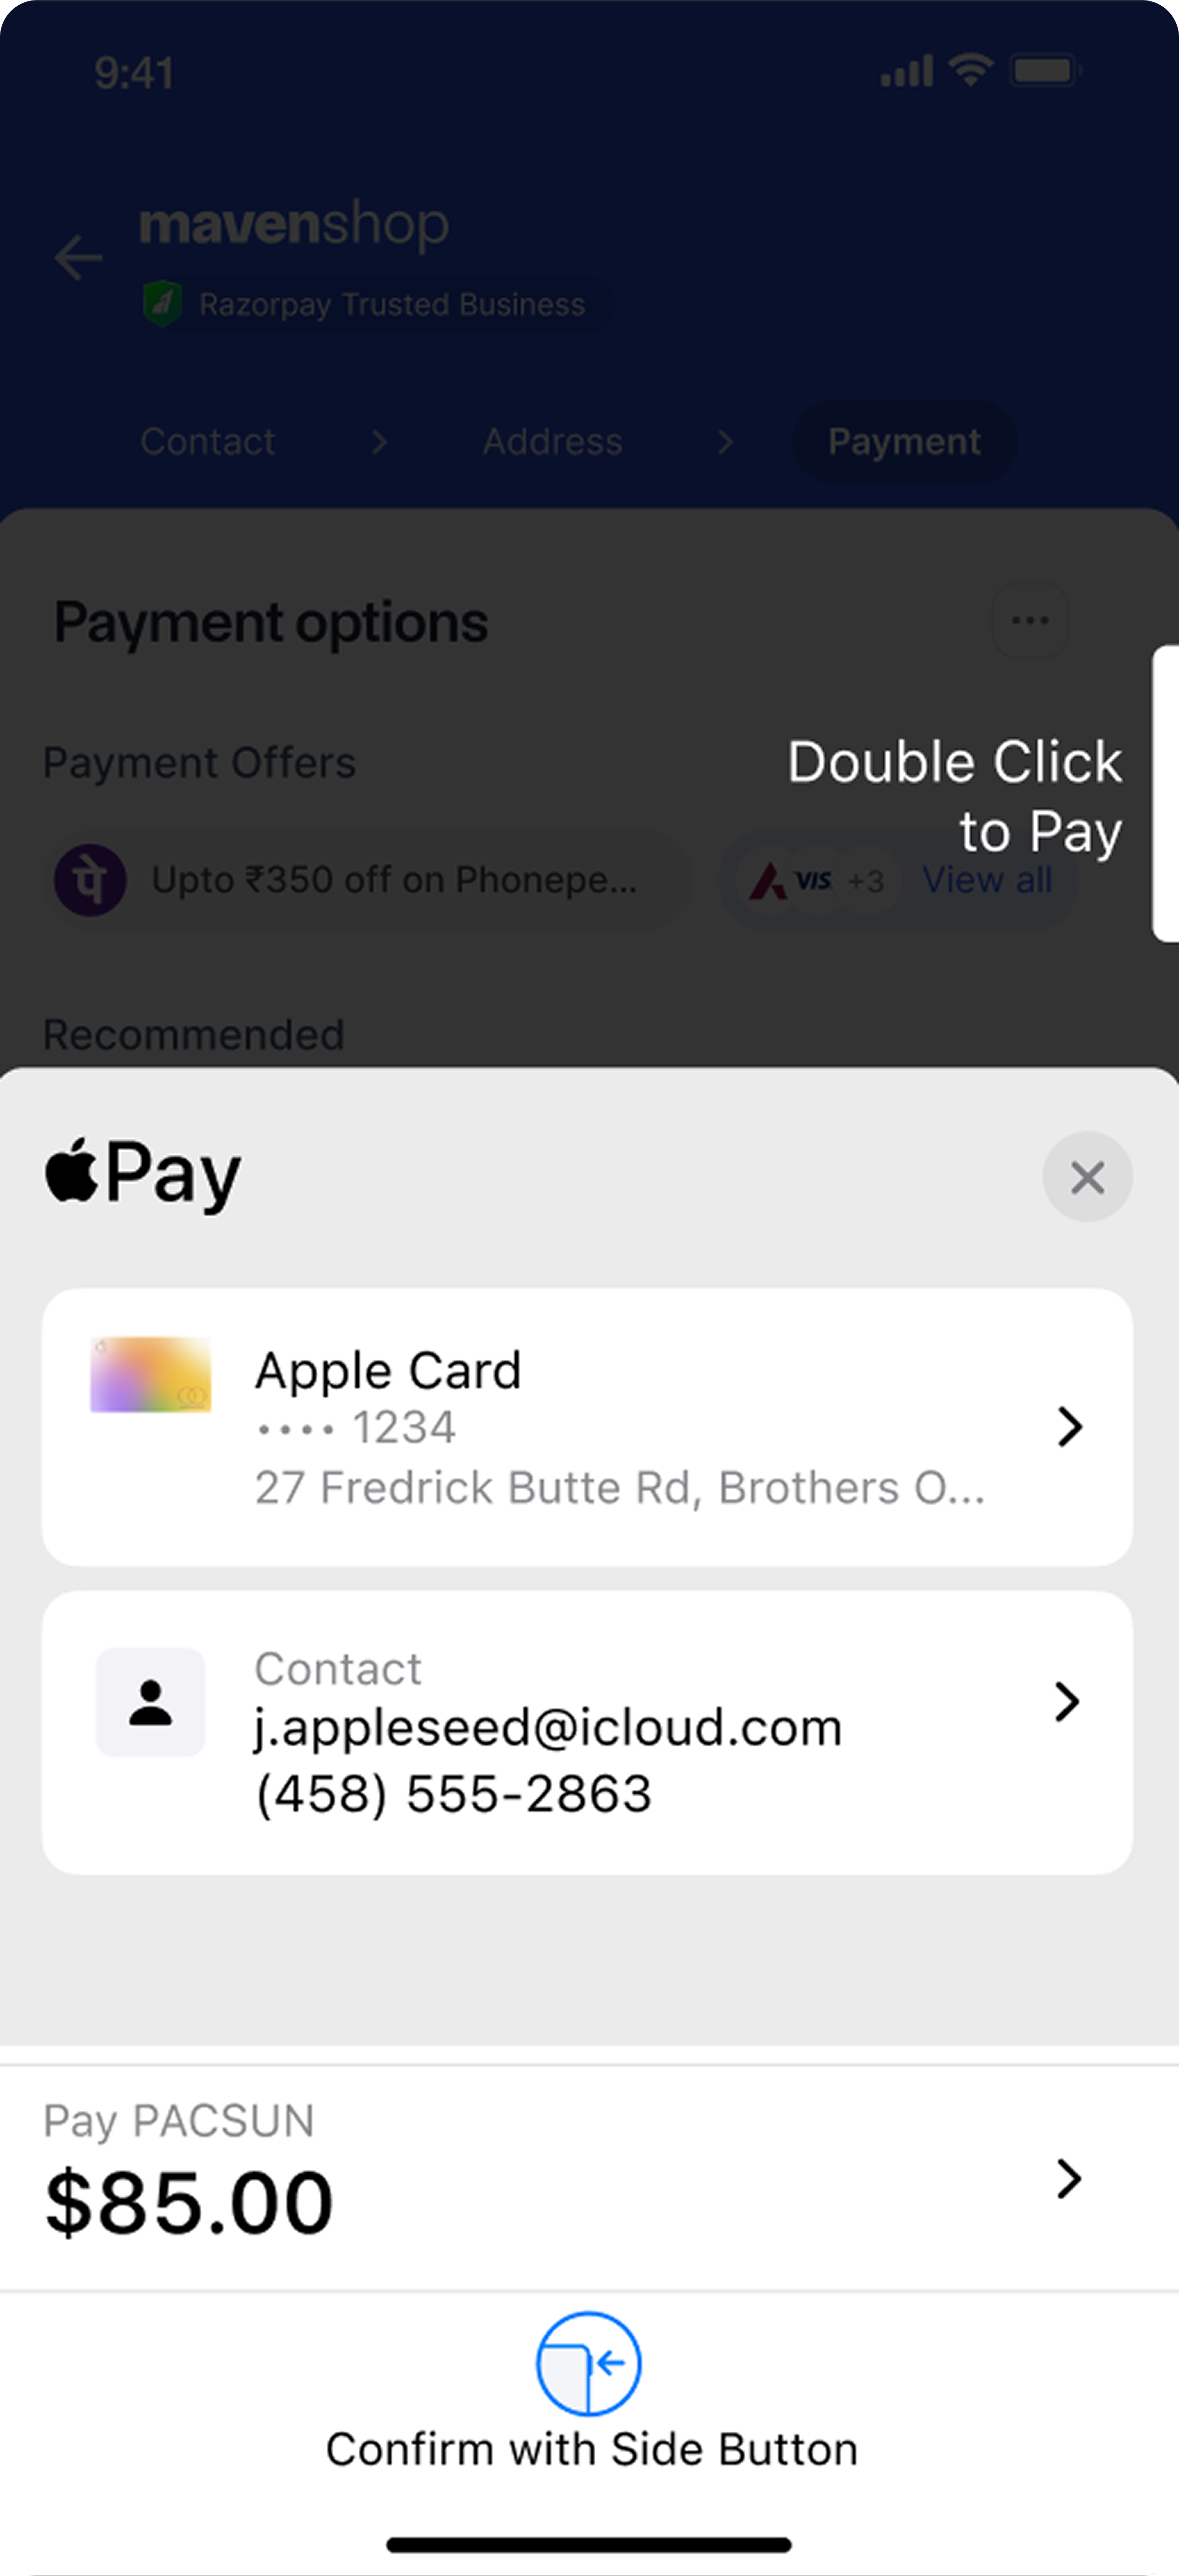 4. Upon successful authentication, the payment processes instantly and the customer is returned to your website or app with a confirmation.
**Best Practice: Apple Pay with iFrames**
As a best practice, if you want to show Apple Pay in an iframe element when the shopper is using Safari as their browser:
* For shoppers on Safari 17 later: add the `allow` attribute to the iframe to let the iframe communicate correctly with Apple Pay APIs:
``
* Safari 17 is available on iOS 17 and later, and macOS 12 and later.
* For shoppers on Safari 16 or earlier: match the iframe origin and your top-level origin. The protocols, hosts (full domain name), and ports, when specified, must be the same for both pages.
## Frequently Asked Questions
If the Apple Pay button is not appearing, check for these common issues:
* Verify that your domain verification file is correctly hosted and accessible.
* Ensure your website is using HTTPS with proper TLS configuration.
* Confirm that international payments feature is enabled.
* Check if the customer's device supports Apple Pay.
Domain verification failures typically occur due to the following reasons:
* The verification file must return an HTTP 200 status code (not 301 or 302 redirects).
* The file path must be exactly `/.well-known/apple-developer-merchantid-domain-association`.
* The file must be accessible via HTTPS (not HTTP).
* The file content must exactly match what Razorpay provided, with no modifications or extra characters.
No code changes are required for Standard Checkout integration. Once domain verification is complete and Apple Pay is enabled on your account, it will automatically appear as a payment option for eligible customers.
There are no additional charges for Apple Pay transactions. Standard Razorpay payment processing rates apply, same as regular card transactions.
Apple Pay uses device-specific tokens that are automatically available for repeat purchases. Customers do not need to manually save payment details as their Apple Wallet handles this seamlessly.
Apple Pay transactions can be identified by checking the payment `notes` field in the API response or webhook payload:
```json theme={null}
"notes": {
"provider": "apple_pay"
}
```
This `provider` field will always contain `apple_pay` for Apple Pay transactions, making it easy to distinguish them from regular card payments.
There are structural differences between Apple Pay and standard card payment webhook events:
4. Upon successful authentication, the payment processes instantly and the customer is returned to your website or app with a confirmation.
**Best Practice: Apple Pay with iFrames**
As a best practice, if you want to show Apple Pay in an iframe element when the shopper is using Safari as their browser:
* For shoppers on Safari 17 later: add the `allow` attribute to the iframe to let the iframe communicate correctly with Apple Pay APIs:
``
* Safari 17 is available on iOS 17 and later, and macOS 12 and later.
* For shoppers on Safari 16 or earlier: match the iframe origin and your top-level origin. The protocols, hosts (full domain name), and ports, when specified, must be the same for both pages.
## Frequently Asked Questions
If the Apple Pay button is not appearing, check for these common issues:
* Verify that your domain verification file is correctly hosted and accessible.
* Ensure your website is using HTTPS with proper TLS configuration.
* Confirm that international payments feature is enabled.
* Check if the customer's device supports Apple Pay.
Domain verification failures typically occur due to the following reasons:
* The verification file must return an HTTP 200 status code (not 301 or 302 redirects).
* The file path must be exactly `/.well-known/apple-developer-merchantid-domain-association`.
* The file must be accessible via HTTPS (not HTTP).
* The file content must exactly match what Razorpay provided, with no modifications or extra characters.
No code changes are required for Standard Checkout integration. Once domain verification is complete and Apple Pay is enabled on your account, it will automatically appear as a payment option for eligible customers.
There are no additional charges for Apple Pay transactions. Standard Razorpay payment processing rates apply, same as regular card transactions.
Apple Pay uses device-specific tokens that are automatically available for repeat purchases. Customers do not need to manually save payment details as their Apple Wallet handles this seamlessly.
Apple Pay transactions can be identified by checking the payment `notes` field in the API response or webhook payload:
```json theme={null}
"notes": {
"provider": "apple_pay"
}
```
This `provider` field will always contain `apple_pay` for Apple Pay transactions, making it easy to distinguish them from regular card payments.
There are structural differences between Apple Pay and standard card payment webhook events:
Apple Pay Payment:
```json theme={null}
"notes": {
"provider": "apple_pay"
}
```
Card Payment:
```json theme={null}
"notes": [],
"token_id": "token_RIa2YPNM92wfzv"
```
Key differences:
* Apple Pay includes `provider: "apple_pay"` in the `notes` field.
* Card payments may include a `token_id` for saved cards.
Check if the file is hosted correctly at your domain by visiting:
`https://www.yourstorename.com/.well-known/apple-developer-merchantid-domain-association`.
Follow the [Apple Pay documentation](/docs/sg/payments/payment-methods/apple-pay) and ensure the file is publicly accessible.
On Mobile:
* Open Safari in incognito mode on an iPhone with Apple Pay configured.
* Visit your checkout page.
* Apple Pay should appear at the top of payment options and under the cards menu.
On Desktop:
* Use Safari on macOS with Apple Pay configured.
* Ensure you are signed into your Apple account.
* Apple Pay will be visible if you have cards linked to your Apple account.
No, Apple Pay does not work in test mode.
Apple Pay will be visible on desktop under the following conditions:
macOS Requirements:
* Customer must have Apple Pay cards linked to their Apple account.
* User must be signed into their Apple account on their macOS device.
### Related Information
* [Apple Pay S2S Integration](/docs/sg/payments/payment-methods/apple-pay/s2s-integration)
* [Apple Pay Custom Integration](/docs/sg/payments/payment-methods/apple-pay/custom-integration)
* [Apple Pay Integration – iOS (Custom Checkout)](/docs/sg/payments/payment-methods/apple-pay/ios-custom-checkout)
* [Apple Pay Web Component Integration](/docs/sg/payments/payment-methods/apple-pay/web-component-integration)