> ## Documentation Index
> Fetch the complete documentation index at: https://razorpay-881012b3.mintlify.site/llms.txt
> Use this file to discover all available pages before exploring further.
# Test Subscriptions
> Test Razorpay Subscriptions, Plans, authenticate transaction and cancellation using Razorpay APIs or from the Razorpay Dashboard.
Available in🇮🇳 India🇸🇬 Singapore🇺🇸 United States
Check the Prerequisites and steps to test the Subscriptions and the various flows.
## Prerequisites
* Use your test \[KEY\_ID] and \[KEY\_SECRET] while testing. This can be generated from the Dashboard by [generating API keys](/docs/sg/payments/dashboard/account-settings/api-keys) in the test mode.
* Ensure you are using your Dashboard in the test mode. Some options mentioned in this article are available only in the test mode.
## Steps to Test Subscriptions
To test Subscriptions:
Before you create Subscriptions, [configure a test webhook](/docs/sg/webhooks/setup-edit-payments) to receive notifications regarding Subscriptions.
Create a Plan from your [Dashboard](/docs/sg/payments/subscriptions/create-plans#create-a-plan) and use them in your code while creating Subscriptions. You can also create Plans using [Razorpay Subscriptions APIs](/docs/sg/api/payments/subscriptions/create-plan).
**Eaxmple**
Create a Plan with a billing amount of ₹500 and a cycle of 2 months.
```bash Request theme={null}
curl -u [YOUR_KEY_ID]:[YOUR_KEY_SECRET] \
-X POST https://api.razorpay.com/v1/plans \
-H "Content-Type: application/json" \
-d '{
"period": "monthly",
"interval": 1,
"item": {
"name": "Test plan",
"amount": 50000,
"currency": "SGD",
"description": "500, charged every 2 months"
},
"notes": {
"notes_key_1": "Tea, Earl Grey, Hot",
"notes_key_2": "Tea, Earl Grey… decaf."
}
}'
```
```json Response theme={null}
{
"id": "plan_00000000000001",
"entity": "plan",
"interval": 1,
"period": "monthly",
"item": {
"id": "item_00000000000001",
"active": true,
"name": "Test plan",
"description": "500, charged every 2 months",
"amount": 50000,
"unit_amount": 50000,
"currency": "SGD",
"type": "plan",
"unit": null,
"tax_inclusive": false,
"tax_id": null,
"tax_group_id": null,
"created_at": 1508762880,
"updated_at": 1508762880
},
"notes":{
"notes_key_1":"Tea, Earl Grey, Hot",
"notes_key_2":"Tea, Earl Grey… decaf."
},
"created_at": 1508762880
}
```
You must create a Subscription for every customer using a Plan. You can create Subscriptions from the Dashboard or using APIs.
**Example**
* Create **Subscription A**: A Subscription for the Plan created above, to be charged a total of 6 times and due to be started immediately.
* Create **Subscription B**: A second Subscription for the same Plan, to be charged a total of 6 times, due to start on 1st January 2026.
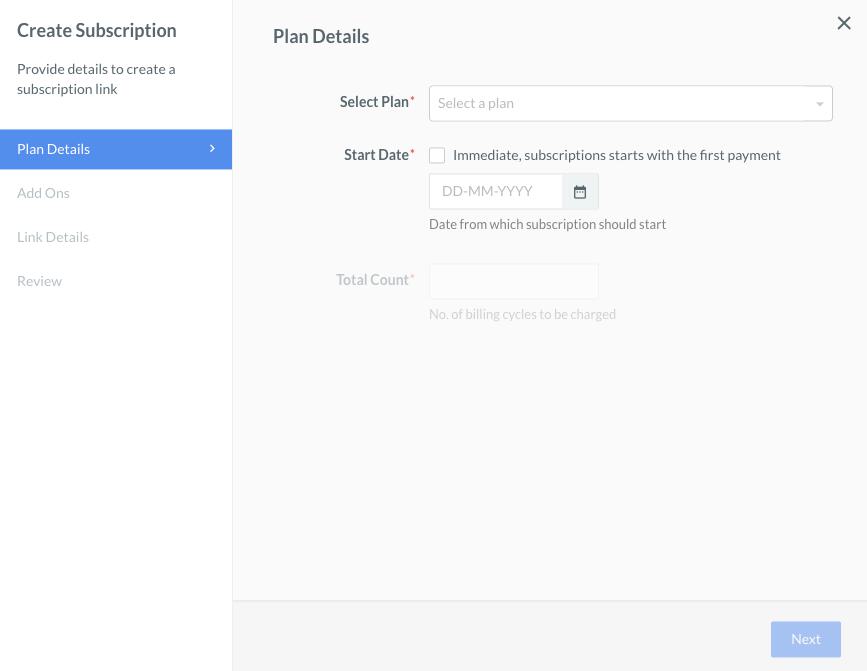
If you create a Subscription using the Dashboard, it can only be created as a [Subscription Link](/docs/sg/payments/subscriptions/create-subscription-links).
You can also create Subscriptions using [APIs](/docs/sg/api/payments/subscriptions/create-subscription). A sample request and response for the creation of **Subscription A** and **Subscription B** is given below.
```bash Curl theme={null}
curl -u [YOUR_KEY_ID]:[YOUR_KEY_SECRET] \
-X POST https://api.razorpay.com/v1/subscriptions \
-H "Content-Type: application/json" \
-d '{
"plan_id":"plan_00000000000001",
"total_count":6,
"notes":{
"name":"Subscription A"
}
}'
```
```json Response theme={null}
{
"id": "sub_00000000000001",
"entity": "subscription",
"plan_id": "plan_00000000000001",
"customer_id": null,
"status": "created",
"current_start": null,
"current_end": null,
"ended_at": null,
"quantity": 1,
"notes": {
"name": "Subscription A"
},
"charge_at": null,
"start_at": null,
"end_at": null,
"auth_attempts": 0,
"total_count": 6,
"paid_count": 0,
"customer_notify": true,
"created_at": 1508763473
}
```
To indicate a future starting date, pass the proper timestamp to the `start_at` parameter in the request.
```bash Curl theme={null}
curl -u [YOUR_KEY_ID]:[YOUR_KEY_SECRET] \
-X POST https://api.razorpay.com/v1/subscriptions \
-H "Content-Type: application/json" \
-d '{
"plan_id":"plan_00000000000001",
"total_count":6,
"start_at": 1577817000,
"notes":{
"name":"Subscription B"
}
}'
```
```json Response theme={null}
{
"id": "sub_00000000000001",
"entity": "subscription",
"plan_id": "plan_00000000000001",
"customer_id": null,
"status": "created",
"current_start": null,
"current_end": null,
"ended_at": null,
"quantity": 1,
"notes": {
"name": "Subscription B"
},
"charge_at": 1577817000,
"start_at": 1577817000,
"end_at": 1580841000,
"auth_attempts": 0,
"total_count": 6,
"paid_count": 0,
"customer_notify": true,
"created_at": 1508763558
}
```
Both Subscriptions are now in the `created` state and await an authentication transaction where the payer authenticates the use of their card.
To authenticate a Subscription using your checkout, that is, a Subscription created using APIs, make a regular payment using Razorpay, but pass an extra parameter `subscription_id` in the options sent to the Razorpay Standard Checkout request.
To see this in action, use the following code on a test webpage, and hit the **Authenticate** button. This triggers a Razorpay payment that in turn authenticates the Subscription.
```html Auth Payment theme={null}
```
The above code only contains the minimum required options that need to be sent to initiate a payment, that is, only `key` and `subscription_id` are mandatory. Check the [checkout fields](/docs/sg/payments/payment-gateway/web-integration/standard/integration-steps#123-checkout-options) for a complete list of options that can be passed.
1. Log in to your Dashboard, click **Subscriptions** under **PAYMENT PRODUCTS** and then click **Subscription Id** to be authenticated → **Start Subscription**.
2. Click **PAY BY CARD**, enter a **CVV** and click **PAY**.
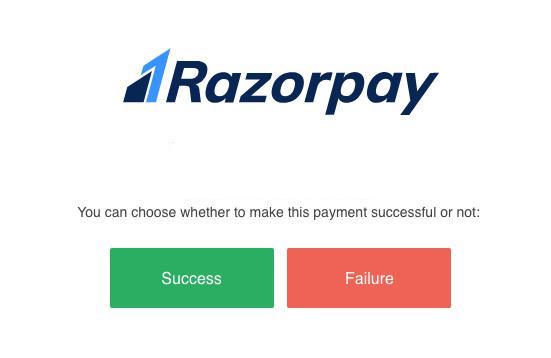
3. Click **Success** to authenticate the payment.
Use the following test card details to make the authentication payment:
| Card Network | Card Number | CVV & Expiry Date |
| ------------ | ------------------- | --------------------------------------- |
| Mastercard | 5120 4333 9011 9037 | Use a random CVV and any future date ^^ |
| Visa | 4628 9499 7226 2986 | |
Unlike a regular payment, you do not need to pass the amount as an option. This is because the amount to be charged is determined by the Subscription that is being authenticated.
* For **Subscription A**, that is, to start immediately upon completion of this payment, the charge amount will be ₹500, that is the amount we used while creating the Plan.
* For **Subscription B**, this payment acts only as an authentication step, as the Subscription is not due to start until January 2026. So for **Subscription B**, the charge amount is ₹5, a token amount that is immediately refunded.
To make a successful payment, the payment response contains a few fields carrying information about the Subscription that has been authenticated. Check the [payment verification section](/docs/sg/payments/subscriptions/integration-guide#payment-verification) to know more about how this payment response can be authenticated.
After the payment is completed successfully, **Subscription A** is marked as `active`.
**Subscription A**
At this stage you receive the webhook payloads for the 2 events that **Subscription A** has gone through.
* First, you receive the `subscription.activated` webhook when **Subscription A** moves from the `authenticated` to the `active` state.
* Next, you receive the `subscription.charged` webhook when a payment is successfully charged on **Subscription A**.
**Subscription B**
Performing the same payment request on **Subscription B** results in being marked as `authenticated`. It is not charged, as it is not due to start for a few months. For this reason, no webhook events are triggered by performing an authentication payment for **Subscription B**.
After the initial payment (the authentication charge), all subsequent charges for a subscription are automatically triggered by Razorpay. Each time a charge is triggered, its outcome is communicated by the webhooks to the Subscriptions entity.
In test mode, you can simulate these charges from the Dashboard using the Charge this now button. This allows you to trigger all the events associated with a due subscription, enabling testing without having to wait until the actual due date (for example, January 2026 for Subscription B).
**Watch Out!**
* You cannot test the update subscription feature if any test charges (beyond the initial authentication payment) have been made. This feature can only be tested if no subsequent payments have been processed for the subscription.
* In test mode, you can perform a subsequent debit only within 3 days of token creation, as card tokens are valid for 3 days only.
You can now integrate with Razorpay webhooks to verify that different webhook events are being consumed correctly.
**Example**
* Triggering a test charge on Subscription A results in a single webhook event: `subscription.charged`.
* In contrast, triggering a test charge on Subscription B from the Dashboard causes it to move from the authenticated state to the active state. This indicates that the `start_at` time for Subscription B has passed, thereby triggering the `subscription.activated` webhook event. Immediately after, the charge is processed, resulting in the `subscription.charged` webhook being triggered.
## Manage Subscriptions
Following are the steps to handle charge failures, halted Subscriptions, manually charge invoices and completed and cancelled Subscriptions:
After the first payment, that is, the authentication of the Subscription, all subsequent charges are triggered automatically by Razorpay. When Razorpay initiates the automatic charges, it is possible that a charge attempt on the card saved for a Subscription could fail. In this case, the failure event webhooks are triggered.
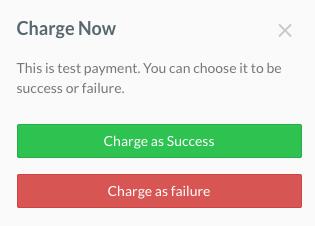
To simulate this in test mode, the test charge option prompts you to choose the result of a manual charge attempt.
* To charge a Subscription as a success, a new payment is simply created (and captured), and the `subscription.charged` webhook is triggered.
* To charge a Subscription as a failure, the Subscription moves from the `active` to the `pending` state, and the `subscription.pending` webhook event is triggered. With each failure, the number of charge attempts made on a Subscription increases, and the next charge time is updated by a single day, rather than the actual plan period, which in this case is two months.
* If you fail a charge 4 times in a row, all the available retries get exhausted. This results in a Subscription being marked as `halted` and the `subscription.halted` webhook event is triggered.
Following are some payment failure scenarios and how they can be handled:
When a payment fails, an auto-retry is attempted. If the payment succeeds on subsequent auto-retries made by the customer, we:
* Trigger the `subscription.charged` webhook.
* If the customer notifications are handled by Razorpay, the customer receives an email confirmation.
* Move the Subscription from the `pending` to the `activated` state.
* Trigger the `subscription.activated` webhook.
When the last auto-charge attempt made by your customers was unsuccessful and the subsequent retries were also exhausted, we:
* Send an email requesting manual attempt of a charge or request change of the card if the customer notifications are handled on Dashboard.
* Move the Subscription to the `halted` state.
* Trigger the `subscription.halted` webhook.
* Continue generating invoices in the `halted` state, but we do not attempt a charge on them.
If customer's notifications are not handled by Razorpay, you need to either request the customer to change their card or manually attempt a charge on the same card.
When a customer changes the card due to failure of a recurring payment, we:
* Automatically perform a charge on the new card.
* On a successful charge, the following webhooks are triggered:
* `subscription.charged`
* `subscription.activated`
* The Subscription is moved from the `halted` state to the `activated` state.
If there are any incomplete charges, you have to manually attempt to charge the card again from the [Dashboard](/docs/sg/payments/subscriptions/manually-charge-card).
Once a Subscription has reached `halted` state, Razorpay no automatic charge attempts are triggered on the saved card. However, invoices continue to be issued in accordance with the original plan.
In test mode, the **Charge This Now** button available on Dashboard is replaced with an **Issue Invoice** button for `halted` subscriptions. Using this option, a new invoice is issued, but no charge is attempted on the saved card.
The invoices created by a Subscription may remain in the `issued` state if the charge attempts on the saved card results in a failure. Once the maximum number of retries attempts are exhausted:
* The Subscription is moved to the `halted` state.
* The Subscription moves on to the next recurring payment, that is, the next invoice.
However, the invoice that was skipped is still chargeable, after the customer has fixed the issue either by correcting the issue with their card or changing the card associated with a Subscription. This can be done via the **Attempt Charge** option available for each invoice on [Dashboard](/docs/sg/payments/subscriptions/manually-charge-card).
Using this option, a new charge attempt is triggered on the issued invoice, and does not increase the number of retries remaining for a Subscription.
**Manual Charging an Invoice Vs. Test Charging a Subscription**
Manually charging an issued invoice is different from performing a test charge on a Subscription.
* A manual charge on an invoice is possible even in live mode. This can be done anytime an invoice is observed to be in the `issued` state. A manual charge attempt does not count toward the remaining retries for a Subscription.
* A test charge on a Subscription can be triggered only in test mode. The result of this charge attempt is up to you. If you choose to fail the attempt it counts toward the remaining retries that a Subscription has before it moves to the `halted` state.
A Subscription can be moved to any of the terminal states in the following ways:
* Charging a Subscription repeatedly in test mode, until all the invoices for a Subscription have been issued.
* Cancelling a Subscription using [Dashboard](/docs/sg/payments/subscriptions/pause-resume-cancel#cancel-a-subscription-via-the-dashboard) or [API](/docs/sg/api/payments/subscriptions/cancel-subscription).
### Related Information
* [Subscriptions](/docs/sg/payments/subscriptions)
* [Subscription Workflow](/docs/sg/payments/subscriptions/workflow)
* [Subscription States](/docs/sg/payments/subscriptions/states)
* [Create Subscriptions](/docs/sg/payments/subscriptions/create)
 You can also create Subscriptions using [APIs](/docs/sg/api/payments/subscriptions/create-subscription). A sample request and response for the creation of **Subscription A** and **Subscription B** is given below.
 * To charge a Subscription as a success, a new payment is simply created (and captured), and the `subscription.charged` webhook is triggered.
* To charge a Subscription as a failure, the Subscription moves from the `active` to the `pending` state, and the `subscription.pending` webhook event is triggered. With each failure, the number of charge attempts made on a Subscription increases, and the next charge time is updated by a single day, rather than the actual plan period, which in this case is two months.
* If you fail a charge 4 times in a row, all the available retries get exhausted. This results in a Subscription being marked as `halted` and the `subscription.halted` webhook event is triggered.
* To charge a Subscription as a success, a new payment is simply created (and captured), and the `subscription.charged` webhook is triggered.
* To charge a Subscription as a failure, the Subscription moves from the `active` to the `pending` state, and the `subscription.pending` webhook event is triggered. With each failure, the number of charge attempts made on a Subscription increases, and the next charge time is updated by a single day, rather than the actual plan period, which in this case is two months.
* If you fail a charge 4 times in a row, all the available retries get exhausted. This results in a Subscription being marked as `halted` and the `subscription.halted` webhook event is triggered.