> ## Documentation Index
> Fetch the complete documentation index at: https://razorpay-881012b3.mintlify.site/llms.txt
> Use this file to discover all available pages before exploring further.
# Create a Payment Page
> Create a Payment Page to start accepting payments.
Available in
🇮🇳 India
🇸🇬 Singapore
🇺🇸 United States
You can build a Payment Page from your Dashboard to start accepting payments from customers. This method does not require any code or API integration.
## Prerequisites
* Ensure you have an account.
* Log in to the Dashboard and complete the KYC requirements.
* The Dashboard has [test and live modes](/docs/us/payments/dashboard/test-live-modes). Use the test mode for a sandbox experience. You can switch to live mode when you are ready to accept payments. You will have to create a new Payment Page in live mode.
* Understand the [Payment Flow](/docs/us/payments/payment-gateway/how-it-works).
 ## Steps to Create a Payment Page
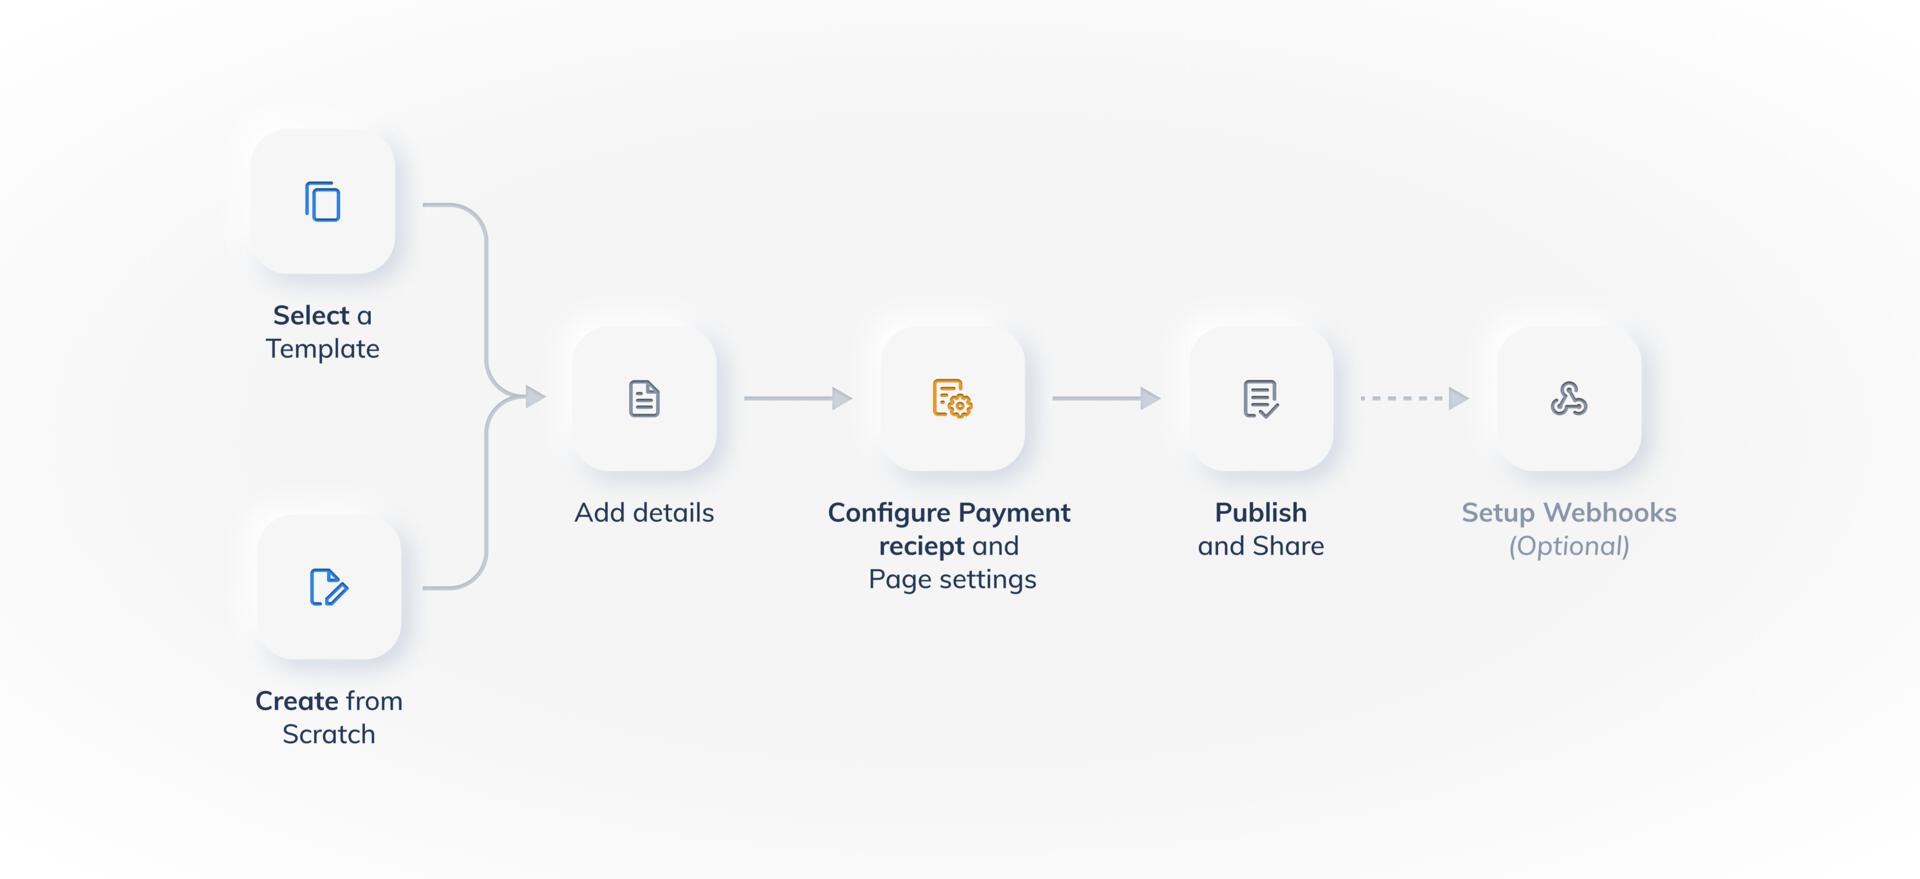
To create a Payment Page, you must complete the following actions:
Navigate to Payment Pages and click + Create Payment Page.
Add business details, payment fields and custom input fields.
Set up payment receipt configuration (optional).
Customise URL, theme, expiry date and post-payment actions.
Publish your page and share via URL, social media or embed button.
Configure webhooks to receive payment notifications.
1. Log in to the Dashboard and navigate to Payment Pages.
2. Click the **+ Create Payment Page** button.
3. Click **Select Payment page**.
1. Enter the page title. The **Payment Page Title** cannot exceed 40 characters.
2. Fill in the page details:
1. Enter a brief description for the page.
2. You can use the [rich-text features](/docs/us/payments/payment-pages/add-images-videos) to add images and videos.
3. Click **Add social media share icons**. This makes the Payment Page shareable on popular social media sites and Instant Messaging (IM) services such as Facebook, Twitter and WhatsApp.
4. Click **Add your contact information** to enter support email and contact number details.
5. Click **Add Terms & Conditions** to add your terms of business. For example, terms and conditions for refund of payment.
**Optional Fields and Customisation**
* Apart from `title` and `contact information`, all fields in this section are optional.
* You can customise this section by adding videos, images and more, using our [rich-text features](/docs/us/payments/payment-pages/add-images-videos).
1. Create and configure the price field. Price fields are the products and services that you intend to sell.
2. Add description to `Phone` and `Email` fields.
3. Add any custom input fields you need to gather additional customer information.
4. Reorder fields if necessary.
5. Customise the Pay button label.
1) Click **Add Price Field**. In the **Select Amount Type** menu, choose a price field type from the list:
1. **Item with Quantity** - Select this type if you want the customer to buy more than one unit of the item. You can set additional parameters for minimum and maximum numbers of units the customer can buy.
2. **Fixed Amount** - Select this type if you want to limit the customer to buy only one unit.
3. **Customer Decides Amount** - Select this type if you want the customer to enter the price. For example, in the case of donations. You can set additional parameters for the minimum and maximum amount the customer can enter.
2) Add the label for the field.
3) Set the currency. By default, it is `$`. We support international currencies too.
4) If you have selected `Item with Quantity` or `Fixed Amount` as the price field type, enter the price you want to charge.
5) Click the more icon to open the **Additional Options** menu to:
1. Add image.
2. Specify if the field is mandatory.
3. Configure further for quantity and price. Know more about [Additional Options](#additional-options).
6) Click **Save**.
**One Currency per Page**
You can set only one currency for price fields on a Payment Page.
**Add an image**
1. In the **Additional Options** menu, select **Add Image**.
2. You can add the thumbnail image by dragging and dropping or select the **Click to Upload** option. Ensure that the image size does not exceed 500 KB. Only PNG, JPG, JPEG or GIF files are allowed.
3. Crop the image as per your requirements using the zoom bar.
4. Click **Save**.
You can remove the image by selecting **Remove Image** on the **Additional Options** menu.
**Add a Description**
1. In the **Additional Options** menu, select **Add Description**.
2. Add the description in the field that appears beneath the price field.
3. Click **Save**.
You can remove the description by selecting **Remove Description** on the **Additional Options** menu.
**Mark the field Optional**
1. In the Additional Options menu, select **Make it Optional Item**.
2. Click **Save**.
**Handy Tips**
You can mark the field mandatory by selecting **Optional Item** on the **Additional Options** menu.
**Quantity and Price Settings**
## Steps to Create a Payment Page
To create a Payment Page, you must complete the following actions:
Navigate to Payment Pages and click + Create Payment Page.
Add business details, payment fields and custom input fields.
Set up payment receipt configuration (optional).
Customise URL, theme, expiry date and post-payment actions.
Publish your page and share via URL, social media or embed button.
Configure webhooks to receive payment notifications.
1. Log in to the Dashboard and navigate to Payment Pages.
2. Click the **+ Create Payment Page** button.
3. Click **Select Payment page**.
1. Enter the page title. The **Payment Page Title** cannot exceed 40 characters.
2. Fill in the page details:
1. Enter a brief description for the page.
2. You can use the [rich-text features](/docs/us/payments/payment-pages/add-images-videos) to add images and videos.
3. Click **Add social media share icons**. This makes the Payment Page shareable on popular social media sites and Instant Messaging (IM) services such as Facebook, Twitter and WhatsApp.
4. Click **Add your contact information** to enter support email and contact number details.
5. Click **Add Terms & Conditions** to add your terms of business. For example, terms and conditions for refund of payment.
**Optional Fields and Customisation**
* Apart from `title` and `contact information`, all fields in this section are optional.
* You can customise this section by adding videos, images and more, using our [rich-text features](/docs/us/payments/payment-pages/add-images-videos).
1. Create and configure the price field. Price fields are the products and services that you intend to sell.
2. Add description to `Phone` and `Email` fields.
3. Add any custom input fields you need to gather additional customer information.
4. Reorder fields if necessary.
5. Customise the Pay button label.
1) Click **Add Price Field**. In the **Select Amount Type** menu, choose a price field type from the list:
1. **Item with Quantity** - Select this type if you want the customer to buy more than one unit of the item. You can set additional parameters for minimum and maximum numbers of units the customer can buy.
2. **Fixed Amount** - Select this type if you want to limit the customer to buy only one unit.
3. **Customer Decides Amount** - Select this type if you want the customer to enter the price. For example, in the case of donations. You can set additional parameters for the minimum and maximum amount the customer can enter.
2) Add the label for the field.
3) Set the currency. By default, it is `$`. We support international currencies too.
4) If you have selected `Item with Quantity` or `Fixed Amount` as the price field type, enter the price you want to charge.
5) Click the more icon to open the **Additional Options** menu to:
1. Add image.
2. Specify if the field is mandatory.
3. Configure further for quantity and price. Know more about [Additional Options](#additional-options).
6) Click **Save**.
**One Currency per Page**
You can set only one currency for price fields on a Payment Page.
**Add an image**
1. In the **Additional Options** menu, select **Add Image**.
2. You can add the thumbnail image by dragging and dropping or select the **Click to Upload** option. Ensure that the image size does not exceed 500 KB. Only PNG, JPG, JPEG or GIF files are allowed.
3. Crop the image as per your requirements using the zoom bar.
4. Click **Save**.
You can remove the image by selecting **Remove Image** on the **Additional Options** menu.
**Add a Description**
1. In the **Additional Options** menu, select **Add Description**.
2. Add the description in the field that appears beneath the price field.
3. Click **Save**.
You can remove the description by selecting **Remove Description** on the **Additional Options** menu.
**Mark the field Optional**
1. In the Additional Options menu, select **Make it Optional Item**.
2. Click **Save**.
**Handy Tips**
You can mark the field mandatory by selecting **Optional Item** on the **Additional Options** menu.
**Quantity and Price Settings**
Given below are the price field type settings and the applicable quantity and price rules:
| Feature | Item with Quantity | Fixed Amount | Customer decides Amount |
| ---------------------------------------------------------------------------------------------------------------------------- | ------------------ | ------------ | ----------------------- |
| **Quantity Rules** - In **Units Available in Stock** field, select **limited** and set the quantity or choose **unlimited**. | Yes | Yes | Yes |
| **Minimum and Maximum Quantity** - Set minimum and maximum number or units purchasable by customer. | Yes | No | No |
| **Minimum and Maximum Price** - Set minimum and maximum price limits for customer. | No | No | Yes |
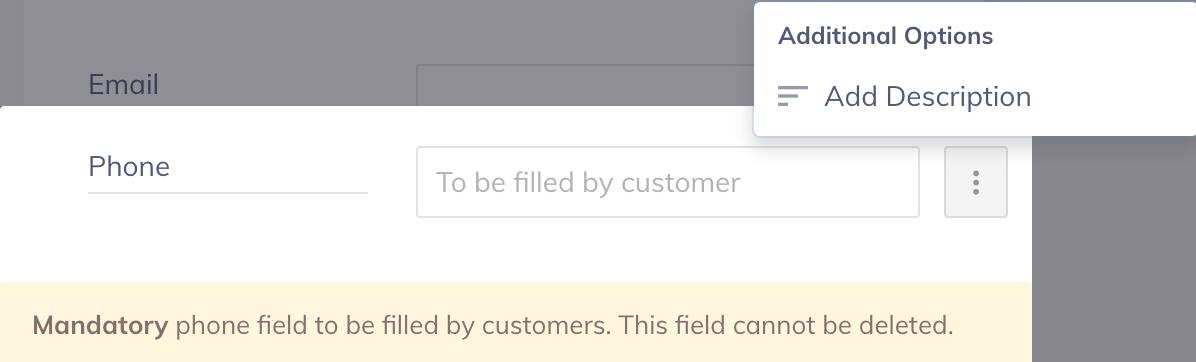
`Email` and `Phone` fields appear by default and are mandatory. You cannot delete these. However, you may add descriptions to appear with these fields.
1. Click the edit icon.
2. Click **Add Description** to enter a brief description regarding the field.
 You can add more fields to collect additional data from the customer. Let us add `Full Name` as a mandatory field.
1. Click **Add new** and select **Input Field**. In the drop-down, select **Single Line Text** as the **Field Type**.
You can add more fields to collect additional data from the customer. Let us add `Full Name` as a mandatory field.
1. Click **Add new** and select **Input Field**. In the drop-down, select **Single Line Text** as the **Field Type**.
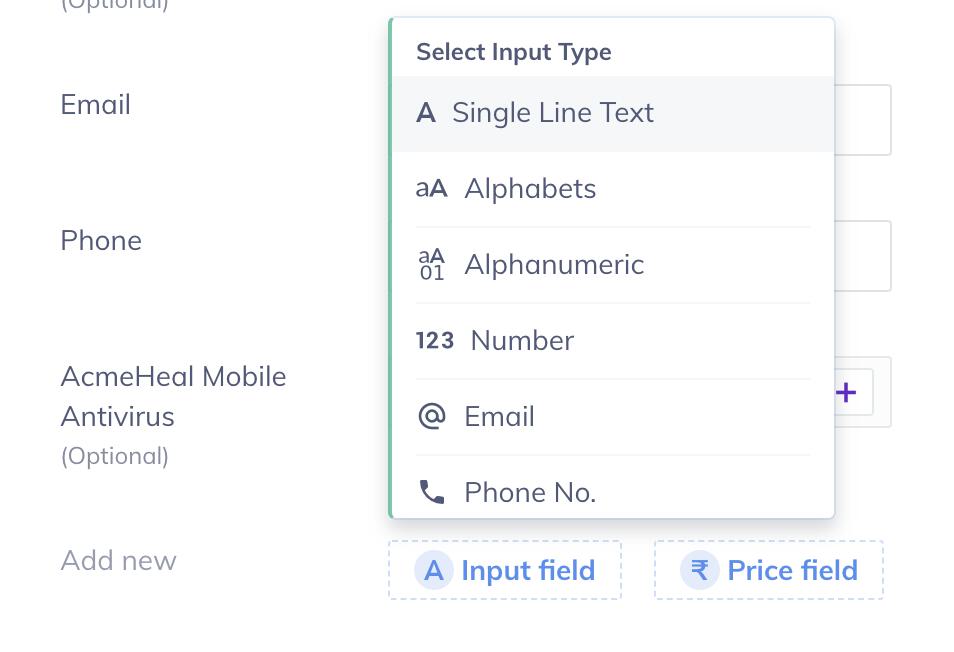 2. Add the label for the field - `Full Name`.
 3. Click **Save**.
You can reorder the fields by dragging them up and down the section. Hover over a field and use the drag icon present in the left corner.
1. Hover on the Pay button and click the edit icon.
2. Enter a new label - `Book Tickets` and click the save icon.
The label cannot exceed 16 characters.
You can ensure that your customers receive payment receipts via email once they complete the payment. Know how you can [send and download automated or manual payment receipts](/docs/us/payments/payment-pages/receipt).
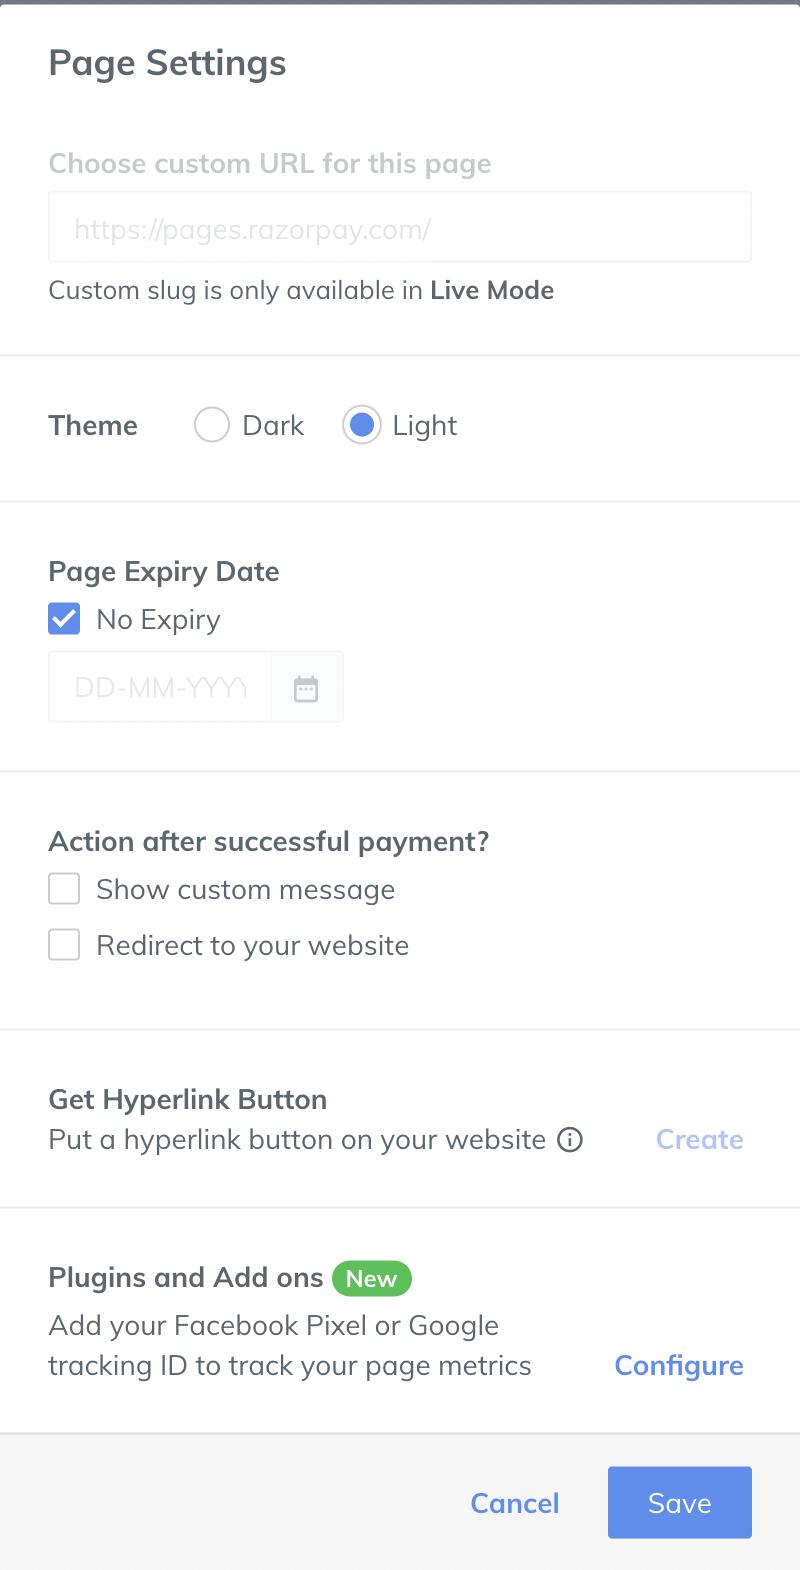
To configure page settings, click **Page Settings**. On the pop-up page:
1. Choose a **custom URL** for the page. This is available only if you are in live mode.
2. Choose from the **Dark** or **Light** themes.
3. To set the expiry date for the page, disable **No Expiry**. In the calendar that is displayed, select the expiry date and set the time.
4. Under **Action after successful payment**, you can:
1. Select **Show custom message** and enter a custom message to be shown to the customer once the payment is made.
2. Select **Redirect to your website** and enter a URL. This redirects the customer to your official webpage once the payment is successful.
5. You can [put a hyperlink button on your website](#create-hyperlink-button). This can be done only after your page is published.
6. Click **Save**.
3. Click **Save**.
You can reorder the fields by dragging them up and down the section. Hover over a field and use the drag icon present in the left corner.
1. Hover on the Pay button and click the edit icon.
2. Enter a new label - `Book Tickets` and click the save icon.
The label cannot exceed 16 characters.
You can ensure that your customers receive payment receipts via email once they complete the payment. Know how you can [send and download automated or manual payment receipts](/docs/us/payments/payment-pages/receipt).
To configure page settings, click **Page Settings**. On the pop-up page:
1. Choose a **custom URL** for the page. This is available only if you are in live mode.
2. Choose from the **Dark** or **Light** themes.
3. To set the expiry date for the page, disable **No Expiry**. In the calendar that is displayed, select the expiry date and set the time.
4. Under **Action after successful payment**, you can:
1. Select **Show custom message** and enter a custom message to be shown to the customer once the payment is made.
2. Select **Redirect to your website** and enter a URL. This redirects the customer to your official webpage once the payment is successful.
5. You can [put a hyperlink button on your website](#create-hyperlink-button). This can be done only after your page is published.
6. Click **Save**.
 Click **Save and Publish** to complete the Payment Page creation.
Copy the URL and share it.
To customise the URL, go to **Page Settings** (only in live mode). Once the URL is ready, share the page on social media sites such as Facebook, X and WhatsApp.
Enter the email and phone number of customers to send the page directly to them.
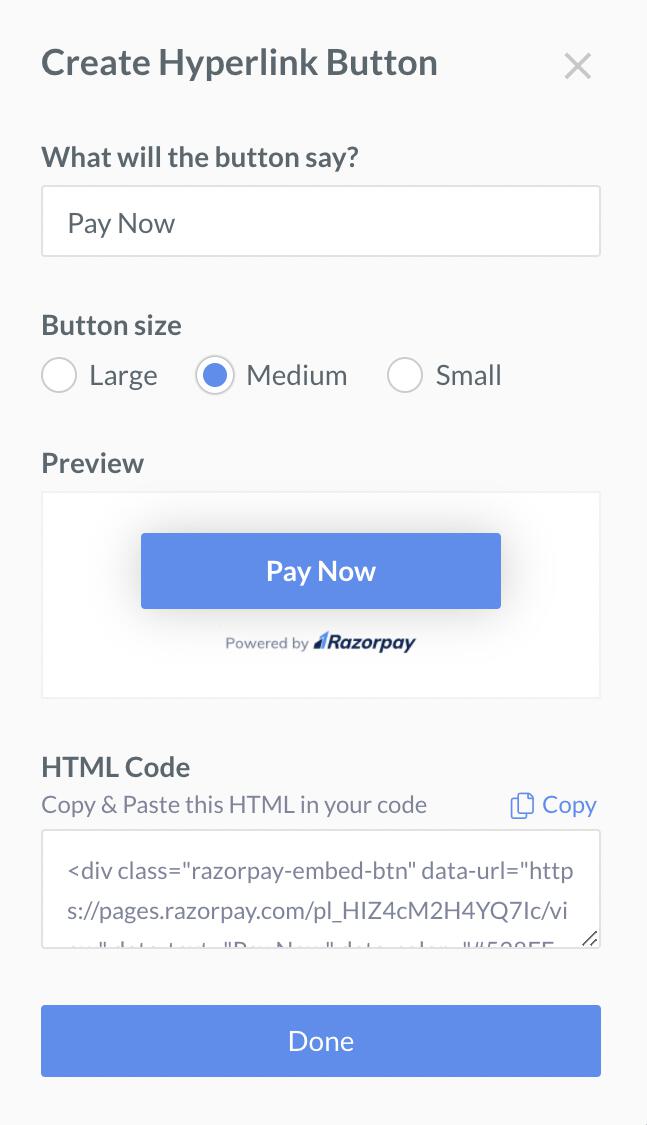
You can add a hyperlink button on your website. When customers click on this button, the Payment Page will appear.
To get a hyperlink button:
1. Click **Create** to customise and create a button.
2. In the pop-up page, customise the button text and select the button size.
3. Copy the HTML code to embed on your website and click **Done**.
Click **Save and Publish** to complete the Payment Page creation.
Copy the URL and share it.
To customise the URL, go to **Page Settings** (only in live mode). Once the URL is ready, share the page on social media sites such as Facebook, X and WhatsApp.
Enter the email and phone number of customers to send the page directly to them.
You can add a hyperlink button on your website. When customers click on this button, the Payment Page will appear.
To get a hyperlink button:
1. Click **Create** to customise and create a button.
2. In the pop-up page, customise the button text and select the button size.
3. Copy the HTML code to embed on your website and click **Done**.
 After you are done with the publish settings, click **Back to Dashboard**. Once the Payment Page is created, Razorpay generates a unique identifier for the page (for example, `pl_C4VFJaiO69EvdL`). The page is then added to the list of previously created Payment Pages.
You can search for a Payment Page using filters, such as: **Title**, **Status** and **Count**.
You can set up webhooks to receive notifications on payments using the page. Know more about how to [set up webhooks](/docs/us/payments/payment-pages/subscribe-to-webhooks).
## View Payment Page in Action
Your Payment Page is now live!
## Payments
You can view the payments as and when they are made in the [Transactions Details View](/docs/us/payments/payment-pages/view-reports) of the page.
To export the report data into a CSV file:
1. Navigate to **Dashboard** → **Payment Pages**.
2. Select the relevant Payment Page. The Transactions Details View appears.
3. Click **Export All (CSV)** button.
A .csv file downloads, allowing you to find a monthly report of all the payments made using your page.
You can download and resend the payment receipt from the **Transaction Details View** screen.
To download and resend payment receipt:
1. Click on the relevant **Payment Id**. For example, `pay_EWqq21bljDMbcl`.
2. In the side pane, click **Download** to download a PDF copy of the receipt. You can now save this for your reference or send it to the customer via email or WhatsApp.
3. Click **Resend** to automatically send the receipt to the customer via email.
## Settlements
You will receive the payments in your bank account as per your settlement cycle.
### Related Information
* [How Payment Pages Work](/docs/us/payments/payment-pages/how-it-works)
* [Search for Payment Pages](/docs/us/payments/payment-pages/search)
* [Manage Payment Pages](/docs/us/payments/payment-pages/manage)
After you are done with the publish settings, click **Back to Dashboard**. Once the Payment Page is created, Razorpay generates a unique identifier for the page (for example, `pl_C4VFJaiO69EvdL`). The page is then added to the list of previously created Payment Pages.
You can search for a Payment Page using filters, such as: **Title**, **Status** and **Count**.
You can set up webhooks to receive notifications on payments using the page. Know more about how to [set up webhooks](/docs/us/payments/payment-pages/subscribe-to-webhooks).
## View Payment Page in Action
Your Payment Page is now live!
## Payments
You can view the payments as and when they are made in the [Transactions Details View](/docs/us/payments/payment-pages/view-reports) of the page.
To export the report data into a CSV file:
1. Navigate to **Dashboard** → **Payment Pages**.
2. Select the relevant Payment Page. The Transactions Details View appears.
3. Click **Export All (CSV)** button.
A .csv file downloads, allowing you to find a monthly report of all the payments made using your page.
You can download and resend the payment receipt from the **Transaction Details View** screen.
To download and resend payment receipt:
1. Click on the relevant **Payment Id**. For example, `pay_EWqq21bljDMbcl`.
2. In the side pane, click **Download** to download a PDF copy of the receipt. You can now save this for your reference or send it to the customer via email or WhatsApp.
3. Click **Resend** to automatically send the receipt to the customer via email.
## Settlements
You will receive the payments in your bank account as per your settlement cycle.
### Related Information
* [How Payment Pages Work](/docs/us/payments/payment-pages/how-it-works)
* [Search for Payment Pages](/docs/us/payments/payment-pages/search)
* [Manage Payment Pages](/docs/us/payments/payment-pages/manage)