> ## Documentation Index
> Fetch the complete documentation index at: https://razorpay-881012b3.mintlify.site/llms.txt
> Use this file to discover all available pages before exploring further.
# Multi-bank Routing
> Avoid payout failures and improve payouts success rates with industry-first dynamic Multi-bank Routing by RazorpayX.
Available in
🇮🇳 India
RazorpayX **Payouts Pro** is a Multi-bank Routing feature which allows you to set primary, secondary and tertiary accounts and helps avoid payout failures by detecting bank downtimes. While [Intelligent Payouts](/docs/x/payouts/intelligent-payouts) prevents the money from being blocked, Multi-bank Routing changes the account of the transaction and prevents payment delays in real-time.
* **Payouts Pro** instantly detects bank degradations and immediately switches between two or more RazorpayX powered Current Accounts or RazorpayX Lite, thus improving success rates.
* This process is entirely automated and you will receive the debit account number in the API and webhook responses informing you the account from which the payout was finally done.
* Your payments will no longer be stuck in processing.
* You can enable Payouts Pro if you have more than one bank account registered with RazorpayX (Current/Escrow/Lite).
**Watch Out!**
* Dynamic Multi-bank Routing is applicable only to payouts made via [Payout APIs](/docs/api/x/payouts).
* RazorpayX Lite is currently not available for new merchants. To set up a new RazorpayX account, refer to [Current Account](/docs/x/account-types/current-account).
## How It Works
Consider the following scenario:
* Name of the business: **Acme Corp**
* Number of accounts: **3**
* The different accounts enabled and set in priority by **Acme Corp** for UPI:
* Primary bank account: **RBL Bank**
* First backup account: **Yes Bank**
* Second backup account: RazorpayX **Lite**
**Handy Tips**
If you do not have a backup current account or cannot open one, you can use RazorpayX Lite as your backup account.
Let us consider a scenario where Acme Corp has initiated five payouts through UPI.
* After 3 payouts, RBL Bank which is the primary bank started facing a downtime.
* The remaining 2 payouts are now deducted from Yes Bank.
* While the payouts are being made via Yes Bank, we parallelly check whether the downtime has been resolved at RBL Bank.
* Once the downtime is resolved, the rest of the payouts are re-routed through RBL Bank.
* Else, they are processed from Yes Bank.
This process is entirely automated and can be reconciled easily by accurately identifying the debit account number from the API and webhook responses.
## Set Account Preferences in Payouts Pro
You can view and set your account priorities.
1. Log in to your [RazorpayX Dashboard](https://x.razorpay.com/).
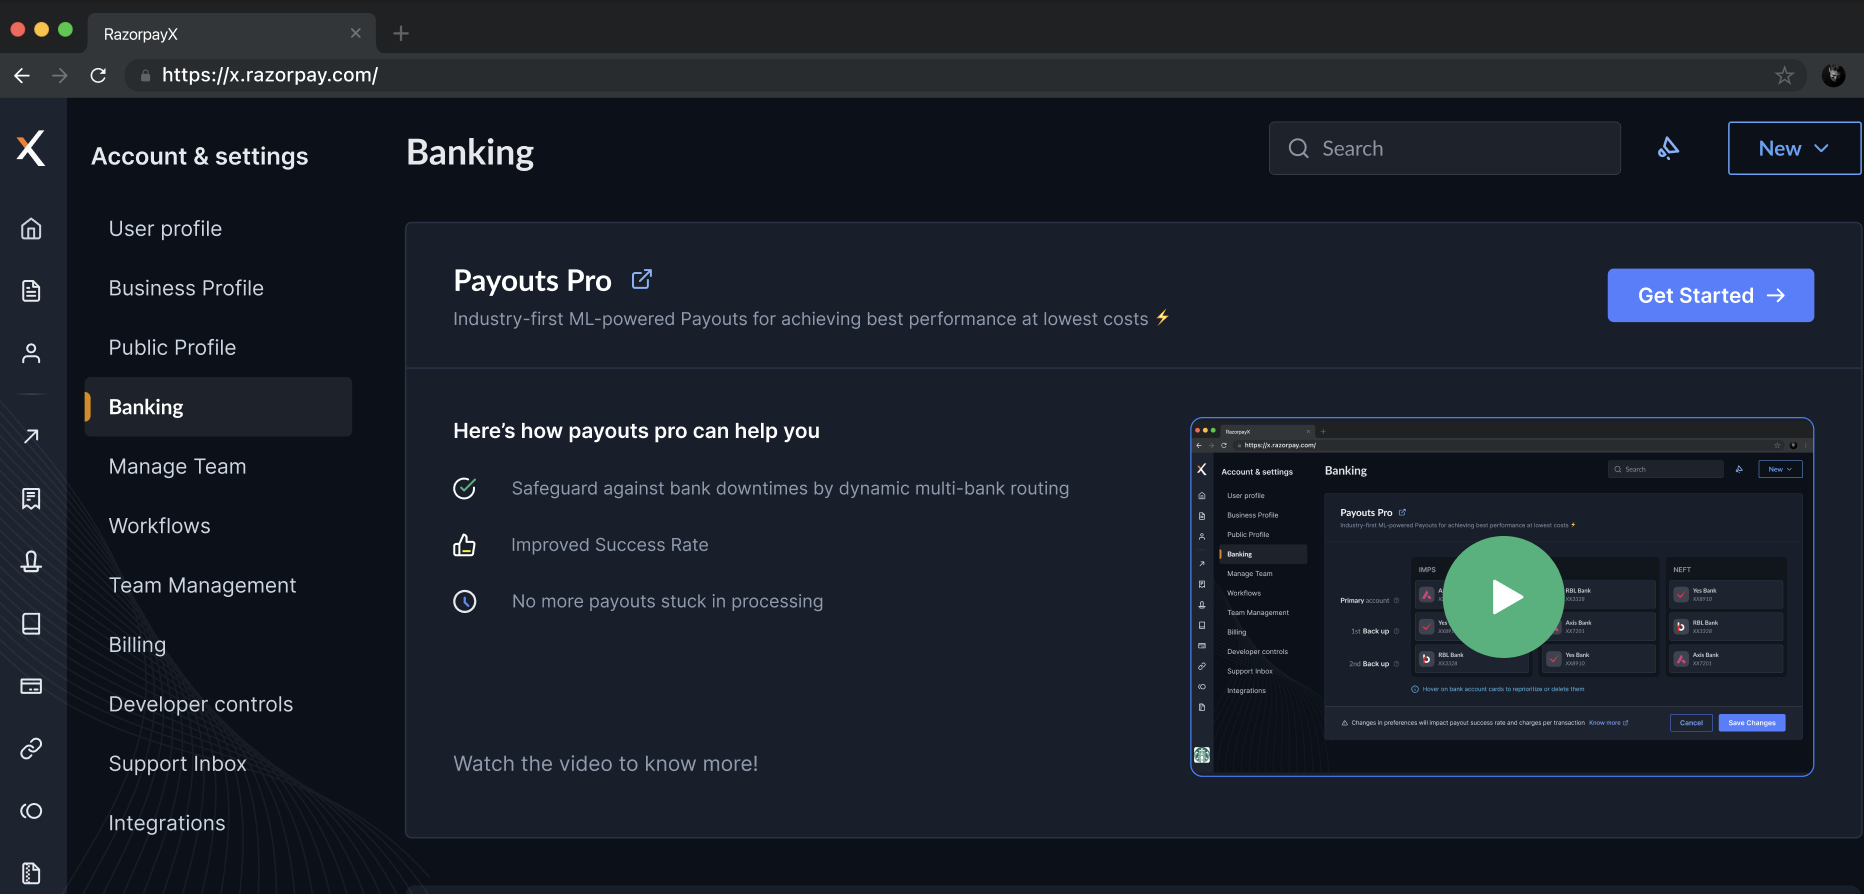
2. Go to **Payouts Pro** by clicking **User Icon→Account & Settings→Banking**.
3. Click **Get Started** to set up your account priorities.
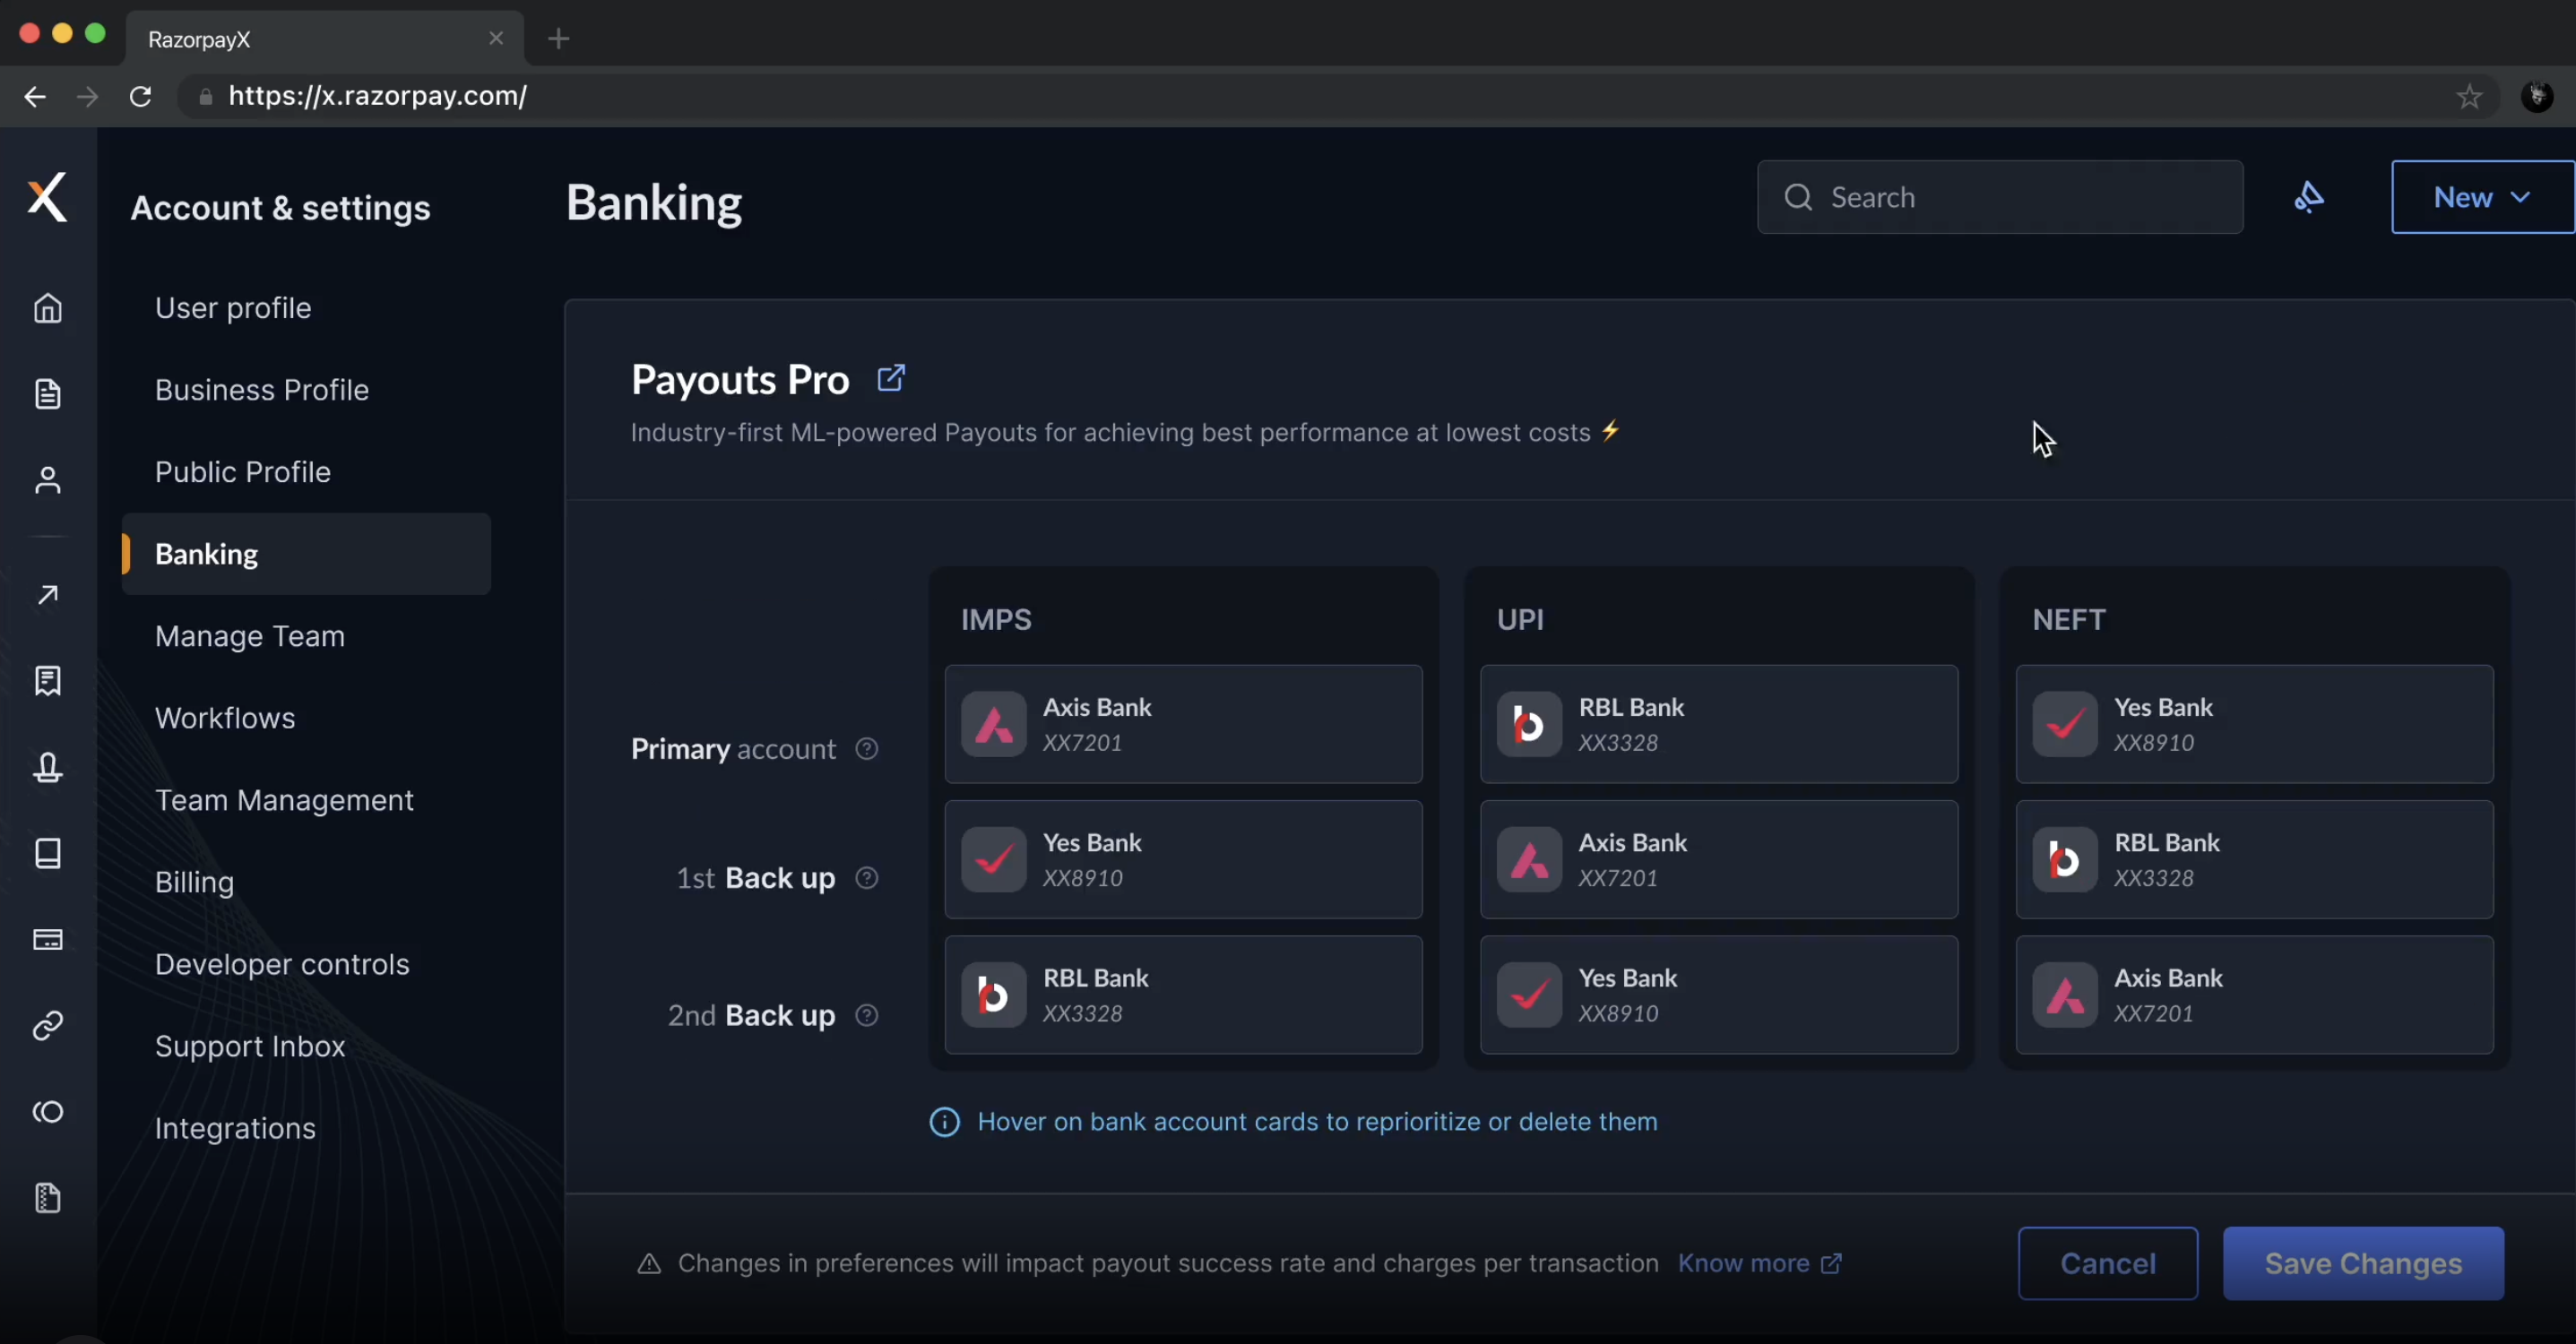
 4. You can view your accounts listed under each of IMPS, UPI and NEFT channels. This is the default setting.
 **Handy Tips**
Accounts are listed by default based on their transaction success rates. This means that the account listed first has had the most number of successful transactions historically.
5. Click **Save Changes** to save the default account priority settings.
6. Click **Yes, save changes** to confirm. All the payouts will now be routed based on the default account priorities.
7. You can also [edit your preferences](#edit-payout-account-preferences), [add a new account](#add-new-account) or [delete an account](#delete-account) later.
**Watch Out!**
RTGS channel is currently not enabled for Multi-bank Routing.
You can edit the default settings and change your account preferences.
1. Log in to your [RazorpayX Dashboard](https://x.razorpay.com/).
2. Go to **Payout Pro** by clicking **User Icon→Account & Settings→Banking**.
3. Click **Get Started**.
4. Click **Edit Preferences** on **Payouts Pro**. You will see the default listing of your accounts.
5. Hover over each bank account and use up/down arrows to move the bank up or down the list under each payment method.
6. Click **Save changes** to save your preferences or **Cancel** to continue editing.
7. To confirm, click **Yes, save changes** in the pop-up modal.
**Handy Tips**
Accounts are listed by default based on their transaction success rates. This means that the account listed first has had the most number of successful transactions historically.
5. Click **Save Changes** to save the default account priority settings.
6. Click **Yes, save changes** to confirm. All the payouts will now be routed based on the default account priorities.
7. You can also [edit your preferences](#edit-payout-account-preferences), [add a new account](#add-new-account) or [delete an account](#delete-account) later.
**Watch Out!**
RTGS channel is currently not enabled for Multi-bank Routing.
You can edit the default settings and change your account preferences.
1. Log in to your [RazorpayX Dashboard](https://x.razorpay.com/).
2. Go to **Payout Pro** by clicking **User Icon→Account & Settings→Banking**.
3. Click **Get Started**.
4. Click **Edit Preferences** on **Payouts Pro**. You will see the default listing of your accounts.
5. Hover over each bank account and use up/down arrows to move the bank up or down the list under each payment method.
6. Click **Save changes** to save your preferences or **Cancel** to continue editing.
7. To confirm, click **Yes, save changes** in the pop-up modal.
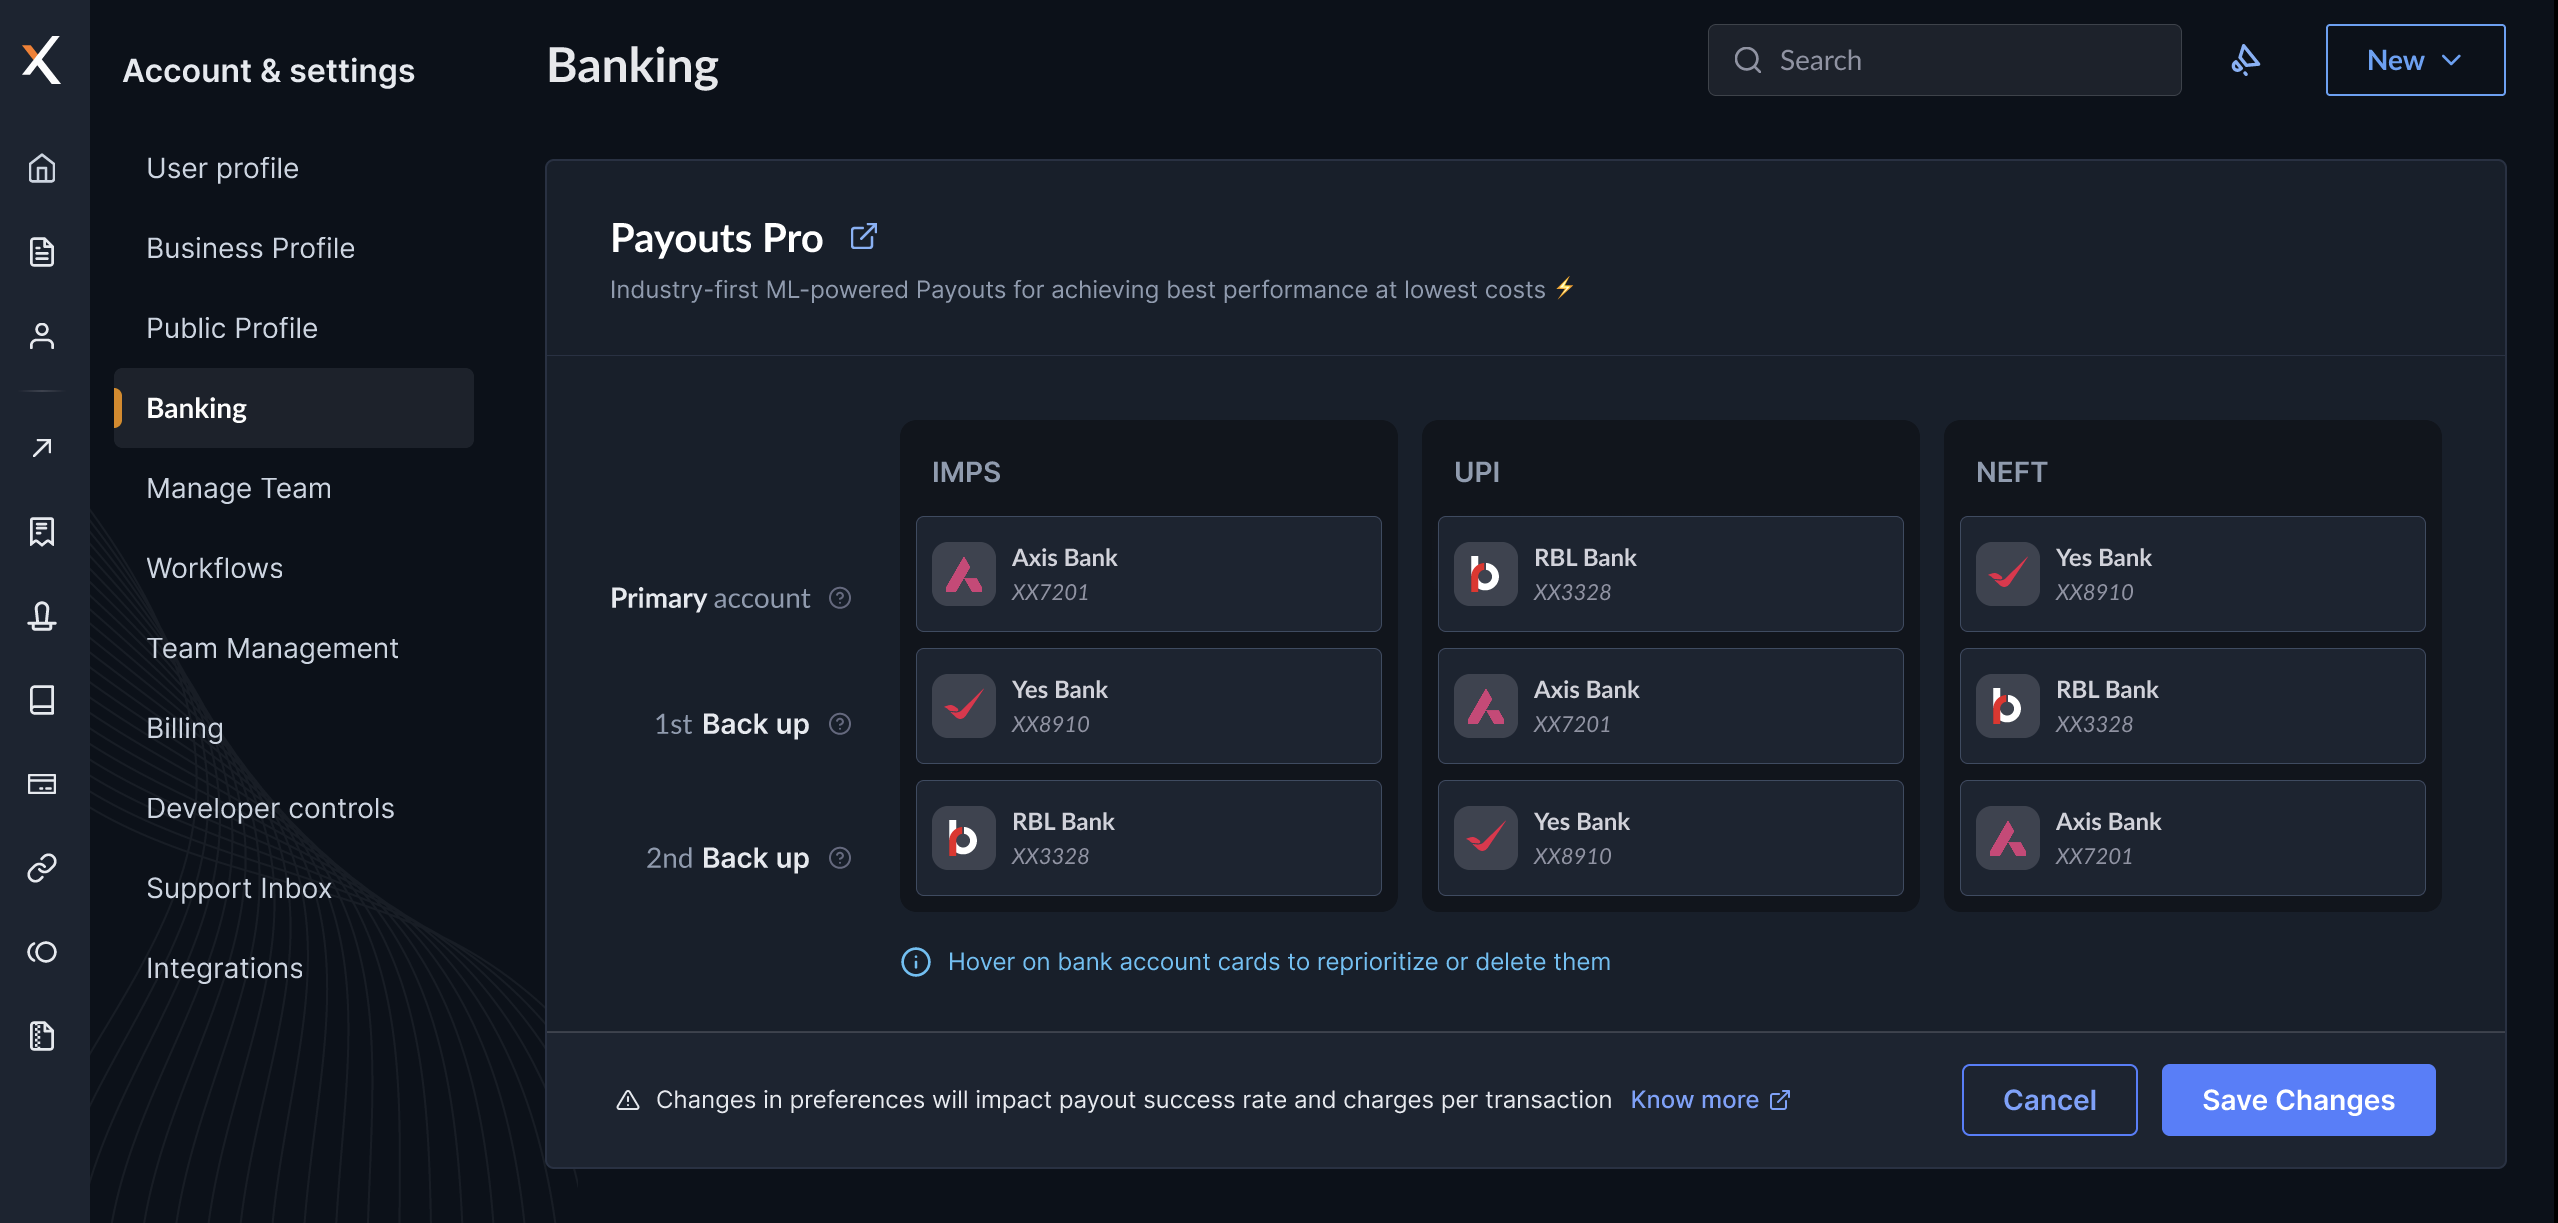 All the payouts will now be routed based on the changed account priorities.
You can add your registered account(s) to Payouts Pro.
1. Log in to your [RazorpayX Dashboard](https://x.razorpay.com/).
2. Go to **Payout Pro** by clicking **User Icon→Account & Settings→Banking**.
3. Click **Get Started**.
4. If you are unable to view all your accounts (those registered during RazorpayX account creation) listed on Payouts Pro, you can add them by clicking **Add bank +** immediately below the existing list of banks.
5. You can select the bank account from the drop-down list.
6. If you have registered only one account with RazorpayX, you will not see the **Add bank +** option.
All the payouts will now be routed based on the changed account priorities.
You can add your registered account(s) to Payouts Pro.
1. Log in to your [RazorpayX Dashboard](https://x.razorpay.com/).
2. Go to **Payout Pro** by clicking **User Icon→Account & Settings→Banking**.
3. Click **Get Started**.
4. If you are unable to view all your accounts (those registered during RazorpayX account creation) listed on Payouts Pro, you can add them by clicking **Add bank +** immediately below the existing list of banks.
5. You can select the bank account from the drop-down list.
6. If you have registered only one account with RazorpayX, you will not see the **Add bank +** option.
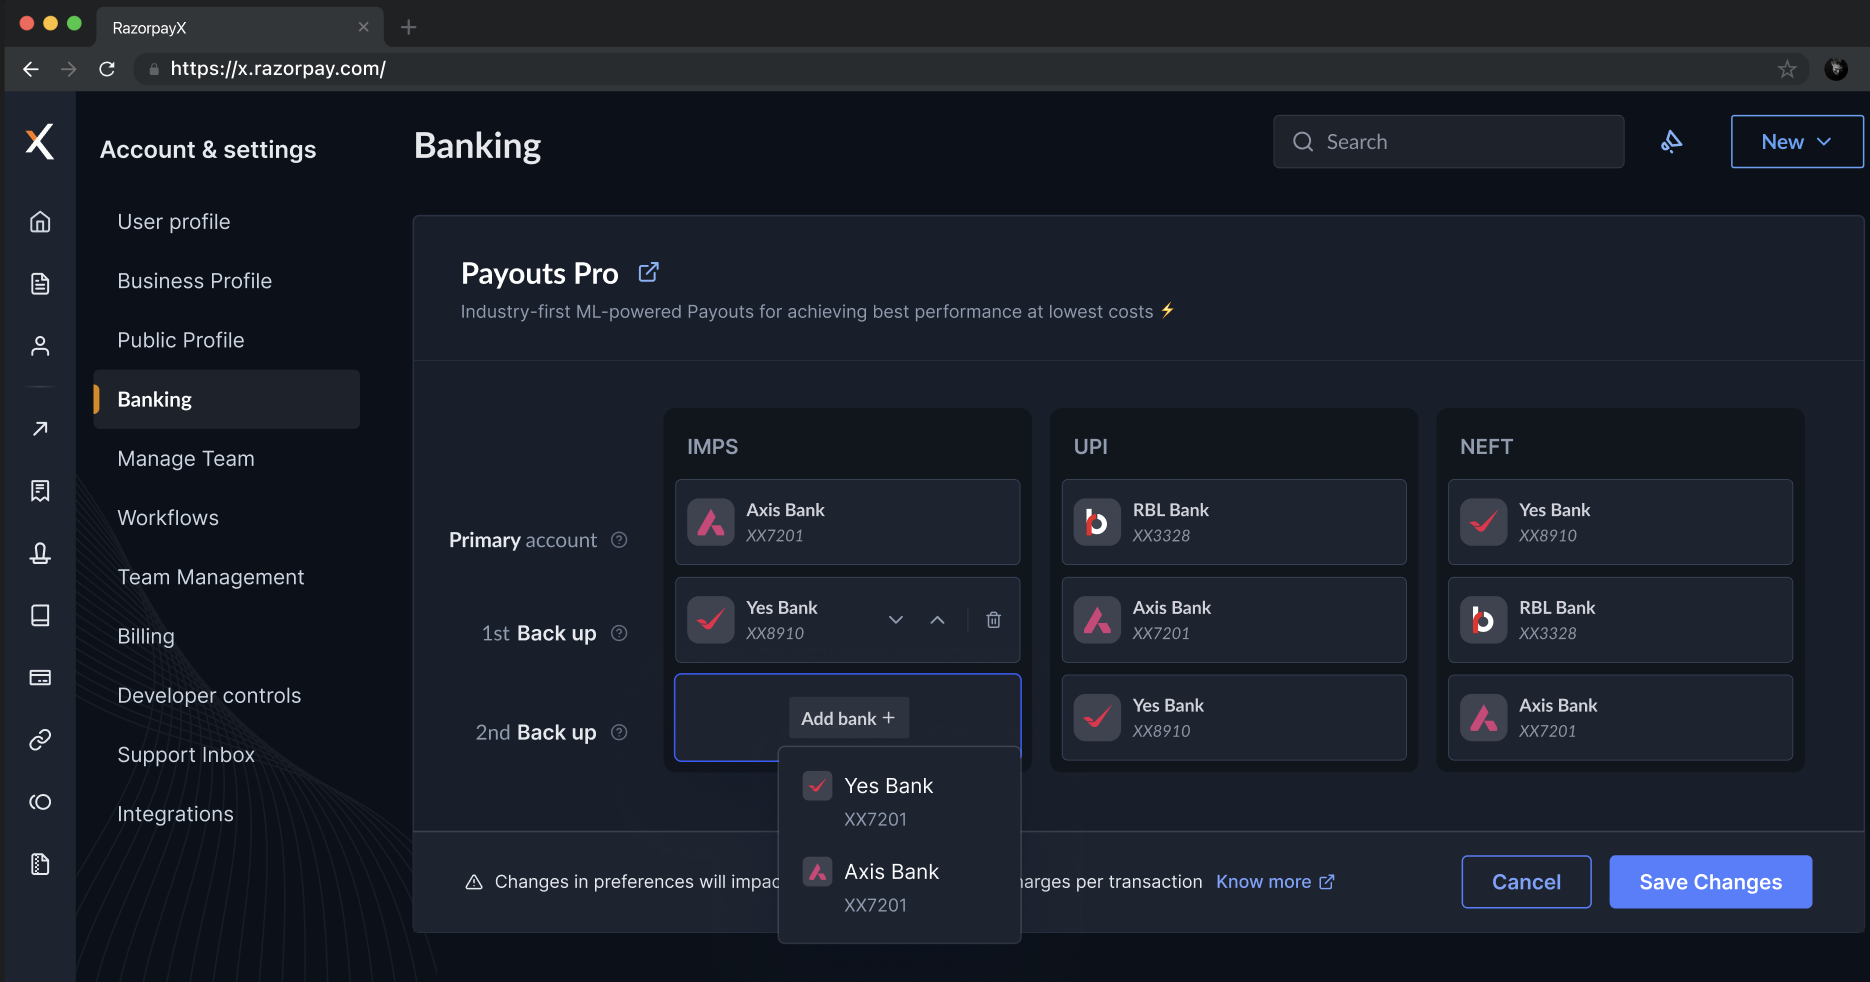 The newly added account will be used for the subsequent payouts as per the priority you have set for it.
**Handy Tips**
* Only those accounts registered by you during RazorpayX account creation can be added to **Payouts Pro** using **Add bank** option. Your accounts which are not registered with RazorpayX will not be listed when you click **Add bank**.
* To register a new account with RazorpayX, log in to your [RazorpayX Dashboard](https://x.razorpay.com/) , go to **My Account & Settings** → **Banking** → **+ADD ACCOUNT**.
1. Log in to your [RazorpayX Dashboard](https://x.razorpay.com/).
2. Go to **Payout Pro** by clicking **User Icon→Account & Settings→Banking**.
3. Click **Get Started**.
4. Go to **Payouts Pro** to view your accounts.
5. Hover over the bank account card that you want to delete, and click the delete icon next to it.
6. Click **Remove account** on the pop-up modal to confirm or **Don't remove account** to cancel the action.
**Watch Out!**
* Deleting a bank account from Payout Pro does not delete the registered bank account from RazorpayX. It is deleted only from the Payouts Pro routing preferences.
* **It is mandatory to have at least one account each under IMPS, UPI and NEFT options.**
The deleted account will no longer be used for Multi-bank Routing of subsequent payouts.
You can disable Payouts Pro if you no longer want to use the Multi-bank Routing feature.
1. Log in to your [RazorpayX Dashboard](https://x.razorpay.com/).
2. Go to **Payout Pro** by clicking **User Icon→Account & Settings→Banking**.
3. Click **Get Started**.
4. Go to **Payouts Pro**
5. Click **Disable Payouts Pro**.
6. Click **Disable** in the pop-up modal to confirm or **Don't disable** to cancel your action.
The newly added account will be used for the subsequent payouts as per the priority you have set for it.
**Handy Tips**
* Only those accounts registered by you during RazorpayX account creation can be added to **Payouts Pro** using **Add bank** option. Your accounts which are not registered with RazorpayX will not be listed when you click **Add bank**.
* To register a new account with RazorpayX, log in to your [RazorpayX Dashboard](https://x.razorpay.com/) , go to **My Account & Settings** → **Banking** → **+ADD ACCOUNT**.
1. Log in to your [RazorpayX Dashboard](https://x.razorpay.com/).
2. Go to **Payout Pro** by clicking **User Icon→Account & Settings→Banking**.
3. Click **Get Started**.
4. Go to **Payouts Pro** to view your accounts.
5. Hover over the bank account card that you want to delete, and click the delete icon next to it.
6. Click **Remove account** on the pop-up modal to confirm or **Don't remove account** to cancel the action.
**Watch Out!**
* Deleting a bank account from Payout Pro does not delete the registered bank account from RazorpayX. It is deleted only from the Payouts Pro routing preferences.
* **It is mandatory to have at least one account each under IMPS, UPI and NEFT options.**
The deleted account will no longer be used for Multi-bank Routing of subsequent payouts.
You can disable Payouts Pro if you no longer want to use the Multi-bank Routing feature.
1. Log in to your [RazorpayX Dashboard](https://x.razorpay.com/).
2. Go to **Payout Pro** by clicking **User Icon→Account & Settings→Banking**.
3. Click **Get Started**.
4. Go to **Payouts Pro**
5. Click **Disable Payouts Pro**.
6. Click **Disable** in the pop-up modal to confirm or **Don't disable** to cancel your action.
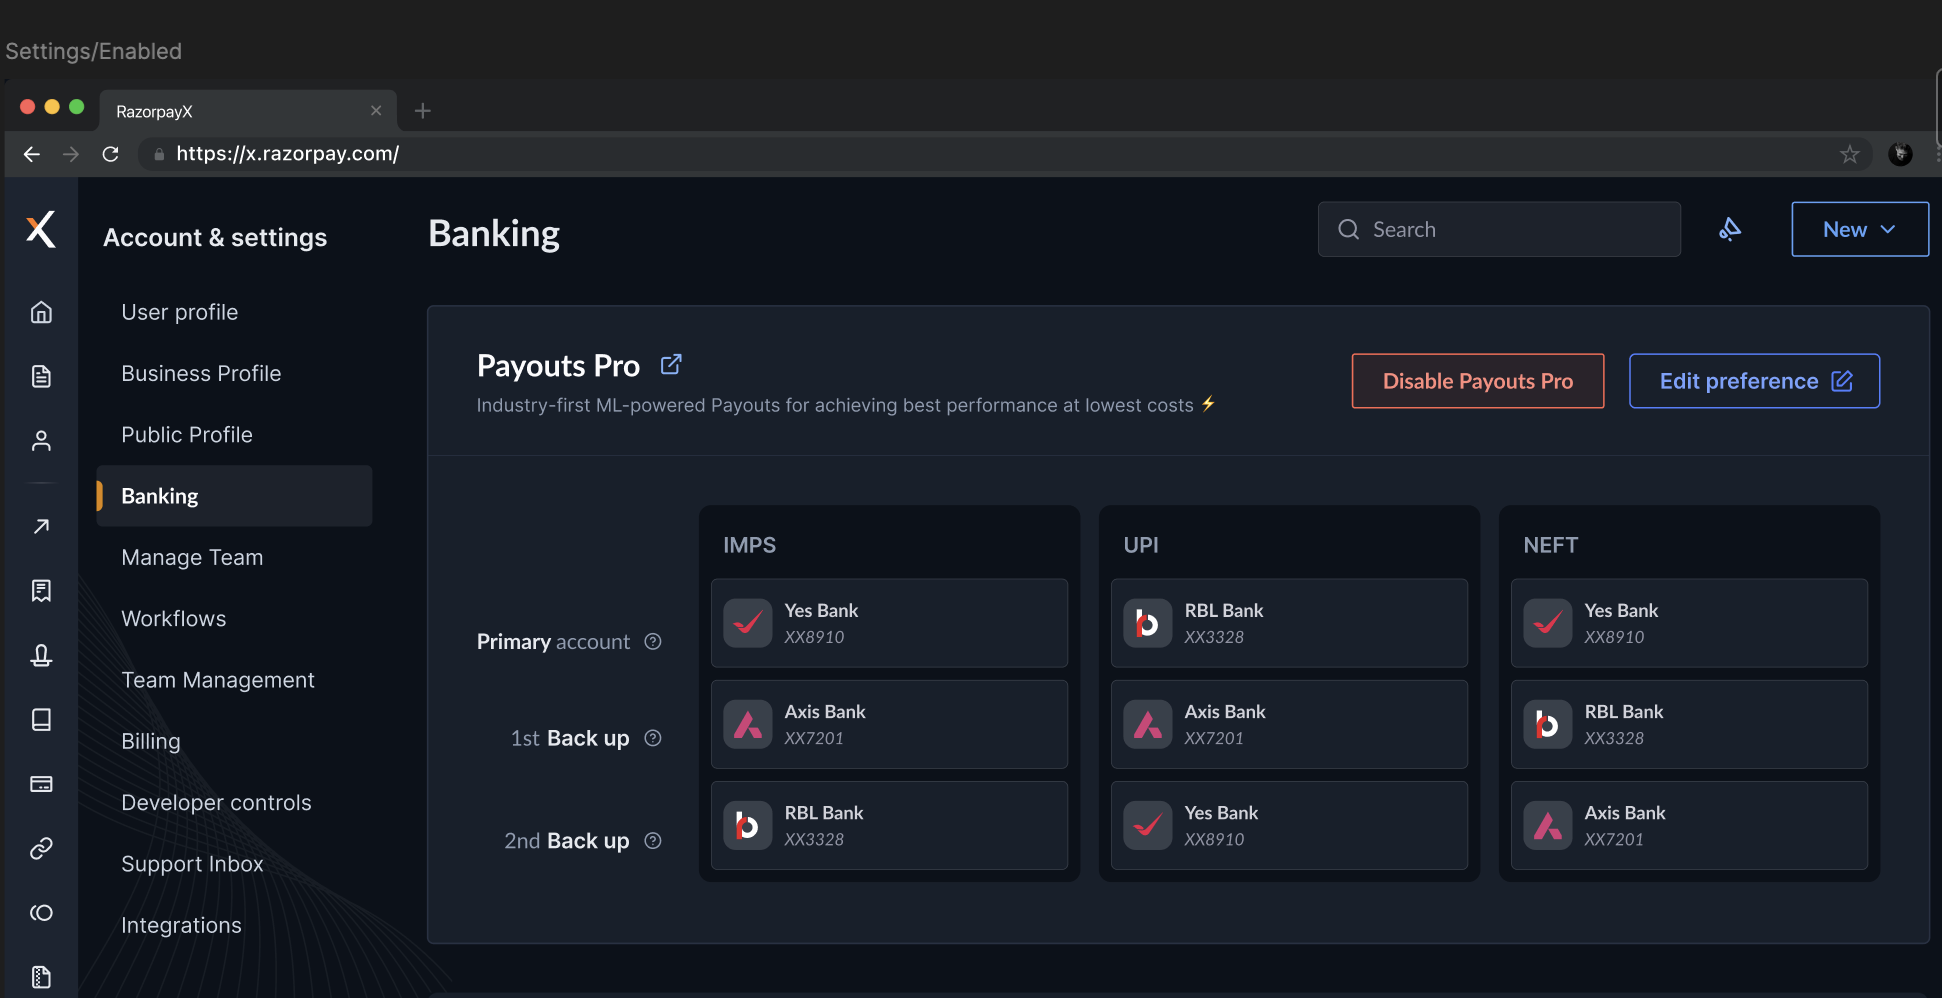 Once you disable **Payouts Pro**, the payouts will no longer use the Multi-bank Routing and will use only the selected account and channel.
## Widget
* The Payouts Pro widget displays the payout volumes, total number of payouts, transactions protected from downtimes and the success rates of transactions under each payout modes.
* The first account displayed here is the first account you registered with RazorpayX.
* Click **View all account details** to view the success rates of all your registered accounts.
For example, the following widget shows data available for two payment modes across the last 30 days: UPI and IMPS.
Once you disable **Payouts Pro**, the payouts will no longer use the Multi-bank Routing and will use only the selected account and channel.
## Widget
* The Payouts Pro widget displays the payout volumes, total number of payouts, transactions protected from downtimes and the success rates of transactions under each payout modes.
* The first account displayed here is the first account you registered with RazorpayX.
* Click **View all account details** to view the success rates of all your registered accounts.
For example, the following widget shows data available for two payment modes across the last 30 days: UPI and IMPS.
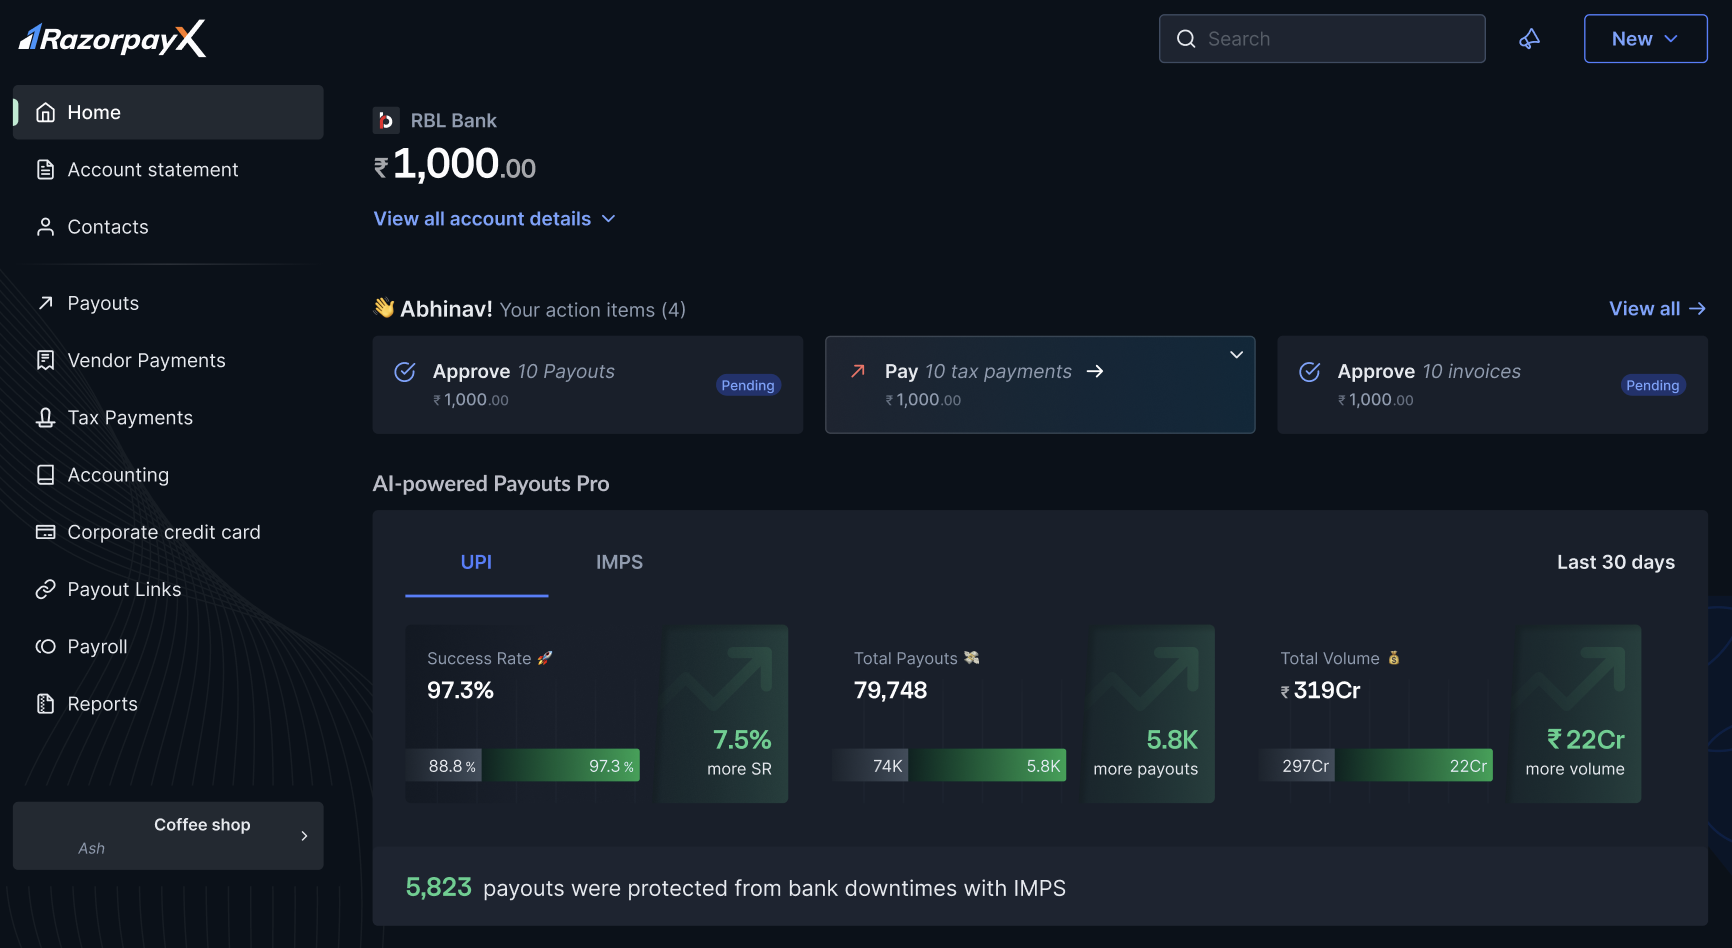 You can read the widget data in the following manner:
* **7.5% more success rate**, that is, success rates spiked to 97.3% from 88.8% due to Payouts Pro.
* **5.8k more payouts**, that is, number of payouts increased by 5823 due to protection from bank downtimes.
* **₹ 22 Cr more volume**, that is, volume of payouts increased from 297 Cr to 319 Cr.
## Reports
All the transactions made from different accounts, through this feature, are recorded accordingly. You can find the information when you generate reports from:
1. [Account Statements](/docs/x/account-statement)
2. [Reports](/docs/x/reports)
3. [Payouts](/docs/x/payouts/reports)
### Related Information
* [About Payouts](/docs/x/payouts)
* [Open a Current Account](/docs/x/account-types/current-account)
You can read the widget data in the following manner:
* **7.5% more success rate**, that is, success rates spiked to 97.3% from 88.8% due to Payouts Pro.
* **5.8k more payouts**, that is, number of payouts increased by 5823 due to protection from bank downtimes.
* **₹ 22 Cr more volume**, that is, volume of payouts increased from 297 Cr to 319 Cr.
## Reports
All the transactions made from different accounts, through this feature, are recorded accordingly. You can find the information when you generate reports from:
1. [Account Statements](/docs/x/account-statement)
2. [Reports](/docs/x/reports)
3. [Payouts](/docs/x/payouts/reports)
### Related Information
* [About Payouts](/docs/x/payouts)
* [Open a Current Account](/docs/x/account-types/current-account)