

Available in🇮🇳 India
You can use Razorpay Recurring Payments APIs to create subsequent payments for your customers at intervals you can define and control.
Feature RequestThis is an on-demand feature. Please raise a request with our Support team to get this feature activated on your Razorpay account.
Integration Flow
The integration flow varies depending on how you choose to create the authorisation transaction.Using Razorpay Standard Checkout
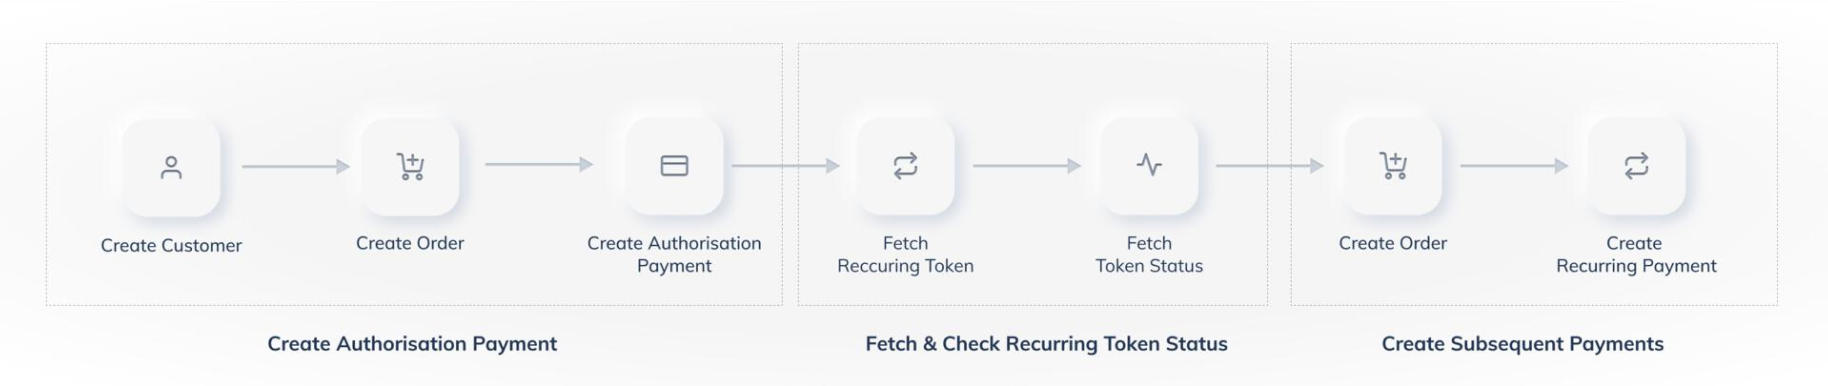 You can integrate Recurring Payments using Razorpay Standard Checkout via APIs. Following is the integration flow to collect recurring payments using the Razorpay Standard Checkout:
- Create a customer
This returns acustomer_id. - Create an order
This returns anorder_id. The order amount for:- For Emandate is ₹0.
- Cards is a minimum of ₹1.
- Paper NACH is ₹0.
- UPI is ₹1.
- Create authorisation transaction
Pass thecustomer_id,order_idand a few additional parameters in your Checkout to create the authorisation payment. The customer completes the authorisation payment, which generates atoken. This payment can be authorized using one of the following instruments:- Emandate
- Card
- Paper NACH. The following additional steps have to be completed for NACH:
- The customer either downloads a pre-filled NACH form or you can send it to the customer.
- The customer signs the pre-filled NACH form.
- The customer either uploads the signed form or sends it to you to upload for processing.
Know more about uploading Paper Nach Form.
- UPI.
- Retrieve and check the status of the token
After the token status changes toconfirmed, you can create and charge subsequent payments. - Create and charge subsequent payments
To do this, you have to manually:- Create a new order.
- Create a recurring payment.
Using a Registration Link
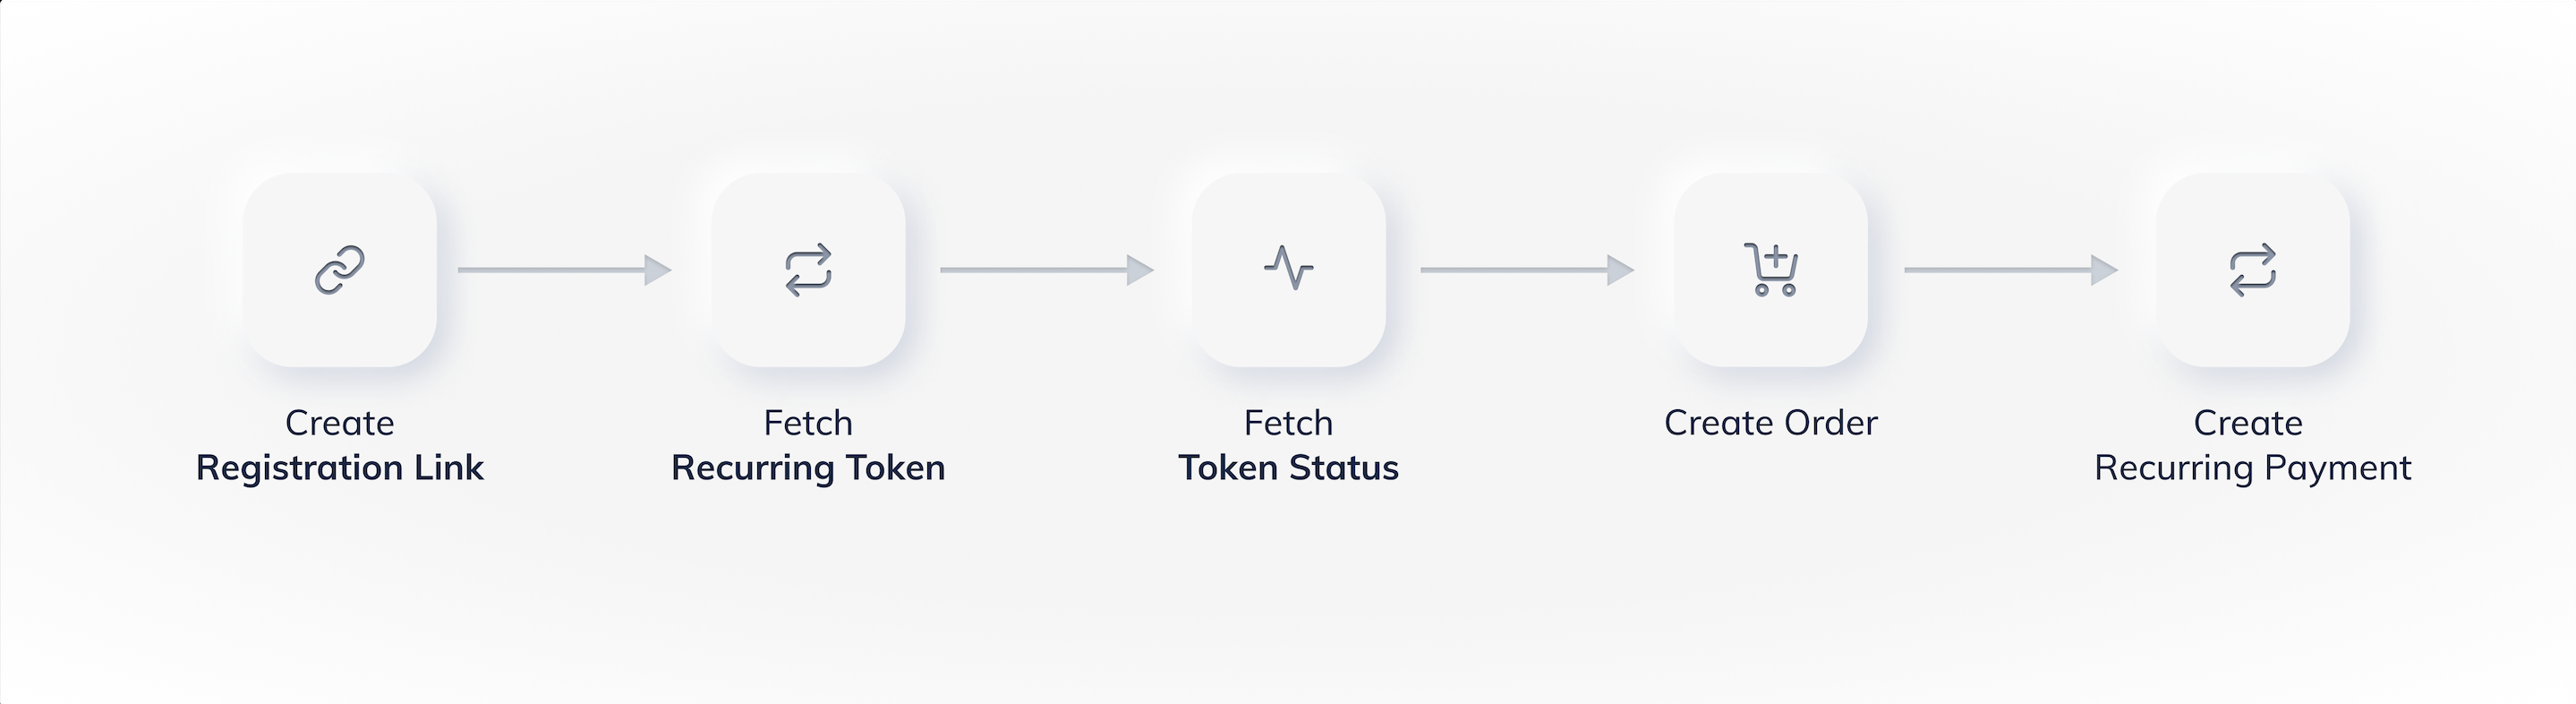 You can create registration links from the Dashboard or using APIs.
Following is the integration flow to collect recurring payments using a registration link:
You can create registration links from the Dashboard or using APIs.
Following is the integration flow to collect recurring payments using a registration link:
- Create a registration link and send it to your customer
The customer completes the authorisation payment, which generates atoken. This payment can be authorised using one of the following instruments:- Emandate
- Card
- Paper NACH. The following additional steps have to be completed for NACH:
- The customer either downloads a pre-filled NACH form or you can send it to the customer.
- The customer signs the pre-filled NACH form.
- The customer either uploads the signed form or sends it to you to upload for processing.
Know more about uploading Paper Nach Form.
- UPI
No Need to Create a Customer and Order SeparatelyIf you use a registration link to create the authorisation transaction, Razorpay automatically creates a customer and the order on your behalf.
- Retrieve and check the token status
After the token status changes toconfirmed, you can create and charge subsequent payments. - Create and charge subsequent payments
To do this, you have to manually:- Create a new order.
- Create a recurring payment.
API Gateway URL
For most of the Razorpay APIs, the Gateway URL ishttps://api.razorpay.com/v1. You need to include this before each API endpoint to make API calls. However, certain APIs are on V2. Hence, the gateway URL may differ for certain APIs.
Example
Example
-
Use the URL
https://api.razorpay.com/v1/paymentsto access payment resources. -
Use the URL
https://api.razorpay.com/v2/accountsto access Route (Linked Account)-related resources.
API Authorisation
All Razorpay APIs are authenticated usingBasic Auth. Basic auth requires the following:
[YOUR_KEY_ID][YOUR_KEY_SECRET]
Authorization header for each request in the Basic base64token format. Here, base64token is a base64 encoded string of YOUR_KEY_ID:YOUR_KEY_SECRET.
Generate API Key
Follow these steps to generate API keys:Test Mode API Keys
Watch this video to see how to generate API keys in the Test mode.
Live Mode API Keys
Watch this video to see how to generate API keys in the Live mode.
- Log in to your Dashboard with the appropriate credentials.
- Select the mode (Test or Live) for which you want to generate the API key.
- Test Mode: The test mode is a simulation mode that you can use to test your integration flow. Your customers will not be able to make payments in this mode.
- Live Mode: When your integration is complete, switch to live mode and generate live mode API keys. In the integration, replace test mode keys with live mode keys to accept customer payments.
- Navigate to Account & Settings → API Keys (under Website and app settings) → Generate Key to generate key for the selected mode.
List of APIs as per Supported Payment Methods
Cards
Cards
UPI
UPI
UPI OTM
UPI OTM
UPI TPV
UPI TPV