

How are webhooks auto-configured?
How are webhooks auto-configured?
- Auto-webhook support is available for Razorpay Woocommerce Plugin from v3.5.0 onwards.
- Once you save the changes on the Woocommerce Dashboard, webhooks are auto configured for events:
payment.authorizedandrefund.created. You do not have to configure it on the Dashboard.
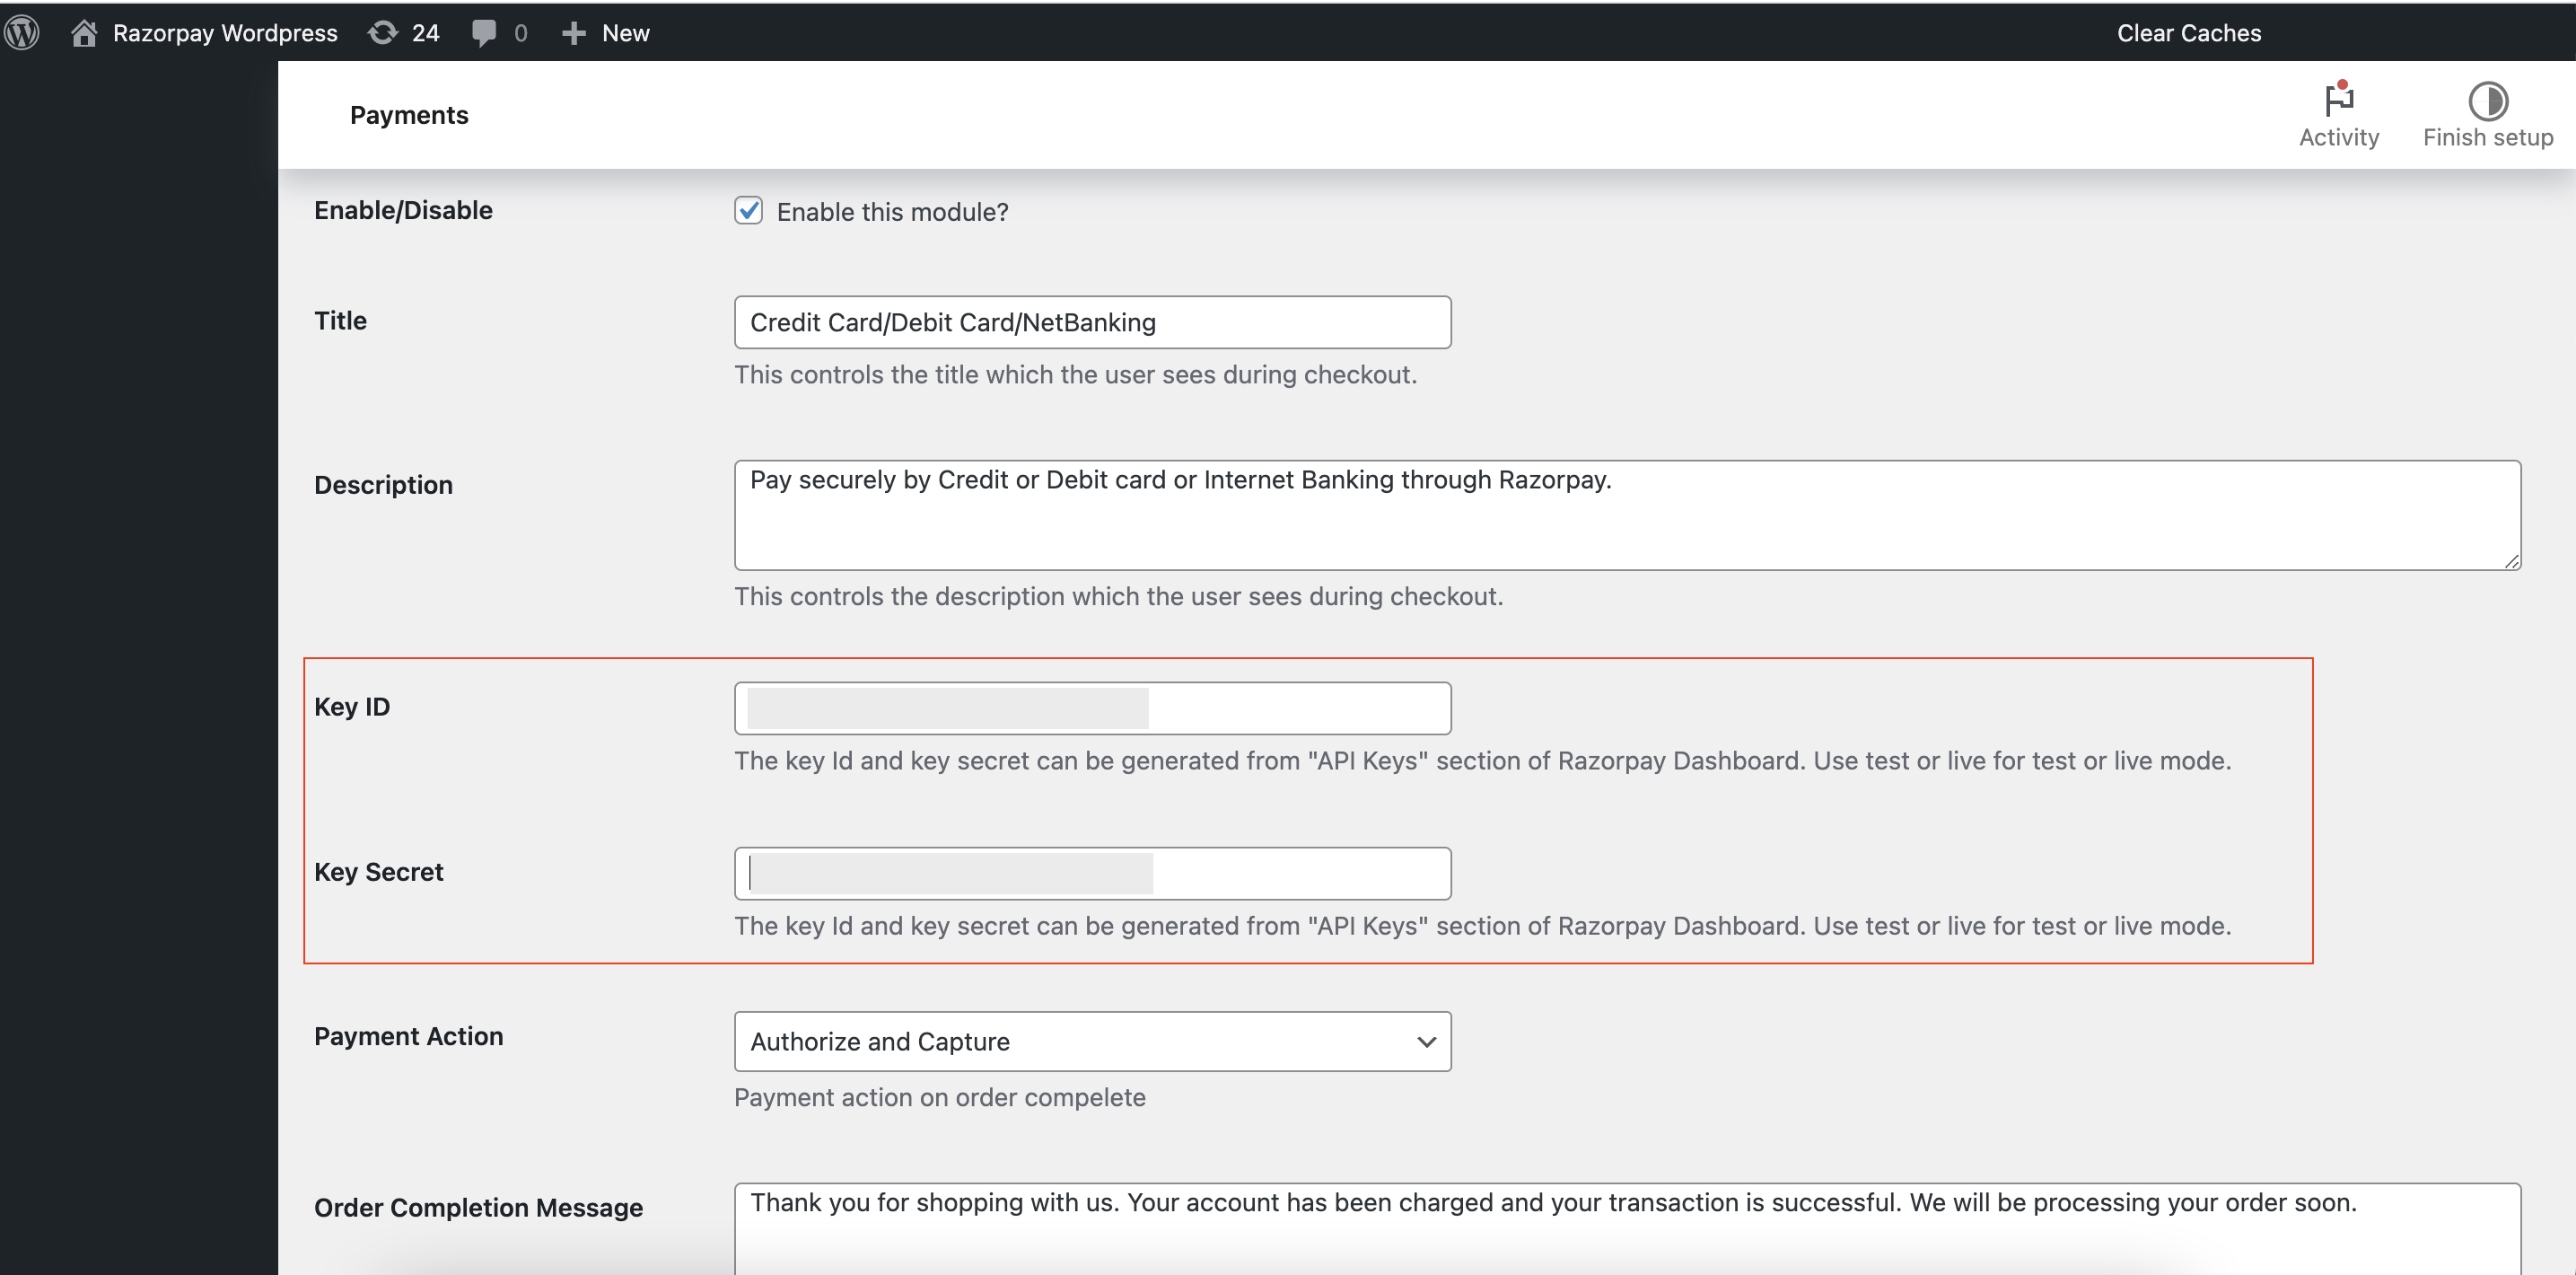
- In the WordPress Dashboard, click WooCommerce and navigate to Settings.
- In the Payments tab, enter the Key ID and Key Secret.
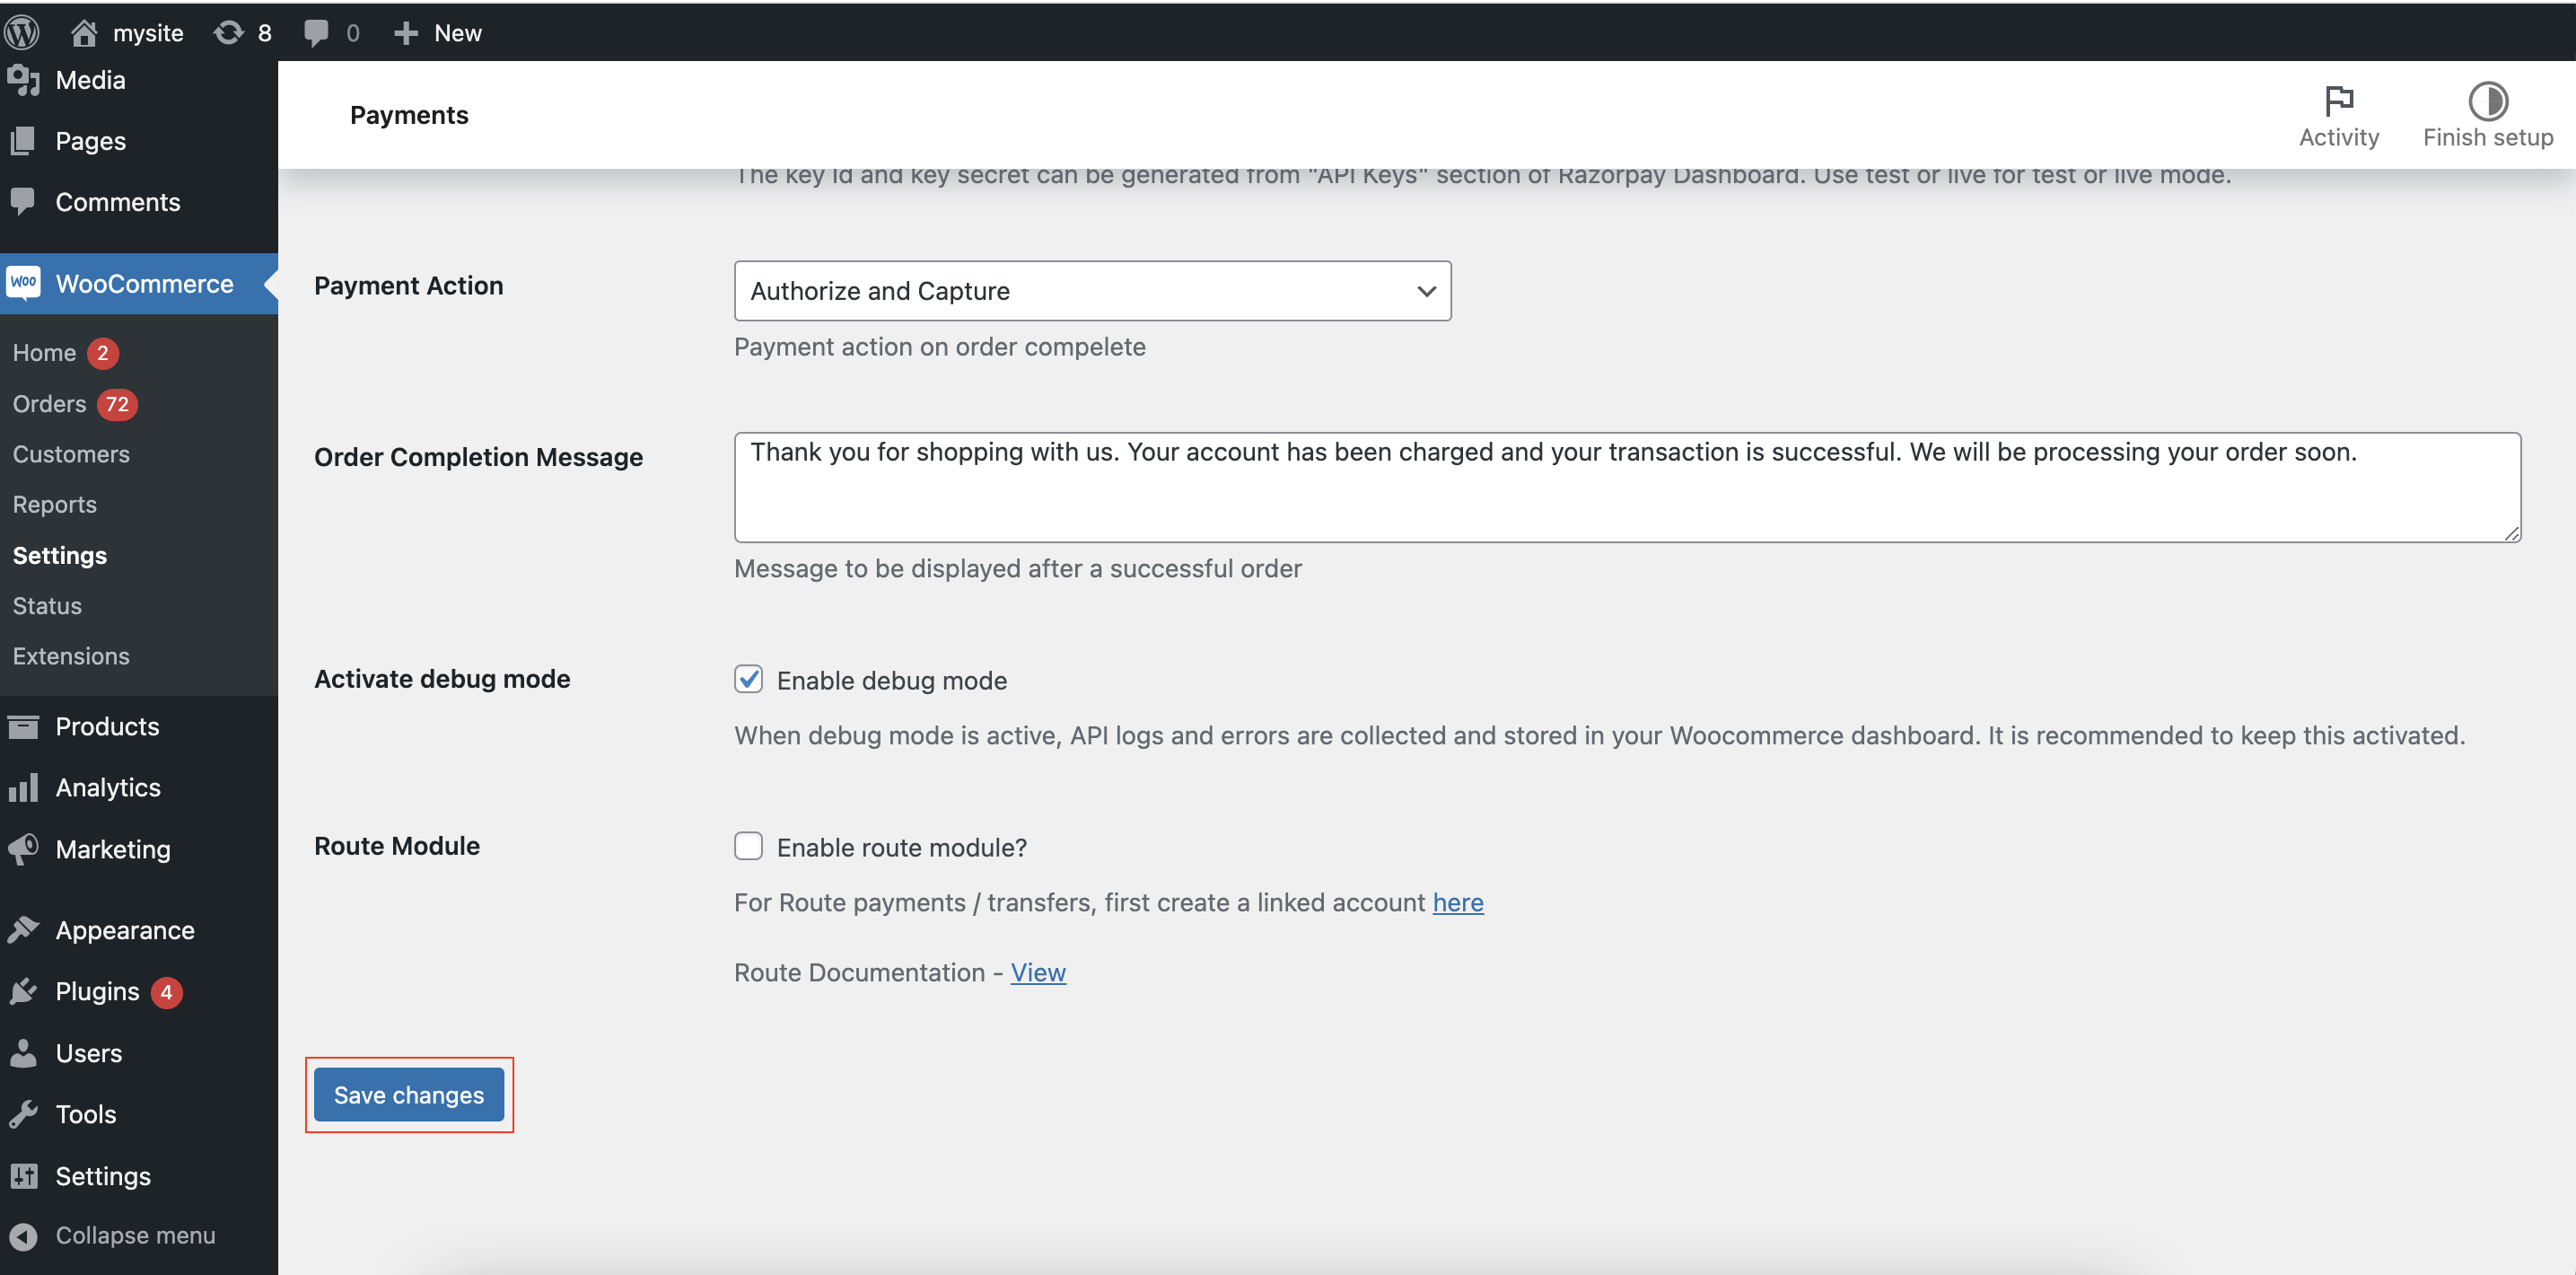
- Click Save Changes.
My webhooks are not auto-configured since I am not using the upgraded version of the WooCommerce plugin. How do I manually configure webhooks?
My webhooks are not auto-configured since I am not using the upgraded version of the WooCommerce plugin. How do I manually configure webhooks?
payment.authorizedpayment.pendingrefund.createdvirtual_account.creditedsubscription.cancelledsubscription.pausedsubscription.resumed
- Log in to the Razorpay Dashboard and navigate to Account & Settings.
- In the Website and app settings section, click Webhooks.

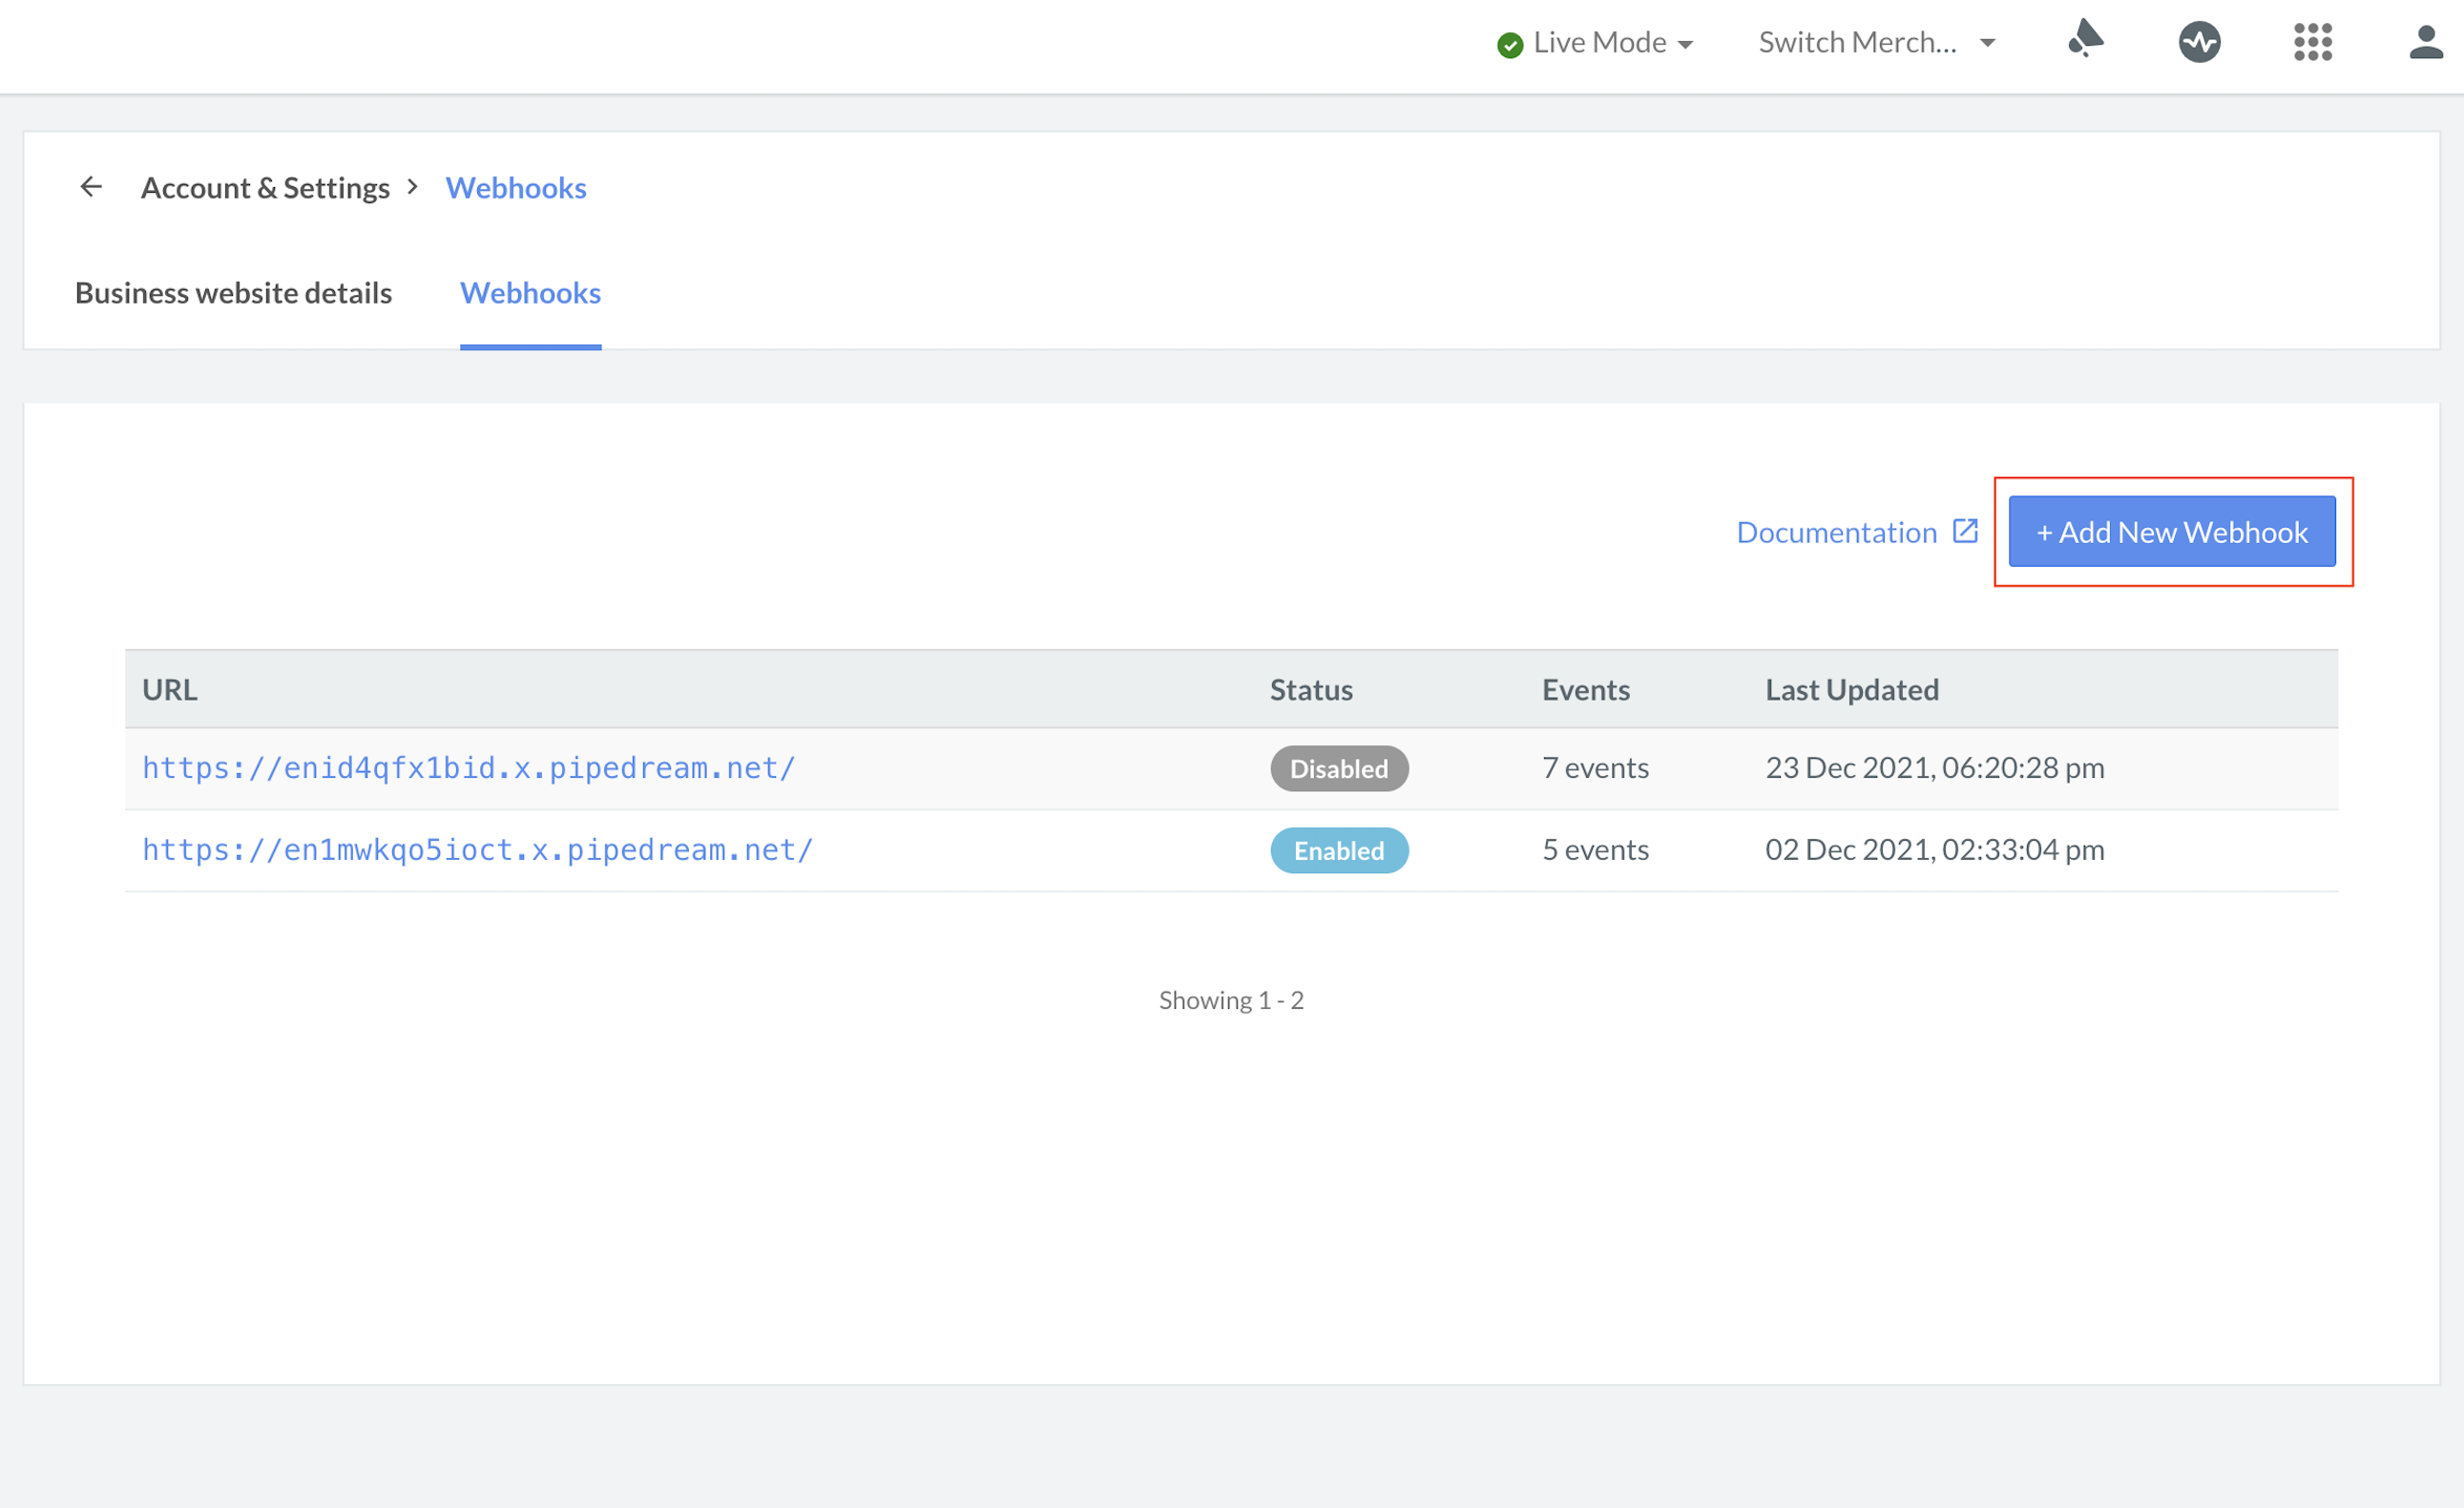
- Click + Add New Webhook.
- In the Webhook Setup pop-up page:
- Enter the URL where you want to receive the webhook payload when an event is triggered. We recommend using an HTTPS URL.
- Enter a Secret for the webhook endpoint. The secret is used to validate that the webhook is from Razorpay. Do not expose the secret publicly. Know more about how to validate webhooks.
- When setting up the webhook, you will be asked to specify a secret. Using this secret, you can validate that the webhook is from Razorpay. Entering the secret is optional but recommended. The secret should never be exposed publicly.
- The webhook secret does not need to be the merchant secret key provided by Razorpay.
- In the Alert Email field, enter the email address to which the notifications should be sent in case of webhook failure. You will receive webhook deactivation notifications to this email address.
- Select the required events from the list of Active Events.
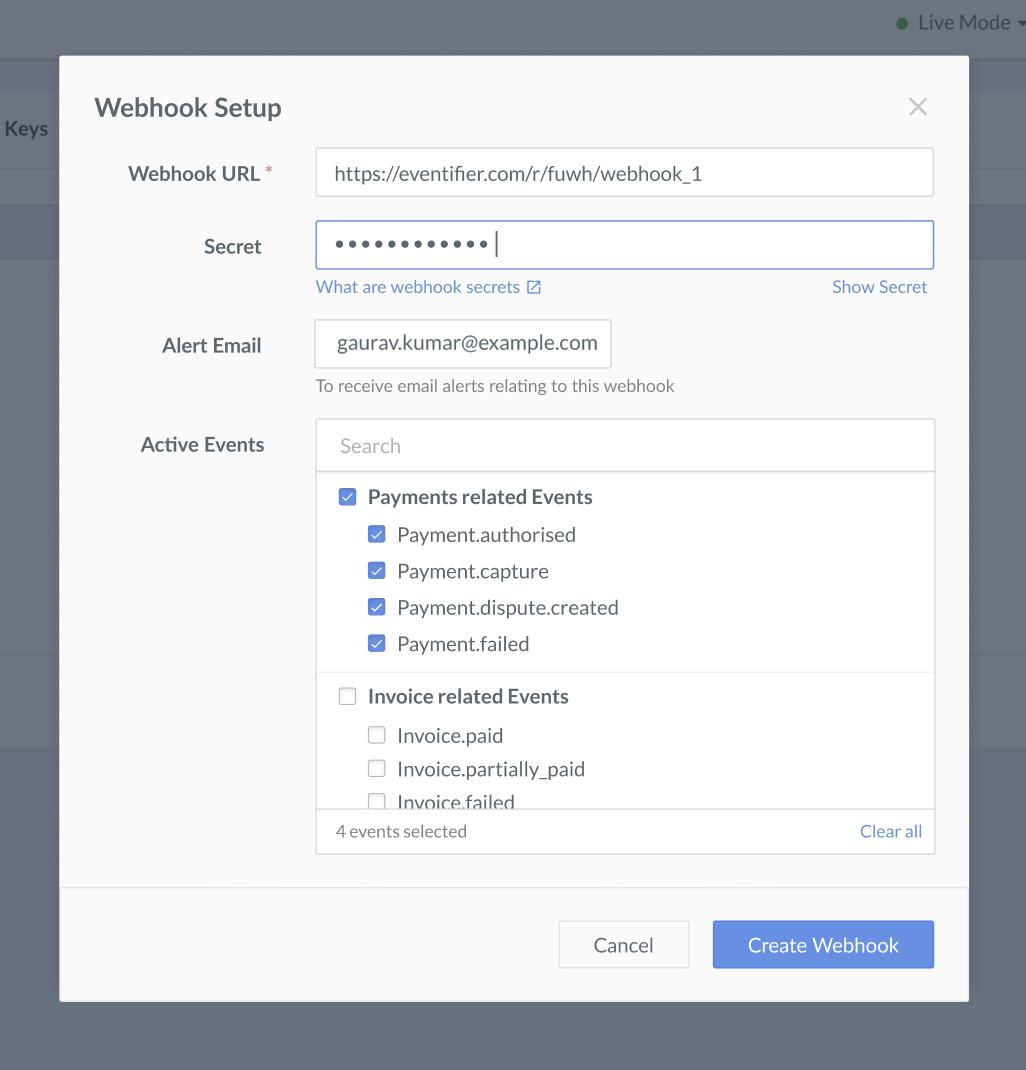
- Click Create Webhook. After you set a webhook, it appears on the list of webhooks.
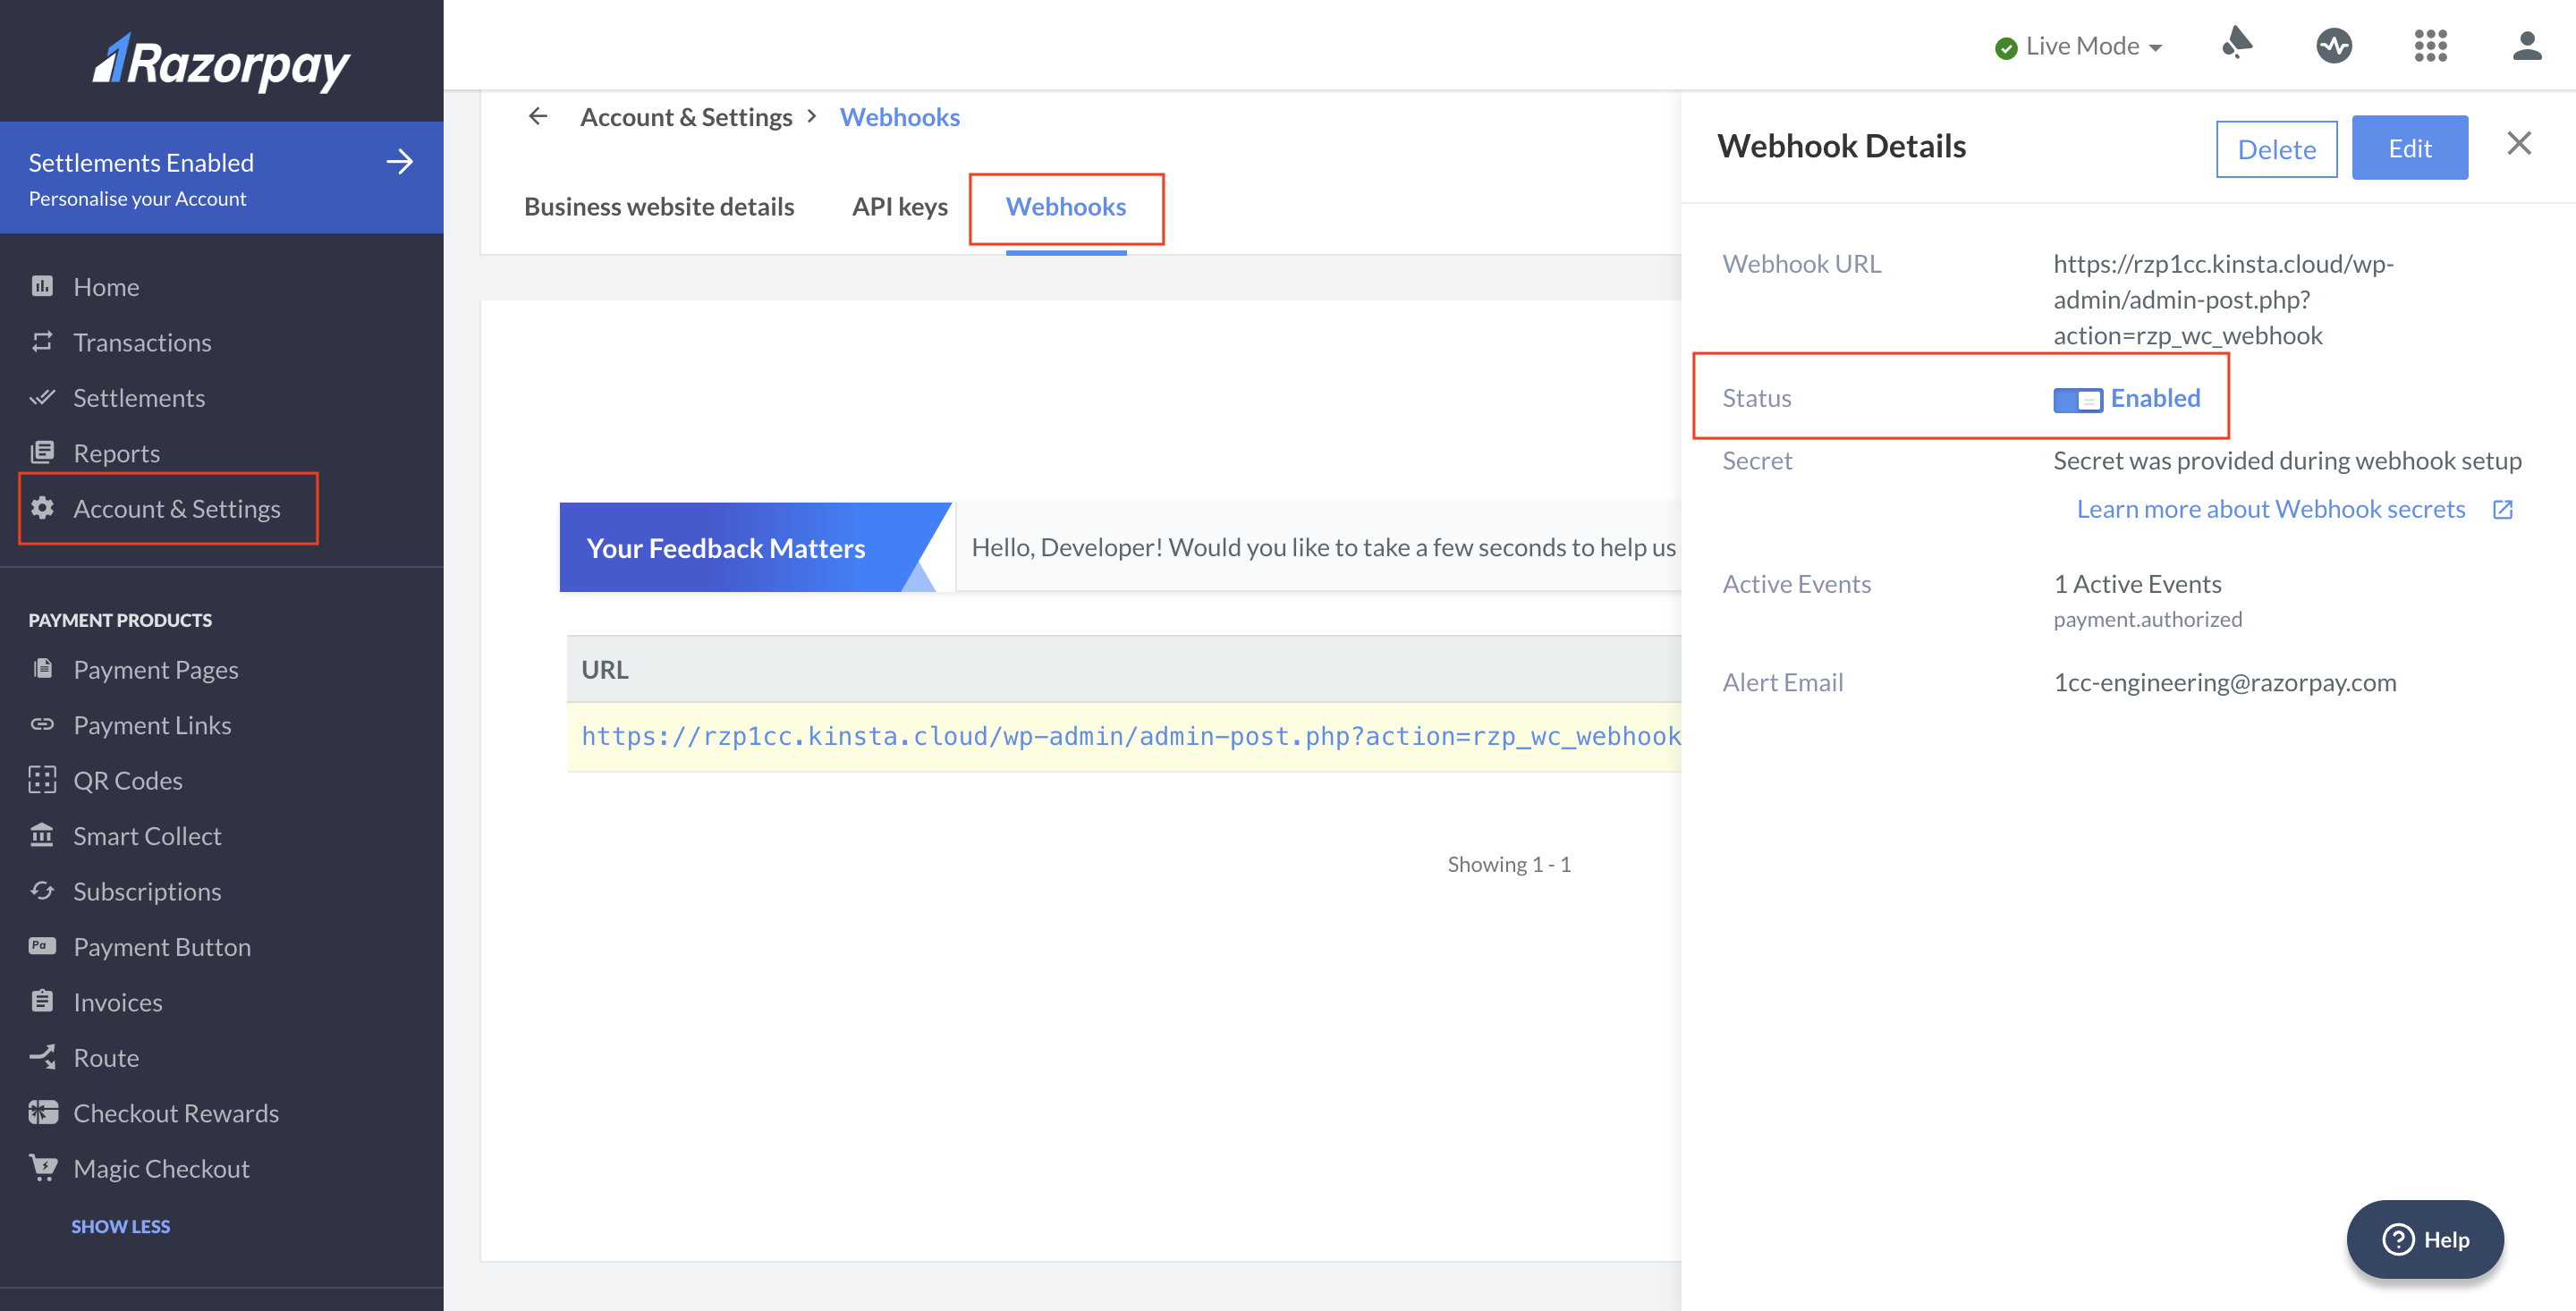
- You can select the webhook and click Edit to make more changes.
How can I verify if webhooks are auto-configured?
How can I verify if webhooks are auto-configured?
- Log in to the Razorpay Dashboard and navigate to Account & Settings.
- In the Website and app settings section, click Webhooks.
- Select the relevant webhook URL.
- On the right panel, check if the status for
payment.authorizedandrefund.createdis enabled.
Can I make partial payments using WooCommerce?
Can I make partial payments using WooCommerce?
I am getting the following error message "RAZORPAY ERROR: Order creation failed with the message: The API key provided is invalid". Why?
I am getting the following error message "RAZORPAY ERROR: Order creation failed with the message: The API key provided is invalid". Why?
I am getting the following php error in the plugin:"PHP message: ORDER NUMBER 57999:webhook conflict over for razorpay order: order_LWVB71vGYh7nEr". Why?
I am getting the following php error in the plugin:"PHP message: ORDER NUMBER 57999:webhook conflict over for razorpay order: order_LWVB71vGYh7nEr". Why?
Why am I getting the error message: "RAZORPAY ERROR: Order creation failed with the message "Authentication failed"."?
Why am I getting the error message: "RAZORPAY ERROR: Order creation failed with the message "Authentication failed"."?
I am getting the following error in WordPress: "Required parameter $razorpayPaymentId follows optional parameter $amount in /home/xxxcustom/public_html/wp-content/plugins/woo-razorpay/woo-razorpay.php on line 1353". Why?
I am getting the following error in WordPress: "Required parameter $razorpayPaymentId follows optional parameter $amount in /home/xxxcustom/public_html/wp-content/plugins/woo-razorpay/woo-razorpay.php on line 1353". Why?
- Deactivate and delete the Razorpay WooCommerce plugin from your WordPress Dashboard.
- Reinstall the Razorpay WooCommerce plugin.
- For easy integration journey, watch the Razorpay WooCommerce Integration tutorial.
I am getting the following error: "Plugin could not be activated because it triggered a fatal error.
Parse error: syntax error, unexpected 'int' (T_STRING), expecting function (T_FUNCTION) or const (T_CONST) in /home4/yutihbjy/public_html/wp-content/plugins/woo-razorpay/includes/cron/one-click-checkout/one-cc-address-sync.php on line 12"
I am getting the following error: "Plugin could not be activated because it triggered a fatal error. Parse error: syntax error, unexpected 'int' (T_STRING), expecting function (T_FUNCTION) or const (T_CONST) in /home4/yutihbjy/public_html/wp-content/plugins/woo-razorpay/includes/cron/one-click-checkout/one-cc-address-sync.php on line 12"
- Uninstall the Razorpay for WooCommerce plugin from your WordPress Dashboard. Ensure you delete the plugin entirely, not just deactivate it.
- Remove the WooCommerce webhook associated with Razorpay from the Dashboard. Know how to delete a webhook.
- After removing both the plugin and the webhook, install the latest version of the Razorpay for WooCommerce plugin.
- WooCommerce version
- WordPress version
- Razorpay for WooCommerce plugin version
- A screen recording of the checkout flow (if possible)
- Staging site credentials (if applicable)
- Test Key and Secret from your Razorpay account
Why am I getting a "404 Page Not Found" error on the checkout when I select Razorpay as a payment option?
Why am I getting a "404 Page Not Found" error on the checkout when I select Razorpay as a payment option?
- Log in to WordPress Dashboard, click WooCommerce and navigate to Settings.
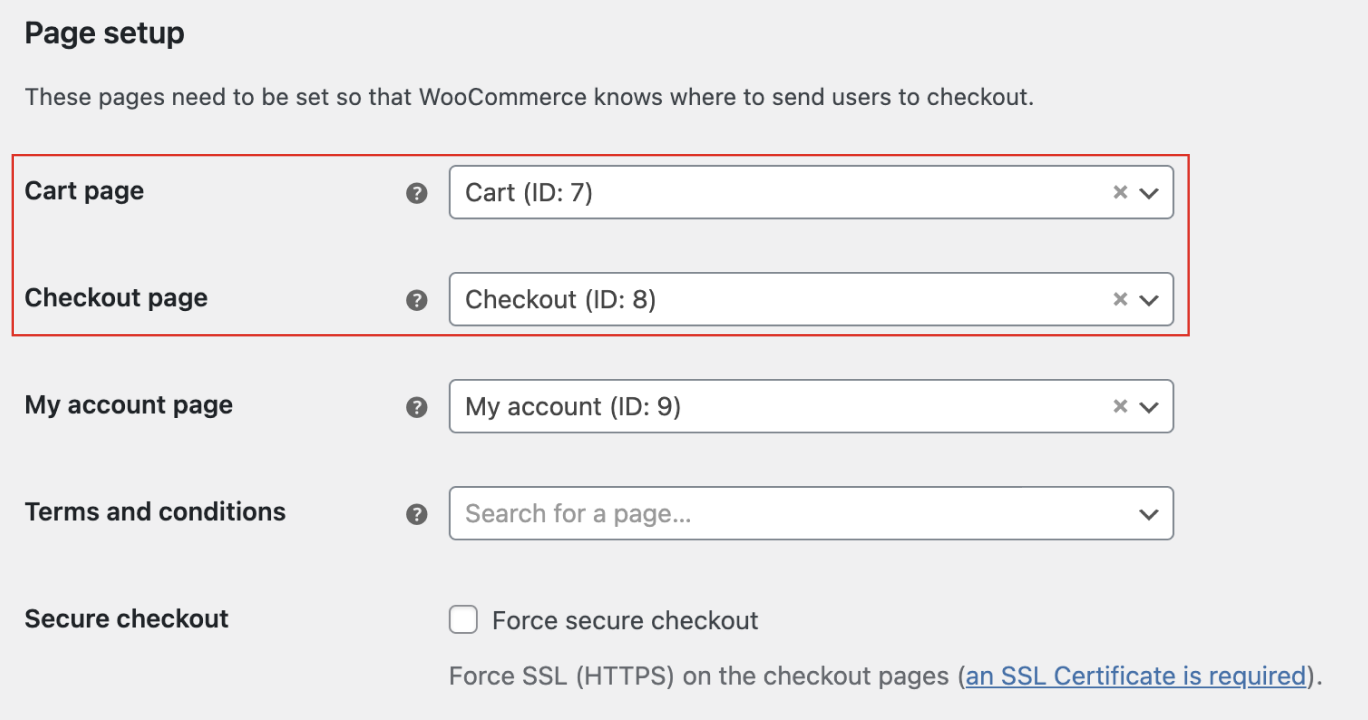
- In the Advanced tab, look for the Page Setup section. Ensure that you have correctly linked the Cart page and Checkout page.
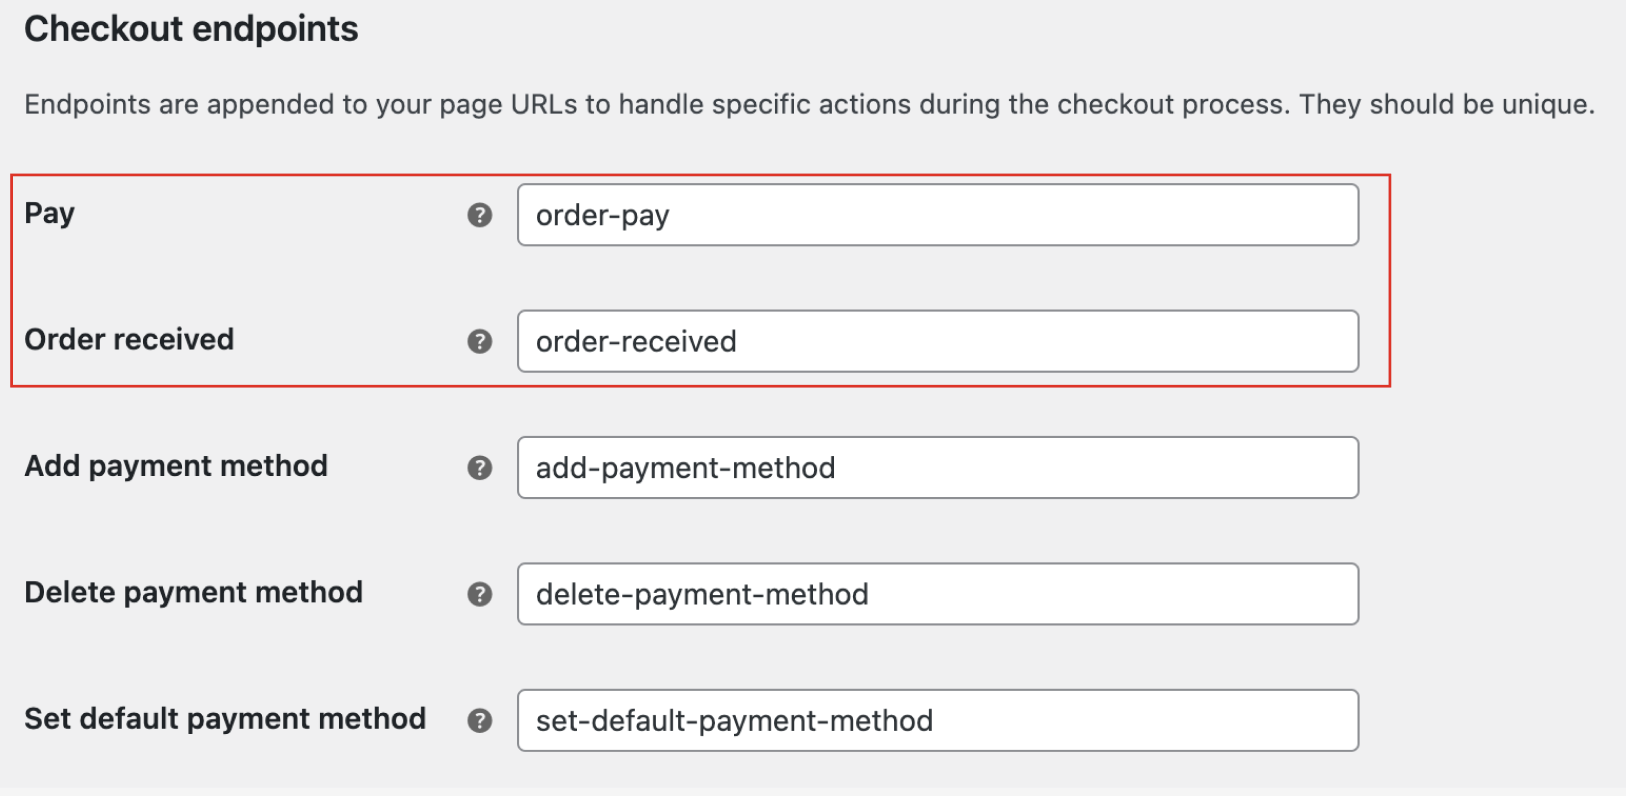
- Validate the Checkout Endpoints settings:
- For the Pay endpoint, set it to order-pay.
- For the Order Received endpoint, set it to order-received.
What troubleshooting procedures should be carried out before initiating a support ticket?
What troubleshooting procedures should be carried out before initiating a support ticket?
- Ensure that your system meets all the requirements mentioned here.
- We recommend you to keep your WordPress, WooCommerce, and Razorpay for WooCommerce plugins up to date. You can find the latest versions here.
- You can perform initial debugging. Follow the steps given below to debug:
- Deactivate all plugins except for Razorpay and WooCommerce.
- If you are using a paid theme, switch to a default WordPress theme and check if the issue persists.
- Verify if the Razorpay checkout is rendering correctly. If not, try reinstalling the Razorpay for WooCommerce plugin.
- If the issue persists after following these steps, contact our Support team. Provide the following information while creating a ticket:
- WordPress version
- WooCommerce version
- Razorpay for WooCommerce plugin version
- PHP version
- WordPress theme
- Steps to reproduce the issue (Screen recording/Screenshots)
- Error logs, if any
- Staging website credentials (login URL, login id, and password)
How do I reconfigure webhooks for in WooCommerce?
How do I reconfigure webhooks for in WooCommerce?
- Deactivate and delete the Razorpay WooCommerce plugin from your WordPress Dashboard.
- Remove the WooCommerce webhook associated with Razorpay from the Dashboard. Know how to delete a webhook.
- After removing both the plugin and the webhook, install the latest version of the Razorpay for WooCommerce plugin.
How can I revert to the legacy order confirmation page on WooCommerce?
How can I revert to the legacy order confirmation page on WooCommerce?
- Open the Order Confirmation template in the Site Editor by navigating to Appearance → Editor → Templates → Order Confirmation.
- Open the List View and delete all the special Order Confirmation blocks.
- Open the Block Inserter, search for Order Confirmation Block and add it.
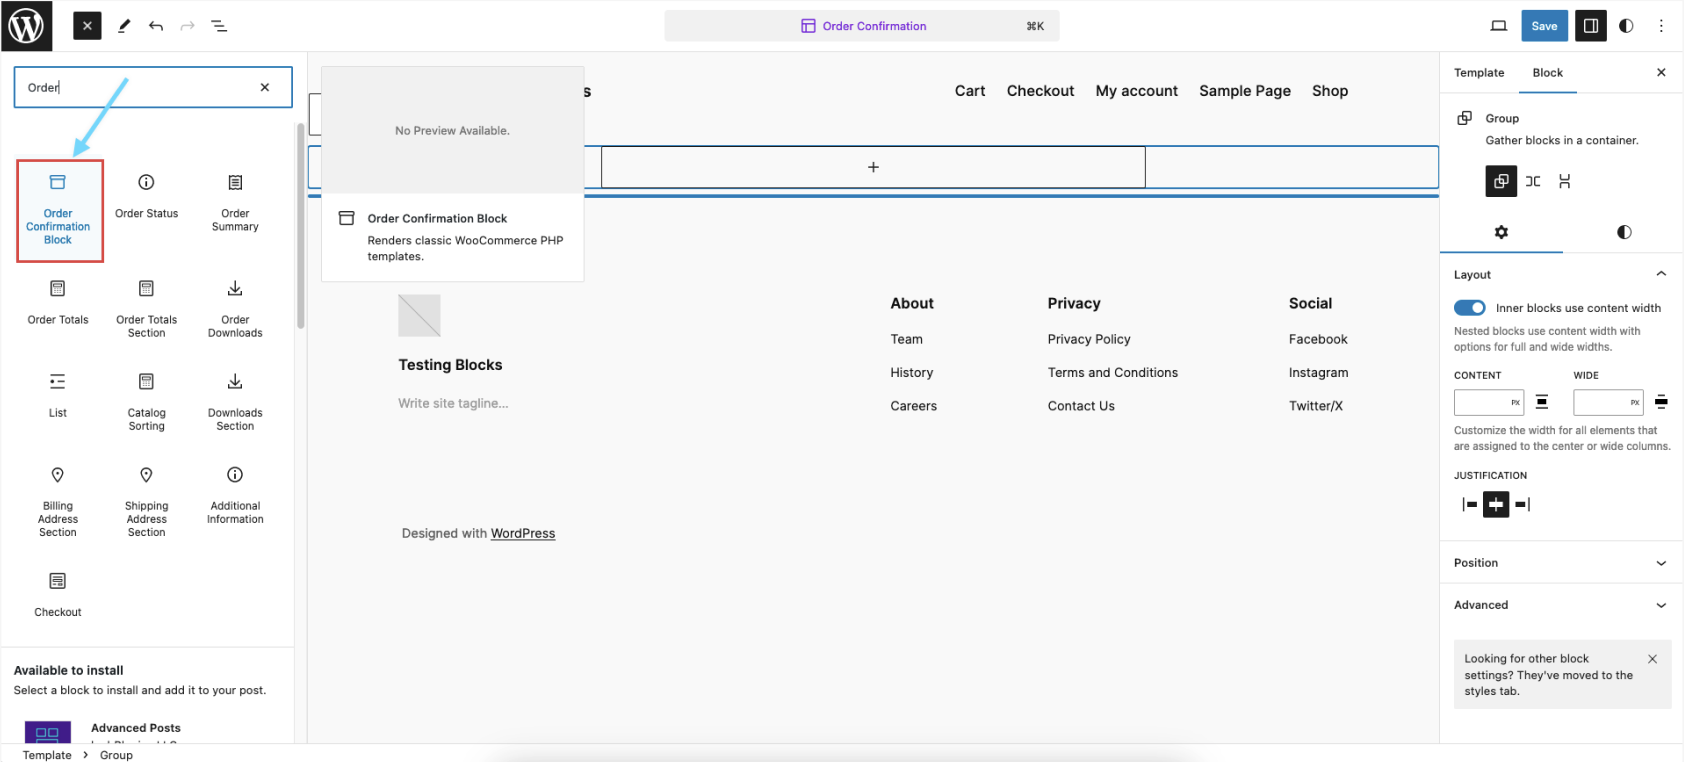
- Click Save.
Does WooCommerce support High-Performance Order Storage(HPOS)?
Does WooCommerce support High-Performance Order Storage(HPOS)?
I am getting the error: "Invalid signature passed" when I trigger the webhook. What should I do?
I am getting the error: "Invalid signature passed" when I trigger the webhook. What should I do?
- Uninstall the Razorpay for WooCommerce plugin from your WordPress Dashboard. Ensure you delete the plugin entirely, not just deactivate it.
- Remove the WooCommerce webhook associated with Razorpay from the Dashboard. Know how to delete a webhook.
- After removing both the plugin and the webhook, install the latest version of the Razorpay for WooCommerce plugin.
Does WooCommerce support Checkout Blocks?
Does WooCommerce support Checkout Blocks?
Is the WooCommerce subscription plugin free?
Is the WooCommerce subscription plugin free?
Is it mandatory to set an expiry date for a subscription?
Is it mandatory to set an expiry date for a subscription?
Does the WooCommerce plugin support 3 or 0 decimal unit currencies?
Does the WooCommerce plugin support 3 or 0 decimal unit currencies?
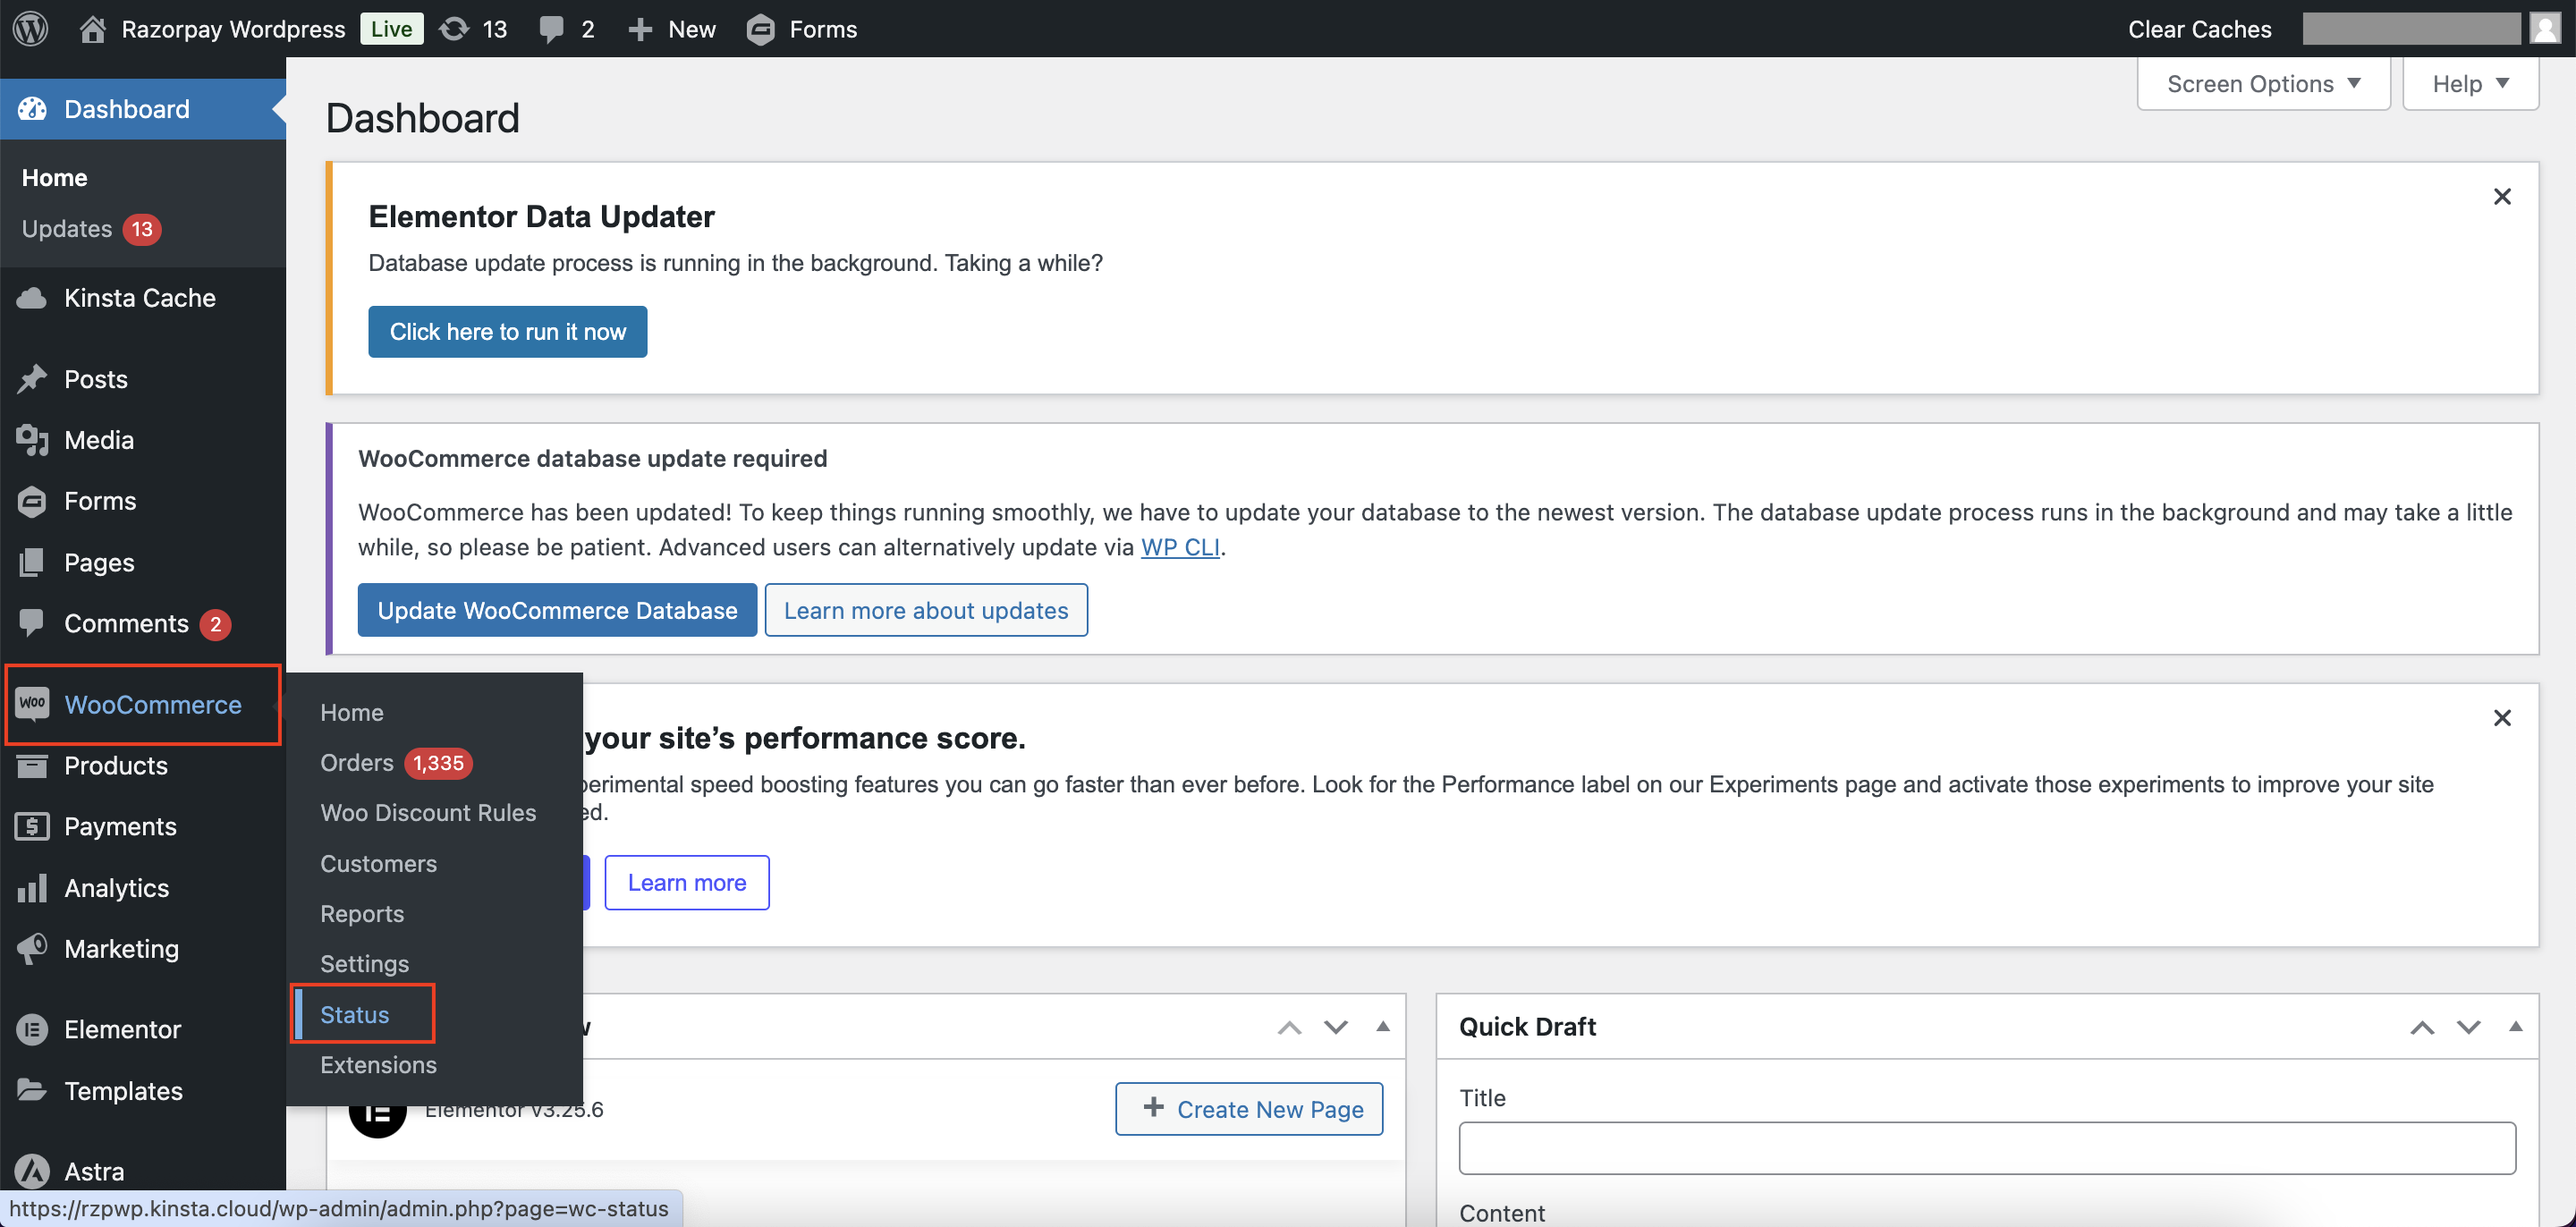
How and where can I check the logs in WooCommerce?
How and where can I check the logs in WooCommerce?
- Go to WordPress Admin and navigate to WooCommerce. Click Status.
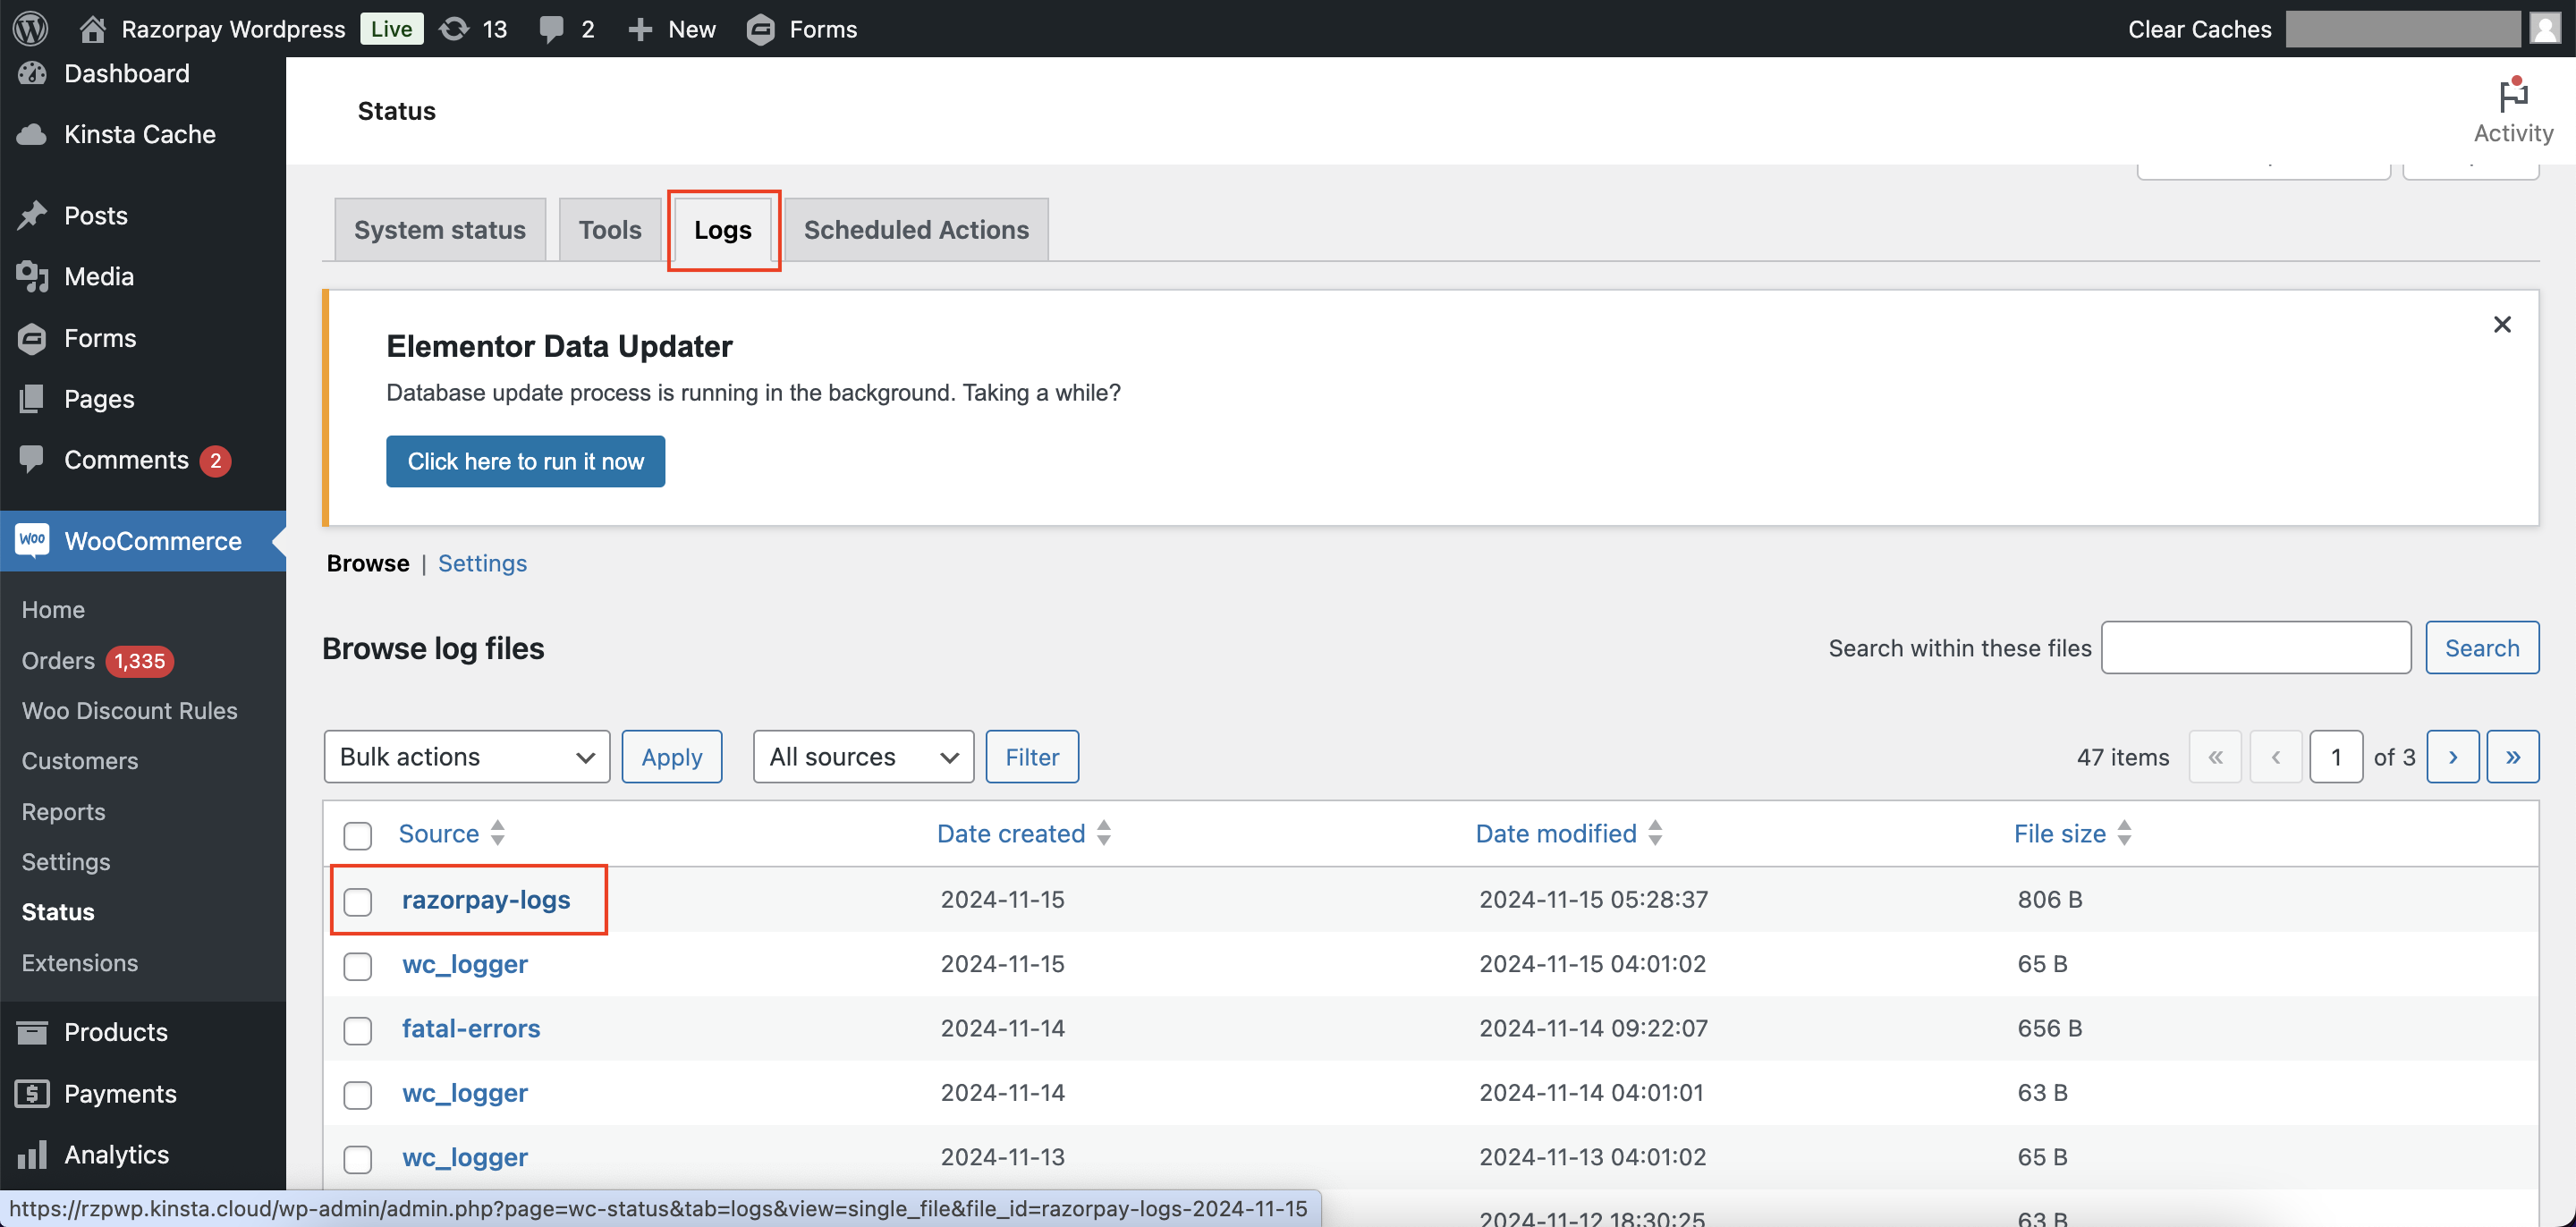
- Select Logs. Locate and open razorpay-logs to view the logs.
Why is the payment captured on but not updated on WooCommerce for some orders?
Why is the payment captured on but not updated on WooCommerce for some orders?
- Ensure that the webhook is configured correctly in your Razorpay Dashboard.
- After placing an order, check the WooCommerce site logs for entries such as:
Webhook conflict due to early execution for razorpay orderWebhook conflict over for razorpay orderWebhook process finished the updateOrder function
My Razorpay Payment Gateway is not working properly on WooCommerce. How do I fix integration issues?
My Razorpay Payment Gateway is not working properly on WooCommerce. How do I fix integration issues?
- Deactivate and delete the Razorpay WooCommerce plugin from your WordPress Dashboard.
- Reinstall the Razorpay WooCommerce plugin.
- For easy integration journey, watch the Razorpay WooCommerce Integration video tutorial.