

Available in🇮🇳 India
Integrate with Razorpay APIs to start accepting card payments. Our APIs support the latest 3DS2 authentication protocol.
Handy TipsIf you are an existing Razorpay user, that is, you integrated with our S2S APIs before October 15, 2022, you need to make certain integration changes to migrate to the 3DS2 flow.
3DS2 Authentication
3DS2 is an authentication protocol, the successor of 3DS1, that enables businesses and payment providers to send additional information (such as customer device or browser data) to verify the transaction’s authenticity. Razorpay integration is compliant with the 3DS2 protocol. Know more: Razorpay supports 3DS2 transactions.Handy Tips
- Integration does not differ for the challenge or frictionless flow.
- Frictionless flow is not applicable for payments on cards issued in India.
Integration Steps
The integration consists of the following steps. 1.1 Create an Order.1.2 Create a Payment.
1.3 Handle Payment Success and Failure.
1.4 Verify Payment Signature.
1.5 Verify Payment Status.
1.1 Create an Order
Order is an important step in the payment process.- An order should be created for every payment.
- You can create an order using the Orders API. It is a server-side API call. Know how to authenticate Orders API.
- The
order_idreceived in the response should be passed to the checkout. This ties the order with the payment and secures the request from being tampered.
- Using the sample code on the Razorpay Postman Public Workspace.
- By manually integrating the API sample codes on your server.
Razorpay Postman Public Workspace
You can use the Postman workspace below to create an order:
Handy TipsUnder the Authorization section in Postman, select Basic Auth and add the Key Id and secret as the Username and Password, respectively.
API Sample Code
Use this endpoint to create an order using the Orders API.POST /orders
Request Parameters
Request Parameters
amount mandatory
: integer Payment amount in the smallest currency subunit. For example, if the amount to be charged is ₹299, then pass 29900 in this field. In the case of three decimal currencies, such as KWD, BHD and OMR, to accept a payment of 295.991, pass the value as 295990. And in the case of zero decimal currencies such as JPY, to accept a payment of 295, pass the value as 295.currency mandatory
: string The currency in which the transaction should be made. See the list of supported currencies. Length must be 3 characters.Handy TipsRazorpay has added support for zero decimal currencies, such as JPY and three decimal currencies, such as KWD, BHD and OMR, allowing businesses to accept international payments in these currencies. Know more about Currency Conversion (May 2024).
receipt optional
: string Your receipt id for this order should be passed here. Maximum length is 40 characters.notes optional
: json object Key-value pair that can be used to store additional information about the entity. Maximum 15 key-value pairs, 256 characters (maximum) each. For example, "note_key": "Beam me up Scotty”.partial_payment optional
: boolean Indicates whether the customer can make a partial payment. Possible values:true: The customer can make partial payments.false(default): The customer cannot make partial payments.
first_payment_min_amount optional
: integer Minimum amount that must be paid by the customer as the first partial payment. For example, if an amount of ₹7000 is to be received from the customer in two installments of #1 - ₹5000, #2 - ₹2000 then you can set this value as 500000. This parameter should be passed only if partial_payment is true.Know more about Orders API.Response Parameters
Response Parameters
Descriptions for the response parameters are present in the Orders Entity parameters table.
Error Response Parameters
Error Response Parameters
The error response parameters are available in the API Reference Guide.
1.2 Create a Payment
Create a payment using the API given below after your order is created.POST /payments/create/json
Request Parameters
amount mandatory
: integer Payment amount in the smallest currency sub-unit. For example, if the amount to be charged is ₹299, then pass 29900 in this field. In the case of three decimal currencies, such as KWD, BHD and OMR, to accept a payment of 295.991, pass the value as 295990. And in the case of zero decimal currencies such as JPY, to accept a payment of 295, pass the value as 295.
currency mandatory
: string Currency code for the currency in which you want to accept the payment. For example, INR. Refer to the list of supported currencies. Length must be of 3 characters.
Handy TipsRazorpay has added support for zero decimal currencies, such as JPY, and three decimal currencies, such as KWD, BHD, and OMR, allowing businesses to accept international payments in these currencies. Know more about Currency Conversion (May 2024).
order_id mandatory
: string Unique identifier of the Order generated in the first step.
email mandatory
: string Email address of the customer. Maximum length supported is 40 characters.
contact mandatory
: string Phone number of the customer. Maximum length supported is 15 characters, inclusive of country code.
method mandatory
: string Name of the payment method. Possible value is card.
card mandatory
: object Details associated with the card.
number
: string Unformatted card number.
name
: string Name of the cardholder.
expiry_month
: string Expiry month for the card in MM format.
expiry_year
: string Expiry year for the card in YY format.
cvv
: string CVV printed on the back of the card.
Handy Tips
- CVV is not required by default for tokenised cards across all networks.
- CVV is optional for tokenised card payments. Do not pass dummy CVV values.
- To implement this change, skip passing the
cvvparameter entirely, or pass anullor empty value in the CVV field. - We recommend removing the CVV field from your checkout UI/UX for tokenised cards.
- If CVV is still collected for tokenised cards and the customer enters a CVV, pass the entered CVV value to Razorpay.
user-agent mandatory
: string The User-Agent header of the user’s browser. Default value will be passed by Razorpay if not provided by merchant.
ip mandatory
: string The customer’s IP address.
authentication optional
: object Details of the authentication channel.
authentication_channel
: string The authentication channel for the payment. Possible values:
browser(default)app
browser mandatory
: object Information regarding the customer’s browser. This parameter need not be passed when authentication_channel=app.
java_enabled
: boolean Indicates whether the customer’s browser supports Java. Obtained from the navigator HTML DOM object. Possible values:
true: Customer’s browser supports Java.false: Customer’s browser does not support Java.
javascript_enabled
: boolean Indicates whether the customer’s browser can execute JavaScript. Obtained from the navigator HTML DOM object. Possible values:
true: Customer’s browser can execute JavaScript.false: Customer’s browser cannot execute JavaScript.
timezone_offset
: integer Time difference between UTC time and the cardholder browser local time. Obtained from the getTimezoneOffset() method applied to Date object.
screen_width
: integer Total width of the payer’s screen in pixels. Obtained from the screen.width HTML DOM property.
screen_height
: integer Obtained from the navigator HTML DOM object.
color_depth
: integer Obtained from payer’s browser using the screen.colorDepth HTML DOM property.
language
: string Obtained from payer’s browser using the navigator.language HTML DOM property. Maximum limit of 8 characters.
notes optional
: object Key-value object used for passing tracking info. Refer to Notes for more details.
callback_url optional
: string URL endpoint where Razorpay will submit the final payment status.
referrer optional
: string Referrer header passed by the client’s browser.
Response Parameters
If the payment request is valid, the response contains the following fields.razorpay_payment_id
: string Razorpay-generated ID for the payment created for this request. Present for all responses.
next
: array A list of action objects available to you to continue the payment process.
action
: string An indication of the next step available for payment processing. Possible value:
redirect: The payment requires the customer to be redirected to a bank page. Redirect the customer’s browser to the URL returned in theurlattribute of the object.
url
: string URL to be used for the action indicated. For redirect, this will be a URL that the customer’s browser needs to be redirected to for authentication.
A basic integration must look out for one type of next action:
Implementing Native OTP flows
If you are using this endpoint to implement native OTP on your website, you can pass the following additional request parameters.auth_type
: string Can be set to otp for Native OTP or 3ds for regular ACS payments. This will force the payment to use this authentication type.
preferred_auth
: array List of authentication types that can be sent instead of auth_type, in order to indicate a preference. In this case, if the first authentication type is not supported, the payment will fallback to the next.
You can also opt to have ['otp', '3ds'] defined as your default preferred auth. Get in touch with our Support Team to have this configured for your account.
The response contains the following actions that should be consumed:
Examples
Different samples of payments using Native OTP with and without redirect flows are given below.Payment Using Native OTP
This payment request results innext array containing otp_submit and otp_resend. This means the customer must be prompted for an OTP which can be submitted in the OTP Submit endpoint.
As otp_resend is also available, you can re-trigger the OTP SMS using the URL shared.
Payment Using Native OTP with Redirect Fallback
This payment request results in anext array containing otp_submit, otp_resend, and redirect. The redirect action here acts as a fallback to the bank page, that is, if your customer opts to enter the OTP on his bank page only, the browser can be redirected to the redirect URL in order to complete the payment using 3DS flow.
Payment Using Native OTP as Preferred Auth
Here the payment request containspreferred auth that opts for otp and falls back to 3ds. This will result in a next array containing otp_submit and otp_resend. If Native OTP is not supported for the card, the next array containing only redirect is returned in the response.
Response on Submitting OTP
Once the customer submits the OTP using the following endpoint, the respective success or failure responses will be generated.Feature RequestThis is an on-demand feature. Please raise a request with our Support team to get this feature activated on your Razorpay account.
POST payments/:id/otp/submit
callback_url of the request.
1.3 Handle Payment Success and Failure
Once the payment is completed by the customer, aPOST request is made to the callback_url provided in the payment request. The data contained in this request will depend on whether the payment was a success or a failure of the payment made by the customer.
Success Callback
If the payment made by the customer is successful, the following fields are sent:razorpay_payment_idrazorpay_order_idrazorpay_signature
Callback Example
Failure Callback
If the payment has failed, the callback will contain details of the error. Refer to errors for details.1.4 Verify Payment Signature
This is a mandatory step to confirm the authenticity of the details returned to the Checkout form for successful payments.To verify the `razorpay_signature` returned to you by the Checkout form:
To verify the `razorpay_signature` returned to you by the Checkout form:
-
Create a signature in your server using the following attributes:
order_id: Retrieve theorder_idfrom your server. Do not use therazorpay_order_idreturned by Checkout.razorpay_payment_id: Returned by Checkout.key_secret: Available in your server. Thekey_secretthat was generated from the Dashboard.
-
Use the SHA256 algorithm, the
razorpay_payment_idand theorder_idto construct a HMAC hex digest as shown below:
HMAC Hex Digest
- If the signature you generate on your server matches the
razorpay_signaturereturned to you by the Checkout form, the payment received is from an authentic source.
Generate Signature on Your Server
Generate Signature on Your Server
Given below is the sample code for payment signature verification:
Post Signature Verification
Post Signature Verification
After you have completed the integration, you can set up webhooks, make test payments, replace the test key with the live key and integrate with other APIs.
1.5 Verify Payment Status
Handy TipsOn the Razorpay Dashboard, ensure that the payment status is
captured. Refer to the payment capture settings page to know how to capture payments automatically.You can track the payment status in three ways:
You can track the payment status in three ways:
- Verify Status from Dashboard
- Subscribe to Webhook Events
- Poll APIs
To verify the payment status from the Razorpay Dashboard: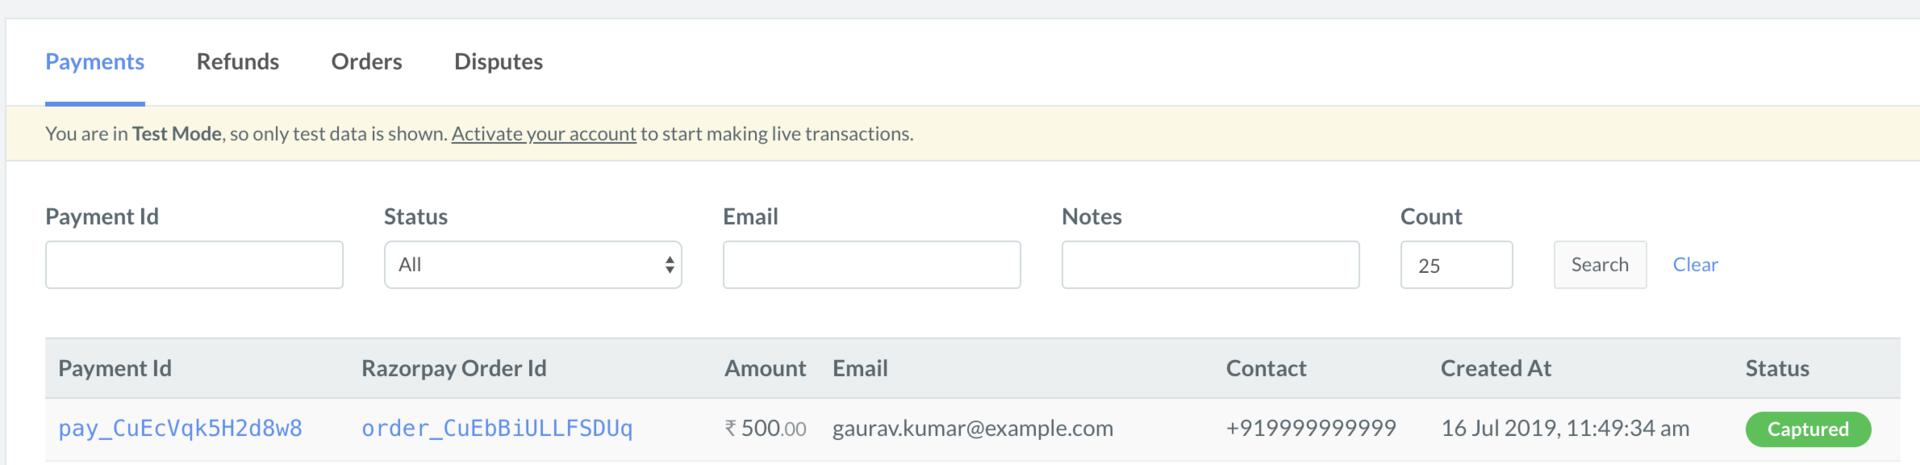
- Log in to the Razorpay Dashboard and navigate to Transactions → Payments.
- Check if a Payment Id has been generated and note the status. In case of a successful payment, the status is marked as Captured.