

Available in🇮🇳 India
You can initiate mandate registration using the Razorpay APIs or a Registration Link.
The following state diagram depicts the mandate registration flow and token lifecycle:
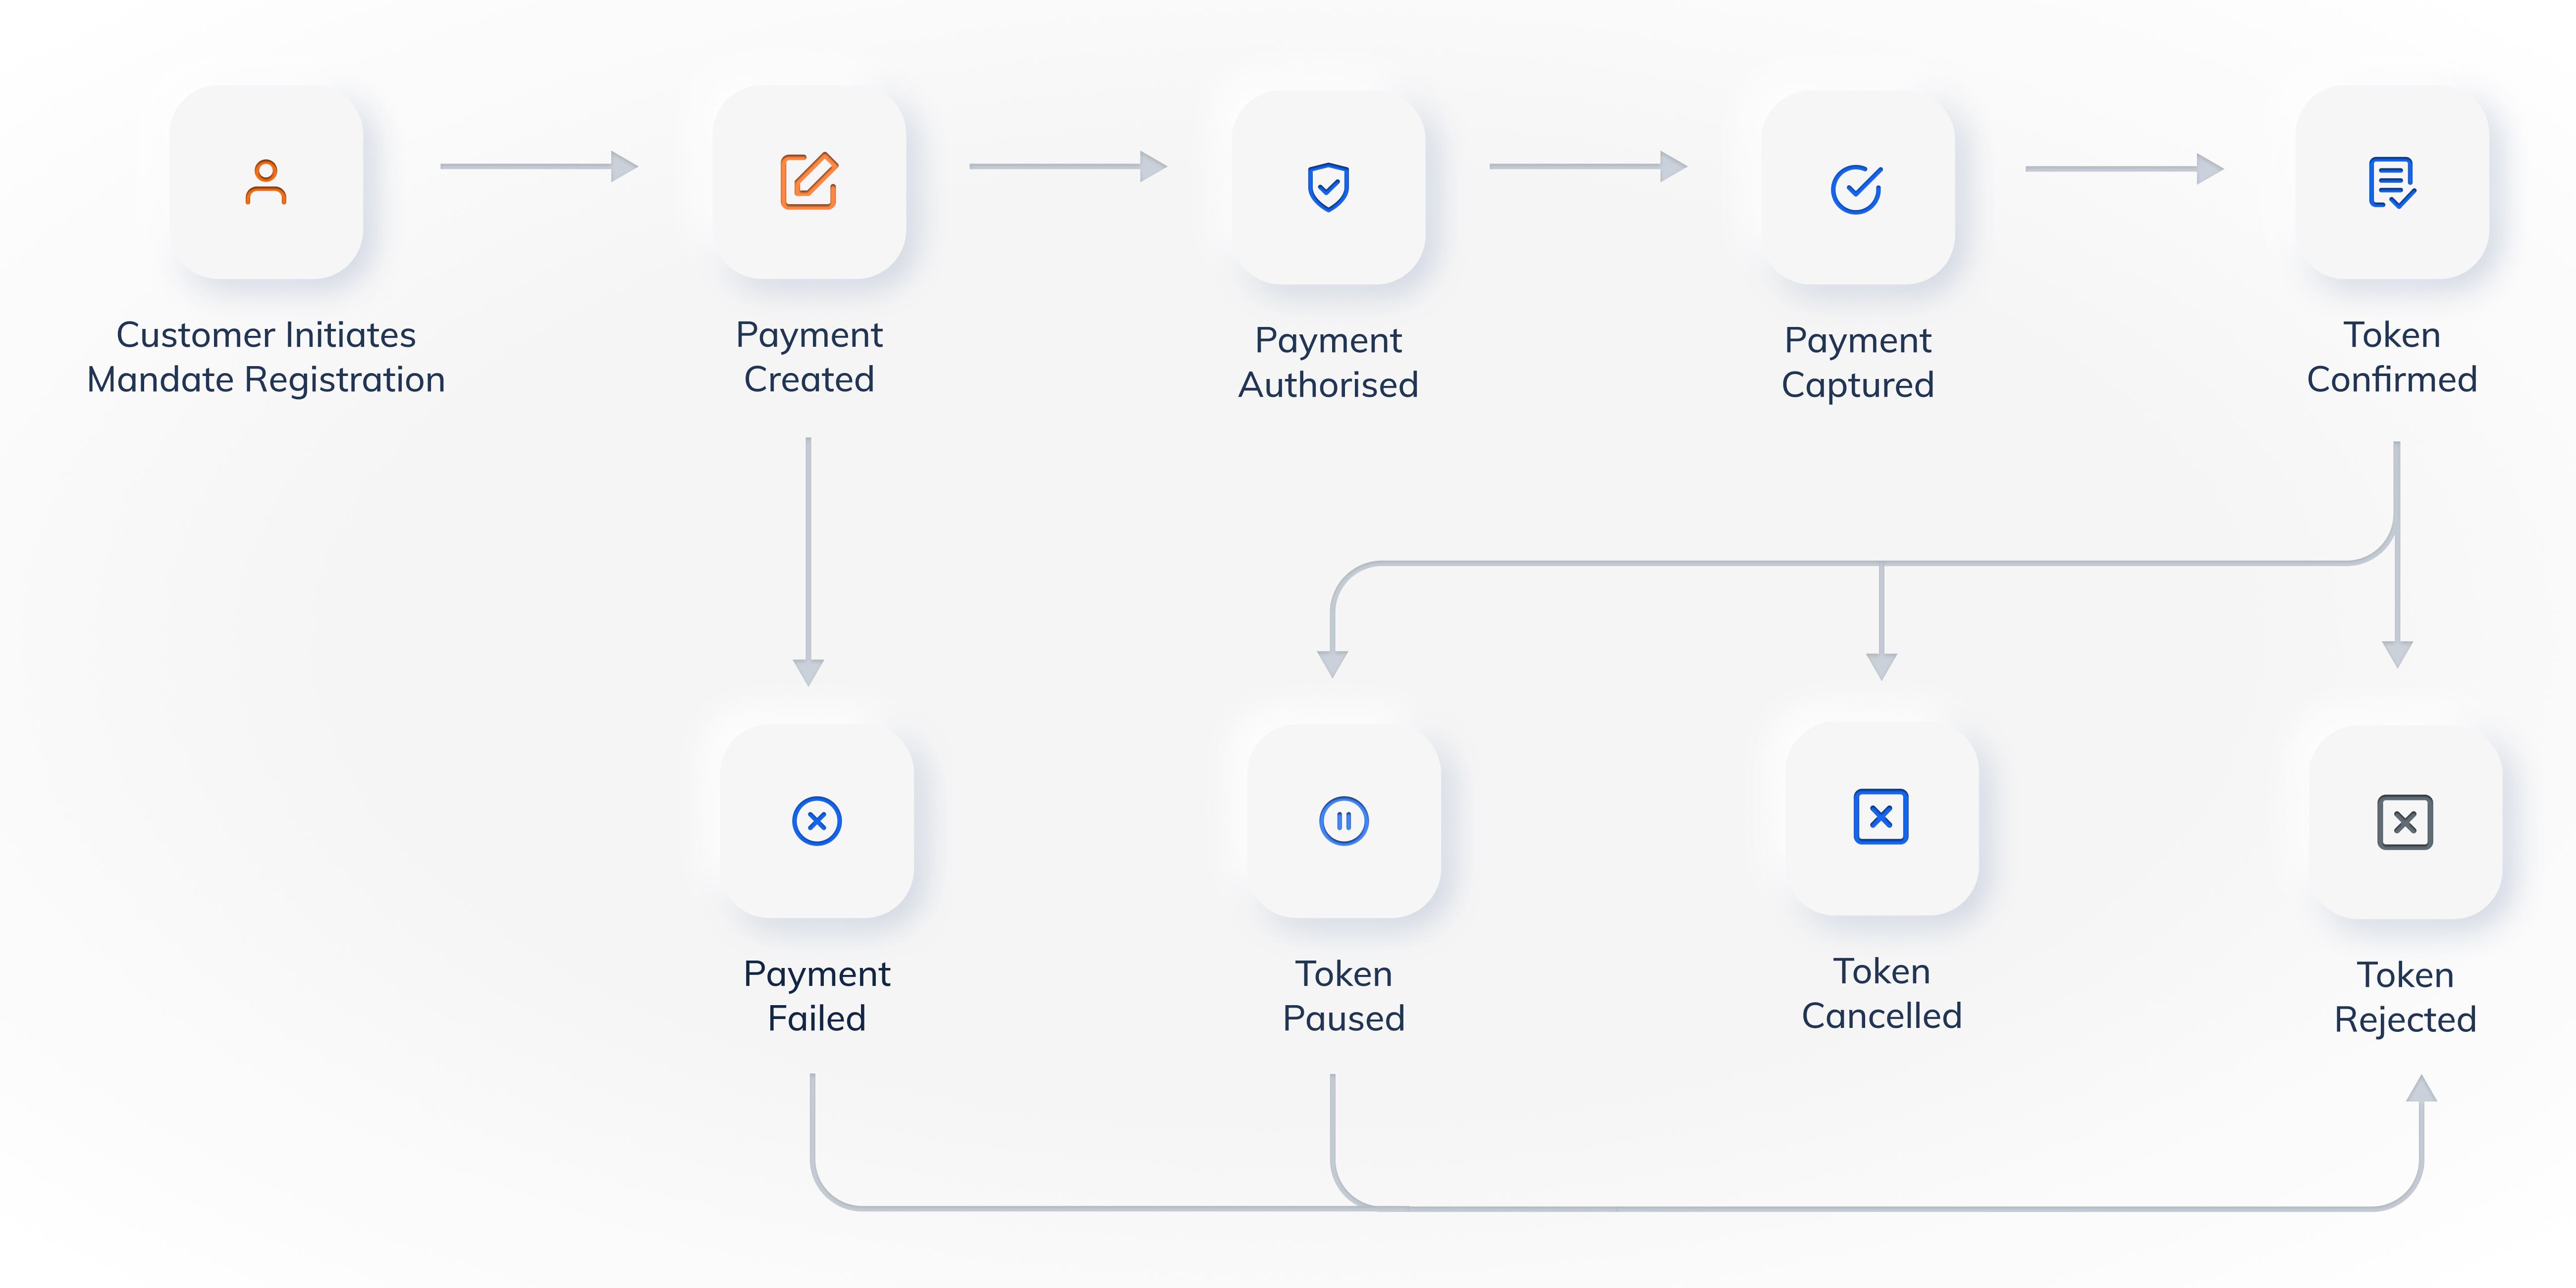
1.1 Using Razorpay APIs
You can use APIs to set up mandate registrations on UPI Autopay inside the customer’s checkout journey. To do this, you need to create customer identifiers and then initiate the checkout process. Here are the steps:- Create a Customer - This allows Razorpay to uniquely identify the customer and store UPI Autopay tokens against the customer ID.
- Create an Order - Send the token details required to set up UPI Autopay on the customer ID.
- Create an Authorisation Payment - Initialise the authorisation journey where the actual mandate registration happens.
1.1.1 Create a Customer
Razorpay links recurring tokens to customers using a unique identifier generated through the Customer API. You can create customers with basic details such asemail and contact and use them for various Razorpay offerings. Know more about Customers.
The following endpoint creates a customer.
POST /customers
Request Parameters
Request Parameters
name mandatory
: string The customer’s name. For example, Gaurav Kumar.email optional
: string The customer’s email address. For example, gaurav.kumar@example.com.contact optional
: string The customer’s phone number. For example, 9876543210.notes optional
: object Key-value pair that is used to store additional information about the entity. Maximum 15 key-value pairs, 256 characters (maximum) each. For example, "note_key": "Beam me up Scotty".1.1.2 Create an Order
Use the Orders API to create a unique Razorpayorder_id that is associated with the mandate registration. The following endpoint creates an order.
POST /orders
Sample Code
Sample Code
Handy TipsThe
token.max_amount value must respect the limits defined by NPCI for your merchant category. For regular industries, the maximum is ₹99,999. For lending and investment categories (MCCs 6211, 6300, 7322, 6529, 5960), the maximum is ₹2,00,000. Refer to the UPI Autopay overview for the complete limits table.Request Parameters
Request Parameters
amount mandatory
: integer Amount, in paise.currency mandatory
: string The 3-letter ISO currency code for the payment. Currently, we only support INR.method mandatory
: string Payment method for the mandate registration. Here, the value should be upi.receipt optional
: string Unique identifier for the order entered by you. For example, Receipt No. 1. This parameter should be mapped to the order_id sent by Razorpay.notesoptional
: object Key-value pair that can be used to store additional information about the entity. Maximum 15 key-value pairs, 256 characters (maximum) each. For example, "note_key": "Beam me up Scotty".token
: Details related to the mandate such as max amount, frequency and expiry information.max_amount optional
: integer The maximum amount that can be debited in a single charge.For other categories and MCCs, the minimum value is
100 (₹1) and maximum value is 9999900 (₹99,999).expire_at optional
: integer The Unix timestamp that indicates when the mandate must expire. Defaults to 10 years.frequency mandatory
: string The frequency at which you can charge your customer. Possible values:weeklymonthlyquarterlyyearlyas_presented
recurring_value optional
: integer Determines the exact date or range of dates for recurring debits. Possible values are:- 1-7 for
weeklyfrequency - 1-31 for
monthlyfrequency - 1-31 for
quarterlyfrequency - 1-31 for
yearlyfrequency and is not applicable for theas_presentedfrequency.
recurring_type optional
: string Determines when the recurring debit can be done. Possible values are:on: Recurring debit happens on the exact day of every month.
Handy TipsFor creating an order with
recurring_type=on, set the recurring_value parameter to the current date.before: Recurring debit can happen any time before the specified date.after: Recurring debit can happen any time after the specified date.
monthly, recurring_value is 17 and recurring_type is before, recurring debit can happen between the month’s 1st and 17th. Similarly, if recurring_type is after, recurring debit can only happen on or after the 17th of the month.1.1.3 Create an Authorisation Payment
Once an order is created, your next step is to create a payment to initiate the mandate registration on the customer’s UPI app. The UPI payment flow you use determines how the customer approves the mandate:- UPI Intent (recommended): The customer is redirected to their preferred UPI app (or scans a QR code on desktop) to approve the mandate. This is the default flow.
- UPI Collect (deprecated): A collect request is sent to the customer’s VPA (UPI ID). This flow is being deprecated for new UPI Autopay registrations effective 28 February 2026. For iOS users, you may continue to use the Collect flow as a fallback.
upi.
POST /payments/create/upi
Sample Code
Sample Code
UPI Intent
UPI Intent
UPI Collect (Deprecated)
UPI Collect (Deprecated)
Before creating the collect payment, validate the customer’s UPI ID using the Once the UPI ID is validated, create the authorisation payment with
/payments/validate/vpa endpoint.upi.flow set to collect.Request Parameters
Request Parameters
amount mandatory
: integer The amount associated with the payment in smallest unit of the supported currency. For example, 2000 means ₹20. Must match the amount in order created previously.currency mandatory
: string The 3-letter ISO currency code for the payment. Currently, we support only INR.order_id mandatory
: string The unique identifier of the order created in the previous step.customer_id mandatory
: string Unique identifier of the customer, obtained from the response of Step 1.1.1: Create a Customer.recurring mandatory
: string Determines if the payment is recurring or one-time. Possible values:1: Recurring payment is enabled.preferred: Use this when you want to support recurring payments and one-time payment in the same flow.
method mandatory
: string The payment method selected by the customer. Here, the value must be upi.upi
: object Details of the UPI payment flow.flow mandatory
: string Specify the type of the UPI payment flow. Possible values are:
intent(default, recommended)collect: Deprecated effective 28 February 2026. For iOS users, you may continue to use the Collect flow as a fallback.
vpa mandatory for collect
: string VPA of the customer where the collect request will be sent. Applicable only to the UPI Collect flow.expiry_time optional
: integer Period of time (in minutes) after which the collect request will expire. The default value is 5. Applicable only to the UPI Collect flow.email mandatory for collect
: string The customer’s email address. For example, gaurav.kumar@example.com.contact mandatory for collect
: string The customer’s contact number. For example, 9123456780.ip mandatory for collect
: string Client’s browser IP address. For example, 117.217.74.98.referer mandatory for collect
: string Value of referer header passed by the client’s browser. For example, https://example.com/user_agent mandatory for collect
: string Value of user_agent header passed by the client’s browser. For example, Mozilla/5.0 (Windows NT 6.1) AppleWebKit/537.36 (KHTML, like Gecko) Chrome/79.0.3945.130 Safari/537.36
save optional
: boolean Applicable only to the UPI Collect flow. Specifies if the VPA should be stored as a token. Possible values:true: Saves the VPA details.false(default): Does not save the VPA details.
notes optional
: json object Key-value pairs that can hold additional information about the payment.Response Parameters
Response Parameters
If the payment request is valid, the response contains the following fields. Refer to the UPI Intent Flow document or the UPI Collect Flow document for more details.
razorpay_payment_id
: string Unique reference for the payment created. For example, pay_EAm09NKReXi2e0.link
: string Returned only for the UPI Intent flow. The UPI intent link to redirect the customer to their UPI app for mandate approval. Use this as a deeplink on mobile or convert it to a QR code for desktop.Next Steps by Platform
For the UPI Intent flow, use thelink returned in the response to take the customer to their UPI app:
- mWeb and Mobile App
- Desktop Web
Use the
link returned in the response as a deeplink to redirect the customer to their preferred UPI app to complete the mandate registration.1.2 Using a Registration Link
Registration Links are an alternate way of initiating mandate registration. If you create a registration link, you need not create a customer or an order separately. When you create a registration link, an invoice is automatically issued to the customer. The customer can use the invoice to complete the mandate registration. Know how to create Registration Links using the Dashboard.Handy TipsYou can use webhooks to get notifications about successful payments against a registration link. Know more about Webhooks.
₹1.
1.2.1 Create a Registration Link
The following endpoint creates a registration link.POST /subscription_registration/auth_links
Sample Code
Sample Code
Request Parameters
Request Parameters
customer
: object Details of the customer to whom the registration link is sent.name mandatory
: string Customer’s name.email mandatory
: string Customer’s email address.contactmandatory
: integer Customer’s contact number.type mandatory
: string In this case, the value is link.amount mandatory
: integer The payment amount in the smallest currency sub-unit.currency mandatory
: string The 3-letter ISO currency code for the payment.description mandatory
: string A description that appears on the hosted page.subscription_registration
: Details of the mandate registration.method mandatory
: string The payment method used for mandate registration. Here, it is upi.max_amount mandatory
: integer Use to set the maximum amount (in paise) per debit request.For other categories and MCCs, the minimum value is
100 (₹1) and maximum value is 9999900 (₹99,999).expire_at optional
: integer The Unix timestamp till when you can use the token to charge the customer subsequent payments. The default value is 10 years and the maximum value allowed is 30 years.frequency mandatory
: string The frequency at which you can charge your customer. Possible values:dailyweeklyfortnightlybimonthlymonthlyquarterlyhalf_yearlyyearlyas_presented
recurring_value optional
: integer Determines the exact date or range of dates for recurring debits. Possible values are:- 1-7 for
weeklyfrequency - 1-31 for
fortnightlyfrequency - 1-31 for
bimonthlyfrequency - 1-31 for
monthlyfrequency - 1-31 for
quarterlyfrequency - 1-31 for
half_yearlyfrequency - 1-31 for
yearlyfrequency and is not applicable for theas_presentedfrequency.
recurring_type optional
: string Determines when the recurring debit can be done. Possible values are:on: recurring debit happens on the exact day of every month.before: recurring debit can happens any time before the specified date.after: recurring debit can happens any time after the specified date.
For example, if the frequency ismonthly, recurring_value is17and recurring_type isbefore, recurring debit can happen between the month’s 1st and 17th. Similarly, if recurring_type isafter, recurring debit can only happen on or after the 17th of the month.
sms_notify optional
: boolean Indicates if SMS notifications are to be sent by Razorpay. Possible values:true(default): Notifications are sent by Razorpay .false: Notifications are not sent by Razorpay.
email_notify optional
: boolean Indicates if email notifications are to be sent by Razorpay. Possible values:true(default): Notifications are sent by Razorpay .false: Notifications are not sent by Razorpay.
expire_by optional
: integer The Unix timestamp indicates the expiry of the registration link.receipt optional
: string A unique identifier entered by you for the order. For example, Receipt No. 1. You should map this parameter to the order_id sent by Razorpay.notes optional
: object This is a key-value pair that is used to store additional information about the entity. Maximum 15 key-value pairs, 256 characters (maximum) each. For example, "note_key": "Beam me up Scotty".1.2.2 Send/Resend Notifications
The following endpoint sends/resends notifications with the short URL to the customer:POST /invoices/:id/notify_by/:medium
Sample Code
Sample Code
Response
Path Parameters
Path Parameters
idmandatory
: string The unique identifier of the invoice linked to the registration link for which you want to send the notification. For example, inv_1Aa00000000001.medium mandatory
: string Determines through which medium you want to resend the notification. Possible values:smsemail
1.2.3 Cancel a Registration Link
The following endpoint cancels a registration link.POST /invoices/:id/cancel
Handy TipsYou can only cancel registration link in the
issued state.Sample Code
Sample Code
Response
Path Parameter
id mandatory
: string The unique identifier for the invoice linked to the registration link that you want to cancel. For example, inv_1Aa00000000001.