

Available in🇮🇳 India
Follow these steps to integrate Razorpay Route on your WooCommerce-enabled WordPress website:
1. Build Integration
Integrate Route Using WooCommerce plugin.
2. Test Integration
Test the integration by making a test payment.
3. Go-live Checklist
Check the go-live checklist.
1. Build Integration
Follow the integration steps based on how you want to transfer funds to the Linked Accounts using Razorpay Route:Transfers Via Orders or Payments
Transfers Via Orders or Payments
Given below are the steps to transfers funds via orders or payments through the WooCommerce Payment Gateway plugin:
1 Enable Route Module On Your WordPress Site
1 Enable Route Module On Your WordPress Site
To enable the Route Module:
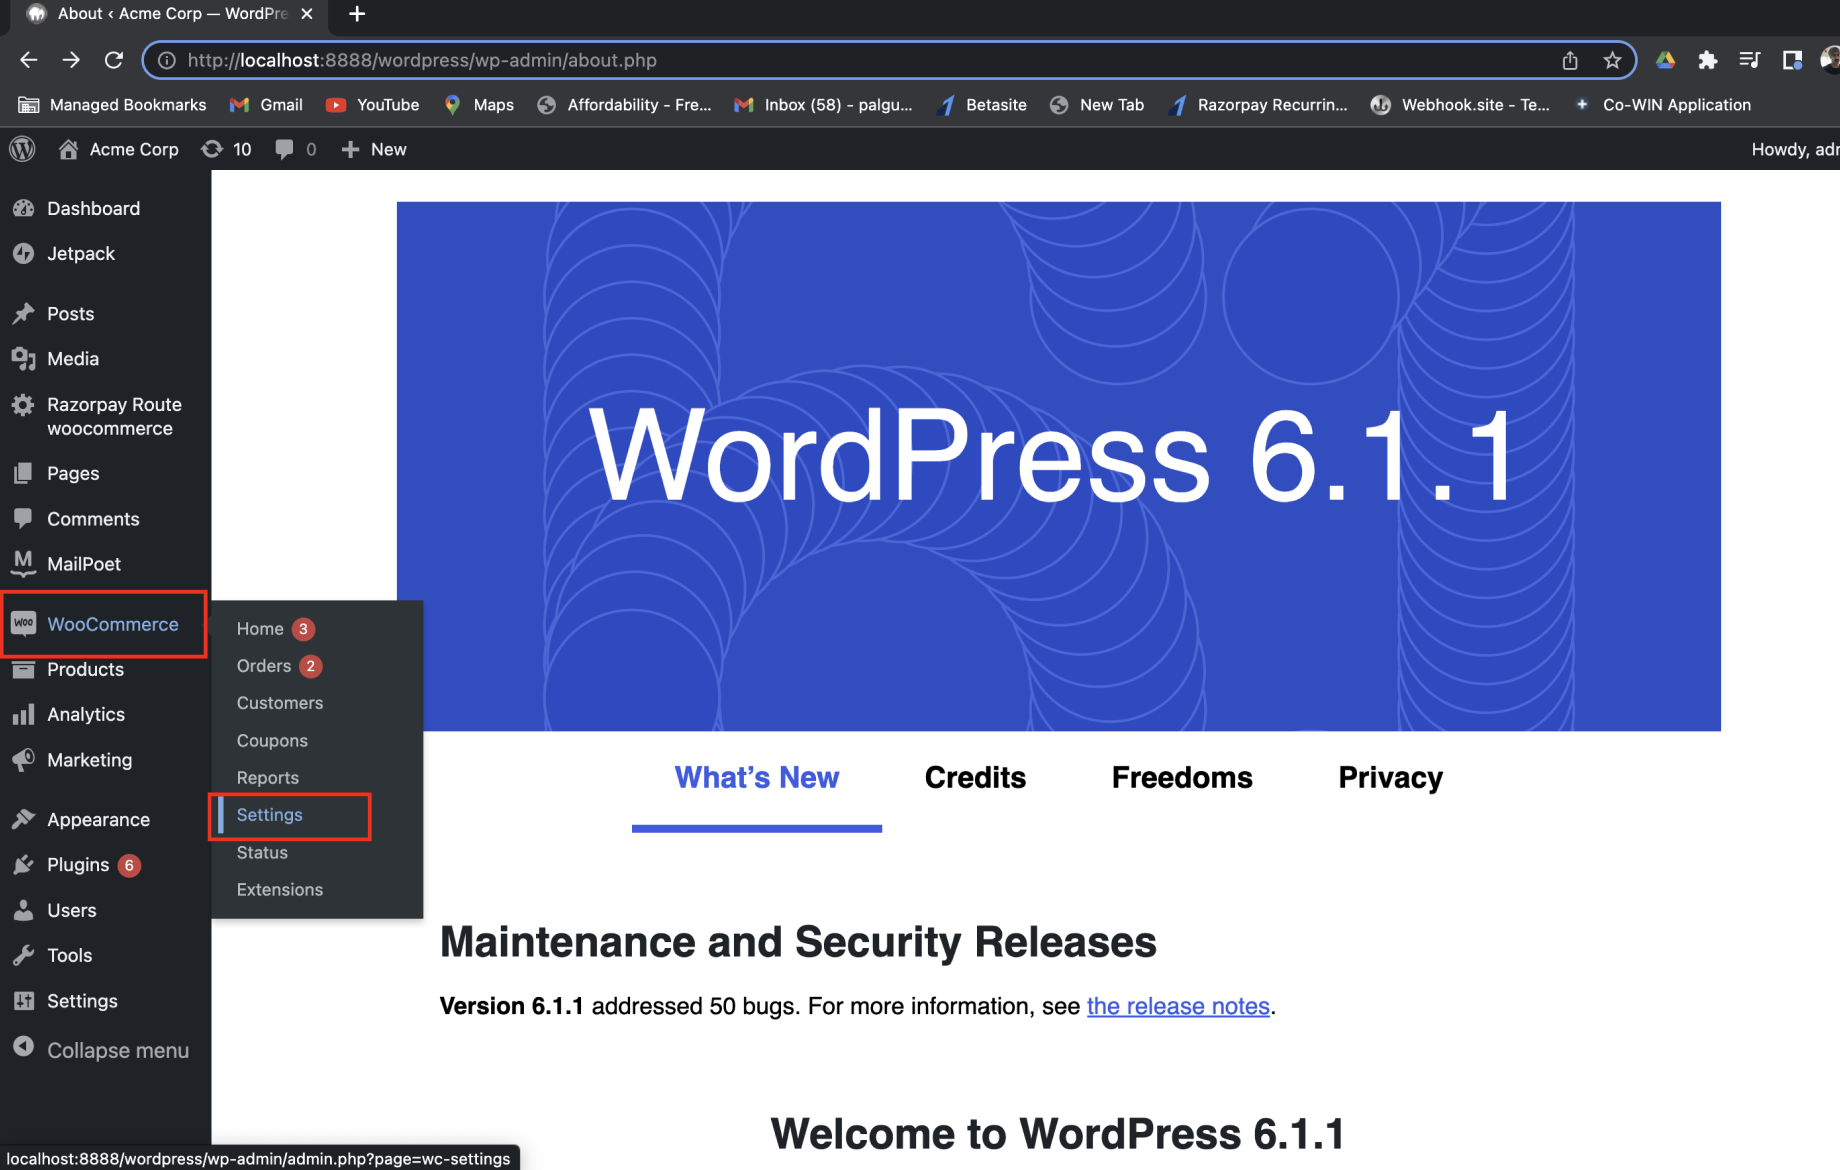
- Log in to the WordPress Admin Dashboard and navigate to WooCommerce → Settings.
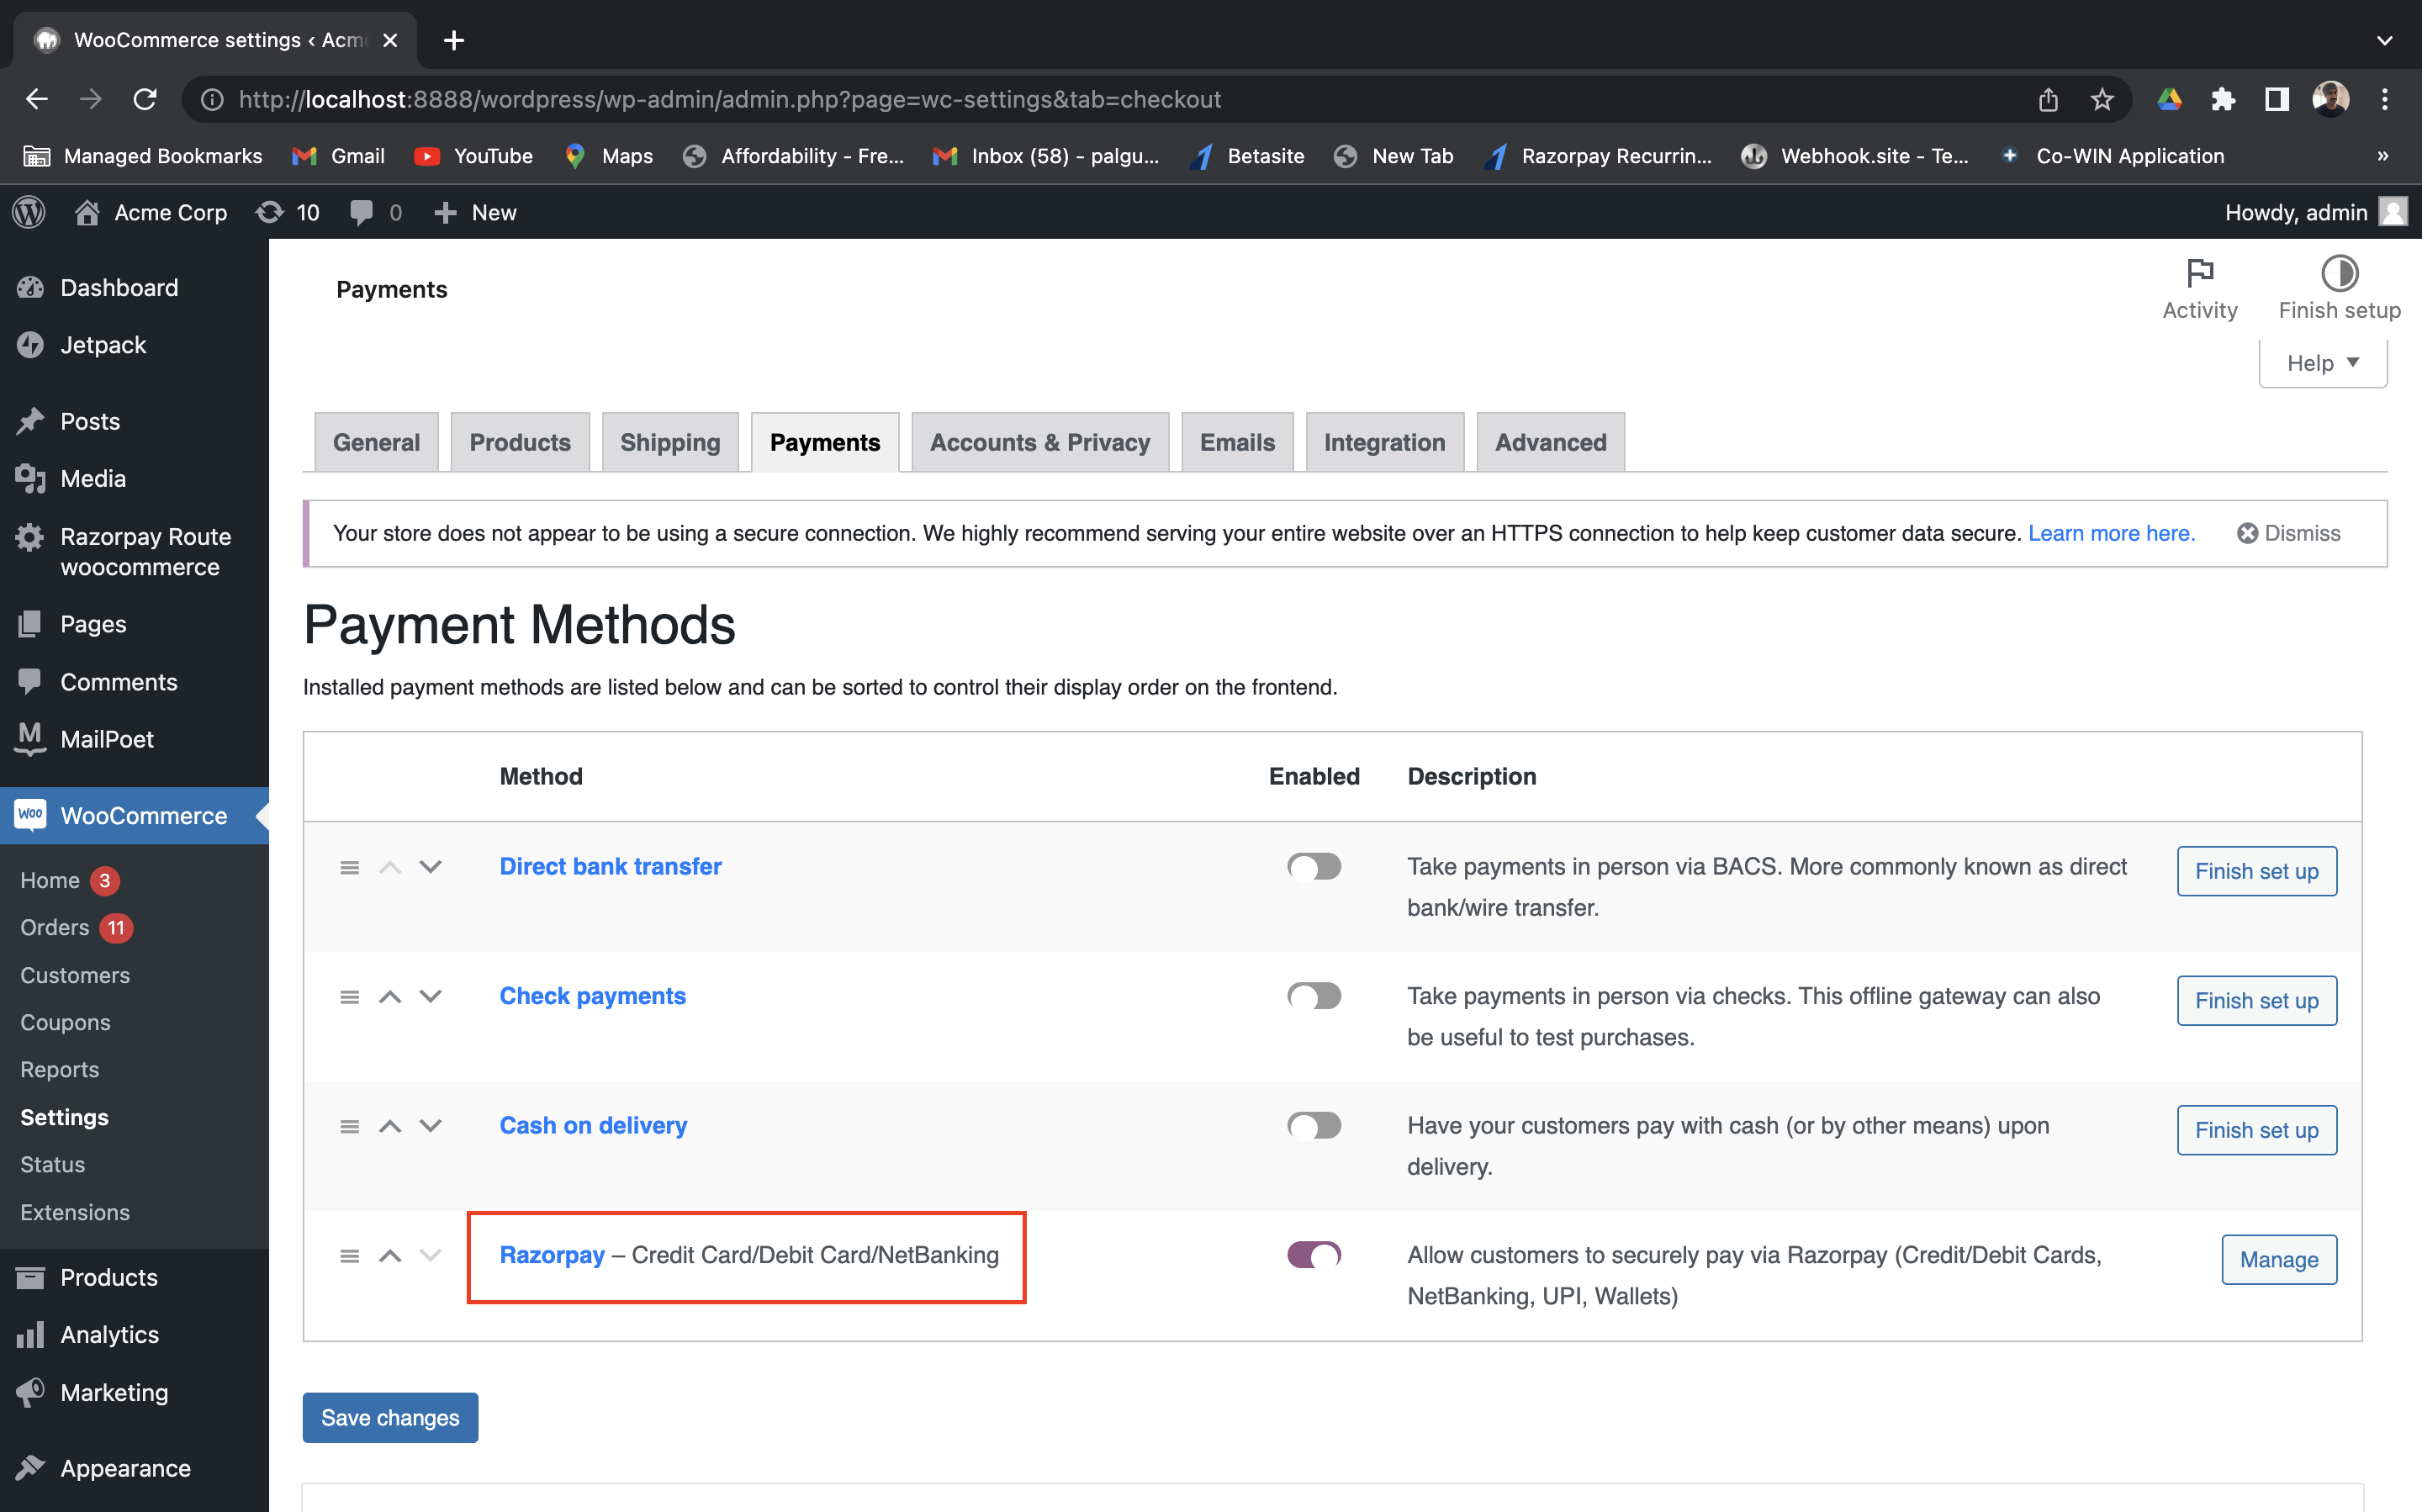
- Go to Payments and click Razorpay – Credit Card/Debit Card/NetBanking.
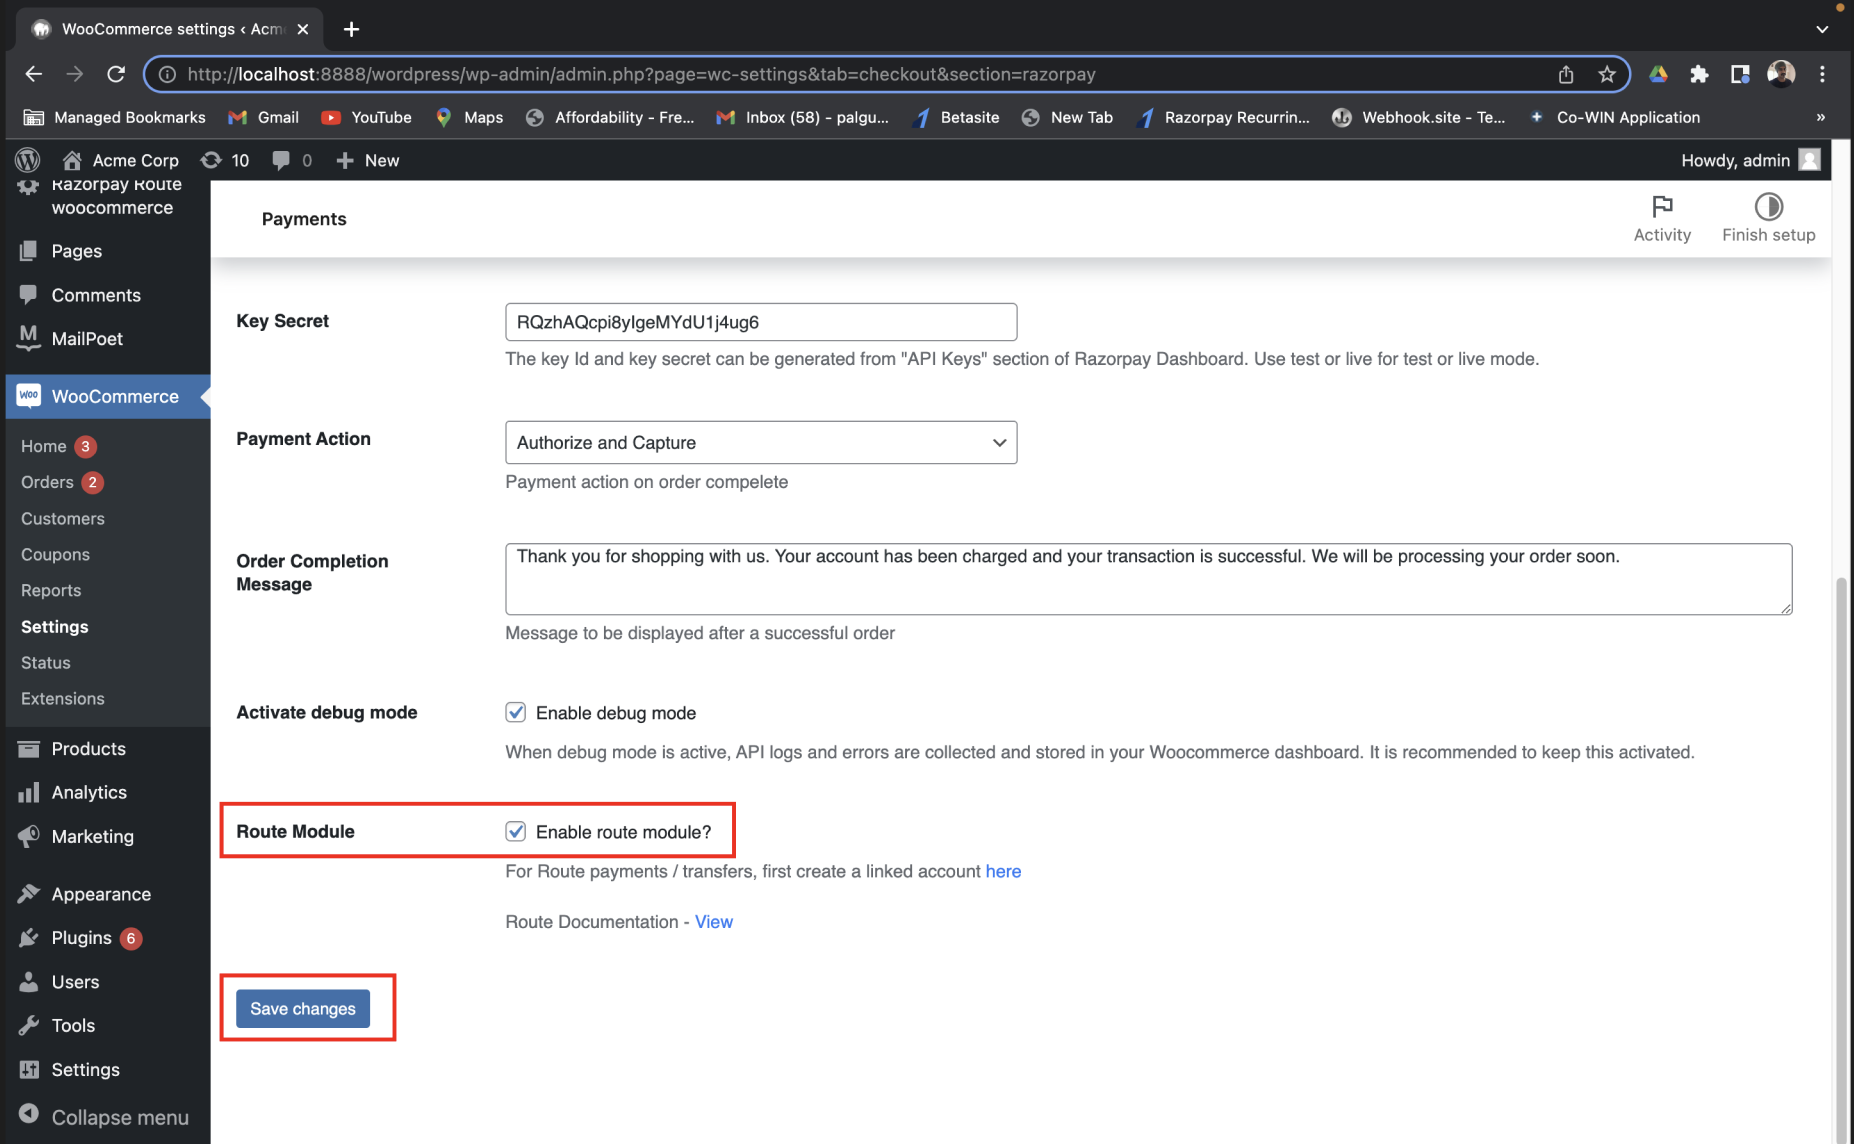
- Select Enable route module? and click Save changes.
2 Transfer via Orders or Payments (Automatic Transfers) On Your WordPress Site
2 Transfer via Orders or Payments (Automatic Transfers) On Your WordPress Site
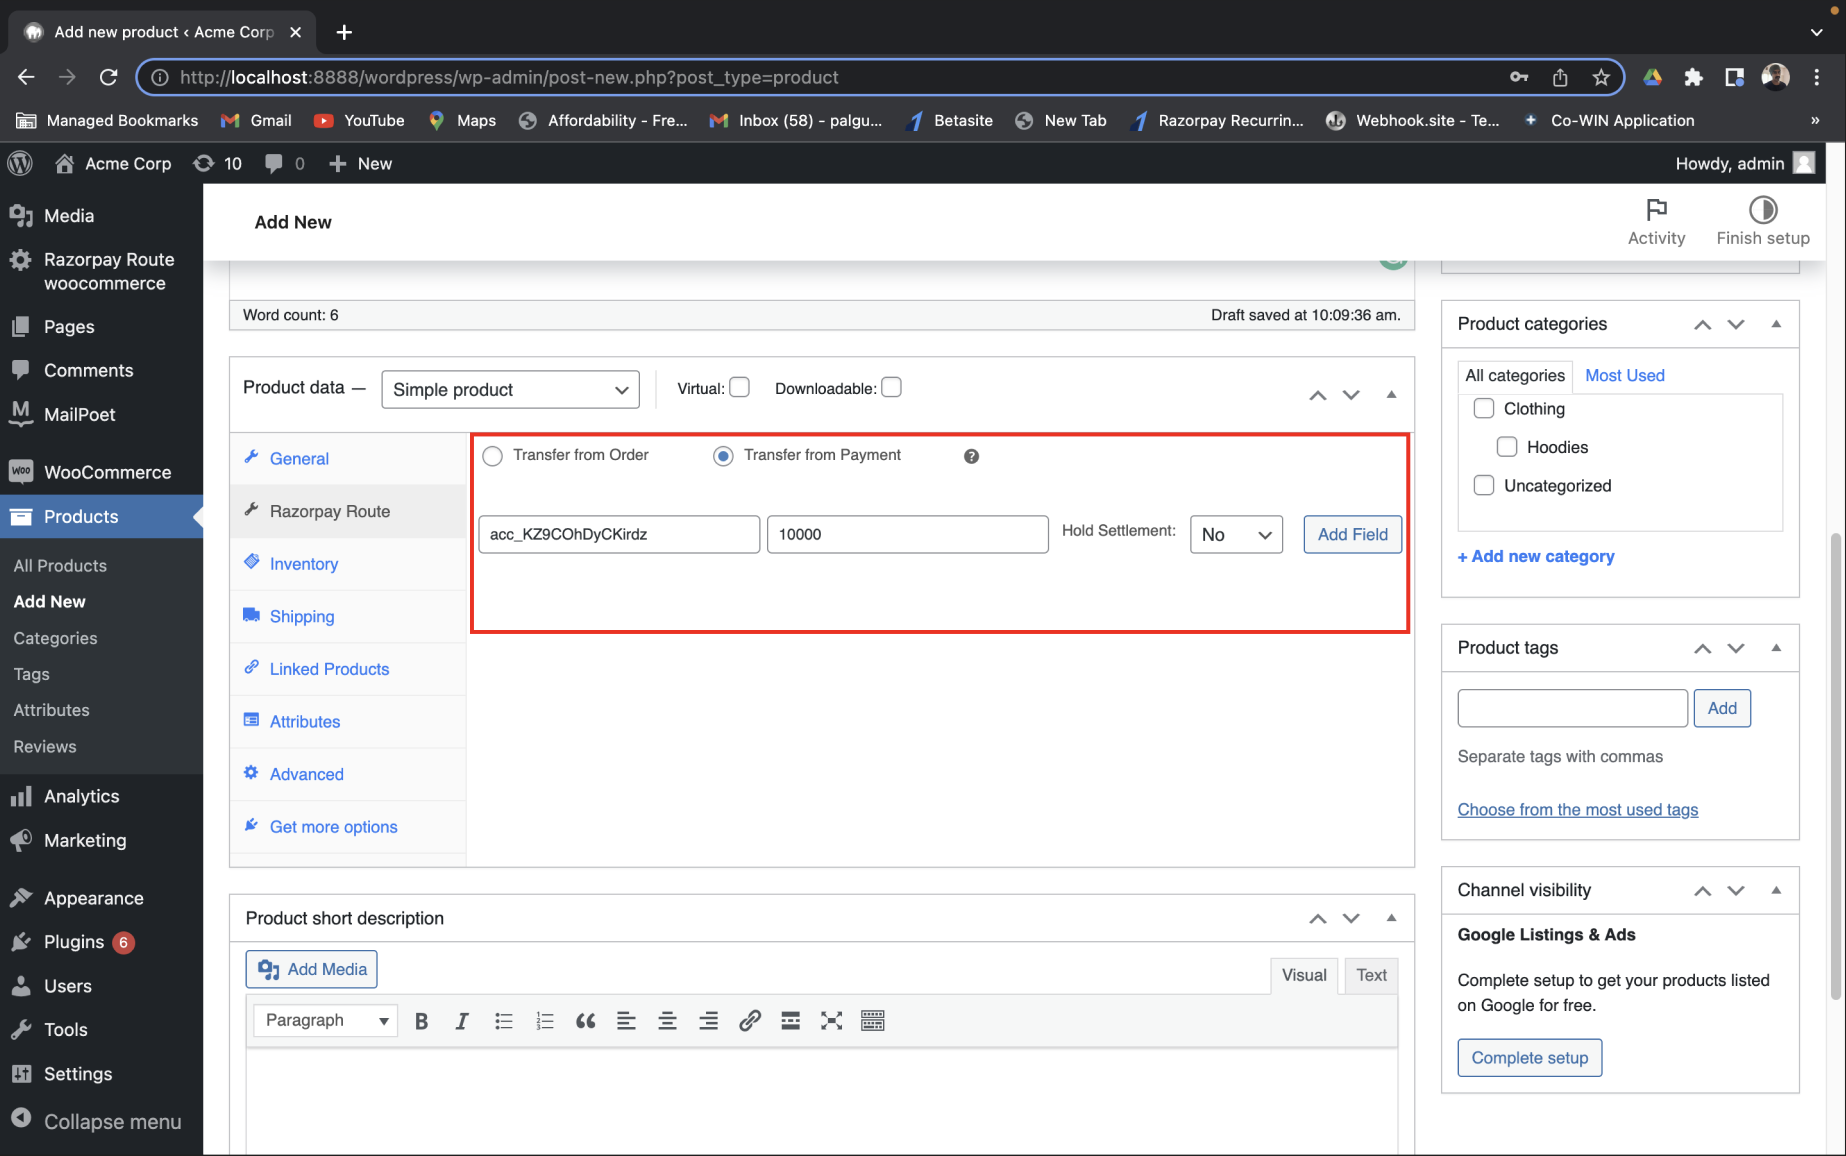
You can initiate a automatic transfer via orders or payments by providing the transfer details while creating a product. A transfer will be automatically initiated after the customer makes the payment.To provide the transfer details while creating a product:
- Log in to the WordPress Admin Dashboard and navigate to Products → Add New.
- Click Razorpay Route in the Product data section.
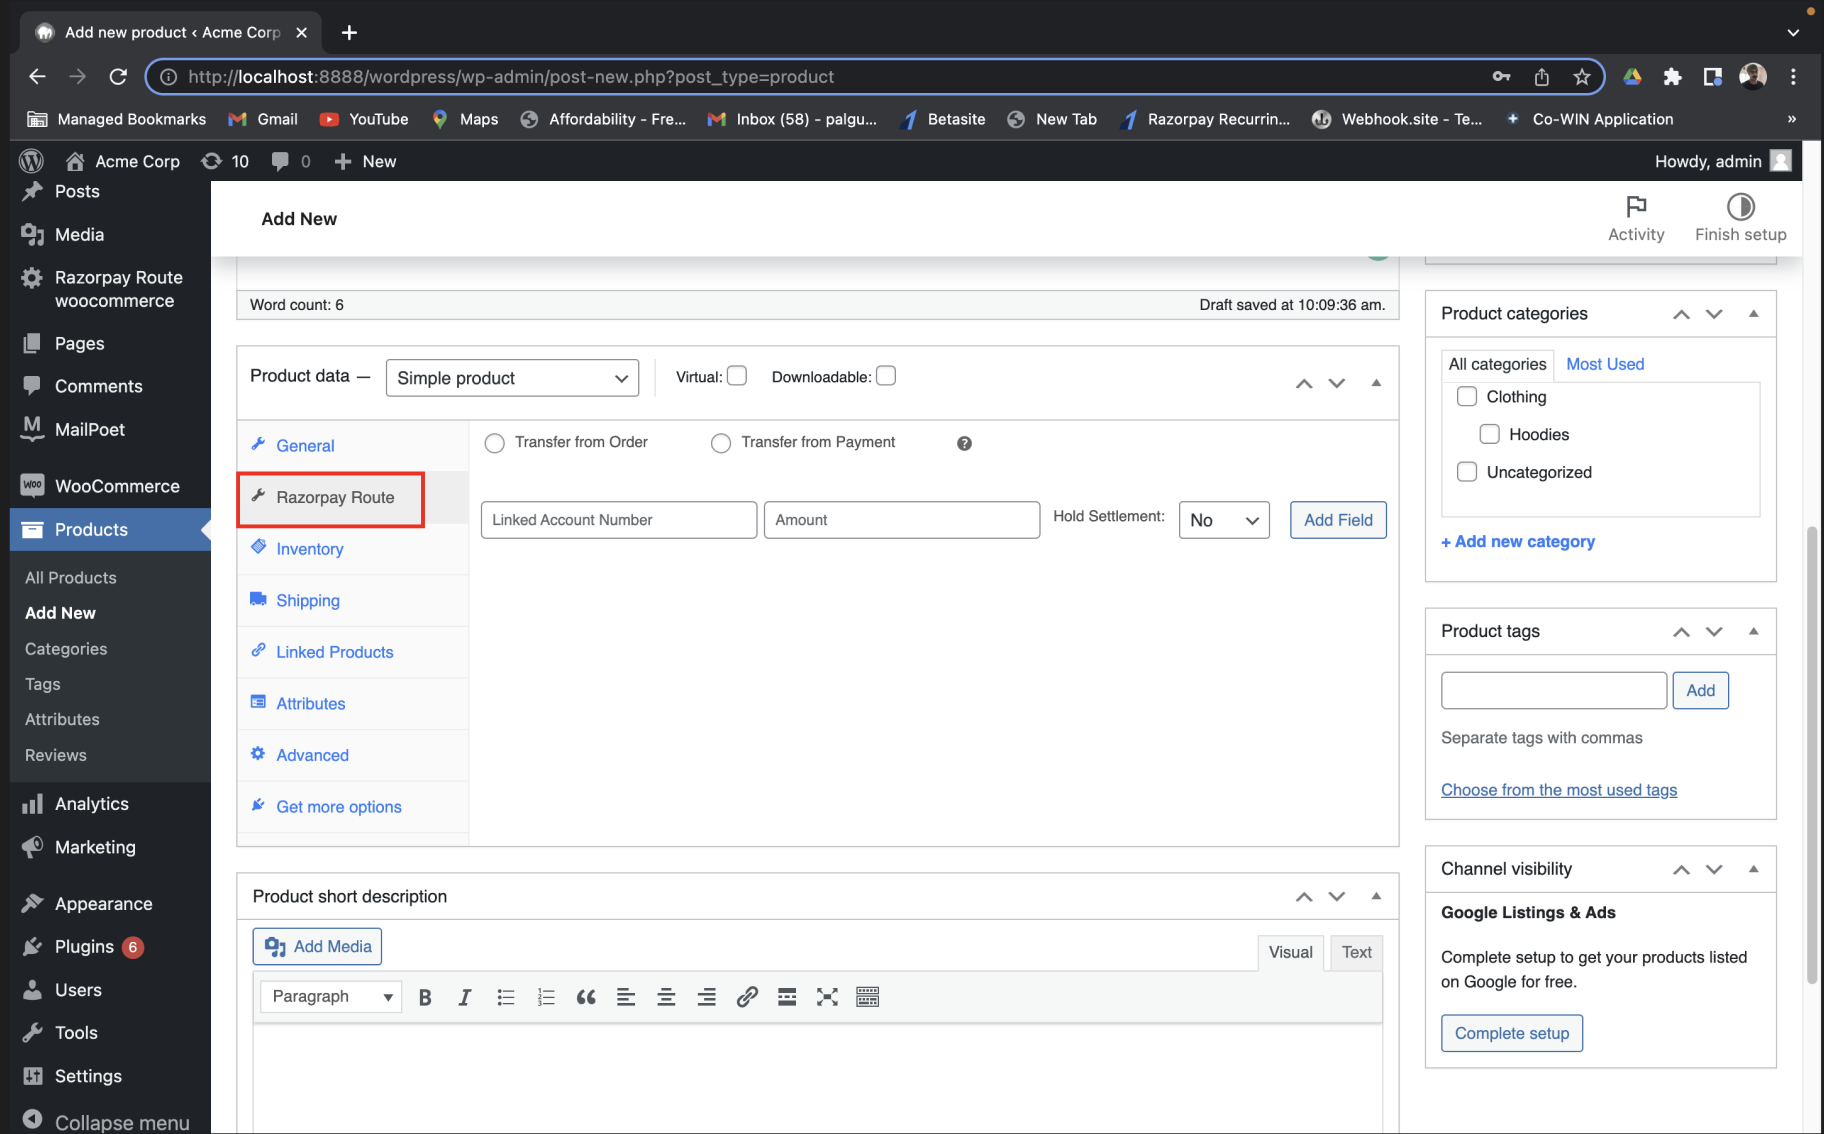
- Select any of the following options. You can transfer the funds to linked accounts from orders or payments.
- Transfer from Order: This will initiate a transfer at the time of order creation.
- Transfer from Payment: This will initiate a transfer after the customer makes the payment.
- Provide the Linked Account Number and the transfer Amount.
- Select your required option from the Hold Settlement: drop-down menu.
- You can add multiple transfer details by using the Add Field button.
3 Enable Webhooks on the Dashboard
3 Enable Webhooks on the Dashboard
These 3 webhooks are auto-configured for the Route Module:
transfer.processedsettlement.processedtransfer.failed
4 Create Manual Trasfers from Payments
4 Create Manual Trasfers from Payments
You can manually create a transfer after the customer makes the payment.To create a transfer manually from the received payment: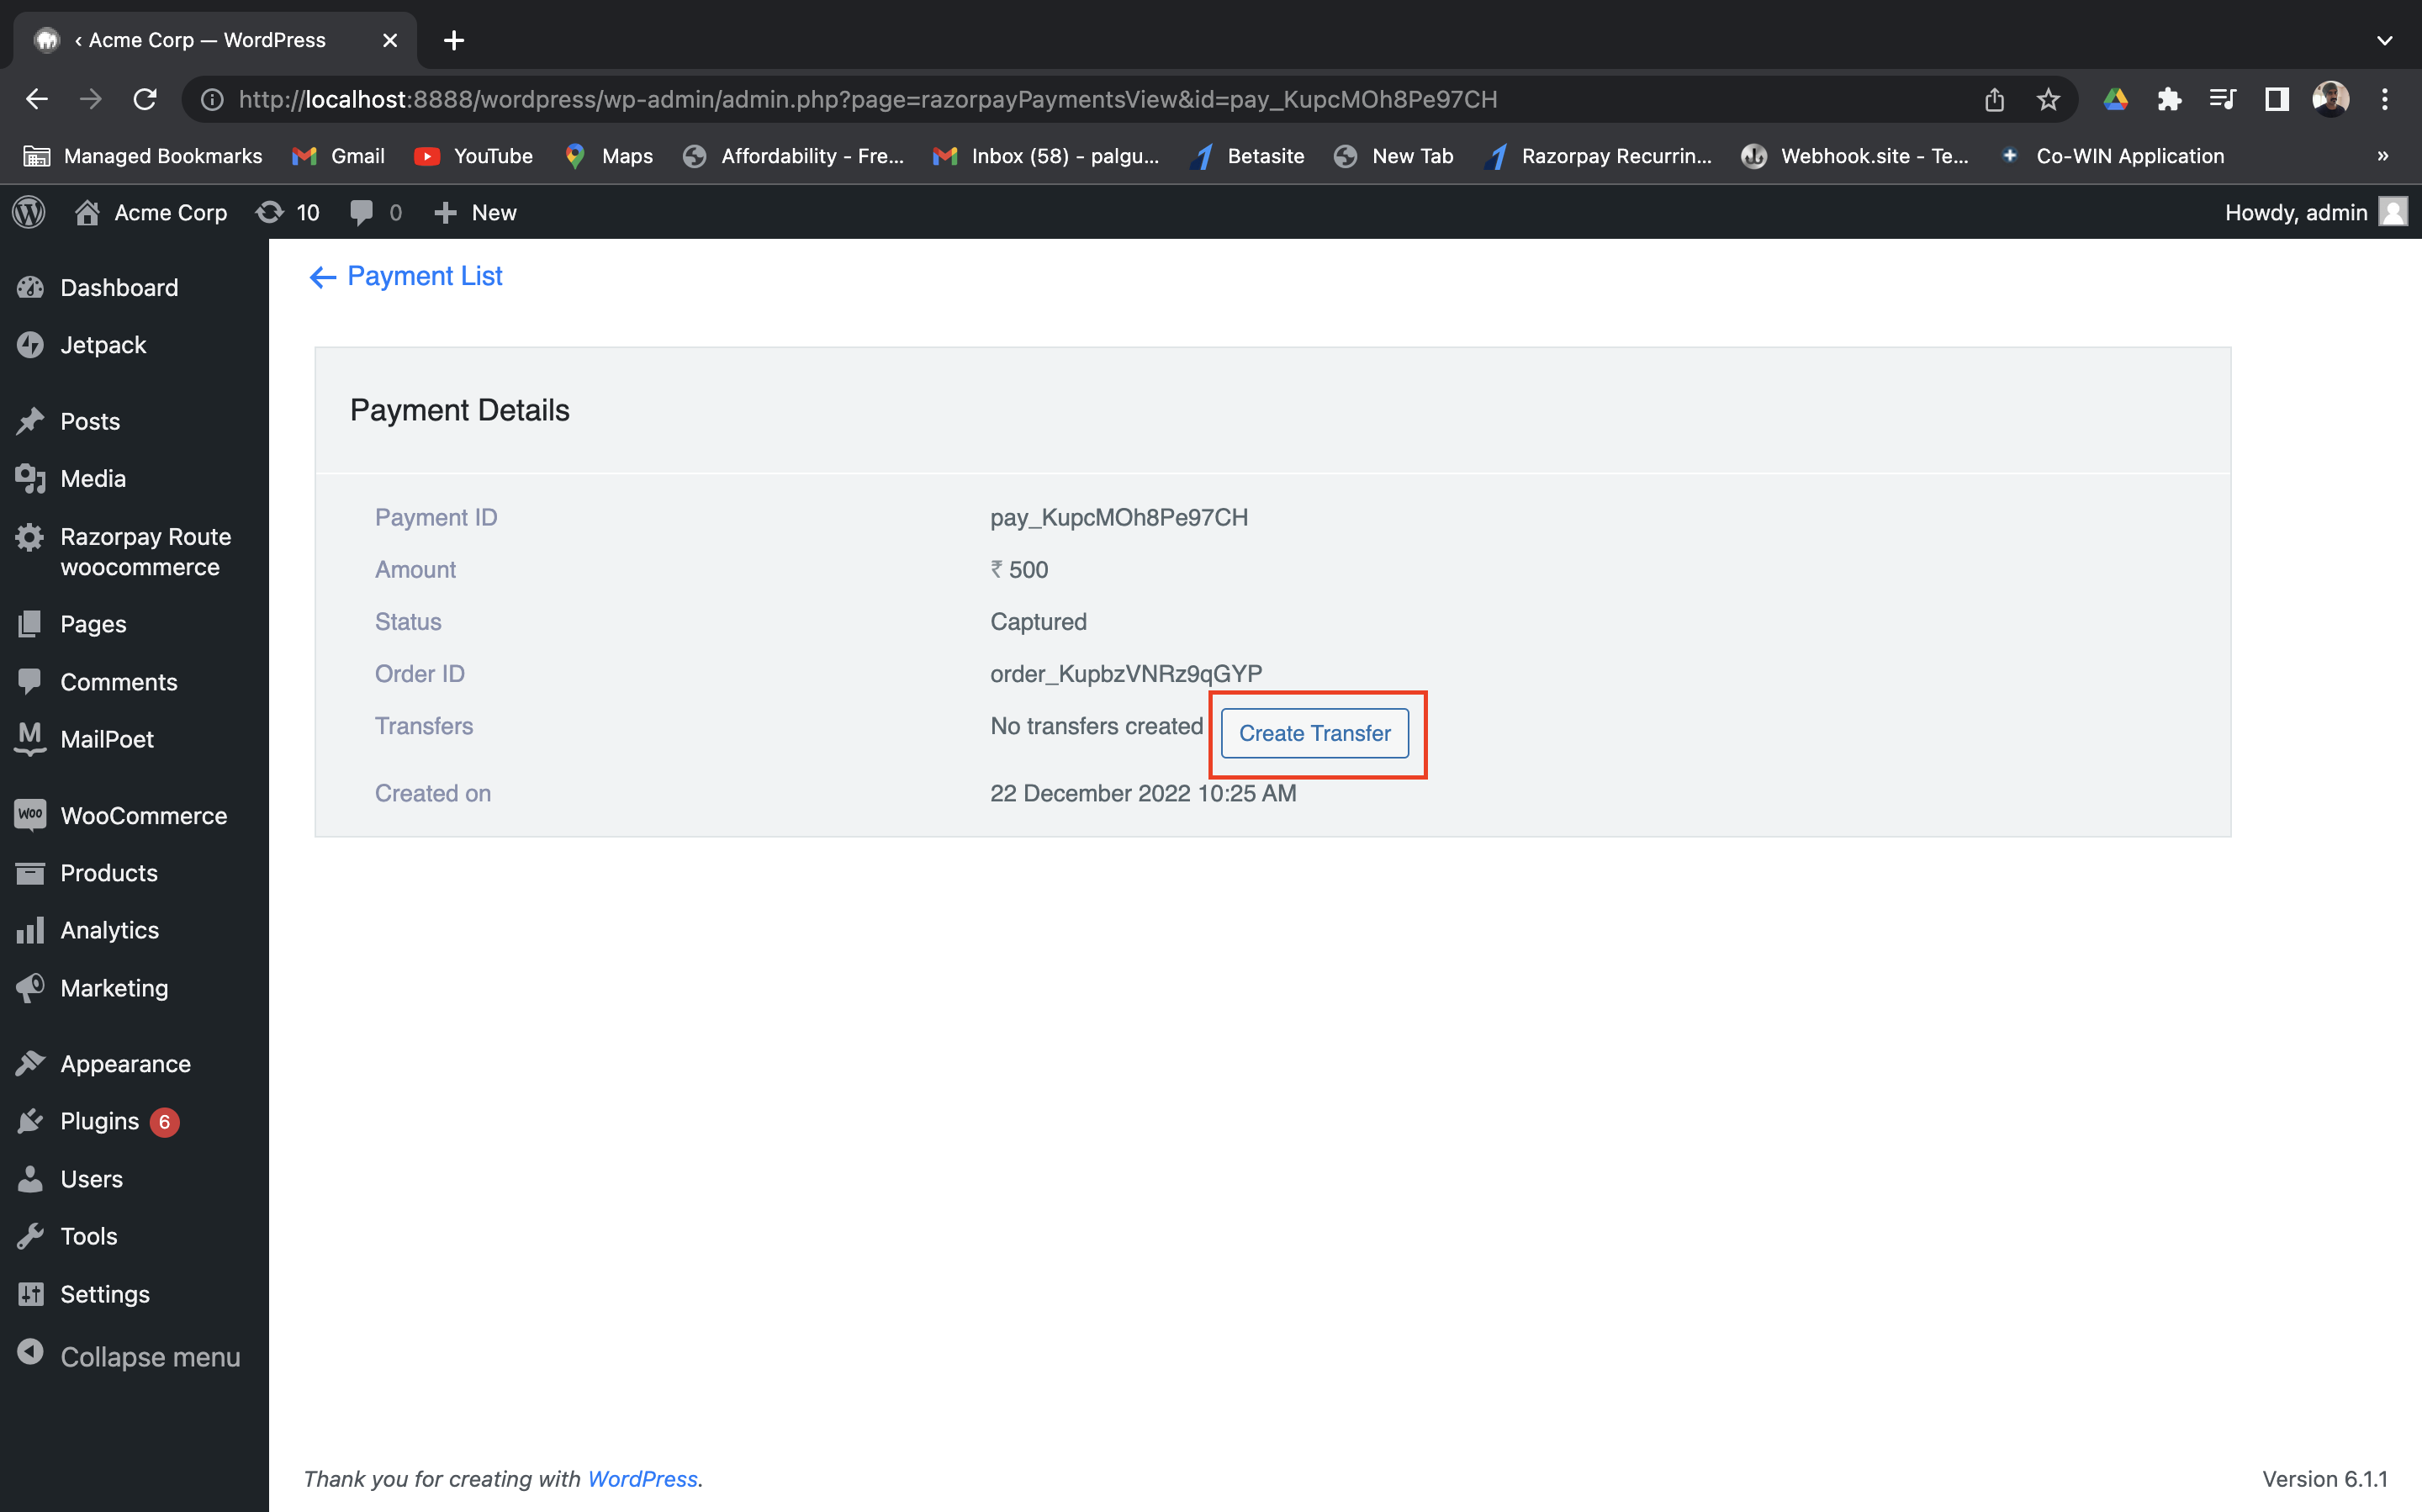
- Log in to the WordPress Admin Dashboard and navigate to Razorpay Route woocommerce → Payments.
- Click the required Payment Id to create a transfer.
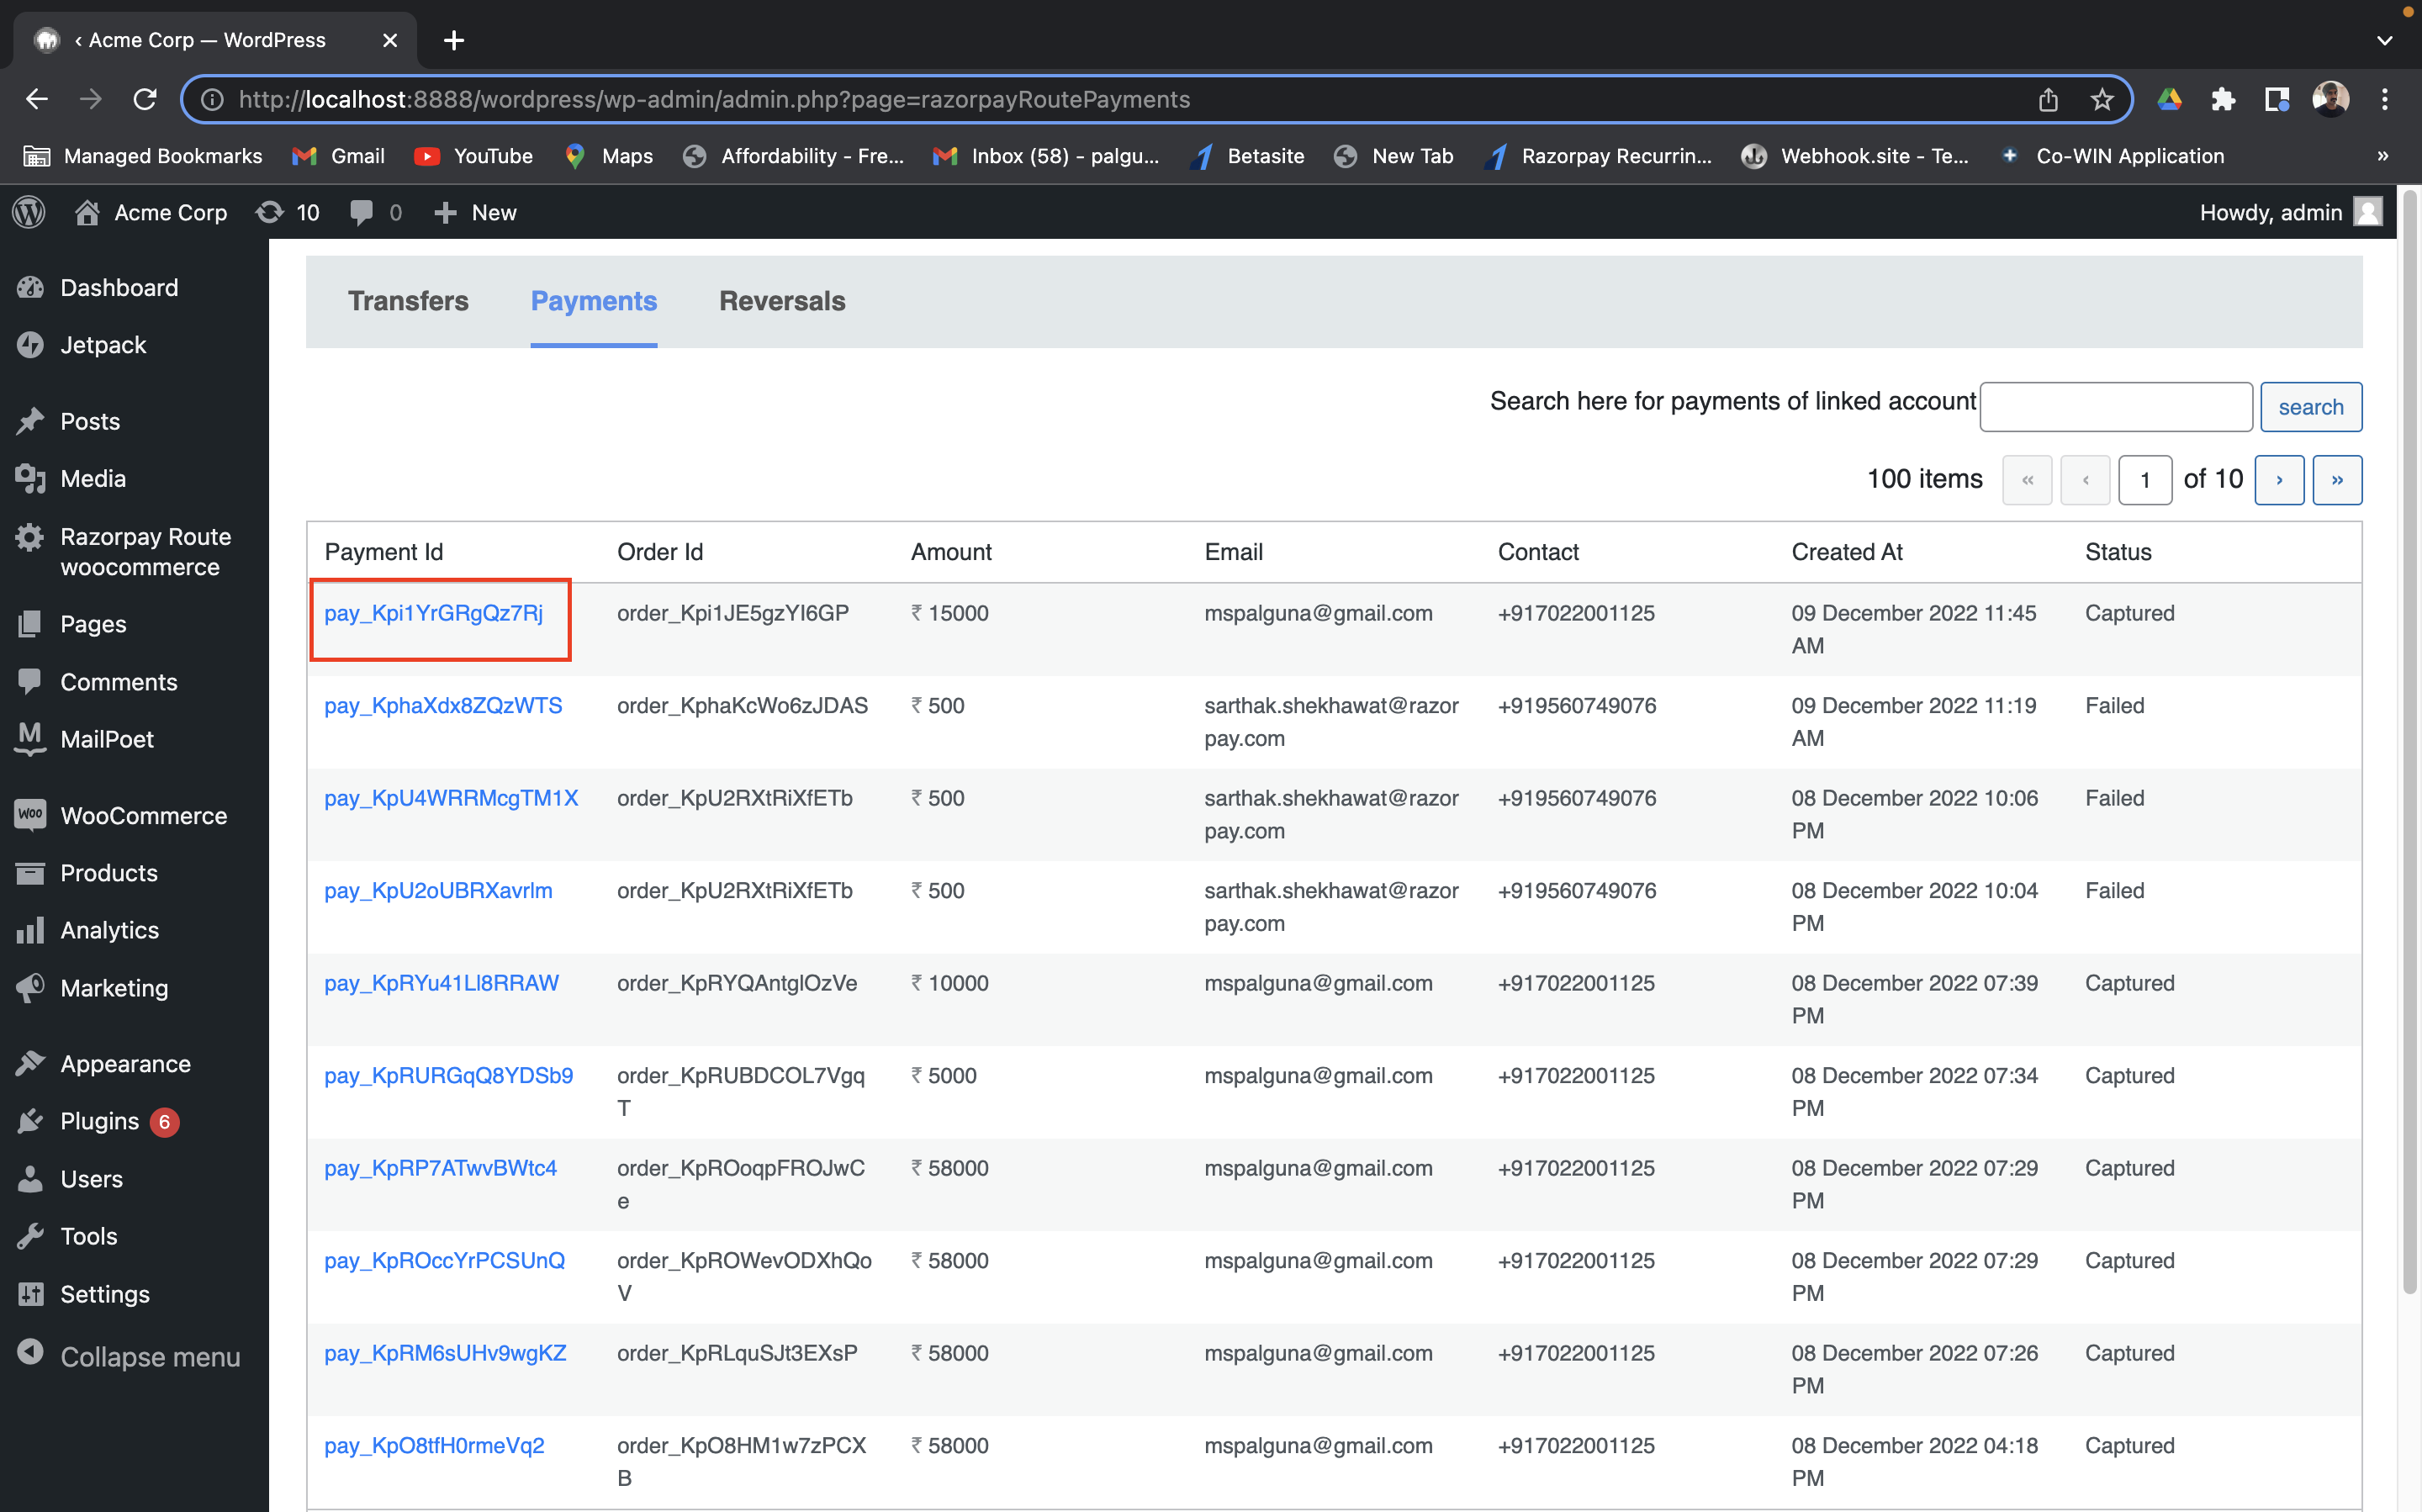
- Click Create Transfer and provide the following details:
- Transfer Amount: Amount to be transferred. The transfer amount cannot be greater than the payment/order amount.
- Linked Account Number: ID of the Linked Account to which the amount should be transfered.
- Settlement schedule: Define the settlement schedule.
- Click Create to create a transfer.
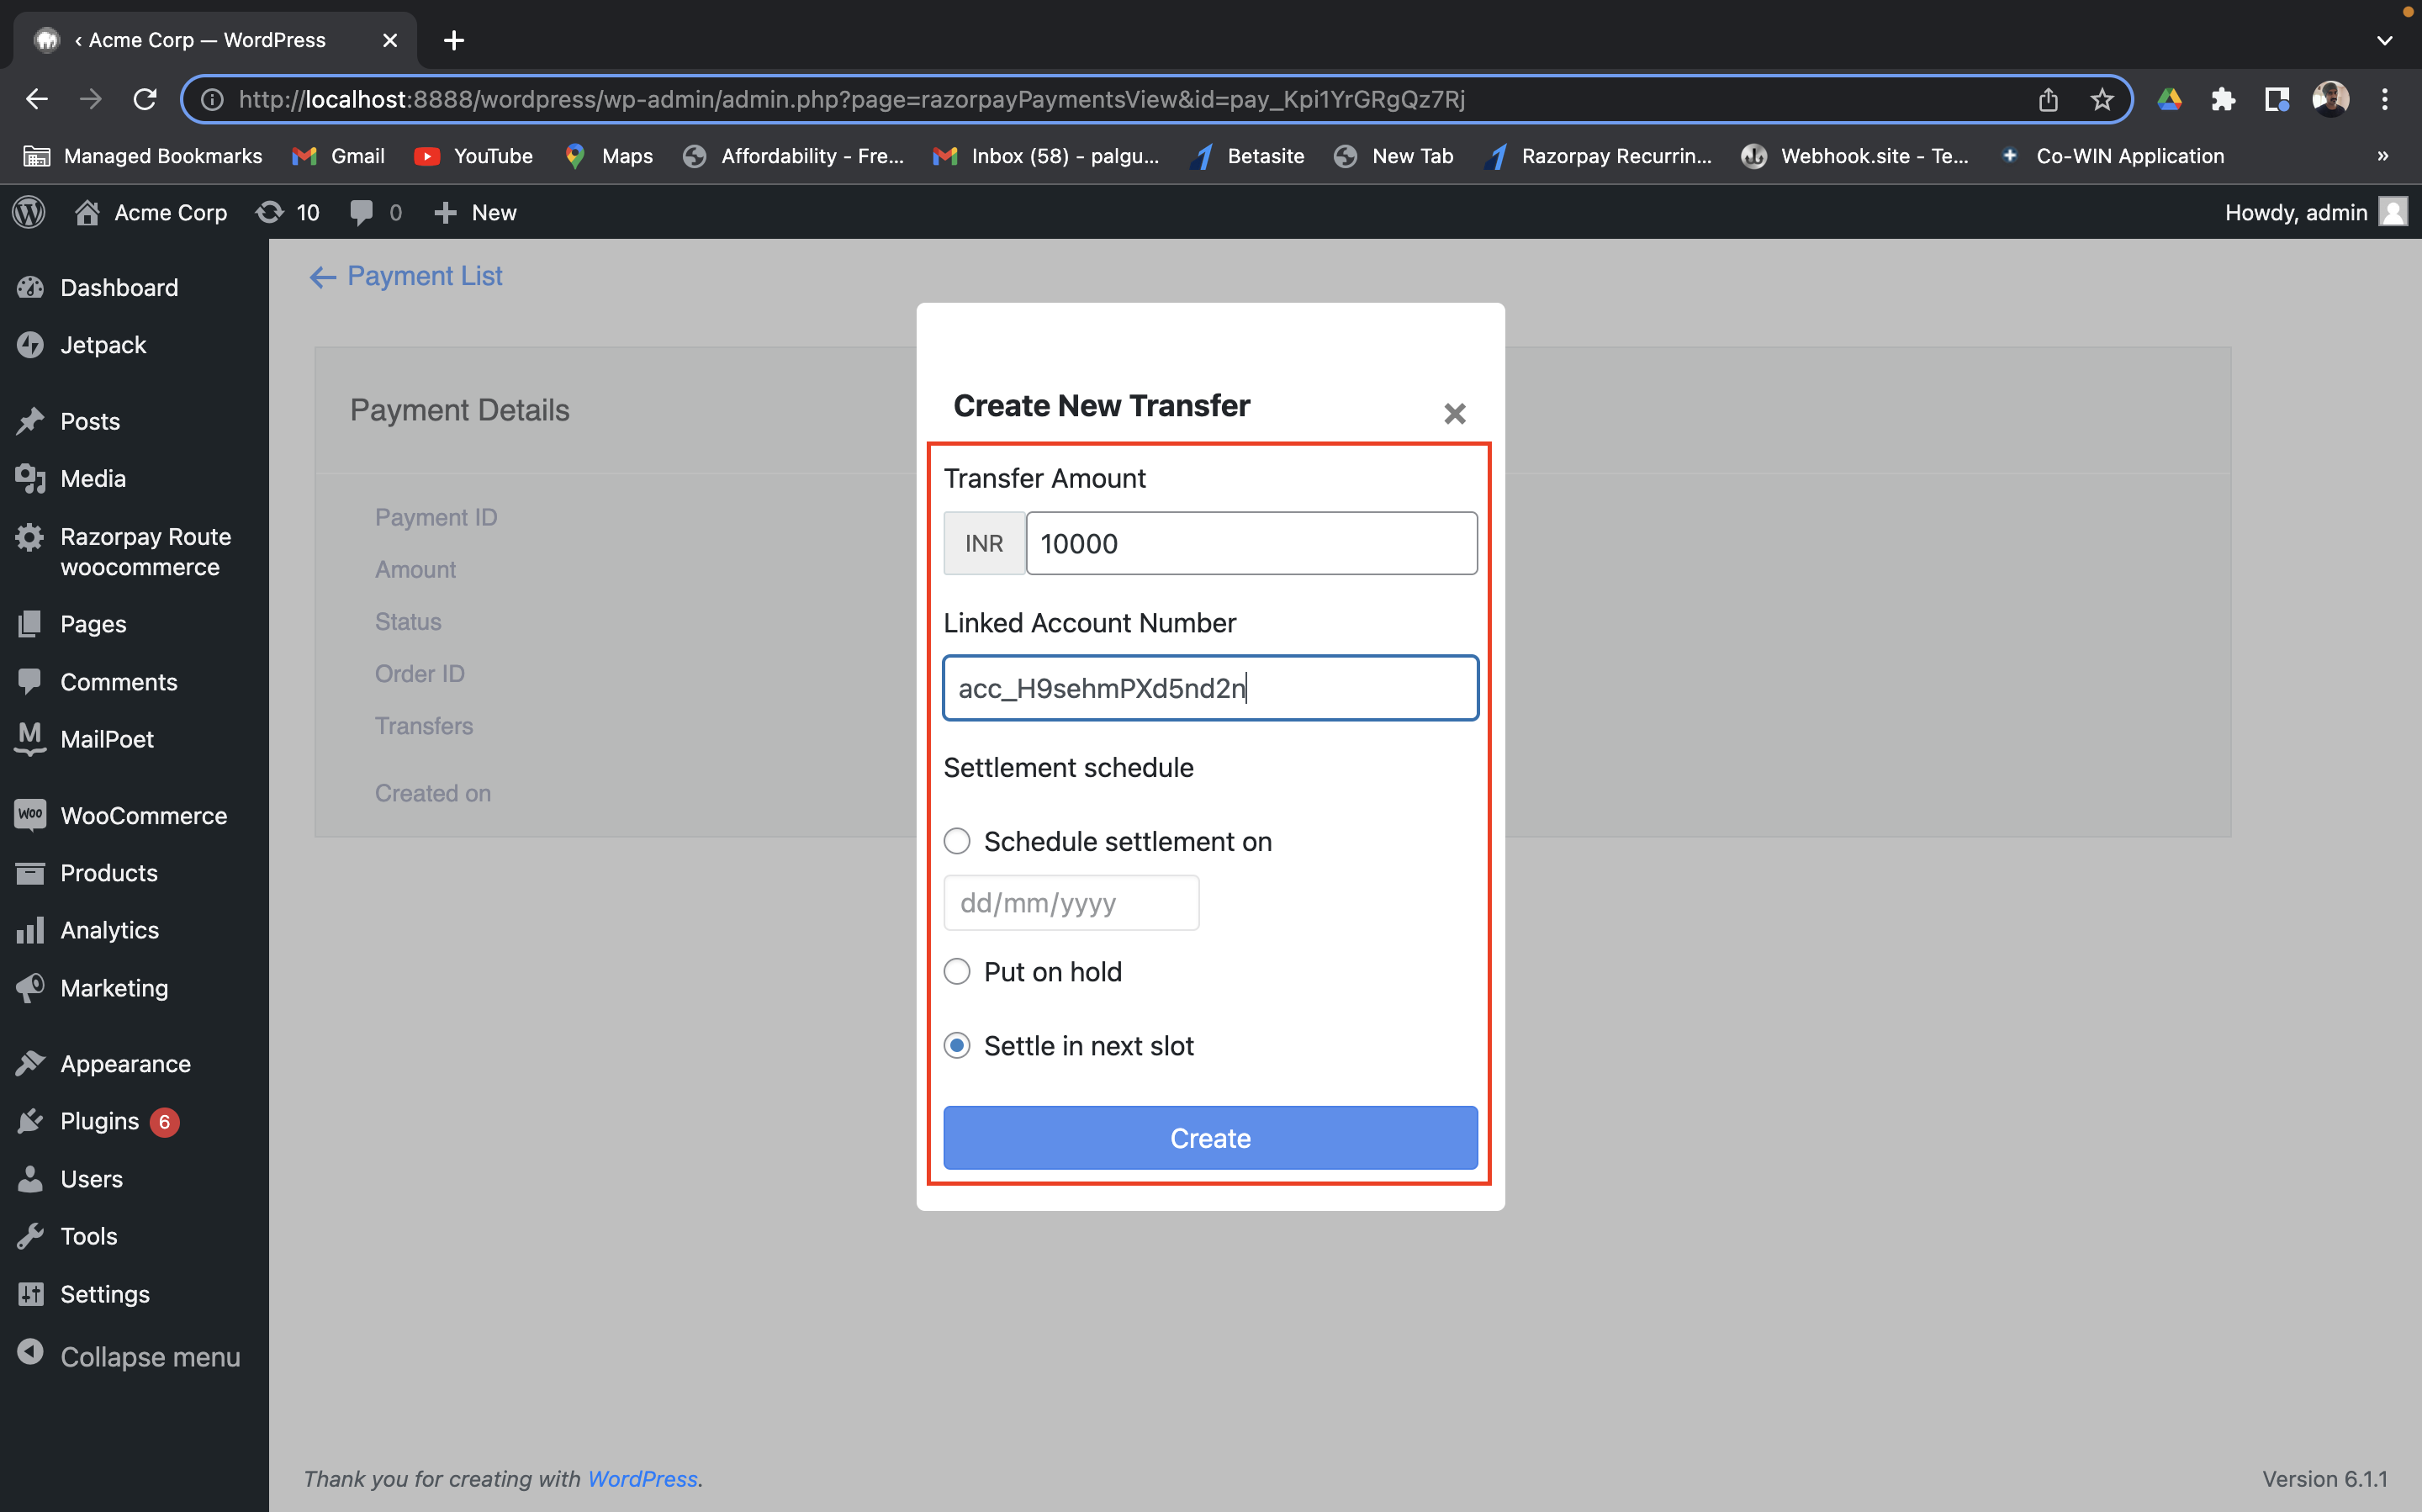
Handy TipsThe transfer amount will be settled into the Linked Account depending on the defined schedule.
5 Schedule Settlements
5 Schedule Settlements
You can schedule a settlement of the initiated transfer from the WordPress Admin Dashboard.To schedule a settlement: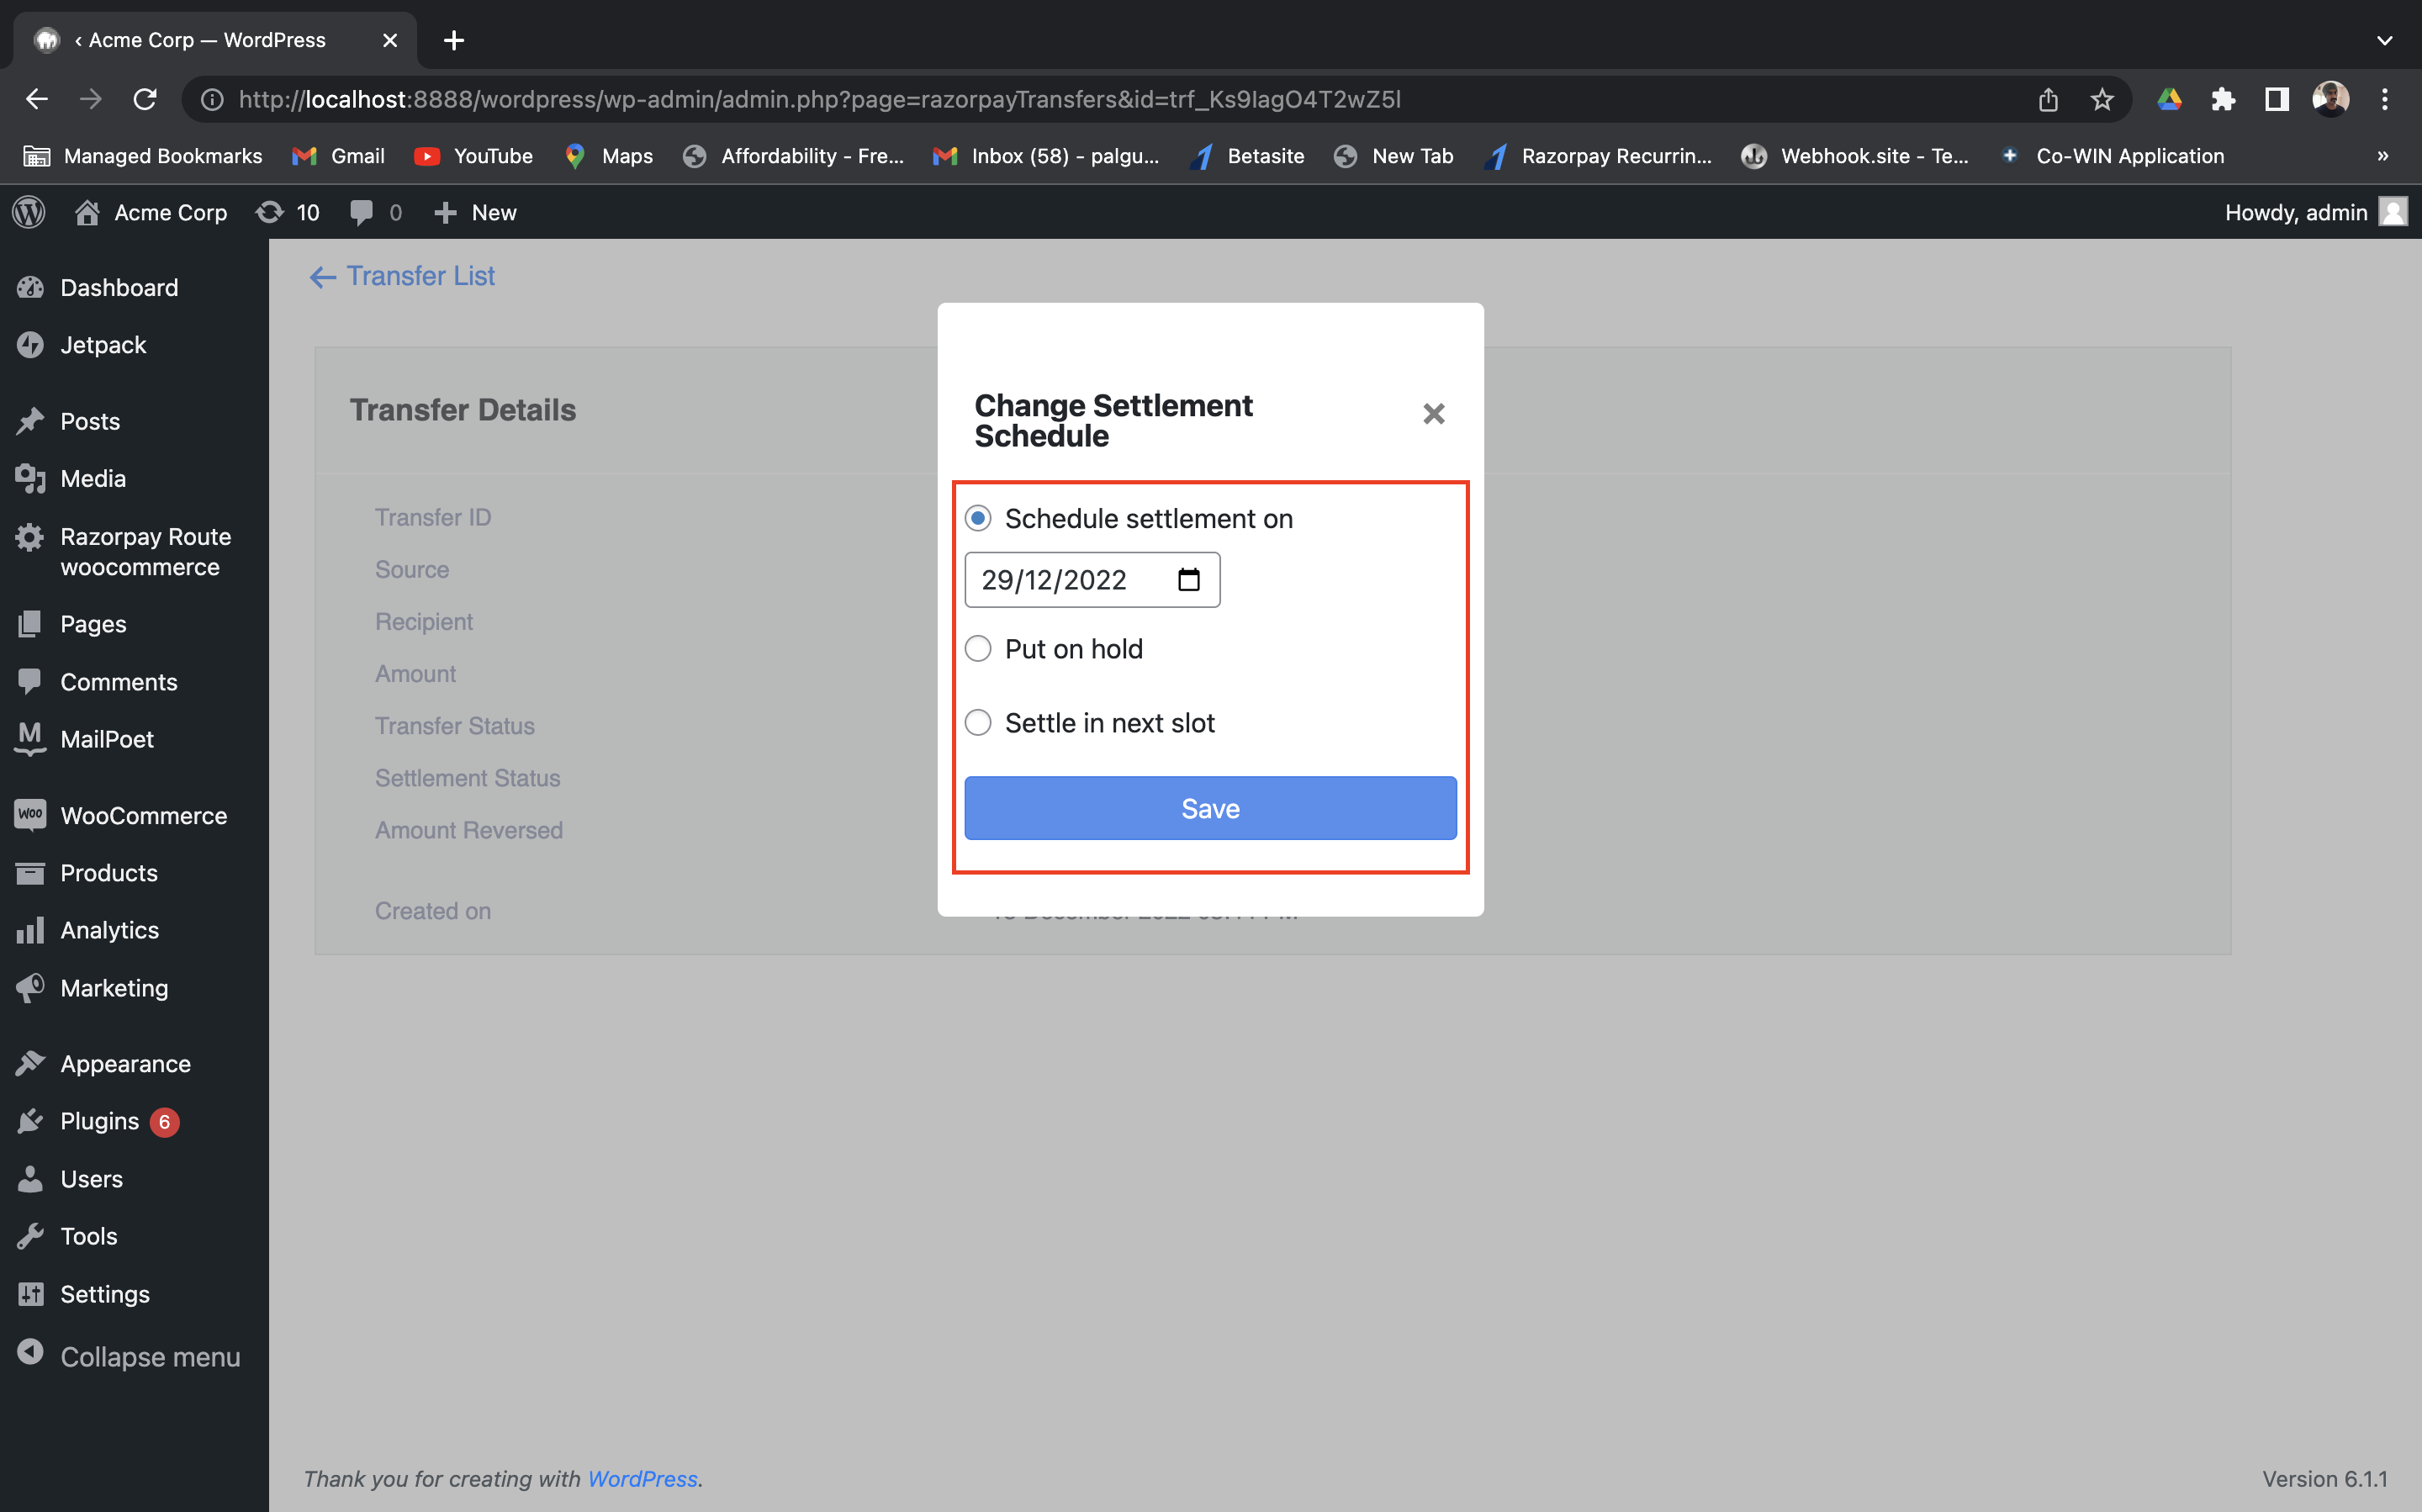
- Log in to the WordPress Admin Dashboard and navigate to Razorpay Route woocommerce.
- Click the Transfer Id to schedule a settlement.
- Click Change under Transfer Details.
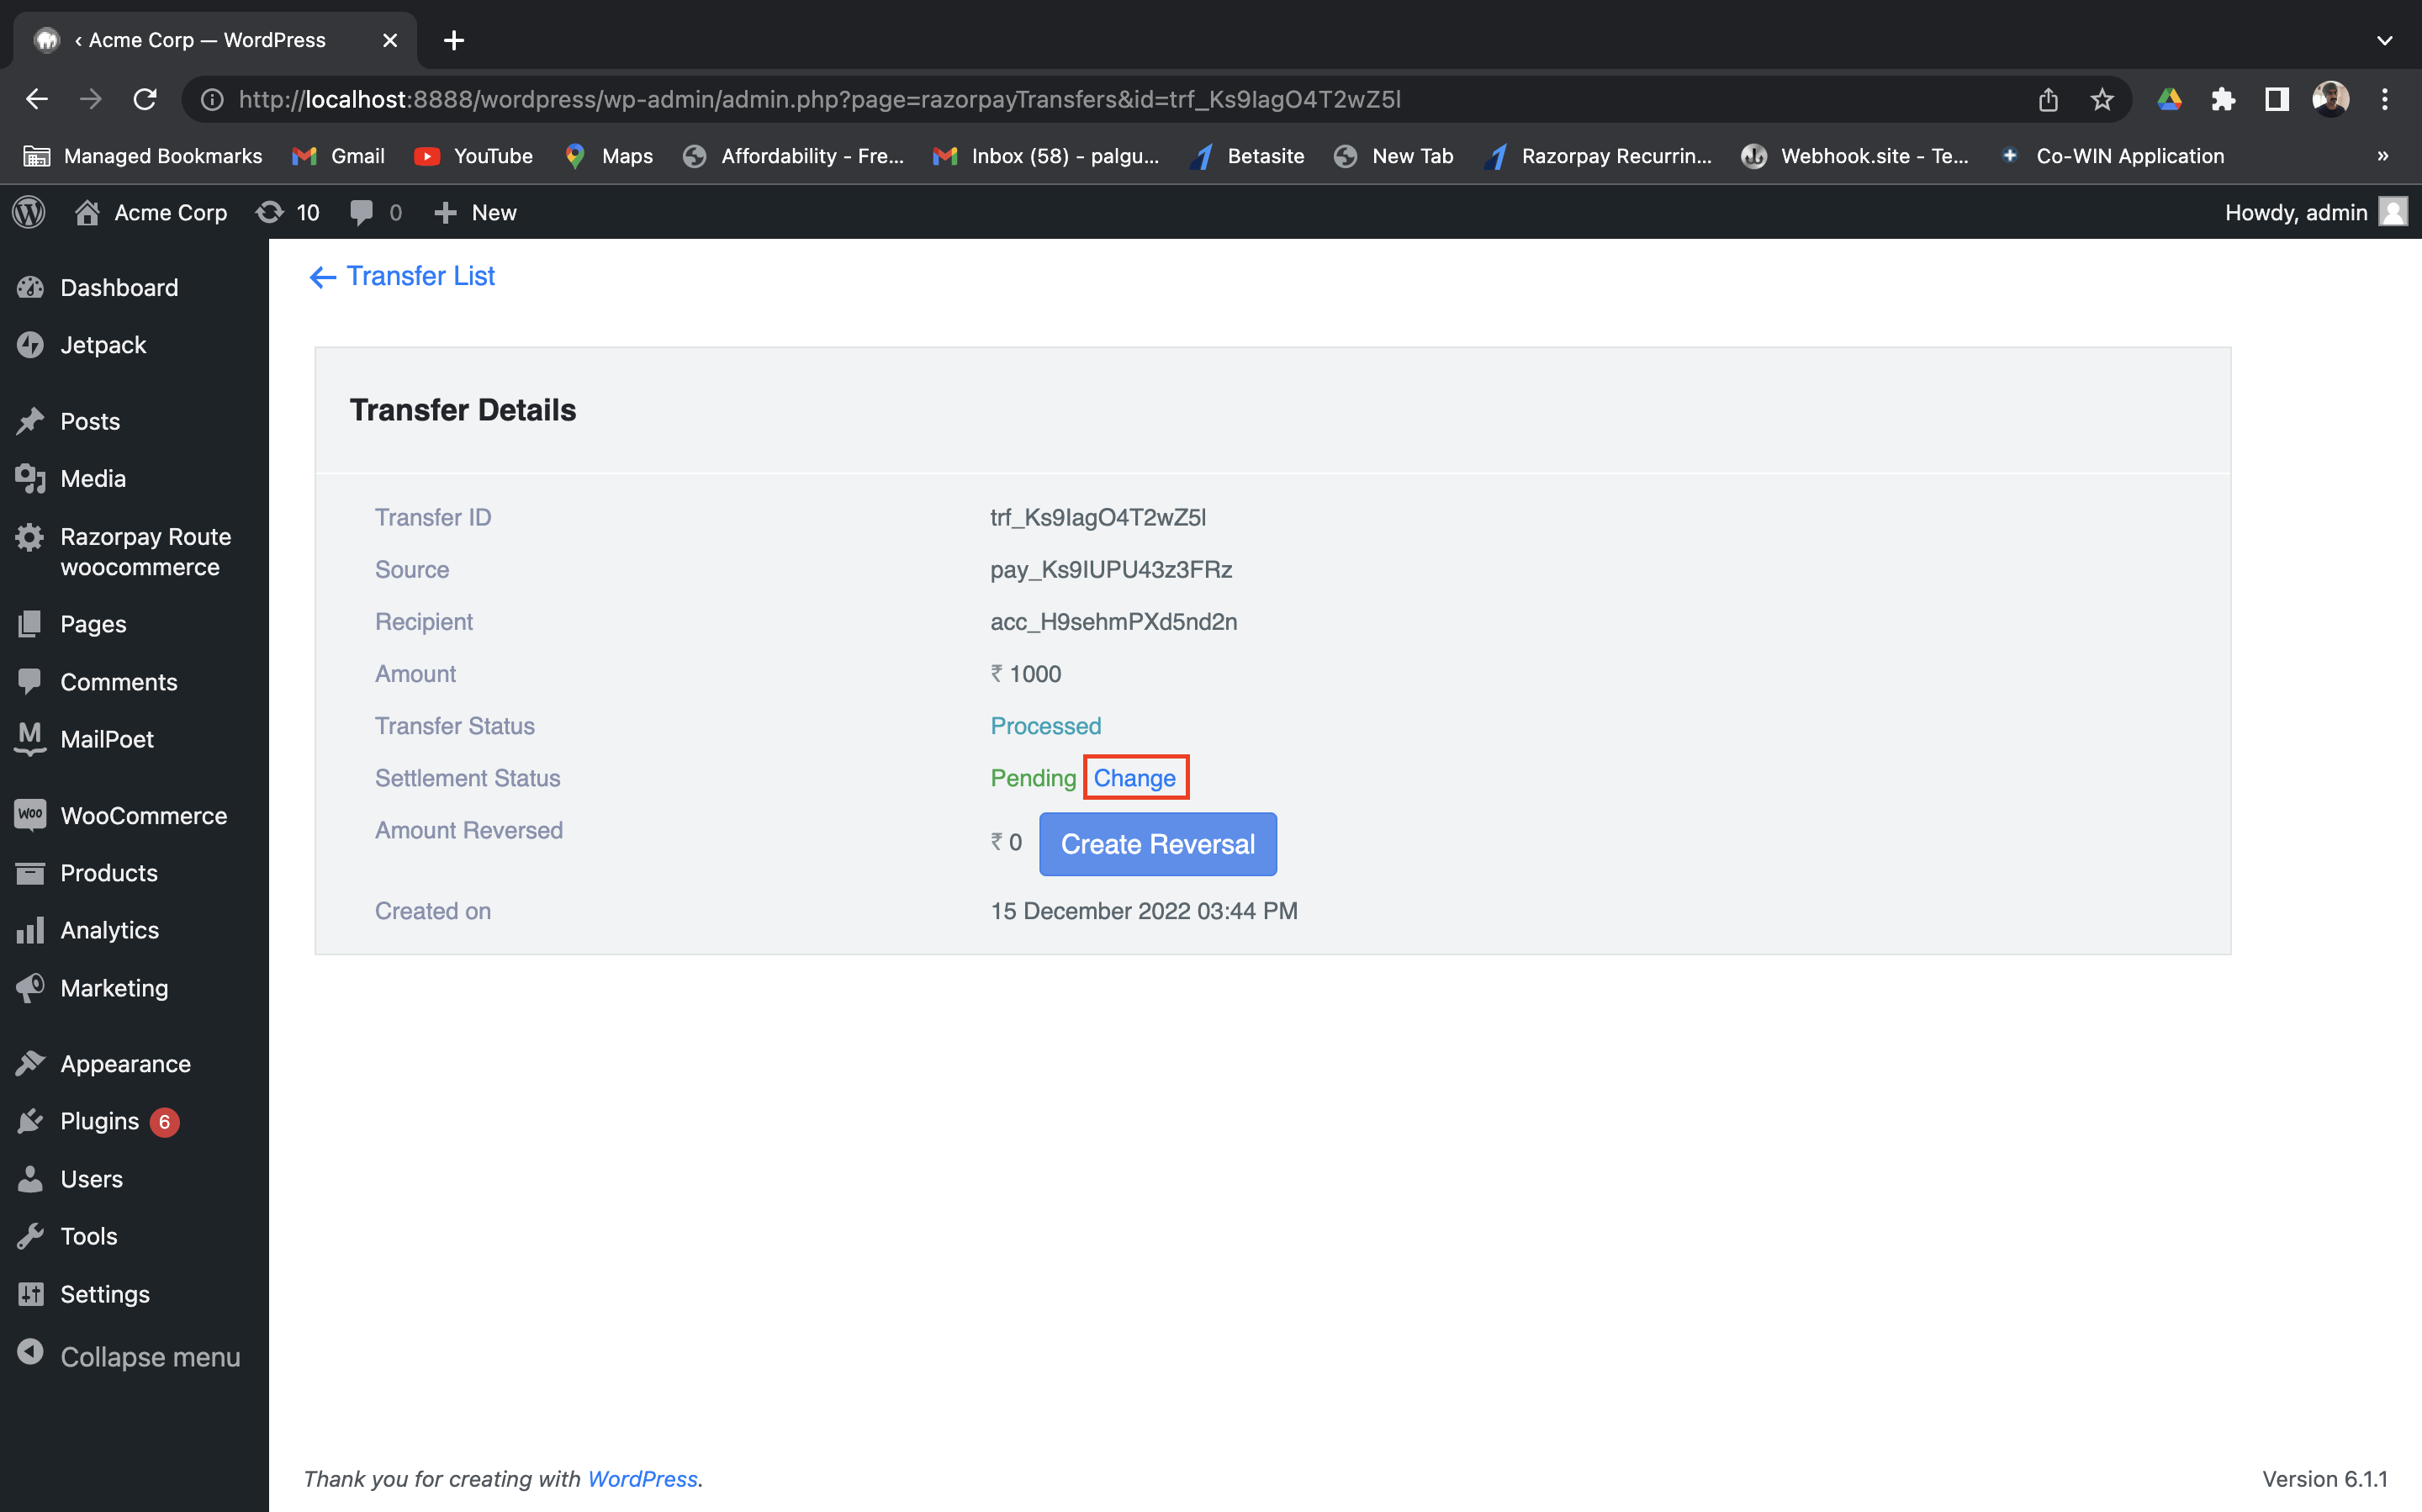
- Select either of the following Settlement Schedule options:
- Schedule settlement on: Select this to schedule the transfer to a later date using the calendar.
- Put on hold: Use this to defer the transfer until specified otherwise.
- Settle in next slot: Use this to settle the payment in the next settlement slot.
- Click Save.
6 Verify Payment Status
6 Verify Payment Status
You can track the payment status from the WordPress admin Dashboard or Razorpay Dashboard.
Verify Payment Status from the WordPress Admin Dashboard
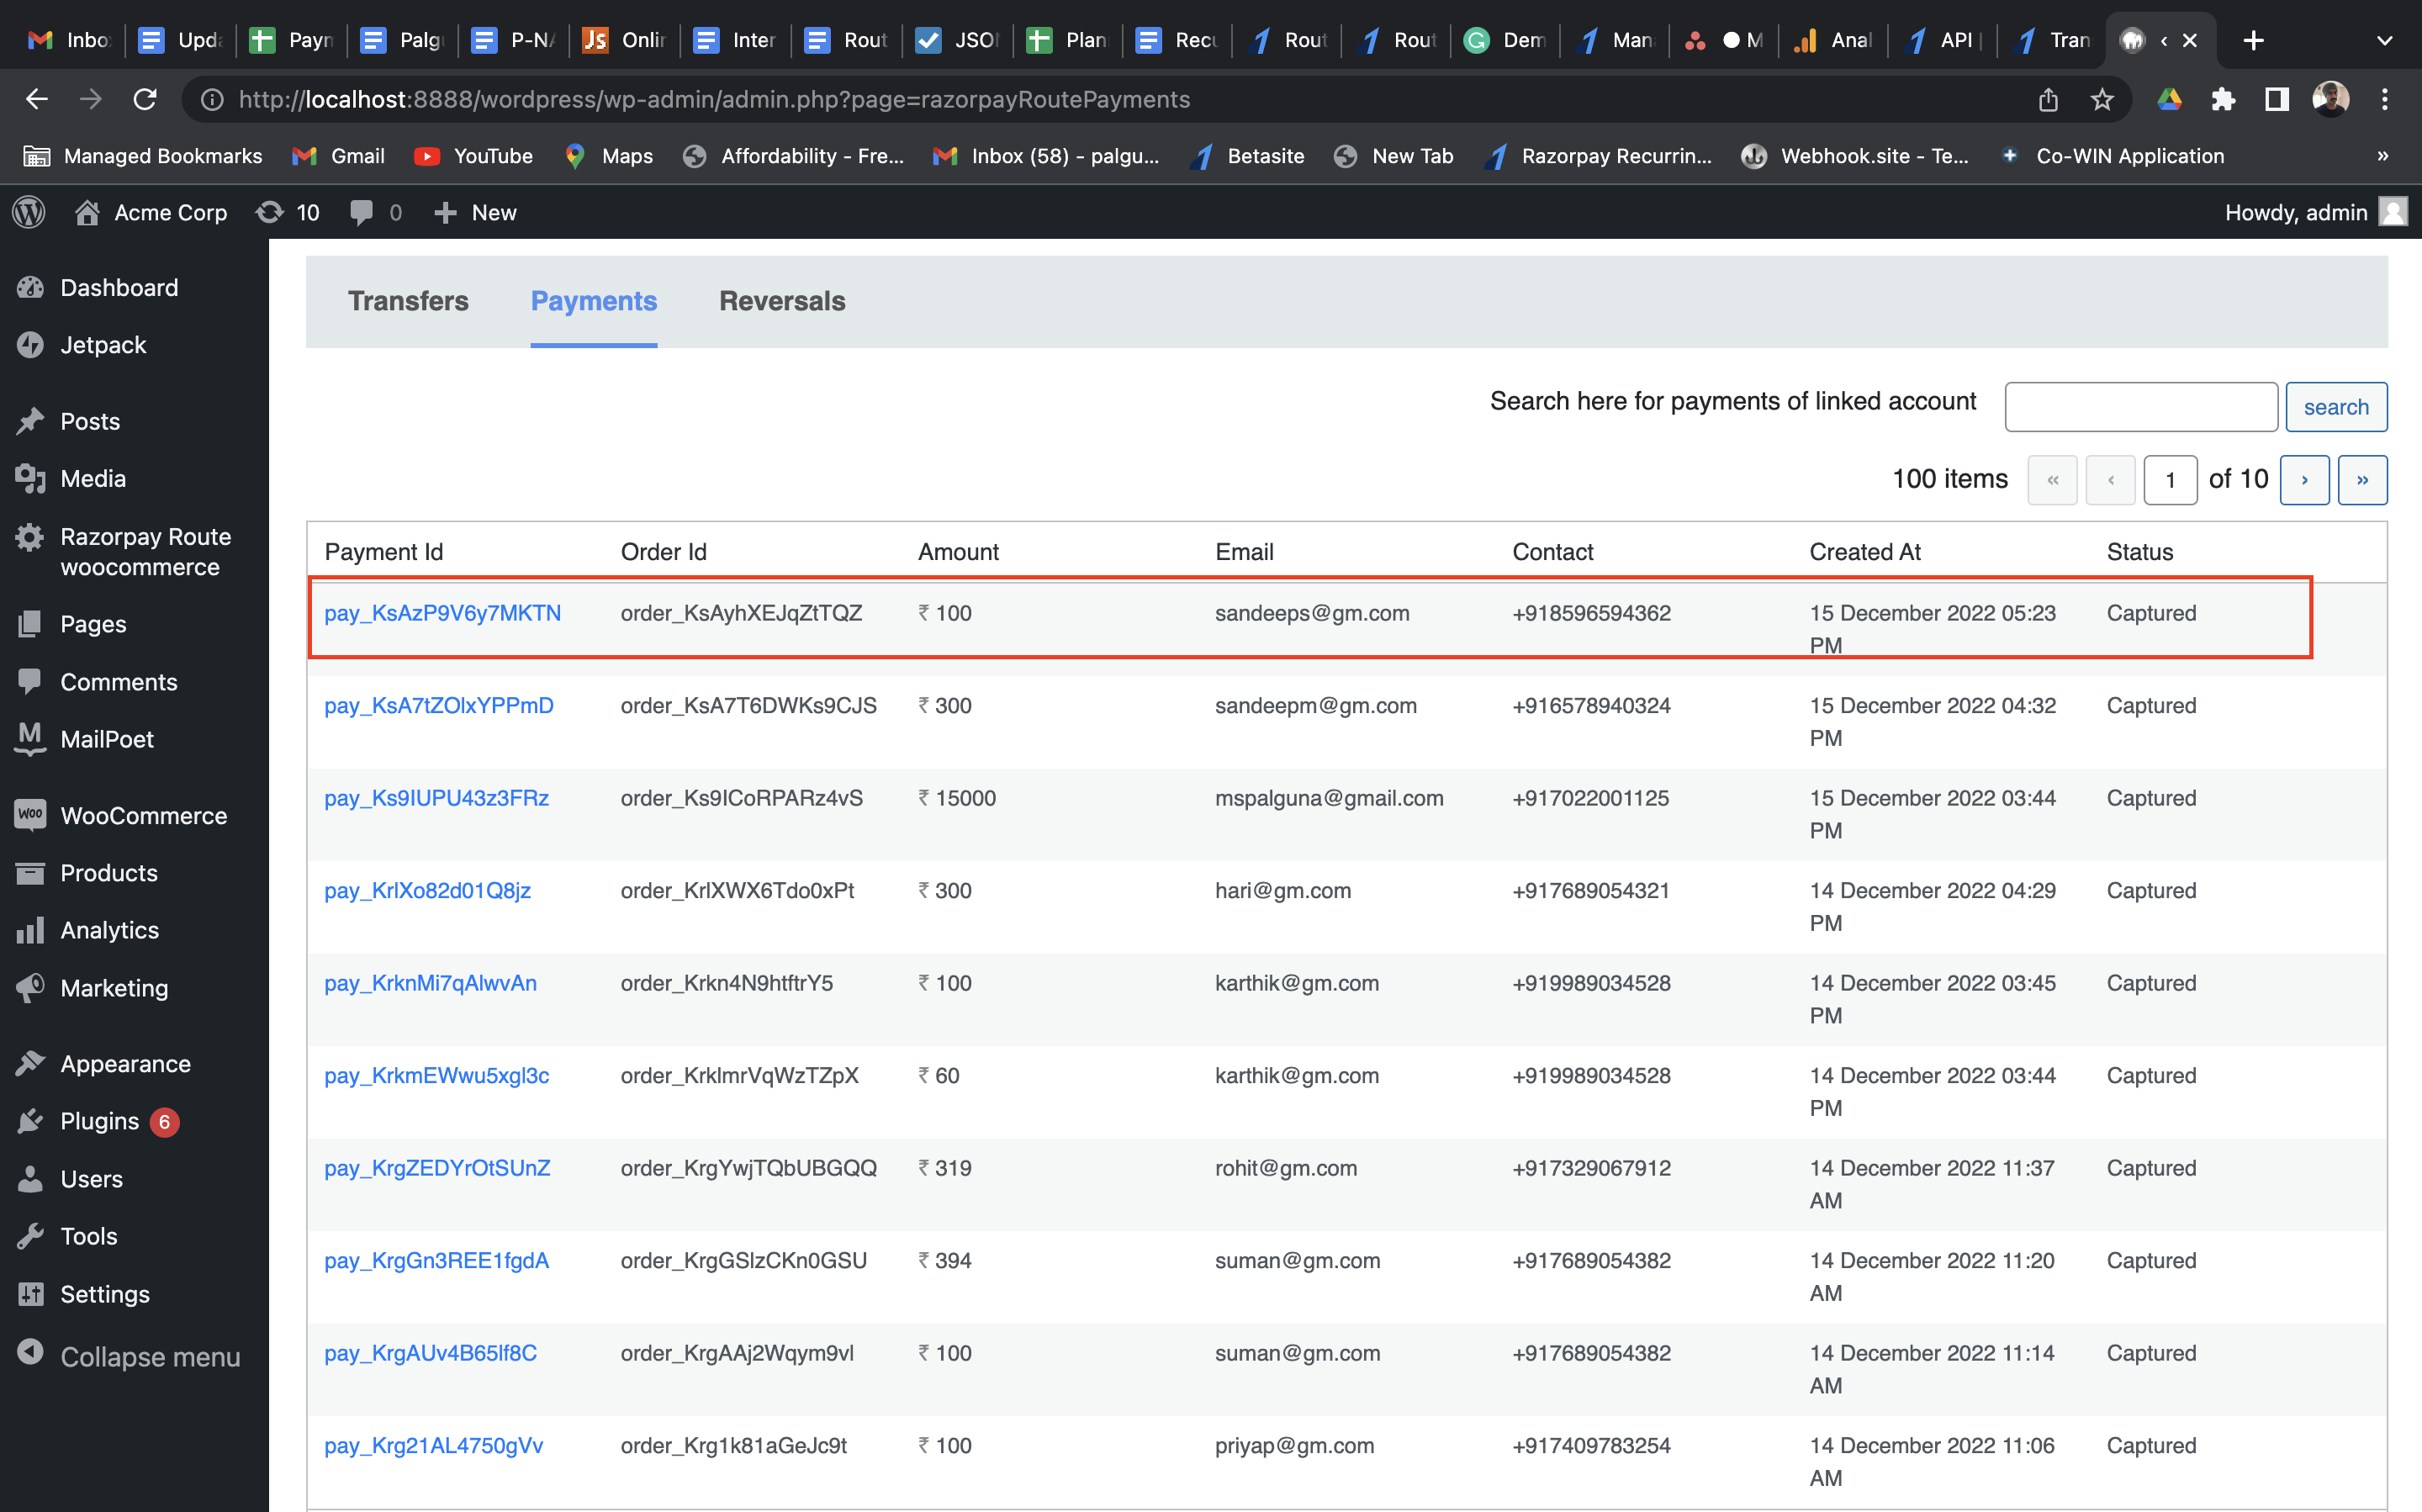
To verify the payment status:- Log in to the WordPress Admin Dashboard and navigate to Razorpay Route woocommerce → Payments.
- Check if a Payment Id has been generated and note the status. In case of a successful payment, the status is marked as Captured. Know more about various payment states.
Direct Transfers
Direct Transfers
Given below are the steps to directly transfer funds to Linked Accounts from a WooCommerce-based website using Razorpay Route.
Feature RequestThis is an on-demand feature. Please raise a request with our Support team to get this feature activated on your Razorpay account.
1 Enable Route Module On WordPress Site
1 Enable Route Module On WordPress Site
To enable Route Module:
- Log in to the WordPress Admin Dashboard and navigate to WooCommerce → Settings.
- Go to Payments and click Razorpay – Credit Card/Debit Card/NetBanking.
- Enable the Route Module on the Razorpay Payment Gateway page and click Save Changes.
2 Create a Direct Transfer on WordPress Site
2 Create a Direct Transfer on WordPress Site
You can create a Direct Transfer from the WordPress Admin Dashboard. The transfer amount will be deducted from your account.To create Direct Transfers: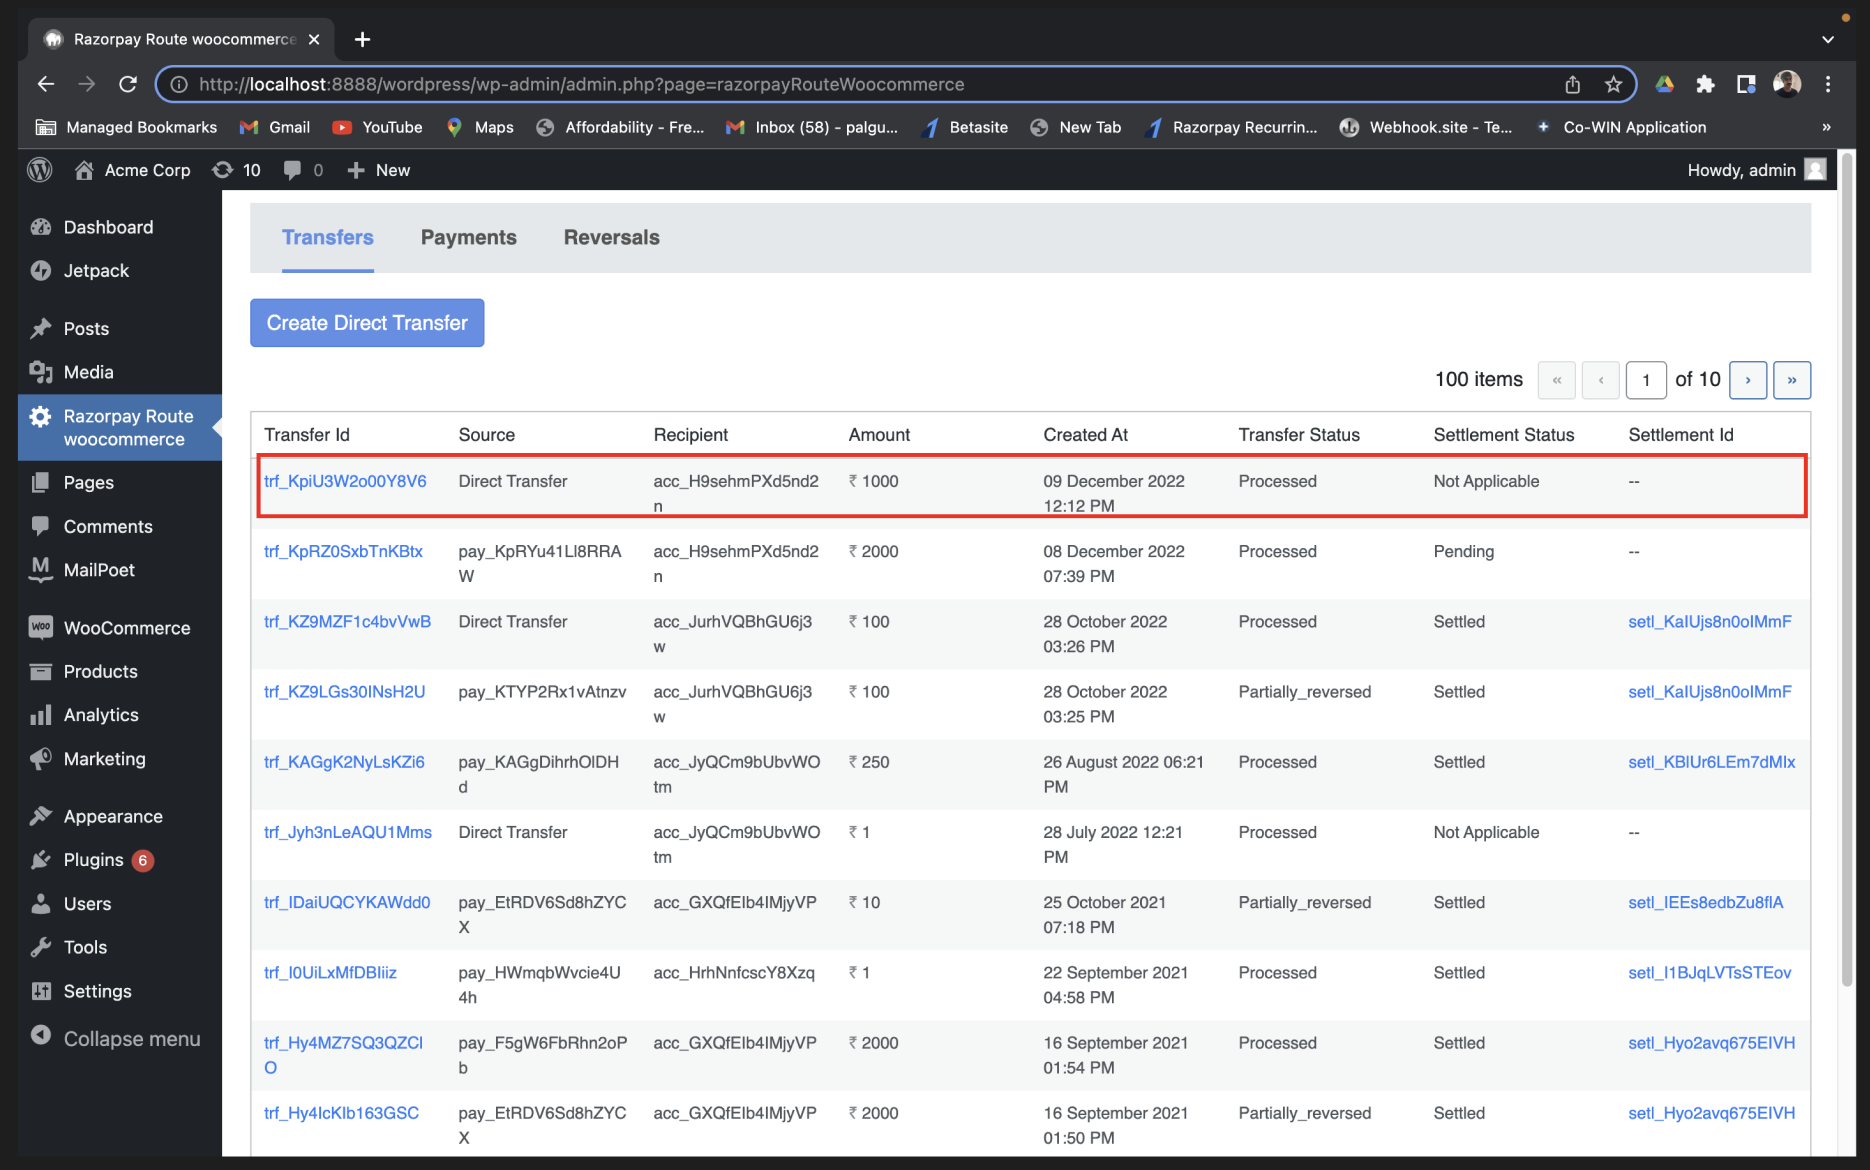
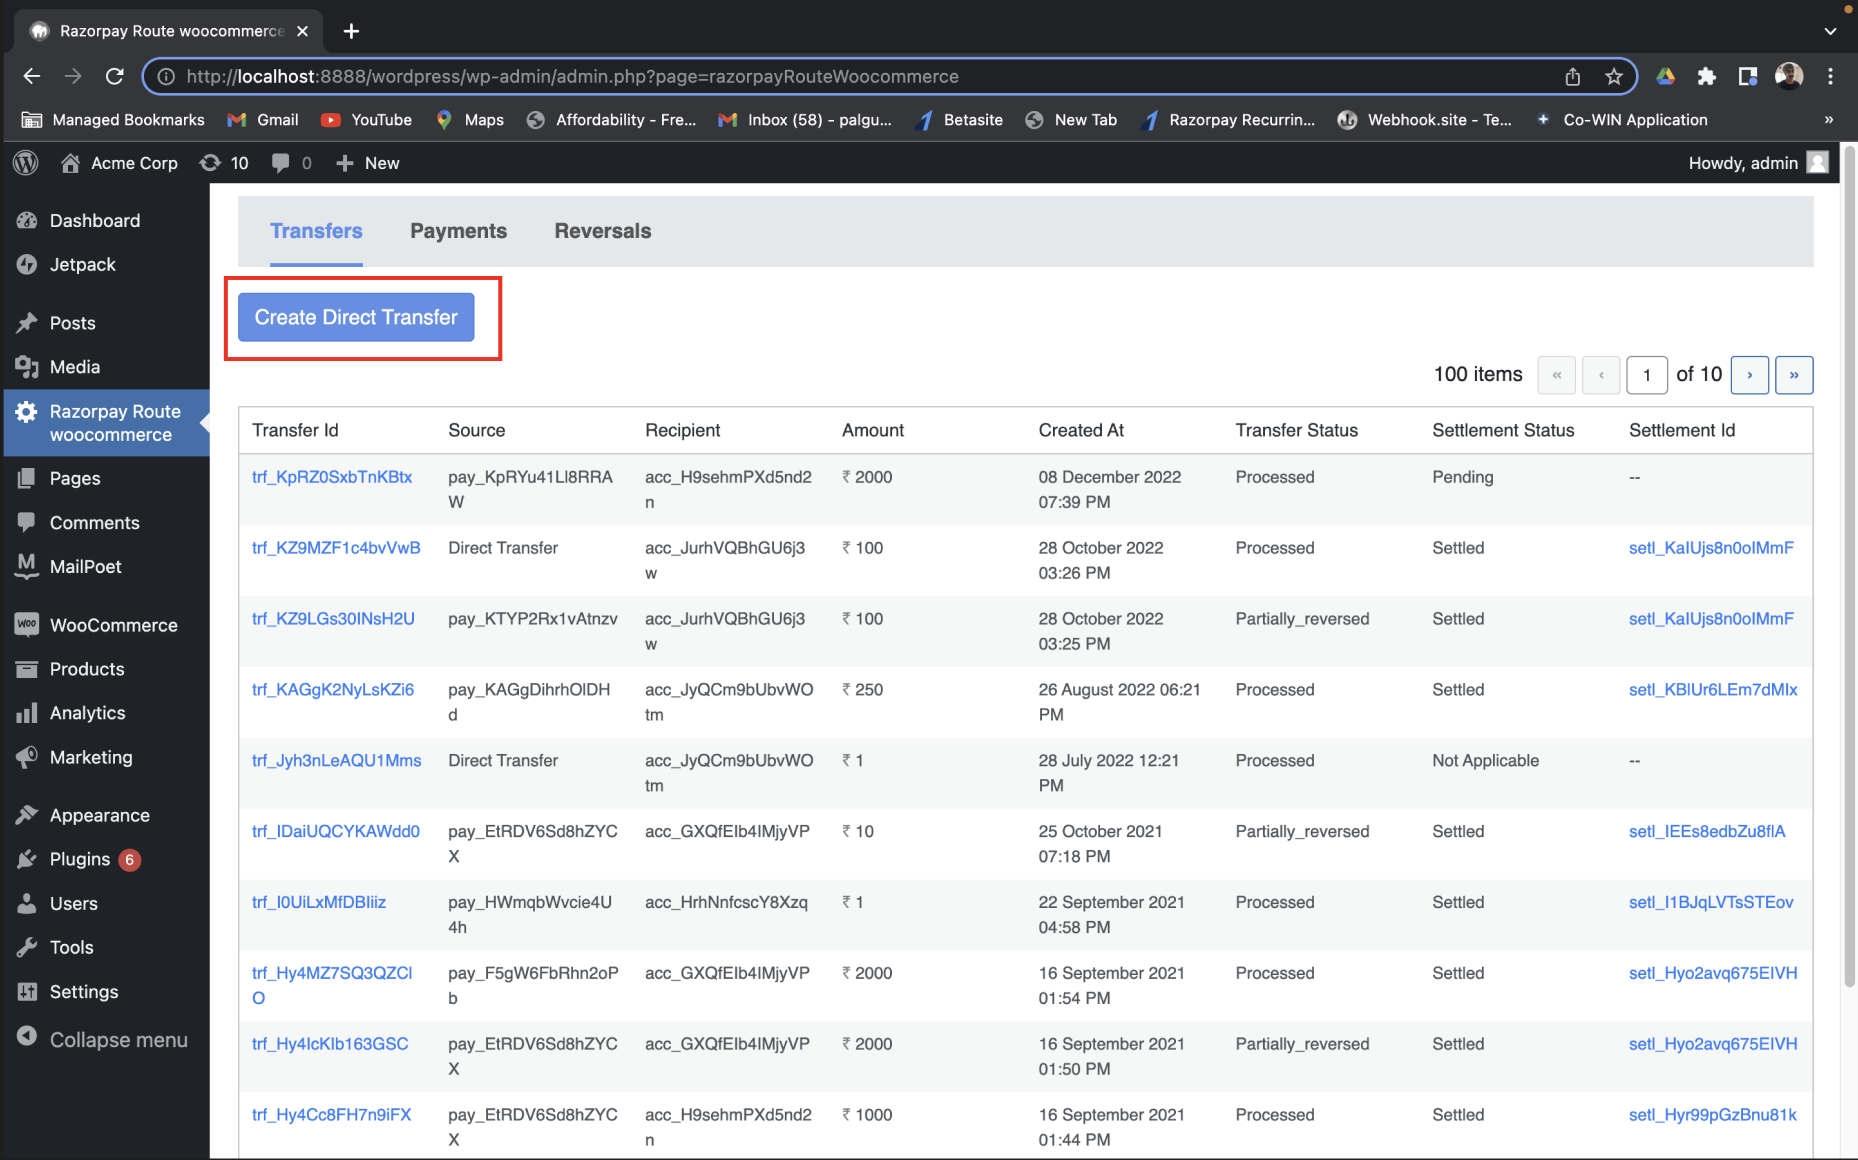
- Log in to the WordPress Admin Dashboard and click Razorpay Route woocommerce.
- Click Create Direct Transfer.
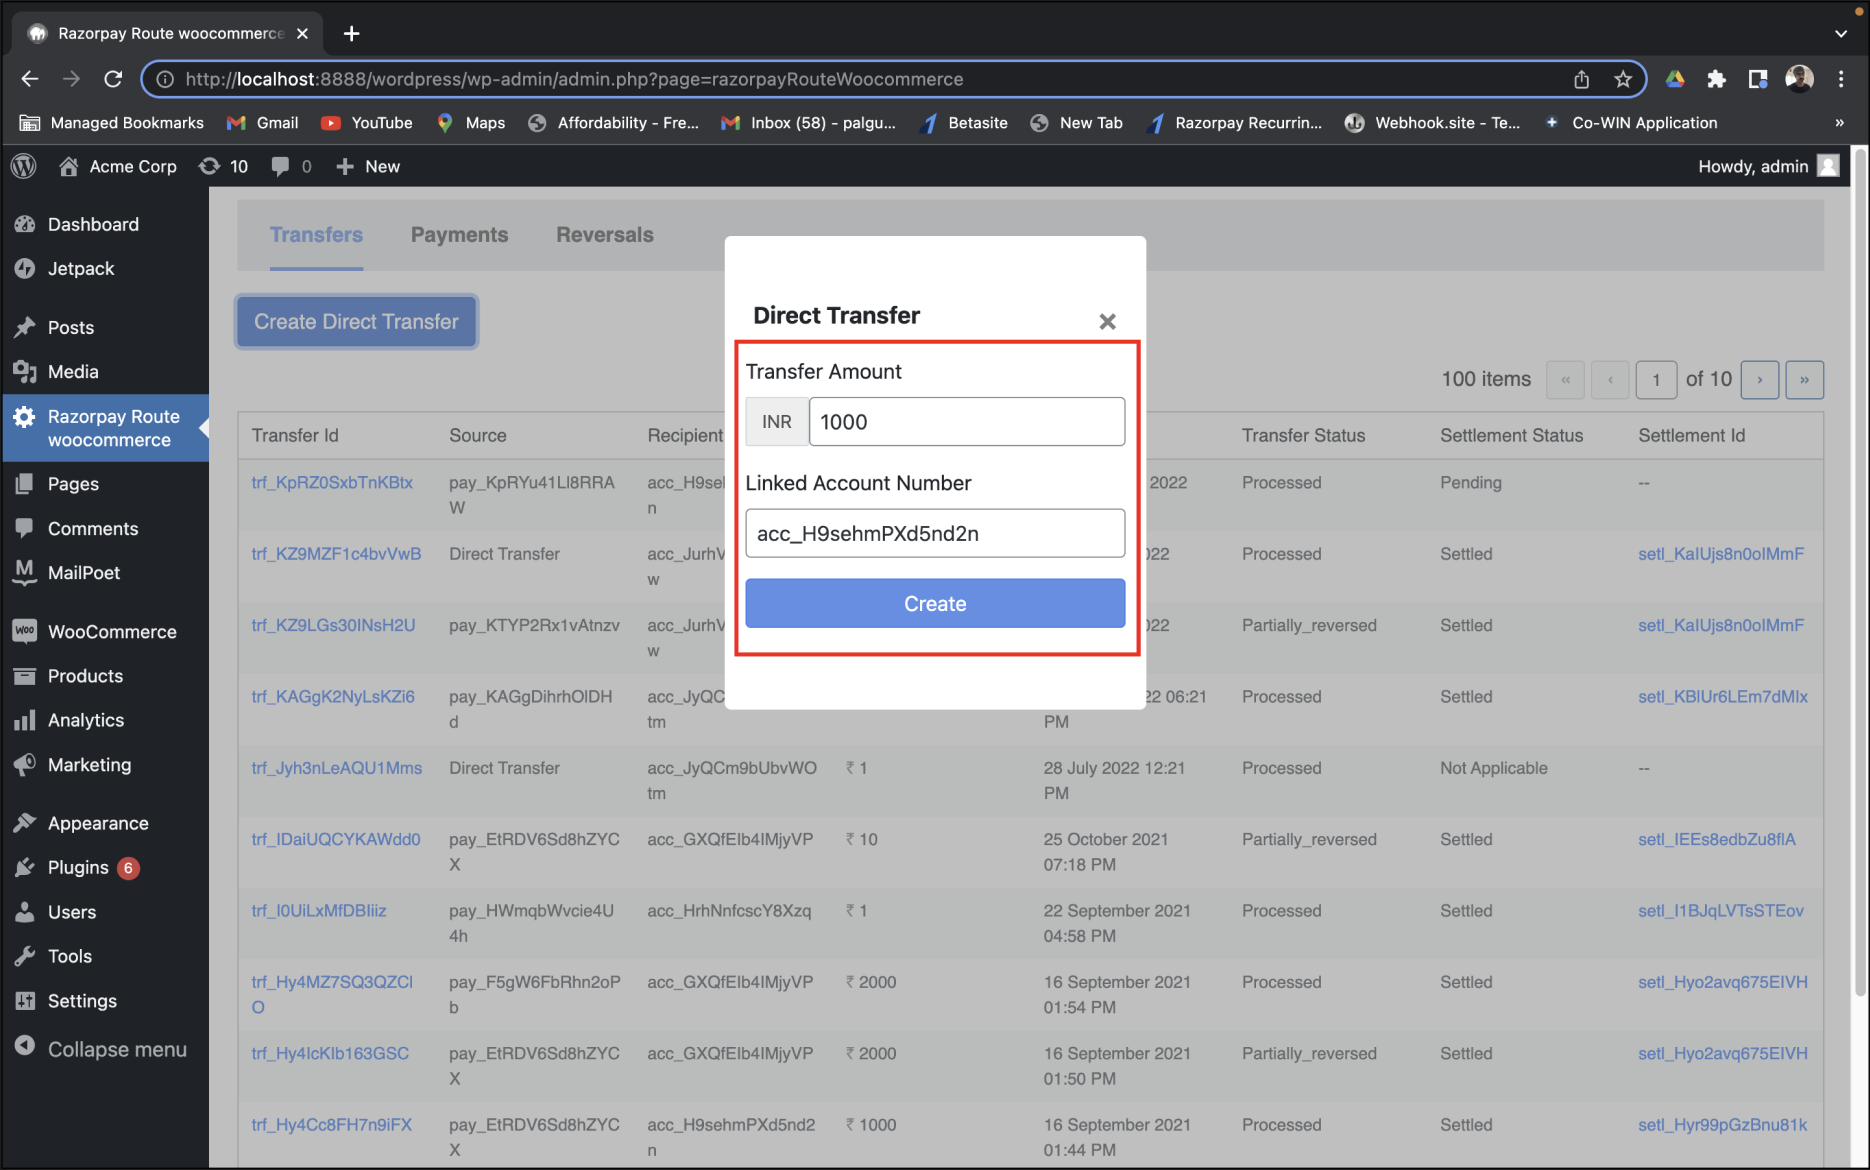
- Enter the Transfer Amount and Linked Account Number to create a Transfer.
- Click Create.
3 Enable Webhooks on Dashboard
3 Enable Webhooks on Dashboard
These 3 webhooks are auto-configured for the Route Module:
transfer.processedsettlement.processedtransfer.failed
2. Test Integration
After completing the integration, you can simulate a test payment transfer. After the test is successful, you can start accepting real-time payments and transferring them to linked accounts.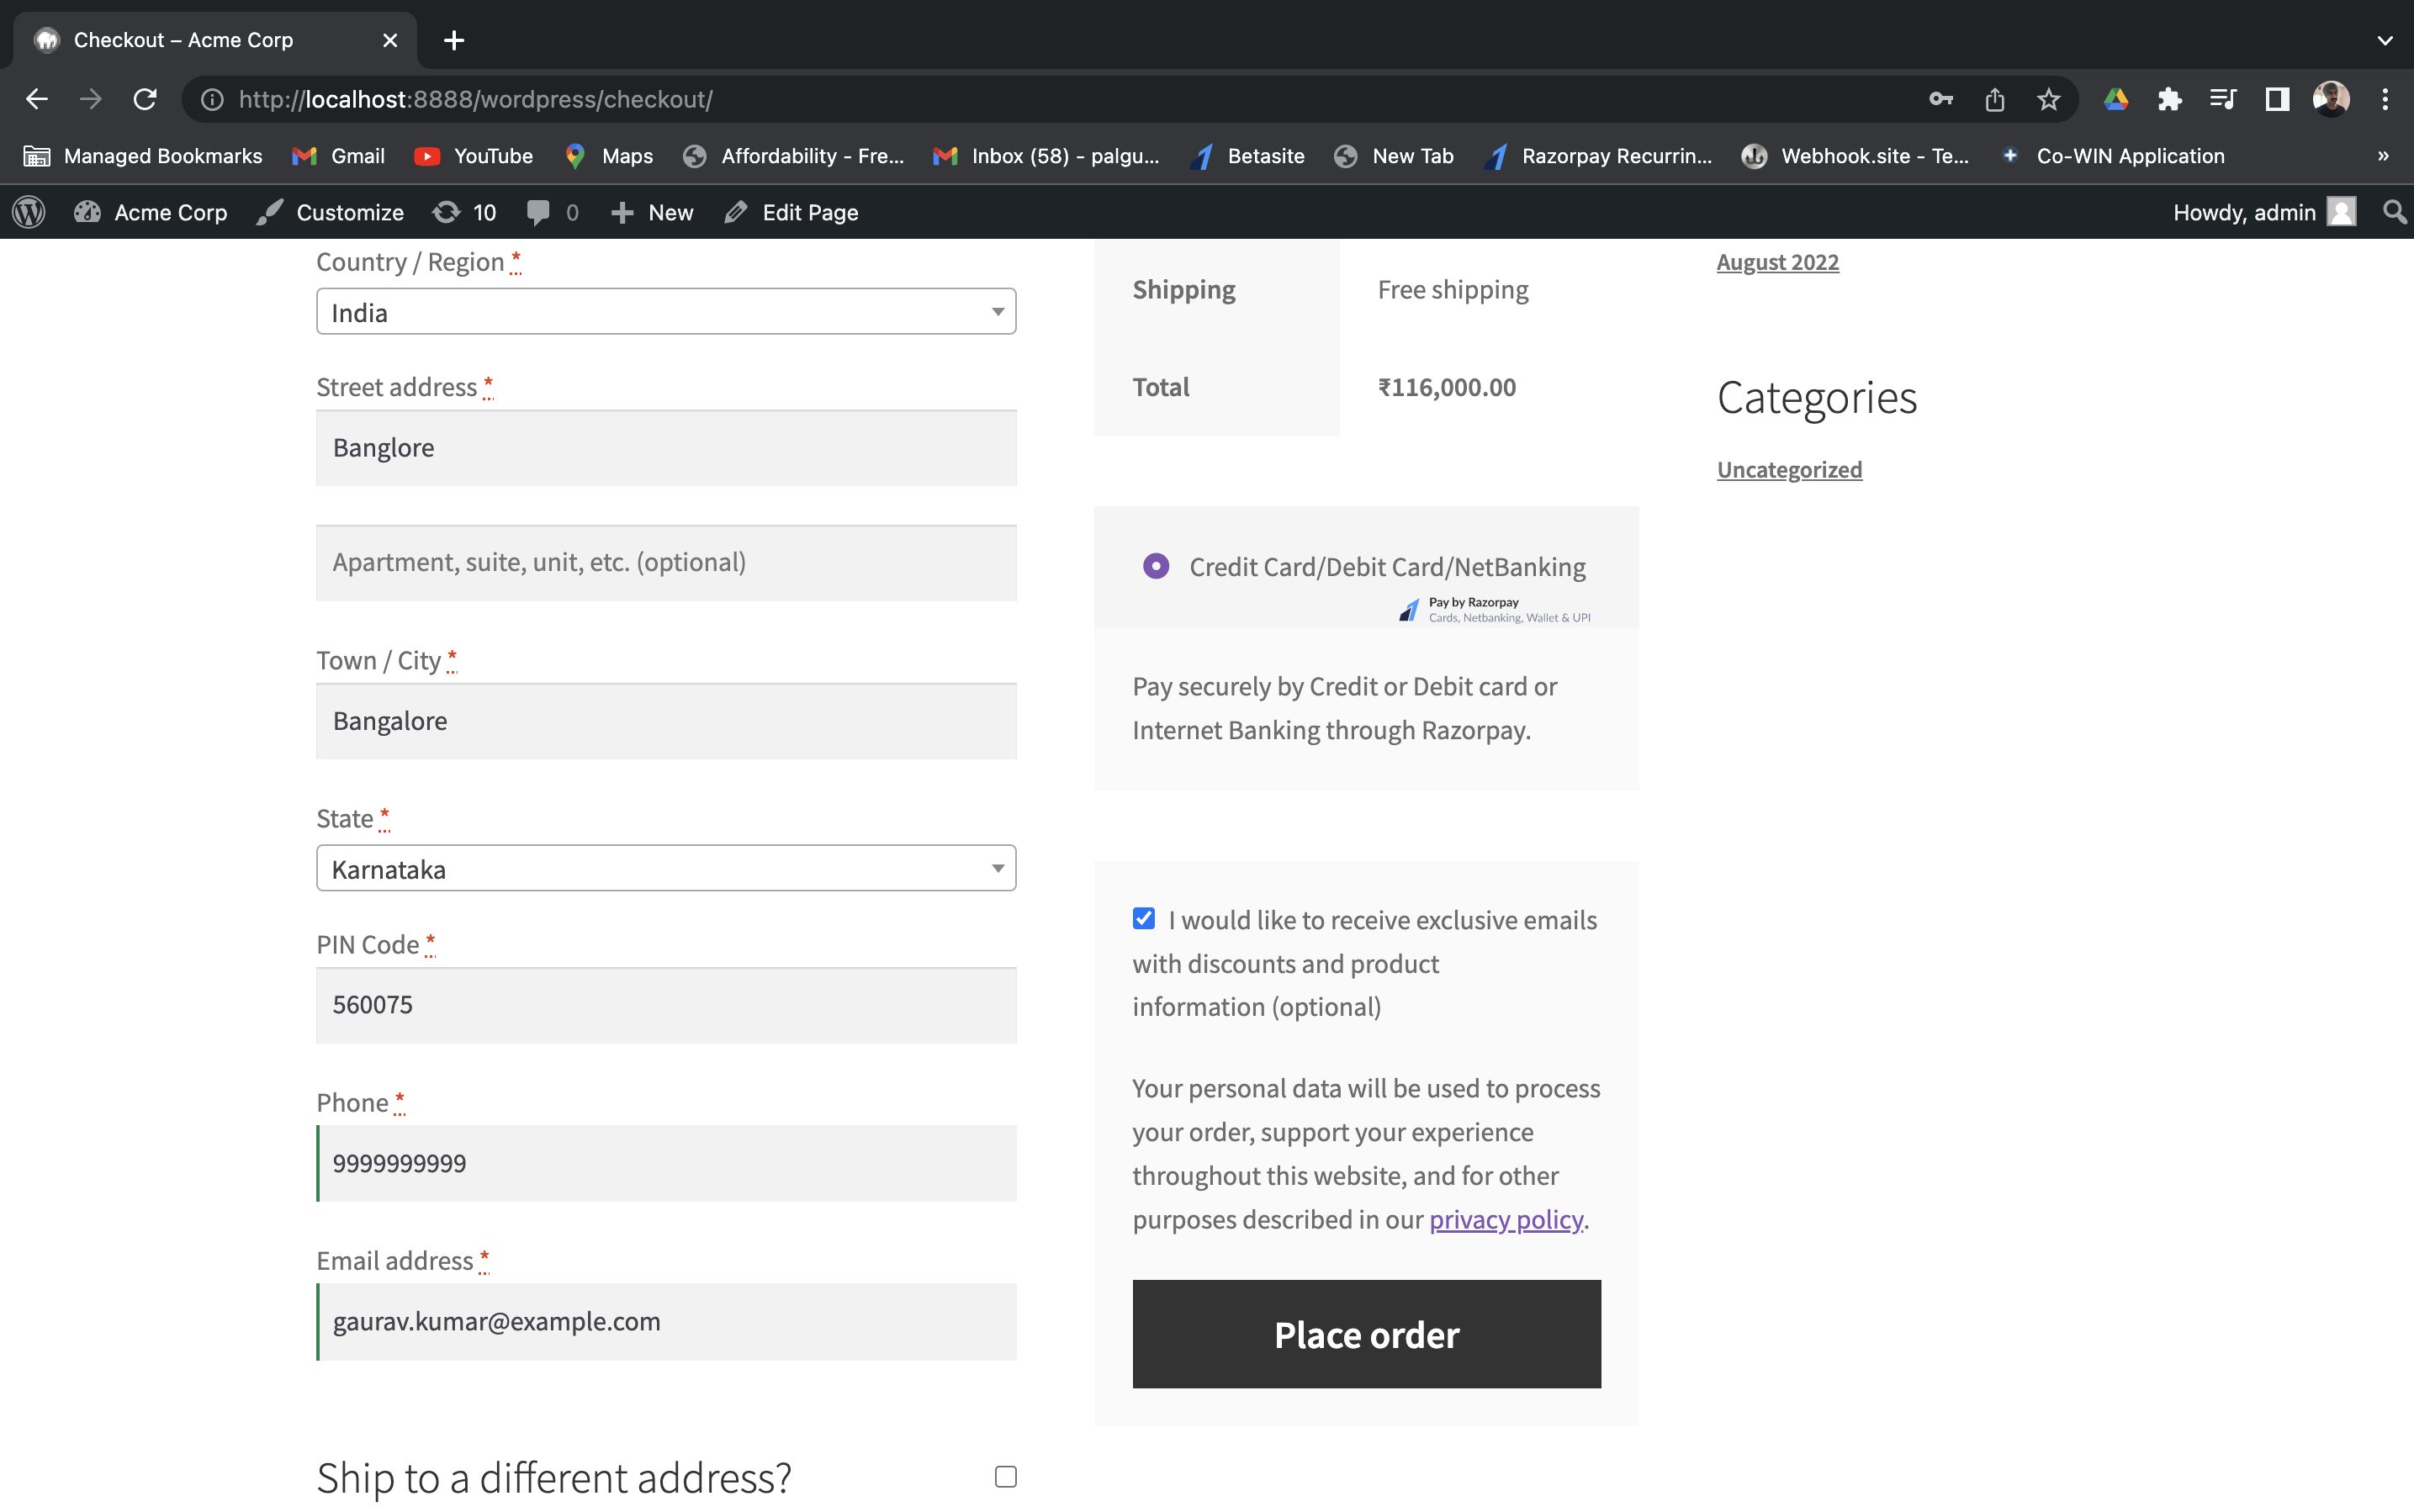
1 UPI/Test Cards
1 UPI/Test Cards
UPI IDs
You can enter one of the following UPI IDs:success@razorpay: To make the payment successful.failure@razorpay: To fail the payment.
Handy TipsYou can use Test Mode to test UPI payments, and Live Mode for UPI Intent and QR payments.
Test Cards
You can use one of the test cards to make transactions in the test mode. Use any valid expiration date in the future and any random CVV to create a successful payment.2 View Test Transfer Details
2 View Test Transfer Details
You can check the test transfer details on the WordPress Admin Dashboard after the transaction is successful.To check the test transfer:
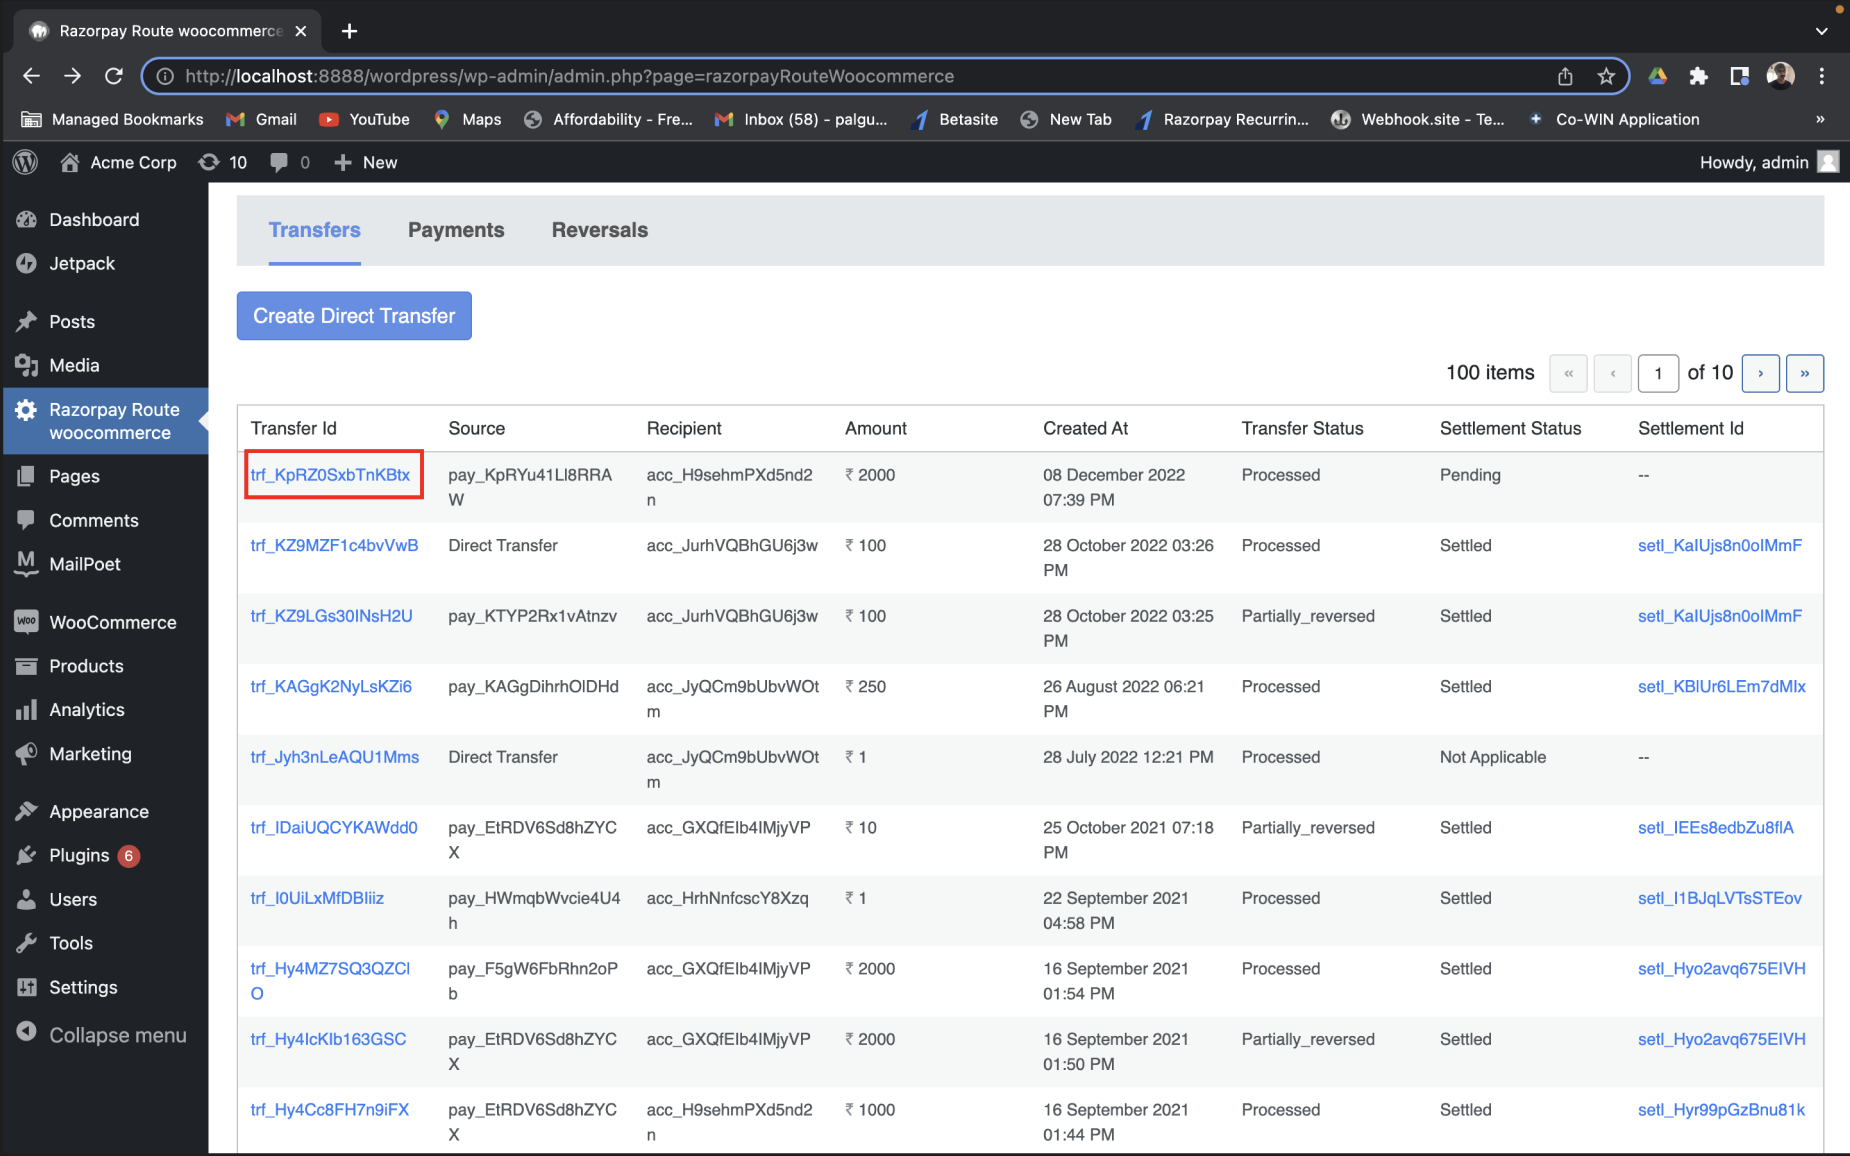
- Log in to the WordPress Admin Dashboard and click Razorpay Route woocommerce from the left menu. The list of recent transfers is displayed.
- Click the recent Transfer Id to view the details.
3. Go-Live Checklist
You can perform an end-to-end simulation of funds flow in the Test Mode. Once you are confident that the integration is working as expected, switch to Live Mode to accept live payments and transfer them to Linked Accounts.1 Create Linked Accounts
1 Create Linked Accounts
You should create Linked Accounts in Live Mode to transfer live payments. Watch this video to create a Linked Account in Live Mode.
To create a Linked Account:
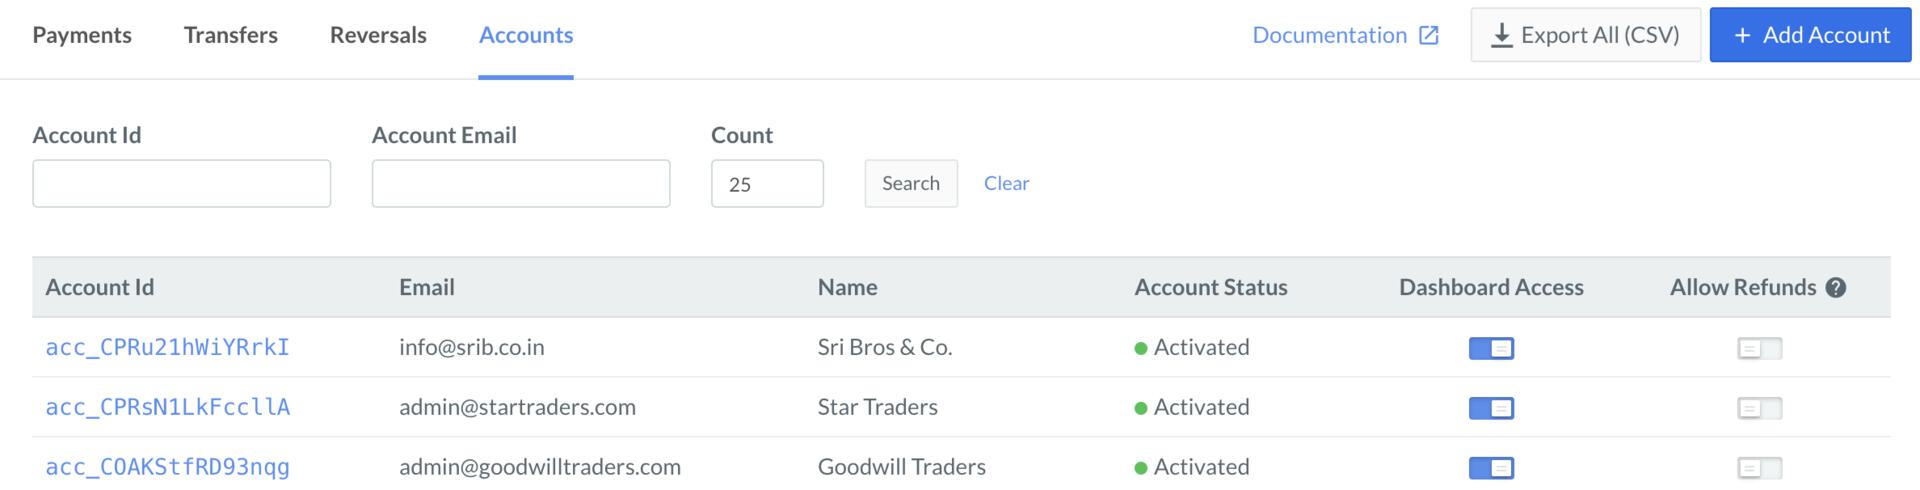
- Log in to the Dashboard and click the Route menu.
-
Click Accounts tab, and then click + Add Account.
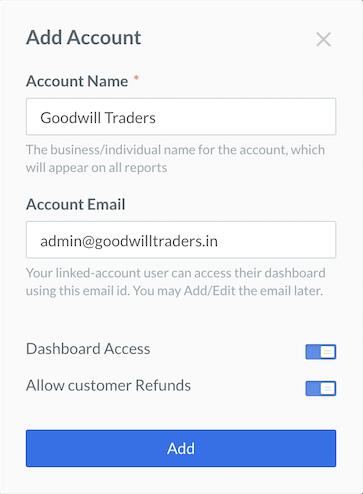
- Enter the Account Name and Account Email in the Add Account pop-up page.
- If you want to enable the Dashboard access for the Linked Account, turn on the toggle bar.
-
Click Add.
-
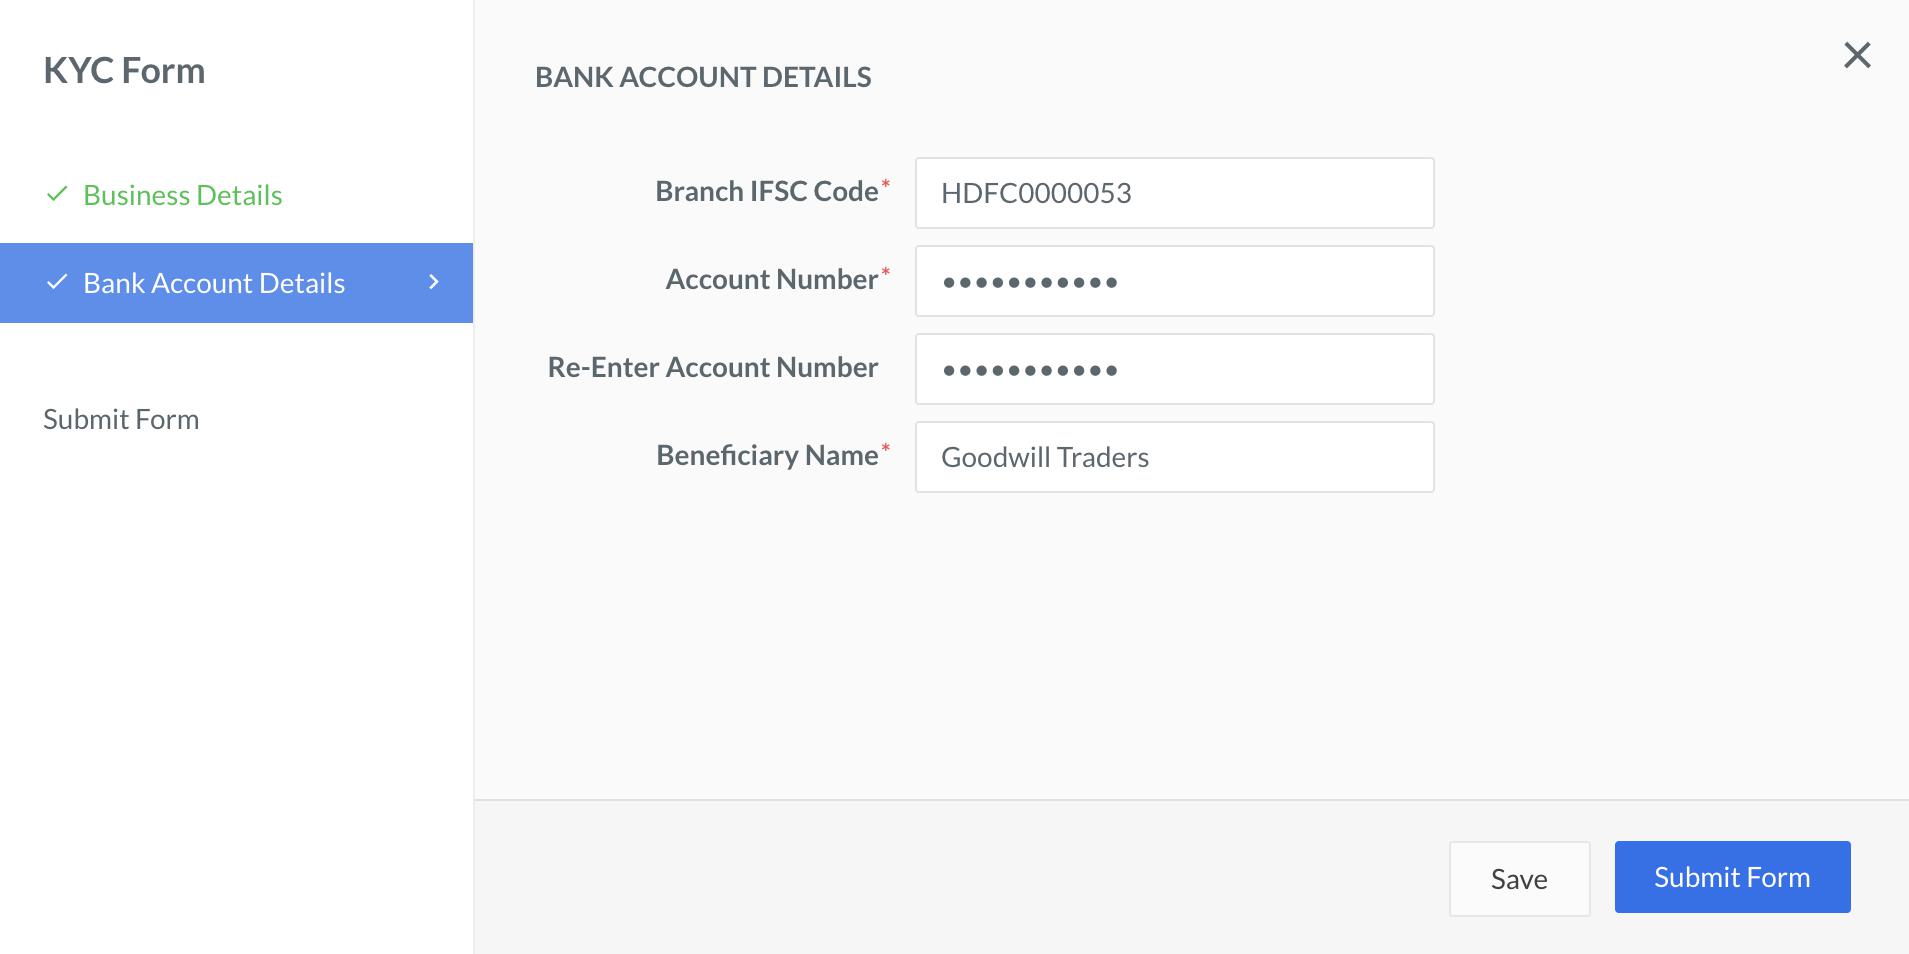
On the KYC Form pop-up page, enter Business Details and Bank Account Details, and then click Submit Form.
2 Generate an API Key in Live Mode
2 Generate an API Key in Live Mode
To generate an API Key in Live Mode:
- Log in to the Dashboard and switch to Live Mode on the menu.
- Navigate to Account & Settings → API Keys → Generate Key to generate the API Key for Live Mode.
- Download the keys and save them securely.
- Replace the Test API Key with the Live Key in the WordPress Dashboard and accept actual payments.
Key_ID and Key_Secret to accept payments from your customers and route them to the involved third parties using Route.