

Available in🇮🇳 India
Xpress onboarding allows partners to quickly onboard sub-merchants to accept payments on Razorpay with minimal KYC.
How it Works
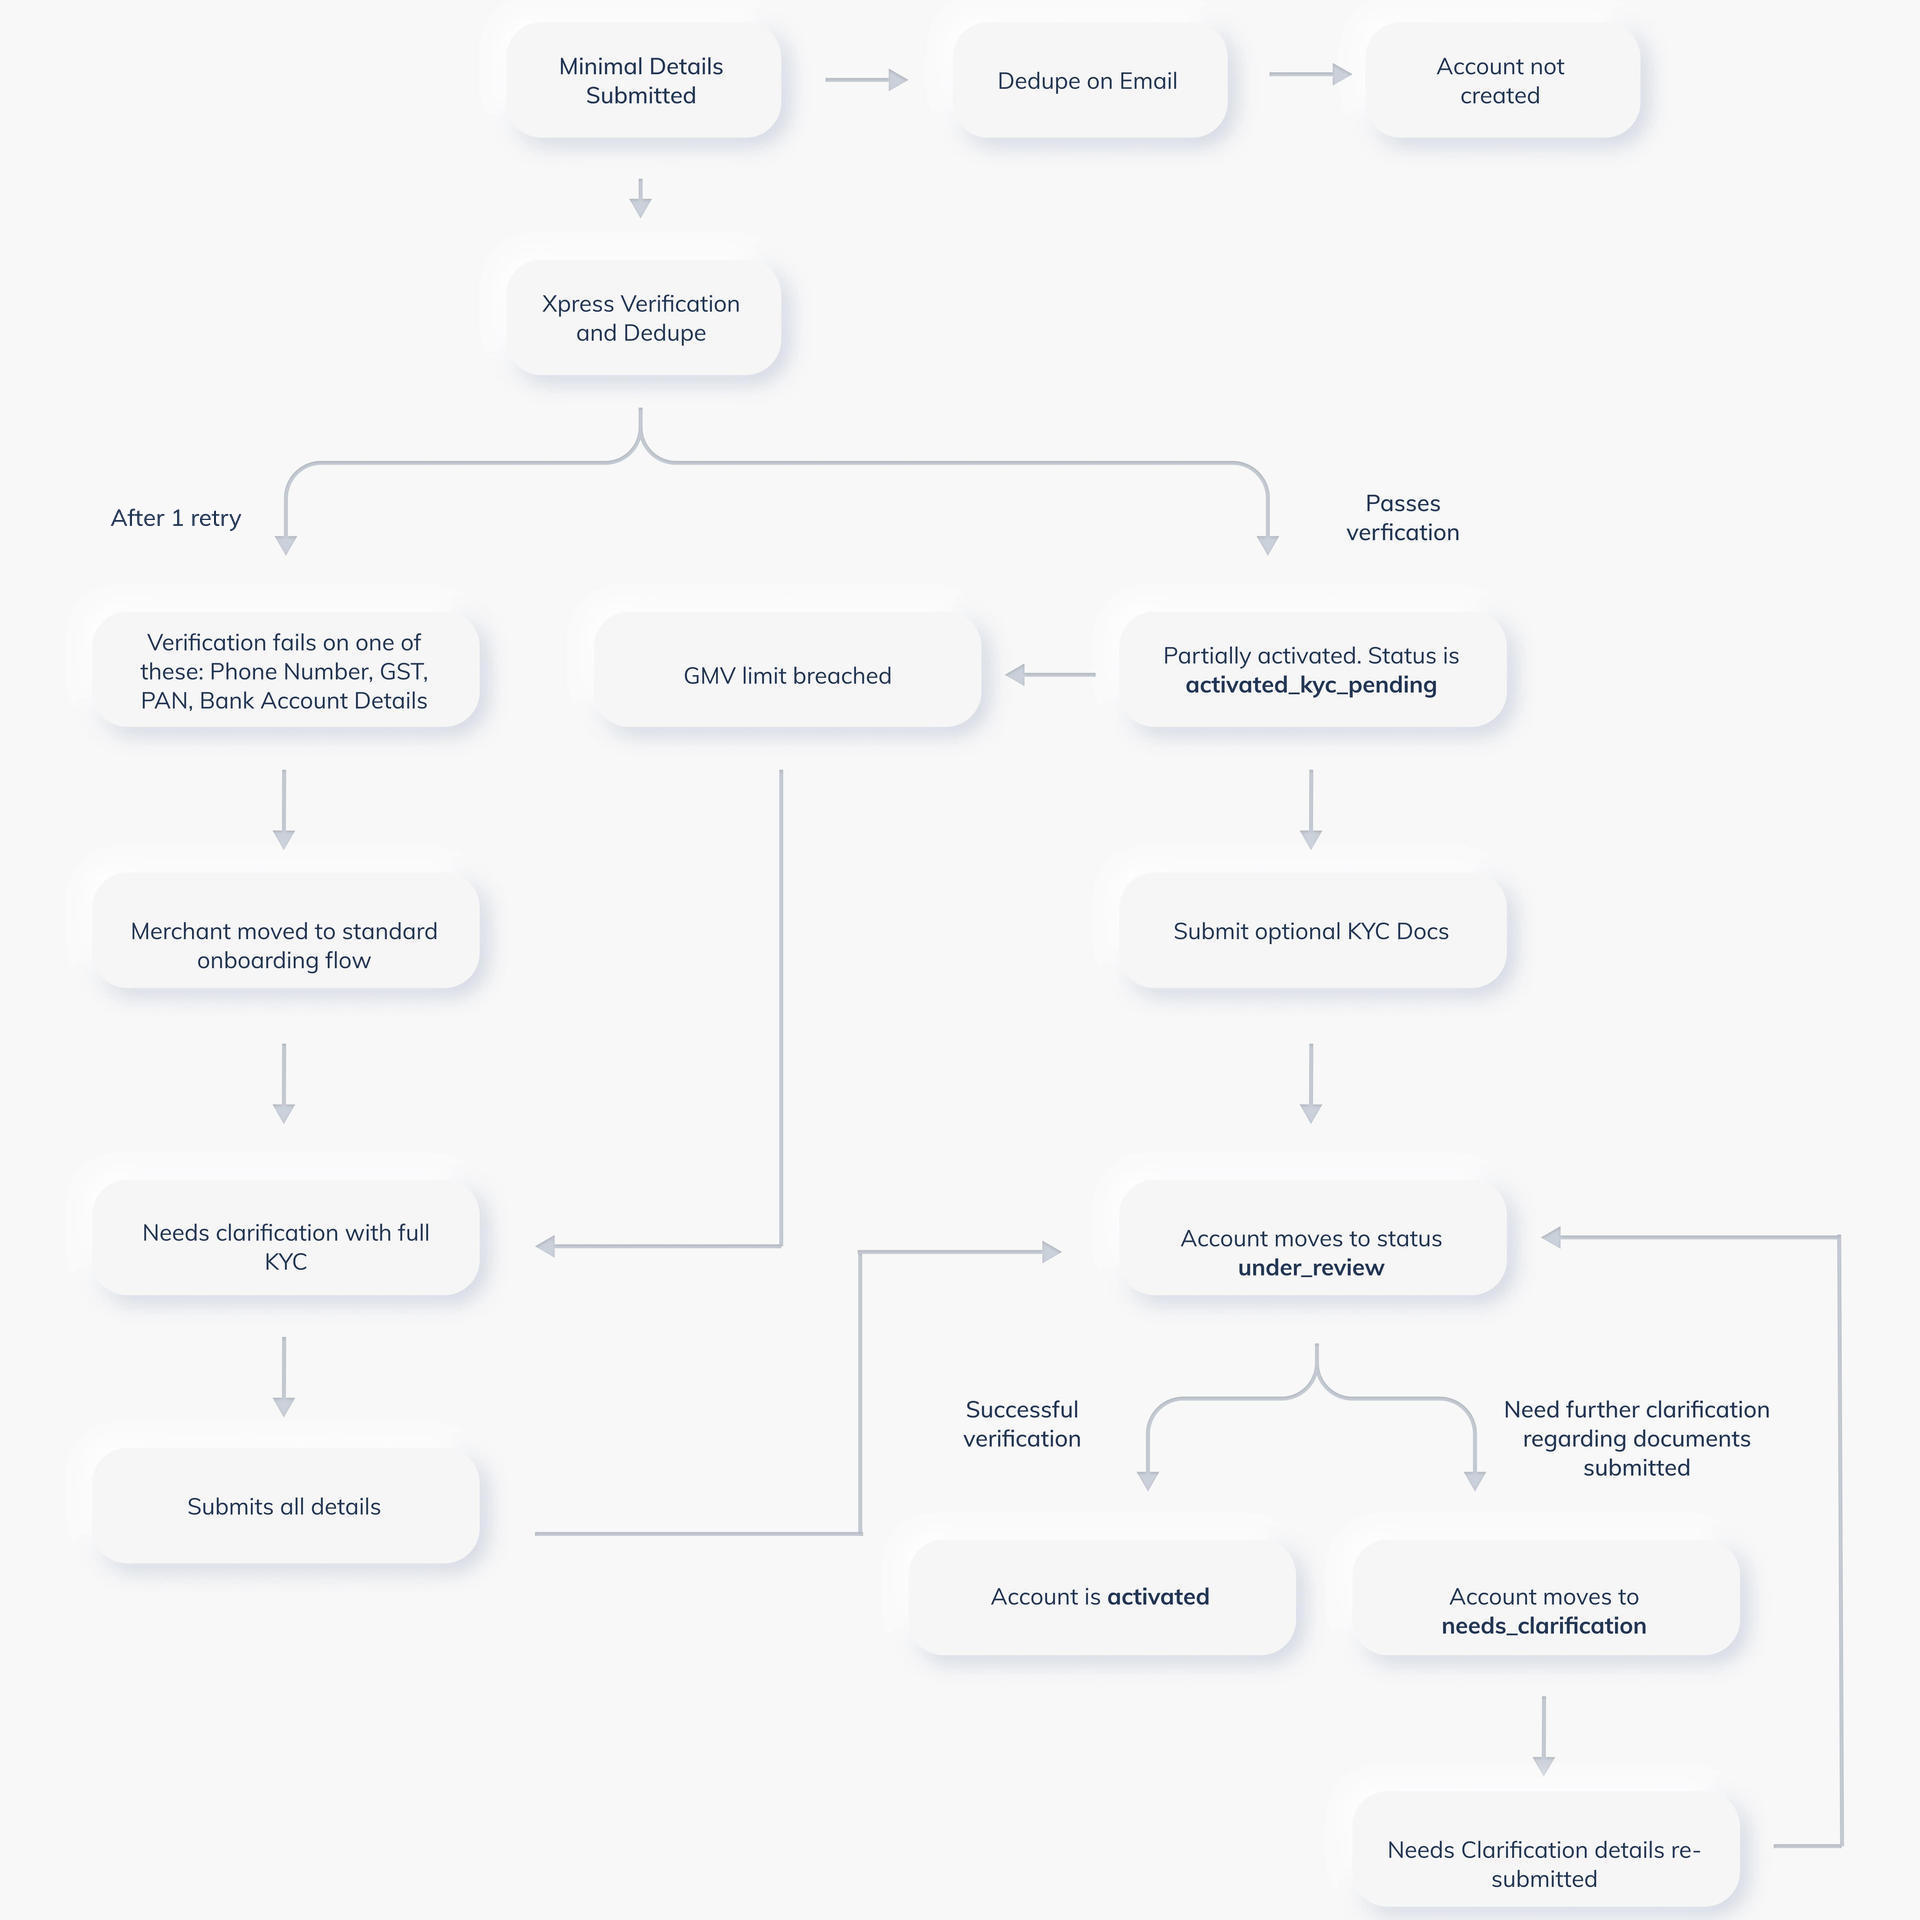
Razorpay partially activates the account after verifying the KYC submitted.- The sub-merchant needs to submit the following minimum KYC details along with the other business details :
-
Razorpay verifies the KYC details and partially activates the sub-merchant account. The account moves to
activated_kyc_pendingstate. The sub-merchant can start accepting payments up to GMV (Gross Merchandise Value) limit of ₹50,000 (or ₹5,00,000 if GST verified) using Payment Links and QR Codes. -
The sub-merchant can submit the rest of the KYC documents while the account is in
activated_kyc_pendingstate. -
Razorpay team reviews the submitted details. Based on the evaluation, the account can move to either of these states:
-
needs_clarificationandunder_review: Your sub-merchant can accept payments and receive settlements, upto the GMV limit. If limits are breached, the payments and settlements are put on hold. -
activated: If account is successfully activated, the breach limits are removed for payments and settlements. -
suspended: Payments and settlements are put on hold. Please reach out to Razorpay support for the next steps.
-
Example
ABC Inc. is an ERP software company, that wants to onboard their customer Acme Corp (an ecommerce business that sells books) as a sub-merchant to accept payments. ABC Inc. should sign up as a Razorpay partner and then use our onboarding APIs to create Acme Corp’s sub-merchant account by providing the relevant details and documents. Our team will review the submitted details and change the account state as applicable.Prerequisites
- Sign up as Partner and complete KYC to activate your account.
- Generate
client_idandclient_secretto authenticate APIs calls for both test mode or live mode.
Workflow
Given below is a diagram that illustrates the various steps in the workflow. The document requirements are visible in the array.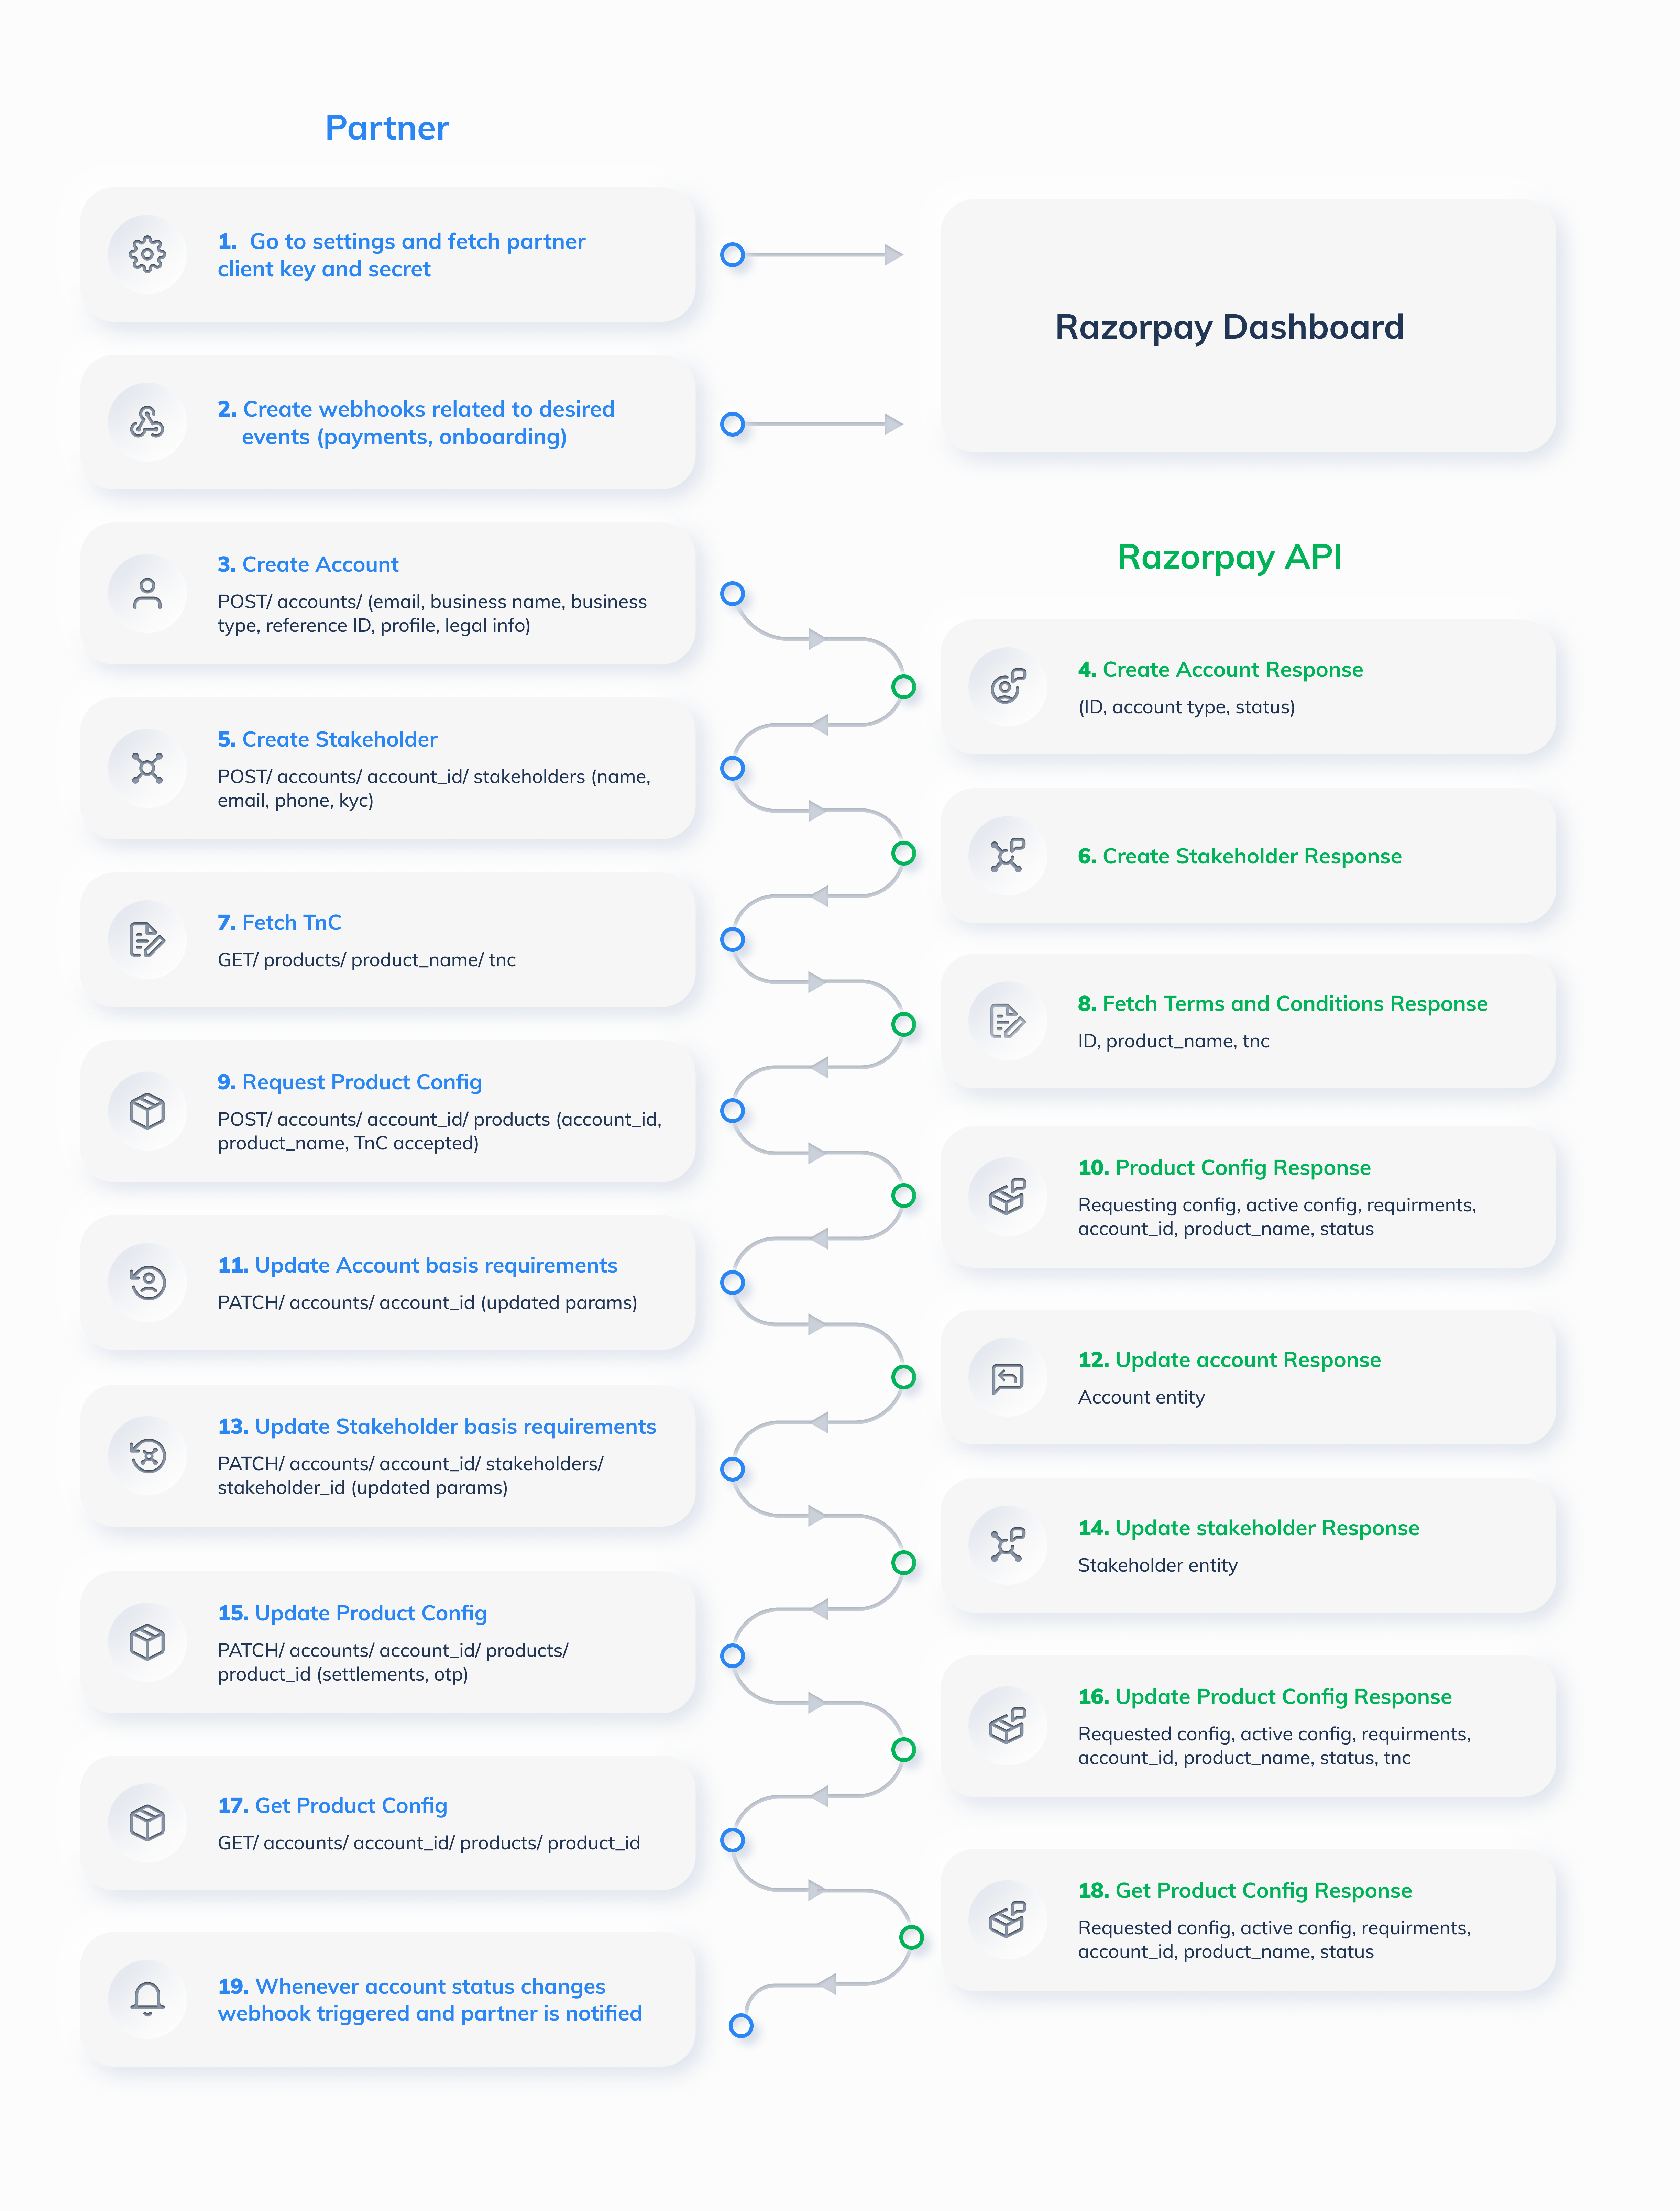
1. Create an Account
Create an account for the sub-merchant using the Create an Account API by passing theno_doc_onboarding=true parameter. This triggers the Xpress Onboarding flow.
Available Account APIs
Available Account APIs
2. Create a Stakeholder
Use the Create a Stakeholder API to add a stakeholder for an account. Each stakeholder needs to update the KYC.Available Stakeholder APIs
Available Stakeholder APIs
3. View and Accept Terms and Conditions
Before activating the sub-merchant and requesting for relevant product configurations, the sub-merchant needs to view and accept the Terms and Conditions. You can fetch these Terms and Conditions links using the Fetch Terms and Conditions API to share them with the sub-merchant. You can also accept Terms and Conditions for the sub-merchant using the Request a Product Configuration API.Available Terms and Conditions APIs
Available Terms and Conditions APIs
4. Configure Products to Accept Payments
You can use the Product Configuration APIs to configure and activate Razorpay products for a sub-merchant account according to their requirements.Available Product Configuration APIs
Available Product Configuration APIs
5. Upload Supporting Documents
You can submit the required documents for sub-merchant onboarding using the Documents APIs listed in the table below.Available Documents APIs
Available Documents APIs
6. Subscribe to Webhooks
Subscribe to relevant webhook events to receive notifications (in the form of a webhook payload) when these events occur. There are 2 types of events:- Transaction Events: These are events related to payment transactions performed by the sub-merchants. You can configure these events at a sub-merchant level. View webhook events and payload details.
- Sub-Merchant Onboarding Events: These events are related to the onboarding status of the sub-merchant. You should configure these at your end. Subscribing to these events will enable you to get the onboarding status of all sub-merchants.
Available Webhook Events and Descriptions
Available Webhook Events and Descriptions
View payload details.
To subscribe to webhook events:
To subscribe to webhook events:
- Log in to the Dashboard.
- Navigate to Partner’s Dashboard → Settings → Webhooks to subscribe to any of the events mentioned in the following section.
- Click Manage.
- In the Webhook Setup pop-up page:
- Enter the URL where you want to receive the webhook payload when an event is triggered. We recommended using an HTTPS URL.
- Enter a Secret for the webhook endpoint. The secret is used to validate that the webhook is from Razorpay.
- In the Alert Email field, enter the email address to which the notifications should be sent in case of webhook failure.
- Select the required events from the list of Active Events.
- Click Create Webhook.
Alerts
Razorpay sends alerts once the sub-merchant GMV is breached. The first webhook event will be triggered when 90% of the GMV is breached. After that, at an increment of 1% a webhook event will be triggered. Given below is the event name and description:Sample Payload
Webhooks APIs
You can use the Webhooks APIs to receive event notifications or subscribe to events happening in a sub-merchant’s account, such as payments, orders, invoices and so on.Available Webhooks APIs
Available Webhooks APIs