

Available in🇮🇳 India
As a Service Partner, you can invite your affiliates to use Razorpay Payments products and RazorpayX powered Current Account. You get a partnership commission when the Sub-merchants perform any transaction using Razorpay products. Know more about partnership commission.
Handy TipsYou can invite your clients to use Razorpay payments. To become a Sub-merchant, the invitee has to accept the invite and create a Razorpay account.
Who is a Sub-merchant
Sub-merchants are the merchants who get onboarded on the Razorpay platform by a Partner. For example, Acme wants to provide an order management solution for its client company “Gekko”. In this scenario, “Gekko” is Acme’s Sub-merchant. Once onboarded, Sub-merchant accounts (Affiliate accounts) must be activated to start collecting or disbursing payments. You can invite your Affiliate partners/Sub-merchants directly using the Dashboard. You can also encourage businesses to sign up for Razorpay products by sharing referral links on social media and instant messengers.Add Sub-merchants Using Email Id
You can invite Sub-merchants using their email id to sign up and register on Razorpay. You can send an invite link to an individual account or multiple accounts.Handy TipsYou can send a maximum of 1,00,000 invites/day. This could be individual invites, bulk invites or a combination of both.
Add One Sub-merchant
To invite a new Sub-merchant using email id:
To invite a new Sub-merchant using email id:
- Log in to the Dashboard.
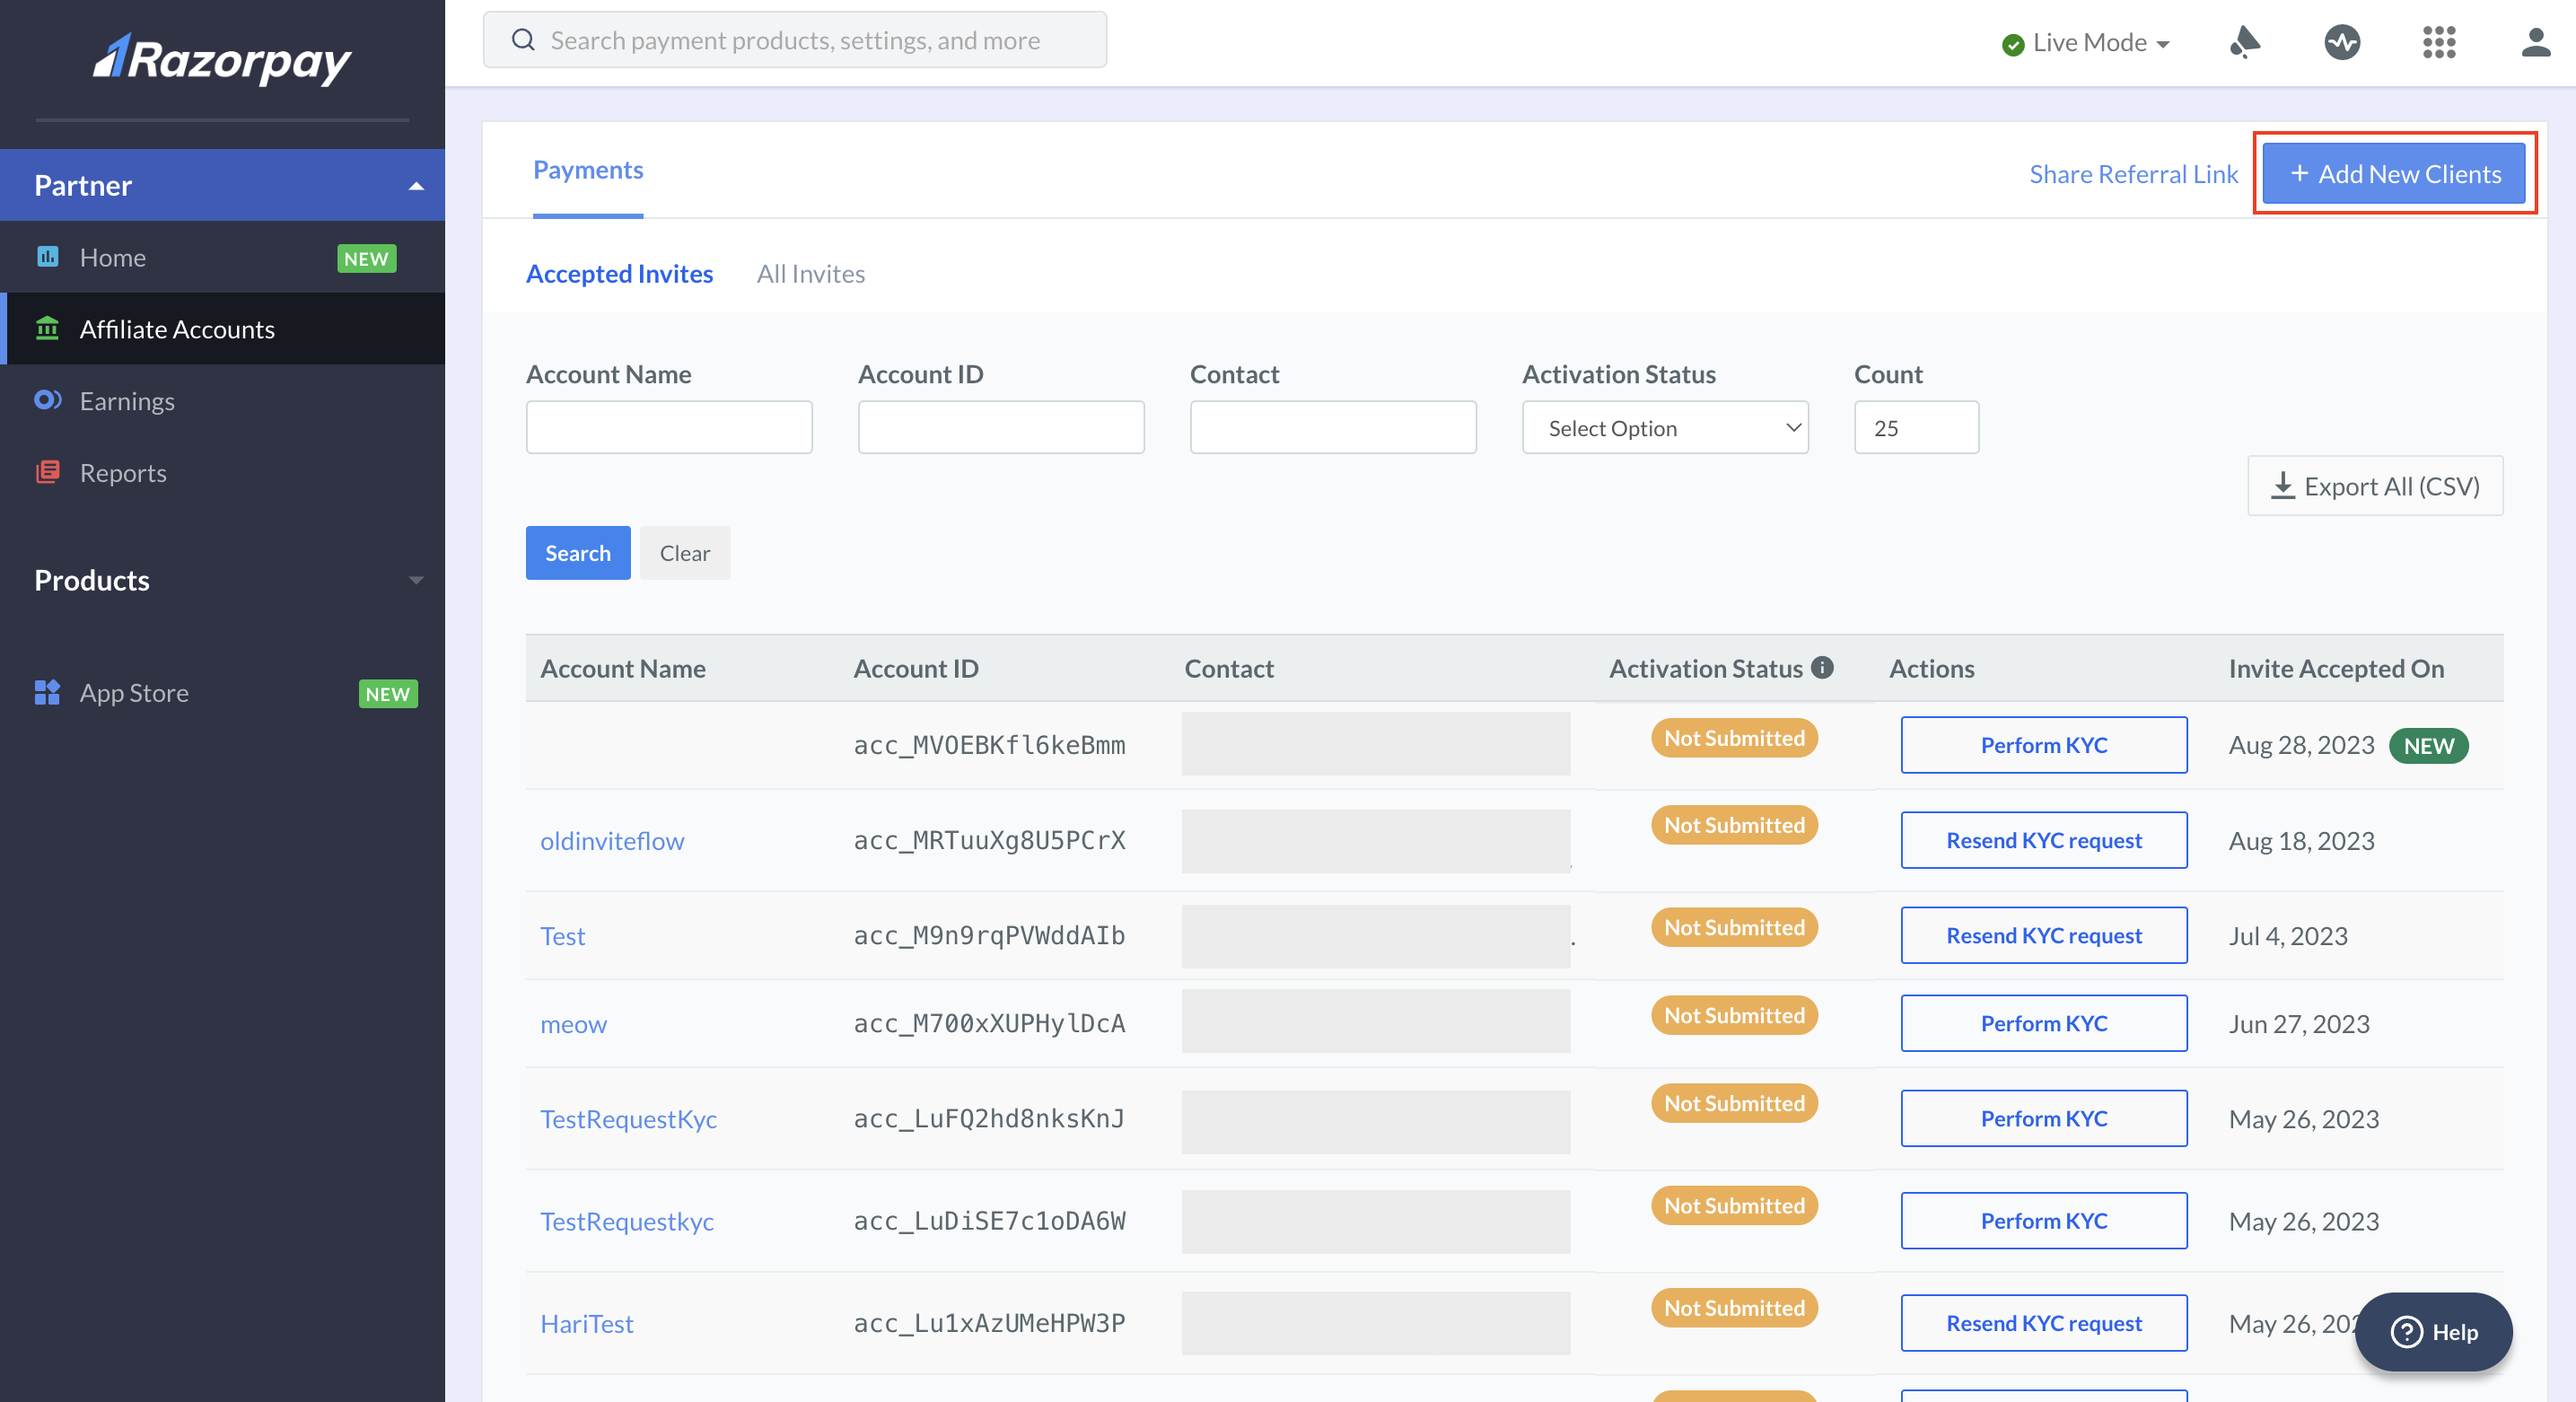
- Click Partner and navigate to Affiliate Accounts.
- Select the Payments or RazorpayX tab depending on the product you want to refer your affiliate.
- Click + Add New Clients.
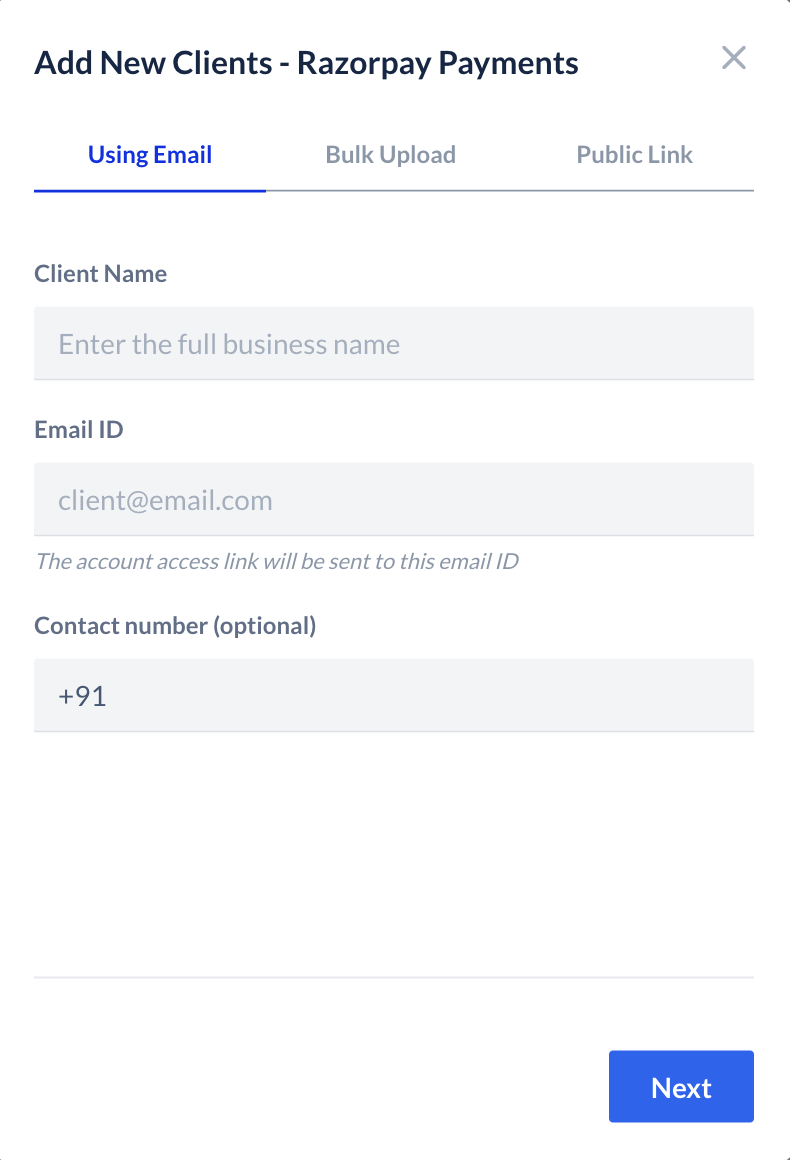
- Under the Using Email tab, enter the Client Name, Email ID and Contact number (optional) to which the invite link must be sent. Click Next.
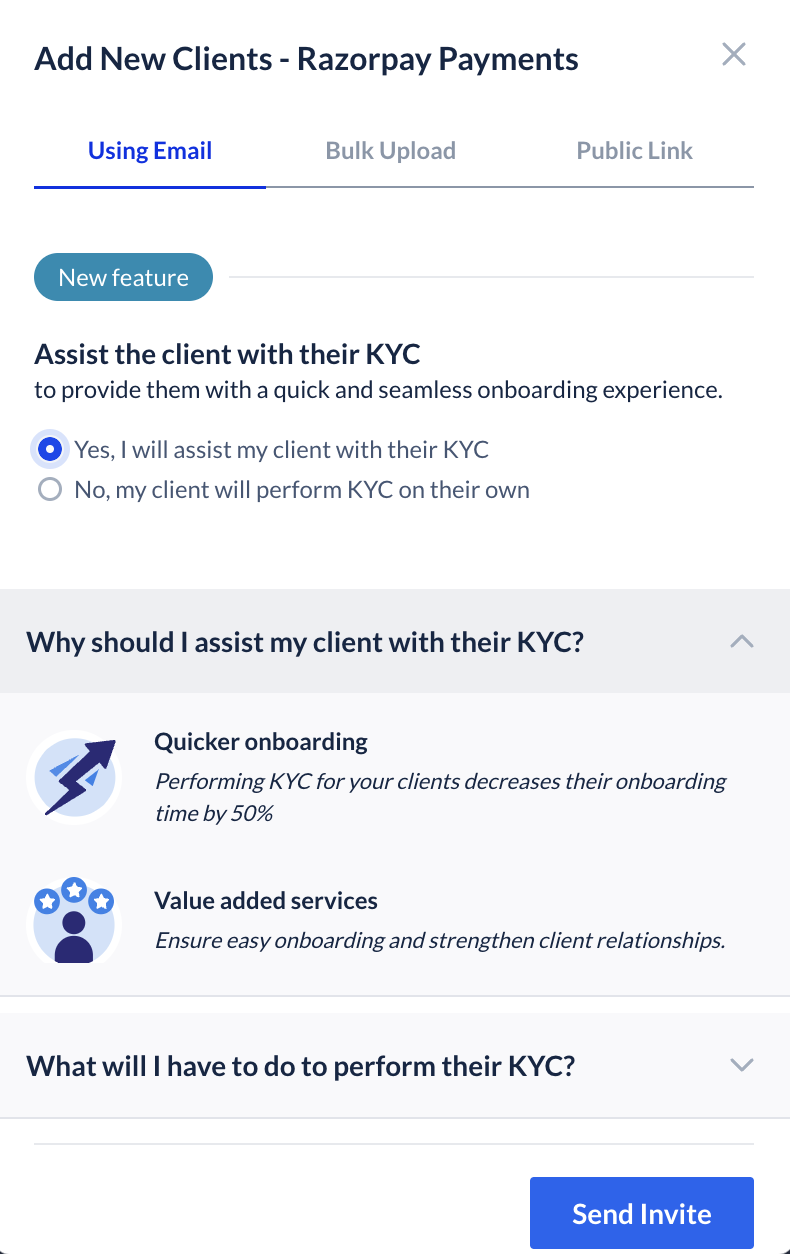
- If you want to perform KYC for your client, select Yes, I will assist my client with their KYC and click Send Invite.
Handy TipsWe recommended you to perform KYC for your Sub-merchants as it decreases onboarding time by 50% and acts as a value added service. Know how to perform KYC for your Sub-merchants. During onboarding, your client will see a consent screen to allow you access to perform KYC. They need to approve it for you to submit the KYC form on their behalf.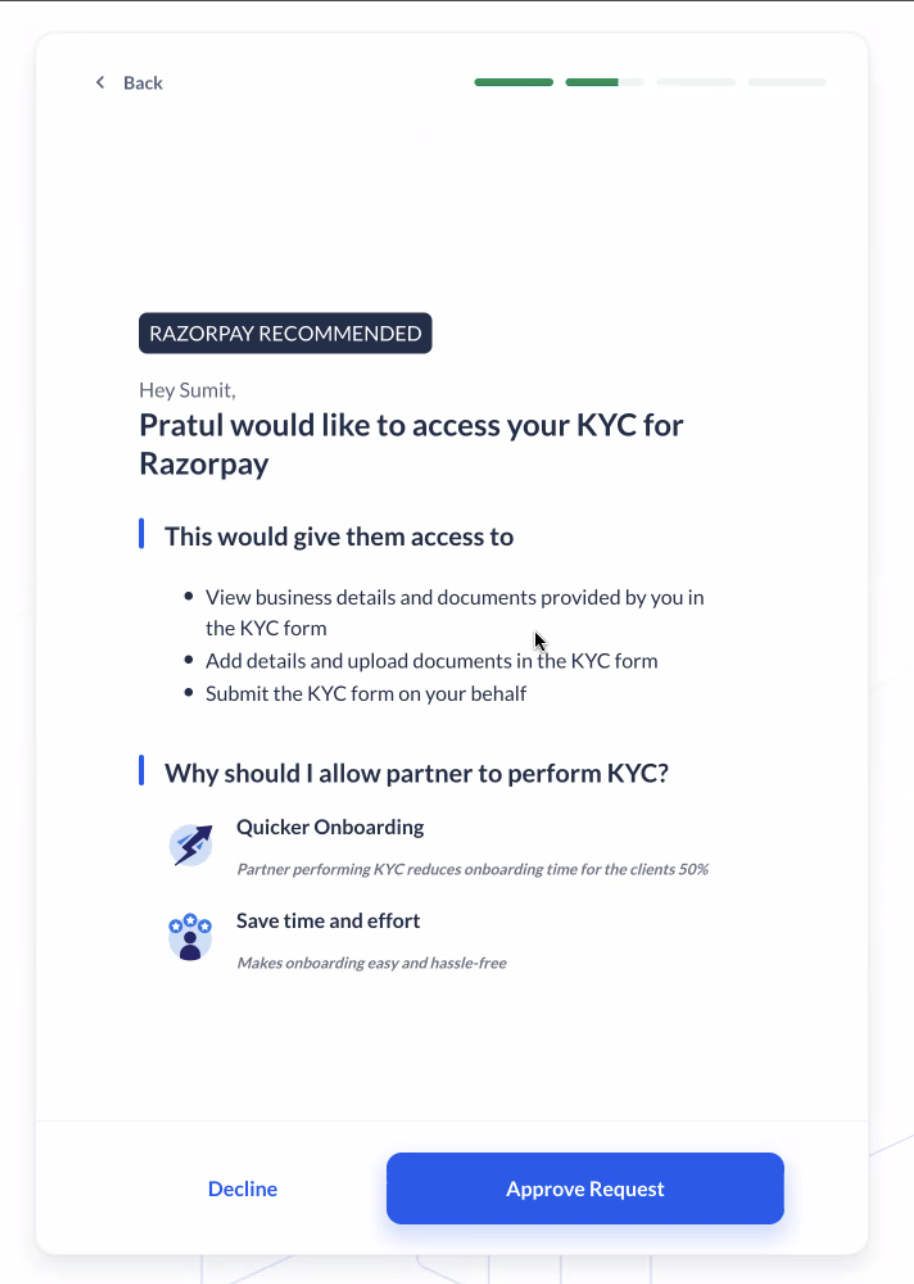
Bulk Upload Multiple Sub-merchants
You can send invites to multiple users using the Bulk Upload option. Upload an XLSX or CSV file with the Dashboard’s required data. This sends a single sign up invitation link to multiple affiliate accounts in bulk. This enables your Sub-merchants to sign up and register on Razorpay.Bulk Upload Template
Bulk Upload Template
To view and understand the file format requirements, download the sample template. The account creation template contains the following headers.
account_name optional
: Name of the Sub-merchant’s account.email mandatory
: The email address of the Sub-merchant.Add Multiple Accounts Using Bulk Upload Template
Add Multiple Accounts Using Bulk Upload Template
- Log in to the Dashboard.
- Click Partner and navigate to Affiliate Accounts.
- Select the Payments or RazorpayX tab depending on the product you want to refer your affiliate.
- Click + Add New Clients.
- Shift to the Bulk Upload tab.
- Upload the file. You can drag and drop or click to upload.
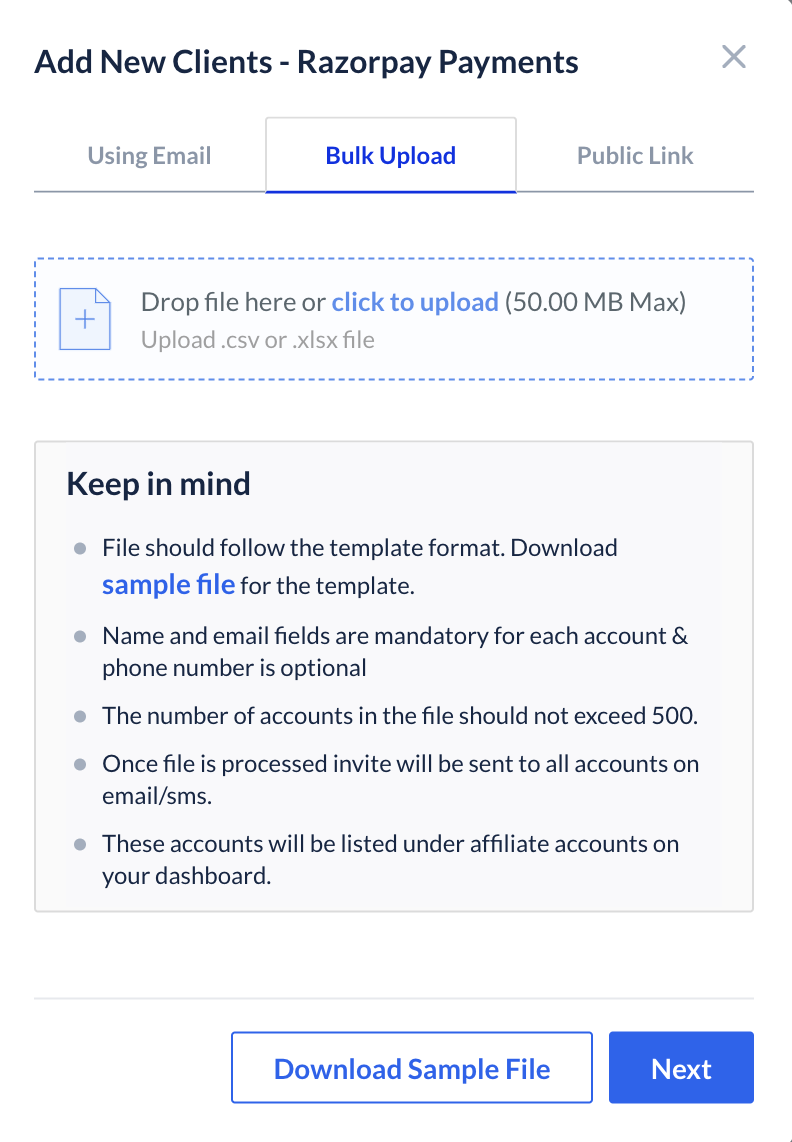
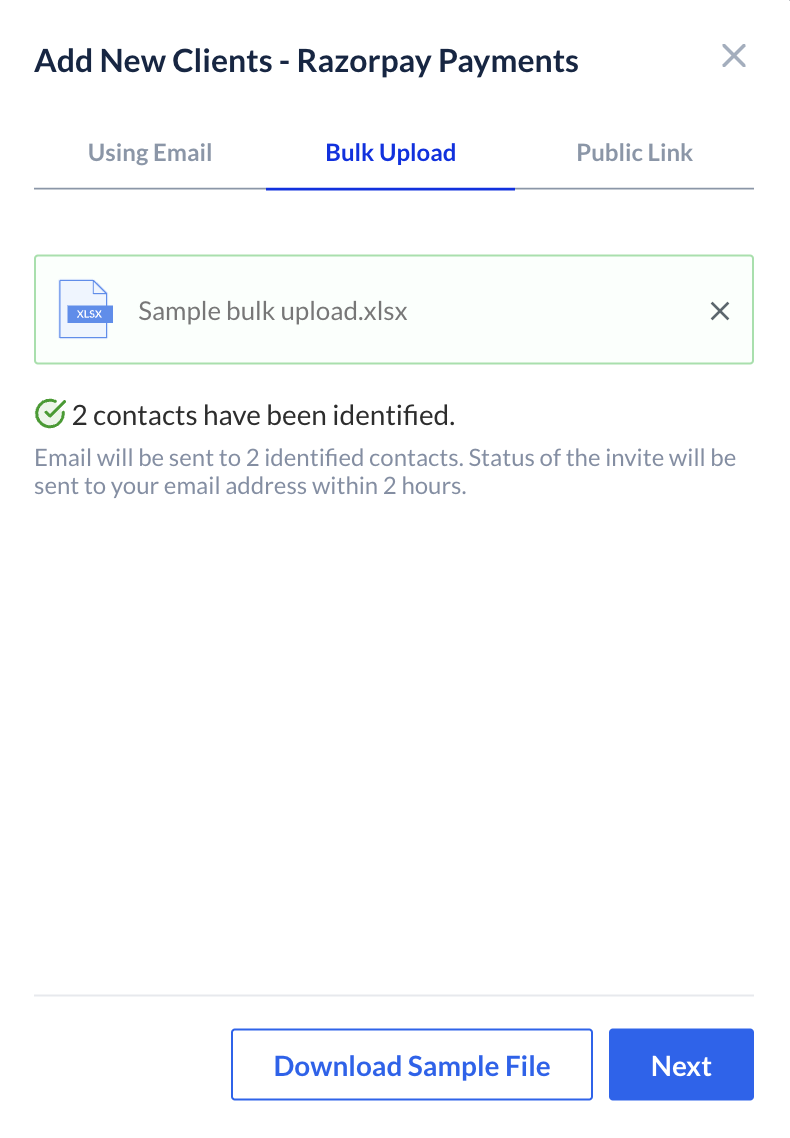
- The file is validated for any associated errors and uploaded to the Razorpay server. Click Next.
- If you want to perform KYC for your client, select Yes, I will assist my client with their KYC and click Send Invites to send invites to your clients via email.
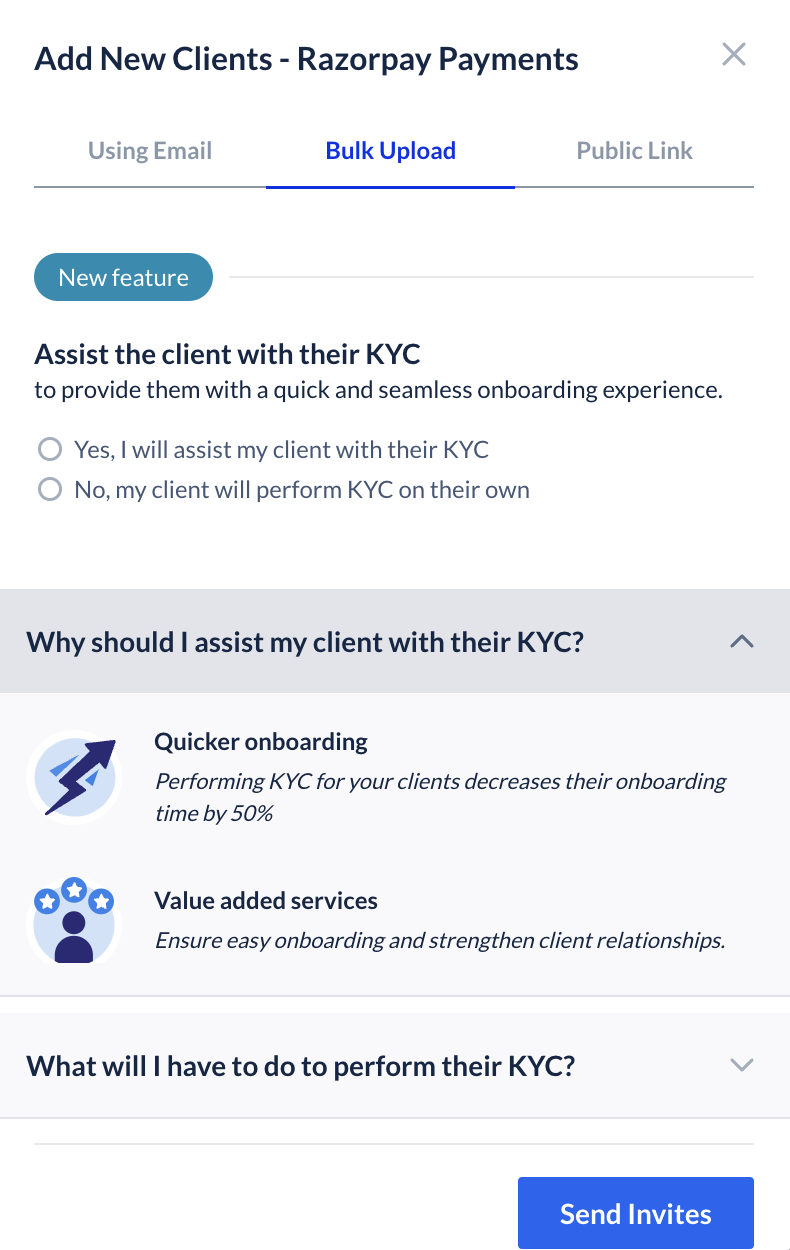
Handy TipsWe recommended you to perform KYC for your Sub-merchants as it decreases onboarding time by 50% and acts as a value added service. Know how to perform KYC for your Sub-merchants. During onboarding, your client will see a consent screen to allow you access to perform KYC. They need to approve it for you to submit the KYC form on their behalf.
What Happens Next
Once the file is successfully processed, you will receive the account creation status via email. The email attachment will include both success and/or failure details for each account, including the error code and exact reason for the failure.- Payments
- RazorpayX
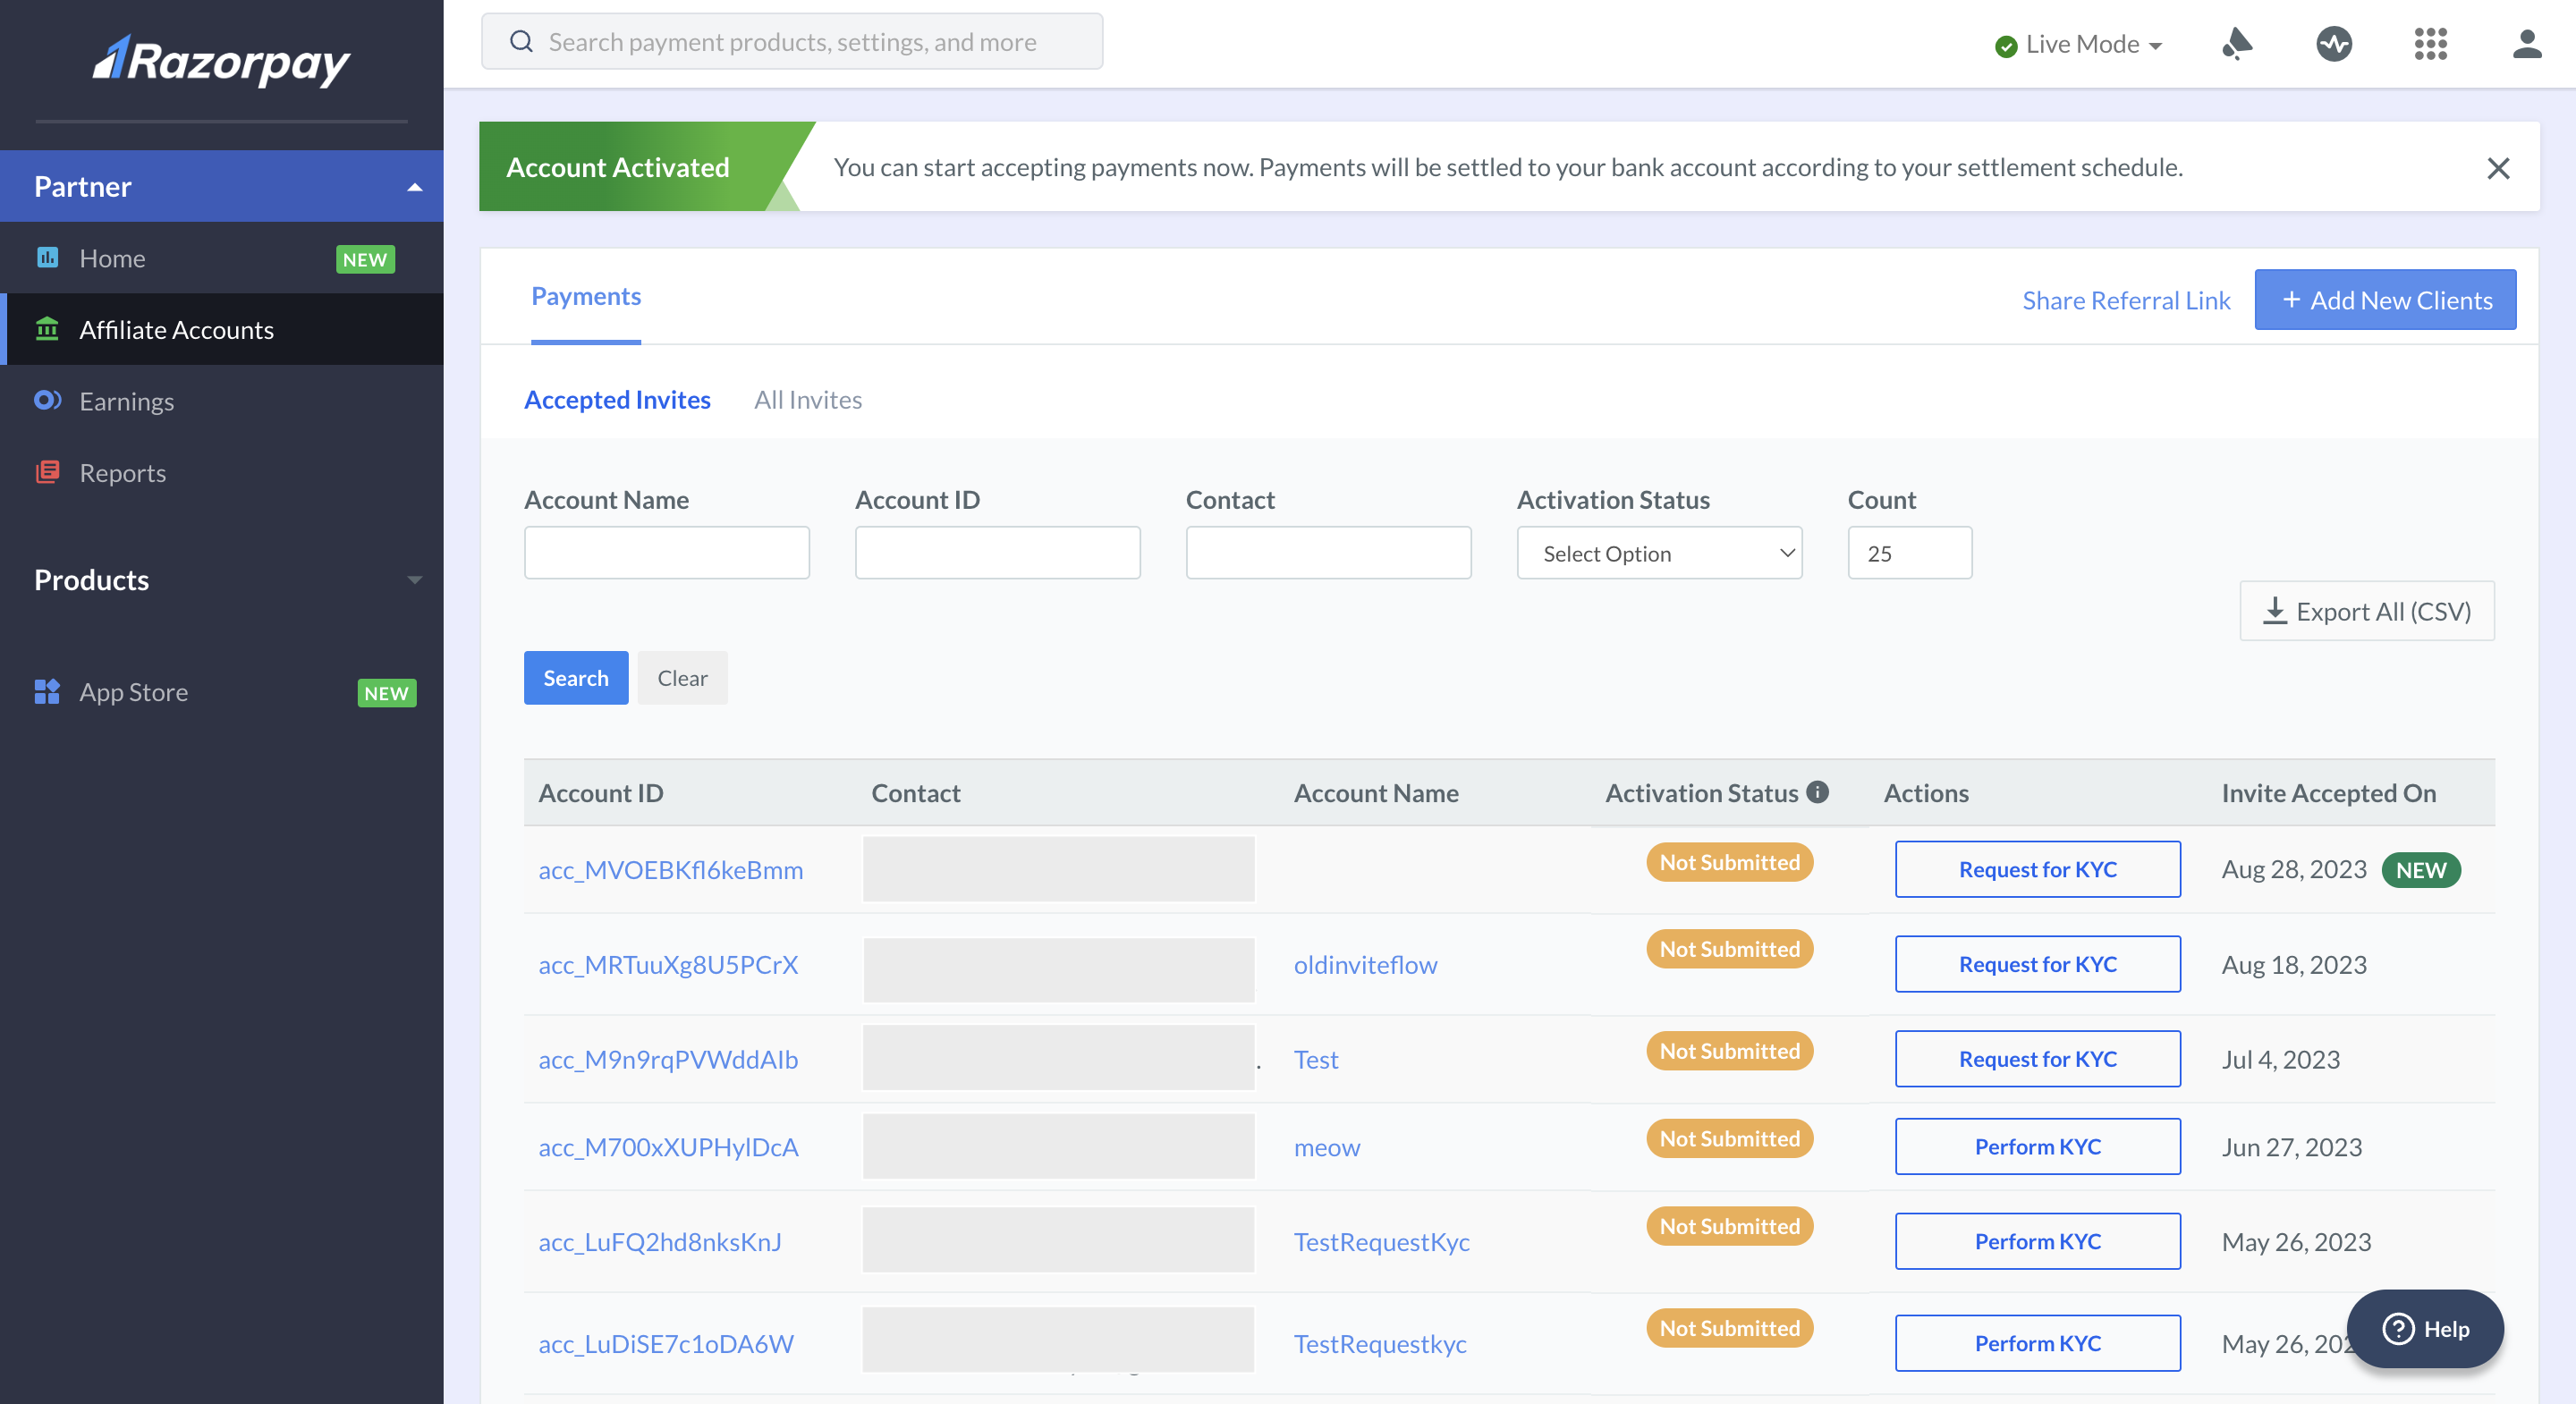
- The newly added Payments Sub-merchants will appear on your list on the Partner Dashboard with a default Activation Status as Not Submitted.
- To get started, the Sub-merchants must proceed to complete the Account Set Up and KYC Verification processes by using their Razorpay account credentials.
Add Sub-merchants Using a Referral Link
Share a referral link with potential Sub-merchants via social media or instant messengers. You can also copy the referral link and send it via email.To add Sub-merchants using a referral link:
To add Sub-merchants using a referral link:
- Log in to the Dashboard.
- In the Partner section, navigate to Affiliate Accounts.
- Click Share Referral Link.
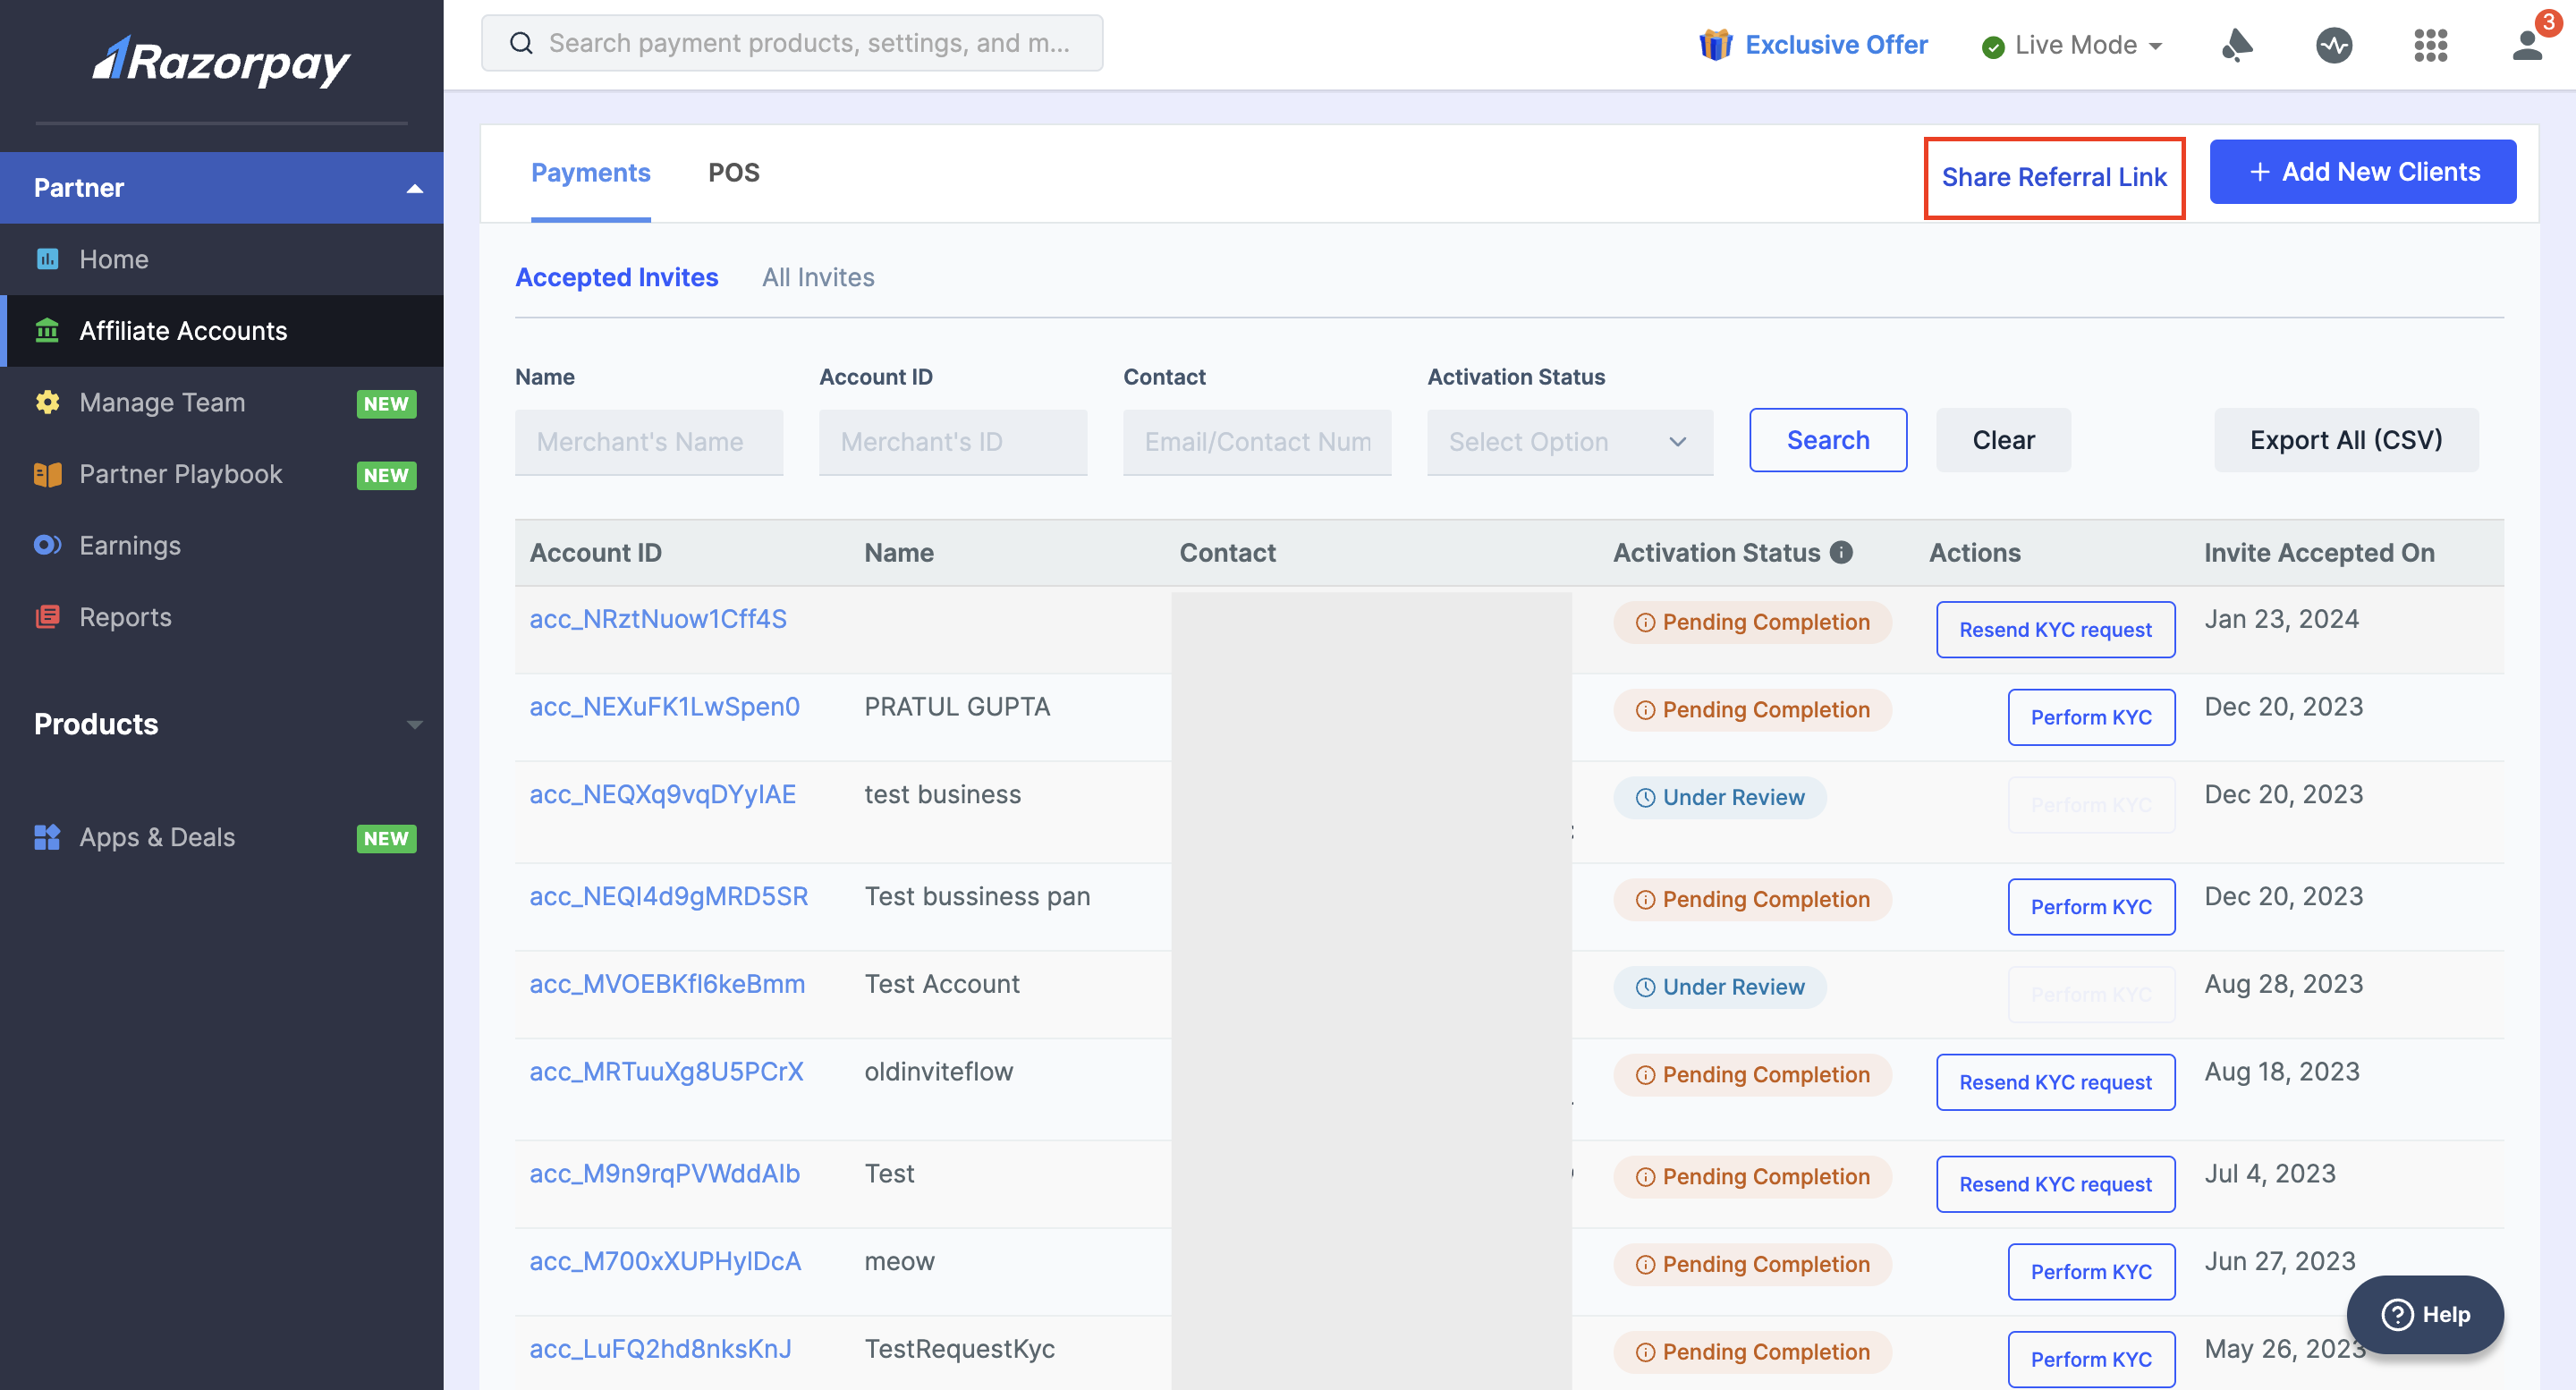
- For Partner accounts on which X referrals have been activated in the Share Referral Link modal, select Razorpay Payments or RazorpayX depending on the product you want to refer an affiliate.
- If you want to perform KYC for your client, select Yes, I will assist my client with their KYC.
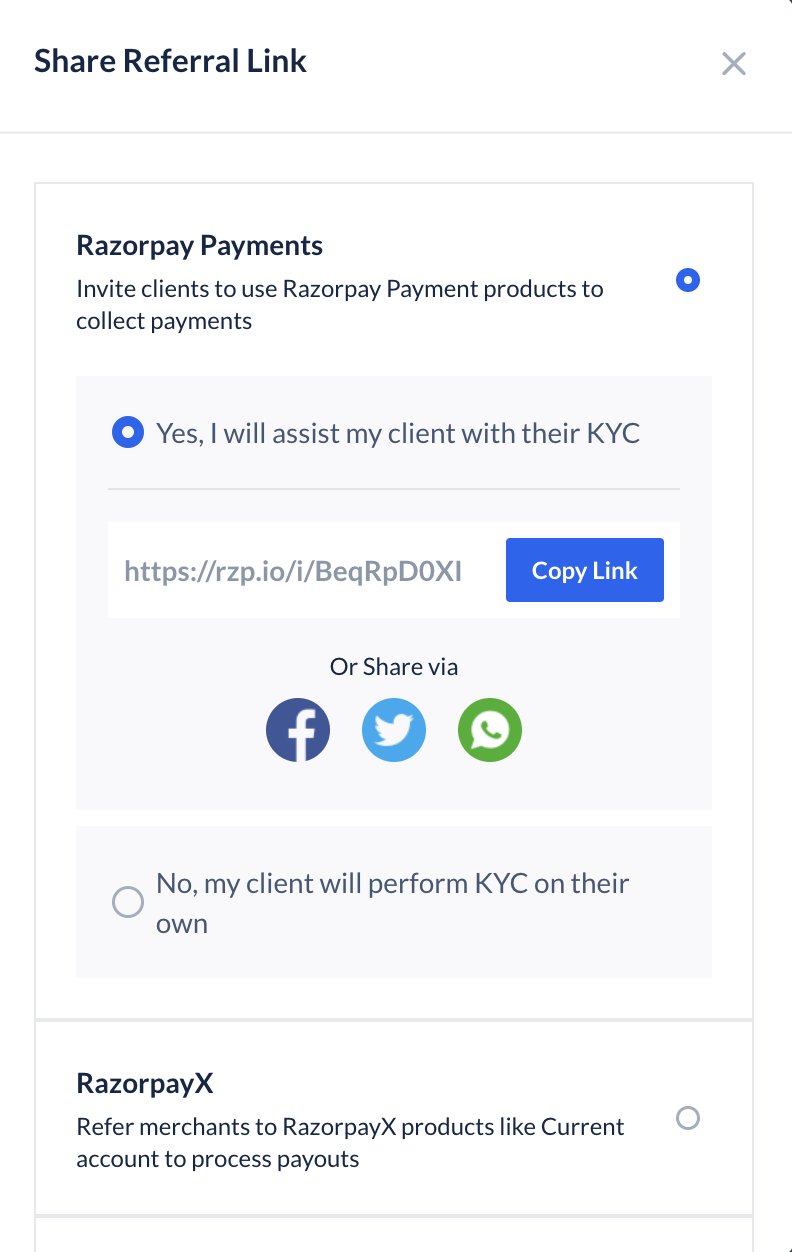
- A drop-down page appears where you can share the link using:
- Copy button: This copies the referral link. You can copy-paste this link and send it via email or instant messaging apps such as WhatsApp.
- Facebook: Click the Facebook icon to share the referral link as a post on your Facebook account.
- Twitter: Click the Twitter icon to send a tweet with the referral link.
- WhatsApp: Click the WhatsApp icon to send a message with the referral link.
- If you do not want to perform KYC for your Sub-merchants, select No, my client will perform KYC on their own. A different referral link will be displayed. You can share this link using the above options.
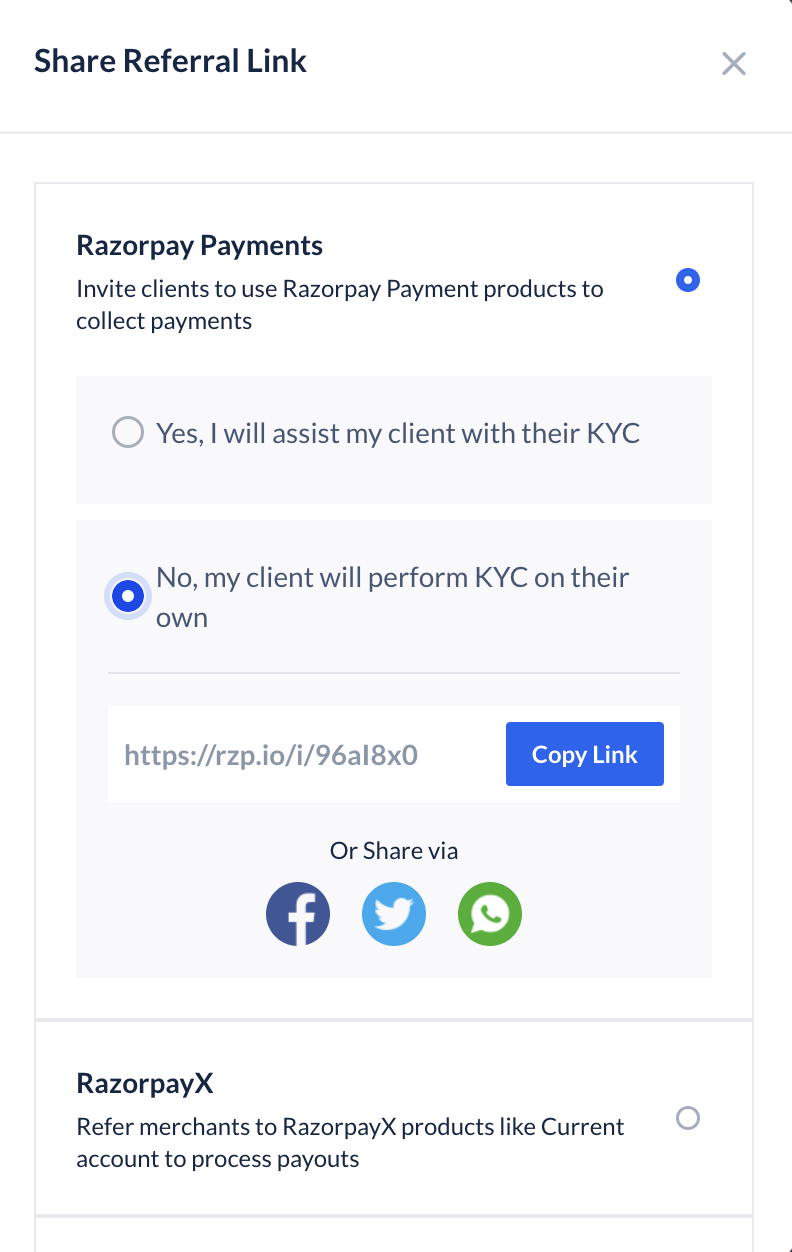
Handy TipsWe recommended you to perform KYC for your Sub-merchants as it decreases onboarding time by 50% and acts as a value added service. Know how to perform KYC for your Sub-merchants. During onboarding, your affiliate will see a consent screen to allow you access to perform KYC. They need to approve it for you to submit the KYC form on their behalf.
Actions After Inviting
- Payments
- RazorpayX
Your contact will receive an invite via email and SMS to create a Razorpay account. To get started, the contacts invited for 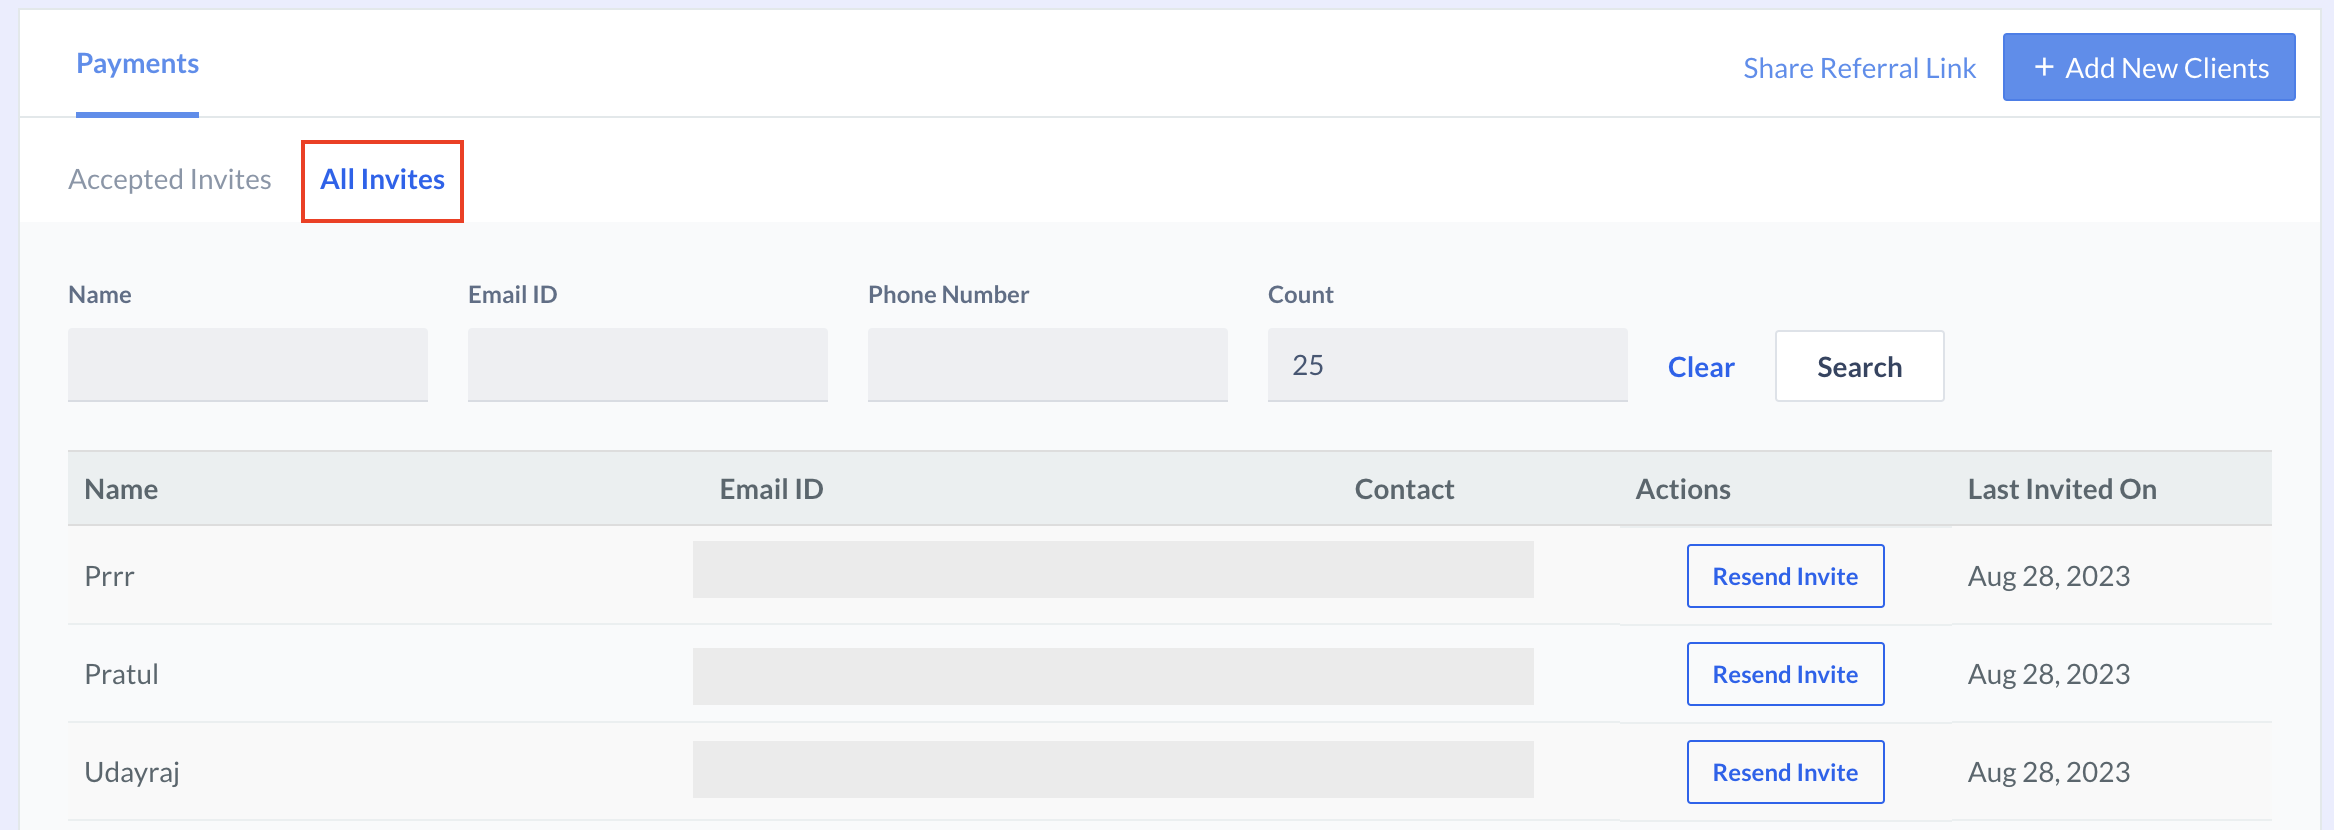 Accepted InvitesTo see the contacts that have accepted your invite, switch to the Accepted Invites tab. You can check the activation status and request for KYC.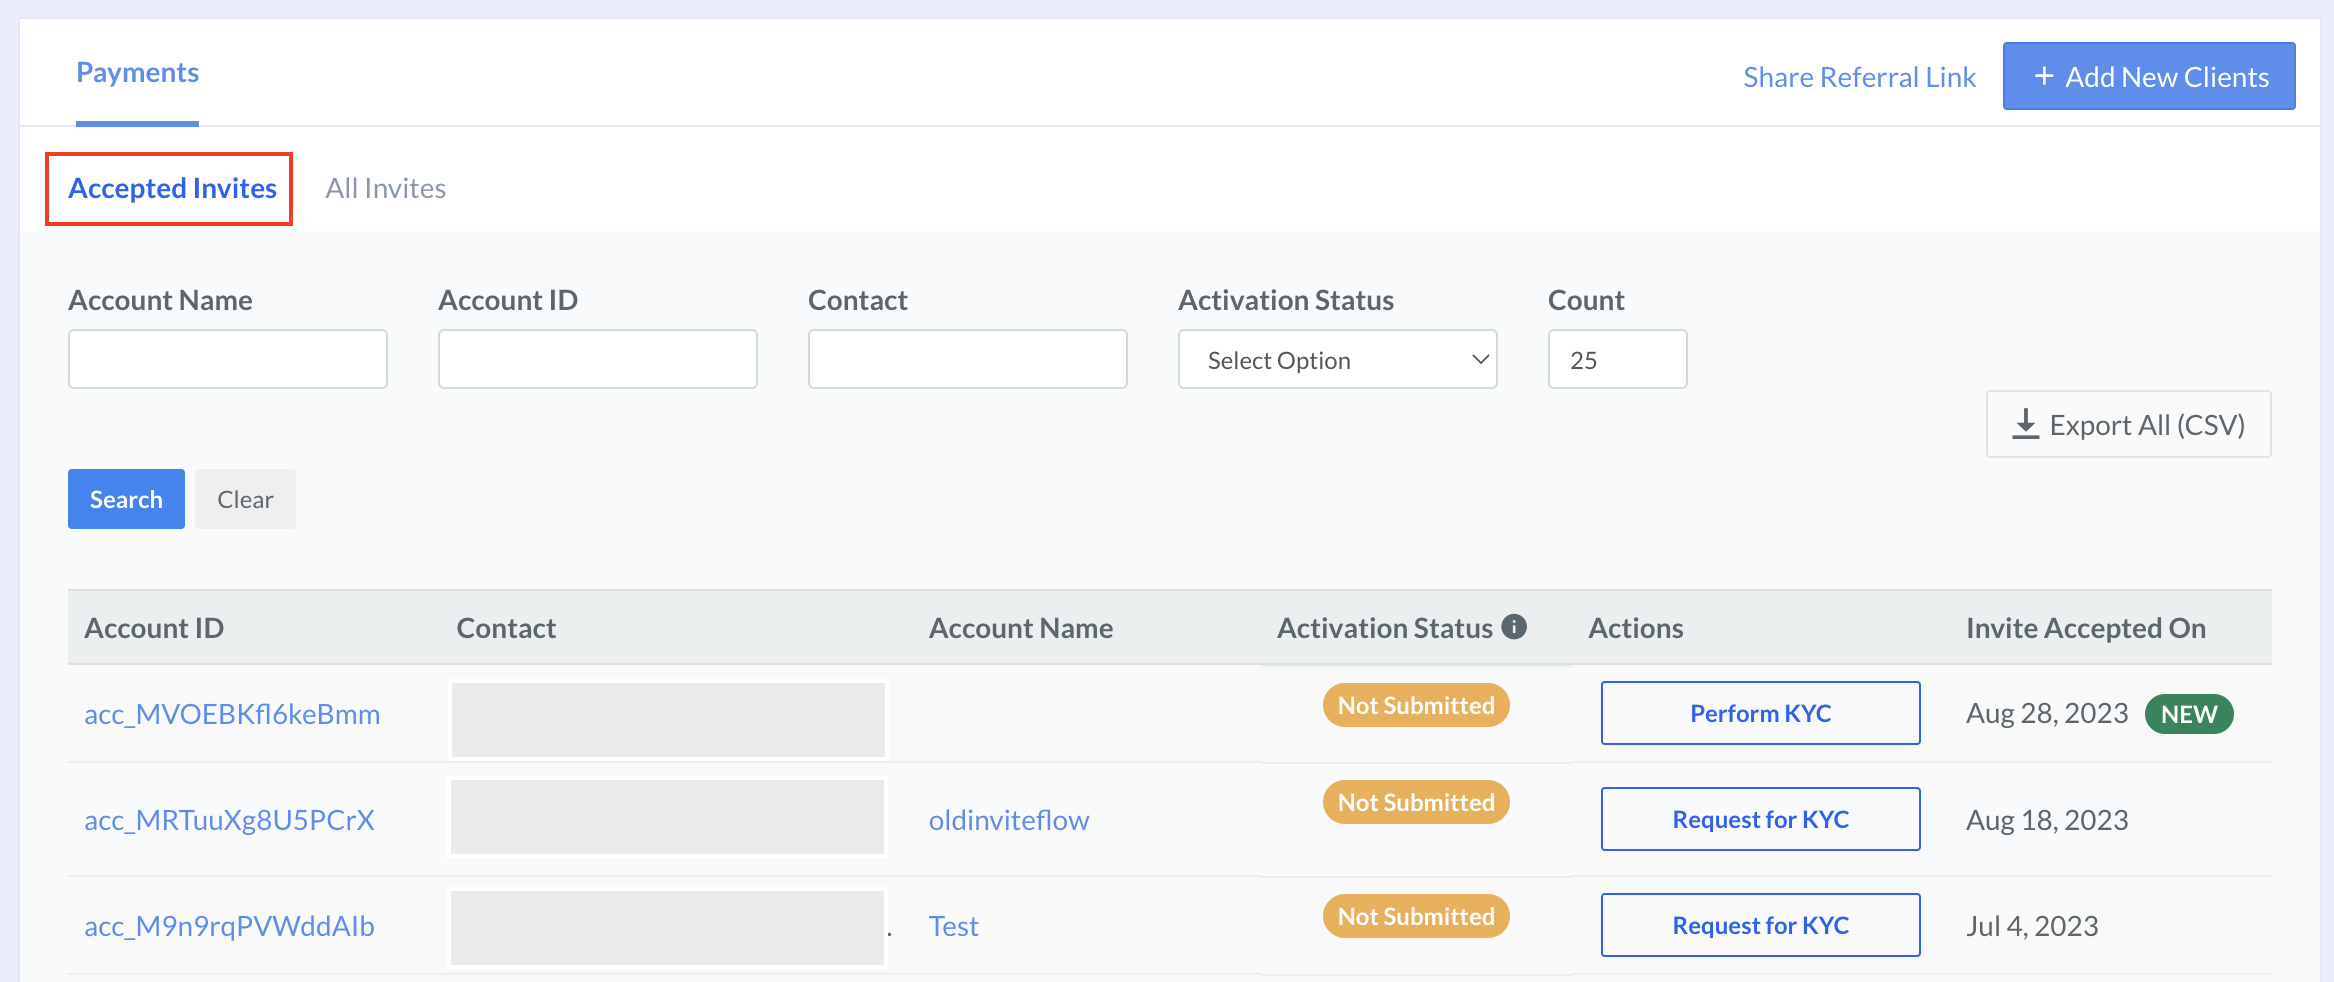
Payment products, must proceed to create a Razorpay account and complete account activation and KYC Verification. Sub-merchants invited for Payments can be seen under Payments.All InvitesYou can check all the invites sent in the All Invites tab. You can resend invites to your contacts.Accepted InvitesTo see the contacts that have accepted your invite, switch to the Accepted Invites tab. You can check the activation status and request for KYC.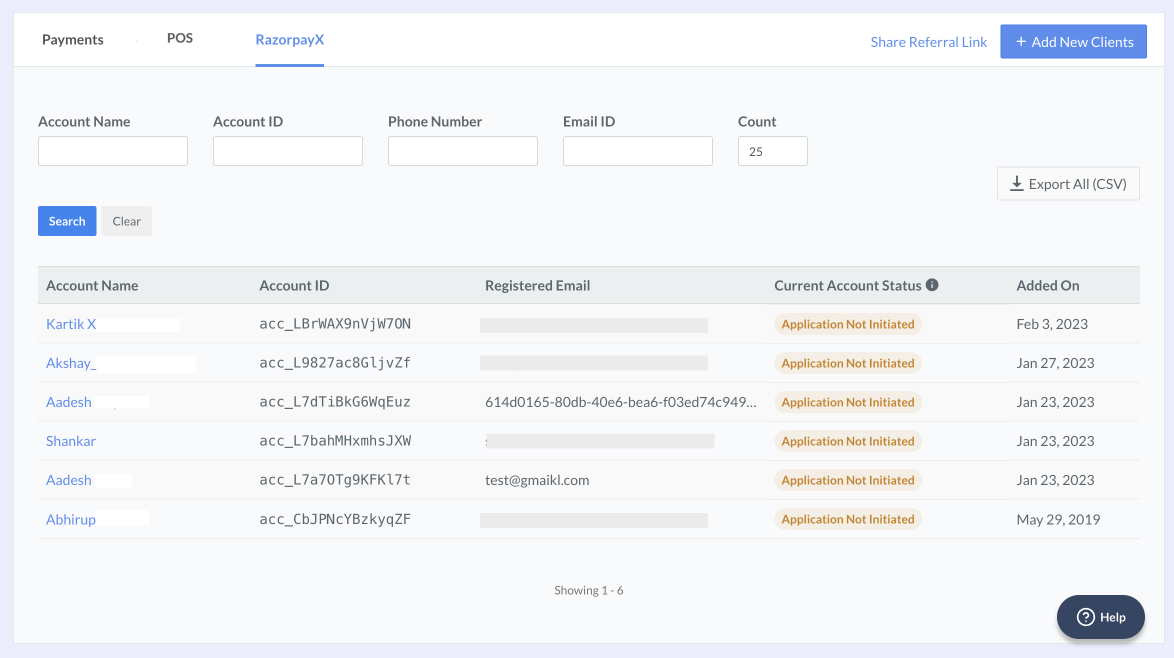
Sub-merchant Activation Status
You can track the account activation status of the Sub-merchant on your Dashboard under the Affiliate Accounts tab.- Payments
- Current Account