

Generic
Who can use this widget?
Who can use this widget?
What does the widget include?
What does the widget include?
- All the offers that you have set up on Razorpay (along with an expandable view to read the details about each offer).
- All EMI, Cardless EMI, and Pay Later options enabled by you which satisfies the minimum order limit. Know more about the minimum order limit for EMI, Cardless EMI and Pay Later.
How does the integration work?
How does the integration work?
- Create a Razorpay account.
- Follow the integration steps specific to your integration. It is that simple!
Where should I place the widget on my website?
Where should I place the widget on my website?
Is the widget available on Android and iOS SDKs?
Is the widget available on Android and iOS SDKs?
Is it possible to integrate the widget on my website using plugins?
Is it possible to integrate the widget on my website using plugins?
How can I disable the Affordability Widget from the Dashboard?
How can I disable the Affordability Widget from the Dashboard?
- Log in to the Dashboard and navigate to Affordability → Settings.
- Click Disable Widget.
- Click Yes, disable to remove the Affordability Widget from your website.
What are the various features of the Affordability Widget that will help increase customer conversion?
What are the various features of the Affordability Widget that will help increase customer conversion?
If a customer is ineligible for payment, what should they do next?
If a customer is ineligible for payment, what should they do next?
- Try again using a different mobile number for the chosen payment instrument.
- Opt for a different payment instrument/method.
Native Website
What customisations are possible in the widget?
What customisations are possible in the widget?
- Offers
- Payment Methods
- Theme
Can I disable offers?
Can I disable offers?
How can I alter the appearance of the widget?
How can I alter the appearance of the widget?
- Customise the theme colour.
- Change the heading colour and font size.
- Change content colour and font size.
- Change link colour and font size.
- Change footer colour, font size and logo variants.
What is Checkout from Affordability Widget and how does it benefit my business?
What is Checkout from Affordability Widget and how does it benefit my business?
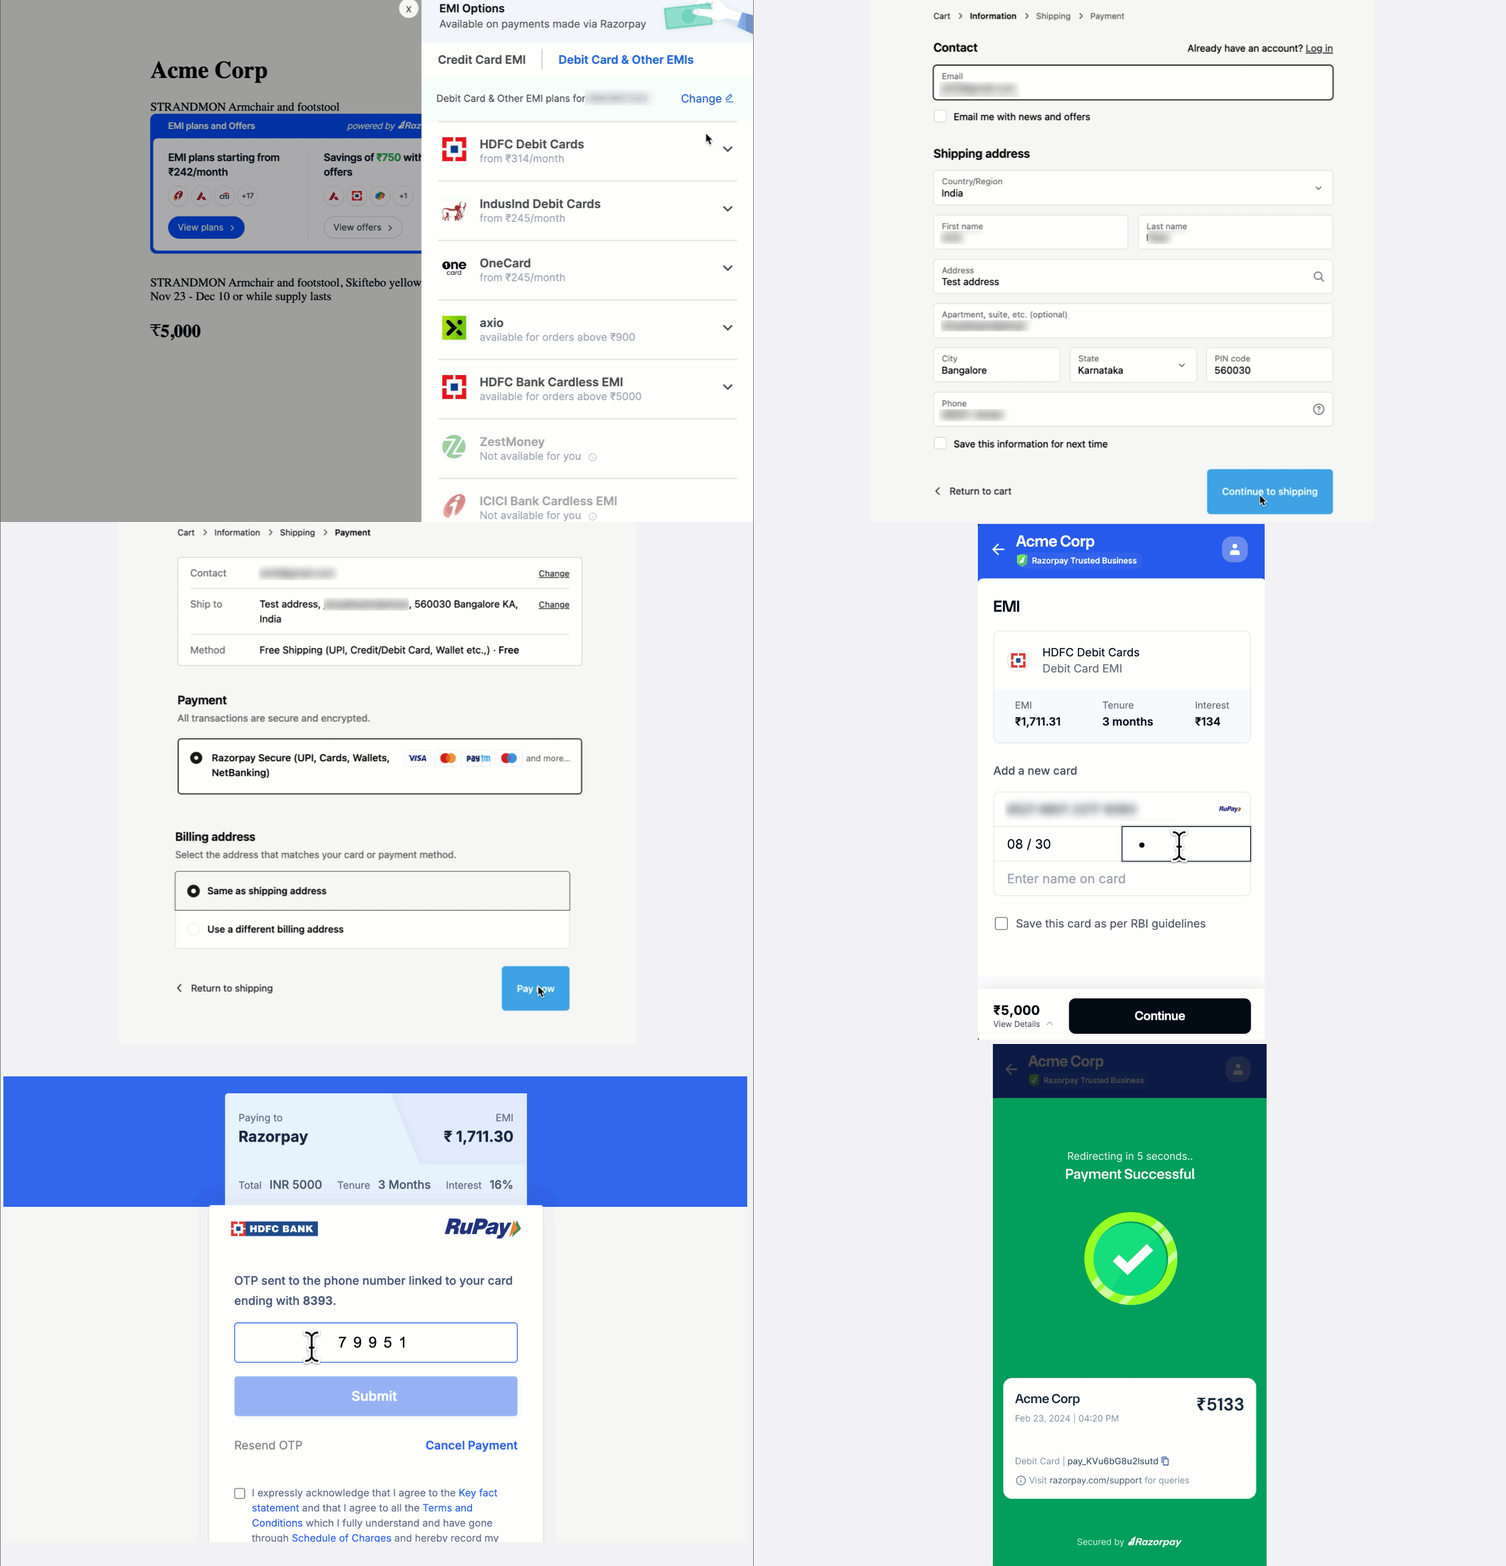
What does the customer journey look like after integrating Checkout from Affordability Widget?
What does the customer journey look like after integrating Checkout from Affordability Widget?
- Customers view the existing plans and offers on the widget, choose an eligible payment instrument or offer, and click Buy now.
- They are redirected to your checkout page, where they enter their contact and shipping details and proceed to checkout.
- They are then redirected to the Razorpay checkout if you have integrated the widget with our Standard Checkout. If not, they are redirected to your custom-built checkout.
- Once redirected to our Standard Checkout, the payment option or offer the customer selects on the widget appears pre-selected on checkout.
- They enter the relevant details and complete the payment.
What are the prerequisites to enable the Checkout from Affordability Widget feature?
What are the prerequisites to enable the Checkout from Affordability Widget feature?
- Create a Razorpay account.
- Integrate with the Razorpay Affordability Widget. This feature is only supported on Native Website.
- Integrate with Razorpay Standard Checkout.
- Integrate Checkout from Widget using Standard Integration.
Will the Checkout from Affordability Widget feature affect my website's page load time?
Will the Checkout from Affordability Widget feature affect my website's page load time?
WooCommerce
I am integrating with Razorpay Plugin for the first time. What are the steps that I need to follow?
I am integrating with Razorpay Plugin for the first time. What are the steps that I need to follow?
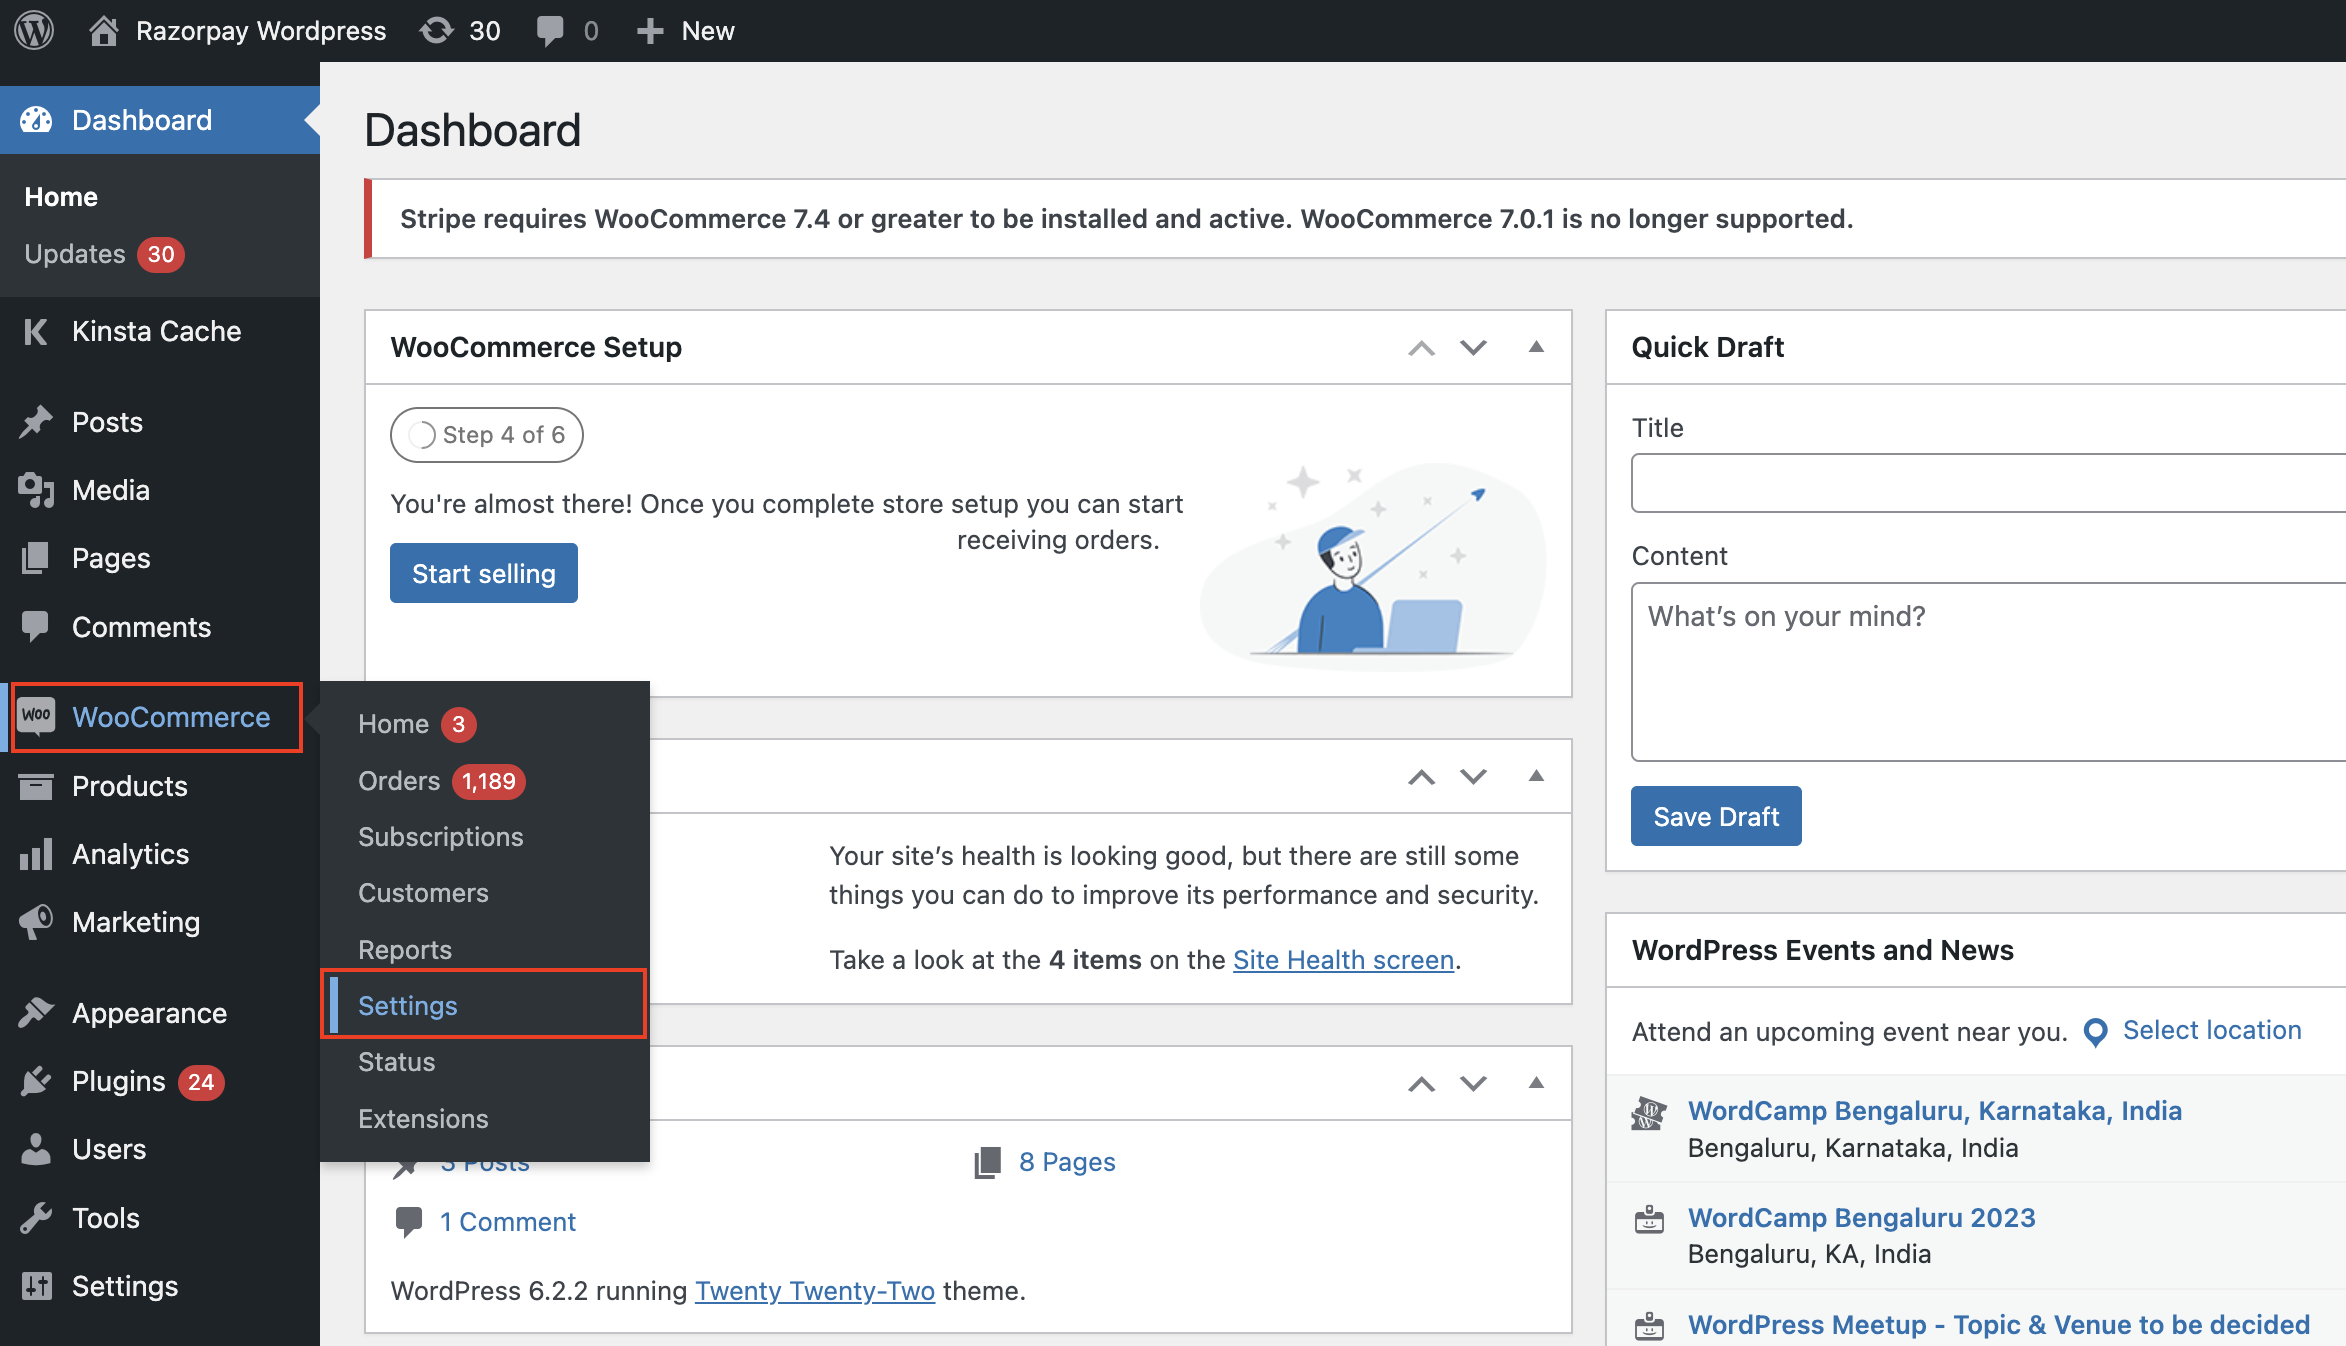
- Log in to the WordPress account, navigate to WooCommerce → Settings and click the Payments tab.
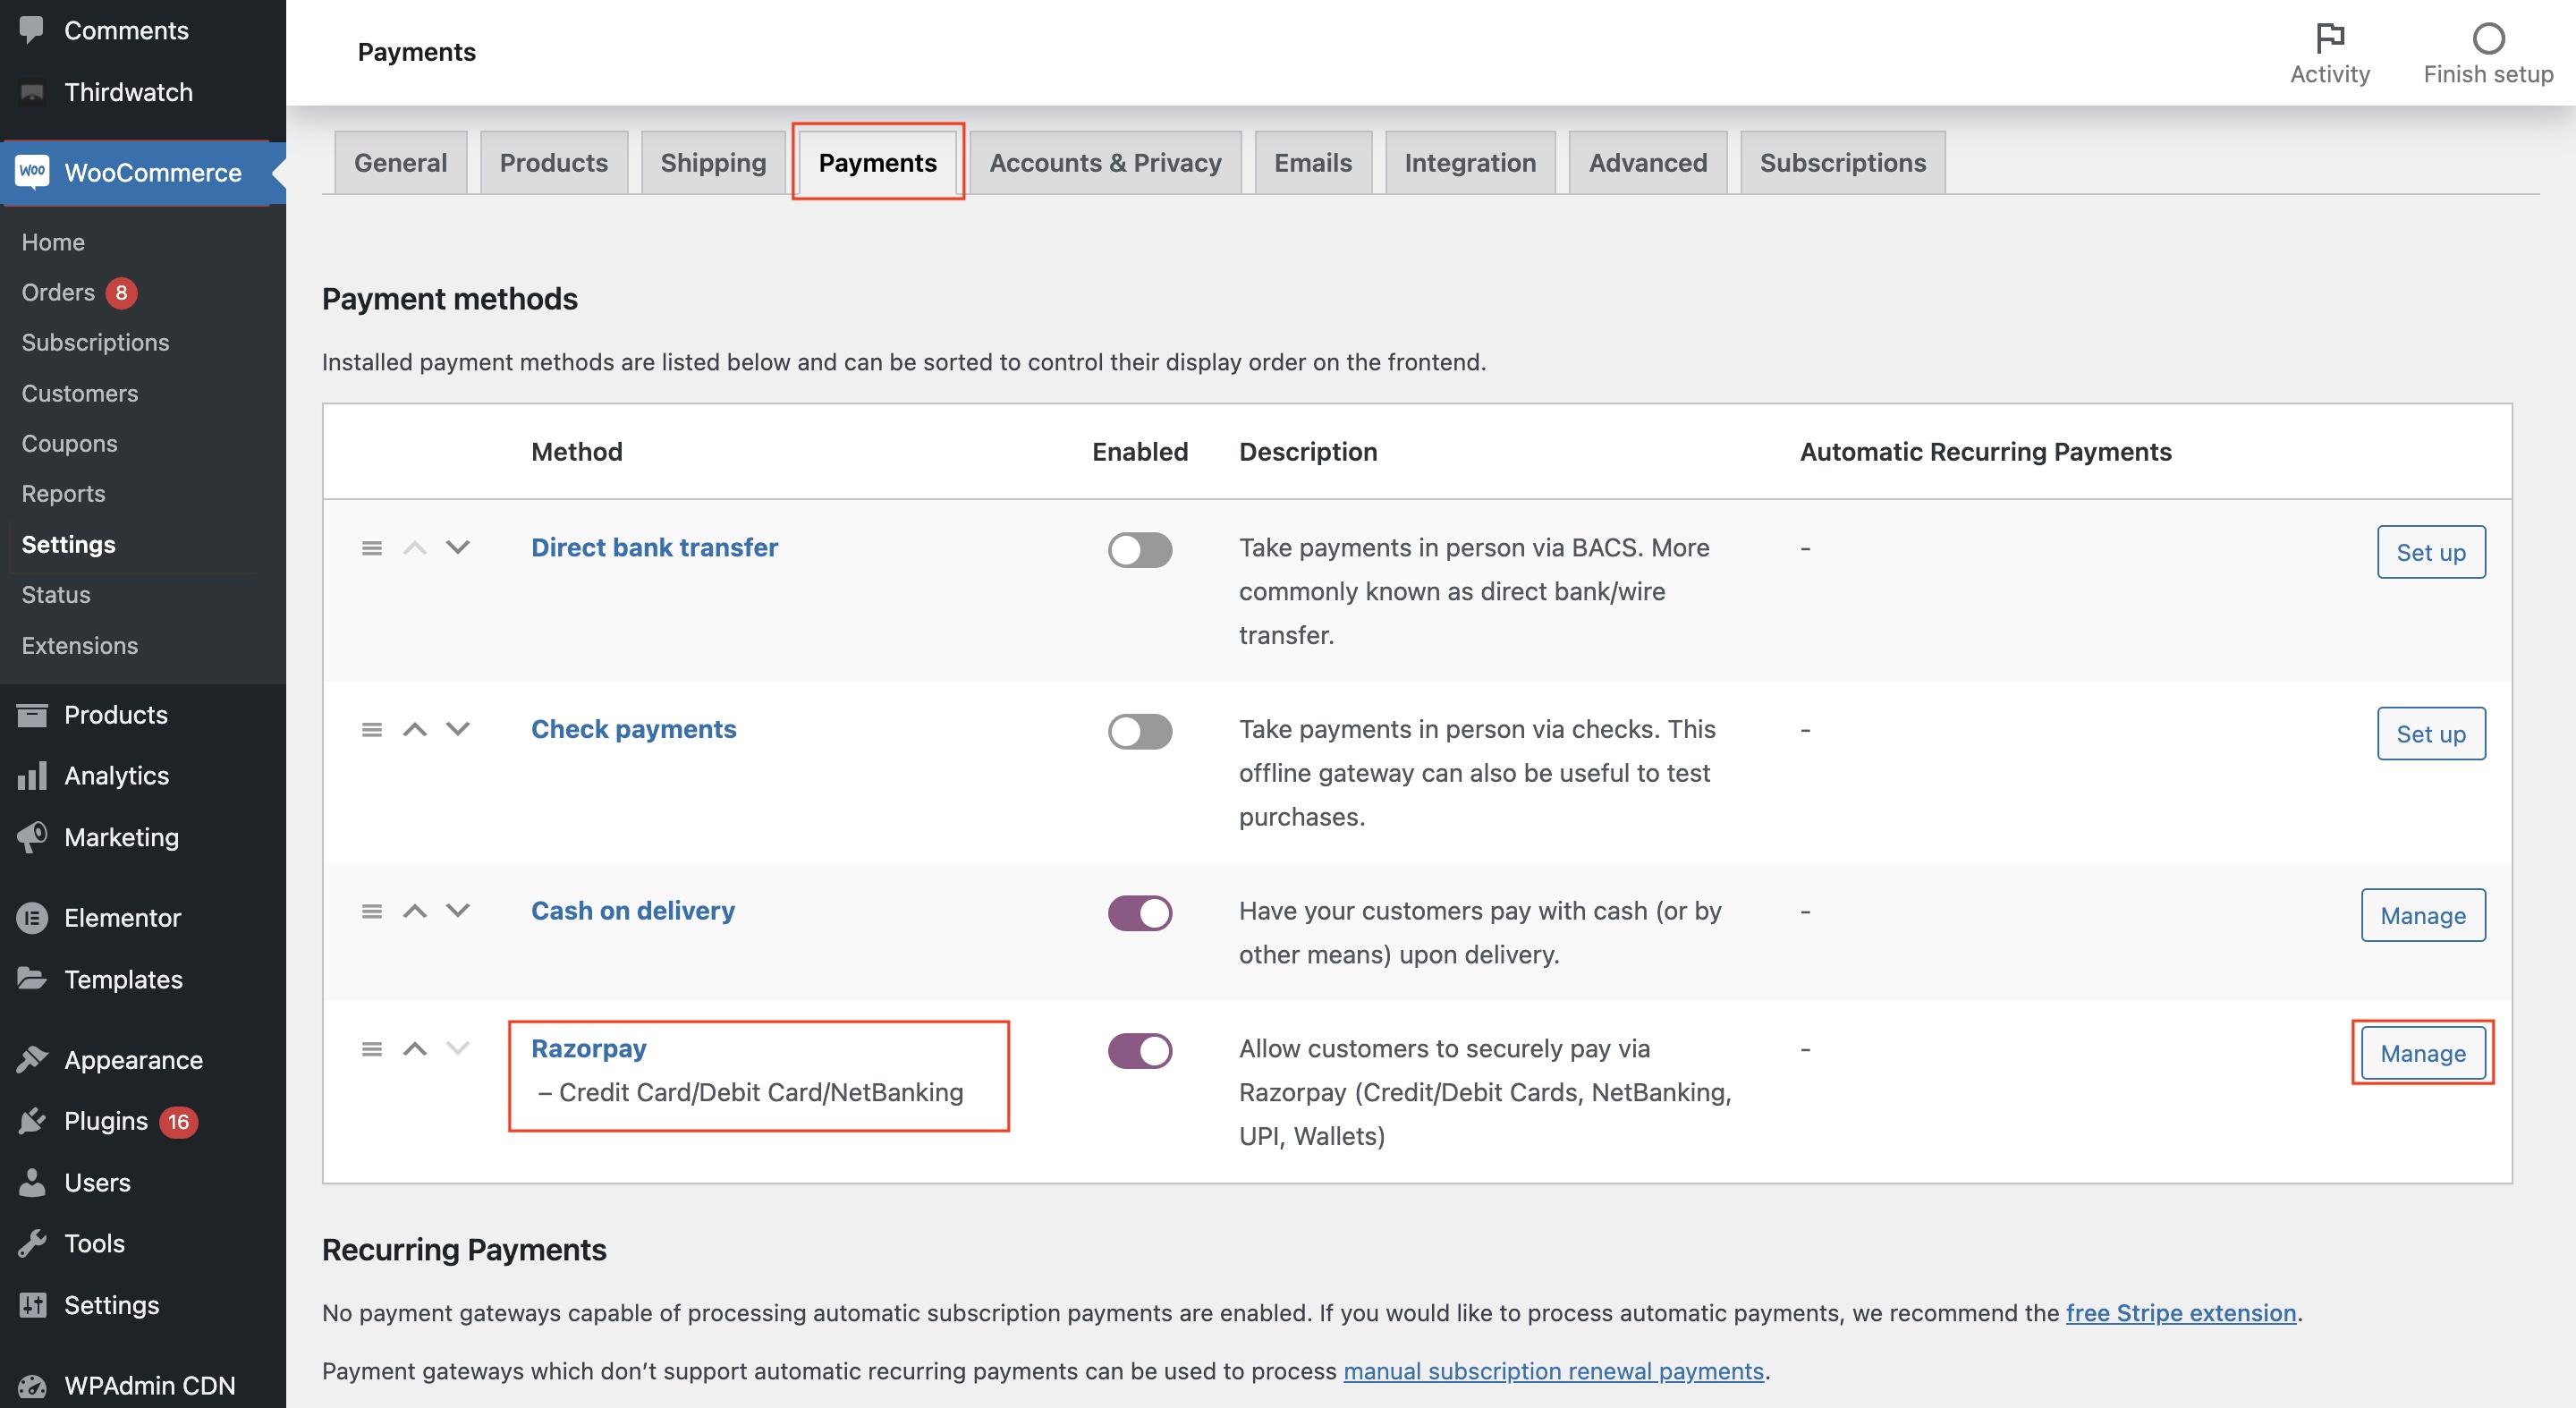
- In the Payments tab, scroll down to Razorpay and click Manage to edit the settings.
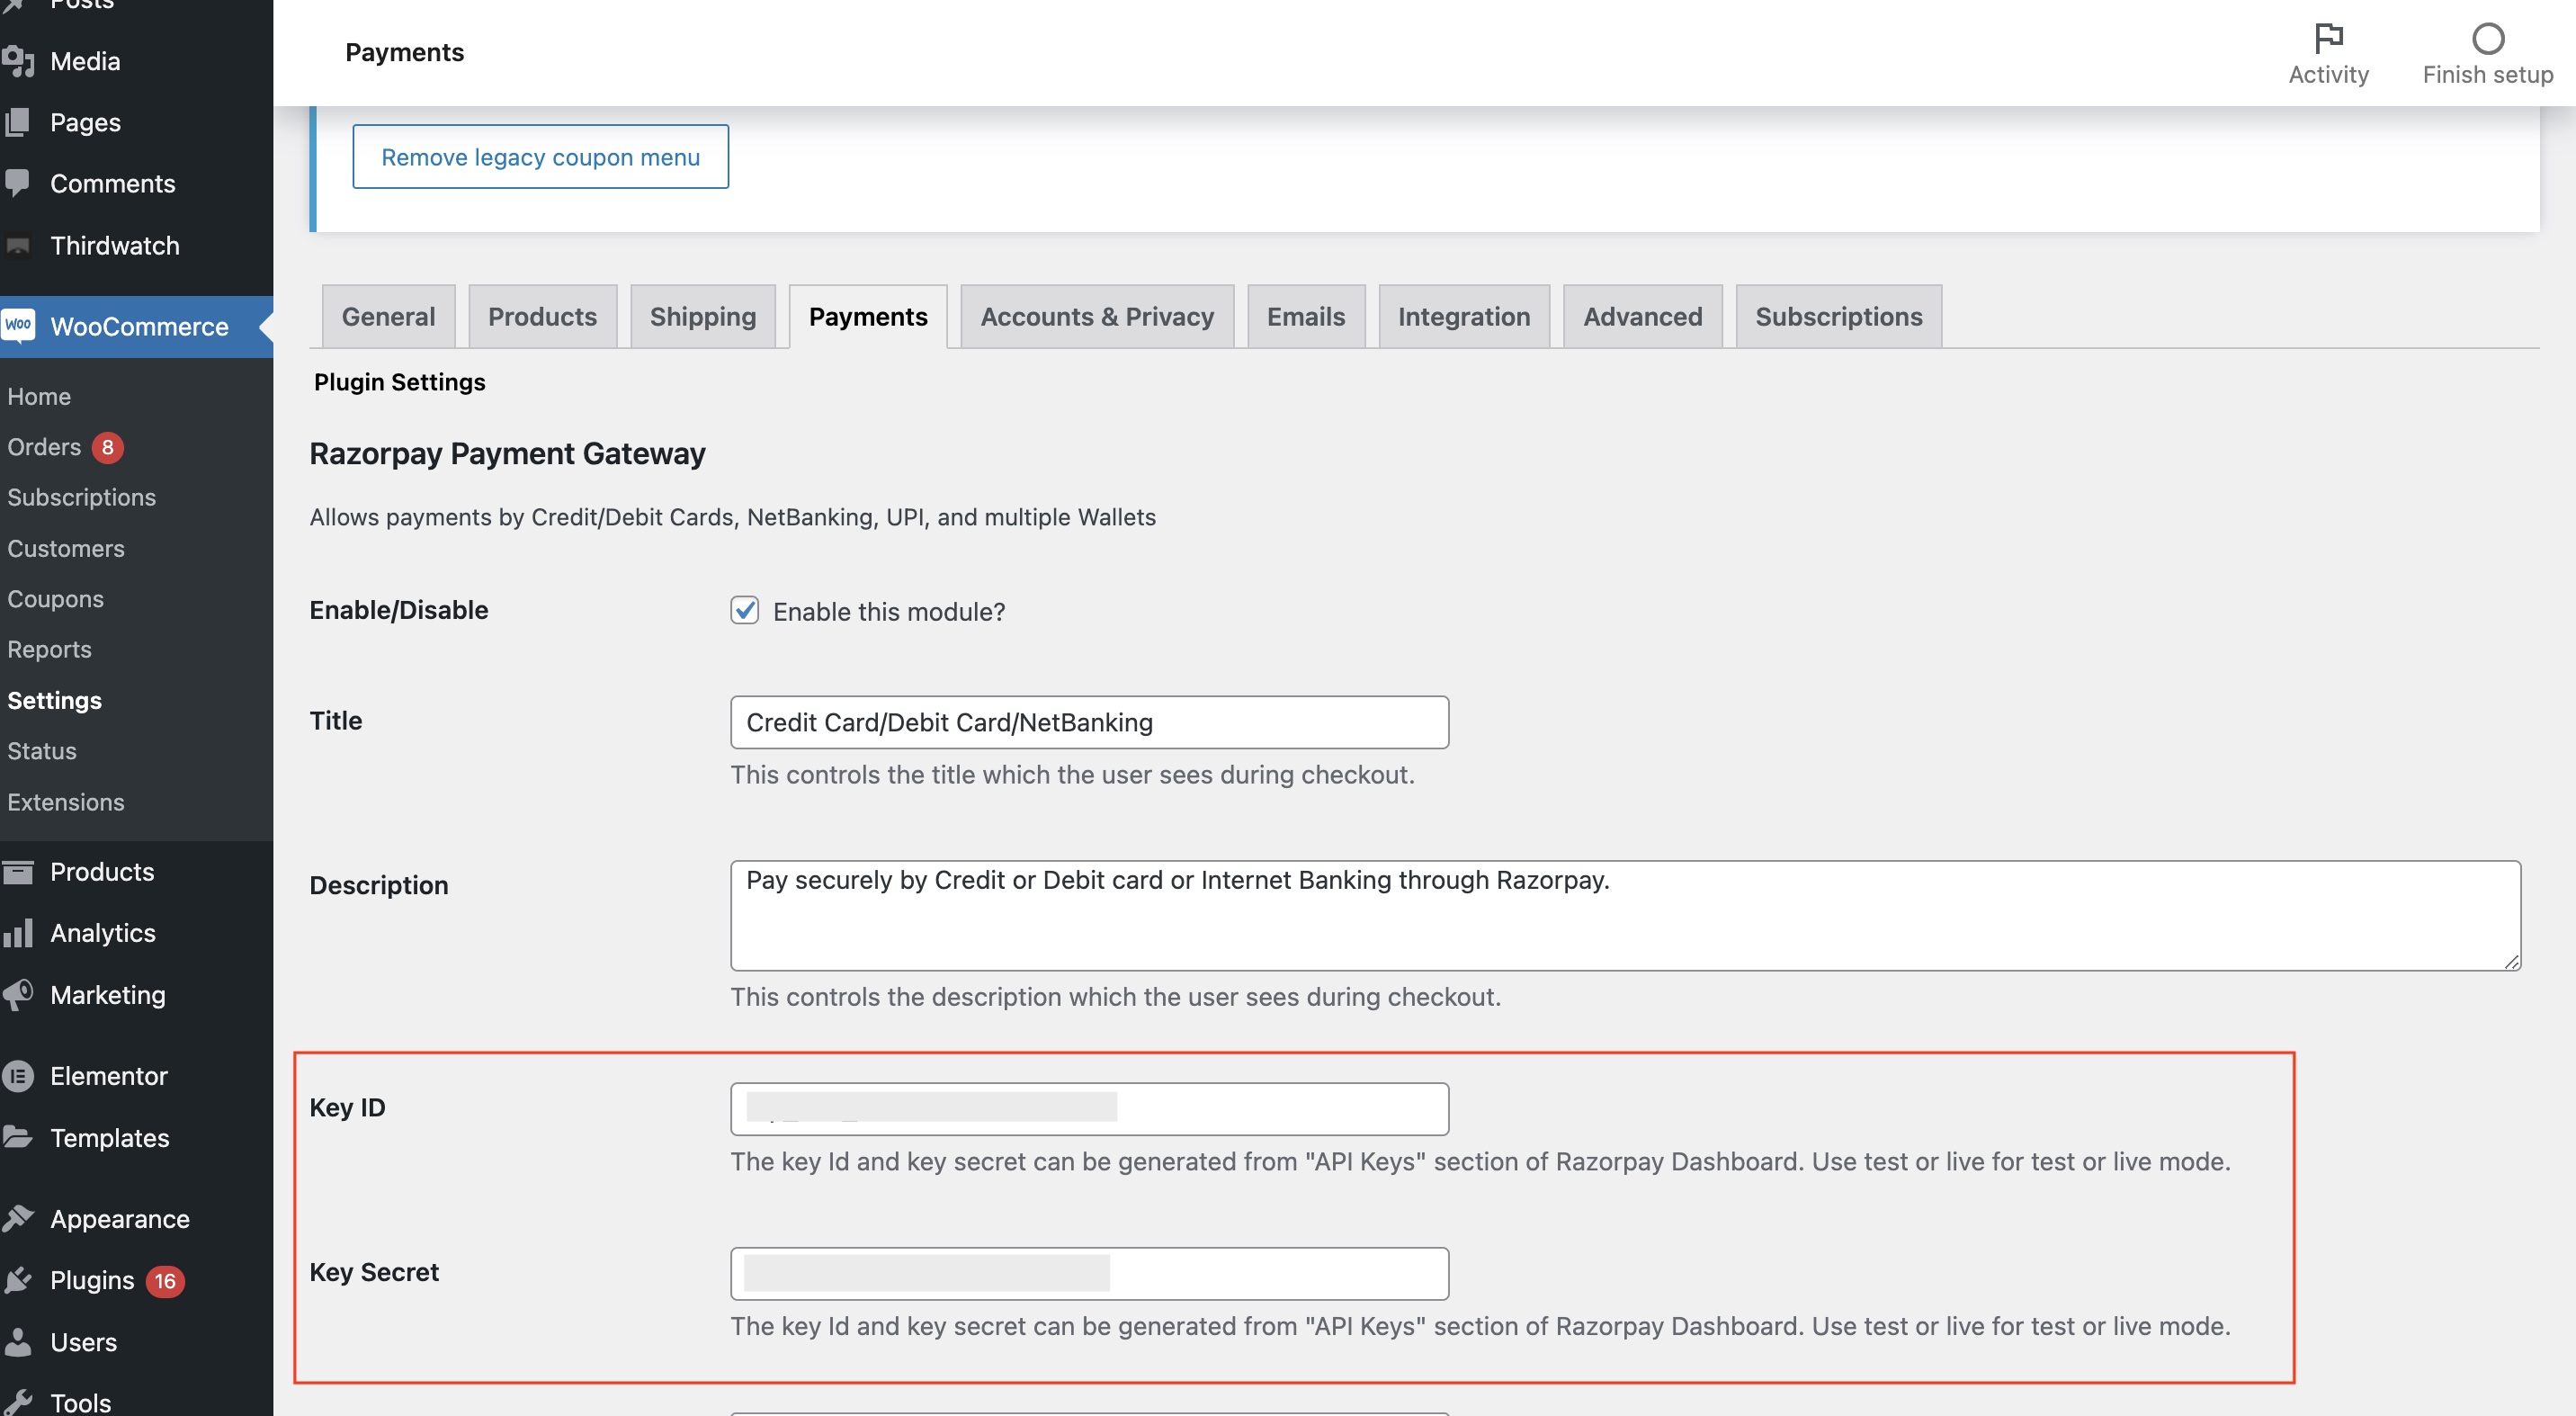
- In the Plugin Settings, enter the Key ID and Key Secret generated from the Dashboard. Click Save Changes.
How does the integration work?
How does the integration work?
- Install the WooCommerce plugin version 4.3.4 directly from the WordPress Plugin Directory.
- Create a Razorpay account and follow the integration steps.
- You can enable the widget from the Dashboard.
How can I test the widget before taking it live?
How can I test the widget before taking it live?
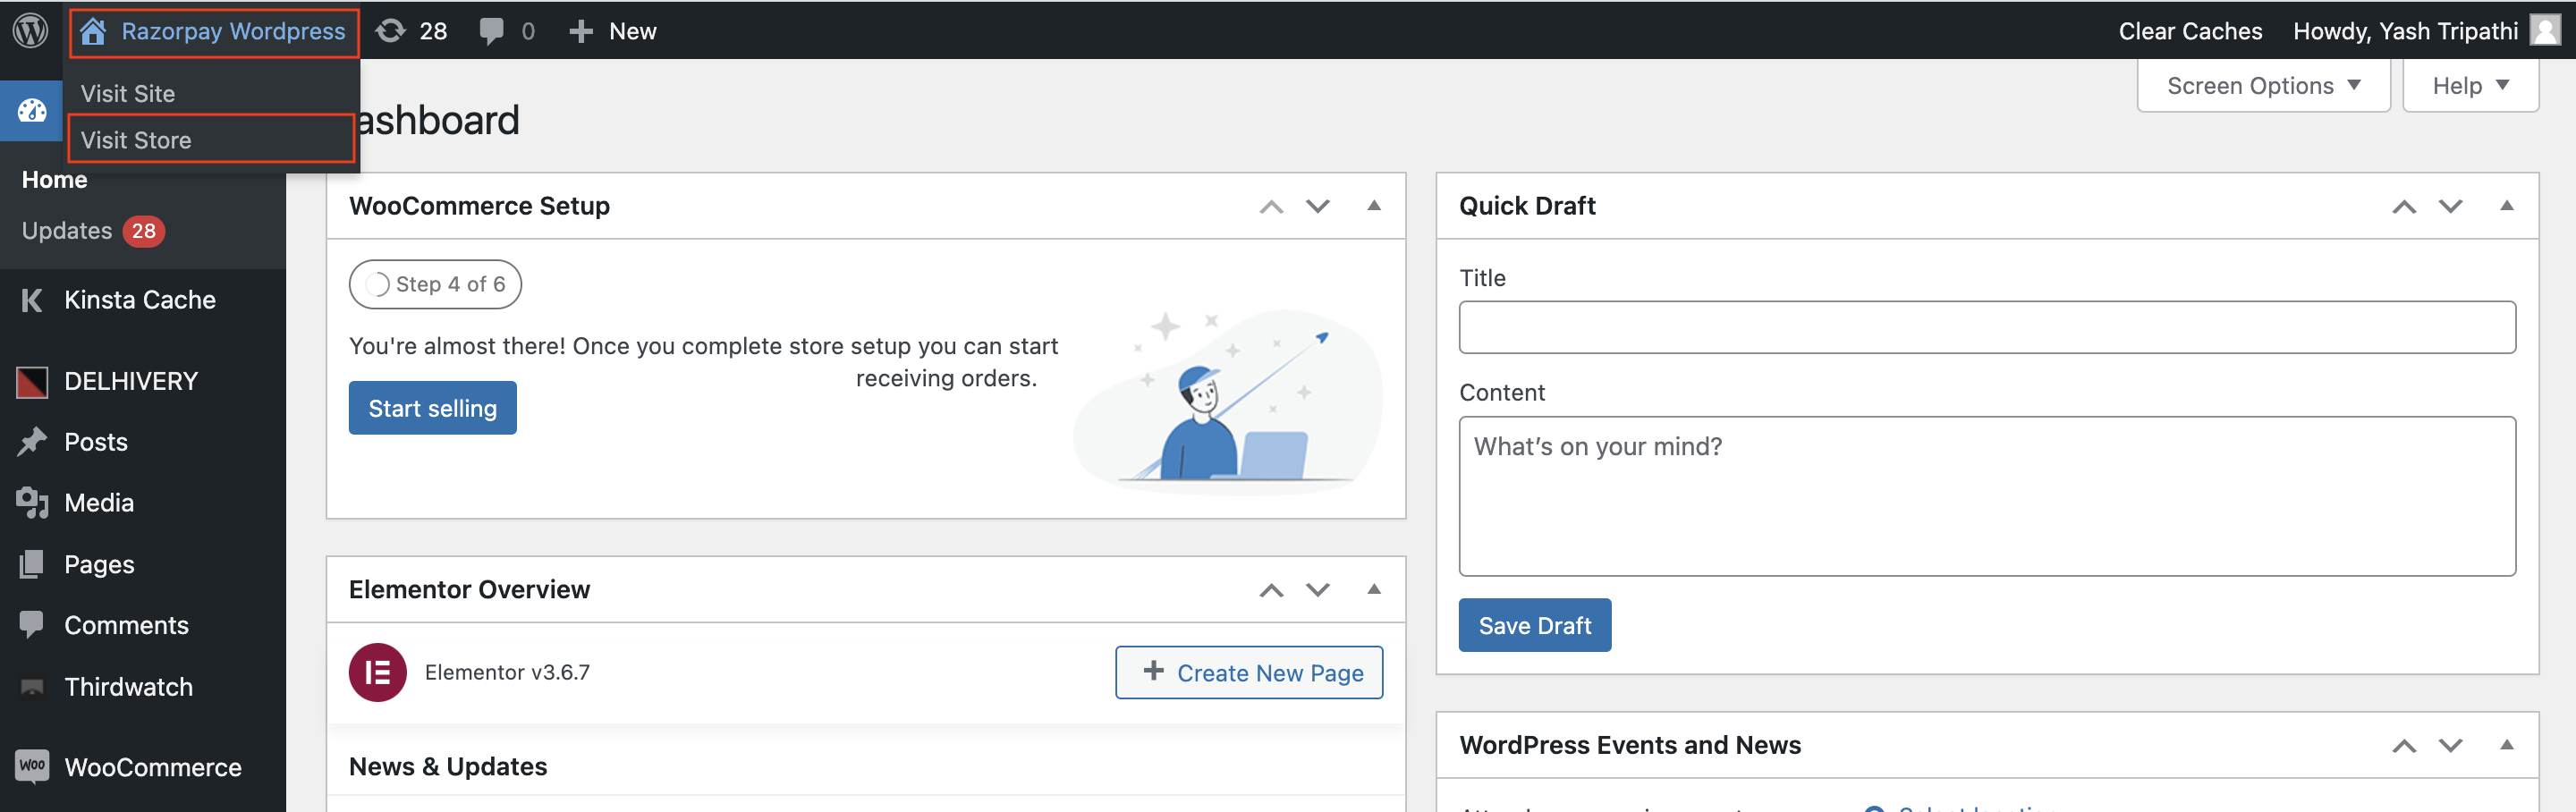
- On the WordPress Dashboard hover over Razorpay WordPress and click Visit Store.
- Click on a product to view the widget.
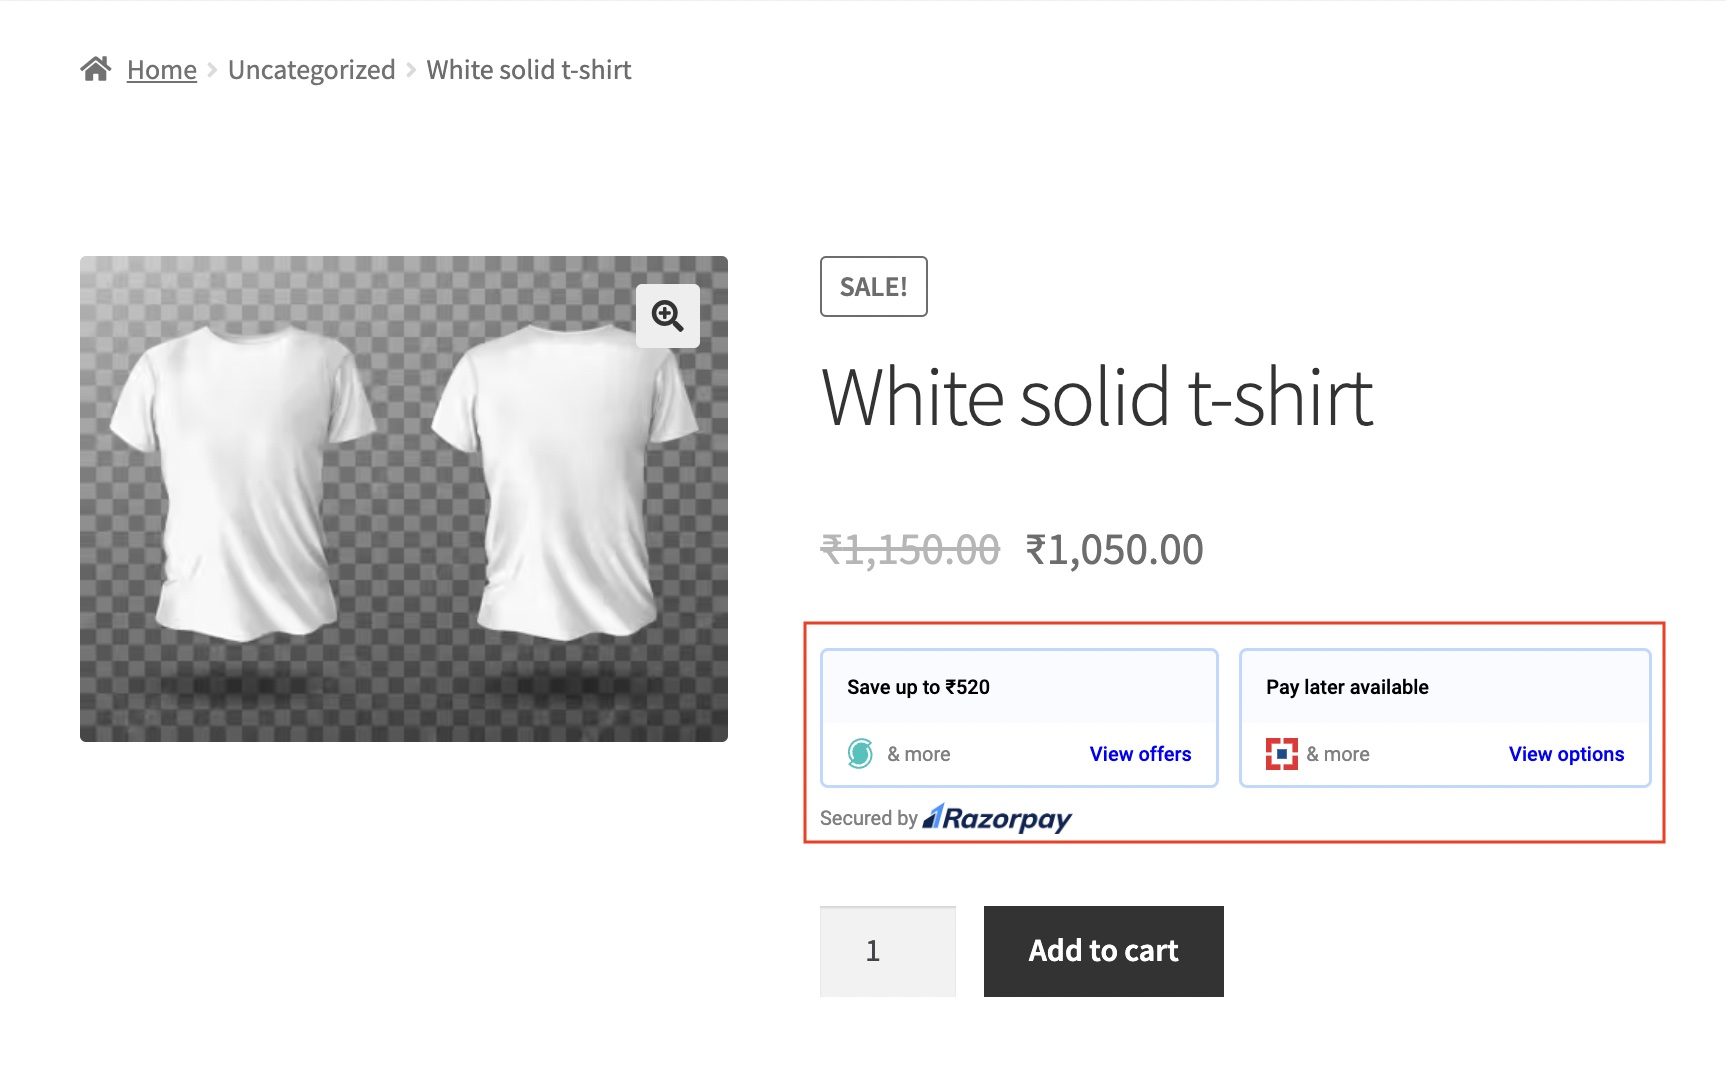
What customisations are possible in the widget?
What customisations are possible in the widget?
- Offers
- Payment Methods
- Theme
The Affordability widget does not appear on the product page. What should I do?
The Affordability widget does not appear on the product page. What should I do?
- Log in to your WP Rocket Dashboard.
- Navigate to the WP Rocket plugin’s settings page.
- Add
/widgets/affordability/affordability.jsto the following sections in your settings:- Navigate to ADVANCE RULES in the left menu → Never Cache URL(s)
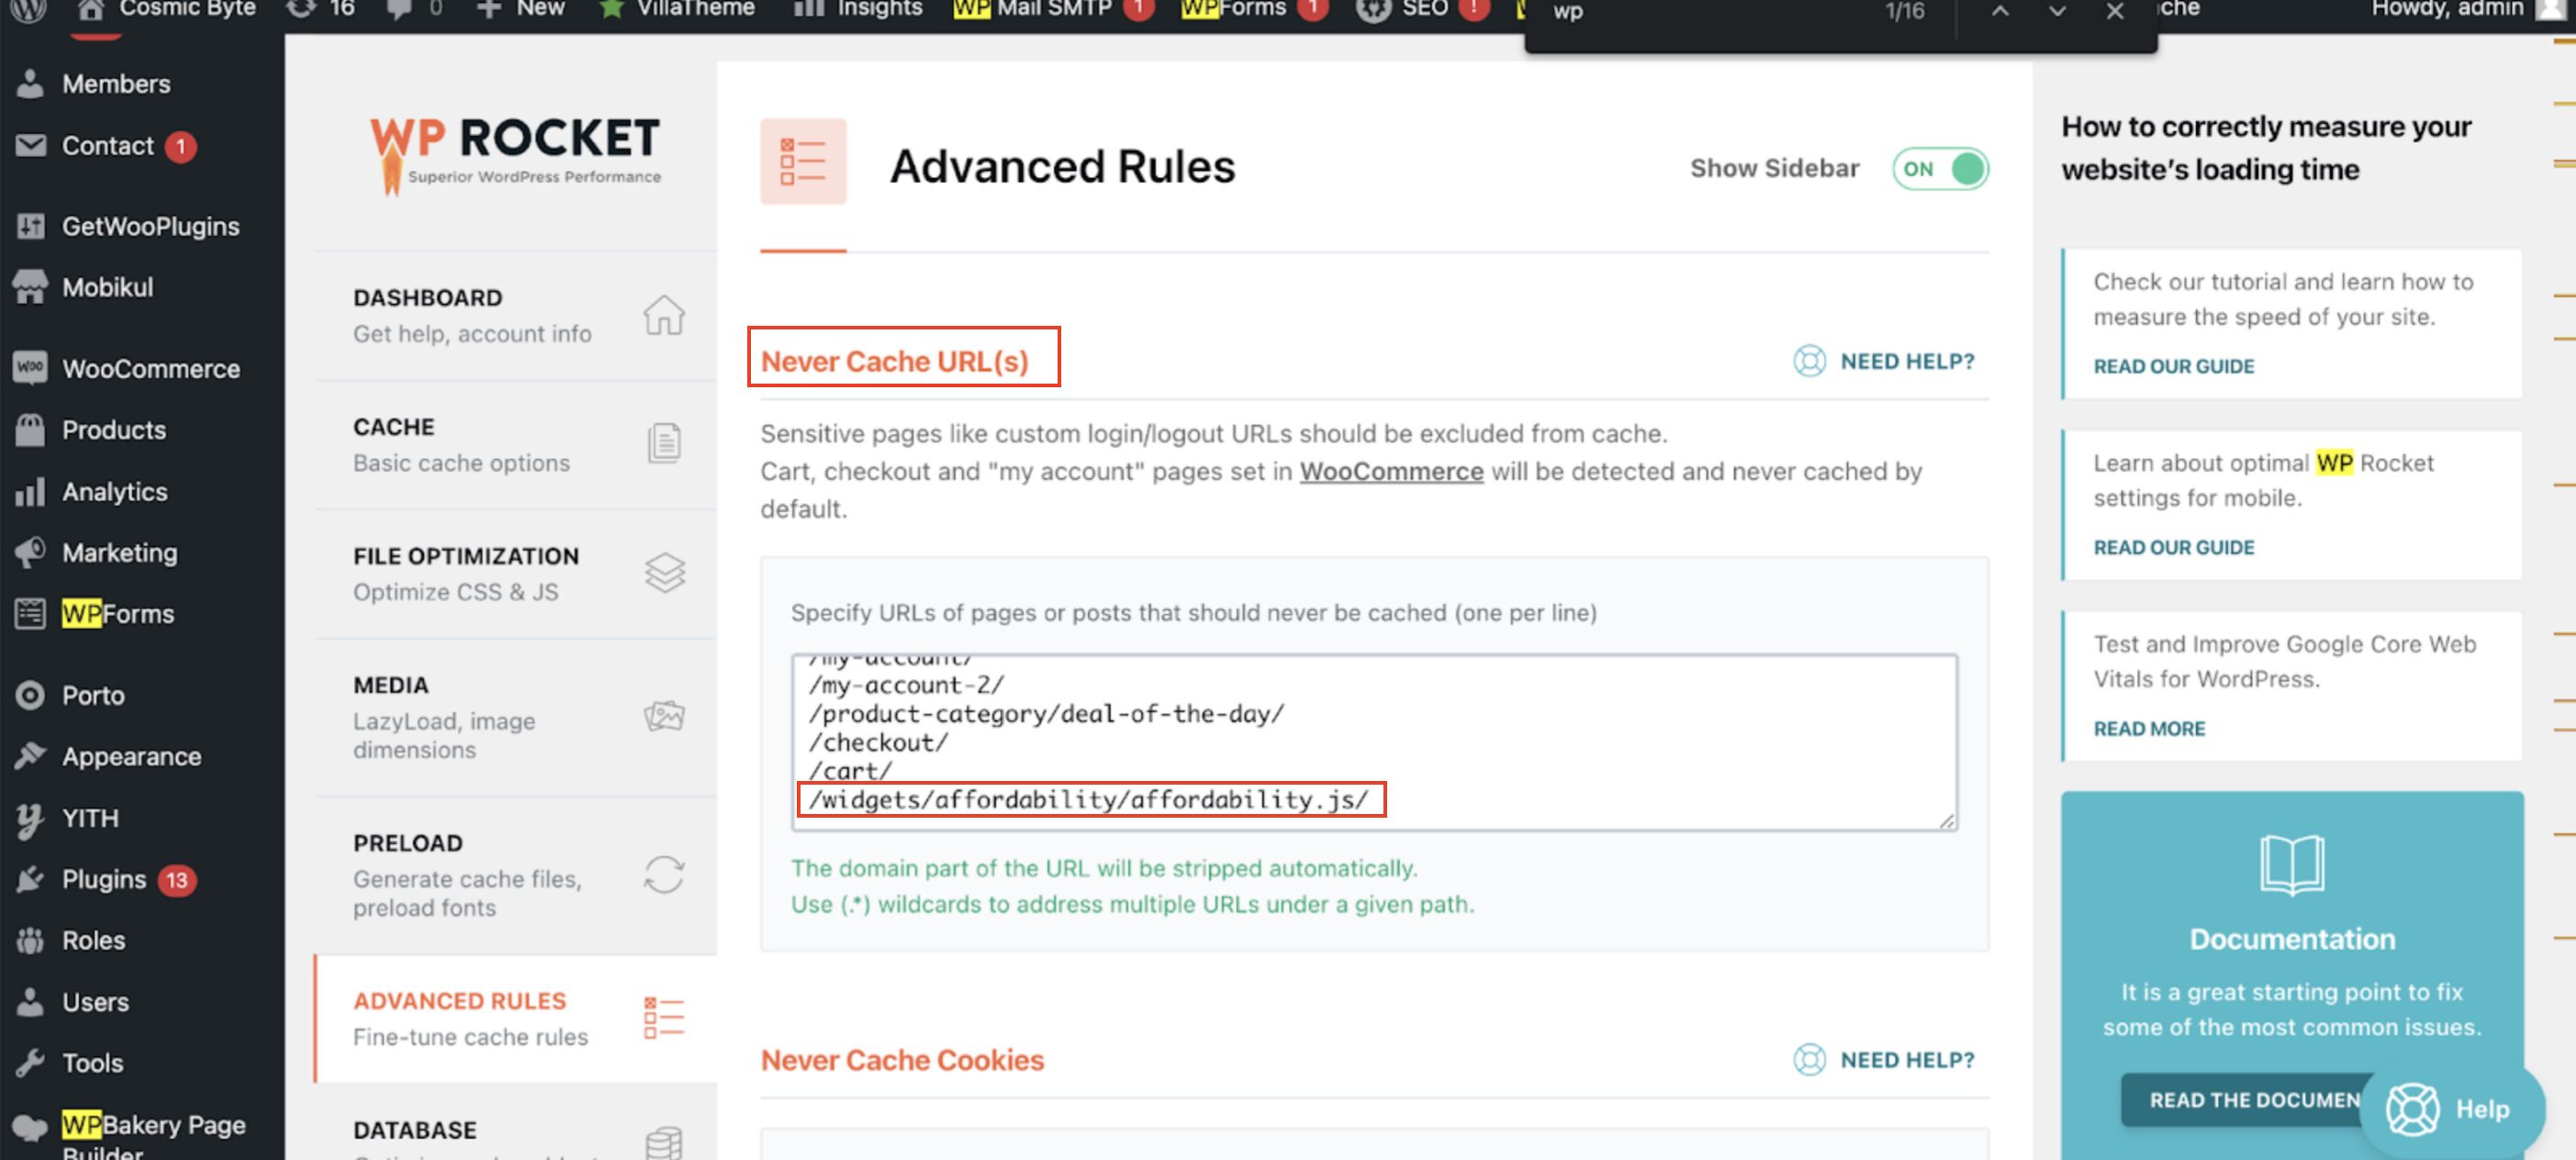
- Navigate to CDN in the left menu → Exclude files from CDN
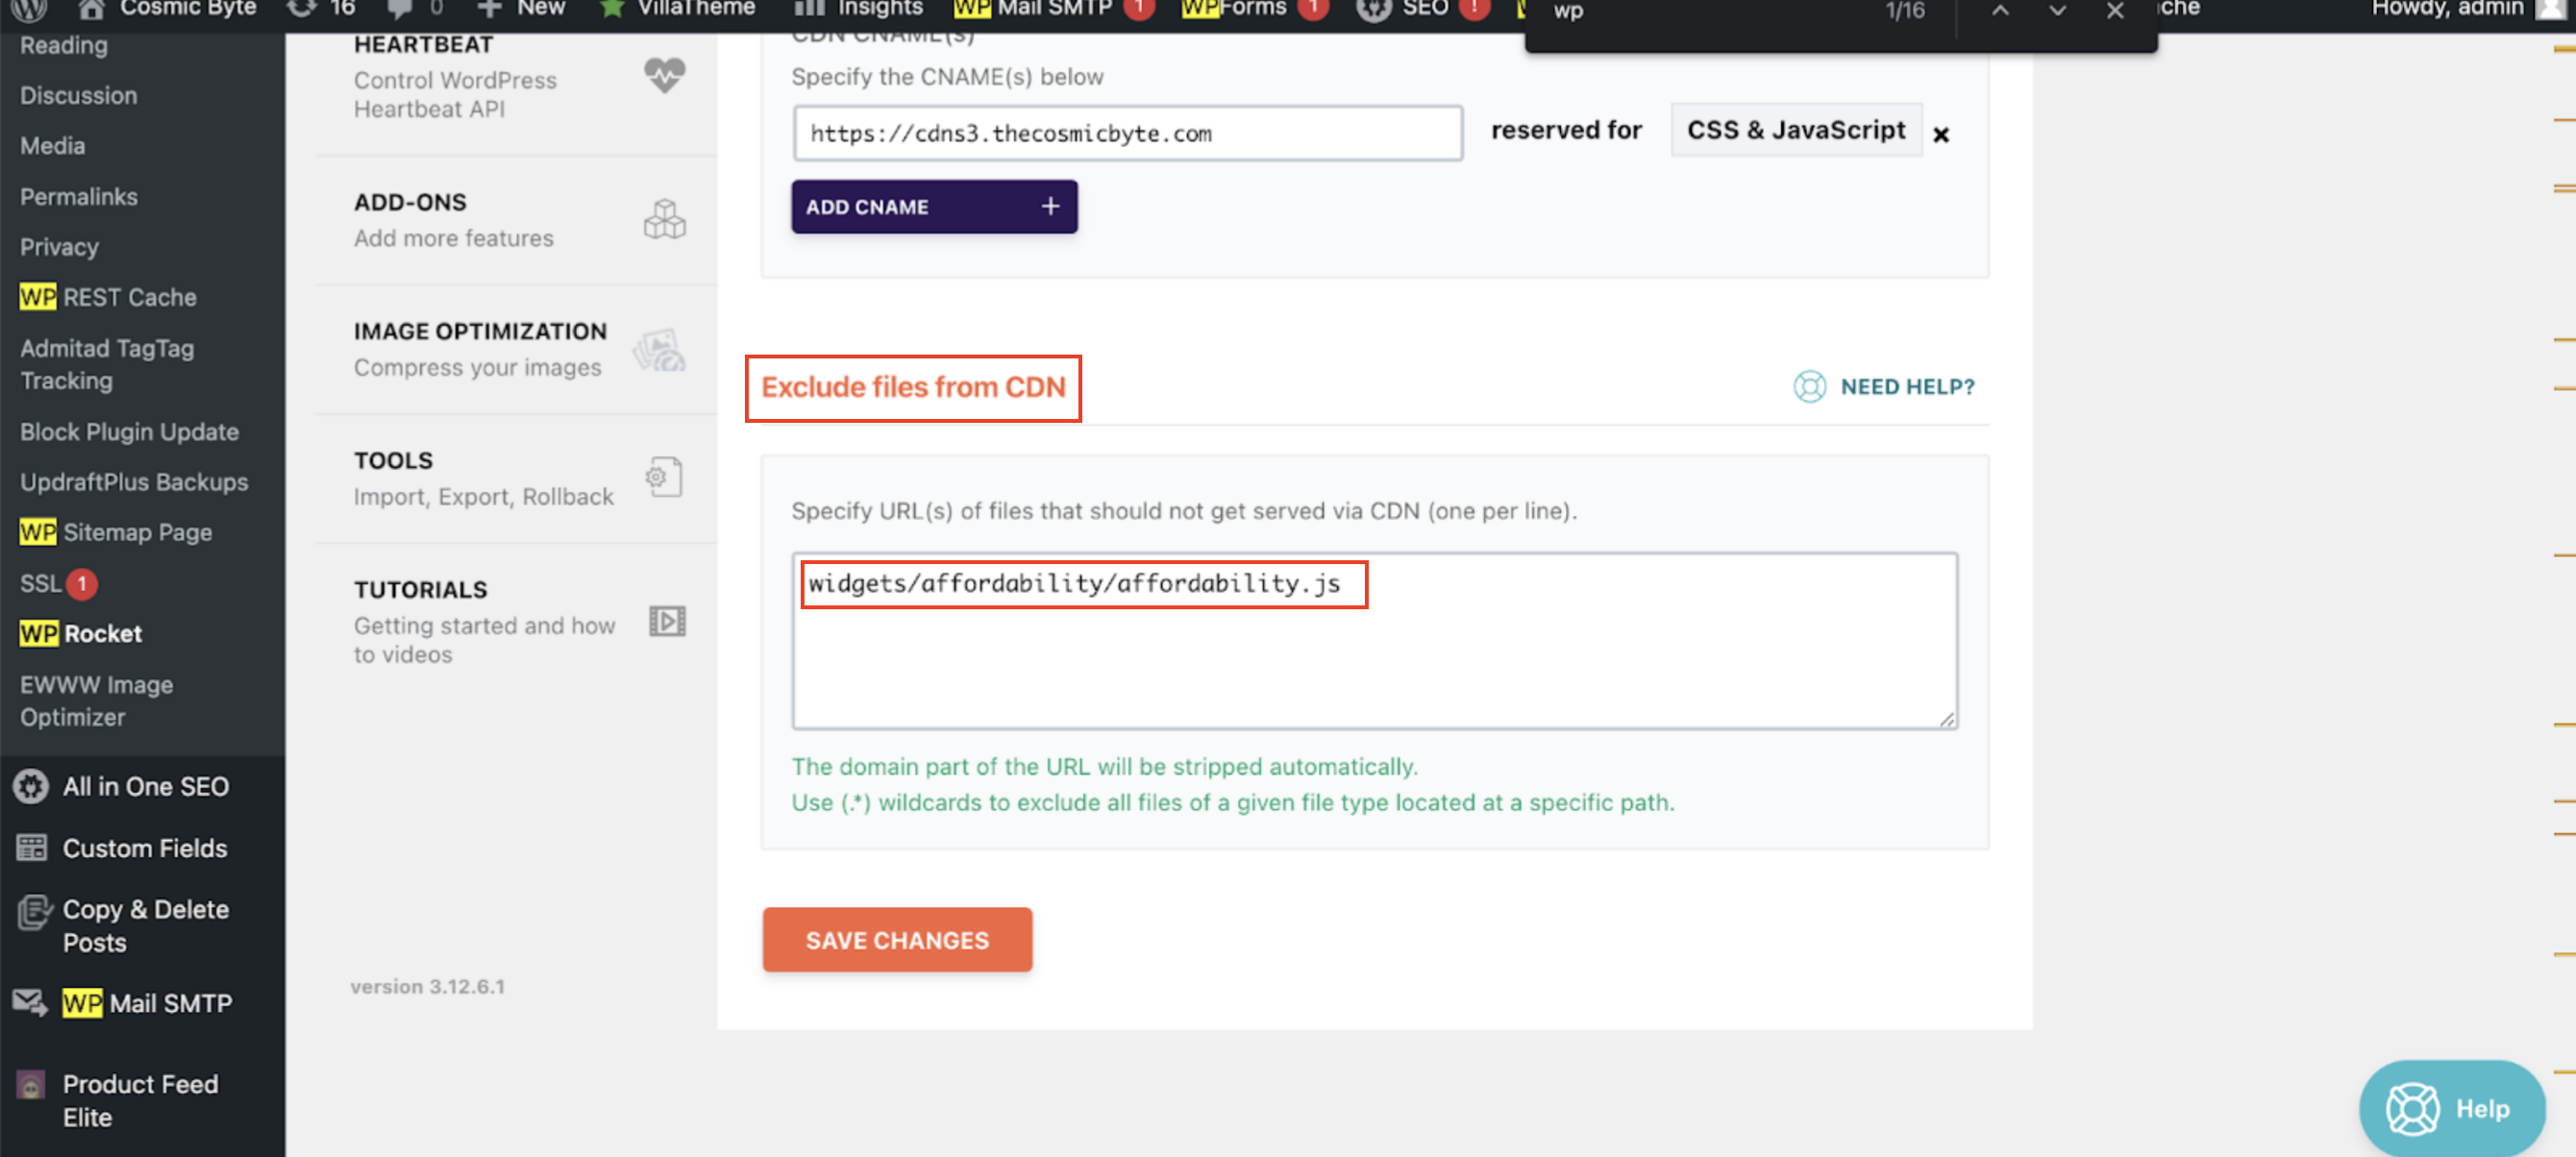
- Navigate to ADVANCE RULES in the left menu → Never Cache URL(s)
- Navigate to File Optimization in the left nav and enable Minify Javascript files and
- Add
/widgets/emi²/affordability.jswithin the Excluded Javascript Files section.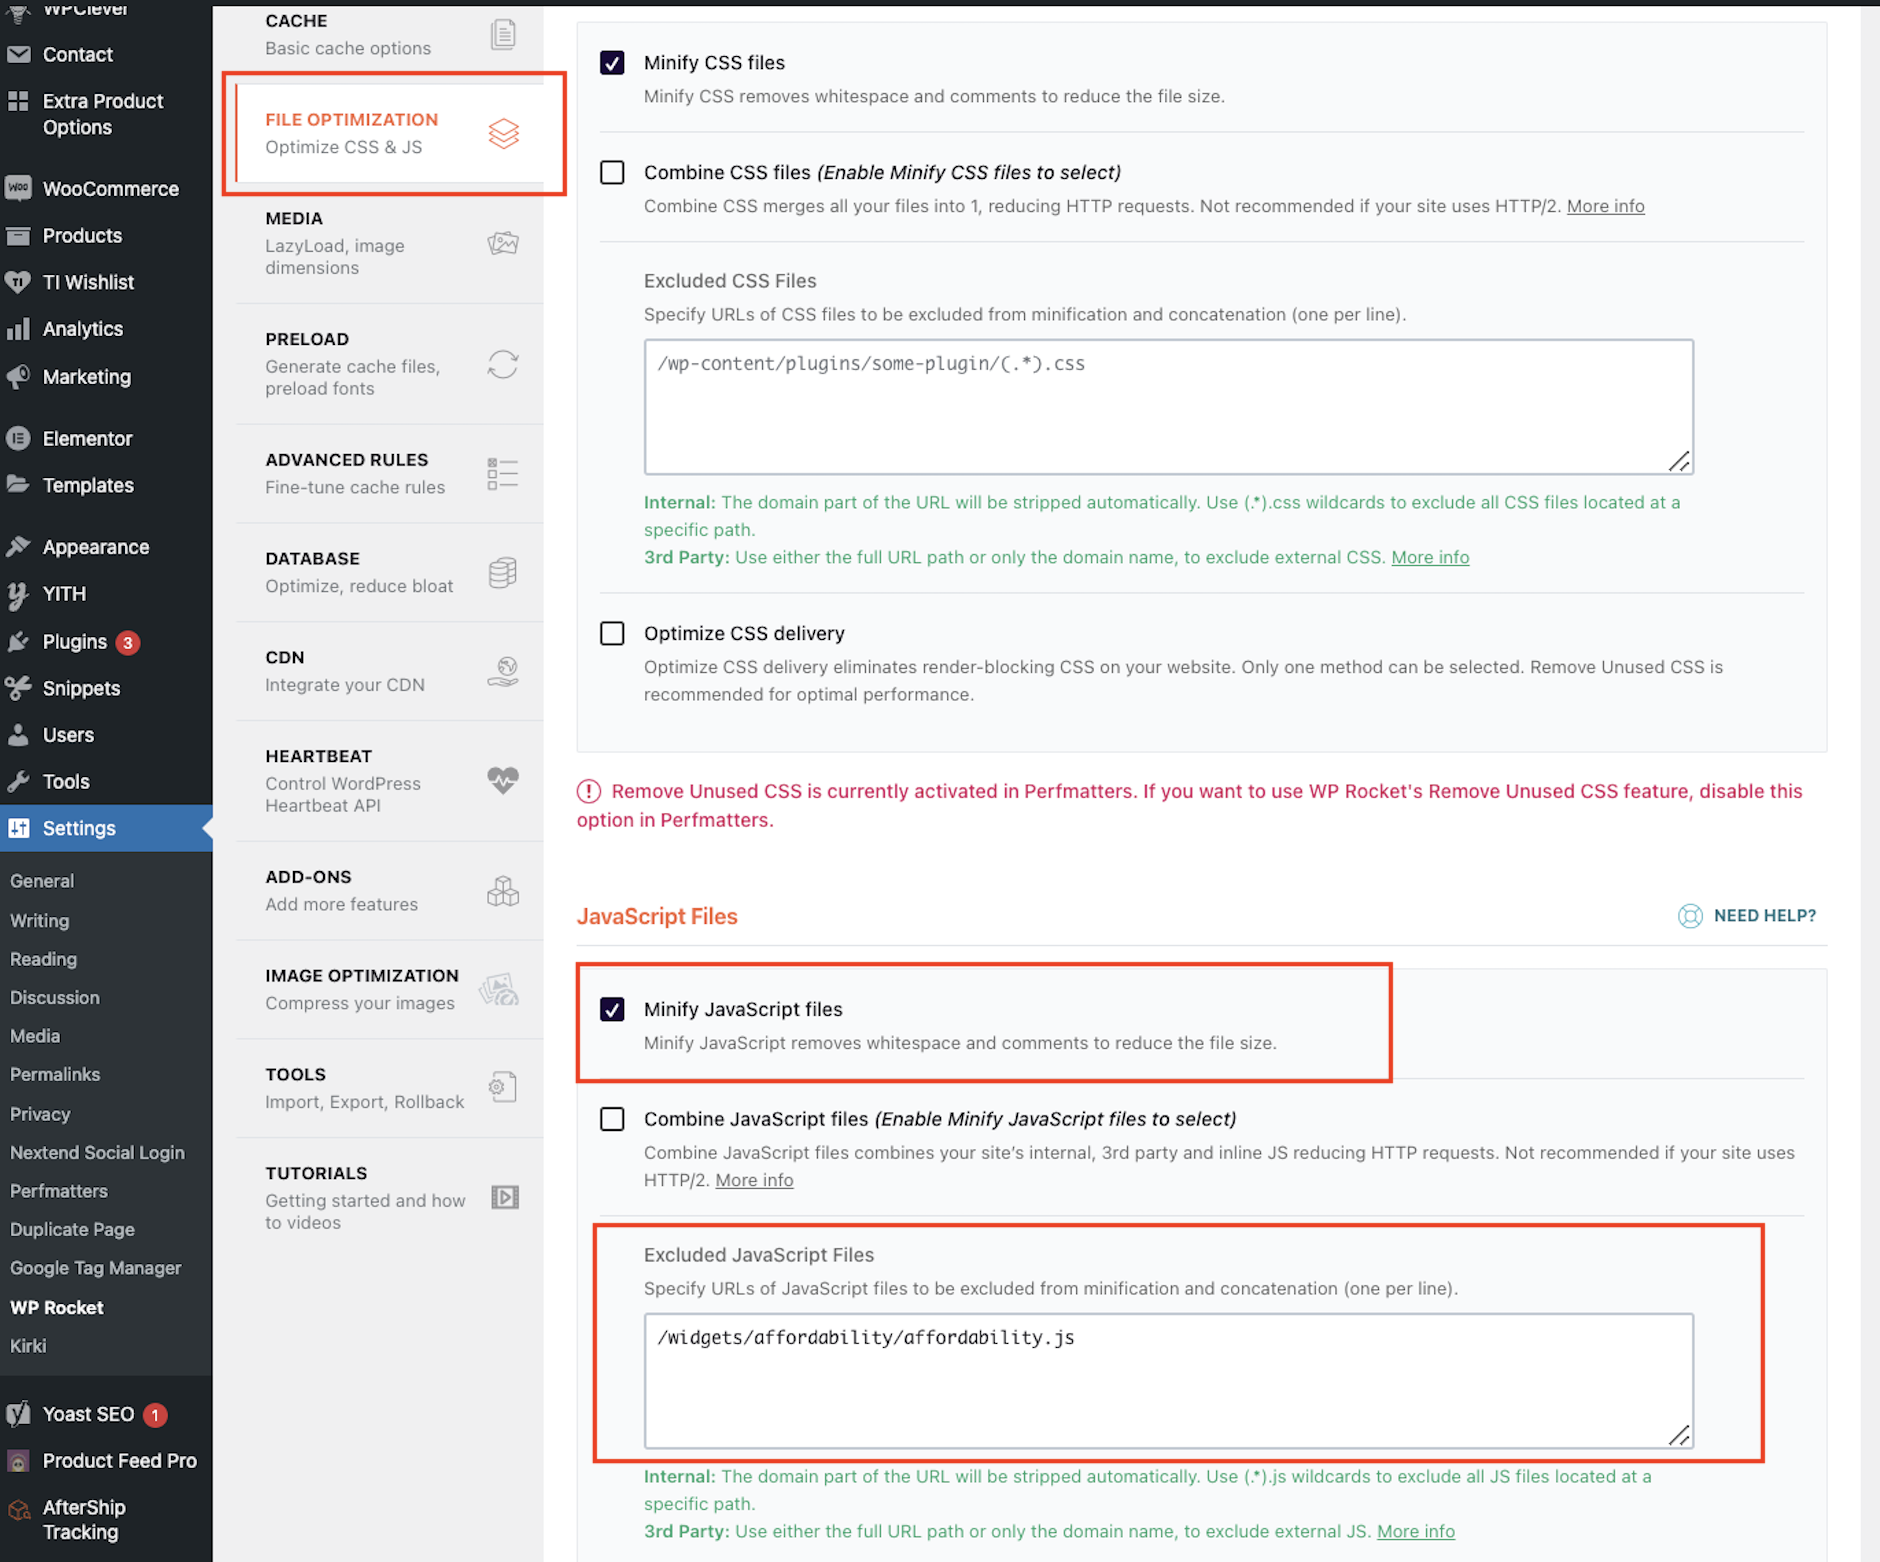
- Click SAVE CHANGES. The Affordability widget will appear again on your product page.
Shopify
How can I enable the widget on my Shopify store?
How can I enable the widget on my Shopify store?
- Enable the widget directly from your Shopify app.
- Create a Razorpay account and perform the EMI² integration steps on your Shopify store.
Where should I place the widget on my Shopify store?
Where should I place the widget on my Shopify store?
Where can I find the Razorpay Live API Key ID?
Where can I find the Razorpay Live API Key ID?
- Log in to the Dashboard in live mode and navigate to Account & Settings.
- In the Website and app settings section, click API keys.
- Click Generate new key and save the keys in your system.
I am not able to view the Widget on my Shopify Store. What should I do?
I am not able to view the Widget on my Shopify Store. What should I do?
What should I do if my current theme does not support Online Store Theme 2.0?
What should I do if my current theme does not support Online Store Theme 2.0?
- Check if any version updates are available for your current theme that supports Online Store Theme 2.0.
- Look for themes that explicitly mention compatibility with Online Store Theme 2.0.
- Fill in the integration support form in case you are still facing issues with the integration.
What customisations are possible in the widget?
What customisations are possible in the widget?
- Offers
- Payment Methods
- Theme
Know more about the customisation options.
Is the Affordability Widget compatible with all the free themes?
Is the Affordability Widget compatible with all the free themes?
What themes are compatible with the Razorpay Affordability Widget on the Shopify store?
What themes are compatible with the Razorpay Affordability Widget on the Shopify store?