

Available in🇮🇳 India
PhonePe Switch platform allows customers to switch seamlessly between PhonePe and their preferred apps within the PhonePe app itself. With a single tap, customers can log in to these apps without downloading them. For example, customers can book cabs or hotel rooms right on the PhonePe app and utilize offers provided by PhonePe.
PhonePe enables various businesses to integrate their web apps or mobile sites with the Switch platform and instantly reach out to the PhonePe user base. By integrating Razorpay APIs with PhonePe Switch payment flow, you can accept in-app payments made by your customers without having to worry about handling settlements or reconciliation separately.
Feature RequestThis is an on-demand feature. Please raise a request with our Support team to get this feature activated on your Razorpay account.
User Flow
The user’s journey through this entire flow is outlined below:- Customers log in to the PhonePe app and click PhonePe Switch.
- In the PhonePe Switch, customers select your app, place orders and click Proceed to Pay.
- Customers are redirected to the PhonePe payment page.
- After the successful payment on the PhonePe payment page, customers are redirected to your website.
Prerequisites
Before integrating with the Checkout, run through this checklist:- Check if your webapp is integrated with PhonePe Switch.
- Understand the payment flow.
- Sign up for a Razorpay Account.
- Generate the API keys from the Dashboard. Use the test API Keys to test out the integration.
Integration Steps
Steps to integrate Custom Checkout in your site:- Create an Order from your Server.
- Invoke Checkout and Pass Order Id and Other Options to it
- Include the JavaScript code in your Webpage.
- Instantiate Razorpay Custom Checkout.
- Submit Payment Details.
- Store Fields in Your Server.
- Verify the Signature.
Step 1: Create an Order in your Server
When a customer places an order on your website or application, use the details to create an order on Razorpay.POST /orders
Request Parameters
amount mandatory
: integer The transaction amount, expressed in the currency subunit, such as paise (in case of INR). For example, for an actual amount of ₹299.35, the value of this field should be 29935.
currency mandatory
: string The currency in which the transaction should be made. You can create Orders in INR only.
receipt optional
: string Your receipt ID for this order can be passed here. Maximum length is 40 characters.phonepe_switch_context optional
notes optional
: object Key-value pair that can be used to store additional information about the entity. Maximum 15 key-value pairs, 256 characters (maximum) each. For example, "note_key": "Beam me up Scotty”.
Step 2: Invoke Checkout and Pass Order Id and Other Options to it
Step 2.1: Include the JavaScript code in your Webpage
Include the following script, preferably in<head> section of your page:
Index HTML
Including the Javascript, not the LibraryInclude the script from
https://checkout.razorpay.com/v1/razorpay.js instead of serving a copy from your own server. This allows new updates and bug fixes to the library to get automatically served to your application.We always maintain backward compatibility with our code.Step 2.2: Instantiate Razorpay Custom Checkout
Single Instance on a Page
Invoke a Single Instance
Multiple Instances on Same Page
If you need multiple razorpay instances on same page, you can globally set some of the options:Invoke Multiple Instances
Step 2.3: Submit Payment Details
Once the order is created and the customer’s payment details are obtained, the information should be sent to Razorpay to complete the payment. The data that needs to be submitted depends upon the payment method selected by the customer. You can do this by invokingcreatePayment method:
Handler Function vs Callback URL
- Handler Function:
When you use the handler function, the response object of the successful payment (razorpay_payment_id,razorpay_order_idandrazorpay_signature) is submitted to the Checkout Form. You need to collect these and send them to your server. - Callback URL:
When you use a Callback URL, the response object of the successful payment (razorpay_payment_id,razorpay_order_idandrazorpay_signature) is submitted to the Callback URL.
Step 3: Store Fields in Your Server
A successful payment returns the following fields to the Checkout form.Success Callback
Success Callback
- You need to store these fields in your server.
- You can confirm the authenticity of these details by verifying the signature in the next step.
razorpay_payment_id
: string Unique identifier for the payment returned by Checkout only for successful payments.razorpay_order_id
: string Unique identifier for the order returned by Checkout.razorpay_signature
: string Signature returned by the Checkout. This is used to verify the payment.Step 4: Verify the Signature
This is a mandatory step to confirm the authenticity of the details returned to the Checkout form for successful payments.To verify the `razorpay_signature` returned to you by the Checkout form:
To verify the `razorpay_signature` returned to you by the Checkout form:
-
Create a signature in your server using the following attributes:
order_id: Retrieve theorder_idfrom your server. Do not use therazorpay_order_idreturned by Checkout.razorpay_payment_id: Returned by Checkout.key_secret: Available in your server. Thekey_secretthat was generated from the Dashboard.
-
Use the SHA256 algorithm, the
razorpay_payment_idand theorder_idto construct a HMAC hex digest as shown below:
HMAC Hex Digest
- If the signature you generate on your server matches the
razorpay_signaturereturned to you by the Checkout form, the payment received is from an authentic source.
Generate Signature on Your Server
Generate Signature on Your Server
Given below is the sample code for payment signature verification:
Post Signature Verification
Post Signature Verification
After you have completed the integration, you can set up webhooks, make test payments, replace the test key with the live key and integrate with other APIs.
Payment Capture Settings
After payment isauthorized, you need to capture it to settle the amount to your bank account as per the settlement schedule. Payments that are not captured are auto-refunded after a fixed time.
- Auto-capture Payments (Recommended)
- Manually Capture Payments
Authorized payments can be automatically captured. You can auto-capture all payments using global settings on the Razorpay Dashboard. Know more about capture settings for payments.
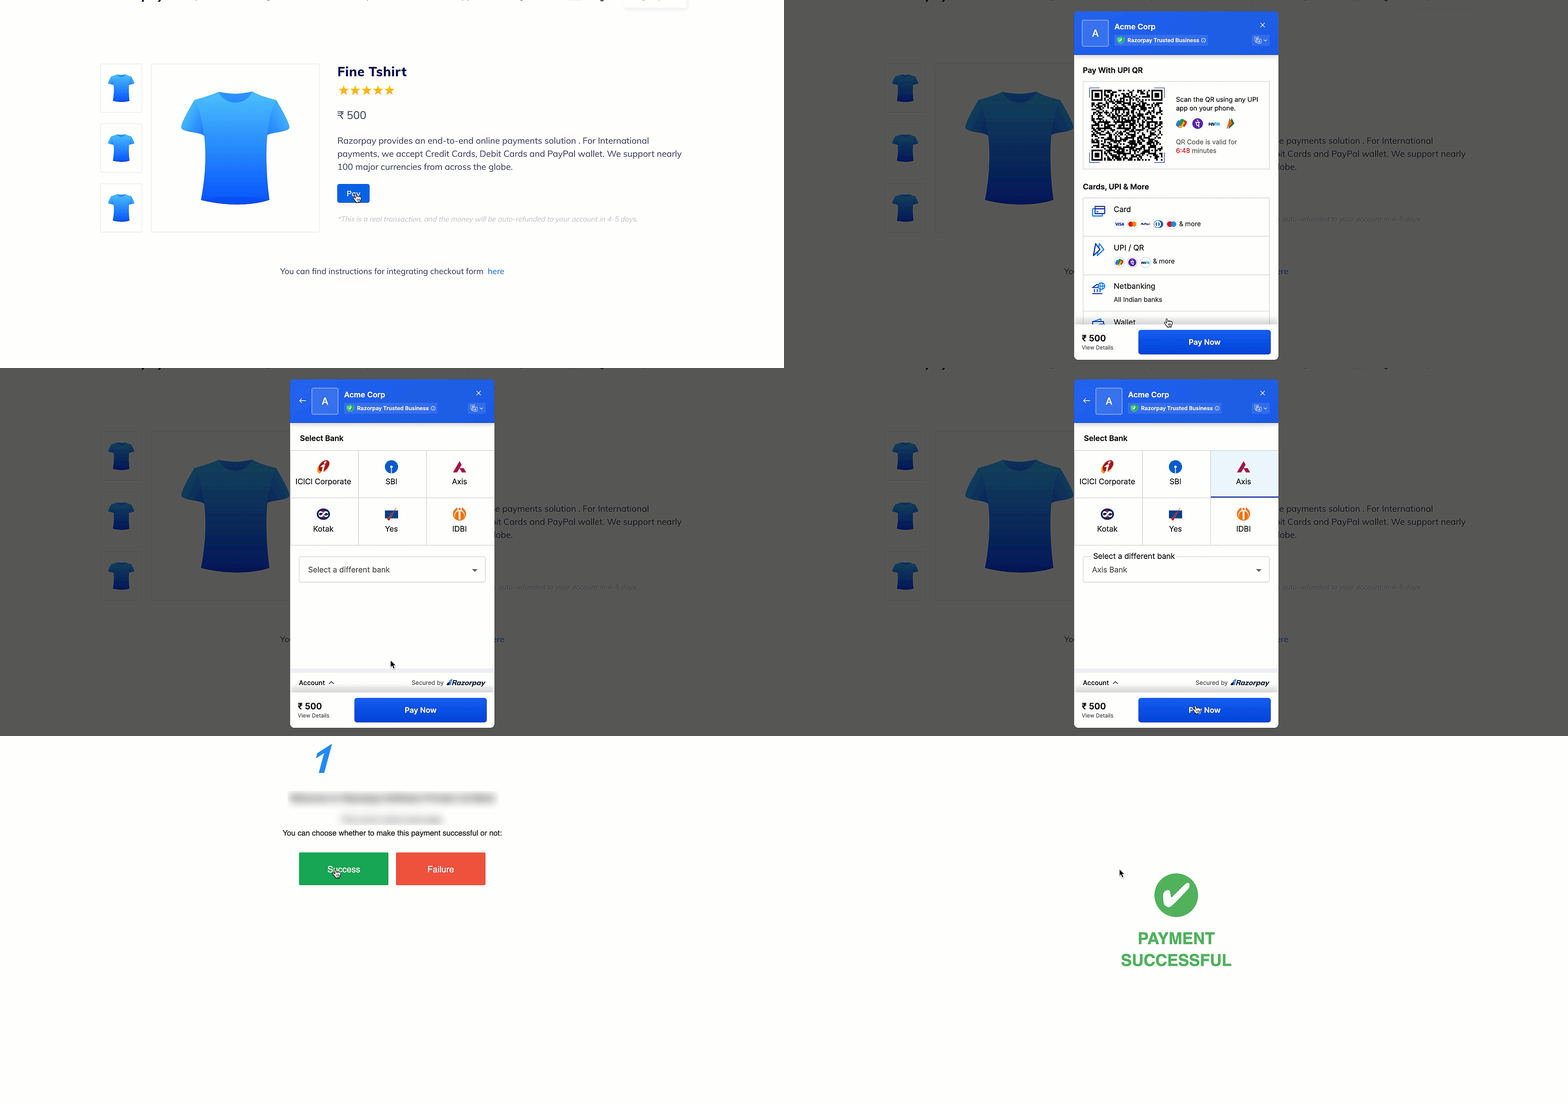 Click the button and make a test transaction to ensure the integration is working as expected. You can start accepting actual payments from your customers once the test transaction is successful.
Following are all the payment modes that the customer can use to complete the payment on the Checkout. Some of them are available by default, while others may require approval from us. Raise a request from the Dashboard to enable such payment methods.
Click the button and make a test transaction to ensure the integration is working as expected. You can start accepting actual payments from your customers once the test transaction is successful.
Following are all the payment modes that the customer can use to complete the payment on the Checkout. Some of them are available by default, while others may require approval from us. Raise a request from the Dashboard to enable such payment methods.
You can make test payments using one of the payment methods configured at the Checkout.
Netbanking
Netbanking
You can select any of the listed banks. After choosing a bank, Razorpay will redirect to a mock page where you can make the payment
success or a failure. Since this is Test Mode, we will not redirect you to the bank login portals.Check the list of supported banks.UPI
UPI
You can enter one of the following UPI IDs:
success@razorpay: To make the payment successful.failure@razorpay: To fail the payment.
Handy TipsYou can use Test Mode to test UPI payments, and Live Mode for UPI Intent and QR payments.
Cards
Cards
You can use the following test cards to test transactions for your integration in Test Mode.
Domestic Cards
Use the following test cards for Indian payments:Error Scenarios
Use these test cards to simulate payment errors. See the complete list of error test cards with detailed scenarios. Check the following lists:International Cards
Use the following test cards to test international payments. Use any valid expiration date in the future in the MM/YY format and any random CVV to create a successful payment.Check the list of supported card networks.
Wallet
Wallet
You can select any of the listed wallets. After choosing a wallet, Razorpay will redirect to a mock page where you can make the payment
success or a failure. Since this is Test Mode, we will not redirect you to the wallet login portals.Check the list of supported wallets.Related Information
- Webhooks (Recommended)
- Error Codes (Recommended)
- How Payment Gateway Works
- Payment States
- Settlements
- Refunds