

Available in🇮🇳 India
Payouts are transactions made to contacts. For every payout, you need to specify the amount, the contact, and the payout purpose. You become eligible to make payouts after you sign up, complete the account activation and KYC verification.
A payout transaction is made to a Fund account associated with a Contact. Contact is the beneficiary (person or institution) and Fund account is the account used for payment transactions.
What’s NewYou can now initiate payouts directly to mobile numbers using the Payout Composite API. This feature is currently not available on dashboard.
Features and Functions
Features and Functions
Payouts in RazorpayX come with variety of features and functions. You can:
- Add attachments to your payouts and help customers and clients reconcile payments.
- Create Payout Purpose as a narration to the payment to give context. You can create new or/and use the existing ones.
- Create and view Payout summary as created.
- Use the various supported payout modes to process payouts from RazorpayX Lite and Current Account.
- Make payouts in Test Mode to understand the payout process and life cycle.
How to Make Payouts
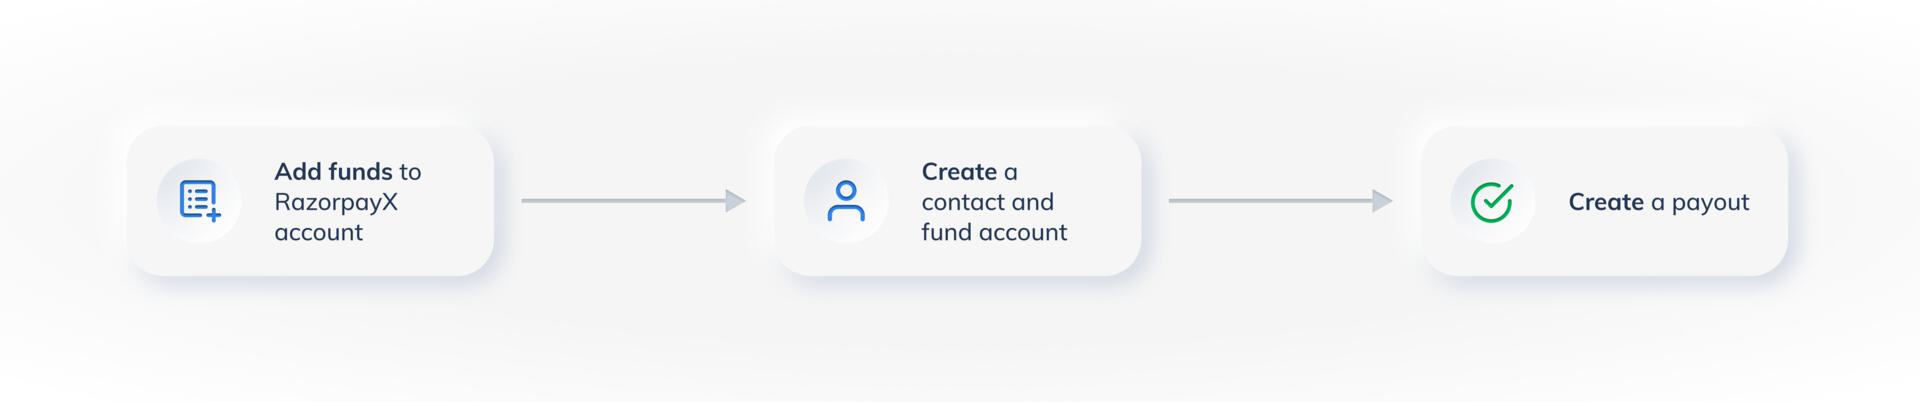
You can make payouts in 3 simple steps:- Add funds to your business account.
- Create a Contact and a Fund account. This is similar to adding a beneficiary on your netbanking portal. Know more about adding Contacts and Fund accounts.
- Make a payout.
Payouts DemoCheck out the RazorpayX Payouts Demo to understand how to create and make payouts in 4 simple steps. Experience making payouts in a jiffy, without having to sign up!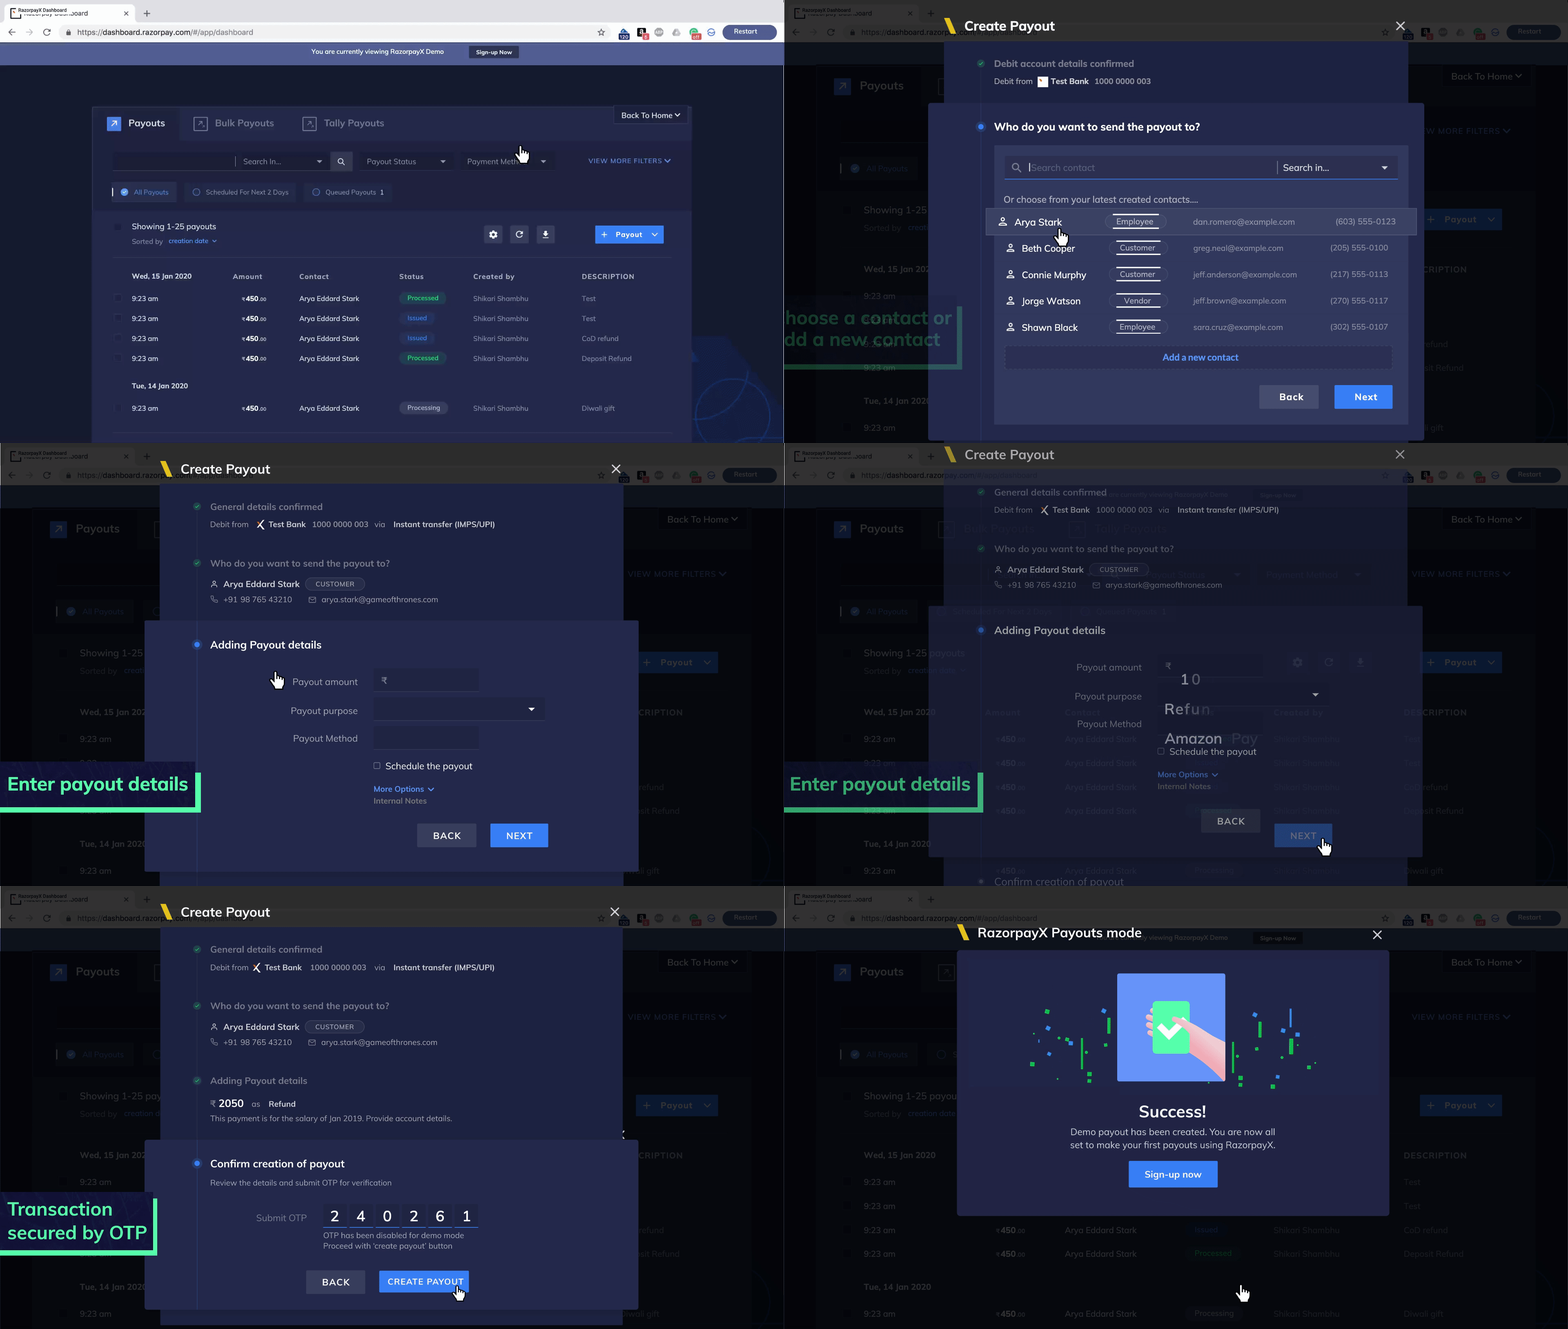
Create a Payout
Watch the video to know how to create payouts.
To make a Payout:
- Log in to the RazorpayX Dashboard.
- You can navigate to Payouts in two ways:
- Click + Payouts on the top-right side of the Dashboard or
- Hover over Payouts on the left navigation and click +.
- You can also click Payouts on the left navigation and then click + Payouts on the left side.
- Select an existing contact or create a new one.
- Hover over the fund account to which you want to make the payout and click NEXT or + FUND ACCOUNT as per requirement.
- Enter the total amount to be paid and click Next.
- Select the Payout Details:
- Payout Purpose (mandatory)
- Debit from (mandatory)
- Transfer Type (mandatory)
- Attachment (optional)
- Additional details (optional)
- Click Next. An OTP is sent to your registered mobile number and email id. Enter the OTP to confirm the Payout.
- Click Pay.
Is your payout in
processing state?You can check status details of a payout to know why it is in the processing state.- Status Details via API
- Status Details via Dashboard
- You can subscribe to daily reports to receive a detailed document on the status, reason for status and SLA for the payouts in
processing state. Raise a support ticket from the Dashboard, with a list of recipient email IDs. We will enable the function for you in 3 working days.
Watch Out!If you get the below response while trying to complete a payout, it is recommended to wait for sometime and retry the payout if required, after the status is updated on the Dashboard.
Payout Purpose
You can add a payout purpose as a narration to the payout as it leads to easier reconciliation. You can choose an existing purpose or create a new one while making the payout itself. You can add up to 400 Payout Purposes.Create Payout Purpose
Create Payout Purpose
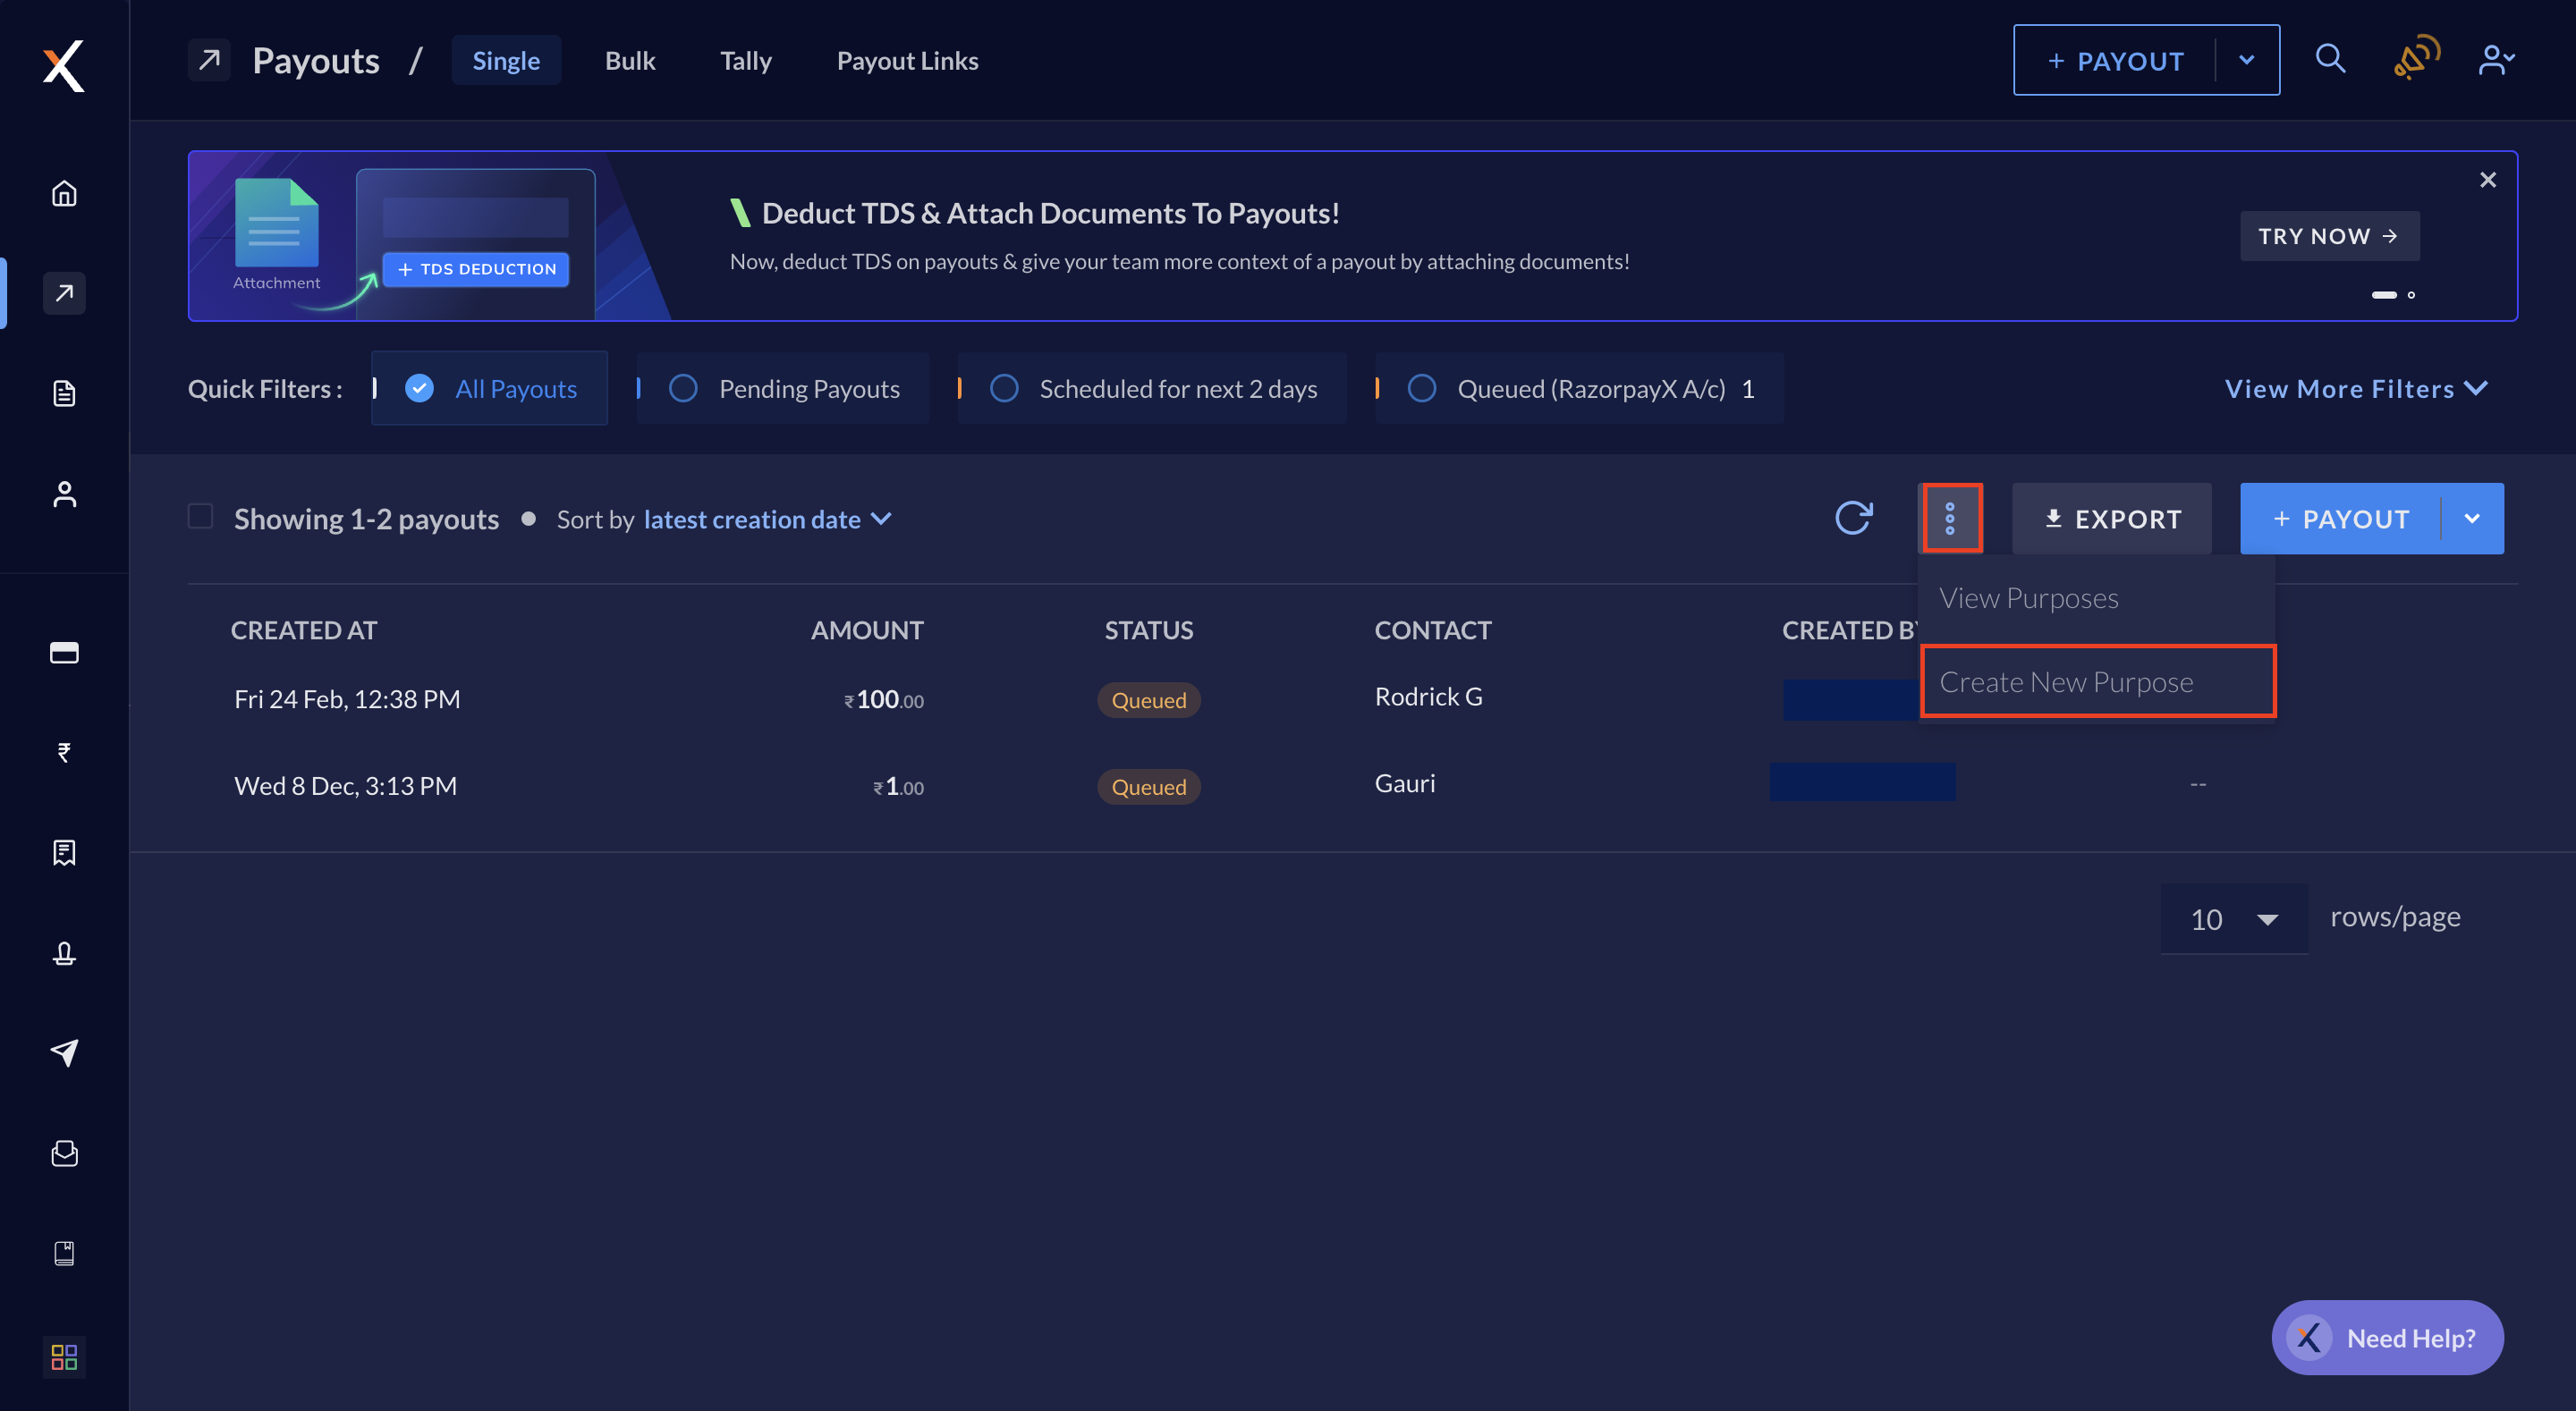
To create payout purpose via the Dashboard: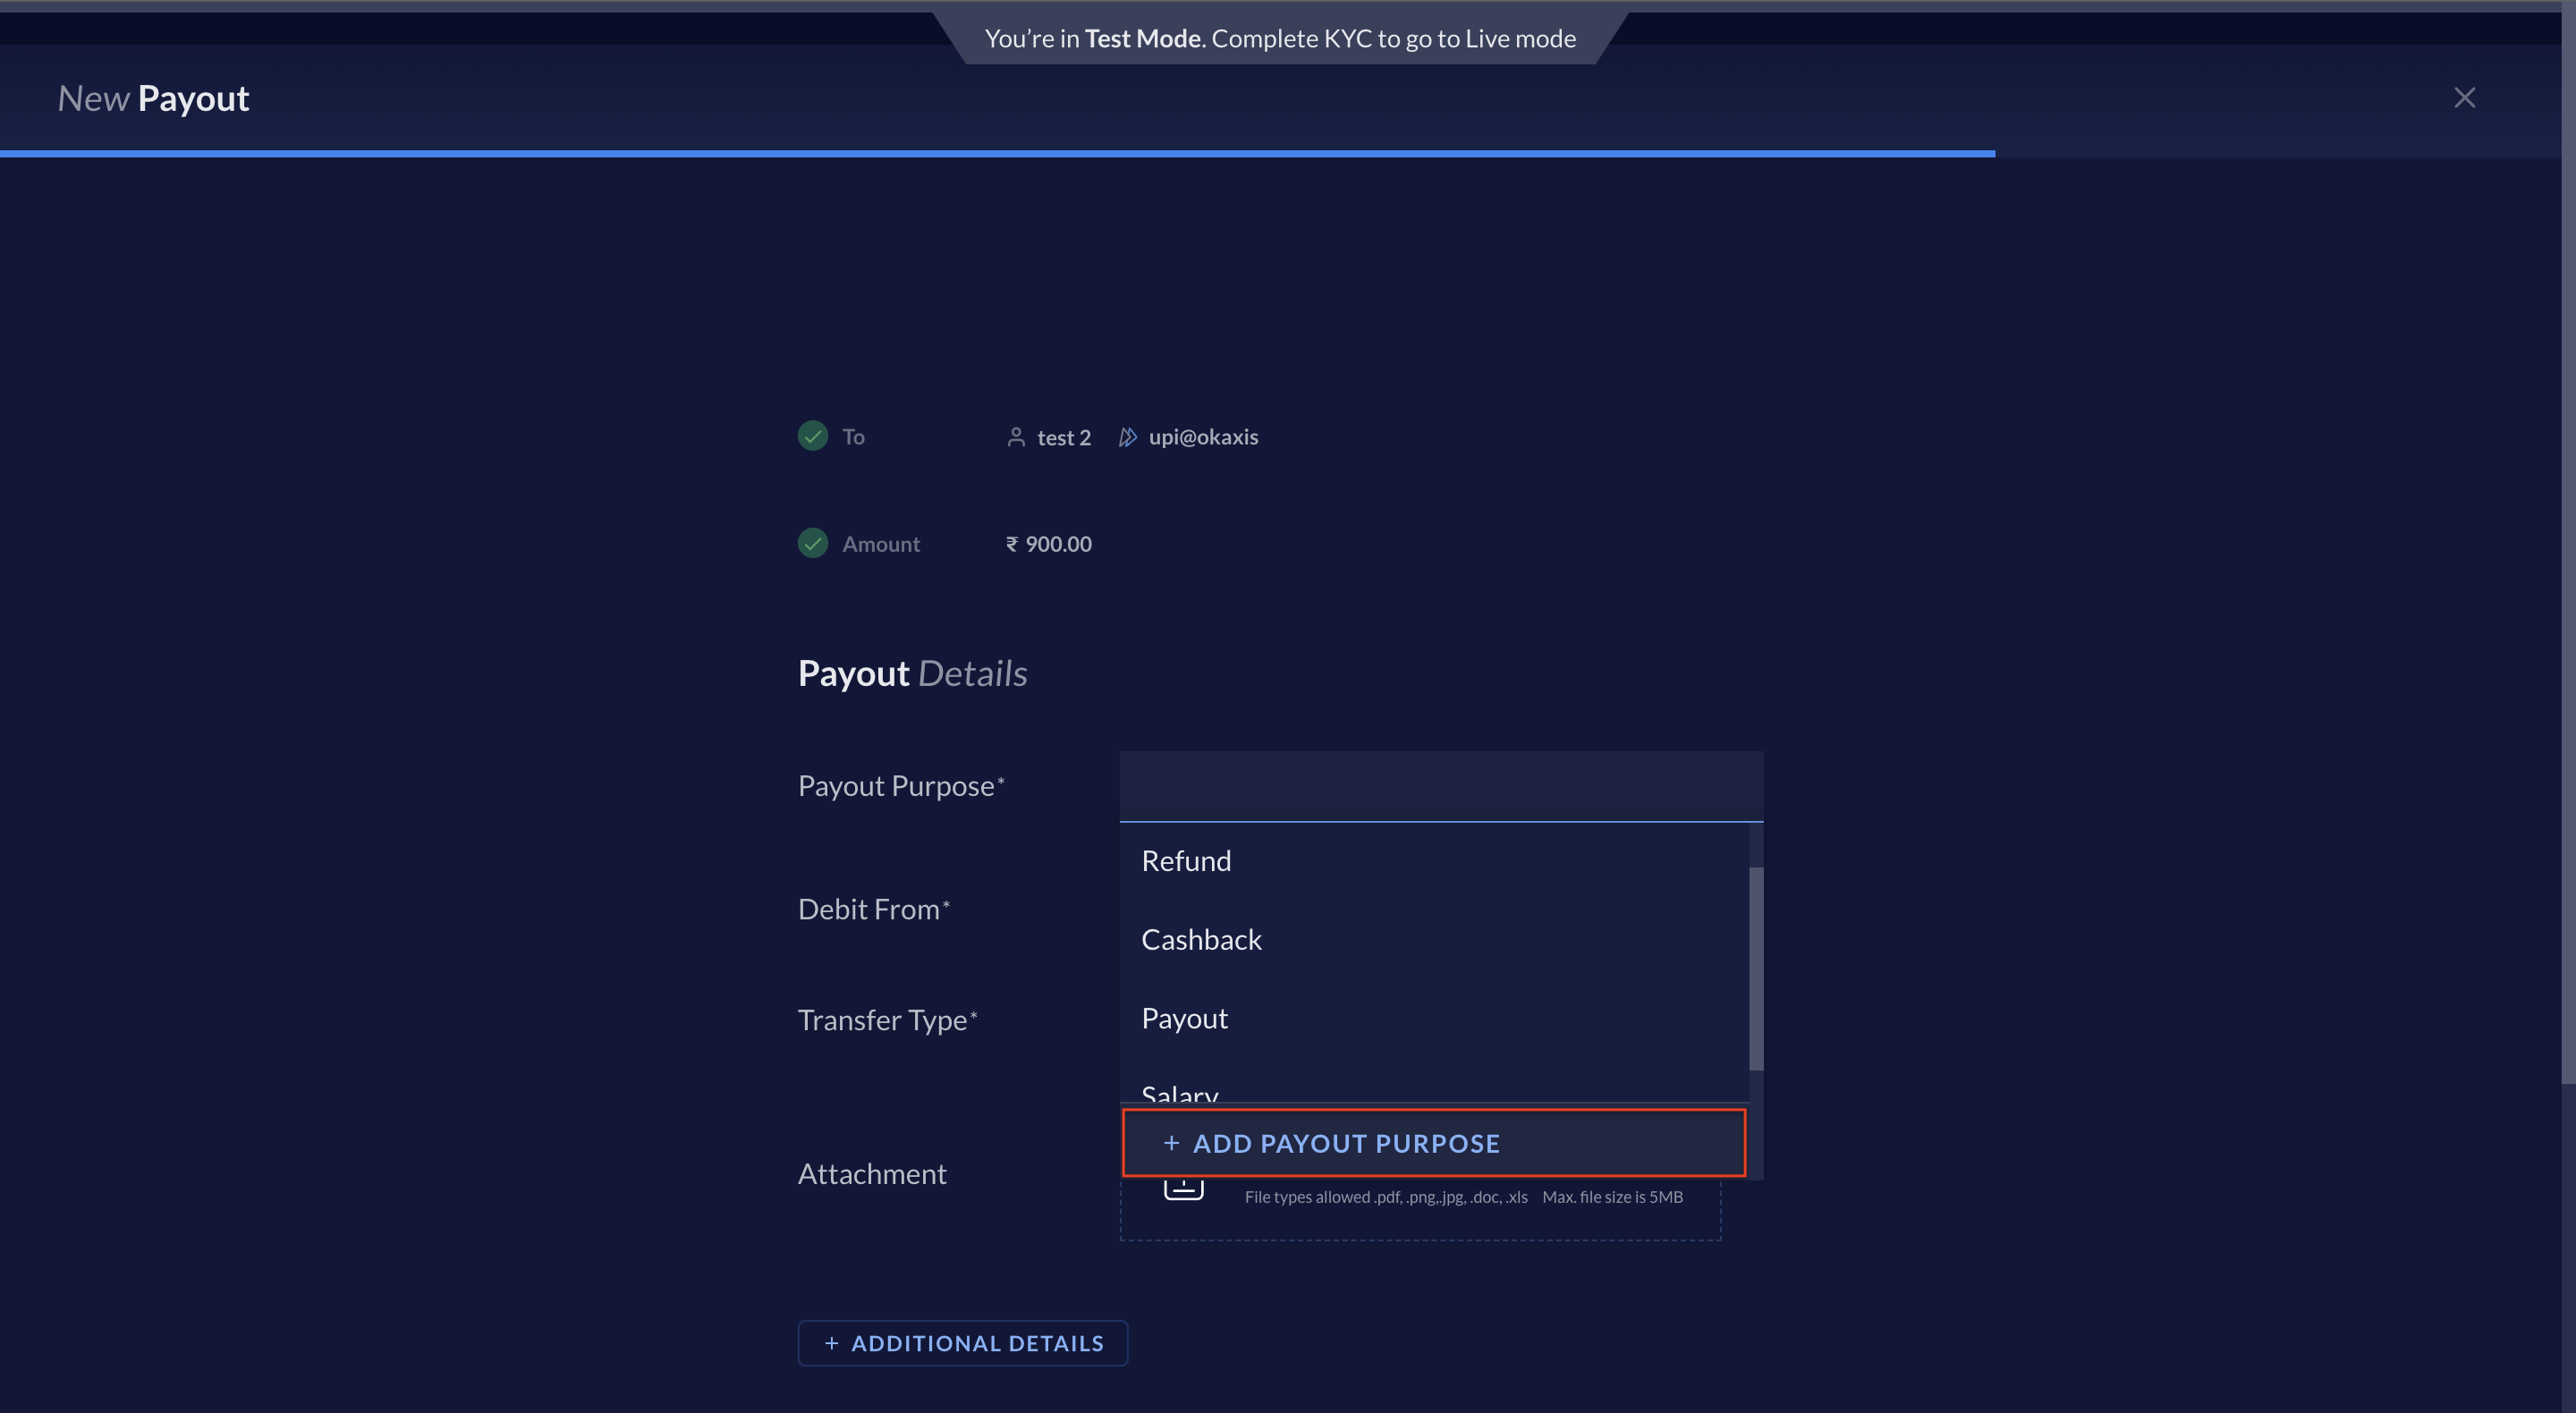
- Log in to the RazorpayX Dashboard.
- Navigate to Payouts on the left navigation and click the more options (⋮) menu.
-
Click Create New Purpose.
- Enter name for the purpose.
-
Click CREATE PAYOUT PURPOSE.
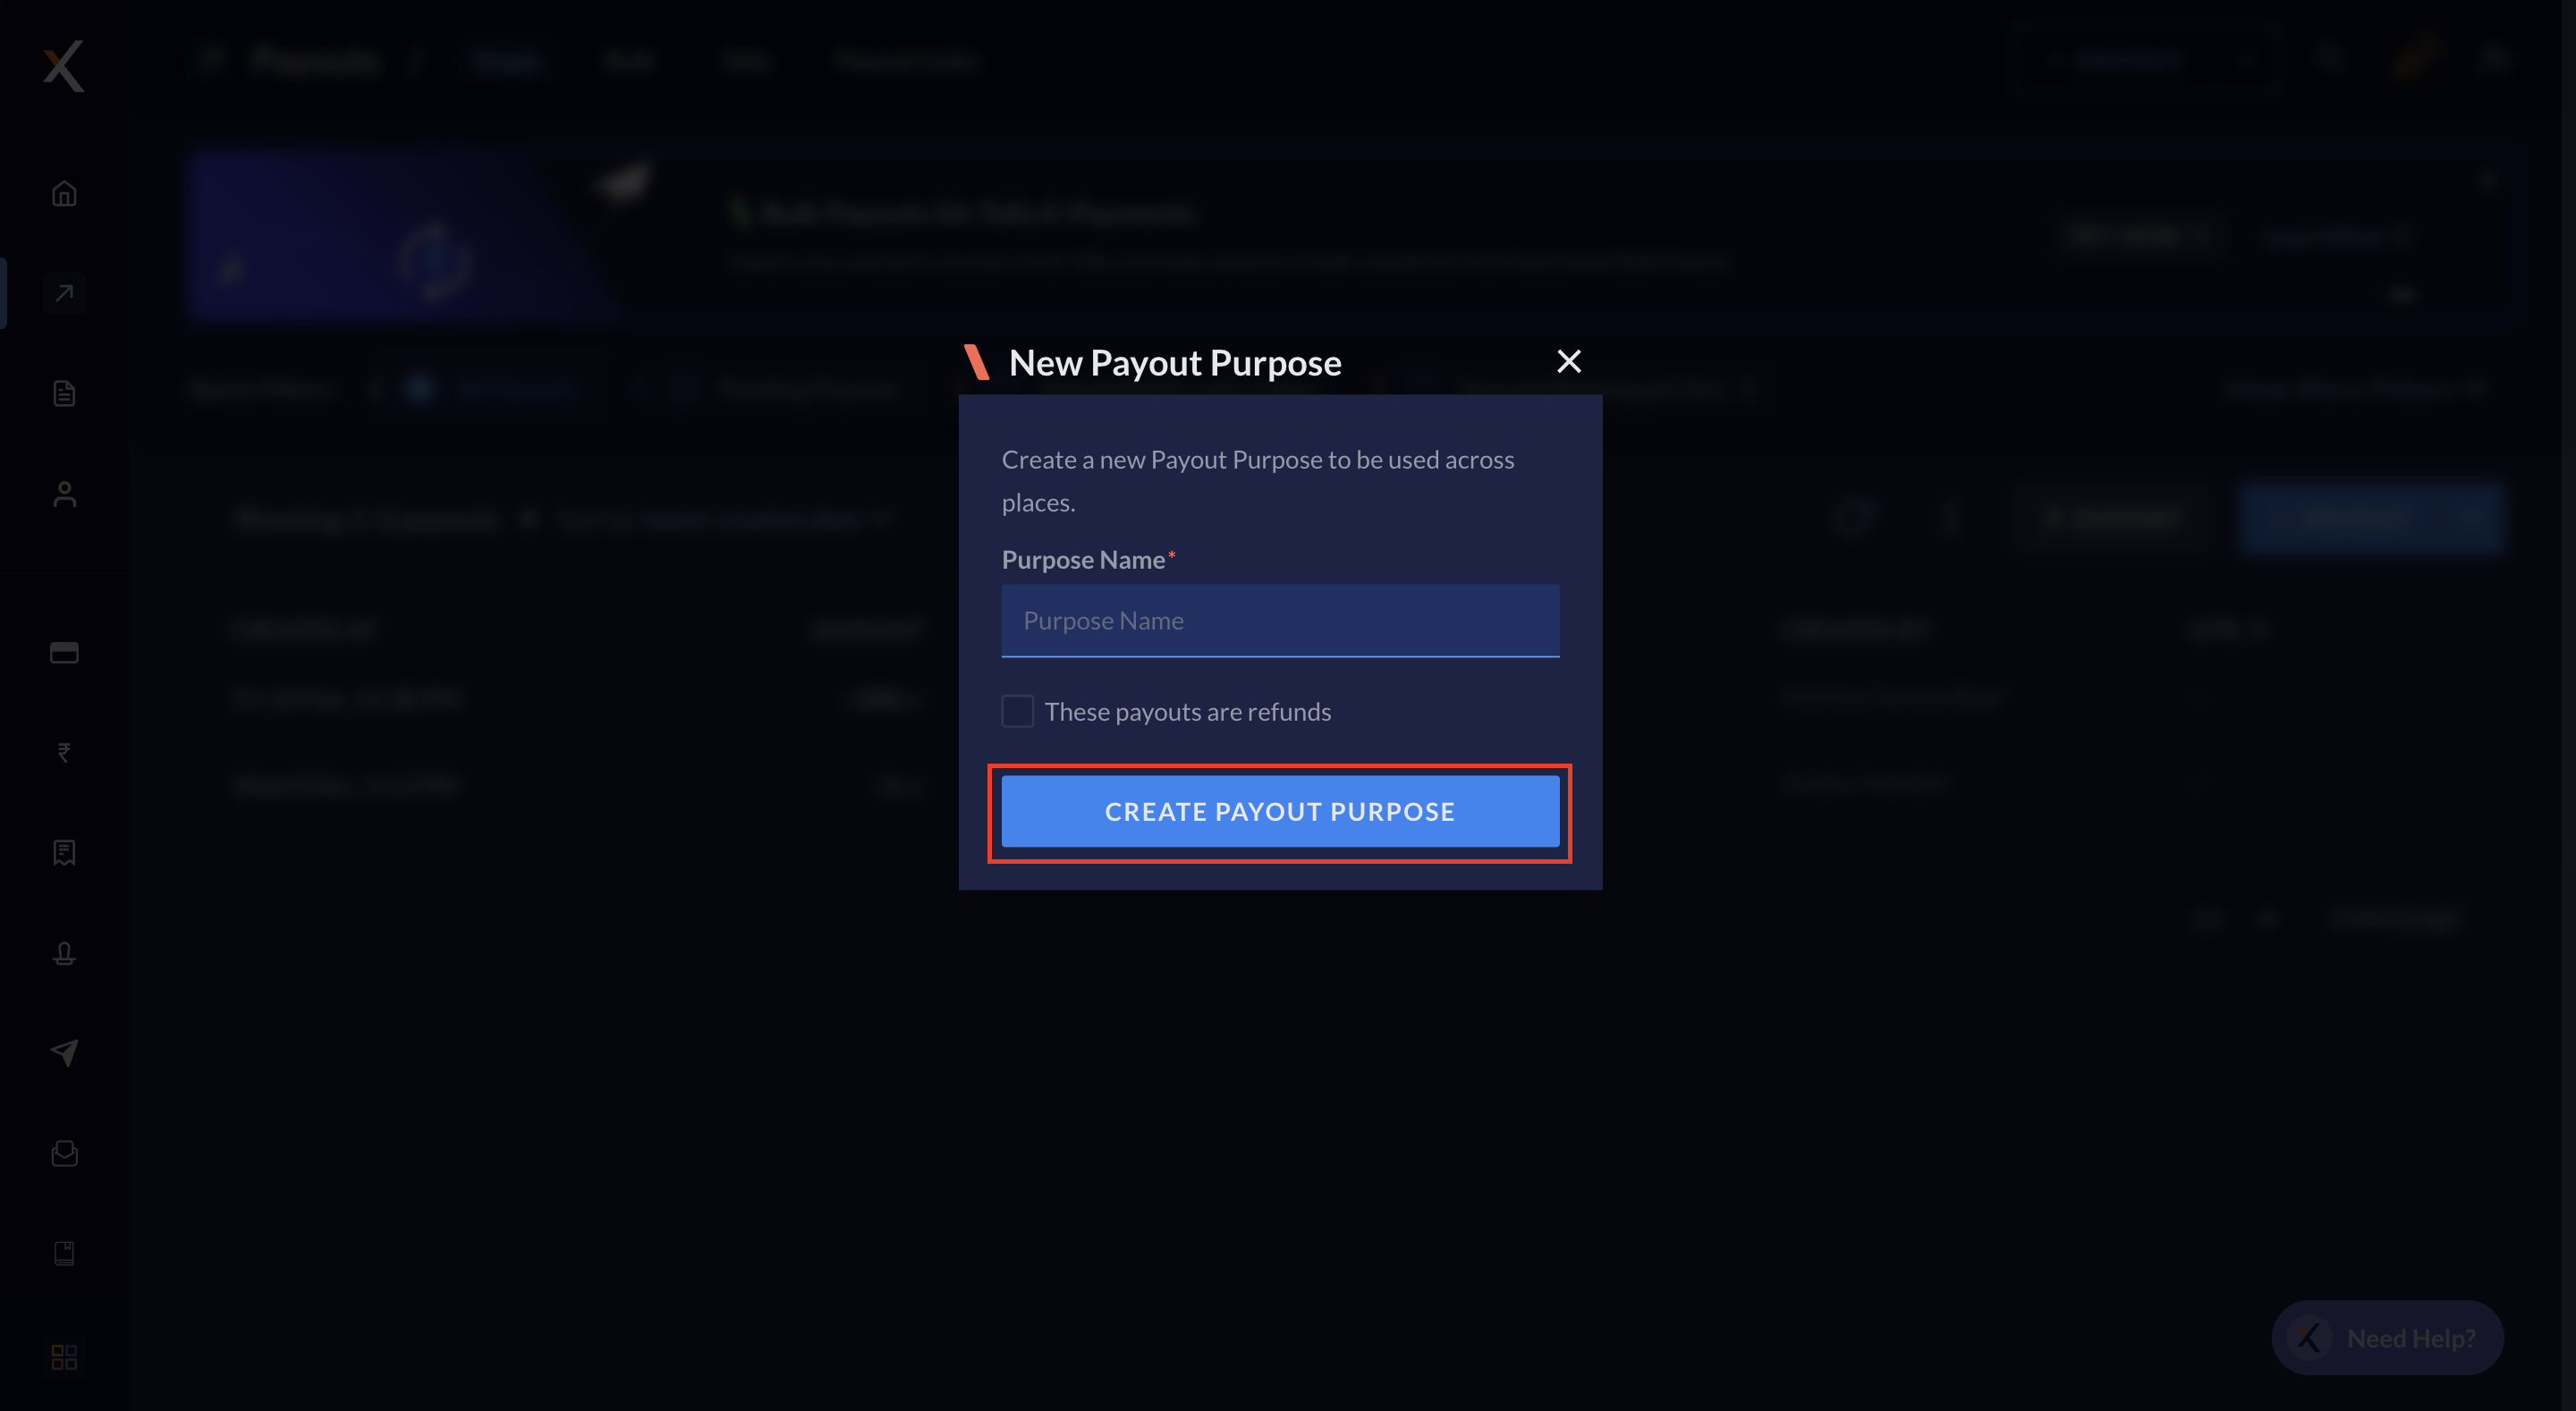 The payout purpose is created.
Upload Attachments During Payout Creation
Upload Attachments During Payout Creation
To add attachments during the payout creation process: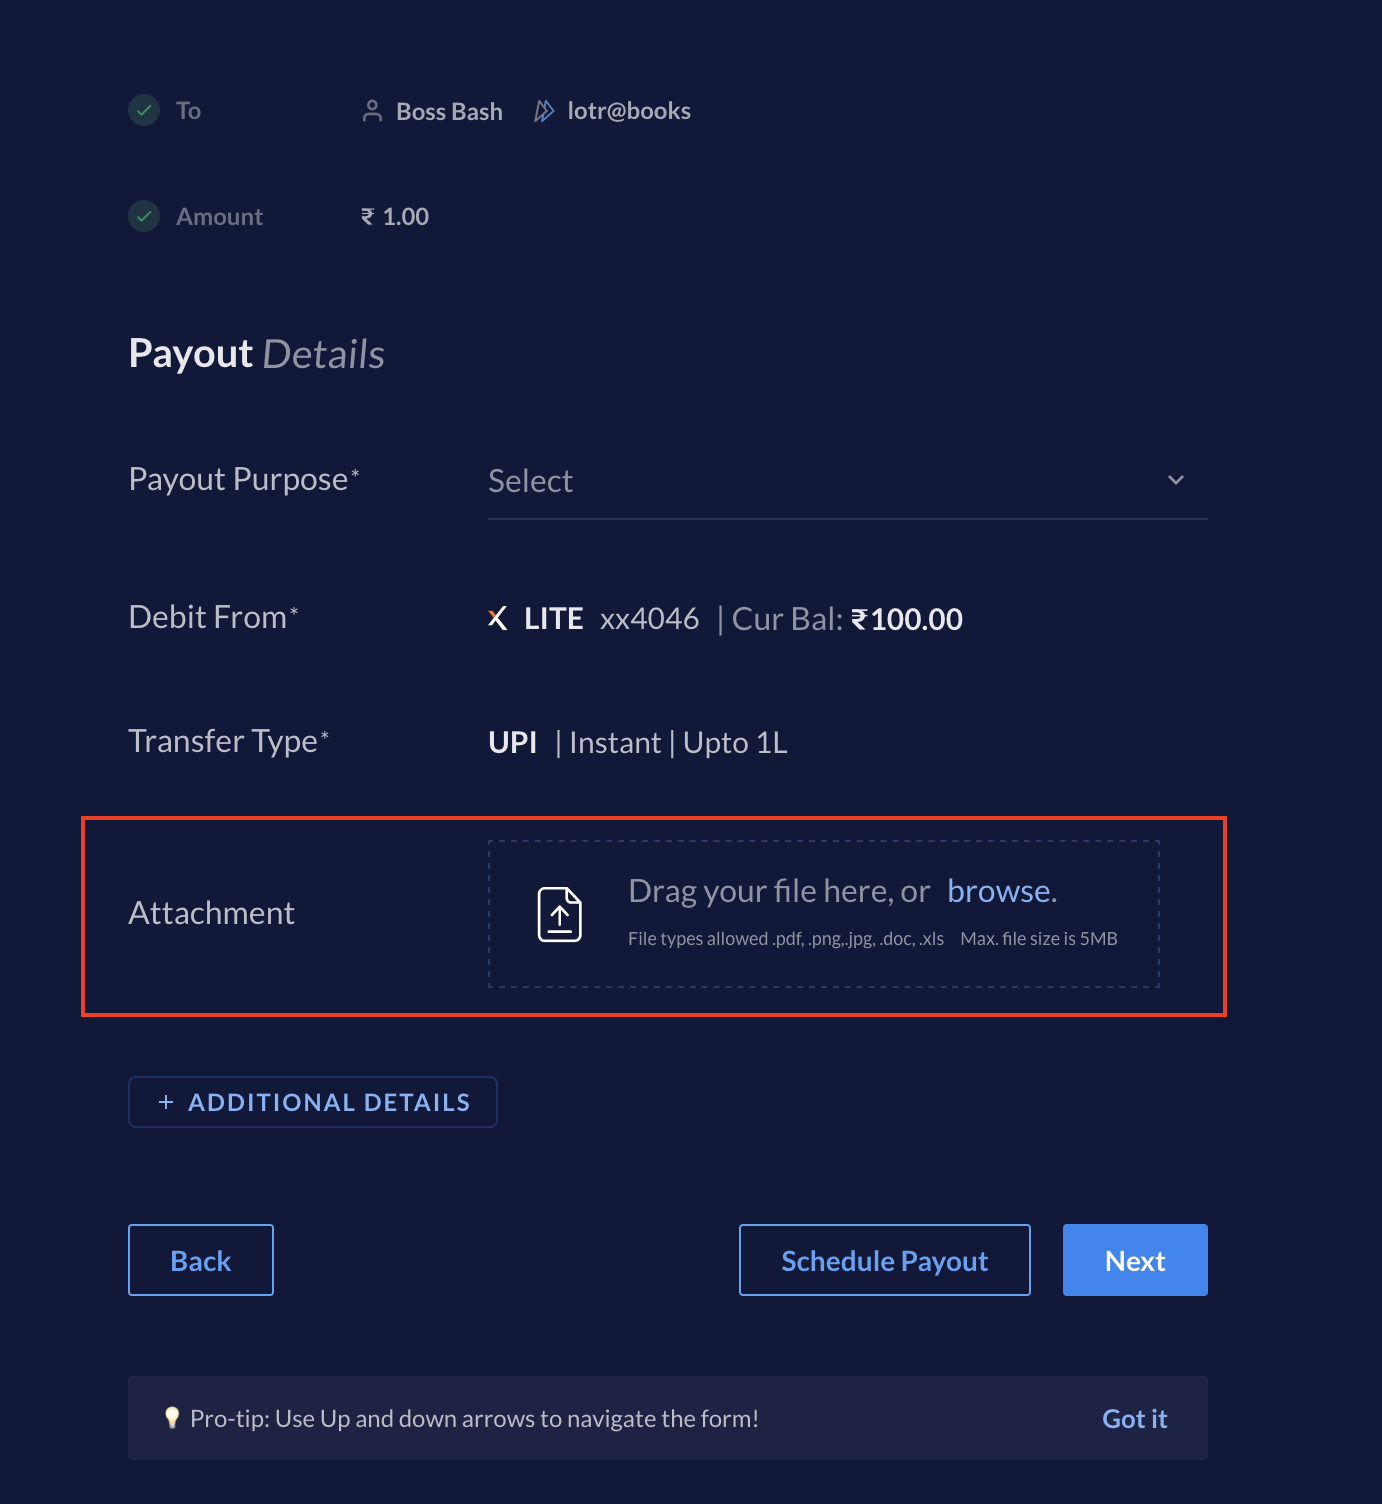
- On your Dashboard, create a Payout.
- In the Payout Details page of creating a payout, add files against Attachment, as shown.
- You can upload files with
.pdf,.jpg,.jpg,.docand.xlsextensions. - The supported file size is upto 5 MB.
- Drag and drop the file or click browse to upload it from the system.
- You can upload files with
- Add other details in + ADDITIONAL DETAILS if required and click NEXT. Enter the OTP and proceed to pay.
Upload Attachments After Payout Creation
Upload Attachments After Payout Creation
To add attachments after the Payout is created: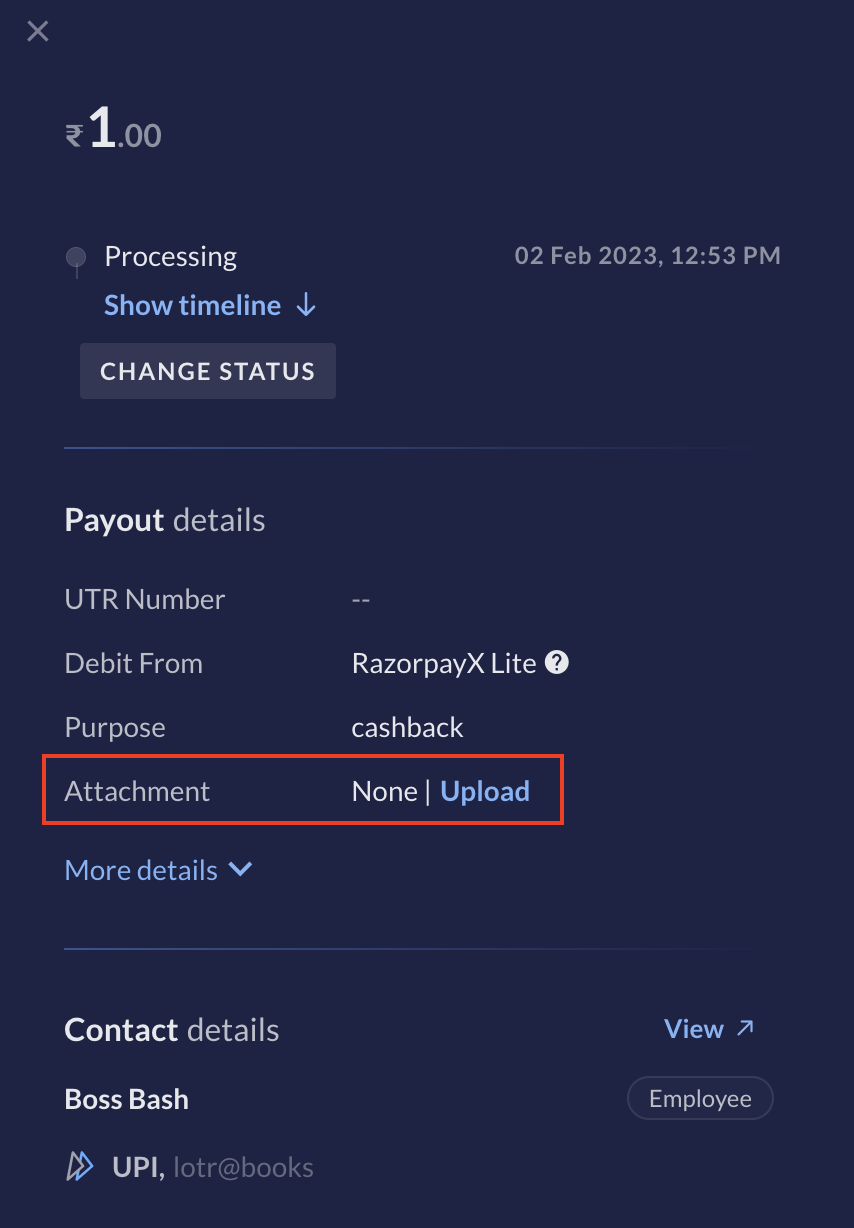
- In you Payouts Dashboard, click on the Payout you want to add an attachment to.
- Navigate to Attachment in pop-up page that appears to the right.
- Click Upload and upload the attachment file. The supported file type remain as mentioned above.
Cancel Payouts
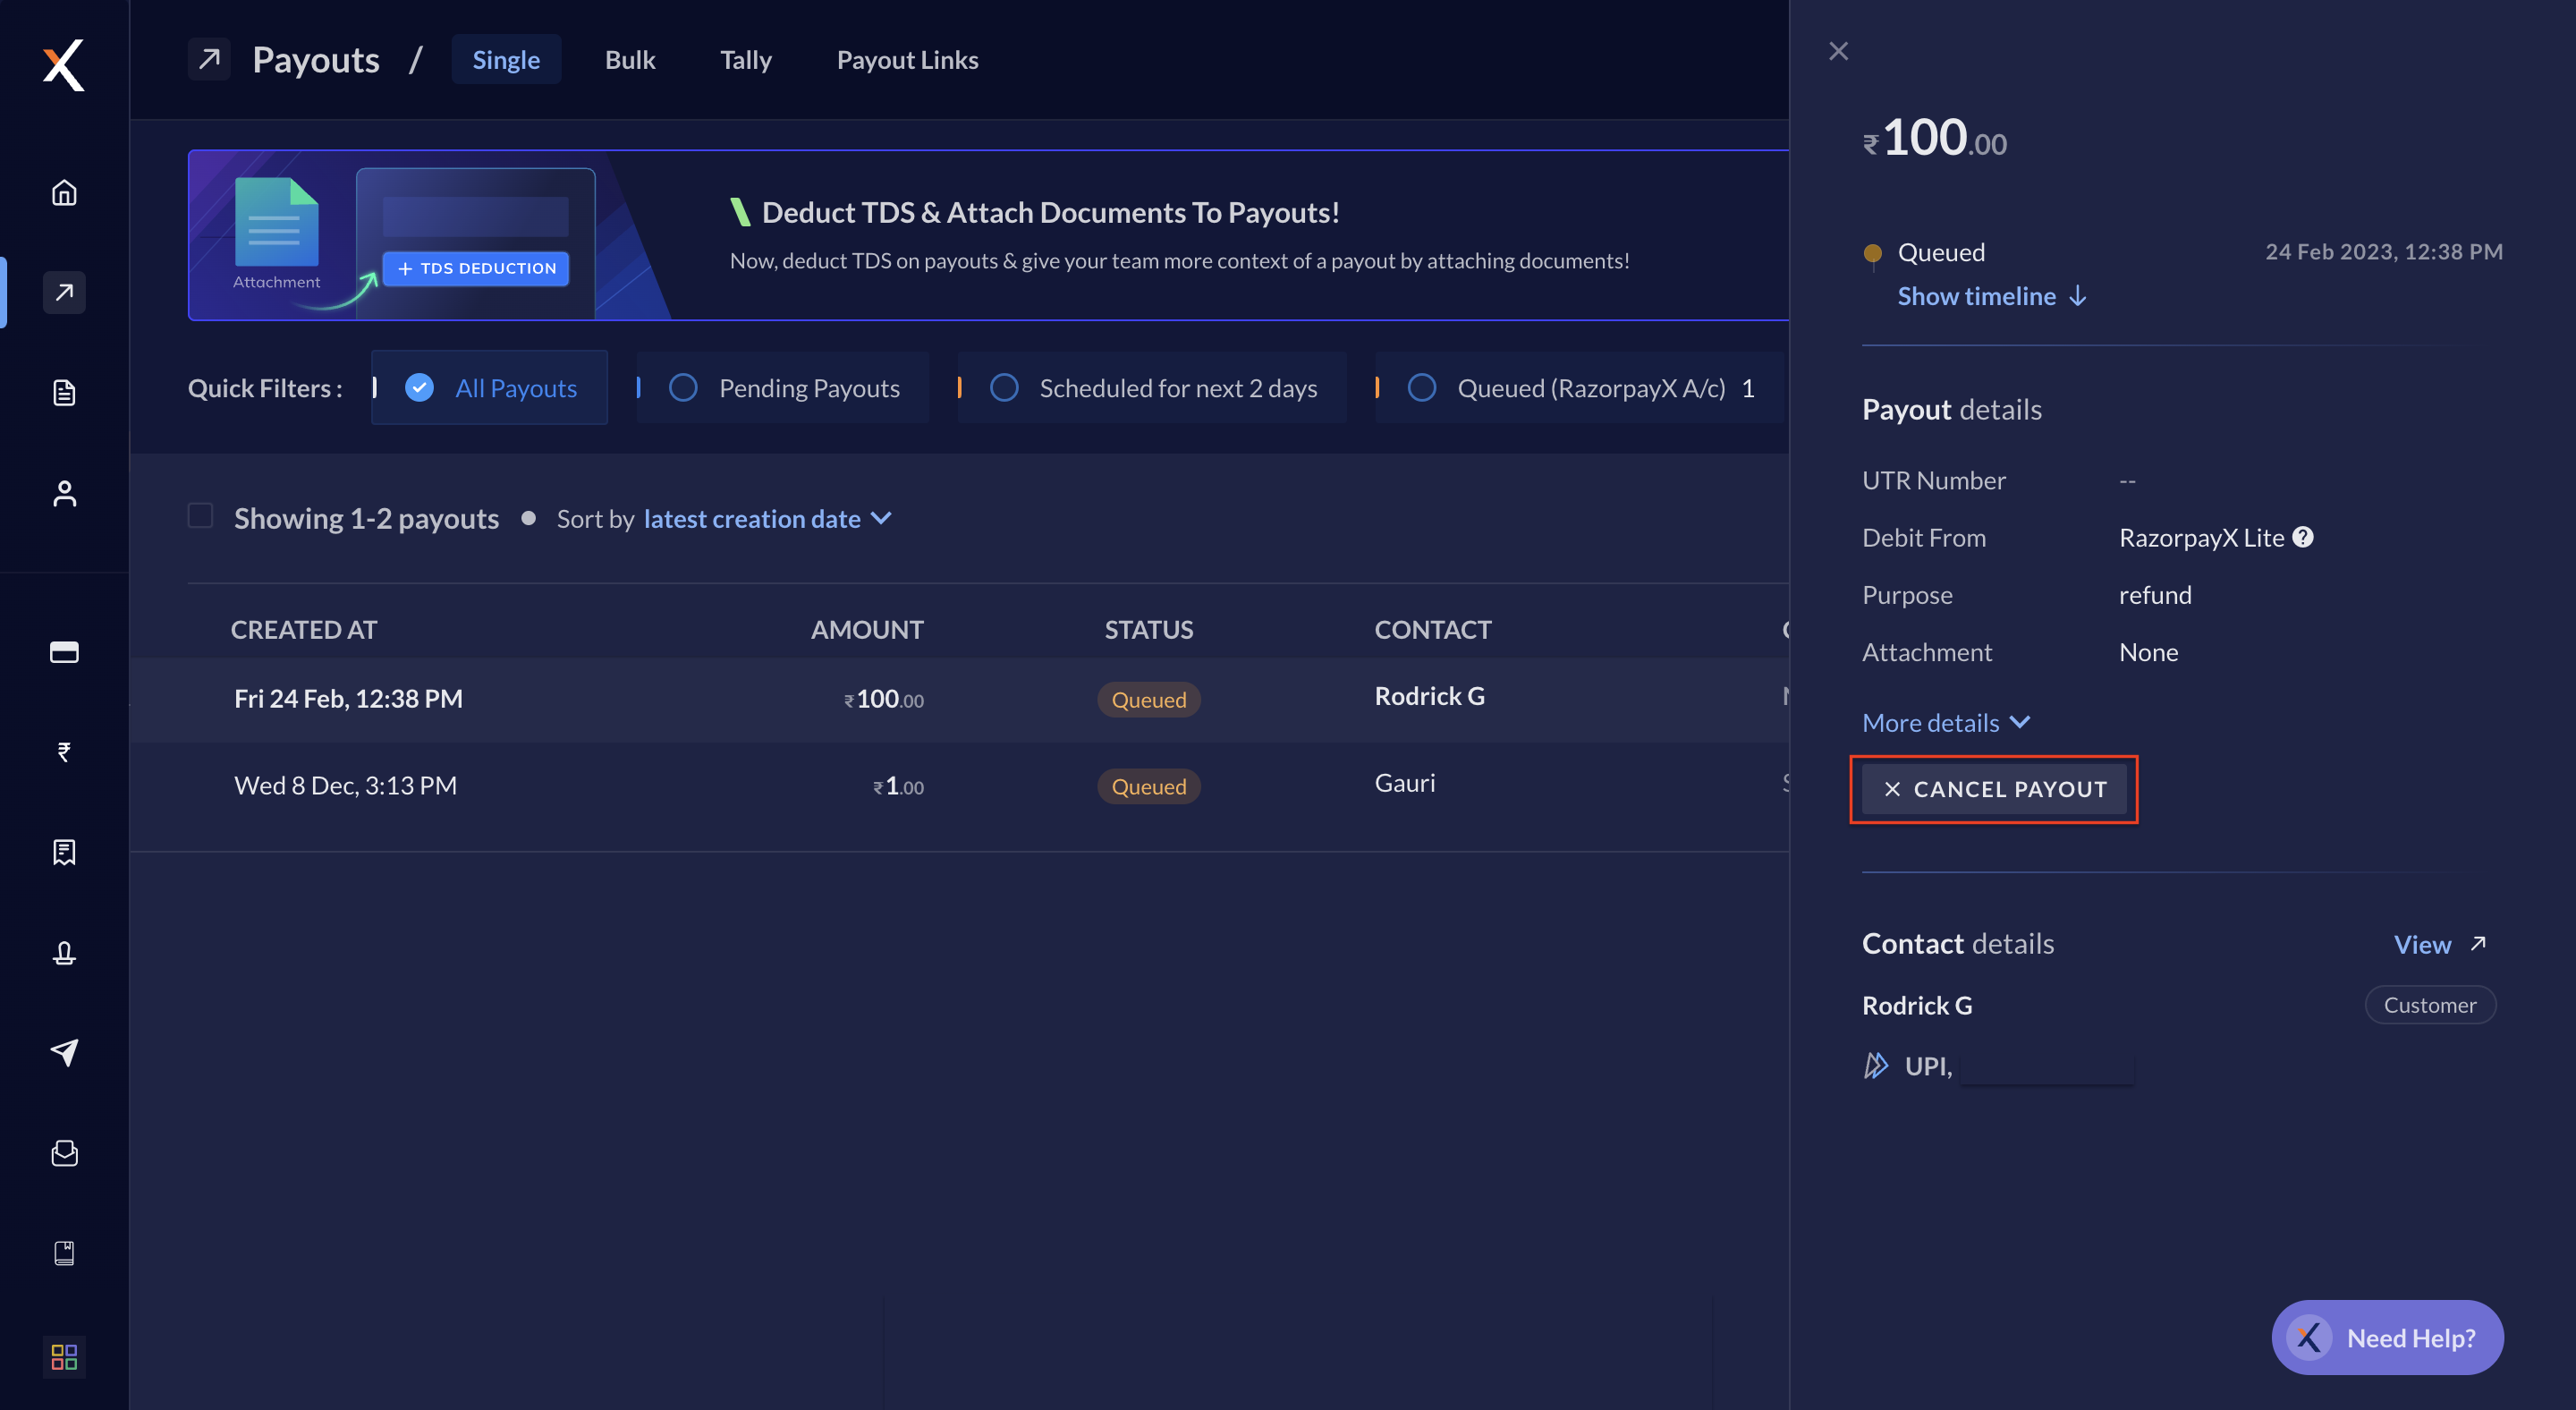
You can cancel the payouts in aqueued, pending or scheduled state only.
Cancel Payout
Cancel Payout
- Log in to the RazorpayX Dashboard.
- Navigate to Payouts.
- Hover over the payout you want to cancel and click CANCEL. Your payout is cancelled.
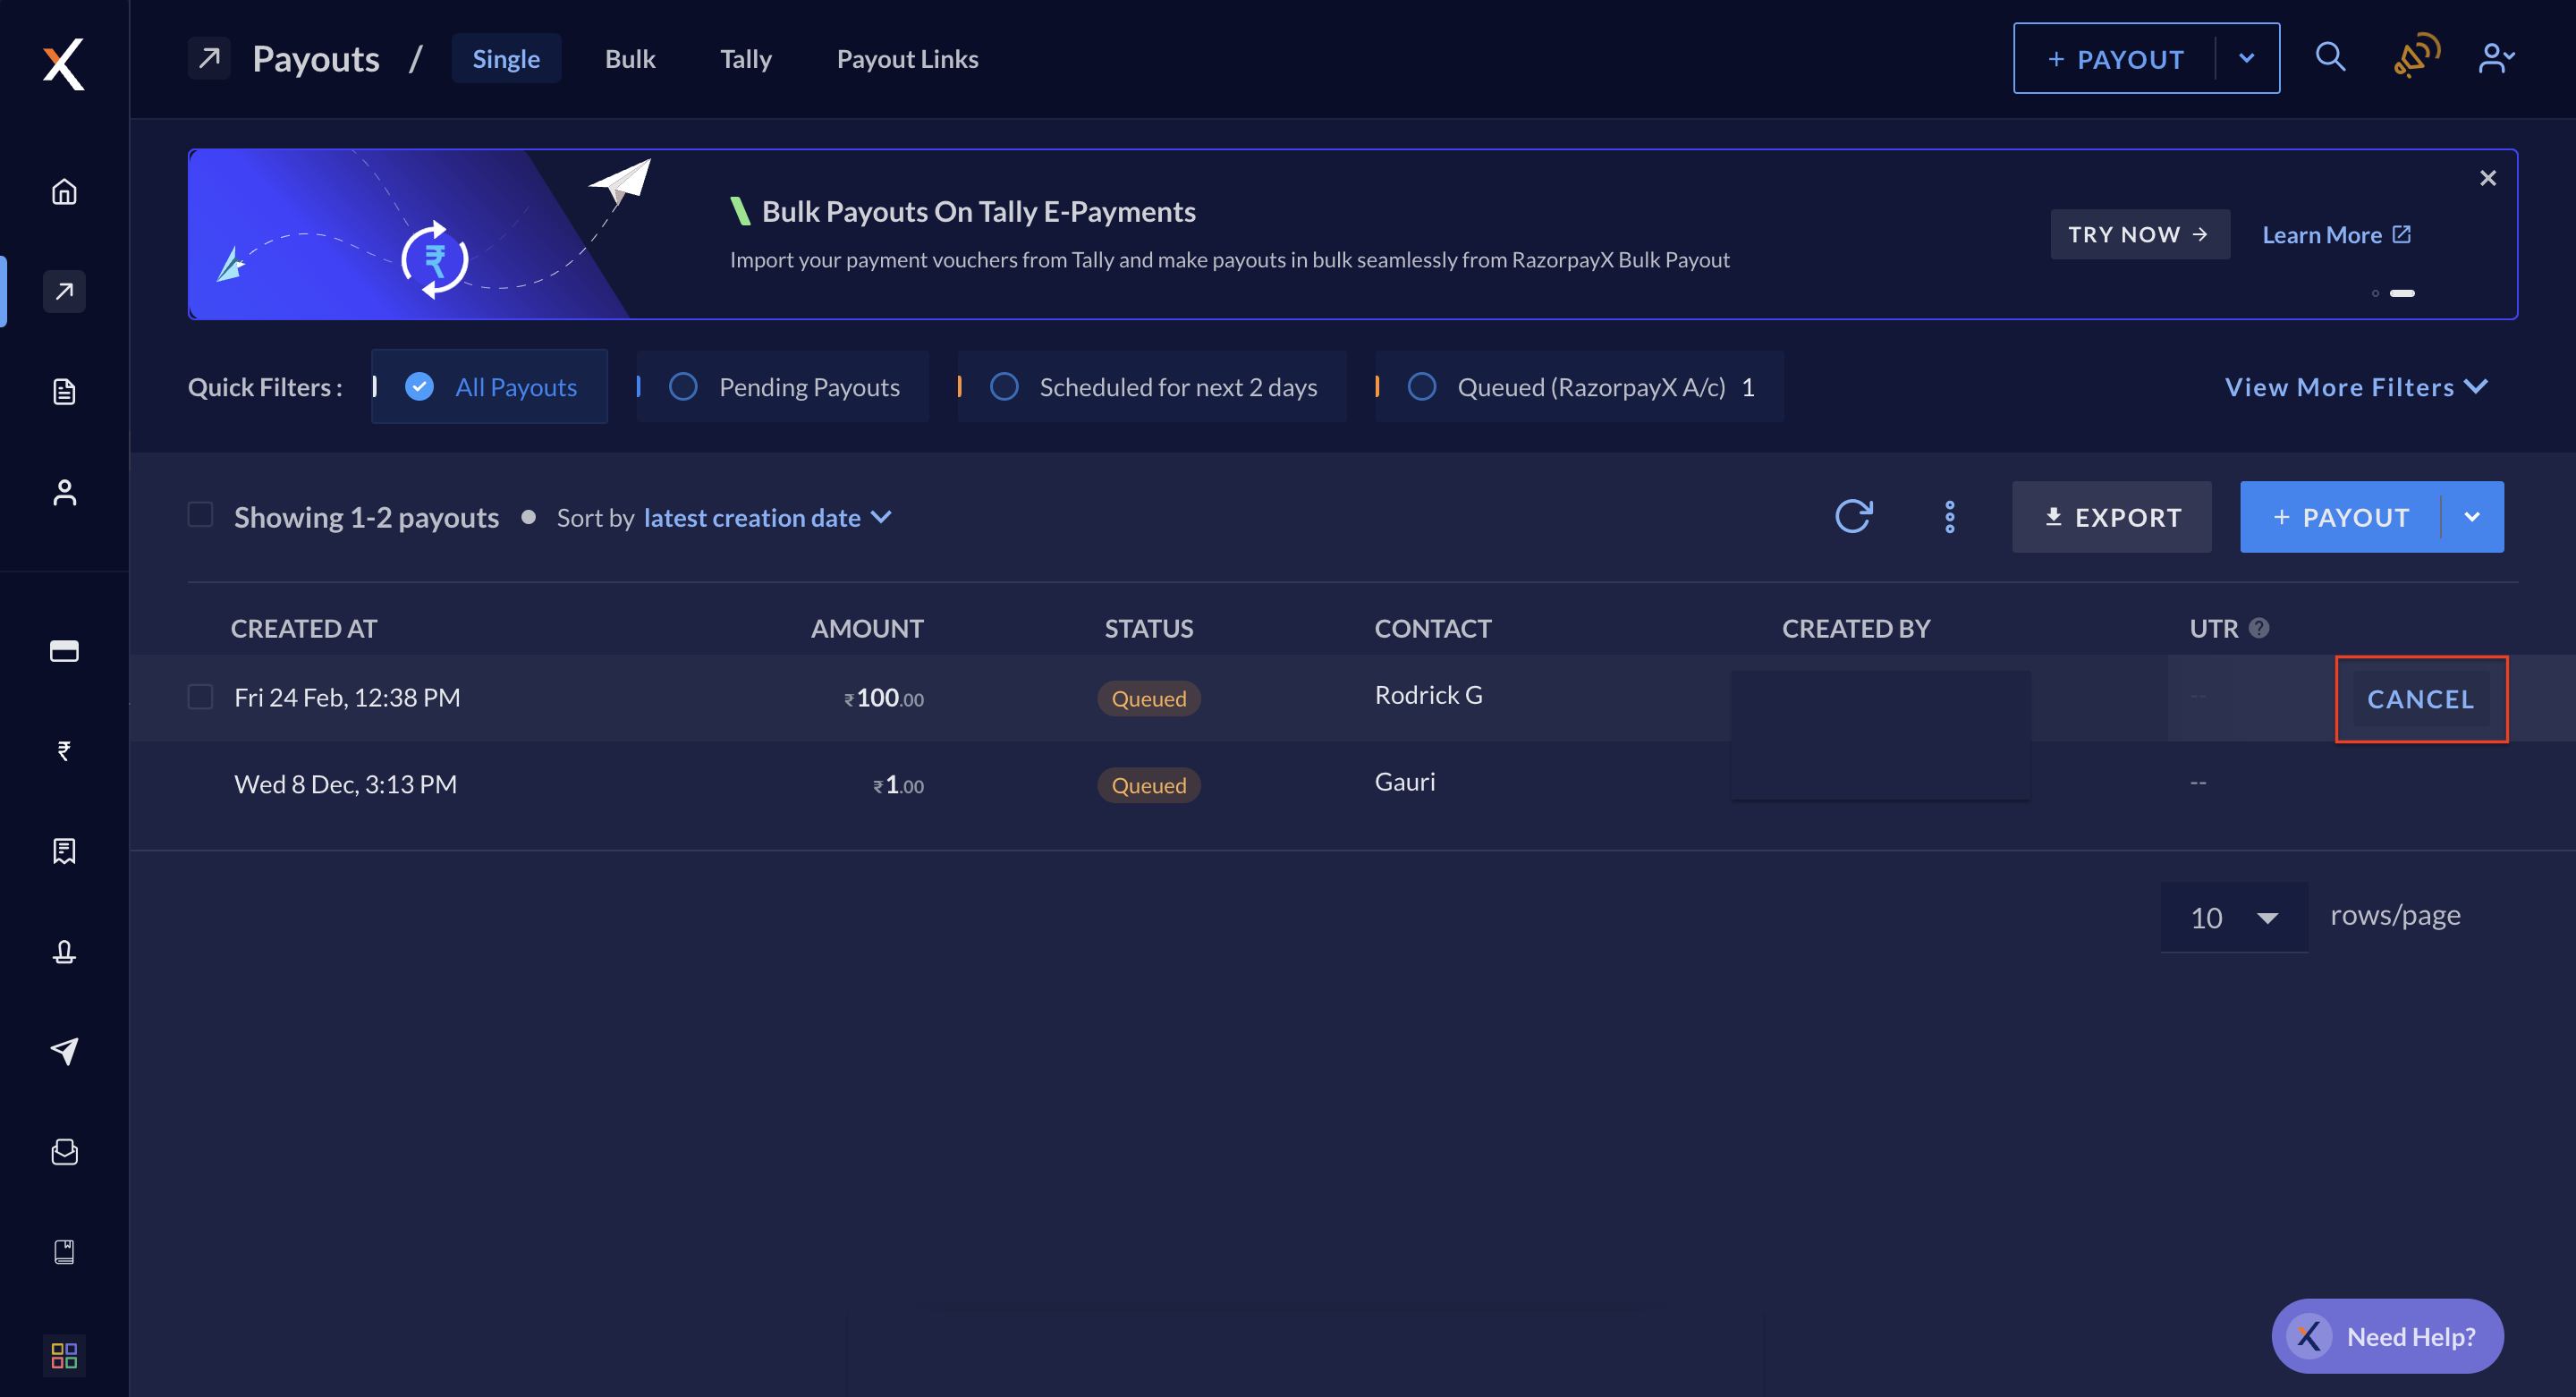
- Select the payout you want to cancel.
- Click CANCEL PAYOUT on the right pane. Your payout is cancelled.
Actions
Know more about creating payouts using APIs and payouts in bulk.
Payout Modes and TAT
You can make payouts using any one of the following payout modes (IMPS/RTGS/NEFT/UPI). The transaction limits and operating hours for each payout mode is listed below.RazorpayX Lite
RazorpayX Lite
The transaction limits and operating hours for different payout modes for RazorpayX Lite are as below:
- IMPS
- NEFT
- RTGS
- UPI
- Amazonpay
When the payout mode is IMPS for the following conditions:
- Fund account type:
bank_account - Amount limit: Upto ₹5 lakh (per transaction)
The transaction is processed to the fund account immediately on all days, 24x7.
Current Account
Current Account
The transaction limits and operating hours for different payout modes for Current account:
- IMPS
- NEFT
- RTGS
- UPI
When the payout mode is IMPS for the following conditions:
- Fund account type:
bank_account - Amount limit: Upto ₹5 lakh (per transaction)
The transaction is processed to the fund account immediately on all days, 24x7.