

Available in🇮🇳 India
To use the Sub-Merchant Onboarding APIs, you need to enroll in the Razorpay Partner Program.
The following illustration depicts the Sub-merchant Onboarding APIs flow to help Partners onboard merchants from their platform:
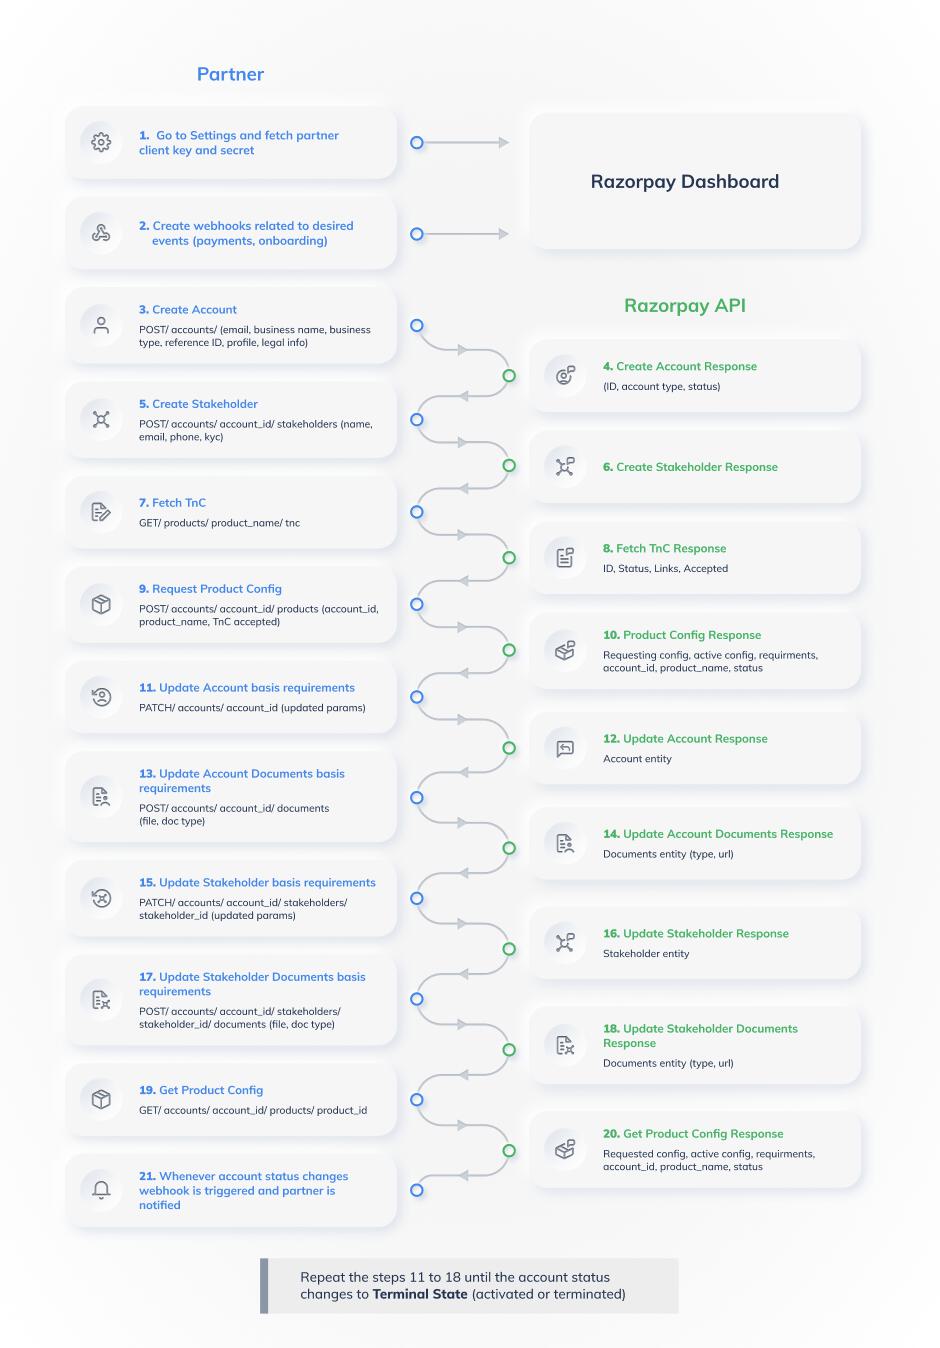 Follow the steps given below:
- Sign in to your Partner Dashboard to obtain your
client_idandclient_secretto authenticate API calls. You can obtainclient_idandclient_secretdepending on the test mode or live mode. - Create a webhook related to desired events such as payments, orders, invoices and so on.
- Create an account for the sub-merchant using the Create an Account API.
- An account is created and the
account_idis provided in the response. For example,acc_Hbu4sC0O4GOGSN. Use thisaccount_idto fetch, update, delete the account and upload account documents. - Use the Create a Stakeholder API to add a stakeholder for an account. Each stakeholder needs to update the KYC.
- A
stakeholder_idis provided in the response as a stakeholder is created. For example,sth_Hbu4sC0O4GOGSK. Use this stakeholder id to complete stakeholder-related KYC details while onboarding a product. Also, use thisstakeholder_idto fetch and update a stakeholder. - Before activating the sub-merchant and requesting for relevant product configurations, the sub-merchant needs to view and accept Terms and Conditions. The partner can fetch Terms and Conditions links to show to the sub-merchant using Fetch Terms and Conditions API.
- As requested, the partner will get a link to the relevant Terms and Conditions.
- Create a product (for example,
payment_gateway) and accept Terms and Conditions for the sub-merchant using the Request a Product Configuration API. A product is created with default configurations. To update configurations, you can use the Update a Product Configuration API (For Payment gateway product, settlement details (bank account) have to be sent in the Update Config API). - As the product is created, the
merchant_product_idand the list of pending requirements are provided in the response. - Cater to the pending account requirements using the Update an Account API.
- As the requested account details criteria is met, an updated account response will be provided.
- Using the Documents APIs, upload the required sub-merchant’s business documents.
- Once the required documents are uploaded, the uploaded details of a document (S3 URL) are provided in the response based on the entity, that is, account.
- Fill in the stakeholder requirements using the Update a Stakeholder API. For example, KYC requirements such as PAN is the type of document required to establish the stakeholder’s identity.
- After the KYC requirements for a stakeholder are met, the response for the stakeholder is updated.
- Using the Documents APIs, upload the required sub-merchant’s stakeholder’s signatory documents.
- Once the required documents are uploaded, the uploaded document details (S3 URL) are provided in the response based on the entity, that is, stakeholder.
- Using the Product Configuration Request APIs, fetch the account product.
- The product activation status changes to
under_reviewwhen all the requirements are met. At this point, the status for a Payment Gateway product changes tounder_reviewand the webhook eventproduct.payment_gateway.under_reviewis triggered. - When the product status is changed to
needs_clarification, the webhook eventproduct.payment_gateway.needs_clarificationis triggered.
Handy TipsRepeat steps 11 to 18 till the account status changes to Terminal state (either activated or rejected).
- The webhook event
product.payment_gateway.activatedis triggered when the Payment Gateway product status isactivated.