

- Cash on Delivery
- Partial Cash on Delivery
- RTO
- Convert COD Orders to Prepaid
- Shipping Options
- International Shipping
- Coupons
- Login with Razorpay
- Orders Not Placed
- Inventory and Stock
- Offers
- Shopify Bundles
- Separate Billing Address
- Capture and Validate GSTIN
- Capture Order Instructions
- Google Analytics
- Google Ads
- Facebook Ads
- Gift Card Settings
Cash on Delivery
You can choose to configure COD using the following methods:Method 1: Razorpay Dashboard *(Recommended)*
Method 1: Razorpay Dashboard *(Recommended)*
- Log in to the Dashboard and navigate to Magic Checkout → Setup & Settings → Platform Settings.
- Select Shopify from the Platform drop-down list and enter your Shopify Store ID.
- Navigate to COD Setup → COD Settings.
- Enable COD as a payment option.
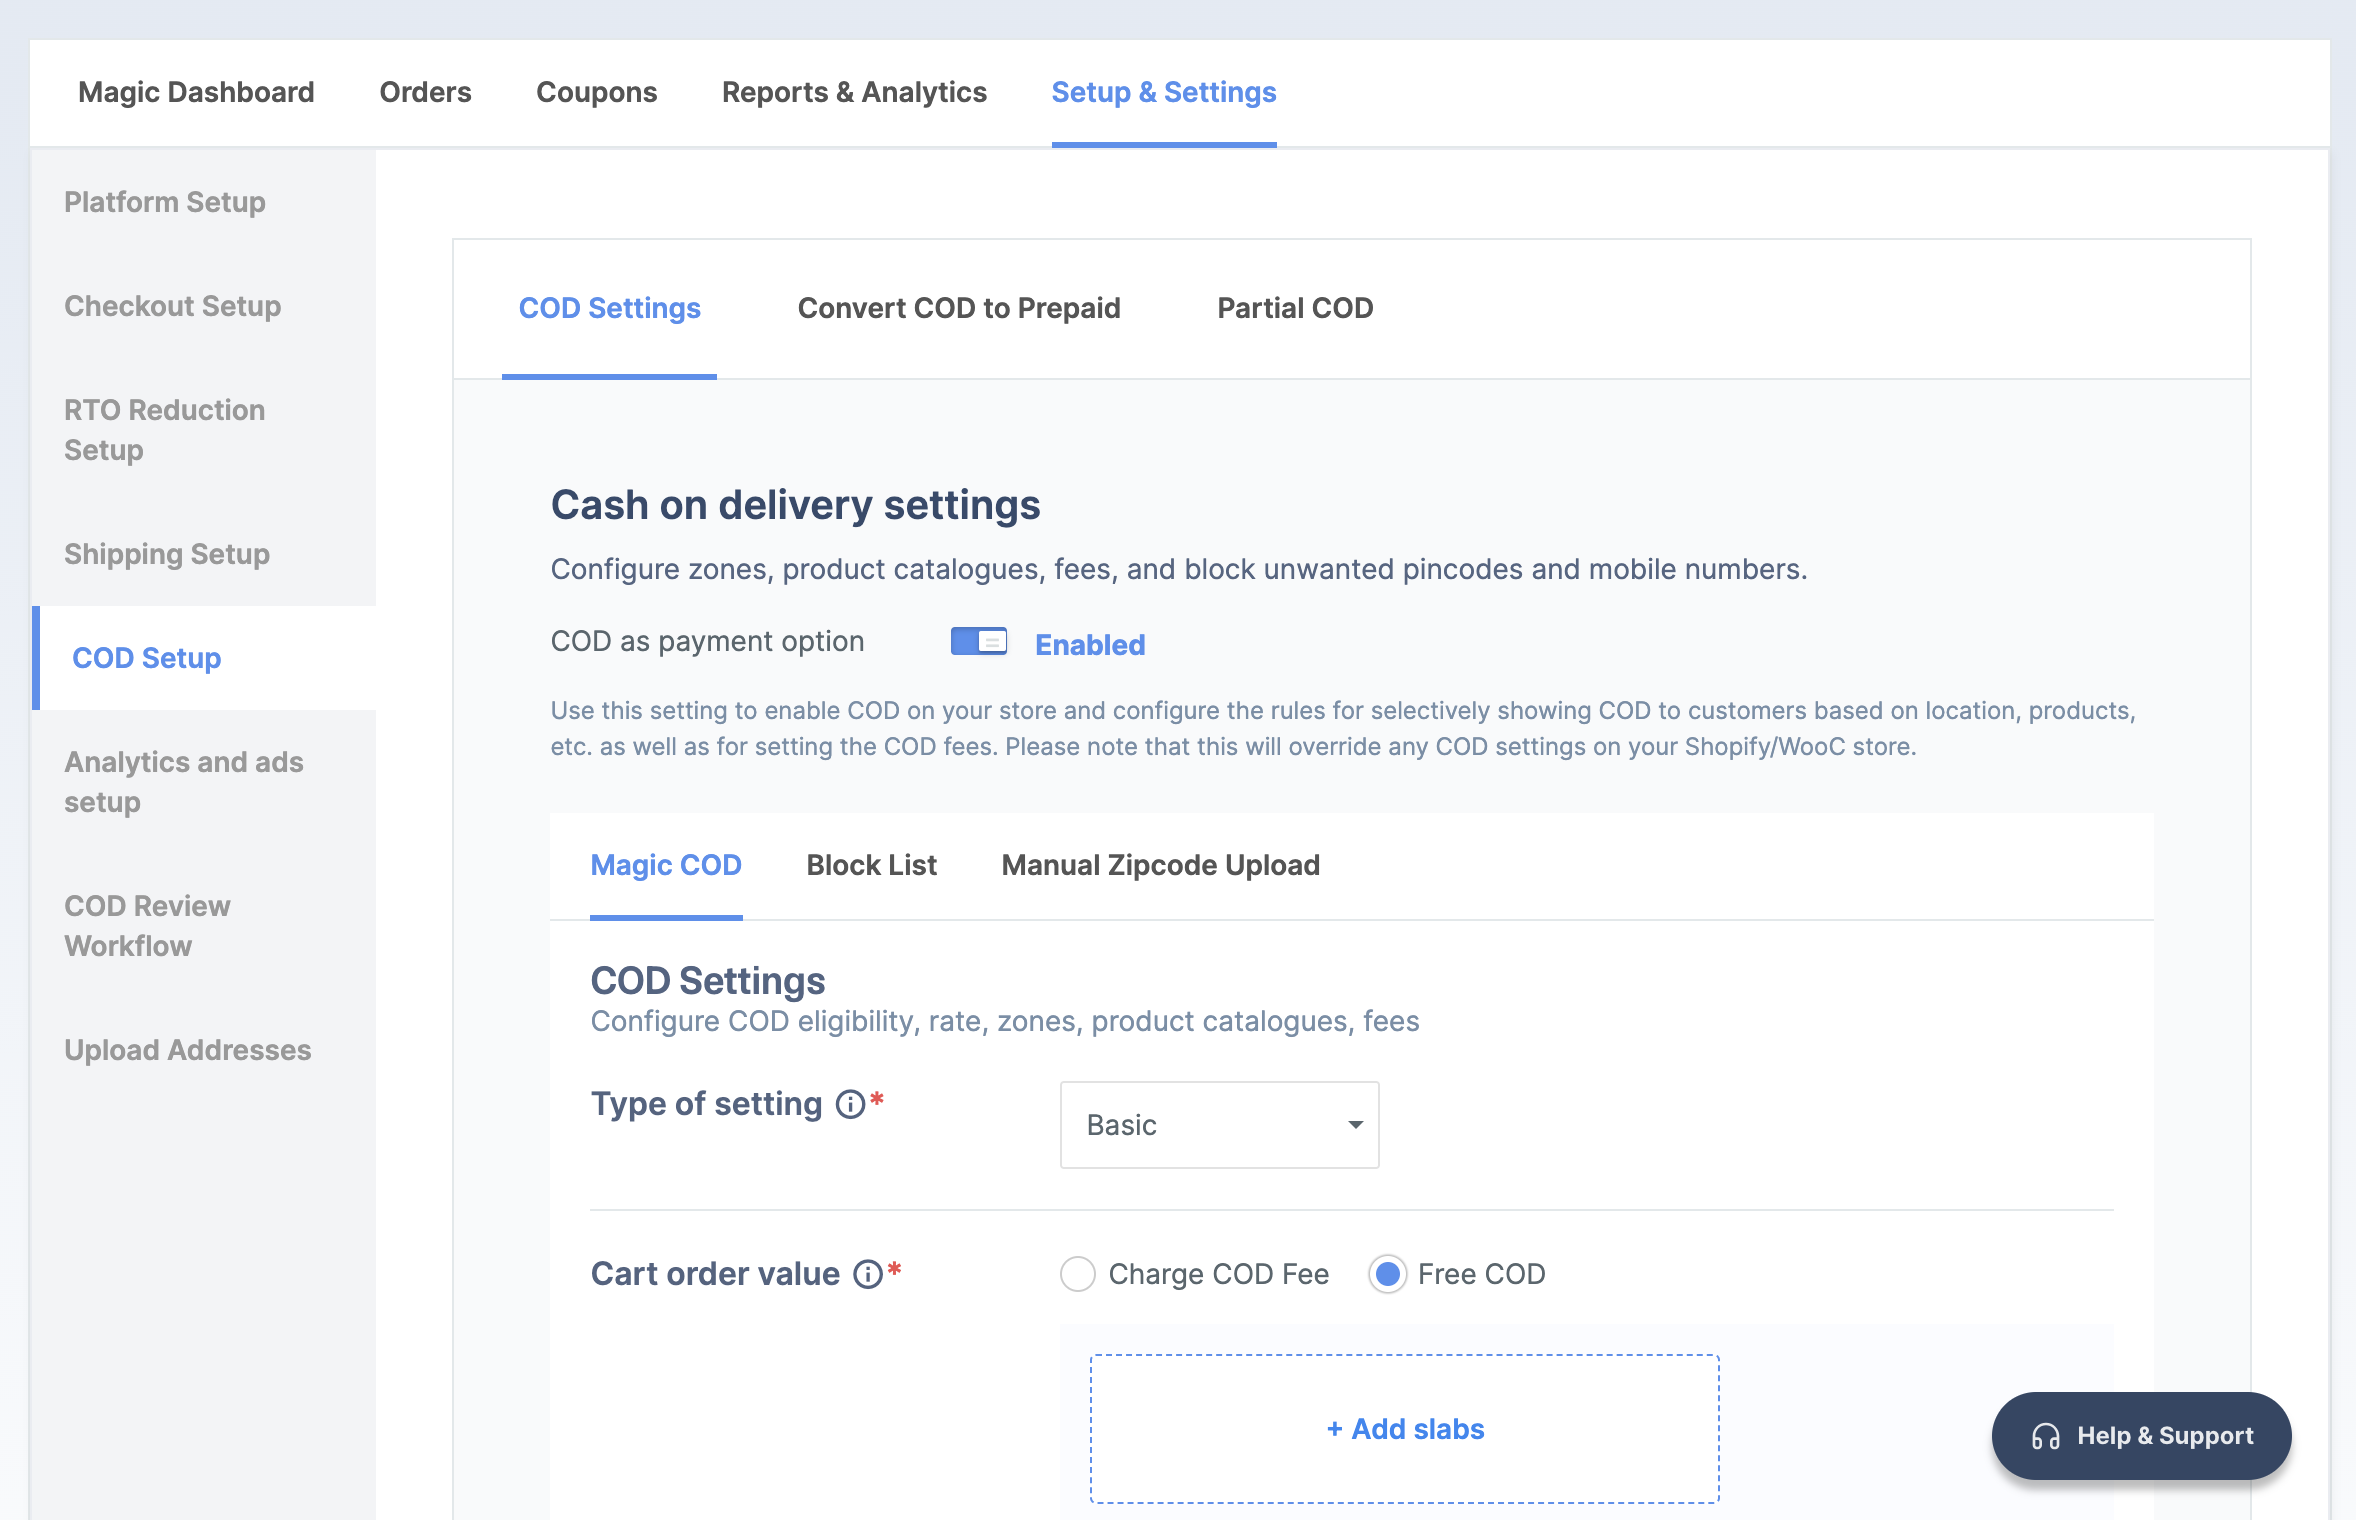
- Select the Type of setting.
Type of Setting
Basic
Basic
- Configure the Cart order value by selecting an option based on your requirement:
- Charge COD Fee
- Free COD
- Click + Add slabs.
- Enter the minimum and maximum order value for which the fee should apply.
- Enter the Delivery price. For example, if the Min Order Value is ₹400, the Max Order Value is ₹1000 and the fee is ₹50, a ₹50 COD fee is applied to any order value in this range.
- Click Save slabs.
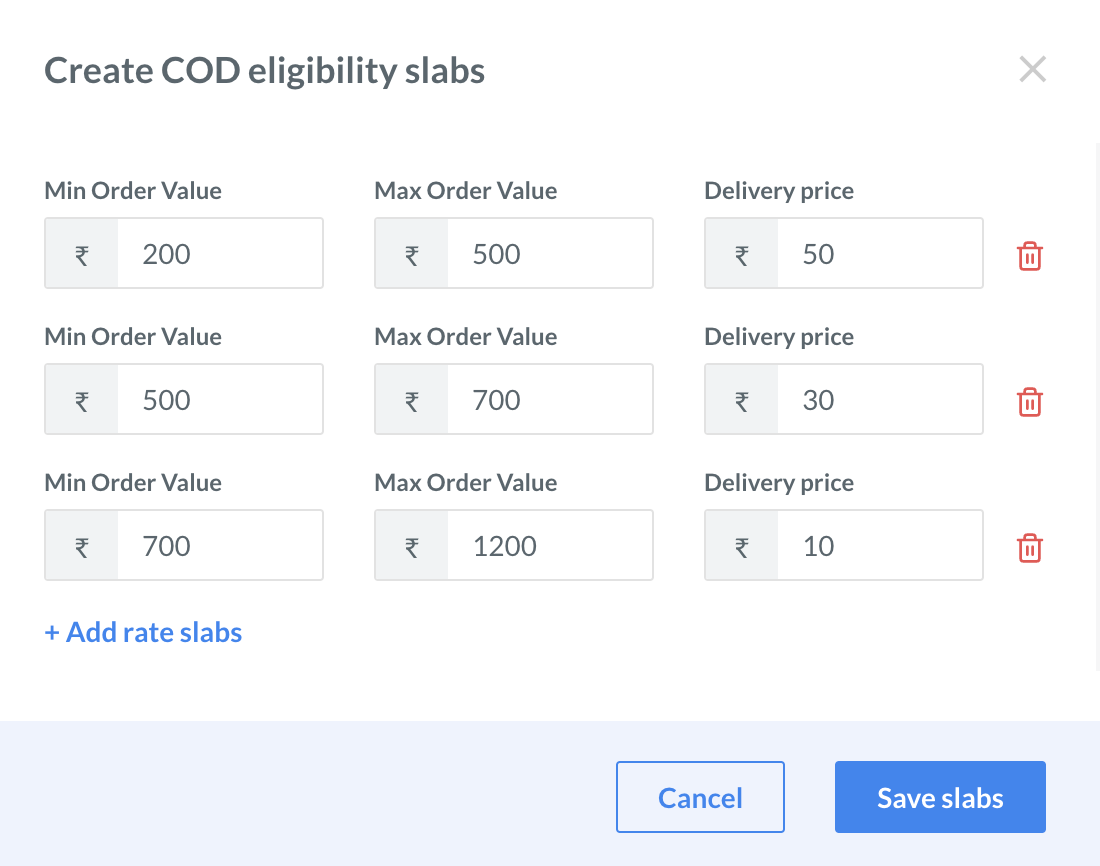
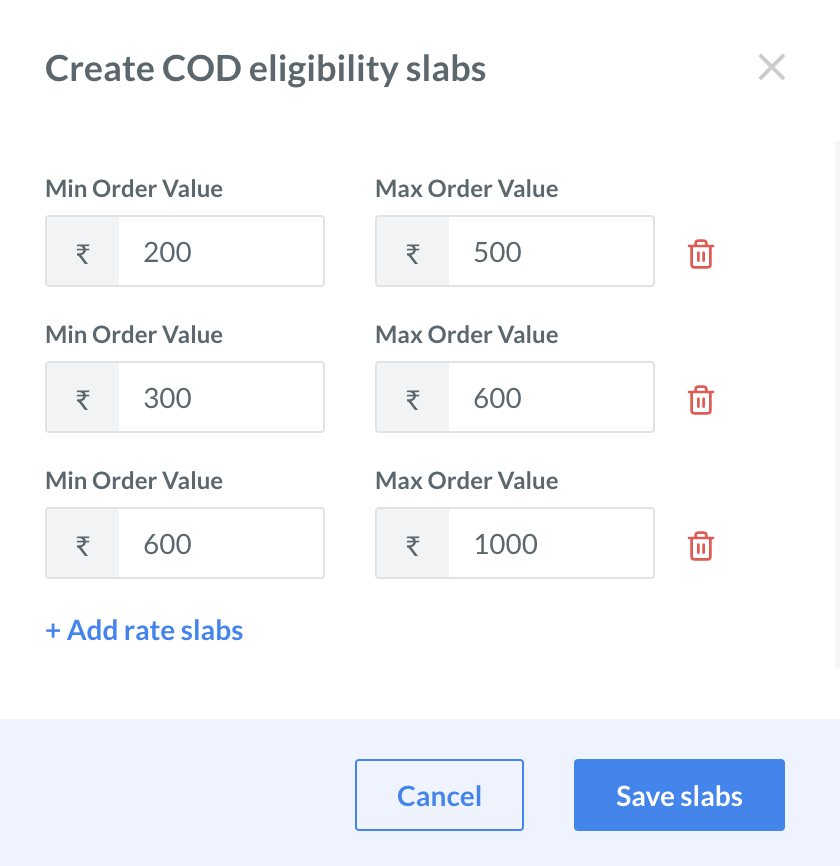
- Click + Add rate slabs if you want to create more slabs.
- In the COD zones section, click + Add zones to create shipping zones where COD is applicable.
- Enter the Zone name.
- Select the country, state and city where the COD charges configured in the previous step should be applicable. Click Confirm.
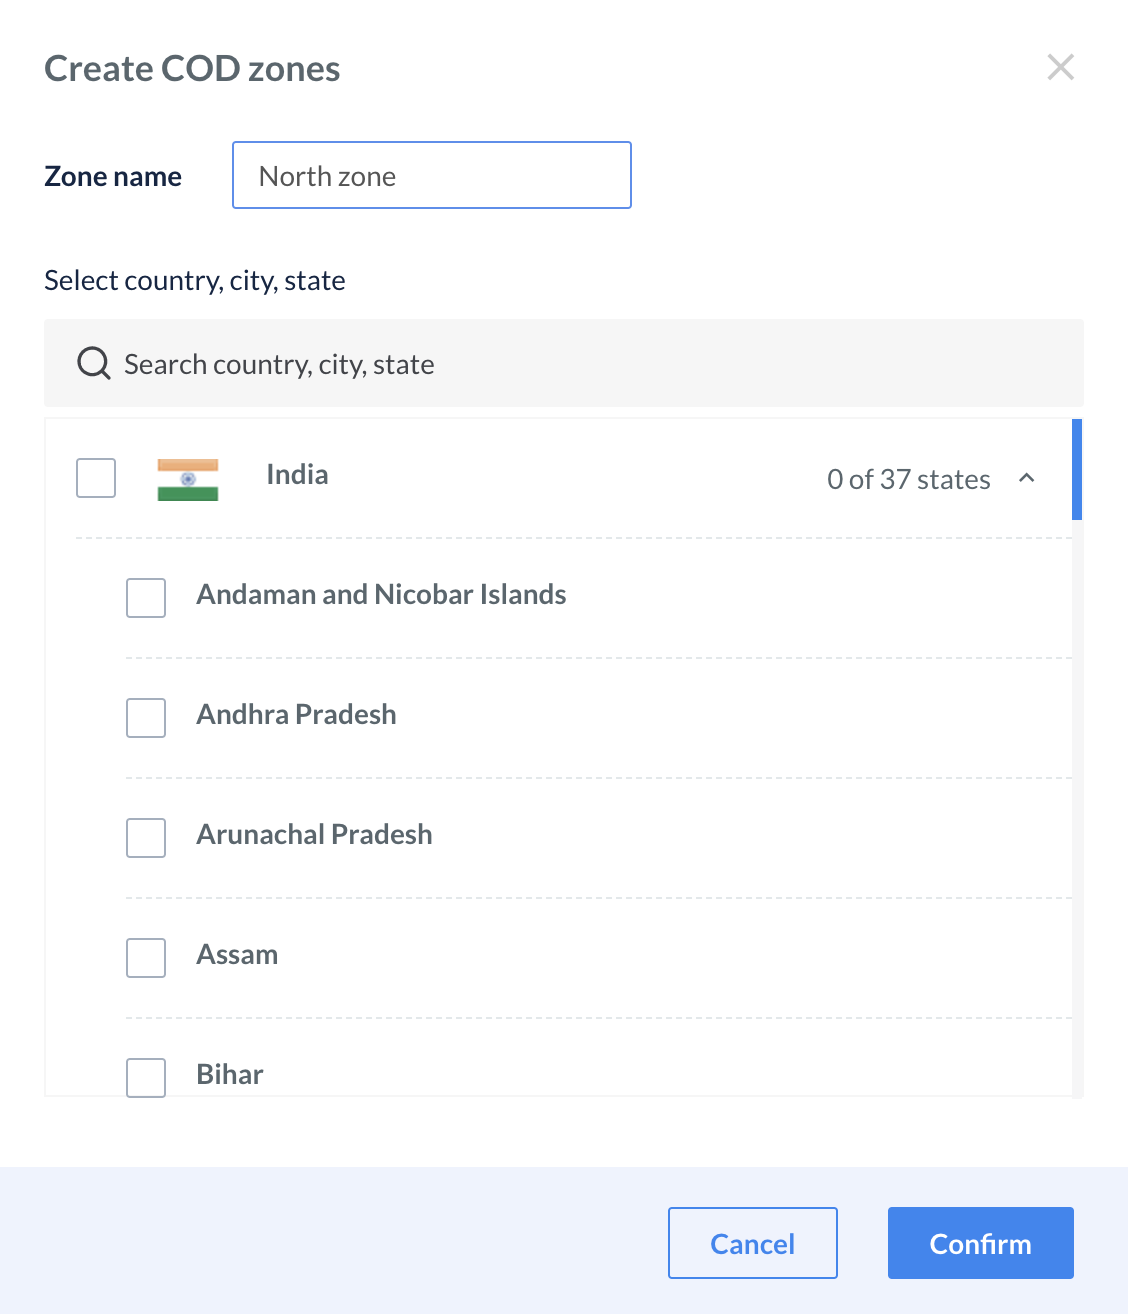
- Click Save & apply.
- Navigate to Manual Zipcode upload and click Upload ZIP codes to offer COD only to specific ZIP codes.
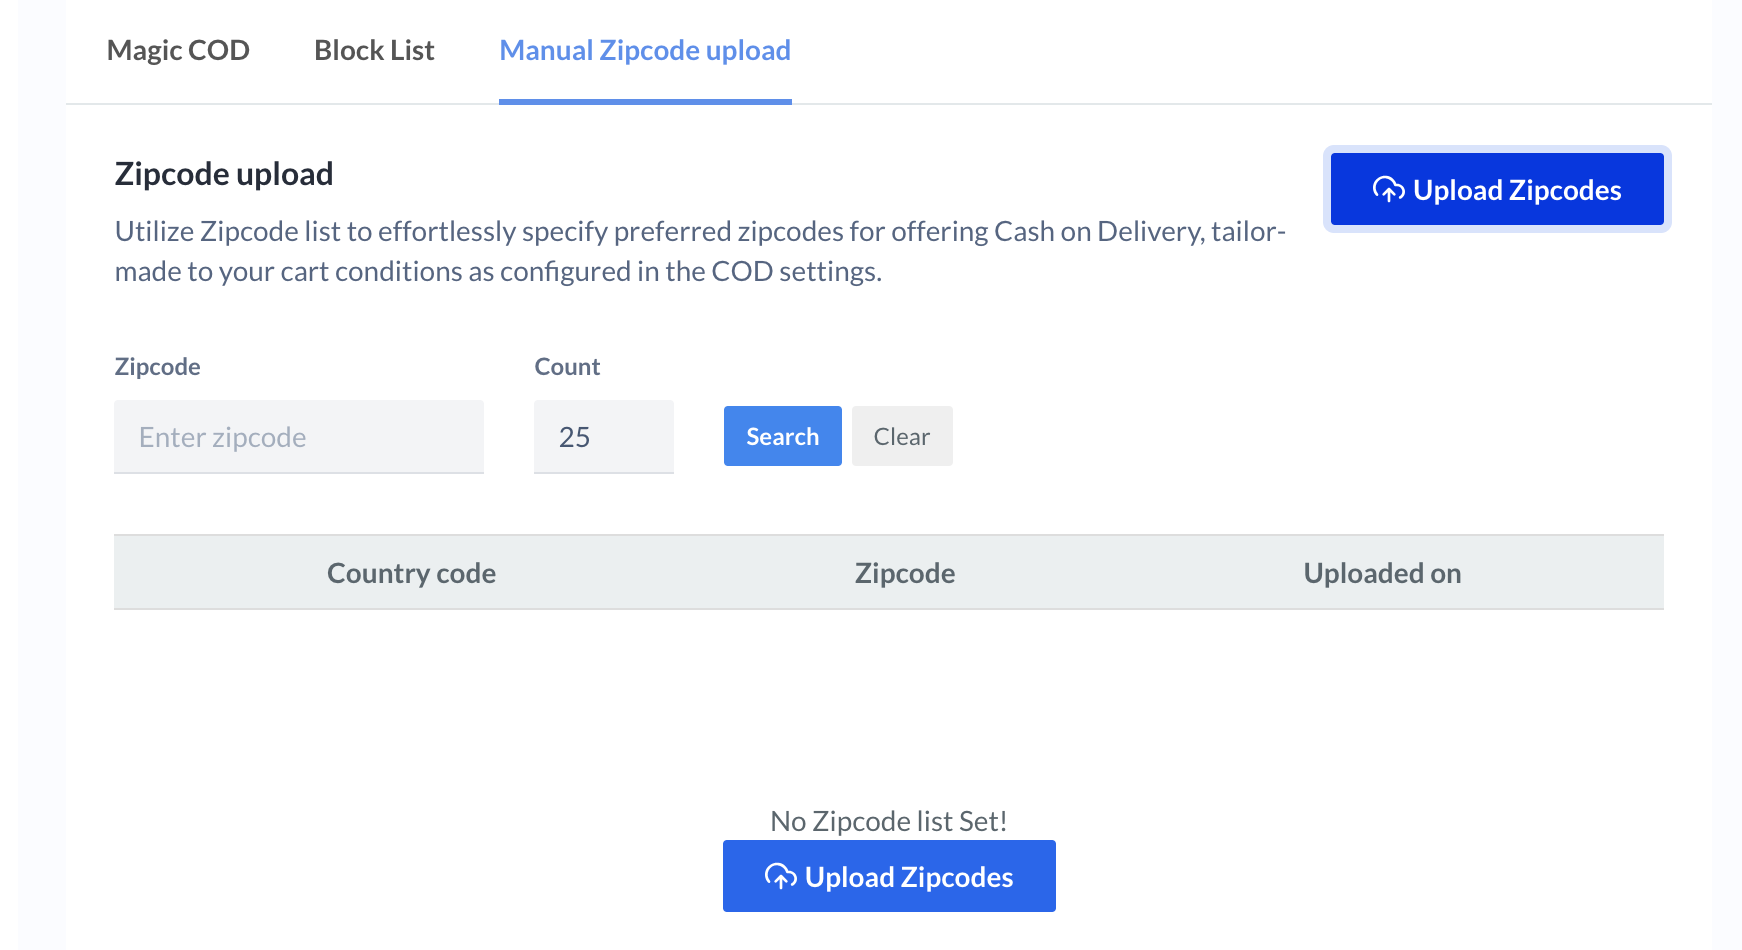
- Download the sample CSV file.
- Enter the ZIP codes as individual rows in column 1.
- Upload the file in .CSV format. Maximum file size supported is 50 MB.
- Uploaded ZIP codes are compatible only with Basic COD settings.
- Drag the file or click click to upload.
Advanced
Advanced
- In the Cart order value section, click + Add slabs.
- Enter the minimum and maximum order value for which the fee should apply.
- Enter the Delivery price. For example, if the Min Order Value is ₹400, the Max Order Value is ₹1000 and the fee is ₹50, a ₹50 COD fee will apply to any order value in this range.
- Click Save slab.
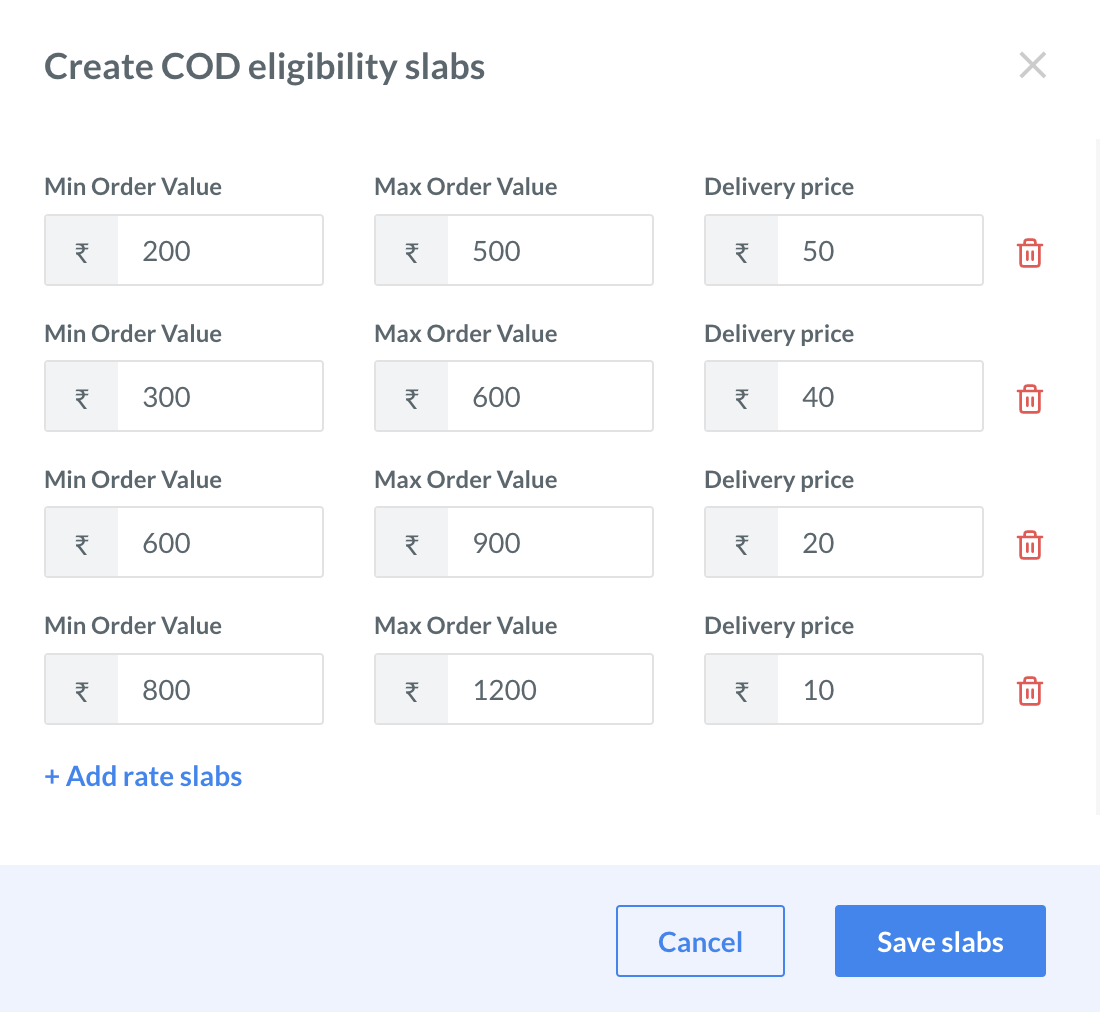
- Click + Create more slabs if you want to create more slabs.
- In the COD zones section, click + Add zones to create shipping zones where COD is applicable.
- Enter the Zone name.
- Select the country, state and city where you want to apply COD charges configured in the previous step. Click Confirm.
- You can configure COD based on either the zone or product categories.
- Zone Configuration: Manage applicable COD slabs and rates for different zones.
- Click + Set zone configuration.
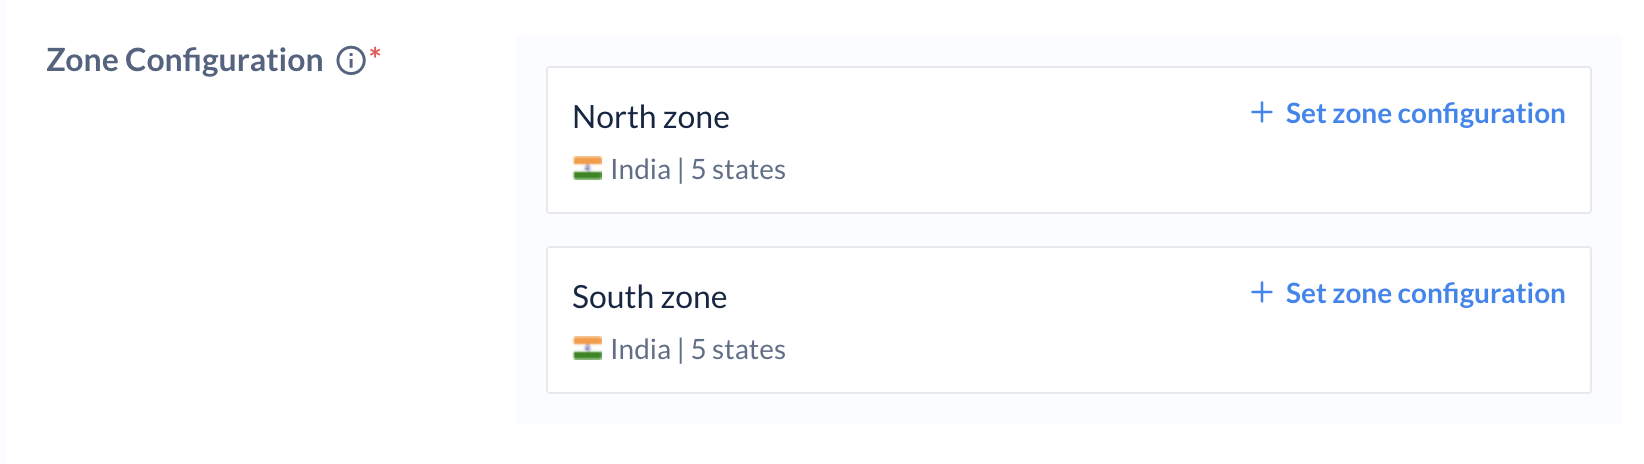
- Select the slabs based on your requirement and click Save configuration. It is mandatory to configure all the zones you create. The COD charge applies to each zone based on the slabs you select.
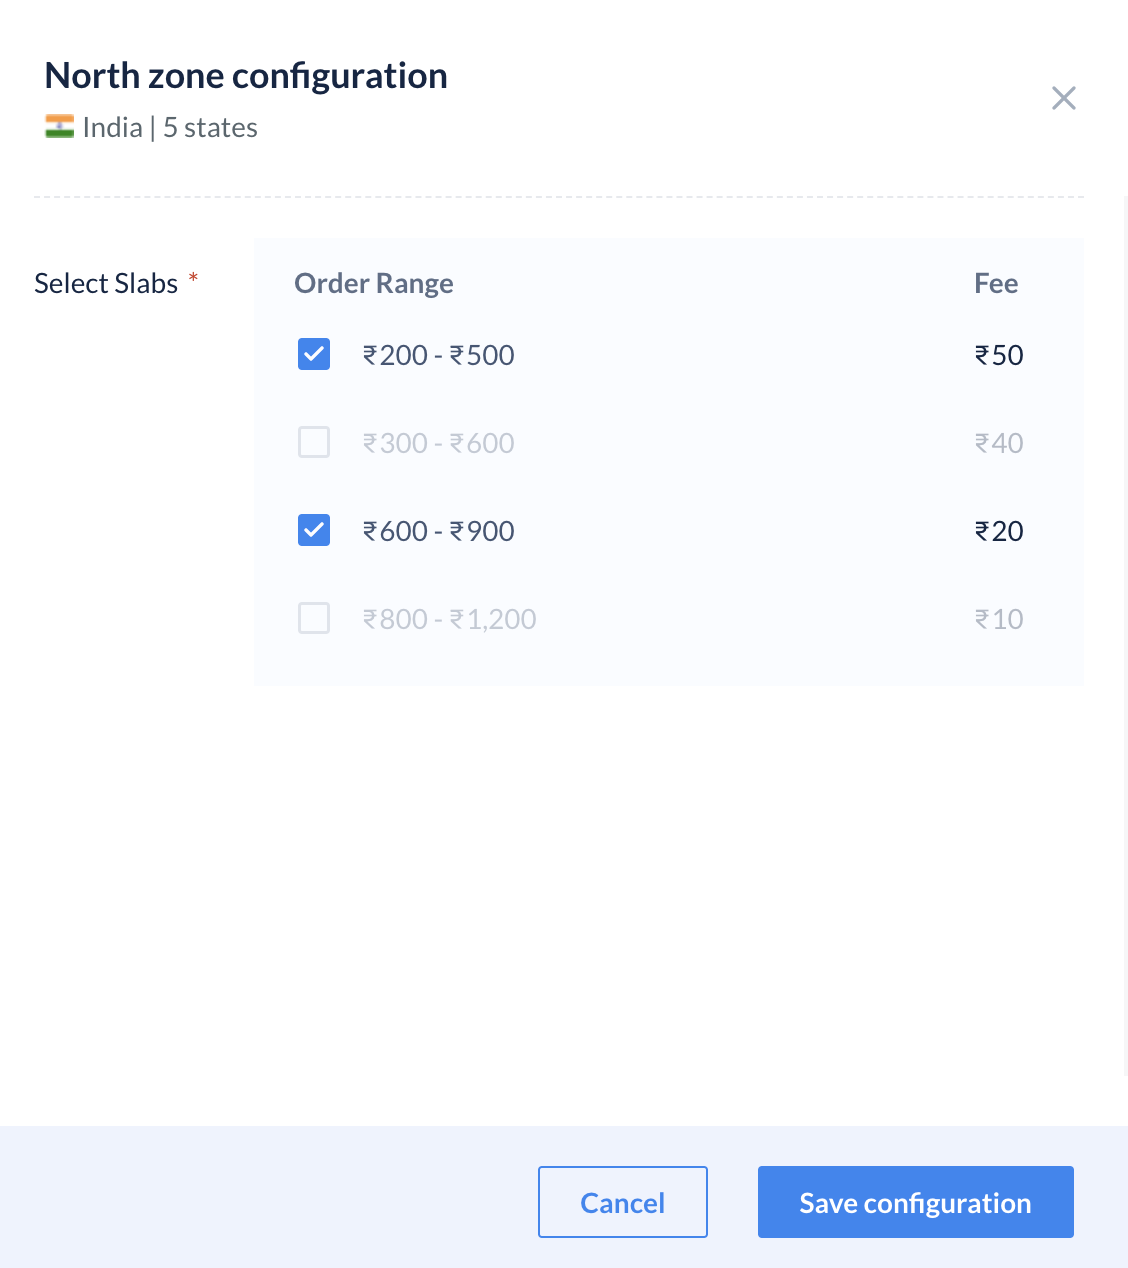
- Click Save & apply.
- Click + Set zone configuration.
- Product categories: Create Product categories to establish custom rates or zone restrictions for different categories.
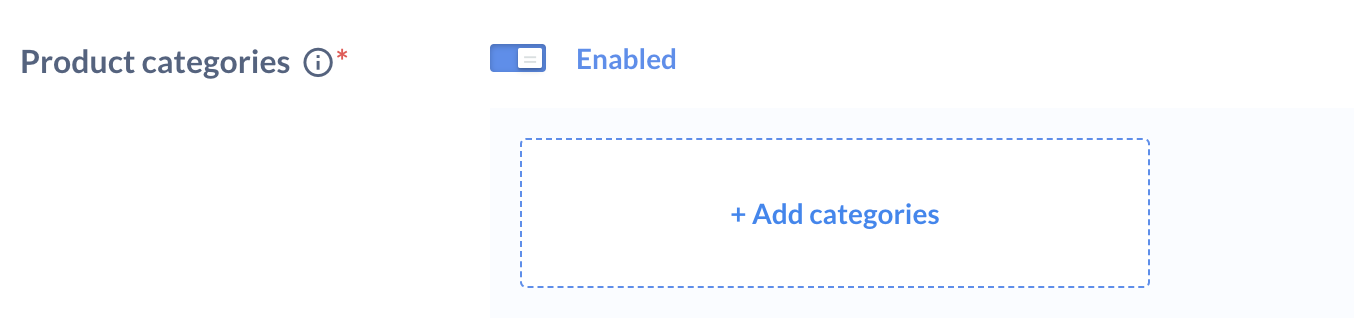
- Enable the Product categories setting. Once you enable this setting, the Zone configuration field will not appear.
- Click + Add categories.
- Enter the Category name.
- Select the products of your choice that you want to add to the category and click Confirm. You cannot add the same product in different categories.
- Click + Create more categories if you want to add more product categories.
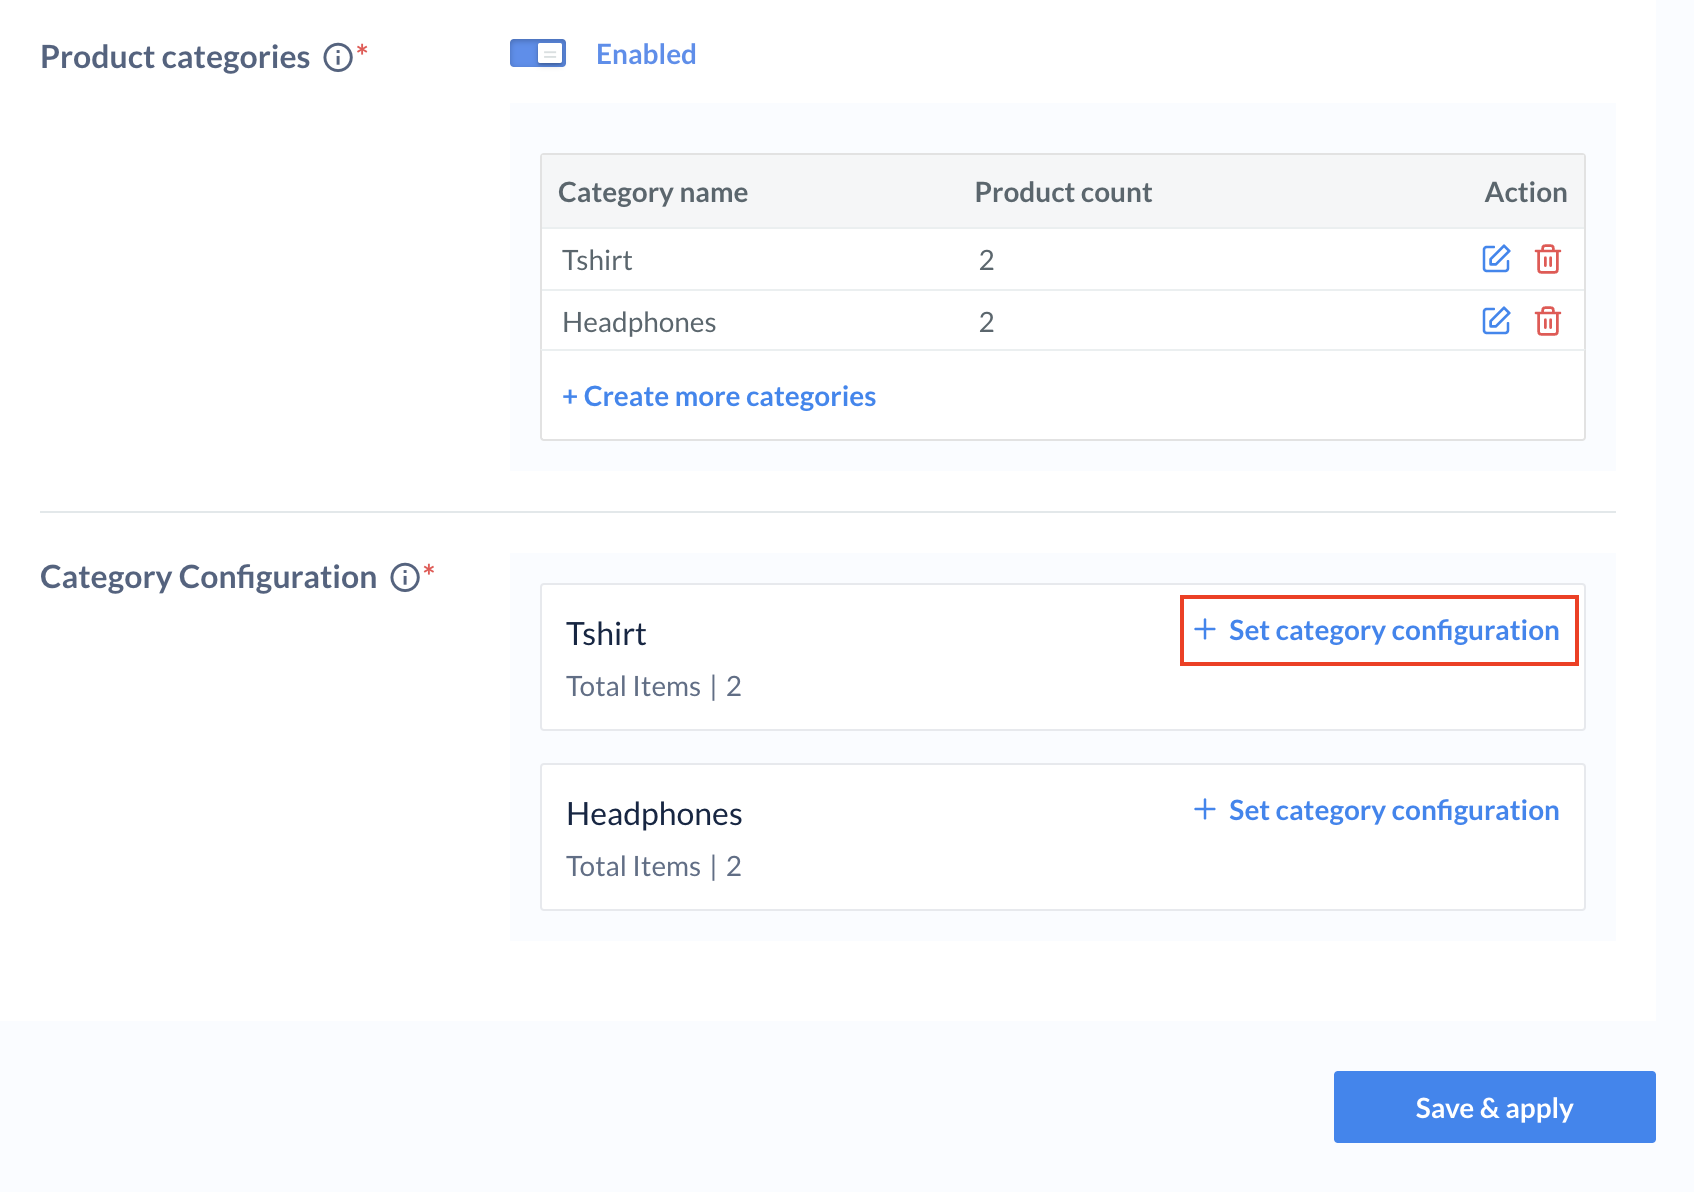
- Click + Set category configuration to configure the zones and slabs for each category.
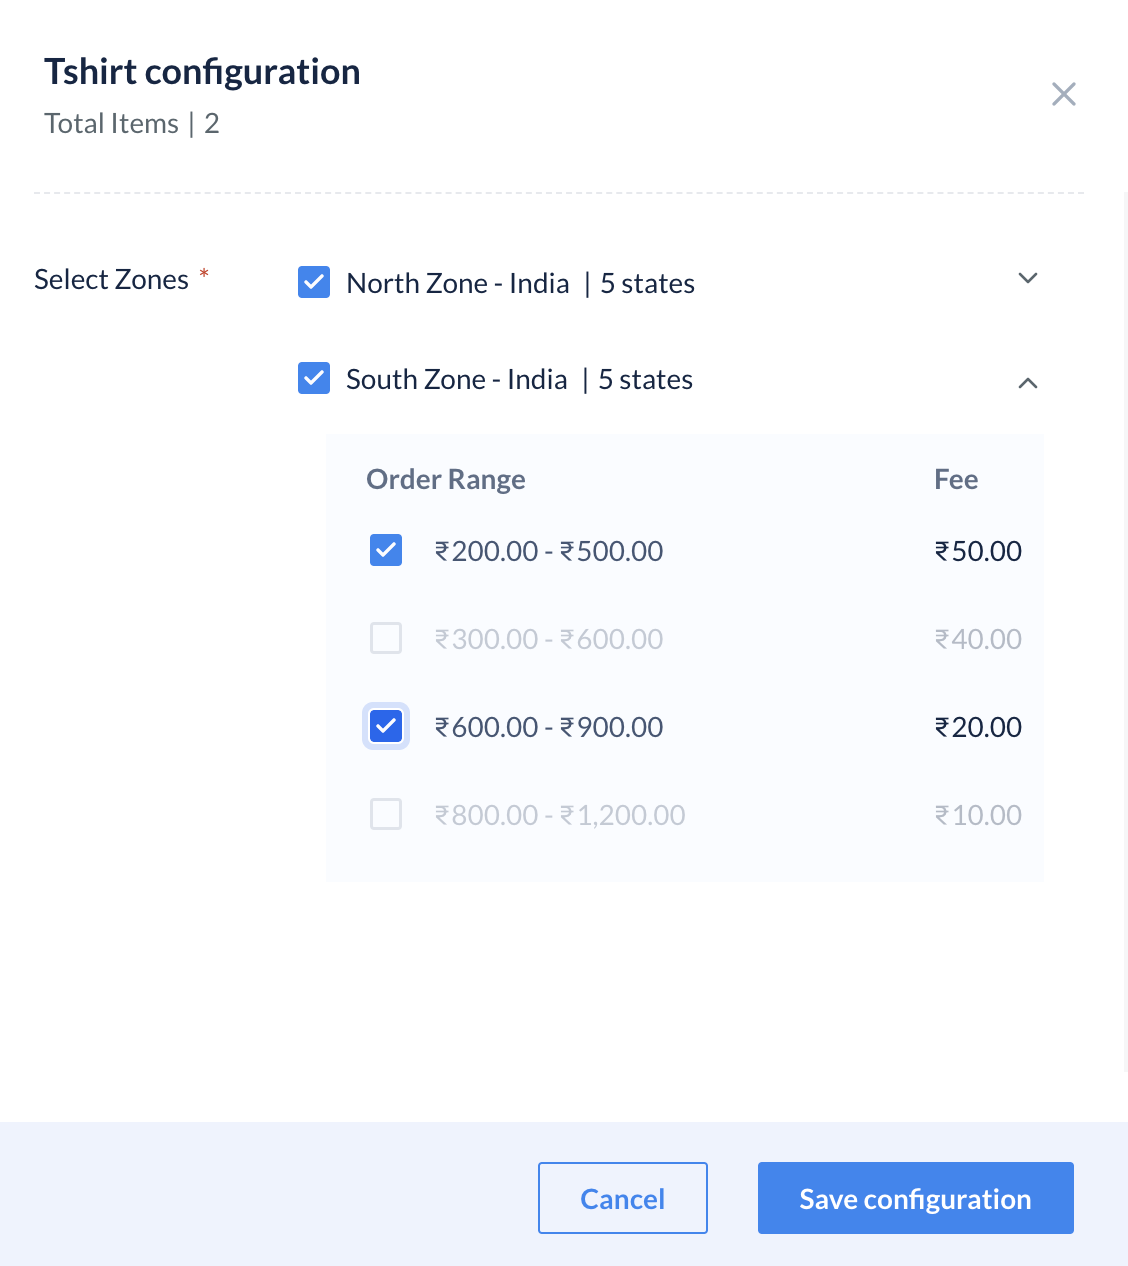
- Select the serviceable zone for the selected category and choose the slabs based on your requirements. For example, if you want to set configurations for the product category, Topwear, select the order range for this category on which COD should apply for each zone.
- Click Save configuration. It is mandatory to configure slabs for all the zones you create.
- Click Save & apply.
- Zone Configuration: Manage applicable COD slabs and rates for different zones.
Feature
Block List
Block List
The customers mentioned in the blocklist based on the order phone number, email ID, device IP and shipping zip code will not be eligible for COD.
- Only the Owner and Admin roles have access to this feature.
- Blocklist will work only if you enable COD as a payment option.
- Log in to the Dashboard and navigate to Magic Checkout → Setup & Settings → Platform Settings.
- Select Shopify from the Platform drop-down list and enter your Shopify Store ID.
- Navigate to COD Setup → Block List.
- Click + Add New Blocklist.
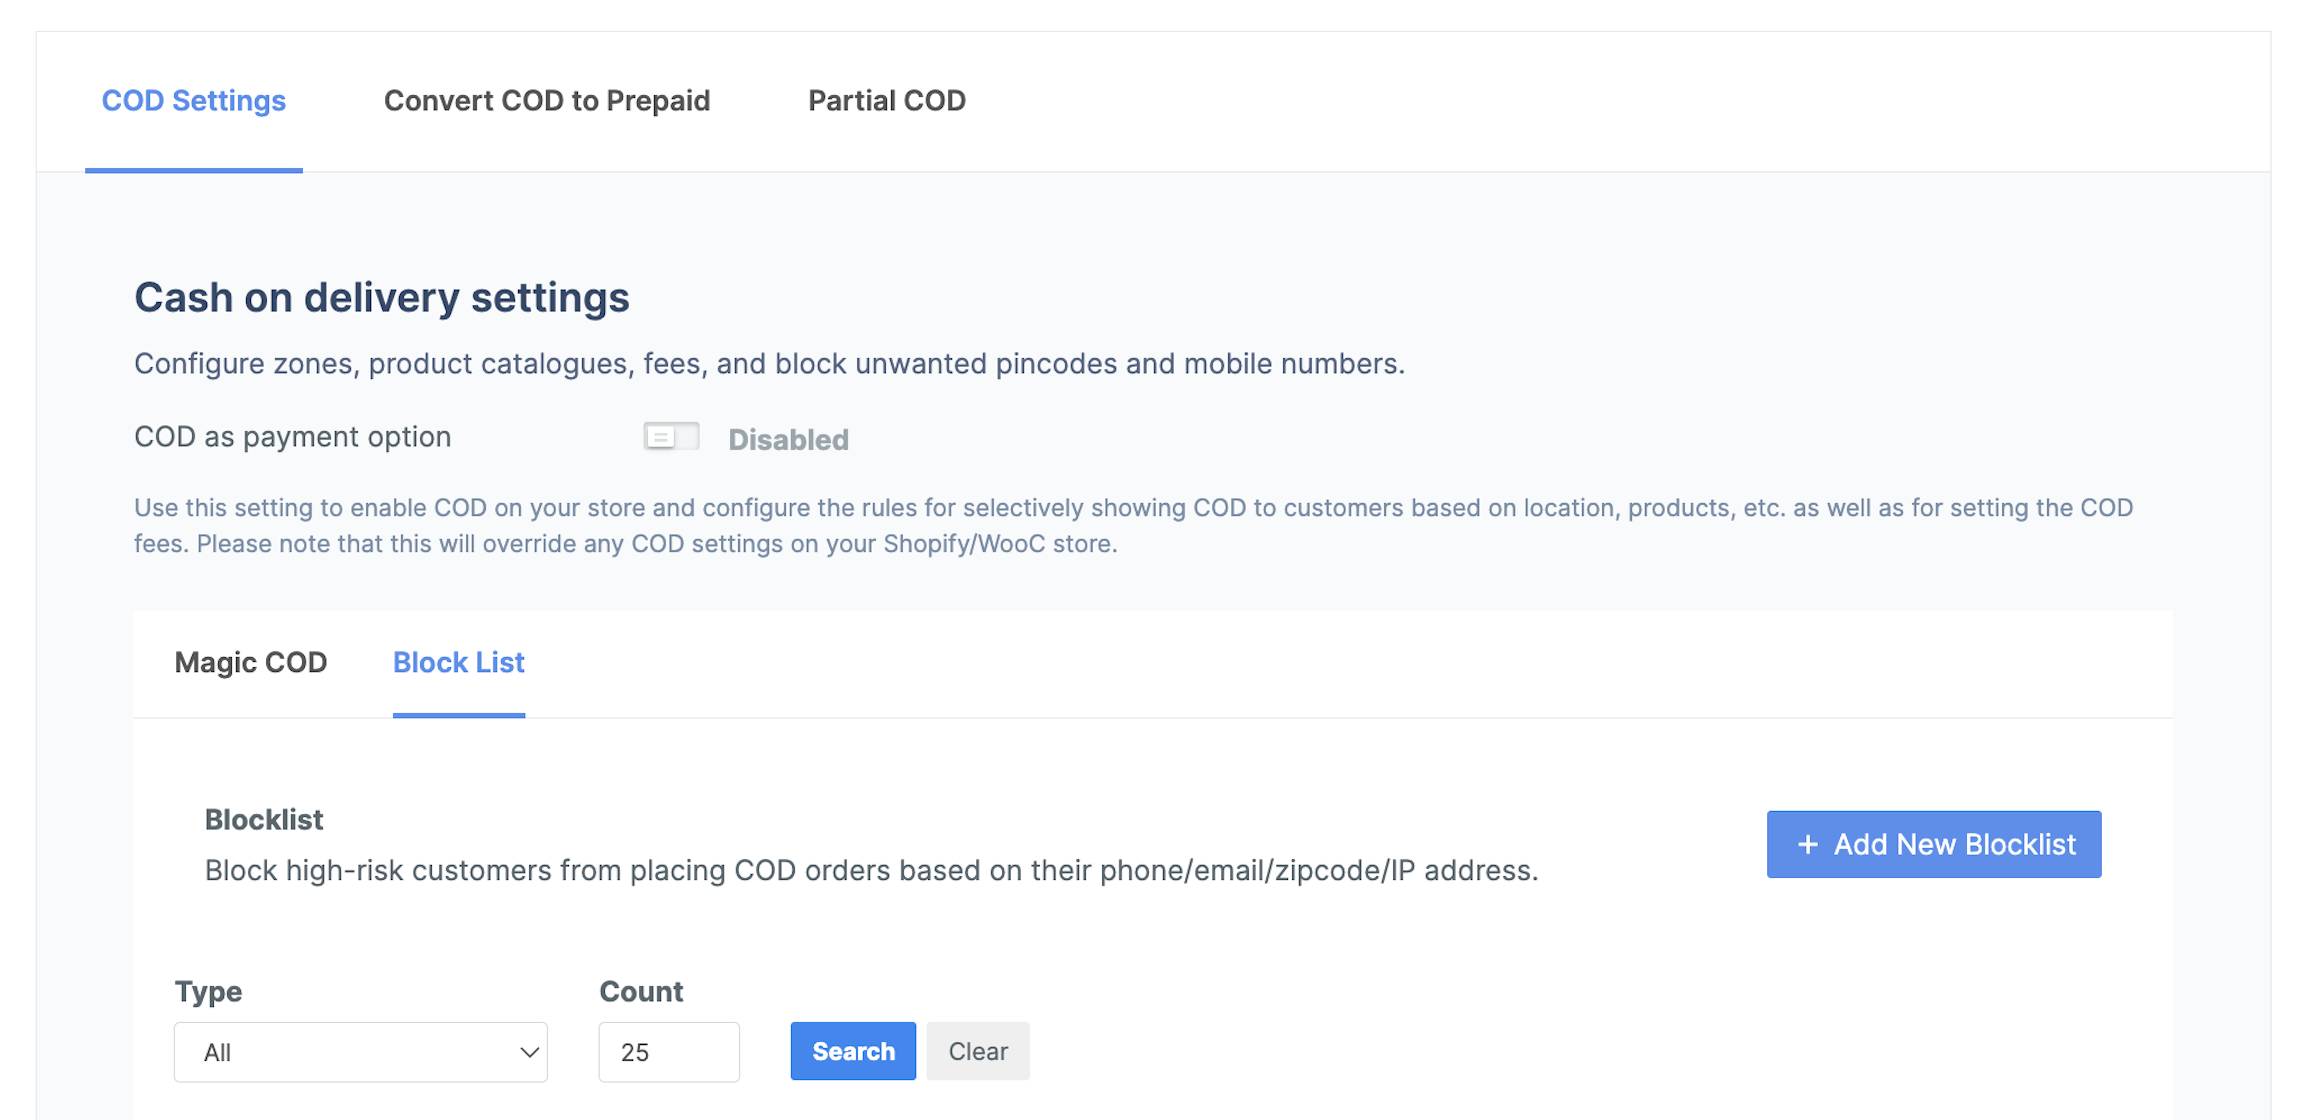
- You can either upload a list or enter it manually.
- To upload a list:
- Download the sample file.
- Add the required data to the file. A maximum of 1M rows are acceptable in the file.
- Upload the file in .CSV format. Maximum file size supported is 50 MB.
- To manually enter the list:
- Select the Type from the drop-down list.
- Enter the values. You can enter up to 20 values by separating them with a comma based on the type.
- To upload a list:
- Phone number: 10-digit phone number with the country code. For example, +919000090000.
- Zip code: 6-digit zip code.
- Device IP: For example, 123.123.123.123.
- Click Confirm.
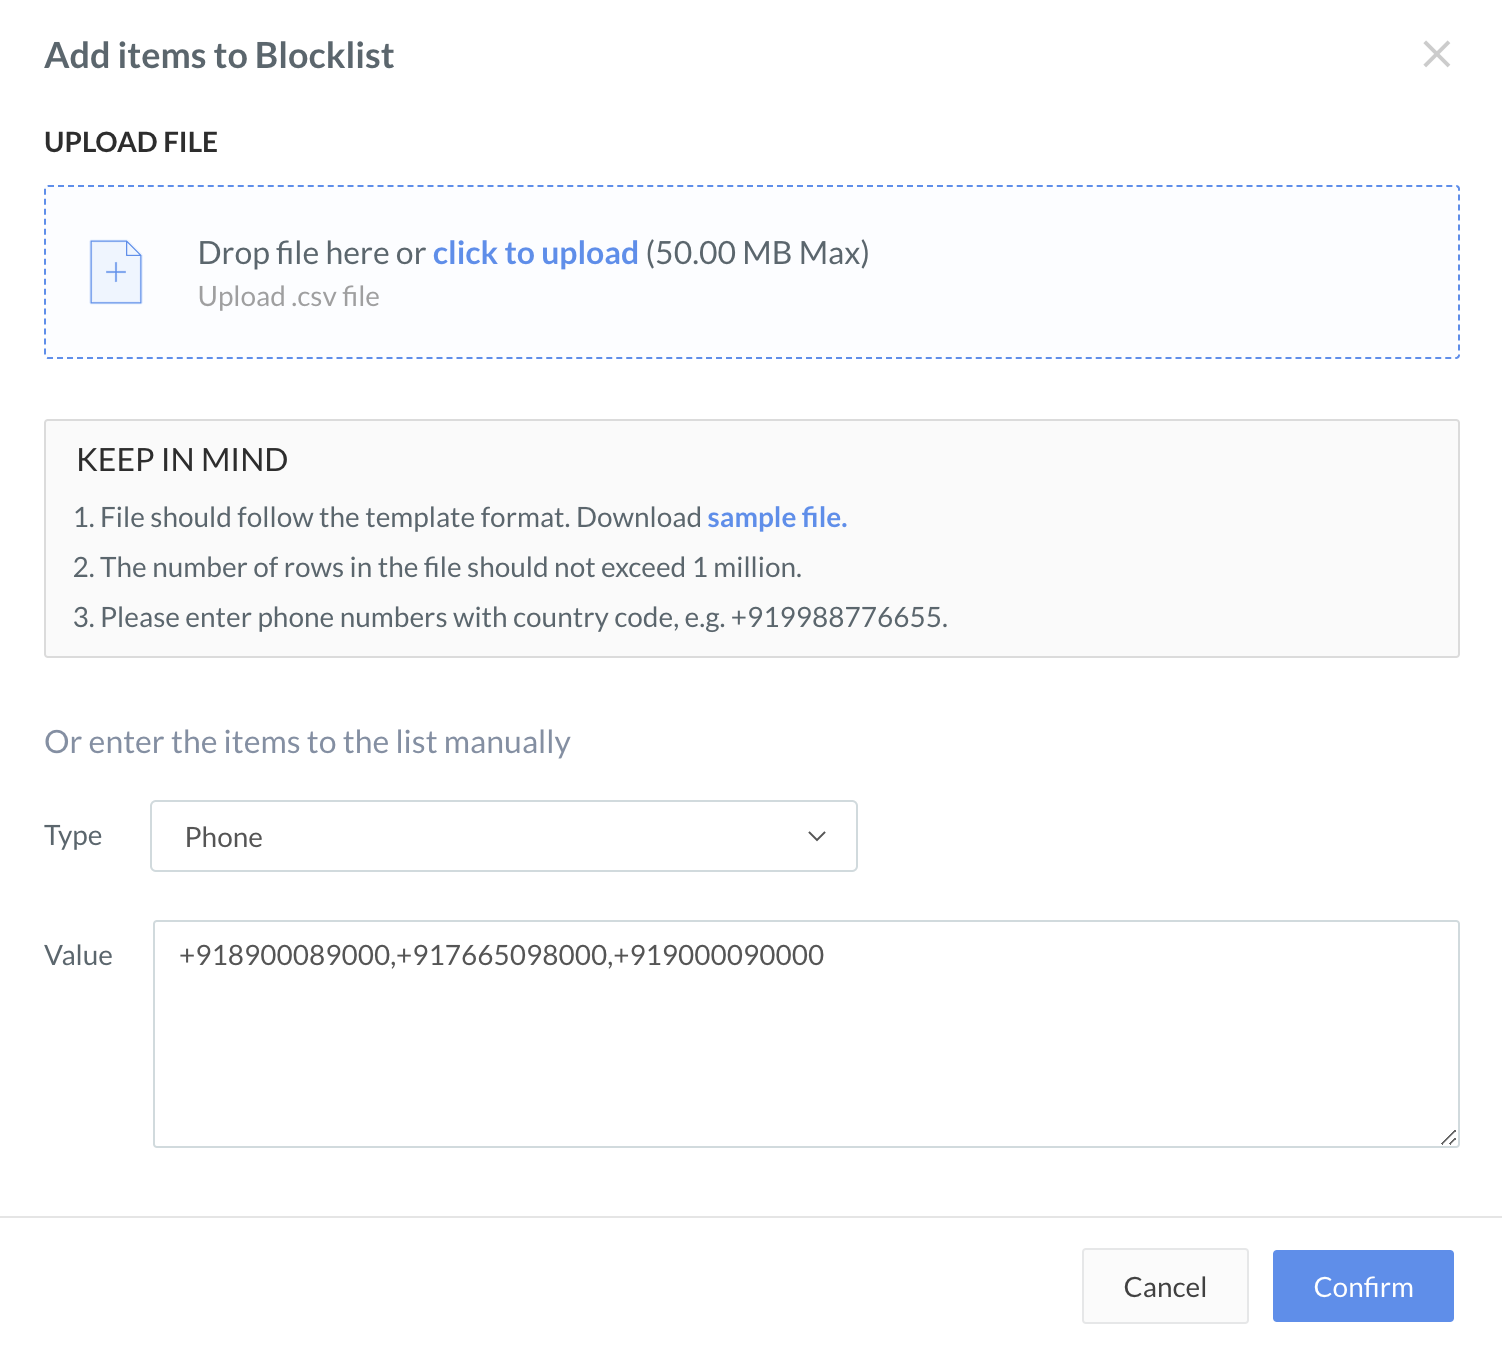
- A pop-up page appears with the list of items added. Review the list and click Add To Blocklist.
Method 2: Shopify Store
Method 2: Shopify Store
- Log in to the Shopify Store and navigate to Products.
- Select the required products to add a COD tag.
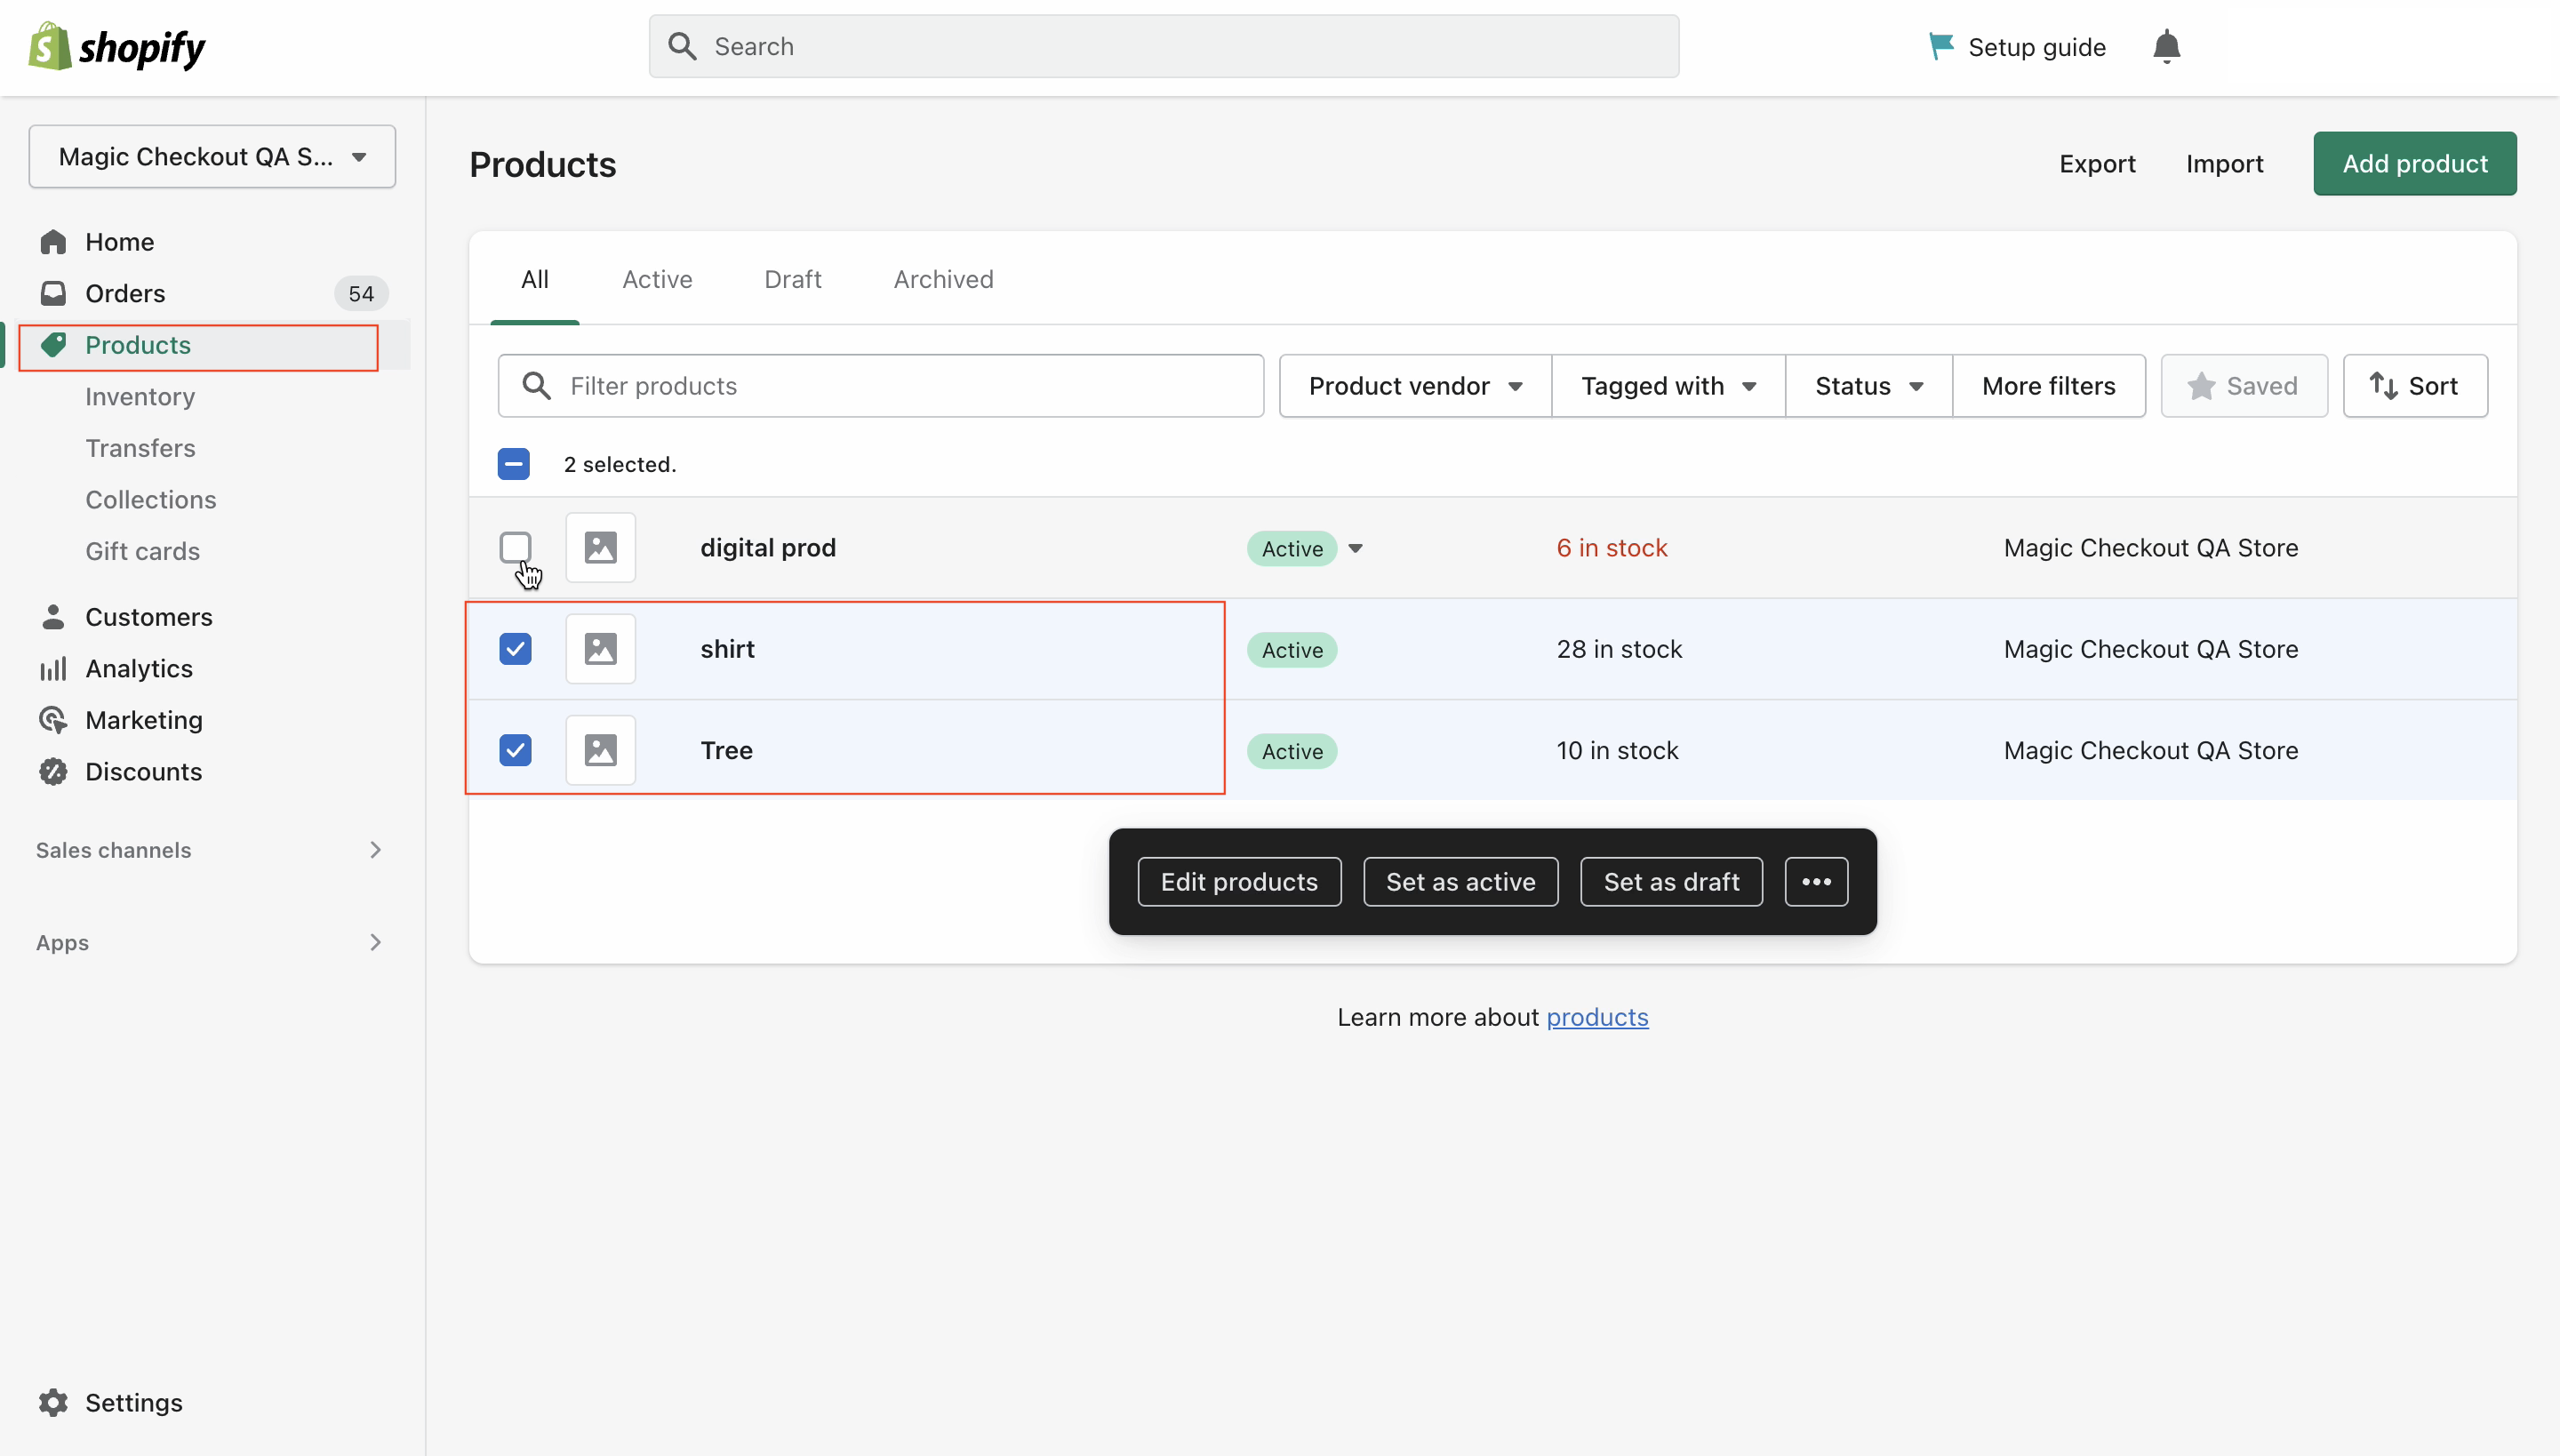
- Click the options icon below and click Add tags.
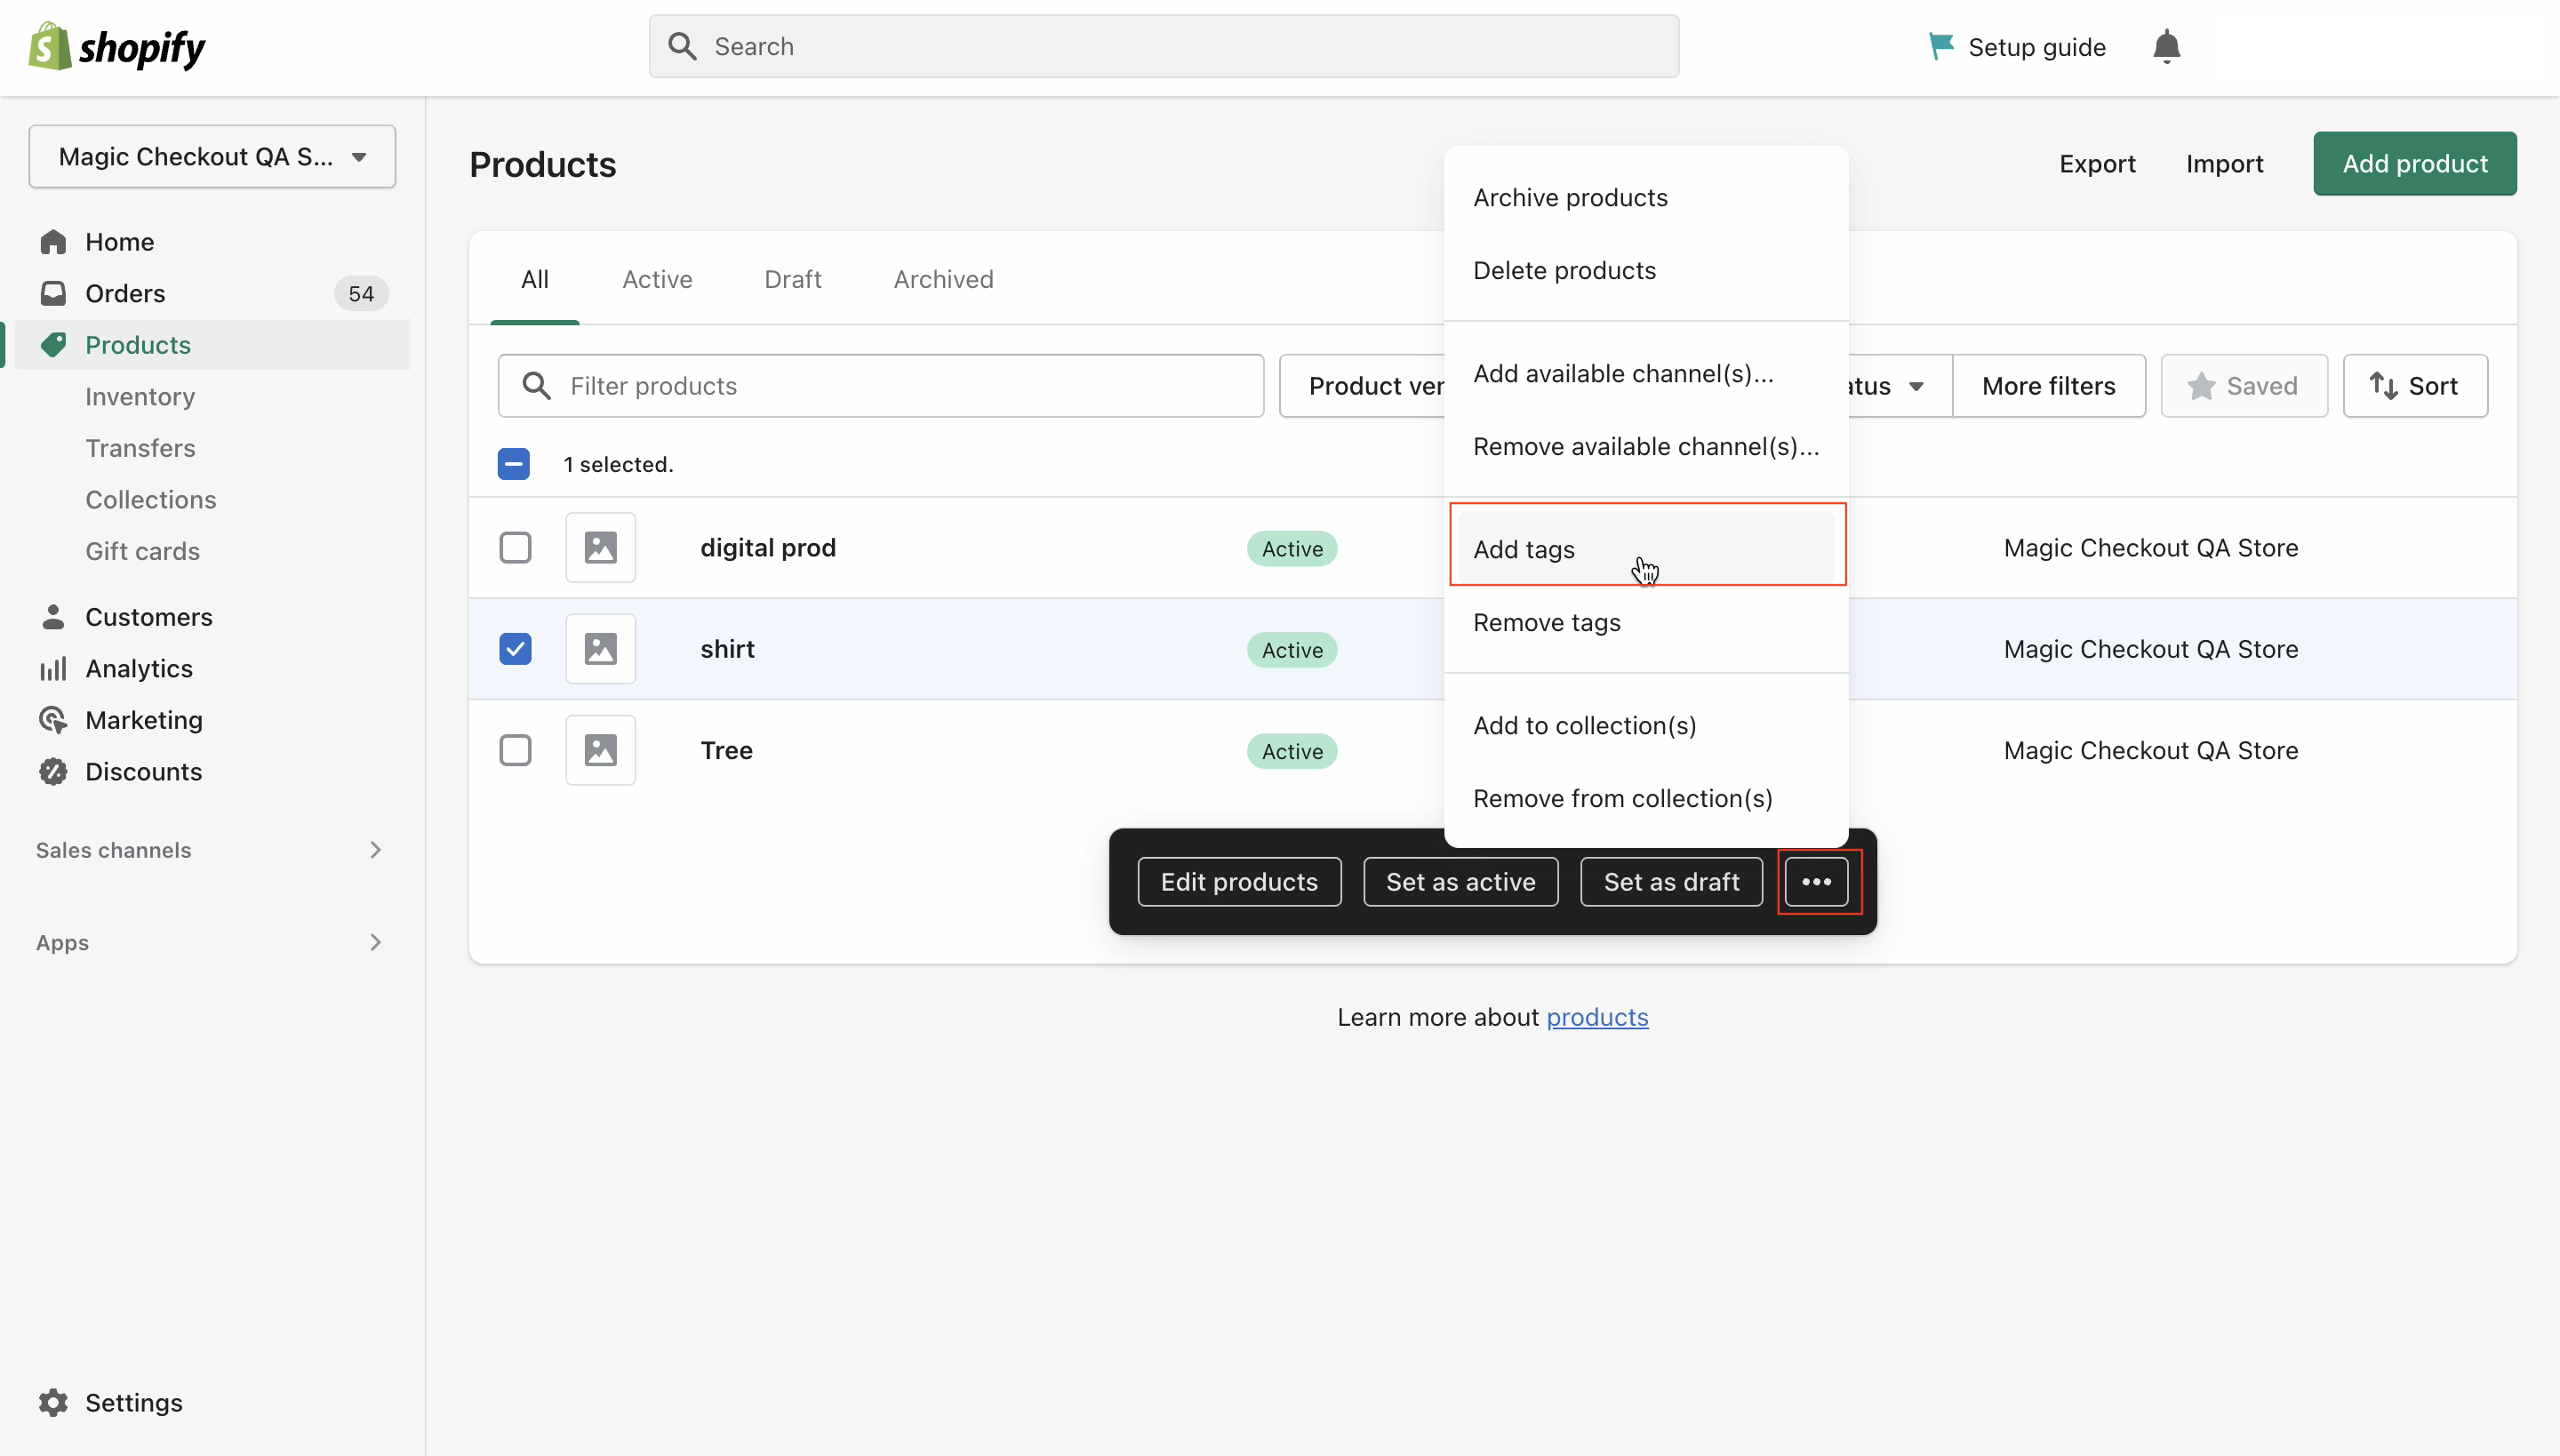
- Enter the COD rate and click Add CODXXXX.
- The format of the tag is
CODXXXX(in capital), where XXXX denotes the COD charges of the product. For example,COD500. - If you want to offer COD with no COD charge, use
COD0000.
- Click Save.
- Select a product you added a tag to and view the COD tag under the Product organization field to verify the changes.
Customer Experience
Customer Experience
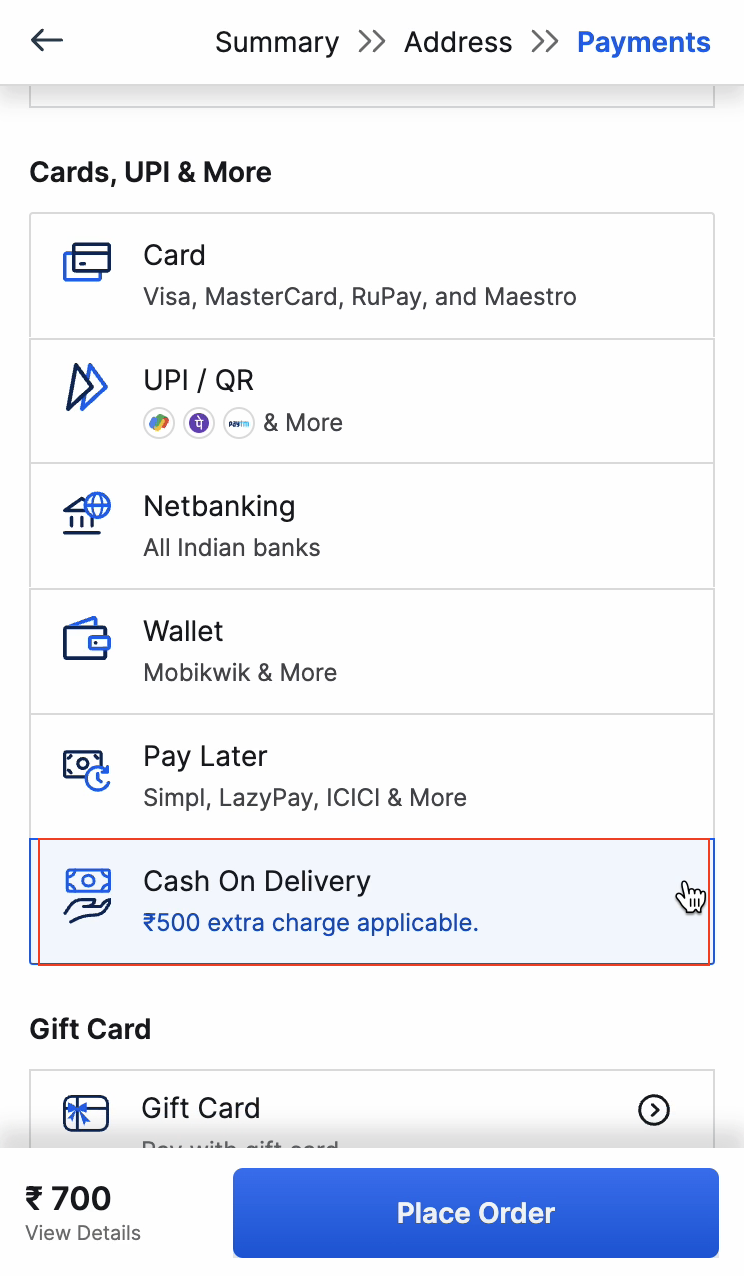
Partial Cash on Delivery
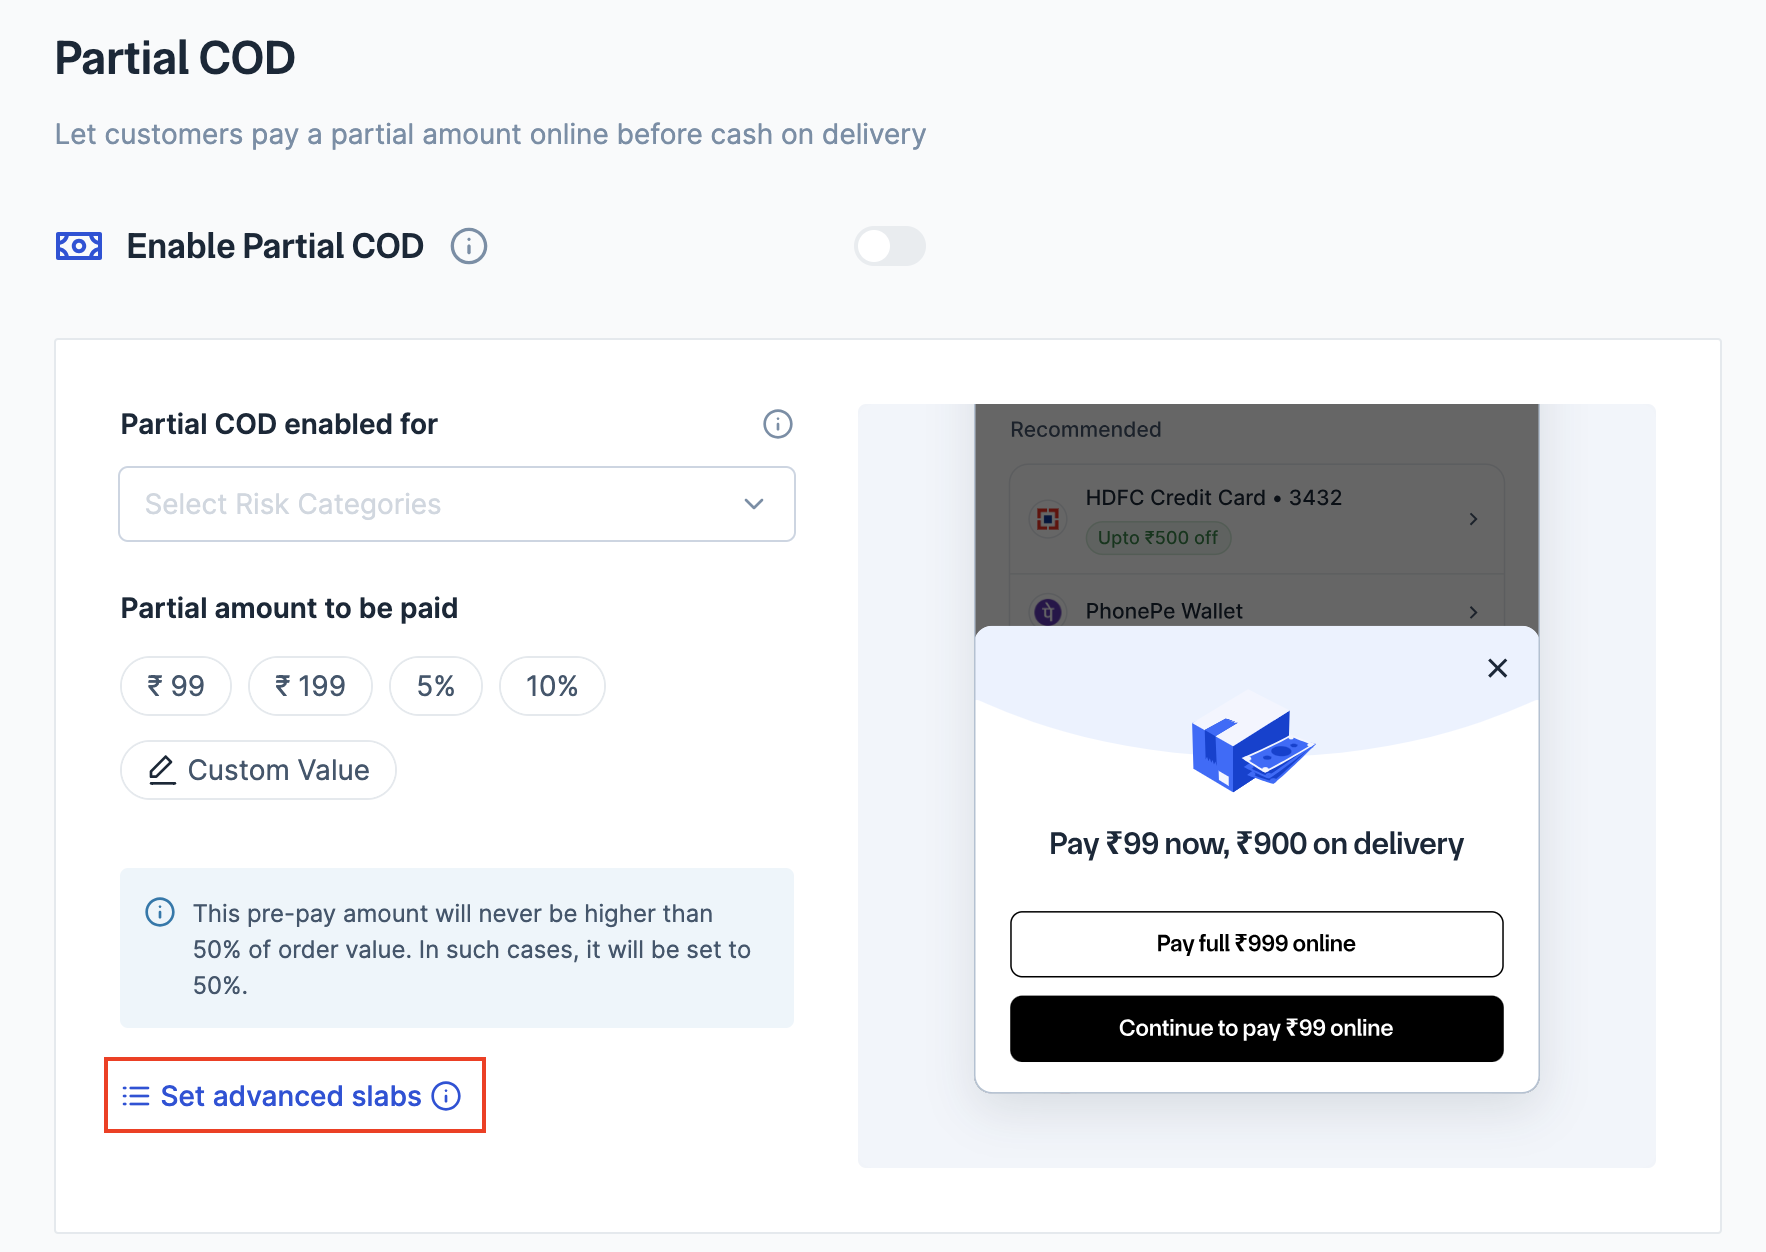
Enable customers to pay a partial order amount online and use cash on delivery for the remaining balance to reduce order cancellation risk.To enable partial COD:
To enable partial COD:
- Log in to the Dashboard and navigate to Magic Checkout → Setup & Settings → Platform Settings.
- Select Shopify from the Platform drop-down list and enter your Shopify Store ID.
- Navigate to COD Setup → Partial COD.
- Turn on Enable Partial COD and click Enable to confirm.
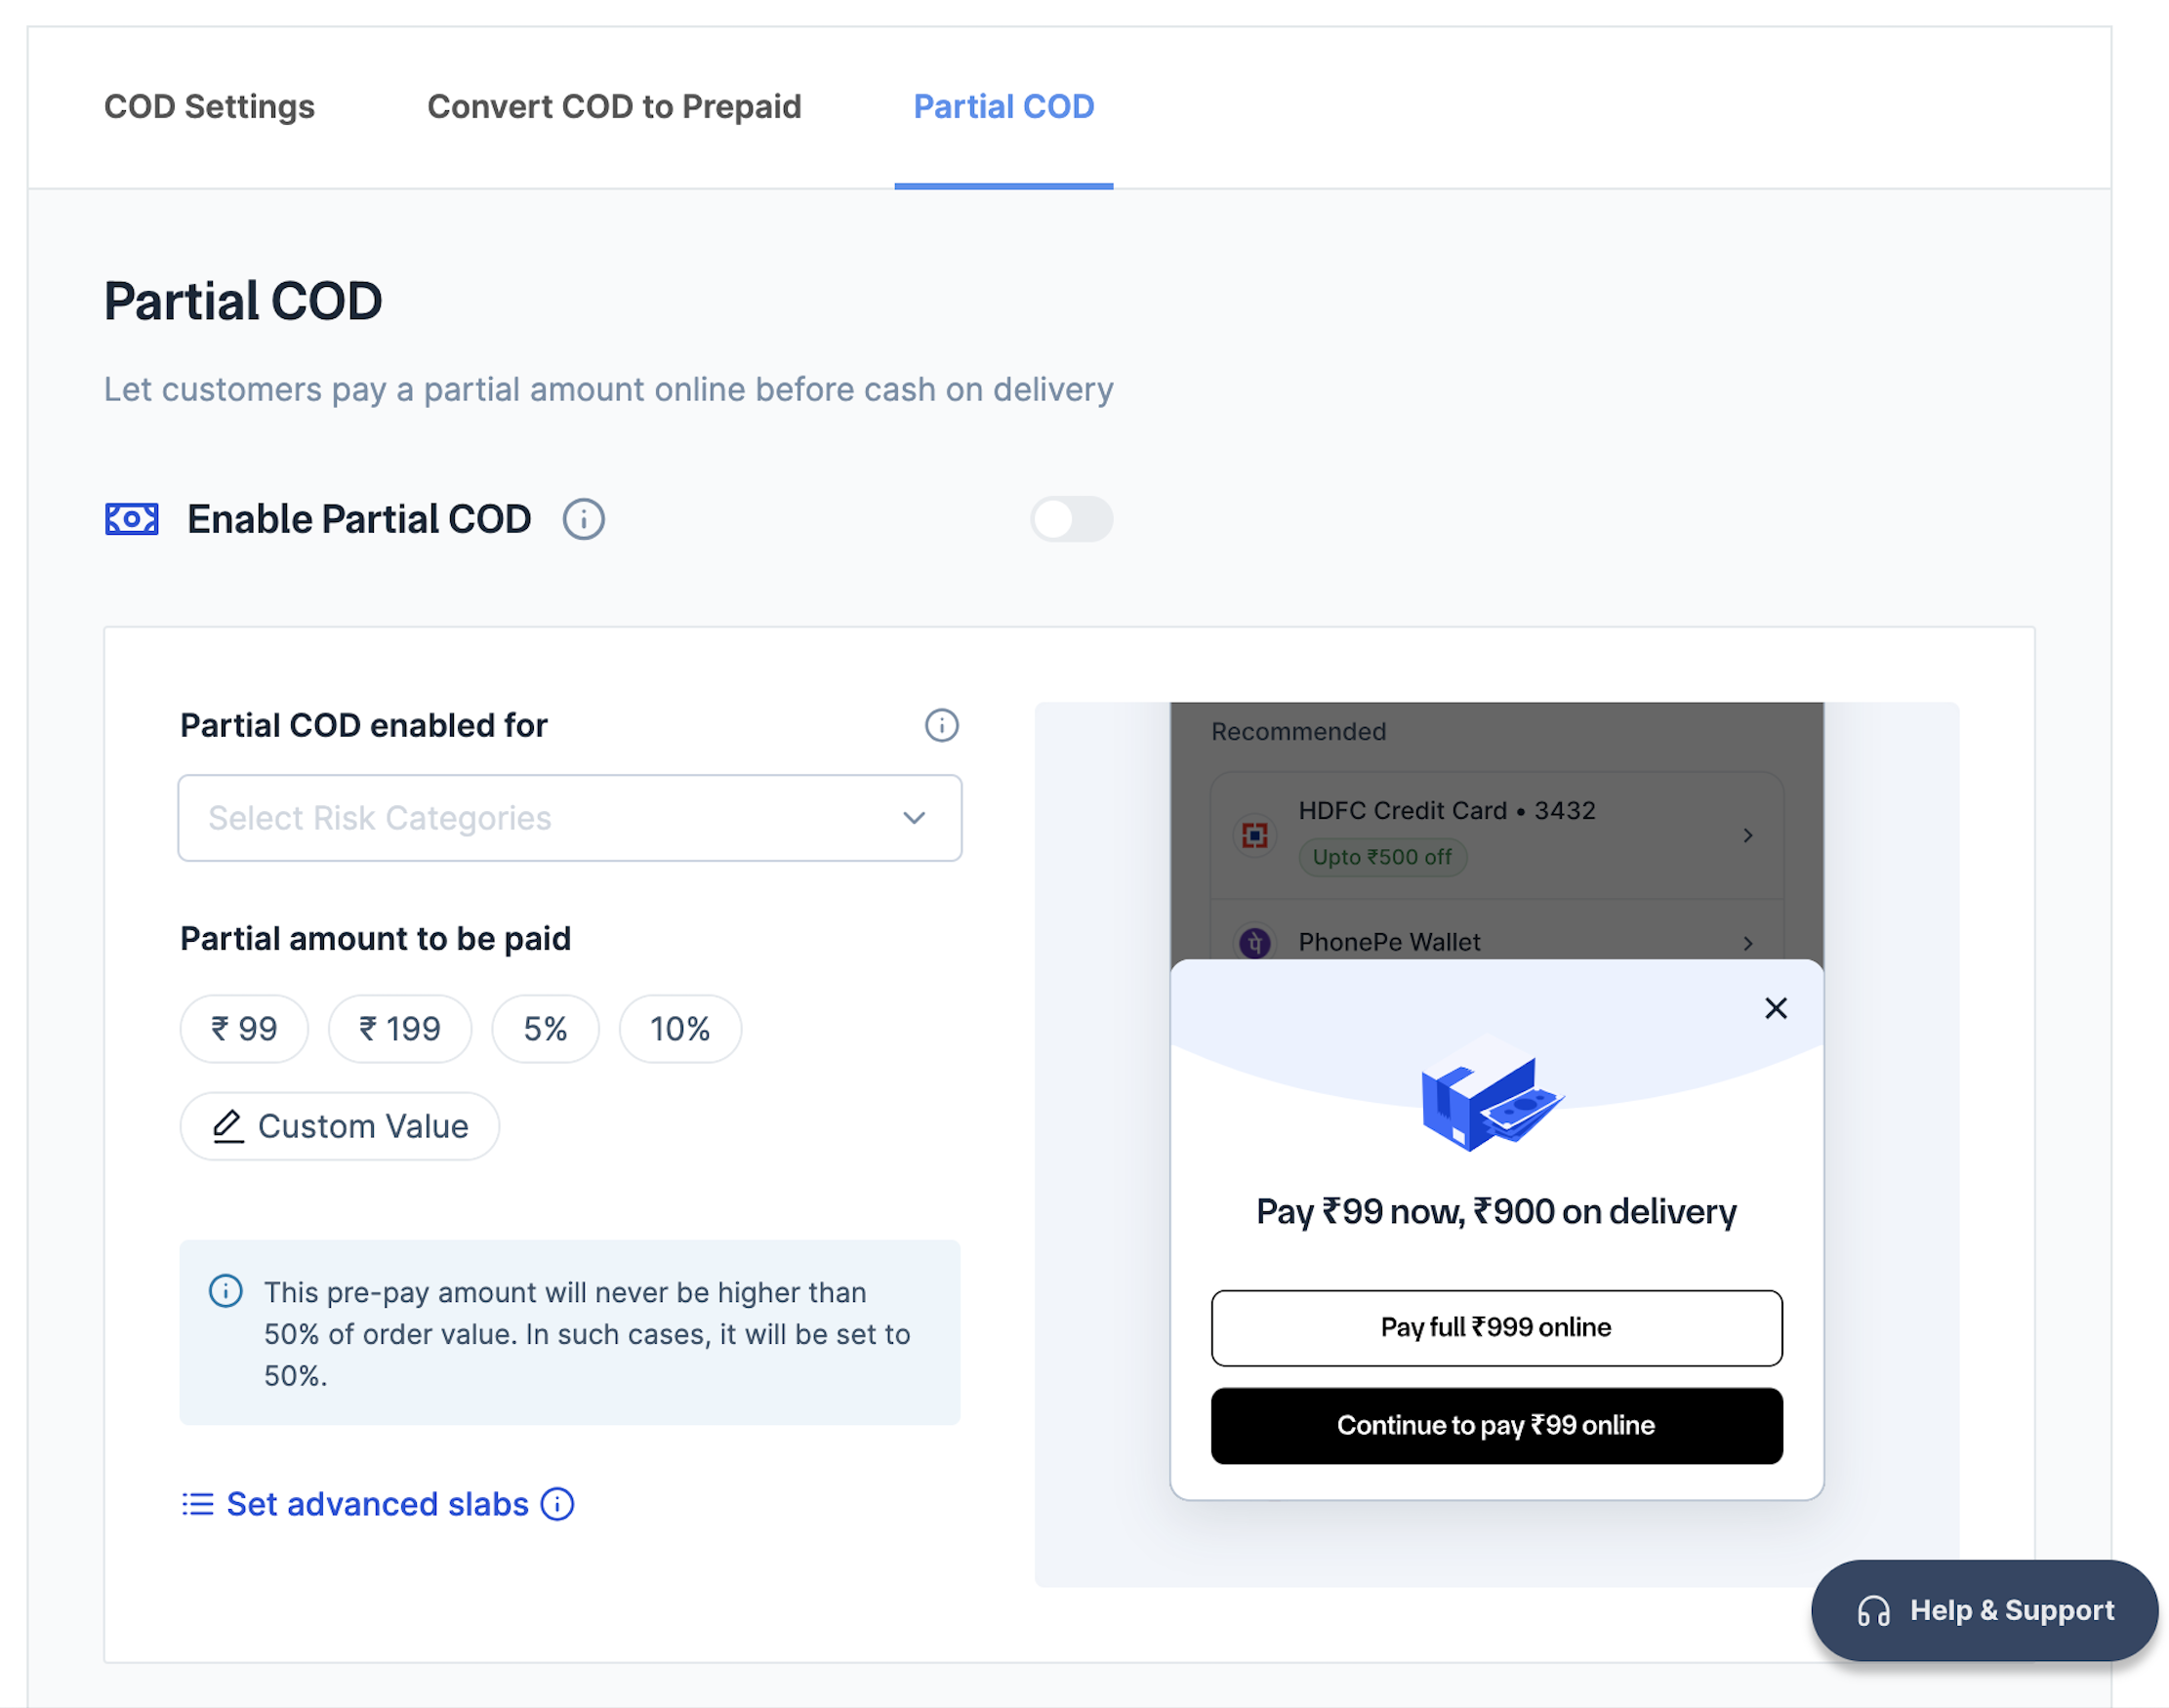
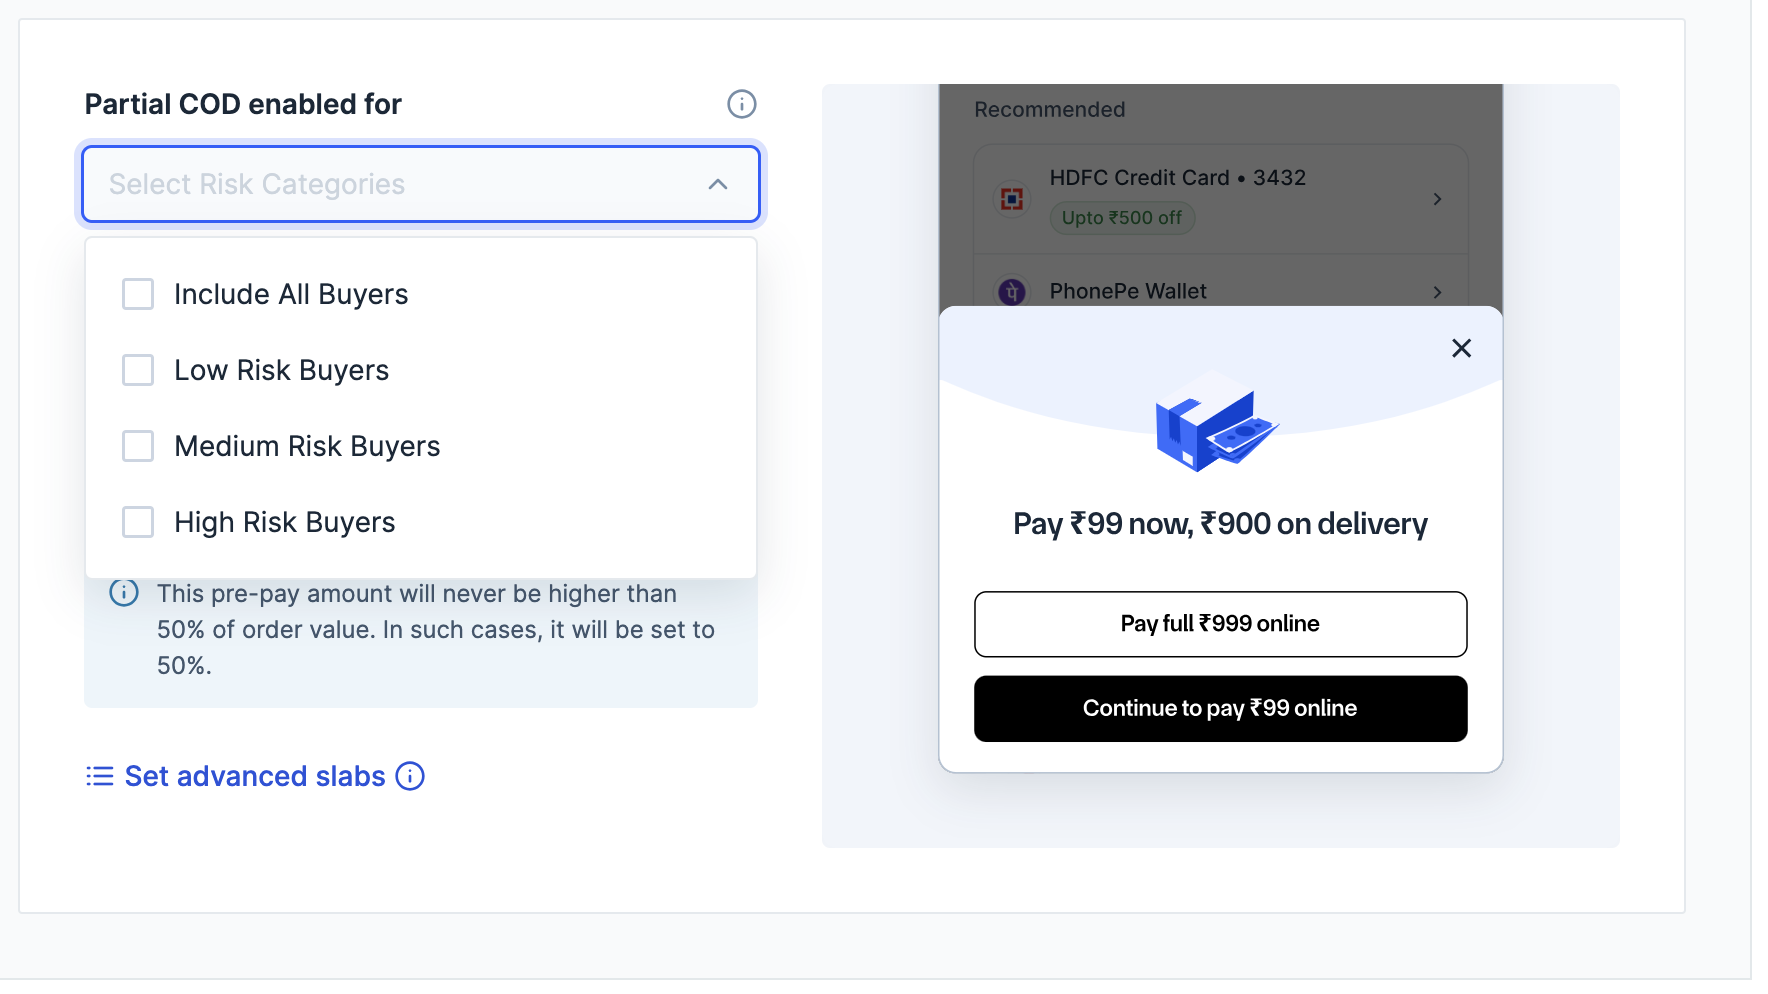
- Select the appropriate check boxes to enable Partial COD for specific categories:
- All Buyers: Enables Partial COD for all buyers, regardless of risk level.
- Low Risk Buyers: Limits Partial COD to low-risk buyers, helping maintain low RTO rates by focusing on safer transactions.
- Medium Risk Buyers: Allows Partial COD for medium-risk buyers, providing flexibility while managing moderate RTO potential.
- High Risk Buyers: Enables Partial COD for high-risk buyers, which may increase RTO rates but offers selective COD availability for specific cases.
- You can select a default partial amount or set a custom amount for partial COD.
- Default Value
- Custom Value
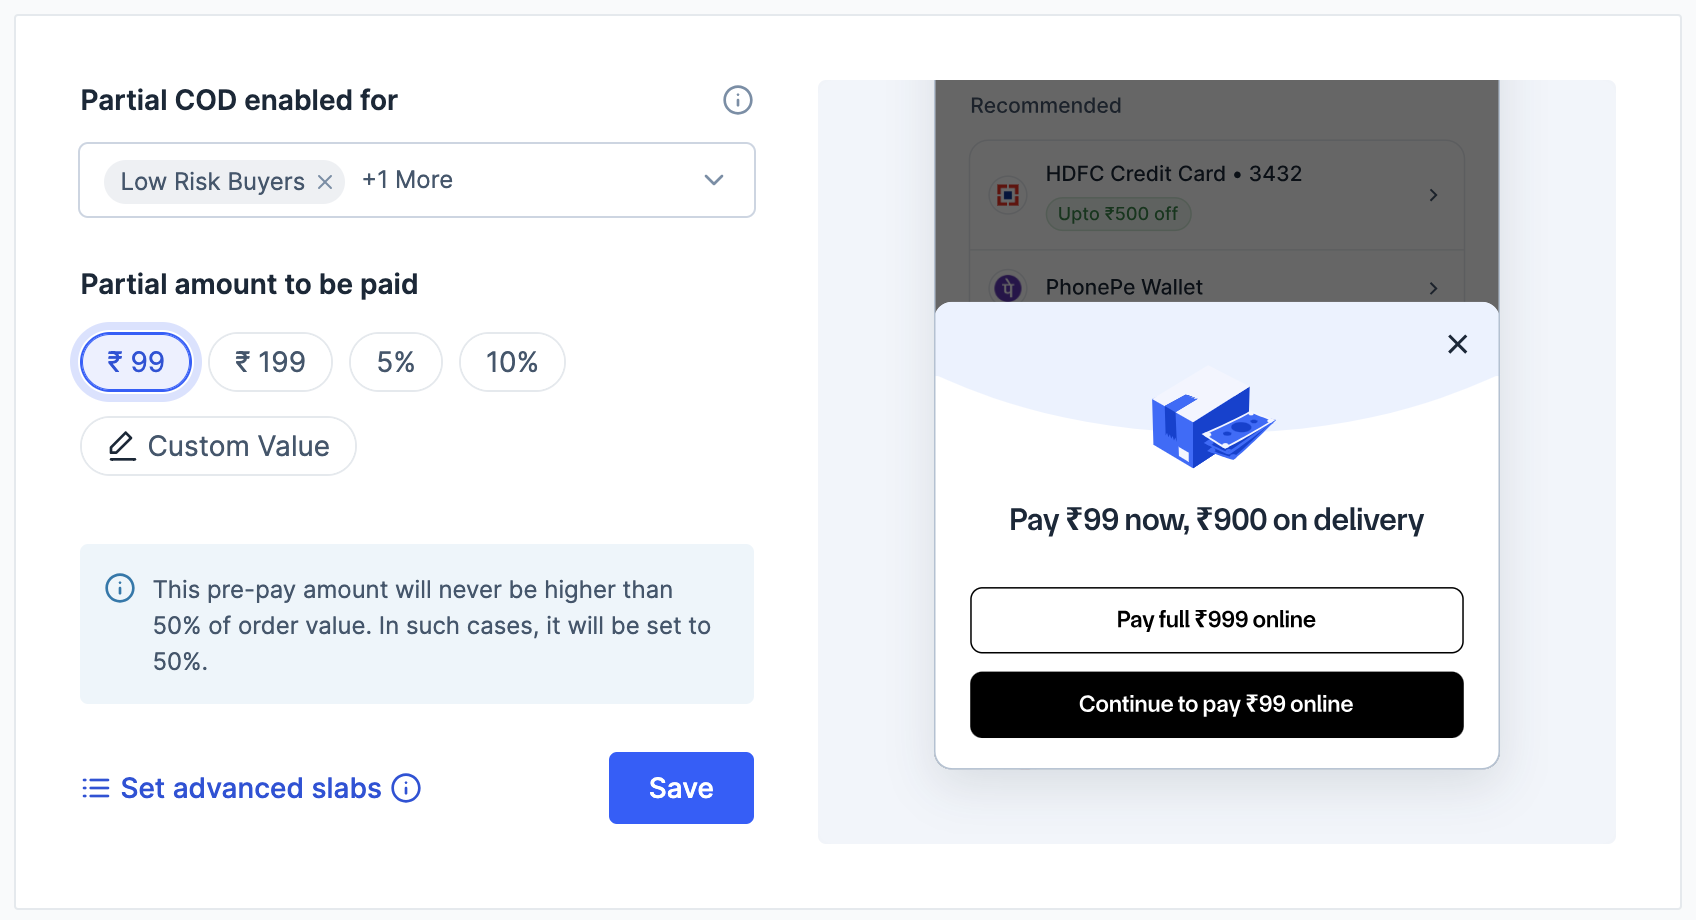
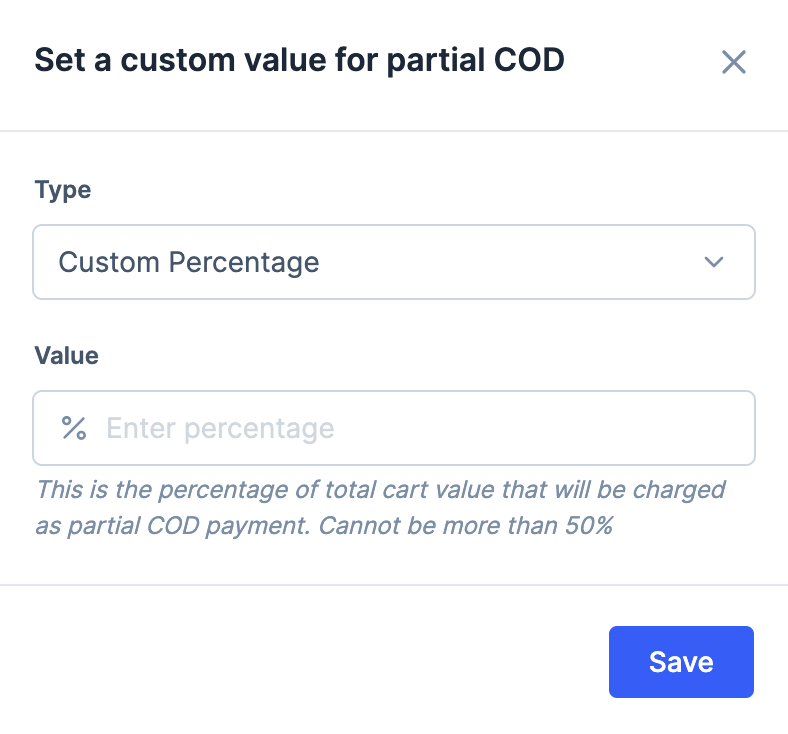
- Click Save.
Set Advanced Partial COD Slabs
Set Advanced Partial COD Slabs
- In the Partial COD section, click Set advanced slabs.
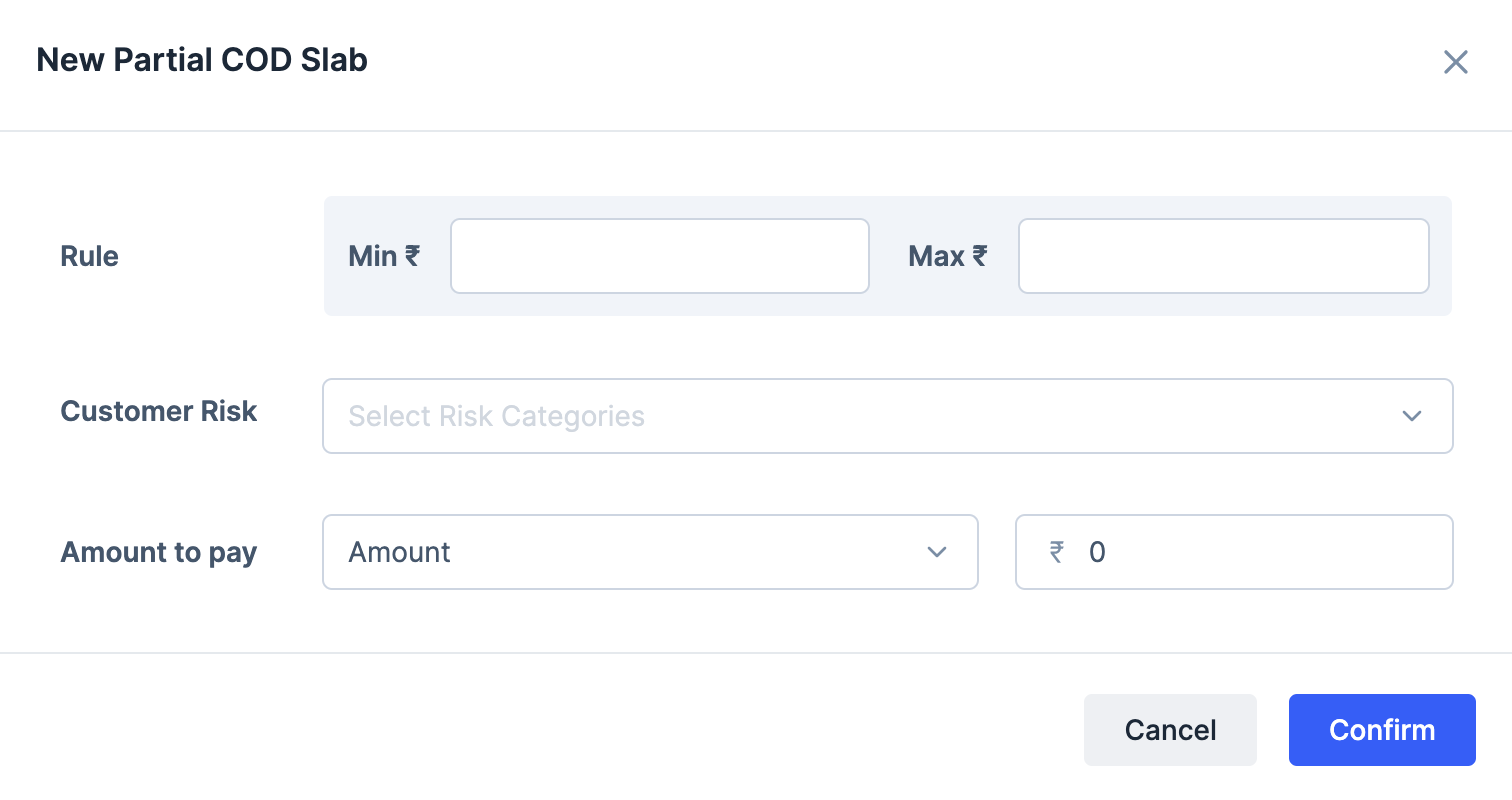
- Click + New Slab.
- Enter the Min and Max cart values for which the partial COD amount should apply.
- Choose a Customer Risk category from the drop-down list:
- All Buyers: Enables Partial COD for all buyers, regardless of risk level.
- Low Risk Buyers: Limits Partial COD to low-risk buyers, helping maintain low RTO rates by focusing on safer transactions.
- Medium Risk Buyers: Allows Partial COD for medium-risk buyers, providing flexibility while managing moderate RTO potential.
- High Risk Buyers: Enables Partial COD for high-risk buyers, which may increase RTO rates but offers selective COD availability for specific cases.
- In the Amount to pay section, select the value type and enter the value:
- Percentage: Define a percentage of the order value the customer must pay upfront as a partial COD amount. For example, if you set the range as ₹300 to ₹600 and the percentage to 20%, customers will pay ₹120 (20% of ₹600) upfront and the remaining ₹480 via COD for any order within this range.
- Amount: Enter a fixed amount that the customer must pay upfront. For example, if you set the range as ₹300 to ₹600 and the fixed partial COD amount is ₹150, customers will pay ₹150 online and the remaining amount via COD for any order within this range.
- Click Confirm to save the settings.
RTO
You can either opt for the automated option by enabling COD intelligence or manually review COD orders.COD Intelligence
COD Intelligence
- Log in to the Dashboard and navigate to Magic Checkout → Setup & Settings → Platform Settings.
- Select Shopify from the Platform drop-down list and enter your Shopify Store ID.
- Navigate to RTO Reduction Setup → RTO Reduction.
- Toggle on COD Intelligence and click Enable COD Intelligence in the confirmation pop-up modal.
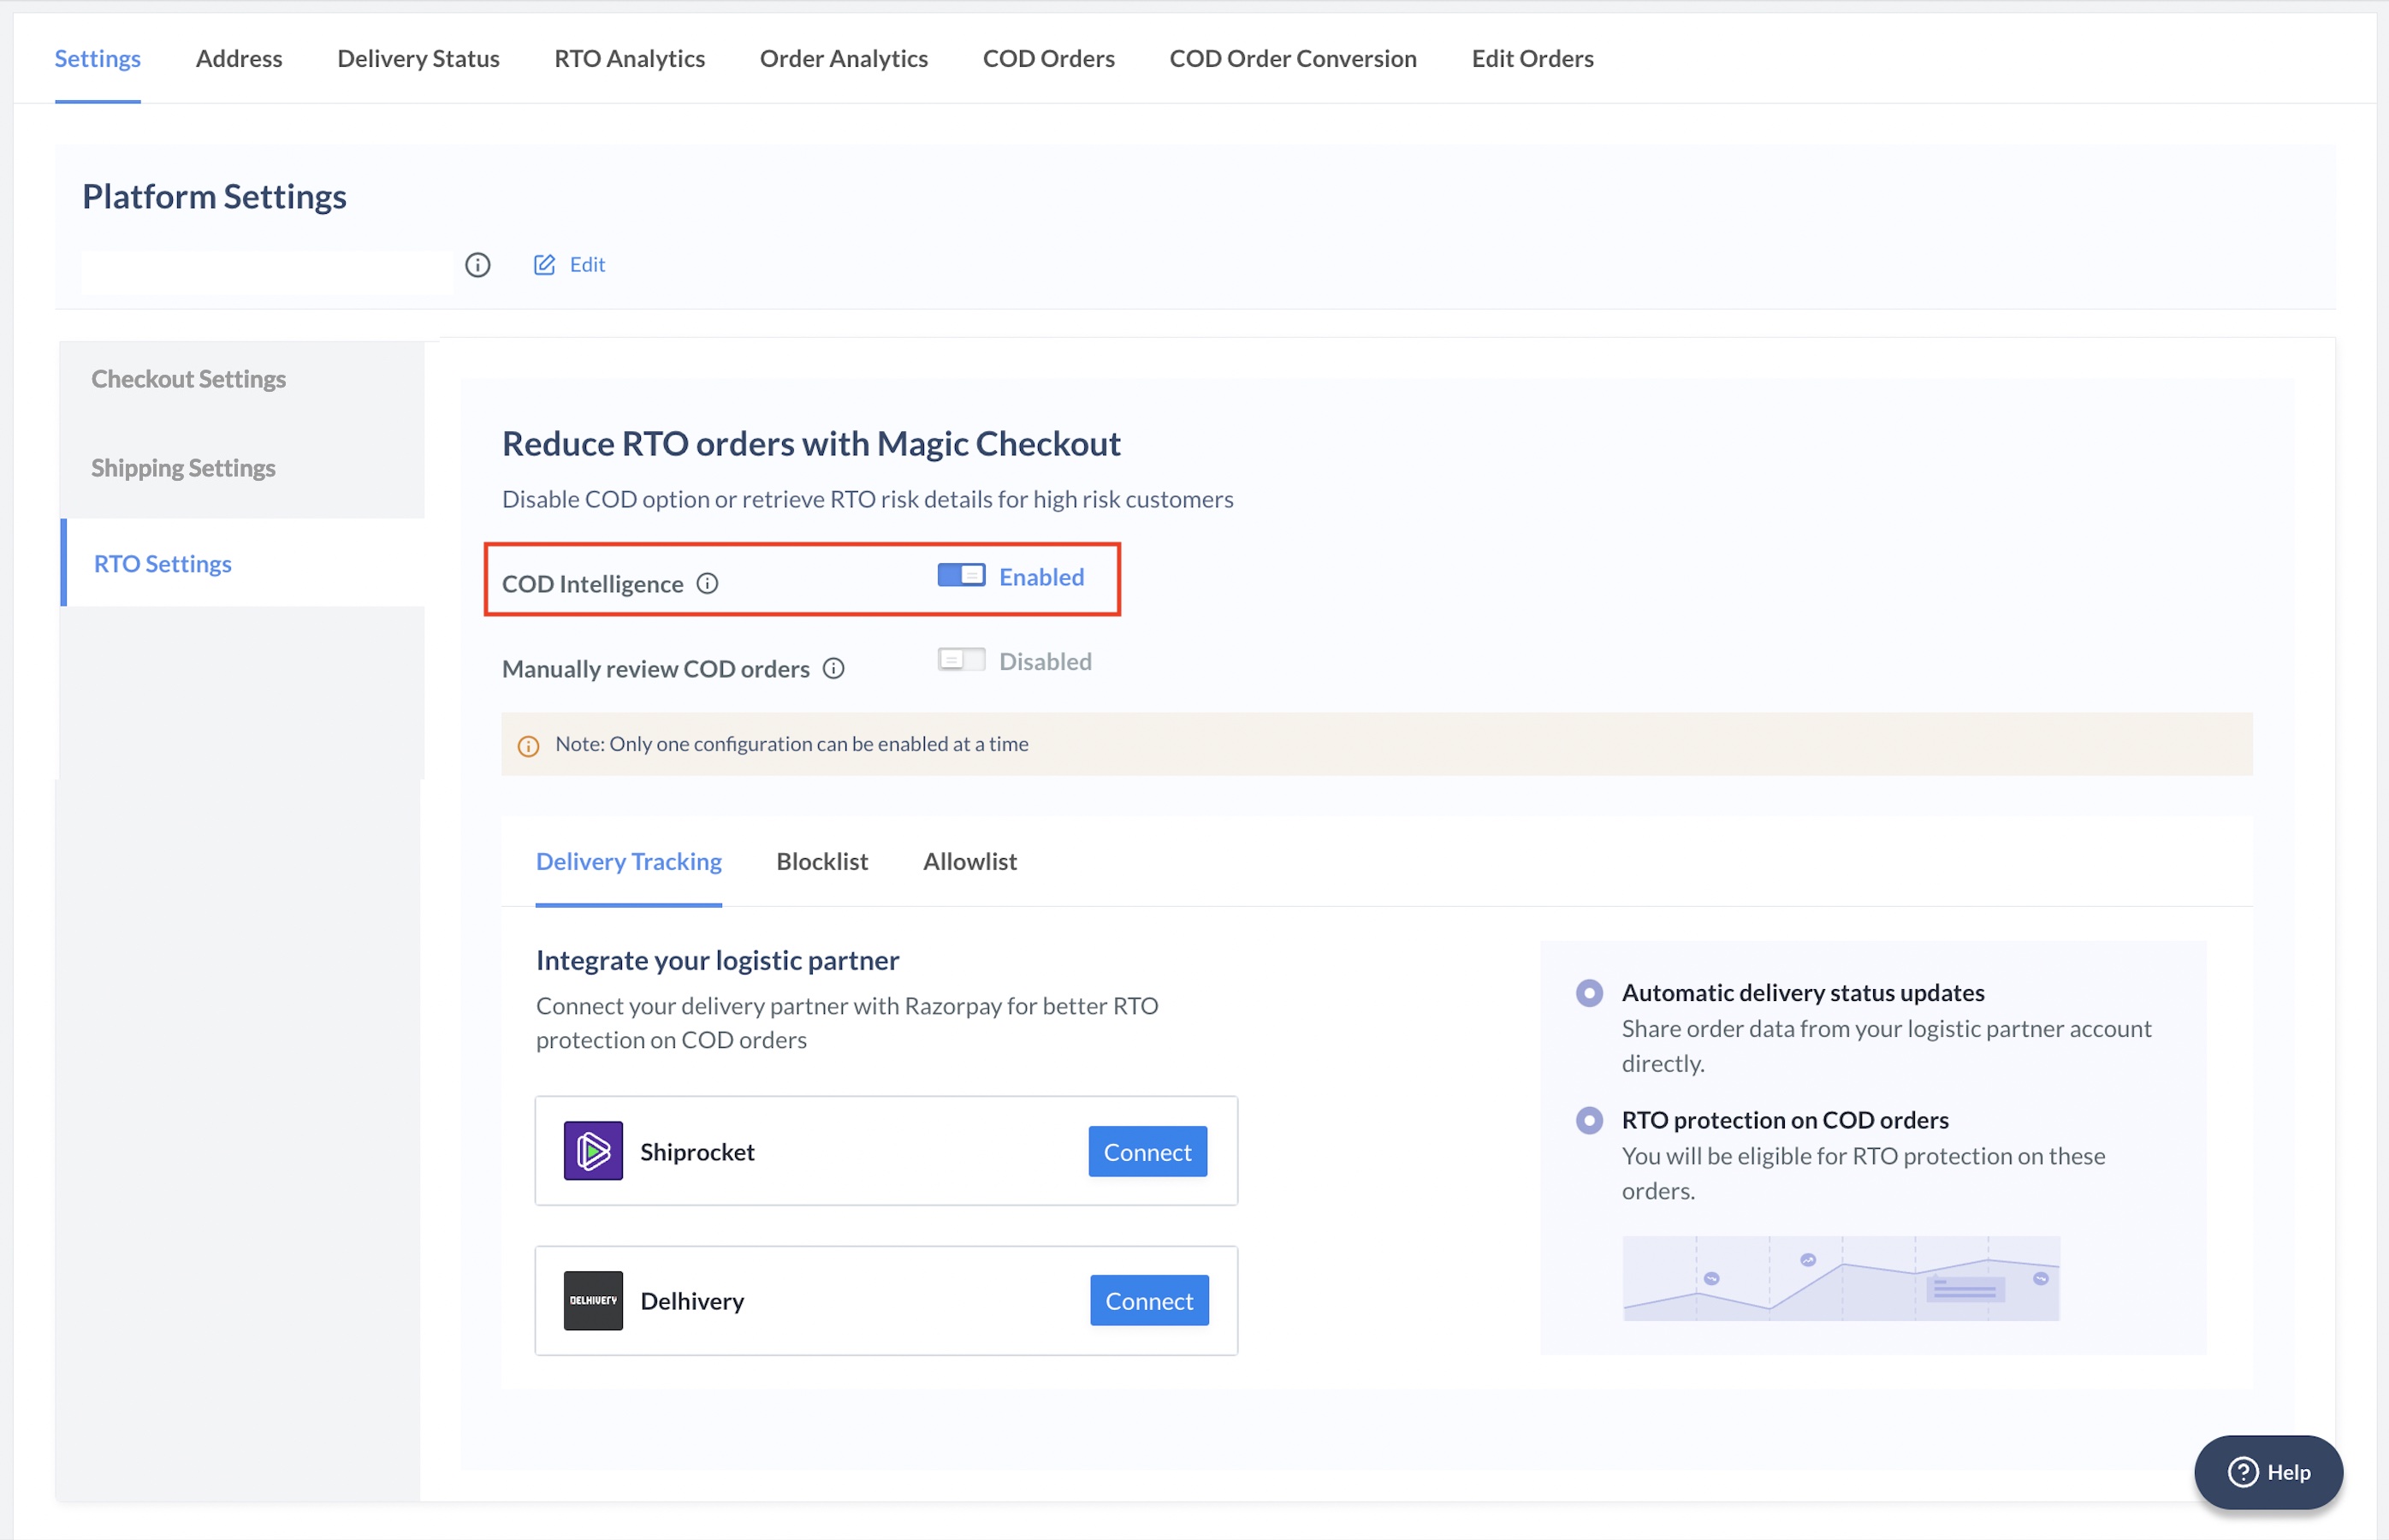 You can disable COD Intelligence if required. This will enable the COD option for all the customers, including those considered risky by Magic Checkout. Once you enable COD intelligence, the RTO Analytics tab will appear. Know more about RTO Analytics.
- Magic Checkout automatically disables the cash on delivery option in case of high-risk customers who often return products on delivery resulting in damaged products during transit, high returns, refund issues and so on.
- You must enable COD Intelligence if you opt for RTO protection.
Manually Review COD Orders
Manually Review COD Orders
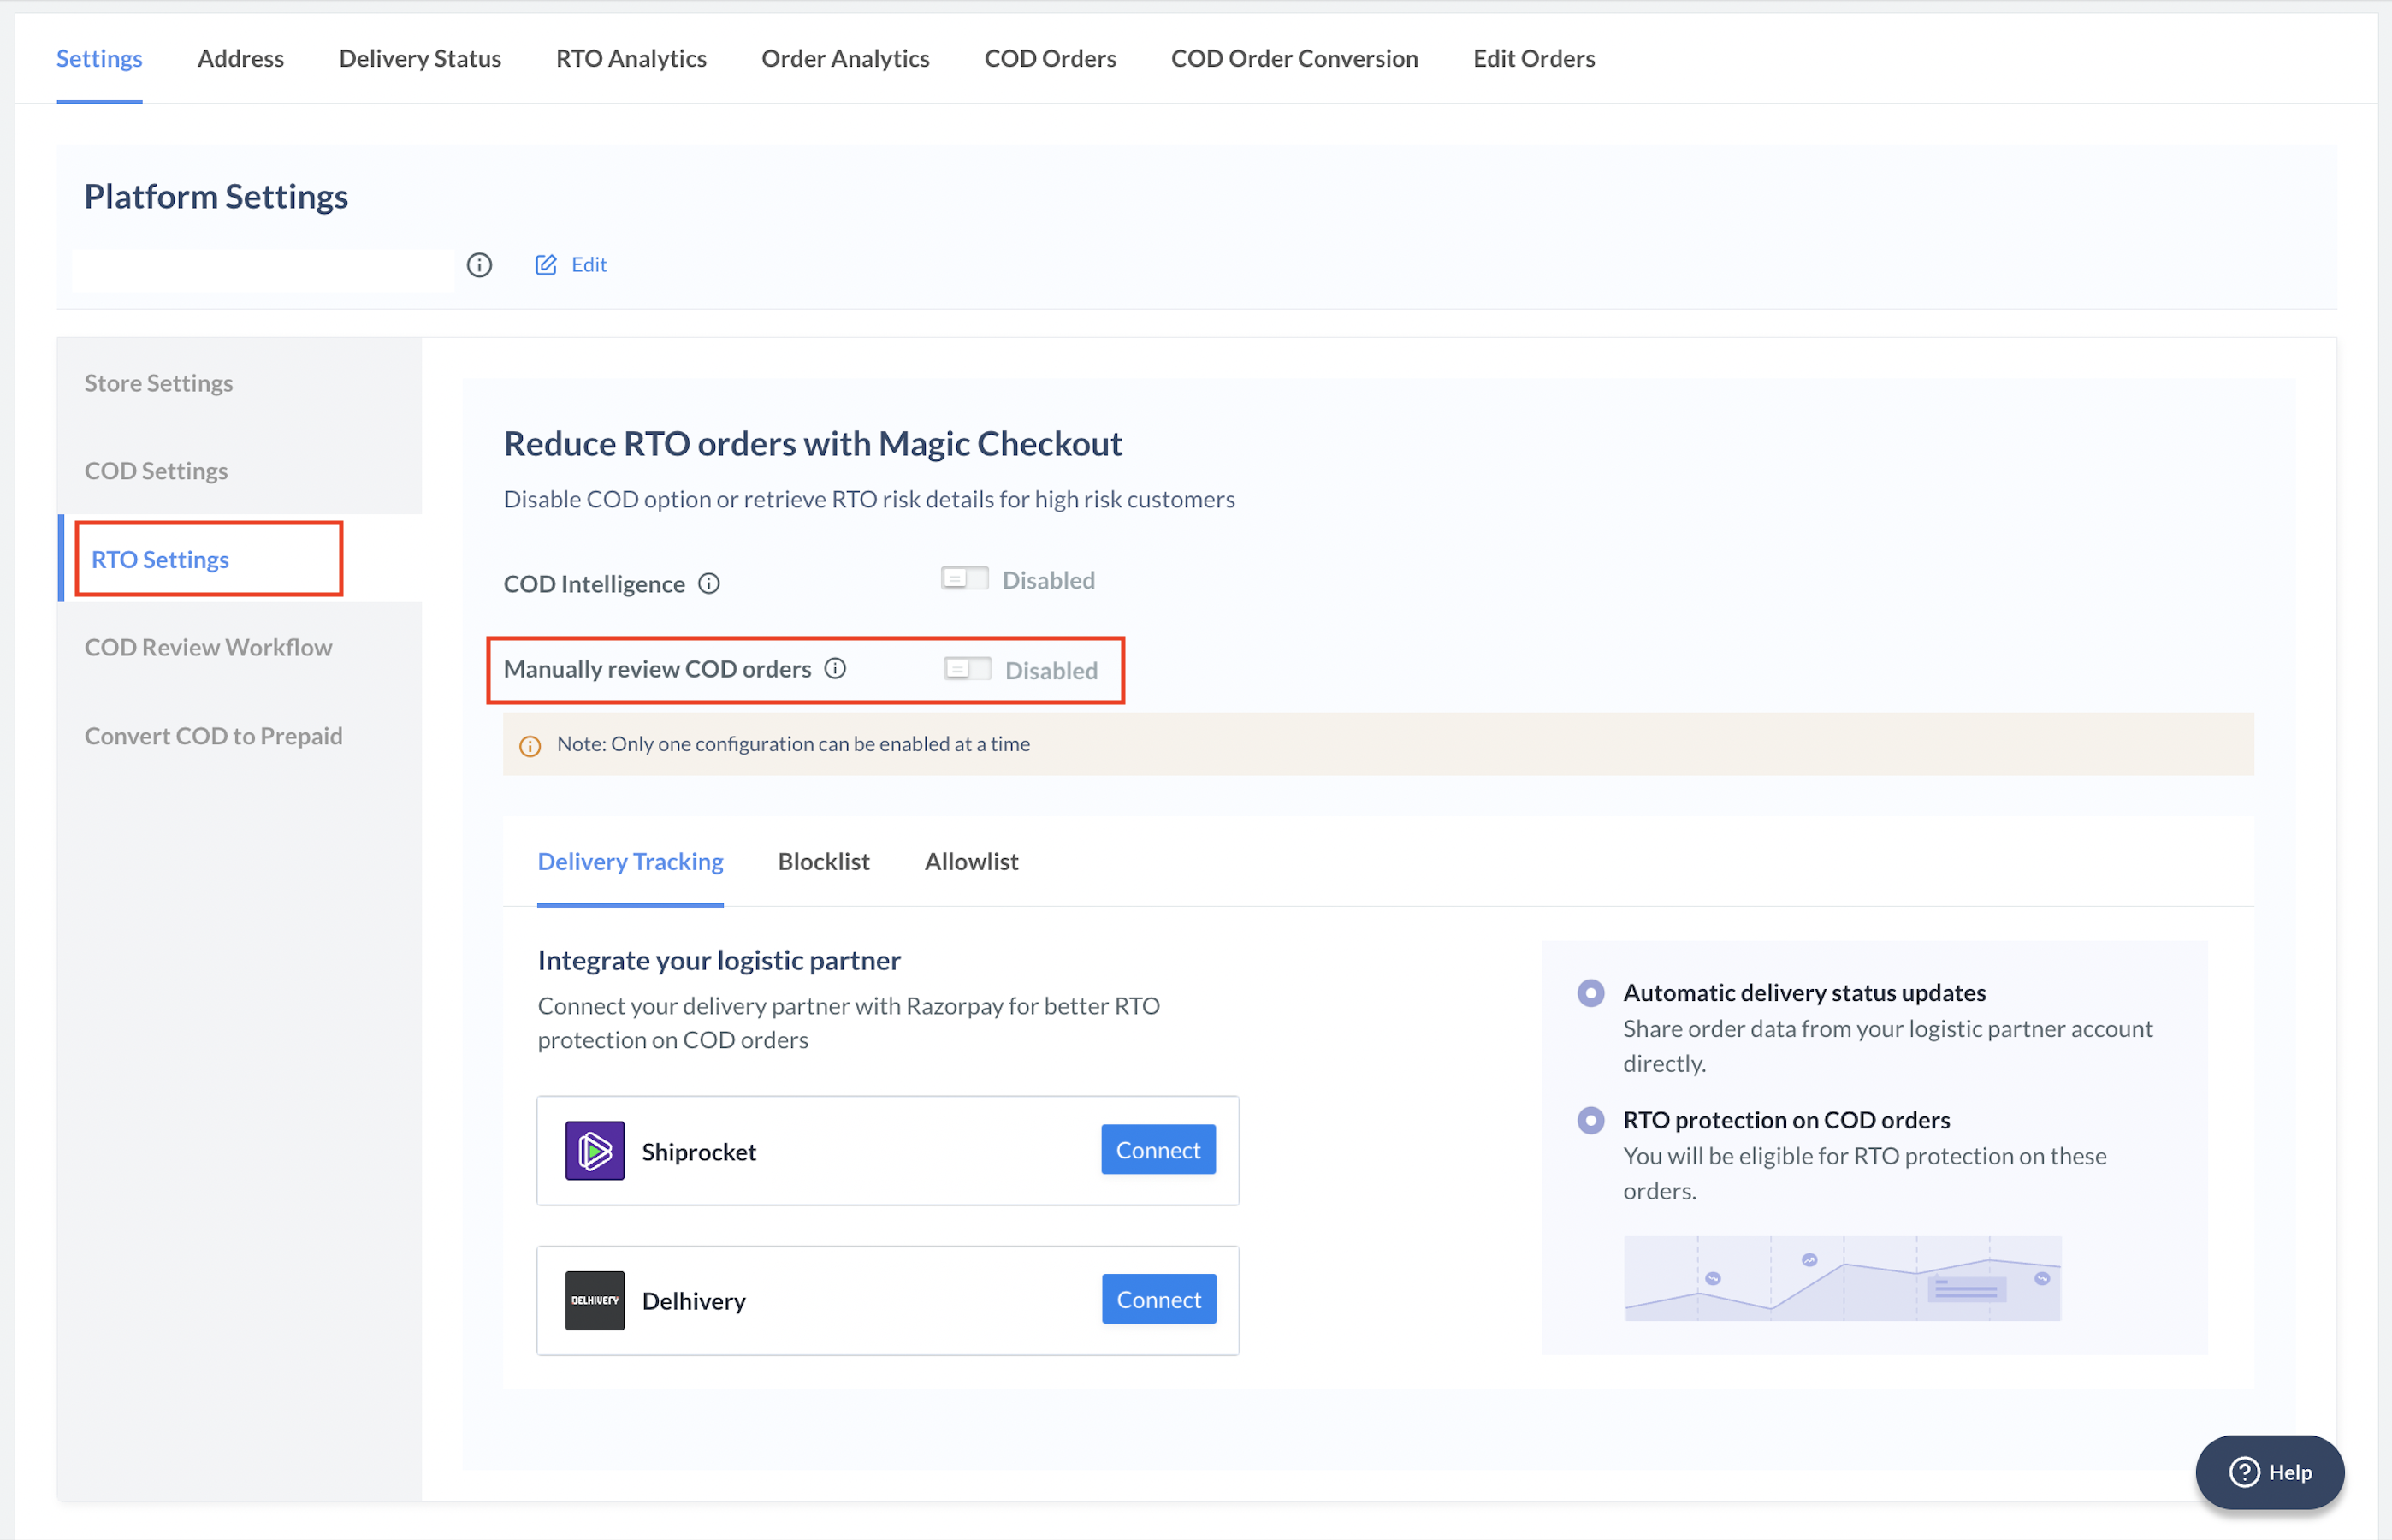
- Log in to the Dashboard and navigate to Magic Checkout → Setup & Settings → Platform Settings.
- Select Shopify from the Platform drop-down list and enter your Shopify Store ID.
- Navigate to RTO Reduction Setup → RTO Reduction.
- Toggle on Manually review COD orders.
Convert COD Orders to Prepaid
With Magic Checkout, you can urge customers who chose cash on delivery while placing an order to convert COD orders to prepaid by offering discounts or incentives post-order placement. Converting orders to prepaid can help you increase order commitment, reduce RTO, streamline operations and enhance customer trust. Know how to convert COD orders to prepaid.Shipping Options
You can choose to configure the shipping options using the following methods:Method 1: Razorpay Dashboard *(Recommended)*
Method 1: Razorpay Dashboard *(Recommended)*
- Log in to the Dashboard and navigate to Magic Checkout → Setup & Settings → Platform Settings.
- Select Shopify from the Platform drop-down list and enter your Shopify Store ID.
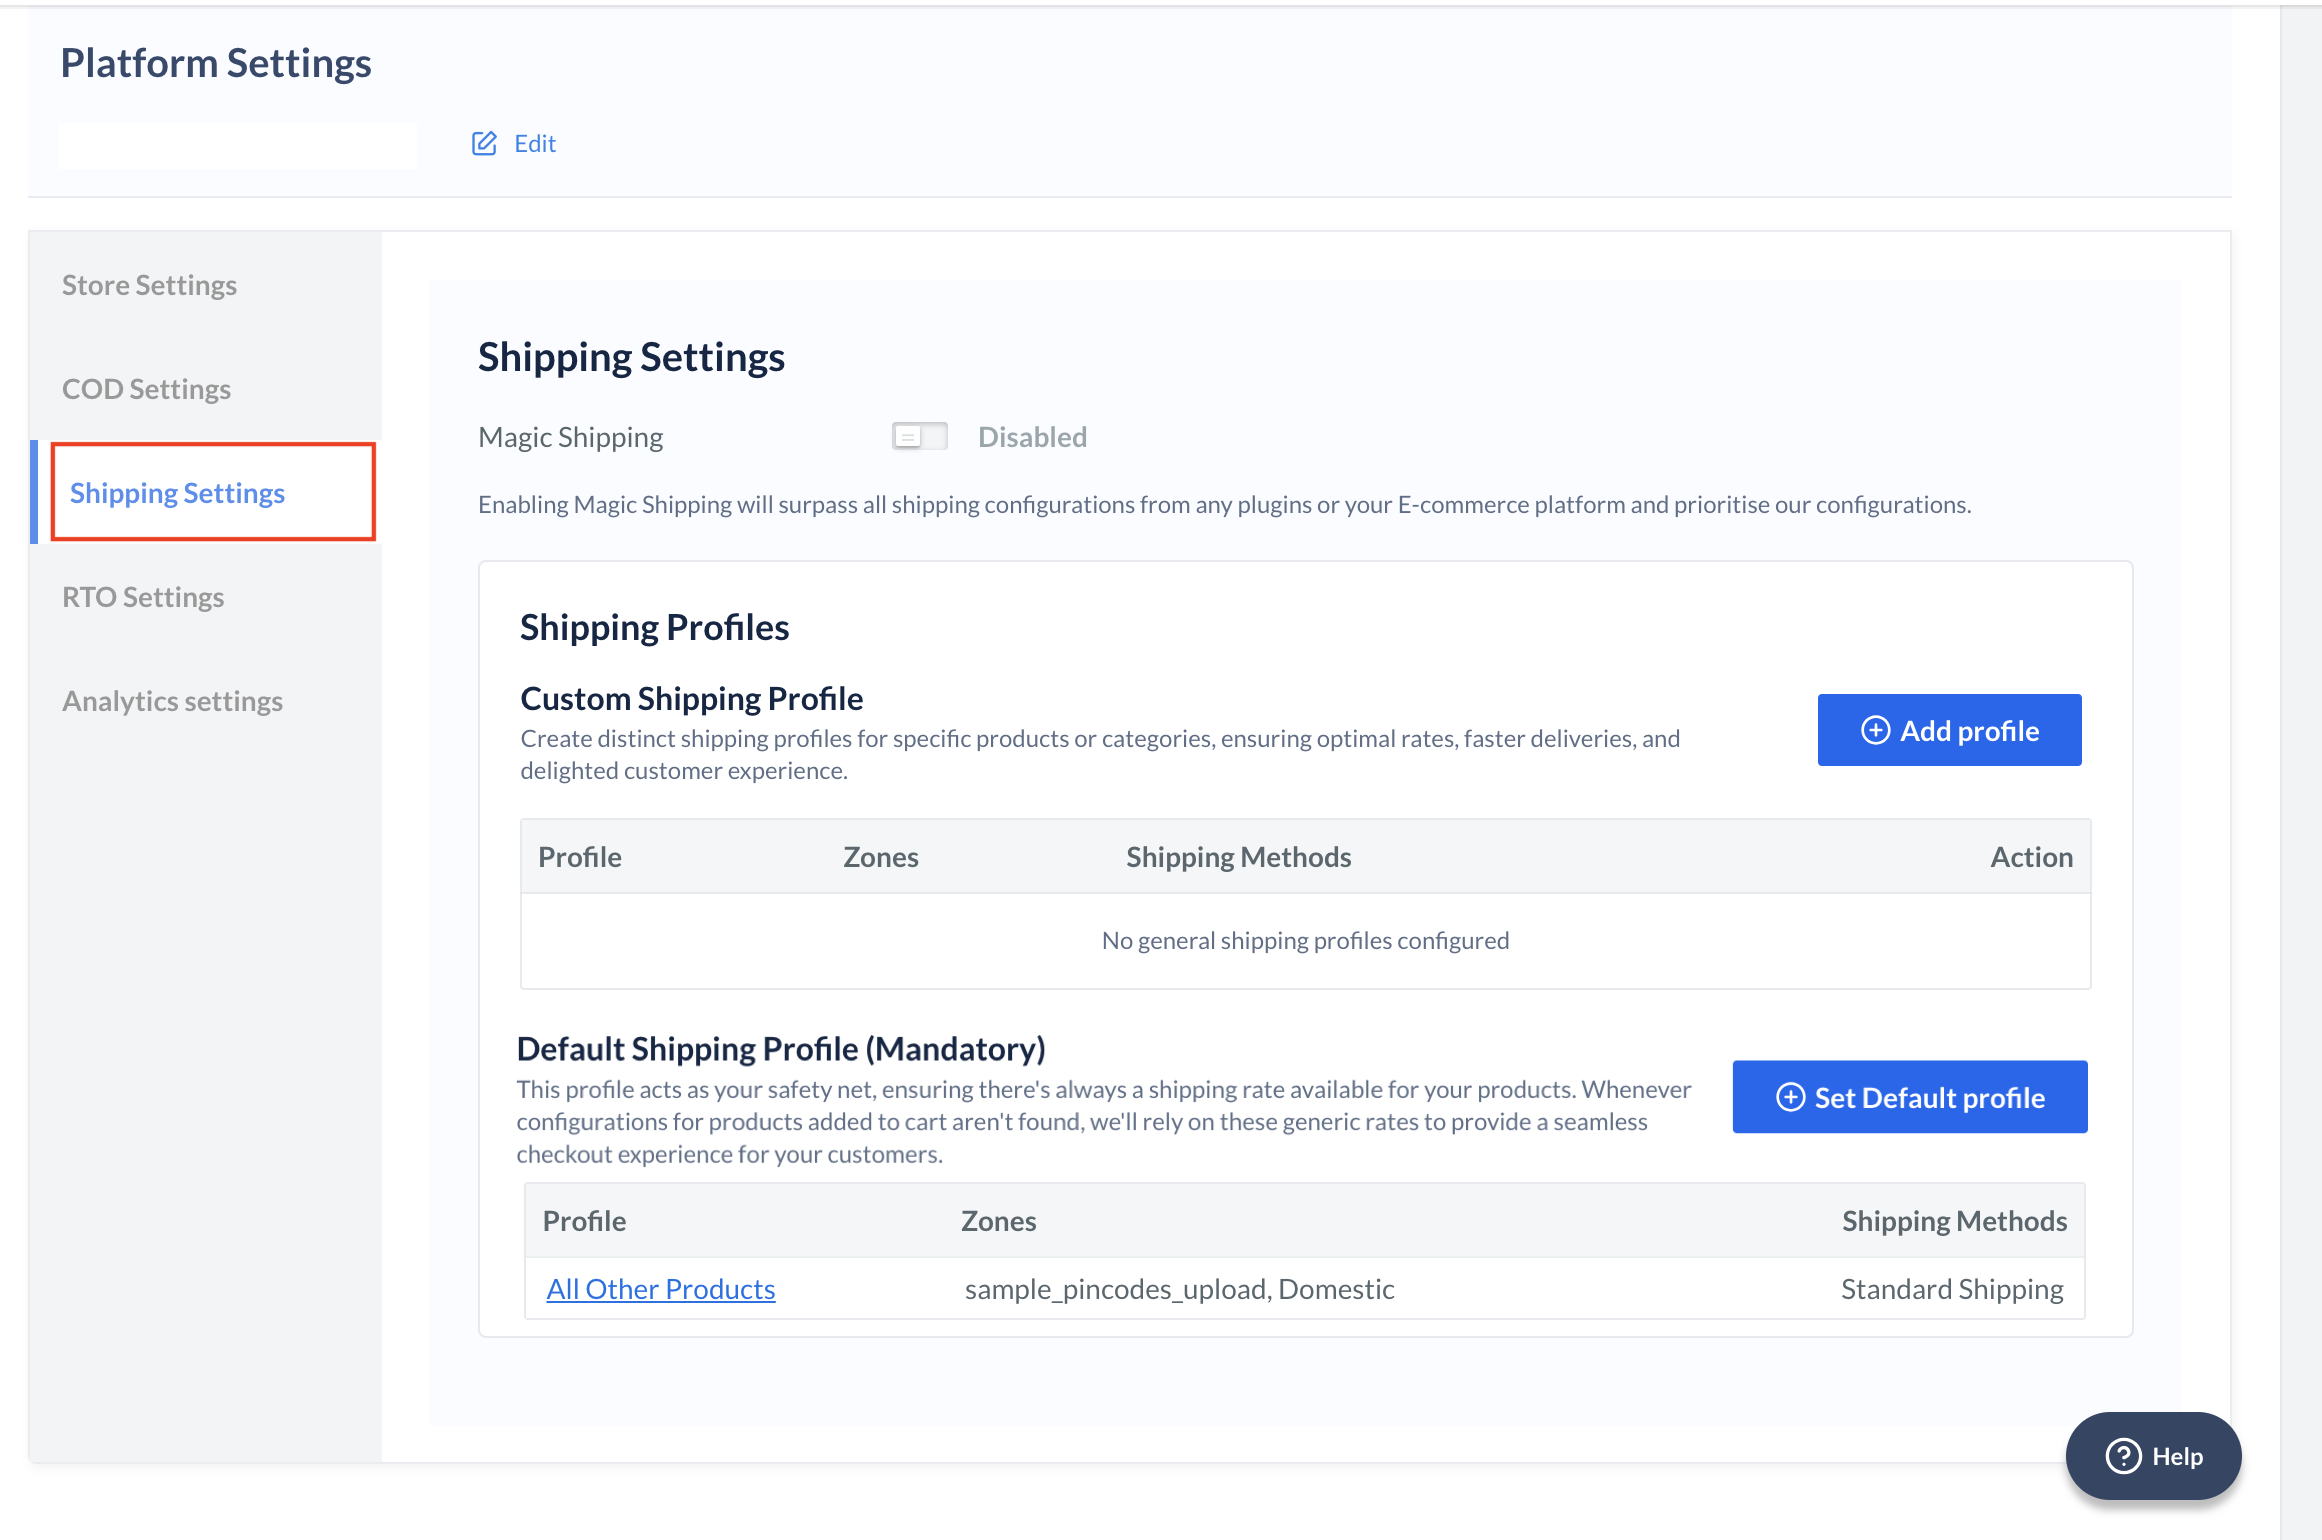
- Navigate to Shipping Setup.
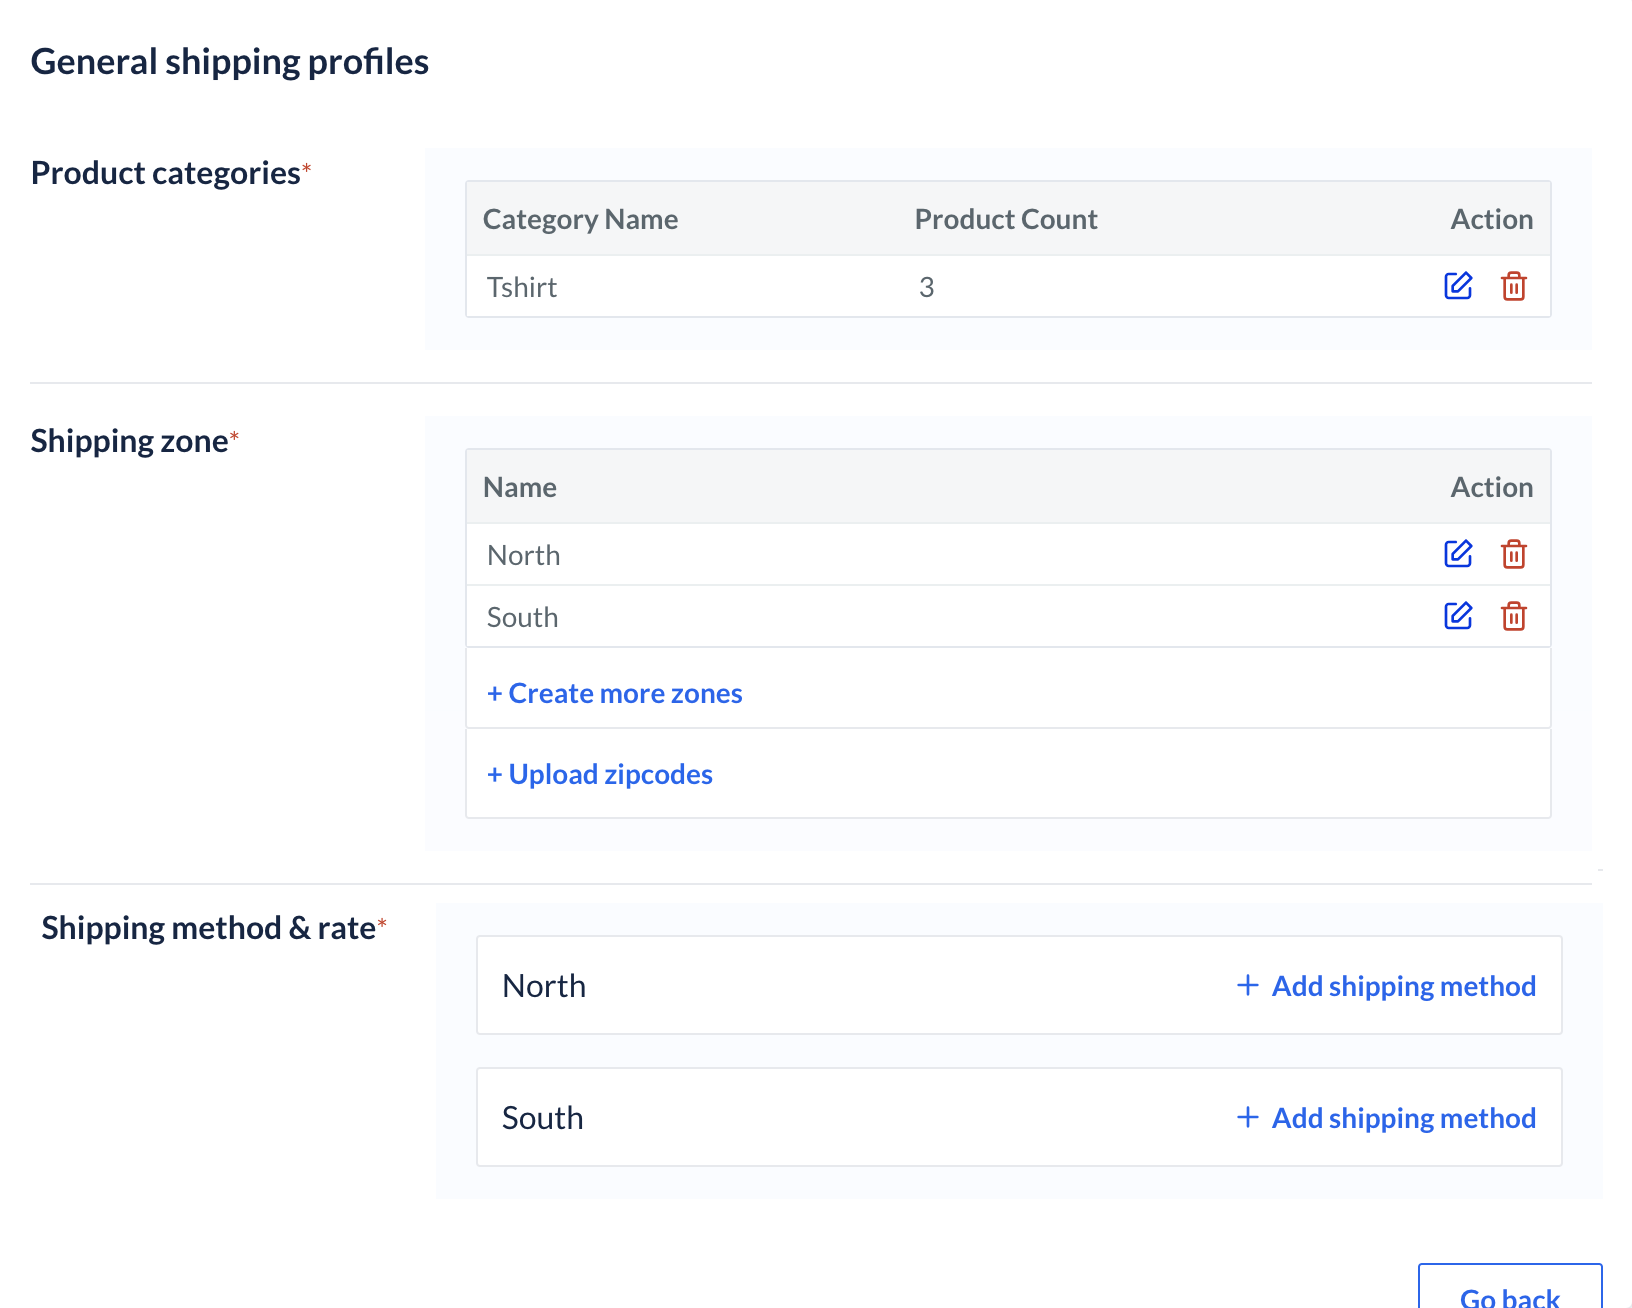
- Click Add Profile in the Custom Shipping Profile section.
- Click + Add category in the Product categories section.
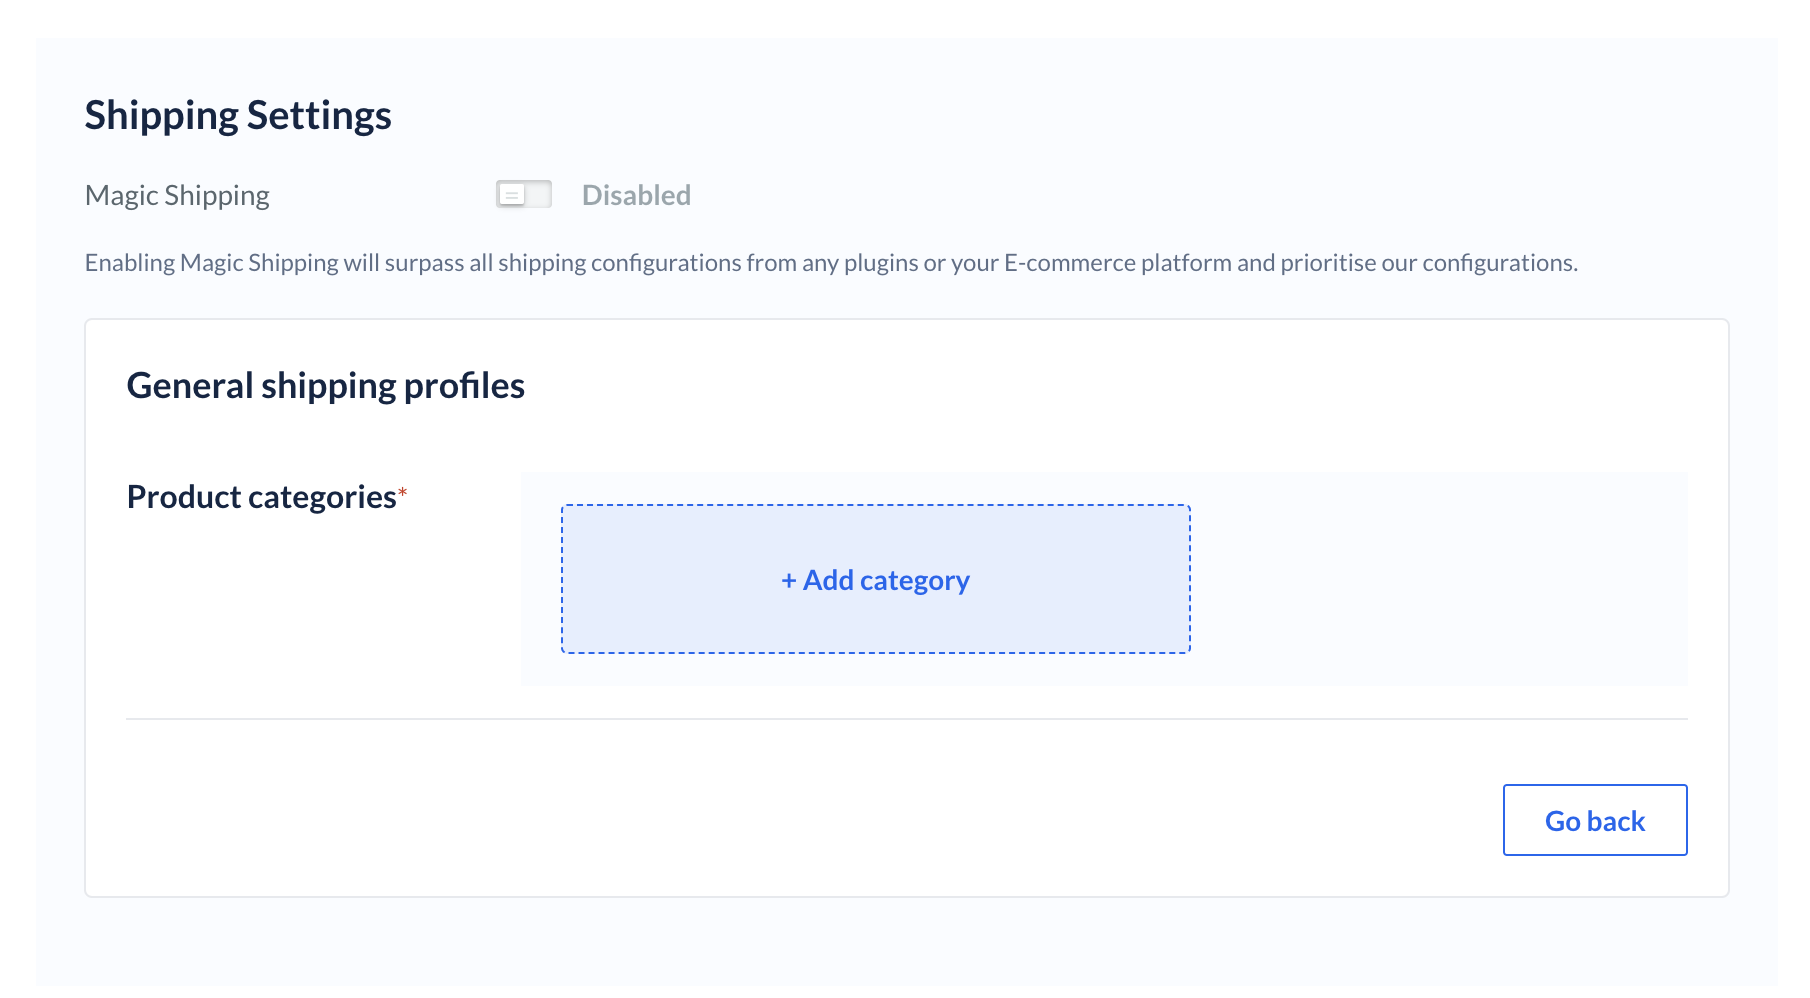
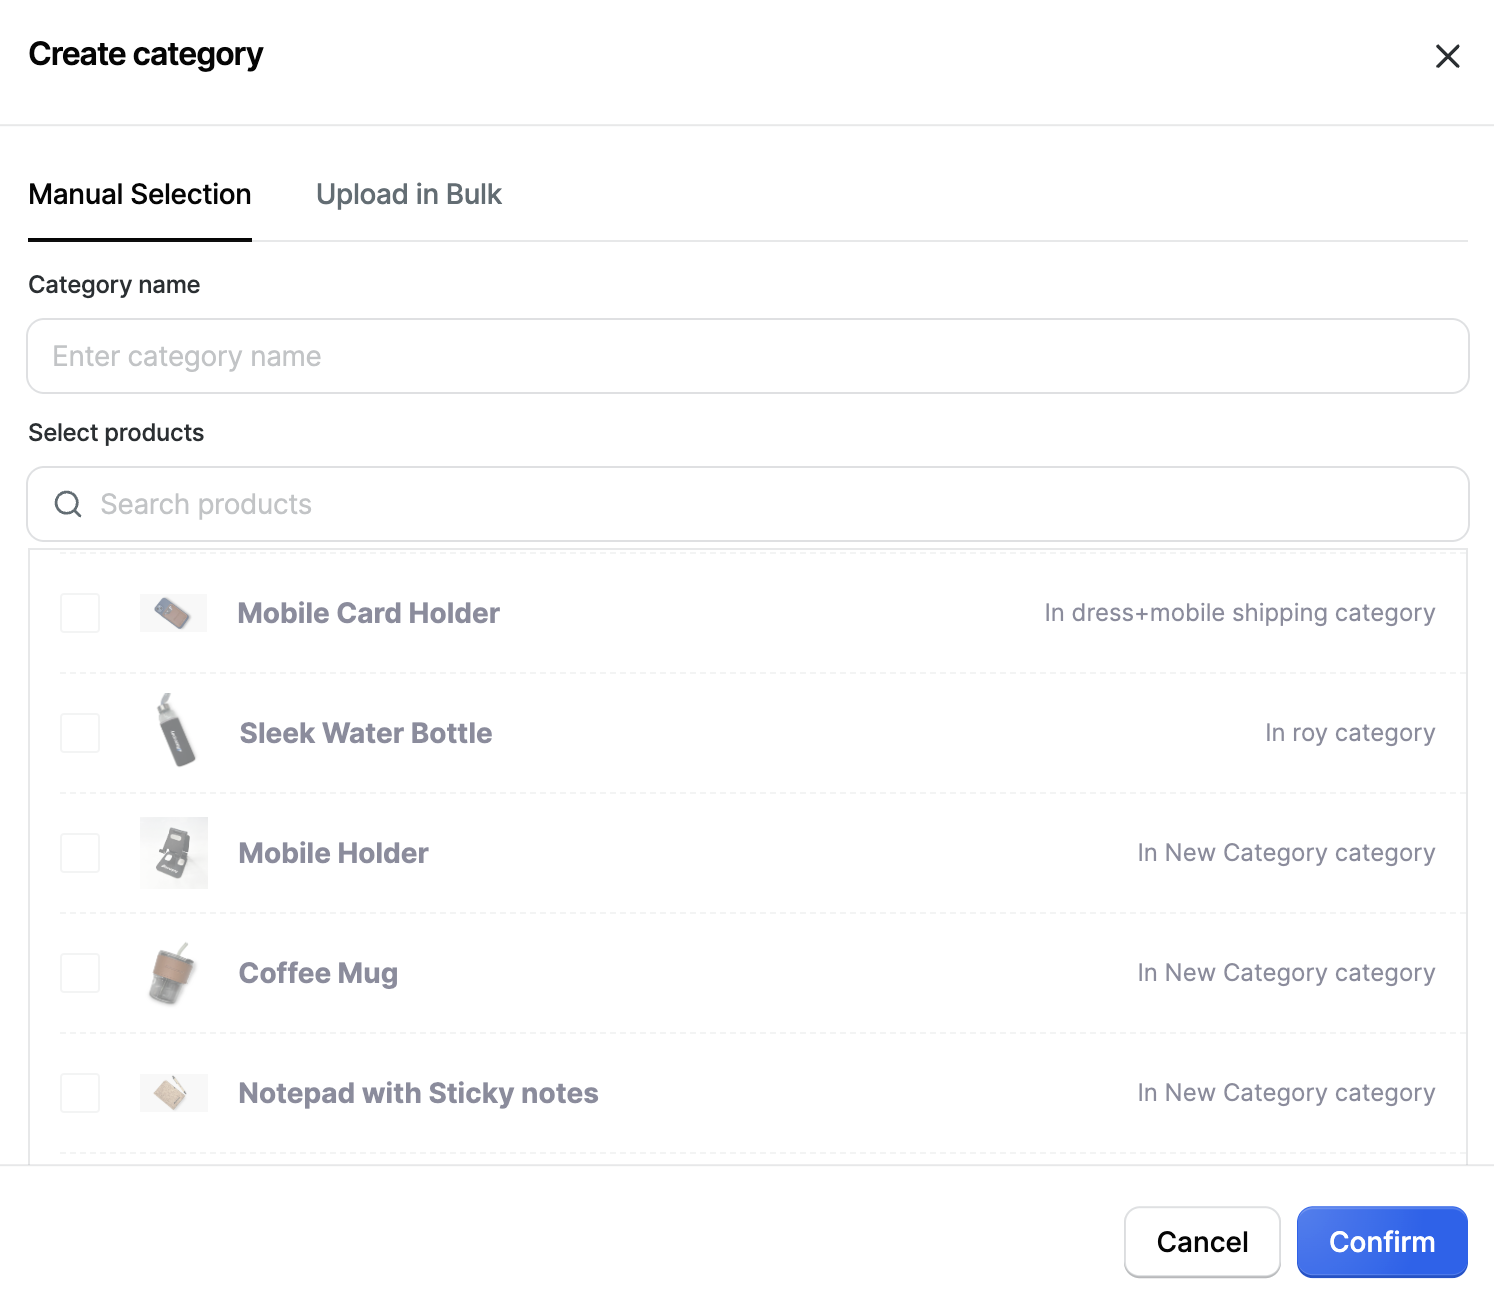
- You can add products to the category in two ways.
- Manual Selection
- Upload in Bulk
- Enter the Category name.
- Select the products of your choice manually.
- Click Confirm.
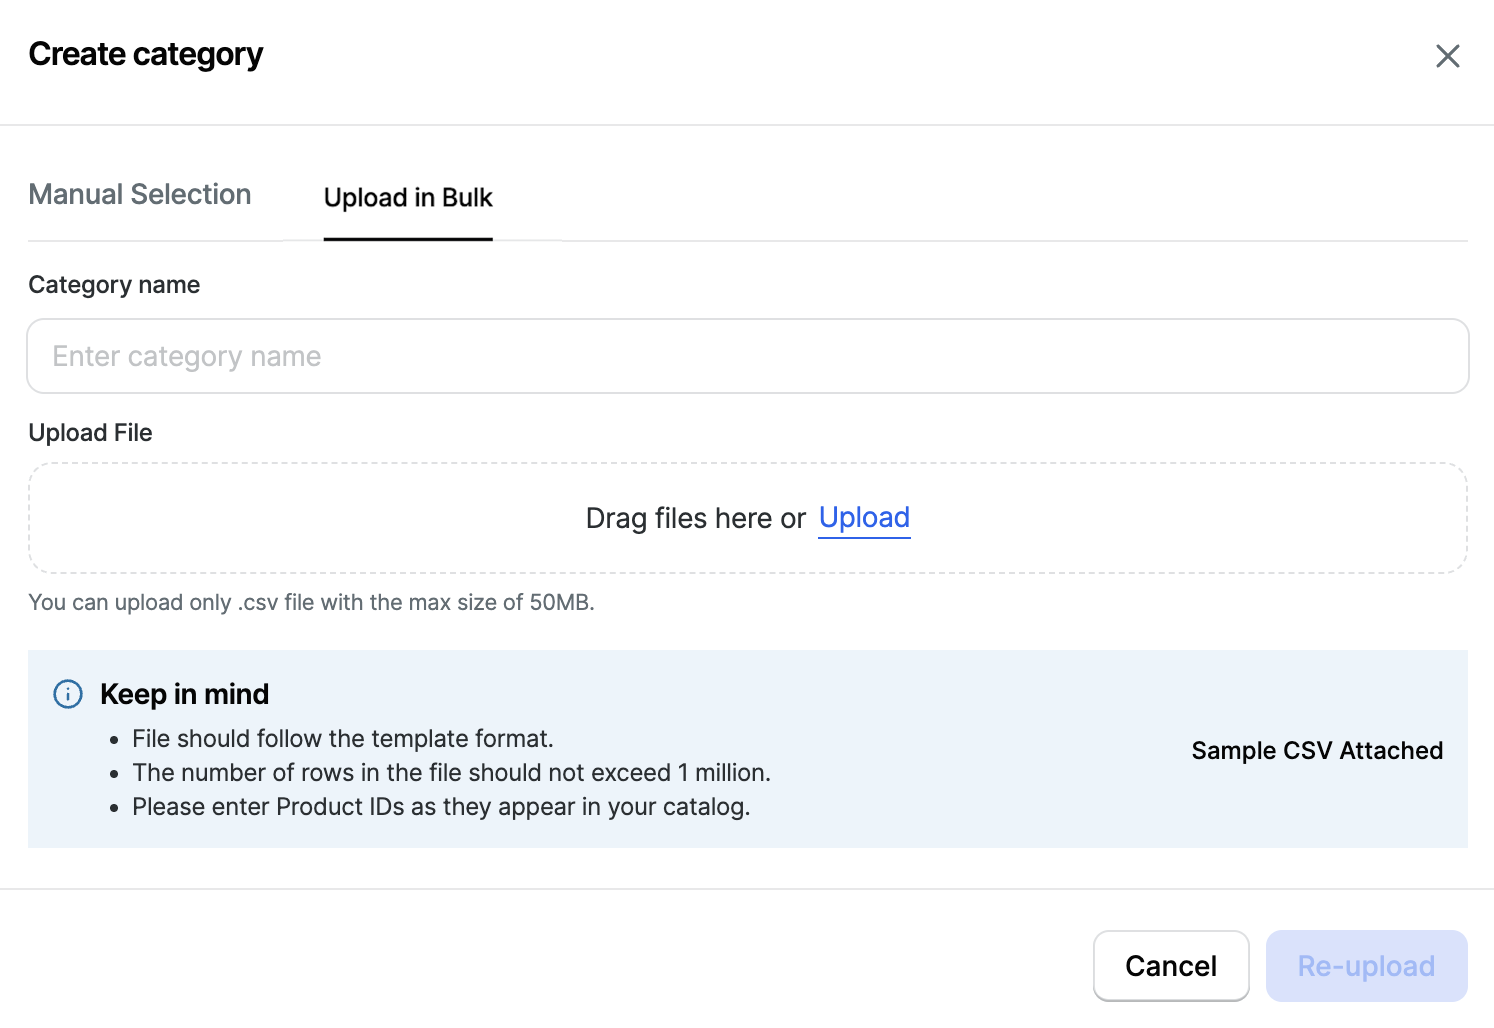
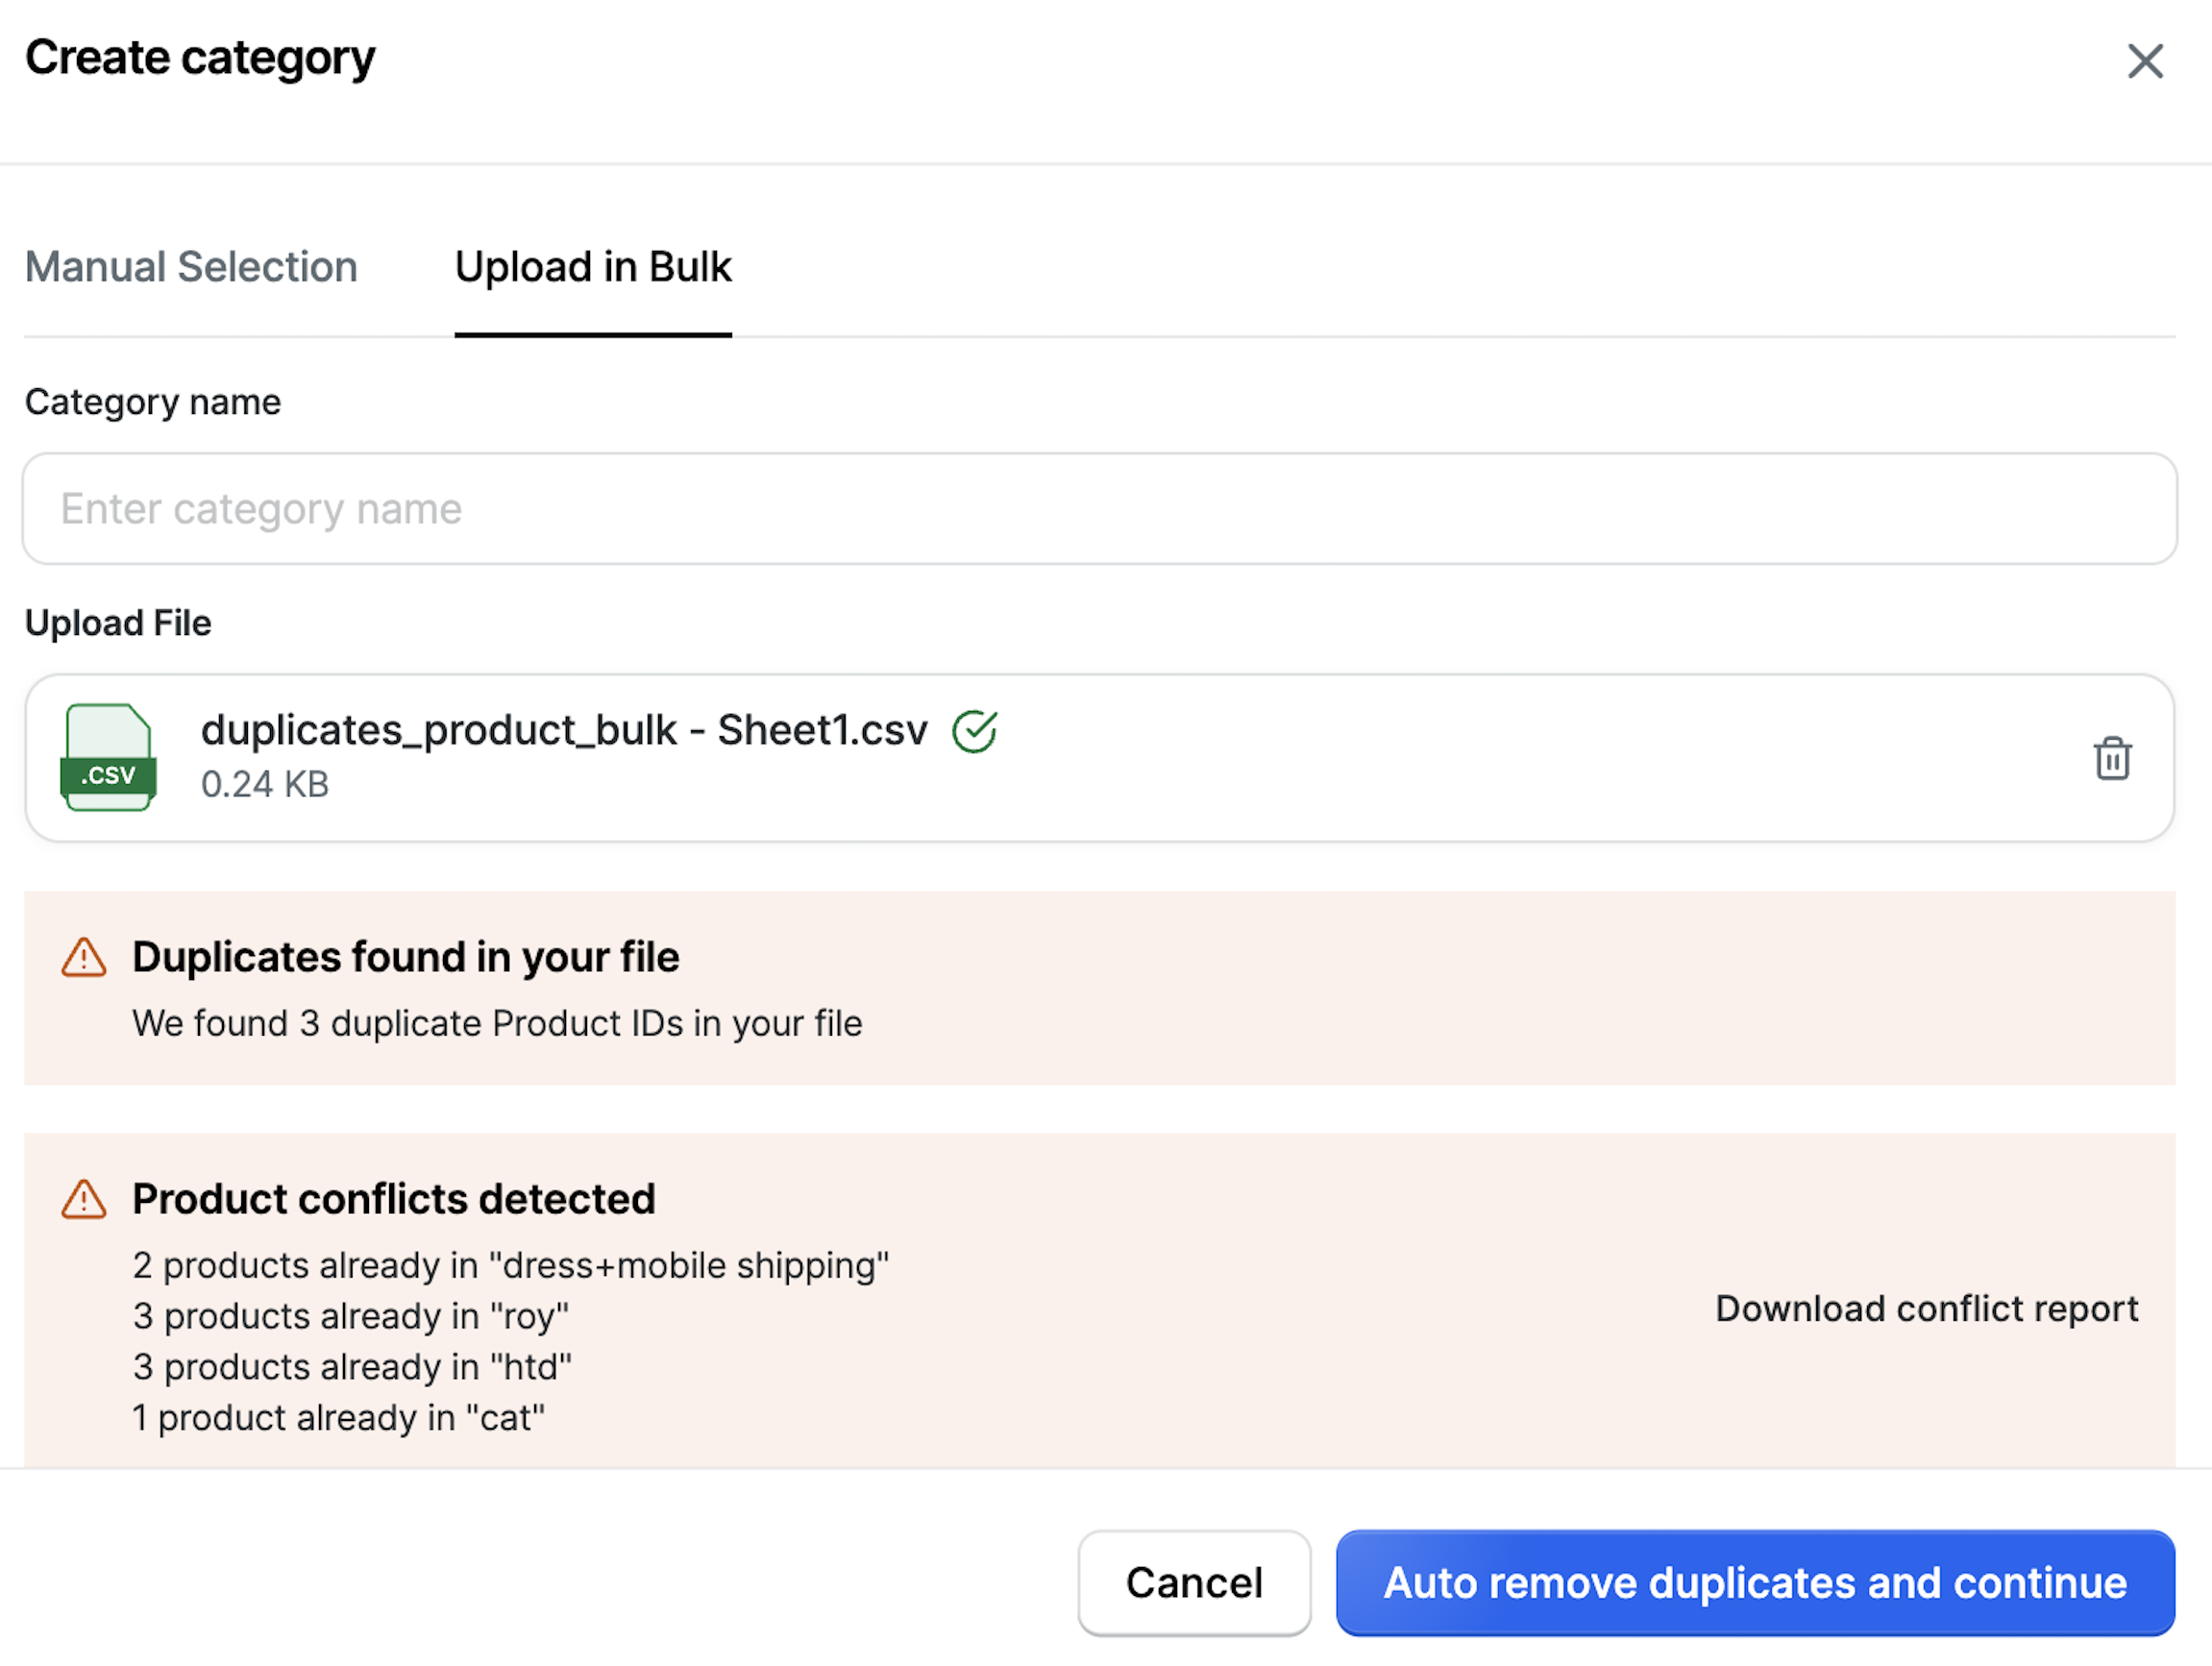
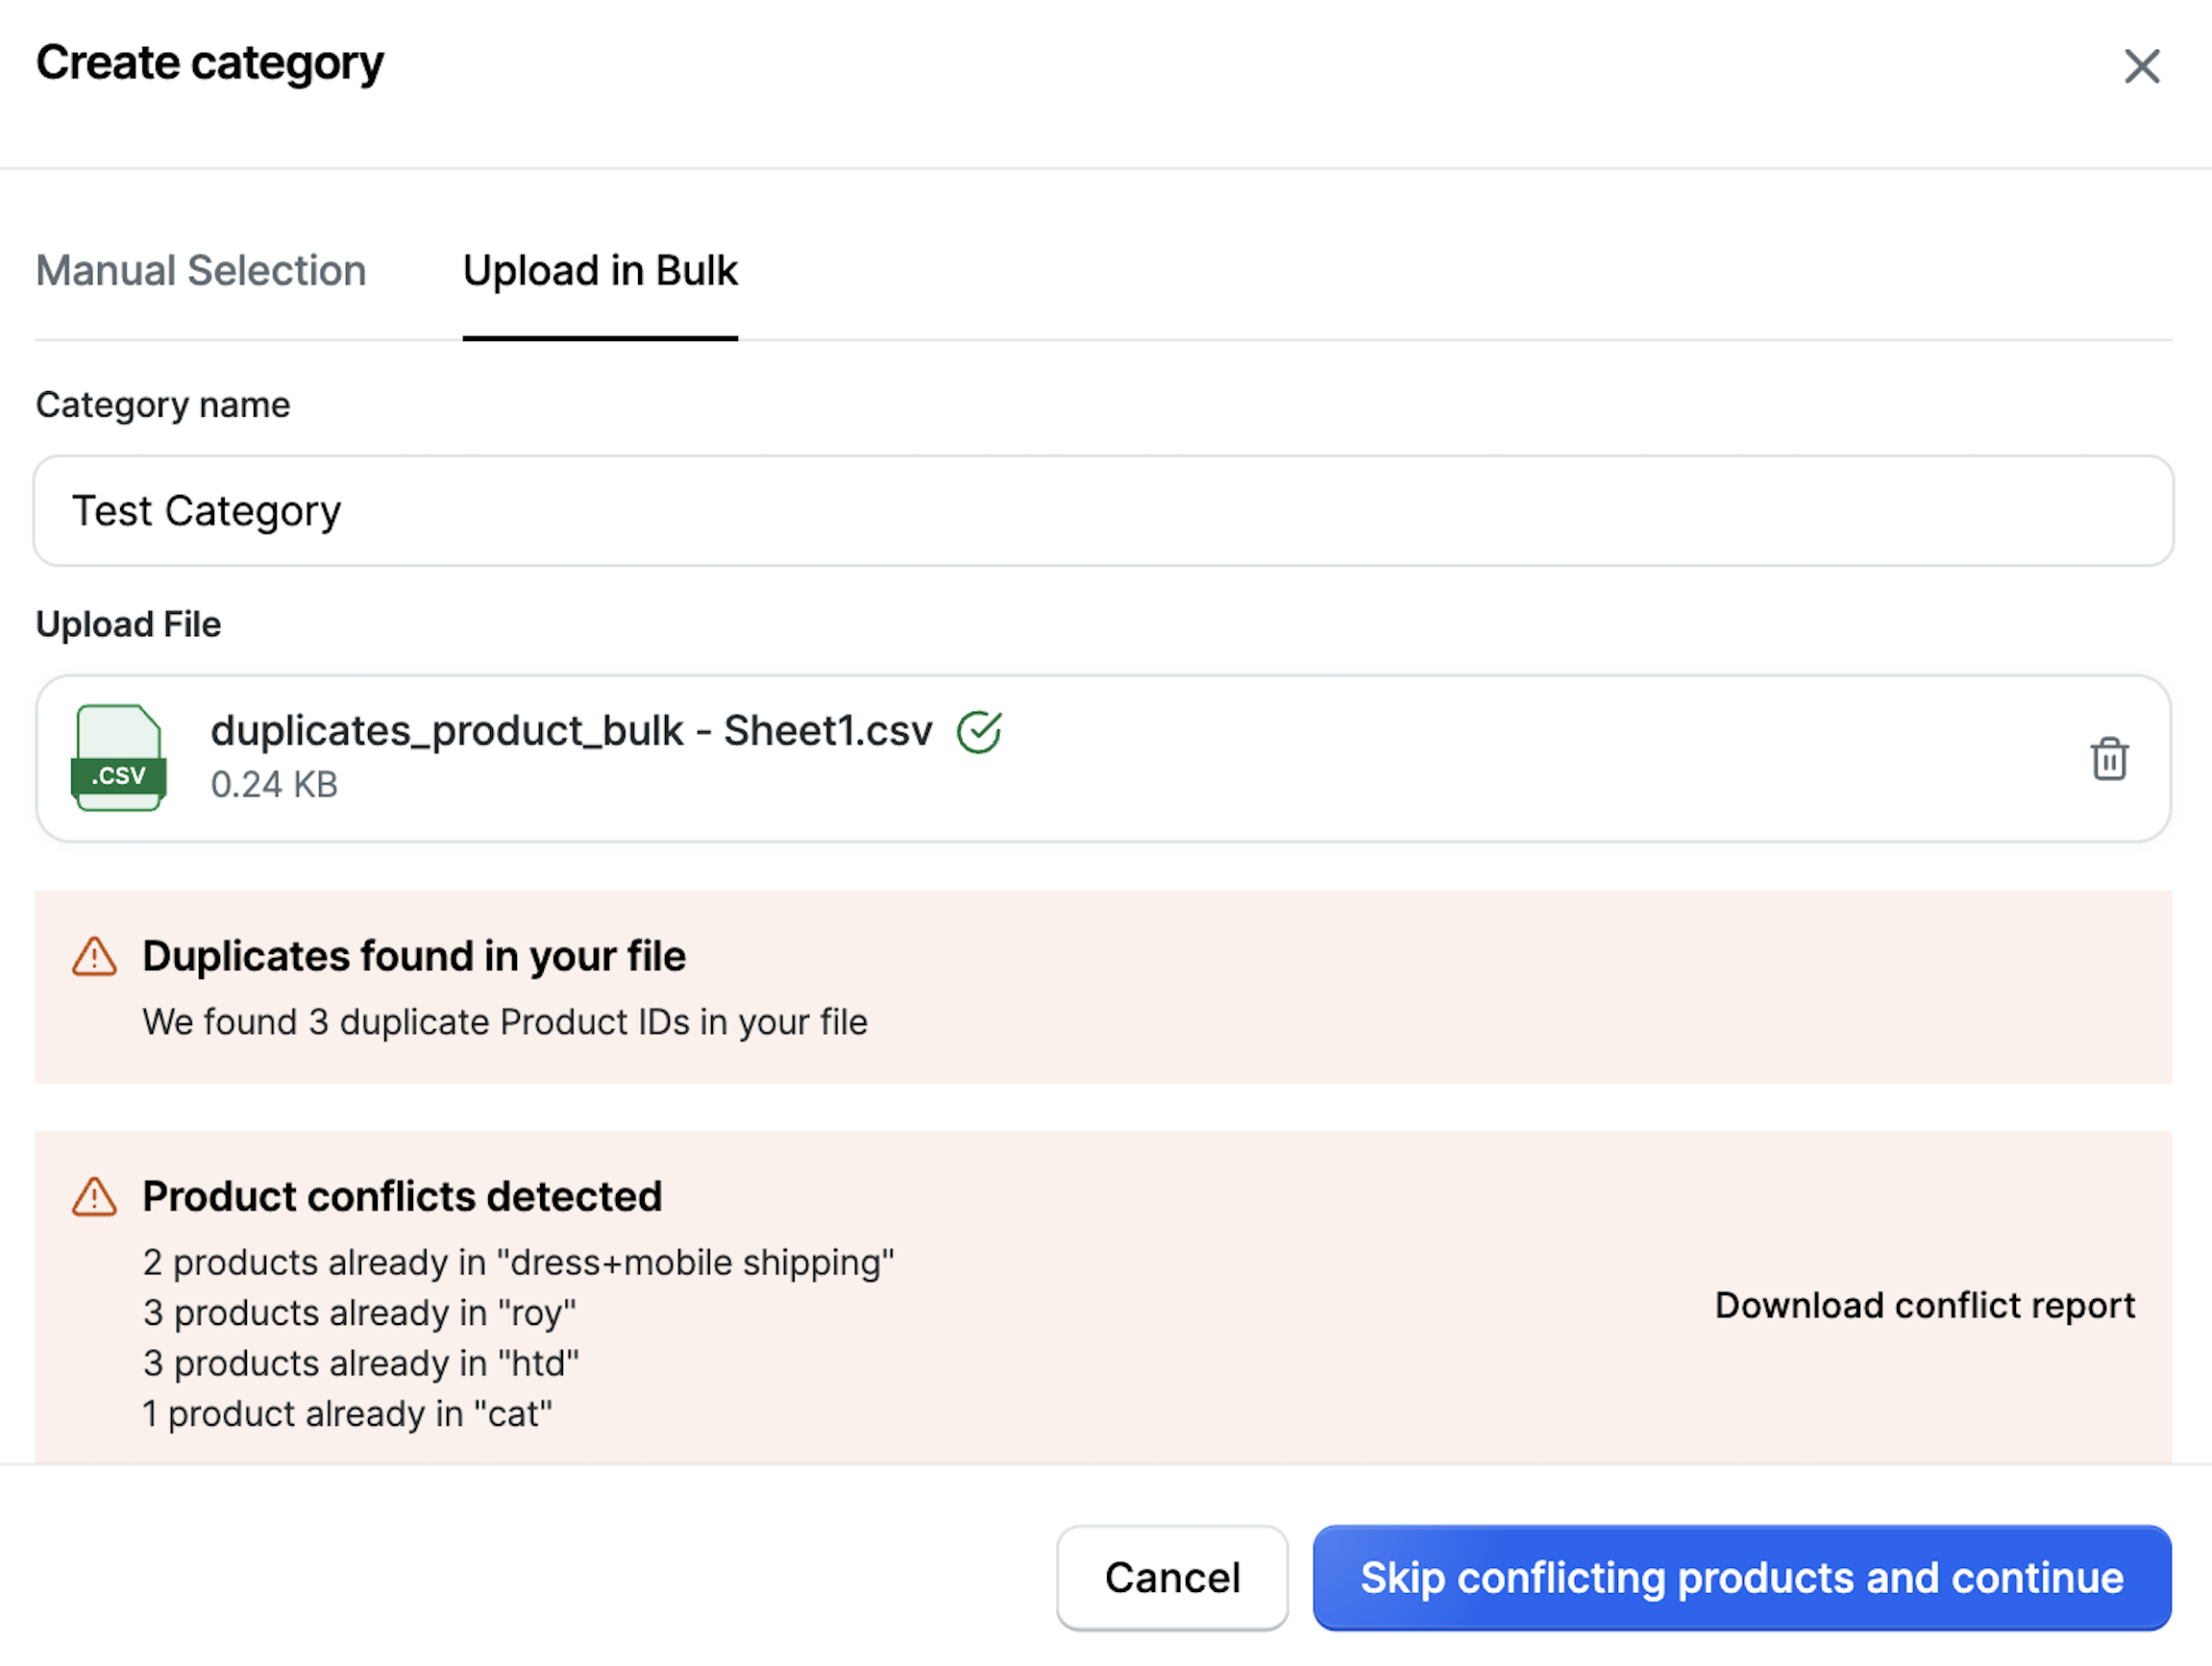
- Click + Add zones in the Shipping zone section to create zones where shipping is applicable.
- Enter the Zone name and select the country, state and city of your choice.
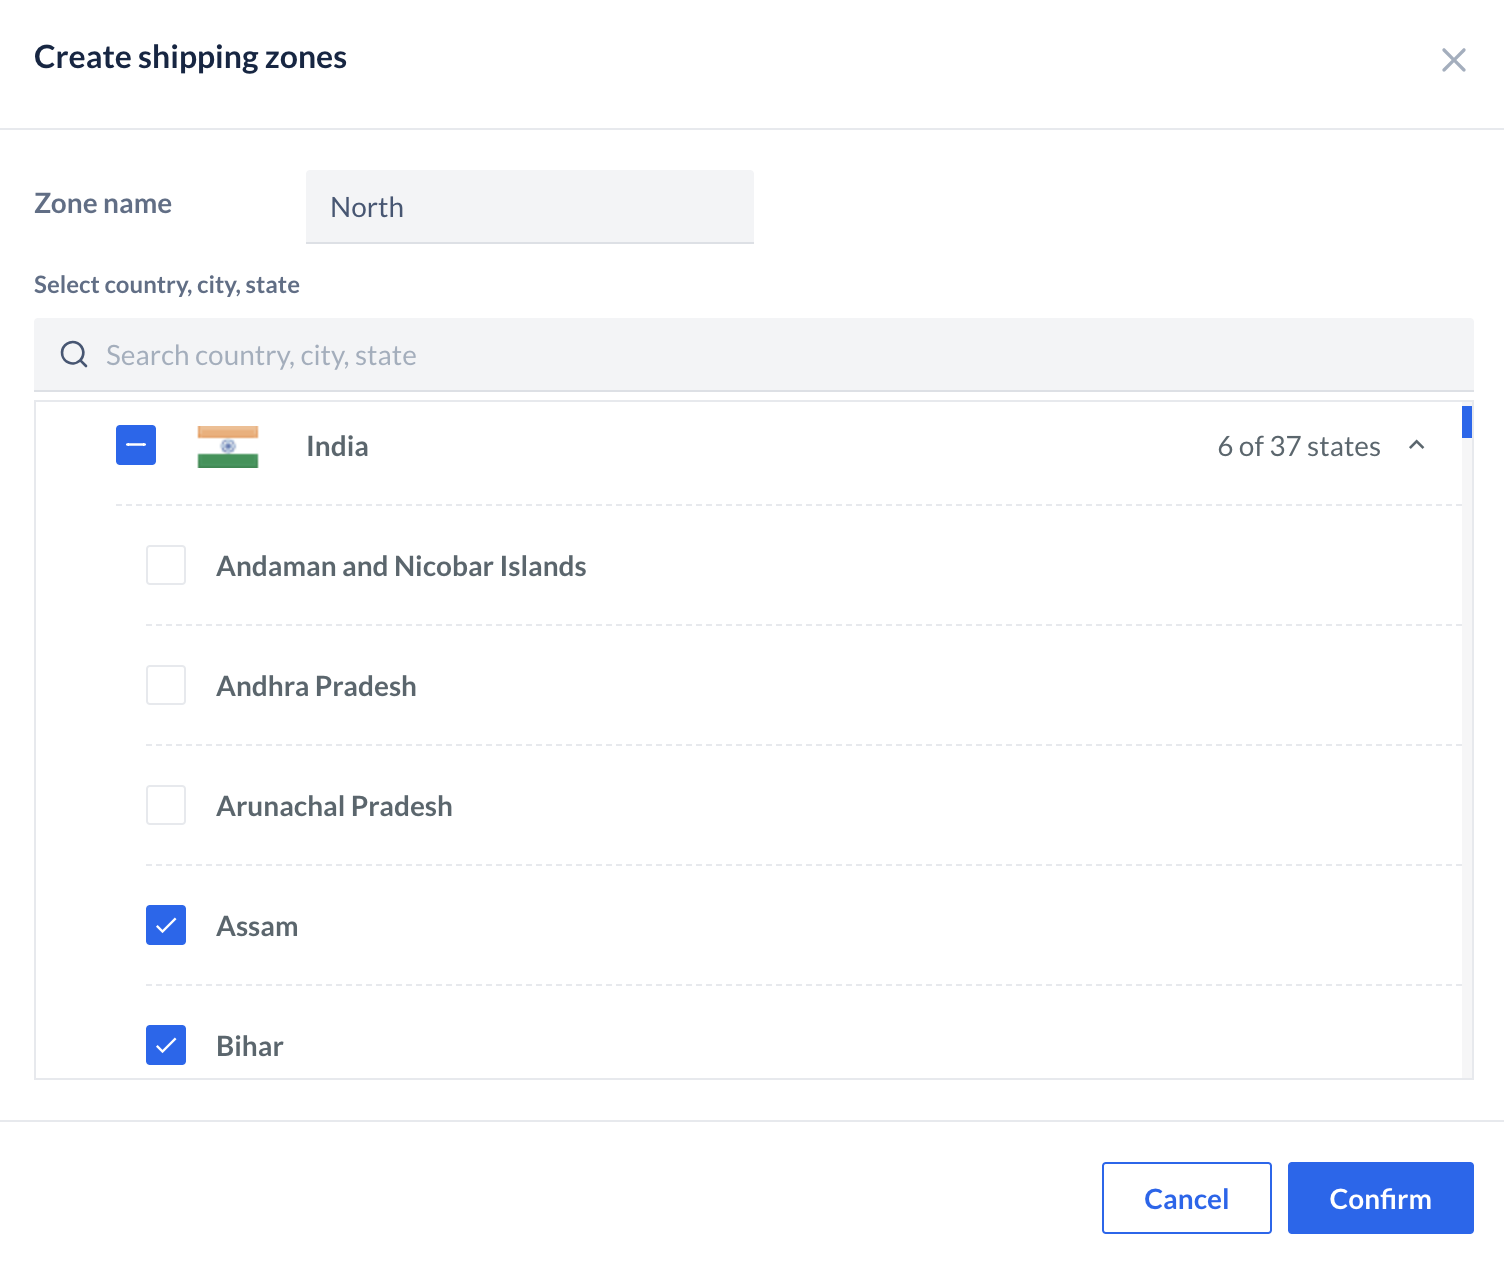
- Click + Upload ZIP codes to offer shipping only to specific ZIP codes. You can either upload the ZIP codes in this profile or in the default shipping profile.
- Download the sample template.
- Enter the ZIP codes as individual rows in column 1.
- Upload the file in .CSV format. Maximum file size supported is 50 MB.
- Uploaded ZIP codes are compatible only with Basic COD settings.
- Drag the file or click click to upload.
- Click + Add shipping method and configure the Shipping method & rate for all the shipping zones added in the previous step.
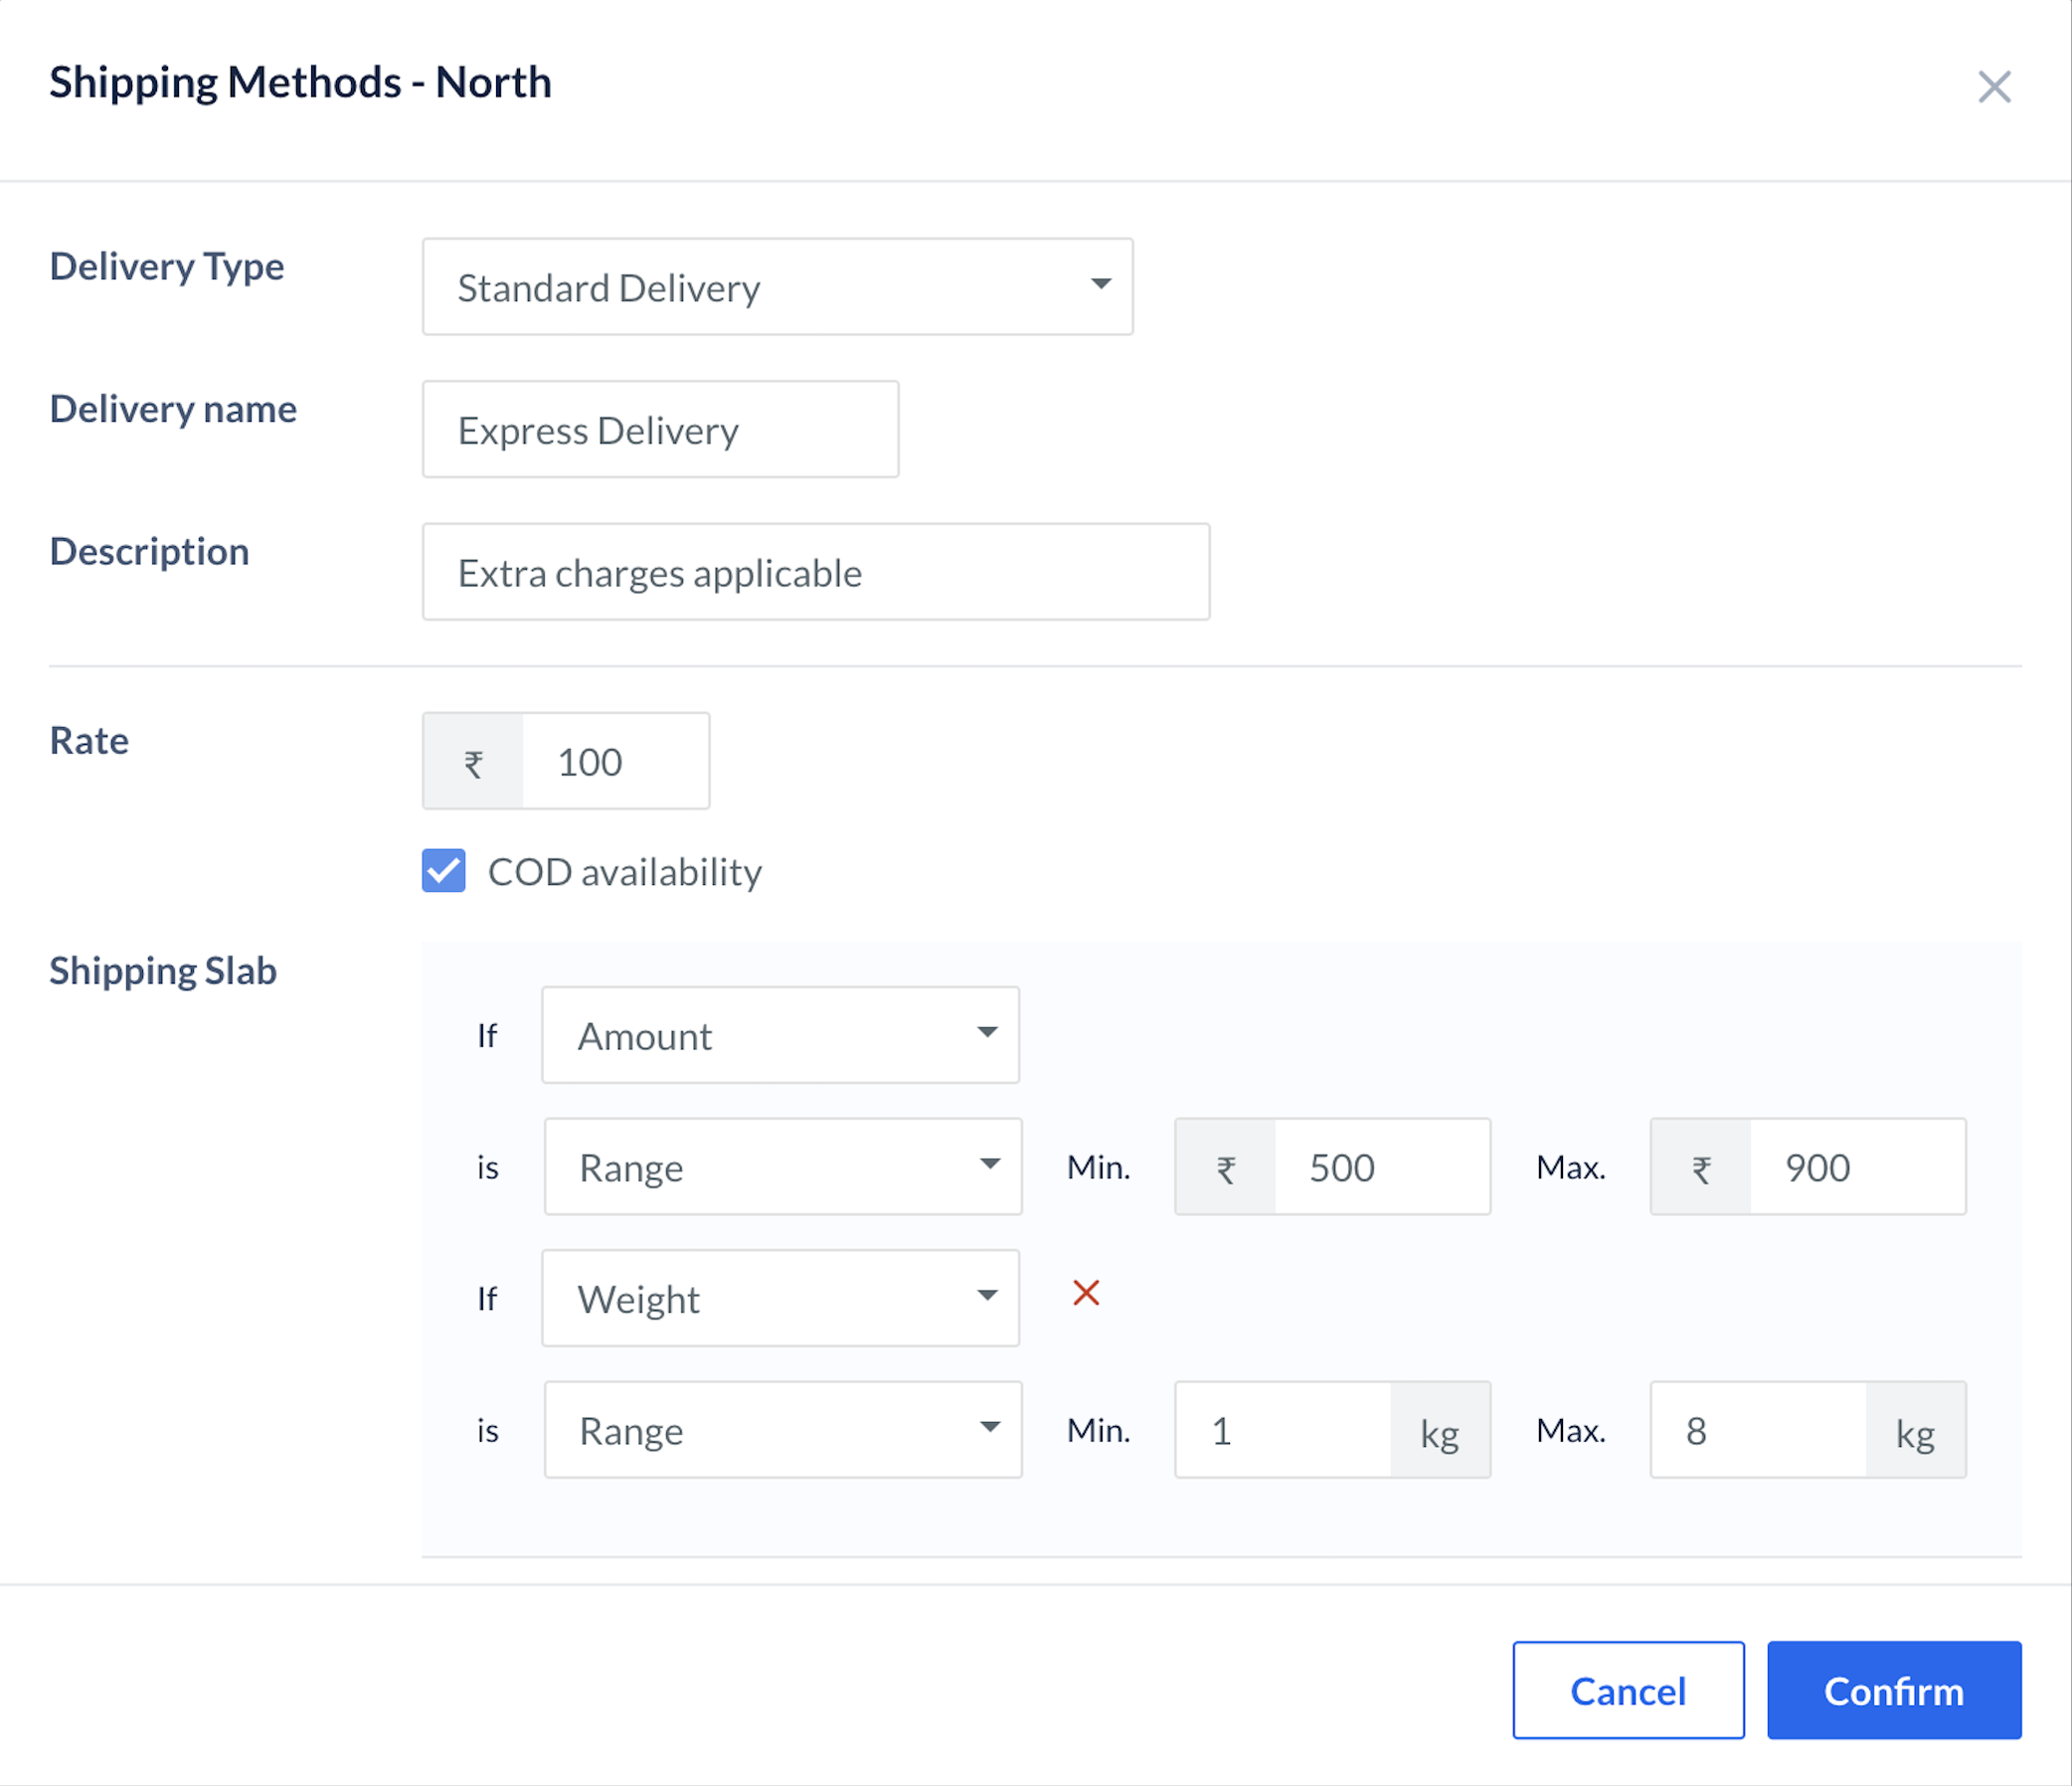
- Enter the Delivery Name and Description of your choice which will appear to your customers on Magic Checkout.
- Enter the Rate for the delivery and enable the COD availability if you want to show the cash on delivery payment option on checkout at the shipping method level.
- Configure the Shipping slab based on the Amount and Weight of the product and enter the minimum and maximum values respectively. For example, enter the minimum-maximum value as ₹500-₹900. If the amount of the product falls in that range, a shipping rate is applicable on the product.
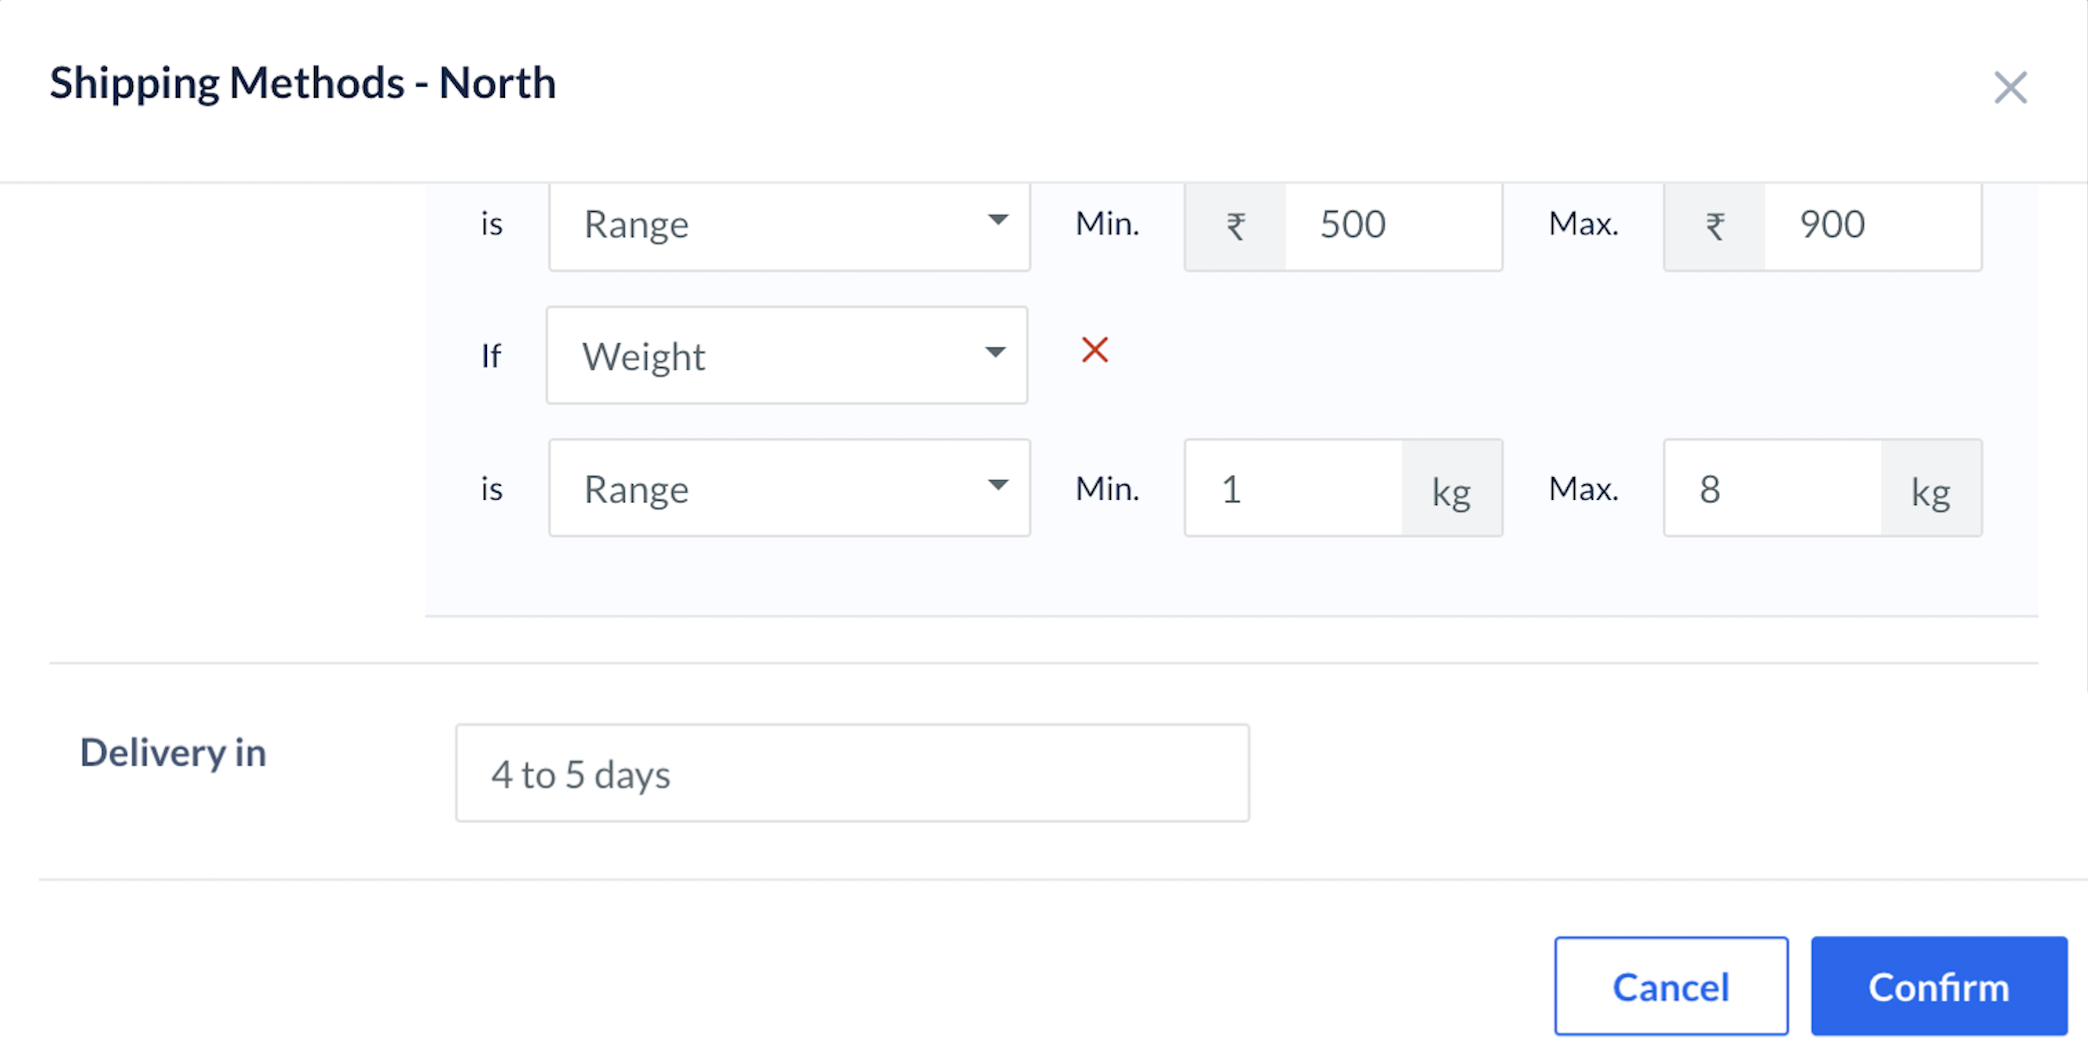
- Enable Display Delivery in option to display the estimated timeline for the customers on checkout.
- Enter the estimated delivery timeline and click Confirm.
- Once you configure all the shipping zones, click Go Back.
- Click + Set Default Profile in the Default Shipping profile section. Follow all the steps from 7 to 15 to configure the profile.
- Enable Magic Shipping. To confirm the action, click Yes, enable.

Method 2: Shopify Store
Method 2: Shopify Store
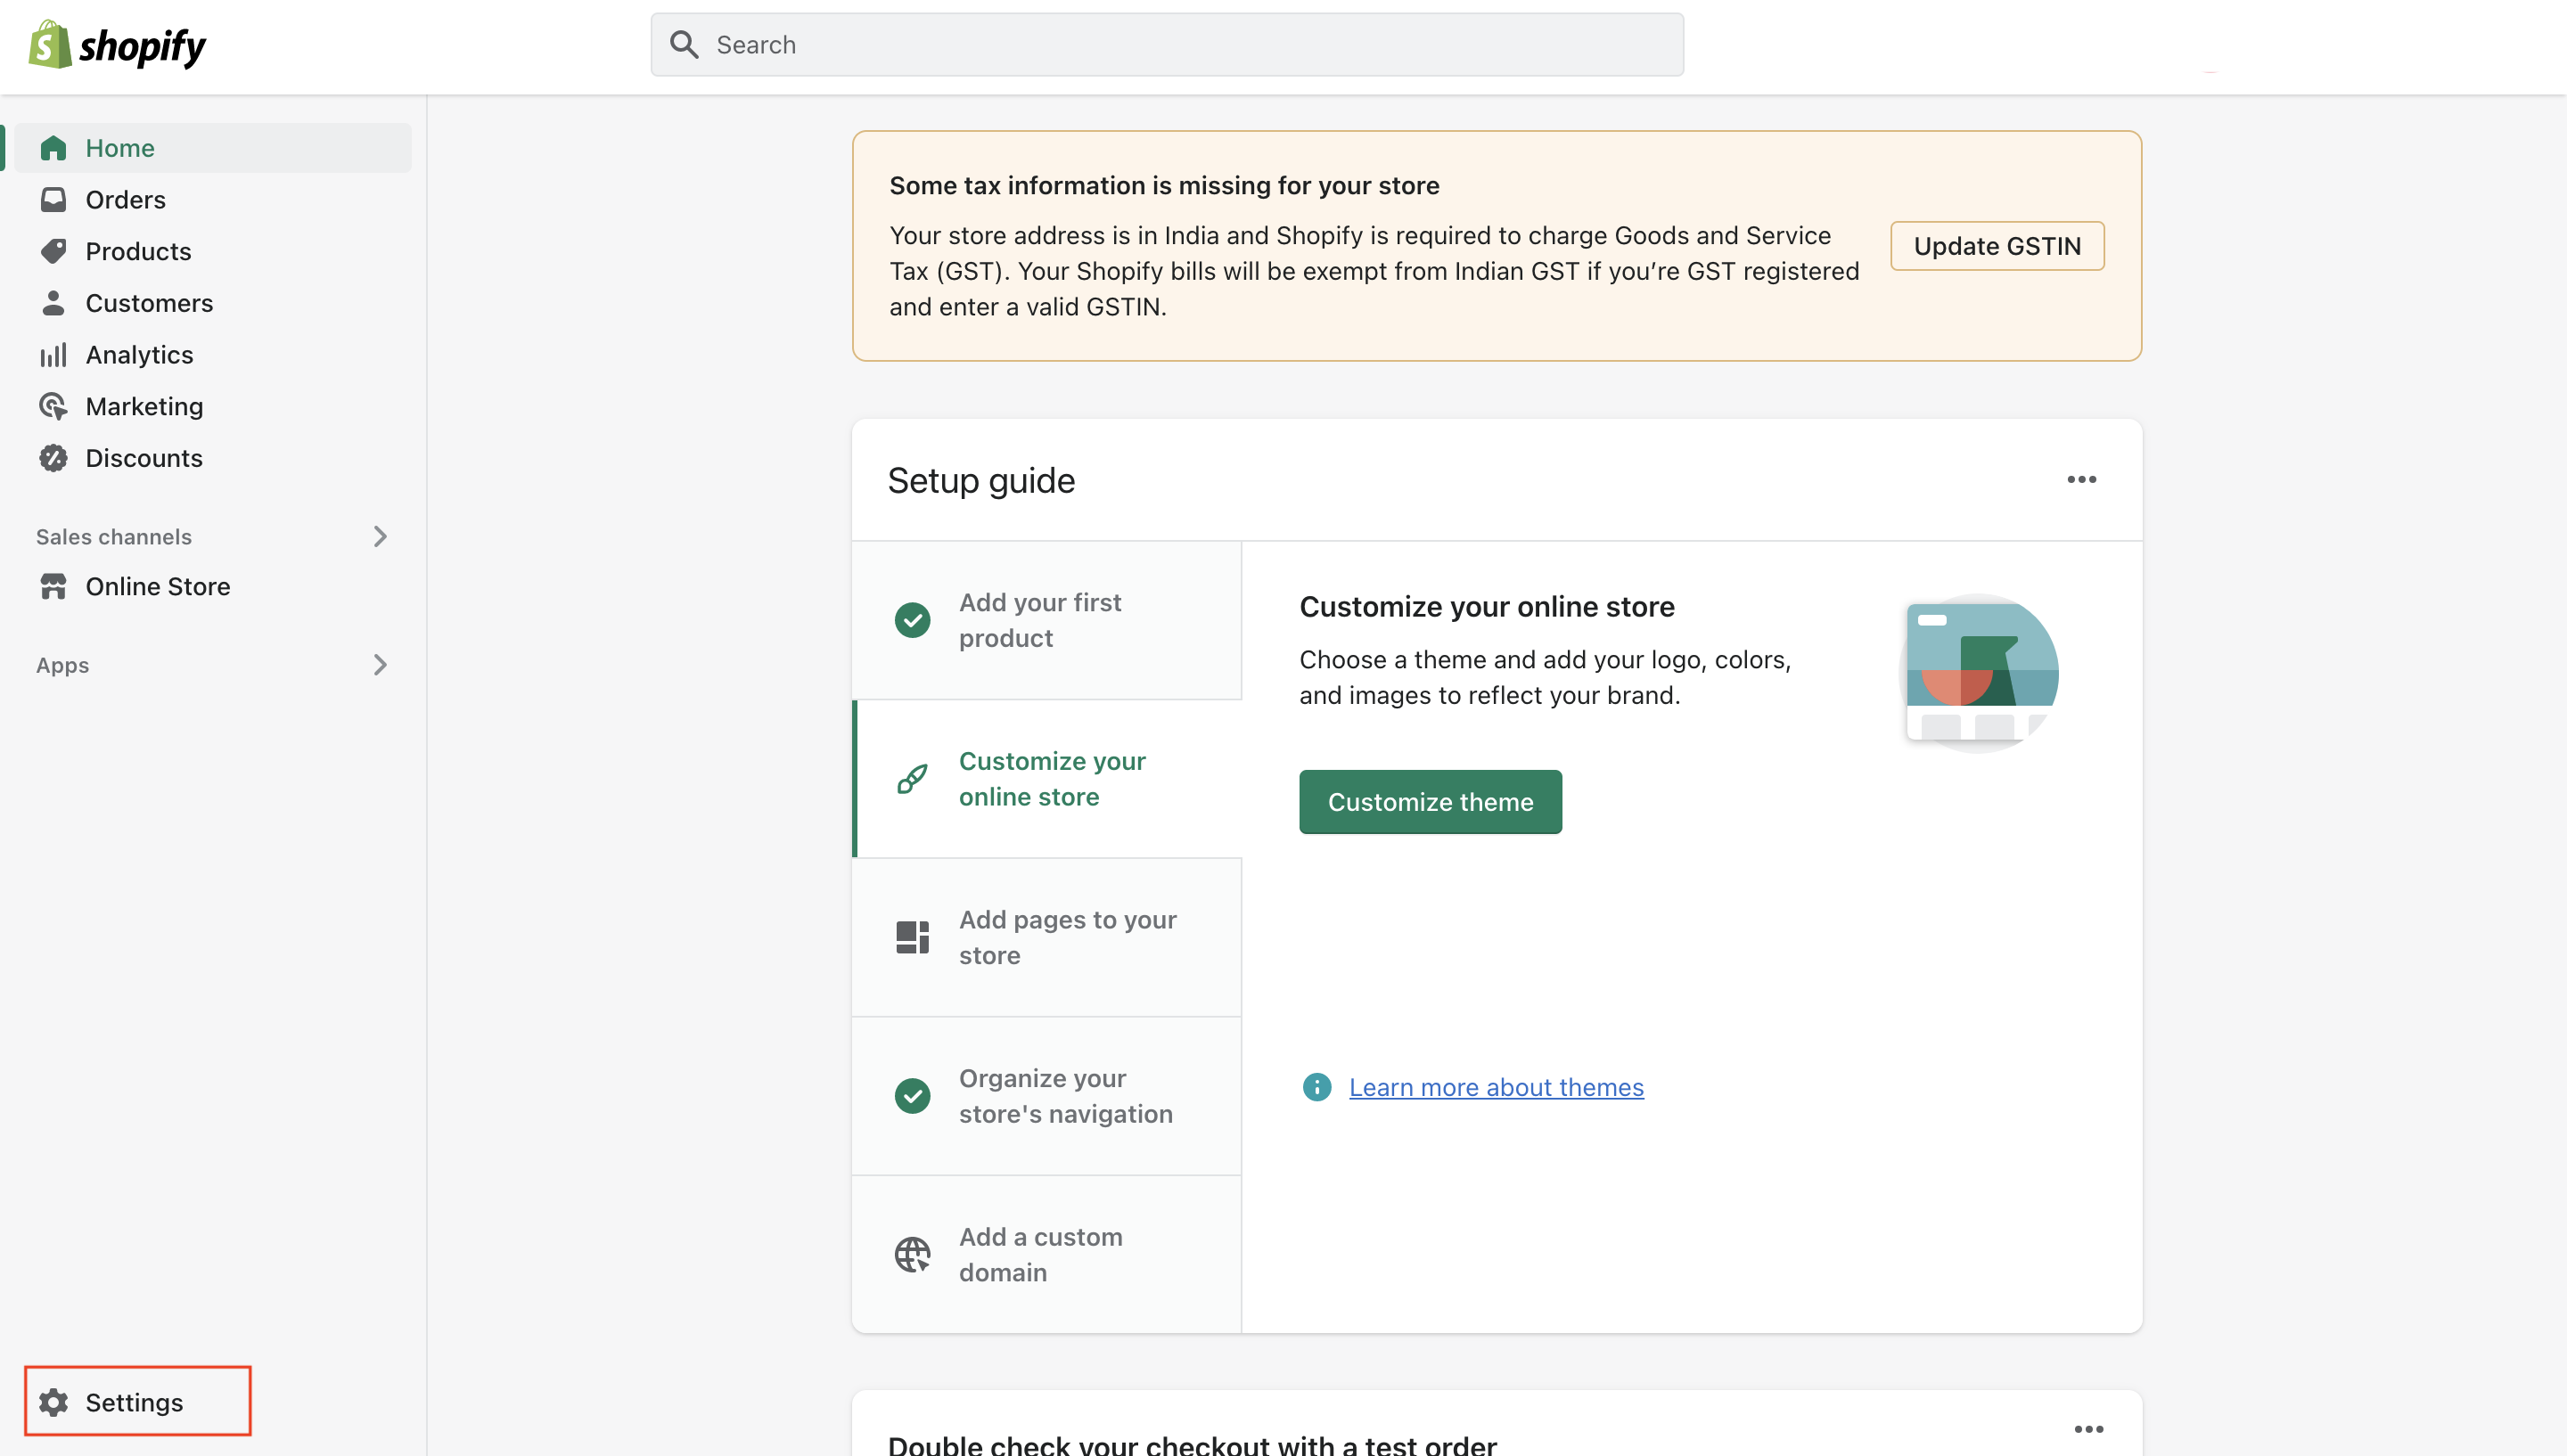
- Log in to the Shopify Store and navigate to Settings → Shipping and delivery.
- Create a profile under general or custom shipping rates and add the required details.
- General Shipping Rates: Create a profile for all products. With this, you charge a standard shipping rate on certain products.
- Custom Shipping Rates: Create an individual shipping rate for a certain product.
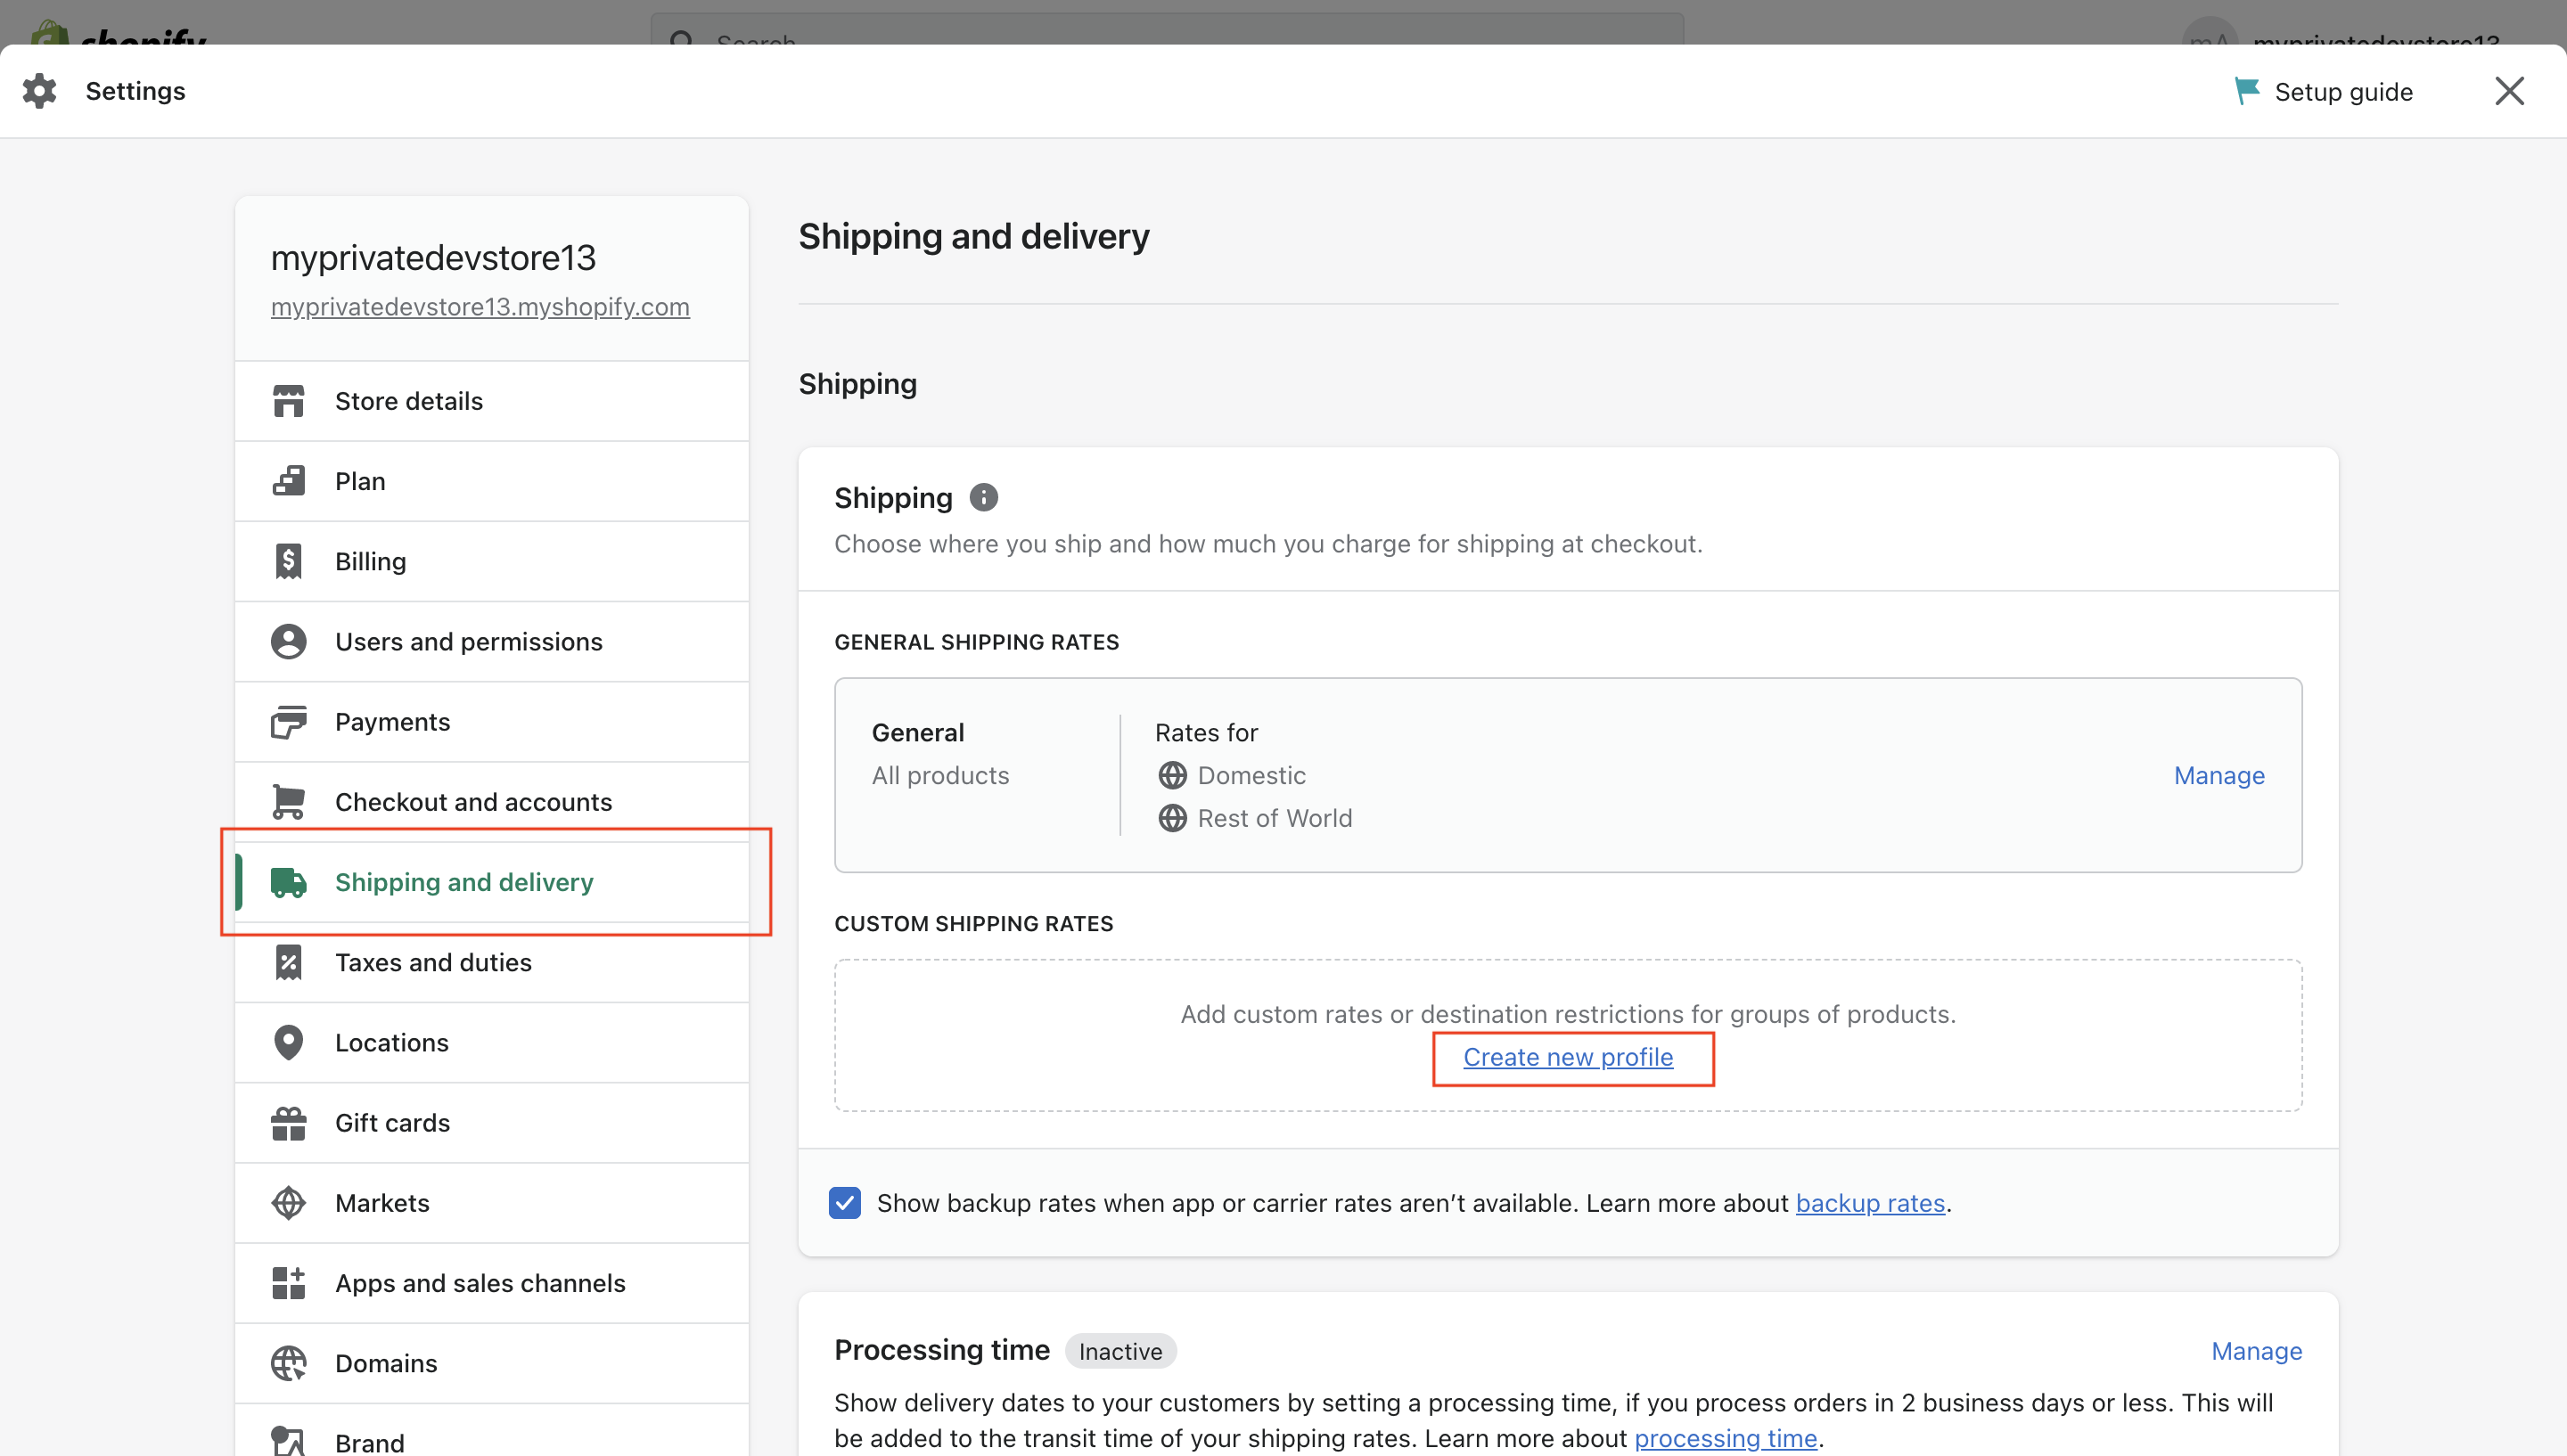
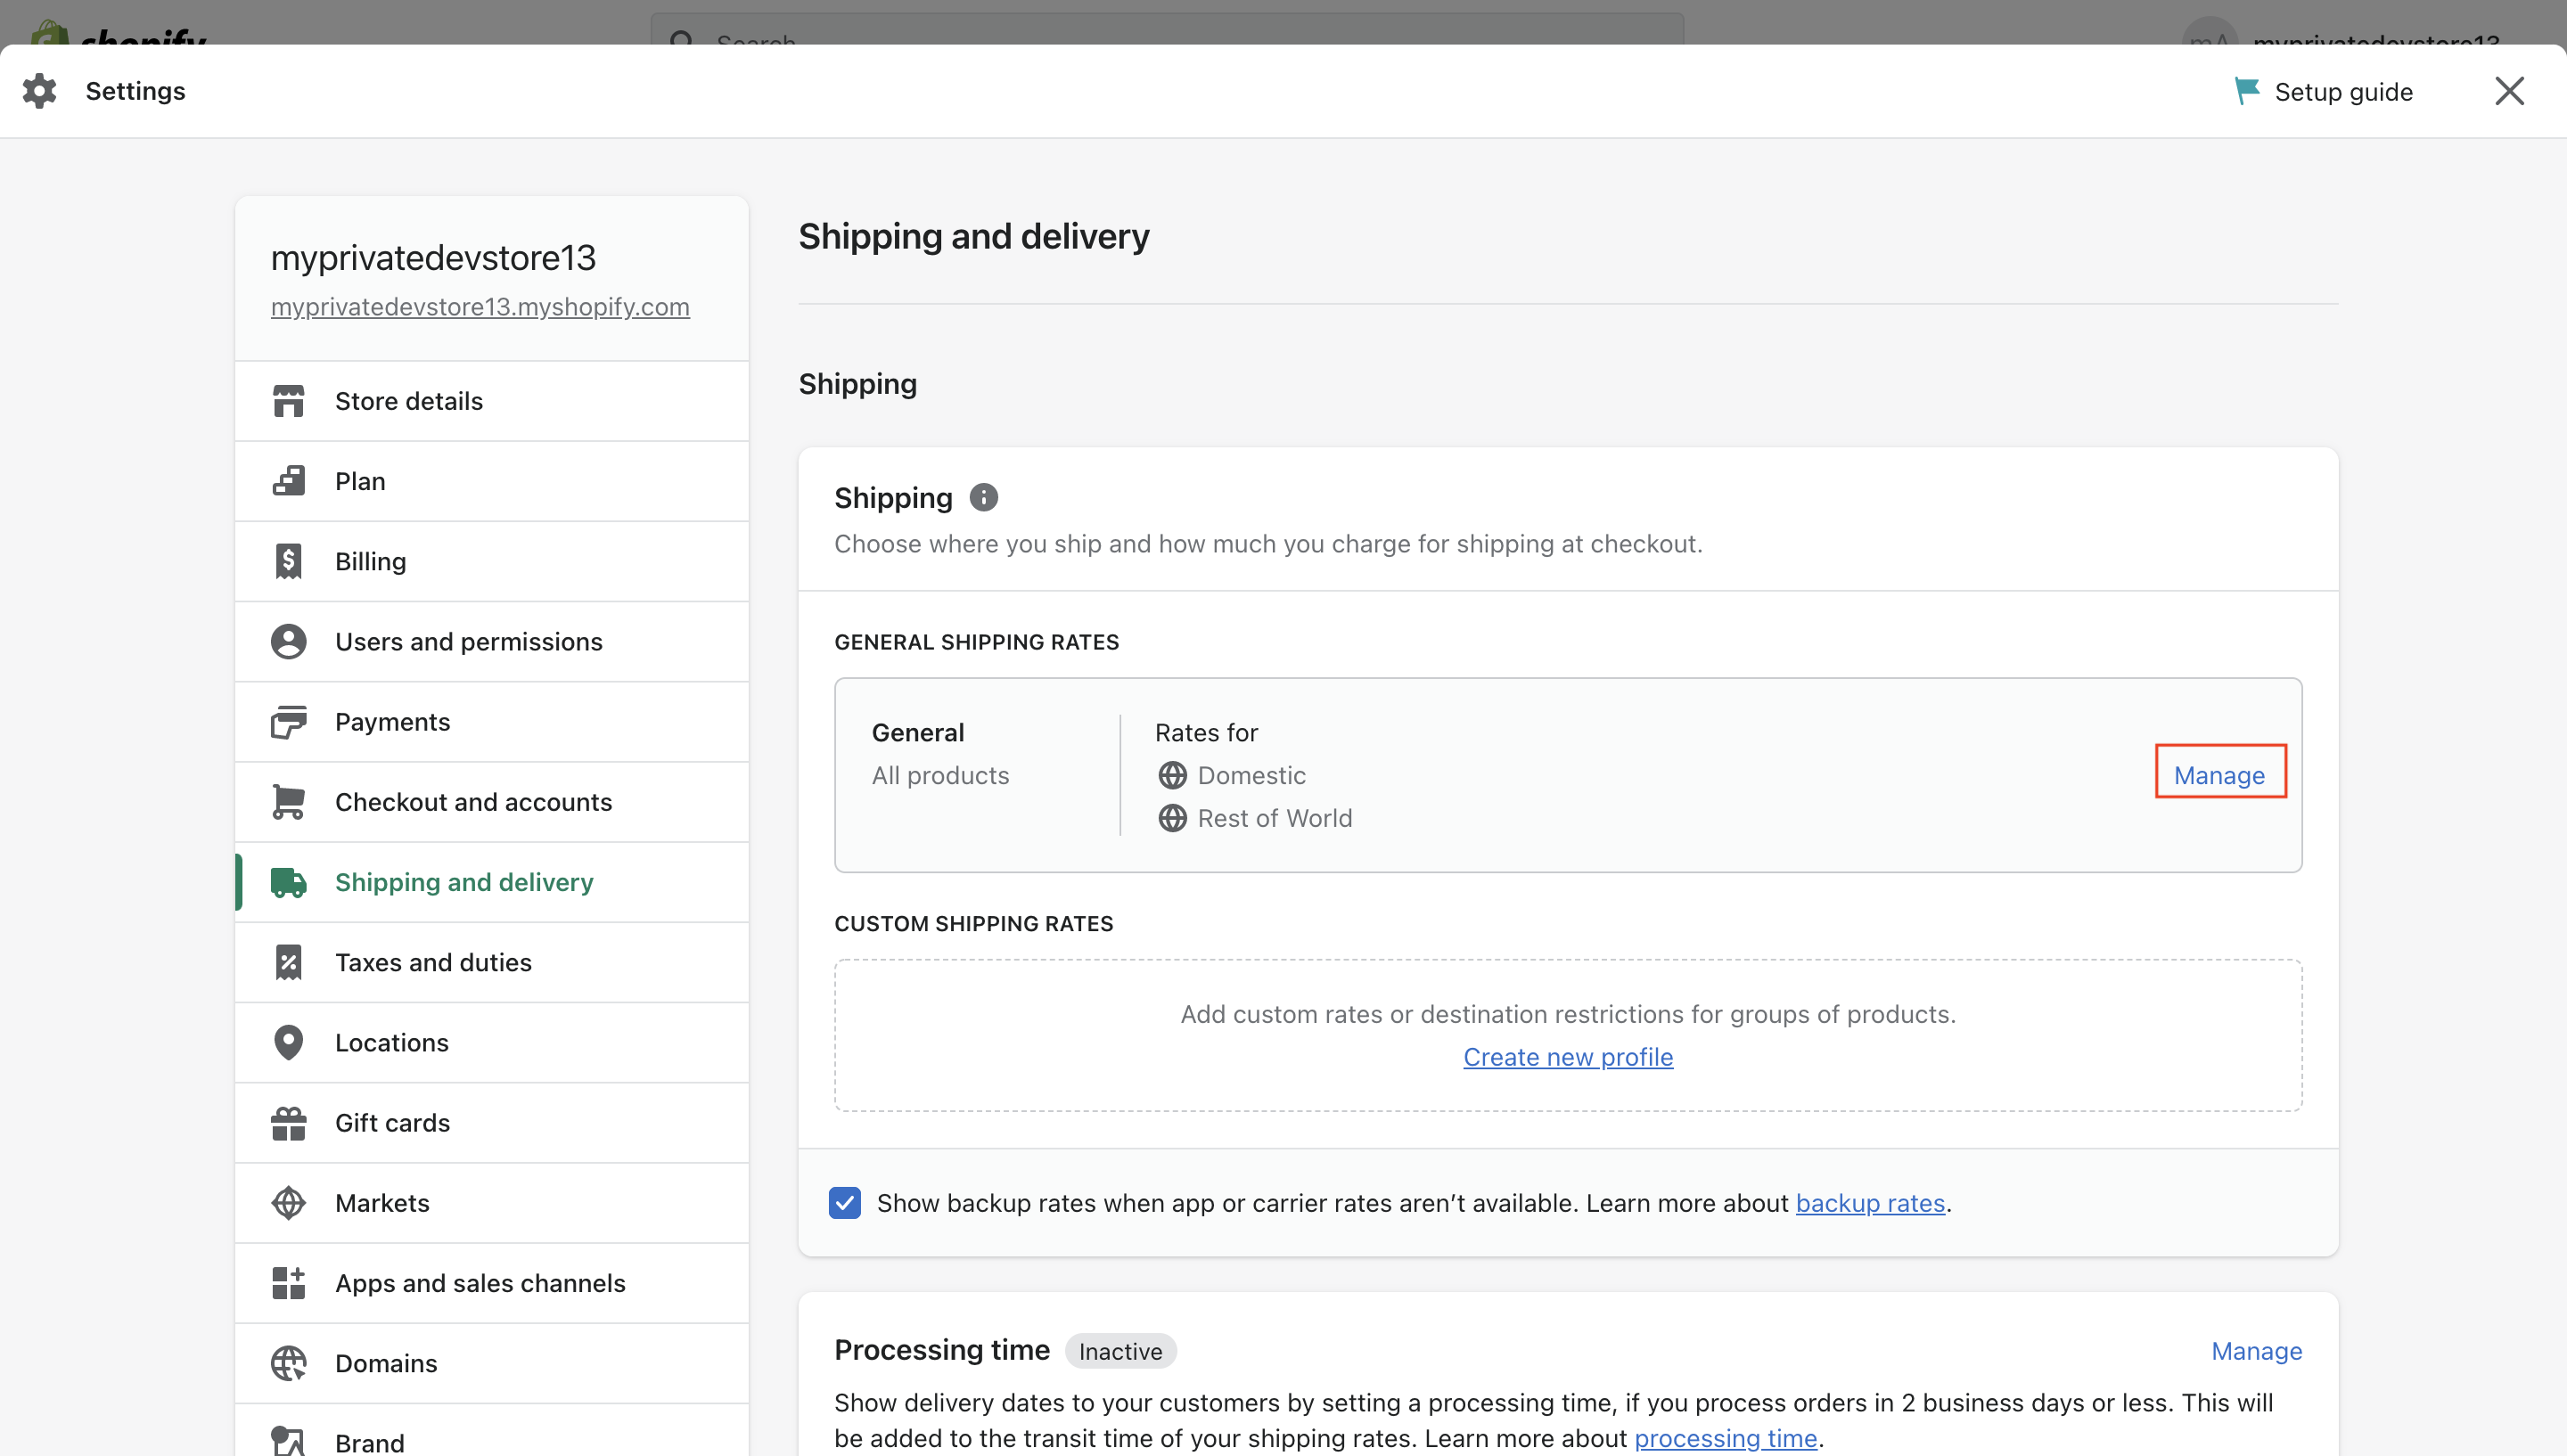
- After creating a profile, click Manage to navigate to the shipping settings under that profile.
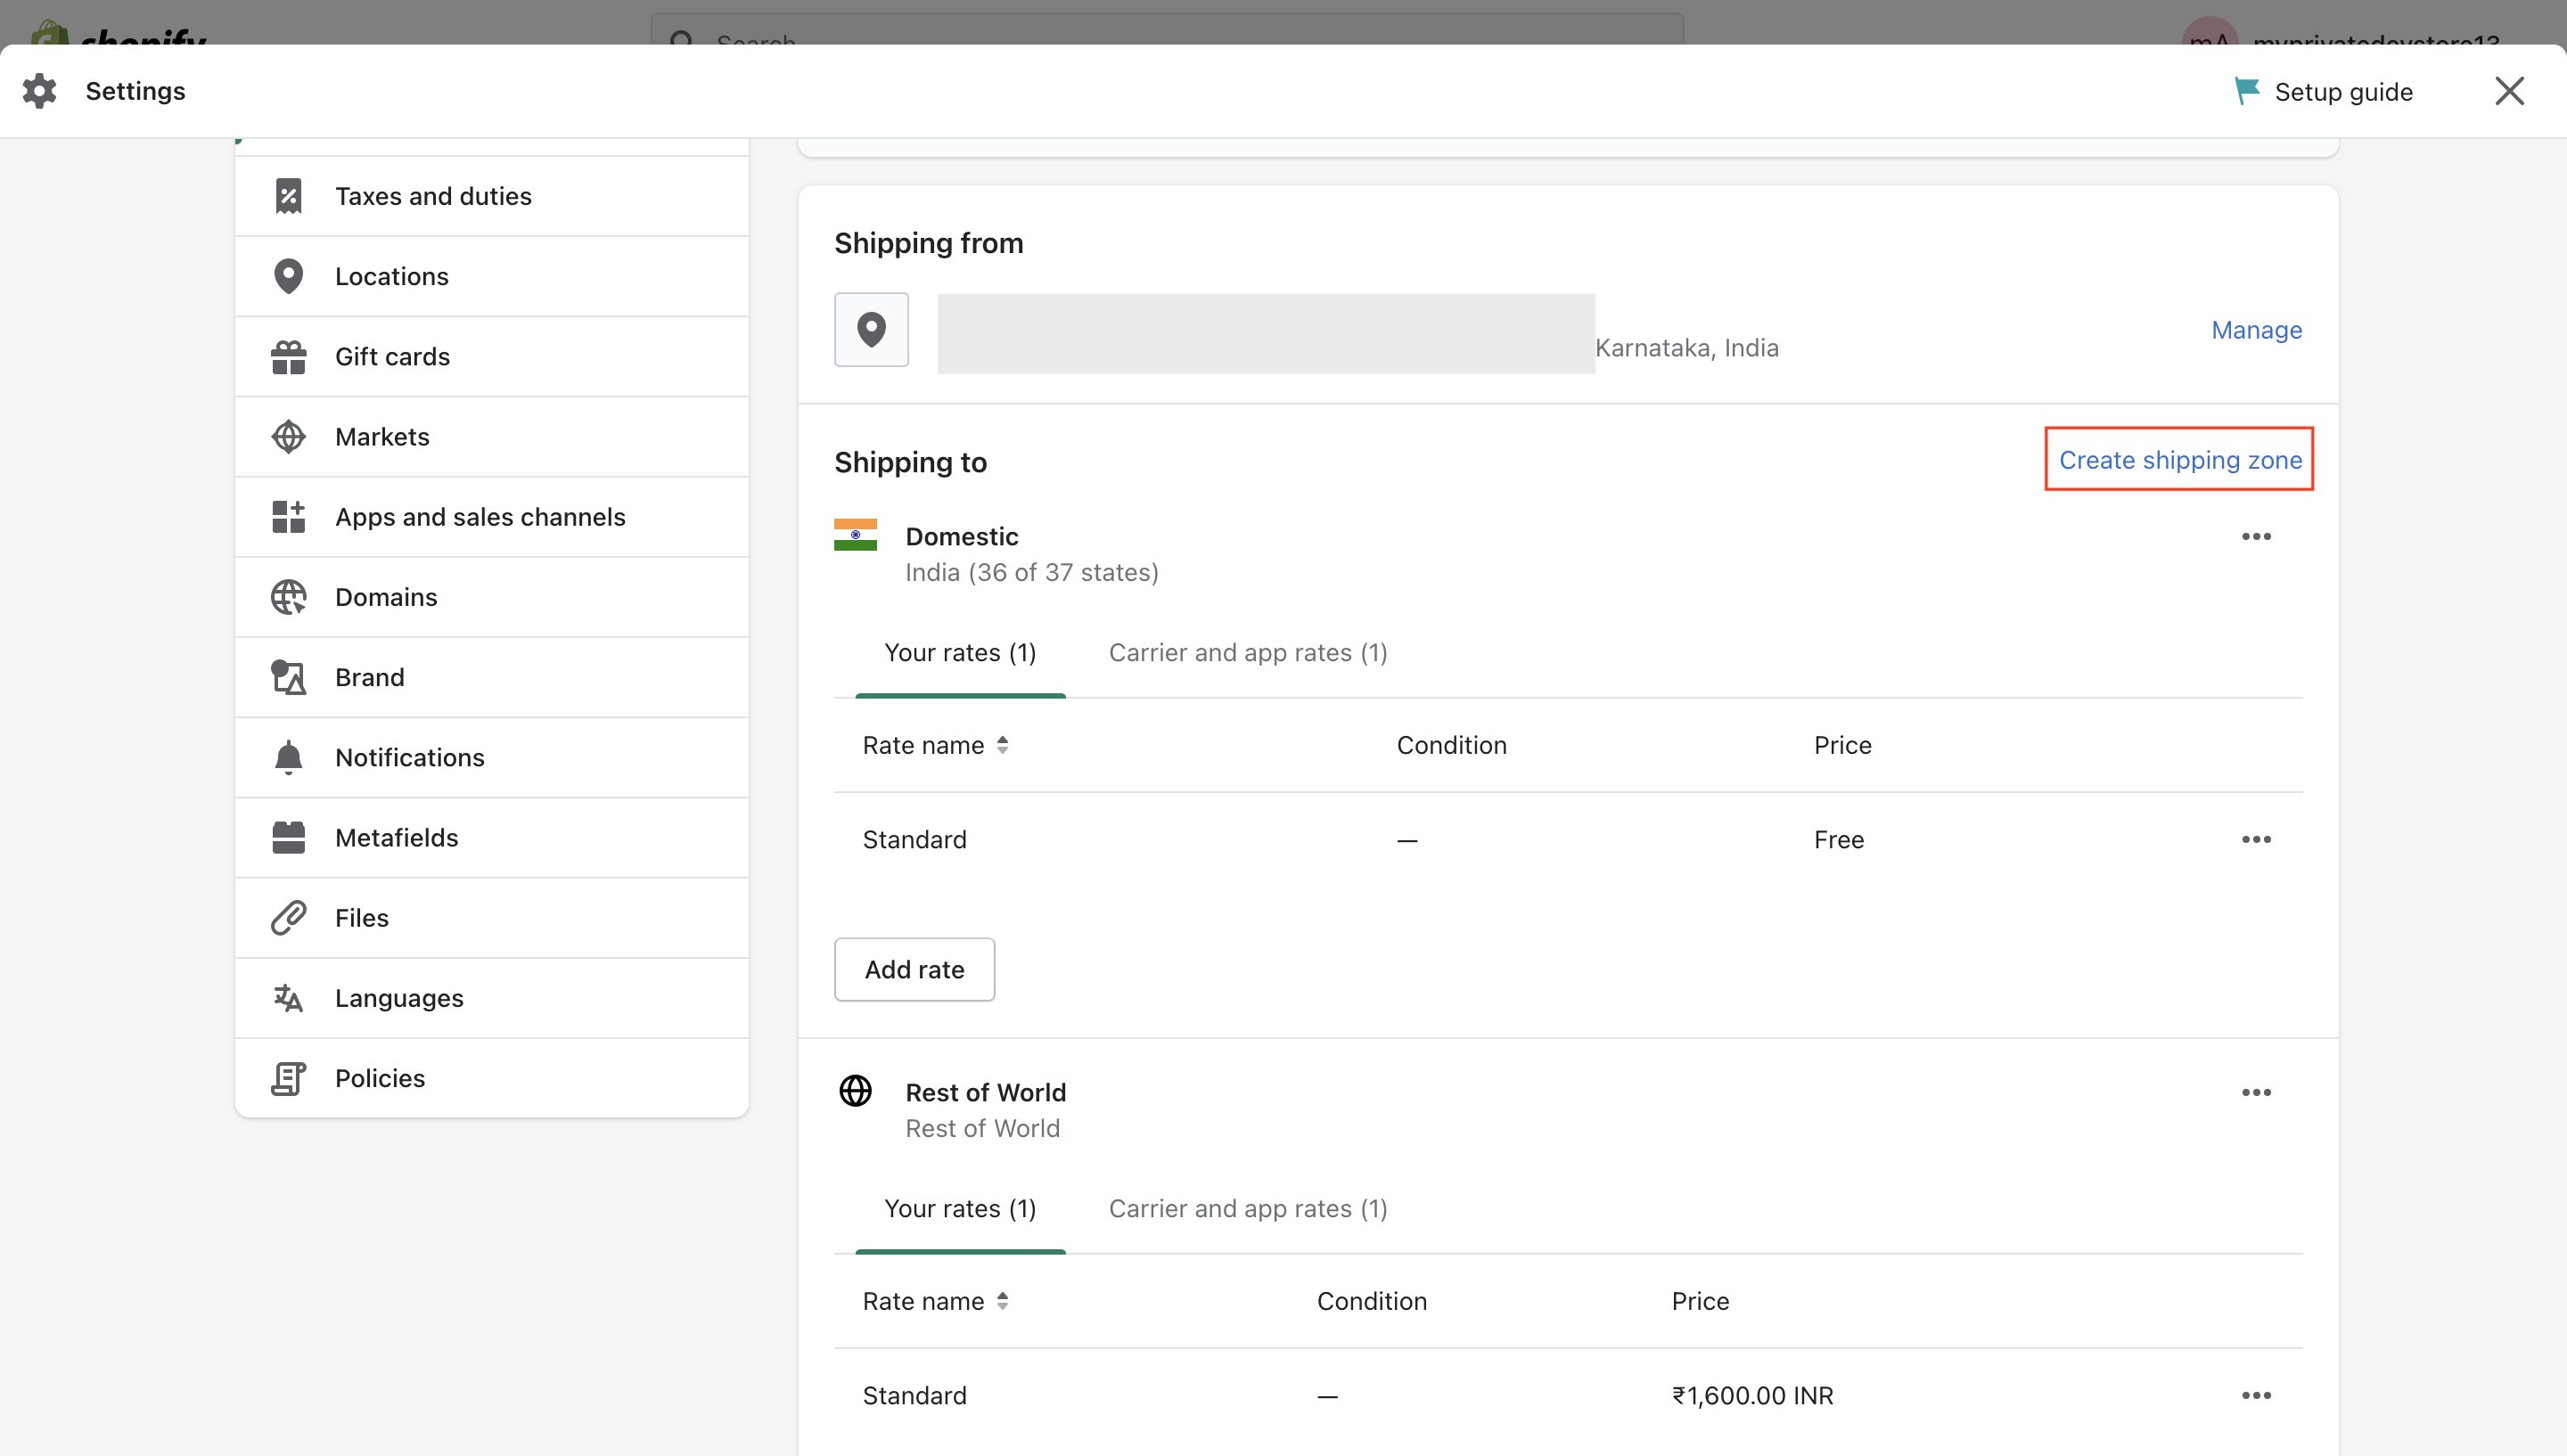
- Click Create shipping zone and add zones of your choice. Click Done.
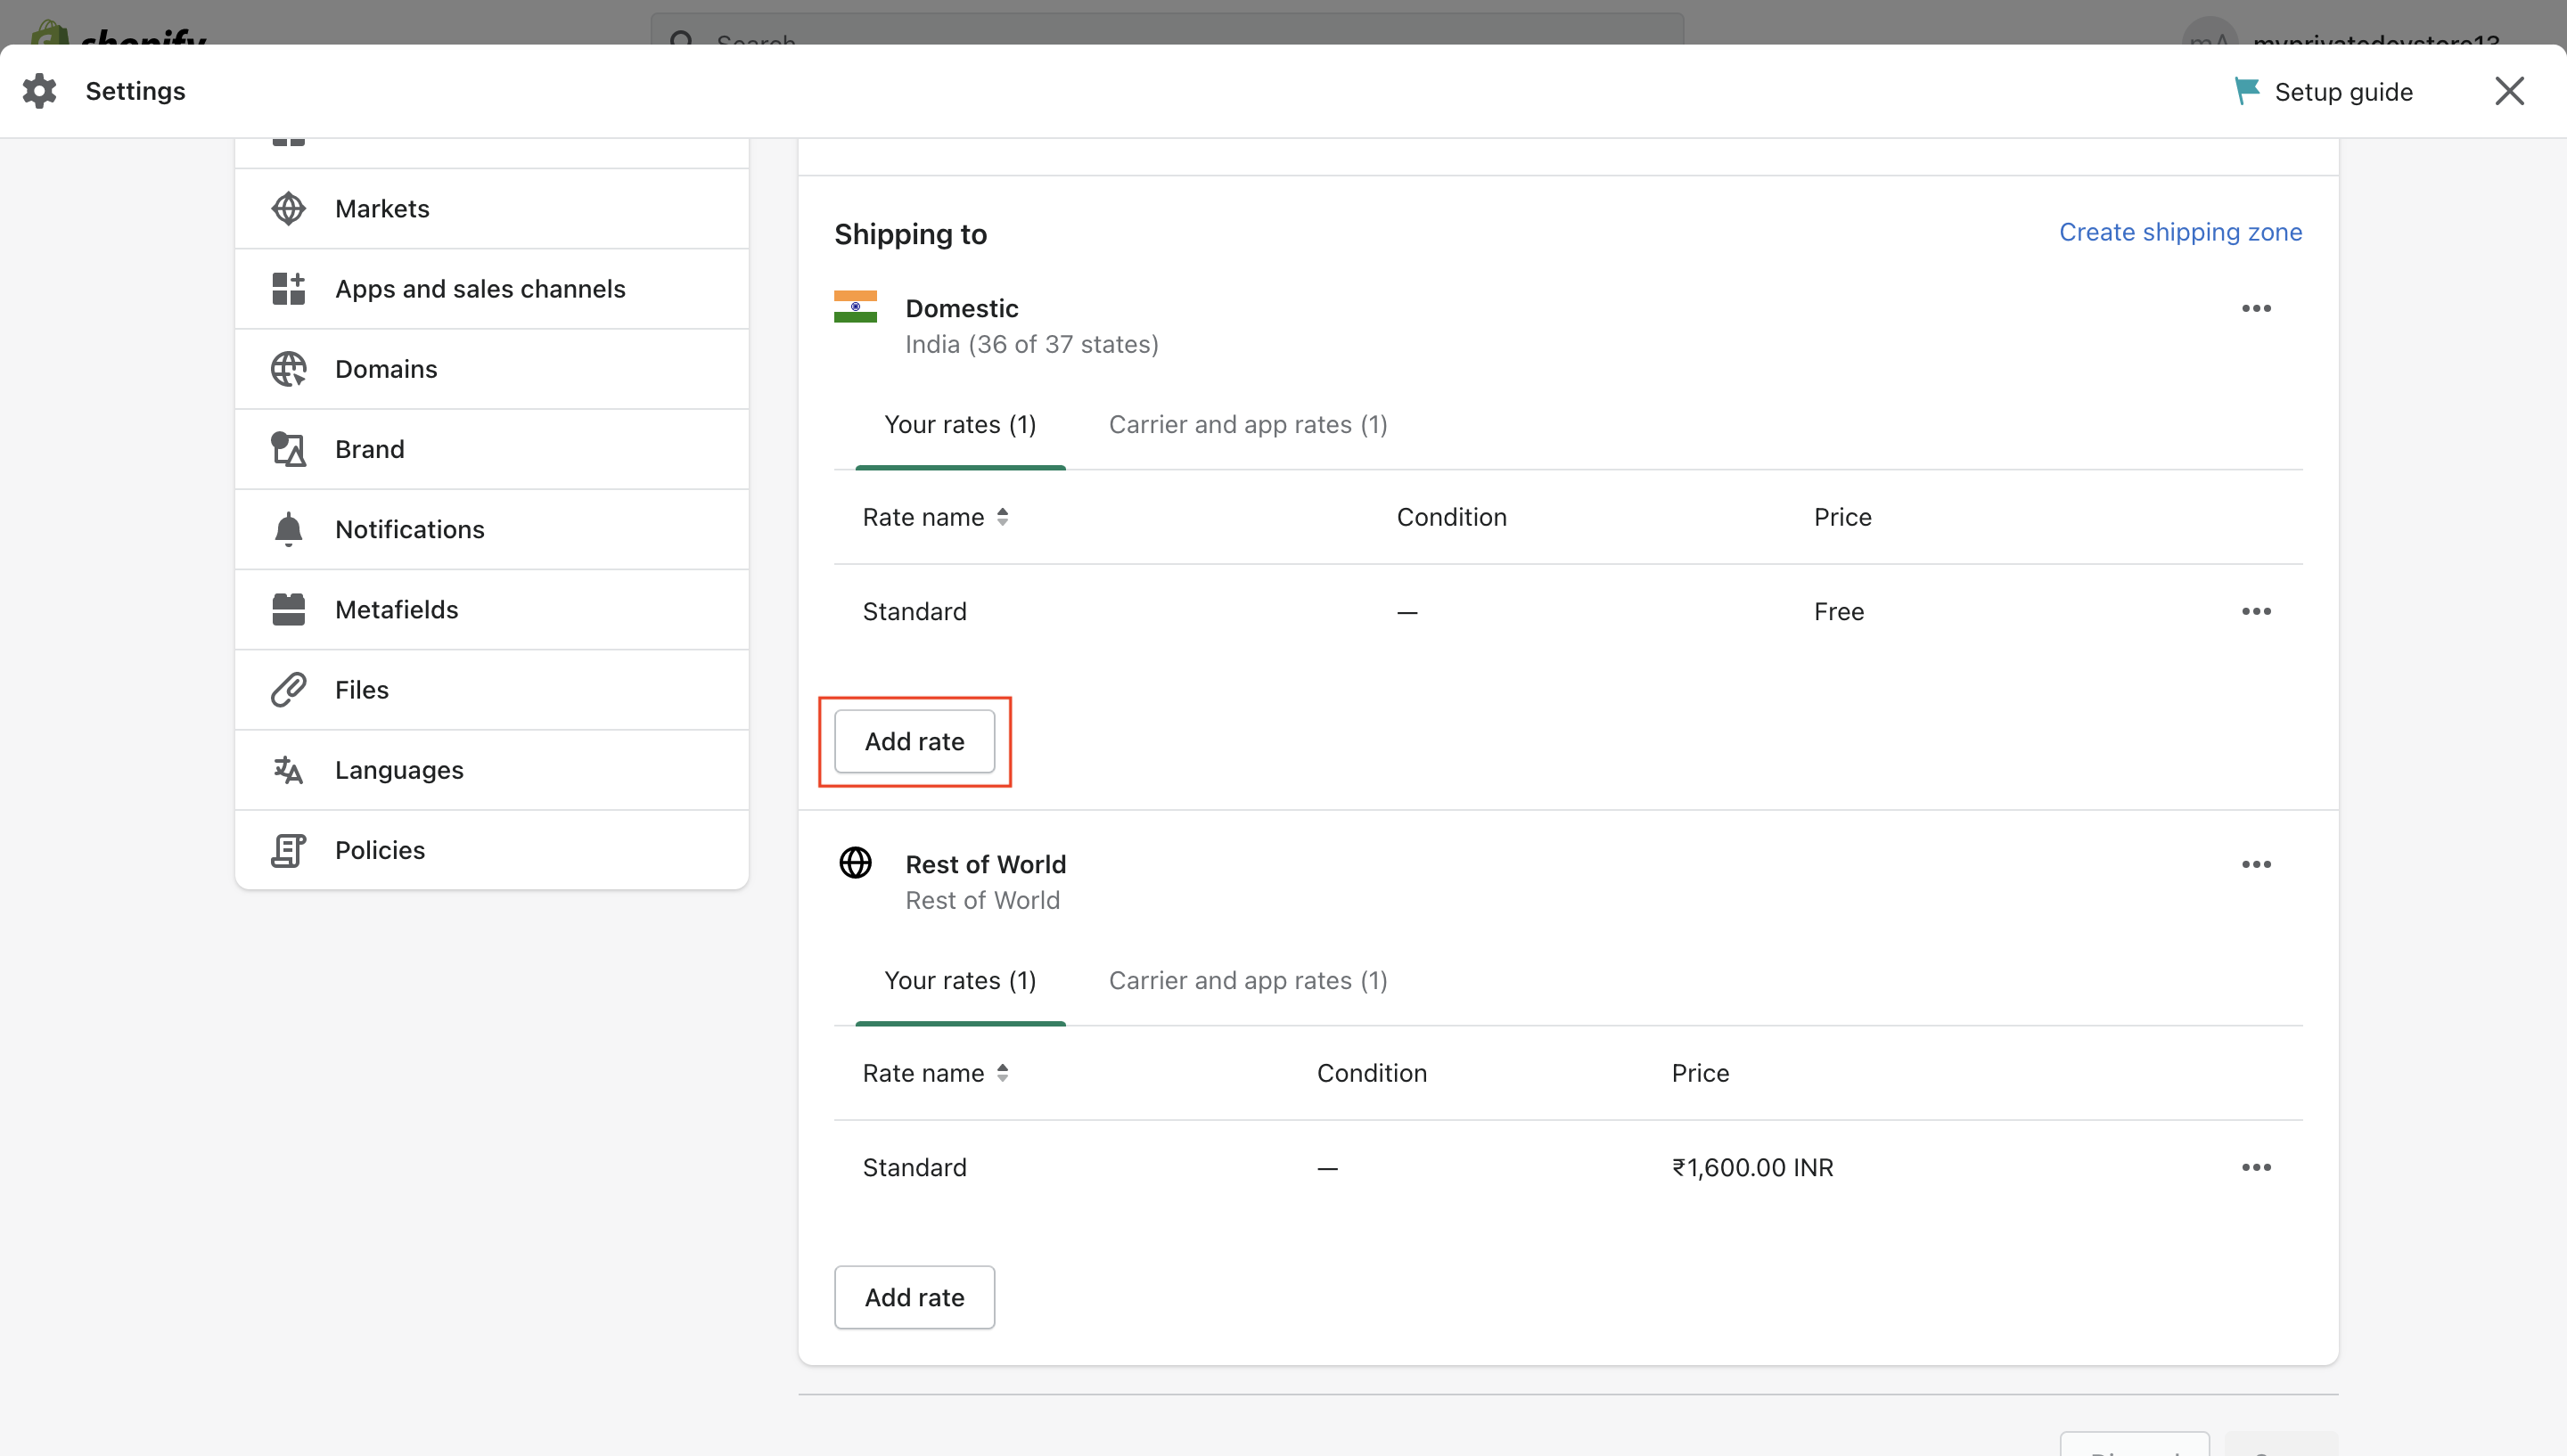
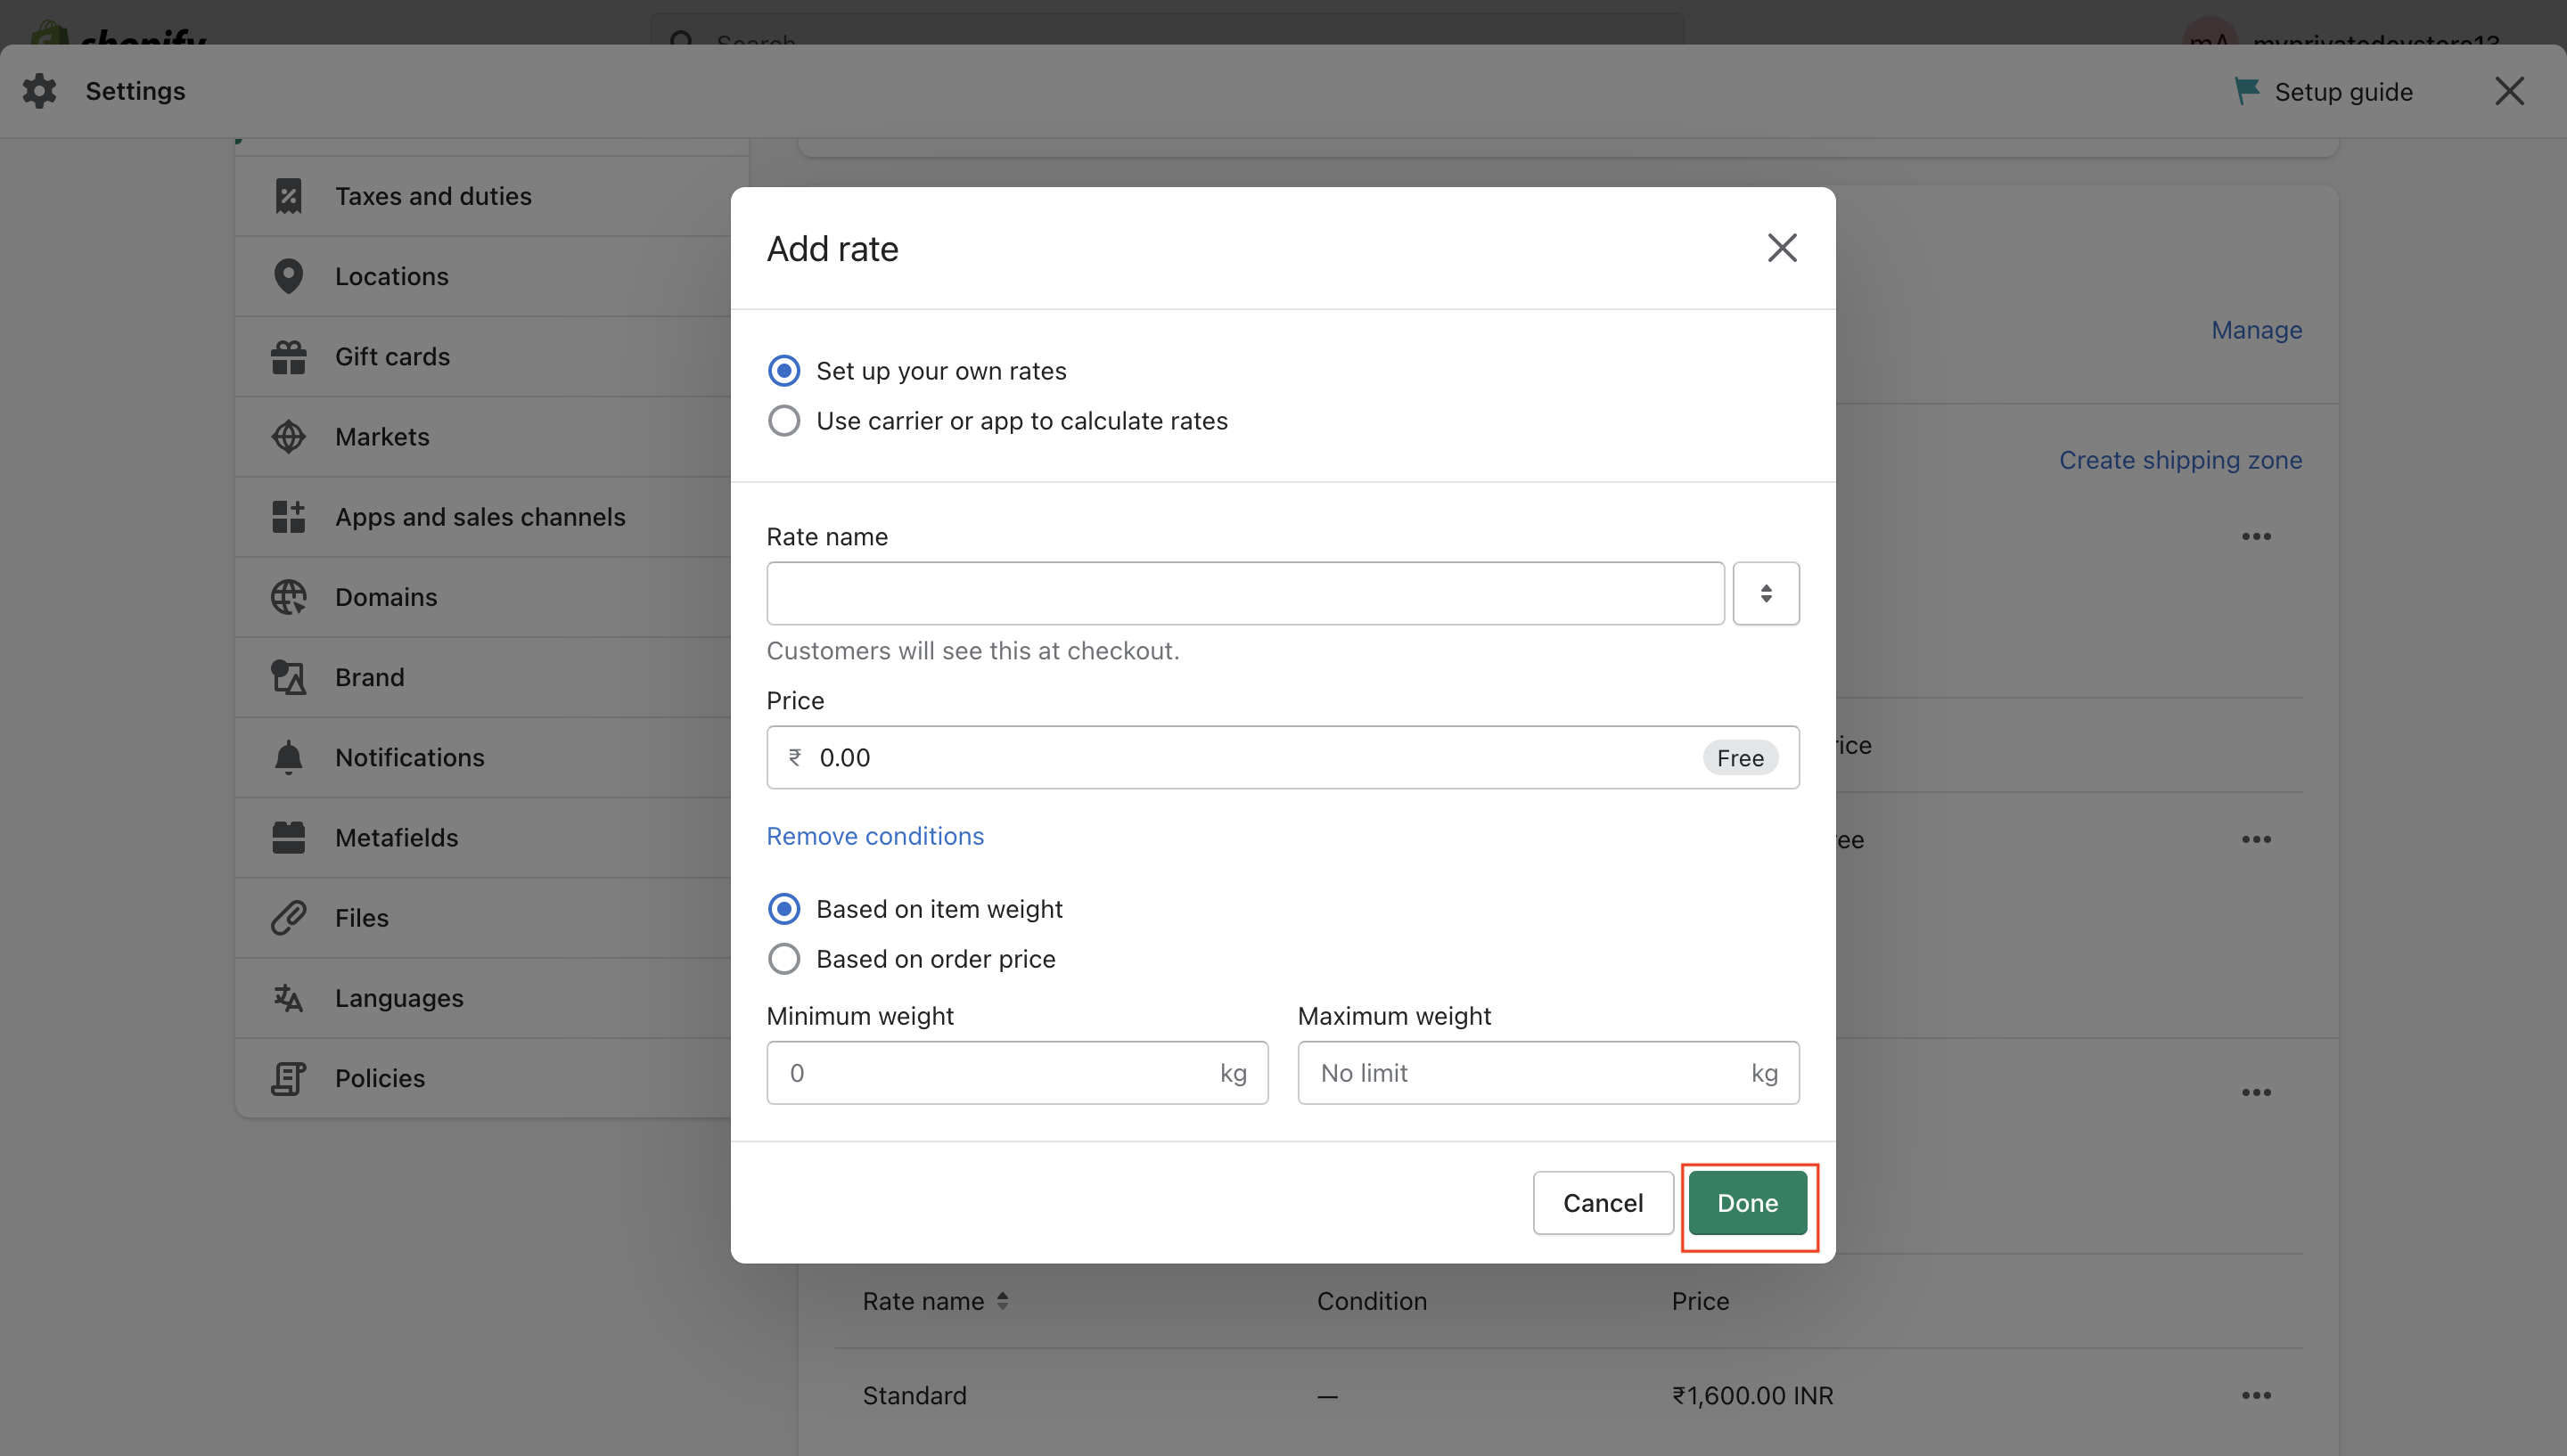
- Click Add rate to add the shipping rates. You can create multiple shipping rates/options you want to show to your customers on Magic Checkout.
- Select Set up your own rates. Follow the steps given below:
- Enter your Rate name, for example, Standard Shipping Charges. Customers will view this at Checkout.
- Enter the Price.
- Add conditions if required. You can add conditions based on item weight or order price. Enter the required details.
- Click Done.
International Shipping
You can allow customers to enter an international PIN code for delivery.To enable international shipping:
To enable international shipping:
- Log in to the Dashboard and navigate to Magic Checkout → Setup & Settings → Platform Settings.
- Select Shopify from the Platform drop-down list and enter your Shopify Store ID.
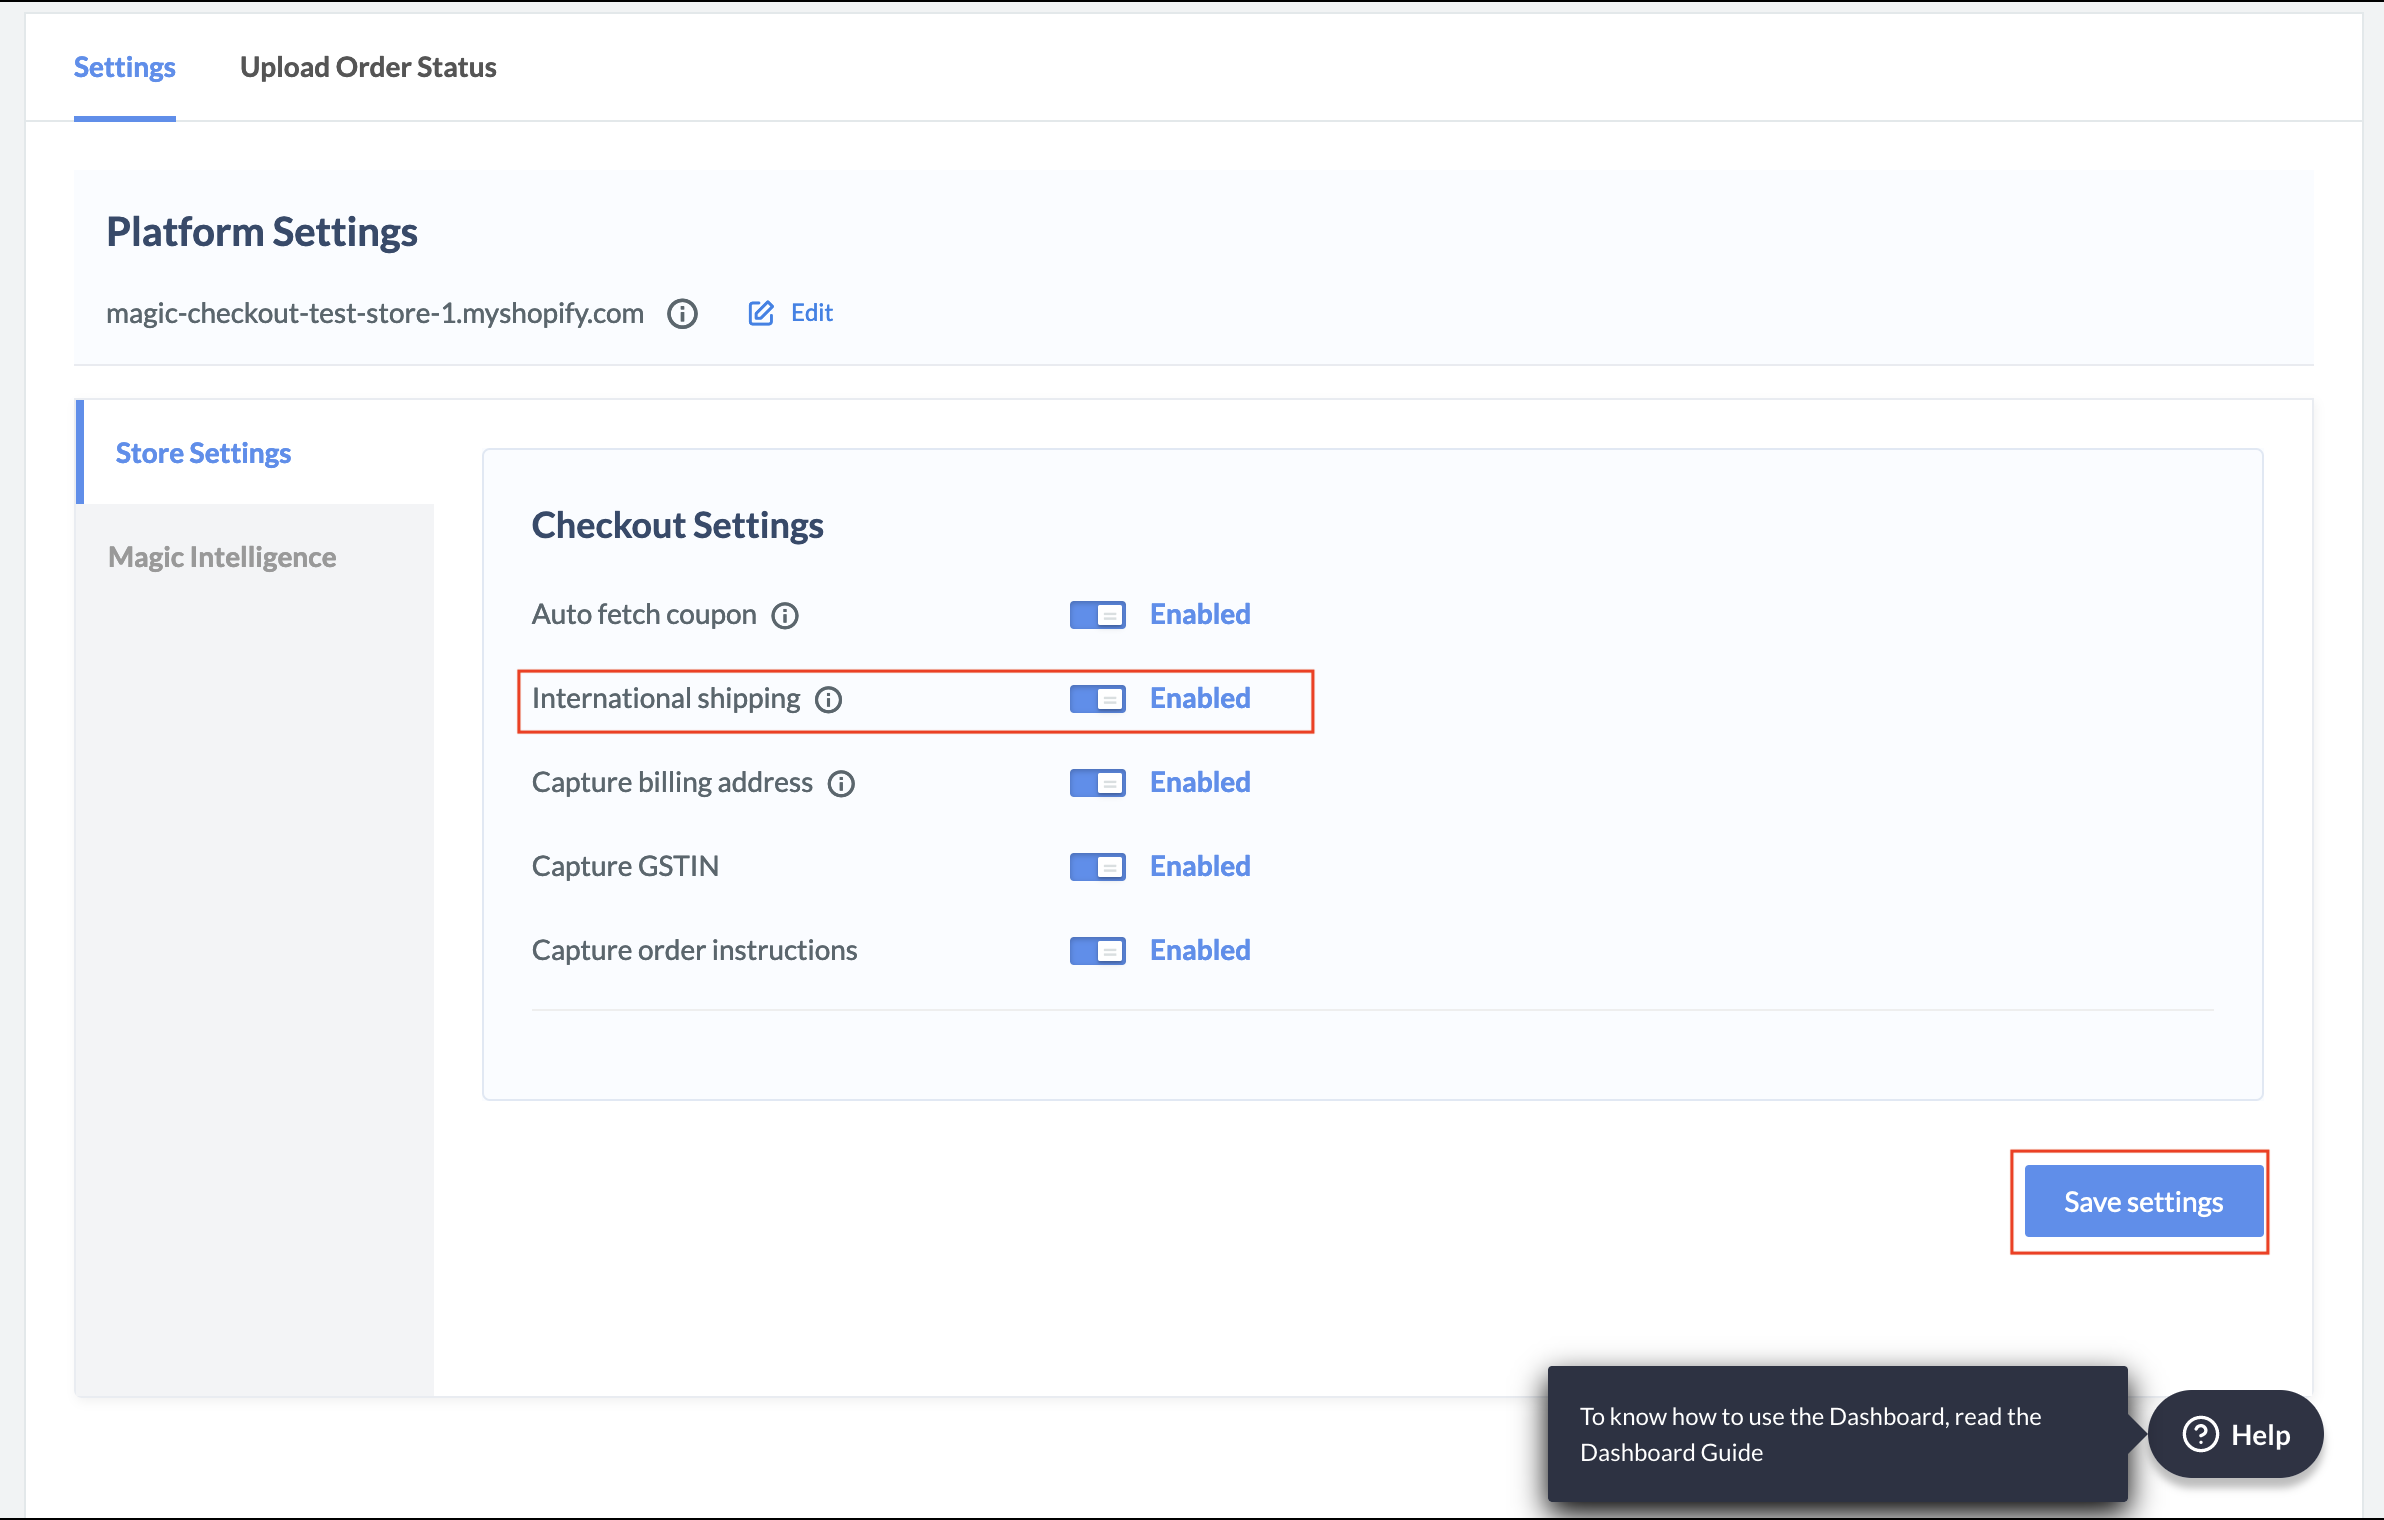
- Navigate to Shipping Setup and enable International Shipping.
Coupons
You can choose to offer discounts to your customers by adding coupons using the following methods:Method 1: Razorpay Dashboard
Method 1: Razorpay Dashboard
- Once the feature is enabled, log in to the Dashboard and navigate to Magic Checkout → Setup & Settings → Platform Settings.
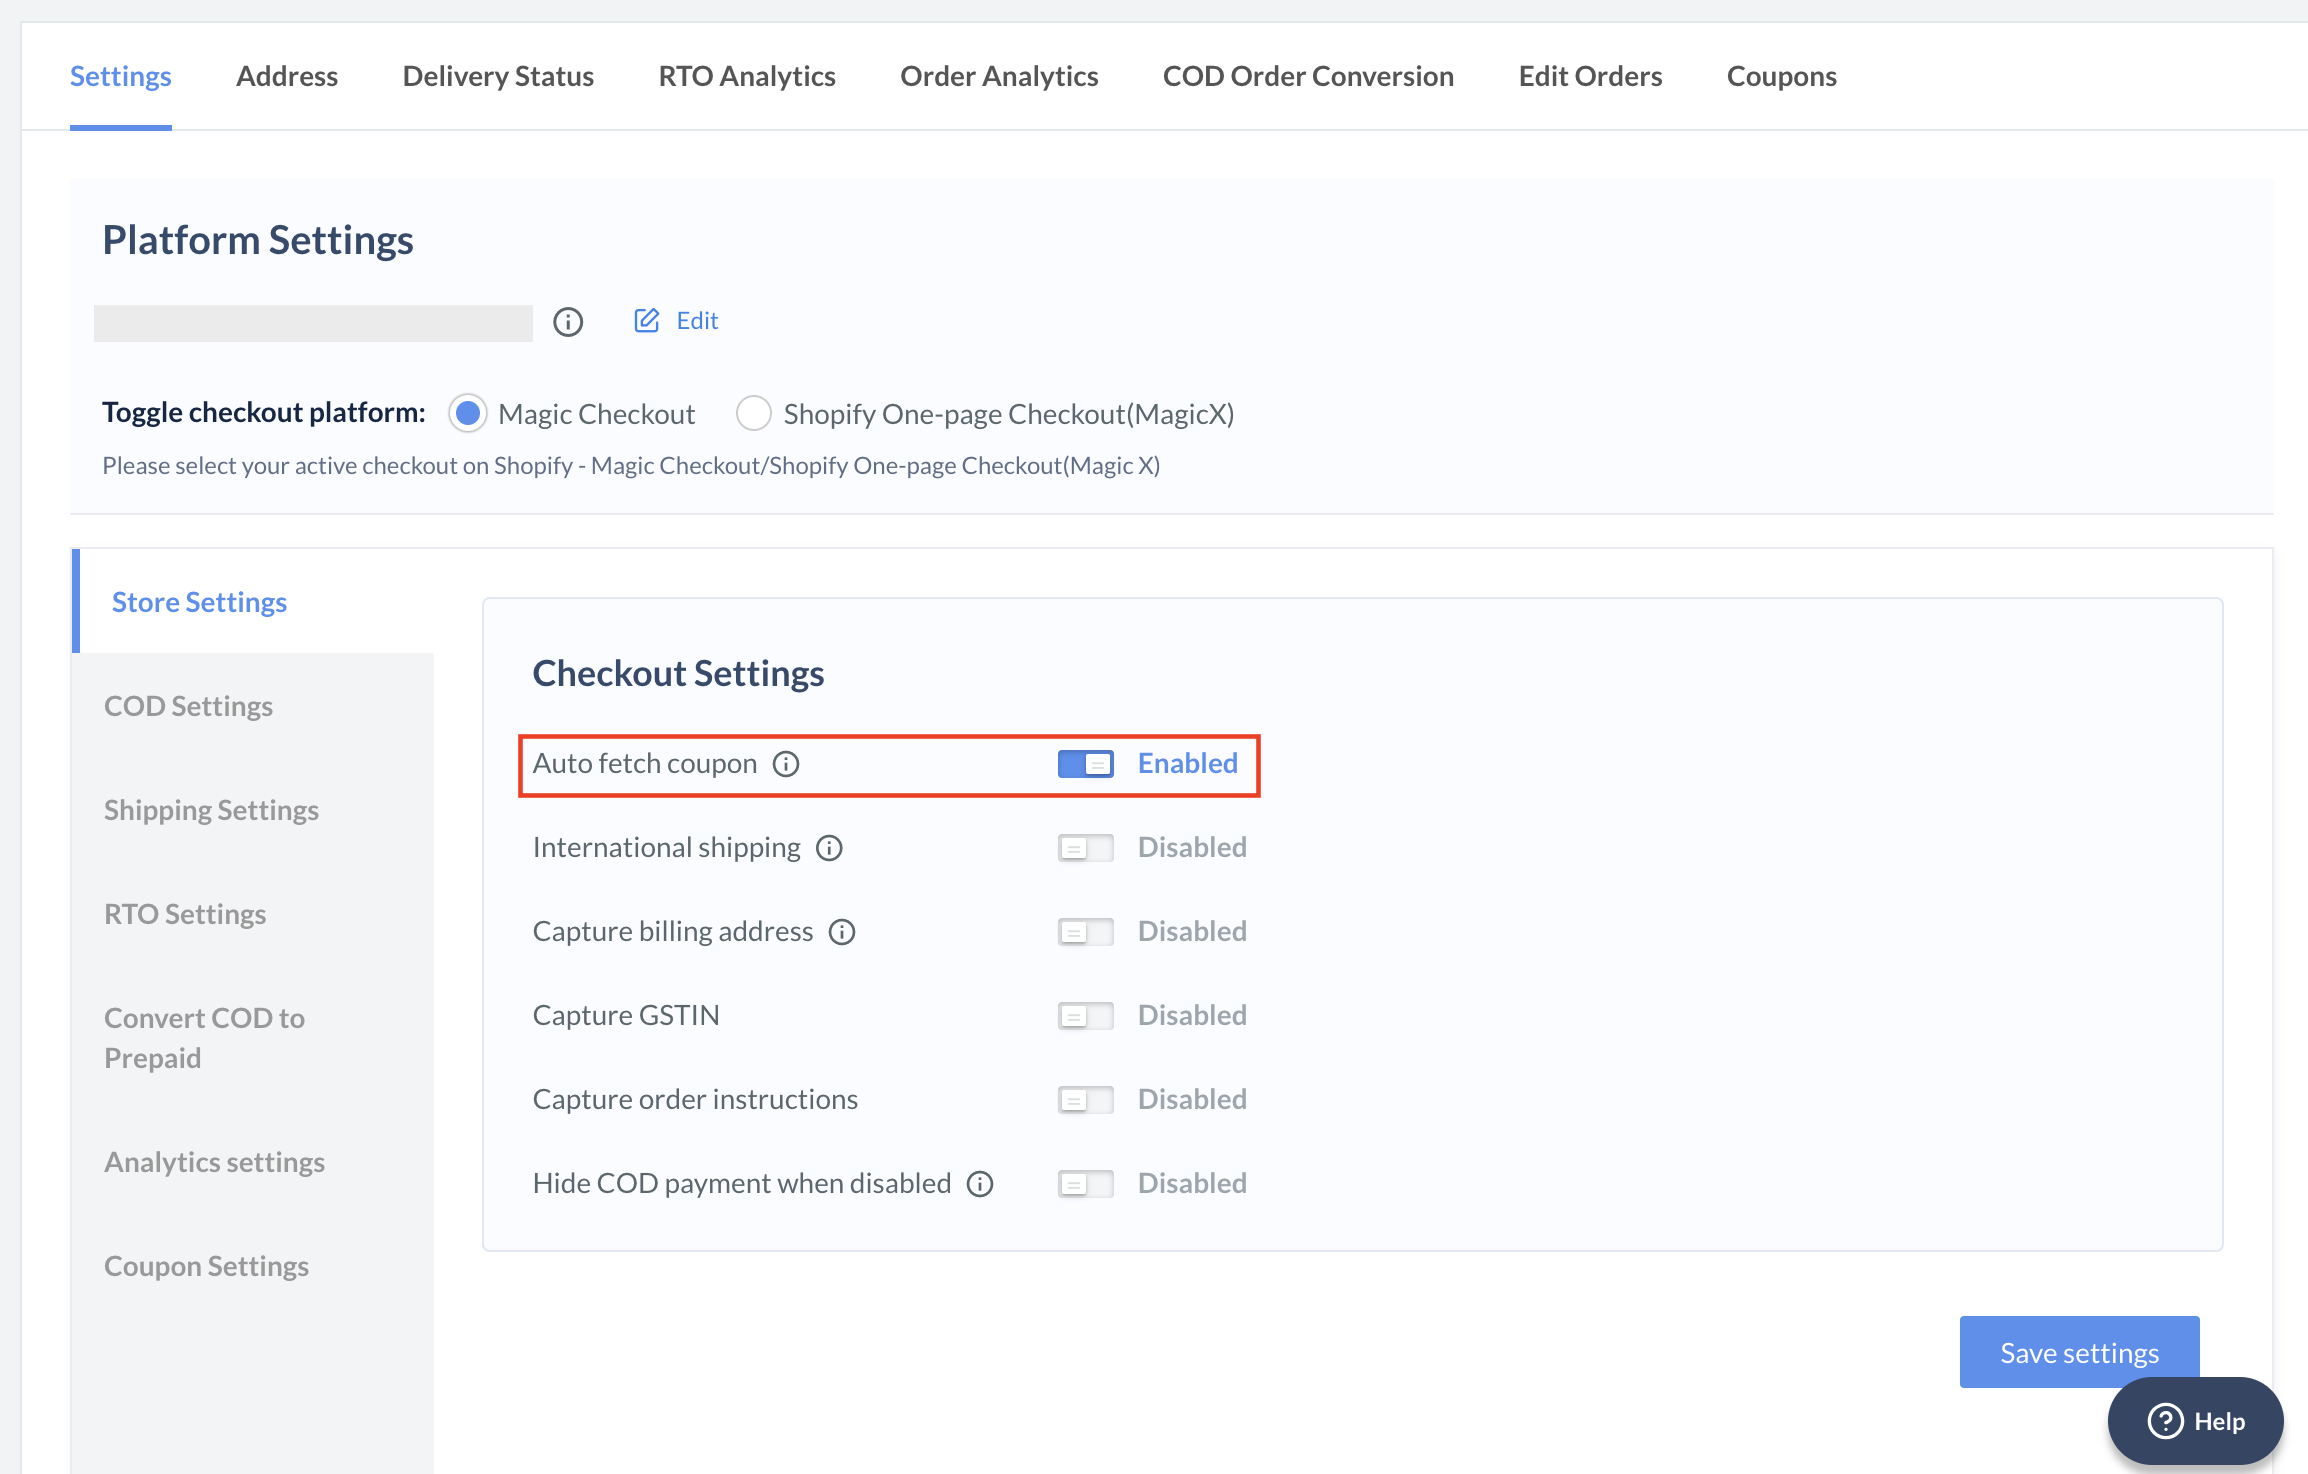
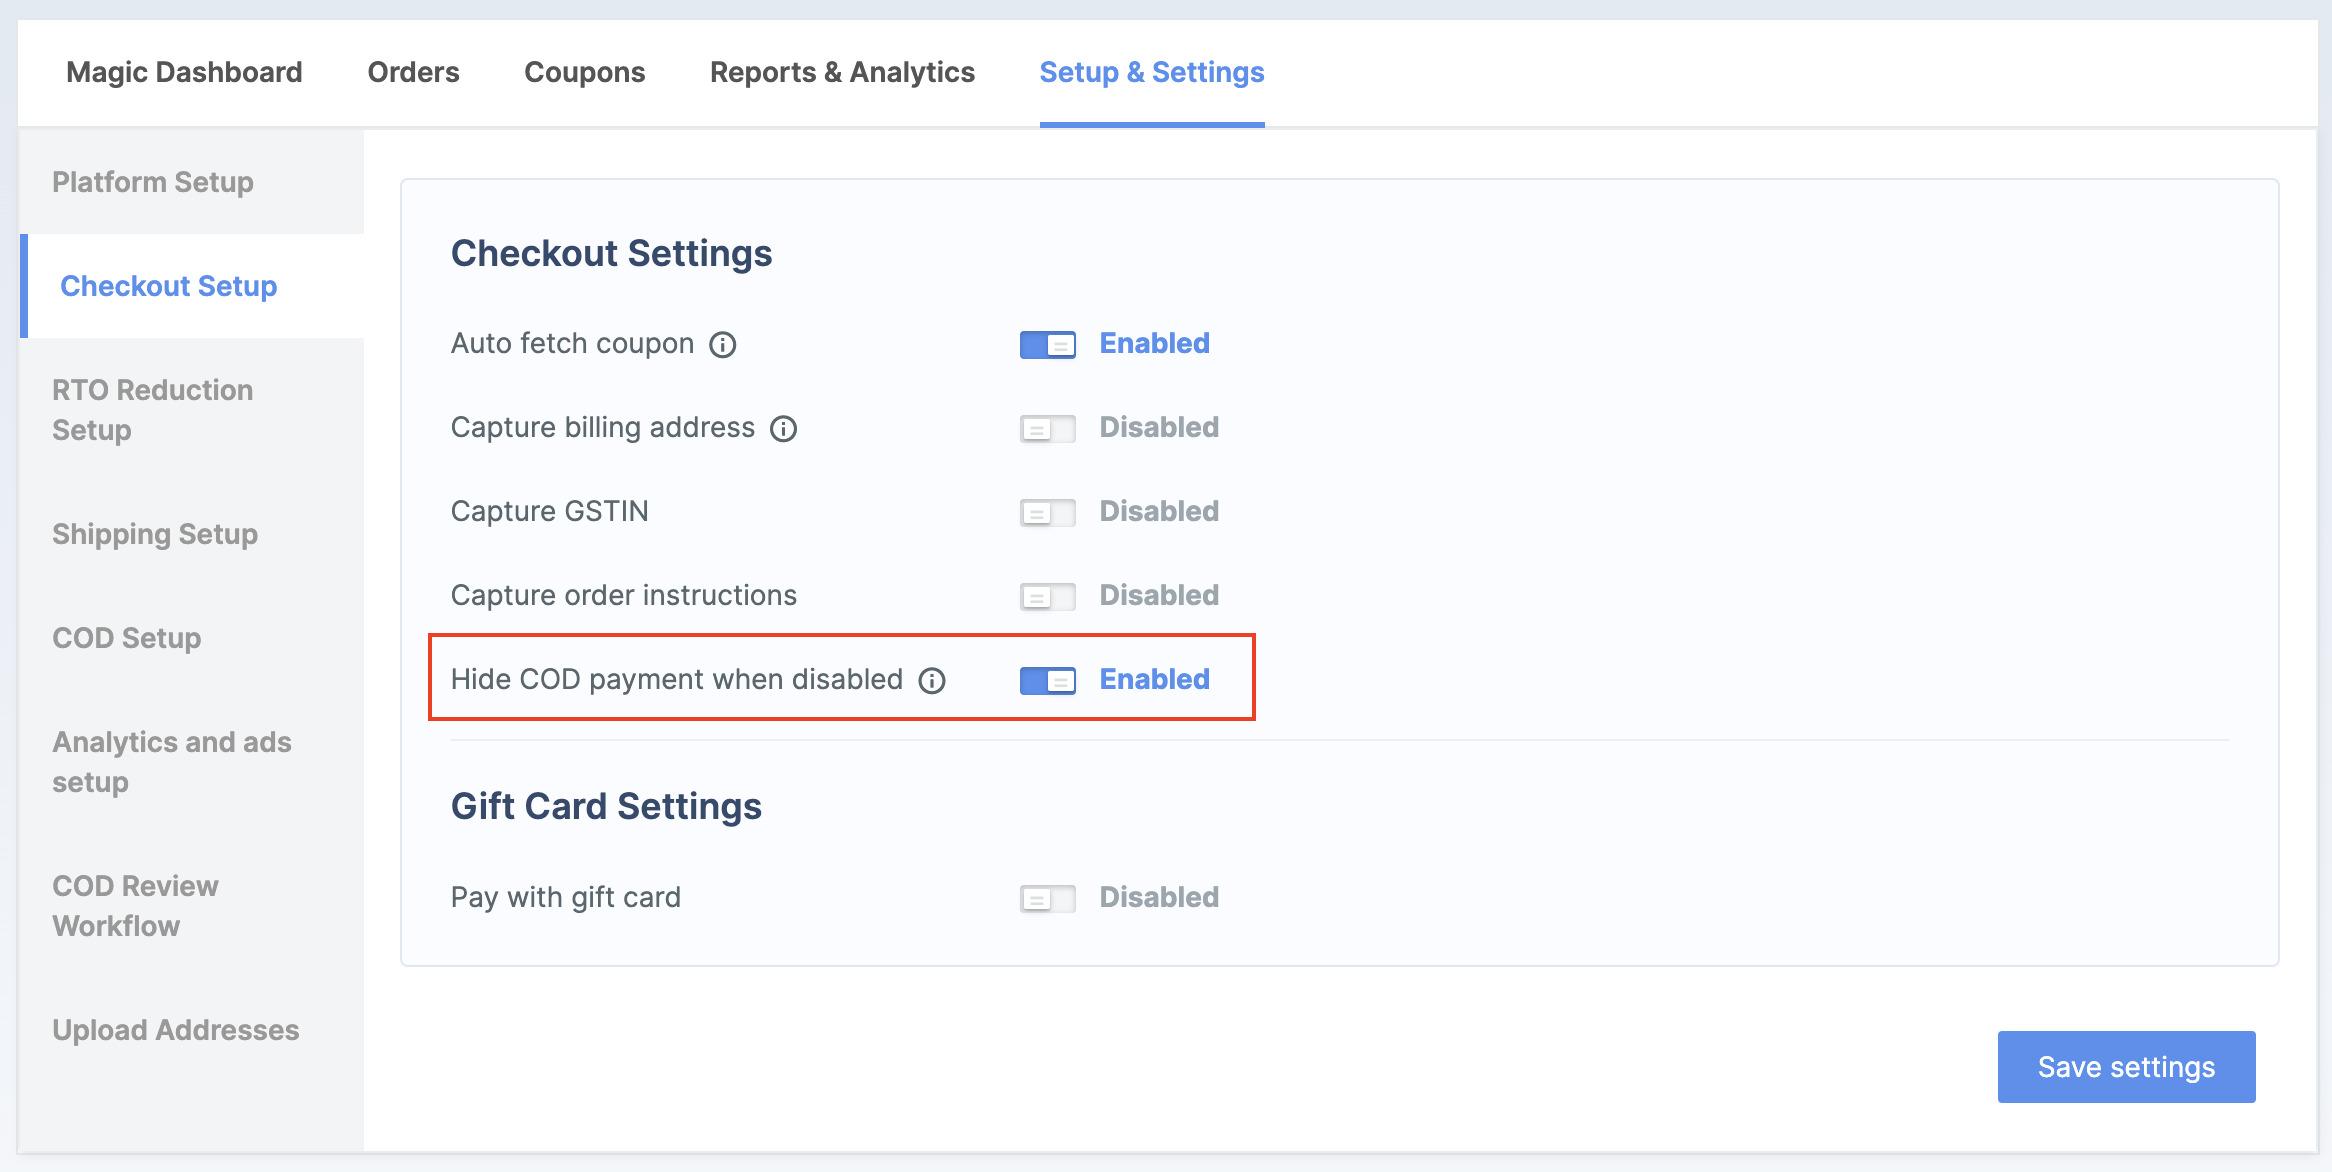
- In the Checkout Setup tab, enable Auto fetch coupon and click Save settings. This step is mandatory and allows you to display coupons to your customers at checkout. Even if you enable Display this coupon at checkout in the next steps, you must still enable Auto fetch coupon.
- Navigate to Coupons → Setup.
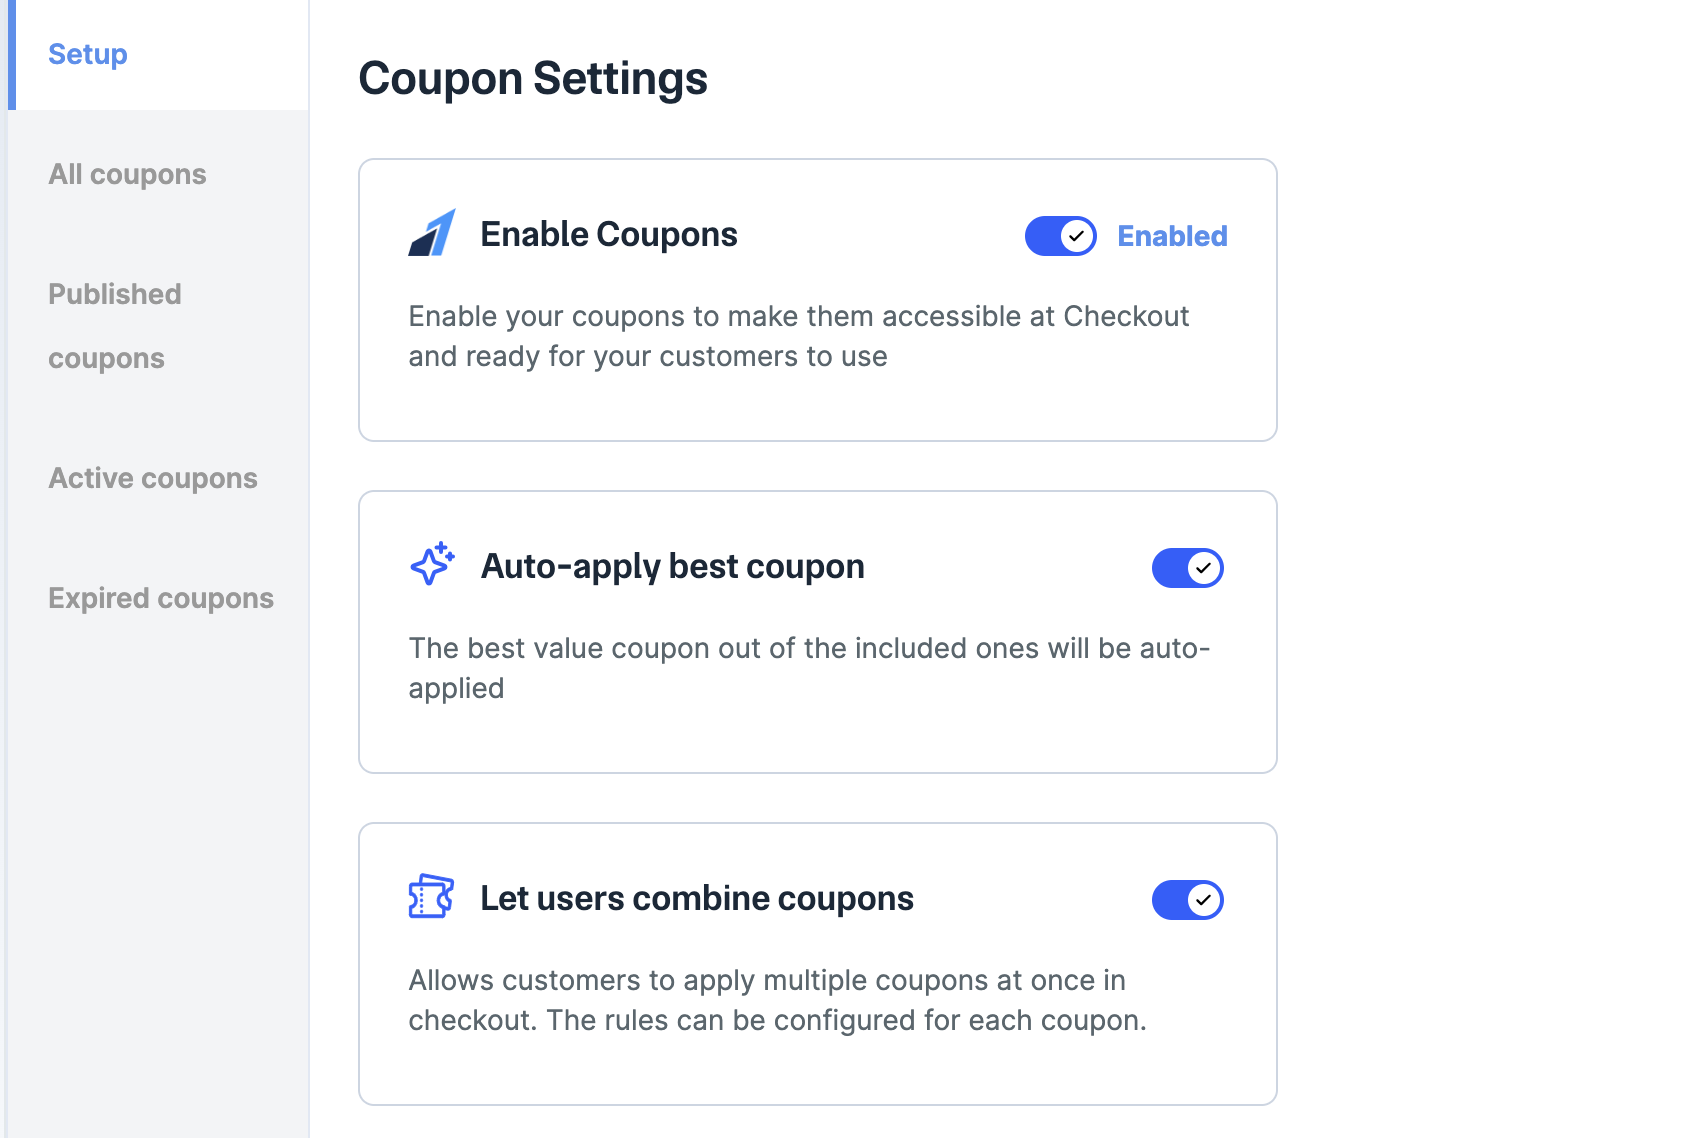
- Enable the following, as required:
- Enable Coupons: Allows customers to make the coupons accessible on checkout for your customers. Once you enable this all the coupons created on Shopify will stop working immediately if not synced.
- Auto-apply best coupon: Automatically applies the coupon with the best value from those available.
- Let users combine coupons: Lets customers apply multiple coupons at checkout. You can configure specific rules for each coupon.
- By default, all the coupons synced from Shopify are in the
createdstate. You must manually configure and publish the coupons. To configure a coupon, identify the one you want to publish, click the options icon and click View and Edit (if required) or click Publish.
Watch the GIF below:
Watch the GIF below:
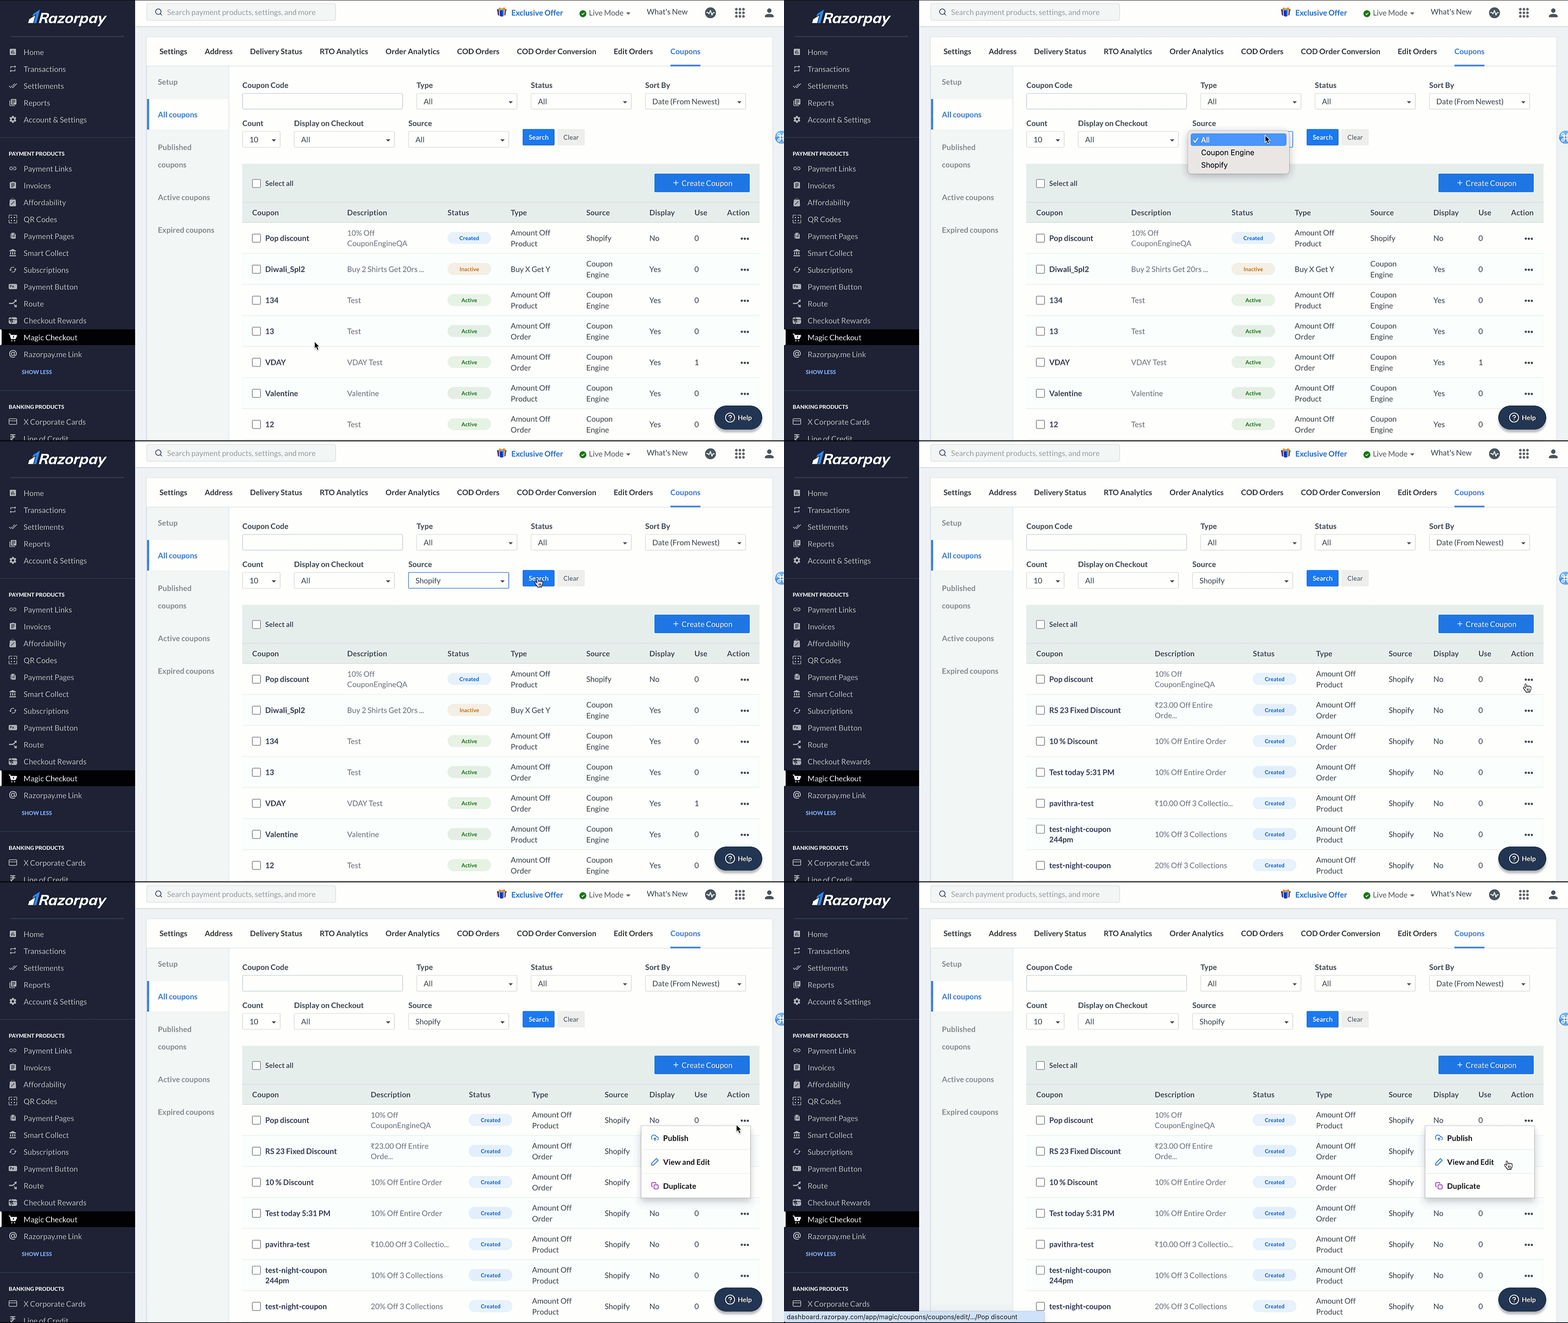
- All newly created coupons will be automatically synced after the initial sync. You must manually configure and publish the coupons.
- Only the following coupons will be synced from Shopify: (currently, multiple collections are not synced)
- Amount discounted on orders
- Amount discounted on products
- Buy X Get Y (if minimum quantity configured)
- Navigate to All Coupons, click + Create Coupon and Select a Coupon Type based on your requirement. Alternatively, you can click + Create Coupon next to Coupons on Magic in the Setup section and Select a Coupon Type.
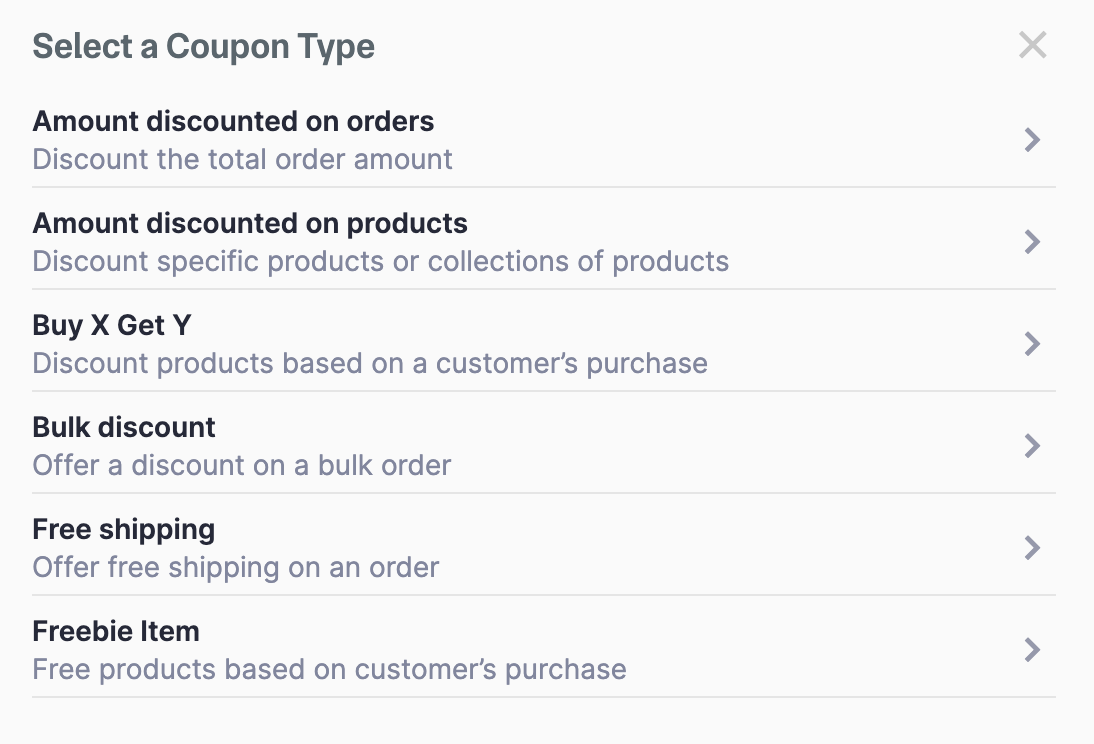
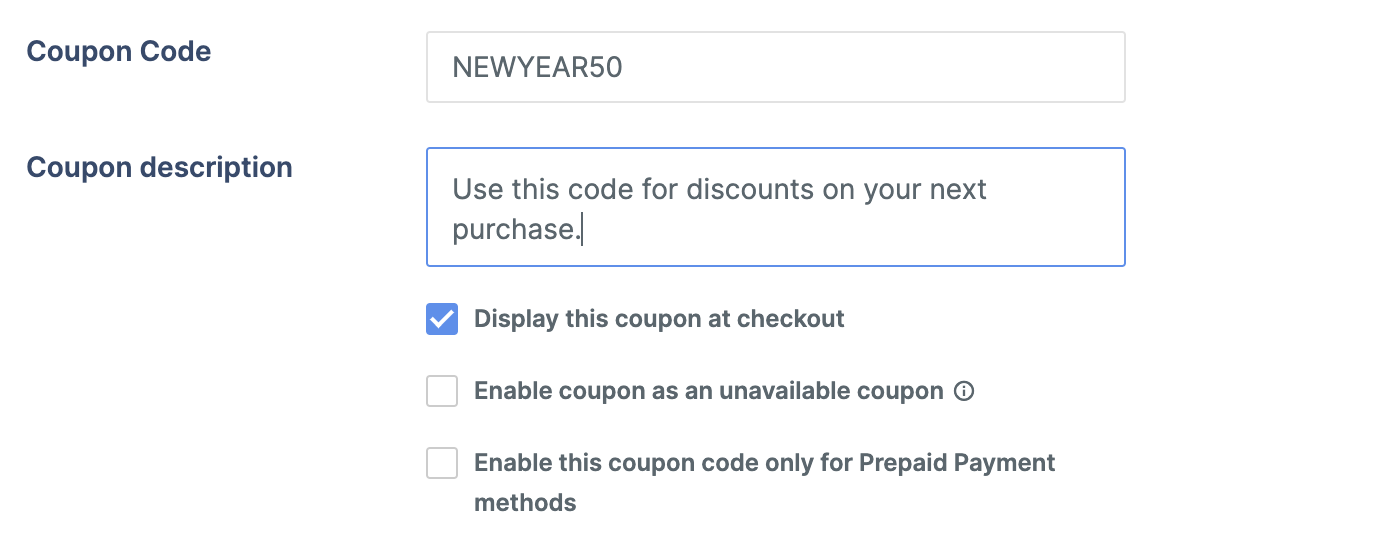
- Enter the Coupon Code. Your customers can view the coupon code at checkout.
- Enter the Coupon description. Your customers can view the coupon description at checkout.
- Select the Display this coupon at checkout check box to display the coupon at checkout for your customers.
- After selecting the above check box, the Enable coupon as an unavailable coupon check box appears.
- Select this check box if you want to display the coupon as unavailable (in a disabled state) when users do not meet the cart or eligibility conditions. Once the conditions are met, the coupon is automatically enabled.
- Select the Enable this coupon code only for Prepaid Payment methods check box to disable the COD payment option for customers and nudge them to pay via prepaid methods. (optional)
- Select the Automatically apply this coupon for eligible users check box to automatically apply the coupon with the best value from those available.
Coupon Type
Select a coupon type from the following:Amount discounted on orders
Amount discounted on orders
- Discount Details: Select the Discount type.
- Fixed Discount
- Percentage discount
Discount amount: Enter an amount by which the original price should be reduced. For example, if ₹150 is the flat discount applied, ₹150 is deducted from the original price.
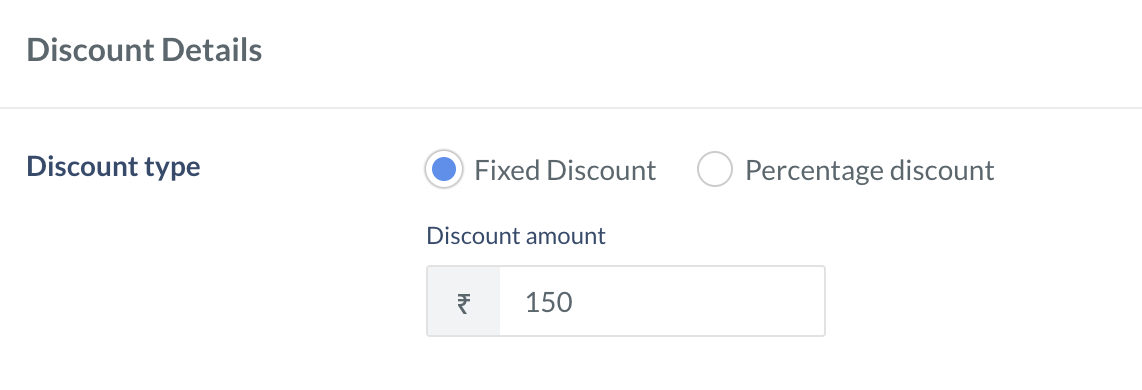
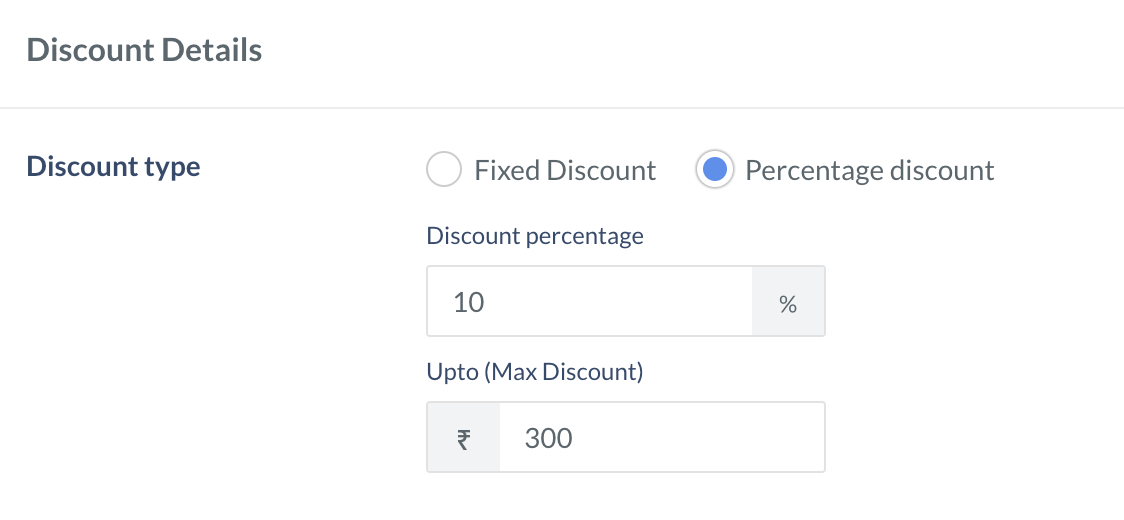
- Select the Purchase requirements based on your preference to set eligibility criteria for the customers to use the coupon.
- No minimum requirements
- Minimum quantity
- Minimum amount requirements



- Coupon validity: Set the duration for the coupon.
- Active dates: Set the Start date and Start time.
- Select the Set an end date check box and set the End date and End time. (optional)
- Total maximum budget (Optional): Set an amount to expire the coupon when the total discount to be offered to all your customers is reached. For example, if you set ₹10,000 as the total maximum budget, once the budget limit is reached, the coupon code gets expired and is not visible at checkout.
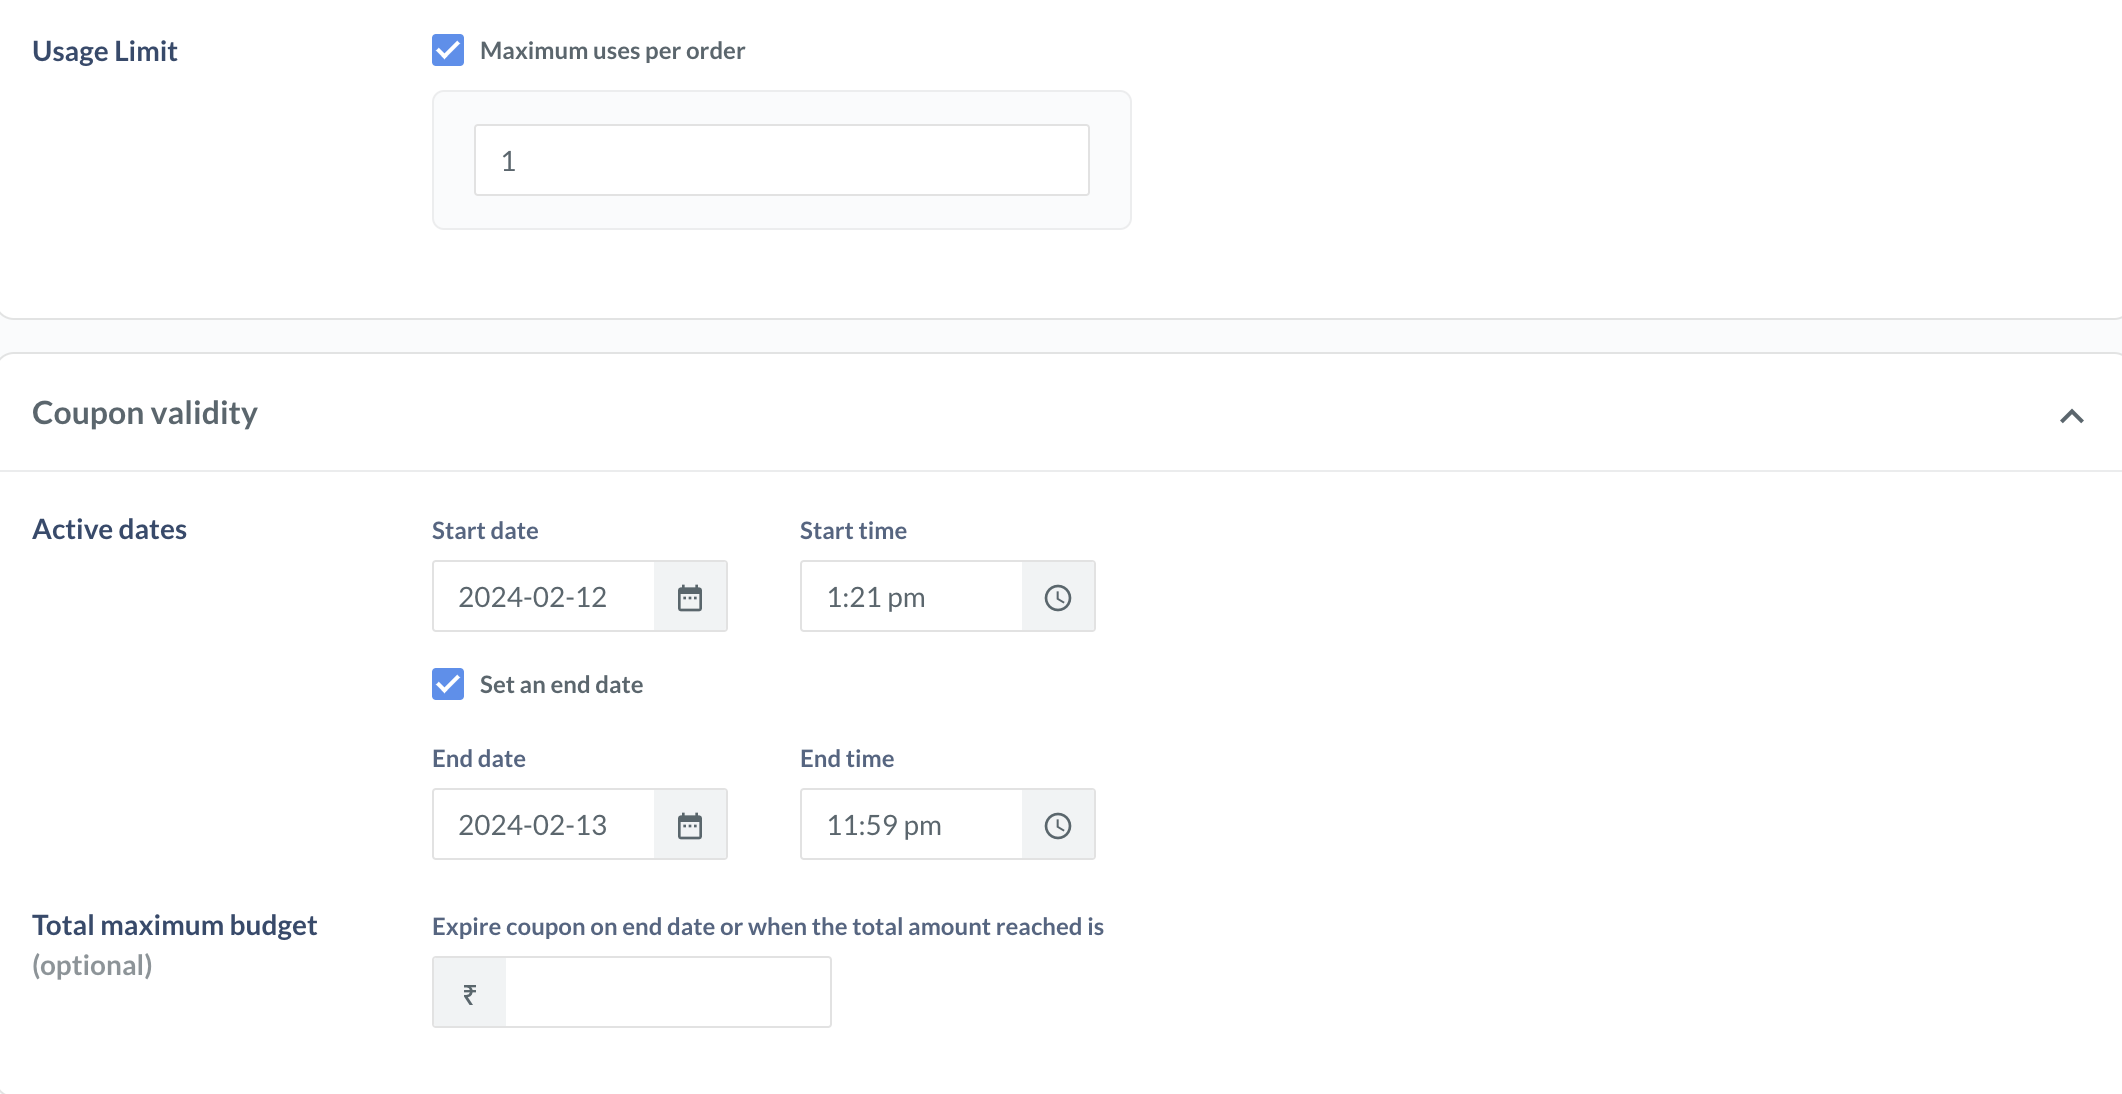
- Coupon eligibility: Create the coupon for All customers or Specific customers. If you want to create coupons for specific customers:
- Click + Add Customers.
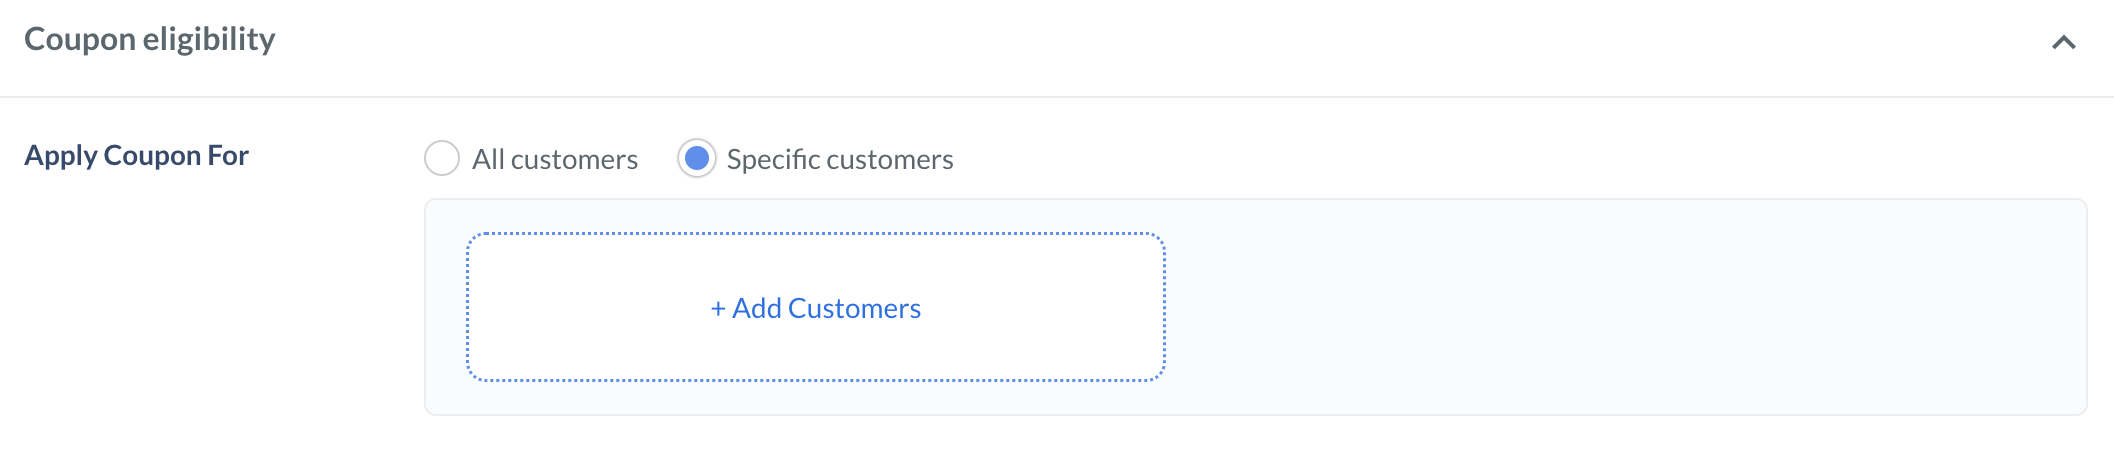
- You can upload a list of Mobile Number or Email ID based on your requirement.
- Click + Add Customers.
- Click Download Sample File and add the required data to the sample file. Ensure the data is formatted correctly and save the file.
- Enter the values in a valid format as given below:
- Mobile number: +919000090000
- Email id: gauravkumar@example.com
- CSV file should not have any header/column title.
- Maximum acceptable rows in the file is 1 million.
- Upload the file in .CSV format. Maximum file size supported is 50 MB.
- Select click to upload and choose the file you want to import. Click Confirm.
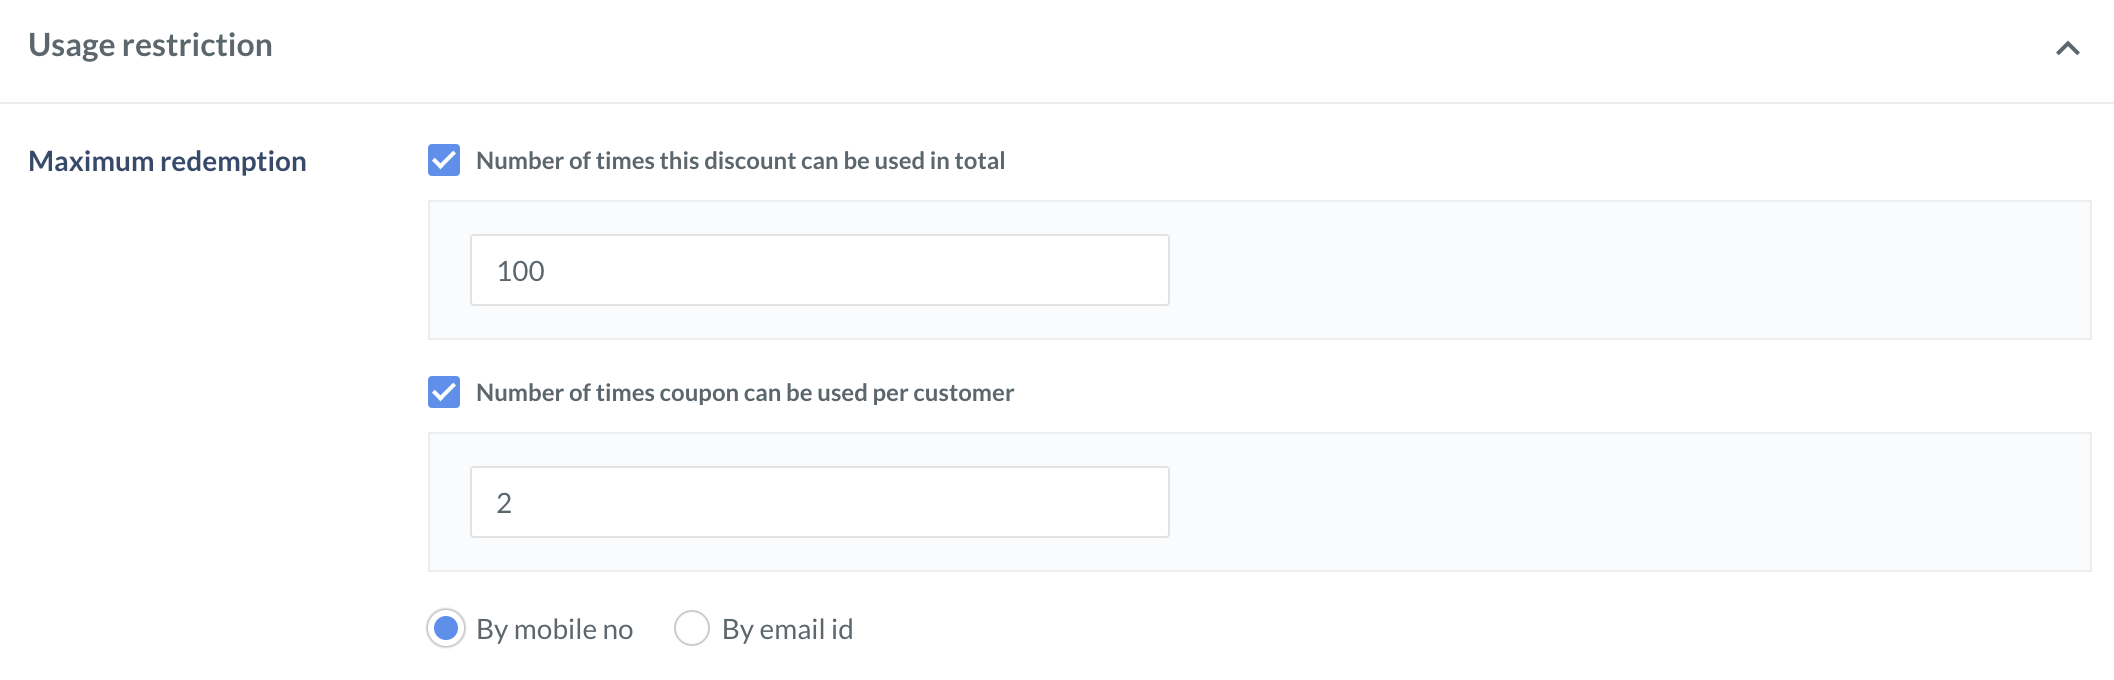
- Usage restriction: Set the maximum limit to which a coupon is redeemed in total and per customer.
- Select the Number of times discount can be used in total check box and set the number. For example, 100.
- Select the Number of times the coupon can be used per customer check box and set the number. For example, 2.
- Select By mobile no. or By email id via which the customer can use the coupon.
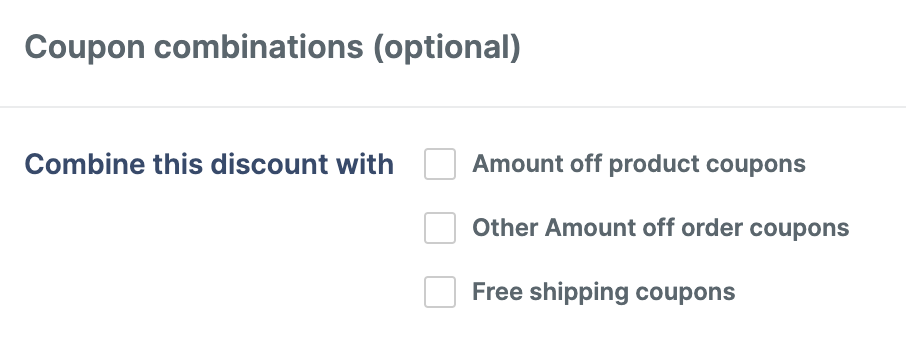
- Coupon combinations (optional): You can combine this coupon with various other coupons as follows:
- Amount off product coupons: Combine this coupon with a coupon created in the Amount discounted on products category to offer a discount on the total order amount and specific products or collections of products.
- Other Amount off order coupons: Combine this coupon with other coupons created in the same category to offer multiple discounts on the total order amount.
- Free shipping coupons: Combine this coupon with Free shipping coupons to provide free shipping along with the discount. If you select Free shipping coupons in this category then you must select the Amount off order coupons check box in the Free Shipping category to combine the coupon.
- Click Create and Publish.
Amount discounted on products
Amount discounted on products
- Discount Details: Select the Discount type.
- Fixed Discount
- Percentage discount
Discount amount: Enter an amount by which the original price should be reduced. For example, if ₹150 is the flat discount applied, ₹150 is deducted from the original price.
-
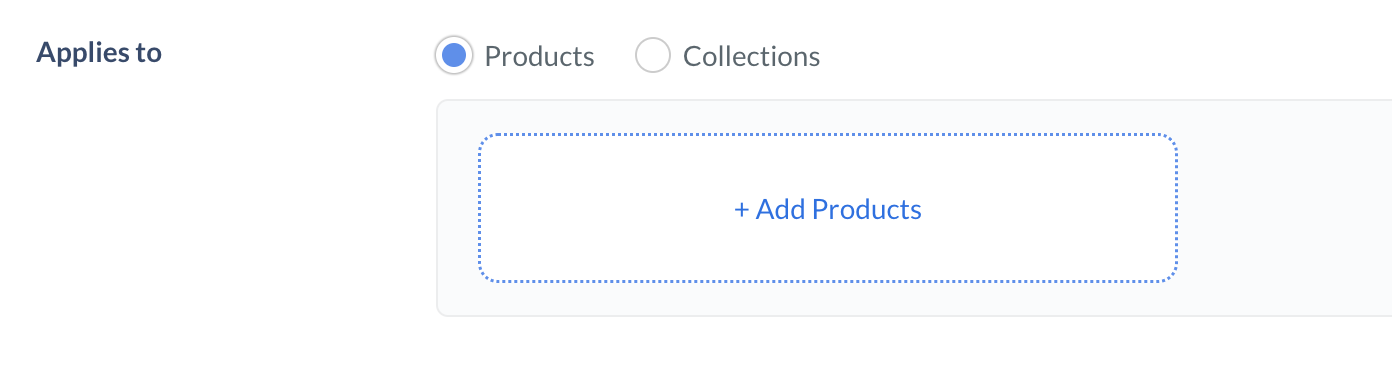
Select Products or Collections to limit the discount to specific products or collections. Click + Add Products or + Add Collections respectively. Select the products or collections based on your requirement and click Confirm. You can add multiple products or collections.
- Select the Purchase requirements based on your preference to set eligibility criteria for the customers to use the coupon.
- No minimum requirements
- Minimum quantity
- Minimum amount requirements
- Coupon validity: Set the duration for the coupon.
- Active dates: Set the Start date and Start time.
- Select the Set an end date check box and set the End date and End time. (optional)
- Total maximum budget (Optional): Set an amount to expire the coupon when the total discount to be offered to all your customers is reached. For example, if you set ₹10,000 as the total maximum budget, once the budget limit is reached, the coupon code gets expired and is not visible at checkout.
- Coupon eligibility: Create the coupon for All customers or Specific customers. If you want to create coupons for specific customers:
- Click + Add Customers.
- You can upload a list of Mobile Number or Email ID based on your requirement.
- Click + Add Customers.
- Click Download Sample File and add the required data to the sample file. Ensure the data is formatted correctly and save the file.
- Enter the values in a valid format as given below:
- Mobile number: +919000090000
- Email id: gauravkumar@example.com
- CSV file should not have any header/column title.
- Maximum acceptable rows in the file is 1 million.
- Upload the file in .CSV format. Maximum file size supported is 50 MB.
- Select click to upload and choose the file you want to import. Click Confirm.
- Usage restriction: Set the maximum limit to which a coupon is redeemed in total and per customer.
- Select the Number of times discount can be used in total check box and set the number. For example, 100.
- Select the Number of times the coupon can be used per customer check box and set the number. For example, 2.
- Select By mobile no. or By email id via which the customer can use the coupon.
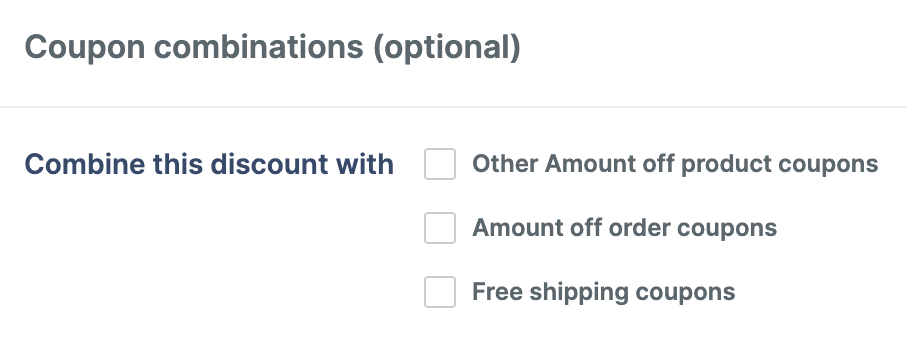
- Coupon combinations (optional): You can combine this coupon with various other coupons as follows:
- Amount off order coupons: Combine this coupon with a coupon created in the Amount discounted on order category to offer a discount on the total order amount and specific products or collections of products.
- Other Amount off product coupons: Combine this coupon with other coupons created in the same category to offer multiple discounts on specific products or collections of products.
- Free shipping coupons: Combine this coupon with Free shipping coupons to provide free shipping along with the discount. If you select Free shipping coupons in this category then you must select the Amount off product coupons check box in the Free Shipping category to combine the coupon.
- Click Create and Publish.
Buy X Get Y
Buy X Get Y
- Configure the Purchase requirements for X products based on your preference to set eligibility criteria for the customers to avail of the coupon offer.
- Minimum quantity of items
- Minimum purchase amount


-
Select Products or Collections to limit the discount to specific products or collections. Click + Add Products or + Add Collections respectively. Select the products or collections based on your requirement and click Confirm. You can add multiple products or collections.
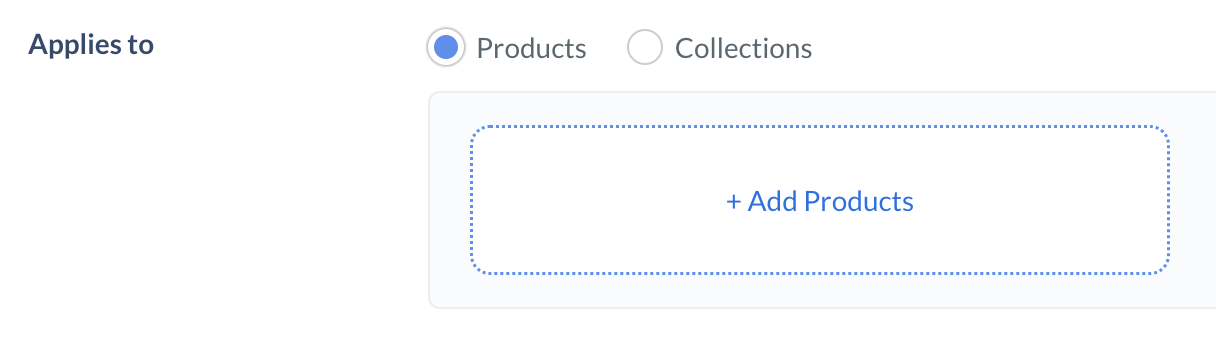
- Configure the Additional products offered for Y products based on your preference. For example, if you set the purchase requirement as 3 and additional products offered quantity as 2, the customers can buy 3 products and get a discount on 2 additional products.
-
Select Products or Collections for Y products as well. Refer to step 2.
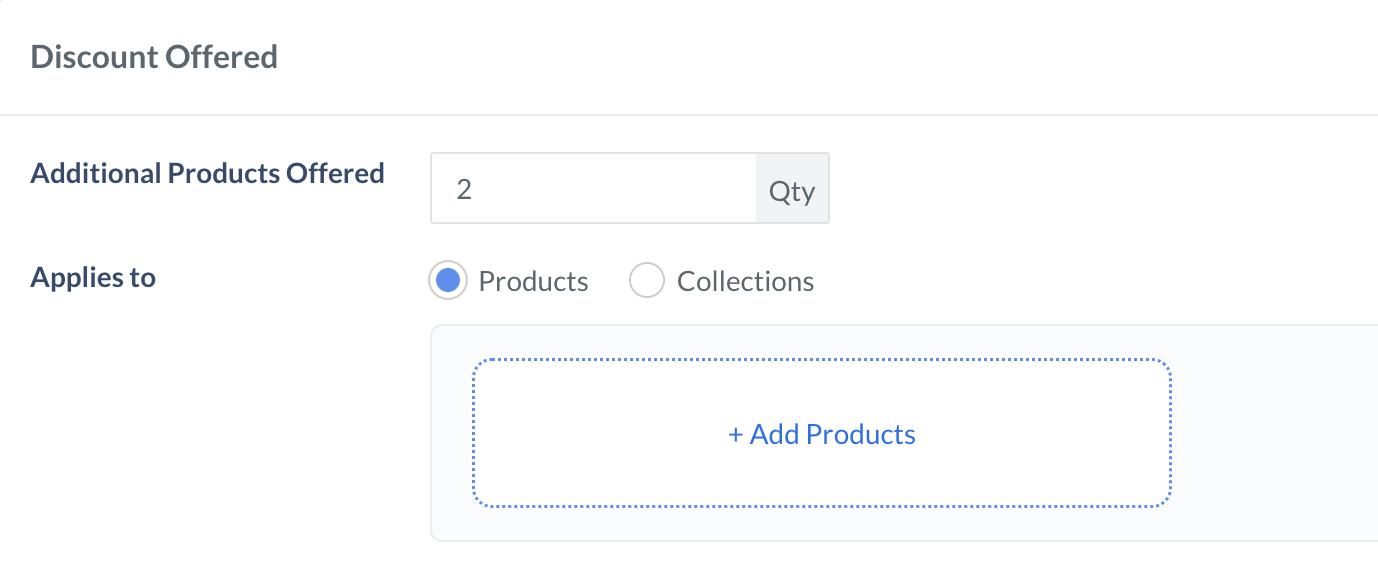
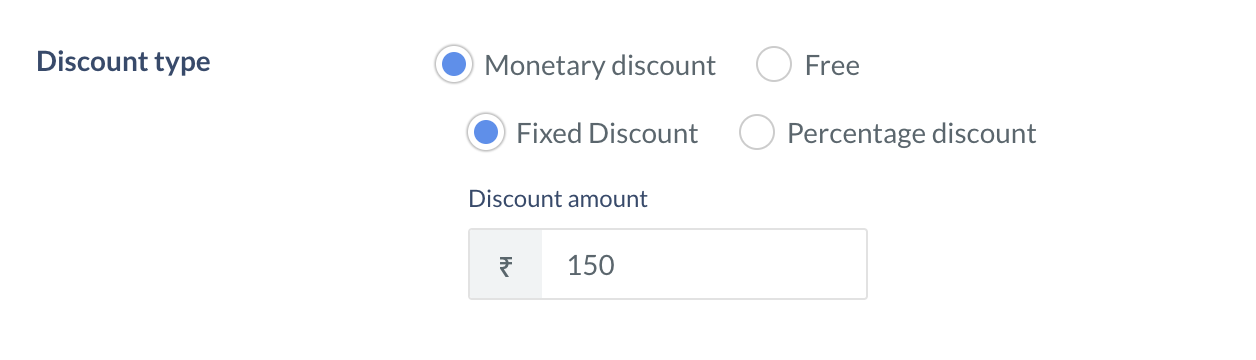
- Discount type: Select the Discount type applicable on Y products.
- Monetary discount
- Free
- Fixed Discount: In this type, a fixed amount is deducted from the original amount of the Y product.
- Discount amount: Enter an amount by which the original price should be reduced. For example, if ₹150 is the flat discount applied, ₹150 is deducted from the original price.
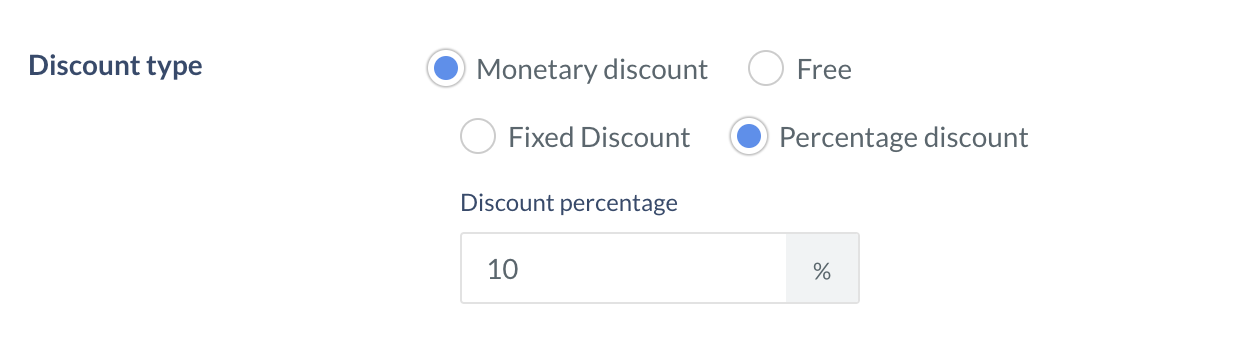
- Percentage discount: In this type, a set percentage of the amount is deducted from the original amount of the Y product.
- Discount percentage: The percentage by which the original price should be reduced. For example, if 10% discount is applied, on an order amount of ₹900, ₹90 will be deducted.

- Usage Limit: Specify the maximum number of Y products that qualify for a discount. For instance, if the customer adds 2 Y products to the cart and you set the usage limit at 1, the discount applies to only 1 of the Y products.
- Coupon validity: Set the duration for the coupon.
- Active dates: Set the Start date and Start time.
- Select the Set an end date check box and set the End date and End time. (optional)
- Total maximum budget (Optional): Set an amount to expire the coupon when the total discount to be offered to all your customers is reached. For example, if you set ₹10,000 as the total maximum budget, once the budget limit is reached, the coupon code gets expired and is not visible at checkout.
- Coupon eligibility: Create the coupon for All customers or Specific customers. If you want to create coupons for specific customers:
- Click + Add Customers.
- You can upload a list of Mobile Number or Email ID based on your requirement.
- Click + Add Customers.
- Click Download Sample File and add the required data to the sample file. Ensure the data is formatted correctly and save the file.
- Enter the values in a valid format as given below:
- Mobile number: +919000090000
- Email id: gauravkumar@example.com
- CSV file should not have any header/column title.
- Maximum acceptable rows in the file is 1 million.
- Upload the file in .CSV format. Maximum file size supported is 50 MB.
- Select click to upload and choose the file you want to import. Click Confirm.
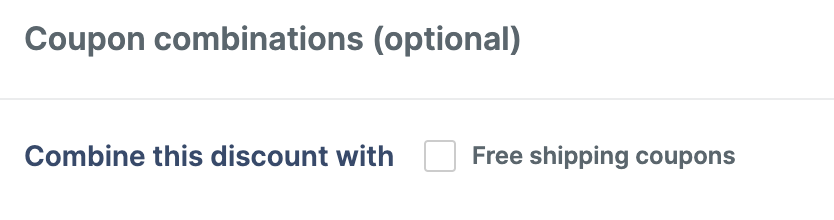
- Coupon combinations (optional): Combine this coupon with Free shipping coupons to provide free shipping along with the discount. If you select Free shipping coupons in this category then you must select the BxGy discount coupons check box in the Free Shipping category to combine the coupon.
- Click Create and Publish.
Bulk discount
Bulk discount
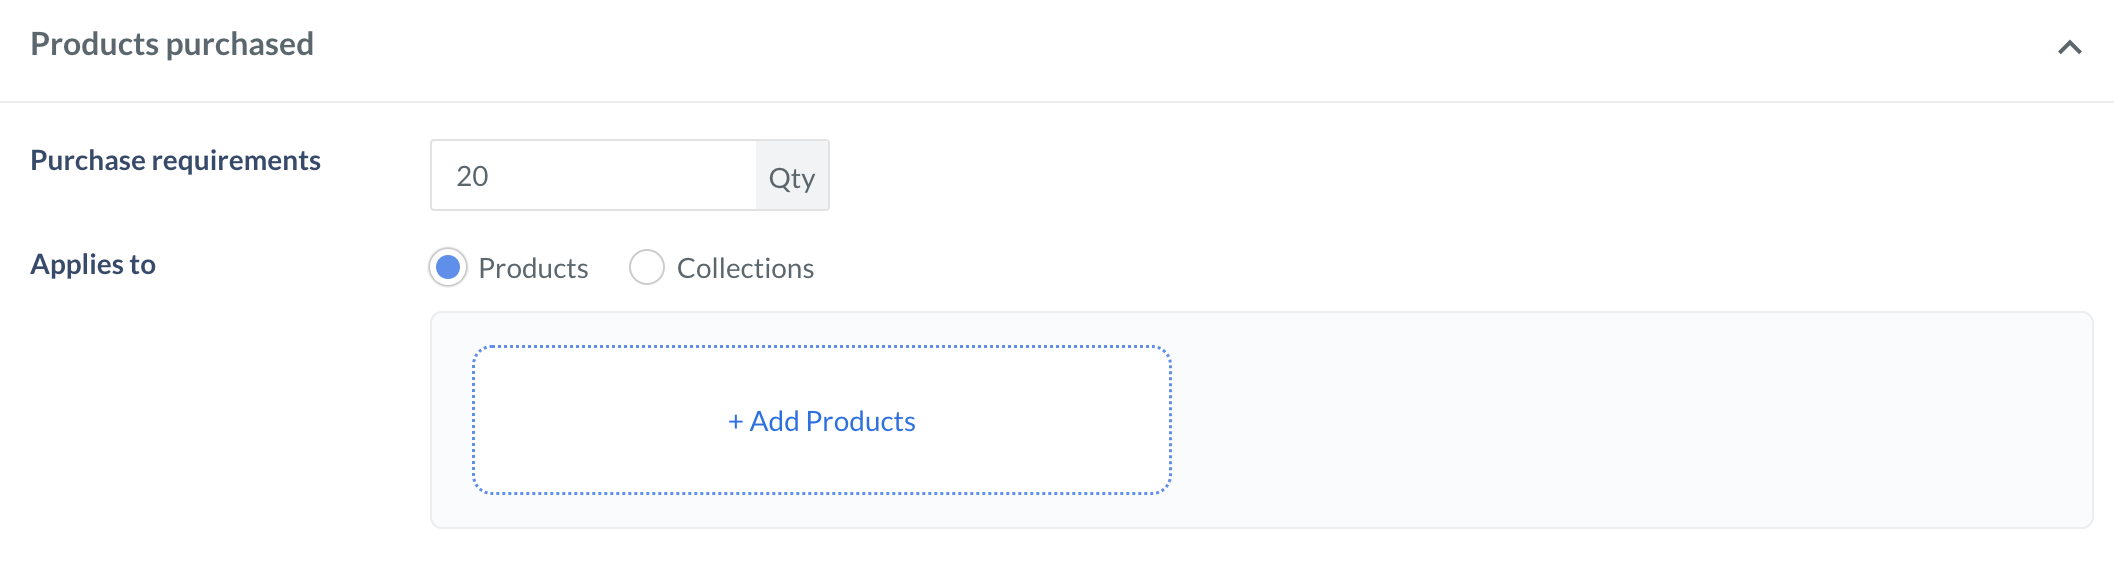
- Configure the Purchase requirements for products based on your preference to set eligibility criteria for the customers to avail of the coupon offer. You can set a minimum quantity for customers. For example, if you set the minimum quantity as 20, the customers can use the coupon only if there are 20 or more items in their cart.
-
Select Products or Collections to limit the discount to specific products or collections. Click + Add Products or + Add Collections respectively. Select the products or collections based on your requirement and click Confirm. You can add multiple products or collections.
- Select the Discount type.
- Discount on all
- Rate Per Product
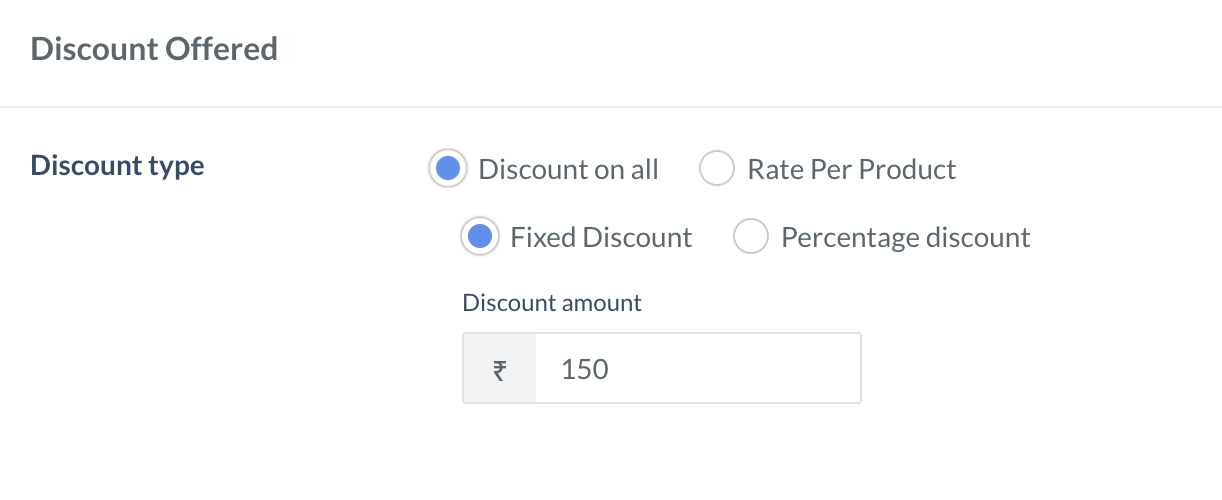
- Fixed Discount: In this type, a fixed amount is deducted from the original amount of the Y product.
- Discount amount: Enter an amount by which the original price should be reduced. For example, if ₹150 is the flat discount applied, ₹150 is deducted from the original price.
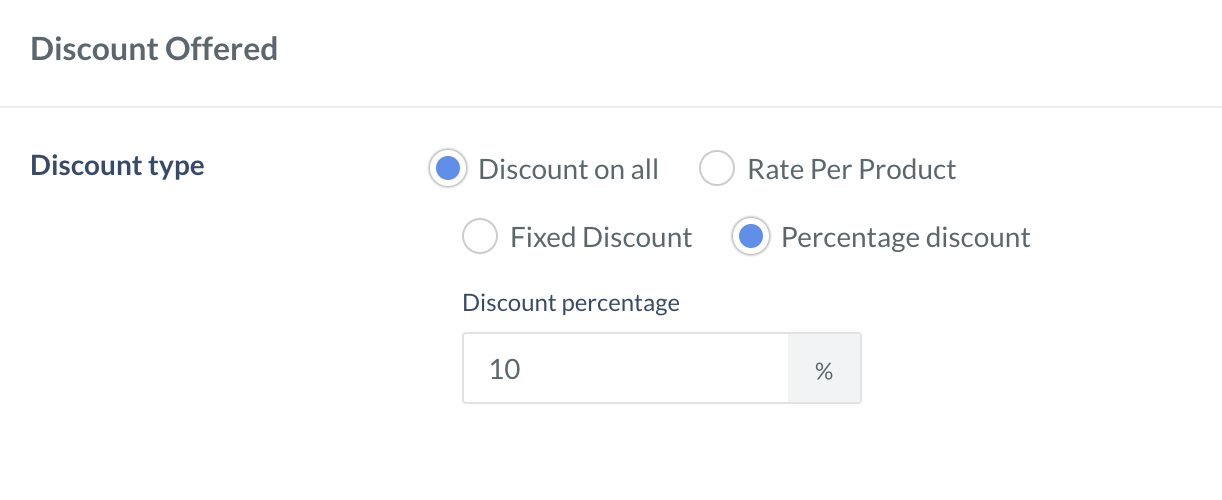
- Percentage discount: In this type, a set percentage of the amount is deducted from the original amount of the Y product.
- Discount percentage: The percentage by which the original price should be reduced. For example, if 10% discount is applied, on an order amount of ₹900, ₹90 will be deducted.
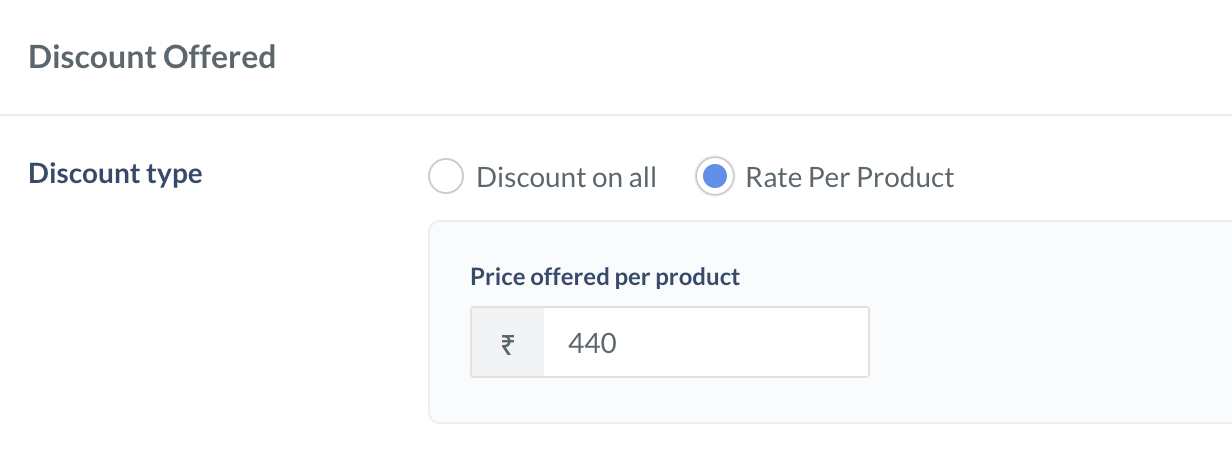
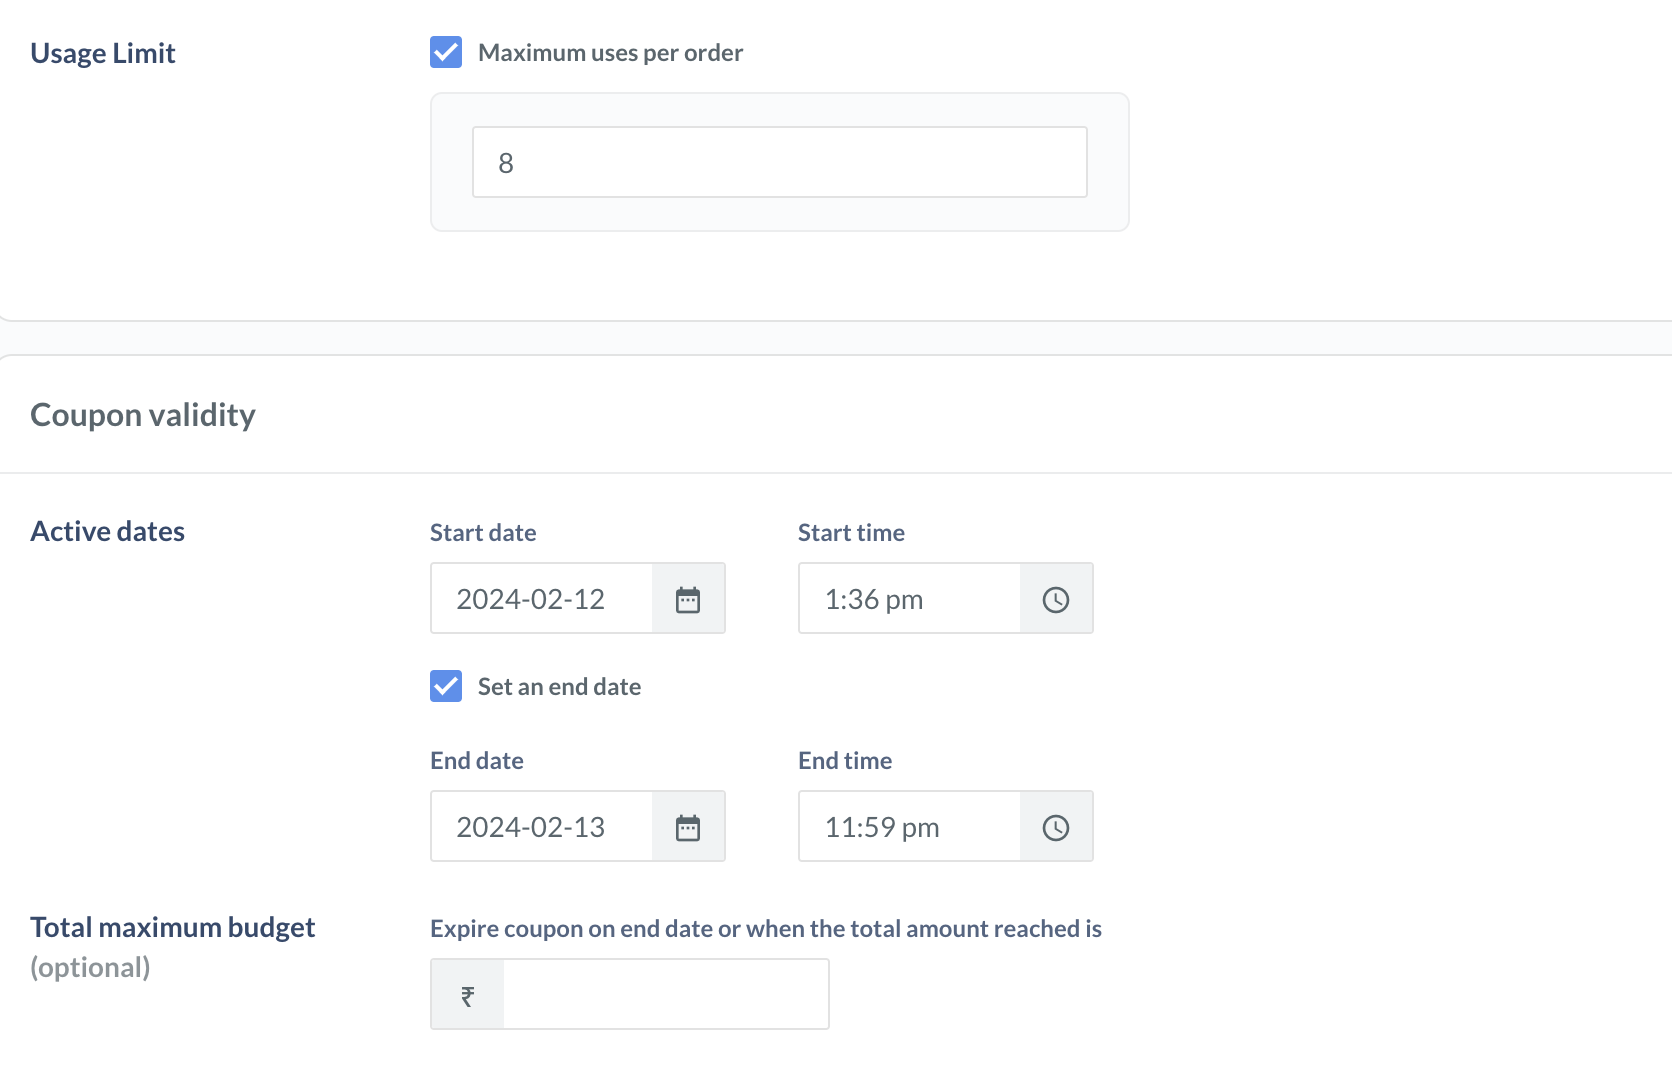
- Usage Limit: Specify the maximum number of products that qualify for a discount. For instance, if the customer adds 20 products to the cart and you set the usage limit at 8, the discount applies to only 8 of the products.
- Coupon validity: Set the duration for the coupon.
- Active dates: Set the Start date and Start time.
- Select the Set an end date check box and set the End date and End time. (optional)
- Total maximum budget (Optional): Set an amount to expire the coupon when the total discount to be offered to all your customers is reached. For example, if you set ₹10,000 as the total maximum budget, once the budget limit is reached, the coupon code gets expired and is not visible at checkout.
- Coupon eligibility: Create the coupon for All customers or Specific customers. If you want to create coupons for specific customers:
- Click + Add Customers.
- You can upload a list of Mobile Number or Email ID based on your requirement.
- Click + Add Customers.
- Click Download Sample File and add the required data to the sample file. Ensure the data is formatted correctly and save the file.
- Enter the values in a valid format as given below:
- Mobile number: +919000090000
- Email id: gauravkumar@example.com
- CSV file should not have any header/column title.
- Maximum acceptable rows in the file is 1 million.
- Upload the file in .CSV format. Maximum file size supported is 50 MB.
- Select click to upload and choose the file you want to import. Click Confirm.
- Usage restriction: Set the maximum limit to which a coupon can be redeemed in total and per customer.
- Select the Number of times discount can be used in total check box and set the number. For example, 100.
- Select the Number of times the coupon can be used per customer check box and set the number. For example, 2.
- Select By mobile no. or By email id via which the customer can use the coupon.
- Coupon combinations (optional): Combine this coupon with Free shipping coupons to provide free shipping along with the discount. If you select Free shipping coupons in this category then you must select the Bulk discount coupons check box in the Free Shipping category to combine the coupon.
- Click Create and Publish.
Free shipping
Free shipping
- Select the Purchase requirements based on your preference to set eligibility criteria for the customers to use the coupon.
- No minimum requirements
- Minimum quantity
- Minimum amount requirements
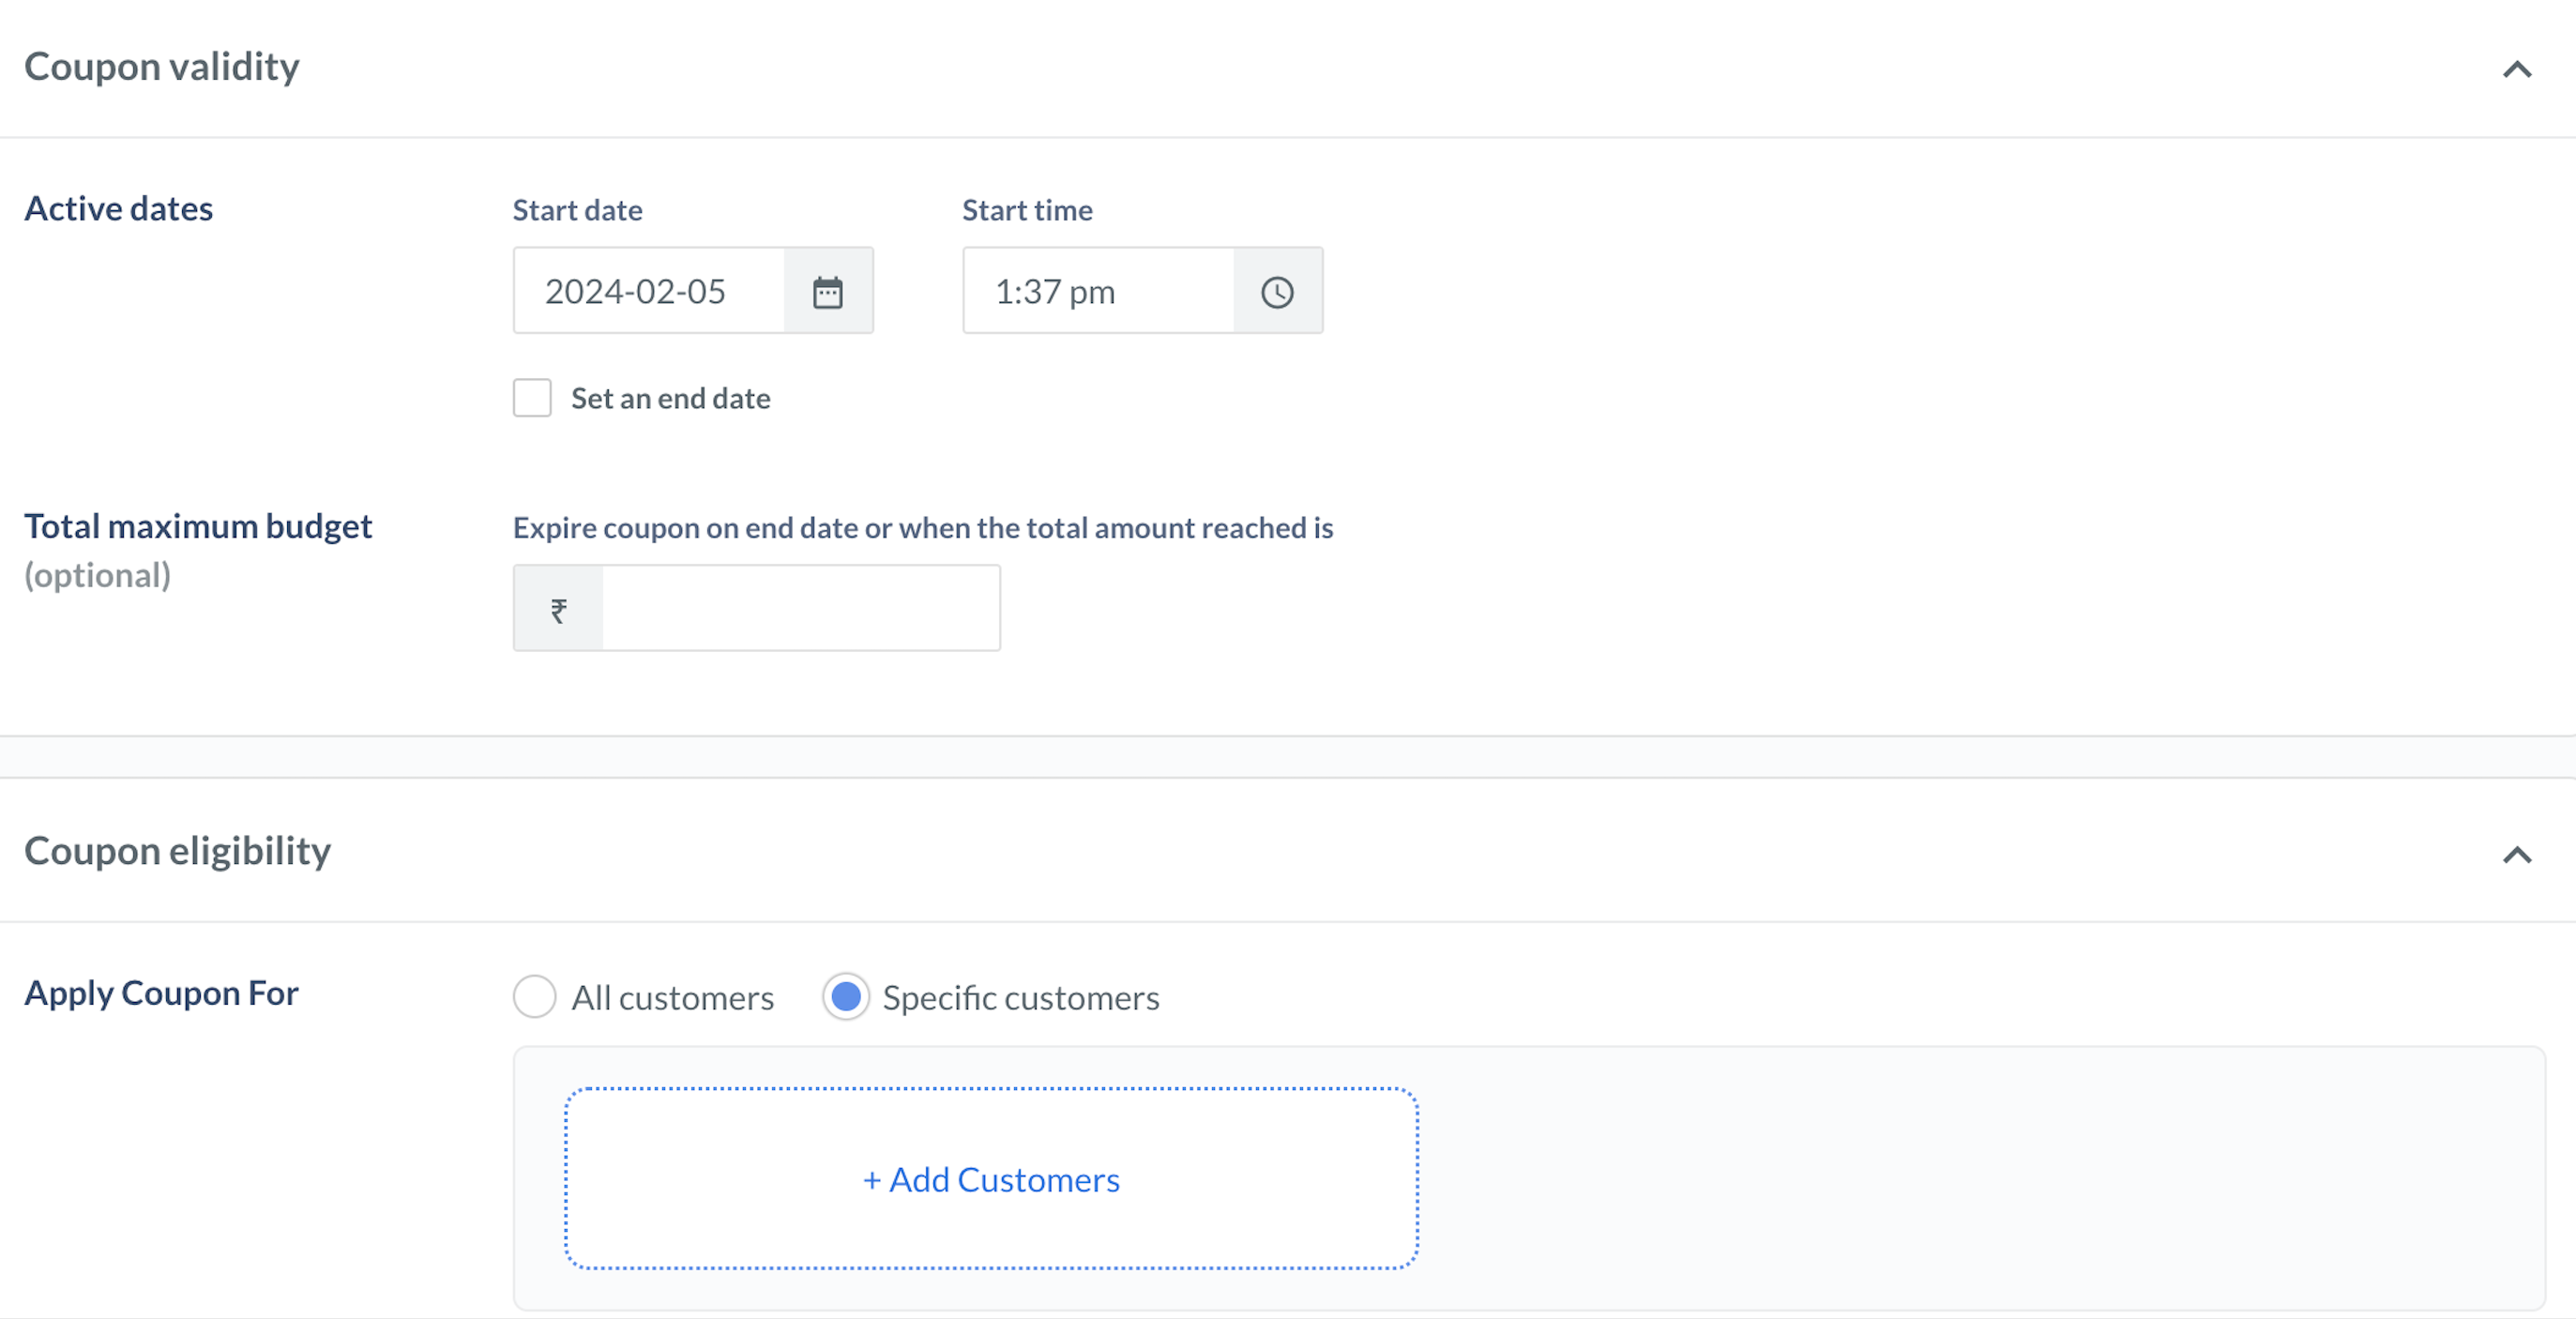
- Coupon validity: Set the duration for the coupon.
- Active dates: Set the Start date and Start time.
- Select the Set an end date check box and set the End date and End time. (optional)
- Total maximum budget (Optional): Set an amount to expire the coupon when the total discount to be offered to all your customers is reached. For example, if you set ₹10,000 as the total maximum budget, once the budget limit is reached, the coupon code gets expired and is not visible at checkout.
- Coupon eligibility: Create the coupon for All customers or Specific customers. If you want to create coupons for specific customers:
- Click + Add Customers.
- You can upload a list of Mobile Number or Email ID based on your requirement.
- Click Download Sample File and add the required data to the sample file. Ensure the data is formatted correctly and save the file.
- Enter the values in a valid format as given below:
- Mobile number: +919000090000
- Email id: gauravkumar@example.com
- CSV file should not have any header/column title.
- Maximum acceptable rows in the file is 1 million.
- Upload the file in .CSV format. Maximum file size supported is 50 MB.
- Select click to upload and choose the file you want to import. Click Confirm.
- Usage restriction: Set the maximum limit to which a coupon can be redeemed in total and per customer.
- Select the Number of times discount can be used in total check box and set the number. For example, 100.
- Select the Number of times the coupon can be used per customer check box and set the number. For example, 2.
- Select By mobile no. or By email id via which the customer can use the coupon.
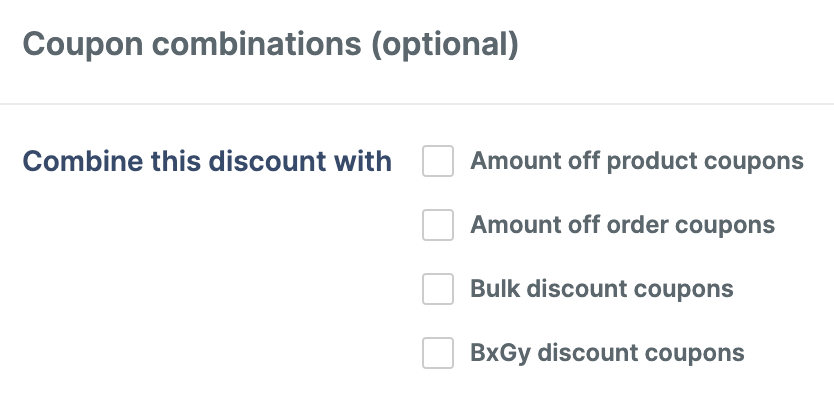
- Coupon combinations (optional): You can combine this coupon with various other coupons as follows:
- Amount off product coupons: Combine this coupon with a coupon created in the Amount discounted on product coupons category to offer a discount on the specific products or collect of products and free shipping.
- Amount off order coupons: Combine this coupon with a coupon created in the Amount discounted on order coupons category to offer a discount on the total order amount and free shipping.
- Bulk discount coupons: Combine this coupon with a coupon created in the Amount discounted on product coupons category to offer a discount on a bulk order and free shipping.
- BxGy discount coupons: Combine this coupon with a coupon created in the Amount discounted on product coupons category to offer a discount on products based on customer’s purchase and free shipping.
- Freebie item coupons: Combine this coupon with a coupon created in the Freebie item coupon category to offer a free gift to customers when their cart meets specific conditions.
- Click Create and Publish.
Freebie Item
Freebie Item
- Configure the Purchase requirements for products based on your preference to set eligibility criteria for the customers to avail of the coupon offer.
- Minimum quantity of items
- Minimum purchase amount
-
Select Products or Collections to limit the discount to specific products or collections. Click + Add Products or + Add Collections respectively. Select the products or collections based on your requirement and click Confirm. You can add multiple products or collections.
- Discount Offered: Select one product variant to offer as a free gift when the purchase requirements are met:
- Click +Add Products.
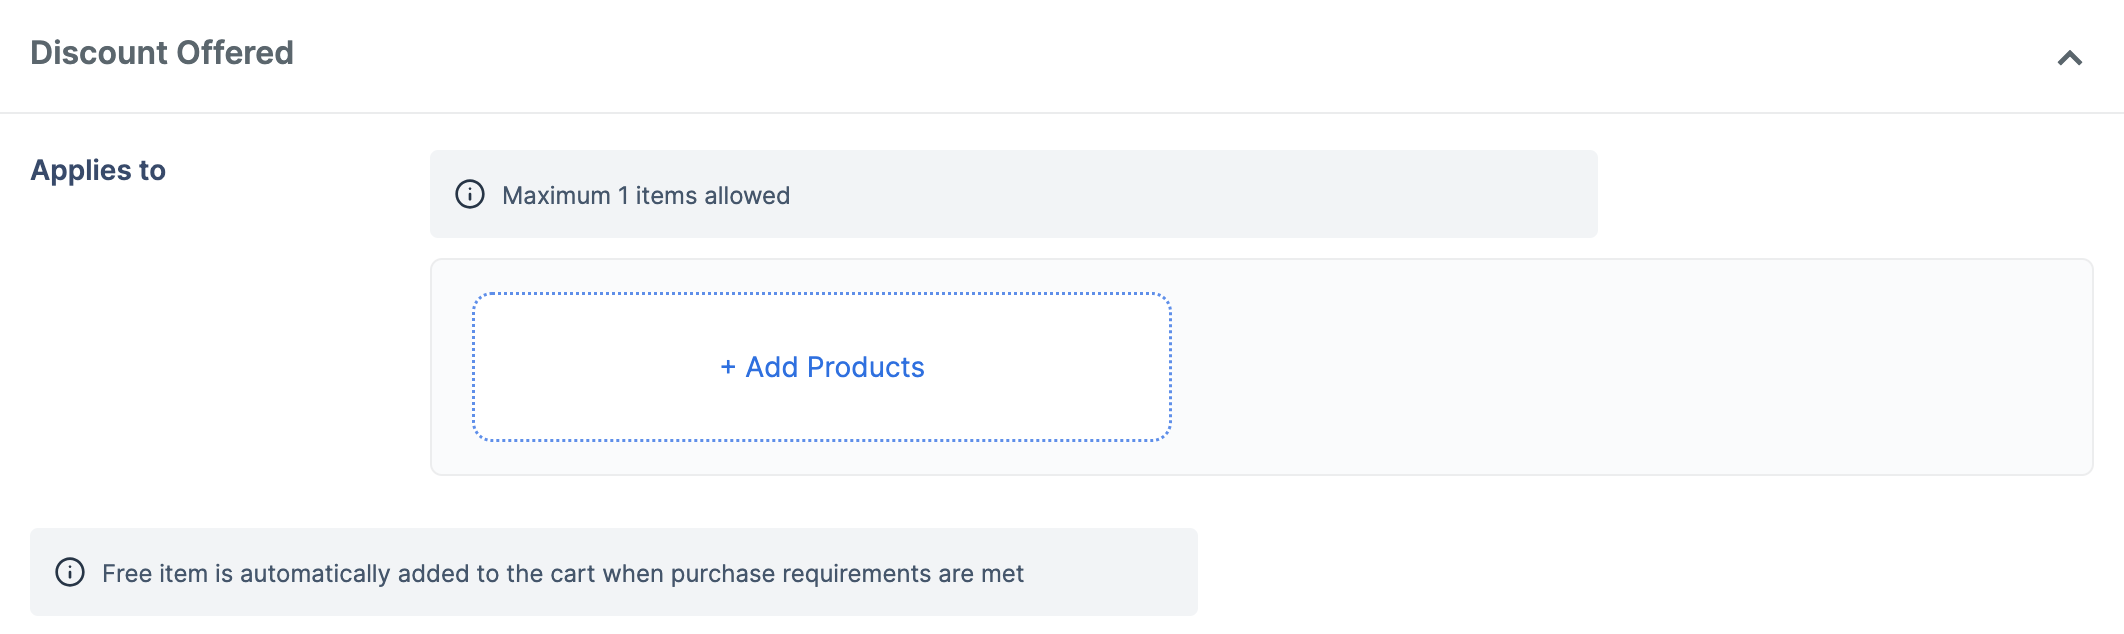
- Select the product of your choice and click Confirm.
- Usage Limit: Select the Maximum uses per order check box and specify the maximum number of products that qualify for a discount. For instance, if the customer adds 2 products to the cart and you set the usage limit at 1, the discount applies to only 1 of the products.
- Coupon validity: Set the duration for the coupon.
- Active dates: Set the Start date and Start time.
- Select the Set an end date check box and set the End date and End time. (optional)
- Total maximum budget (Optional): Set an amount to expire the coupon when the total discount to be offered to all your customers is reached. For example, if you set ₹10,000 as the total maximum budget, once the budget limit is reached, the coupon code gets expired and is not visible at checkout.
- Coupon eligibility: Create the coupon for All customers or Specific customers. If you want to create coupons for specific customers:
- Click + Add Customers.
- You can upload a list of Mobile Number or Email ID based on your requirement.
- Click + Add Customers.
- Click Download Sample File and add the required data to the sample file. Ensure the data is formatted correctly and save the file.
- Enter the values in a valid format as given below:
- Mobile number: +919000090000
- Email id: gauravkumar@example.com
- CSV file should not have any header/column title.
- Maximum acceptable rows in the file is 1 million.
- Upload the file in CSV format. Maximum file size supported is 50 MB.
- Select click to upload and choose the file you want to import. Click Confirm.
- Usage restriction: Set the maximum limit to which a coupon can be redeemed in total and per customer.
- Select the Number of times discount can be used in total check box and set the number. For example, 100.
- Select the Number of times the coupon can be used per customer check box and set the number. For example, 2.
- Select By mobile no. or By email id via which the customer can use the coupon.
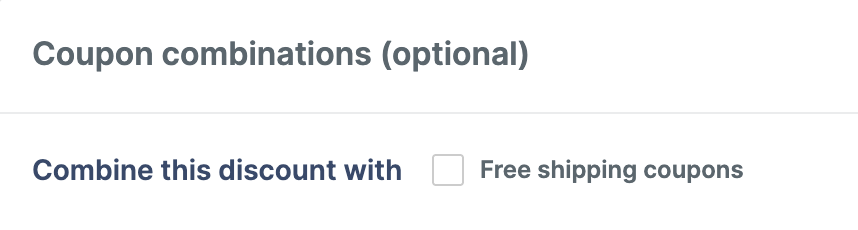
- Coupon combinations (optional): You can combine this coupon with Free shipping coupons category to offer free shipping on an order.
- Click Create and Publish.
Coupon Statuses
The table below lists the various coupon states and their descriptions:States and Descriptions
States and Descriptions
Manage Coupons
You can perform the following actions based on your requirement on the Razorpay Dashboard. Navigate to Magic Checkout → Coupons → All Coupons.- You can activate an inactive coupon if it has not expired. Identify the coupon you want to activate, navigate to the options icon and click Activate.
- You can only delete coupons in created and inactive states. Identify the coupon you want to delete, navigate to the options icon and click Delete.
- You can only deactivate coupons in active and published states and not delete them. Identify the coupon you want to deactivate, navigate to the options icon and click Deactivate.
- If a coupon has expired and you want to offer the coupon again, you can duplicate the coupon. Identify the expired coupon, navigate to the options icon and click Duplicate.
- You cannot create multiple coupons with the same coupon code. However, you can reuse a coupon code once a coupon with a similar code expires.
- Once a coupon is active, you cannot edit the Coupon Code, Coupon eligibility file, Coupon start date and Total Maximum budget.
- You can edit the Display this coupon at checkout configuration in all states except expired. After editing, the coupons will not appear to the customer.
Method 2: Shopify Dashboard
Method 2: Shopify Dashboard
- Log in to the Shopify Store.
- Navigate to Discounts and click Create discount.
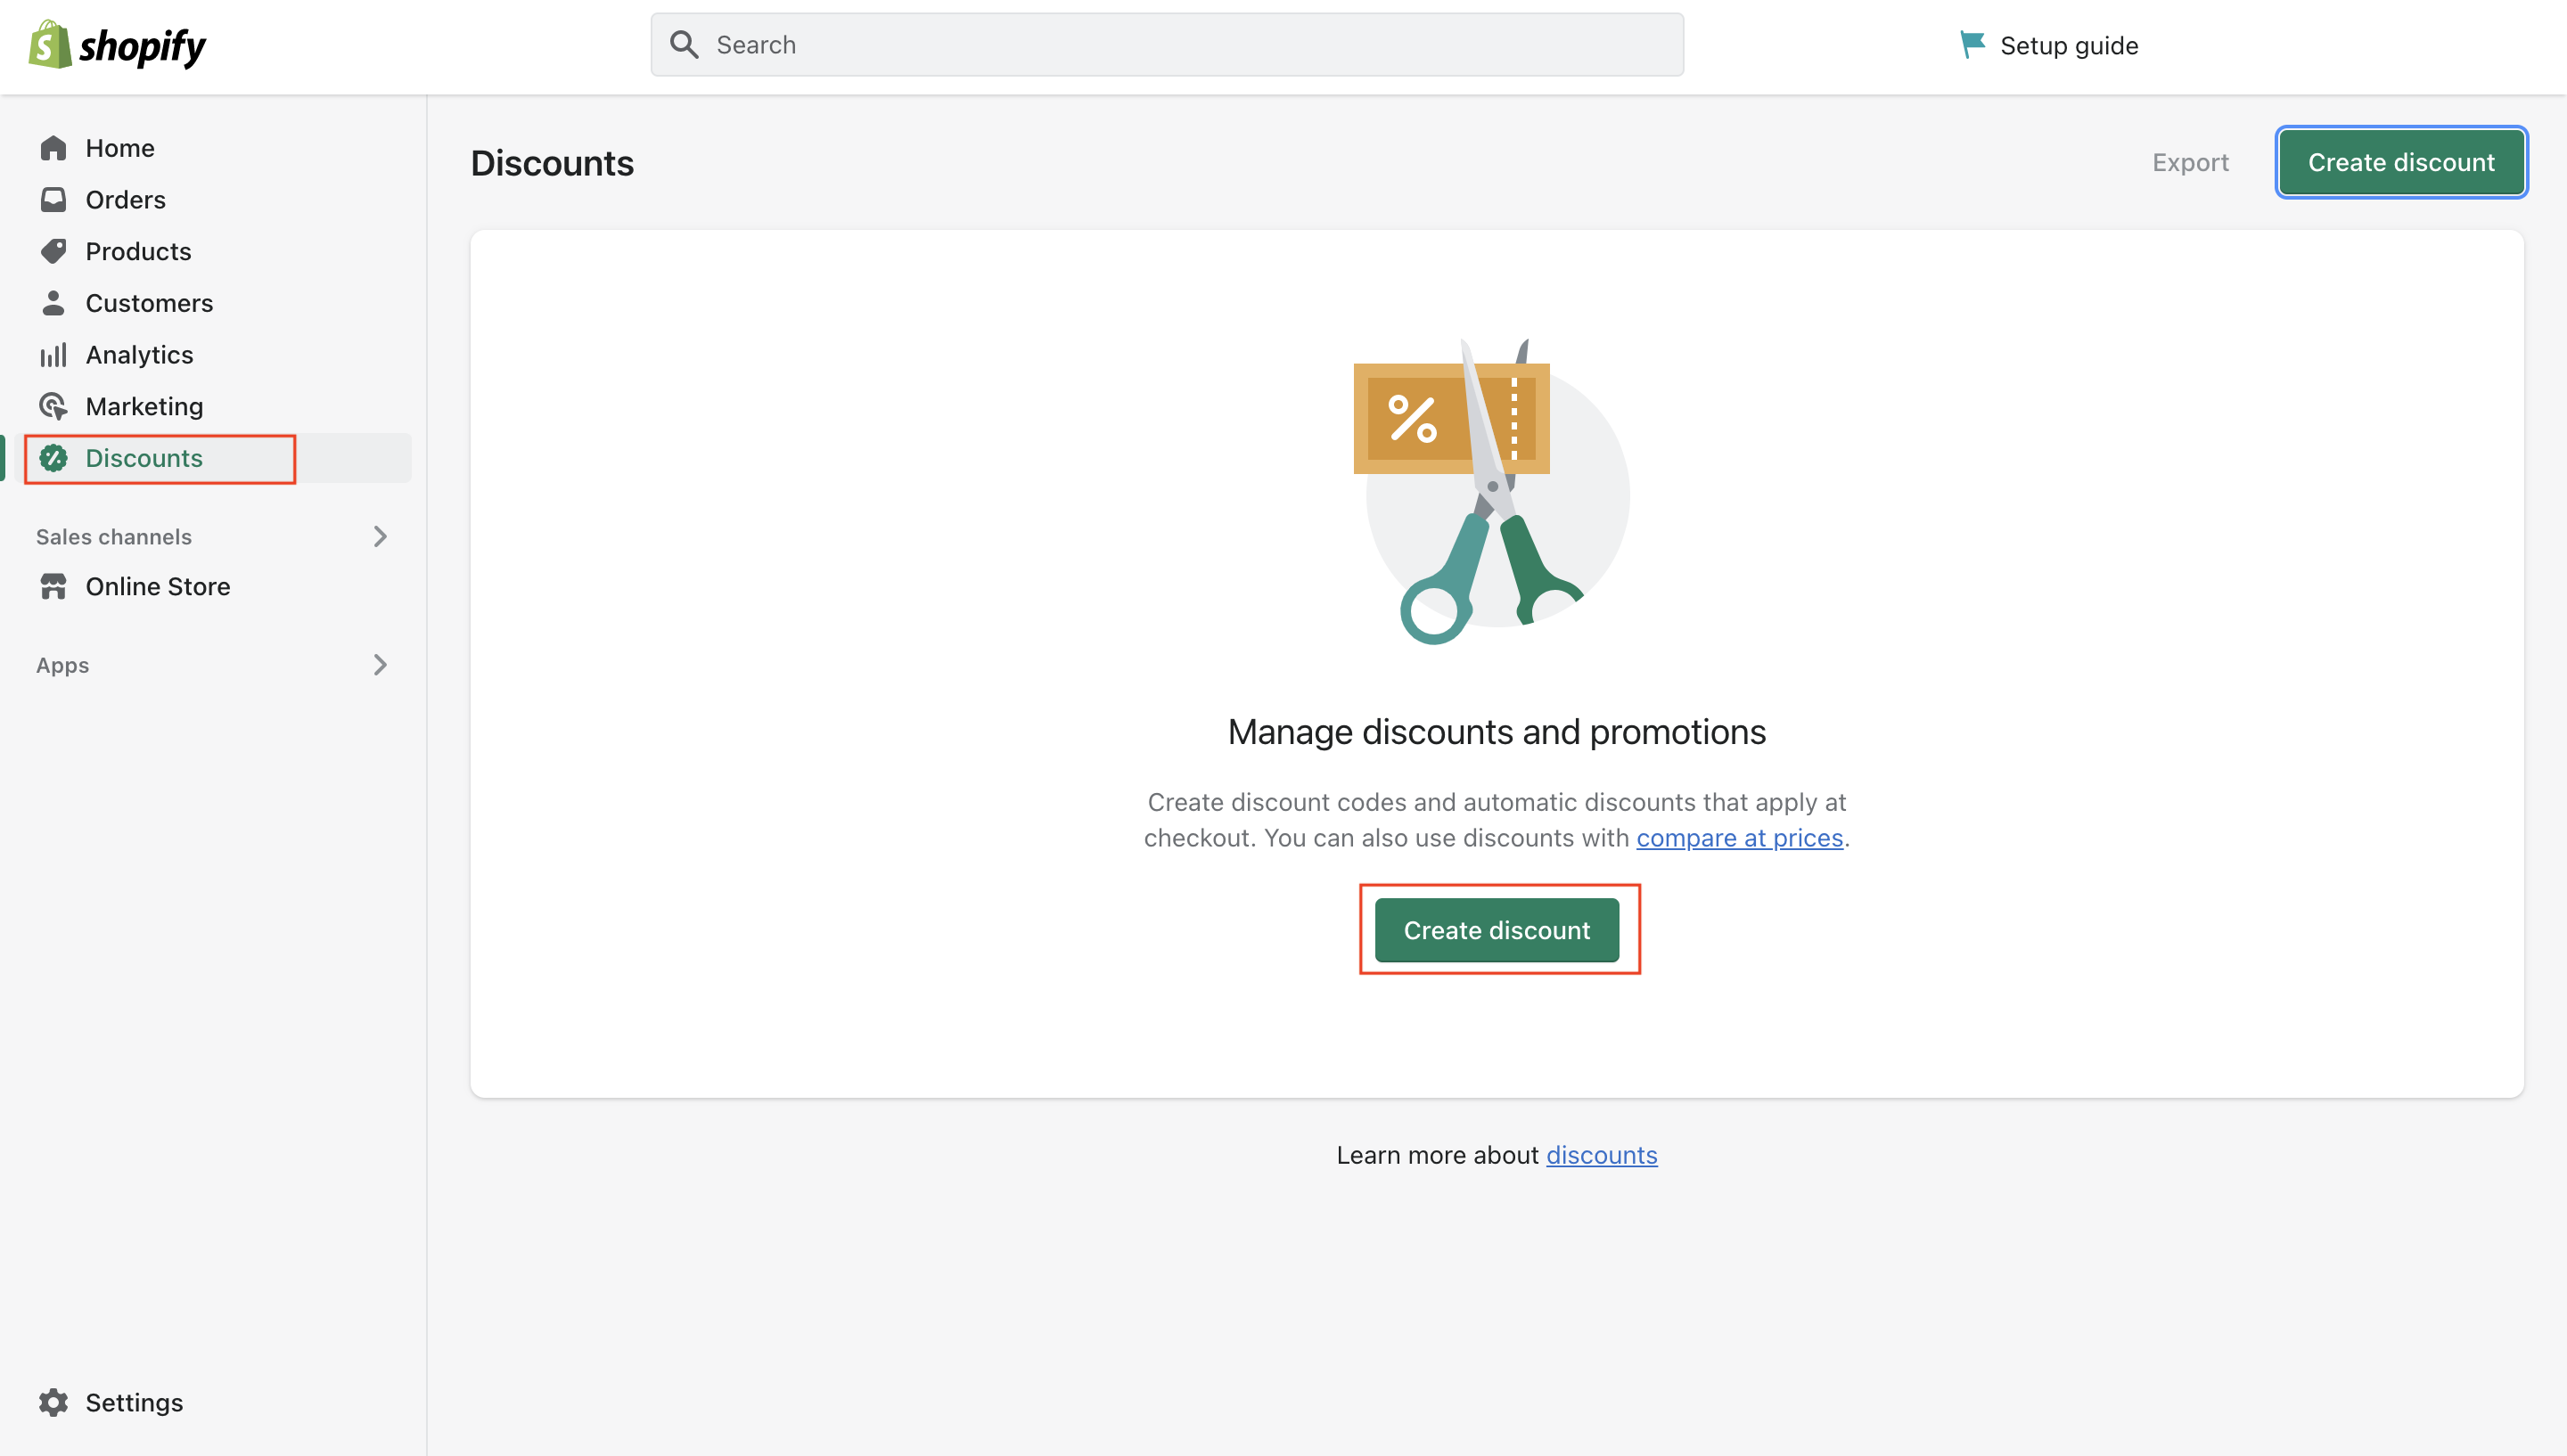
- You can create four types of discounts:
- Amount off products: Discount specific products or collection of products.
- Amount off order: Discount the total order amount.
- Buy X Get Y: Discount products based on customer’s purchase.
- Free shipping: Offer free shipping on an order.
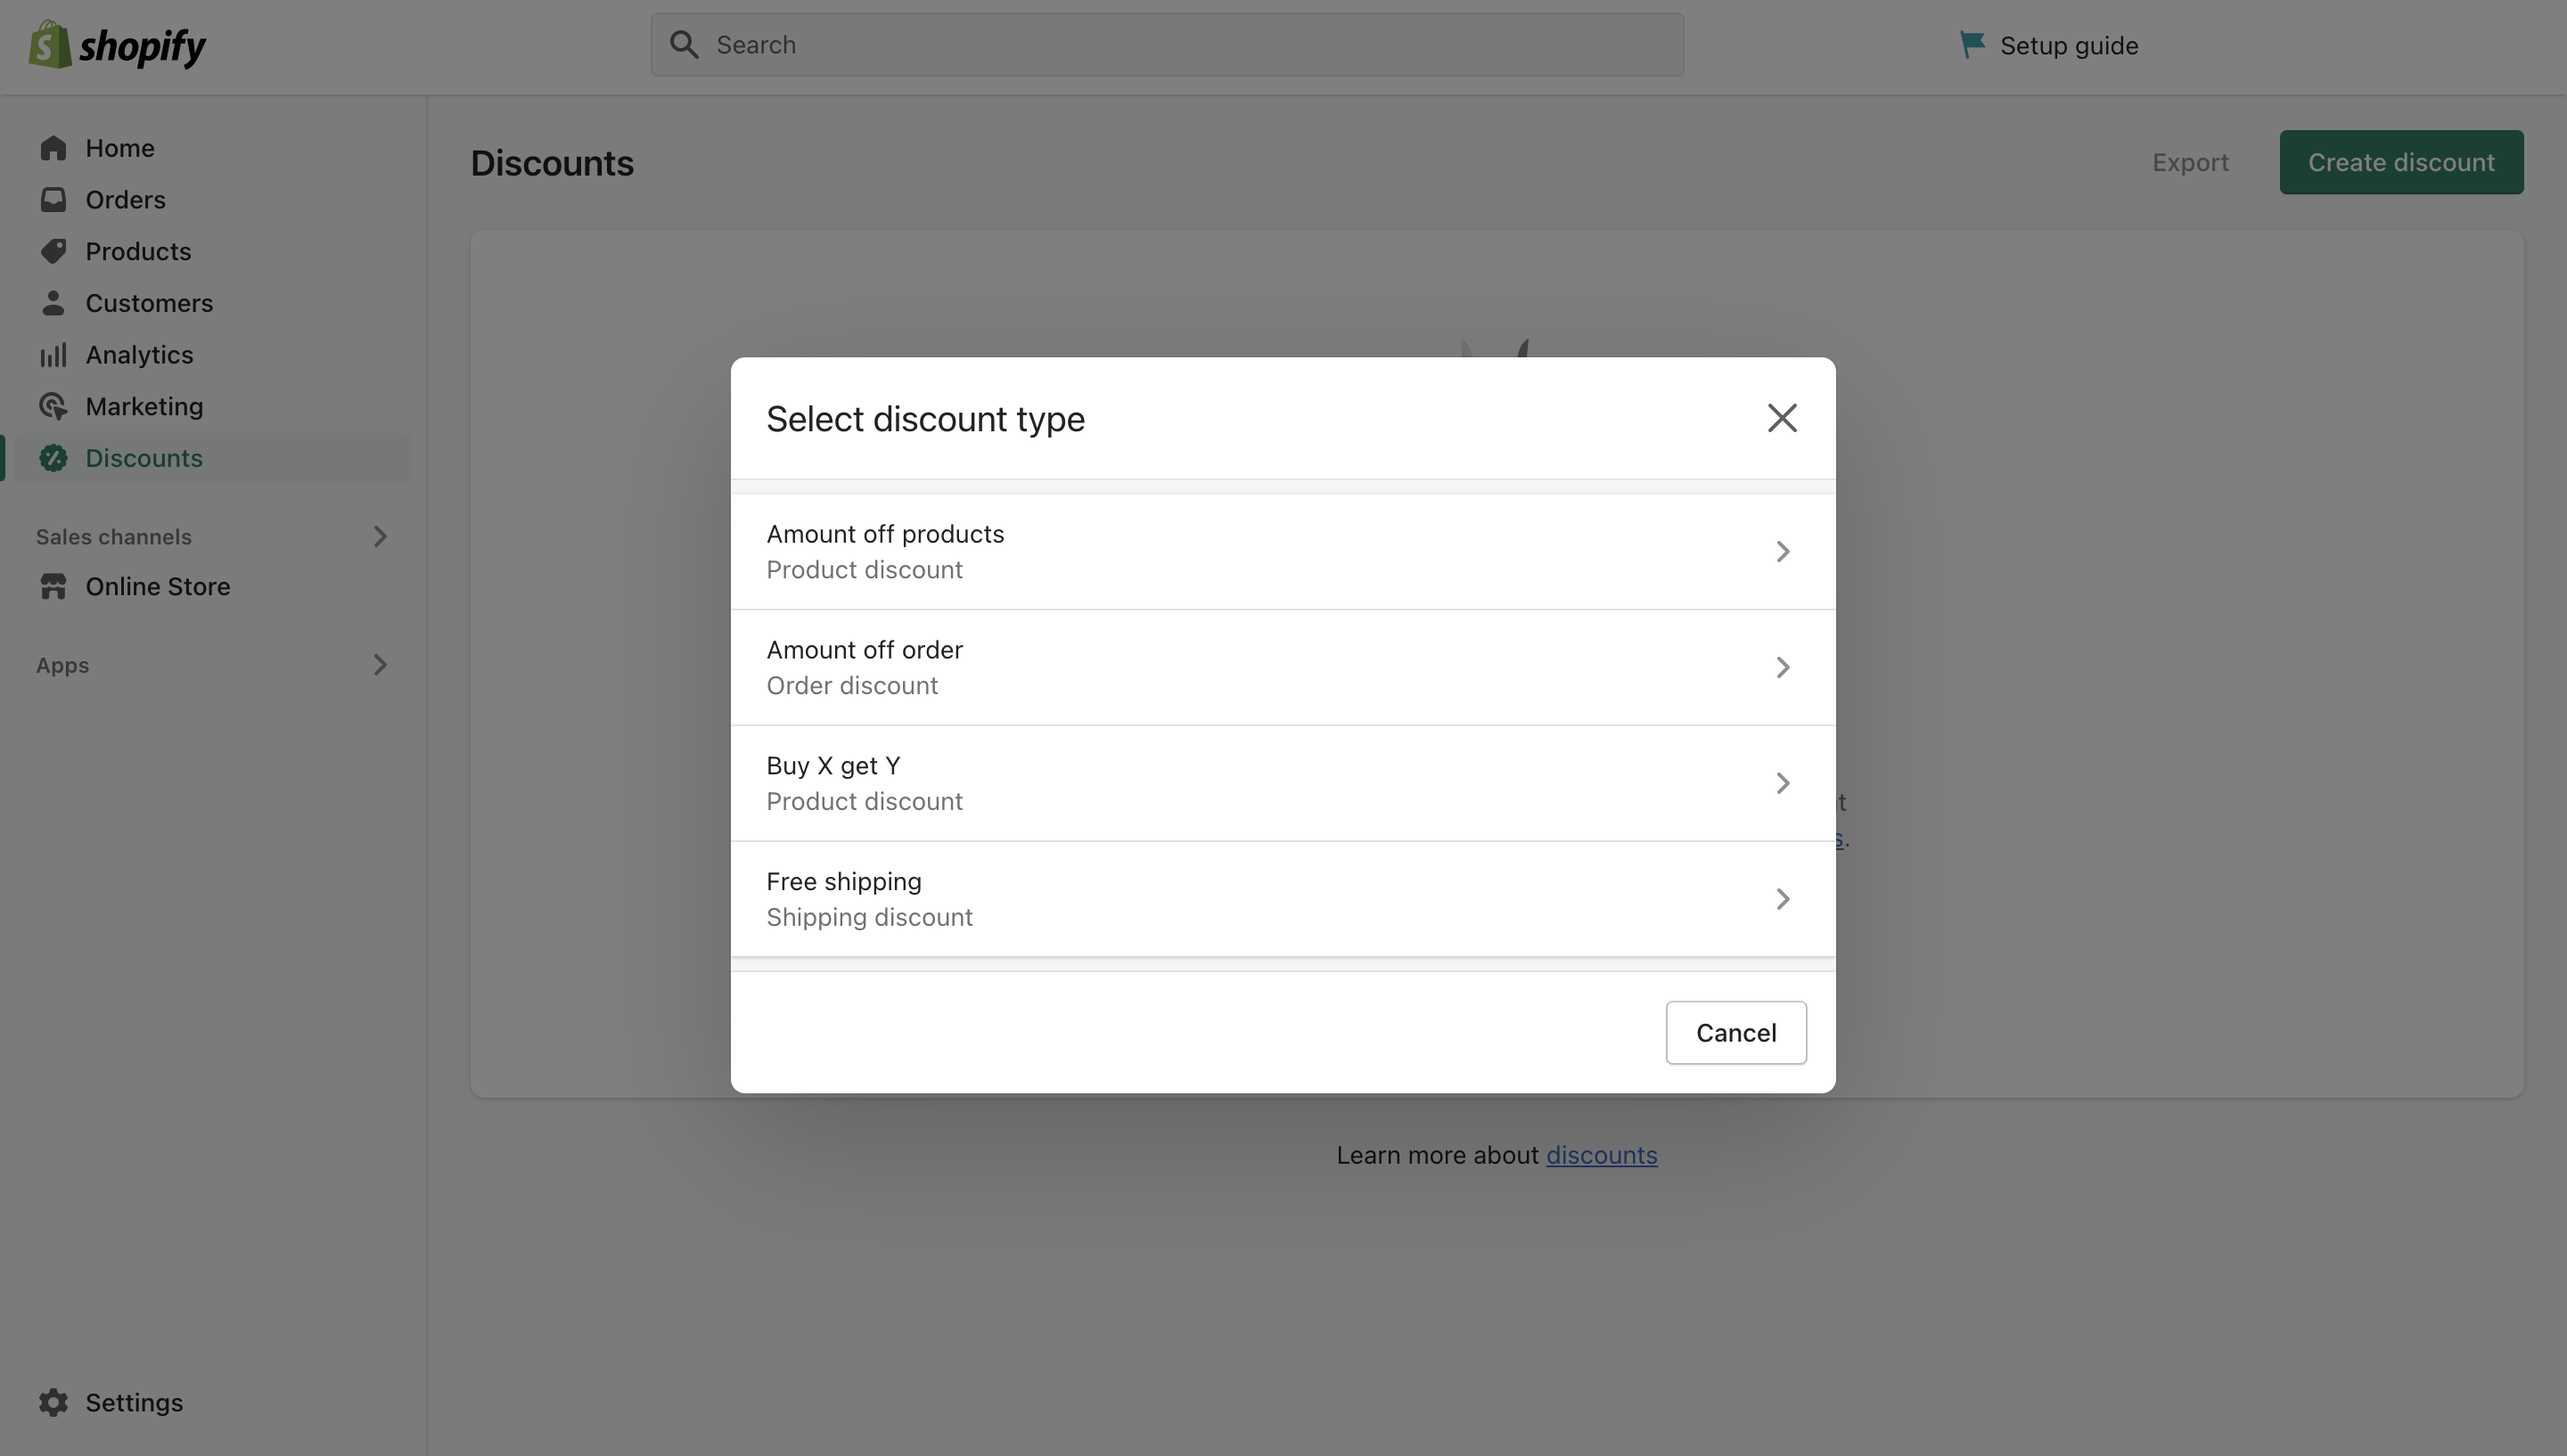
- Select discount type of your choice and enter the following details:
- Method: Choose Discount code or Automatic discount.
- Discount code: Create a code-specific discount and click Generate. The customer must enter this code at checkout to avail of discounts.
- Automatic discount: Once a customer adds a product to the cart, the discount will be applied automatically.
- Select the Value of the discount based on your requirement. You can also choose to add a discount to Specific collections or Specific products.
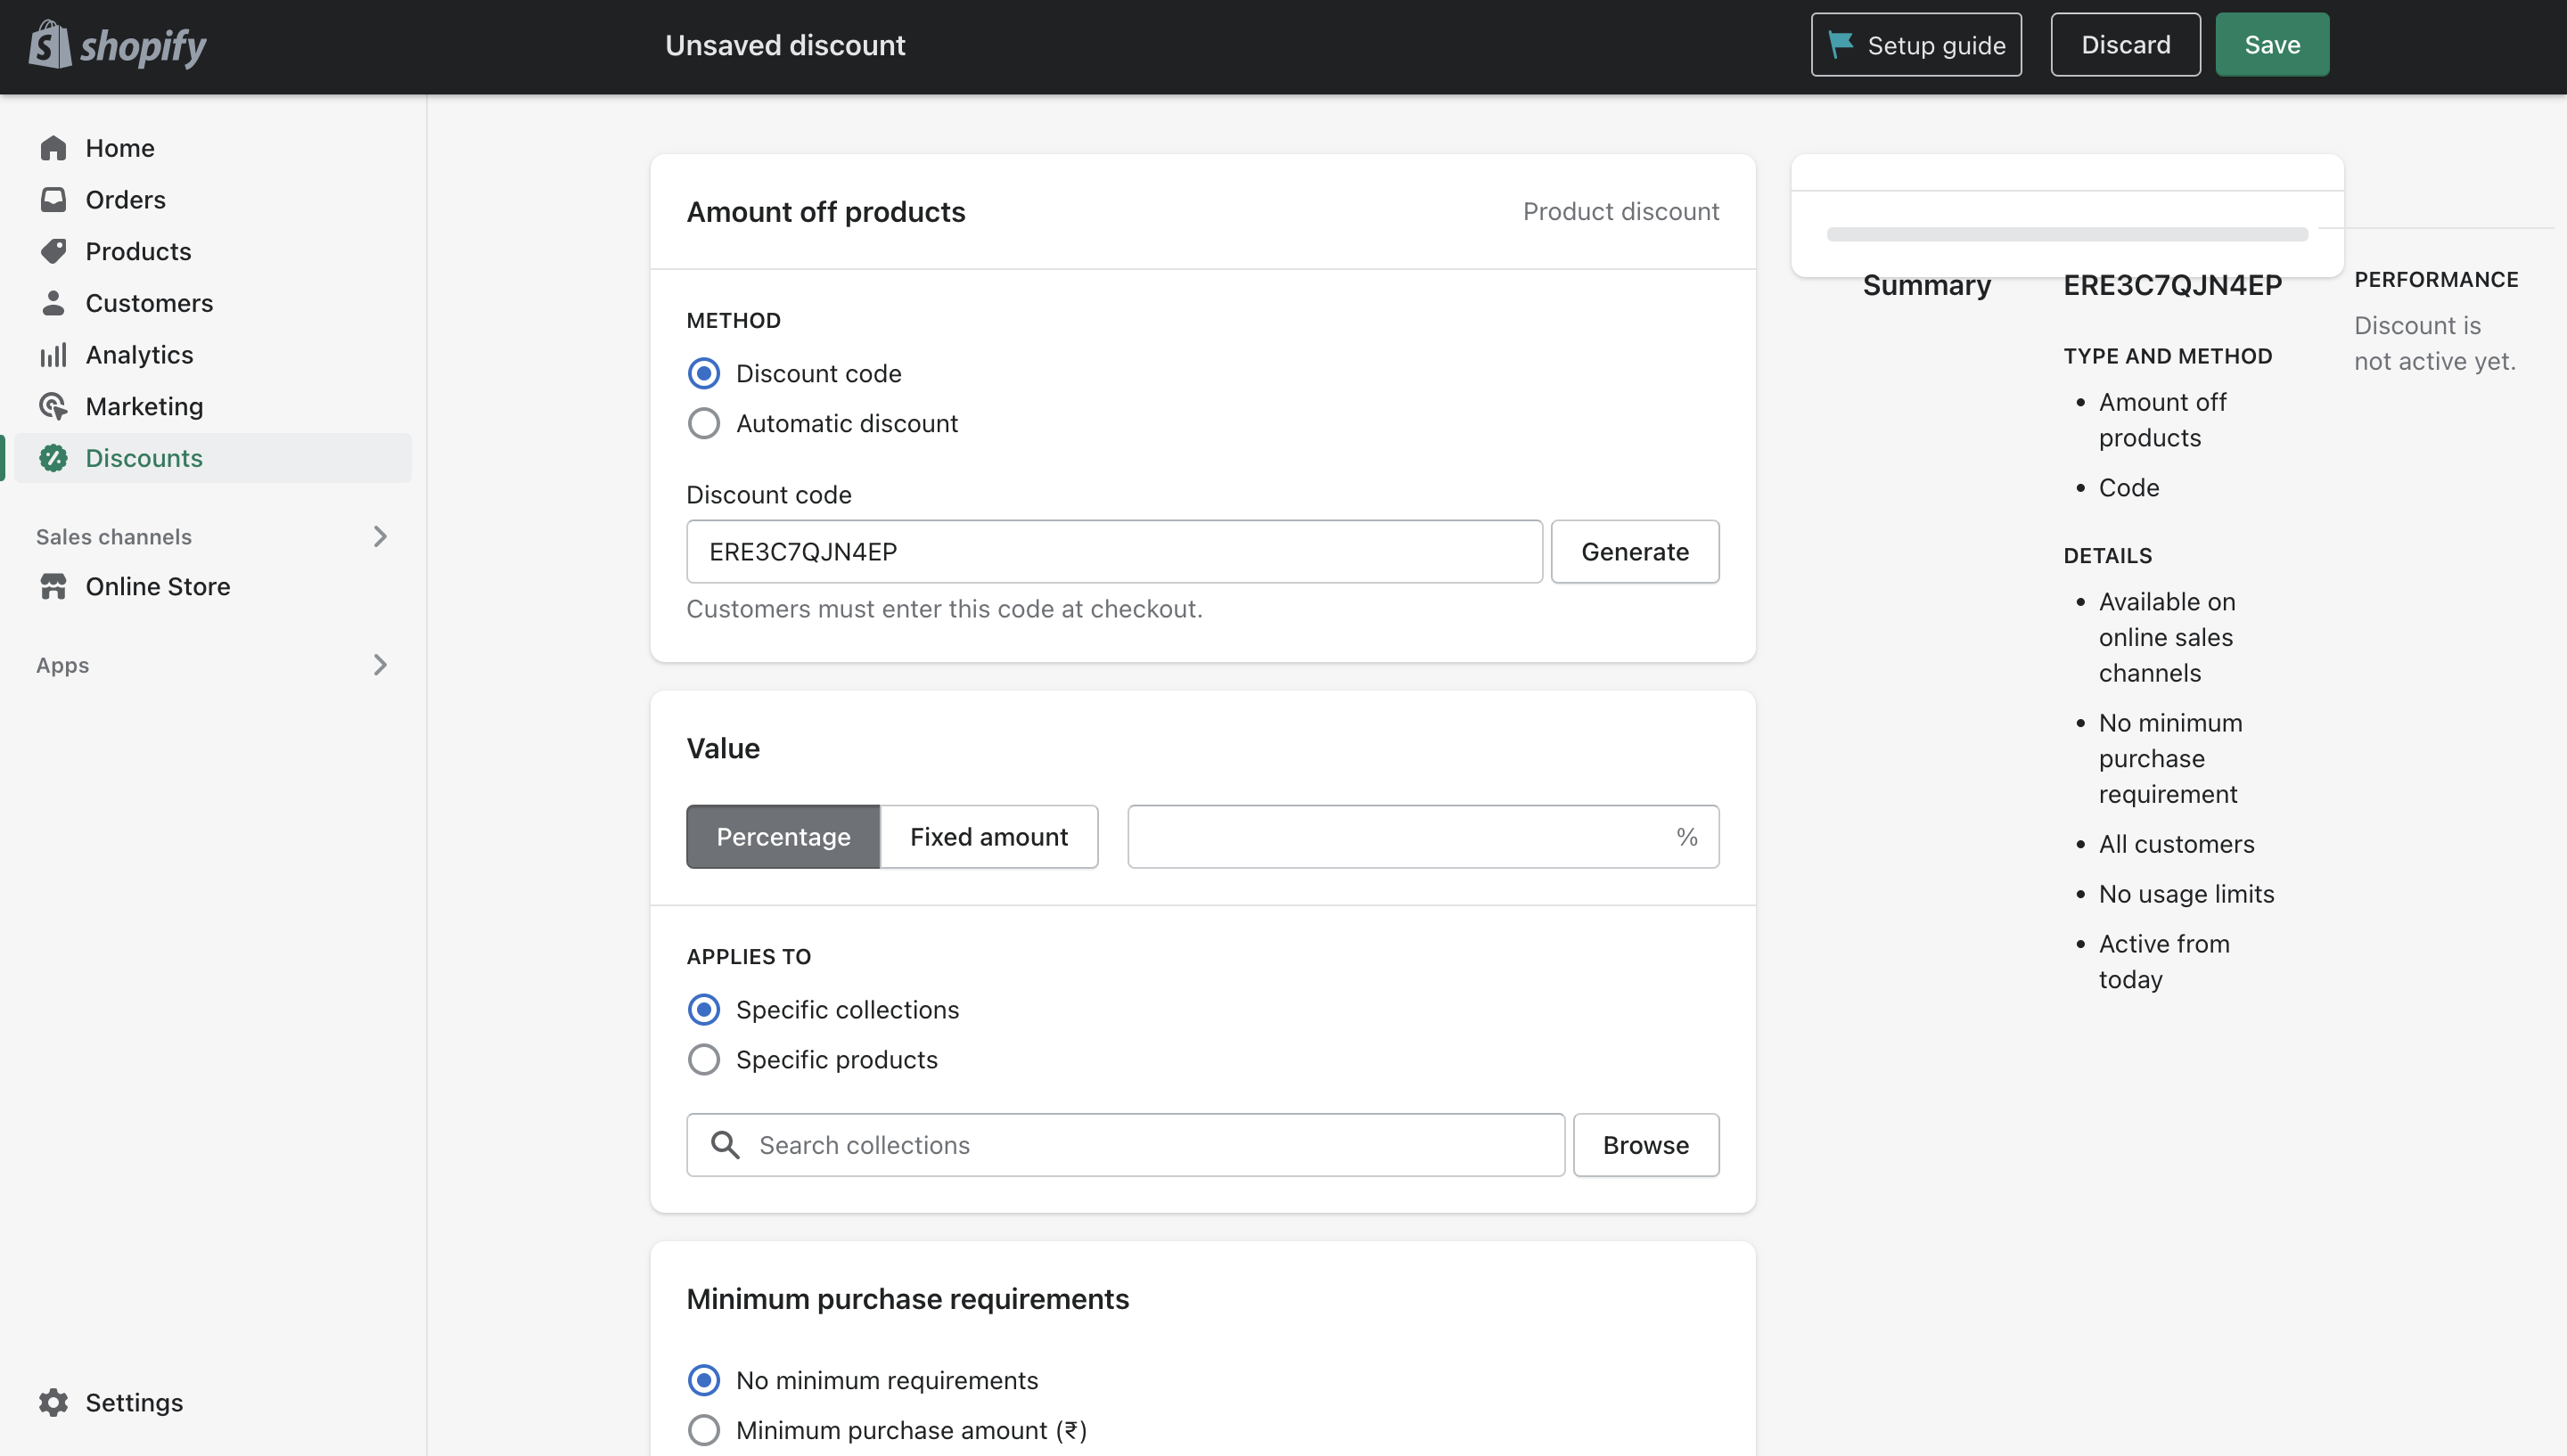
- In the Minimum purchase requirements section, you can decide whether the offer should be provided in case of minimum purchase in terms of rupees or quantity.
- In the Customer eligibility section, you can decide which customer or customer segments can avail discounts.
- Add Maximum discount uses to Limit number of times this discount can be used in total or Limit to one use per customer.
- Select the Start date and Start time for the coupons. You can also Set end date if required.
- Click Save discount.
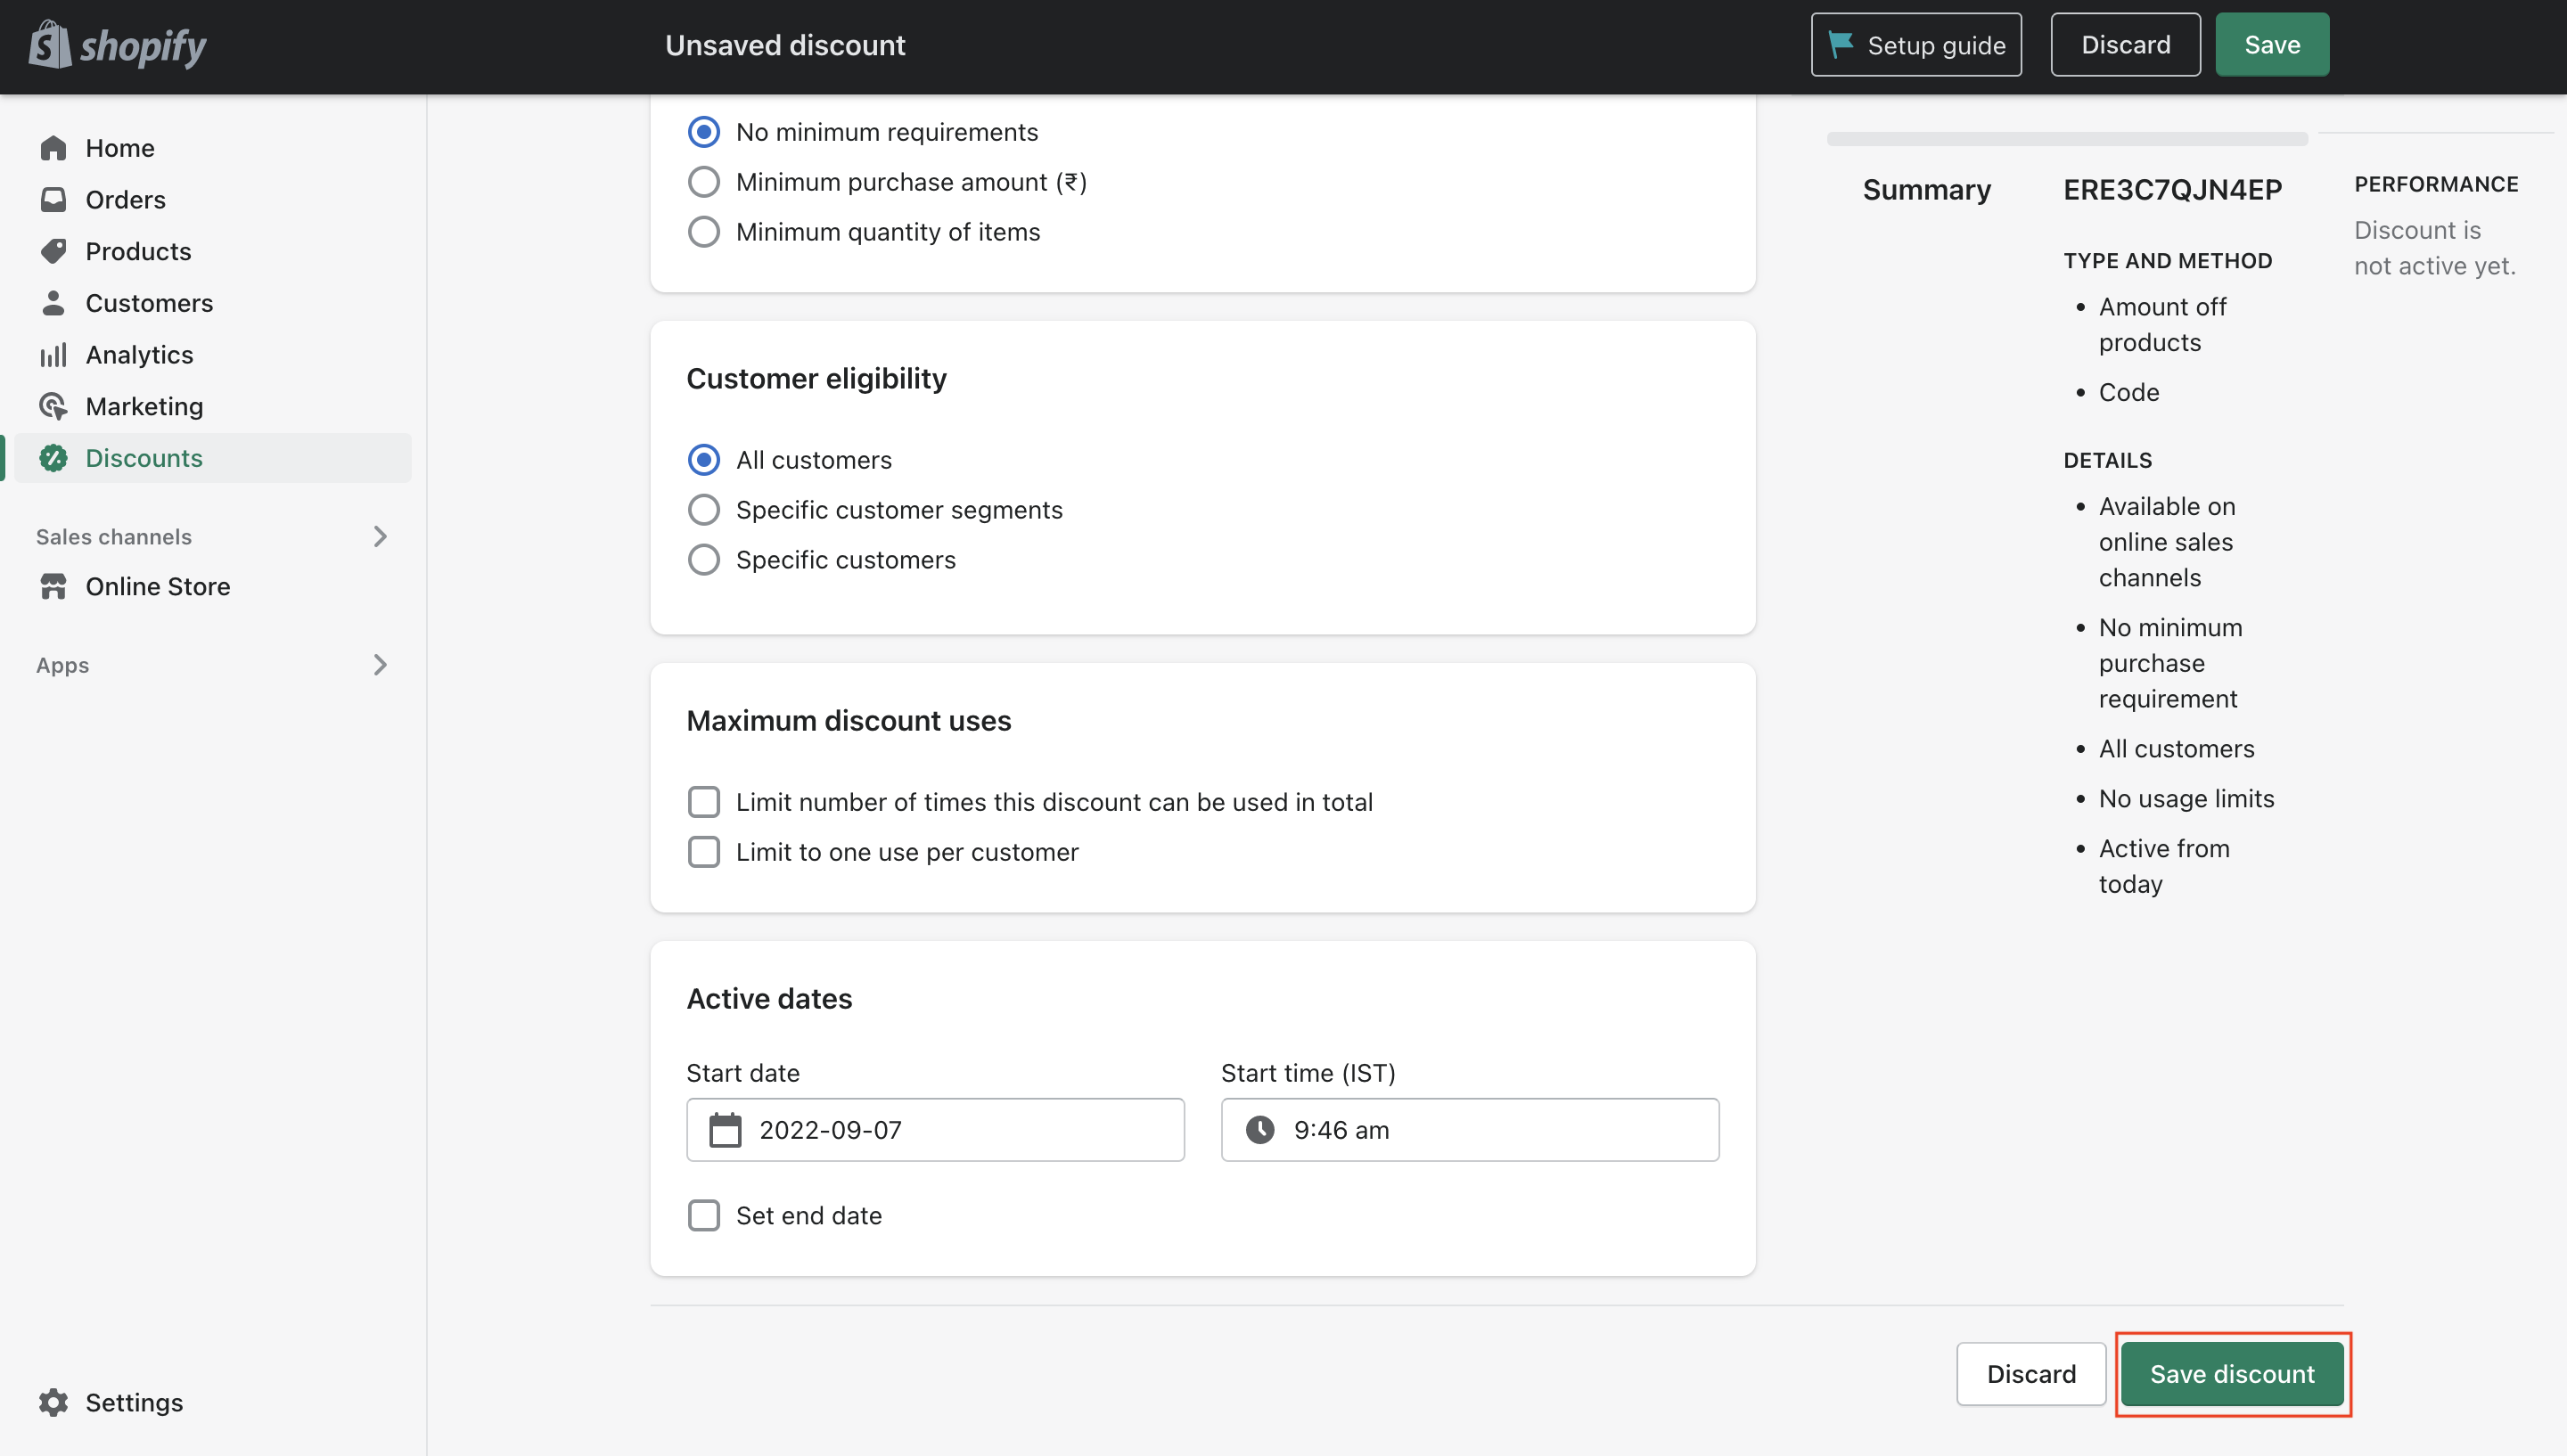
- Method: Choose Discount code or Automatic discount.
Disable Coupon Listing
Disable Coupon Listing
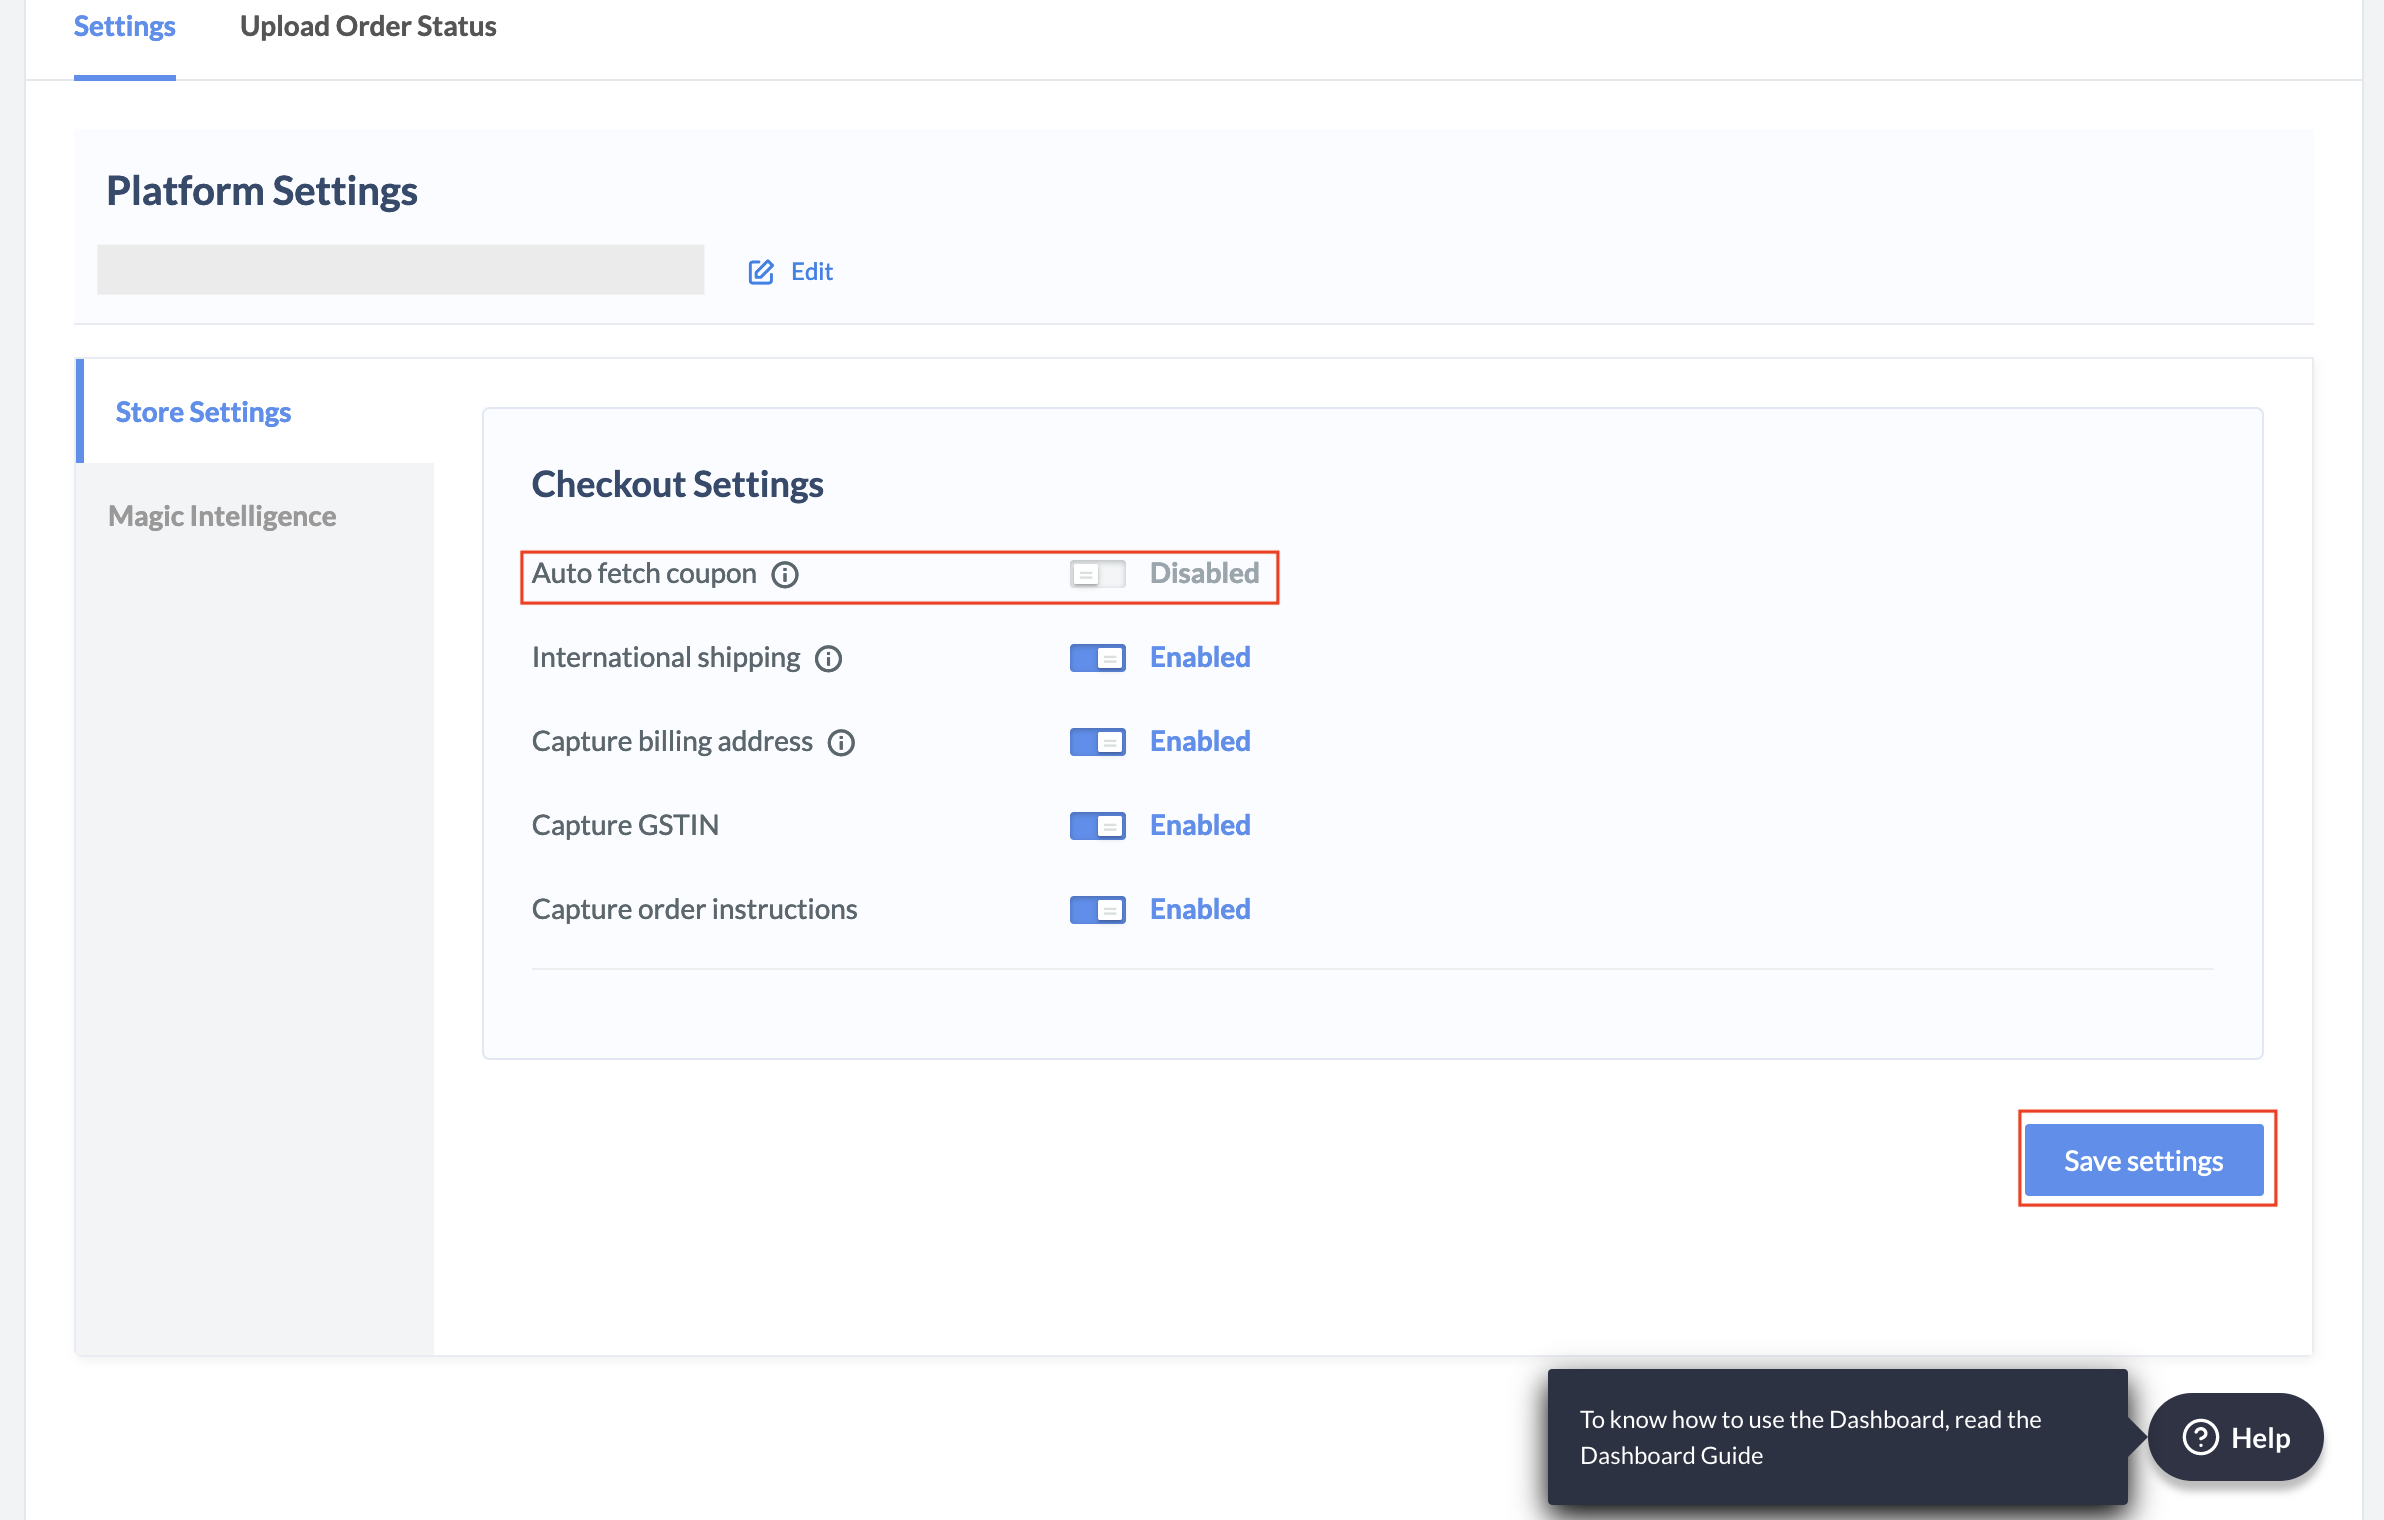
- Log in to the Dashboard and navigate to Magic Checkout → Setup & Settings → Platform Settings.
- Select Shopify from the Platform drop-down list and enter your Shopify Store ID.
- Navigate to Checkout Setup, disable Auto fetch coupon and click Save settings.
Login With Razorpay
Razorpay Magic SSO (Single Sign-On) offers a seamless login experience, helping you enhance conversions and gain valuable insights into user behaviour. Know more about how to setup login with Razorpayt on your shopify store.Orders Not Placed
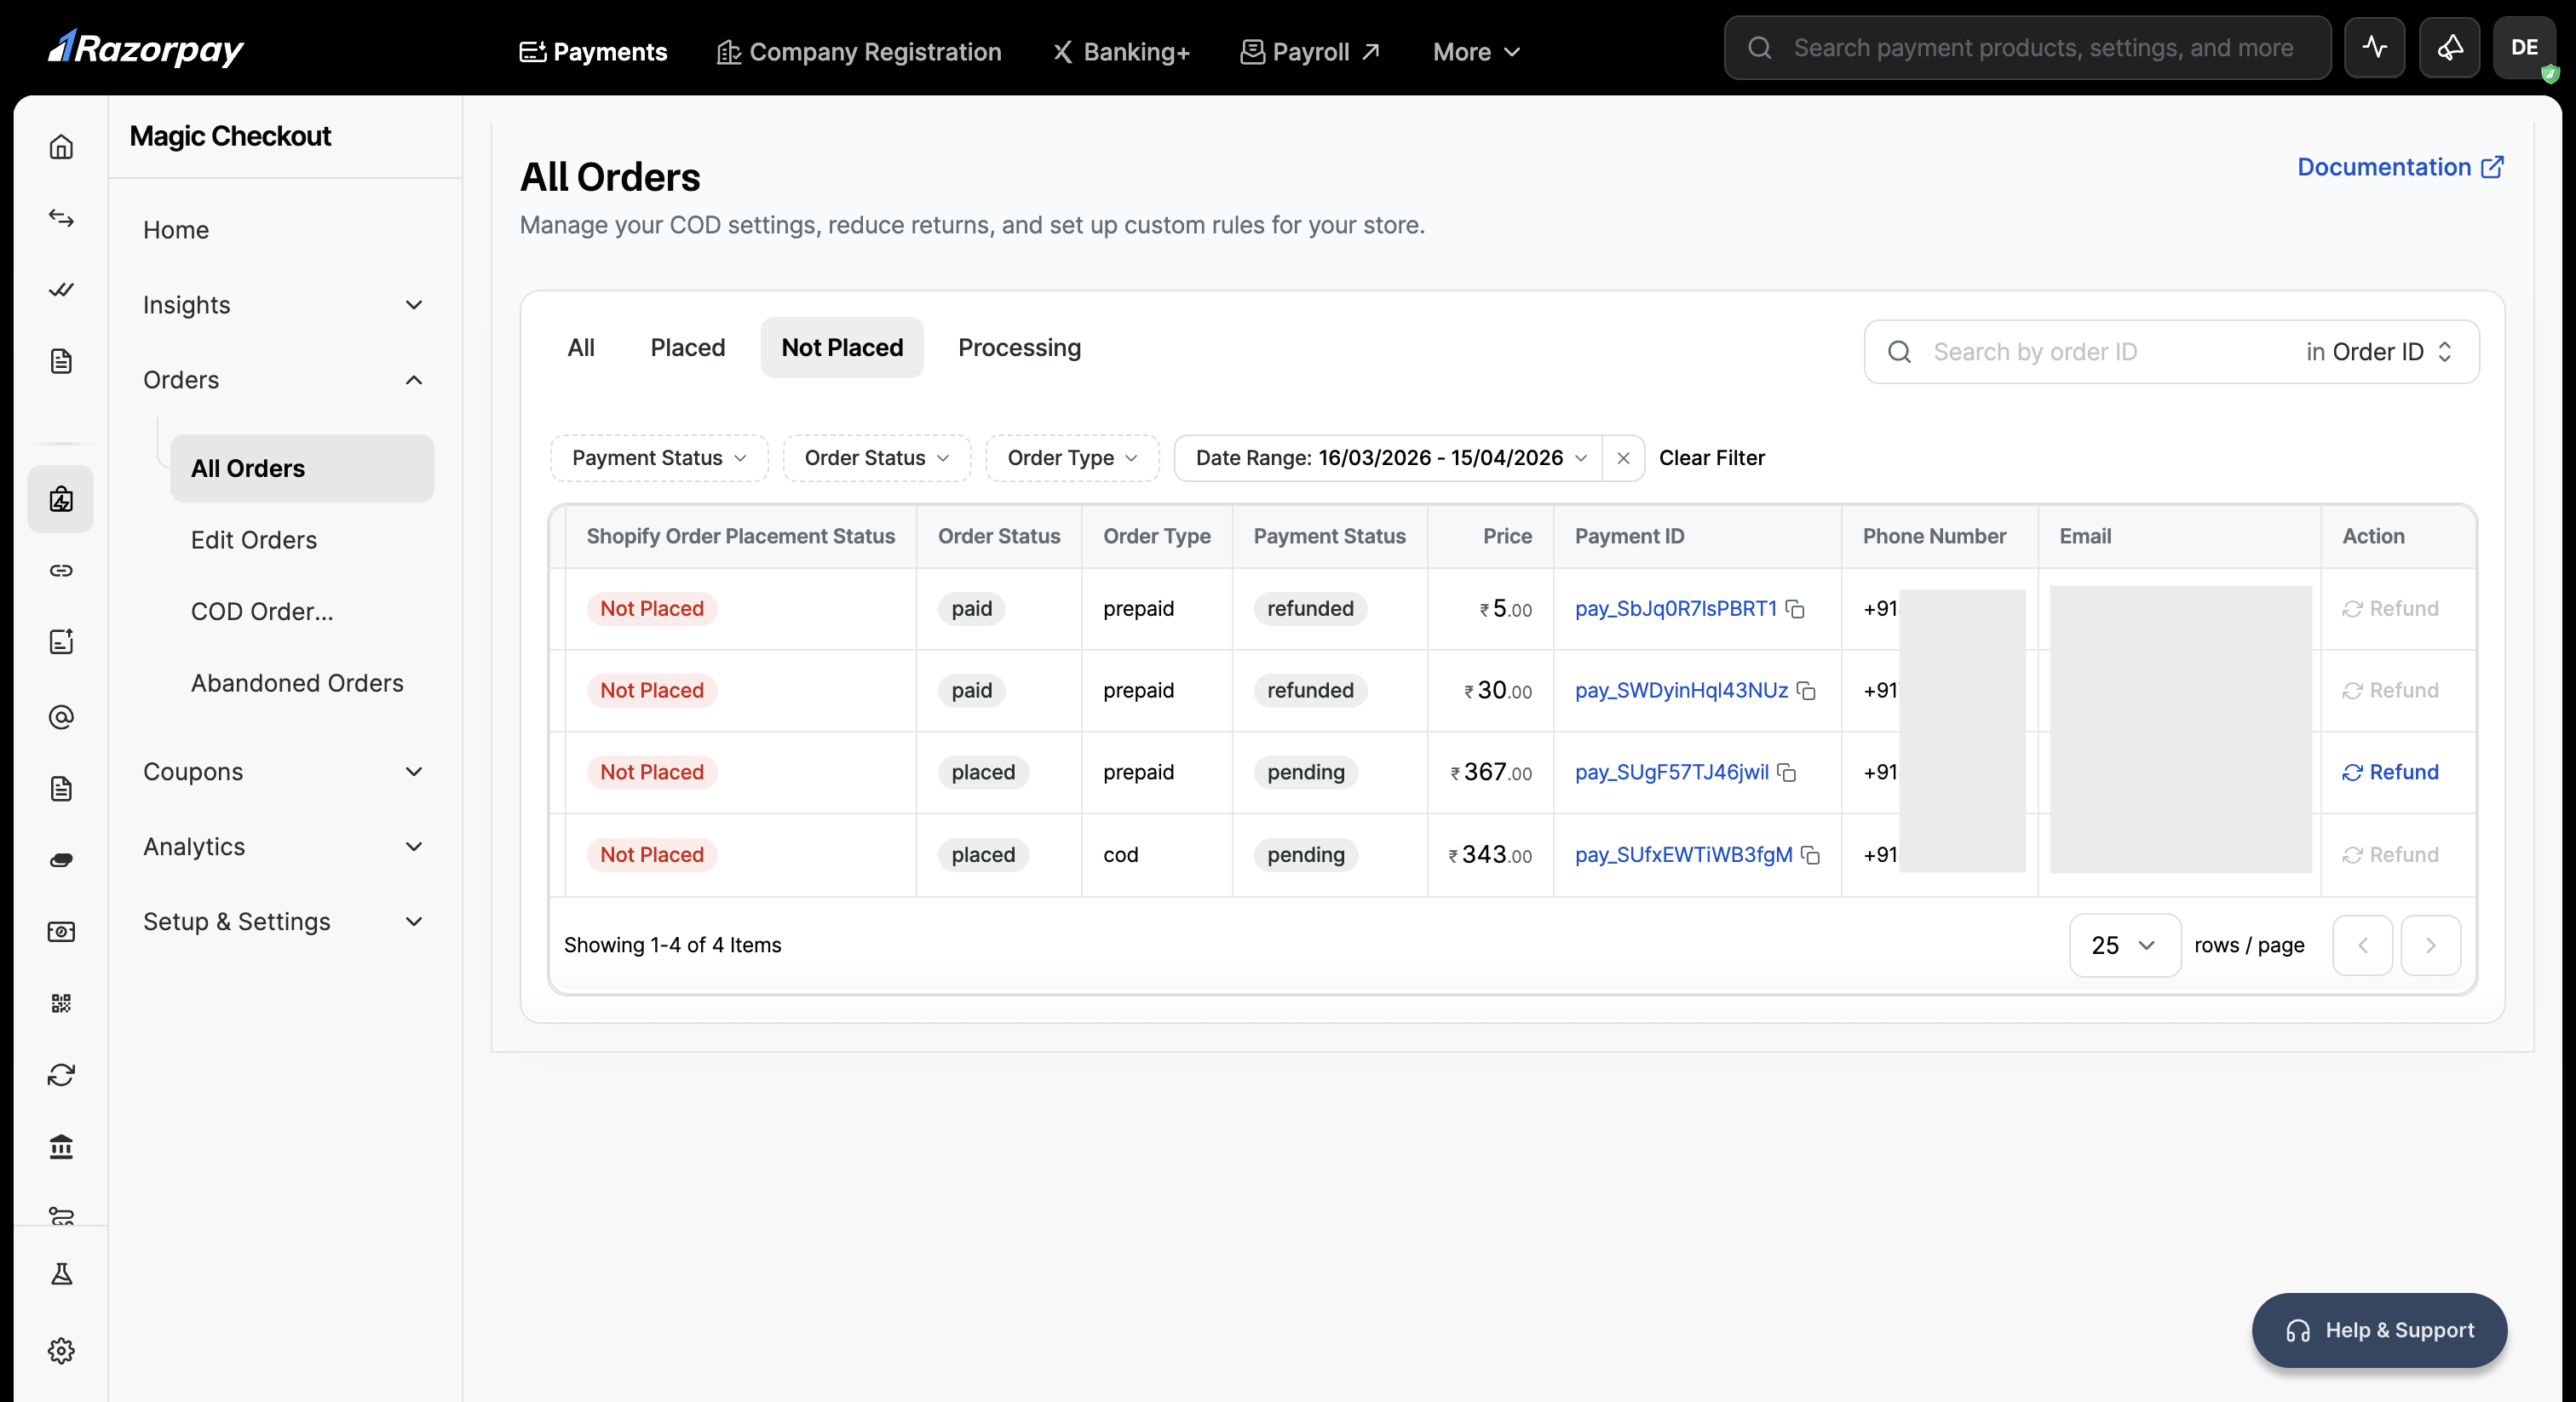
When a customer completes payment on Magic Checkout but the corresponding order fails to be created on Shopify, the order is marked as not placed. Common reasons include out-of-stock items, validation errors (such as invalid email or phone number), or an amount mismatch between Magic Checkout and Shopify.To view and manage not placed orders:
To view and manage not placed orders:
- Log in to the Dashboard and navigate to Magic Checkout → Orders.
- Click All Orders → Not Placed tab.
- Search for a specific order using the customer’s Phone Number or Email.
- Select the order you want to refund in the Action column and click Refund.
Inventory and Stock
When a customer completes payment on Magic Checkout, there is a small window between payment confirmation and final order placement on Shopify during which an item in the cart may go out of stock. You can configure whether Magic Checkout should place the order regardless of stock availability or automatically refund the customer if an item goes out of stock. Know more about Inventory and Stock Settings.Offers
You can offer discounts or cashback on Magic Checkout to attract customers and improve sales. Using Razorpay Offers, you can completely control the discounts offered to your customers. You create offers on prepaid methods, which will reflect on the Magic Checkout payment page. Know how to create offers.Shopify Bundles
Shopify Bundles is a Shopify app that lets businesses create and sell combinations of products together, often at a discounted price, helping increase average order value (AOV). Magic Checkout now supports Shopify Bundles. Customers with bundle products in their cart can complete their purchase entirely within Magic Checkout, without being redirected to the native Shopify checkout.Zero Rupee Orders
A zero rupee order occurs when the final payable amount on a customer’s cart is reduced to ₹0 after applying a 100% discount. This can happen when a customer uses a combination of coupons, gift cards, or loyalty coins that covers the entire order value. For example, if a customer’s cart value is ₹500 and they apply a gift card worth ₹500, the final amount payable becomes ₹0. Previously, Magic Checkout displayed ₹1 and opened the payment gateway for such orders. Now, when the order amount is ₹0, the payment gateway is skipped entirely and the customer sees a Place Order button directly on the checkout screen to complete their purchase.Separate Billing Address
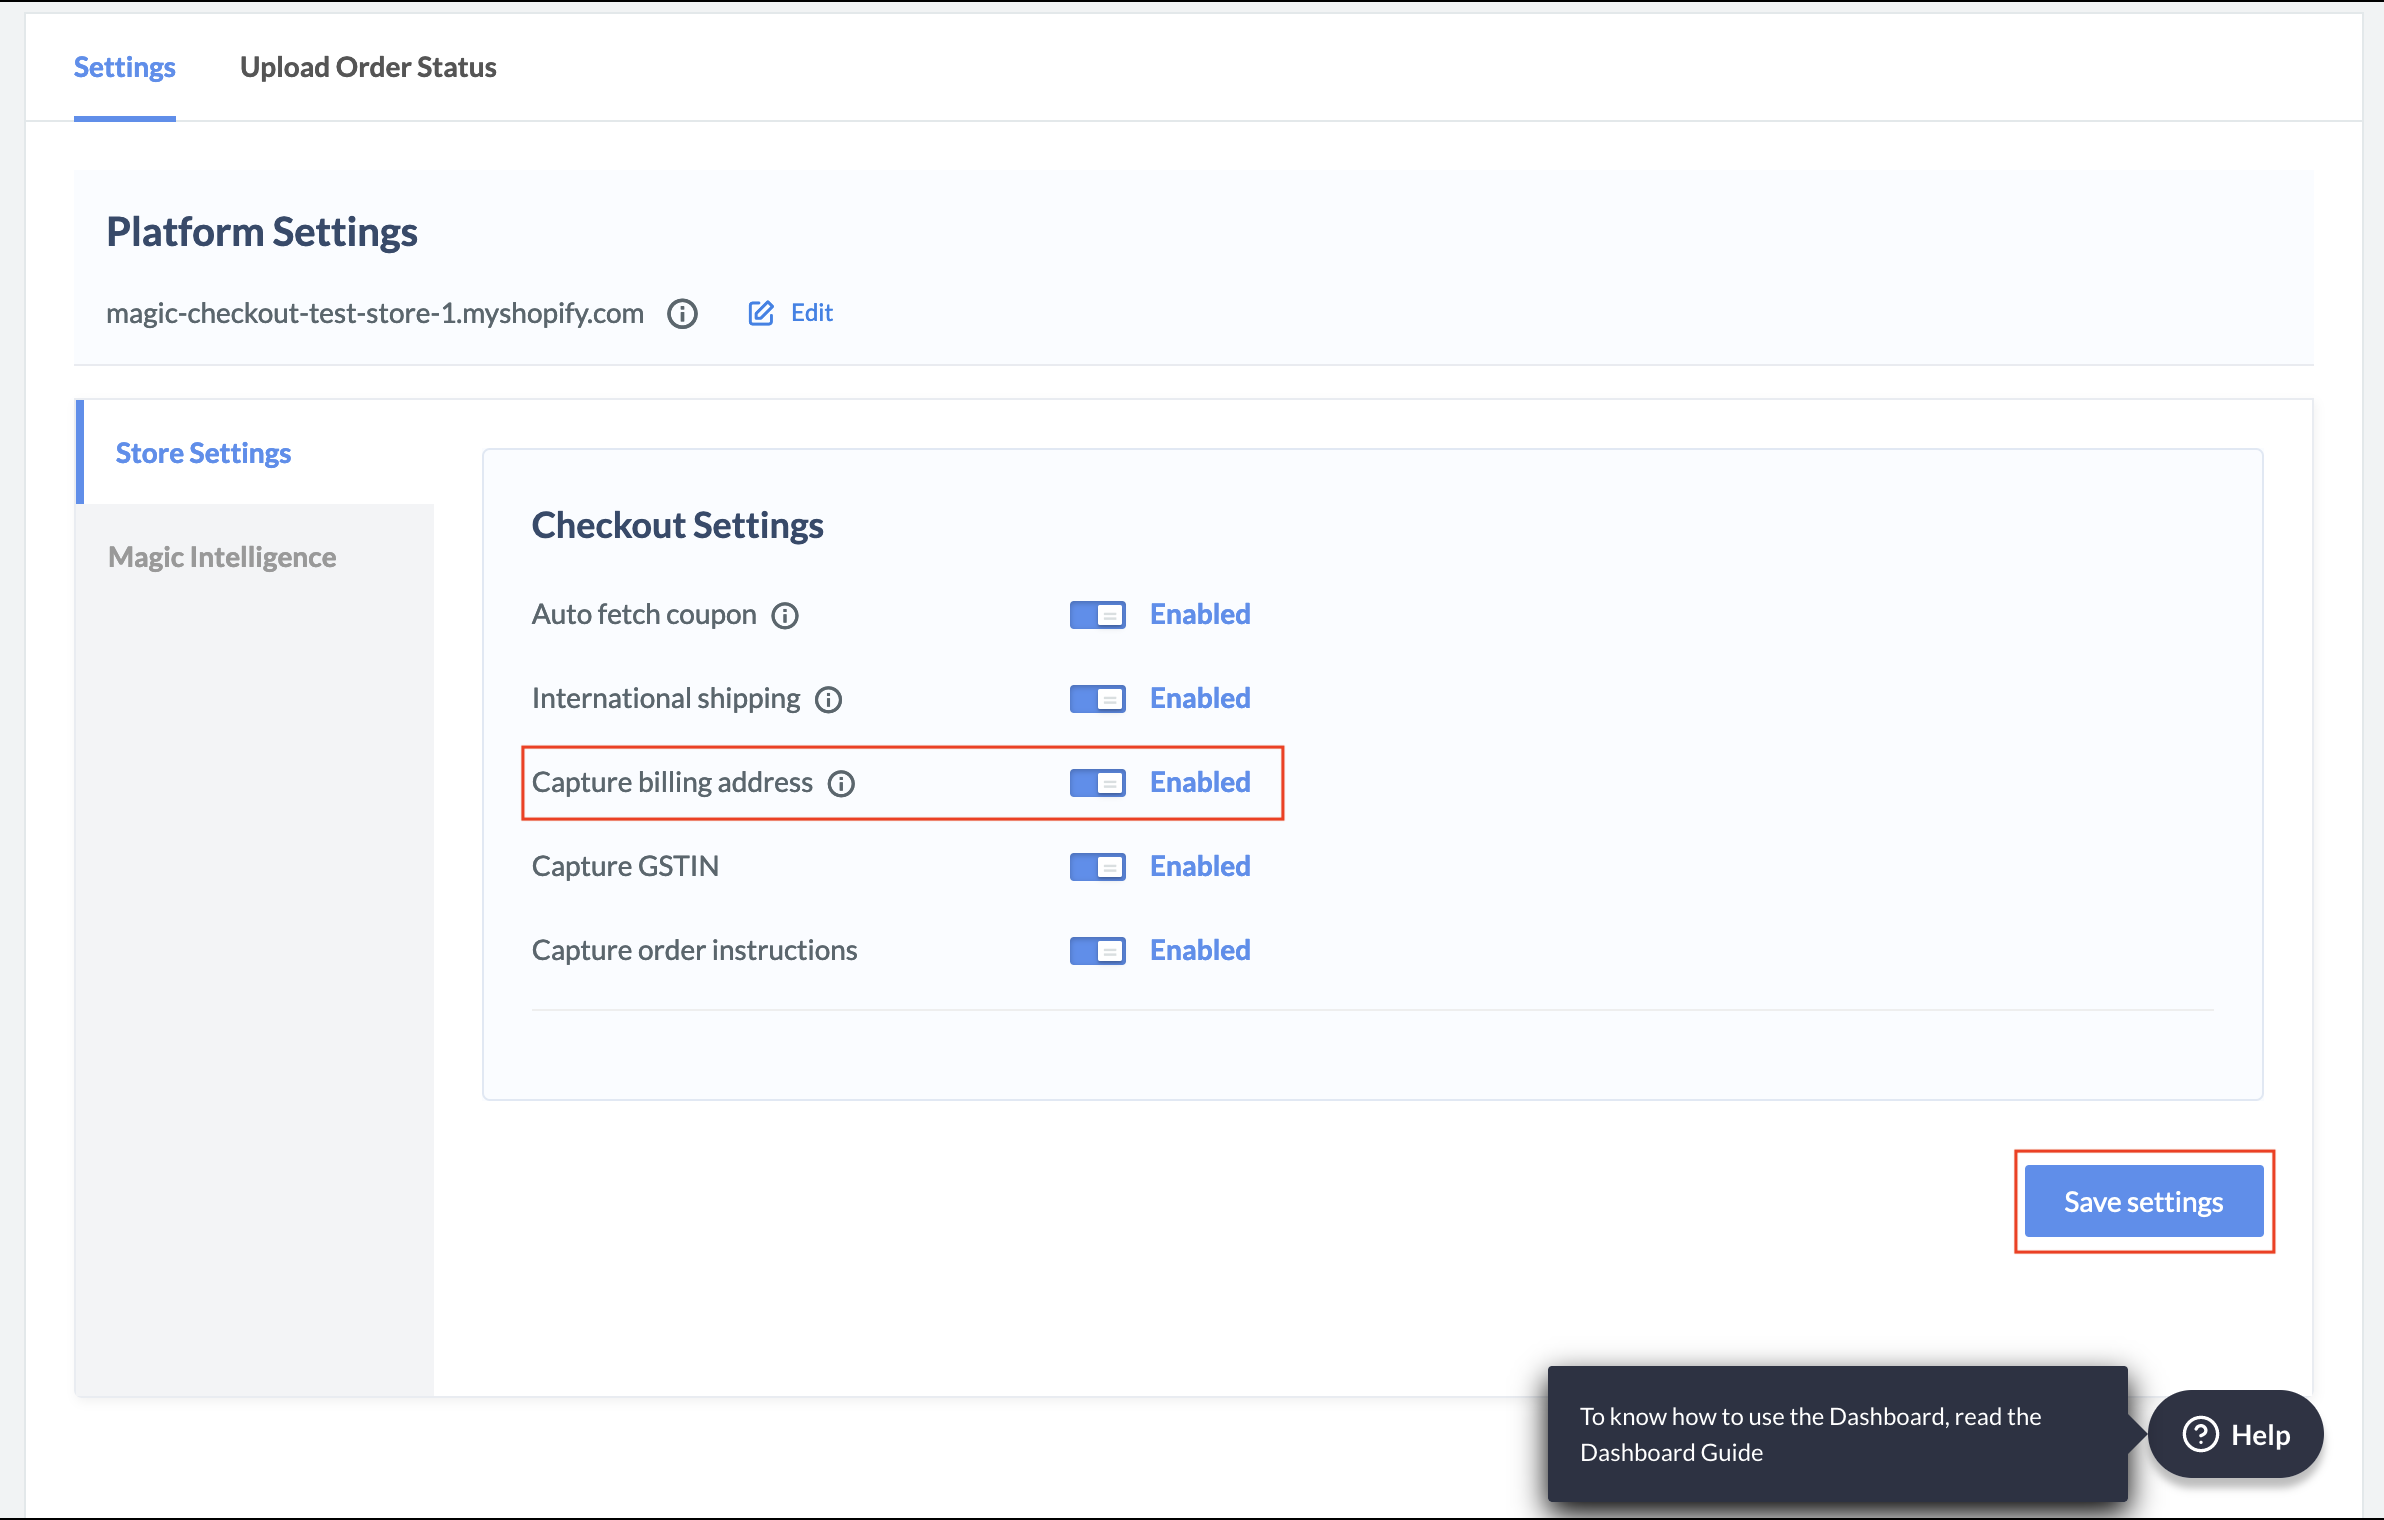
You can collect the customer’s Billing Address separately from the Shipping address. Customers can enter a separate billing address apart from the delivery address.To collect the billing address separately:
To collect the billing address separately:
- Log in to the Dashboard and navigate to Magic Checkout → Setup & Settings → Platform Settings.
- Select Shopify from the Platform drop-down list and enter your Shopify Store ID.
- Navigate to Checkout Setup, enable Capture billing address and click Save settings.
Capture and Validate GSTIN
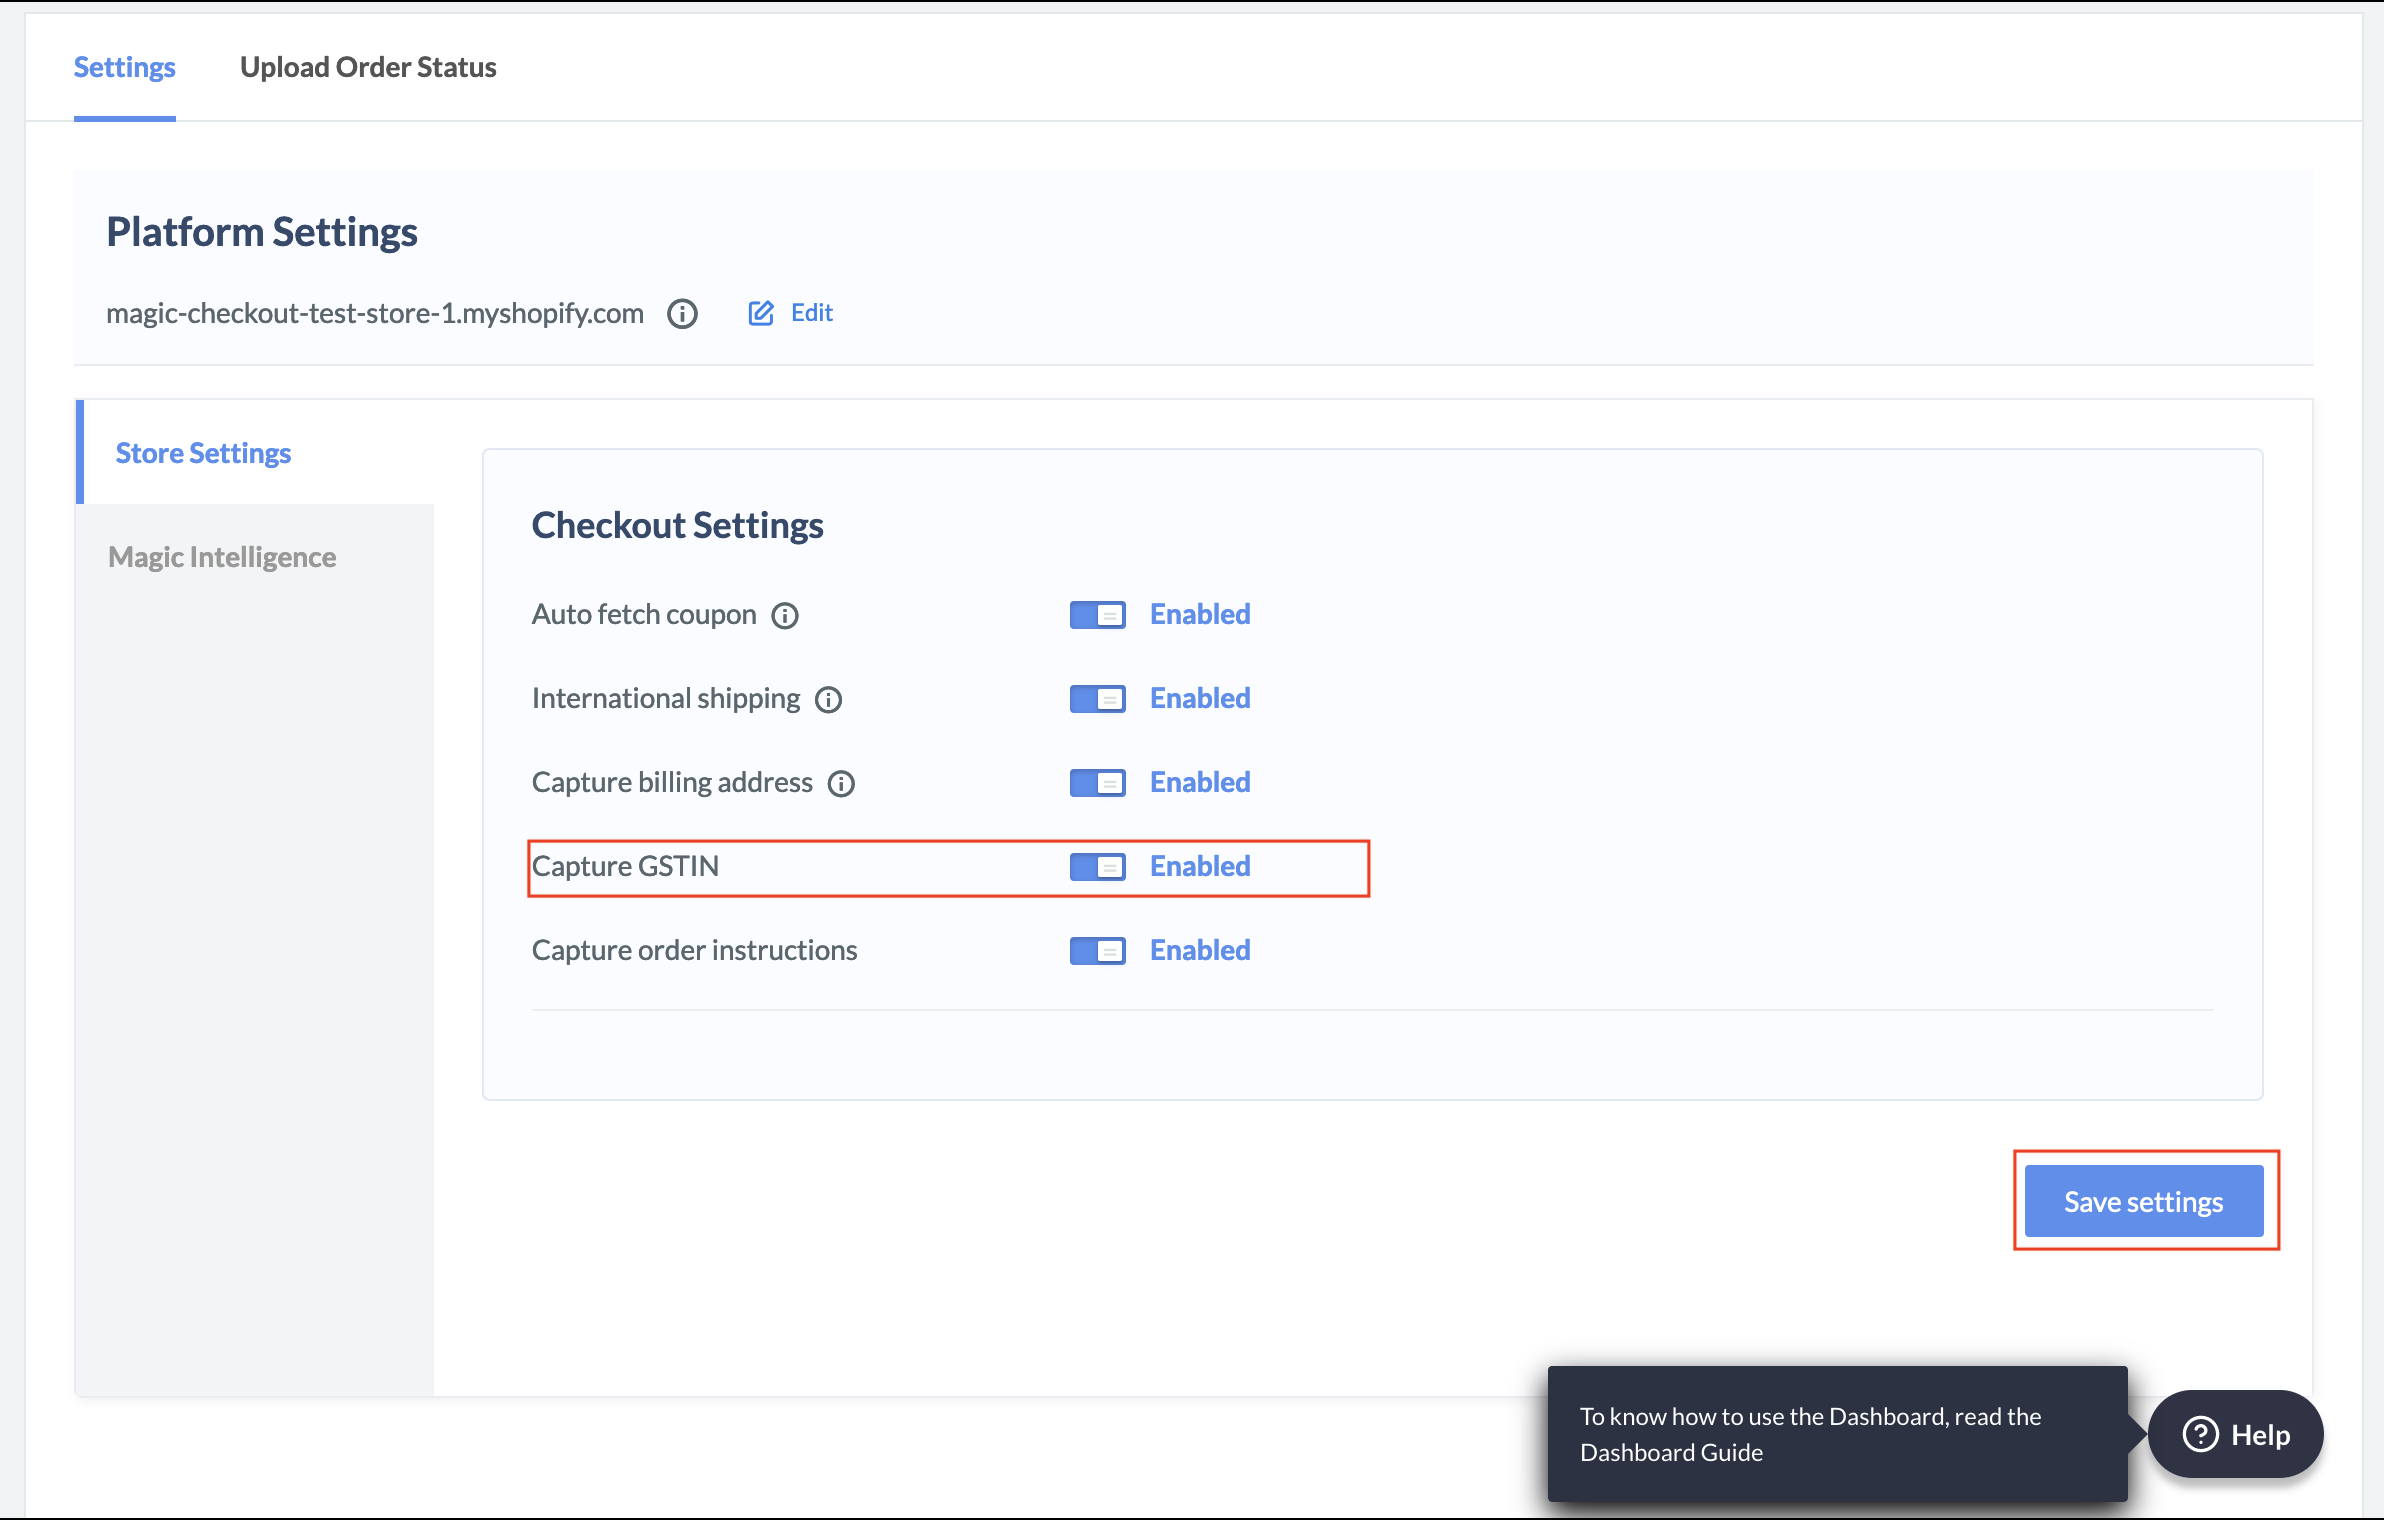
You can capture and validate your customer’s GST details from the Dashboard.To capture and validate GSTIN details:
To capture and validate GSTIN details:
- Log in to the Dashboard and navigate to Magic Checkout → Setup & Settings → Platform Settings.
- Select Shopify from the Platform drop-down list and enter your Shopify Store ID.
- Navigate to Checkout Setup, enable Capture GSTIN and click Save settings.
- To validate the GSTIN entered by your customers at checkout, contact our Support team to enable GSTIN validation for your account.
- After the customers place an order, you can view the GST details on the Shopify and the Razorpay Dashboard.
- Shopify Dashboard: On the Shopify Admin Dashboard, navigate to Orders and select the required order number to view the details.
- Razorpay Dashboard: On the Razorpay Dashboard, navigate to Transactions → Orders and select the required Order Id to view the details.
Customer Experience
Customer Experience
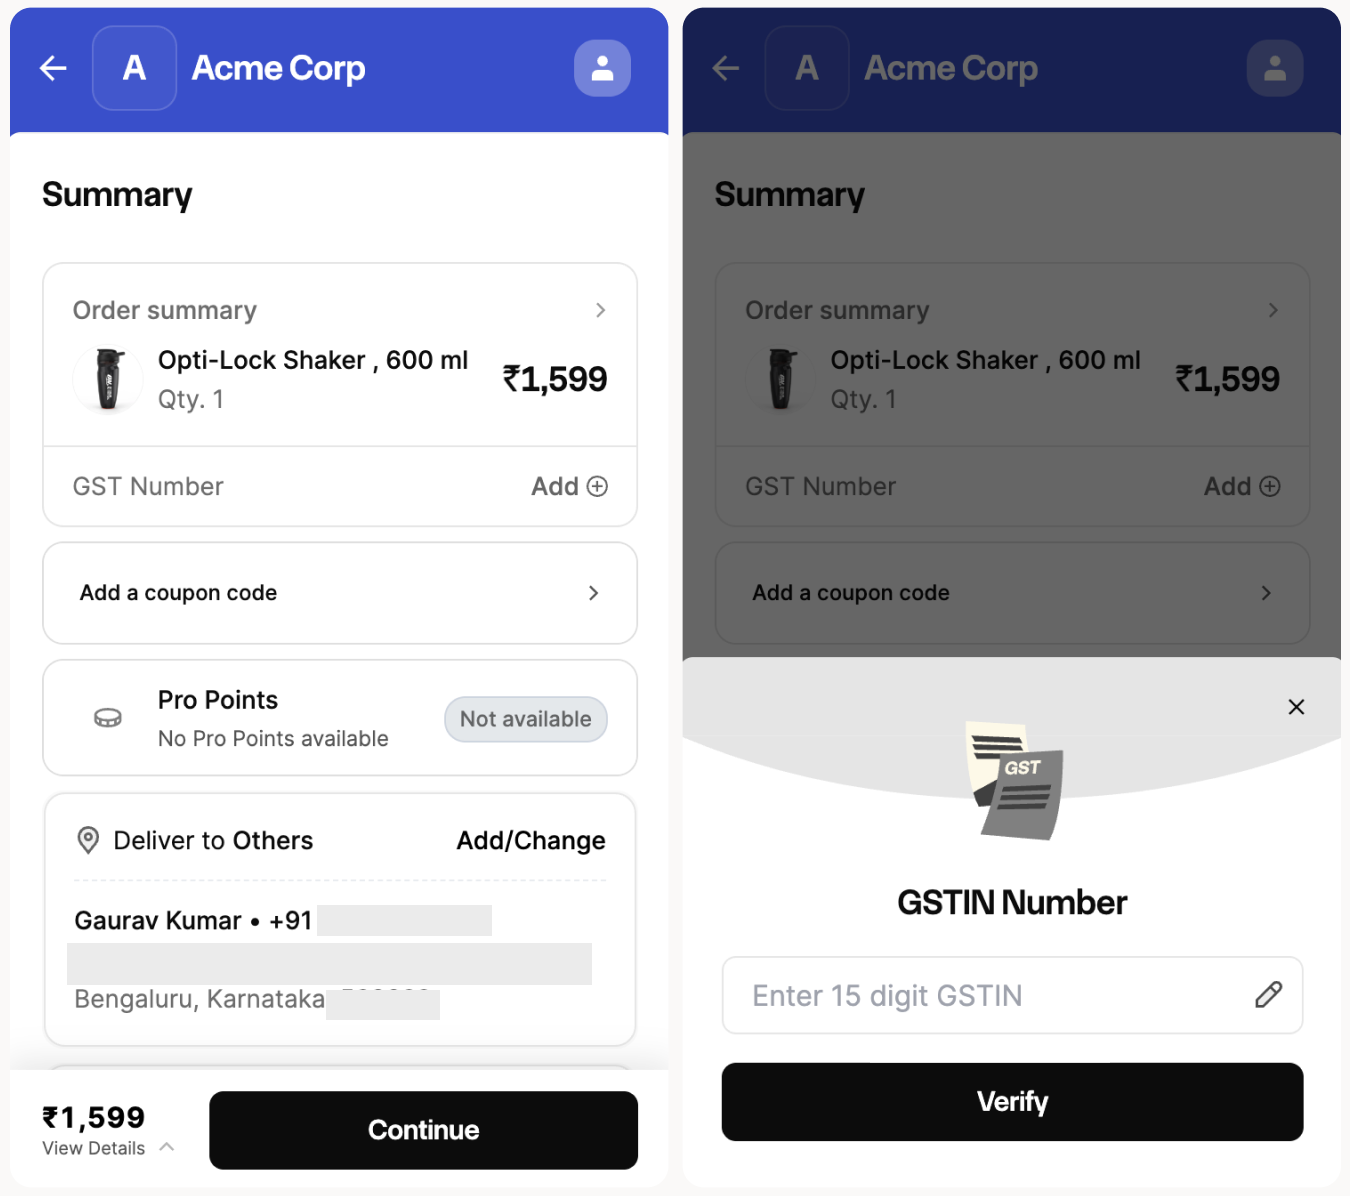
- On the order summary screen, the customer clicks Add next to GST Number.
- A GSTIN Number pop-up appears.
- The customer enters their GSTIN and clicks Verify.
- If the GSTIN is invalid, an error message is displayed asking the customer to enter a valid GSTIN number.
- If the GSTIN is valid, the GST-registered address is automatically set as the billing address.
Capture Order Instructions
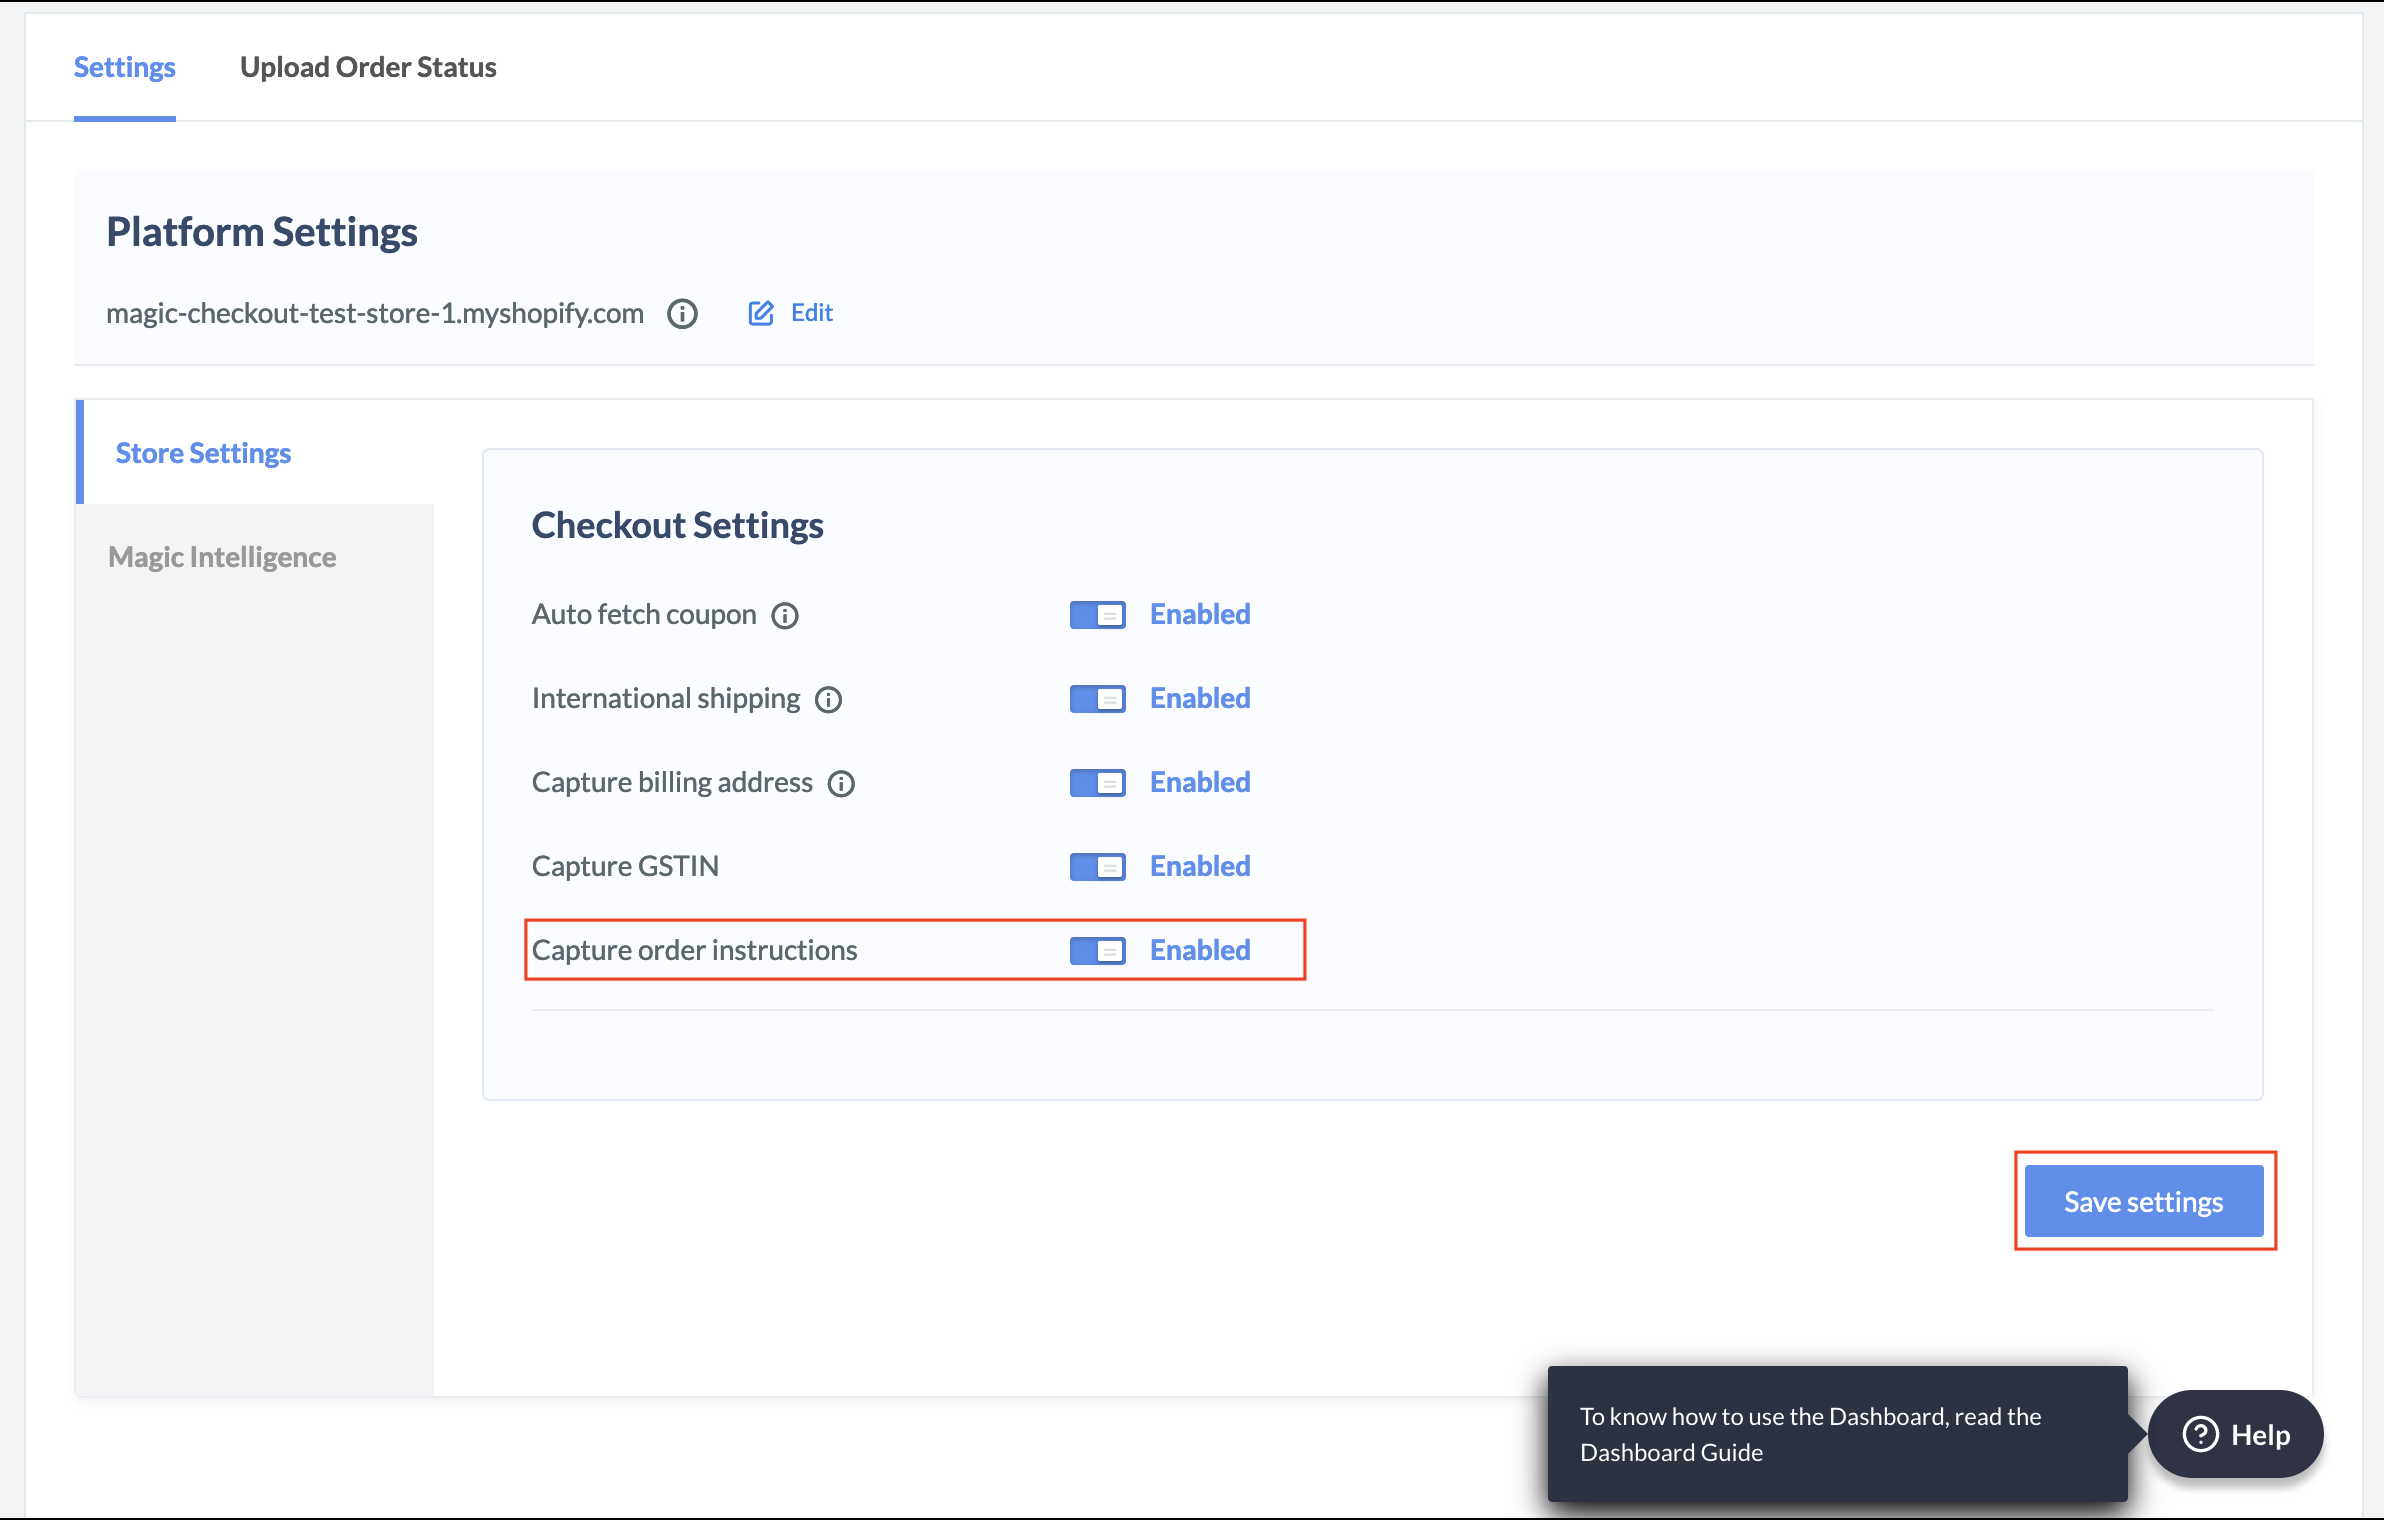
You can enable your customers to enter order instructions if any at the checkout. For example, customer may want a particular order to be expedited.To capture order instructions:
To capture order instructions:
- Log in to the Dashboard and navigate to Magic Checkout → Setup & Settings → Platform Settings.
- Select Shopify from the Platform drop-down list and enter your Shopify Store ID.
- Navigate to Checkout Setup, enable Capture order instructions and click Save settings.
- After the customers place an order, you can view the GST details on the Shopify and the Razorpay Dashboard.
- Shopify Dashboard: On the Shopify Admin Dashboard, navigate to Orders and select the required order number to view the details.
- Razorpay Dashboard: On the Razorpay Dashboard, navigate to Transactions → Orders and select the required Order Id to view the details.
Google Analytics
You can use Google Analytics to track orders based on your requirement.To activate Google analytics:
To activate Google analytics:
- Log in to the Dashboard and navigate to Magic Checkout → Setup & Settings → Platform Settings.
- Select Shopify from the Platform drop-down list and enter your Shopify Store ID.
- Navigate to Analytics and ads setup → Google Analytics.
- Select the integration type from the drop-down list.
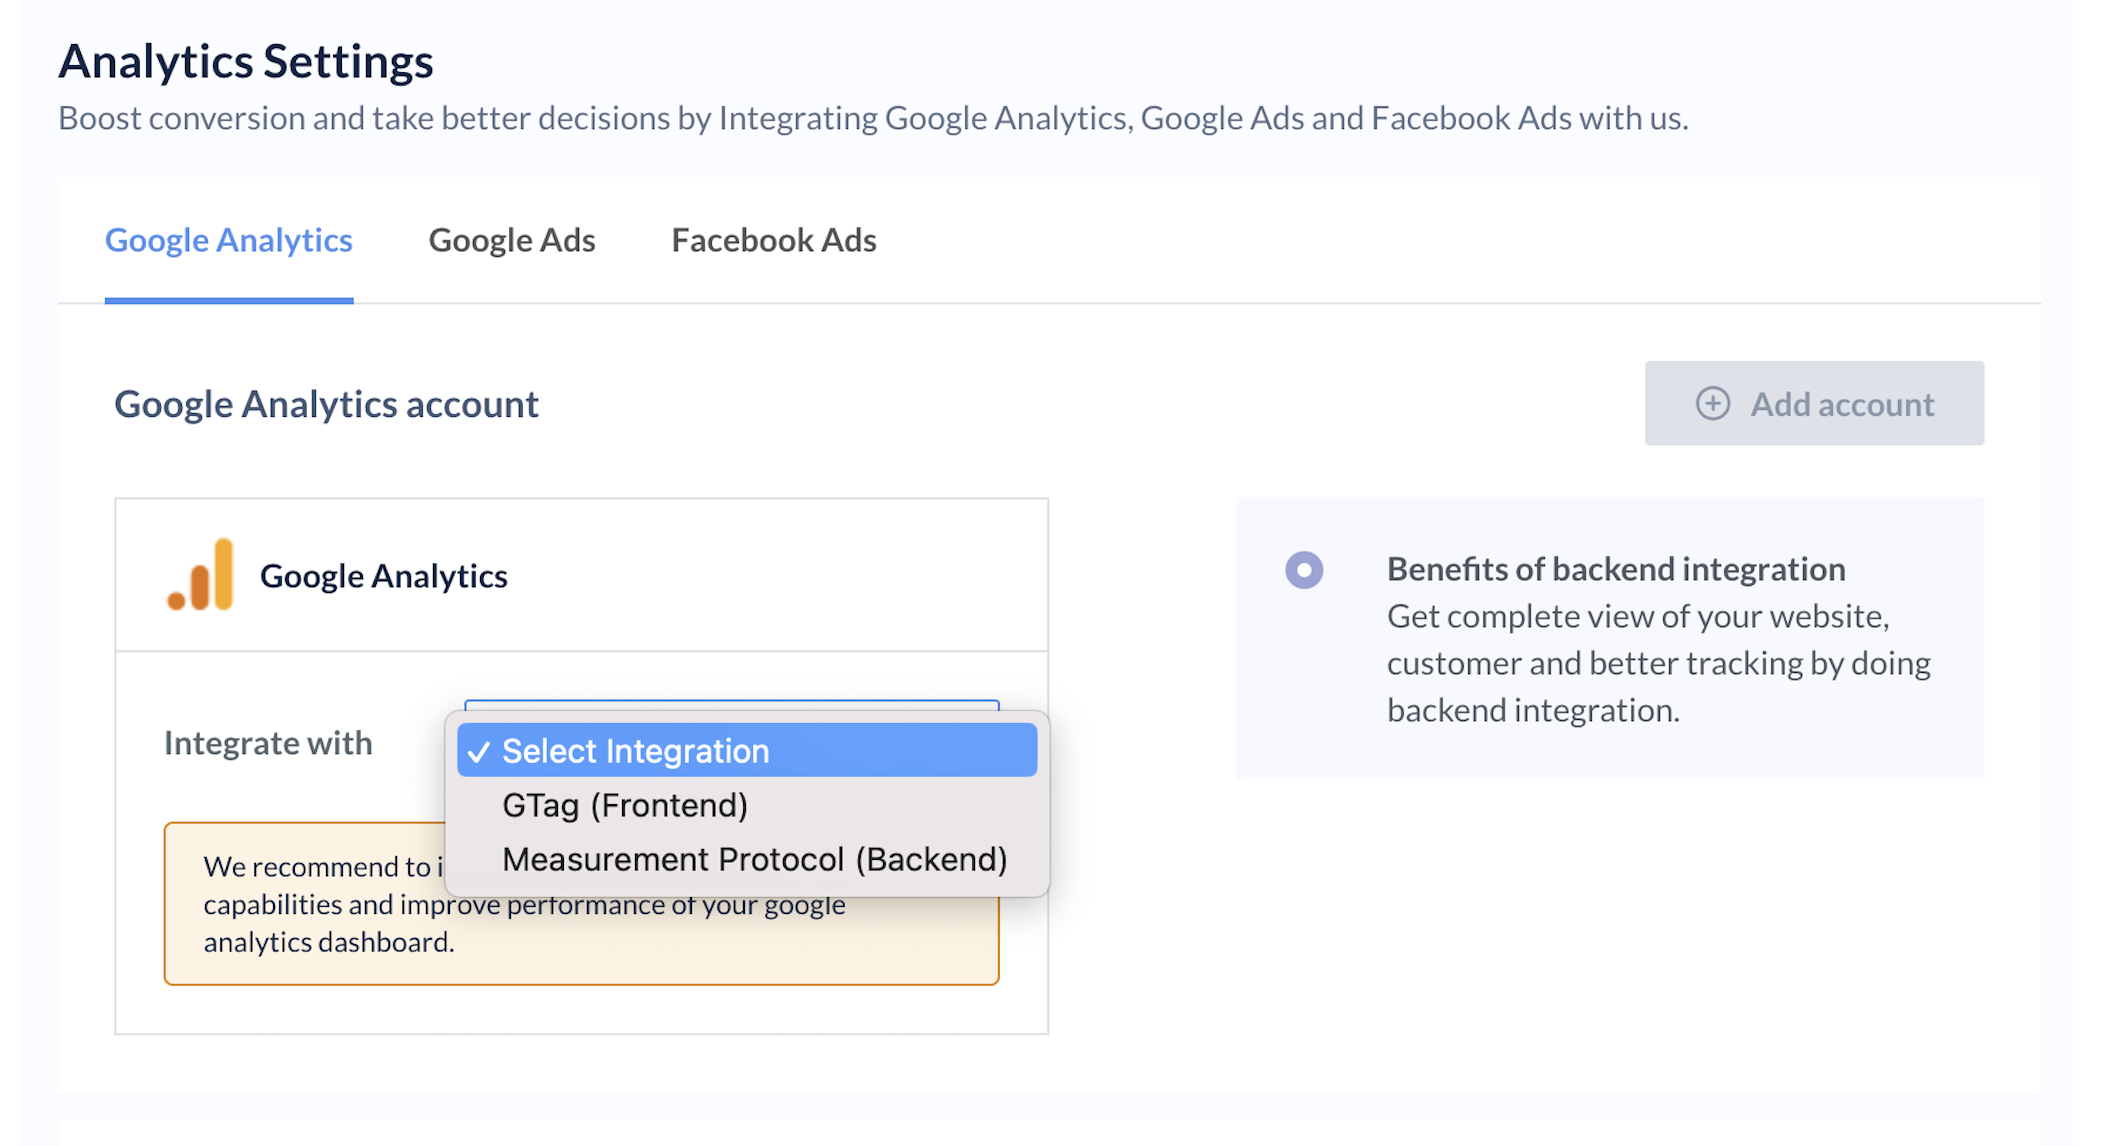
- GTag
- Measurement Protocol (Recommended)
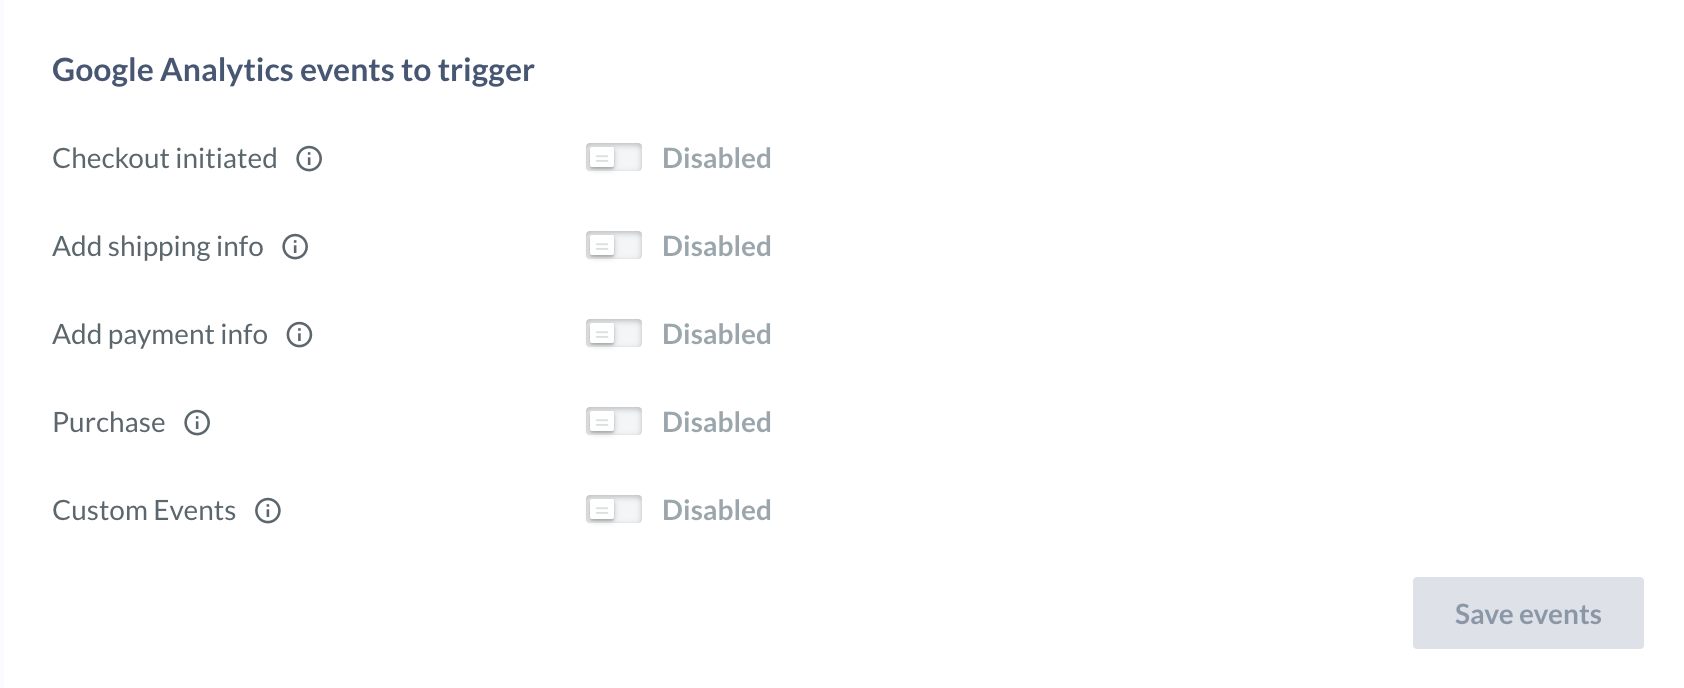
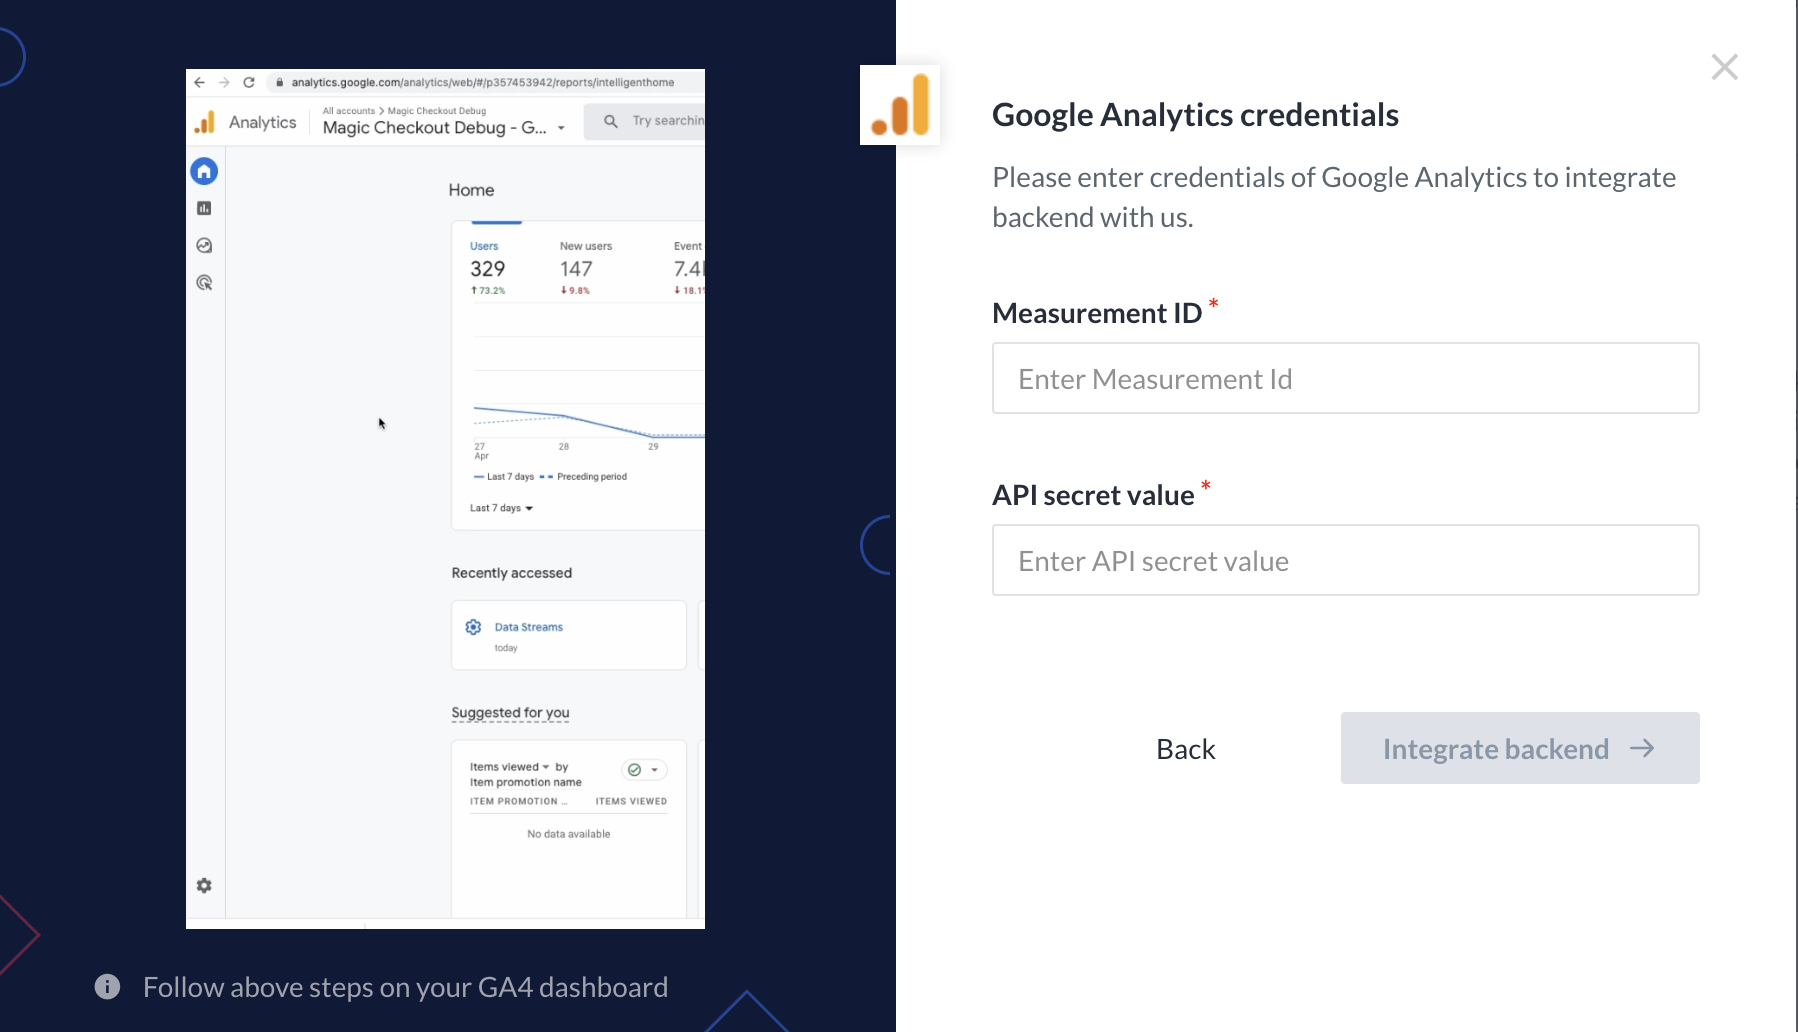
List of Events
List of Events
Google Ads
Integrate Google Ads on your Shopify store based on your requirement.To integrate Google Ads:
To integrate Google Ads:
- Log in to the Google Ads Dashboard.
- Navigate to Goals if you are using the newer version of the Google Ads Dashboard. If you are using an older version, navigate to Tools & Settings.
- Select the primary conversion action (purchase) you want to track.
- Click Tag setup and click Install the tag yourself.
- The second snippet code (Event snippet) is the Gtag code. Copy the code and share it with us at magic-checkout-support@razorpay.com to get this feature enabled on your Shopify store.
Facebook Ads
Integrate Facebook Ads on your Shopify store based on your requirement.To integrate Facebook ads:
To integrate Facebook ads:
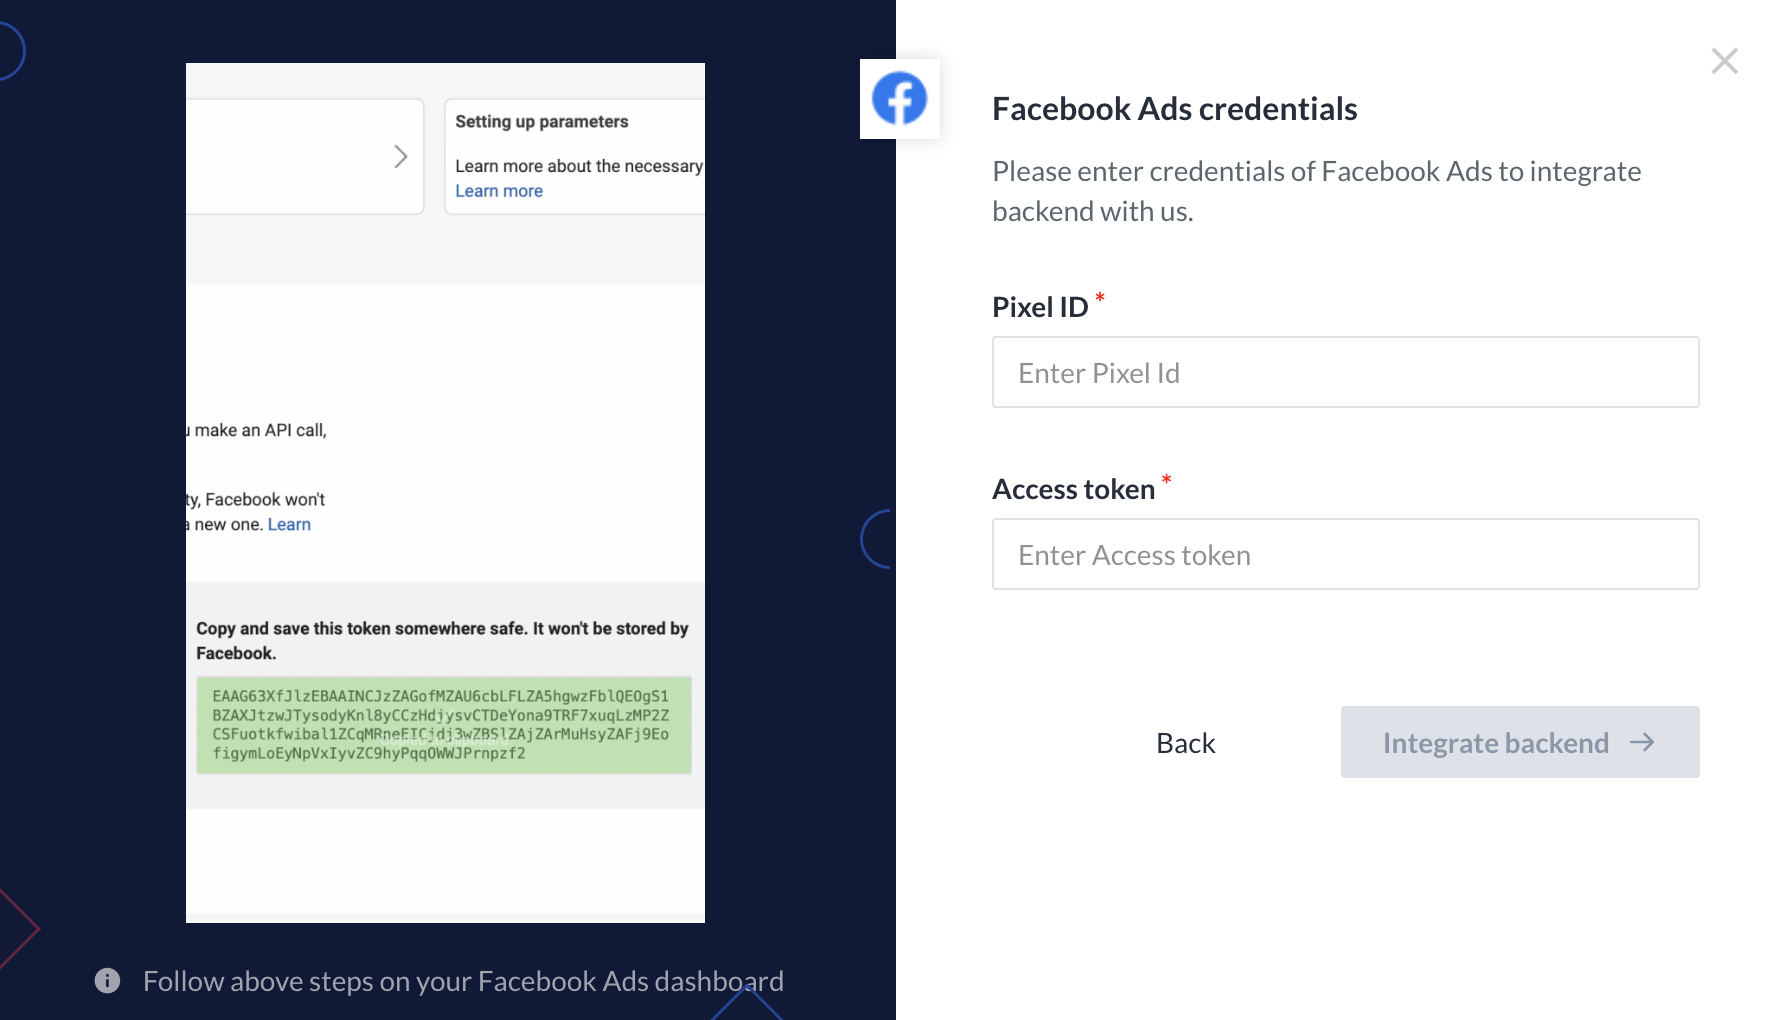
- Log in to the Dashboard and navigate to Magic Checkout → Setup & Settings → Platform Settings.
- Select Shopify from the Platform drop-down list and enter your Shopify Store ID.
- Navigate to Analytics and ads setup → Facebooks Ads.
- Select the integration type from the drop-down list.
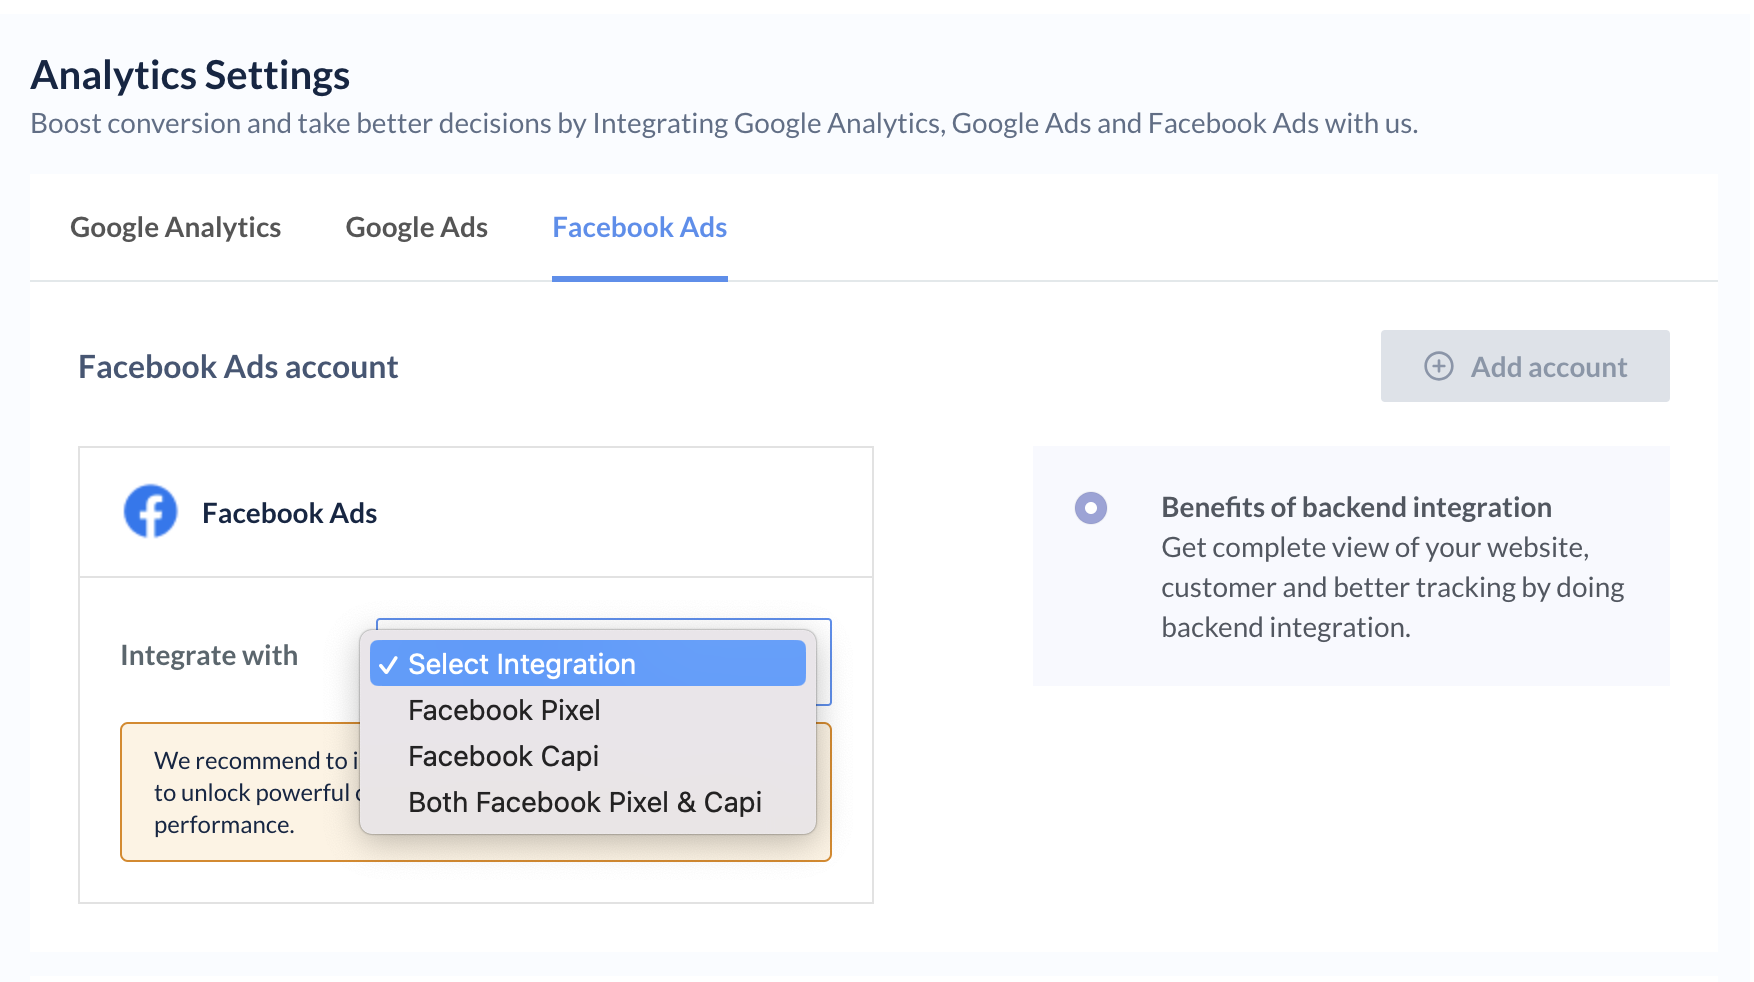
- Facebook Pixel
- Facebook Capi
- Both Facebook Pixel and Capi (Recommended)
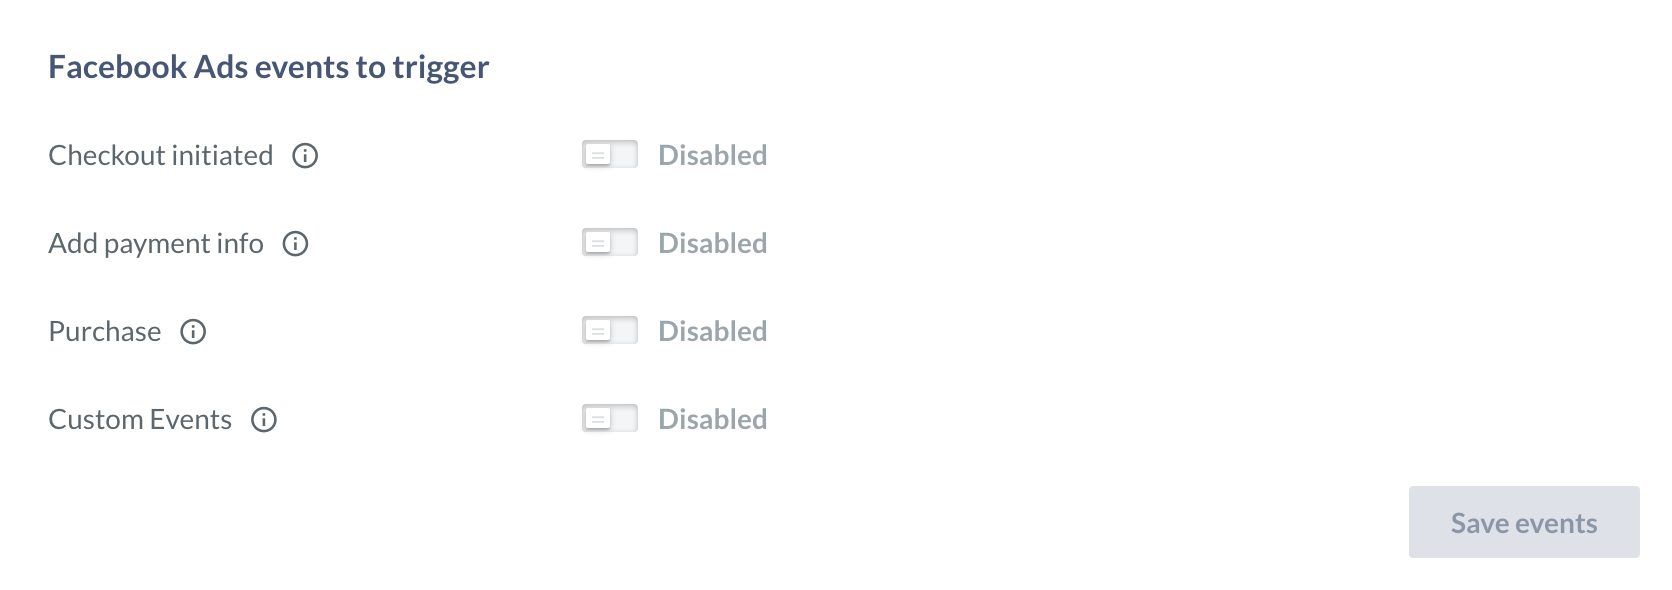
List of Events
List of Events
Gift Card Settings
You can enable various gift card options for your customers from the Dashboard.To enable gift card settings:
To enable gift card settings:
- Log in to the Dashboard and navigate to Magic Checkout → Setup & Settings → Platform Settings.
- Select Shopify from the Platform drop-down list and enter your Shopify Store ID.
- Navigate to Checkout Setup and enable Pay with gift card.
- Once you enable the gift card settings, you can also enable the following options if required:
- Pay with multiple gift cards: Allow your customers to pay with multiple gift cards at once.
- Restrict paying with coupon and gift card together: Restrict your customers from using both coupon and gift card together while making a payment.
- Restrict buying gift cards with existing gift cards: Restrict your customers from purchasing gift cards using existing gift cards.
- Restrict customers from clubbing gift cards with COD: Restrict the usage of gift cards if your customers avail of the cash on delivery option.
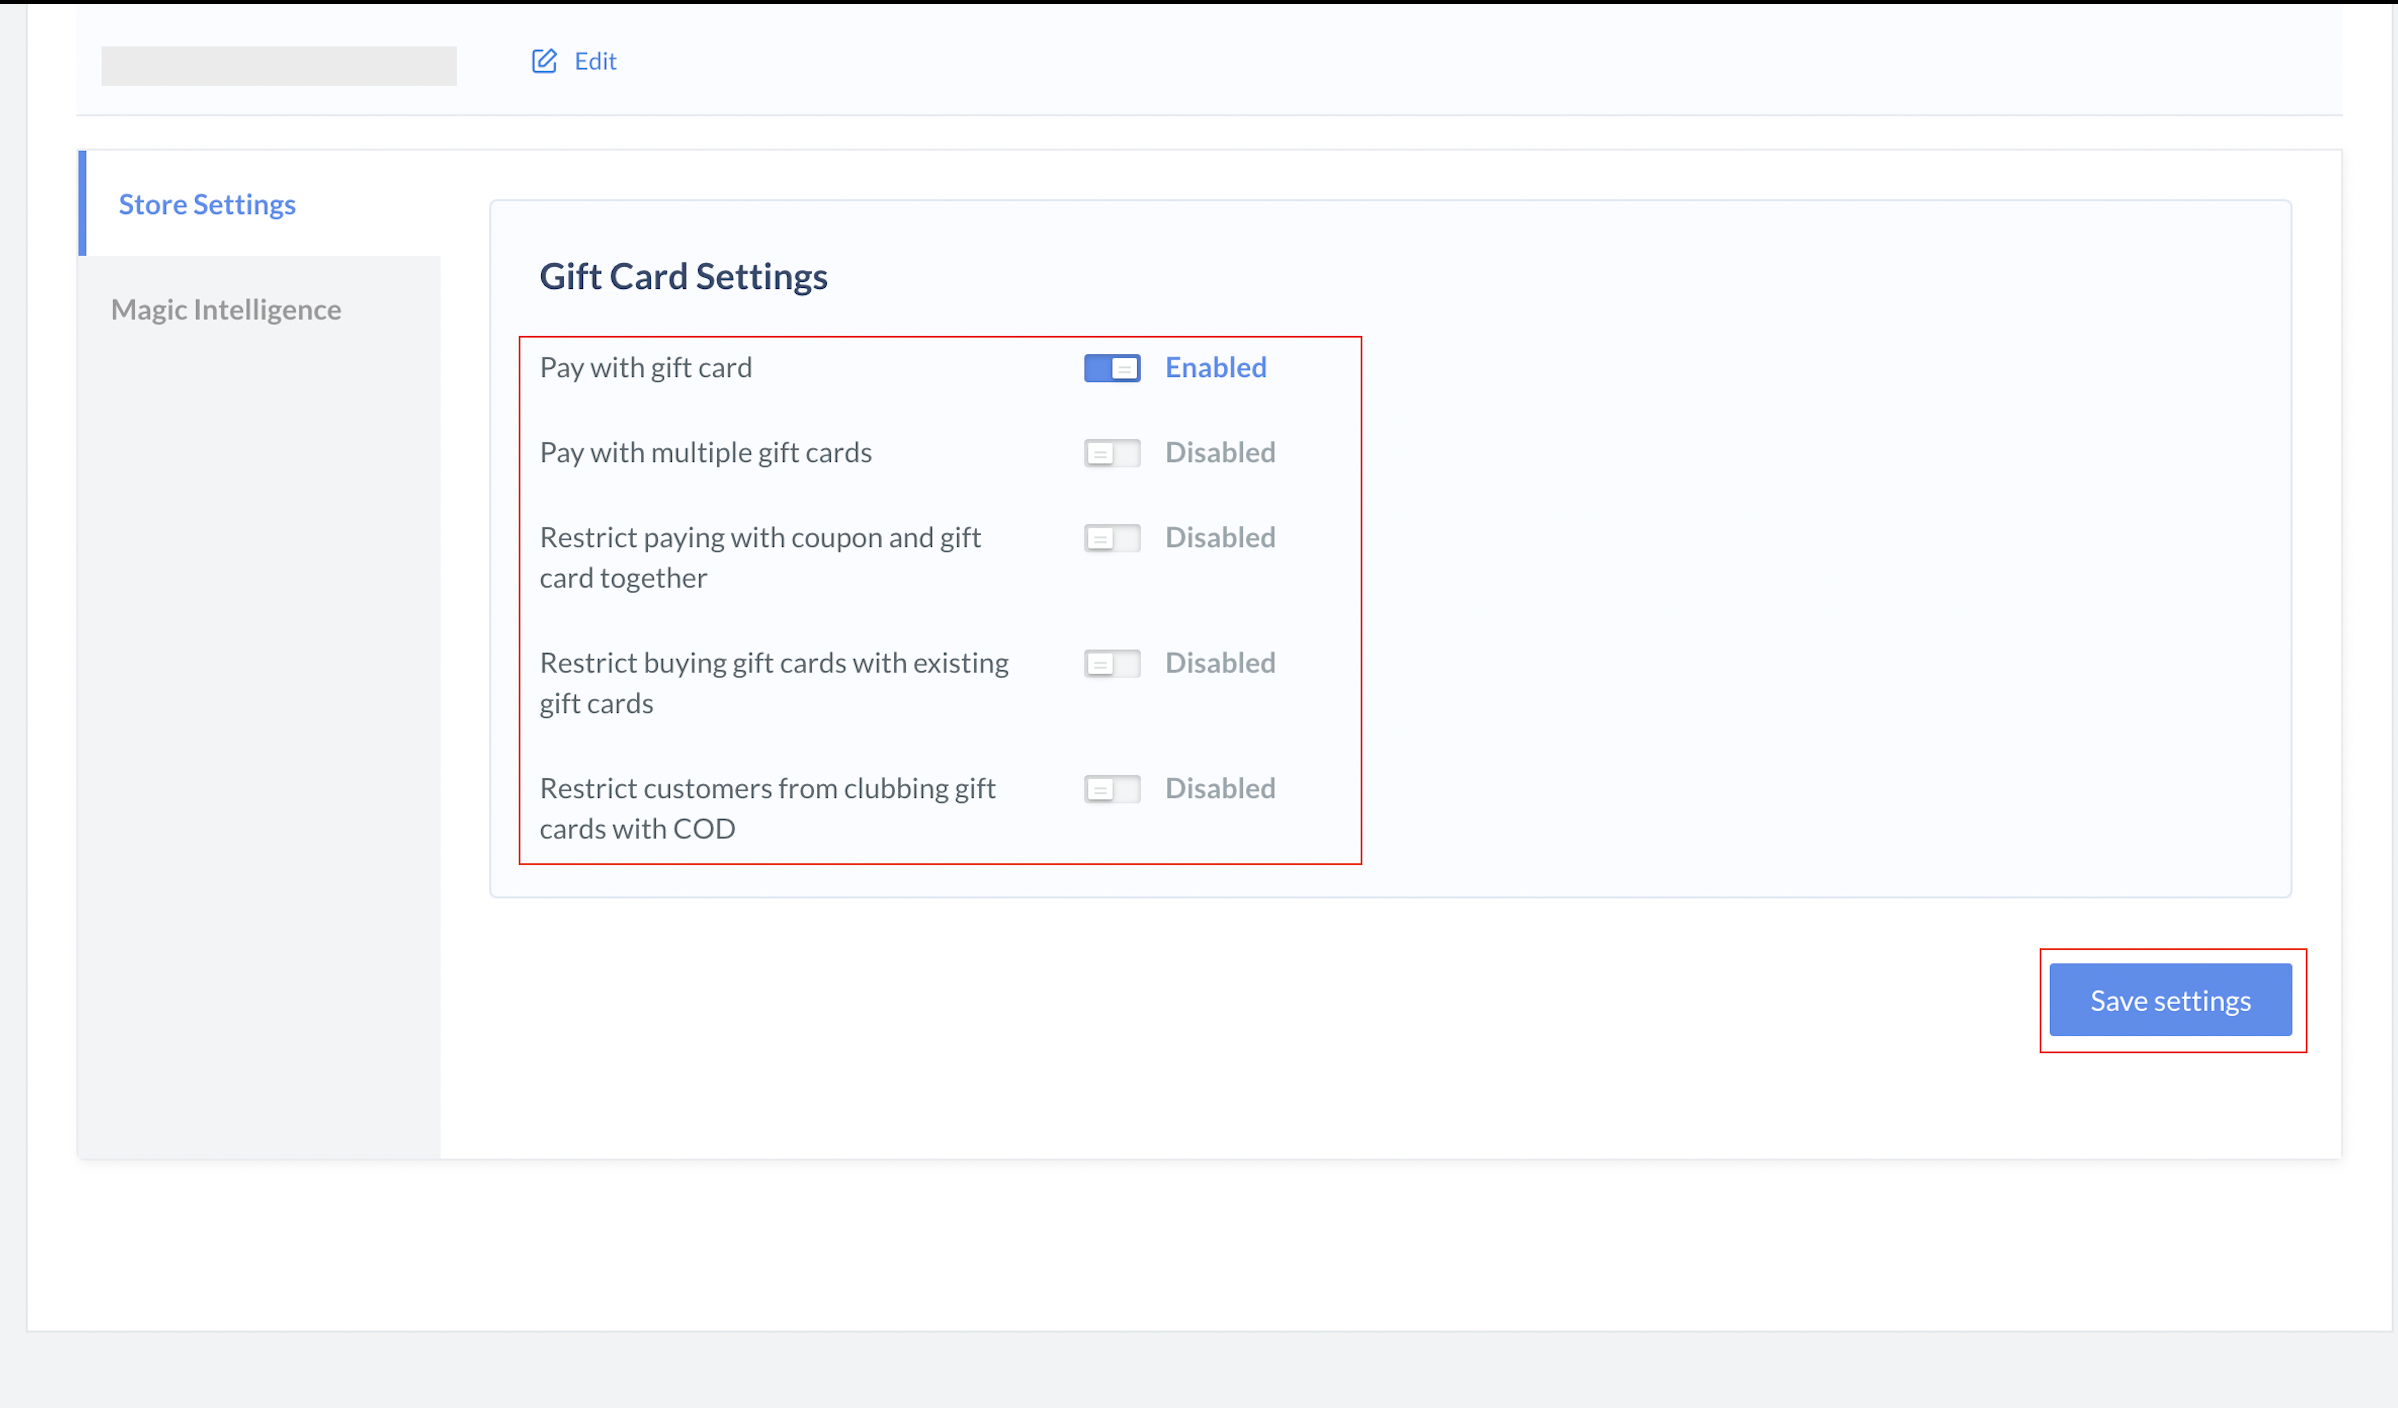
- Click Save Settings.