

Common
What are the benefits of using Magic Checkout?
What are the benefits of using Magic Checkout?
- Seamless prepaid and COD options
- Faster checkout experience
- Higher conversions
- Saved customer details
- Reduced RTOs (Return To Origin)
- Efficient promotions
How does Magic Checkout improve conversion rates?
How does Magic Checkout improve conversion rates?
How do I check if Magic Checkout is enabled on my account?
How do I check if Magic Checkout is enabled on my account?
Magic Checkout is not showing up on my website - what should I do?
Magic Checkout is not showing up on my website - what should I do?
How do I fix Magic Checkout after updating my website theme?
How do I fix Magic Checkout after updating my website theme?
How does Magic Checkout help reduce fake orders and RTOs?
How does Magic Checkout help reduce fake orders and RTOs?
Is international payments supported on Magic Checkout?
Is international payments supported on Magic Checkout?
How do I enable COD (Cash on Delivery) in Magic Checkout?
How do I enable COD (Cash on Delivery) in Magic Checkout?
Is Magic Checkout available on plugins?
Is Magic Checkout available on plugins?
What should I do if Magic Checkout is causing conflicts with other plugins?
What should I do if Magic Checkout is causing conflicts with other plugins?
Can I restrict a coupon discount to first-time users?
Can I restrict a coupon discount to first-time users?
Can Magic Checkout help with abandoned cart recovery?
Can Magic Checkout help with abandoned cart recovery?
How do I customise the Checkout appearance on my store?
How do I customise the Checkout appearance on my store?
How can I track Magic Checkout analytics and performance?
How can I track Magic Checkout analytics and performance?
Web
Can I use both live and test keys at the same time in a sandbox environment?
Can I use both live and test keys at the same time in a sandbox environment?
How do I enable and integrate Magic Checkout on my custom website?
How do I enable and integrate Magic Checkout on my custom website?
Is Single Sign-On (SSO) supported?
Is Single Sign-On (SSO) supported?
Why are the serviceability and coupon calls failing?
Why are the serviceability and coupon calls failing?
Can I create payment offers on checkout for my customers?
Can I create payment offers on checkout for my customers?
How can I fetch the GSTIN and order notes provided by a customer through Magic Checkout?
How can I fetch the GSTIN and order notes provided by a customer through Magic Checkout?
gstin and order_instruction respectively.How can I retrieve customer details?
How can I retrieve customer details?
Can I make email and phone number collection mandatory or optional on checkout?
Can I make email and phone number collection mandatory or optional on checkout?
What should I do if my domain's firewall or cloud configuration is blocking requests to api.razorpay.com?
What should I do if my domain's firewall or cloud configuration is blocking requests to api.razorpay.com?
How can I initiate a refund to my customer?
How can I initiate a refund to my customer?
WooCommerce
I am integrating with Razorpay Plugin for the first time. What are the steps that I need to follow?
I am integrating with Razorpay Plugin for the first time. What are the steps that I need to follow?
- Create a Razorpay account.
- Generate the API Keys from the Dashboard. Navigate to Account & Settings → API Keys (under Website and app settings).
- Enable features on Razorpay Dashboard.
- Install Razorpay Plugin: With the release of version 4.1.0, you can install the plugin directly from the WordPress Plugin Directory.
-
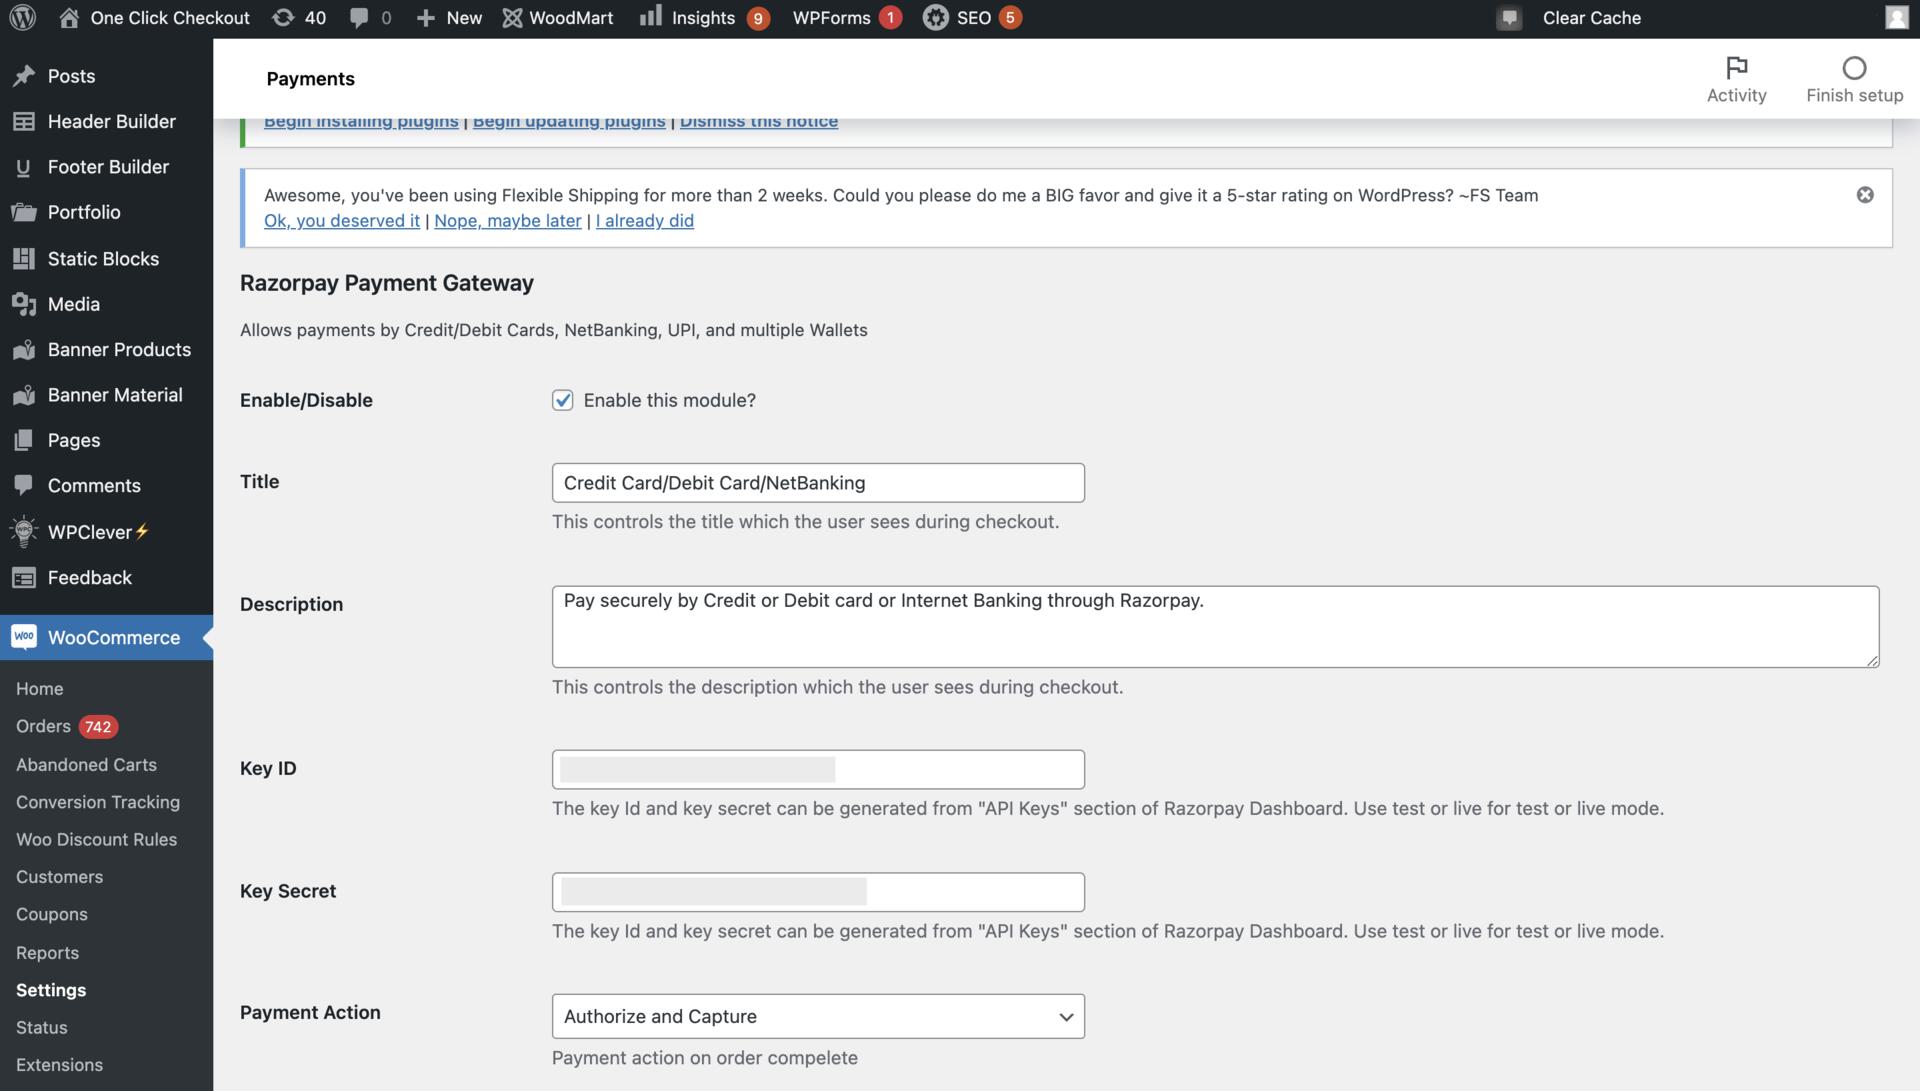
Enable features on WordPress Dashboard. In addition to the other steps, scroll down to Razorpay under the Payments tab and click Manage to edit the settings.
- Enable the Payment Method, name it Credit Card/Debit Card/Internet Banking (Displayed to your customer on the payment page).
- Add in your
[KEY_ID]and[KEY_SECRET]generated from the Razorpay Dashboard. - Set Payment Action to Authorize and Capture to auto-capture payments. If you want to capture payments manually from the Dashboard after manual verification then set the Payment Action to Authorize.
-
Accept Live Payments.
- Generate the
[KEY_ID]and[KEY_SECRET]in the Live mode on your Razorpay Dashboard. - Enter the Live mode
[KEY_ID]and[KEY_SECRET]in your WooCommerce store.
- Generate the
How do I enable and integrate Magic Checkout on my WooCommerce website?
How do I enable and integrate Magic Checkout on my WooCommerce website?
How can I exclude draft orders from WooCommerce analytics reports?
How can I exclude draft orders from WooCommerce analytics reports?
My Webhooks are not auto-configured since I am not using the upgraded version of WooCommerce. How do I manually configure webhooks?
My Webhooks are not auto-configured since I am not using the upgraded version of WooCommerce. How do I manually configure webhooks?
- Auto-webhook support is available from Razorpay Woocommerce Plugin v2.7.2 onwards.
- You can configure only these events:
payment.authorized,refund.createdandvirtual_account.credited.
payment.pending event.- Once you configure auto-webhook on WooCommerce, you do not have to configure it on the Razorpay Dashboard.
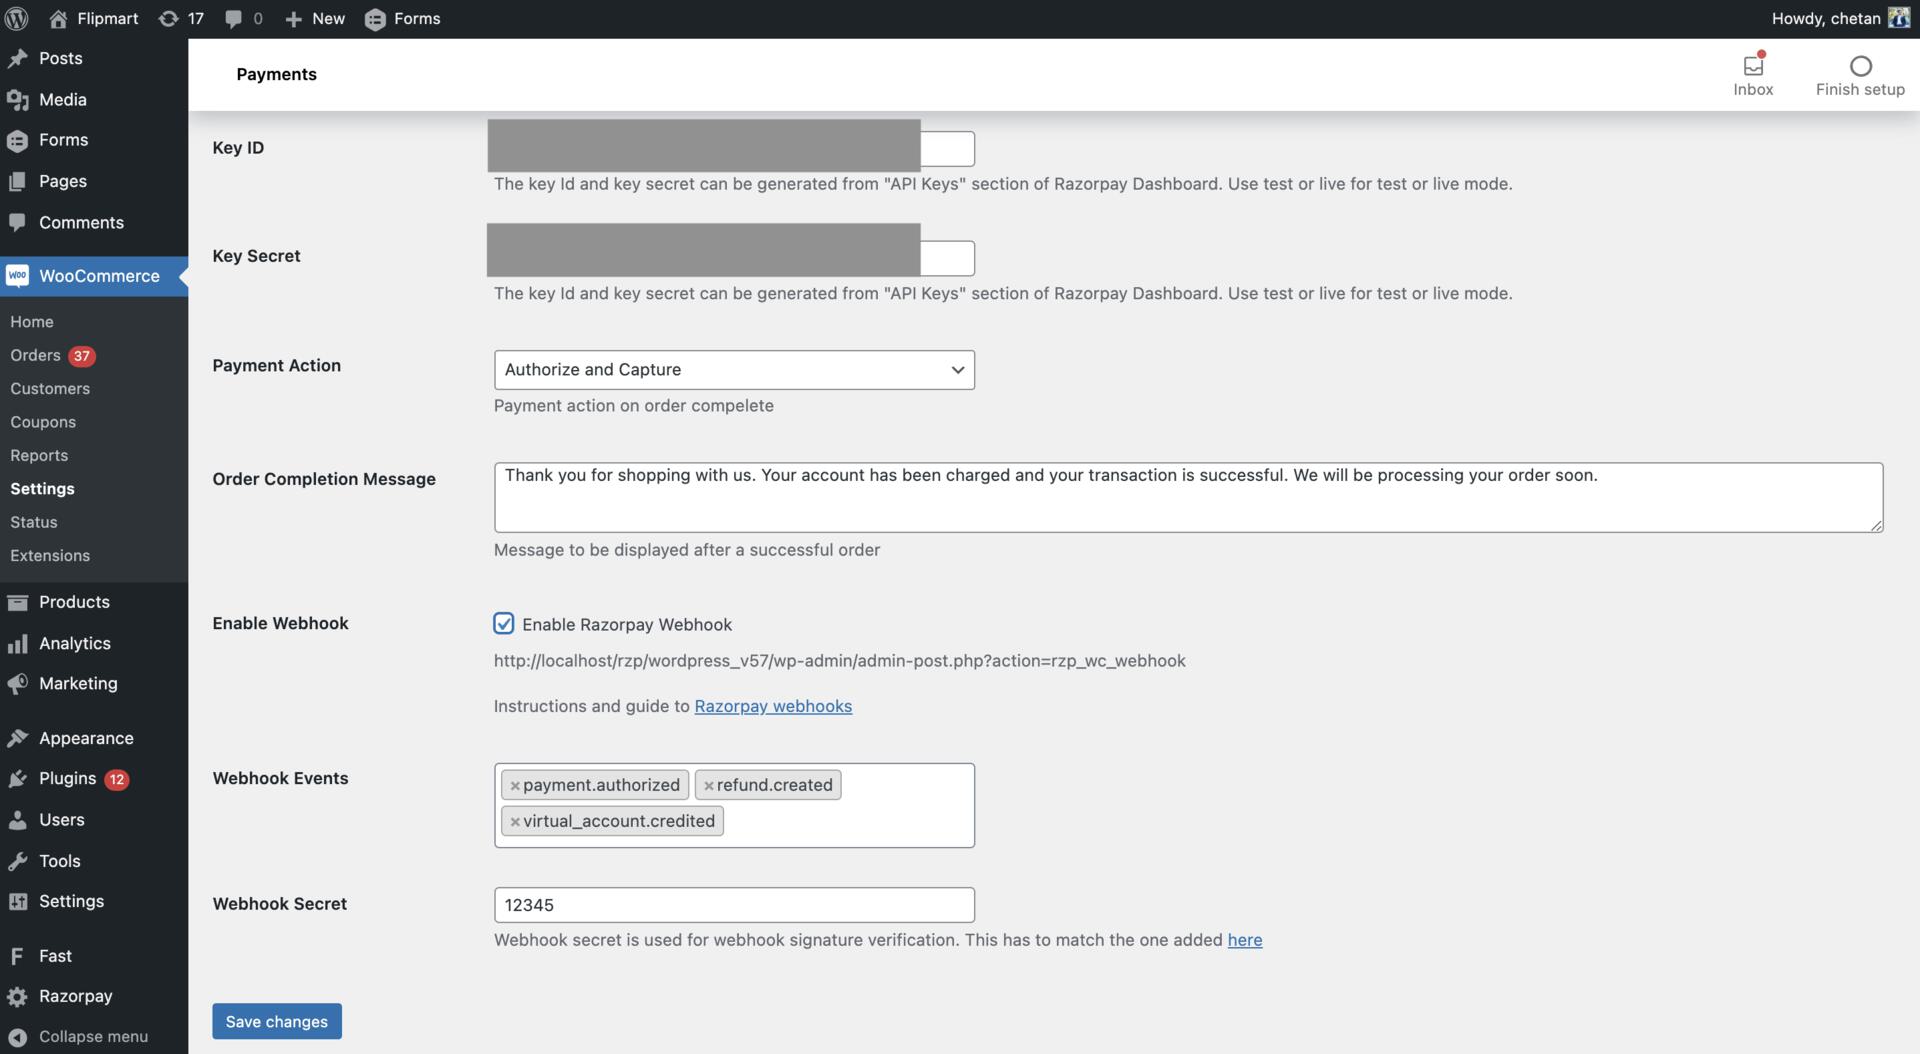
- In the WordPress Dashboard, click WooCommerce and go to Settings.
- In the Payments tab, complete the following steps:
- Select Enable Razorpay Webhook.
- Webhook Events: From the list, select the events for which you want to receive notifications.
- Webhook Secret: Enter the secret. This is a mandatory field as the secret is required for webhook signature verification.
- Click Save Changes.
How can I verify if webhooks are enabled?
How can I verify if webhooks are enabled?
- Log in to the Razorpay Dashboard and navigate to Account & Settings → Webhooks (under Website and app settings).
- Select the relevant webhook URL.
- On the right panel, check if the status for
payment.authorized,refund.createdandvirtual_account.creditedis enabled.
payment.pending event.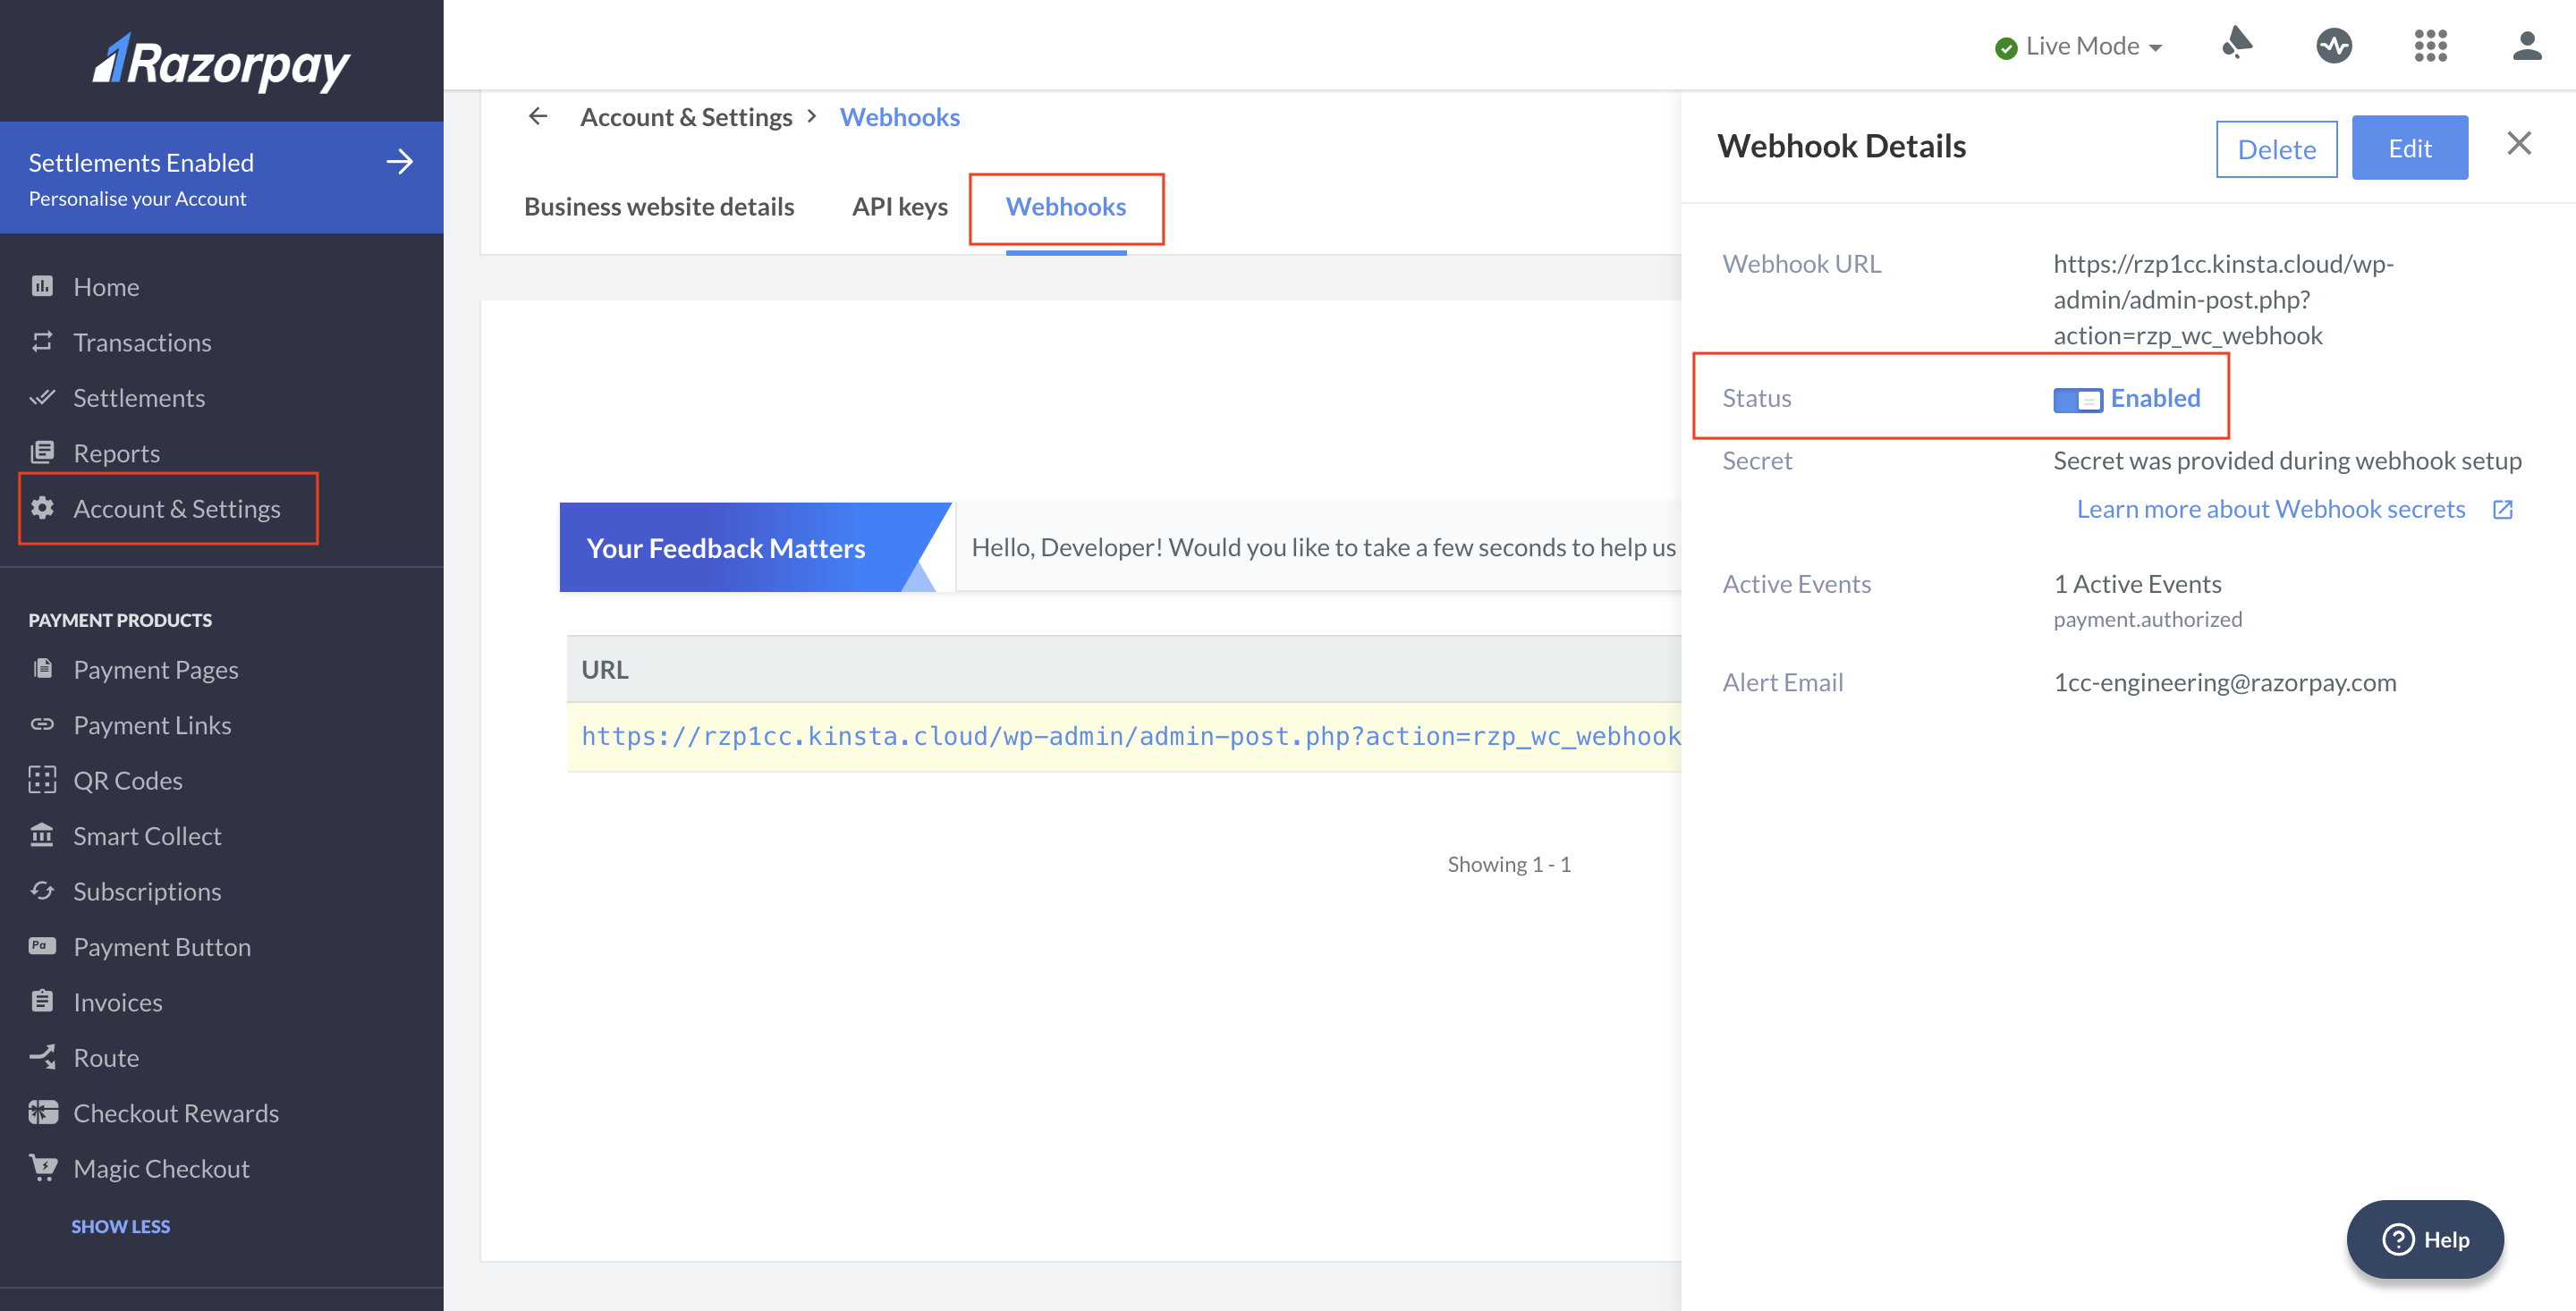
Can I disable Magic Checkout?
Can I disable Magic Checkout?
- Log in to the WordPress account and navigate to Woocommerce → Settings.
- Click Payments.
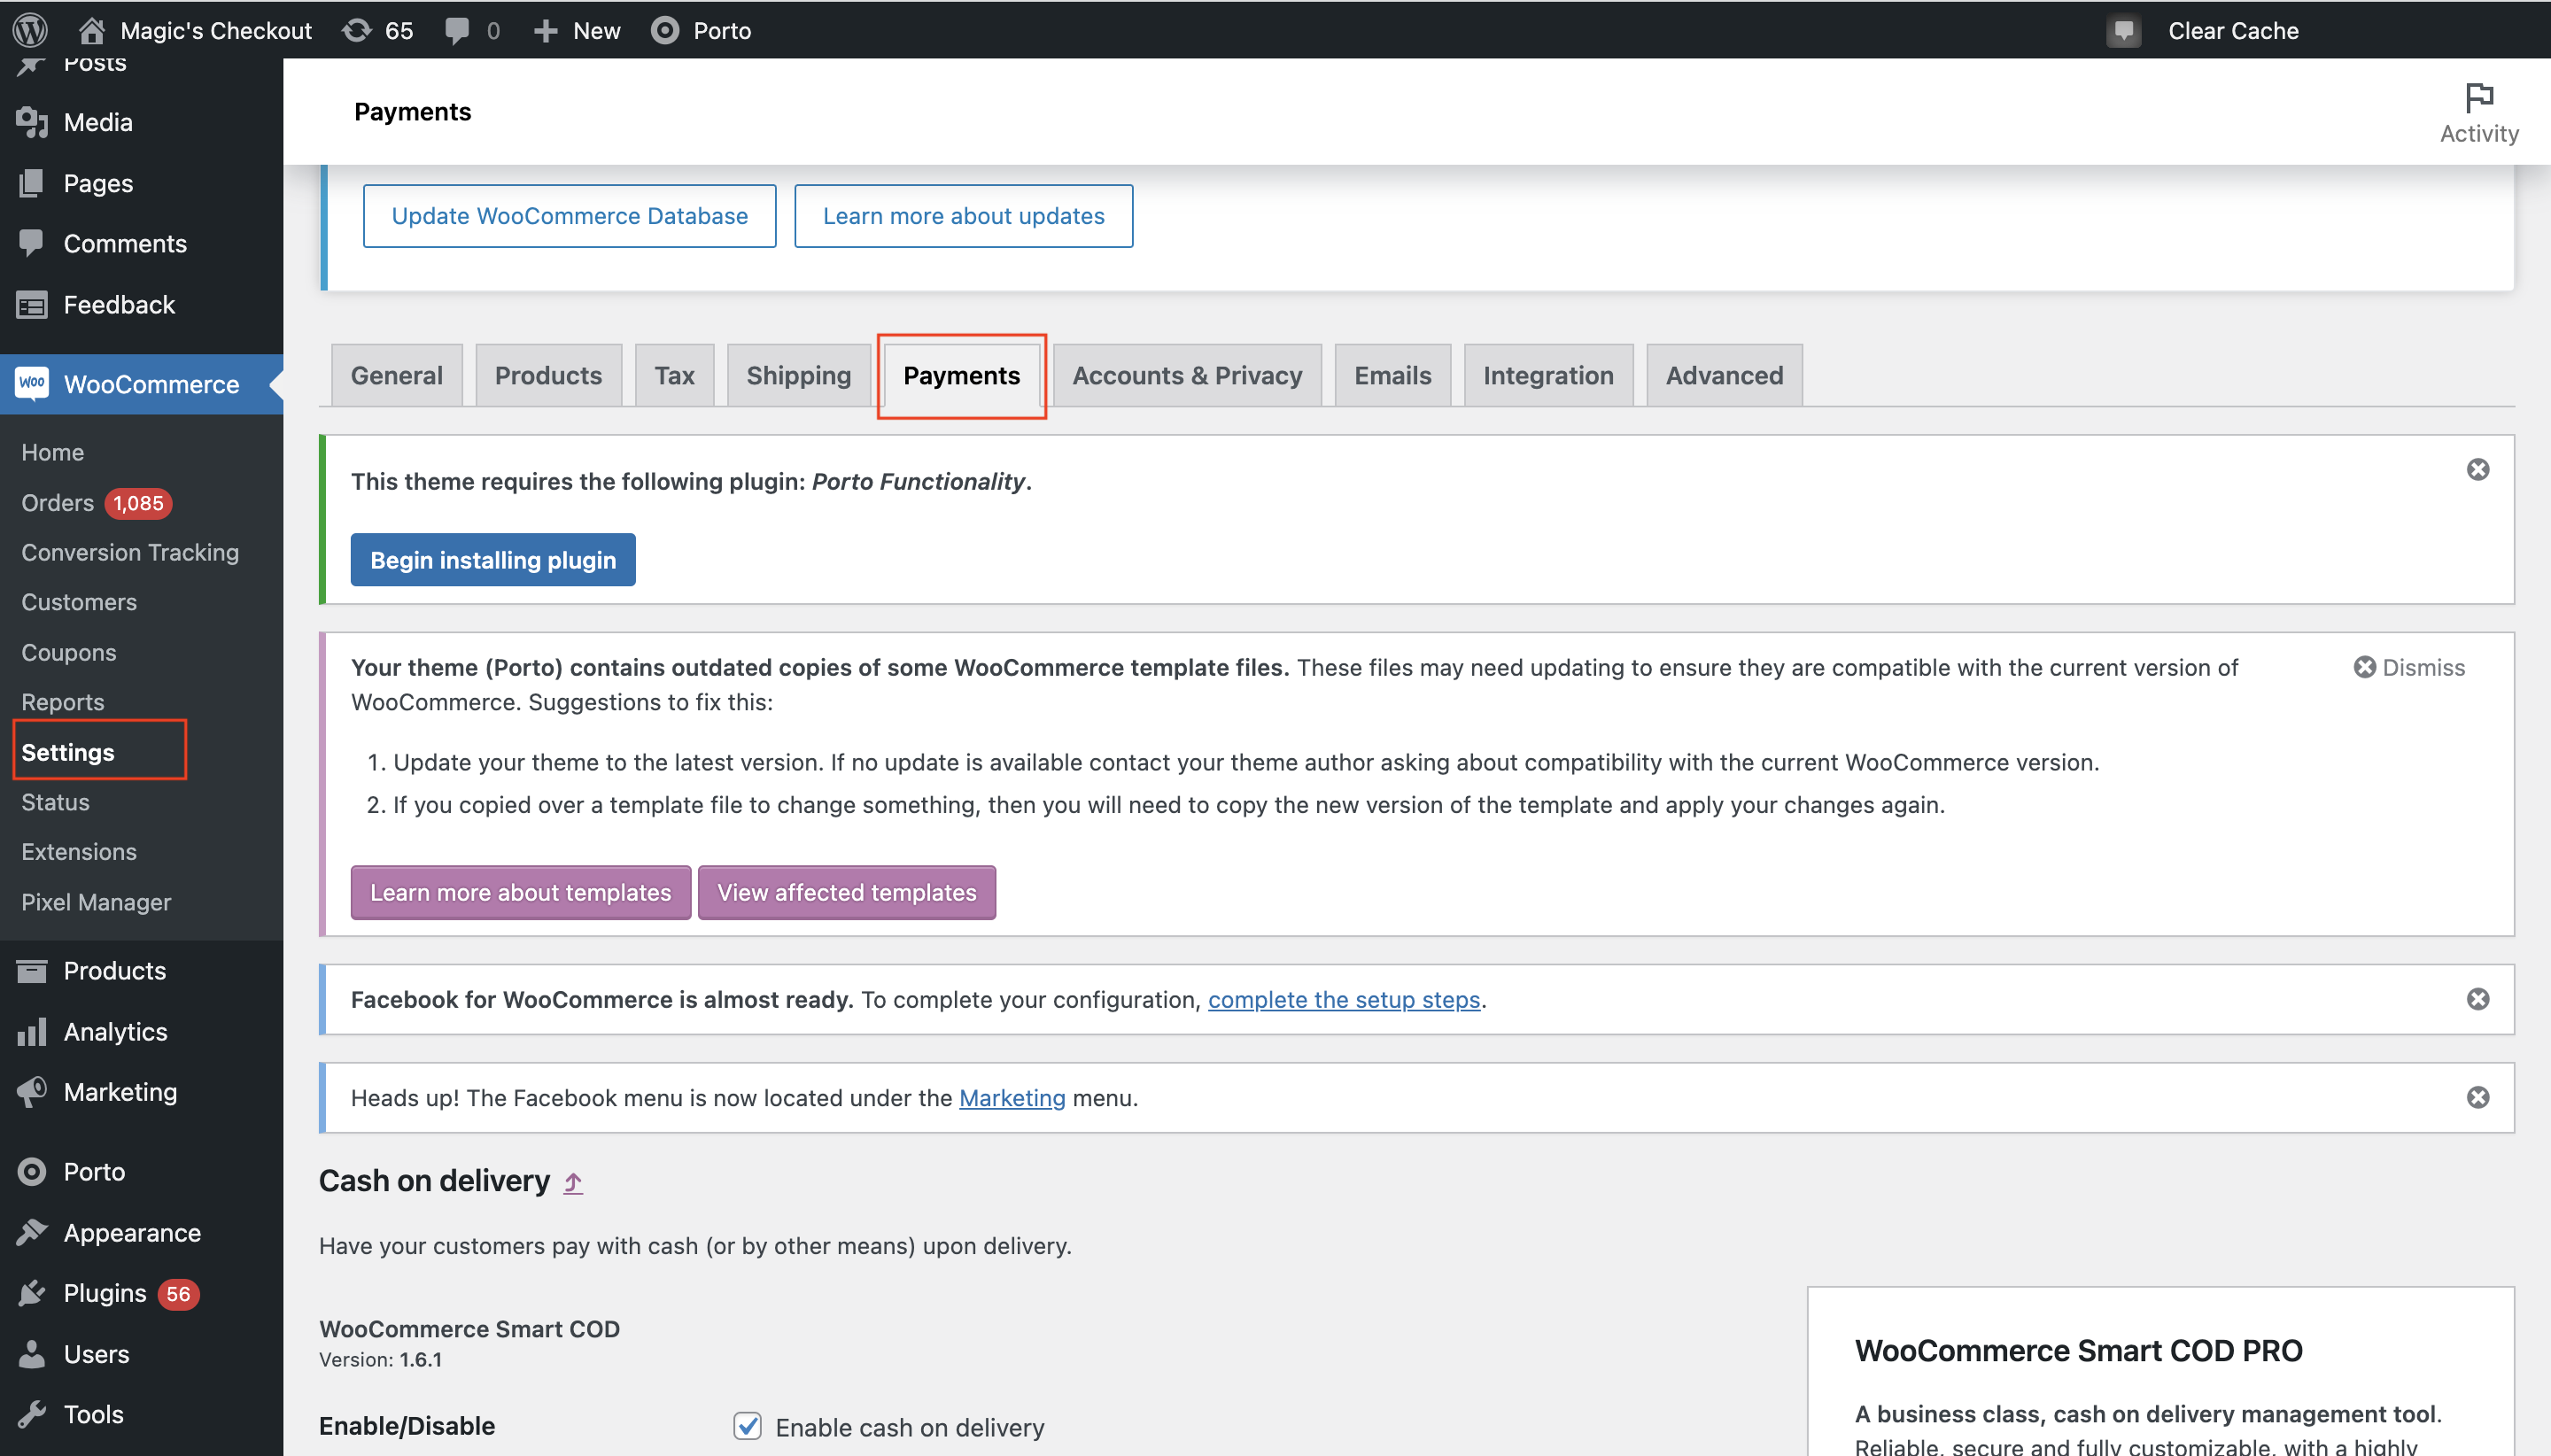
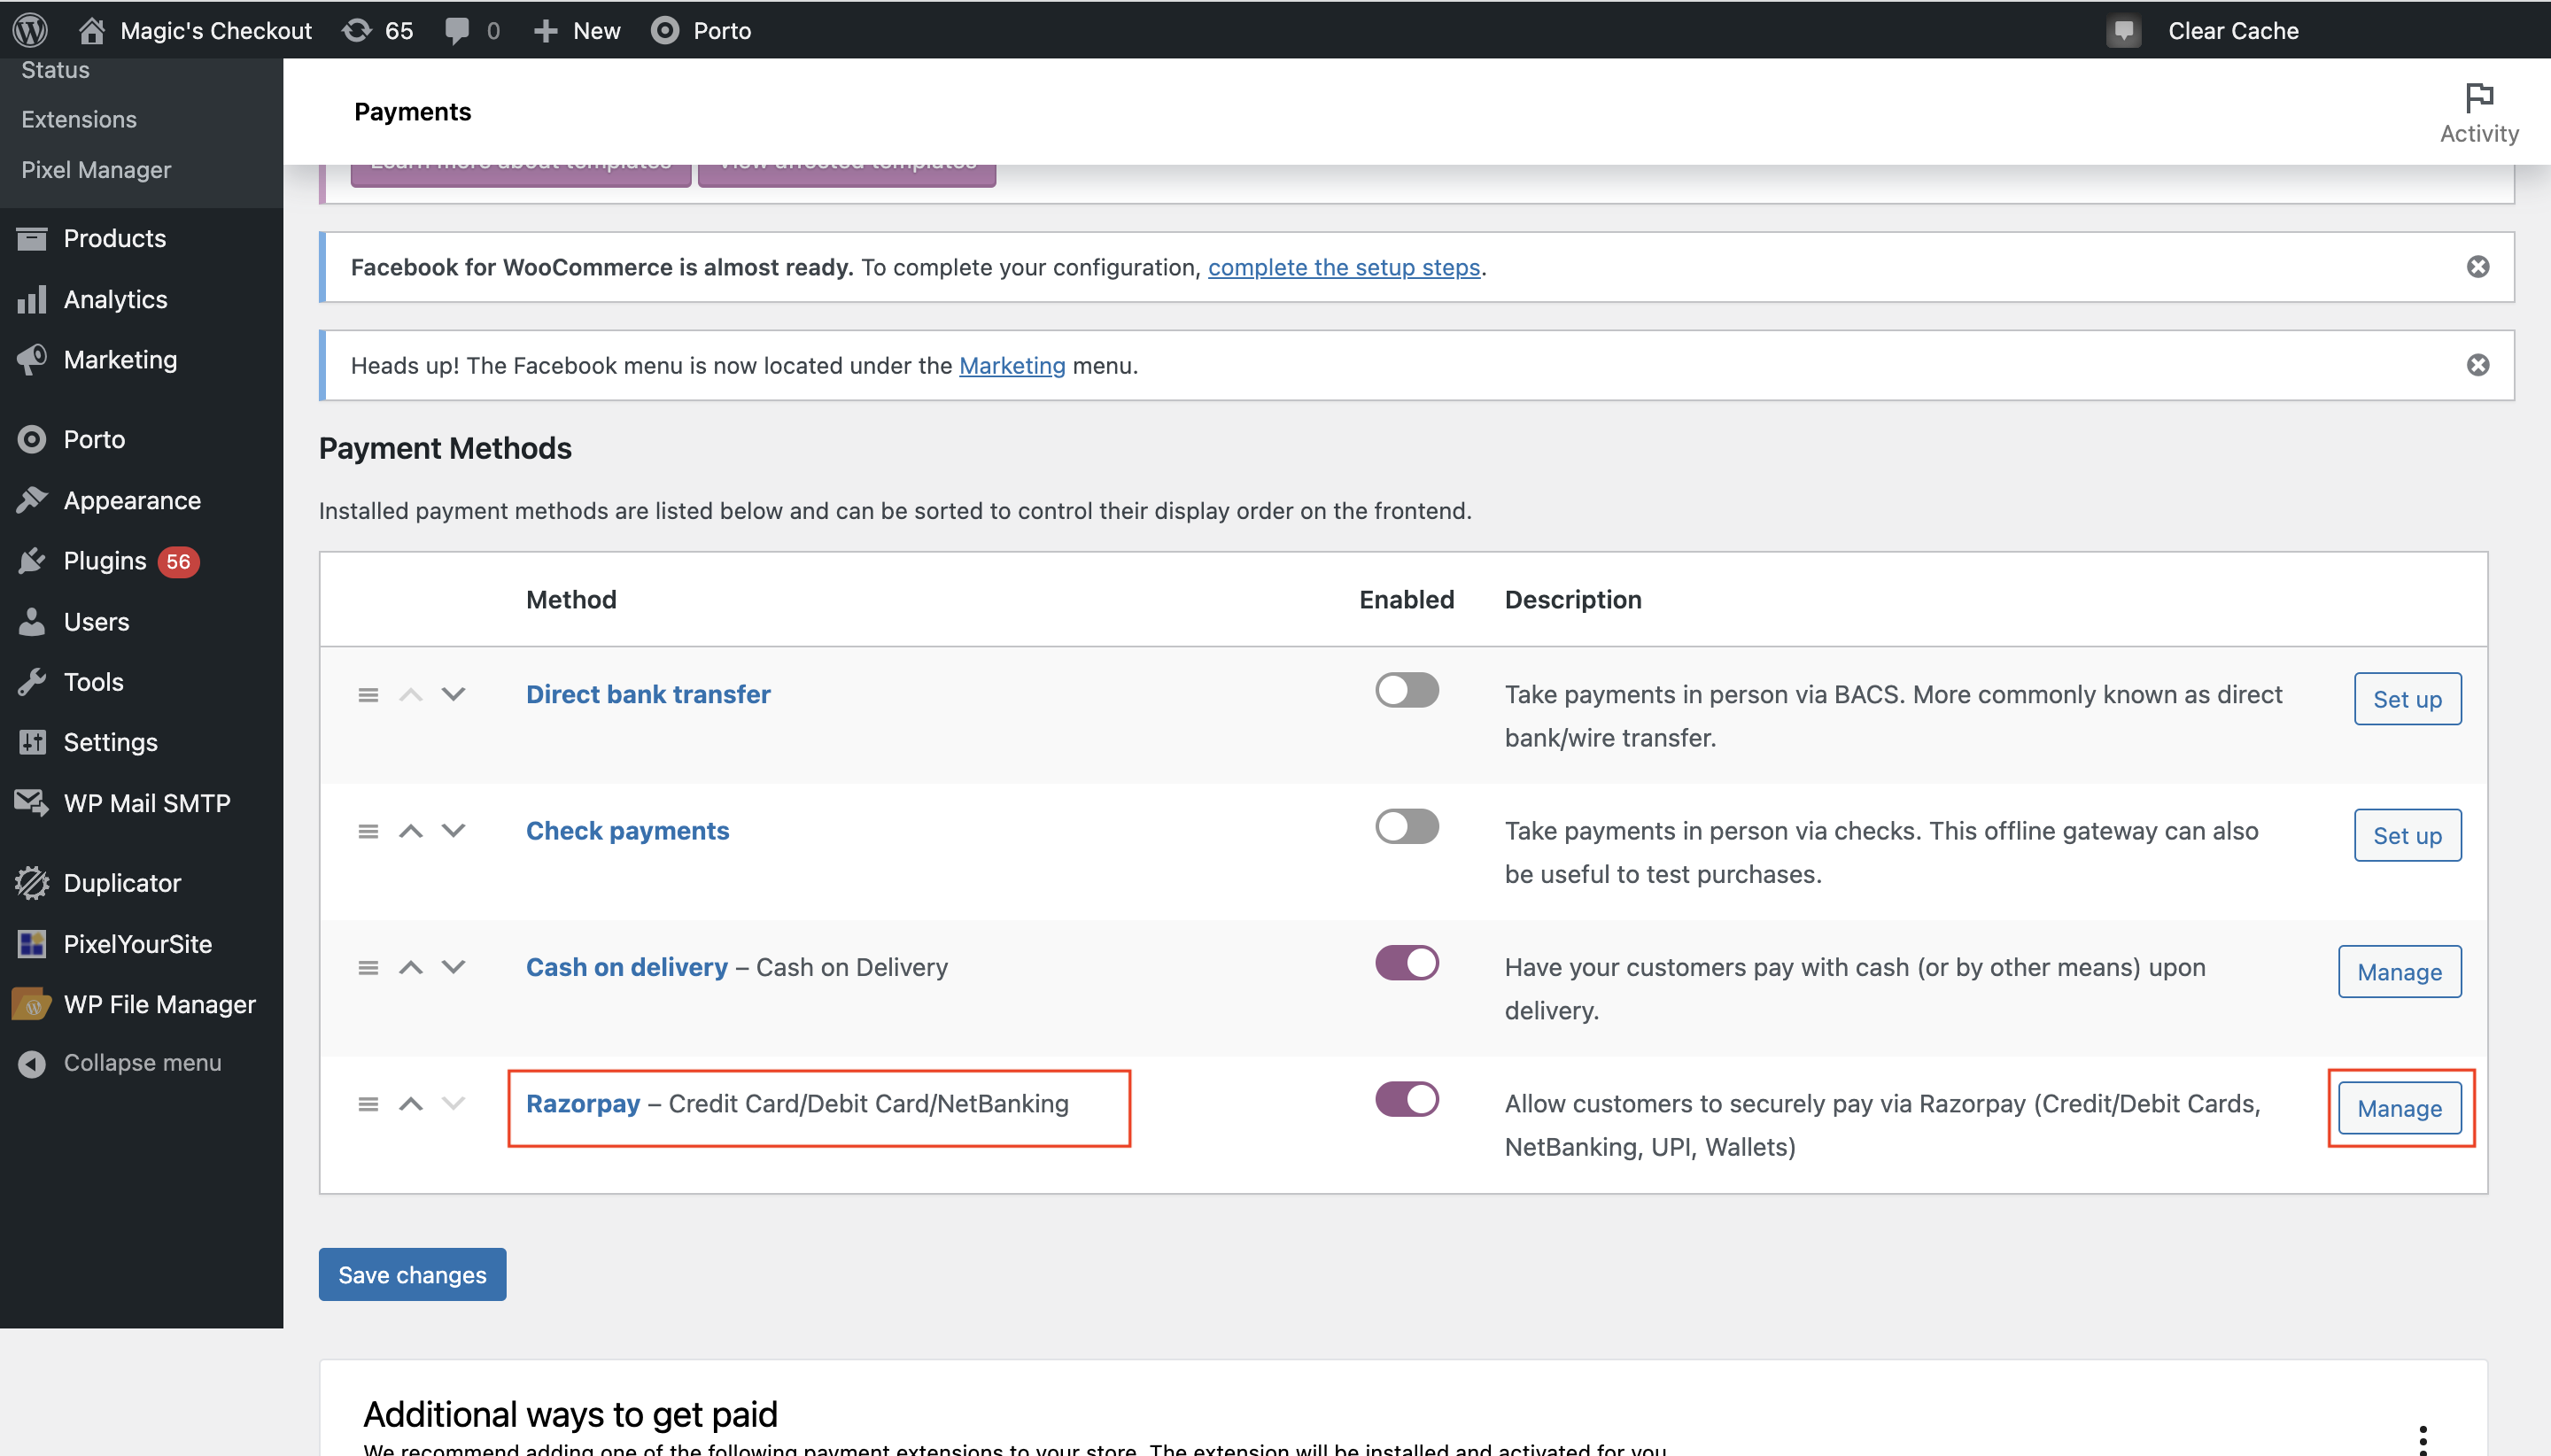
- In the Payments tab, scroll down to Razorpay and click Manage to edit the settings.
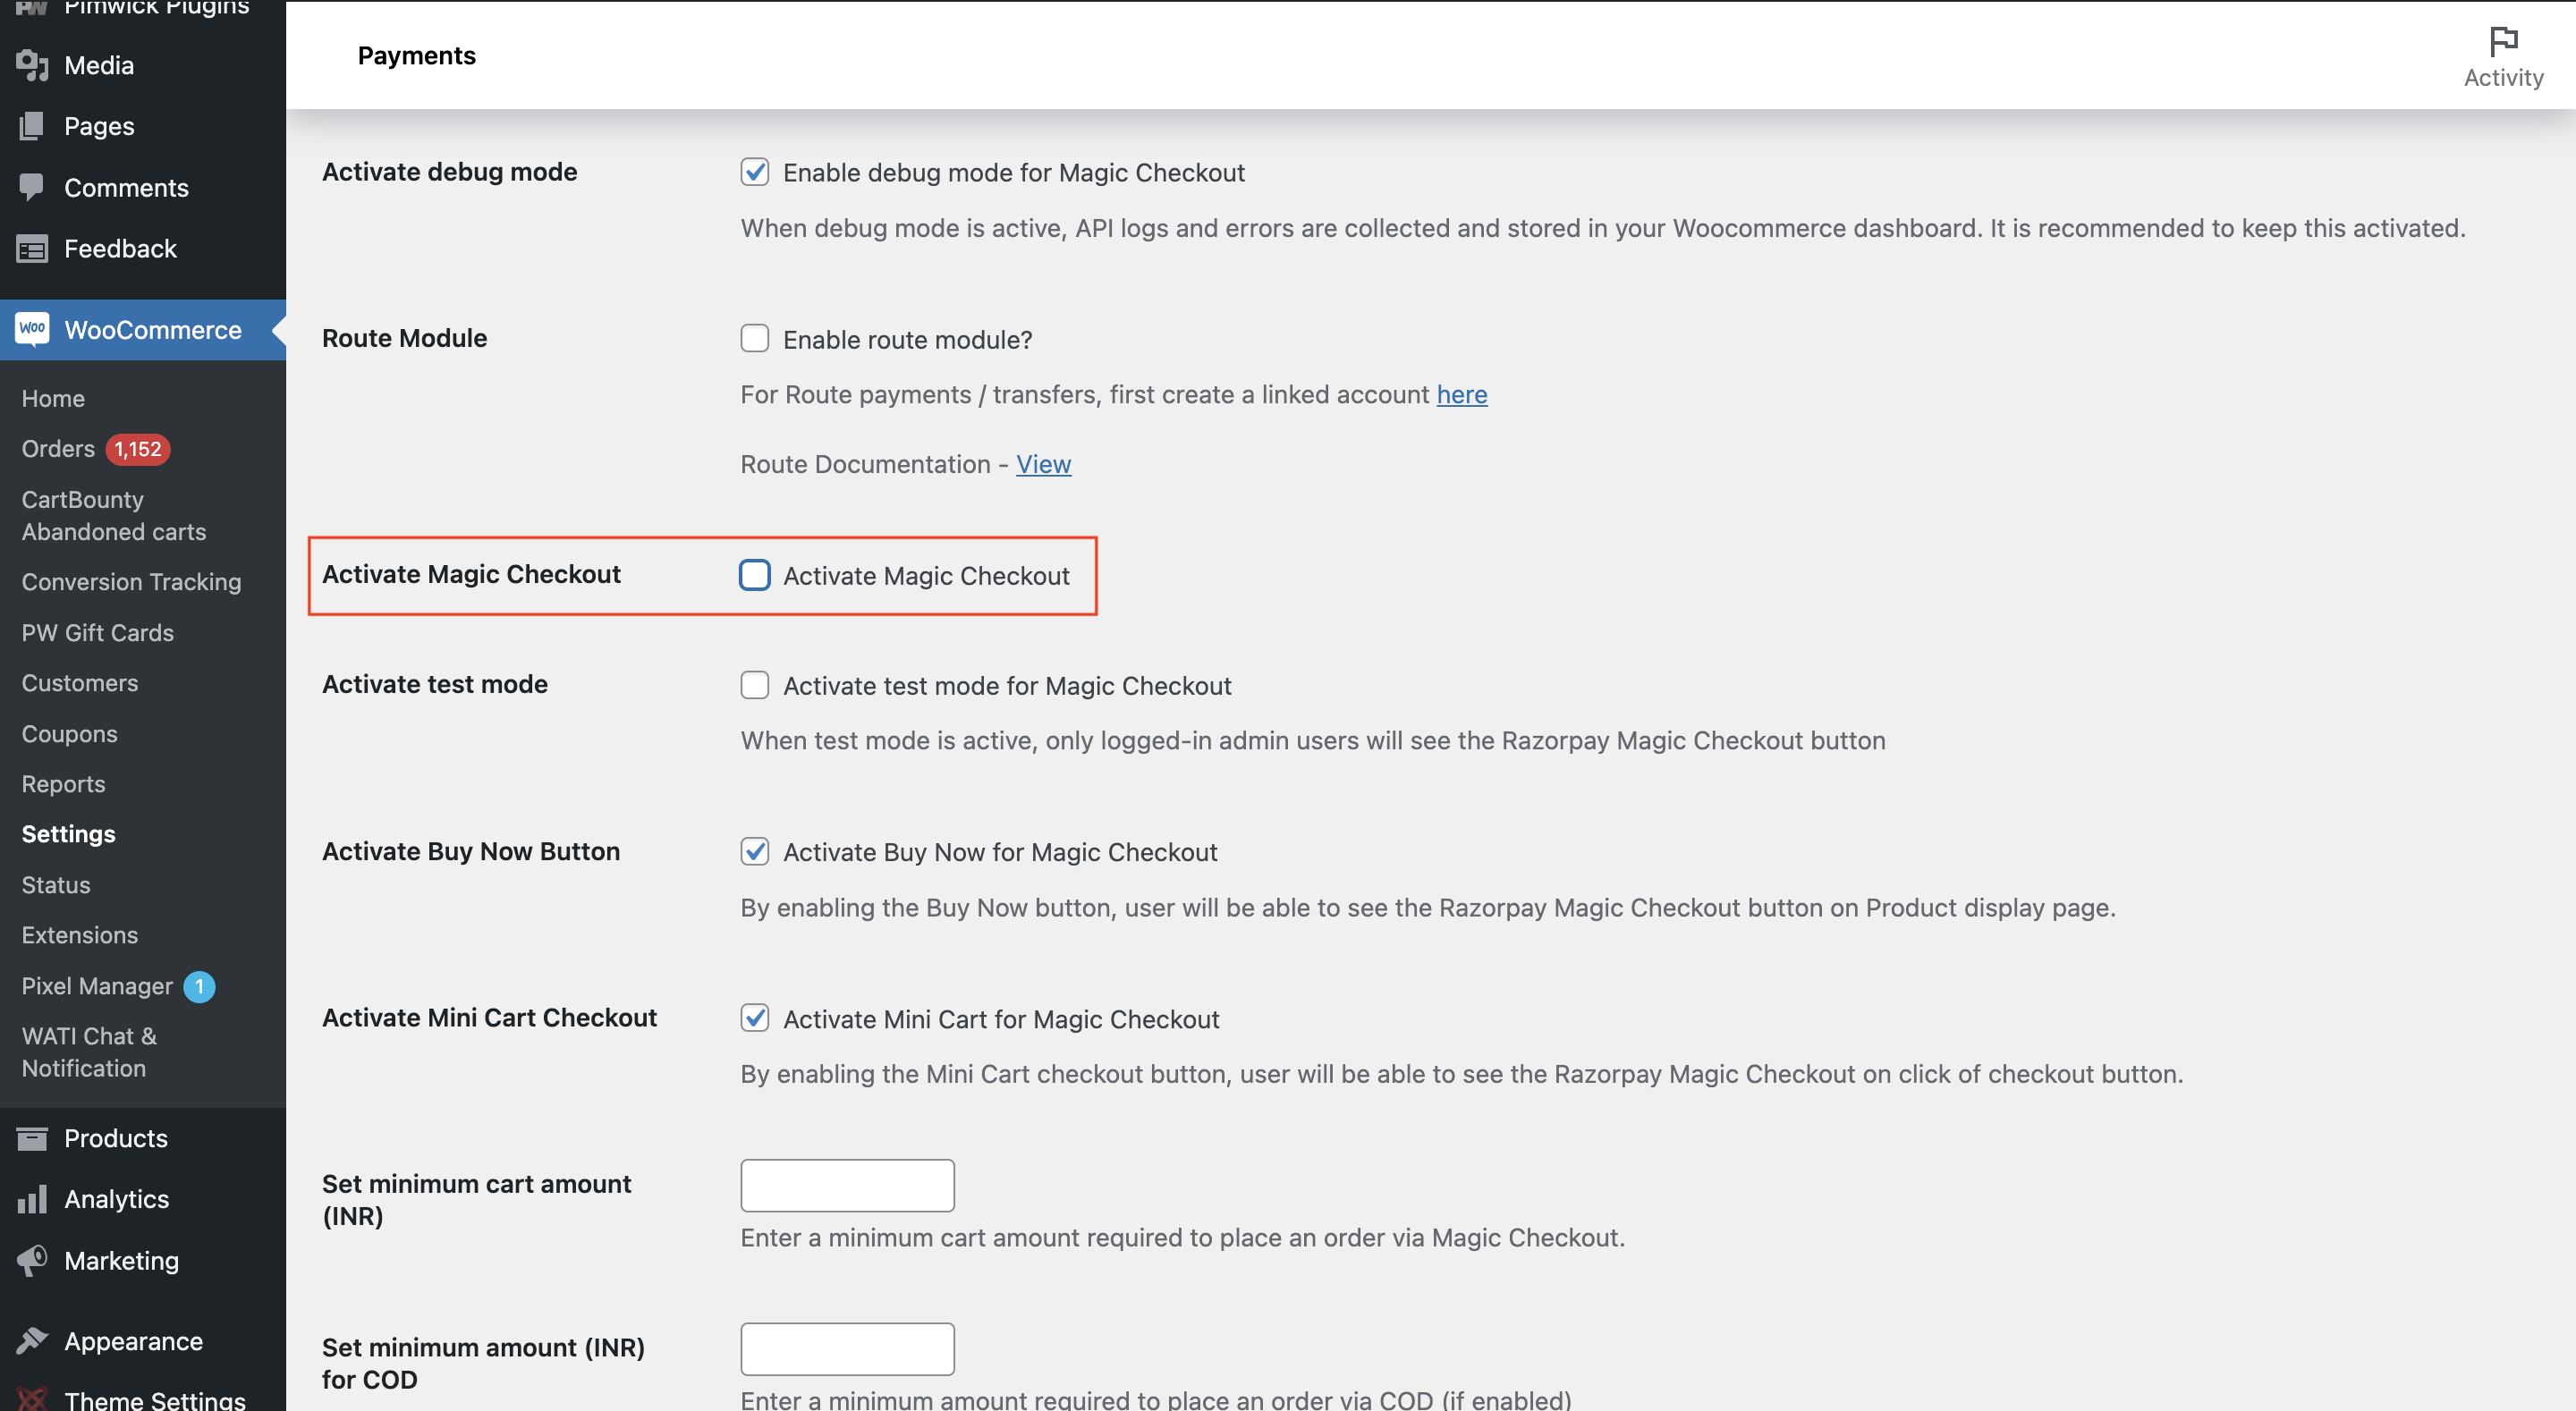
- Scroll down to the Activate Magic Checkout field and unselect the check box to deactivate it.
- Click Save Changes.
Shopify
How do I enable and integrate Magic Checkout on my Shopify store?
How do I enable and integrate Magic Checkout on my Shopify store?
I changed my Shopify theme - how do I re-enable Magic Checkout?
I changed my Shopify theme - how do I re-enable Magic Checkout?
Why am I not able to view the Coupons tab on the Razorpay Dashboard?
Why am I not able to view the Coupons tab on the Razorpay Dashboard?
Can I create coupons for an international audience?
Can I create coupons for an international audience?
How do I set up coupon codes with Magic Checkout on Shopify?
How do I set up coupon codes with Magic Checkout on Shopify?
What happens to my Shopify coupons when I enable coupons on Razorpay Dashboard?
What happens to my Shopify coupons when I enable coupons on Razorpay Dashboard?
- On the Razorpay Dashboard, navigate to Coupons → Setup section.
- Click Sync now next to the Coupons from Shopify section.
- Enter the Start date and End date to set the sync duration for the coupon.
- Click Start Sync.
Do Razorpay Dashboard coupons sync back to Shopify?
Do Razorpay Dashboard coupons sync back to Shopify?
Are all the coupons created on Shopify published once synced?
Are all the coupons created on Shopify published once synced?
created state. You must manually configure and publish the coupons. To publish a coupon, identify the coupon created on Shopify, click the options icon and click View and Edit (if required) or click Publish.Can I restrict coupons to specific payment methods??
Can I restrict coupons to specific payment methods??
Why are my customers not able to avail the Buy X Get Y coupon?
Why are my customers not able to avail the Buy X Get Y coupon?
Why are my created and published coupons not visible on checkout?
Why are my created and published coupons not visible on checkout?
Can I edit a coupon after creating it?
Can I edit a coupon after creating it?
Can I delete a coupon?
Can I delete a coupon?
What is the CSV format to upload the coupon eligibility file?
What is the CSV format to upload the coupon eligibility file?
- Mobile number: +919000090000
- Email id: gauravkumar@example.com
Why am I unable to refund the full order amount when I used Razorpay offers/coupons?
Why am I unable to refund the full order amount when I used Razorpay offers/coupons?
- Shopify shows the full order amount as captured.
- Razorpay only captures the discounted amount (what the customer actually paid).
- You can only refund the amount that was actually captured.
How is the refund processed if a customer returns a product paid partially via COD and partially online?
How is the refund processed if a customer returns a product paid partially via COD and partially online?
How do I set up shipping profiles on Razorpay Dashboard?
How do I set up shipping profiles on Razorpay Dashboard?
What happens if I configure shipping settings on the Razorpay Dashboard?
What happens if I configure shipping settings on the Razorpay Dashboard?
Can I add the same product to multiple shipping categories?
Can I add the same product to multiple shipping categories?
Can I offer Cash on Delivery (COD) for specific shipping methods?
Can I offer Cash on Delivery (COD) for specific shipping methods?
Login With Razorpay (SSO)
What is Login with Razorpay (SSO)?
What is Login with Razorpay (SSO)?
Is this feature available for all platforms?
Is this feature available for all platforms?
Can I choose where the login prompt appears for users?
Can I choose where the login prompt appears for users?
- On the first page a customer visits.
- After a customer adds their first item to the cart.
- During checkout (with the option to make login mandatory).
Can I customise how consent is collected from users?
Can I customise how consent is collected from users?
Can I customise how the login widget looks?
Can I customise how the login widget looks?
How do login rewards work?
How do login rewards work?
What is automatic customer tagging in Razorpay Magic Checkout?
What is automatic customer tagging in Razorpay Magic Checkout?
Will existing customer accounts get tagged?
Will existing customer accounts get tagged?